sage 300 construction and real estate - accordant … mycommunicator for outlook is a new microsoft...
TRANSCRIPT
Sage 300 Construction
and Real Estate
MyCommunicator User Guide
Version 13.2

Sage MyCommunicator for Outlook User Guide Page 2
NOTICE This document and the Sage 300 MyCommunicator software may be used only in accordance with the accompanying
Innovative Software Design End User License Agreement. You may not use, copy, modify, or transfer the Sage 300
Construction and Real Estate MyCommunicator software or this documentation except as expressly provided in the
license agreement.
© 2014 Innovative Software Design. All rights reserved.

Sage MyCommunicator for Outlook User Guide Page 3
Contents Chapter 1 – Getting Started .......................................................................................................................... 1
What is MyCommunicator? ...................................................................................................................... 1
Why develop Sage 300 CRE MyCommunicator for Outlook? ................................................................... 1
Document Objectives ................................................................................................................................ 1
Conventions Used in this Document ......................................................................................................... 2
Chapter 2 – System Requirements ............................................................................................................... 3
Outlook ..................................................................................................................................................... 3
Email Server .............................................................................................................................................. 4
Sage ........................................................................................................................................................... 4
MyAssistant Licenses ................................................................................................................................ 4
Chapter 3 – Installation and Activation ........................................................................................................ 5
Before You Begin ....................................................................................................................................... 5
Installing MyCommunicator ...................................................................................................................... 5
Activation .................................................................................................................................................. 6
CHAPTER 4 – Concepts ............................................................................................................................ 8
MyAssistant Emails ................................................................................................................................... 8
Email Views ............................................................................................................................................... 8
MyCommunicator Ribbon ....................................................................................................................... 10
Assign To & Response Due ...................................................................................................................... 12
Updating Sage ......................................................................................................................................... 13
Completing Notifications ........................................................................................................................ 15
Ownership & Due Date ........................................................................................................................... 15
MyCommunicator Log ............................................................................................................................. 16
Activity .................................................................................................................................................... 17
View Associated Email ............................................................................................................................ 19
Marking Activities Complete ................................................................................................................... 19
Activity Indicator Icon ............................................................................................................................. 20
Security ................................................................................................................................................... 20

Sage MyCommunicator for Outlook User Guide Page 1
Chapter 1 – Getting Started
What is MyCommunicator? Sage MyCommunicator for Outlook is a new Microsoft Outlook plugin from Sage that is designed to
further integrate your Sage 300 CRE data with your email. With MyCommunicator, users will be able to:
Access accounting and operations data
Facilitate communication associated with business activity
Track activity & accountability around completion of tasks
Update project accounting data in Sage 300
–– all from within Microsoft Outlook.
Why develop Sage 300 CRE MyCommunicator for Outlook? In talking with many construction and real estate professionals, a healthy majority of the normal day-to-
day operation is spent in email. Most commonly, time was spent either following up on needed
information, documents, or determine the status of something. We also discovered that a majority of
these conversations and correspondences around information were pertaining to data found in the
company’s Sage Project Accounting software, and that most workers said they have their email open at
work all day, every day.
Will all this in mind, we came up with the idea to incorporate Sage Accounting data directly into the
Microsoft Outlook application, as well as a way to create individual activity logs for items from the Sage
300 database in order to better track activity and responsibility. Our result was Sage MyCommunicator
for Outlook.
Document Objectives This document will teach you how to install, configure, and use Sage MyCommunicator for Outlook.
Here are several things that you will understand with the help of this document:
Forwarding and assigning notifications
Creating and tracking activity for notifications
Updating the Sage 300 database
How to filter visibility of notifications based on Security

Sage MyCommunicator for Outlook User Guide Page 2
Conventions Used in this Document This document uses the following conventions:
The names of screens, windows, fields, and other features displayed by the software are shown in bold.
Information you enter into the software is in bold, as in the following example: Enter Miscellaneous in the Amount Type box.
Names of keys are shown in capitals; for example, ENTER, TAB. A plus sign (+) between two key names indicates that you should press both keys at the same time; for example, SHIFT + TAB.
The names of buttons you can click with your mouse are enclosed in bold type; for example, [OK] and [Post].
TIP: Helpful information to make your experience better.
NOTE: This symbol draws your attention to information of particular interest, such as information not
included in steps.
CAUTION: This symbol draws your attention to information that is important because it can help you
avoid a costly or time-consuming error.
IMPORTANT: This symbol draws your attention to information that is of critical importance

Sage MyCommunicator for Outlook User Guide Page 3
Chapter 2 – System Requirements
Outlook MyCommunicator is compatible with the 32-bit versions of Microsoft Outlook 2010, Microsoft Outlook
2013 and Office 365.
CAUTION: MyCommunicator is not compatible with the online version of Microsoft Outlook.
To verify your version of Microsoft Outlook 2010, navigate to the Help tab after clicking [File] at the top
of the Outlook screen. You will be able to see the version in the first line on the right under About
Microsoft Outlook:
To verify your version of Microsoft Outlook 2013, click [File] at the top of Outlook and select [Office
Account] to get the following screen:
Click [About Outlook] (highlighted above) to open the following window, which shows the version of
Outlook being run in the first line:

Sage MyCommunicator for Outlook User Guide Page 4
Email Server While MyCommunicator requires the 32-bit version of either Microsoft Outlook 2010, 2013 or Office 365; there are no email server requirements.
Sage Sage programs and the Sage server must be at least version 13.1 in order to be compatible with
MyCommunicator.
MyAssistant Licenses Every MyCommunicator user does not need their own MyAssistant license. One MyAssistant Designer
license is needed somewhere in the company for the purpose of creating Tasks that generate the
notifications used in MyCommunicator.

Sage MyCommunicator for Outlook User Guide Page 5
Chapter 3 – Installation and Activation
Before You Begin Before starting the installation process for MyCommunicator, make sure that you have your Customer
ID number, your MyCommunicator product key, and you
Installing MyCommunicator After downloading the installation files and extracting them from the .zip file, open the new folder
containing the install files.
To begin the installation process, double-click on SetupMyCommunicator (highlighted below):
After initializing the installation, at one point you will be prompted to select a location to install the
MyCommunicator software (pictured below):

Sage MyCommunicator for Outlook User Guide Page 6
A default location will be pre-filled, but a new location can be selected by typing in the field or clicking
the [Browse…] button. After the software has finished installing, you can close this window and re-open
Microsoft Outlook to begin the activation process.
Activation After the MyCommunicator installation has completed, the next time you open Microsoft Outlook you
will receive this message about configuring the software:
Click [Yes] to begin the activation, which will bring up the screen that will ask you for your Customer
Number and Product Key:
IMPORTANT: While the Customer Number entered in this section will correspond to any MyAssistant
software that was installed, the Product Key for MyCommunicator is unique. This means you cannot use a
MyAssistant Product Key to activate MyCommunicator.

Sage MyCommunicator for Outlook User Guide Page 7
Once the activation has completed, a new message will appear below where you entered your Customer
Number and Product Key:
After successful activation, you will be prompted to enter your name and email address.
Once you enter your email address and click [Finish], Microsoft Outlook will open as normal, and you’re
ready to begin using the Sage MyCommunicator software.
TIP: An easy way to check that the install and activation were performed
correctly will be the presence of a new MyCommunicator button in the bottom
left of your Outlook window (highlighted). If the activation was unsuccessful, this
button would not appear.
Sage MyCommunicator for Outlook User Guide Page 8
CHAPTER 4 – Concepts
MyAssistant Emails Emails from Sage 300 CRE MyAssistant are how users receive the notifications that will be tracked,
forwarded and updated in Microsoft Outlook using MyCommunicator. The emails containing these
notifications are generated by the running of MyAssistant Tasks, which run through the Sage 300
database for records matching a criteria set up in each Task. A majority of the time, the notifications
generated by MyAssistant Tasks will be sent out in the form of a list in an email message.
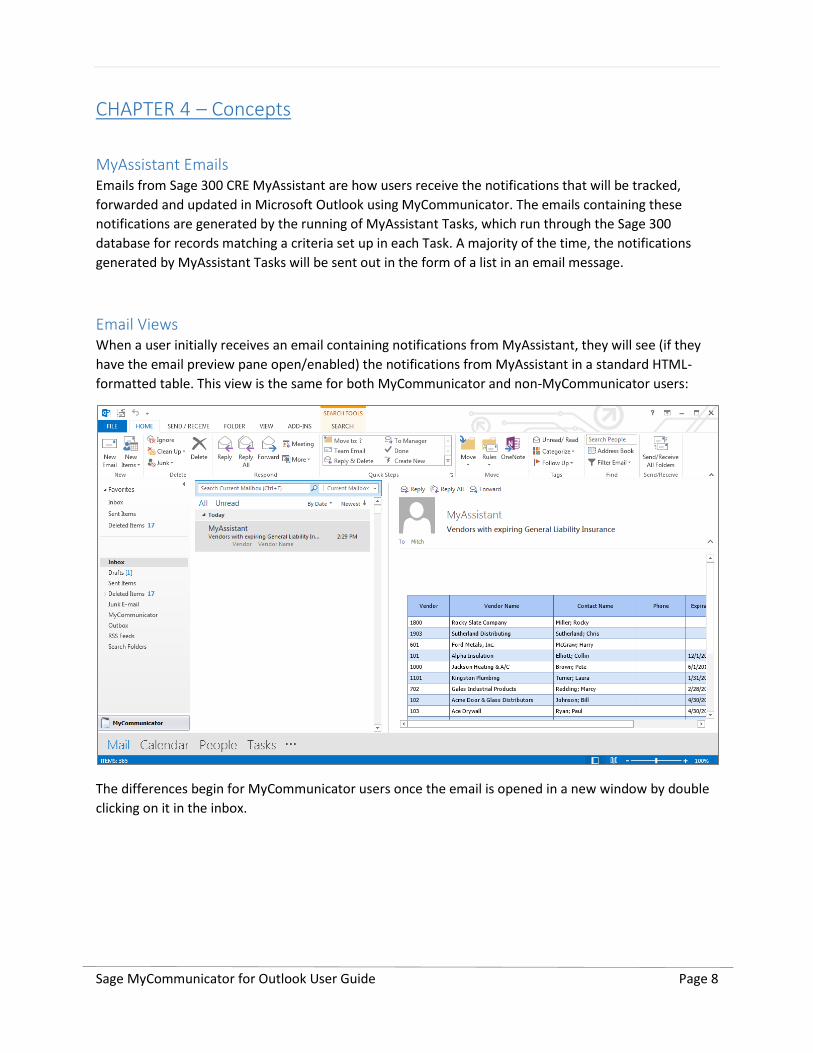
Email Views When a user initially receives an email containing notifications from MyAssistant, they will see (if they
have the email preview pane open/enabled) the notifications from MyAssistant in a standard HTML-
formatted table. This view is the same for both MyCommunicator and non-MyCommunicator users:
The differences begin for MyCommunicator users once the email is opened in a new window by double
clicking on it in the inbox.

Sage MyCommunicator for Outlook User Guide Page 9
When MyCommunicator users open an email in a new window, the list of notifications will transform
from an HTML table into a live grid:
This grid now enables the user to perform specific actions on individual notifications, such as
forwarding, creating Task requests around specific items, and updating certain Sage data without leaving
Outlook.
However, as many MyAssistant emails may also contain a message and/or an attachment, the user can
manually switch back to the “Message View” of the email by clicking on [Message] in the
MyCommunicator ribbon:
Clicking [Message] changes the email back to how it would normally look when received by a normal
Microsoft Outlook user.

Sage MyCommunicator for Outlook User Guide Page 10
Should the user decide to switch back to the live grid view, they can simply click [Live] in the
MyCommunicator ribbon (highlighted below):
MyCommunicator Ribbon
The MyCommunicator ribbon in Microsoft Outlook provides users the actions available to perform on
one or more notifications. This ribbon is available and in focus by default whenever opening an email or
request containing notifications in a new window, or when accessing the MyCommunicator Log within
Outlook (For more information about the MyCommunicator Log, see page XX).
The “Respond” section:
[Reply], [Reply All], [Forward] and [New Conversation] work the
same as they would in a normal Outlook email message, with the only
difference being the ability to select specific notifications. By selecting
the notifications using the check boxes next to each line before
clicking one of these buttons, it generates an email message in a new
window containing only the notifications selected.

Sage MyCommunicator for Outlook User Guide Page 11
Selecting one or more notifications and then clicking [Follow Up] adds a red flag to each line in the (by
default) far right column. This serves as a reminder for the user to return at some point to the
information in the flagged notification(s) and determine if and what type of action needs to be
executed.
The “New” Section:
[Task], [Task Request] and [Meeting Request] also work as they normally
would in Outlook, but are also enabled to have specific notifications (attached
to/embedded in/included in) them when selecting the notifications before
clicking one of the buttons pictured to the left.
The “Actions” Section
After selecting a notification, users can click [Notes] to add specific notes to
a notification. Any user with access to the notification will be able to see and
contribute to its notes, and all entries are stamped with the date and
contributor’s name.
[Update Sage] is used to update a record in a notification that has been enabled as editable. Clicking this
button and selecting a notification triggers the inline edit form, where information is updated by the
user and then written back to the Sage 300 database (For more information on updating Sage, see page
XX)
Selecting a notification and then clicking [Mark Complete] will indicate to all other users with access to
the notification that it the issue has been sufficiently addressed. This is different than a notification
closing, but can be considered part of the process for completing notifications (For more information
see page XX)
[Refresh List] can be clicked to refresh the entire list of notifications, ensuring that the information is the
most up-to-date before potentially performing another actions on a specific item. This is a similar to
process as running the MyAssistant Task that generated the notifications again, but does not send out
any new email messages.
TIP: Another way to add a note to a notification is to click on the
grayed out Note icon next to the notification in the live grid view – once you
add your note to the notification, the icon turns blue. If a notification already
has a note, you can view and add to it by clicking on the blue icon.
The “View” Section
This section will vary depending on the current view of the email message. If in the
live view, the section will contain two buttons: [Activity] will toggle the visibility of the
Activity Pane (for more information on Activity see page XX), while [Message] will
change the entire email back to the message view, in which the email looks like a regular message.

Sage MyCommunicator for Outlook User Guide Page 12
If already viewing the email in the message view, then there will be no [Activity], as you cannot view the
activity for individual Sage items when the list is in an HTML form. The only button this section will
contain will be [Live], which will switch the entire email back to the live grid view.
Assign To & Response Due As mentioned above, users have the ability to select individual notifications from a greater list and then
forward them to another person. During this process, users are provided the option to dynamically
assign notifications to a person they are being sent to, marking them as the party to be held responsible
for the completion of any activities around those notifications. Examples where this would be used
include when Project Managers forward and assign notifications to each of their
(subcontractors/workers/etc.) about their individual (X)’s.
At the same time when notifications can be assigned to another person, users can also set a due date
and a reminder to receive a response from that person. When used, users gain the ability to not only
track who is being held responsible for a given notification, but also the time frame in which a response
is expected from them. In addition, choosing to remind the recipient automatically creates a reminder in
their inbox upon receipt of the forwarded notifications.
After selecting the notifications to be sent, a user can click [Forward] or [New Conversation] (provided
that the user is looking at the live grid view of an email) to open up a new email message containing only
the selected notifications. When that new window opens, the yellow bar that now appears below the
Message ribbon (highlighted below) is where the user can assign the notifications to a user, set the due
date for a response and choose whether or not to remind the recipient to respond by the set date:
Users can type in the email address of the individual they want to assign the notifications to, or they can
click the [•••] button next to the “Assign To” field to add a contact from the address book. Similarly,
users can type in a date in the “Response Due” field, or use the button next to the field to select a date
from a dropdown calendar. In our example, the user at [email protected] will be forwarded and
assigned the notifications, and the original sender will expect a response by April 30th, 2014; but has
elected to not remind the recipient.

Sage MyCommunicator for Outlook User Guide Page 13
After the email has been sent, you can track which Sage notifications have been assigned to whom back
in the live grid view of the notifications with the “Waiting On” and “Response Due” sections (highlighted
below):
The person you are “Waiting On” is the same person whose email address entered in the “Assign To”
section of the forwarded email. In the live grid, MyCommunicator parses out the text before the “@”
symbol in the email address entered into the “Assign To” section to display as the name in the “Waiting
On” column. Furthermore, the displayed “Response Due” date is the same as the one that was entered
in the email step.
NOTE: While it is possible to assign a notification to multiple people (select a notification again,
click [Forward] or [New Conversation], enter a different email address in the Assign To bar and send), in
most cases the name and “Response Due” date for the activity closest to the current date (that has not
been marked complete) will be displayed. The exception to this is when an active “Response Due” date
has passed, in which case the past due activity will be the one displayed in the notification row. If more
than one active activity is past due, the activity with the oldest “Response Due” date will be the one
displayed in the notification row.
Updating Sage One of the biggest features available in the MyCommunicator software is the ability to update Sage data
from Microsoft Outlook. With just a couple of clicks, users are now able to more quickly and efficiently
enter their updated business data at the point of receipt.
In MyCommunicator, updating the Sage database is accomplished via an inline edit form that can be
accessed in both the live grid view of a MyAssistant email and the MyCommunicator Log. To access the
inline edit form, a user can either double click on a notification, or select a notification and then click
[Update Sage] in the MyCommunicator ribbon:

Sage MyCommunicator for Outlook User Guide Page 14
Any fields that are greyed out cannot be updated, while all others can be changed. When the user is
done, they can either click [Update] or click outside of the inline edit form to save changes and close, or
can click [Cancel] if they want to discard changes and keep the information as it was.
Which data can and cannot be updated without leaving Outlook is determined by three factors:
1. Is the field updatable? Only certain fields (as determined by Sage) within the Sage 300 database can be updated without creating completely new records around them. An easy way to determine which records are updateable is to see if the field has a notepad and pencil icon included below the column head when added to the notification list in the Email step of the Task Setup Wizard in MyAssistant:
2. Has the field been enabled as updatable within the MyAssistant Task Setup Wizard? Even if a field is updatable (as indicated by the icon), it must be enabled while setting up the MyAssistant Task in order to work in MyCommunicator. To enable a field for editing, click on the notepad and pencil icon to add a green check mark – this indicates that the field can now be edited in MyCommunicator:
3. Was the user attempting to edit in MyCommunicator named in the “To” line of the MyAssistant email that sent out the notifications? While many may have access to a given notification because it is necessary for all parties involved to be aware of a situation, the chances for erroneous information being written back to the Sage database increases as the number of people with the ability to do so grows. As such, only users that are named in the “To” line of the MyAssistant email that sends out the notifications can update Sage data within MyCommunicator.

Sage MyCommunicator for Outlook User Guide Page 15
Completing Notifications Marking notifications complete in MyCommunicator can potentially be a two-step process:
The first step of this process is an optional one, and occurs when users have determined that a
notification has been sufficiently dealt with: users have the option of marking a notification complete,
even though the data in Sage 300 CRE has yet to be updated. When a notification is marked complete,
all the text in the line will turn grey, and the name of the Windows user who marked the item complete
will be displayed in the “Marked Complete By” column. To mark one or more notifications complete,
select them from the live grid (can be completed in either the MyCommunicator Log or email message),
and click [Mark Complete] in the MyCommunicator Ribbon.
The second step of this process is the closing of a notification, which occurs when a notification no
longer meets the condition set up in the MyAssistant Task. A notification that is closed will disappear
from the MyCommunicator Log, while appearing to have a line through it in any MyAssistant emails
containing that notification. Furthermore, a notification does not need to be marked complete before it
can close.
Should a Sage item be marked complete in error, it can be undone by opening its context menu (i.e.
right-clicking on the notification) and selecting the option, “Reopen.”
Ownership & Due Date Similar to how users can forward individual Sage data items to different users, assign them responsibility
and then set a date by which a response is needed; the person setting up the Tasks in Sage MyAssistant
that eventually sends out the data used in MyCommunicator has the option to establish an Owner for all
the notifications generated by a Task, making an individual as the one ultimately responsible for
ensuring that Sage data will no longer meet the condition. Furthermore, they are given the option of
either typing in one email address – which would make one person the “Owner” of every item that Task
found – or dynamically assigning owners depending on what data is found by the Task through the use
of an email directory (for more information on email directories and assigning ownership, please refer to
the MyAssistant Guide).

Sage MyCommunicator for Outlook User Guide Page 16
The person setting up the Task in MyAssistant also has the option of establishing a deadline by which
the Sage data is expected to marked complete (see previous section), meaning it’s expected to no longer
meet the condition in the MyAssistant Task. This deadline is referred to as the Due Date.
IMPORTANT: If you want to remove an owner and due date from a Task in the Setup Wizard in
MyAssistant by unchecking the box next to “Follow up required,” be sure to also clear the owner field
prior to unchecking the box.
Both the Owner and Due Date sections can be found when viewing an email the live grid view:
Unlike with Waiting On and Response Due, the Owner and Due Date cannot be changed or added (in
the event one was not established in the MyAssistant Task Setup Wizard) from within MyCommunicator.
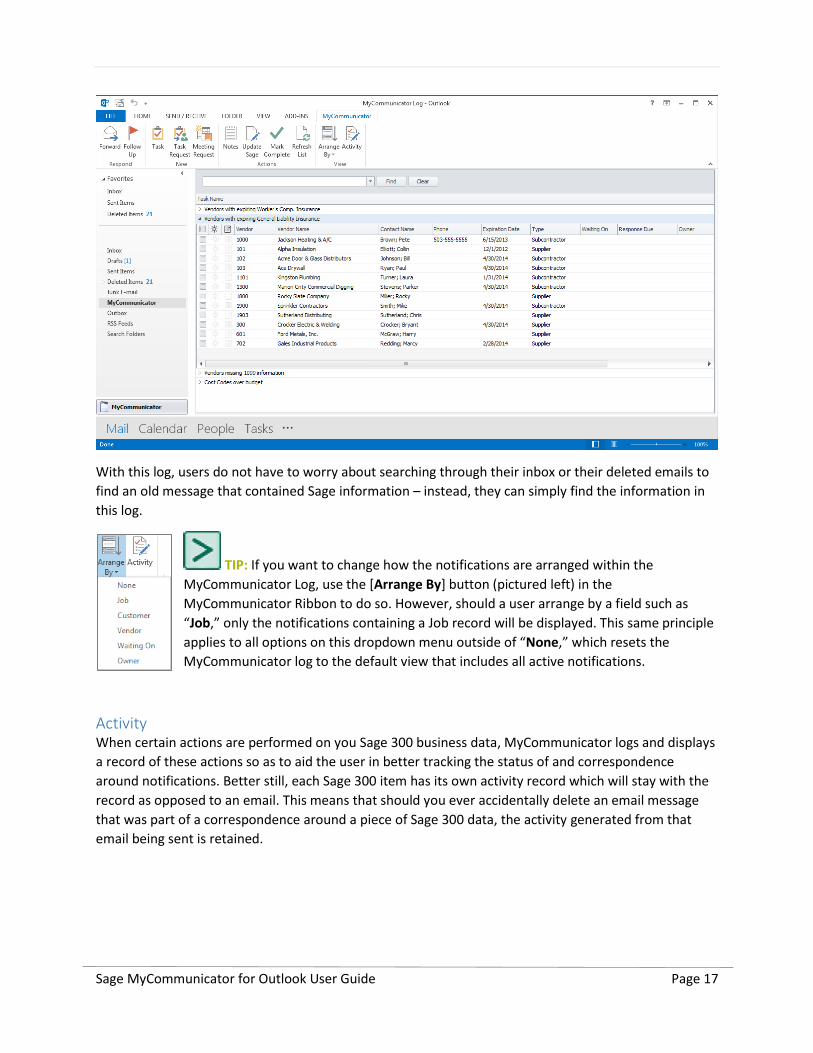
MyCommunicator Log Remember the button that was referenced as a check to make sure that the activation of
MyCommunicator was successful? When that button is clicked, it opens the MyCommunicator Log. This
log is a live grid view of all the notifications of every active Task to which the user has access:
Sage MyCommunicator for Outlook User Guide Page 17
With this log, users do not have to worry about searching through their inbox or their deleted emails to
find an old message that contained Sage information – instead, they can simply find the information in
this log.
TIP: If you want to change how the notifications are arranged within the
MyCommunicator Log, use the [Arrange By] button (pictured left) in the
MyCommunicator Ribbon to do so. However, should a user arrange by a field such as
“Job,” only the notifications containing a Job record will be displayed. This same principle
applies to all options on this dropdown menu outside of “None,” which resets the
MyCommunicator log to the default view that includes all active notifications.
Activity
When certain actions are performed on you Sage 300 business data, MyCommunicator logs and displays
a record of these actions so as to aid the user in better tracking the status of and correspondence
around notifications. Better still, each Sage 300 item has its own activity record which will stay with the
record as opposed to an email. This means that should you ever accidentally delete an email message
that was part of a correspondence around a piece of Sage 300 data, the activity generated from that
email being sent is retained.

Sage MyCommunicator for Outlook User Guide Page 18
IMPORTANT: Only the following actions create activity in the MyCommunicator Activity Log, provided the
user performing the action has a MyCommunicator license installed:
Sending (including forwarding) emails containing notifications
Receiving emails containing notifications, other than emails received from Sage 300 CRE MyAssistant
Responding to emails containing notifications
When a Task request containing notifications is sent and received
In our example from before, we forwarded three vendors with expiring general liability insurance to
another user. By selecting a notification and then clicking on [Activity] in the MyCommunicator ribbon,
the Activity pane now opens to show all activity around the selected notification:
In this section, we can see the time which an action that generated activity was performed, the type of
action that created the activity, the sender, the recipient, the status of the activity, as well as the
Waiting On and Response Due sections from when they were assigned in the forwarded email.
NOTE: While it is possible to select multiple lines in the live email view with the Activity Grid
open, only the activity of the last line selected will be displayed.
As correspondence around one or more notifications continues, individual records of each activity-
generating action that involves at least one MyCommunicator user will be logged:

Sage MyCommunicator for Outlook User Guide Page 19
By default the records are arranged in a reverse-chronological list of newest to oldest activity, but users
have the option to change this sorting at their discretion.
Included in the Activity Log is a column whose header is labeled “Message.” For each activity record, this
field contains all the text of the email message or Task request prior to the first carriage return.
Depending on the […………] being used in each user’s version of Microsoft Outlook, the list of carriage
returns will vary. Most commonly, the [Enter] button on the keyboard works as a carriage return, but it
would be advised each user confirm this for his or her own machine.
IMPORTANT: Since the message field in an activity record displays all text prior to a carriage
return, emails that do not make use of a carriage return will be visible in their entirety in the Message
field of the Activity Log to anyone who has access to the notification the email was sent around.
View Associated Email At the far left of each activity record for a notification is an icon of a magnifying glass over an
envelope (pictured left). When this icon is clicked, it will open the original email that generated
that activity record, provided the user clicking the icon already had access to the email via their Outlook.
Since the MyCommunicator software does not store emails, clicking this button initiates a search within
the user’s Microsoft Outlook application for the original message. If it is found, the email is displayed. If
the user never received/doesn’t have access to the email, it is not displayed when the icon is clicked.
Marking Activities Complete Similar to how notifications can be marked complete when they have been sufficiently dealt with (see
page XX), individual activities within a notification can also be marked complete by MyCommunicator
users. For example, if the same set of notifications were forwarded and assigned to two individuals, the
sender could mark each original activity record of forwarding the notifications complete upon receiving
replies.
Marking activities complete also affects what users see in the MyCommunicator live grid. If a user has forwarded and assigned a notification to another person, marking the activity record of that assignment complete changes the “Waiting On” and “Response Due” sections in the live grid. If the record of the only active assignment of the notification was marked complete, the “Waiting On” and “Response Due” sections are cleared. If the notification had been assigned multiple times, MyCommunicator displays the assignment either closest to the current date or (if any) furthest past due (For more information on “Assign To” and “Response Due,” see page XX).
NOTE: When an activity record is marked complete, it affects all notifications associated with that
activity record. This means that if three notifications were all included in one forwarded email and
assigned to the recipient, marking that activity record complete for one notification will automatically
mark it complete for the other notifications as well.

Sage MyCommunicator for Outlook User Guide Page 20
Furthermore, if anyone marks an activity as complete, their name will be recorded in the “Marked
Complete By” field. This aids in the tracking of activity and allows for faster follow-up to the right person
in the event of needing more information.
Activity Indicator Icon
Once a “Response Due” date has been attached to an activity around one or more notifications, an icon
will appear in the live grid next to each notification. This asterisk-like icon is called the activity indicator
icon (confirm name), and will change colors to help indicate when a response to an activity is coming
due.
The three colors of the icon are:
Green – Indicates more than 3 days until a response to an activity is due
Yellow – Indicates 3 days or fewer until a response to an activity is due
Red – Indicates the response to the activity is either due today or overdue
Since the color of the activity indicator icon corresponds with the Waiting On and Response Due fields
in the activity and live grid, it will operate under the same circumstances as those two fields in the event
multiple people are assigned the same notification and given various response due dates (see Note on
page XX). Specifically, the color of the activity indicator will correspond to the activity displayed in the
notification row.
Security
Just as MyCommunicator was designed to work with Sage 300 CRE MyAssistant for things like
establishing an owner for notifications or toggling whether a Sage record can be updated from Outlook,
so too does the relationship extend to security.
Via record-level security (consider reminder them of MA security) settings in the MyAssistant software,
MyCommunicator users can be restricted as to what information is visible to each individual. When
record-level security is turned off, MyCommunicator users can see all notifications for all MyAssistant
Tasks that have been run, as well as all activity records for each notification.
When record-level security is enabled, the visibility of notifications is restricted based on a number of
factors:
A user’s security level Explain
Whether a user’s email address was included in the setup of a MyAssistant Task o As a named recipient (To, CC, Also Notify, etc.) o As part of an email directory o As an additional user named in the Security step of Task Setup that appears in
MyAssistant when record-level security is enabled
If the user has been forwarded any notifications to which they would otherwise not have had access

Sage MyCommunicator for Outlook User Guide Page 21
However, even when a user has access to notifications, the amount of activity that will be see for each
notification depends on the user’s security level.
For example, let’s say the head of operations is sent a list of XXXX from MyAssistant. If set up as a
MyAssistant Admin User, they will be able to view all of Notifications and associated activity records in
the company. This means that if they were to forward notifications to a project manager, they could
check their MyCommunicator log and see an activity record when the project manager forwarded the
notifications to a project assistant.
To better illustrate this and other scenarios, we have included this spreadsheet:
Waiting On Reponse Due In Activity Log? Waiting On Reponse Due Activity Log? Waiting On Reponse Due Activity Log?
Head of Operations forwards &
assigns notifications to Project
Manager
Project
Manager5/30/2014 Yes N/A N/A Yes N/A N/A No
Project Manager forwards and
assigns notifications to Project
Assistant
Project
Manager5/30/2014 Yes
Project
Assistant5/25/2014 Yes N/A N/A Yes
Project Manager forwards and
assigns notifications to Vendor
1
Project
Manager5/30/2014 Yes Vendor 1 5/15/2014 Yes N/A N/A No
Vendor 1 repsonds to Project
Manager
Project
Manager5/30/2014 Yes Vendor 1 5/15/2014 Yes N/A N/A No
Project Manager marks Vendor
1 activity complete
Project
Manager5/30/2014 Yes
Project
Assistant5/25/2014 Yes N/A N/A No
Project Manager forwards
Vendor 1 response to Project
Assistant
Project
Manager5/30/2014 Yes
Project
Assistant5/25/2014 Yes N/A N/A Yes*
Project Assistant forwards &
assigns notifications to Vendor
2
Project
Manager5/30/2014 Yes
Project
Assistant5/25/2014 No
External
Account5/20/2014 Yes
Vendor 2 forwards notifications
to coworker
Project
Manager5/30/2014 No
Project
Assistant5/25/2014 No
External
Account5/20/2014 No
Coworker responds to Vendor 2Project
Manager5/30/2014 No
Project
Assistant5/25/2014 No
External
Account5/20/2014 No
Vendor 2 responds to Project
Assistant
Project
Manager5/30/2014 Yes
Project
Assistant5/25/2014 No
External
Account5/20/2014 Yes
Project Assistant marks External
account activity complete
Project
Manager5/30/2014 Yes
Project
Assistant5/25/2014 No N/A N/A Yes
Project Assistant replies to
Project Manager
Project
Manager5/30/2014 Yes
Project
Assistant5/25/2014 Yes N/A N/A Yes
Project Manager marks Project
Assistant activity complete
Project
Manager5/30/2014 Yes N/A N/A Yes N/A N/A No
Head of Operations (Admin) SeesAction
Project Assistant SeesProject Manager Sees

Sage MyCommunicator for Outlook User Guide Page 22
Since both the project manager and project assistant are standard users, neither can see the activity
records the other one is independently creating. For example, if the project manager were to send an
email containing notifications to vendor, the project assistant would not see that activity record in their
activity log of that notification.
* = Even if the project manager were to receive a response from the vendor and forward it to the
project assistant, the only record that the project assistant would see in the activity log for the
notifications would be the record created by the project manager forwarding the notifications to the
assistant. The only evidence of the conversation with the vendor would be the email message thread,
provided the project manager included it.