sachsenrad e-racing bike r6
TRANSCRIPT

Manual SachsenRad E-Racing Bike R6
Product number: BB12062/BB12083

Content Important information ..................................................................................................................... 3 1. Unpack your e-bike ...................................................................................................................... 4 2. Assembling the e-bike .................................................................................................................. 6 3. Instrument operation and function introduction ......................................................................... 8 4. Battery level indication ................................................................................................................. 9 5. Battery use, storage and handling .............................................................................................. 10 6. Before riding the bike ................................................................................................................. 12 7. Maintenance .............................................................................................................................. 13 8. Safety advice and technical parameters ..................................................................................... 15 Technical data ................................................................................................................................. 15 Appendix I. Safety instructions for riding: ...................................................................................... 16 Appendix II. Notes on the use of bicycles: ..................................................................................... 18 Appendix III. Preparation before riding: ......................................................................................... 19 Appendix IV. Adjustment and precautions for the brake ............................................................... 20 Declaration of conformity .............................................................................................................. 21 Disposal .......................................................................................................................................... 21

Thank you for purchasing our product! Please read this manual carefully! Cycling naturally belongs to a lifestyle of fashion, health and leisure. People travel longer and longer, and the roads to ride are more complicated. Due to differences between physiological traits, riding habits and riding skills of each cyclist, especially in case of uphill and long distance riding, cycling can be hard and exhausting. Our E-Bike is specially developed to solve your problems! This e-bike is a combination of a high-grade lithium electric battery and a high-end bicycle. It completely solves the troubles of riding. Faster and farther with more fun: it is the ideal companion for your fitness, leisure and travel.
Importeur: V-King GmbH Dohnanyistr. 28 04103 Leipzig
Vertrieb: LEICKE GmbH Dohnanyistr. 28 04103 Leipzig
Important information
This manual contains important safety, performance, and service information. Please confirm that you have read and understood the following warnings and precautions before using the product for the first time. If you lend your e-bike to another person, please let the user read this manual to minimize the probability of accidents. WARNING: Wear a suitable and qualified helmet while riding, and wear a fluorescent or reflective strip when riding at night. Warning: Your existing insurance business may not cover all situations you may encounter when you use an e-bike. Please contact your insurance company or insurance broker for advice. Warning: This manual does not contain and prompts all situations that may be encountered during the ride. For more information, please contact your dealer for more comprehensive services. Please contact your dealer or find a professional service technician when repair or maintenance is required. Please pay attention to all the warning signs and terms in this manual, read and understand

the contents stated in the terms before using your bicycle. WARNING: A warning sign indicates that this situation may result in significant property damage, severe personal injury or death to you or others. Please strictly follow the content of this logo. Note: Attention signs represent general negligence that requires your attention, resulting in bodily injury, equipment damage, or minor property damage.
1. Unpack your e-bike
Tip: Your e-bike will be slightly heavier than a regular bike. It is best to have two people getting it out of the box. Required tools and equipment: Wire cutters (for the purpose of cutting off the package cable). Blanket or canvas (to prevent scratching the ground during assembly. Your e-bike should be assembled when you buy from a dealer. However, if you need to assemble yourself from the new packaging, please read and understand the following terms: 1. Carefully open the packaging carton and carefully open the packing nails (to prevent scratches, please wear gloves and pliers). 2. Carefully remove the bike from the carton. It is recommended that two people do it together. 3. Place the bike on a blanket to prevent scratching the floor. 4. Remove the accessory tray and all parts from the large carton. 5. Use a wire cutter to cut off the various tie wraps. Please note that you can only cut those from bundling tie and strap, to not accidentally damage the bike or lose accessories. 6. Remove all protective paper and foam. Tip: The battery needs to be charged for at least 12 hours before the first use. Please read 5.2 and Section 5.3. Upgrade parts or add accessories If you need to upgrade parts or add accessories, please read and understand the following: WARNING: Before installing parts or accessories, make sure the specifications and dimensions match. Please check with your dealer. Parts with different specifications may be installed but there is a huge safety hazard. Please note: When you find that the parts do not match, please read the instructions and parameter specifications that come with the parts. WARNING: Incorrect installation and use of purchased parts and incorrect modifications may result in significant property damage, severe personal injury or death. WARNING: Using counterfeit parts or upgrading the product can have serious consequences and will void your original warranty on your bicycle. If you would like to upgrade or add other

accessories, please contact your dealer. Warning: If you choose to replace parts, upgrade parts or add accessories, please note that such modifications have not been tested by the original safety and reliability, there is a certain safety risk.
1. Seat cushion 2. Seat tube 3. Quick release seat tube clamp 4. Rear brake 5. Front wheel / tire 6. Front brake 7. Foot, crank and chain-ring 8. Fork 9. Battery case 10. Drive chain 11. Rear wheel / tire 12. Flywheel 13. Motor 14. Battery charging port 15. Grip 16. Left hand brake lever (control rear brake) 17. Right hand brake lever (control front brake)
2. Assembling the e-bike
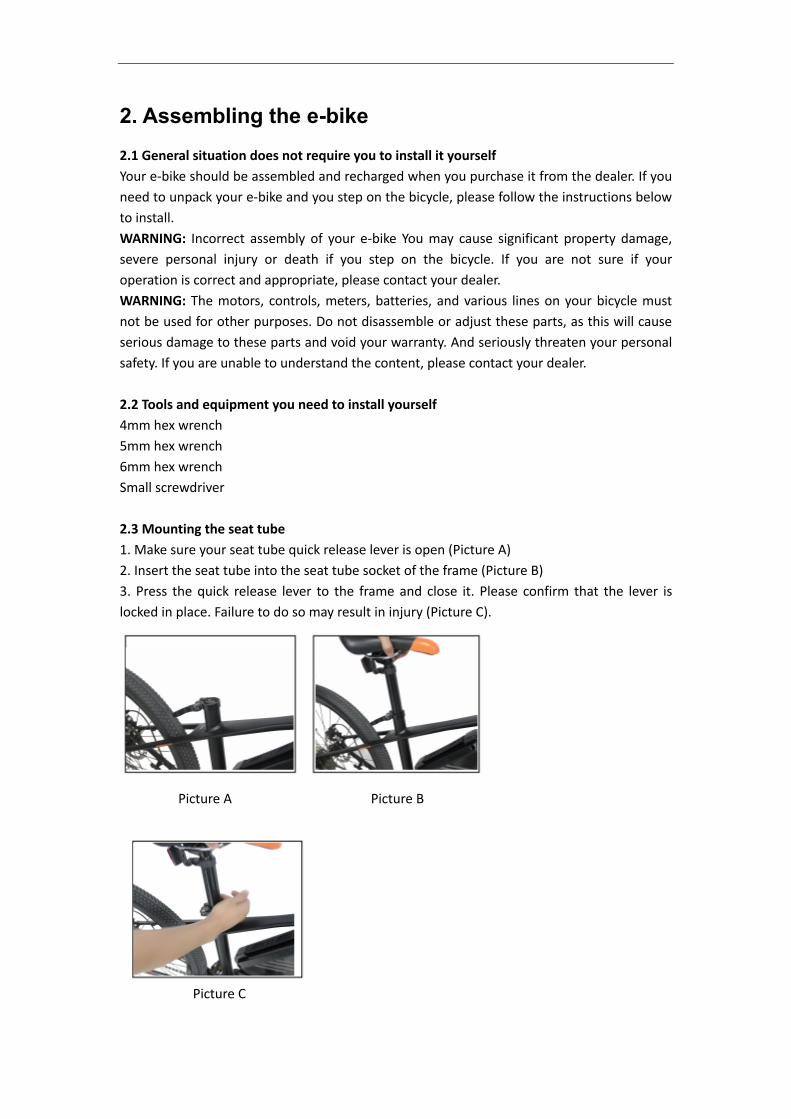
2.1 General situation does not require you to install it yourself Your e-bike should be assembled and recharged when you purchase it from the dealer. If you need to unpack your e-bike and you step on the bicycle, please follow the instructions below to install. WARNING: Incorrect assembly of your e-bike You may cause significant property damage, severe personal injury or death if you step on the bicycle. If you are not sure if your operation is correct and appropriate, please contact your dealer. WARNING: The motors, controls, meters, batteries, and various lines on your bicycle must not be used for other purposes. Do not disassemble or adjust these parts, as this will cause serious damage to these parts and void your warranty. And seriously threaten your personal safety. If you are unable to understand the content, please contact your dealer. 2.2 Tools and equipment you need to install yourself 4mm hex wrench 5mm hex wrench 6mm hex wrench Small screwdriver 2.3 Mounting the seat tube 1. Make sure your seat tube quick release lever is open (Picture A) 2. Insert the seat tube into the seat tube socket of the frame (Picture B) 3. Press the quick release lever to the frame and close it. Please confirm that the lever is locked in place. Failure to do so may result in injury (Picture C).
Picture A Picture B
Picture C

Tip: Please adjust the nut on the opposite side of the lever to adjust the
tightening force of the lever. Do not tighten or loose the lock.
2.4 Installation of the pedal 1. Please hold your bike. It is best to operate it with two people, so that the chain and crank can rotate smoothly. 2. Take out the pedals and sort them. On is labeled “R” for the right foot. The “L” is the left foot. The side of your electric bicycle chain is the right side, and vice versa. 3. Align the foot thread with the mounting hole on the crank, lock the right foot clockwise, and lock the left foot counterclockwise. 4. Use a 15mm open-end wrench to lock the foot. WARNING: Improper foot installation can present a serious safety hazard that could result in significant property damage, severe personal injury, or death. Please check that the pedals are firm and smooth before each use. 2.5 Brake handle adjustment If you are not satisfied with your brakes, please contact your dealer and ask a professional technician to mediate. 2.6 Adjust the height of the seat cushion according to the height of the rider 1. The height of the seat cushion can be adjusted by using the seat tube quick release lever. You only need to loosen the quick release lever to freely raise or lower the height of the seat cushion. After adjusting to the height you want, lock the quick release lever. The adjustment is completed. 2. After adjustment, please confirm that the seat tube quick release lever has been locked and maintain proper locking force. The seat tube will not slide. 3. Please confirm that the seat tube quick release lever is locked. WARNING: Incorrect installation of the seat tube seat cushion can result in severe personal injury or death. Warning: It is strictly forbidden to raise the seat tube height beyond the safety line of the seat tube.

2.7 R6 chain adjustment method After a certain period of use, the chain could be worn out due to the transmission strength, and can be properly adjusted by a tension screw tightening the chain. The chain is adjusted to the smallest tooth of the flywheel. Use a screwdriver to turn the rear transmission tension screw clockwise. The chain should not sag.
2.8 Lights If the package includes front and rear lights, they must be attached.
3. Instrument Operation and Function Introduction
Please read this section carefully. Before using for the first time, please consult your dealer to find out the features of your electric bicycle. 3.1 Start and stop 1. Put on your helmet and choose a quiet place away from cars, other bicycles, obstacles or risky things. 2. Make sure the power switch is in the “off” position and then raise your parking bracket. 3. Ride your electric bicycle and adjust your posture. 4. Press the switch button in the middle of the body to start your lithium battery. Warning: If you turn on the power switch before riding the bike, you may accidentally touch the switch or step on the pedal during the boarding process causing the motor to work suddenly and by this causing an accident. So please keep the power switch in the off position. WARNING: Do not sit on your bike with the parking stand lowered, as this can result in damage to the vehicle and personal injury. No power? The following are some common problems and solutions. If the following methods do not solve your problem, please contact your dealer. Possible Causes Solutions

3.2 Brakes Tip: When you pinch the brakes, the motor will automatically power off, which is a default security setting. Tip: There is a sensor in the brake handle. When you pinch the brake, the motor will automatically power off, so do not press the brake handle when you want the motor to work. Try the brakes at low speed. The brake handle of the left hand corresponds to the brake of the rear wheel. The brake handle of the right hand corresponds to the front wheel brake. Never brake hard when braking. Pinch the rear brakes. Warning: Suddenly pinching the front brakes will cause you to roll over. Please do not adjust your brakes too tightly to lock the wheels and cause accidents. ! Check the sensitivity and braking force of the brakes before each ride.
4. Battery level indication
Your e-bike uses a red indicator light on the battery box to display the power. Always check the remaining battery power. When your battery is less than one cell (20%), please charge as soon as possible. The motor and battery controller will automatically stop working when your battery voltage is below a certain level to protect the battery and to prevent the occurrence of loss of power. Warning: Never use your battery excessively, which will seriously damage the battery's capacity and charge. When your battery is no longer working, please use a dedicated charger to charge your battery. It can be fully charged in about 5-6 hours under normal conditions. 4.1 Boost mode When you turn off the power, the electric assembly will not provide power. When you turn on the power, the electric components will start working automatically. Tip: Using the high boost mode will reduce your battery's cruising range, reducing your cruising range by approximately 30%. Note: If you suddenly encounter a steep hill during the ride and your speed drops below 10km/h, please consider getting off the bike and leaving the steep slope before riding again
Problem possible reason Solution The indicator light is off.
The battery is dead.
Charge the battery, Please refer to chapter 5.2 and 5.3.
The indicator light is on, but the motor does not turn on.
1. The brake is pinched 2. The motor power cord is unplugged
Release the brakes, or pinch the brakes a few times and let go. Check the motor power cable.

to prevent the chain and motor from breaking. Otherwise, the motor may overheat, the battery discharges at high power and the battery capacity and life are reduced. 4.2 After use Get off the vehicle after turning off the power, then lower the parking bracket. If you have any questions about using your e-bike, please contact your dealer before your next ride. 4.3 When to charge Please fully charge your battery, because the lithium-ion battery will be seriously damaged in case of loss of power. Keeping the battery power will help maintain the battery. Please refer to sections 5.2 and 5.3 for details. 4.4 Distance Affecting factors:
• Battery charging status • Tire inflation • The power mode you choose • Rider's weight • Are you riding fast? • Terrain • High frequency of starting and stopping
How to increase the mileage of a charge cruise:
• Charge the electricity • Check tire pressure (40-50psi recommended) • Always look for professional technicians to maintain your electric bicycle and adjust
the brakes, transmissions and other components. • Reduce the load • Don't ride too fast • Maintain a steady speed
5. Battery use, storage and handling
5.1 Battery use Reading and understanding the following can help you use, maintain and store your battery properly, which is very important for your e-bikes performance improvement. WARNING: Incorrect removal, repair, use or storage of the battery can void your warranty and can have serious consequences. It is strictly forbidden to use the battery of your electric vehicle on other vehicles or equipment. For other purposes, your battery may be out of warranty and may cause serious consequences such as fire, serious personal injury or death. If you have questions about the use of the battery, please contact your dealer. WARNING: Never intentionally short-circuit a battery. This can cause an explosion, fire, severe personal injury and death.

Tip: Your battery needs to be charged for a minimum of 12 hours before you use it for the first time. Tip: If your battery is not used for more than 30 days, please refer to section 5.3. 5.2 How to charge the bike WARNING: Please use the factory-supplied charger to charge the battery. If you use another non-original charger for charging, your battery will lose its warranty and may be damaged, causing fire, injury or death. Tip: You can charge your battery at any time. If you do not charge it in time if the battery is running out of power, your battery will gradually lose its performance and reduce its life. Proper use and maintenance can keep your battery more than 80% capacity after more than 500 charge and discharge, but the overall capacity of the battery is inevitable. Charging steps: 1. Remove the battery from the bike (see 5.5). 2. Check if the AC voltage used for charging is 100-240 volts. 3. Make sure everything is turned off (charger, bike, battery). 4. Insert the plug into the socket and switch on the charger. Check the color of the (CHARGE) LED on the charger. If it is red, the battery is charging normally. 5. When the (CHARGE) LED on the charger changes color to green, your battery has been fully charged. Note: Please turn off the charger when the charger's power plug is connected to the power outlet. Keep the charger off before plugging it into the battery charging jack. Note: When you want to unplug any charger, please turn off the charger switch first. CAUTION: To prevent damage to the charger, do not pull, bump or subject the charger to strong shocks. WARNING: Improper use of the charger can cause serious consequences that could result in fire, substantial property damage, serious injury or death. Note: Do not place anything on the battery and charger while charging, as this may cause overheating and serious consequences. Note: Please use your charger indoors, as damage caused by improper use will not be covered by the warranty.
5.3 Long-term storage of batteries
Charging hours
First three charges 12
Normal charging 4-6
Every ten charges 12
If you want the longest battery life, please charge after each use. Note: To prevent your battery from being overcharged, please charge do not charge more than 12 hours.

Store the battery in a cool dry place, keep the temperature between 10-21°C and avoid direct sunlight. Special Note: If the battery remains in a deficit for a long time, it will result in permanent performance loss. Be sure to remove the battery at least every 30 days for a charge, which will extend battery life and maintain performance. If you have any problems with battery use, maintenance and storage, please contact your dealer. 5.4 Treatment after battery failure Do not dispose of your used batteries with household waste. Please dispose of them according to local battery recycling regulations. It is best to contact your dealer for the best treatment. 5.5 Battery removal
Insert the battery box key and unlock. Pull out the battery compartment. Pull until the battery is completely separated from the base.
6. Before riding the bike
This section can help you prepare for your use. When riding, please always wear a safety helmet that is safe and of the right size. If you want to lend to others, please ensure that others wear a helmet that is safe and of the right size. Do not carry other people with you on the bike! Overloading that may be caused by manning can have serious consequences that can result in significant property damage, severe personal injury or death. Compliance with traffic laws and regulations Please ride on the right edge of the road. Consider the local laws and regulations! Reflective film

Reflective film, please keep the reflector clean and bright, please do not remove the reflector. Check the brakes Please check the brake distance and braking force before each ride. Please remember that the left hand brake will correspond to the rear brake, and the right hand brake will correspond to the front brake. Your e-bike is equipped with normal specifications of brake pads. Please check the brake pads every time, and always check with your dealer to check the brake pads. If the brake pads are worn out, please replace them as soon as possible. . Tire pressure 40-50 psi (or depending on the tire pressure written on the side of the tire). Your tires contain inner tubes. You need to inflate the inner tubes. Please check the pressure of the tires before each ride. The tires will gradually lose pressure, this is normal. If you lose too much air pressure, please inflate again. If your tire pressure is not enough, it will lead to extra power consumption and fitness and reduces your cruising range. WARNING: When you brake heavily and cause the tire to lock up, it will lead to rollover, which will lead to major property damage, serious personal injury or death. If you are not sure if your brake adjustment is appropriate, please contact your dealer or look for a professional The technician checks for you.
7. Maintenance
7.1 Wheels The front and rear wheels of the vehicle should be located at the center of the fork or frame. The tension of each spoke on the wheel rim should be similar and the rim should maintain a regular circle without bounce or yaw. If there are missing or broken spokes, this will make the rim lose smoothness. Please ask your dealer or professional technician for repair and debugging. The rim must be smooth. If it does not, it will increase the resistance of the ride or cause danger. If you think you need to adjust, please contact your dealer or find a professional technician to adjust it. 7.2 Chain Your e-bike is equipped with a high-quality drive chain, so please keep the chain clean and often add lubricant, the grease used in ordinary bicycles is universal. WARNING: The brake pads and rims must be kept away from grease. Keep the rims and brake pads clean. WARNING: Moistened or humid air can also cause the brake to break. Please avoid riding in wet or rainy weather. If you can't avoid it, please remember that in the rain and snow weather, your braking distance will be several times more than normal. Please ride slowly and keep away from other vehicles and brake early. Failure to do so may result in accidents, significant property damage, serious personal injury or death. If you are unsure of the performance of your vehicle, please contact your dealer or a professional service technician and ask them to test their performance. After each commissioning, please try again in a safe place.

Special tips for parents or guardians Please refer to local laws and regulations. As a parent or guardian, you are responsible for your child's riding on any vehicle and you should take the initiative to take responsibility for safety. Please take personal safety as your top priority in any situation. Please read the following: Please work with your child to understand local laws and regulations as well as traffic safety regulations. Please confirm that your child has a safe judgment and that you are using the lithium battery correctly. Read and understand all of this manual before you let your child learn to ride a lithium-light bike. Warning: Please make sure your child wears a qualified and appropriate safety helmet before riding on the e-bike. Otherwise, it may cause serious consequences. 7.3 Tires Always check the tire for scratches, cracks or excessive wear. The tire should be properly combined with the rim. The tire bead line should be completely exposed. If the tire can not be fully expanded, apply water to the rim and the tire to increase lubrication. The air nozzle of the inner tube should be perpendicular to the rim. Damaged or excessively worn tires need to be replaced immediately. Please contact your dealer or professional technician to replace your tires. If your tires are accidentally punctured, please contact your dealer or technician for repair or replacement. WARNING: Do not ride while your vehicle is leaking or under-inflated. Failure to do so may result in serious damage to the vehicle, substantial property damage, severe personal injury or death.
7.4 Controller It is strictly forbidden to open the controller privately and change the components and circuits in the controller. Do not overload or operate the electric assist function over a long distance or steep slope. Do not change the controllers installation position. It is strictly forbidden to wrap other things on the controller casing, which will affect the heat dissipation. Warning: Avoid cleaning the controller box when cleaning the bike. The controller box should be kept ventilated 7.5 Motor Do not open the motor! Do not overload or operate the electric assist function over a long distance or steep slope. It is strictly forbidden to wrap other things on the motor casing affecting the heat dissipation. Warning: Maintenance-free motor, no need to refuel. The motor needs to be kept clean and ventilated.

8. Safety advice and technical parameters
Please wear a helmet! When you ride the e-bike, please wear a qualified helmet! It is strictly forbidden to carry people, please observe the traffic regulations and be careful of car doors. Try to stay away from cars parked on the side of the road, in case the door suddenly opens or the car blocks the line of sight so that you can't see the person or thing that suddenly appears. Please pay special attention during bad weather! In wet weather, your electric bicycle will brake several times more slowly than normal. Please reduce the riding speed, brake in advance and carefully pass curves. Make sure you are seen by other drivers. When riding in dark roads or at night, please wear clothes with reflective tape or fluorescent color to serve as a warning. It is recommended that you use your own head and tail lights to alert and illuminate the front road, check the position of the reflector and keep it clean, ride slowly and ensure that drivers can see you. Please concentrate! You should pay attention to the traffic! Check your vehicle before each ride Please check your entire e-bike before each ride, including: brakes, tires, rims, quick release levers and all screws or components. The battery requires careful maintenance to ensure its safety and reliability. Please refer to and understand the chapter on battery maintenance. If you have more questions, please contact your dealer.
Technical Data
Main technical reference number: (TDG01Z)
Main technical parameters of the vehicle Dimensions: 1725/1785 × 640 × 1010 mm Wheel diameter: 640/690 mm Front and rear axle center distance: 1010mm Vehicle quality (weight): ≤ 40kg Loading mass (weight): 75kg Maximum speed: ≤25Km/h Average operating distance: ≥25km Maximum cruising range: >50km

Maximum allowable load: 90kg Main technical parameters of the battery Battery Type: Lithium-Ion-Battery Battery capacity: 11Ah Battery nominal voltage: 36V Main technical parameters of the motor Motor form: Brushless DC motor Motor rated continuous output power: ≤250W Motor rated voltage: 36V Motor rated speed: 210±20r/min Motor rated output moment: 7N.m Controller main technical parameters Undervoltage protection value: 31.5±1v Overcurrent protection value: 15±1A Battery charger description Input voltage: AC 115/230V, 50/60Hz Output voltage: 42V Output current intensity: 2A Security and frame number Your e-bike has a unique frame number. Record this frame number As a certificate of warranty or in combination with your invoice when your lithium battery is stolen, keep the owner's certificate. To maximize the protection of your e-bike from theft, purchase a high quality U-lock or chain lock. Please do not put your e-bike in an unattended place. Please lock the main components such as the frame motor when you lock the e-bike.
Appendix I. Safety instructions for riding:
(1) Slow down when turning, and confirm that passing vehicles are driving again. (2) Try to avoid sudden braking in the middle of a turn to prevent slipping and falling. (3) When turning, avoid stepping the inner foot to the lower end to maintain a certain maneuverability. (4) Avoid driving on a road surface that is too smooth, such as snow, ice, engineering steel plates, or rails. (5) The bicycle stand cannot be lifted without lifting the bike. (6) Do not pull lines such as the brake line, shifting line or adjusting lights during riding to avoid falling and hurting. (7) It is necessary to avoid a direct shift of more than two levels during driving, otherwise it may lead to dangers such as chain tripping.

(8) It is necessary to wear a light and convenient clothing when riding, avoid wearing a long skirt, wearing a scarf and over-sized trousers, etc. Those may be easily caught in rotating parts such as a sprocket wheel. (9) Avoid wearing shoes that are slippery and inconvenient like slippers and high heels. (10) Avoid one-handed braking when riding, otherwise it is easy to lose balance and have an accident. When braking, you should first pull the rear wheel and then pull the front and rear brakes together to keep the control smooth. (11) Try to avoid sudden braking. (12) When the downhill is long, slow down and use the intermittent brake to slow down; if the brake is held down, it will easily cause the brake to wear sharply or even cause the brake to fail due to friction and overheating. (13) The traffic rules must be observed during driving. The right brake of the bike brakes the front wheel and the left brake brakes the rear wheel. (14) Do not drive in bad weather such as heavy rain or snow. A. When raining, please prepare rain gear such as raincoats, avoid using one hand to control the bicycle with one hand, and use a tool such as clip rubber band when riding a raincoat to prevent the raincoat from being caught in the rotating parts of the car body, and slow down slowly to decrease the braking distance. B. In strong winds, if you feel that the handlebars are difficult to handle, you must get off the vehicle to ensure safety. C. When it is snowing, try to get off the bike, especially if the road is frozen and the ground is too slippery. Don't ride. (15) Traffic rules must be observed while driving. (16) If there are parked cars near you when driving, slow down to avoid colliding with suddenly opened car doors. (17) Regular inspection: A. Check the tires for damage and if the tire pressure is sufficient. Inspection standard: When riding on the bike, if the length of the tire contacting the ground exceeds 9~10cm, it needs to be inflated. B. To check front brake function, pull it half or two-third and if the front wheel does not rotate everything is functional. To check the rear brake: apply weight to the foot pedal while lifting the bike. The brake is effective when the rear wheel does not rotate. C. Check that the quick release parts of the bike are locked in place. D. The safety line of the handlebar riser and the saddle is required to be inserted into the front standpipe and the inside of the frame. Confirm the tightening torque. E. Check whether the frame and the front fork are cracked or deformed, whether the pedal and the gear crank are deformed, whether the paint is detached or wrinkled. F. Check whether the gear is deformed or damaged. G. Check whether the gear can be used normally. H. Check whether the screw nuts of each part are loose. (Lift the front and rear wheels for about 10 to 20cm and then let them bounce. If there is a noise, there may be loose parts) I. Check whether the lights can be used normally. J. If you bought a regular folding bike, please assemble carefully before riding.

Appendix II. Notes on the use of bicycles:
(1) Just take normal roads. The e-bike is no mountain bike and it is unsafe to use it as such. (2) Avoid carrying two people and driving in stunts. Do not step on the rear wheel hub. (3) At night, avoid riding a bicycle without lights. (4) Do not ride after consuming alcohol. (5) Do not drive side by side. (6) Do not to overload the bike. (7) When the bike has cracks or deformation, it cannot be driven. (8) If the reflective sheet is damaged, it must be replaced. Otherwise, it may be you are not seen by pedestrians or vehicles, resulting in an accident. (9) It is forbidden to change the position and shape of the handlebars arbitrarily, otherwise accidents will occur due to the state in which the handlebars are unnaturally difficult to handle. (10) The bike must be assembled carefully before using it. (11) Don't take the bike if the visual field is not good, and the visibility is low caused by things like fog. (12) Avoid riding on extremely uneven ground to prevent accidents. (13) If there is solid matter between the spokes, it is necessary to take it away and drive. (14) Check the lights before driving. (15) When driving, do not carry items or ropes holding pets on the hands and handlebars. (16) Do not place your pet in a basket to prevent the pet from suddenly jumping out of it and causing an accident. (17) Do not use it for purposes other than driving, such as standing on the bicycle to take high-rise items, etc., to prevent falls and injuries. (18) If the handle of the handlebar is loose, it must be replaced in time. Otherwise, there will be an accidental risk when the hand and the cover are separated from the handlebar. (19) Do not lubricate the brake part or wipe it with tarpaulin. (20) Do not modify the bicycle without authorization. (21) Do not touch rotating parts. (22) Do not remove the safety hook used for the middle pull brake. (23) When riding, you must control the bicycle with both hands. (24) Do not transport umbrellas, skis, fishing gear and other items on the bike to prevent accidents. (25) Slow down when it is rainy or if the road surface is slippery and also when going downhill, and increase the braking distance or get off the vehicle. (26) The driving speed should not be too fast, otherwise the high-speed driving will make the handlebars difficult to control and the brakes will easily fail. (27) Applicable accessories, such as tires, inner tubes and brake shoe parts, can be purchased at domestic bicycle accessory manufacturers and bicycle repair shops.
Appendix III. Preparation before riding:
(1) Adjustment and precautions for the saddle:

A. Adjusting the height of the saddle: Generally, when the user sits on the saddle, the pedal is stepped on the lowermost end, and the height of the saddle when the knee can be easily and naturally bent is the best height. The user or beginner must adjust the saddle to the position where the toes of the feet can land when riding. B. When using the pin type saddle clamp: Use a wrench to loosen the pin nut of the clamp saddle tube counterclockwise to adjust the height of the saddle. After adjusting the height, lock it clockwise. C. When using the quick release saddle clamp: adjust the saddle height by pulling the quick release handle (the arrow direction is locked), adjust the height and lock it clockwise. If the quick release handle is locked and you cannot reach the normal closed position, you can adjust the adjustment nut on the opposite side of the quick release handle until the quick release handle can be locked to the position parallel and adjacent to the front and rear fork legs. D. When using the screw-type saddle clamp: Rotate the knob counterclockwise to loosen the height adjustment of the saddle tube. After adjusting the height, lock it clockwise. E. When using the hexagon socket pin type saddle clamp: Use a 5mm hex wrench to twist the pin counterclockwise to adjust the saddle height. After adjusting the height, lock it clockwise. (Note: due to the left end of the pin Adjustment will damage the saddle clamp and related components, so it must be adjusted from the right end of the pin) F. Front and rear position adjustment of the saddle: When riding, when the foot pedal is in the most stressed position in the oblique front, the rider's knee center line can vertically penetrate the center of the pedal, which is the best state of riding the bike. This is used as a reference for saddle position adjustment. In addition, the saddle should be adjusted to a horizontal state under normal conditions. G. Warning sign: A safety identifier is engraved on the saddle tube. The safety sign must not be seen when used otherwise the tube might break. (2) Adjustment and precautions for handlebars and wheels: A. Adjusting the height and angle of the handlebars: Generally, the height of the handlebars when the shoulders and elbows feel relaxed and comfortable when the handlebars are held by both hands is the best height. Crossbars and risers of the handlebars: when viewed from the side, the handlebar should be in a 90° angle to the riser. B. Adjust the angle of the handlebar: first loosen the handlebar locking screw (or nut), then adjust the angle of the handlebar, adjust and then lock the handlebar. C. Adjusting the height of the handlebar: The height of the riser can be adjusted by rotating the riser boom screw for 2/3 turns. (The hanger screw generally uses a 13mm wrench. If it is a hexagonal row of hanger screws, a hex wrench is to be used) If the boom is stuck in the riser and cannot be loosened, tap the top of the screw with a wooden hammer to loosen it. D. Warning sign: A safety identifier is engraved on the riser. The safety sign must be buried in the front fork standpipe and locked in the riser before use. Otherwise, if the riser is extended for a long time, there is a risk of accidental breakage. E. Adjustment of the wheel: The wheels can be adjusted or exchanged with a quick release or normal nuts. The torque at the front wheel is 180-220 kgf.cm and the torque at the rear

wheel 250-350kgf.cm. Please stick to this for your safety. (3) Adjustment of the shock absorber: A. After the adjustment of the rear shock absorber, the rider can adjust the pounds of the rear shock absorber according to his own weight: spring shock absorber, pneumatic shock absorber, hydraulic shock absorber, but the pounds of the shock absorber cannot be lower than 80% of the original pounds. B. For the adjustment of the front shock absorber, the rider can select the lock suspension according to the road condition, the mechanical button is rotated and locked, and the line pull type is locked. If it is a normal spring suspension, it cannot be adjusted. (4) The total allowable weight of the bicycle: the rider and the carrier (bicycle + rider + carrier) cannot exceed 110KG. (5) Since all mechanical parts of the bicycle are subjected to friction and large stress, different materials and components are subjected to various frictional fatigue stresses. If the component is used more than its design life, a sudden damage may cause injury to the rider. Any crack, scratch or color change in the stressed part indicates that the component has reached the end of its service life. Replace! (6) The rim is part of the brake system and can be dangerous in the event of wear and tear. Therefore, this warning should be clearly and permanently marked on the rim without covering the tire. The rider should pay attention to this. The warning sign on the rim means to change the rim when the rim wears to the safety line. Otherwise, the rim will burst. (7) The lighting system and reflector needs to be installed. However, the rider needs to understand the standard of use: the front of the bicycle is a colorless (white) reflector, the rear is a red reflector, the pedal is amber, and the rim is colorless or amber.
Appendix IV. Adjustment and Precautions for the
Brake
(1)To check front brake function, pull it half or two-third and if the front brake does not rotate everything is functional. To check the rear brake: apply weight to the foot pedal while lifting the bike. The brake is effective when the rear wheel does not rotate. (2)Avoid pinching your fingers when pulling the brakes. (3)Brake adjustment: After long-term use, the brake cable lengthening and other factors will make the brake effect worse. At this time, the adjustment screw on the brake lever can be rotated to tighten the brake wire to the state where the left and right brake skins are at the distance of 2 mm from the rim, and the adjustment nut is locked. (4)Brake line replacement time: The normal state is 1 year replacement, but if abnormal phenomena such as rust and break occur, it must be replaced as soon as possible. (5)The use of the foot brake is to use the foot to step on the pedal and then pour 60 degrees, so that the sprocket drives the chain to make the rear wheel rotate again and then the hub brakes. Pay attention to the need to lock the hub (6) Adjustment and precautions for the brake: A. The lever type brake is adjusted by loosening the lock nut rotation lever.

B. Steel wire type brake is adjusted by loosening the lock nut rotation adjustment nut. C. After the adjustment, the lock nut must be tightened, and the brakes cannot be adjusted too tightly. Otherwise, the brake drum is likely to be rubbed, which makes the ride very laborious. (7) The brake shoe must be adjusted to fully contact the side of the rim when in use and the distance to the rim is 2mm. If the brake shoe touches the tire or does not completely touch the rim when braking, it will cause the brake shoe to wear too fast and the brake is out of order. When the brake shoe wears to the groove, only 1MM is left or the brake stroke exceeds 1/1. When the distance is 2, the brake shoe must be replaced in time. We have made every effort to ensure that the information in this manual is accurate and the product function parameters are subject to change without prior notice.
Declaration of Conformity
The manufacturer declares that the products listed above are conform to all relevant declarations of the Machinery Directive –2006/42/EG, Low Voltage Directive 2014/35/EU, product safety 2001/95/EC and Dir. Electromagnetic Compatibility –2014/30/EU. Please, find the full declaration here: www.leicke.eu/de/products/bb12062 www.leicke.eu/de/products/bb12083 Applied technical standards: DIN EN 15194 Bicycles–Electrically power assisted bicycles DIN EN ISO 4210
Disposal This device contains materials that must not be disposed of as household waste. Please check local laws concerning the applicable disposal regulations. Protect the environment by participating in recycling programs.