s225-50-54 cl-6b control panel retrofit installation ... · 1 cl-6b control panel retrofit...
TRANSCRIPT

1
CL-6B Control Panel Retrofit Installation Instructions
Voltage RegulatorsService Information
S225-50-54
0512 • Supersedes 05/08 1
Safety Information ..................................................... 2
Hazard Statement Definitions ................................. 2
Safety Instructions .................................................. 2
Product Information .................................................. 3
Introduction ............................................................ 3
Acceptance and Initial Inspection ........................... 3
Handling and Storage .............................................. 3
Quality Standards ................................................... 3
Installation Procedures Kit 57A64327900A, CL-6B Control Panel in Cooper Box, Dead Front ... 4
Installation Procedures Kit 57A64327900B,CL-6B Control Panel in Cooper Box, Not Dead Front .......................................................... 5
Installation Procedures Kit 57A64327900C,CL-6B Control Panel in Siemens Box ...................... 6
Installation Procedures Kit 57A64327900D,CL-6B Control Panel in General Electric Box with Fork-Type Terminal ............................................ 9
Installation Procedures Kit 57A64327900E,CL-6B Control Panel in General Electric box with Pin-Type Terminal .............................................. 12
Installation Procedures Kit 57A64327900F,CL-6B Control Panel in Howard Box ....................... 14
Contents
Figure 1. Cl-6B regulator control panels in various control boxes.

The instructions in this manual are not intended as a sub stitute for proper training or adequate experience in the safe operation of the equipment described. Only competent technicians, who are familiar with this equipment should install, operate and service it.
A competent technician has these qualifications:n Is thoroughly familiar with these instructions.n Is trained in industry-accepted high- and low-voltage
safe operating practices and procedures.n Is trained and authorized to energize, de-energize, clear,
and ground power distribution equipment.n Is trained in the care and use of protective equipment
such as flash clothing, safety glasses, face shield, hard hat, rubber gloves, clampstick, hotstick, etc.
Following is important safety information. For safe installation and operation of this equipment, be sure to read and understand all cautions and warnings.
Safety InstructionsFollowing are general caution and warning statements that apply to this equipment. Additional statements, related to specific tasks and procedures, are located throughout the manual.
DANGER: Hazardous voltage. Contact with high voltage will cause death or severe personal injury. Follow all locally approved safety procedures when working around high- and low-voltage lines and equipment.
!
WARNING: Before installing, operating, maintaining, or testing this equipment, carefully read and understand the contents of this manual. Improper operation, handling or maintenance can result in death, severe personal injury, and equipment damage.
!
WARNING: This equipment is not intended to protect human life. Follow all locally approved procedures and safety practices when installing or operating this equipment. Failure to comply may result in death, severe personal injury and equipment damage.
!
WARNING: Power distribution and transmission equipment must be properly selected for the intended application. It must be installed and serviced by competent personnel who have been trained and understand proper safety procedures. These instructions are written for such personnel and are not a substitute for adequate training and experience in safety procedures. Failure to properly select, install or maintain power distribution and transmission equipment can result in death, severe personal injury, and equipment damage.
!
SAFETY FOR LIFECooper Power Systems products meet or exceed all applicable industry standards relating to product safety. We actively promote safe practices in the use and maintenance of our products through our service literature, instructional training programs, and the continuous efforts of all Cooper Power Systems employees involved in product design, manufacture, marketing and service.
We strongly urge that you always follow all locally approved safety procedures and safety instructions when working around high-voltage lines and equipment and support our “Safety For Life” mission.
!SAFETYFOR LIFE
!SAFETYFOR LIFE
SAFETY INFORmATION
This manual may contain four types of hazard statements:
DANGER: Indicates a hazardous situation which, if not avoided, will result in death or serious injury.
WARNING: Indicates a hazardous situation which, if not avoided, could result In death or serious injury.
CAUTION: Indicates a hazardous situation which, if not avoided, could result in minor or moderate injury.
CAUTION: Indicates a hazardous situation which, if not avoided, could result in equipment damage only.
Hazard Statement Definitions
!
!
!
CL-6B Control Panel Retrofit Installation Instructions

IntroductionService Information S225-50-54 provides the instructions for retrofitting a CL-6B control panel on a Cooper Power Systems, Siemens Corporation, General Electric, or Howard Industries, Inc. 32-step voltage regulator.
Read This Manual First Read and understand the contents of this manual and follow all locally approved procedures and safety practices before installing or operating this equipment. Read and understand the manuals detailing the installation and operation of the regulator and the regulator control used with the regulator. Refer to S225-11-1 CL-6 Series Control Installation, Operation, and Maintenance Instructions for information on the CL-6B voltage regulator control. Refer to S225-10-30 VR-32 Voltage Regulator with Quik-Drive™ Tap-Changer Installation, Operation, and Maintenance Instructions for information on the Cooper Power Systems voltage regulator with Quik-Drive tap-changer.
Additional Information These instructions cannot cover all details or variations in the equipment, procedures, or process described nor provide directions for meeting every possible contingency during installation, operation, or maintenance. For additional information, please contact your Cooper Power Systems representative.
Acceptance and Initial Inspection This kit is thoroughly inspected at the factory. It is in good condition when accepted by the carrier for shipment.
Upon receipt of the regulator kit, a thorough inspection should be made for damage, evidence of rough handling, or shortages. Should this initial inspection reveal evidence of rough handling, damage, or shortages, it should be noted on the bill of lading and a claim should immediately be made with the carrier. Also, notify your Cooper Power Systems representative.
Handling and Storage Be careful during handing and storage of equipment to minimize the possibility of damage. If the regulator kit is not to be placed into immediate use, store the kit where the possibility of damage is minimized.
Quality StandardsISO 9001 Certified Quality Management System
S225-50-54!
SAFETYFOR LIFE
PRoducT InFoRMATIon
3
!

Follow these instructions to install the CL-6B in a CL-6A control box on a Cooper Power Systems voltage regulator with a dead-front backpanel.
Required Tools: • Screwdriver (standard)
• Backpanel tool (included in kit)
Note: Verify all kit items are present before beginning installation procedure.
1. Remove the existing control. Refer to the appropriate voltage regulator control manual for complete instructions on removing a control. Refer to S225-11-1 VR-32 Voltage Regulators CL-6 Series Control Installation, Operation, and Maintenance Instructions for information on the Cooper Power Systems CL-6 series voltage regulator control.
2. Using a screwdriver, install the bracket (Item 1) on the control box mounting tabs with screws (Item 2). Refer to Figure 2.
3. Slide the Cooper CL-6B control panel onto the existing hinge pins.
4. Plug the wiring harness connector into TB-2 on the backpanel.
5. Connect ground cable to back panel. Refer to Figure 3.
6. Secure the Cooper CL-6B control panel to the bracket using the existing latch.
7. Refer to S225-11-1 CL-6 Series Control Installation, Operation, and Maintenance Instructions for proper control configuration and start up procedures.
CL-6B Control Panel Retrofit Installation Instructions
4
InSTALLATIon PRocEduRES KIT 57A64327900A cL-6B conTRoL PAnEL In cooPER Box, dEAd FRonT
Figure 2. Control box bracket mounting.
Figure 3. Backpanel terminal board TB-2.
TaBle 1 Kit Parts Identification, Kit 57a64327900a*
Item Description Cooper Part # Qty
1 CL-6 adaptor bracket, Cooper box
2092700A001 1
2 12-13-203-11 screw 0800071095Z 2
3 Backpanel tool, plastic† A613098001 1 * Use this kit with CL-6B control panel, Part # 57A6432690EA. † Retain for future use.

Follow these instructions to install the CL-6B PRA in a CL-5 control box on a Cooper Power Systems voltage regulator without a dead-front backpanel.
Required Tools: • Screwdriver (standard)
• SVR tool (included in kit)
Note: Verify all kit items are present before beginning installation procedure.
1. Remove the existing control. Refer to the appropriate voltage regulator control manual for complete instructions on removing a control. Refer to S225-11-1 VR-32 Voltage Regulators CL-6 Series Control Installation, Operation, and Maintenance Instructions for information on the Cooper Power Systems CL-6 series voltage regulator control.
2. Refer to S225-50-27, CL-6A Control Retrofit Connector Kit Instructions for updating control box for CL-6B control. Pay particular attention to:
• Updating older 10-position terminal block to 18.
• Insure jumpers between 4 and 3 and 2 and 1 are in place. See Figure 6 in S225-50-27 S225-50-27, CL-6A Control Retrofit Connector Kit Instructions.
3. Using a screwdriver, install the bracket (Item 2) on the control box mounting tabs with screws (Item 3). Refer to Figure 2.
4. Disconnect the white connector from the side of the panel to remove the strain relief and standard wiring harness from the CL-6B control panel. See Figure 4.
5. Install the new wiring harness assembly (Item 1) in the connectors located on the side of the CL-6B control panel. Refer to Figure 5.
6. Attach the strain relief device, removed in Step 3, to the wiring harness. Be careful to position the tie-wrap on the proper side of strain relief device. Resecure with screw. Refer to Figure 5.
7. Slide the Cooper CL-6B control panel onto the existing hinge pins.
8. Install the wiring harness fanning strip into TB-2 on the backpanel. Refer to Figure 6.
9. Connect the ground lead to the ground connection located on the back panel of the control encloser. Refer to Figure 6.
10. Secure the Cooper CL-6B control panel to the bracket using the existing latch.
11. Refer to S225-11-1 CL-6 Series Control Installation, Operation, and Maintenance Instructions for proper control configuration and start up procedures.
5
S225-50-54!
SAFETYFOR LIFE
InSTALLATIon PRocEduRES KIT 57A64327900B cL-6B conTRoL PAnEL In cooPER Box, noT dEAd FRonT
TaBle 2 Kit Parts Identification, Kit 57a64327900B*
Item Description Cooper Part # Qty
1 Wiring harness assembly, CL-6 to CL-5 control equipment
A64316200A 1
2 CL-6 adaptor bracket, Cooper box
2092700A001 1
3 18-position terminal board A64289100A 1
4 Neutral light kit assembly A64317100C 1
5 Terminal Jumper TAA114731001 2
6 12-13-203-11 screw 0800071095Z 2
7 Backpanel tool, plastic† A613098001 1 * Use this kit with CL-6B control panel, Part # 57A6432690EA. † Retain for future use.
Figure 6. Fanning strip.
Ground
Figure 4. Harness connector.
Figure 5. Wiring harness and strain relief cable-tie assembly.
Strain-relief device
Tie-wrapWiring harness
Ground

Follow these instructions to install the CL-6B PRA on a voltage regulator manufactured by Siemens Corporation.
Required Tools: • Screwdriver (standard)
• Screwdriver (Phillips head)
• Backpanel tool (included in kit)
Note: Verify all kit items are present before beginning installation procedure.
1. Remove existing control per manufacturer's requirements. Retain wingnuts.
Note: If the Siemens style wiring harness, hinge and magnet assembly have already been installed on the control, proceed to Step 11.
2. Using a screwdriver, attach the hinges (Item 13) and brackets (Item 12) to the CL-6B control panel. Refer to Figure 7.
CL-6B Control Panel Retrofit Installation Instructions
6
InSTALLATIon PRocEduRES KIT 57A64327900c cL-6B conTRoL PAnEL In SIEMEnS Box
Figure 7. Hinge and bracket placement.
TaBle 3 Kit Parts Identification, Kit 57a64327900C*
Item Description Cooper Part # Qty
1 CL-6B PRA wiring harness, Siemens/Howard control equipment
A64316200B 1
2 CL-6B adaptor bracket assembly, Siemens box
57A643282001 1
3 CL-6B kit magnet assembly, Siemens retrofit
57A643282002 1
4 CL-6B shield ground wire A643281001 1
5 SS flat washer, #6 0800019079Z 2
6 Phillips-head screw, 6-32X0.38
0800071090Z 4
7 SS lockwasher, #6 0800070916Z 4
8 Mounting base TAA136264002 2
9 Cable tie assembly, (1/16 to 5/8)
TAA136263001 2
10 Cable tie with SS locking, 50 lb, 7"
0800011079Z 3
11 Backpanel tool, plastic† A613098001 1
* Use this kit with CL-6B control panel, Part # 57A6432690EA. † Retain for future use.

3. Disconnect the white connector from the side of the panel to remove the strain relief and standard wiring harness from the CL-6B control panel. See Figure 8.
4. Remove the ground wire from the side of the panel.
5. Plug the small white connector on the wiring harness (Item 1) into the connector located on the side of the CL-6B control panel.
6. Attach the strain relief device, removed in Step 3, to the wiring harness. Be careful to position the tie-wrap on the proper side of strain relief device. Resecure with screw. Refer to Figure 9.
7. Install the cable-tie mounting bases in the CL-6B control back panel. This provides strain relief for the wiring harness. Refer to Figure 10.
8. Secure the wiring harness (Item 1) to both cable-tie mounting provisions with cable ties (Item 10). Refer to Figure 10.
9. Using the backpanel tool (Item 11), insert the BROWN lead from the wiring harness into the auxiliary I/O connector (Position 13 - second from bottom). Refer to Figure 10.
10. Install the ground wire (Item 4) onto the hinge side of the CL-6B control panel using screw provided. Refer to Figure 11.
11. Slide the Cooper CL-6B control panel onto the existing hinge pins.
12. Connect the green ground wire to the enclosure ground.
13. Using a screwdriver, adjust the magnet depth in the magnet bracket as needed so that the CL-6B control panel remains in a closed position.
7
S225-50-54!
SAFETYFOR LIFE
Figure 10. Control back panel.
Ground, Position 13
Cable ties and mounting bases
Figure 8. Harness connector.
Figure 9. Wiring harness and strain relief cable-tie assembly.
Strain-relief device
Tie-wrapWiring harness
GroundFigure 11. Ground wire.
Ground
Ground

CL-6B Control Panel Retrofit Installation Instructions
8
14. Install the large black connector (Figure 12) into the existing enclosure terminal block (Figure 13), securing with retained wing nuts.
15. Review manufacturer's nameplate to determine correct overall Potential Transformer (PT) ratio used at Function Code 44 on control. On regulators manufactured by Siemens Corporation, divide the load volts by the corresponding control volts to obtain the overall PT ratio.
16. Refer to S225-11-1 CL-6 Series Control Installation, Operation, and Maintenance Instructions for proper control configuration and start up procedures.
Figure 12. Siemens style terminal connector.
Figure 13. Siemens enclosure terminal block.
U11 U10 K J U2 E1 E C2 P2 U12SIEMENS
TERMINAL MARKINGS
COOPER WIRE
COLORS
WHT/ORG
BRW
WHT/GRN
BLU
WHT/BRW
RED
WHT
GRN
WHT/BLK&
BLK
WHT/RED
Figure 14. Cooper-Siemens adapter with terminal markings and wire colors.
Important: If a source side PT will not be used, move the white/brown wire from terminal U2 and place it on terminal P2 to enable the source-side voltage calculation.

9
S225-50-54!
SAFETYFOR LIFE
Follow these instructions to install the CL-6B PRA on a General Electric voltage regulator type with the fork-type terminal.
Required Tools: • Screwdriver (standard)
• Screwdriver (Phillips head)
• Backpanel tool (included in kit)
Note: Verify all kit items are present before beginning installation procedure.
1. Remove existing control per manufacturer’s requirements. Retain hinge pins.
Note: If the General Electric style wiring harness has previously been installed on the control and the hinges relocated, proceed to Step 11.
2. Using standard screwdriver, change the hinge locations on the CL-6B control panel. Refer to Figure 15.
3. Disconnect the white connector from the side of the panel to remove the strain relief and standard wiring harness from the CL-6B control panel. See Figure 16.
4. Remove the ground wire from the side of the panel.
5. Install the small white connector on the wiring harness (Item 1) into the connector located on the side of the CL-6B control panel.
6. Attach the strain relief device, removed in Step 3, to the wiring harness. Be careful to position the tie-wrap on the proper side of strain relief device. Resecure with screw. Refer to Figure 15.
7. Install the ground wire to the hinge side of the CL-6B control panel. Refer to Figure 15.
Note: Verify that harness wires are not in contact with edge of metal shield.
InSTALLATIon PRocEduRES KIT 57A64327900d cL-6B conTRoL PAnEL In GEnERAL ELEcTRIc Box wITH
FoRK-TyPE TERMInALTaBle 4 Kit Parts Identification, Kit #57a64327900D*
Item Description Cooper Part # Qty
1 CL-6B PRA wiring harness, General Electric fork terminal-type control equipment
A64316200C 1
2 CL-6 shield ground wire A643281001 1
3 Phillips-head screw, 6-32 0.38" 0800071090Z 2
4 Lock washer, #6 0800070916Z 2
5 Cable-tie mounting base TAA136264002 2
6 Cable Tie TAA136263001 2
7 Backpanel tool, plastic† A613098001 1
* Use this kit with CL-6B control panel, Part # 57A6432690EA. † Retain for future use.
Figure 16. Harness connector.
Figure 15. Hinge and wiring harness.
Ground
New hinge locations
WaRNING: Hazardous Voltage. Disconnecting the control panel without proper precautions
could open the regulator CT circuit, which can cause hazardous voltage levels in the control box. The CT circuit must be shorted when disconnecting the control. Follow the regulator manufacturer's guidelines when disconnecting any part of the control. Failure to comply can cause severe personal injury or death. VR-TXXXXXXX.0
!

CL-6B Control Panel Retrofit Installation Instructions
10
8. Using a Phillips-head screwdriver, install the cable-tie mounting bases (Item 5) onto the control back using screws (Item 3). Refer to Figure 17.
9. Using the backpanel tool (Item 7), insert the BROWN lead from the wiring harness into the auxiliary I/O connector (Position 13 - second from bottom). See Figure 17.
10. Install the cable ties into the cable-tie mounting bases (Item 5). Secure the brown wire in the cable ties. Refer to Figure 17.
11. Install the Cooper CL-6B control panel onto the existing control box hinges using the hinge pins removed in Step 1.
12. Connect the fork lugs on the wiring harness (Item 1) to the General Electric terminal block NN as specified in the Table 5. Also see Figures 18 and 19. The wires designated to connect to cabinet grounds may be connected to any convenient ground point including the studs and nuts used to hold the terminal boards in place.
Figure 17. Control back panel.
Ground, Position 13
Cable ties and mounting bases
GE Labels1Cooper Wiring
Harness Required Signals:
32 White/Brown Source PT
31 White/Red Neutral Light
30 Brown2 Operations Counter
29 White/Orange Drag hand reset
28 White/Green Lower
27 Blue Raise
26 White, White Common
25 —
Cabinet Ground3 Red, Red CT Ground
24 Red, White CT Ground
23 Green CT
224 —
214 —
204 —
10 White, White Common
94 Black, White/Black Load PT
84 —
Cabinet Ground3 White Common
TaBle 5 Terminal Block NN Identification
Notes: 1. General Electric terminal labels and wiring has changed over time. Consult the regulator documentation for terminal markings and required signals when connecting the wiring harness.
2. The other end of the brown wire connects to orange I/O connector on the back of the control panel (See Step 6).
3. Connect to any of the convenient ground studs.
4. Some General Electric units will have a jumper between terminals 8 or 9 and terminals 20, 2`1, or 22. If this is the case, leave the jumper in place. Terminals 20, 21, and 22 are used for PT tap adjustments. A system voltage change may require a change in the position of the jumper. See the nameplate for the correct jumper position.
Figure 18. General electric terminal board NN.
Important: If a source side PT will not be used, move the white/brown wire from terminal 32 and place it on terminal 9 to enable the source-side voltage calculation. As necessary, use the extra length of wire provided and train the wire around securing it with wire ties.

11
S225-50-54!
SAFETYFOR LIFE
13. Connect the green ground wire to the enclosure ground.
14. Close and secure Cooper CL-6B control panel using the existing latch.
15. Review manufacturer's nameplate to determine correct overall PT ratio used at Function Code 44 on control. On General Electric regulators, divide the load terminal volts by the corresponding control volts to obtain the overall PT ratio.
16. Refer to S225-11-1 CL-6 Series Control Installation, Operation, and Maintenance Instructions for proper control configuration and start up procedures.
25
COOPER WIRE COLORS
26 27 28 29 30 3231
8 9 10 20 21 22 2423
NN
NN
WHT &
WHT
BLU WHT/GRN
WHT/ORG
BRW WHT/RED
WHT/BRW
BLK &
WHT/BLK
WHT GRN RED&
WHT
GETERMINALMARKINGS
COOPER WIRE COLORS
GETERMINALMARKINGS
RED&
RED
WHT
Figure 19. Connections to General electric terminal board.

CL-6B Control Panel Retrofit Installation Instructions
12
Follow these instructions to install the CL-6B PRA on a voltage regulator type manufactured by General Electric with the pin-type terminal.
Required Tools: • Screwdriver (standard)
• Screwdriver (Phillips head)
• Backpanel tool (included in kit)
Note: Verify all kit items are present before beginning installation procedure.
1. Remove existing control per manufacturer’s requirements. Retain hinge pins.
2. Remove the circuit board from the existing control backpanel by pressing the white plastic levers out and sliding down. Disconnect existing wiring harness from circuit board, and save circuit board for reinstallation.
3. Using standard screwdriver, change the hinge locations on the CL-6B control panel. Refer to Figure 20.
InSTALLATIon PRocEduRES KIT 57A64327900E cL-6B conTRoL PAnEL In GEnERAL ELEcTRIc Box wITH
PIn-TyPE TERMInALTaBle 6 Kit Parts Identification, Kit 57a64327900e*
Item Description Cooper Part # Qty
1 CL-6B PRA wiring harness, General Electric, pin-type control equipment
A64316200D 1
2 CL-6 shield ground wire A643281001 1
3 Machine screw, 4-40X0.31 0800070990Z 2
4 Lock washer, #4 0800070914Z 2
5 Phillips-head screw, 6-32 0.38"
0800071090Z 3
6 Lock washer, #6 0800070916Z 3
7 Cable-tie mounting base TAA136264002 3
8 Cable Tie TAA136263001 3
9 Backpanel tool, plastic† A613098001 1
* Use this kit with CL-6B control panel, Part # 57A6432690EA. † Retain for future use.
Figure 20. Hinge location.
Ground
New hinge locations
WaRNING: Hazardous Voltage. Disconnecting the control panel without proper precautions
could open the regulator CT circuit, which can cause hazardous voltage levels in the control box. The CT circuit must be shorted when disconnecting the control. Follow the regulator manufacturer's guidelines when disconnecting any part of the control. Failure to comply can cause severe personal injury or death. VR-TXXXXXXX.0
!

13
S225-50-54!
SAFETYFOR LIFE
4. Disconnect the white connector from the side of the panel to remove the strain relief and standard wiring harness from the CL-6B control panel. See Figure 21.
5. Remove the ground wire from the side of the panel.
6. Install the small white connector on the wiring harness (Item 1) into the connector located on the side of the CL-6B control panel. Refer to Figure 20.
Note: Verify that harness wires are not in contact with edge of metal shield.
7. Attach the strain relief device, removed in Step 4, to the wiring harness. Be careful to position the tie-wrap on the proper side of strain relief device. Resecure with screw. Refer to Figure 20.
8. Install the ground wire (Item 2) to the hinge side of the CL-6B control panel.
9. Using a Phillips-head screwdriver, install the cable-tie mounting bases (Item 7) onto the control back using screws (Item 5). Refer to Figure 22.
10. Using a screwdriver, mount the terminal block on wiring harness with screws (Item 3) onto the CL-6B control back panel. Refer to Figure 22.
11. Insert the BROWN lead from the wiring harness into the auxiliary I/O connector (Position 13 - second from bottom). See Figure 22.
12. Install the cable ties into the cable-tie mounting bases (Item 7). Secure cable with tie-wrap. Refer to Figure 22.
13. Install Cooper CL-6B control panel on existing hinges using pins removed in Step 1.
14. Connect ground lead to enclosure ground.
15. Connect wiring harness (Item 1) to circuit board removed in Step 2.
16. Reinstall circuit board into backpanel enclosure by lining up the circuit board and pressing up firmly. Refer to Figure 23.
17. Close and secure Cooper CL-6B control panel using existing latch.
18. Review manufacturer's nameplate to determine correct overall PT ratio used at Function Code 44 on control. On regulators manufactured by General Electric, divide the load terminal volts by the corresponding control volts to obtain the overall PT ratio.
19. Refer to S225-11-1 CL-6 Series Control Installation, Operation, and Maintenance Instructions for proper control configuration and start up procedures.
Figure 21. Harness connector.
Figure 22. Control back panel.
Cable ties and mounting bases
Ground, Position 13
Figure 23. Ge pin terminal.
CL-6B Control Panel Retrofit Installation Instructions
14
Follow these instructions to install the CL-6B PRA on a voltage regulator manufactured by Howard Industries, Inc.
Required Tools: • Screwdriver (standard)
• Screwdriver (Phillips head)
• SVR tool (included in kit)
Note: Verify all kit items are present before beginning installation procedure.
1. Remove existing control per manufacturer’s requirements. Retain hinge pins.
Note: If the Howard style wiring harness, hinge and latch bracket have already been installed on the control, proceed to Step 11.
2. Using a screwdriver, attach adapter brackets (Item 2) and latch brackets (Item 3) to CL-6B front-panel. Refer to Figure 24.
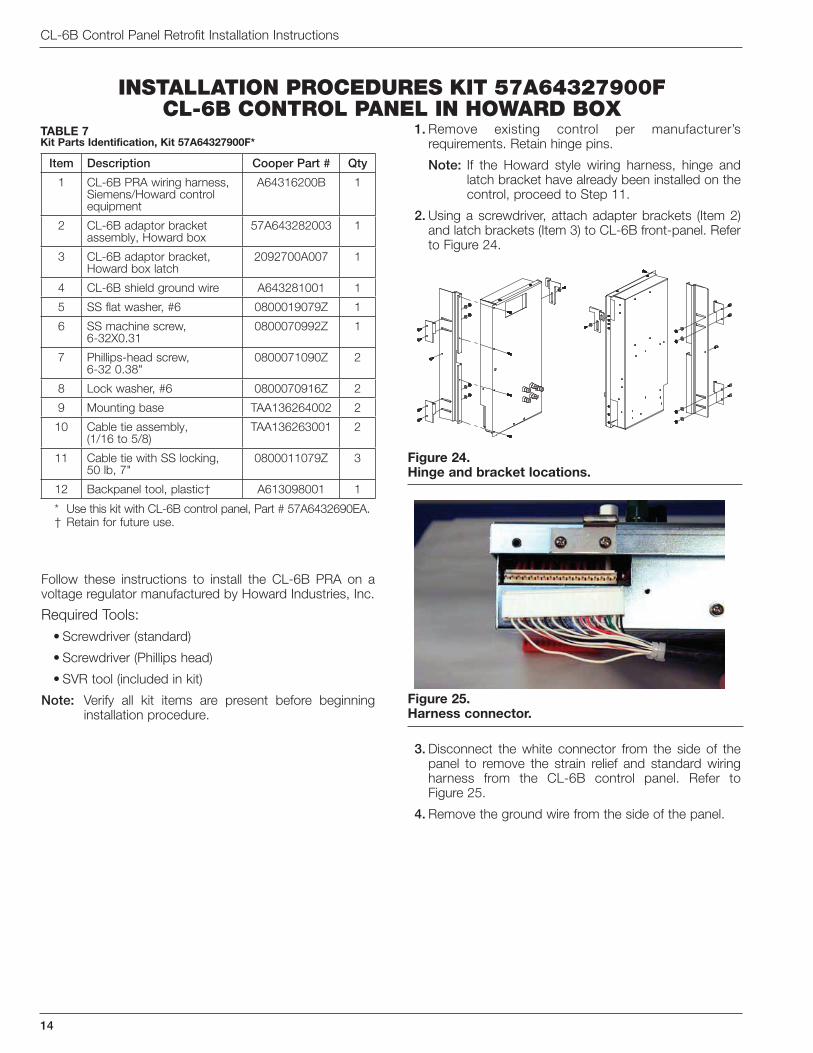
3. Disconnect the white connector from the side of the panel to remove the strain relief and standard wiring harness from the CL-6B control panel. Refer to Figure 25.
4. Remove the ground wire from the side of the panel.
Figure 24. Hinge and bracket locations.
InSTALLATIon PRocEduRES KIT 57A64327900F cL-6B conTRoL PAnEL In HowARd Box
Item Description Cooper Part # Qty
1 CL-6B PRA wiring harness, Siemens/Howard control equipment
A64316200B 1
2 CL-6B adaptor bracket assembly, Howard box
57A643282003 1
3 CL-6B adaptor bracket, Howard box latch
2092700A007 1
4 CL-6B shield ground wire A643281001 1
5 SS flat washer, #6 0800019079Z 1
6 SS machine screw, 6-32X0.31
0800070992Z 1
7 Phillips-head screw, 6-32 0.38"
0800071090Z 2
8 Lock washer, #6 0800070916Z 2
9 Mounting base TAA136264002 2
10 Cable tie assembly, (1/16 to 5/8)
TAA136263001 2
11 Cable tie with SS locking, 50 lb, 7"
0800011079Z 3
12 Backpanel tool, plastic† A613098001 1
TaBle 7 Kit Parts Identification, Kit 57a64327900F*
* Use this kit with CL-6B control panel, Part # 57A6432690EA. † Retain for future use.
Figure 25. Harness connector.

15
S225-50-54!
SAFETYFOR LIFE
5. Plug the small white connector on the wiring harness (Item 1) into the connector located on the side of the CL-6B control panel. Refer to Figure 26.
6. Attach the strain relief device, removed in Step 3, to the wiring harness. Be careful to position the tie-wrap on the proper side of strain relief device. Resecure with screw. Refer to Figure 26.
7. Install the cable-tie mounting bases in the CL-6B control back panel. This provides strain relief for the wiring harness. Refer to Figure 27.
8. Using the backpanel tool (Item 12), insert the BROWN lead from the wiring harness into the auxiliary I/O connector (Position 13 - second from bottom). Refer to Figure 27.
9. Secure wire harness to (2) mounting provisions with cable ties (Item 11). Refer to Figure 27.
10. Install the ground wire (Item 4) onto the hinge side of the CL-6B control panel.
11. Install Cooper CL-6B control panel on mounting provisions.
12. Install terminal block and secure with wing nuts.
13. Connect the green ground wire to the enclosure ground.
14. Close the CL-6B panel and secure with the latch.
15. Review to manufacturer's nameplate to determine correct overall PT ratio used at Function Code 44 on control. On regulators manufactured by Howard Industries, Inc., divide the load volts by the corresponding control volts to obtain the overall PT ratio.
16. Refer to S225-11-1 CL-6 Series Control Installation, Operation, and Maintenance Instructions for proper control configuration and start up procedures.
Figure 27. Control back panel.
Ground, Position 13
Cable ties and mounting bases
Figure 26. Wiring harness and strain relief cable-tie assembly.
Strain-relief device
Tie-wrapWiring harness
Ground
DHR DC L R MS CO G C PS NSHOWARD
TERMINAL MARKINGS
COOPER WIRE
COLORS
WHT/ORG
BRW WHT/GRN
BLU WHT/BRW
RED WHT GRN WHT/BLK&
BLK
WHT/RED
Figure 28. Howard style terminal connector.
Figure 29. Howard enclosure terminal block.
Important: If a source side PT will not be used, move the white/brown wire from terminal U2 and place it on terminal P2 to enable the source-side voltage calculation.

CL-6B Control Panel Retrofit Installation Instructions
16
© 2012 Cooper Industries. All Rights Reserved.Cooper Power Systems and Quik-Drive are valuable trademarks of Cooper Industries in the U.S. and other countries. You are not permitted to use the Cooper Trademarks without the prior written consent of Cooper Industries.
One Cooper | www.cooperpower.com | Online
S2255054 0512 • Supersedes S2255054 05/08
2300 Badger DriveWaukesha, WI 53188 USA
!SAFETYFOR LIFE