running mesa on amazon ec2 instances: a...
TRANSCRIPT

Page ! of !2 12
Introduction
Welcome! In this guide, I’ll be demonstrating how to set up MESA on Amazon EC2 instances. I’ve divided into three sections:
I. Introduction (you are here!)
II. First Steps: Installing MESA on a single EC2 instance
III. Advanced topics: custom AMIs & managing instances
Before we get deep into the process of using EC2 instances with MESA, I want to briefly discuss what EC2 instances are, and where it makes sense to use them. EC2 is Amazon’s cloud compute service. Essentially, it allows users to rent time on remote machines, which can be customized to meet individual needs. It’s probably not economical to rent an EC2 instance if you’re just running one MESA job, especially if it’s the kind of project that will take a long time to run. If you project involves running many MESA jobs, particularly less demanding ones, using EC2 instances is much more likely to be a suitable solution.

Page ! of !3 12
First Steps: Installing MESA on a single EC2 instance
Step 1: Make an Amazon Web Services account
Go to https://aws.amazon.com and click on the yellow “Sign In to the Console” button on the top right. Fill in your email and the “I am a new user” button. Then, follow the instructions to create an account; you’ll need to provide a method of payment and confirm your id with a phone call. When you’re done, log in. You should see a webpage that looks like this:
Step 2: Create an instance
Click on “Services” on the top left of your window. Under “Compute”, you should see an entry titled “EC2”. Click on it. Your window should now look similar to this (although without any running instances, volumes, or anything - this is an account I’ve been using):

Page ! of !4 12
Click on the button that says “Launch Instance”. You’ll be confronted by something that looks like this:
This is where you can choose an operating system for your instance, packaged as an Amazon Machine Image (AMI). In my experience, the standard Amazon Linux AMI doesn’t play nice with MESA. I strongly recommend using the Ubuntu Server 16.04 AMI - it’s what I use for own MESA-focused instances, and it’s what I’ll be using in this tutorial.
Page ! of !5 12
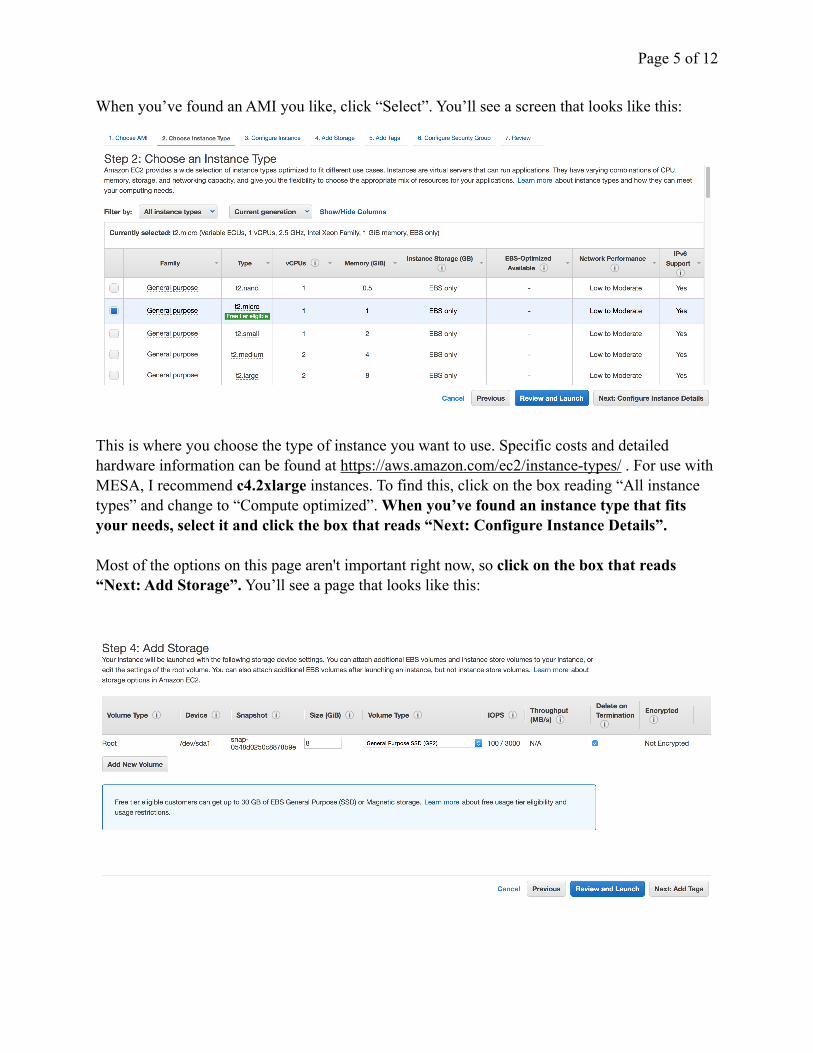
When you’ve found an AMI you like, click “Select”. You’ll see a screen that looks like this:
This is where you choose the type of instance you want to use. Specific costs and detailed hardware information can be found at https://aws.amazon.com/ec2/instance-types/ . For use with MESA, I recommend c4.2xlarge instances. To find this, click on the box reading “All instance types” and change to “Compute optimized”. When you’ve found an instance type that fits your needs, select it and click the box that reads “Next: Configure Instance Details”.
Most of the options on this page aren't important right now, so click on the box that reads “Next: Add Storage”. You’ll see a page that looks like this:

Page ! of !6 12
Here, you can configure the storage attached to your instance. The default amount of storage is 8 gigabytes, which isn’t even enough to set up MESA, let alone run any jobs. I’ve had success using 30 gigabyte volumes, but you can use whatever size you like as long as it is large enough to hold MESA. If you want, you can also attach non-root volumes here. When you’re done, click “Add Tags”. This is another step that isn’t important for our purposes, so click on “Configure Security Group”. You’ll see a page that looks like this:
This is a very important step. As the page says, a security group is a set of firewall rules that control the traffic for your instance. If your security groups are not set up correctly, you will not be able to connect to your instance. For now, we only need to make one rule. Simply click on the selection box in the “Source” column and choose “My IP”. This will allow your instance to make SSH connections with your local machine. Now, click on “Review and Launch”. Here, you can review your choices and ensure that your instance is set up correctly. When you’re ready, click “Launch”. You’ll be presented with a pop-up that looks like this:

Page ! of !7 12
Amazon does not allow anyone to connect to their instances with a password. You may only ssh into an instance if you possess its corresponding private key. So, name your key-pair, download your private key, and put it somewhere safe on your local machine. Then, click “Launch Instances”.
Step 3: Connecting to your instance
After you click “Launch Instances”, you’ll see a screen that looks similar to this one (although with only one instance; again, I’m currently using my account):
To connect, select your instance and click the “Connect” button. You’ll see a screen that looks like this:
Follow the instructions as given. You may need to navigate to the directory where your private key is located.
Page ! of !8 12
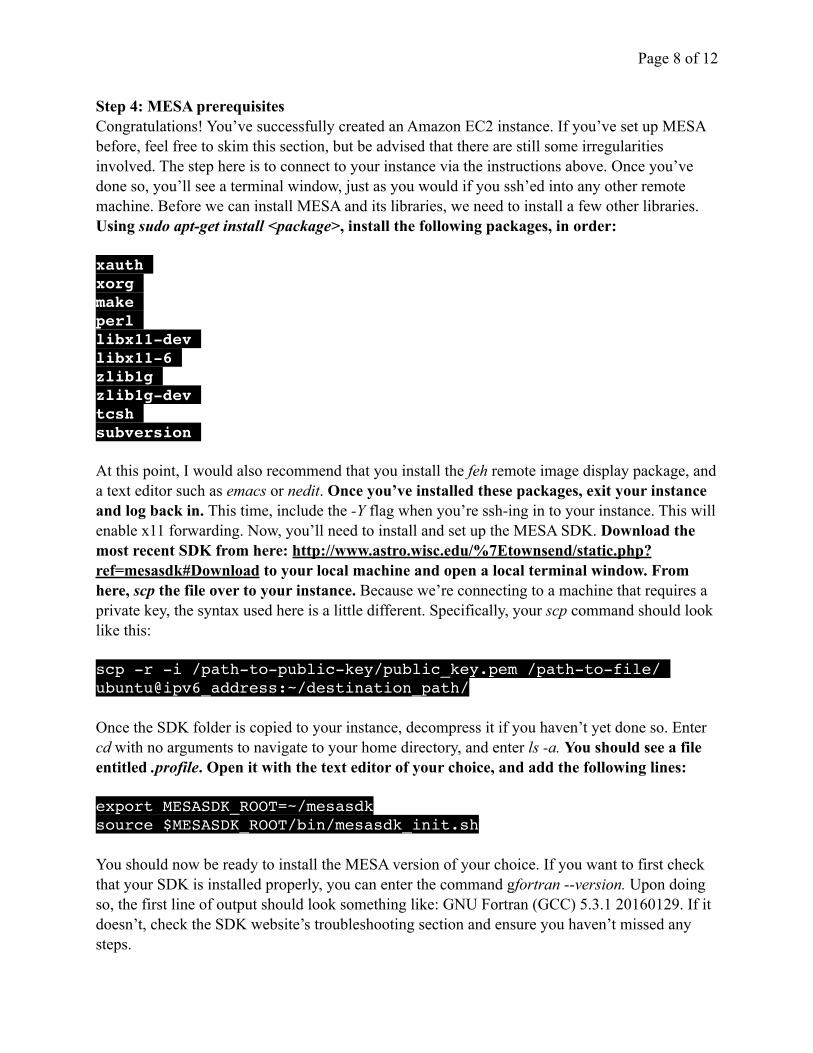
Step 4: MESA prerequisites Congratulations! You’ve successfully created an Amazon EC2 instance. If you’ve set up MESA before, feel free to skim this section, but be advised that there are still some irregularities involved. The step here is to connect to your instance via the instructions above. Once you’ve done so, you’ll see a terminal window, just as you would if you ssh’ed into any other remote machine. Before we can install MESA and its libraries, we need to install a few other libraries. Using sudo apt-get install <package>, install the following packages, in order:
xauthxorgmakeperllibx11-devlibx11-6zlib1gzlib1g-devtcshsubversion
At this point, I would also recommend that you install the feh remote image display package, and a text editor such as emacs or nedit. Once you’ve installed these packages, exit your instance and log back in. This time, include the -Y flag when you’re ssh-ing in to your instance. This will enable x11 forwarding. Now, you’ll need to install and set up the MESA SDK. Download the most recent SDK from here: http://www.astro.wisc.edu/%7Etownsend/static.php?ref=mesasdk#Download to your local machine and open a local terminal window. From here, scp the file over to your instance. Because we’re connecting to a machine that requires a private key, the syntax used here is a little different. Specifically, your scp command should look like this:
scp -r -i /path-to-public-key/public_key.pem /path-to-file/ ubuntu@ipv6_address:~/destination_path/
Once the SDK folder is copied to your instance, decompress it if you haven’t yet done so. Enter cd with no arguments to navigate to your home directory, and enter ls -a. You should see a file entitled .profile. Open it with the text editor of your choice, and add the following lines:
export MESASDK_ROOT=~/mesasdksource $MESASDK_ROOT/bin/mesasdk_init.sh
You should now be ready to install the MESA version of your choice. If you want to first check that your SDK is installed properly, you can enter the command gfortran --version. Upon doing so, the first line of output should look something like: GNU Fortran (GCC) 5.3.1 20160129. If it doesn’t, check the SDK website’s troubleshooting section and ensure you haven’t missed any steps.

Page ! of !9 12
Step 5: Installing MESA
You should now be prepared to install the MESA version of your choice. The easiest way to do this is though the subversion package, which you should have installed in the previous step. From your instance, enter the following command:
svn co -r 9793 svn://svn.code.sf.net/p/mesa/code/trunk mesa-r9793
This specific command would download the source files for version 9793 into a file named mesa-r9793. If you want to install a different version of MESA, simply change the numbers to the version number of MESA you desire. Then, cd back to your home folder and edit ./profile. Add the following two lines:
export MESA_DIR=/home/ubuntu/mesa-r8845export OMP_NUM_THREADS=8
This assumes that you’re using an c4.2xl instance (which has 8 cores) and that you’re putting your MESA install in your home folder. If you’re using a different type of instance, or you want to install MESA somewhere else, you’ll need to change these lines appropriately. Once you save the changes, exit out of the instance and log back in so that you start a new shell session. All you need to do now is:
cd $MESA_DIR./install
The rest of the installation process should run itself. Once it’s done (which might take a while - this is a big package), you should see something like:
************************************************************************************************************************************************mesa installation was successful.************************************************************************************************************************************************
If you see this, congratulations! You’ve installed MESA on an Amazon EC2 instance! If not, check MESA’s troubleshooting page at http://mesa.sourceforge.net/troubleshooting.html.
Page ! of !10 12
Advanced topics: custom AMIs & managing instances
Part 1: Using MESA on an EC2 instance
I’ve found that there a few tricks you need to know to successfully run MESA on an EC2 instance. In general, I've found that my work is easier and more cost-effective when I prepare all the work folders I want on my local machine, and copy them to my instances when I want to actually run them. This lets me get away with attaching smaller, less expensive storage volumes to my instances as well as giving me the luxury of building my projects in an easier-to-use environment. If you run your project this way, make sure you ./clean and ./mk inside each workfile once it’s been copied to your instance. If you run these commands in your local machine but not the instance, you’re likely to see some very weird errors.
When you’re done using an instance and wish to cease being billed, you can shut it down using:
sudo shutdown -h
This will retain everything stored on the instance. If you wish to start it back up again, navigate to your EC2 Management Console on the AWS website. Near the top of your screen, you will see a button labeled “Actions”. Once you click on this, you will see a drop-down menu with an option labeled “Instance State”. To turn on an instance, navigate here and click the option “Start”. You can also shut down an instance from this menu with the command labeled “Stop”. If you wish to permanently delete an instance and all of its memory, you can use the “Terminate” command.
It’s also possible for pgstar to behave oddly with EC2 instances, especially when you’re trying to monitor runs on multiple instances on the same time. To simplify matters, I disable active pgstar windows when I’m working with EC2 instances, and instead monitor my runs by looking at the .png images pgstar saves. I prefer the feh package for this, but you can use the application of your choice.
It’s also important to understand how Amazon handles billing for these instances. You are billed for a minimum of one full hour of compute time every time an instance is turned on, even if it is on for less than an hour. For each hour after the first, you are also billed at the hourly rate advertised for your instance type and region. Additionally, be aware that Amazon bills your account for storage if the total amount of storage you use per month exceeds 30gb. Storage is considered “used” if it’s attached to an instance, regardless of whether or not it is empty. So, I would recommend you terminate any unused instances as soon as you’re done with them.

Page ! of !11 12
Part 2: Making custom AMIs and running multiple instances
Setting up MESA individually on many instances can be time consuming and a waste of resources. A more appropriate course of action is to use Amazon’s system to make a custom image from which an arbitrary number of identical images can be built. This process is actually pretty simple. To begin, go to the AWS website and navigate to your EC2 Management Console. Find the instance you want to duplicate, and right click on it. Make sure it’s been shut down before you do this. Scroll down to “Image”. Your window should look something like this:
Click on “Create image”. A window will pop up that looks like this:

Page ! of !12 12
Enter a name and description for your image. You should also specify a volume size for your image. The minimum allowed size for your image is equal to the size of the volume attached to your instance. Once you’re happy with your setup, click “Create Image”.
Now, you can create instances based of this image. Go back to the EC2 Management Console and click “Launch Instance”. Instead of selecting a pre-made AMI, click on “My AMIs”. You should see the image you’ve just created! Select this and generate the instance just as we did before. You can even use the same security group and key pair as before if you want to make access even easier. If you want to launch multiple instances at the same time, make your way to the “Configure Instance Details” step. It will look like this:
You can choose how many instances you want to launch in the “Number of Instances” group, if you want to launch multiple identical instances at the same time
Thank you for reading this guide! I hope it’s been helpful and complete. Please forgive any mistakes; I’m just an undergraduate. If you do find any, let me know via the email on the cover of this document.