running eduroam on nps with windows 2008 r2 enterprise · running eduroam on nps with windows 2008...
TRANSCRIPT

Running eduroam on NPS with Windows 2008 R2 EnterpriseThe network policy server is the RADIUS server as part of Windows server editions. These instructions assume a basic setup of an Active Directory.
Installation of NPS
In the “initial configuration” or “Server Manager” look for “Roles” and click “Add Roles”.
Select the “Network Policy and Access Services” option and click “Next >”. After reading the introduction to NPS, continue to the role services to install:
Select only the “Network Policy Server” component, and click “Next >” again.
You will see a summary of the installer-actions, and need to click “Install” to continue. Wait for the installation to finish, and click “Close”.
You can now find the “Network Policy Server” under the “Administrative Tools” in the start menu, in the Server Manager, or as a snap-in to mmc.

Server certificate for NPS
You need to have a server certificate in order to use PEAP-authentication with eduroam. PEAP sets up a secure tunnel (just like HTTPS does for websites) in order to protect the credentials, and is an important part of the mutual authentication: both the user needs to prove who he is, and the authentication server needs to prove to the user that he or she is providing credentials to the right authority.
Without certificate (self signed or not) it's not possible to do local authentication. NPS can still be used as a proxy to receive requests from Access Points, log, filter, and forward to the eduroam infrastructure.
If you have no certificate installed (or in doubt about your certificate), read Appendix A about Certificates.
Configuration of NPS
The NPS console (snap-in) allows you do use a Wizard for 802.1X / secure wireless. While you can use this for eduroam, it doesn't provide all the required settings (like realm/user-name pattern-matching), so you need to make some more changes in the created policies anyway. In these instructions, we'll create the policies directly from the “Connection Request Policies” and the “Network Policies”.
Before any policy can be applied to authentication requests, we need to create “RADIUS clients” in order to allow both your Access Points (and/or Switches) and the eduroam infrastructure to actually send requests to your server (that's also a client).
To prevent typo's between multiple peers and allow easier changes, it's preferable to create a shared secret template for peers using the same shared secret. You can for instance create one for your accesspoints and one for the proxy-servers. The proxy-server secret you need to negotiate with your national eduroam roaming-operator. The access-point secret, you configure on your own access-points so you can make something up there yourself.
You can create these templates in the “Template Management” and “Shared Secrets” section, by right-clicking and selecting “New”...

After creating the template, create clients for your access-points and proxy-servers, by right-clicking “RADIUS clients” (under RADIUS Clients and Servers) and “New”:

Now, we create a server group for the proxy-servers, that will be used to send authentication requests to for non-local users. In the “RADIUS Clients and Servers” right-click “Remote RADIUS Server Groups” and “New”...
Enter a name for your server group, such as “proxy-servers”, and click “Add...” to add one or more of the servers. Enter the proper name (proxy-1 in the example is not a proper name ;-) but you will get these details from your National Roaming Operator (NRO)), and proceed to the Authentication/Accounting tab for the shared secret settings:

For a secondary server, consider the last tab “Load Balancing”. It's recommended not to load-balance single EAP-sessions across multiple servers, which is what NPS will do when the Load-Balancing Priority is all set to the same level. In many situations it just works, but there's no guarantee, so better set it to a lower priority so it's only used for failover. If in doubt, ask your National Roaming Operator for advise.
The “Connection Request Policy” is there to decide what to do with an authentication request: forward it to a proxy-server, or authenticate locally. The decision is based on RADIUS attributes, such as the User-Name, but this can also be a RADIUS client IP-address or friendly-name for instance.
The order or Connection Request Policies is important. You can move policy-rules up and down, and also temporarily disable a rule.
A typical order is as follows:
1. authenticate local users @your-realm.tld (you can add more for eg. @student.your-realm.tld)
2. authenticate mis-matches in your-realm, such as non-existant.your-realm.tld
3. forward to remote proxy-servers
First, create a connection to the proxy-servers by right-clicking the “Connection Request Policies” and “New”.

Give the policy a name (such as “eduroam”), and click “Next”. Now conditions for matching this policy have to be specified. This rule will be based on User-Name matching.

We use a regular expression here to match user-names that look valid. User-names in eduroam are like the e-mail addresses, and end on something.tld – that means we shouldn't forward realms that have no dot “.” in them, or when there's no realm (after the @-sign, the domain is realm in RADIUS-slang) at all.
The regular expression @.+\.[a-z]{2,6}$ is a case-insensitive match for realms ending on something dot tld between 2 and 6 letters. Keep in mind that this might change in the future when internationalized top-level domains are allowed, then this regular expression might need to be updated. A more lenient regexp would be @.+\..+$ to allow a realm with something dot something as a minimum. Both regexps handle any number of sub-realms.
After the condition is set, click “Next”. (Note that the default Wizard also adds a condition for NAS Port Type, and sets this to “Wireless – IEEE 802.11”. This is fine if your Access Points add this and if you need to do that kind of filtering of RADIUS requests. You could add “Wired”, as some AP's seem to be non-compliant and add this.)
Next, specify what to do with the requests that match the condition. In this case, we want to forward the request to the proxy-servers, so the RADIUS server group needs to be selected:
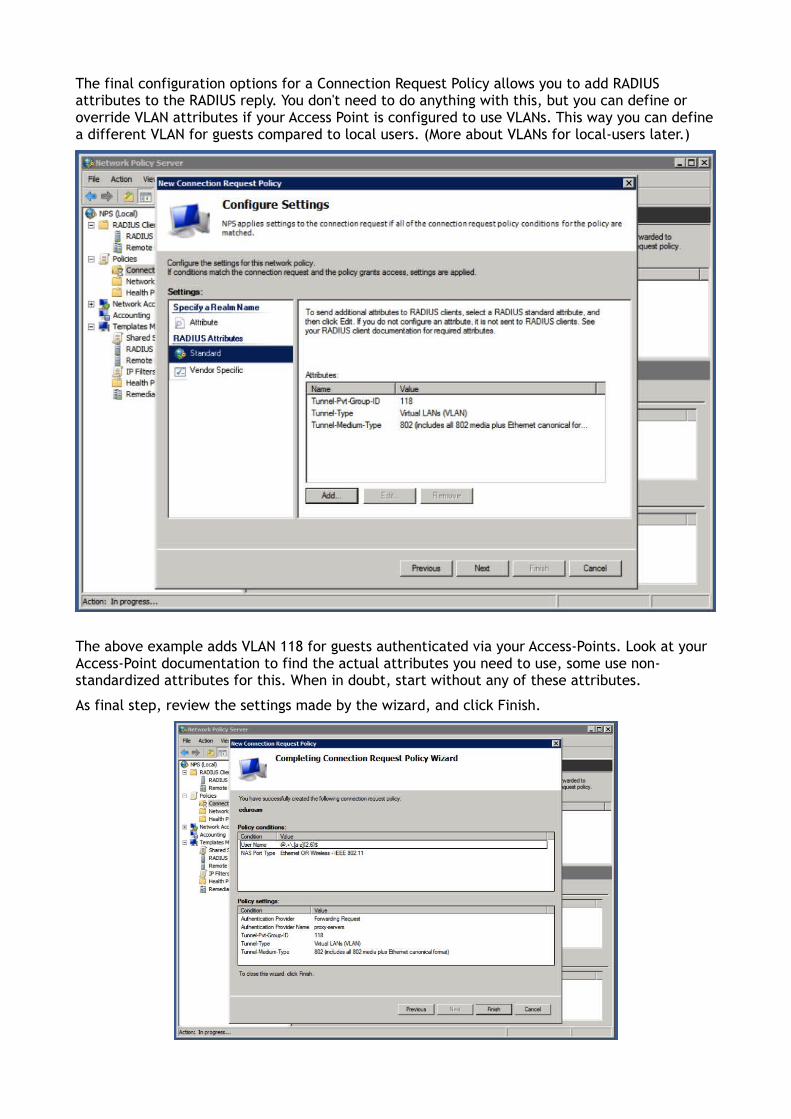
The final configuration options for a Connection Request Policy allows you to add RADIUS attributes to the RADIUS reply. You don't need to do anything with this, but you can define or override VLAN attributes if your Access Point is configured to use VLANs. This way you can define a different VLAN for guests compared to local users. (More about VLANs for local-users later.)
The above example adds VLAN 118 for guests authenticated via your Access-Points. Look at your Access-Point documentation to find the actual attributes you need to use, some use non-standardized attributes for this. When in doubt, start without any of these attributes.
As final step, review the settings made by the wizard, and click Finish.

After creating a new policy-rule, always reconsider the order of policies. A policy might catch all the requests and make NPS not consider any of the newer requests.
While testing, take into account that it might take a second or two before NPS actually uses the newly configured settings.
You could test eduroam authentication with a remote (test)-account provided you have one. The next step is to create a policy for local users.
Again, click the “Connection Request Policies” tree-item and select “New”.
Give the policy a name such as “local eduroam users”, and click “Next”.

Again, we need to specify conditions for the policy to match. In this case we'll want to match local users, by their user-names. This can be done by a regular expression:
Please don't allow users to authenticate without realm! It will be very confusing for users if it works locally without @realm, and you need to have a @realm in a remote location. That breaks the whole working of eduroam for this user and it will lead to misconfigured clients and support-calls.
Click “OK” and “Next” when done.
Now, select to “Authenticate requests on this server”.

The next screen asks to override authentication methods configured for this user in the Network Policies.
Make sure no override is done.
The next screen allows you to configure RADIUS attributes, but don't enter anything here.

If you want to assign VLAN attributes for your users, you'll need to do that in the Network Policy.
Review your settings, and click “Finish”.
Next, create a Network Policy for your local users.
These policies are only used for Connection Request Policies that have “Authenticate requests on this server” set.
Give your policy a name such as “local eduroam users” and leave the other settings default.
We need to specify the conditions for matching this request. Here you can define the users in your AD that are allowed to authenticate.
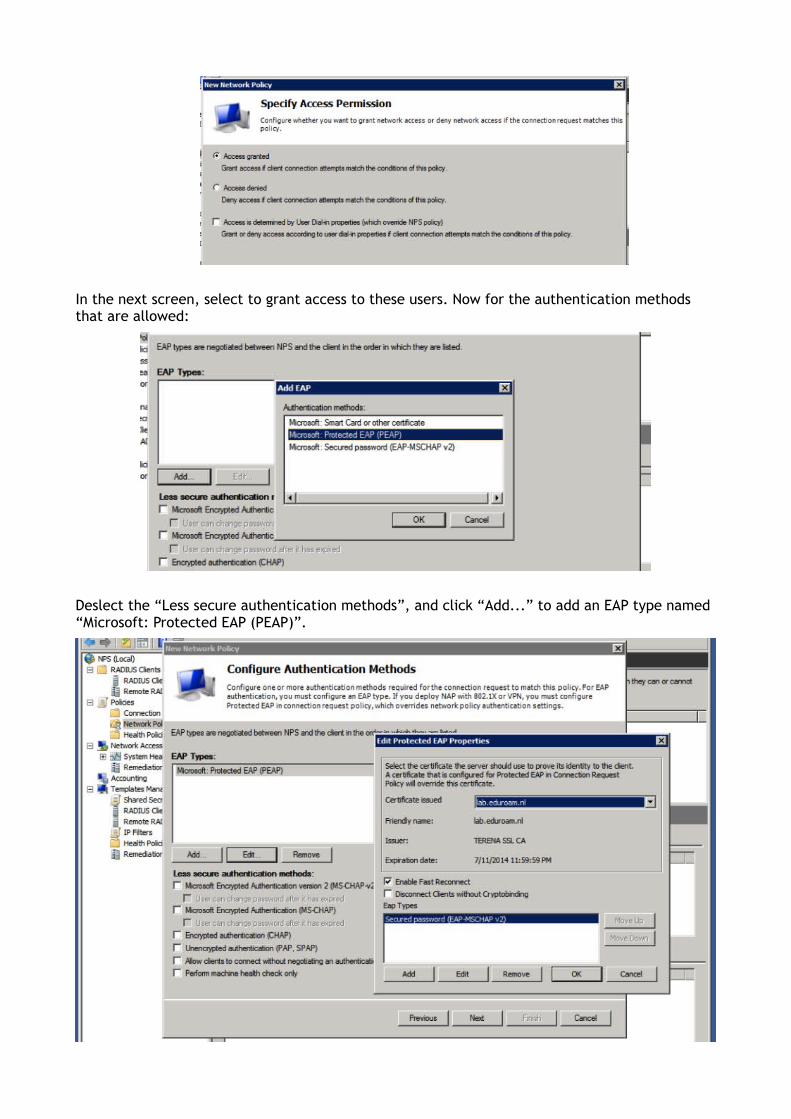
In the next screen, select to grant access to these users. Now for the authentication methods that are allowed:
Deslect the “Less secure authentication methods”, and click “Add...” to add an EAP type named “Microsoft: Protected EAP (PEAP)”.

Edit the PEAP settings, and make sure the proper certificate for the server authentication and TLS tunnel setup is selected. (See the Appendix about certificates if any of these steps give a warning or if you don't have a certificate installed just yet.)
In the next step of the wizard you will have the chance to configure any RADIUS attributes.
But: don't add attributes just like that! If you want to override for instance the VLAN by setting attributes for your own users, you need to do this in a seperate policy that only works for your local clients (Access-Points) only. If you set VLAN attributes for your users in authentication requests that originate from the eduroam infrastructure your users might be denied access, which might be a difficult thing to debug.
Don't use NAP enforcement or any of the other settings: they don't have value for eduroam deployments.
Finally, review your settings, and click “Finish”.
Your local accounts should now be able to authenticate wirelessly! Go ahead and try it, before making any more changes.

In order to assign VLAN attributes to your local users, we need to duplicate the Network Policy.
The order of rules is important: make sure the rule for matching local users is first. You can add extra conditions to this rule to make sure it only matches local requests, and add VLAN attributes in the properties (“Settings” tab) for this policy.
First, add a Condition to only match local requests. A simple example is to use the friendly name for your clients: if you named your clients accesspoint-1 and accesspoint-2, you can use an expression here like accesspoint-*

In the settings tab, add additional attributes for your users.
The standardized attributes for VLANs are Tunnel-Medium-Type, Tunnel-Type and Tunnel-Pvt-Group-ID where the Tunnel-Pvt-Group-ID contains the number of the VLAN you want to assign.
The other attributes need to contain default values,
Tunnel-Medium-Type = 802, and Tunnel-Type = Virtual LANs (VLAN).

One last Connection Request Policy needs to be created (unless your National Roaming Operator only forwards the realms you're using to your servers).
We need to create a policy to reject “unknown local realms”: realms that are sub-realms of your realm, but are not actually used. When they are forwarded to you by the proxies, you shouldn't forward them back to the proxy servers, because that will create loops.
The condition to match for this rule (that should come after all other rules for local users but before the proxy userse) should match a user-name ending on your top-level realm. This is done by a regular expression such as \.lab\.eduroam\.nl$

Though we're going to reject the request, set it to authenticate on this server. It needs to be processed locally, and not forwarded.
Don't override any of the settings and finalize the policy; you can create a Network Policy to match the requests as well and assign a Reply-Message to log why the request was rejected, but it's no problem to leave that out.
Make sure the order of Connection Request Policies and the Network Policies is correct, and test your configuration.
Topics not yet covered (and/or left as exercise to the reader):
• Logging (Take a look at the Accounting section)
• Adding the Operator-Name attribute (That needs a dictionary change, annoying)
• Loop prevention (By using conditions to filter on proxyserver-* for instance, or only trigger with conditionon accesspoint-*)

Appendix A: Certificates
You need to have a server certificate in order to use PEAP-authentication with eduroam. PEAP sets up a secure SSL tunnel (just like HTTPS does for websites) in order to protect the credentials, and is an important part of the mutual authentication: both the user needs to prove who he or she is, and the authentication server needs to prove to the user that he or she is providing credentials to the right authority.
Without certificate (self signed or not) it's not possible to do local authentication. NPS can still be used as a proxy to receive requests from Access Points, log, filter, and forward to the eduroam infrastructure.
Open the Microsoft Management Console, mmc (via “Start” – “Run” – “mmc”). Go to “File”, “Add/Remove Snap-in...”, select “Certificates”, click “Add >” and answer the prompt by choosing “Computer account”:
After this, select you want to access the resources on the Local Computer (assuming that's where you install your NPS on), and click “Ok” in the “Add or Remove Snap-ins” window to work with the MMC console.
If you have a signed certificate already in pkcs12 format, you can import it (and/or intermediate certificates) to the “Personal” store by right-clicking the “Personal” folder and choosing “Import...” under “All Tasks”.

Clicking “Next” after the Certificate Import Wizard introduction asks you for the certificate files to import.
In the next screens you're asked for the password that protected the file, and folder to store the certificate in (this is the “Personal” folder that you just selected). Then the import is complete you will find your certificate in the Personal folder, and you can select it from NPS later.
Generate a certificate request
If you have no existing certificate to import, you need to generate a CSR to be signed.
Create the request by right-clicking the “Personal” tree in the Certificates snap-in, selecting “All Tasks – Advanced Operations” and “Create Custom Request”. Click “Next” after the introduction and (assuming you have no internal CA running) choose “Custom Request, proceed without enrollment policy” as shown below.
If you have an internal CA, the procedure is different. If your (Windows) clients also get this CA enrolled by the Active Directory, an internal CA might be an option for your server certificate. If your clients (especially true with “bring your own” devices) don't have the internal certificate, having a certificate from a public certificate authority (CA) makes the configuration of eduroam on the devices easier. Windows for one, refuses to authenticate if it can't verify the certificate used by any of its stored CA's, whether public or not. A self-signed certificate, means more work for the end-users (and maybe more support calls).

After clicking “Next”, leave the options for the Custom request default to PKCS10;
In the next screen though, you need to change some properties for the requested certificate:
In the “General” tab you can configure a friendly name for the certificate; in this example the “common name” (CN) of the certificate is used: lab.eduroam.nl – this is also the domain under which the Active Directory operates, and it will be the RADIUS realm too.
In the “Subject” tab, enter the “Common Name” for your certificate. You probably need to prove ownership of the hostname/domain used to the certificate authority (CA), plus your users will see this name in the certificate: so this name is important.
It doesn't need to be the name of the host itself: actually, if you have multiple NPS servers, it's important that all servers have the same certificate because devices will (at least) prompt when there is a certificate change (which is what then happens during failover).
If your users recognize the name of the certificate when they're prompted, that's probably safer and easier for instructions. (Besides, they might need to check other properties of the certificate, eg. the fingerprint, which is what the Windows 8 client will show for verification.)
If you make the certificate “eduroam.your-org.tld” for instance, that's fine. In this case, we're using “lab.eduroam.nl” for the CN.

Click “Add” for the subject, and go to the Private Key menu. It's recommended (and by some CA's required) to make the key size 2048 bits. Click “OK” after these changes, and proceed to the “Next” step in the Wizard.
(Make sure the profile used at the public CA includes the TLS server extensions. If you use an internal CA in your Active Directory, you might want to include these extensions in the “Extensions” tab. For a public CA, you probably don't have to worry about this.)
Store your certificate signing request (CSR) in a file: to request the certificate you need to copy-paste the BASE64 contents to the request page.
The certificate request (and private key for now), you will find under the Certificate Enrollment Requests. You can also delete it from there if you made a mistake.

Now, request your certificate using the file/BASE64 copy-pasted content at your CA page. If you're a Terena Certificate Service you probably know the URL for this; you can also request a certificate at any of the well known commercial CA vendors, such as Comodo, GlobalSign, Verisign... or even test it with a trial-certificate that's valid for limited time.
It's preferable to make your certificate expire after a longer period, such as 3 years: your users might receive a prompt about the new certificate that you need to tell them about before changing it. (Normally if they get such a prompt, this could be a man-in-the-middle attack, so inform them about that too! Mutual authentication is an important part of your security!)
After your certificate is issued by the CA, import it via the MMC snap-in:
You can download the .pem files provided by the provisioning interface of the public CA.
Also install the intermediate certificates that you receive from your CA, in particular if they're not already installed in your store. The NPS server needs to send them (along with the certificate) to the clients in order to do proper verification. (This isn't different from protecting a website with SSL certificates.)
Running eduroam on NPS with Windows 2008 R2 Enterprise
DRAFT version 2013-07-15
Author: Paul Dekkers, paul at surfnet dot nl
License: CC BY