rule book have a deck of 80 playable cards numbered #1–#80. find the four cards (#1–#4) marked...
TRANSCRIPT

THE CIVIL WAR CARD GAME 1
© 2003 GMT Games & Q.E.D. Games, Inc.
R U L E B O O KR U L E B O O K1. Introduction ............................................... 22. Setting Up the Game ................................. 23. Card Types ................................................ 24. Leadership ................................................. 45. Turn Sequence Outline ............................. 56. Draw/Replace Step ................................... 67. Deploy/Move Step .................................... 68. Combat ...................................................... 89. Naval Operations ...................................... 1110. Cavalry ...................................................... 1111. Supply Lines ............................................. 1212. Reorganization Step .................................. 13
13. Regroup Step............................................. 1314. Railnets ..................................................... 1415. CSA Production ........................................ 1416. Kentucky ................................................... 1417. Late War & End of Game ......................... 1418. Victory Conditions .................................... 15Optional Rules ................................................. 15Card Clarifications........................................... 17Historical Scenario .......................................... 18Gettysburg Scenario ........................................ 184-Player Game ................................................. 19Strategy Hints .................................................. 20
TA B L E O F C O N T E N T S
BLUE vs GRAY: THE CIVIL WAR CARD GAME and the term ENIGMA are TM Evan Jones.
GMT GamesP.O. Box 1308 • Hanford, CA 93232-1308www.GMTGames.com

BLUE vs. GRAY2
© 2003 GMT Games & Q.E.D. Games, Inc.
cards to replace them (see 17.1). You can put these cards in anyorder you choose, with the uppermost turned face-up (the1864Elections Card is turned face-up and turned sideways if drawnat this time).
2.2 Arrange Map CardsArrange the four AT START map cards as shown below, withcards A and B towards the USA player (if playing with the playmat, these cards are not necessary).
NOTE. The map is used to show the geography of the area, andto record which side controls each city. It does not show thelocation of particular units and leaders. These are simply lo-cated in one theater or the other, and may fight in any city (sub-ject to the rules on Supply Lines [11.1]).
2.3 Your Cadre PileEach player should establish some space for your Cadre pile.This is a discard pile that you can get cards back from. Any unitthat loses its last step, or any leader wounded, dismissed orsacked is placed in Cadre.
2.4 CSA Pre-ActionBefore the first turn of the game, the CSA player may (andshould) play some cards (units and leaders) from his hand tothe board so that he has units in position to respond to possibleUSA attacks.
You are now ready to begin the game. The USA has the firstturn.
3. CARD TYPES3.1 Types of CardsThere are six types of playable cards in the game:
• Map Cards (3.2)• Leaders (3.3)• Infantry Units (3.4)• Cavalry Units (3.5)• Naval Squadrons (3.6)• Enigma™ Cards (3.7)
3.2 Map CardsThe War is fought on a map, which, at the beginning of thegame, consists of the four AT START map cards (A, B, D, E).Additional map cards are added to the map by players duringthe course of the game. The entire map consists of 11 cardslettered A-K (see play mat).
3.21 CITIES: Ports, forts and pestholes are all types of cities.
1. INTRODUCTIONBlue vs Gray™ is a two-player division/corps level card gamecovering the Civil War from start to finish. To win as the USA,you must occupy the vital centers of the South. To win as theCSA, you must invade the North or survive the Yankee on-slaught. Both sides have a roughly equal chance to win.
The game is divided into two theaters: East and West. East isthe Atlantic seaboard, east of the Appalachians, including theShenandoah and Savannah. West is everywhere else. Look onthe map for a black line along the Georgia border.
A complete game of Blue vs Gray contains:• 2 dice (one red and one white).• 2 decks of cards:1 CSA deck, 1 USA deck.• 1 Play Mat• 24 USA tokens and 6 CSA tokens• 1 Player Aid Card• This rules booklet
GMT VERSION: This version differs only from the original bythe inclusion of a play mat, dice and this rules booklet. All rulesof the original game remain the same.
2. SETTING UP THE GAMEDecide who will play the USA (North), and who will play theCSA (South).
2.1 Prepare Decks and Initial HandUSA: Remove all the rules cards (#R1-#R44) from your deck,along with the two map cards marked DO NOT PLAY (includedin the original game so each player could view the entire map).These cards are not used in the game, and should be set aside.You now have a deck of 76 playable cards numbered #1–#76.Find the five cards (#1–#5) marked AT START. Two of thesecards are map cards (A and B): place these face up on the playmat. Keep the other three cards in your hand. Shuffle the re-maining 71 cards, let your opponent cut, and place the deckface-down on your side of the board. Then draw the top fourcards, and add them to your hand. Place a token on the “1”circle of your Supply Track (on the play mat), to show that youstart the game with one supply point.
CSA: Remove all the rules cards (#R1–#R34) from your deck,along with the three map cards marked DO NOT PLAY. Thesecards are not used in the game, and should be set aside. Younow have a deck of 80 playable cards numbered #1–#80. Findthe four cards (#1–#4) marked AT START. Two of these cardsare map cards (D and E): place these face up on the play mat.Keep the other two cards in your hand. Shuffle the remaining76 cards, let your opponent cut, and place the deck face-downon your side of the board. Then draw the top six cards, and addthem to your hand. Place a token on the “0” circle of your Sup-ply card, to show that you start the game with zero supply points.
LATE-WAR: If you (CSA or USA player) draw any cardsmarked LATE-WAR, place these on the bottom of your deck(the first card face-up, the others face down), and draw new
THE CIVIL WAR CARD GAME 3
© 2003 GMT Games & Q.E.D. Games, Inc.
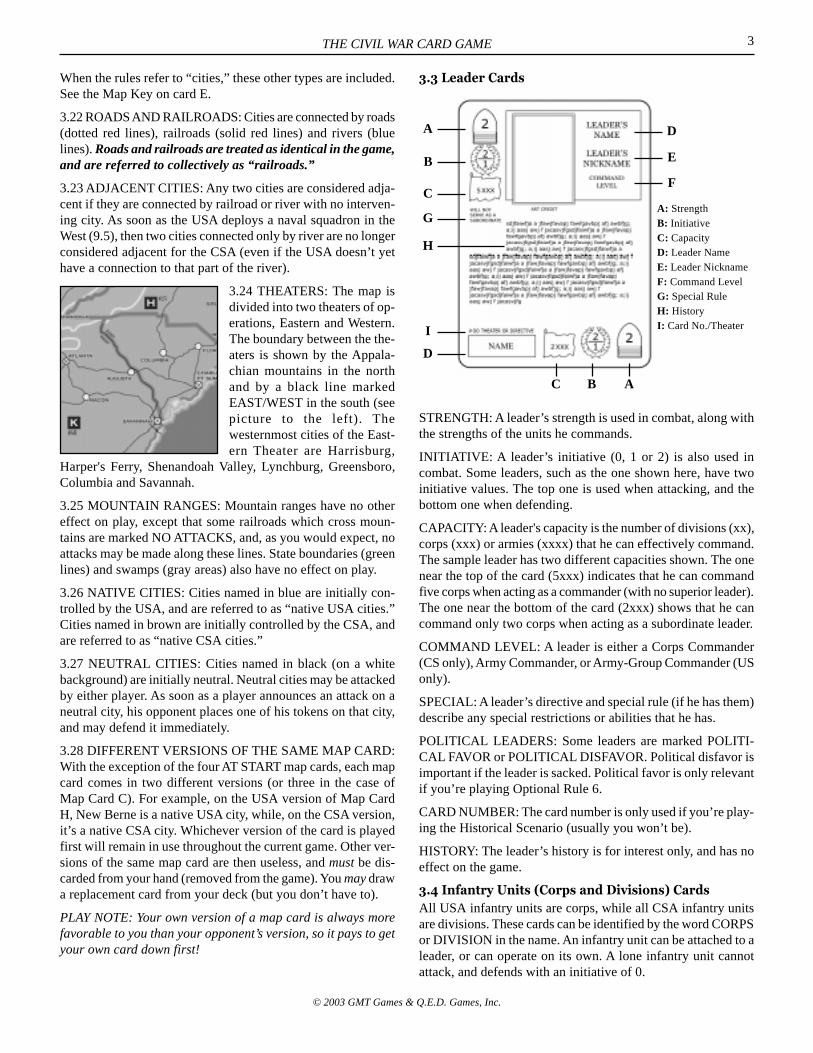
3.3 Leader Cards
STRENGTH: A leader’s strength is used in combat, along withthe strengths of the units he commands.
INITIATIVE: A leader’s initiative (0, 1 or 2) is also used incombat. Some leaders, such as the one shown here, have twoinitiative values. The top one is used when attacking, and thebottom one when defending.
CAPACITY: A leader's capacity is the number of divisions (xx),corps (xxx) or armies (xxxx) that he can effectively command.The sample leader has two different capacities shown. The onenear the top of the card (5xxx) indicates that he can commandfive corps when acting as a commander (with no superior leader).The one near the bottom of the card (2xxx) shows that he cancommand only two corps when acting as a subordinate leader.
COMMAND LEVEL: A leader is either a Corps Commander(CS only), Army Commander, or Army-Group Commander (USonly).
SPECIAL: A leader’s directive and special rule (if he has them)describe any special restrictions or abilities that he has.
POLITICAL LEADERS: Some leaders are marked POLITI-CAL FAVOR or POLITICAL DISFAVOR. Political disfavor isimportant if the leader is sacked. Political favor is only relevantif you’re playing Optional Rule 6.
CARD NUMBER: The card number is only used if you’re play-ing the Historical Scenario (usually you won’t be).
HISTORY: The leader’s history is for interest only, and has noeffect on the game.
3.4 Infantry Units (Corps and Divisions) CardsAll USA infantry units are corps, while all CSA infantry unitsare divisions. These cards can be identified by the word CORPSor DIVISION in the name. An infantry unit can be attached to aleader, or can operate on its own. A lone infantry unit cannotattack, and defends with an initiative of 0.
When the rules refer to “cities,” these other types are included.See the Map Key on card E.
3.22 ROADS AND RAILROADS: Cities are connected by roads(dotted red lines), railroads (solid red lines) and rivers (bluelines). Roads and railroads are treated as identical in the game,and are referred to collectively as “railroads.”
3.23 ADJACENT CITIES: Any two cities are considered adja-cent if they are connected by railroad or river with no interven-ing city. As soon as the USA deploys a naval squadron in theWest (9.5), then two cities connected only by river are no longerconsidered adjacent for the CSA (even if the USA doesn’t yethave a connection to that part of the river).
3.24 THEATERS: The map isdivided into two theaters of op-erations, Eastern and Western.The boundary between the the-aters is shown by the Appala-chian mountains in the northand by a black line markedEAST/WEST in the south (seepicture to the left). Thewesternmost cities of the East-ern Theater are Harrisburg,
Harper's Ferry, Shenandoah Valley, Lynchburg, Greensboro,Columbia and Savannah.
3.25 MOUNTAIN RANGES: Mountain ranges have no othereffect on play, except that some railroads which cross moun-tains are marked NO ATTACKS, and, as you would expect, noattacks may be made along these lines. State boundaries (greenlines) and swamps (gray areas) also have no effect on play.
3.26 NATIVE CITIES: Cities named in blue are initially con-trolled by the USA, and are referred to as “native USA cities.”Cities named in brown are initially controlled by the CSA, andare referred to as “native CSA cities.”
3.27 NEUTRAL CITIES: Cities named in black (on a whitebackground) are initially neutral. Neutral cities may be attackedby either player. As soon as a player announces an attack on aneutral city, his opponent places one of his tokens on that city,and may defend it immediately.
3.28 DIFFERENT VERSIONS OF THE SAME MAP CARD:With the exception of the four AT START map cards, each mapcard comes in two different versions (or three in the case ofMap Card C). For example, on the USA version of Map CardH, New Berne is a native USA city, while, on the CSA version,it’s a native CSA city. Whichever version of the card is playedfirst will remain in use throughout the current game. Other ver-sions of the same map card are then useless, and must be dis-carded from your hand (removed from the game). You may drawa replacement card from your deck (but you don’t have to).
PLAY NOTE: Your own version of a map card is always morefavorable to you than your opponent’s version, so it pays to getyour own card down first!
A
B
C
D
I
G
H
D
E
F
C B A
A: StrengthB: InitiativeC: CapacityD: Leader NameE: Leader NicknameF: Command LevelG: Special RuleH: HistoryI: Card No./Theater

BLUE vs. GRAY4
© 2003 GMT Games & Q.E.D. Games, Inc.
STRENGTH: The main attribute of an infantry unit is its strength(shown inside the bullet symbol).
DIRECTIVE: An infantry unit may also have a directive (suchas a deployment restriction or other special rule). See 2.1, 7.3and optional Rule #1.
BIOGRAPHICAL INFORMATION: The card also gives bio-graphical information about the men who commanded the unit.This is for interest only, and has no effect on the game.
TWO STEPS: An infantry unit has two “steps.” That meansthat, after taking one step loss in combat, it becomes depleted.After taking a second step loss, it goes to cadre (2.3).
DEPLETED STRENGTH: A depleted USA corps has twostrength points. A depleted CSA division has one strength point,unless its full strength is only one point, in which case its de-pleted strength is 0 points (but it still can fight).
3.5 Cavalry CardsCavalry units have similar properties to infantry units, but thereare some significant differences too (see 10.0). Cavalry unitscan be identified by the word CAVALRY under the name, andby a crossed sabers symbol.
3.6 Naval Squadron CardsNaval squadrons are identified by the word SQUADRON un-der the name, and by an anchor symbol. Only the USA has na-val squadrons. Naval Squadrons have many uses (see 9.0).
3.7 Enigma™ Cards"One of those little things in war..." —Lincoln.
Enigma™ cards represent unique political, social and techno-logical events. Each one has a different effect, as described inits special rule. Enigma™ cards can be played any time, in-cluding your opponent’s turn, unless the rules on the card sayotherwise. Sometimes the effect of an Enigma™ card can befelt for many turns (e.g. CSA Ironclads and USA Monitor). Placethese cards in a convenient place on the board, and put one ofyour tokens on top to remind you that it's still active.
Some Enigma™ cards are marked “Play as a reserve.” Theseare played in battle, in lieu of adding a reserve card.
SPECIAL RULES: Many cards have special rules printed onthem. When these rules conflict with the standard rules, the spe-cial rules take precedence.
DISCARDED: When Enigma™ cards are discarded, they’reremoved from the game.
4.0 LEADERSHIP4.1 CommandsEvery unit and leader which is in play must be part of a “com-mand.” A command consists of one or more unit cards and/orleader cards, which attack and defend together as a group. Onthe board, show that cards are in the same command by arrang-ing them together, overlapping, with the commander at the top.Four different command structures are possible:
• Single unit. A single infantry or cavalry unit on its own. Aunit cannot be attached to another unit (exception: cavalrypairs [10.2]).
• One leader. The leader must have one or more units underhim (attached to him). He is referred to as the “Commander.”
• Multiple leaders. One leader is the commander. Attached tohim are one or more “subordinate” leaders, each of whichhas one or more units attached to him. The units attached toone subordinate, together with the subordinate himself, arereferred to as a “subcommand.”
• Cavalry pair (10.2).
EXAMPLE: In the picture below, Lee (commander) has two sub-ordinates (Jackson and Longstreet). He also has a cavalry unit(Stuart) and a division directly attached to him. Jackson hasthree divisions under him, and Longstreet has two.
ArmyCommander
Cavalry,attached toLee for free.
Attached toLee in lieuof a corps.
CorpsCommander;Lee'ssubordinate.
Attached toLongstreet.
Longstreet’sCorps
a Subcommand ofLee’s ArmyJackson’s
Corps
a Subcommand ofLee’s Army
EXAMPLE OF A MULTIPLE LEADER COMMAND:

THE CIVIL WAR CARD GAME 5
© 2003 GMT Games & Q.E.D. Games, Inc.
SUBORDINATES: A subordinate is not considered to be a Com-mander. A subordinate leader cannot be attached to another sub-ordinate leader—only a high-level leader (4.2) can have subor-dinate leaders attached to him.
4.2 High and Low-Level LeadersHIGH: For the USA, high-level leaders are classified as “army-group commander” on their card; for the CSA, high-level lead-ers are classified as “army commander.”
LOW: For the USA, low-level leaders are classified as “armycommander” on their card; for the CSA, low-level leaders areclassified as “corps commander.”
4.3 USA LeadersThe USA player has army-group and army leaders. His indi-vidual units are corps.
ARMIES: An army consists of a leader plus one or more corps(and/or possibly a cavalry unit). An army may be an indepen-dent command or it may be a subcommand attached to an army-group commander (providing his card isn’t marked WON’TSUBORDINATE). A USA army can be commanded by a highor low level leader.
ARMY-GROUPS: An army-group consists of an army-groupcommander plus one or more armies (subcommands), corps and/or cavalry units. Only army-group commanders may commandarmy-groups. An army-group leader may act as a Subordinate,providing his card isn’t marked WON’T SUBORDINATE. Whenacting as a Subordinate, an army-group leader is treated as anarmy commander (so he can’t have Subordinates of his own).
4.4 CSA LeadersThe CSA player has army and corps leaders. His individual unitsare divisions.
CORPS: A corps consists of a leader plus one or more divi-sions (and/or possibly a cavalry unit). A corps may be an in-dependent command or it may be a subcommand attached toan army commander. A corps can be commanded by a high orlow level leader.
ARMIES: An army consists of an army commander plus one ormore corps (subcommands), divisions and/or cavalry units. Anarmy commander may act as a Subordinate, providing his cardisn’t marked WON'T SUBORDINATE. When acting as a Sub-ordinate, the army commander is treated as a corps commander(so he can’t have Subordinates of his own).
4.5 Leadership CapacityEach leader has a capacity shown inside a flag on his card. Thisis the maximum number of formations that he can effectivelylead. A leader is free to exceed his capacity—however, at thestart of a battle, excess cards must be turned face-down (theybecome inactive) and play no part in the battle.
FORMATIONS: The possible formations are divisions (xx),corps (xxx) and armies (xxxx).
EXAMPLE: 5xxx means that he can lead up to five corps.
COMMANDER/SUBORDINATE: A leader’s capacity is shown
in two places on his card, and these are sometimes different.When he’s a Commander, use the value shown near the top ofthe card. When he’s acting as a Subordinate, use the value atthe bottom of the card.
DIRECT ATTACHMENTS: When individual unit cards are di-rectly attached to a high-level leader, they count against his ca-pacity as if they were larger formations. For example, R.E. Lee(CSA) has a capacity of 3xxx (3 corps); each division directlyattached to him counts as a corps.
CAVALRY ATTACHMENTS: Any leader who is a Commander(not a Subordinate) may have one cavalry unit attached to himfor free (it doesn’t count against his capacity). A high-levelleader may have additional cavalry units attached, with eachone counting against his capacity as if it was an army (USA)or corps (CSA).
4.6 Leaders Without a CommandA leader may never be alone, he must always have units at-tached. A leader without attached units is sacked (8.6).
5. TURN SEQUENCEOUTLINEPlayers alternate taking turns, starting with the USA. Eachplayer’s turn consists of five possible Steps.
5.1 USA Player Turn1: DRAW / REPLACE STEPThe USA player performs the following in any order:• Draw cards (6.2).• Take supply points (6.3).• Take cards from cadre (6.4).• Cash in supply points (6.5).• Restore depleted units (6.6).• Replace useless (duplicate) map cards (6.7).At the end of this Step, turn up any face-down cards in cadre(6.8).
2: DEPLOY / MOVE STEPThe USA player performs the following in any order:• Play map cards (7.2).• Deploy units, leaders and naval squadrons from hand (7.3).• Transfer units within commands (7.4).• Detach/attach subcommands and individual units (7.5).• Dismiss/replace leaders (7.6).• Move forces by rail movement (7.7).• Move naval squadrons between theaters (7.8).
3: COMBAT STEPThe USA player performs the following in any order:• Make attacks (8.2).• Make a cavalry raid (10.3).• Check for Automatic Surrender (8.8).
4: REORGANIZATION STEPThis costs you a supply point, and you can't attack or raid in thesame turn. You may freely rearrange any of your cards in play.

BLUE vs. GRAY6
© 2003 GMT Games & Q.E.D. Games, Inc.
5: REGROUP STEPThe USA player may now Restore depleted units in the sameway as he did in the Draw/Replace Step (see 6.6)—one supplyper three units. The USA player’s turn is now over. During youropponent’s turn the only things you can do are:
• Defend against your opponent's attacks and cavalry raids.• Play Enigma™ cards, if applicable.
5.2 CSA Player TurnSame as the USA player turn, except exchanging USA for CSA.
6. DRAW/REPLACE STEP6.1 In GeneralDuring your Draw/Replace Step, you are entitled to a certainnumber of card draws. The USA player is entitled to five (thismay be reduced by a severed railnet [14.3]), the CSA is entitledto four (this may be reduced by the loss of production [15.3]).A player may add one supply point or take one card from hiscadre for each card he doesn’t draw. However, the USA mustalways draw a minimum of two cards, and the CSA a minimumof one card (except, of course, when the player’s deck is empty).In summary:
• draw a card, or• add one supply point, or• take any face-up card from your cadre (into your hand)
6.2 Draw a CardAfter drawing each card, a player may look at it before decid-ing whether to draw any more cards.
EXAMPLE: The USA badly needs a leader; he draws cards un-til he gets one (and has drawn at least two cards) and thentakes the remainder of his draw as supplies.
DEPLETED DECKS: After a player’s deck runs out, he musttake all his draw entitlement as supply points and/or cards fromcadre.
6.3 Add Supply PointsFor each card draw spent to add a supply point, adjust the tokenon your Supply Track one space to the right. There is no limit tothe number of supply points you may accumulate.
FREE SUPPLY:• The CSA player gets one free supply point each Draw/Re-
place Step while the Naval Blockade (9.7) is not in effect.• During USA Late-War, USA gets one additional supply point
(17.3).
6.4 Take Cards From Your CadreFor each card draw spent for cadre, you may take any face-upcard from your Cadre pile (2.3) and place it in your hand.
6.5 Cash In Supply PointsYou can take additional cards from your deck or cadre by “cash-ing in” saved supply points, one point for each extra card taken.
6.6 Restore Depleted UnitsYou can restore depleted units to full strength at a cost of onesupply point for each three units (or part thereof) restored. Thereverse is not true: if you’re entitled to restore three depletedunits for free, you may not take a supply point or card instead.
FREE RESTORE:• The USA player may always restore one depleted corps to
full strength for free each turn.• The CSA player gets one free restore during a Partial Naval
Blockade (9.7).• The CSA player gets one or two free restores (but loses a
supply) when he loses Production (see 15.3 for full details).
6.7 Replace Useless CardsIf you have a map card in your hand which is useless, becauseanother version of the same card has already been played, youmust remove it from play. You may draw another card to re-place it.
6.8 Turn Over Face-Down CardsAt the end of your Draw/Replace Step, turn up any face-downcards in your cadre.
7. DEPLOY/MOVE STEP7.1 In GeneralDuring your Deploy/Move Step, you can take any or all of thefollowing actions. You can take any number of these actions, inany order you like, as long as each action is legal at the momentit’s taken.
7.2 Play a Map CardYou can only play a map card if it fits onto the existing map.The CSA must play all playable map cards in his hand. For theUSA, playing map cards is optional.
EXAMPLE: You can’t play Map Card K until one of Map CardsG, H or J has been played.
7.3 DeployDeploy a unit, leader or naval squadron from your hand to theboard in either theater (East or West). This card forms a newcommand (except naval squadrons, which are never part of acommand). If you want to add a unit to an existing commandyou must first deploy it and then attach it (see below).
Important: Cards with the directive WESTERN THEATERONLY or EASTERN THEATER ONLY must deploy and re-main in the indicated theater, regardless of whether you’re play-ing Optional Rule 1.
7.4 Transfer Units Within CommandsWithin a given command, units may be transferred up or down,but not both in the same Deploy/Move Step. In other words,you may transfer a unit up, from a subordinate to a commander,or down, from a commander to his subordinate. A unit may notbe transferred directly from one subordinate to another, or fromone command to another.

THE CIVIL WAR CARD GAME 7
© 2003 GMT Games & Q.E.D. Games, Inc.
EXAMPLE: Lee has two subordinates, Jackson and Longstreet.Jackson transfers one division up to Lee. That division cannotthen be transferred down to Longstreet in the same turn.
7.5 Detach/AttachDESIGN NOTE: When you want to move a unit or subcommandfrom one command to another, you basically have the followingoptions: Use your free transfer (7.51), but this is limited to oneunit or subcommand per turn; or detach the unit on one turnand attach it in your next turn, but this takes two turns and yourunits are scattered in the interim.
The following Detachments and Attachments are legal:• Detach a unit or subcommand to form an independent com-
mand.• Attach an existing command to a leader in the same theater.
When one leader attaches to another (as a subordinate), thenewly attached leader may absorb units directly from othersubordinates in the same command.
RESTRICTIONS:• A leader with a subordinate may not attach to another leader.• No command may be detached and then attached (or vice
versa) in the same Deploy/Move Step except when using theFree Transfer (7.51).
7.51 FREE TRANSFER: As an exception to the rule above, ineach Deploy/Move Step, just one unit or subcommand may de-tach and then attach again (or vice versa). It could detach in onetheater, move to the other theater by rail movement (see be-low), and then attach to another leader there.
7.52 CAVALRY: If a leader with cavalry units attaches to an-other leader, the cavalry units must automatically transfer up tothe commander (even if that commander has already transferreda unit down to another subordinate).
7.6 Dismiss a LeaderThe dismissed leader goes to cadre (face-down). You must dealwith the leader’s former command or subcommand in one ofthe following ways:
• Replace him from your hand. The replacement leader nowleads all units and/or subcommands that the old leader did.No cards are considered to have been attached or detached,and the command is still considered to be the same one asbefore, not a new one.
• Replace him with another leader from the same theater (per-haps one of his own subordinates, if eligible). This is thesame as above, except that now you need to deal with thatleader’s former command or subcommand as if he too hadbeen dismissed.
• Don’t replace him. If he was a commander, his command isbroken up. Each of his directly attached units and/orsubcommands becomes an independent command. If the dis-missed leader was a subordinate, his units must be transferredto other leaders in the same command. For this purpose, theunits may be transferred directly to other subordinates (con-trary to the usual transfer rule). In any case, no cards are con-sidered to have been attached or detached.
FORCED DISMISSAL: During the course of the Deploy/MoveStep, a leader may temporarily be left with no cards attached.However, at the end of this Step, any leader who still has nocards attached is automatically dismissed (placed face-down incadre).
7.7 Rail MovementLeaders and units may be moved from one theater to the otherby rail movement. During each Deploy/Move Step you can se-lect one command for rail movement. That command and/or
The example above shows a typical layout. The deck is used toseparate the western commands from the eastern commands.The player has placed his Cadre pile above the deck. Note that
the West has three separate commands while the East only hastwo. Cards that have taken a step loss have been tilted 90degrees. Discards are placed to the side.

BLUE vs. GRAY8
© 2003 GMT Games & Q.E.D. Games, Inc.
any cards that subsequently detach from it may then be movedby rail.
EXAMPLE: At the start of the Step, Lee is in the Eastern The-ater commanding three corps (led by Jackson, Ewell and Long-street). The CSA player attaches another corps (led byPemberton) to Lee (exceeding Lee’s capacity, but that doesn'tmatter), and then selects Lee’s command for rail movement. Hewants to keep Lee in the East, but he detaches Jackson’s andPemberton’s corps, and moves them to the West (using his freetransfer to detach Pemberton).
EFFECTS: Cards moved by rail arrive immediately, but maynot attack in the same turn. If they attach to a leader in theirnew theater, they must be turned face-down until the end of thefollowing Combat Step, to show that they are inactive.
7.8 Move Naval Squadrons (USA player only)Move any number of naval squadrons between theaters. Con-trol of the Mississippi River is not required. These naval squad-rons are then inactive (turned face-down) and have no effect onplay, until the end of the following Combat Step.
8. COMBAT8.1 Sequence of CombatIn your Combat Step, you can attack one or more enemy cities,in an attempt to capture them. Each attack follows this basicsequence:
STEP 1: The attacker (the player whose turn it is) expends asupply point, announces which command is attacking, and whichenemy city is the target of the attack (8.2).
STEP 2: The defender announces which command (if any) willdefend the city (8.3).
STEP 3: Both players have the opportunity to withdraw unitsand/or add reserves (8.4).
STEP 4: The combat is resolved (8.5).
STEP 5: Check for Leader Loss (8.6).
STEP 6: If the attacker succeeded in capturing the target city,the defending force must retreat. If unable to do so, it is elimi-nated (8.7).
STEP 7: Turn Up Inactive cards if applicable (8.9).
8.2 Launching an attackEach attack is made by a single command against a single tar-get city, with the aim of capturing that city. Each attack has ajumping-off city (the friendly city from which the attack is com-ing). Although the attacker doesn’t usually need to name thejumping-off city, he must do so if the defender asks him.
See Supply (11.0) to determine which commands may attack(and from which theater). Usually, a command that is attacking(or defending) a city in the Western theater comes from theWestern Theater, but there are exceptions (Cross-Theater At-tacks/Defense, 11.4 & 11.5, Naval Invasions, 9.6).
INITIATIVE: If the attacking commander has an initiative of 0or 1, then the target city must be adjacent (3.23) to the jumping-off city. If the attacking commander has an initiative of 2, thenthere may be one intervening enemy city. Exception: the inter-vening city may not be a CSA-controlled pesthole (USA at-tacks only).
PLAY NOTE: A command attacks or defends using the initia-tive rating of its commander. The initiative of any subordinatesis irrelevant.
RESTRICTIONS:• A single command may only attack once per turn, and no unit
or leader may be involved in more than one attack per turn.
• An attack is not allowed if any part of the connection be-tween the jumping-off city and the target city is marked NOATTACKS.
• SUPPLY LINE: The attacker must be able to trace a supplyline (11.3) from the jumping-off city to a supply base (11.2).The attacking command must be located in the same theateras this supply base.
SUPPLY COST: Each attack costs the attacker one supply point.He may not attack if he has no supply points remaining.
MULTIPLE ATTACKS: You can attack until you run out ofsupply or commands. The same city may be attacked more thanonce per turn (by different commands).
NO REORGANIZATION IN COMBAT STEP: The attackermay not detach or otherwise reorganize any commands duringthe Combat Step, except when required by the loss of a leader(8.6). If, for example, he wants a command to conduct a NavalInvasion (9.6), he must ensure in the Deploy/Move Step thatthe command meets the necessary conditions (maximum of twocorps and one leader).
8.3 DefendingABANDON CITY: The defender may choose to abandon thecity and offer no defense. In this case, the attacker immediatelycaptures the target city, and the attack is over. The attacker stillexpends one supply point.
DEFEND: If the defender does not abandon the city, he an-nounces which existing command will respond to the attack, orhe forms a command by playing one unit (infantry or cavalry)from his hand. If it’s an existing command, he may detach oneor more units and/or subcommands from this command. Unitsmay be detached from the commander and/or from his subordi-nates. No other adjustments (attaching or transferring) may bemade. The defender must then select one of these newly de-tached commands, or the remainder of the original command,to defend.
EXAMPLE: Lee's army responds to a USA attack. Lee has twosubordinates (Jackson and Longstreet) each with 3 divisions.The CSA detaches one of Jackson's divisions to form a secondcommand, and detaches Jackson with his other two divisions toform a third command. The CSA can now defend with Lee'scommand (including Longstreet), Jackson's command (with two

THE CIVIL WAR CARD GAME 9
© 2003 GMT Games & Q.E.D. Games, Inc.
divisions), or the lone division. The two unused commands coulddefend later in the turn.
RESTRICTIONS:• Only one command can defend against each attack. It must
be located in the appropriate theater (see 11.5).
MULTIPLE BATTLES: A unit or leader which has already de-fended in the current turn may defend against another attack,providing one of the following applies:
• the target city is one which it defended earlier in the sameturn; or
• the jumping-off city of the attack is one which it defendedearlier in the same turn; or
• the attacker’s supply line is being traced through or to a citywhich it defended earlier in the same turn (see Supply Lines).
SUPPLY COST: The defender never expends any supply points.
8.4 Reserves and Withdraw8.41 ADDING RESERVES: Both sides “take turns” addingcards from their “hand” to the battle. The players alternate, play-ing one card at a time, starting with the attacker, and continuinguntil both players “pass” consecutively. Cards added must con-form to the Leadership rules, and may not exceed a leader’scapacity. Leaders can’t be added as reserves.
A cavalry unit can be added as a reserve to another, lone cav-alry unit, to form a cavalry pair (10.2). Exception: this cannotbe done if the lone cavalry unit was just played from your handto defend against the current attack.
8.42 WITHDRAW: When it’s your opportunity to play a card,you may instead withdraw a unit from your command, by turn-ing it face-down. Withdrawing a unit frees up some leadershipcapacity, so you can add more reserves. It can also reduce thecasualties suffered by your force.
Once you withdraw a unit, it remains face-down (inactive) un-til the end of the battle. You cannot add it back again.
If, at any time, a subordinate leader has no active units attachedto him, he is also turned face-down.
You must always leave at least one active unit in the command.
8.5 Resolving CombatAdd up the strength of all active units and leaders (includingsubordinates) involved in the battle on each side. The CSAadds an additional five strength points if defending a pest-hole. The USA adds the strength of any naval squadrons hehas in support.
DIE ROLL MODIFIERS TO THE RED DIE:All modifiers are cumulative
–1 If defending in a fort.+/– Any applicable Enigma™ cards.+1 For every 10 points more the attacker has than the defender.–1 For every 10 points more the defender has than the defender.
PLAY NOTE: Once a card has been played, any indicated modi-fiers must be used; you can’t choose to ignore them. Also, if you
wish to affect the die roll, you must play the card before the dicehave been rolled.
PROCEDURE: Roll two dice (one red, one white) and consultthe Combat Table. Modify the red die roll as set forth above. Ifthe modified die roll is greater than 6, treat it as a 6. If less than1, treat it as a 1. All applicable die roll modifiers are addedautomatically; you may not choose to ignore them.
RED DIE: The red die roll tells you who won the battle (theside which was not defeated or routed was the winner). In thecase of a Generals’ Battle or Soldiers’ Battle, the result may bea stalemate (no winner or loser).
WHITE DIE: The white die roll tells you the general casualtylevel (light, normal or heavy) applicable to both players. Eachplayer then consults the Casualties Table independently, to findout exactly how many steps he must lose.
APPLYING STEP LOSSES: Each player decides which of hisown units will take losses (attacker first). Losses must be takenfrom active units first. Losses are taken in “steps.” Infantry unitshave two steps; cavalry units have one. A 2-step unit whichtakes one step loss is “depleted.” Show this by rotating the card90º. A 1-step unit or depleted 2-step unit which takes a step lossis placed in the owner’s cadre pile. A 2-step unit may lose bothits steps in one battle. If all active units involved in the battleare lost, then any remaining losses must be taken from inactive(face-down) units in the command (if any).
8.6 Leader LossesIf both players have at least one active leader in the battle, aleader may have been killed, wounded or sacked (do not usethe leader loss table if only one player has an active leader). Ifyou rolled a total of 7 (red die + white die), a USA leader isaffected; if you rolled doubles (red die = white die), a CSAleader is affected. For this purpose, ignore any die roll modifi-ers. In either case, roll one die again and consult the LeaderLosses Table, to see whether the leader was killed, wounded orsacked, and which player chooses the affected leader (if there ismore than one to choose from).
KILLED: Remove permanently from game.
WOUNDED: Discard face-down to Cadre.*
SACKED: Discard leader face-down to Cadre.* If politicallydisfavored, remove permanently from game. A leader (com-mander or subordinate) is also sacked if he is left with no unitsor leaders under him (active or inactive) at the end of a battle.
*PLAYER NOTE: Only face-up cards may be drawn from yourCadre during your Draw/Replace Step. The face-down cardsare flipped face-up at the end of that Step. This procedure en-sures that the leader cannot be drawn next turn, but can bedrawn thereafter.
DISGRACED: A leader marked Political Disfavor is disgraced(permanently removed from the game) if he is routed while acommander (not a subordinate), or if he is sacked at any time.
REPLACEMENT LEADER: If a leader is killed, wounded,

BLUE vs. GRAY10
© 2003 GMT Games & Q.E.D. Games, Inc.
sacked or disgraced, treat his command or subcommand as ifhe had been dismissed (7.6). Any new commands created bythe breakup of a command may be immediately attached to otherleaders in the same theater. In this case, they become inactive(turned face-down) and may not take part in any further combatin the current turn. The remainder of the command to whichthey are now attached may still attack or defend, providing it isotherwise eligible to do so.
EXAMPLE: Lee is wounded while successfully defending Ma-nassas. He is not replaced, so his subordinates, Jackson andLongstreet, split up. J.E. Johnston, another commander in thesame theater, takes over Longstreet’s corps, but decides not totake Jackson’s. The USA attacks Manassas again. Jackson candefend again, but Longstreet may not, because he is now at-tached to Johnston. Johnston could defend (if otherwise eli-gible), but not using Longstreet. If Longstreet had not been at-tached to J.E. Johnston, any of Longstreet, Jackson or Johnstoncould defend.
INACTIVE LEADERS: Inactive leaders are ignored when de-termining leader losses, as are cavalry units and naval squad-rons (despite their limited leadership ability).
PLAY NOTE: A leader may be sacked due to loss of all his at-tached cards, or be disgraced due to a rout, even when theLeader Loss Table is not used.
8.7 City Capture & RetreatThe attacker captures the target city if he wins the battle or ifthe defending command is eliminated (i.e. there are no unitsremaining in the defending command, active or inactive, aftertaking casualties). Exceptions:
• The city is not captured if the attacking commander is killed,wounded or sacked, even if he wins the battle. (But a cavalrypair whose leading unit went to cadre still takes the city.)
• The city is not captured if the attacking command is wipedout, even if the attacker wins the battle and the defendingcommand is wiped out too.
CITY CONTROL: The captured city is now controlled by theattacker. Mark it with one of his tokens. It may be used as ajumping-off city for further attacks in the same turn.
ELIMINATION DUE TO A RETREAT: When a city is cap-tured, the defender must retreat. Retreating doesn’t involve anymovement. However, if the defender is unable to retreat (11.4),his entire command is eliminated: all units go to cadre and lead-ers are sacked (exception: Pestholes). Attacking commands arenever required to retreat.
PESTHOLES: A CSA army that retreats from a Pesthole is nevereliminated by having no retreat route.
8.8 Automatic SurrenderIf a city has no other friendly city within two moves of it, itsurrenders immediately.
EXAMPLE: The USA holds New Orleans, Jackson and Mem-phis. It then captures Vicksburg. The USA gains control of PortHudson the instant Vicksburg falls.
Two cities are considered to be within two moves of each otherif it’s possible to trace a line by railroad and/or river betweenthe cities, with not more than one intervening city. Note that,for this purpose only, the CSA can ignore riverine interdiction.Also, it doesn’t matter if neither city can trace a supply line—as long as they both remain under friendly control, they pro-vide moral support for each other!
This rule does not apply to USA-controlled ports, CSA-con-trolled pestholes or neutral cities.
8.9 Inactive CardsA card (unit or leader) is inactive when it’s turned face-down.This can happen for any of the following reasons:
A. If a leader is exceeding his leadership capacity when he en-ters combat, excess units (owner’s choice) must be turnedface-down (4.5).
B. Cards which use rail movement and then attach to a leaderin their new theater are turned face-down to show that theycan’t attack in the same turn (7.7).
C. Naval squadrons which change theater are turned face-downto show that they have no effect on play during the subse-quent Combat Step (7.8).
D. When it’s his turn to play reserves, a player may insteadchoose to withdraw a unit from the command, turning it face-down (8.42).
E. When a leader is lost in battle (killed, wounded, sacked ordisgraced), this may result in cards being moved from onecommand to another. If any such cards have already attackedor defended, they are turned face-down to show that theycan’t attack or defend again in the same turn (8.6).
In case A and D, the cards are turned face-up again at the end ofthe current attack. In the other cases, they aren’t turned face-upuntil the end of the Combat Step.
COMBAT LOSSES & INACTIVE UNITS: Inactive cards areignored when resolving battles. However: If losses exceed theactive units available, the excess is taken from inactive units(but inactive leaders are always ignored for resolving leaderlosses).
MISCELLANEOUS:• If at any time a leader has only inactive cards attached to
him, he becomes inactive too.• If a leader becomes inactive, then so do all cards attached to
him (8.42, 8.6).• Inactive cards are still considered to have taken part in the
attack or defense, for the purpose of determining whether theycan attack or defend again in the same turn (8.3).
• If a defending command is unable to retreat when required,inactive units go to cadre and inactive leaders are sacked (8.7).
• Whenever the rules limit the size of a command that may beused in an attack or defense, the limit includes inactive cards.
EXAMPLE: The USA is attacking from Pensacola to Montgom-ery, supplied by sea. The attacking command is limited to oneleader and two corps. He cannot use a command with 3 corps,even if one is inactive. He would need to detach the excess corpsduring his previous Deploy/Move Step.

THE CIVIL WAR CARD GAME 11
© 2003 GMT Games & Q.E.D. Games, Inc.
9. NAVAL OPERATIONS9.1 Naval SquadronsNaval squadrons are not units and never form part of a com-mand. Naval squadrons can never take losses, be sent to cadreor eliminated. Naval squadrons are useful for Naval Support(9.3 & 9.4), Riverine Interdiction (9.5), Invasions (9.6), andcreating a Partial or Full Blockade (9.7).
9.2 Naval Support in GeneralNaval squadrons can add their strength to any applicable battle,this is called naval support. A naval squadron can give navalsupport to any number of attacks or defenses in one turn, andall naval squadrons in the appropriate theater can be used ineach attack. Since naval squadrons are not units, they don’t countfor calculating losses in battle.
9.3 Coastal Naval SupportNaval squadrons in the Eastern Theater can add their strengthinto a battle whenever the USA is attacking or defending a port,whether on the Atlantic Coast or the Gulf Coast.
Exception: Naval Support may only be used at Mobile if FtMorgan is USA-controlled, and at Pensacola if Ft Pickens isUSA-controlled.
9.4 Riverine Naval SupportNaval squadrons in the Western Theater can add their strengthinto a battle whenever the USA is attacking or defending a cityon a river, provided that city is connected to a native USA cityby river with no intervening enemy or neutral cities.
EXAMPLE: If the USA attacks Corinth before taking Fts Henry& Donelson, he cannot use naval support.
9.5 Riverine InterdictionIf the USA has a naval squadron in the West, then two citiesconnected only by river are not considered adjacent for the CSA,even if the USA doesn’t yet have a connection to that part of theriver. This applies for all purposes except for avoiding auto-matic surrender (8.7).
9.6 InvasionsAn invasion is an attack on an enemy port without a conven-tional jumping-off city (the attack is made from the sea). Nosupply line is needed and all naval squadrons in the East cangive naval support to the invasion.
POSSIBLE TARGETS: An invasion may be made against anyCSA-controlled port, whether on the Atlantic Coast or the GulfCoast.
Exception: Mobile may only be invaded if Ft Morgan is USA-controlled, and Pensacola may only be invaded if Ft Pickens isUSA-controlled.
RESTRICTIONS:• Only one invasion may be attempted per turn.• Only the USA may make invasions, and only if it has a naval
squadron in the Eastern Theater.• The attacking command must be located in the Eastern The-
ater, regardless of where the target port is.
• An invading command is limited to a maximum of one leaderand two corps (no cavalry).
LEADERLESS INVASIONS: An invasion may be made by asingle corps without a leader—the naval squadron is consid-ered to be providing leadership. In this case, any Soldiers’ Battleor Generals’ Battle is automatically a stalemate.
9.7 The Naval BlockadeThe Naval Blockade affects CSA supply and is a victory objec-tive for the USA player. Naval squadrons are free to performother activities while enforcing the blockade.
NO BLOCKADE: This is the condition at the start of the cam-paign game. If there is no blockade in effect, the CSA gets onefree supply point.
PARTIAL BLOCKADE: A partial blockade eliminates the freesupply point for the CSA player. However, the CSA player mayrestore one extra depleted unit for free. A partial blockade isautomatically in effect whenever the USA fulfills one of thesetwo conditions:
• There is a USA naval squadron in the Eastern Theater.• The USA controls all Atlantic Coast ports (Savannah, Charles-
ton/Ft Sumter, Wilmington, New Berne, Norfolk, Ft Monroeand Baltimore) or all Gulf Coast ports (New Orleans, FtPickens, Pensacola, Ft Morgan and Mobile).
FULL BLOCKADE: If the USA fulfills both conditions or hastwo naval squadrons in the East, then a full blockade is in ef-fect. A full blockade eliminates the free restore of the PartialBlockade, and is one of the USA victory objectives (18.2).
PLAY NOTE: Players may use the Naval Blockade Track onthe play mat to record the Blockade Level.
10. CAVALRY10.1 Cavalry in GeneralEach cavalry unit has an intrinsic leader, and the card is namedafter this leader. Like a leader card, a cavalry unit has an initia-tive rating. Nevertheless, the cavalry card is not a leader and somay not be killed, wounded, sacked, disgraced or dismissed.
EMPLOYMENT: A cavalry unit can be attached to a leader,operate on its own or pair up with another cavalry unit. Unlikeinfantry, a cavalry unit can attack on its own (thanks to its in-trinsic leader). The first cavalry unit attached to a commanderdoesn’t count against the command limit. Any other cavalryyou add counts against the commander’s command limit as if itwere a Corps (CSA) or an Army (USA).
MAY NOT BE ATTACHED TO A SUBORDINATE: A cavalryunit may never be attached to a subordinate. If a cavalry unit isattached to a leader who joins another as a subordinate, the cav-alry is automatically transferred to the higher-level commander.
ATTACHMENT RESTRICTION: A low-level leader may neverhave more than one cavalry unit attached—there is no limit tothe number of cavalry units a high-level leader may have (4.2).

BLUE vs. GRAY12
© 2003 GMT Games & Q.E.D. Games, Inc.
STRENGTH: Cavalry units (except Forrest) have only one stepeach, and go to cadre as soon as they take a step loss.
10.2 Cavalry PairsTwo cavalry units can pair up to form an independent com-mand, called a “cavalry pair.” Designate one as the leading cav-alry unit and the other as an attachment. The leading cavalryunit in the pair is considered the commander, and uses its initia-tive in combat.
COMMAND: A Cavalry Pair must constitute the entire com-mand—a Cavalry Pair may not be attached to a leader. This isthe only way a command can contain more than one unit with-out a leader.
BREAKING UP A CAVALRY PAIR: The Cavalry Pair is bro-ken up only when the attached unit is detached, or when eitherunit is sent to cadre.
10.3 Cavalry RaidsThe object of a cavalry raid is to reduce your opponent’s supplypoint total. If he has no supply points, there’s no benefit in raid-ing. A cavalry raid is not a form of combat, and does not cost asupply point, but it takes place at any time during the CombatStep. You can only raid once per turn—after a unit has raided ordefended against raiding, turn it face-down until the end of theCombat Step.
RESTRICTIONS:• Cavalry units may only raid, or defend against a raid, if they
were unattached to a leader at the start of the Combat Step.Cavalry pairs are considered unattached to a leader.
• No cavalry unit may raid, or defend against a raid, and beinvolved in combat (attack or defense) in the same CombatStep.
PROCEDURE: To resolve a cavalry raid, each player adds thestrengths of all the applicable cavalry units that he wishes tocommit to raiding or defense against raiding (ignore theaters).Then subtract the defender’s cavalry strength from the Raider’scavalry strength to determine the difference.
• The raiding player has at least one free cavalry and the de-fender doesn’t = Destroy one supply point.
• The raiding player has at least a 4 strength superiority in freecavalry, total (including both fronts):4–7 point superiority = Destroy one supply point.8+ point superiority = Destroy two supply points.
11. SUPPLY LINES11.1 PurposeThe attacker may only attack if he can trace a supply line fromthe jumping-off city back to a supply base. The attack mustthen be made from the theater containing the supply base. Inmost cases, the supply base will be in the same theater, but notalways. This procedure is used for each battle to determine whichcommands (East or West) can be used for that battle.
EXAMPLE: USA attacks from Augusta to Atlanta, tracing itssupply line back to Washington. This is an attack from the East(even though Augusta and Atlanta are both in the West).
11.2 Supply BasesUSA: For the USA, a supply base is any Native USA city, ex-cept Ft Pickens, Pensacola and New Berne.
CSA: For the CSA, a supply base is any Native CSA city adja-cent (by railroad or river) to another friendly city (but see Riv-erine Interdiction). The other friendly city doesn't need to be aNative city or in the same theater.
11.3 Tracing a supply lineA supply line is traced from a friendly city back to a supplybase, through a chain of adjacent friendly cities, by railroadand/or river (however, see 9.4). The USA can also trace a sup-ply line by sea (11.6). You can use a Supply Base from eithertheater, but you can’t trace through a friendly Supply Base—the supply line must stop in the first friendly Supply Base itreaches.
NOTE: It’s possible for both sides in a battle to be using thesame stretch of railroad or river.
EXAMPLE: USA controls Columbia and Charleston. CSA at-tacks from Augusta to Columbia. USA may trace a supply linefrom Columbia to Charleston. In reality, the attack is not nec-essarily following the route of the railroad.
SUPPLY LINE RESTRICTIONS:• A supply line may not be traced through an enemy controlled
city or an unoccupied Neutral city.• You may not trace a supply line through a friendly supply
base. In other words, you can’t refuse supply and thus extendyour supply line to another Theater.
• If the jumping-off city is a supply base, then it must be insupply, itself.
EXAMPLE: USA is attacking from Cairo to Memphis. The at-tack must be supplied from Cairo.
11.4 Supply Lines for the DefenderIn general, the defender does not need a supply line, but he willbe unable to retreat if he doesn’t have one. The defender canonly retreat if he can trace a supply line (before the battle) to asupply base in the theater from which he is defending. Excep-tions: the CSA can always retreat from a pesthole; the USAcannot retreat from a native USA city unless he has an adjacentfriendly city or the target city is a port.
11.5 Cross-Theater AttacksIf the attacker is able to trace a valid supply line to a supplybase in each theater, then he may choose which theater to attackfrom. When attacking or defending cross-theater (from one the-ater to the other), the commands involved always remain in theirtheater of origin. Commands never change theater during theCombat Step (see Optional Rule 18).
Normally the defender defends from the theater containing thetarget city. However, there are two situations in which the de-fender can defend from the other theater:

THE CIVIL WAR CARD GAME 13
© 2003 GMT Games & Q.E.D. Games, Inc.
Situation 1. If the defender can trace a valid supply line fromthe target city to a supply base in the other theater, then he candefend from the theater of his choice.
EXAMPLE: CSA attacks from Atlanta to Chattanooga. USA cantrace supply lines from Chattanooga to Washington (via Knox-ville and Lynchburg) and to Cincinnati. USA can choose to de-fend from either theater, and can retreat in either case.
EXAMPLE: CSA attacks from Columbus to Atlanta. USA has asupply line from Atlanta to Washington, but not to any supplybase in the West. USA can choose to defend from the East (inwhich case he can retreat), or from the West (in which case hecan't). [Rationale: if USA defends from the West, where hedoesn't have a supply line, his command is assumed to be oper-ating behind enemy lines.]
Situation 2. If the attacker is making a cross-theater attack (i.e.using a command in one theater to attack a city in the othertheater), then the defender can defend from the theater of hischoice, even if he cannot trace a supply line to that theater. Fur-thermore, for purposes of retreat, the defender can ignore theusual rule which forces a supply line to stop in the first supplybase it reaches.
EXAMPLE: USA attacks from Atlanta to Macon, using an East-ern command (tracing supply via Chattanooga, Knoxville andLynchburg to Washington). Since this is a cross-theater at-tack, CSA may defend from the East. If Savannah is CSA-con-trolled, CSA can trace a special supply line to the East, and somay retreat if necessary. If Savannah is USA-controlled, thenCSA cannot trace a special supply line to the East, and there-fore will be unable to retreat if he chooses to defend from there.[Rationale: as the attacking command is marching to Maconfrom the East, the defending command also has time to marchfrom the East; if defeated, it must retreat all the way back tothe East.]
EXAMPLE: USA attacks from Atlanta to Macon, using a west-ern Command (tracing supply to Cincinnati). This is not a cross-theater attack, so the CSA supply line must stop in Macon. There-fore CSA can only defend from the West.
Exception to Situation 2 above: if the USA is invading a city inthe West, or is attacking a city in the West and can trace a sup-ply line out to sea through a port in the West (see Supply bySea), then the CSA may not defend from the East.
EXAMPLE: USA attacks from Montgomery to Selma, tracingits supply line by sea through Pensacola. Even though USA isattacking from the East, CSA must defend from the West. [Ra-tionale: since the attacking command is arriving by sea, CSAdoes not have time to march a command from the East.]
EXAMPLE: USA attacks from Montgomery to Selma, tracingits supply line overland to Savannah and then out to sea. In thiscase CSA may defend from the East.
11.6 Supply by SeaThe USA can trace a supply line out to sea via any friendlyport. The supply line is assumed to be going to some off-map
supply base in the East. Any attack or defense which is sup-plied by sea must use a command in the East, regardless ofwhere the target city is located.
EXAMPLE: CSA attacks from Decatur to Corinth. USA con-trols Grenada, Jackson and New Orleans. USA can choose todefend from the East (supplied by sea) or the West. Either way,he can retreat.
SEA SUPPLY RESTRICTION: Attacks and defenses suppliedby sea are limited to a maximum of one leader and two corps(no cavalry). Exception: in USA Late War, all sea-supplied at-tacks and defenses (but not invasions) can be of unlimited size.
11.7 Attacking a PortA CSA attack on a USA-controlled port is limited to a maxi-mum of one leader if the defense is being supplied by sea. Whenthe CSA announces an attack on a port, the USA must announcewhether he will supply by sea, before the CSA announces whichcommand will attack.The USA still has the option to abandonthe city without a fight after the CSA has announced which com-mand will attack.
EXAMPLE: CSA attacks from Pensacola to Ft Pickens. USAcan choose to defend from the East, supplied by sea (in whichcase he is limited to two corps and one leader, unless it's LateWar, but he can retreat), or from the West, unsupplied (in whichcase he is not limited, but he can't retreat). The USA must saywhether he's supplying by sea before the CSA decides who willattack (since, if the USA is supplying by sea, the CSA can onlyattack with one leader).
11.8 Ft MonroeFt Monroe is a USA supply base, so does not trace supply bysea. Therefore, attacks from or against Ft Monroe are not re-stricted in size. USA may retreat by sea from Ft Monroe, ifnecessary.
12. REORGANIZATIONSTEPIf you didn’t attack or raid in this turn, you may now reorga-nize all your cards in play, at a cost of one supply point. Dur-ing reorganization, you can freely rearrange all your com-mands, and move any number of cards between theaters. Youcan also play cards from your hand. You may not put cardsback in your hand.
At the end of this Step, any leader who has no cards attached isautomatically dismissed (placed face-down in cadre).
13. REGROUP STEPIn your Regroup Step, you may restore depleted units to fullstrength at a cost of one supply unit for each three units (or partthereof) restored (just as in the Draw/Replace Step).

BLUE vs. GRAY14
© 2003 GMT Games & Q.E.D. Games, Inc.
14. RAILNETS14.1 PurposeThe USA’s card draw is reduced by one if his railnet is severed(14.3). Severing the CSA’s railnet does not reduce CSA carddraw, but is one of the victory objectives for the USA player(18.2) and also one of the conditions for loss of CSA Food pro-duction (15.2).
14.2 DefinitionA railnet is a network of friendly cities, each of which is con-nected to each of the others by a chain of adjacent friendly cit-ies. Despite the name, the cities may be connected by railroadand/or river (but see Riverine Interdiction).
14.3 Severed RailnetsUSA: The USA railnet is considered severed if no railnet con-tains at least nine native USA cities. For this purpose, only the12 cities north of the original border are counted: Washington,Baltimore, Harper's Ferry, Harrisburg, Pittsburgh, Cleveland,Toledo, Columbus, Cincinnati, Indianapolis, Centralia andCairo. Note that, until Map Card C has been played, Centraliaand Cairo are not available, making the USA railnet particu-larly vulnerable at this time.
CSA: The CSA railnet is considered severed if no railnet con-tains as many native CSA cities as there are map cards in play.All native CSA cities can be counted, including those in a pro-CSA Kentucky.
15. CSA PRODUCTION15.1 PurposeThe number of cards allowed to the CSA player in his Draw/Replace Step is tied to his Production. If he loses Production,he loses cards.
15.2 Three Types of ProductionThe CSA has three types of production: Food, Industry and Con-traband:
• Food. This is lost if the USA controls the Shenandoah Valley,and the CSA railnet has been severed (14.3).
• Industry. This is lost if the USA controls Richmond and At-lanta.
• Contraband. This is lost if the USA controls all cities on theMississippi (Cairo, Memphis, Vicksburg, Port Hudson andNew Orleans). This is only possible when map cards C, Fand I are all in play. (The USA does not need a naval squad-ron in the West to meet this condition).
15.3 Effects of Lost ProductionThe CSA is entitled to four cards/supply in his Draw/ReplaceStep if he has not lost any type of production. Otherwise, thefollowing apply:
LOSE ONE: The loss of any one Production reduces the CSAdraw to three cards, but the CSA player may restore one extradepleted unit for free during the CSA Draw/Replace Step.
LOSE TWO: Same as in Lose One except no Restore (reducesthe CSA draw to three cards).
LOSE THREE: The loss of any three Production reduces theCSA draw to two cards, but the CSA player may restore twoextra depleted units for free during the CSA Draw/Replace Step.
15.4 Regaining ProductionThe CSA regains the appropriate production as soon as the con-ditions are no longer met.
EXAMPLE: The CSA regains its industry production if it re-captures either Richmond or Atlanta.
16. KENTUCKY "I hope that God is on my side. However, I must have Ken-tucky."—Lincoln.
16.1 Three Kentucky CardsThere are two versions of Map Card C in the USA deck, andone in the CSA deck. The three versions represent a pro-USAKentucky, a neutral Kentucky and a pro-CSA Kentucky.
16.2 Four Kentucky CitiesThere are four cities in Kentucky: Louisville, Lexington, Bowl-ing Green and Cumberland Gap. The first three are on MapCard C, and will be native USA cities, neutral cities or nativeCSA cities, depending on which version is played. CumberlandGap is on Map Card D, and is therefore on the map right fromthe start.
16.3 The Cumberland GapIf Cumberland Gap is still neutral when Map Card C is played,proceed as follows:
• PRO-USA: If the pro-USA version is played, place a USAtoken on Cumberland Gap.
• PRO-CSA: If the pro-CSA version is played, place a CSAtoken on Cumberland Gap.
• NEUTRAL KENTUCKY: If the neutral version is played,Kentucky is now neutral. If any of the four cities is subse-quently attacked, the attacker's opponent places his tokenson all four cities.
NO CARD C: If Cumberland Gap is attacked when Map CardC has not yet been played, the attacker’s opponent places oneof his tokens on Cumberland Gap. If, subsequently, the neutralMap Card C is played, the attacker’ s opponent places his to-kens on the other three cities. If either of the other versions isplayed, these cities are controlled as shown on the card.
17. LATE WAR & END OFGAME17.1 To the Bottom of Your DeckCards with the directive LATE-WAR can only be played in thefinal stages of the game. Each time you draw a Late-War card,you must place it on the bottom of your deck, and draw another

THE CIVIL WAR CARD GAME 15
© 2003 GMT Games & Q.E.D. Games, Inc.
card to replace it. Place the first Late-War card on the bottom ofyour deck face-up, and the rest face-down (exception: the 1864Elections card is always placed face-up). This is mandatory,and failure to comply is cheating. Both players are entitled tolook at face-up cards in the deck, but not at face-down cards.
17.2 Late War BeginsWhen you draw the first face-up card, your Late-War begins.From then on, treat Late-War cards just like any others, i.e. putthem in your hand when you draw them; don't put them on thebottom of the deck again. Each player has his own Late-War,which may start at a different time from the opponent's.
17.3 Other Effects of Late WarDuring USA Late-War, the following special rules apply:• USA gets one additional supply point or card (each turn) in
his Draw/Replace Step.• USA attacks and defenses supplied by sea are no longer lim-
ited to two corps and one leader (but invasions still are).
17.4 USA Bonus Turn & End of GameWhen the USA deck runs out, this signals the end of the game.The USA completes his current turn, the CSA takes his turn,and the USA then has one final turn. Then the game ends, andVictory Conditions are checked.
18. VICTORY CONDITIONS18.1 How To WinYou win the game by achieving your objectives and/or stop-ping your opponent from achieving his. The number of USAobjectives currently achieved minus the number of CSA objec-tives currently achieved is called the Objectives Total. Playersshould keep track of the Objective Total on the Objective TotalTrack on the player mat.
PLAY NOTE: Objectives which have been achieved and thenlost again do not count.
18.2 Eight USA Objectives• Control the Mississippi. To control the Mississippi, the USA
must control Cairo, Memphis, Vicksburg, Port Hudson andNew Orleans, and have a naval squadron in the West. This isnot possible until map cards C, F and I are all in play.
• Establish a Full Blockade (9.7) .• Control Richmond.• Control Atlanta.• Control the Shenandoah Valley.• Sever the CSA railnet (14.3).• Control all Atlantic ports.• Control all Gulf ports (including New Orleans).
18.3 Thirteen CSA Objectives• Control any native USA city north of the original border
(Washington, Baltimore, Harper's Ferry, Harrisburg, Pitts-burgh, Cleveland, Toledo, Columbus, Cincinnati, Indianapo-lis, Centralia or Cairo). Score one objective for each of thesecities controlled.
• Sever the USA railnet (14.3).
18.4 Automatic VictoryUSA: The USA player wins and the game ends immediatelywhen the Objectives Total reaches +6. If this occurs before the1864 Election, it is considered an Operational Victory (Malicetowards none and charity towards all ); if this occurs after the1864 Election it is considered an Attritional Victory (Occupa-tion. Reconstruction. Jim Crow).
CSA: The CSA wins and the game ends immediately when anyof the following occurs:
• the CSA player captures Washington (Strategic Victory).• The Objectives Total is reduced to –4 at any time (Strategic
Victory).• The Objectives Total is reduced to –3 before the Emancipa-
tion card has been played (Diplomatic Victory*).
* The British intervene, break the blockade and threaten to bom-bard USA ports. Hail Britannia!
18.5 The 1864 ElectionsThe 1864 Election is usually the watershed; read the 1864 Elec-tions card (USA deck) carefully. The USA player must revealthis card as soon as he draws it. The CSA player wins an Opera-tional Victory if the Objectives Total is +3 or less at the timethe1864 Elections card is played. (McClellan is elected on theplatform of “peace on the basis of separation.”)
If the Objectives Total is +4 or +5 the war continues.
18.6 End Game VictoryThe CSA player wins an Attritional Victory if the ObjectivesTotal is +5 or less after the USA has used up its deck and bonusturn (17.4). (Excessive losses destroy the USA will to continue.Border States remain in the USA — “Yankee Go Home!”)
OPTIONAL RULESThese rules increase both the realism and the complexity of thegame. Use only if both players agree. (N) = helps the USA; (S)= helps the CSA; + = helps a lot. The game is finely balancedwhen using all of the optional rules. The “designer’s storyboard”assumes use of all optional rules.
1. Theater Deployment.Strongly recommended. You can only play a unit to its hometheater, as indicated by the word EAST or WEST next to thecard number. (Units marked EAST-WEST can be played to ei-ther theater.) Once played, a unit can move between theatersnormally. When taking a card from cadre, you can ignore thisrule, providing you play it in the immediately following De-ploy/Move Step.
2. Cumberland Gap. (S)If any city in neutral Kentucky (including Cumberland Gap) isattacked, roll a die. 1–3: USA gains control of Cumberland Gap,4–6: CSA gains control. On a roll of 4–6, repeat the die roll atthe start of the attacker's next turn (do not roll more than twice).Whatever the result, the other cities of Kentucky still join theattacker’s opponent. Regardless of how Kentucky enters the war,

BLUE vs. GRAY16
© 2003 GMT Games & Q.E.D. Games, Inc.
10. Political Generals. (N)USA can buy corps out of cadre (for one supply point each)during the Regroup Step of his turn, providing these corps areimmediately attached to McClellan or Banks. For this purpose,you can deploy and attach the corps in the Regroup Step, con-trary to the usual turn sequence, and can ignore the theater de-ployment restrictions of Optional Rule 1.
11. Deathride.If the combat result is Defender Routed and the attacking com-mander is not sacked, the attacker takes the city, even if thecommander is killed or wounded.
12. The Atlantic “Theater.” (S+)Forces fighting in a sea-supplied bridgehead cannot be instantlytransferred to other parts of the Eastern Theater.
If a USA command attacks while supplied by sea (or from FtMonroe), then, on the following CSA turn, that command canonly defend cities which are connected to the port (or Ft Mon-roe) from which the attack was supplied.
EXAMPLE: Banks attacks from Pensacola and takes Montgom-ery. During the next CSA turn, Banks can only defend Pensacola,Montgomery or Ft Pickens. He could not defend, say, Harper'sFerry or New Berne that turn.
If a USA command makes a successful invasion, then, on thefollowing CSA turn, that command can only defend the invadedport or cities which are connected to it. If the invasion was un-successful, then the command cannot defend at all.
If a USA command defends while supplied by sea (or from FtMonroe), then, on the following USA turn, that command canonly attack a city connected to the port (or Ft Monroe) fromwhich the defense was supplied.
A city is considered to be connected to the port in question ifthey are connected by a chain of adjacent, friendly cities at thestart of the turn.
To remind you that a command is subject to one of these re-strictions, place a token on it.
13. Change of Base (N)If you make a Cross-Theater attack and capture the city, youcan transfer the victorious command to the other theater, pro-vided the city you just captured can trace a supply (includingby sea) to a supply base in that theater.
EXAMPLE: Sherman Attacks Savannah (Eastern Theater) fromAtlanta (Western Theater), bypassing Macon, and capturing Sa-vannah. Savannah can trace (by sea) back to an Eastern USAsupply base, so Sherman may immediately transfer to the East-ern Theater.
If (and only if) you transfer, the enemy may also transfer thecards that defended to the other theater as well (assuming hewas defending across theater lines).
Cumberland Gap always surrenders immediately if Knoxvilleand Lexington are both enemy-controlled.
3. Fort Monroe. (S+)USA can’t attack from Ft Monroe unless there are no CSA-controlled cities adjacent to Washington.
4. Cavalry Losses. (N)Until Late-War, all cavalry units go to cadre face-down. Turnthem face-up on your next turn.
5. Trans-Mississippi. (N+)Control of the Mississippi is worth two objectives to the USA,instead of the usual one, unless the CSA has sent two leadersand one undepleted infantry division to the “Trans-MississippiTheater” (i.e. removed them from the game permanently). TheCSA may only do this in his Deploy/Move Step, and only whilethe USA does not control the the Mississippi. Both leaders musthave an initiative of 2 in both attack and defense, but one ofthem can be taken from cadre (face-up only). [Historically, theleaders were Price and Kirby Smith.]
6. Political favor. (N+)Recommended. No leader with political disfavor may have asmany cards under him at any time as any leader with politicalfavor in the same theater. For this purpose, count all a leader'ssubordinate leaders and units (including units under his subor-dinates), active or inactive. You may never deliberately violatethis restriction. Should it be violated by events outside yourcontrol (e.g. casualties in battle), then excess cards must beimmediately detached from the disfavored leader or his subor-dinates. [This rule can (and should) complicate StonewallJackson’s role in the game. Normally, he can attach at leisureto any eligible army, but this rule can prevent Jackson fromjoining disfavored leaders in many cases.]
7. Isolation.If the defender in a battle cannot trace a supply line to a supplybase in the theater he is defending from, then he can’t add anyreserves. If the attacker is bypassing an enemy city (using aninitiative 2 commander), then he can’t add any reserves. In ad-dition, the USA can't add reserves to any battle (attack or de-fense) that is supplied by sea (including invasions), even dur-ing Late-War, and can’t defend from his hand. However, in thesesituations players can still withdraw cards, and can still playthose Enigma cards that must be played as reserves.
8. The Middle Dept. (N)During USA Late-War, USA VIII Corps, if not attached to theDept of Washington, may add its strength to any command'sattack against or defense of the Shenandoah Valley. VIII Corpsis attached to the command for the duration of the battle, andcounts against a leader's capacity. After the battle, VIII Corpsreturns to being a lone unit.
9. Garrisons. (S)USA VII Corps can’t attack. It may only defend. USA IV Corpscan't attack until USA Late-War. [Use them to defend your ports.]

THE CIVIL WAR CARD GAME 17
© 2003 GMT Games & Q.E.D. Games, Inc.
14. USA Strategic Victory.Upgrade a USA Operational Victory to a Strategic Victory if anOperational Victory (18.4) is achieved without having playedthe Emancipation card. “Liberation without compensation is tyr-anny!”
15. Western Theater Dispersion. (N)The CSA may not defend a Western Theater city solely fromhis hand
CARD CLARIFICATIONSThe special rules on individual cards are mostly self-explana-tory. But here are some additional details for those cards thatneed them.
NOTE: The special abilities of Bragg, Hooker and Grant areonly used when they are acting as commanders, not subordinates.
USA Cards4. Dept. of Washington: May (temporarily) combine strengths withone other (eligible) command. The other command does not actu-ally become attached to the Dept. of Washington (or vice versa).The two commands add their strengths for the current battle only,and both are subject to losses. The commander of the other com-mand is treated as the commander of the combined force for allpurposes (e.g. Grant’s special ability). It doesn't matter if the othercommand has defended already, as long as it's still somehow eli-gible to defend Washington (see 8.3, Multiple Battles).
13. Banks: You can place this card back in your hand during Step1 or 2 of your turn. Treat his command as if he had been dismissed(see Deploy/Move Step). You can play him again on your nextturn. You don't have to play him on the very next turn. Any subse-quent turn will do.
16. VIII Corps: May only be assigned to the Dept of Washingtonor must remain alone. While alone, it can still receive naval sup-port from a naval squadron and make an invasion led by a navalsquadron, since it won't be attached to the squadron.
19. Grant: If combat result is Soldiers’ Battle, Grant always takes(or holds) his city, even if he doesn't win the battle. If Grant is lost(killed, wounded or sacked) while attacking, he does not take thetarget city, but, if he's lost while defending, he still holds the targetcity on a Soldiers’ Battle. Capacity: 2xxxx + 1xxx. Grant may leadtwo armies, a corps and a cavalry unit. He may not lead two armiesand two cavalry units, since each cavalry unit after the first countsas an army against a USA leader’s capacity.
23. Monitor: Nullifies CSA Ironclads card. Nullifies Ironclads re-gardless of which card is played first. Norfolk is automatically oc-cupied by USA forces. Simply place a USA token on Norfolk (ifthere isn't one there already). Can be used as a blockading navalunit. Counts as a naval squadron in the East for purposes of the block-ade, but has no other abilities of a naval squadron.
38. John Brown’s Body: Play any time. May be played during abattle, but only up until the time the dice are rolled.
41. Special Orders No. 191: Play just after a CSA attack on nativeNorthern soil. This means an attack on any native USA city. Playafter the attack has been completed. Next turn, +1 to combat die
roll on one attack vs an occupied native USA city. The USA gets+1 to the red die if he attacks a native USA city currently con-trolled by the CSA.
48. Old Abe: Western Theater Only. This card may be played if,and only if, the target city is in the West, regardless of which the-ater the attacking and defending commands are in.
49. XVI Corps: Acts as cavalry for preventing supply raids if de-ployed alone in the Western Theater. (In this role, it can "pair up"with one other cavalry.) In a cavalry pair, the XVI Corps may beeither the leading unit or the attached unit. In either case, it actsjust like a cavalry unit, so it can attack (with an initiative of 0),raid, etc. While alone, the XVI Corps cannot attack or raid; it countsas infantry for all purposes except defending against raids. twosteps but only one combat value if depleted. It has one strengthpoint if depleted.
51. Emancipation Proclamation: Play any time after a Rebel forceis defeated (or routed) in a battle with at least five participating USinfantry corps. Once such a battle has occurred, the card may beplayed at any later time. Losing a Generals' or Soldiers' Battle countsas being defeated. Inactive USA corps are not counted. Wheelingand Kentucky go pro-North if still neutral. If this is played beforeMap Card C, Cumberland Gap remains neutral until Map Card Cis played (unless attacked). When Map Card C is subsequentlyplayed, the USA places tokens on any Kentucky cities which arestill neutral.
58, 76. Reserve Corps/Provisional Corps: Does not require lead-ership. If attached to a leader, does not count against his capacity.May not attack without leadership. If the corps survives....restoreup to three....corps at the end of your turn. If you play the cardduring your opponent's turn (as a reserve or defense from hand),then it's discarded at the end of his turn, so you don't get to restoreany corps.
60. Blue Mountain Boys: You may play this card the turn youdraw it, but Emancipation must have occurred no later than theend of the last CSA combat phase. Applies to all attacks againstthe listed cities in the current turn. May be played the same turn asFreedom Sickness.
61. Swamp Angel: amphibious attack = invasion.
65. Freedom Sickness: Play once, before announcing attacks, thendiscard. Must be played before any attacks have been announcedin the current turn.
68. Infernal Machines: Additionally, opponent must deplete oreliminate one involved division of his choice. A full strength divi-sion is depleted; a depleted division is placed in cadre.
69. Sheridan: Sheridan can command three infantry corps. In thisrole, Sheridan is still a cavalry unit, and not a leader. For example,he cannot be killed or dismissed. While commanding infantry, hecannot have a cavalry unit attached to him.
CSA Cards6. Beauregard: You can place this card back in your hand duringStep 1 or 2 of your turn. Treat his command as if he had beendismissed (see Deploy/Move Step). You can play him again onyour next turn. You don't have to play him on the very next turn.Any subsequent turn will do.
BLUE vs. GRAY18
© 2003 GMT Games & Q.E.D. Games, Inc.
19. Ironclads: Discard if nullified by Monitor (USA). If Monitoris played first, Ironclads is discarded as soon as it's played, and theCSA receives no free steps. It still has the effect of stopping Moni-tor counting as a naval squadron for blockade. Restore one freestep per turn. Restore one extra depleted unit for free any timeduring your turn. This may be during a battle, but only up until thetime the dice are rolled.
20. The Slows: Play against any Union commander when he an-nounces an attack. This reduces his initiative by 1 (for purposes ofcombat die roll, this combat, only). In other words, his initiative isreduced for purposes of resolving a Generals’ Battle (it doesn’teffect the die roll). If his initiative goes below 0, the attack is can-celed. For this purpose, a naval squadron leading an invasion isconsidered to have an initiative greater than 0, i.e. it can still at-tack, but remember that invasions led by a naval squadron alwaysresult in a stalemate on a Generals’ or Soldiers’ battle.
21. Jackson: Can rejoin a command to defend. Jackson may at-tach to any defending commander in the same theater (subject tonormal leadership restrictions), but only if he is still eligible todefend the target city. This happens before adding reserves.
40. Copperheads: CSA gets a free turn (with no attacks allowed).CSA may not raid during its free turn.
44. Forrest: 2-step cavalry unit (like infantry). When depleted,Forrest has a strength of one, like a CSA division.
50. Pemberton: Cannot be replaced from cadre. If he would nor-mally go to cadre, put him in the dead pile instead.
61. Draft Riots: Play just after any battle in which there are fouror more total Northern losses. This means four or more steps actu-ally removed. If the combat result called for four losses but therewere only three steps in the command, the condition is not met.The card may be played in either player’s turn. Union must perma-nently discard an undepleted corps of at least three strength fromhis hand or the board (his choice). If the USA has no such corpsavailable, he ignores this instruction. The corps cannot come fromcadre and may not be XXII Corps (which must be attached to Deptof Washington).
66. Partisan Rangers: Draw two free cards and get one free sup-ply. Play any time. If you have less than two cards remaining inyour deck, the excess draw(s) are wasted. You may not take sup-plies or cards from cadre instead.
67. Digging For The South: Restore, for free, one unit at the startof each turn (starting now). Restore a depleted unit for free at thestart of your own turn only (not USA turn, too). Don't restore a unitfor free on the turn you play this card, unless you play it at the verystart of your turn (before drawing cards). Replace this card if youcan’t use it. If Freedom Sickness has already been played, discardthis card from your hand and draw another one; you don’t get con-trol of Wheeling.
71. Degataga: Divert one undepleted Union corps (USA choice)...The corps must be one in play, and not XXII Corps (which mustremain attached to Dept of Washington). If the USA has no suchcorps available, he ignores this instruction.
STRATEGY HINTSNorthern StrategyYou bear the burden of the attack, so here is some friendlyadvice. If the front lines don’t change, you lose. The ques-tion is where to attack? Your best bet is usually WinfieldScott’s “Anaconda Plan,” which drew scorn but in the endproved to be the winning strategy.
For the first several turns, draw lots of cards until you havea considerably bigger army than the Rebels. Then pour onthe pressure. Move forward, especially in the West. Drivedown the Mississippi to cut Rebel production, then moveon Atlanta. Once this is accomplished, cut the Southernrailnet. If the Rebels concentrate on one theater, seize theports in the other. In the East, seize the Shenandoah if youcan, to avoid Belle Boyd and protect your railnet. Try totake the Wilderness to cover Washington, and Lynchburgto “fork” Richmond and Petersburg.
Do not get distracted. Concentrate on your objectives andon the clock. Strangle the CSA sea lanes; occupy its portsif the opportunity presents itself. When you gather andorganize sufficient might, rend the South asunder anddance on her grave. Vast resources (despite ineffectiveleadership) give you an even chance of winning, but thepressure of the offensive must continuously dominate yourthinking. You’ve got to push, push, push!
Southern StrategyOn account of the Yankees outnumber you, here's somefriendly advice. Time is on your side. You must seize theopportunities the Yankee presents. Counterattack, disrupthis communications, raid his supply lines. Hang in there.Seriously consider invading the North (hint: think “Harris-burg”) if at any time your foe is disorganized and weak-ened. Do not be deceived by the greater number of cards inyour deck. The weakest Yankee corps are as strong as yourfinest divisions. However, you will probably need less sup-ply than he will and that is an advantage. Don’t put all yourforces in one theater—he’ll just seize the empty ports andyou can't afford that. Your cutting edge is superior leader-ship. Your secondary advantage is cavalry. Use it.
Eastern Theater: Dominate the Wilderness if at all pos-sible. Not only is it your route to the Shenandoah (and pointsnorth), but the Federals might get behind Richmond. IfRichmond does fall, you can afford to trade space for time.
Western Theater: Defend western Tennessee (but don'tmake a cult of it). Fight him for Grenada and Jackson. Tryto hold Chattanooga, at least until the locals turn surly. Thenslam shut the true gateways to the South: Vicksburg andAtlanta. Better yet, kill him before he multiplies.
Soft Route North: play or seize Kentucky and strike at hissoft underbelly, avoiding Cairo.

THE CIVIL WAR CARD GAME 19
© 2003 GMT Games & Q.E.D. Games, Inc.
GETTYSBURGSCENARIOGettysburg is popularly regarded as thehigh-water mark of the Confederacy. Inthe East, Lee had invaded the North. TheANV had routed USA VIII Corps at 2ndWinchester and cut off Harper’s Ferry(Lee didn’t physically occupy it, but heeffectively controlled the area): Lee waspoised to strike at Harrisburg, and blowthe Iron Bridges, cutting the North in two.Success would bring relief to the WesternTheater, where the Confederates weredivided and under heavy pressure: Braggwas pulling back in Tennessee, Grant wasbesieging Pemberton in Vicksburg. J.E.Johnston’s forces were preparing to strikeGrant, but the prospects were poor.(Johnston occupied Jackson, Mississippi,proper, but his position was untenable andhe failed to break the siege, so for gamepurposes, the USA controls Jackson.)
It is the summer of 1863. Will Meade haltLee’s invasion of the North? Will Grantprevail at Vicksburg? Or will the Southhunker down and defend rather thaninvade? It’s all up to you.
Both sides deploy as below and place anyleftover cards in numerical order—useHistorical Scenario rules regarding Late-War & Emancipation. The game beginson Step 3 (Combat) of the CSA turn. (Ingame-terms, the actual battle lasted for 2CSA turns.) Victory is determined as in anormal game.
Confederate Order of BattleCSA Supply Level: 2
CSA Eastern Theater:R.E. LEE (#38)Longstreet (#41)
xx Pickett (#7)xx McLaws (#30)xx Hood (#35)
Ewell (#56)xx Stonewall [Johnson] (#9)xx Ewell [Early] (#10)xx D.H. Hill [Rodes] (#22)
A.P. Hill (#58)xx R.H. Anderson (#33)xx A.P. Hill [Pender] (#34)xx Heth (#46)
BEAUREGARD (#6)xx Ransom (#47)
Lone Units:JEB Stuart (#45)
CSA Western Theater:BRAGG (#26)Wheeler (#51)Van Dorn [his men] (#48)Hardee (#23)
xx Cleburne (#15)xx A.P. Stewart (#28)
Polk (17):xx Cheatham (#13)xx Hindman [Withers] (#24)
J.E. JOHNSTON (#8):xx Breckinridge (#29)xx Loring (#53)xx French (#59)xx W.H.T. Walker (#60)
Pemberton (#50)xx Stevenson (#42)xx M.L. Smith (#52)xx Forney (#54)xx Bowen (#55)
Lone Units:xx Militia [Gardner] (#4)xx Buckner (#16)Forrest (#44)xx Maury (#49)
CSA Map Cards in Play:Map Card D (#1)Map Card E (#2)Map Card G (#36)
Occupied: Harper’s Ferry, CumberlandGap
Hand: Draft Riots (#61)
Cadre:xx Pillow (#12)Buckner (#18)Magruder (#32)
Discard:Miracle from God (#3)“La Belle Rebelle” (#5)xx Lovell (#11)A.S. Johnston (#14)Ironclads (#19)The Slows (#20)“Stonewall” Jackson (#21)Map Card H (#25)Map Card F (#27)Map Card C (#31)Map Card I (#37)Kirby Smith (#39)Copperheads (#40)Price (#43)Map Card J (#57)
UNION Order of BattleUSA Supply Level: 0
HISTORICALSCENARIOAs an alternative to the standard rules, youcan play “historically.” Both players ini-tially deploy their cards as shown in thetable below.
Special Rules• The USA player may not play any cards
(including reserves) on his first turn andmust make an attack.
• The CSA player may not attack on hisfirst turn.
• Each card is numbered. Instead of shuf-fling, arrange both decks in numericalorder!
• Don't put Late-War cards on the bottomof the deck when you first draw them.Instead, Late-War starts immediately(for your side) when you draw your firstLate-War card.
USA PLAYER
USA Eastern Theater:
DEPT. OF WASH. [#4]
McDOWELL [#8]I Corps [#9]
PORTER [#5]
USA Western Theater:FOOTE [#7]
USA Hand:Devil's Own Luck [#3]Habeas Corpus [#6]
USA Supply = 1
CSA PLAYER
CSA Eastern Theater:
BEAUREGARD [#6]Pickett's Div [#7]Ewell's Div [#10]J.E. JOHNSTON [#8]
The Stonewall Div. [#9]
CSA Western Theater: (None)
CSA Hand:Miracle from God [#3]Tidewater Militia [#4]La Belle Rebelle [#5]
CSA Supply = 0
Continued on next page

BLUE vs. GRAY20
© 2003 GMT Games & Q.E.D. Games, Inc.
CREDITSPhoto/Art Credits: (see card #R34)
Blue vs Gray: The Civil War Game™ Credits:Game Design and Development: Evan JonesHistorical Consultant: Albert A. Nofi, Ph.DChief Playtester: Jeffrey Lee SimonsAssociate Playtester: Chris HarringtonPlaytesters: Andrew Gister, Adam Blumenfeld, David J. Kahn, DanWeeks, Mike Rocamora, Phil Taylor, Dan Gelber, Lori Walls
Q.E.D. Games, Inc. Staff:Layout and Design: Stacey SimonsCool Head Under Fire: William J. Watt IISpecial thanks to: Jim Krueger and Bill Jemas
2nd Edition:2nd Edition Rules: Richard Wein and Mark Simonitch2nd Edition Special Advisor: Rob Winslow2nd Edition Art Director and Package Design: Rodger MacGowan2nd Edition Rules Layout, Player Aids, and Play Mat: Mark Simonitch2nd Edition Production Coordination: Tony Curtis2nd Edition Producer: Gene Billingsley2nd Edition Proofreading: Kevin Duke, Paul Bean, Ellis Simpson, Bob Titran,Rob Winslow,
USA Eastern Theater:DEPT. OF WASHINGTON (#4)
XXII xxx (#55)Meade (#56)
Stoneman [Pleasanton] (#53)I xxx (#9)II xxx (#24)III xxx (#25)V xxx (#28)VI xxx (#30)XI xxx (#15)XII xxx (#10)
Banks (#13)XIX xxx (#33)
Lone Units:Porter [S.P. Lee] (#5)X xxx (#40)XVIII xxx (#42)VII xxx (#44)
USA Western Theater:GRANT (#19)
XIII xxx (#20)XV xxx (#21)XVI xxx (#49)XVII xxx (#50)
Rosecrans (#43)Wilson [Stanley] (#47)XIV xxx (#18)XX xxx (#37)XXI xxx (#39)
Burnside (#46)IX xxx (#36)
Lone Units:Foote [Porter] (#7)Farragut (#35)Grierson (#54)
USA Map Cards in Play:Map Card A (#1)Map Card B (#2)Map Card C (#12)Map Card F (#26)Map Card H (#22)Map Card I (#29)Map Card J (#31)
Occupied:Wheeling, Manassas, Norfolk, FtsHenry & Donelson, Nashville,Corinth, Memphis, New Orleans,all 4 cities in Kentucky, andJackson
Hand:The Devil’s Own Luck (#3)Pauline Cushman (#38)“Old Abe” the Battle Eagle (#48)John Brown’s Body (#57)
Cadre:McClellan (#11)Halleck (#14)
Buell (#17)IV xxx (#27)VIII xxx (#16)Butler (#32)Hooker (#52)
You can play 3-player, as well, with one sideplayed by two players. All normal rules applywith the following exceptions:
1. One player plays Eastern Theater, the otherplays Western. They maintain separate hands.2. Use Optional Rule #1 (TheaterDeployment).3. The Eastern Theater (the "prestige" theater)player draws the cards, has the final word onhow much supply to take, whether or not todraw units from cadre, and which units torestore (if applicable).4. Any card which specifically says "WEST"on the bottom or can be used only in theWestern Theater (e.g., "Old Abe," "BlueMountain Boys") goes to the Western player.5. All other cards (yes, including all
commanders!) go to the Eastern Theaterplayer, who may dole them out to the WesternTheater player at his own discretion!6. The Eastern Theater player allocates allsupply for both attacking and restoringdepleted units.7. Players may give cards to each other freely,but neither one has to cough up a card once itis in his hand.8. Spies get to look at both enemy hands.
There you have it. The Western player doesmost of the work, and the Eastern player getsmost of the glory! Also, if it is necessary forone player on a split side to leave the game,he just hands his cards over to his partner andthe game continues.
Discard:Habeas Corpus (#6)McDowell (#8)Monitor (#23)Pope (#34)
4-PLAYER RULES FOR BvG
Special Orders No. 191 (#41)Map Card G (#45)Emancipation Proclamation (#51)