rti pro user guide - hartigan software · hartigan software 3 march 2016 import / export file...
TRANSCRIPT

Hartigan Software 1 March 2016
RTI Pro User Guide 2016-17
Contents Page Number
Set Up
Settings and Folder Locations 2
Add Payroll Employer Information 5
Import Payroll Employer Information 8
RTI Submissions
Full Payment Submission 9
NI Number Verification Request 17
Employer Payment Summary 17
Earlier Year Update 20
View Submission History 29
Request Outstanding Submission Reponses 30
Data and Submission File Backup 31
Payroll Processing and Printing
Receive Notifications from HMRC 32
P60 Printing 34
P45 Printing 36
Advanced Payroll and RTI Processing
Unattended Full Payment Submissions 38
Multiple Payroll/Employer Full Payment Submissions 39
Split Large FPS Files into Smaller Submissions 41
Bulk FPS Submission Settings 42
Bulk EPS Submissions 43
Auto Generate EPS for Period of Inactivity 45

Hartigan Software 2 March 2016
Settings and Folder Locations
Setting the File Locations Once the software has been installed the Payroll File Location, Document Submission Folder Location, and Backup Folder Location can be changed or opened using the settings options above. If more than one license has been purchased and the file location is to be changed ensure a shared folder is selected which allows all required users full access. Tax Year for FPS reporting purposes The Tax Year for FPS reporting purposes will default to the current tax year but can be changed via the settings screen to make a submission in respect of a previous tax year or to perform tests for a future tax year. Import / Export File Options The [Import / Export File Options] screen is displayed when the [Import / Export File Options] button is pressed on the bottom of the [Settings] screen. Advanced Settings The [Advanced Settings] screen is displayed when the [Advanced] button is pressed on the bottom of the [Settings] screen. Printing Options The [Printing Options] screen is displayed when the [Printing Options] button is pressed on the bottom of the [Settings] screen.
Clicking the [Settings] Menu will display the following screen.

Hartigan Software 3 March 2016
Import / Export File Options
Default Import File Type Set the default file type to be used when importing files into the software. This saves time by not having to change the option in the file type drop down box each time a file is imported. Default Import File Locations Set the default file locations to be used when importing files into the software. This saves time by not having to browse to the location each time a file is imported. Export File Locations Set the default file locations to be used when exporting files from the software. This saves time by not having to browse to the location each time a file is exported. File Import Options The [Generate and output BACS random string to Excel file] option will generate the BACS random string for all records where the payee sort code and recipient sort code have been entered but the BACS random string has not. It will also output the BACS random string to the Excel file. If the [Use PAYE Ref from import spreadsheet] option is set, the payroll will be automatically selected when submissions are made. The [PAYE Ref] column must be populated on the Excel import spreadsheet in the format 999/XXX where 999 is the HMRC Office number and XXX is the Employer reference number if the [Use PAYE Ref from import spreadsheet] option is set. By default the date cells on the Excel spreadsheet must be formatted as dates and will fail validation if they are formatted as text. Date cells can sometimes be formatted as text if the import file is generated by separate payroll software. Selecting the [Excel dates are formatted as text] option will bypass this validation and allow the date cells to be formatted as text. The [CSV Date Format] text box allows the user to specify the format of the dates in CSV import files.
Hartigan Software 4 March 2016
Advanced Settings
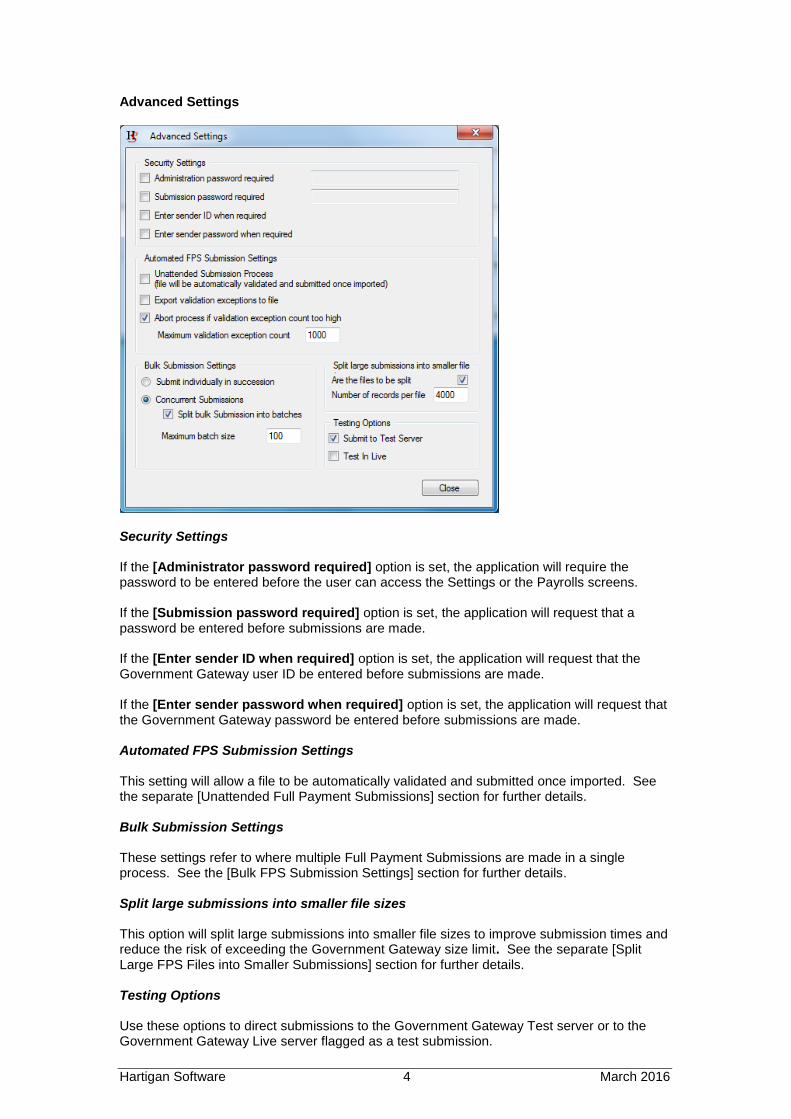
Security Settings If the [Administrator password required] option is set, the application will require the password to be entered before the user can access the Settings or the Payrolls screens. If the [Submission password required] option is set, the application will request that a password be entered before submissions are made. If the [Enter sender ID when required] option is set, the application will request that the Government Gateway user ID be entered before submissions are made. If the [Enter sender password when required] option is set, the application will request that the Government Gateway password be entered before submissions are made. Automated FPS Submission Settings This setting will allow a file to be automatically validated and submitted once imported. See the separate [Unattended Full Payment Submissions] section for further details. Bulk Submission Settings These settings refer to where multiple Full Payment Submissions are made in a single process. See the [Bulk FPS Submission Settings] section for further details. Split large submissions into smaller file sizes This option will split large submissions into smaller file sizes to improve submission times and reduce the risk of exceeding the Government Gateway size limit. See the separate [Split Large FPS Files into Smaller Submissions] section for further details. Testing Options Use these options to direct submissions to the Government Gateway Test server or to the Government Gateway Live server flagged as a test submission.

Hartigan Software 5 March 2016
Add Payroll Employer Information
Click Payrolls, Payroll Details to open the payroll details entry window.
Ensure all required information is available, click ‘Add New’ and enter the payroll name (Weekly Pay, Monthly Salaries etc.) and other information required. Click ‘Save’ to save the information entered. Continue until all required Payroll’s have been set up.
Hartigan Software 6 March 2016
Add Payroll Employer Information
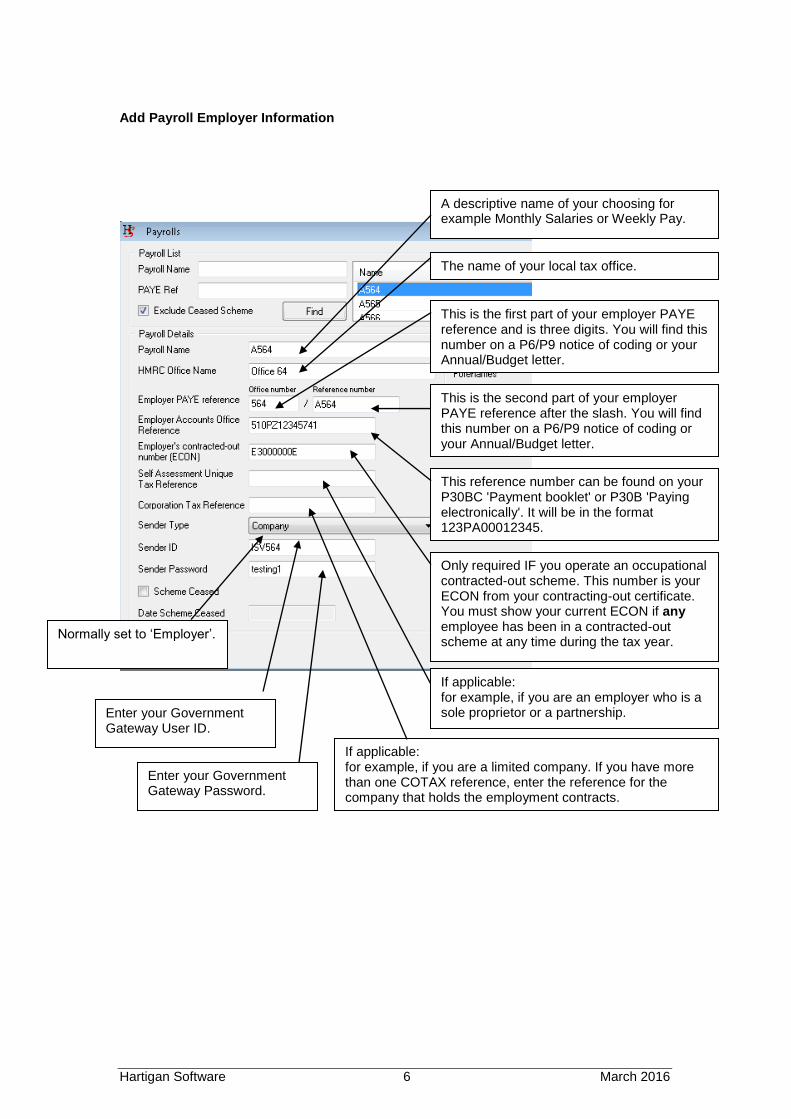
This is the first part of your employer PAYE reference and is three digits. You will find this number on a P6/P9 notice of coding or your Annual/Budget letter.
This reference number can be found on your P30BC 'Payment booklet' or P30B 'Paying electronically'. It will be in the format 123PA00012345.
Only required IF you operate an occupational contracted-out scheme. This number is your ECON from your contracting-out certificate. You must show your current ECON if any employee has been in a contracted-out scheme at any time during the tax year.
If applicable: for example, if you are a limited company. If you have more than one COTAX reference, enter the reference for the company that holds the employment contracts.
If applicable: for example, if you are an employer who is a sole proprietor or a partnership.
This is the second part of your employer PAYE reference after the slash. You will find this number on a P6/P9 notice of coding or your Annual/Budget letter.
A descriptive name of your choosing for example Monthly Salaries or Weekly Pay.
The name of your local tax office.
Normally set to ‘Employer’.
Enter your Government Gateway User ID.
Enter your Government Gateway Password.
Hartigan Software 7 March 2016
Add Payroll Employer Information
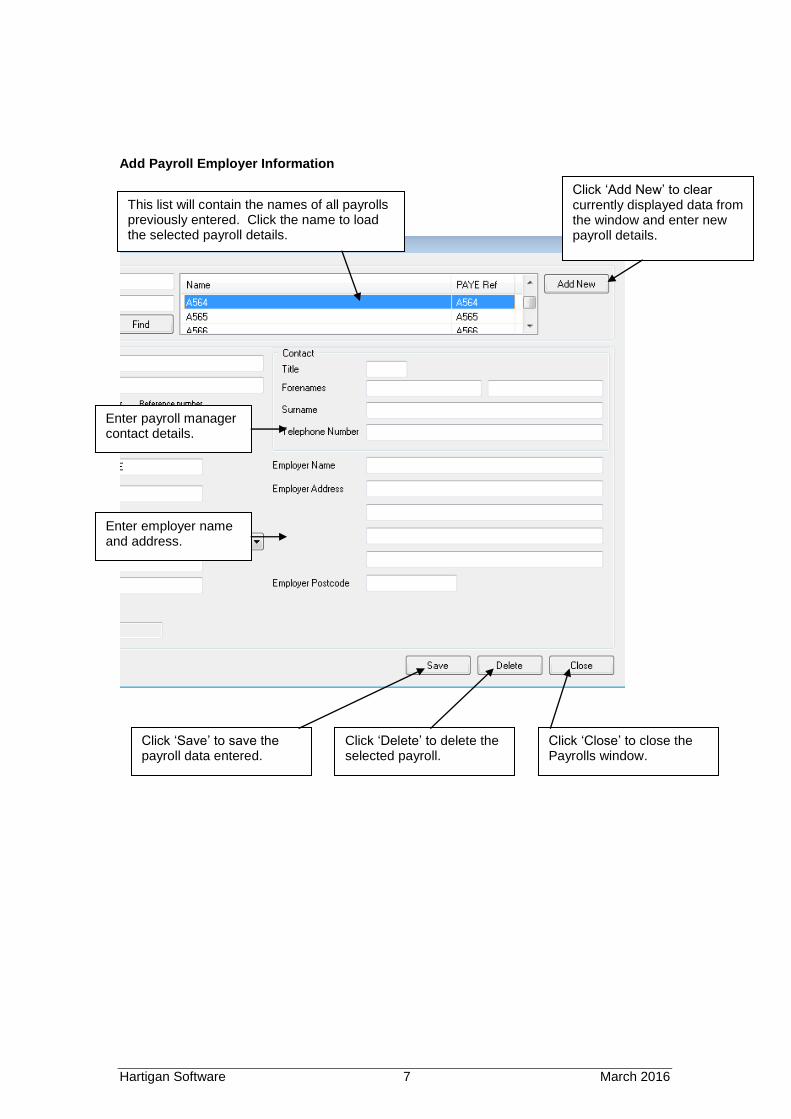
Click ‘Add New’ to clear currently displayed data from the window and enter new payroll details.
Enter payroll manager contact details.
Click ‘Save’ to save the payroll data entered.
Click ‘Close’ to close the Payrolls window.
Click ‘Delete’ to delete the selected payroll.
Enter employer name and address.
This list will contain the names of all payrolls previously entered. Click the name to load the selected payroll details.

Hartigan Software 8 March 2016
Import Payroll Employer Information
The following screen is displayed:
The import process is able to insert new payroll records or update existing payroll records. A CSV file can also be used for importing data as long as either: 1. the CSV column header names are the same or
2. the CSV file does not have column headers but the column order is the same as the Excel template
Click the [Import Payrolls] button to begin the process
This button will create a new Excel document based on our data Import template.
This button allows you to import an existing Excel or CSV document.
This button will validate the data in the Excel or CSV document.
This button will import the data from the Excel or CSV document.

Hartigan Software 9 March 2016
Full Payment Submission
Employee Payroll Data Entry / Import Start the employee payroll information entry process by performing any one of the two options shown below depending on how your company payroll information is generated and the type of information to be entered. ‘Open Template’ generates an Excel document containing all payroll data reporting items. ‘Import File’ allows the import of an existing Excel, CSV, or XML document.
Open Template Each time a template button is clicked an Excel document is created from the Full Template. The new document is named as follows: FPS This relates to the submission type being created (Full Payment Submission) Date Being the date the document is created (-YYYYMMDD format) Count Document count for the ‘Date’ above (-NNN format). If more than 1 document has
been generated for that date. For example FPS-20130329-001 is the second FPS Excel document created on 29
th March
2013.
This button will create a new Excel document based on our FPS Template.
This button allows you to import an existing Excel, CSV, or XML document.
Hartigan Software 10 March 2016
Full Payment Submission
Employee Payroll Data Entry / Import Open Template
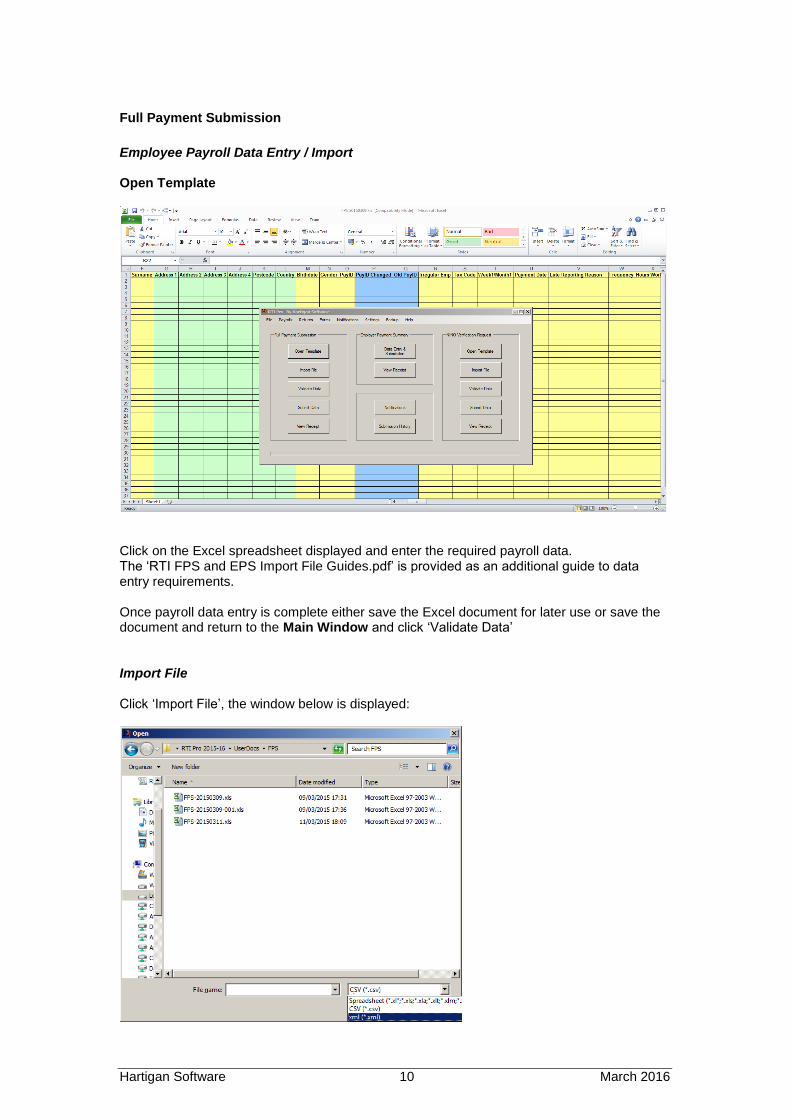
Click on the Excel spreadsheet displayed and enter the required payroll data. The ‘RTI FPS and EPS Import File Guides.pdf’ is provided as an additional guide to data entry requirements. Once payroll data entry is complete either save the Excel document for later use or save the document and return to the Main Window and click ‘Validate Data’ Import File Click ‘Import File’, the window below is displayed:

Hartigan Software 11 March 2016
Full Payment Submission
Employee Payroll Data Entry / Import Select the type of file (Spreadsheet, CSV, or XML) from the [Files of Type] drop down box, browse to the location of the file to be imported and press the [Open] button. Excel Spreadsheet File Type If an Excel spreadsheet is imported, the document is loaded and displayed behind the RTI Pro Main Window. The document can be updated before the validation step if required. XML File Type The XML file will be imported ready for validation CSV File Type If a CSV file is imported, the following screen will be displayed:
Select the delimiter used in the CSV file and whether or not the data contains column headers. If the data does not contain column headers, the columns will need to be in the same order as the standard Full Payment Submission Excel template. Press the [OK] button once the selection has been made. The data will be imported ready for validation.

Hartigan Software 12 March 2016
Full Payment Submission
Data Validation
If more than one file is found the application will display a window showing the files found. The user should click on the required file, the file will be highlighted, then click ‘Ok’. Exceptions If the selected file contents are not in the format required by HMRC or data is missing a data exception report will be displayed confirming the issues found. Alternatively, the exceptions can be exported to a file by selecting the [Export Validation Exceptions to File] in the [Advanced Settings] screen.
Review the information in the exceptions window above, click on the spreadsheet and add missing data or correct entries as necessary referring to the ‘RTI FPS and EPS Import File Guides.pdf’’ or HMRC website for guidance. Save the corrected document and click ‘Validate Data’ to confirm the document is ready for submission. If the selected document does not pass validation repeat the process above. A ‘Validated Successfully’ message will be displayed after successful validation, the document is now ready for submission.
This button will validate the data in the Excel, CSV, or XML document.
This button will submit the data in the Excel, CSV, or XML document.
This button will display the receipt for a successfully submitted file.
Hartigan Software 13 March 2016
Full Payment Submission
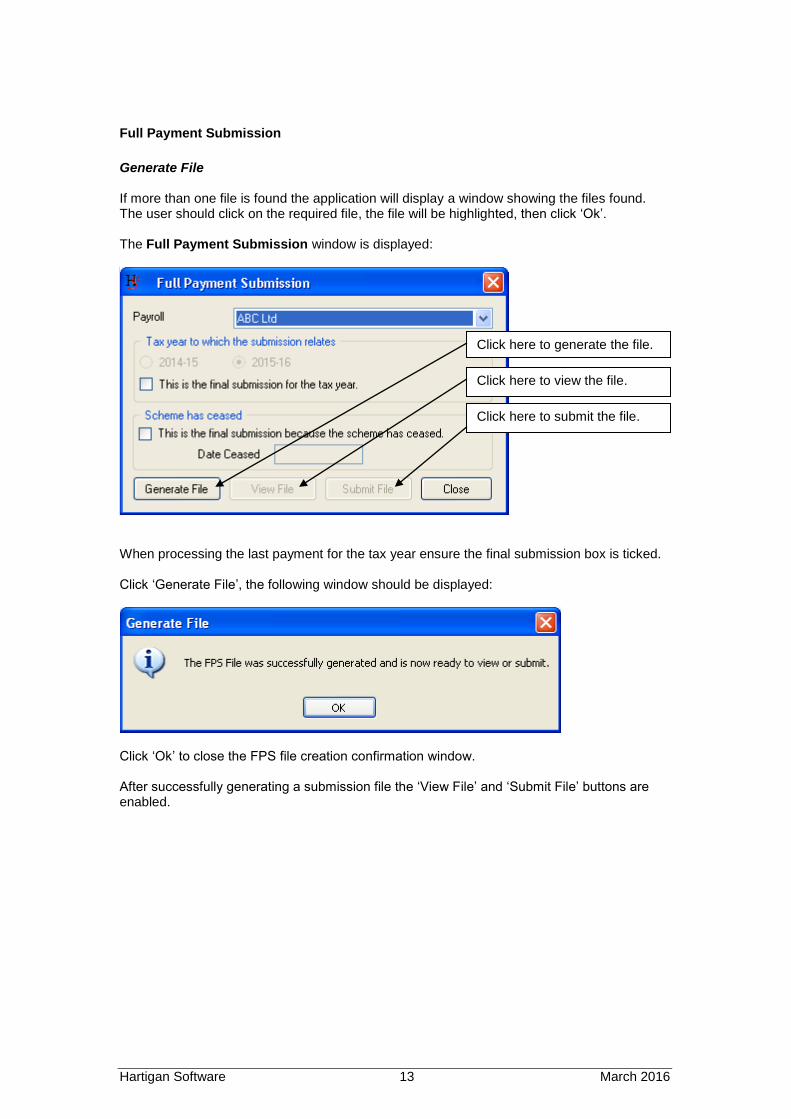
Generate File If more than one file is found the application will display a window showing the files found. The user should click on the required file, the file will be highlighted, then click ‘Ok’. The Full Payment Submission window is displayed:
When processing the last payment for the tax year ensure the final submission box is ticked. Click ‘Generate File’, the following window should be displayed:
Click ‘Ok’ to close the FPS file creation confirmation window. After successfully generating a submission file the ‘View File’ and ‘Submit File’ buttons are enabled.
Click here to generate the file.
Click here to view the file.
Click here to submit the file.

Hartigan Software 14 March 2016
Full Payment Submission
View File Click ‘View File’ to review the submission file content. The report provides a list of all employees with information being submitted to HMRC.
Clicking on an employees name in the list will display the full reporting information relating to that employee:
Confirm the Full Payment Submission extract contains information for all the expected employees. Once content checks have been completed close the FPS extract window.
Press the [Print] button at the bottom right hand side of the screen to print the report.
Click the column header to order the report by Works No or Name.

Hartigan Software 15 March 2016
Full Payment Submission
Submit Data Ensure you are able to connect to the internet then click ‘Submit File’ on the Full Payment Submission window to connect to the HMRC site and transmit your data. A transmission progress window will be displayed. The time taken to transmit your data will depend on how much data you have to transmit, how busy the HMRC site is and the speed of your internet connection. Transmission progress window:
The window above shows where a file submission request has been made and a connection to the HMRC site has been established. The window below shows a rejected connection due to incorrect or otherwise invalid payroll header information having been entered when the payroll was set up. Save the message and close the window. Click ‘Payrolls’ on the RTI Pro Main Window, select the payroll giving the error and review the HMRC payroll references and sender information, correct any discrepancies and ‘Save’ the record.

Hartigan Software 16 March 2016
Full Payment Submission
Submit Data Begin the submission process again commencing with Data Validation. NOTE: If the failure relates to a data issue correct the data then run the validation. A successful submission is shown in the window below:
Submission Receipt Click ‘View Receipt’ to display the HMRC receipt shown below:
A copy of the Full Payment Submission and the Submission Receipt will be stored in the Document Submission Folder.

Hartigan Software 17 March 2016
NI Number Verification Request
Employer Payment Summary
Click here to enter the data for the employer payment summary.
This button will create a new Excel document based on our NINO Template.
This button allows you to import an existing Excel or XML document.
This button will validate the data in the Excel or XML document.
This button will submit the data in the Excel or XML document.
This button will display the receipt for a successfully submitted file.
Hartigan Software 18 March 2016
Employer Payment Summary
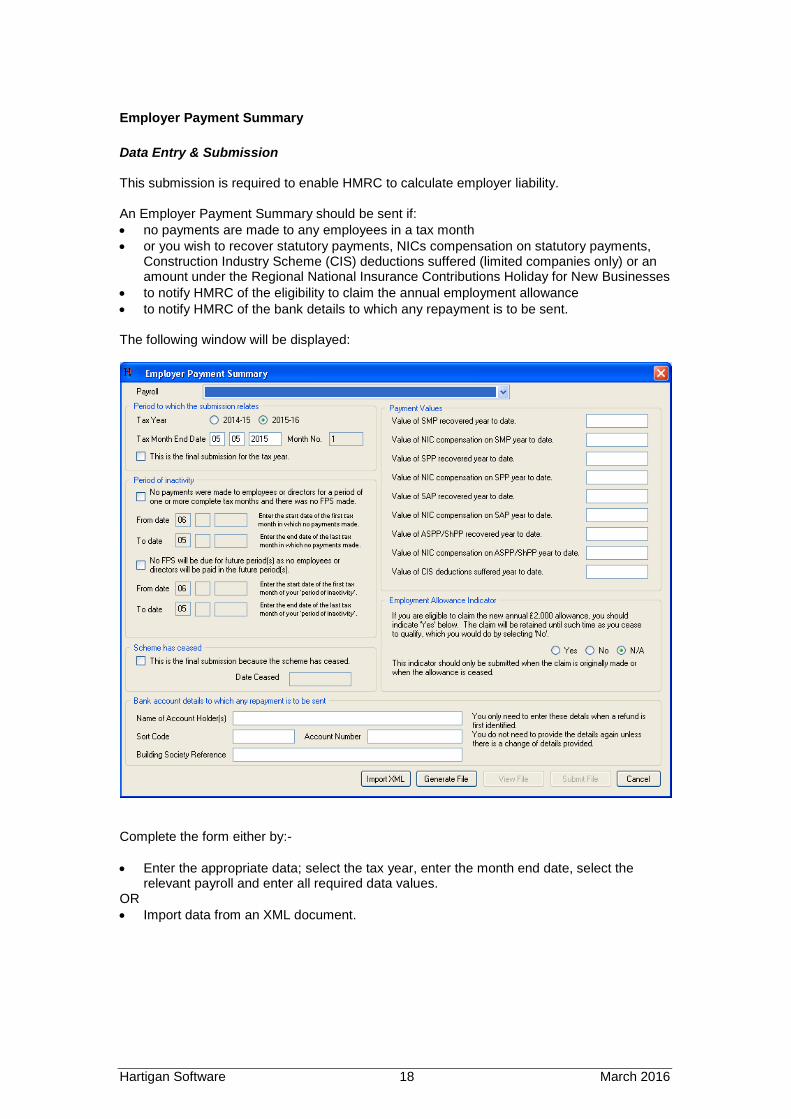
Data Entry & Submission This submission is required to enable HMRC to calculate employer liability. An Employer Payment Summary should be sent if:
no payments are made to any employees in a tax month
or you wish to recover statutory payments, NICs compensation on statutory payments, Construction Industry Scheme (CIS) deductions suffered (limited companies only) or an amount under the Regional National Insurance Contributions Holiday for New Businesses
to notify HMRC of the eligibility to claim the annual employment allowance
to notify HMRC of the bank details to which any repayment is to be sent. The following window will be displayed:
Complete the form either by:-
Enter the appropriate data; select the tax year, enter the month end date, select the relevant payroll and enter all required data values.
OR
Import data from an XML document.

Hartigan Software 19 March 2016
Employer Payment Summary
Data Entry & Submission Click ‘Generate File’, the following window should be displayed:
Click ‘Ok’ to close the EPS file creation confirmation window. After successfully generating a submission file the ‘View File’ and ‘Submit File’ buttons are enabled. View File Click ‘View File’ to review the submission file content:
Submit Data Ensure you are able to connect to the internet then click ‘Submit File’ on the Employer Payment Submission window to connect to the HMRC site and transmit your data.
Press the [Print] button at the bottom right hand side of the screen to print the report.

Hartigan Software 20 March 2016
Earlier Year Update
An Earlier Year Update (EYU) return is required for any employee whose payroll data needs to be corrected for a previous tax year. An EYU must only contain the differences between the values that had previously been submitted on the last submission for the year and the correct values. An EYU cannot be sent until 20
th April following the end of the tax year that it is in respect of.
If the correction is made before this date it can be done via a Full Payment Submission.
Begin the process by selecting the tax year that the earlier year update is in respect of and performing any one of the three options shown below depending on how your earlier year update information is to be generated:
Click here to begin the Earlier Year Update Submission.
This button will create a new Excel document based on our Earlier Year Update Template.
This button allows you to import an existing Excel or XML document.
This button will launch a series of screens for the earlier year update data to be entered manually.

Hartigan Software 21 March 2016
Earlier Year Update
Data Entry
Enter the employee details on the first screen.
Enter the final tax code and the values of the pay and deduction fields that require an adjustment. The [Adjustment] amount will be automatically calculated if the [Previously Submitted Amount] and [Correct Amount] are entered. Please note that the [Adjustment] amount is the only field that is reported on the Earlier Year Update. The [Previously Submitted Amount] and [Correct Amount] are used to help calculate the [Adjustment] amount and are not mandatory. Only enter the values of the fields that require an adjustment and leave the other fields blank.
Hartigan Software 22 March 2016
Earlier Year Update
Data Entry
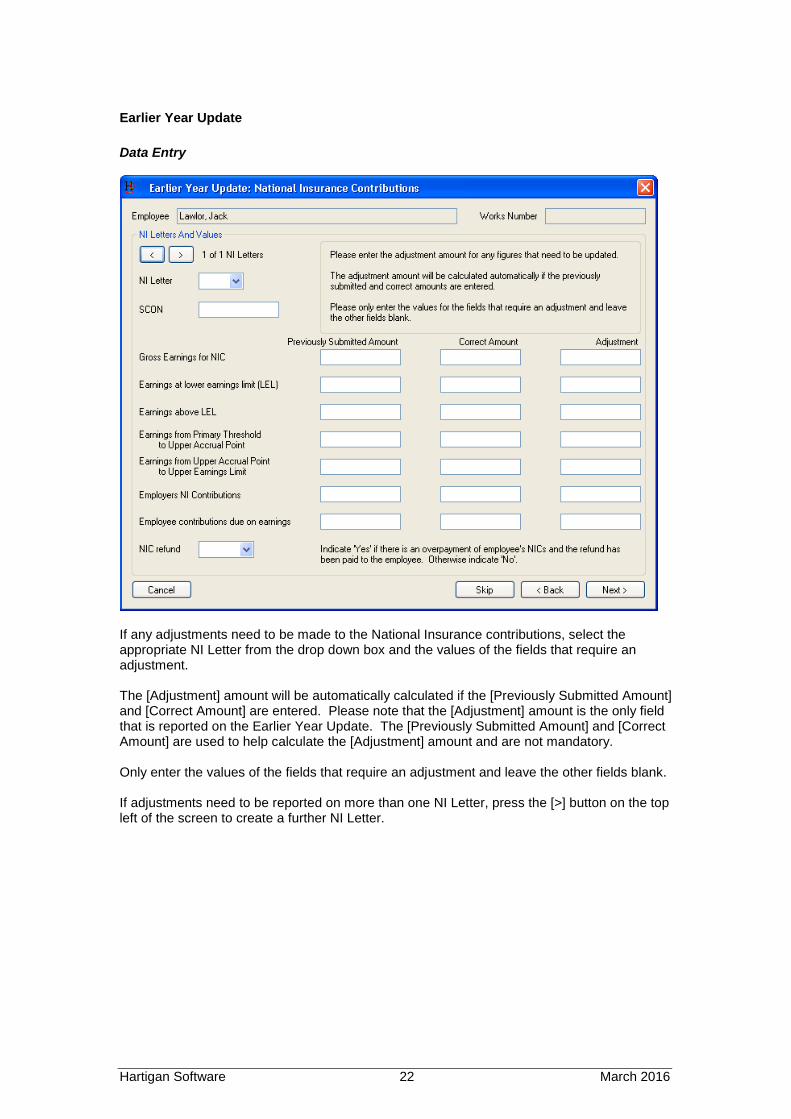
If any adjustments need to be made to the National Insurance contributions, select the appropriate NI Letter from the drop down box and the values of the fields that require an adjustment. The [Adjustment] amount will be automatically calculated if the [Previously Submitted Amount] and [Correct Amount] are entered. Please note that the [Adjustment] amount is the only field that is reported on the Earlier Year Update. The [Previously Submitted Amount] and [Correct Amount] are used to help calculate the [Adjustment] amount and are not mandatory. Only enter the values of the fields that require an adjustment and leave the other fields blank. If adjustments need to be reported on more than one NI Letter, press the [>] button on the top left of the screen to create a further NI Letter.
Hartigan Software 23 March 2016
Earlier Year Update
Data Entry
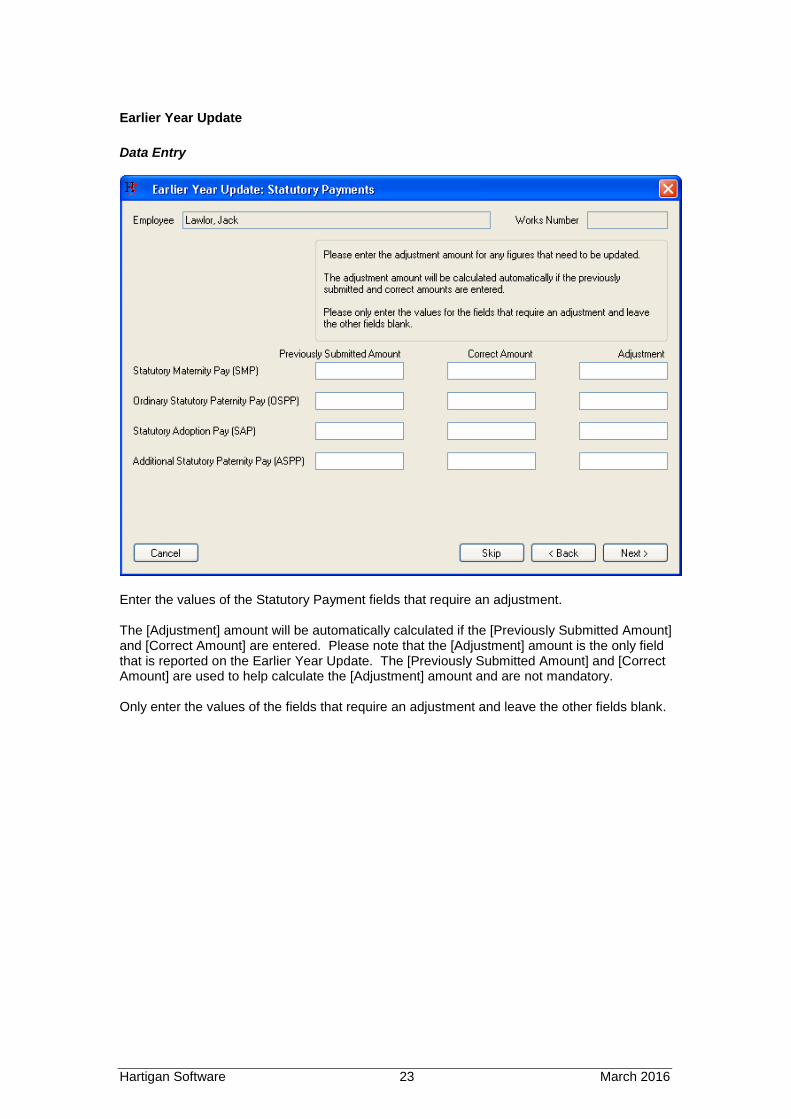
Enter the values of the Statutory Payment fields that require an adjustment. The [Adjustment] amount will be automatically calculated if the [Previously Submitted Amount] and [Correct Amount] are entered. Please note that the [Adjustment] amount is the only field that is reported on the Earlier Year Update. The [Previously Submitted Amount] and [Correct Amount] are used to help calculate the [Adjustment] amount and are not mandatory. Only enter the values of the fields that require an adjustment and leave the other fields blank.
Hartigan Software 24 March 2016
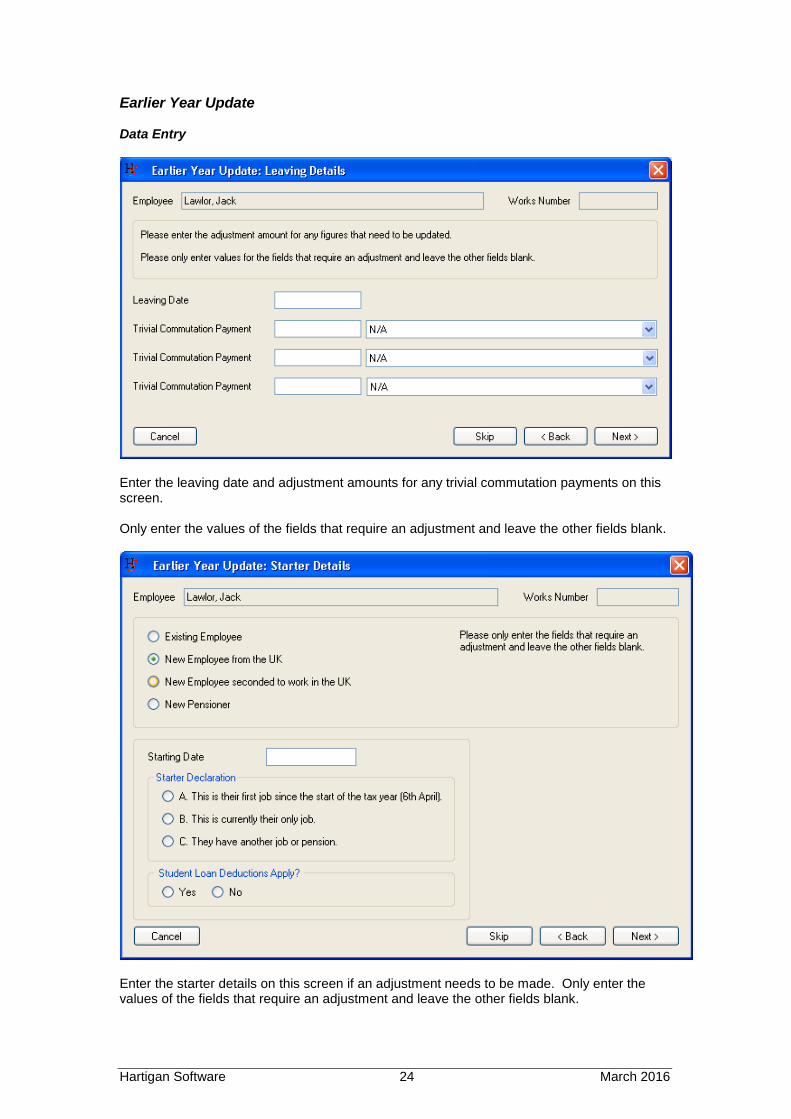
Earlier Year Update Data Entry
Enter the leaving date and adjustment amounts for any trivial commutation payments on this screen. Only enter the values of the fields that require an adjustment and leave the other fields blank.
Enter the starter details on this screen if an adjustment needs to be made. Only enter the values of the fields that require an adjustment and leave the other fields blank.

Hartigan Software 25 March 2016
Earlier Year Update
Open Template Each time a template button is clicked an Excel document is created from the Full Template. The new document is named as follows: EYU This relates to the submission type being created (Earlier Year Update) Date Being the date the document is created (-YYYYMMDD format) Count Document count for the ‘Date’ above (-NNN format). If more than 1 document has
been generated for that date. For example EYU-20130329-001 is the second EYU Excel document created on 29
th March
2013. Open Template
Click on the Excel spreadsheet displayed and enter the required data. Please note that the following fields are mandatory for each employee:
Surname
Forename or initials
NI Number (NINO) or at least two address lines
Birth date
Gender
Tax code Once data entry is complete either save the Excel document for later use or save the document and return to the Main Window and click ‘Validate Data’

Hartigan Software 26 March 2016
Earlier Year Update
Import File Click ‘Import File’, the window below is displayed:
Select the type of file (Spreadsheet or XML) from the [Files of Type] drop down box, browse to the location of the file to be imported and press the [Open] button. Excel Spreadsheet File Type If an Excel spreadsheet is imported, the document is loaded and displayed behind the Main Window. The document can be updated before the validation step if required. XML File Type The XML file will be imported ready for validation. Press the [OK] button once the selection has been made. The data will be imported ready for validation.

Hartigan Software 27 March 2016
Earlier Year Update
Data Validation
If more than one file is found the application will display a window showing the files found. The user should click on the required file, the file will be highlighted, then click ‘Ok’. Exceptions If the selected file contents are not in the format required by HMRC or data is missing a data exception report will be displayed confirming the issues found. Review the information in the exceptions window, click on the spreadsheet and add missing data or correct entries as necessary referring to the HMRC website for guidance. Save the corrected document and click ‘Validate Data’ to confirm the document is ready for submission. If the selected document does not pass validation repeat the process above.
This button will validate the data in the Excel or XML document.
This button will submit the data in the Excel or XML document.
This button will display the receipt for a successfully submitted file.

Hartigan Software 28 March 2016
Earlier Year Update
Generate File If more than one file is found the application will display a window showing the files found. The user should click on the required file, the file will be highlighted, then click ‘Ok’. The Earlier Year Submission window is displayed:
Click ‘Generate File’, the following window should be displayed:
Click ‘Ok’ to close the window. After successfully generating a submission file the ‘View File’ and ‘Submit File’ buttons are enabled. View File Click ‘View File’ to review the submission file content. The report provides a list of all employees with information being submitted to HMRC. Confirm the EYU extract contains information for all the expected employees. Once content checks have been completed close the EYU extract window. Submit Data Ensure you are able to connect to the internet then click ‘Submit File’ to connect to the HMRC site and transmit your data.
Click here to generate the file. Click here to view the file.
Click here to submit the file.

Hartigan Software 29 March 2016
View Submission History
The following screen is displayed:
Select the appropriate filters from the selection at the top of the screen and press the [List Submission History] button. Please note that the history will not include submissions that were made prior to installing the 2014-15 version of the software. The original submission or response can be viewed by clicking on the submission in the list and pressing the [View Submission] or [View Response] button. The status of the submission can be updated manually by selecting the return in the list and pressing the [Update Status] button. This will display the following screen:
Click here to view the Submission History.

Hartigan Software 30 March 2016
Request Outstanding Submission Reponses
If a response was not received from the Government Gateway when the original submission took place, the status of the submission will be displayed as AWAITING_RESPONSE. The response can be retrieved from the Government Gateway by pressing the [Request Outstanding Responses from Government Gateway] button at the bottom of the screen for the selected sender payroll reference or by following the procedure below to request outstanding responses across all payroll references. -
A message box will be displayed confirming the number of responses returned by the Government Gateway.
Select the [View submission awaiting response] option and press the [List Submission History] button. This will list all submissions that are awaiting a response across all payroll references.
To attempt to recover all outstanding responses displayed from the Government Gateway Press the [Request Outstanding Responses from Government Gateway] button. .

Hartigan Software 31 March 2016
Data and Submission File Backup
The location of the backup files can be changed from the [Settings] screen. The location should ideally be a folder that is included in your own backup procedures.
Backup copies of your Payroll Data and submission files can be made by pressing the [Backup] menu at the top of the main screen. `
Select the location of the backup files by pressing this button.
Open the backup folder by pressing this button.
Click here to take backup copies of your files
Press the [OK] button to confirm.
Hartigan Software 32 March 2016
Receive Notifications from HMRC
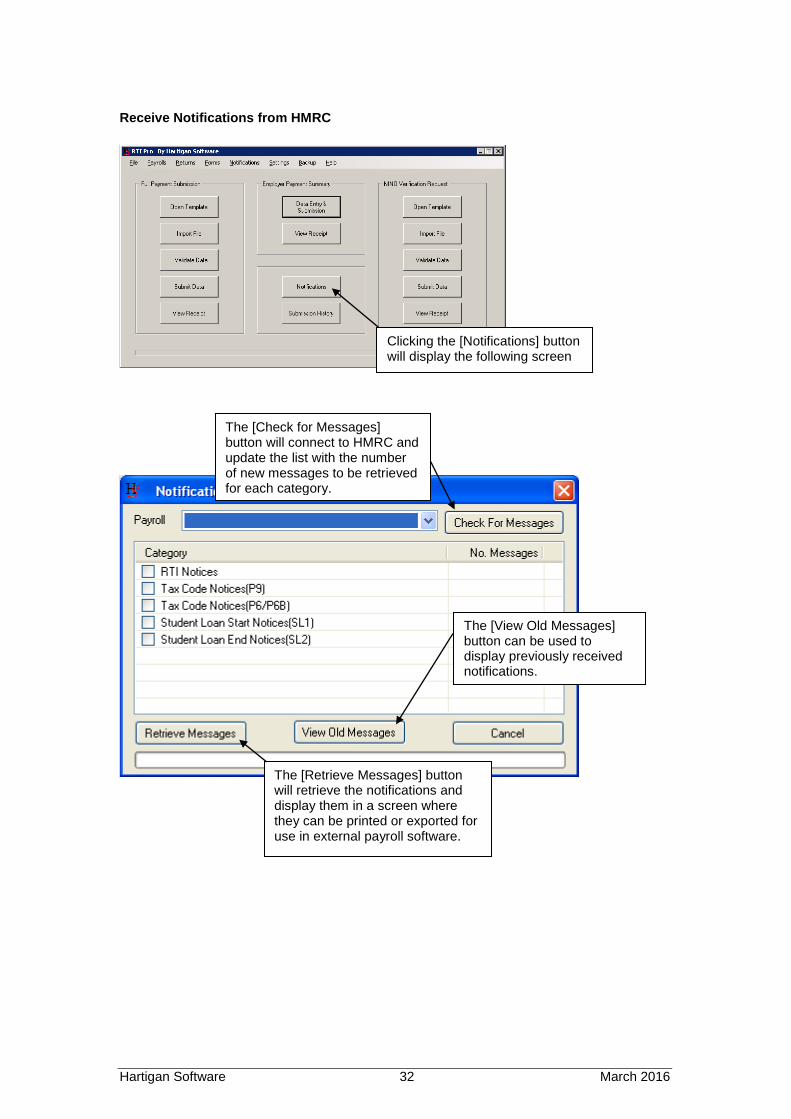
Clicking the [Notifications] button will display the following screen
The [Check for Messages] button will connect to HMRC and update the list with the number of new messages to be retrieved for each category.
The [Retrieve Messages] button will retrieve the notifications and display them in a screen where they can be printed or exported for use in external payroll software.
The [View Old Messages] button can be used to display previously received notifications.

Hartigan Software 33 March 2016
Export Notification Messages
The following screen is displayed:
Select the notification category and export file format. The default option is to create one file per payroll reference. Removing the tick from the [One file per payroll reference] will generate a single file containing the notifications for all payrolls’ references. Select the location for saving the export file. The default location for the export files can be set via the [Import / Export File Settings] button on the [Settings] screen. Click the [Export] button to generate the notification files and the [Open Folder] button to view the files in the selected folder location.
Click the [Notifications / Export Messages] button to begin the process
Hartigan Software 34 March 2016
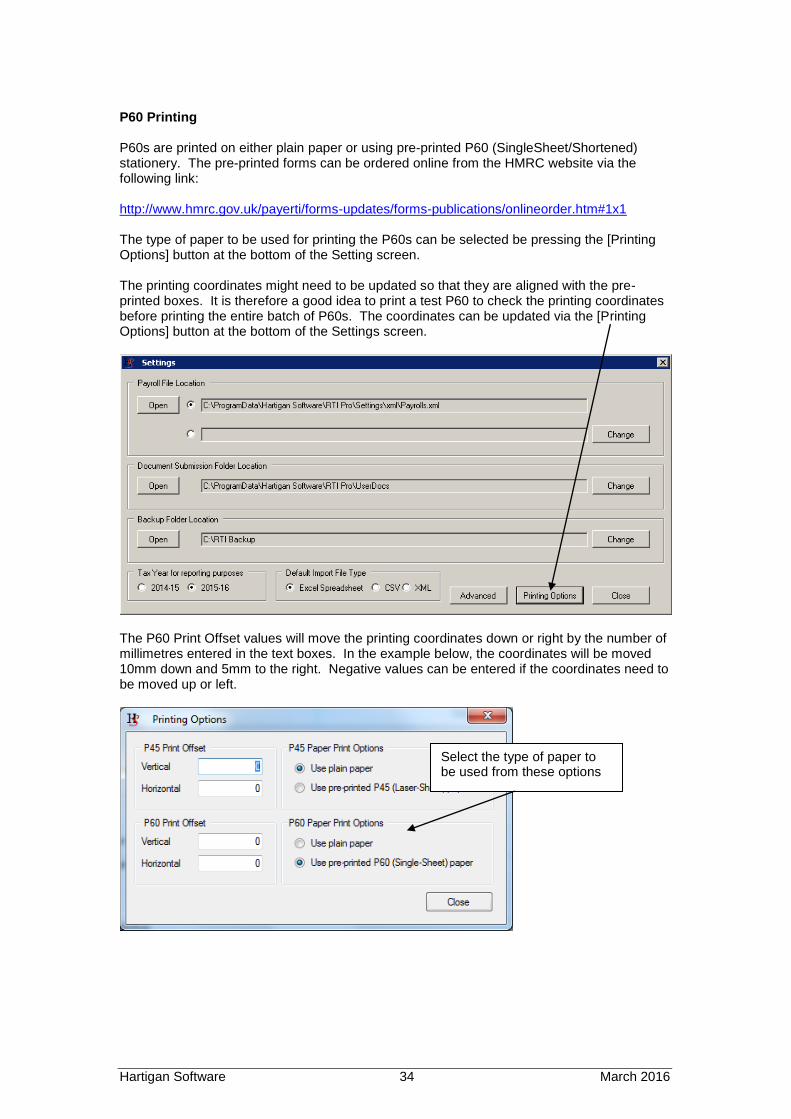
P60 Printing P60s are printed on either plain paper or using pre-printed P60 (SingleSheet/Shortened) stationery. The pre-printed forms can be ordered online from the HMRC website via the following link: http://www.hmrc.gov.uk/payerti/forms-updates/forms-publications/onlineorder.htm#1x1 The type of paper to be used for printing the P60s can be selected be pressing the [Printing Options] button at the bottom of the Setting screen. The printing coordinates might need to be updated so that they are aligned with the pre-printed boxes. It is therefore a good idea to print a test P60 to check the printing coordinates before printing the entire batch of P60s. The coordinates can be updated via the [Printing Options] button at the bottom of the Settings screen.
The P60 Print Offset values will move the printing coordinates down or right by the number of millimetres entered in the text boxes. In the example below, the coordinates will be moved 10mm down and 5mm to the right. Negative values can be entered if the coordinates need to be moved up or left.
Select the type of paper to be used from these options

Hartigan Software 35 March 2016
P60 Printing
.The following screen is displayed when the [Print P60 Forms] button is pressed:
Select the payroll from the drop down box and press the [Print P60 Forms] button.
Click here to begin the P60 printing process.
This button will create a new Excel document based on our P60 printing Template.
This button allows you to import an existing Excel document with the data for P60 printing.
This button will display the following screen ready to print the P60 forms.

Hartigan Software 36 March 2016
P45 Printing
P45s are printed on either plain paper or using the pre-printed P45 (Laser Sheet) - 3 part stationery. The pre-printed forms can be ordered online from the HMRC website via the following link: http://www.hmrc.gov.uk/payerti/forms-updates/forms-publications/onlineorder.htm#1x1 The type of paper to be used for printing the P45 can be selected be pressing the [Printing Options] button at the bottom of the Settings screen.
If printing on pre-printed P45 paper, the printing coordinates might need to be updated so that they are aligned with the pre-printed boxes. The P45 Print Offset values will move the printing coordinates down or right by the number of millimetres entered in the text boxes. In the example above, the coordinates will be moved 10mm down and 5mm to the right. Negative values can be entered if the coordinates need to be moved up or left.
Select the type of paper to be used from these options

Hartigan Software 37 March 2016
P45 Printing
.The following screen is displayed when the [Print P45 Forms] button is pressed:
Select the payroll from the drop down box and press the [Print P45 Forms] button.
Click here to begin the P45 printing process.
This button will create a new Excel document based on our P45 printing Template.
This button allows you to import an existing Excel document with the data for P45 printing.
This button will display the following screen ready to print the P45 forms.
Hartigan Software 38 March 2016
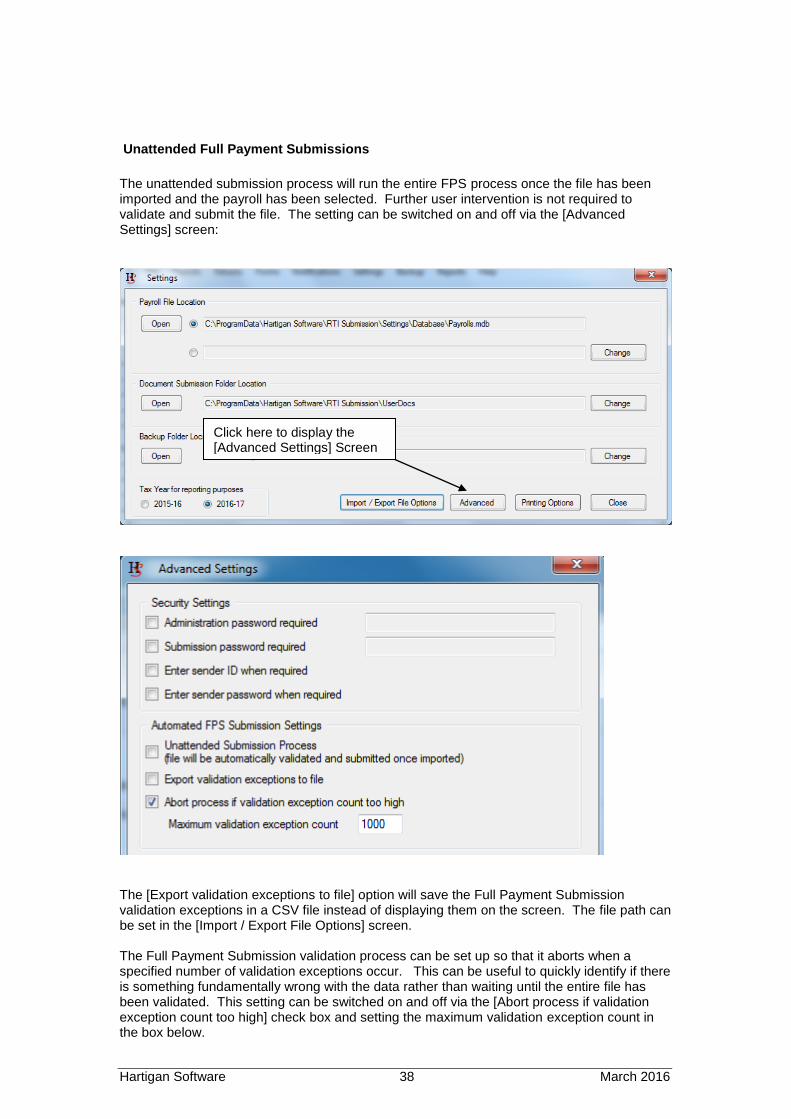
Unattended Full Payment Submissions
The unattended submission process will run the entire FPS process once the file has been imported and the payroll has been selected. Further user intervention is not required to validate and submit the file. The setting can be switched on and off via the [Advanced Settings] screen:
The [Export validation exceptions to file] option will save the Full Payment Submission validation exceptions in a CSV file instead of displaying them on the screen. The file path can be set in the [Import / Export File Options] screen. The Full Payment Submission validation process can be set up so that it aborts when a specified number of validation exceptions occur. This can be useful to quickly identify if there is something fundamentally wrong with the data rather than waiting until the entire file has been validated. This setting can be switched on and off via the [Abort process if validation exception count too high] check box and setting the maximum validation exception count in the box below.
Click here to display the [Advanced Settings] Screen

Hartigan Software 39 March 2016
Multiple Payroll/Employer Full Payment Submissions
The Full Payment Submission Excel Template includes a [PAYE Ref] column which, when enabled, automates payroll selection. This option has been made available to improve the submission processing of multiple payrolls/employers but can also be used to automatically select the payroll when single payrolls/employer submissions are made. In order to utilise the [PAYE Ref] column on the import spreadsheet, it should be populated in the format 999/XXX where 999 is the HMRC Office number and XXX is the Employer reference number. In addition to this, the [Use PAYE Ref from import spreadsheet] option should be selected on the [Import / Export File Options] screen:
The default option is to submit the returns concurrently, however the software is able to submit the returns individually in succession or in batches to improve submission times and reduce the work load of the application. See the [Bulk FPS Submission Settings] page for further details.
Click here to turn on the [Use PAYE Ref] setting
Click here to display the [Import / Export File Options] Screen
Hartigan Software 40 March 2016
Multiple Payroll/Employer Full Payment Submissions
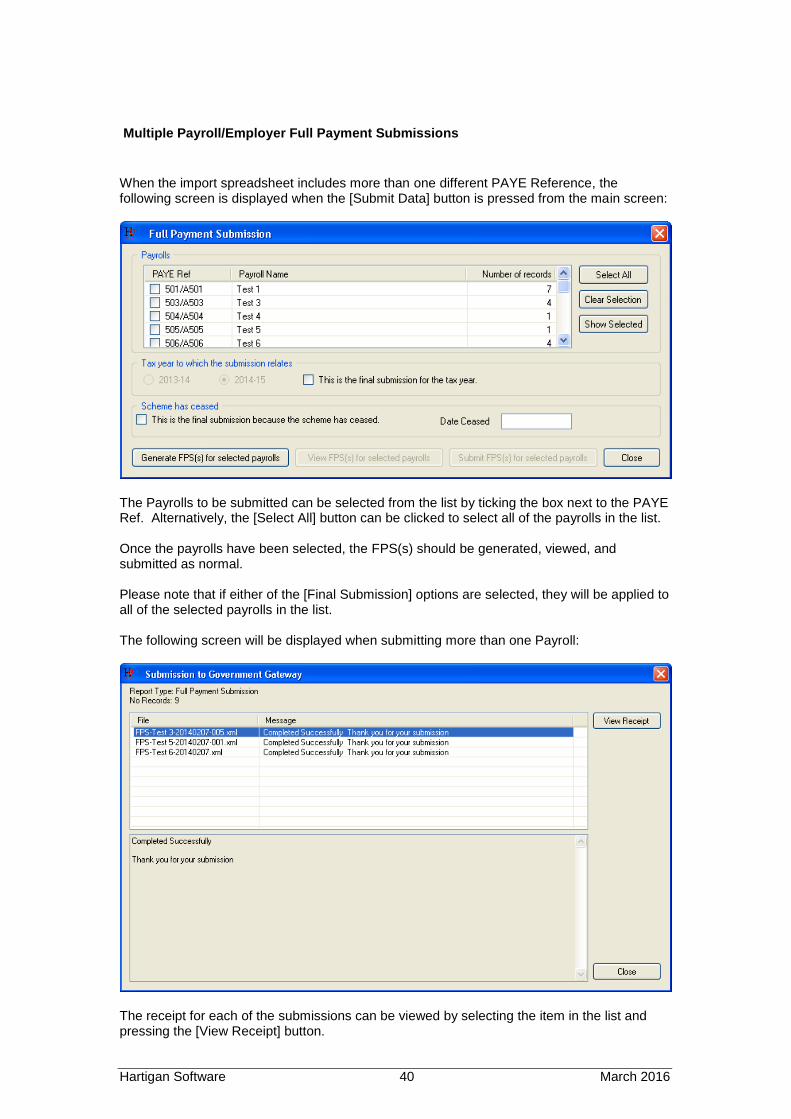
When the import spreadsheet includes more than one different PAYE Reference, the following screen is displayed when the [Submit Data] button is pressed from the main screen:
The Payrolls to be submitted can be selected from the list by ticking the box next to the PAYE Ref. Alternatively, the [Select All] button can be clicked to select all of the payrolls in the list. Once the payrolls have been selected, the FPS(s) should be generated, viewed, and submitted as normal. Please note that if either of the [Final Submission] options are selected, they will be applied to all of the selected payrolls in the list. The following screen will be displayed when submitting more than one Payroll:
The receipt for each of the submissions can be viewed by selecting the item in the list and pressing the [View Receipt] button.
Hartigan Software 41 March 2016
Split Large FPS files into smaller submissions
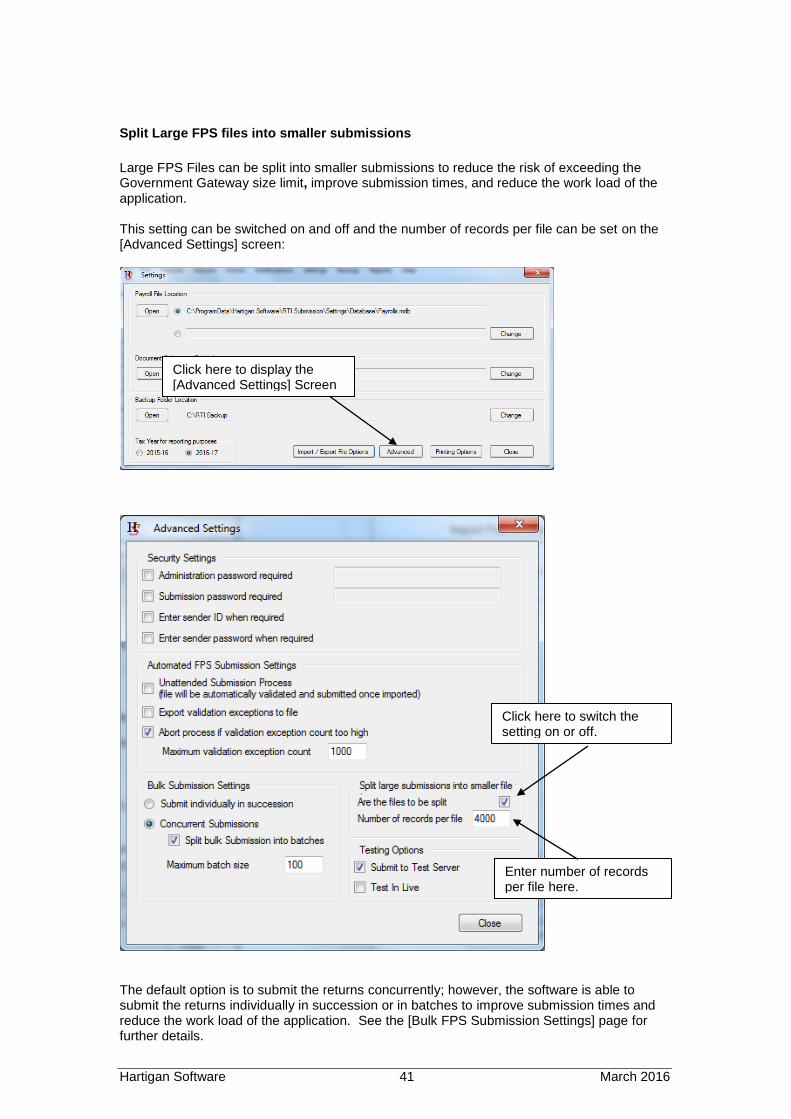
Large FPS Files can be split into smaller submissions to reduce the risk of exceeding the Government Gateway size limit, improve submission times, and reduce the work load of the application. This setting can be switched on and off and the number of records per file can be set on the [Advanced Settings] screen:
The default option is to submit the returns concurrently; however, the software is able to submit the returns individually in succession or in batches to improve submission times and reduce the work load of the application. See the [Bulk FPS Submission Settings] page for further details.
Click here to display the [Advanced Settings] Screen
Click here to switch the setting on or off.
Enter number of records per file here.

Hartigan Software 42 March 2016
Bulk FPS Submission Settings
The bulk Submission settings refer to when more than one FPS return is submitted as part of a single process. This setting can be found on the [Advanced Settings] screen via the [Advanced] button at the bottom of the [Settings] Screen.
The default option is to submit the bulk returns concurrently. The [maximum batch size] setting can be used to restrict the number of concurrent submissions by batching the submissions together into manageable numbers. Once a batch of submissions has completed, the next batch will be submitted. The purpose of this setting is to improve submission times and reduce the work load of the application. The [Submit Individually in Succession] setting will only submit one file at a time and can be used to minimise the internet traffic and reduce the work load of the application.
Click here to display the [Advanced Settings] Screen

Hartigan Software 43 March 2016
Bulk EPS Submissions
EPS data can be imported and submitted in bulk from an Excel or CSV file.
Select the [Returns \ Employer Payment Summary \ Data Import] menu from the application front screen to begin the process. Alternatively, press the [Import Excel/CVS File] button at the bottom of the [Employer Payment Summary] data entry screen:
The following screen will be displayed:
This button will create a new Excel document based on our EPS Template.
This button allows you to import an existing Excel or CSV document.
This button will validate the data in the Excel or CSV document.
This button will submit the data in the Excel or CSV document (see below).
This button will display the receipt for a successfully submitted file.

Hartigan Software 44 March 2016
The following screen is displayed when the [Submit Data] button is pressed:
The Payrolls to be submitted can be selected from the list by ticking the box next to the PAYE Ref. Alternatively, the [Select All] button can be clicked to select all of the payrolls in the list. Once the payrolls have been selected, the EPS(s) should be generated, viewed, and submitted in the normal way. The following screen will be displayed when submitting the EPS files:
A maximum of 100 files will be submitted at a time. If there are more than 100 files to be submitted, they will be submitted in batches of 100 and the progress bar on the bottom of the screen will reflect the current status of the entire batch. The cancel button will cancel the complete process for all files not yet submitted. Any files already submitted will not be cancelled but the process will not submit any further files. If a response is not received from the Government Gateway, the [Request Response from Gateway] button can be pressed to poll for the response again:

Hartigan Software 45 March 2016
Auto Generate EPS for period of inactivity
EPS returns can be automatically generated for payroll references that have not made Full Payment Submissions for a particular tax month. Select the [Reports \ Period of Inactivity] menu option to begin the process.
The following screen will be displayed. Enter the Tax month end date for the reporting period and press the [List inactive payroll schemes] button. All payrolls without Full Payment Submissions in the period will be listed
. Select the Payroll schemes that require Inactivity Employer Payment Submissions or press the [Select All] button. Press the [Generate EPS for selected payroll schemes] button.
Hartigan Software 46 March 2016
Auto Generate EPS for period of inactivity
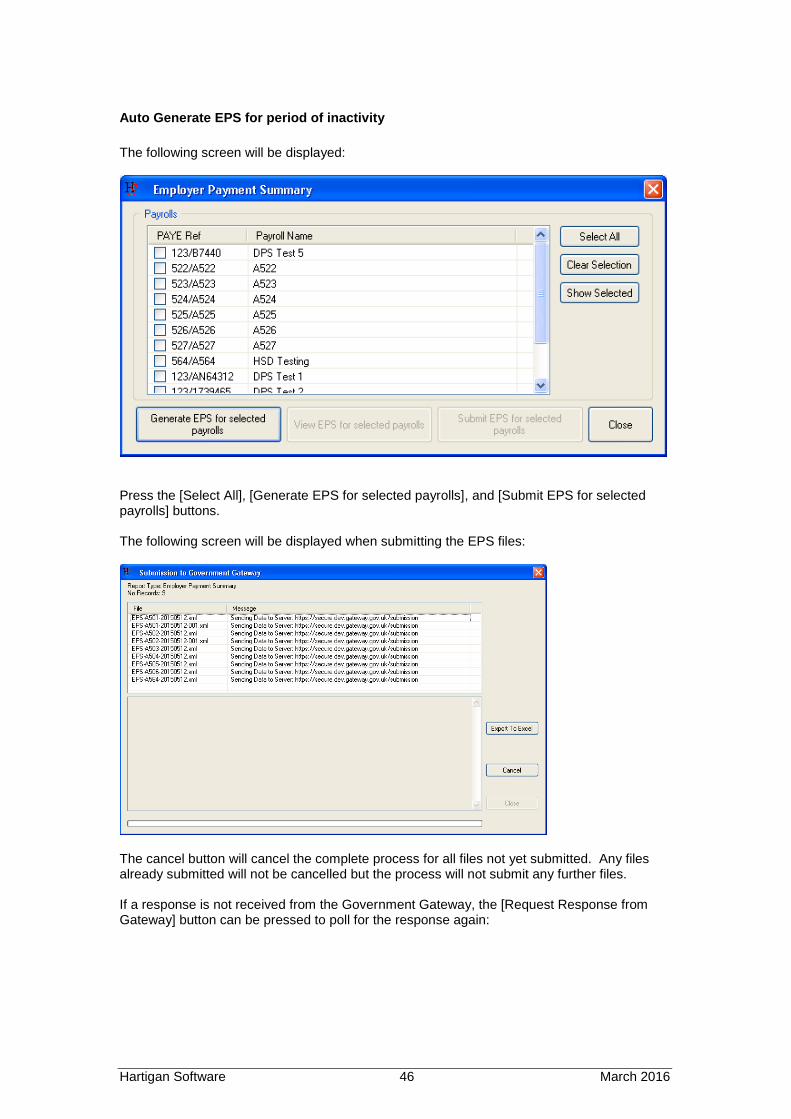
The following screen will be displayed:
Press the [Select All], [Generate EPS for selected payrolls], and [Submit EPS for selected payrolls] buttons. The following screen will be displayed when submitting the EPS files:
The cancel button will cancel the complete process for all files not yet submitted. Any files already submitted will not be cancelled but the process will not submit any further files. If a response is not received from the Government Gateway, the [Request Response from Gateway] button can be pressed to poll for the response again: