rolled rubber installation instructions
DESCRIPTION
Rolled Rubber Installation InstructionsRolled Rubber Installation InstructionsRolled Rubber Installation InstructionsRolled Rubber Installation InstructionsRolled Rubber Installation InstructionsTRANSCRIPT

INSTALLATION
INSTRUCTIONS
FOR
ROLLED RUBBER
UPON DELIVERY OF PRODUCT:
• Verify packing slip matches with product and order. • Inspect product thoroughly. • Report any discrepancies of original order, product defects, etc. No reimbursement or warranty claim will
be given for labor on material installed with visual defects. Any defects (size, color, etc.) must be reported prior to installation.
• Store product and adhesives in clean, dry environment with temperature between 70° and 95° F. • Read product and sub-floor preparation, instructions, warranty and other disclaimers carefully and
completely before beginning installation. Warning: Do NOT use recycled rubber products in conjunction with any petroleum based products. This includes solvents, adhesives or sealants. All substrates (especially new concrete) must be fully cured for 45 to
60 days prior to installing rubber products. Please ask for recommended cleaning agents. RECOMMENDED TOOLS: • Measuring Tape or Ruler • Metal Straight Edge • Non-Retractable Utility Knife with Extra Blades • White Marker or Chalk • Chalkline • 2x4 Wood Block • Cellophane, Masking or Packaging Tape • Mallet INTRODUCTORY NOTE: This installation guide is intended to provide the necessary information for the proper installation of rolled rubber. These instructions are believed to be based on accepted industry standards and are provided for informational use only. Allied Products LLC does not warrant any installation performed pursuant to these instructions or otherwise and specifically disclaims liability for any direct or indirect personal injury, property damage or other costs or losses resulting from installation. Rolled Rubber should be installed by qualified and experienced personnel.
ALLIED PRODUCTS, LLC ּ PO BOX 1431, SHERWOOD, OR 97140 ּ 800-864-1272 ּ ALLIEDPRODUCTSLLC.COM
ADHESIVE OPTIONS: • DSPS—2½”-3” quality double sided carpet tape • CX-941 polyurethane adhesives
• Mineral spirits and rag • Rubber gloves • 1,50-100# linoleum roller • “V” notched trowel
• 1/8”x1/8”x1/8” or 1/16”x1/16”x1/16” flat v-notch. Coverage: Approx. 80 sq.ft. per gal.
• SikaFlex Seam Sealant • Commercial grade caulking gun
PREPARATION: Rolled Rubber products must reach room temperature to ensure a secure, tight installation with minimal size fluctuation. Each piece should be completely unrolled and allowed to set for a full 24 hours prior to beginning installation. This allows the product to relax from being rolled and to size-stabilize at the typical room temperature. Inspect the product prior to installation for measurable defects or variations. Sub-Surface: For best installation, any sub-surface should be reasonably flat and free of holes or variances of more than 1/8”. • All sub-surfaces should be structurally sound and fully cured for 45 to 60 days.
Test floor for vapor drive in accordance with anhydrous calcium chloride test. Vapor drive should not exceed the industry standard of <3.0 lbs per 1,000 square feet in 24 hours.
• Repair concrete and install joint sealants and fillers as necessary.
• Mechanical surface profiling is the preferred floor preparation method. It is the only acceptable preparation method where warranties are issued. Acid etching is not recommended. Mechanically profile the floor to medium grit sandpaper texture. Remove curing and parting compounds and other surface hardeners and floor coatings in accordance with the manufacturer’s instructions.
• It is recommended to test the substrate to give ratio by troweling a small area with adhesive roll and let dry. Then remove (pull up) to check transference of glue to substrate test area. There should be a 85% to 95% transfer in the test area.
• Adjust trowel by tilting the edge 30% to 45% to increase or decrease amount of glue applied.
Concrete: New concrete must be allowed to cure thoroughly prior to installation (45 to 60 days). If sealants are used, DO NOT use one with a petroleum base. Old concrete must be repaired and have joint sealants and fillers installed as necessary. All cracks or flaws should be filled in or repaired prior to covering with rubber products. Use patching materials as appropriate. Surface must be thoroughly cleaned of dirt, dust, grease, or other foreign matter by shot blasting or other mechanical means with a commercial degreaser. Concrete must be allowed to dry completely before beginning installation. Wood Base: Wood surfaces should be completely cleaned of dirt, dust, grease or other foreign matter and be completely dry prior to installation. Trapped moisture may rot the wood or interfere with installation adhesives. Nails or other protrusions should be pounded down or removed, holes repaired, and surface variances repaired within the 1/8” acceptable variance level. Asphalt: Asphalt requires the same preparation as concrete. However, due to variations in asphalt substrates, it is the user’s responsibility to check the adhesion of the cured adhesive on typical test areas at the project BEFORE application. Over Rock Base: Begin preparing the surface 2”-3” below the level of the finished floor. Fill prepared area with 3/4” minus crushed gravel, decomposed granite, or limestone product. Tamp fill down to 2”-3” thickness so that it is near level with the area of installation, minus the thickness of the rubber surfacing. A border should be installed to further house the surfacing once installed. This can be a concrete curb, wood, or other permanent or semi-permanent board product. If a border is not an option, sealing/bonding the seams is recommended with the SikaFlex adhesive using the instructions listed.
ALLIED PRODUCTS, LLC ּ PO BOX 1431, SHERWOOD, OR 97140 ּ 800-864-1272 ּ ALLIEDPRODUCTSLLC.COM
ADHESIVE: Protect unopened containers from heat and direct sunshine. In cool weather, store containers in temperatures of 70° to 95°F for at least 24 hours before using. Adhesive CX-941 has a shelf life of one year when stored at this temperature range. Apply CX-941 in temperatures above 40°F. • Wear gloves during application. CX-941
is difficult to remove from skin and clothing. If adhesive gets on skin, immediately wipe it off with a dry cloth.
• Do not apply on frozen surfaces or standing water.
• Avoid contact with water or alcohol before use and before complete cure.
• Do not use in areas subject to hydrostatic head pressure.
• Do not use on wet, contaminated, or friable substrates.
• It is the user’s responsibility to check the adhesion of the cured adhesive on typical test areas at the project BEFORE application.
OPTIONAL SEAM SEALING: SikaFlex Sealant/Adhesive can be used to create the performance of a one-piece floor. Both act as a bonding agent that will waterproof flooring seams, and will be as flexible as the rubber it bonds. SikaFlex is available in a 10-oz. gun-grade form. To bond the runner together, leave 1/8” gap between seams for adequate adhesive to penetrate adjacent pieces. To seal seams for waterproofing, sealant should be applied post-installation and applied thinly only to the seams. Either application must be allowed to cure for 48 hours prior to use. To assure a strong bond, it is strongly recommended to thoroughly clean the edges of the mats by steam cleaning with a mild dish detergent or wiping with a denatured alcohol. Allow the mats to completely dry prior to applying sealant. * When sealing colored rubber, use
SikaFlex 221 for best bond. ADHESIVE CLEAN UP TIPS: Before troweling with CX-941, cover the unused portions of the trowel with duct tape. After troweling, tear off the duct tape before the material cures. Clean all tools and excess CX-941 immediately after use with mineral spirits. Use proper precautions when handling solvents. Cured adhesives can be removed by cutting with a mechanical tool. DO NOT allow mineral spirits to come in contact with the rubber rolls.
INSTALLATION: Indoors: 1. Rolled Rubber should be installed by a trained professional flooring installer with
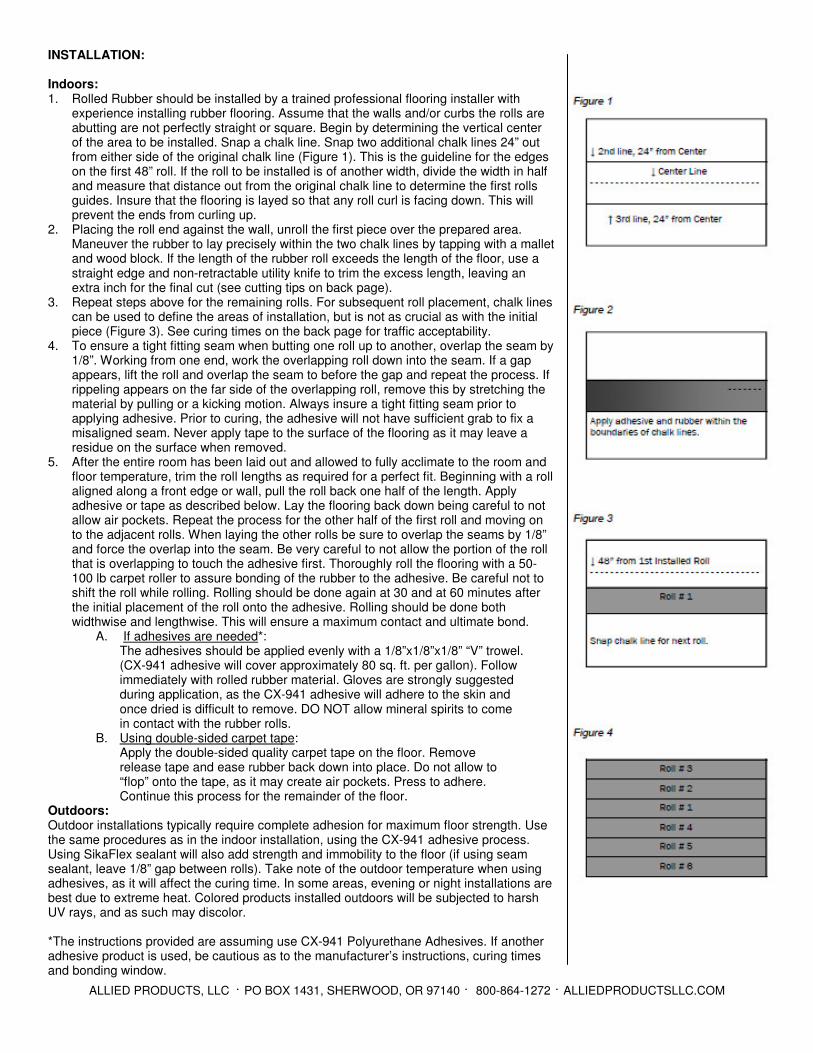
experience installing rubber flooring. Assume that the walls and/or curbs the rolls are abutting are not perfectly straight or square. Begin by determining the vertical center of the area to be installed. Snap a chalk line. Snap two additional chalk lines 24” out from either side of the original chalk line (Figure 1). This is the guideline for the edges on the first 48” roll. If the roll to be installed is of another width, divide the width in half and measure that distance out from the original chalk line to determine the first rolls guides. Insure that the flooring is layed so that any roll curl is facing down. This will prevent the ends from curling up.
2. Placing the roll end against the wall, unroll the first piece over the prepared area. Maneuver the rubber to lay precisely within the two chalk lines by tapping with a mallet and wood block. If the length of the rubber roll exceeds the length of the floor, use a straight edge and non-retractable utility knife to trim the excess length, leaving an extra inch for the final cut (see cutting tips on back page).
3. Repeat steps above for the remaining rolls. For subsequent roll placement, chalk lines can be used to define the areas of installation, but is not as crucial as with the initial piece (Figure 3). See curing times on the back page for traffic acceptability.
4. To ensure a tight fitting seam when butting one roll up to another, overlap the seam by 1/8”. Working from one end, work the overlapping roll down into the seam. If a gap appears, lift the roll and overlap the seam to before the gap and repeat the process. If rippeling appears on the far side of the overlapping roll, remove this by stretching the material by pulling or a kicking motion. Always insure a tight fitting seam prior to applying adhesive. Prior to curing, the adhesive will not have sufficient grab to fix a misaligned seam. Never apply tape to the surface of the flooring as it may leave a residue on the surface when removed.
5. After the entire room has been laid out and allowed to fully acclimate to the room and floor temperature, trim the roll lengths as required for a perfect fit. Beginning with a roll aligned along a front edge or wall, pull the roll back one half of the length. Apply adhesive or tape as described below. Lay the flooring back down being careful to not allow air pockets. Repeat the process for the other half of the first roll and moving on to the adjacent rolls. When laying the other rolls be sure to overlap the seams by 1/8” and force the overlap into the seam. Be very careful to not allow the portion of the roll that is overlapping to touch the adhesive first. Thoroughly roll the flooring with a 50- 100 lb carpet roller to assure bonding of the rubber to the adhesive. Be careful not to shift the roll while rolling. Rolling should be done again at 30 and at 60 minutes after the initial placement of the roll onto the adhesive. Rolling should be done both widthwise and lengthwise. This will ensure a maximum contact and ultimate bond.
A. If adhesives are needed*: The adhesives should be applied evenly with a 1/8”x1/8”x1/8” “V” trowel. (CX-941 adhesive will cover approximately 80 sq. ft. per gallon). Follow immediately with rolled rubber material. Gloves are strongly suggested during application, as the CX-941 adhesive will adhere to the skin and once dried is difficult to remove. DO NOT allow mineral spirits to come in contact with the rubber rolls.
B. Using double-sided carpet tape: Apply the double-sided quality carpet tape on the floor. Remove release tape and ease rubber back down into place. Do not allow to “flop” onto the tape, as it may create air pockets. Press to adhere. Continue this process for the remainder of the floor.
Outdoors: Outdoor installations typically require complete adhesion for maximum floor strength. Use the same procedures as in the indoor installation, using the CX-941 adhesive process. Using SikaFlex sealant will also add strength and immobility to the floor (if using seam sealant, leave 1/8” gap between rolls). Take note of the outdoor temperature when using adhesives, as it will affect the curing time. In some areas, evening or night installations are best due to extreme heat. Colored products installed outdoors will be subjected to harsh UV rays, and as such may discolor. *The instructions provided are assuming use CX-941 Polyurethane Adhesives. If another adhesive product is used, be cautious as to the manufacturer’s instructions, curing times and bonding window.
ALLIED PRODUCTS, LLC ּ PO BOX 1431, SHERWOOD, OR 97140 ּ 800-864-1272 ּ ALLIEDPRODUCTSLLC.COM
PRODUCT WARRANTY: 1.0 This Rolled Rubber product is guaranteed to be free of manufacturing defects in
material and workmanship for 5 years (“Warranty Period”). If there are defects in material and workmanship during the Warranty Period the product will be replaced or repaired, as described herein, at no cost to the owner/end-user. Should defects in material or workmanship be found, it is the owner’s responsibility to contact the point of purchase as described below. This warranty does not cover dissatisfaction or problems or other damage to the materials due to or as a result of:
• Improper installations and/or improper maintenance
• Fading due to sunlight (outdoor exposure, abrasions, and ultra-violet rays may cause normal change in the surface color and is not considered a defect under this warranty.
• Shading (color variation) of individual pieces due to natural rubber variations • Use of harsh and acidic chemicals, acidic foods and abrasive chemicals • Water spotting, petroleum adhesives or floor sealants or abuse • Color variation between samples and/or printed illustrations and actual
product • Wear or product degradation expected from the sun • Chewing, clawing or other animal destruction • Exposure to chlorine, solvents, acids, or other harmful chemicals, or • Acts of negligence, misuse, or willful or accidental external influences
including, but not limited to, vandalism, riot, or acts of war
*** Proof of purchase is required ***
1.1 The warranty is limited to the repair or replacement of products which are shown
to be defective. The owner/end-user agrees not to advance any claim for any other measure of damage or loss. Manufacturer shall not be responsible for installation, disassembly, removal, disposal, return shipping, or other similar costs.
1.2 Manufacturer shall not be liable for any damage, loss or claim whatsoever unless: • The manufacturer is notified in writing within fifteen (15) days of any
occurrence which might give rise to a claim. • The owner/end-user has obtained written authorization from manufacturer
prior to making any repairs or alterations on or through the surface which may affect the integrity of the materials.
• Manufacturer is first permitted to inspect the allegedly defective product or cause of the alleged loss, damage or claim.
• The material is installed accordingly to the written instructions provided by manufacturer and used only as intended by manufacturer.
1.3 If, after inspection, manufacturer determines that there has been a material defect in the product within the warranty period described in paragraph 1.0, the liability of manufacturer and the remedy of the owner/end user shall be limited, at the sole option of manufacturer to either (a) delivery of repair or replacement material for the impacted area, or (b) credit to be applied towards the purchase of new material. The value of either remedy shall be pro-rated upon the remaining months of unexpired warranty as determined by the manufacturer. The maximum pro-rated value of either remedy shall in no case exceed the original purchase price.
Limitation of Warranty: 1. There is no warranty of merchantability or fitness for a particular purpose, nor
any other warranties which extend beyond the description on the face hereof. 2. Manufacturer shall not be liable for any incidental, consequential or other
damages. 3. The remedies stated herein are the sole and exclusive remedies for any claim
or damages. 4. No agent or representative of manufacturer has any express or implied
authority to make any representation, promise or guarantee not stated herein. Disclaimer: • Recycled rubber, as with any recycled product, can vary. Tolerance in thickness and width have been made as stringent as is
possible, but some variance is to be expected. Rubber’s nature is to expand and contract with changes in temperature and humidity.
• Rolled Rubber product is not to be used in any manner or for any purpose not expressly identified by manufacturer.
ALLIED PRODUCTS LLC ּ PO BOX 1431 SHERWOOD OREGON 97140 ּ 800-864-1272 ּ ALLIEDPRODUCTSLLC.COM
CUTTING TIPS: When using a utility knife, be sure to keep the blades sharp to aid in the cut, and help reduce the possibility of injury due to dull blades. • Mark the mats that need to be
cut with chalk or chalk line. • Place straight edge on
corresponding marks placed on the mats.
• Holding the straight edge firmly in place, score the mats two or three times.**
• Grab the mat close to the score line, lift and bend the mat towards you. Then score line with “break open.”
• Make several more passes with the knife, working down the established cut, unit the cut is complete.
**This process may be made easier by cutting the mat on a raised surface such as a 2x4 wood block. CURING TIMES: Indoors: CX-941 Adhesive Standard Set: • Firm Set: 1-2 hours • Light Traffic: 8-19 • Normal Traffic: 24 hours Double-Sided Carpet Tape: • Foot Traffic: Immediate Non-Adhesive: • Normal Traffic: Immediate Outdoors: • Normal Traffic: 24 hours