rocketraid 644l / 642l - highpoint techs_guide_fo… · 1 淘汰 rocketraid 644l / 642l 6gb/s esata...
TRANSCRIPT

1
淘汰
RocketRAID 644L / 642L
6Gb/s eSATA PCI-Express 2.0 RAID HBA
For Mac
User’s Guide
Revision: 1.0 Nov. 24, 2012
HighPoint Technologies, Inc.

2
Copyright
Copyright © 2012 HighPoint Technologies, Inc. This document contains materials protected by International Copyright Laws. All rights reserved. No part of this manual may be reproduced, transmitted or transcribed in any form and for any purpose without the express written permission of HighPoint Technologies, Inc.
Trademarks
Companies and products mentioned in this manual are for identification purpose only. Product names or brand names appearing in this manual may or may not be registered trademarks or copyrights of their respective owners. Backup your important data before using HighPoint's products and use at your own risk. In no event shall HighPoint be liable for any loss of profits, or for direct, indirect, special, incidental or consequential damages arising from any defect or error in HighPoint's products or manuals. Information in this manual is subject to change without notice and does not represent a commitment on the part of HighPoint.
Notice
Reasonable effort has been made to ensure that the information in this manual is accurate. HighPoint assumes no liability for technical inaccuracies, typographical, or other errors contained herein.

3
Table of Contents
1 Features and Specifications ................................................................................................................... 4 2 Physical Specifications ........................................................................................................................... 5 3 Kit Contents .......................................................................................................................................... 6 4 Hardware Description and Installation .................................................................................................. 7
4.1 RocketRAID 644L / 642L Host Adapter board layout ........................................................................ 7 4.2 Installing the RocketRAID 644L / 642L Host Adapter ....................................................................... 7 4.3 Verifying Installation ....................................................................................................................... 9
5 RocketRAID 644L / 642L Driver Installation ......................................................................................... 10
5.1 Driver installation .......................................................................................................................... 10 5.2 Verify Installation of the Software ................................................................................................. 12
6 Install / Uninstall HighPoint Web RAID Management Software .......................................................... 13
6.1 Installing the Web RAID Management Software ............................................................................ 13 6.2 Uninstalling the Web RAID Management Software ....................................................................... 13
7 HighPoint Web RAID Management Software ...................................................................................... 15
7.1 Running the Management Software .............................................................................................. 15 7.2 Web RAID Management Software - Global View ........................................................................... 17 7.3 Web RAID Management Software - Physical .................................................................................. 18
7.3.1 Physical - Controller 1 Devices ............................................................................................... 19 7.3.2 Physical - Controller 1 Devices Physical Devices Information ................................................. 19 7.3.3 Physical - Rescan ................................................................................................................... 20
7.4 Web RAID Management Software - Logical .................................................................................... 21 7.4.1 Logical - Create Array ............................................................................................................. 22 7.4.2 Logical - Spare Pool ............................................................................................................... 28 7.4.3 Logical - Logical Device .......................................................................................................... 29 7.4.4 Logical - Rescan ..................................................................................................................... 29 7.4.5 Logical - Beeper Mute ............................................................................................................ 29
7.5 Web RAID Management Software - Setting ................................................................................... 30 7.5.1 Setting - System ..................................................................................................................... 30 7.5.2 Setting - Email ....................................................................................................................... 32
7.6 Web RAID Management Software - Event ...................................................................................... 33 7.7 Web RAID Management Software - SHI (Storage Health Inspector) ............................................... 34 7.8 Web RAID Management Software - Recover .................................................................................. 36 7.9 Web RAID Management ICON Definition List ................................................................................. 36
8 EFI ....................................................................................................................................................... 39 8.1 EFI Update ..................................................................................................................................... 39 8.2 Booting MacOS X from RocketRAID 644L / 642L Adapter via EFI .................................................... 41
9 Thank You ........................................................................................................................................... 44 10 Customer Support ............................................................................................................................. 45

4
HighPoint RocketRAID 644L / 642L HBA For Mac HighPoint’s RocketRAID 600L Series HBA’s are the Industry’s most affordable, high-performance, SATA 6Gb/s RAID HBA’s, and are ideal for Mac Pro workstations. These 2nd Generation SATA 6Gb/s host controllers utilize a PCI-Express 2.0 host bus interface, HighPoint's Industry-proven RAID engine, and support a wide-range of single-disk and RAID configurations including 0, 1, 5, 10 and JBOD. Each RocketRAID 600L Series HBA’s directly supports up to 4 SATA devices, and up to 20 when used in conjunction with port multiplier storage devices. For maximum performance, attach SATA hard drives and SSD’s directly to the RocketRAID 600’s SATA and eSATA ports. To maximize storage capacity, use the RocketRAID 600 with port multiplier storage chassis and external disk enclosures.
The HighPoint RAID Management Software provides a user friendly interface to create, manage and maintain your storage solutions.
1 Features and Specifications Hardware Specifications
PCI-Express 2.0 x4
4x SATA 6Gb/s Ports
Industry standard SATA/eSATA connectors
Directly supports 4 SATA devices / Up to 20 with port multiplier capable enclosure
Backwards compatible with HighPoint SATA RAID HBA’s
Low Profile (RocketRAID 640L , RocketRAID 642L) / Full Height (RocketRAID 644L) Monitor, Alerts and LED Indicators
Hard Drive LED Indicators (Activity and Failed)
SMTP email notification for events and error reporting
Alarm/Buzzer alerts for drive/array failure Advanced RAID Features
RAID 0, 1, 5, 10, JBOD
Redundant RAID Configuration for Array availability
RAID Initialization Types - Background, Foreground, Quick Init and Keep Old Data
Spin Down Idle Disk
Enhanced data protection with Write Journaling feature
S.M.A.R.T Support
Auto Rebuild on spare drive
HotPlug and HotSwap support
Larger than 2 TB drive support
Bootable RAID Array support via EFI
Write Back or Write Through Cache support
User friendly Browser-based Management Interface
Web browser-based RAID management software (Web GUI) Operating System Support
Mac OS X 10.5 and newer

5
2 Physical Specifications Dimensions: RocketRAID 642L: 79mm x 67mm x 19mm RocketRAID 644L: 106mm x 79mm x 19mm EMI: FCC Part 15 Class B and CE Thermal and Atmospheric Characteristics: Work Temperature Range: +5°C ~ + 55°C Relative Humidity Range: 5% ~ 60% non-condensing Storage Temperature: -20°C ~ +80°C MTBF: 920,585 Hours Electrical Characteristics:
PCI-E 3.3V 12V
Power 4W max 1W max

6
3 Kit Contents RocketRAID 644L HBA / RocketRAID 642L HBA
Quick Installation Guide
HighPoint Software CD
Low-Profile Bracket (RocketRAID 642L only)
Two SATA 6Gb/s cables (RocketRAID 642L only)

7
4 Hardware Description and Installation
4.1 RocketRAID 644L / 642L Host Adapter Board Layout
4.2 Installing the RocketRAID 644L / 642L Host Adapter
Note: Make sure the system is powered-off before installing the RocketRAID host adapter. 1. Open the system chassis and locate an unused PCI-E x16 slot. 2. Remove the PCI-E slot cover. 3. Gently insert the RocketRAID 644L / 642L into the PCI-E slot, and secure the bracket to the system
chassis.
RocketRAID 642L
RocketRAID 644L

8
4. After installing the adapter, attach the hard disks or backplane enclosure to the host adapter using the appropriate cables. Note: Many server-level chassis include hard-drive hot-swap bays. For these system chassis, cables are attached to the chassis backplane, rather than directly to each individual hard drive. Consult the chassis manual for proper installation procedures.
5. Close and secure the system chassis.
RocketRAID 644L / 642L

9
4.3 Verifying Installation
Once the host adapter and hard drives have been installed into the chassis, boot-up the system to verify that the hardware is properly recognized. If the system detects the presence of the adapter, the RocketRAID 644L / 642L will be displayed in the system information PCI Cards window. Note: The RocketRAID 642L was used for this example, but the procedure applies to the RocketRAID 644L model as well (OS X will identify the HBA as “pci1103,644”).

10
5 RocketRAID 644L / 642L Driver Installation
5.1 Driver installation
Once you have installed the RocketRAID 644L / 642L Card and booted your Mac, follow these instructions to install the drivers and the HighPoint Web RAID Management software: 1. Click the “System Information” icon. 2. Click “PCI Cards”. A single PCI entry labeled “pci1103,642” will be displayed (“pci1103,644” for the
RocketRAID 644L HBA). “Driver Installed” should be reported as “No” for this entry. 3. Insert the RocketRAID 600 Series Software CD into your Mac DVD drive and navigate to the Mac
Software package folder: \Driver\RR64xL\Driver\Mac.
4. Double-click on the “*.dmg” file to mount the disc image.
5. Double-click on the installer package labeled to start the installation process.

11
6. Follow the onscreen prompts to install the RocketRAID 644L / 642L driver. After the install has completed, you will be prompted to restart your Mac. You will need to restart in order to use the RocketRAID 644L / 642L.

12
5.2 Verify Installation of the Software 1. Click the “System Information” icon. 2. Click “PCI Cards”. A single PCI entry labeled “pci1103,642” will be displayed (“pci1103,644” for the
RocketRAID 644L HBA). “Driver Installed” should now be reported as “Yes” for this entry.

13
6 Install / Uninstall HighPoint Web RAID Management Software The HighPoint Web RAID Management Software (WebGUI) provides RAID configuration and management features. The software can be installed from the HighPoint software CD.
6.1 Installing the Web RAID Management Software
Getting Started Uninstall the previous release before installing the latest web GUI software package. 1. The Web RAID Management Software for RocketRAID 644L and 642L HBA’s is automatically installed
alongside the driver (see chapter 5 RocketRAID 644L / 642L Driver Installation). 2. To run the Web GUI, start your browser and enter the following URL address or click on the shortcut
icon on the desktop: http://localhost:7402
Note: The user name “RAID” and password “hpt” for the WebGUI management.
6.2 Uninstalling the Web RAID Management Software
1. Go to the Mac Software package folder: \Driver\RR64xL\Driver\Mac. 2. Double-click on the uninstaller icon to start the uninstallation process.
3. If you are not logged in using the root account, the system will ask you to input the user’s password:

14
4. Enter the user password and press the Enter key. This will complete the uninstall procedure.

15
7 HighPoint Web RAID Management Software HighPoint’s web-based RAID Management Software (also known simply as the “Web GUI”), is used to monitor and configure hard disks and RAID arrays attached to HighPoint RocketRAID host adapters. The software package must be installed on a system with supported HighPoint RocketRAID controllers installed, and the device driver must be loaded to run the service. A web browser with XML support is required on the client side, e.g. Sarfari, Mozilla or Google’s Chrome.
7.1 Running the Web RAID Management Software
To run the Web GUI, start your browser and enter the following URL address or click on the shortcut icon on the desktop: http://localhost:7402 Use the short cut icon that is created desktop during the web GUI installation to start the web GUI.
If you are accessing the RAID Management interface using a remote system, please update “localhost” to the server’s address. If you are unable to connect to the local system, please make sure hptsvr is running on that system. In addition, make sure you are able to access the remote system via a TCP/IP connection, and make sure the firewall (if configured) is not blocking TCP Port 7402.

16
Logging into the Web RAID Management interface Enter default User Name and Password User Name: RAID Password: hpt
Remote Login Users connected to a local network can remotely access the Web GUI through the IP address the machine is located on. Open a terminal and type in the following command: ifconfig Once the IP address is obtained users can remotely access the machine by typing in the following address: http://IP Address:7402

17
7.2 Web RAID Management Software - Global View
Controller(0): Drop-down menu that displays the controller that is currently being managed. Host Adapter Model: Name of the RocketRAID series controller Logical Drive: Total number of Logical Drives created (single disk or RAID arrays) Physical Drive: Total physical drives detected by the RocketRAID controller Total Capacity: Total capacity of all detected HDD’s Configured Capacity: Total GB of capacity configured for in Logical devices Free Capacity: Total GB of capacity that is free for use in creating a JBOD or RAID array

18
7.3 Web RAID Management Software - Physical
Controller Information Model Name: RocketRAID model number BIOS Version: RocketRAID BIOS version Vendor: Vendor Name PCI Bus Number: PCI slot information PCI Device Number: PCI device number PCI Func Number: PCI function number Update EFI from the web GUI. Browse for BIOS image and click the Submit button.
19
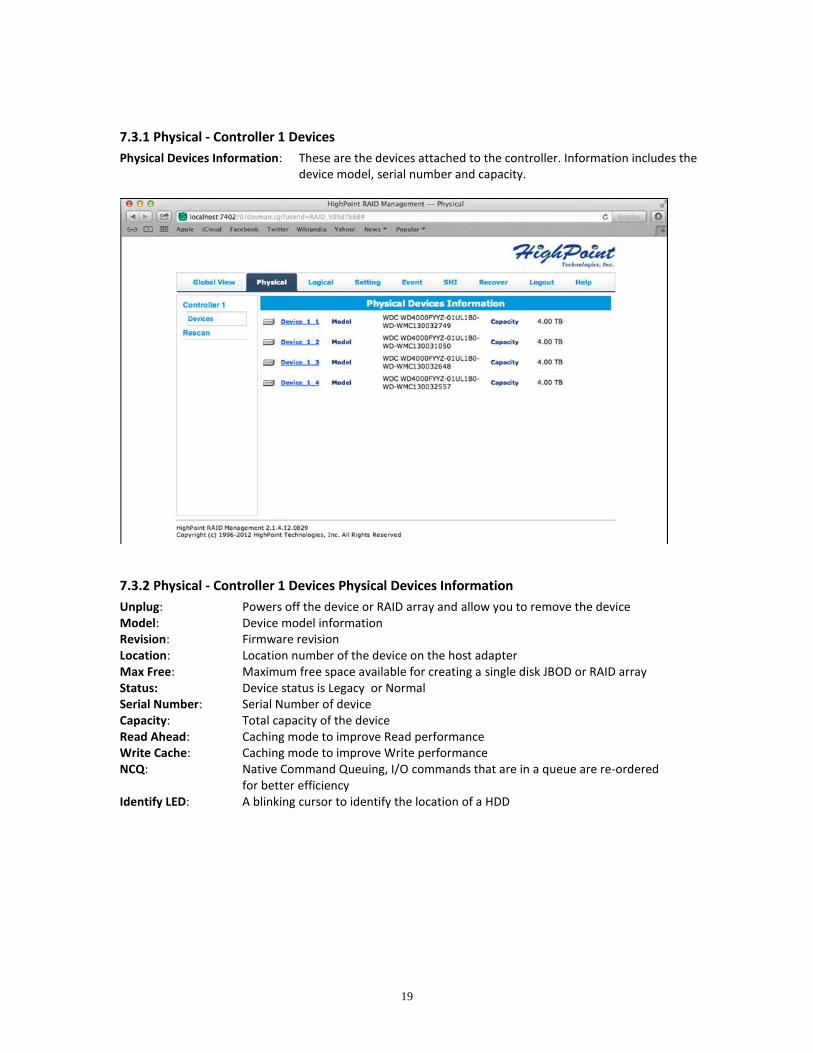
7.3.1 Physical - Controller 1 Devices
Physical Devices Information: These are the devices attached to the controller. Information includes the device model, serial number and capacity.
7.3.2 Physical - Controller 1 Devices Physical Devices Information
Unplug: Powers off the device or RAID array and allow you to remove the device Model: Device model information Revision: Firmware revision Location: Location number of the device on the host adapter Max Free: Maximum free space available for creating a single disk JBOD or RAID array Status: Device status is Legacy or Normal Serial Number: Serial Number of device Capacity: Total capacity of the device Read Ahead: Caching mode to improve Read performance Write Cache: Caching mode to improve Write performance NCQ: Native Command Queuing, I/O commands that are in a queue are re-ordered
for better efficiency Identify LED: A blinking cursor to identify the location of a HDD

20
7.3.3 Physical - Rescan
The item will rescan the controller to detect devices.
21
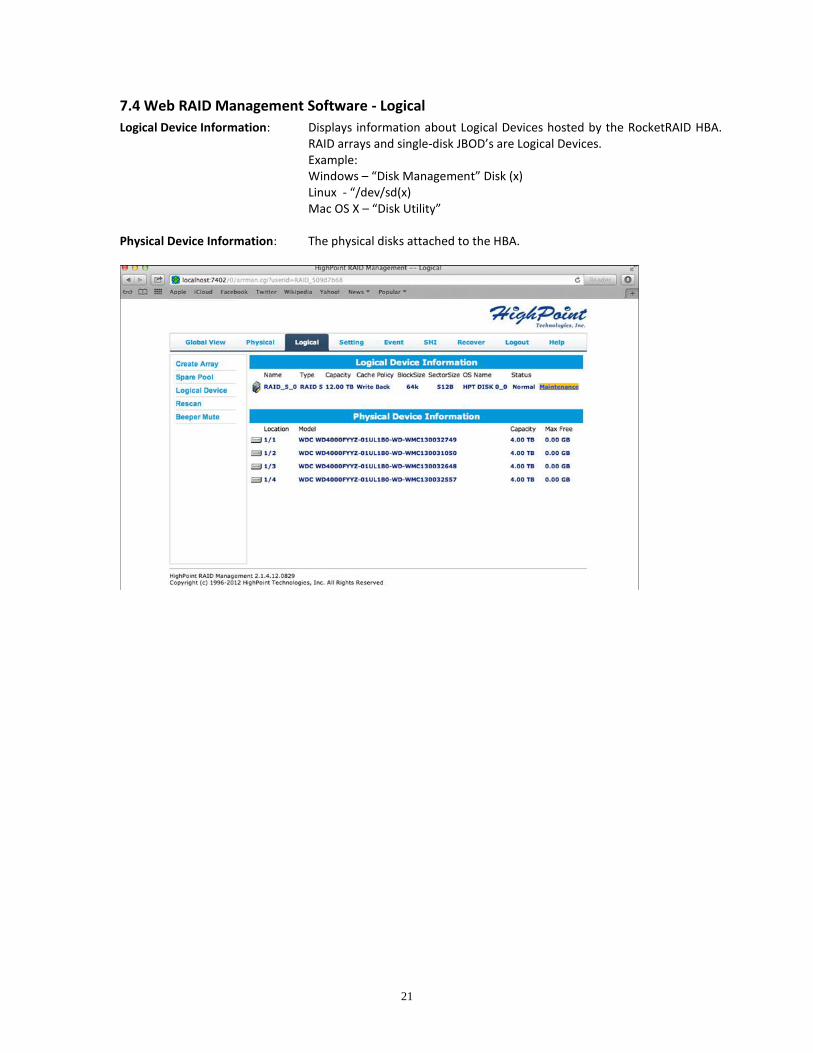
7.4 Web RAID Management Software - Logical
Logical Device Information: Displays information about Logical Devices hosted by the RocketRAID HBA. RAID arrays and single-disk JBOD’s are Logical Devices.
Example: Windows – “Disk Management” Disk (x) Linux - “/dev/sd(x) Mac OS X – “Disk Utility”
Physical Device Information: The physical disks attached to the HBA.

22
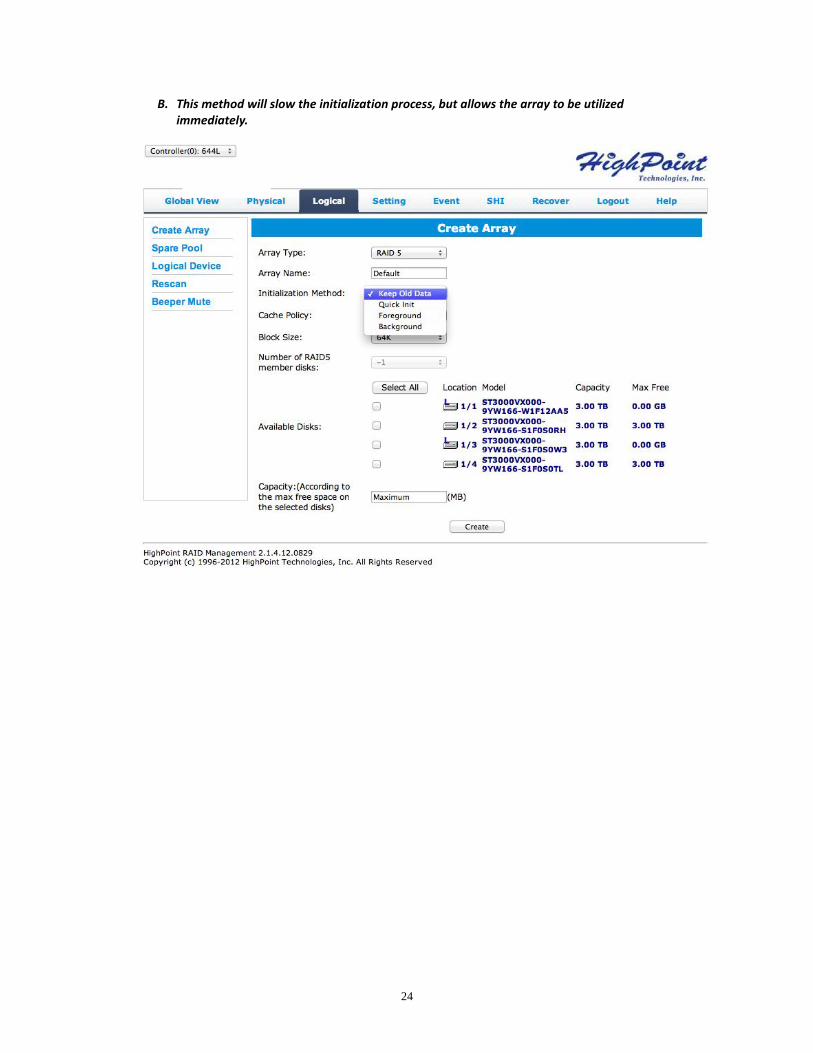
7.4.1 Logical - Create Array
1. Array Type Select the RAID level you wish to create. The RocketRAID 644L/642L support RAID 0, 1, 5, 10 and JBOD.

23
2. Array Name Enter a name for the RAID array. This is optional – the Web GUI will assign a default name if this is not specified.
3. Initialization Method
There are four methods to choose from. Keep Old Data: This is the default option when creating a RAID array.
A. This option leaves existing data intact. B. This option does not initialize the array disk. You can use this option when creating RAID
arrays with new hard disks (initialization is not generally necessary for new drives, as they contain no data).
C. In some cases, this option can be used to recover disabled RAID arrays.
Quick Init: The RAID array will be immediately accessible. A. This option will delete all content on the disks. B. This option will not perform disk array initialization. When new HDD’s are used this option
can be ignored since the there is no data on the hard disks.
Foreground: The RAID array is not accessible until disk array initialization is completed. A. This option will delete all content on the disks. B. The logical disks will not be reported to the operating system until initialization is complete.
This method is faster than “Background”, and requires far less time to complete.
Background: The RAID array is accessible while disk initialization is being performed. A. This option will delete all content on the disks.
24
B. This method will slow the initialization process, but allows the array to be utilized immediately.

25
4. Cache Policy There are two options available when creating redundant RAID arrays (1, 5, 10). Write Back: Provides higher write performance for redundant RAID arrays. Data is at risk when
there is a power failure, system kernel panic and/or the system is not responsive. Write Through: Provides higher data protection when there is a power failure. Data is written
directly to disk.
5. Block Size Block sizes are adjustable from 16K through 1024K. The default setting is 64K.
6. Number of RAID 5 member disk This option is related to creating a RAID 50 array.

26
7. Select All This option will instruct the Web GUI to select all available drives.

27
8. Logical Device Information After the array has been created, it will be displayed under “Logical Device Information”. The following information is displayed for each array: Name: Default name of the RAID array Type: Type of RAID array Capacity: Total capacity of the RAID array Cache Policy: Redundant RAID array options for performance or protection Block Size: RAID array block size Sector Size: RAID array sector size OS Name: Name of HDD seen in the OS Status: Status of RAID array. Other option include (Normal, Critical, Disable,
Rebuilding, Verifying)
9. Maintenance Maintenance provides a selection of general maintenance features and options for the selected array: The arrays current status and RAID level determine which options and features are provided by Maintenance: 1) RAID status is “Normal”, there will be a “Verify” button available. 2) RAID status is “Critical”, there will be a “Add” button available. 3) After “Add Disk” then Rebuilding, it displays “Stop” button.
Delete: Delete the selected RAID array Unplug: Power off the RAID array and remove it Rebuild: Add a disk and rebuild a critical RAID array to normal Change Cache Policy: Toggle between Write Through and Write Back.
4) Write Through: Lower Write performance because data is written directly to HDD. Data cannot be lost due to power failure or some other circumstance.
5) Write Back: Higher Write performance but chances of data lose are greater since data still resides in cache.
6) Rename: Rename the RAID array other than the default
28
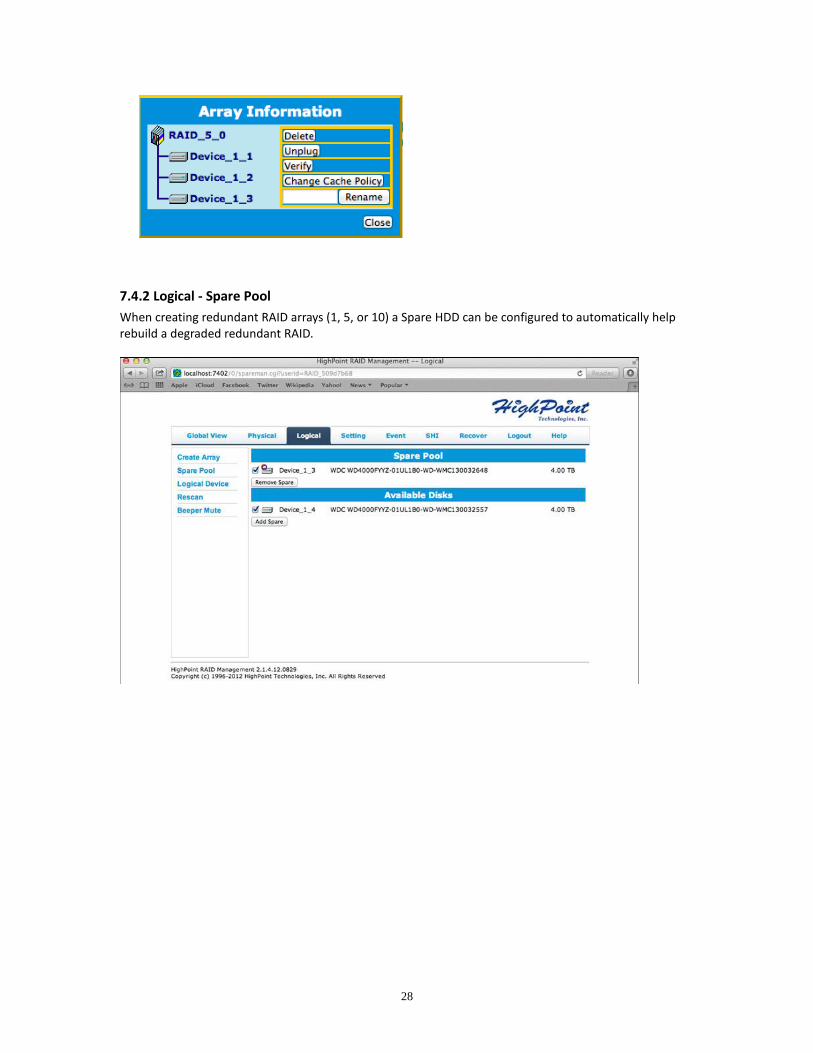
7.4.2 Logical - Spare Pool
When creating redundant RAID arrays (1, 5, or 10) a Spare HDD can be configured to automatically help rebuild a degraded redundant RAID.

29
7.4.3 Logical - Logical Device
Displays logical devices hosted by the RocketRAID 644L/642L HBA.
7.4.4 Logical - Rescan
When hot-plugging a single device or RAID array, the Rescan button prompts the RocketRAID HBA to scan for device changes.
7.4.5 Logical - Beeper Mute
This will temporarily disable the internal speaker on the RocketRAID 644L / 642L HBA.

30
7.5 Web RAID Management Software - Setting
This tab displays various controller related settings and options:
7.5.1 Setting - System
Enable auto rebuild: If enabled, any new disk attached to the HBA will be used to rebuild the critical RAID array. Note: The new disk needs to be equal to or larger than the minimum capacity among the remaining disk members of the array.
Enable Continue Rebuilding on error:
Enabled by default. If disabled, the Web GUI will ignore bad sectors/read failures and allow the rebuild process to continue. Warning: this option should only be enabled in the case of an emergency – data inconsistency or data loss may result. Review the Event Log before enabling this option, and check for HDD bad sector events. If bad sectors are found, we recommend first contacting the HDD manufacturer, then technical support, for further advice.
Enable audible alarm: When a disk goes off-line the beeper on the HBA will sound.
Set Spindown Idle Disk (Minutes):
Hard drives can be instructed to spin down when there is no disk activity for a set period of time. You are free to specify the interval – from 10 to 240 minutes.
Restrict to localhost access:
This option is used to restrict web GUI access to the local system and not allow remote access.
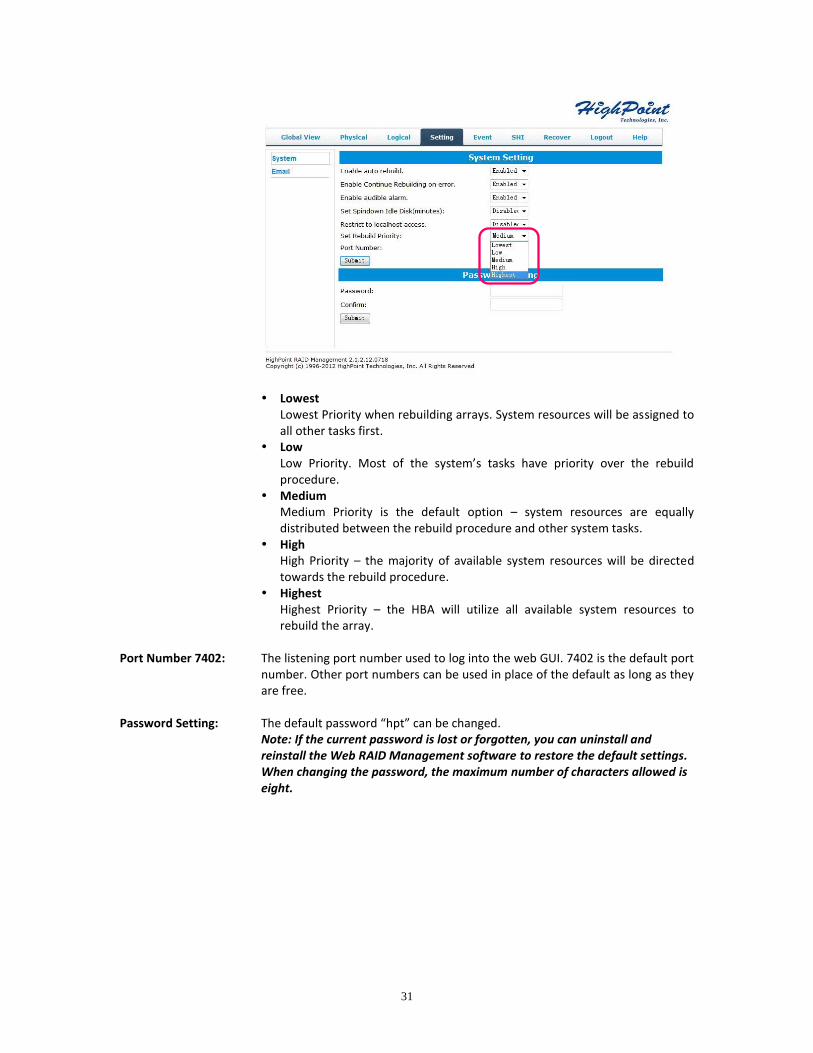
Set Rebuild Priority: When rebuilding a critical RAID array there are five rebuilding options to choose from. Each rebuild priority will affect the rebuild completion time.
31
Lowest
Lowest Priority when rebuilding arrays. System resources will be assigned to all other tasks first.
Low Low Priority. Most of the system’s tasks have priority over the rebuild procedure.
Medium Medium Priority is the default option – system resources are equally distributed between the rebuild procedure and other system tasks.
High High Priority – the majority of available system resources will be directed towards the rebuild procedure.
Highest Highest Priority – the HBA will utilize all available system resources to rebuild the array.
Port Number 7402: The listening port number used to log into the web GUI. 7402 is the default port
number. Other port numbers can be used in place of the default as long as they are free.
Password Setting: The default password “hpt” can be changed. Note: If the current password is lost or forgotten, you can uninstall and reinstall the Web RAID Management software to restore the default settings. When changing the password, the maximum number of characters allowed is eight.

32
7.5.2 Setting - Email
The RocketRAID HBA can be configured to send Event Log entries to one or more E-Mail addresses.
33
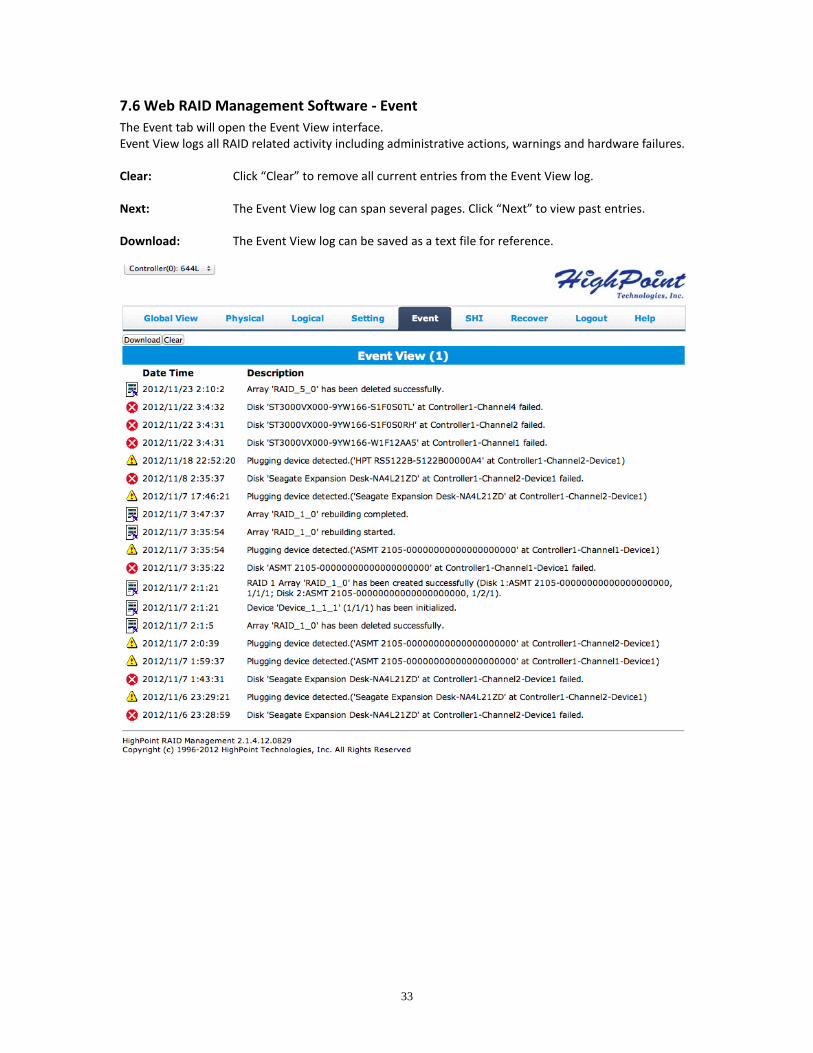
7.6 Web RAID Management Software - Event
The Event tab will open the Event View interface. Event View logs all RAID related activity including administrative actions, warnings and hardware failures. Clear: Click “Clear” to remove all current entries from the Event View log.
Next: The Event View log can span several pages. Click “Next” to view past entries.
Download: The Event View log can be saved as a text file for reference.

34
7.7 Web RAID Management Software - SHI (Storage Health Inspector)
Storage Health Inspector: SHI will inspect each HDD periodically. If any abnormal status is found, it will be recorded in the Event log. SHI can help to identify problems with HDD’s and prevent further damage or data loss. If additional proof of errors is needed, the HDD’s can be placed onto the onboard SATA port and a 3rd party SMART software utility can be run.
HDD Temperature Threshold: Setup the HDD temperature threshold to prevent HDD overheating. When the HDD goes beyond the threshold an alert will be triggered.
SMART: SMART attributes for each HDD will be displayed.

35
Task List: The Task tab allows you to schedule maintenance sessions for RAID 1, 5 and 10 arrays. Regular maintenance is highly recommended for any redundant RAID array, and is essential for maintaining healthy, reliable storage configurations. The interface allows you to name each task, and specify the frequency, date, hour minute and second for each session.

36
7.8 Web RAID Management Software - Recover
Recover can help repair RAID arrays that have been assigned the disabled status. This feature helps protect RAID configurations by storing multiple copies of RAID configuration data, which administrators can use to restore a disabled RAID array. Note: There is a separate How-To guide that explains this Recover feature.
7.9 Web RAID Management ICON Definition List
The definitions of each ICON used by the RAID Management interface are listed below (the examples use a RAID 5 array for reference).
Icon Description
The array status is "Normal".
The array has stopped “Initializing”. Current status is “Uninitialized”.
The array is “Initializing”: Initializing (Foreground) and Initializing (Background).
The array is performing a data consistency checking and its current status is “Verifying”.
The array status is "Critical" - a disk is missing from the RAID array.
The array status is "Verifying". This indicates that the array is running a data integrity check.
The array status is "Rebuilding". This occurs when the data verification fails or when adding a new disk into the "Critical" array.
The array status is "Critical". This indicates that current array needs "rebuild". This icon will also show up on a device in a RAID disk member as needing to "rebuild" its data.

37
The status of the "Array" or "Device" is "Disabled".
The array is "Initializing". There are two types of initialization- Foreground and Background.
The array OCE/ORLM operation has stopped.
This icon means the RAID array is "Uninitialized". On the RAID array either Foreground or Background initialization has stopped (Incomplete).
On a disk ( ), it indicates that the disk is not initialized and will need to be initialized for the 1
st time before it can be used with HighPoint RAID card.
The device status "Legacy". An existing file system has been created on the HDD.
The device is a "Spare". It is used to replace the failed RAID disk member to rebuild automatically.
Information.
Warning.
Error.
The array is inconsistent and it needs to “rebuild”. The current status is “Critical”. Array disk member diagram is listed below.
It shows a RAID-5 disk member is lost and its current status is “Critical”. Array disk member diagram is listed below.
The array is “rebuilding” and its current status is “Rebuilding”. Array disk member diagram is listed below.

38
The array is not available. Two scenarios can cause this to happen. First - a lost RAID disk member exceed the minimum required to maintain a RAID level. Second - a disk failed before the initialization or rebuilding process complete. The status is in “Disabled”. Array disk member diagram is like this:
39
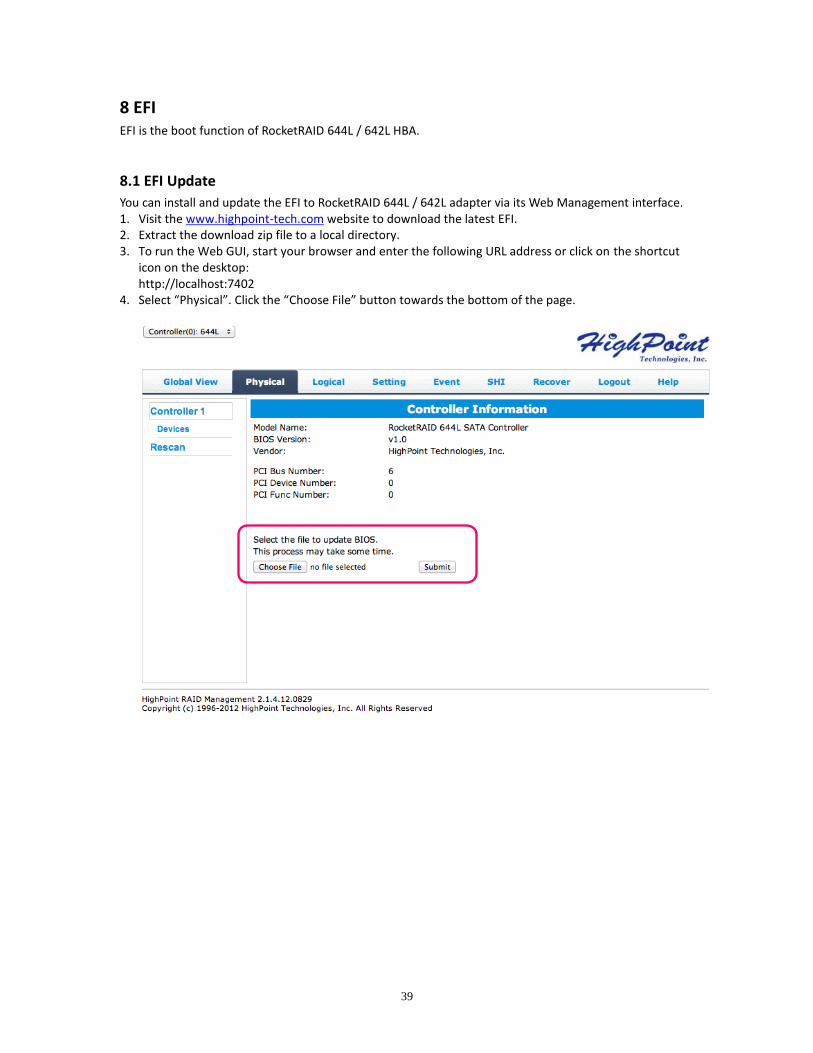
8 EFI EFI is the boot function of RocketRAID 644L / 642L HBA.
8.1 EFI Update
You can install and update the EFI to RocketRAID 644L / 642L adapter via its Web Management interface. 1. Visit the www.highpoint-tech.com website to download the latest EFI. 2. Extract the download zip file to a local directory. 3. To run the Web GUI, start your browser and enter the following URL address or click on the shortcut
icon on the desktop: http://localhost:7402
4. Select “Physical”. Click the “Choose File” button towards the bottom of the page.

40
5. Browse to the location of the EFI BIOS download and select the rr6xxl-efi64.rom. Click the “Choose” button. Note: “xx” refers to the HBA model: “42” for the RocketRAID 642L, and “44” for the RocketRAID 644L.

41
6. After the EFI BIOS has been updated, the Web GUI will prompt you to reboot OS X. Click “OK” to restart the system.
8.2 Booting Mac OS X from RocketRAID 644L / 642L Adapter via EFI
Currently Mac OS X cannot be directly installed to Legacy disks or arrays hosted by RocketRAID 644L / 642L HBA’s. You will need to clone the current system drive to a disk or array attached to the RocketRAID HBA. The following procedure assumes the RocketRAID HBA and Web GUI is already installed. 1. If a legacy disk is not attached to the HBA, configure a single-disk JBOD or RAID array using the Web
GUI. 2. Run Disk Utility, and create a new volume on the array:

42
3. Clone the OS X system disk to this new volume using a cloning /duplication utility. We recommend Carbon Copy Cloner: http://www.bombich.com/software/ccc.html
4. Double-click the Carbon Copy Cloner icon to start the utility. Specify the source (current OS X system disk) and the destination (new volume on the array).

43
5. Click the “Clone” button to start the cloning process.
6. Once the cloning process has completed, open OS X’s System Preferences window, and select “Startup Disk”. Designate the new volume as the Startup Disk and click “Restart”. Alternately, you can shutdown the system and remove the original system disk – OS X should automatically boot from the legacy drive/array the next time you power on the system.
7. Mac Os X will now boot from the legacy disk or array. You are free to remove the original system disk if it is no longer required.

44
9 Thank You Thank you for purchasing the RocketRAID 644L / 642L eSATA RAID Host adapter. We appreciate your support, and welcome any questions, comments or product suggestions you may have.

45
10 Customer Support If you encounter any problems while utilizing RocketRAID series host adapters, or have any questions about this or any other HighPoint Technologies, Inc. product, feel free to contact our Customer Support Department. HighPoint Technologies, Inc. websites: http://www.highpoint-tech.com/
Web Support: http://www.highpoint-tech.com/websupport/