riveting experience - linda & barry's website
TRANSCRIPT

5 6 C O R V E T T E E N T H U S I A S T c o r v e t t e e n t h u s i a s t . c o m
F ROM THE FACTORY: Since bolts don’t hold very well just driven into
fiberglass, your Corvette has a lot of steel tapping plates riveted all over the
underbody and dash/firewall areas. These plates provide threaded holes in a steel
anchor plate for attaching many different components to the fiberglass panels, and
they were riveted in place in the body shop. These aluminum rivets were also used in
virtually every location where a metal part is joined to a fiberglass panel, such as the
steel braces on the lower spare tire tray.
Many of you haven’t dealt with Corvette aluminum body rivets, but there’s no mystery about how to work with them. The objective of this article is to show you how to install and “set” these rivets at home, with a minimum of special tools. They “set” thousands of them by hand every day at St. Louis, and there’s no reason you can’t do a few at home after taking steel/fiberglass assemblies apart for restoration. The example we’ll use is the “V”-brace that’s riveted to the bottom of the spare tire tray, but the process is essentially the same for any other riveted application.
The basic process uses a soft aluminum rivet, trimmed to the correct length for the “sandwich” to be assembled. The large head of the rivet goes on the fiberglass side, the shank of the rivet goes through the fiberglass and through the metal part, and the protruding small end of the rivet is “set” against the metal part, while the head end of the rivet is backed up with something solid. It’s important to use the correct “soft” aluminum body rivets – ordinary aluminum rivets are harder, which makes “setting” the end of the rivet extremely difficult. Suppliers like Paragon and Dr. Rebuild have the correct “soft” aluminum body rivets.
You’ll note in the assembly manuals that there are many different part numbers for 3/16” rivets; essentially, they’re all the same except for length. The guys at St. Louis had specific-length rivets for each application so they could just grab them out of their bin and install them. The rivets you get today tend to be of a longer, “universal” length, and you trim them to the appropriate length you need with a pair of diagonal cutters before “setting” them.
TOOLS REQUIRED: OK, what about tools? All you need is an air hammer (or “burp-gun”), a rivet-set shank for 3/16” rivets that fits in the gun, something solid to use for backing-up against the rivet head (a flat hunk of cast iron, short piece of 2”x 2” steel tubing, or a good-sized hammer head, etc.). An in-line air pressure regulator is handy (or you can just use the one on the output of your
RIVETING EXPERIENCE HOME-RESTORER’S GUIDE TO INSTALLING SOFT ALUMINUM RIVETSB Y J O H N H I N C K L E Y
Here’s a rivet in place, ready to be set. It has been trimmed so about 3/8” of the shank remains above the steel part.
3
2
C O R V E T T E E N T H U S I A S T 5 7 c o r v e t t e e n t h u s i a s t . c o m
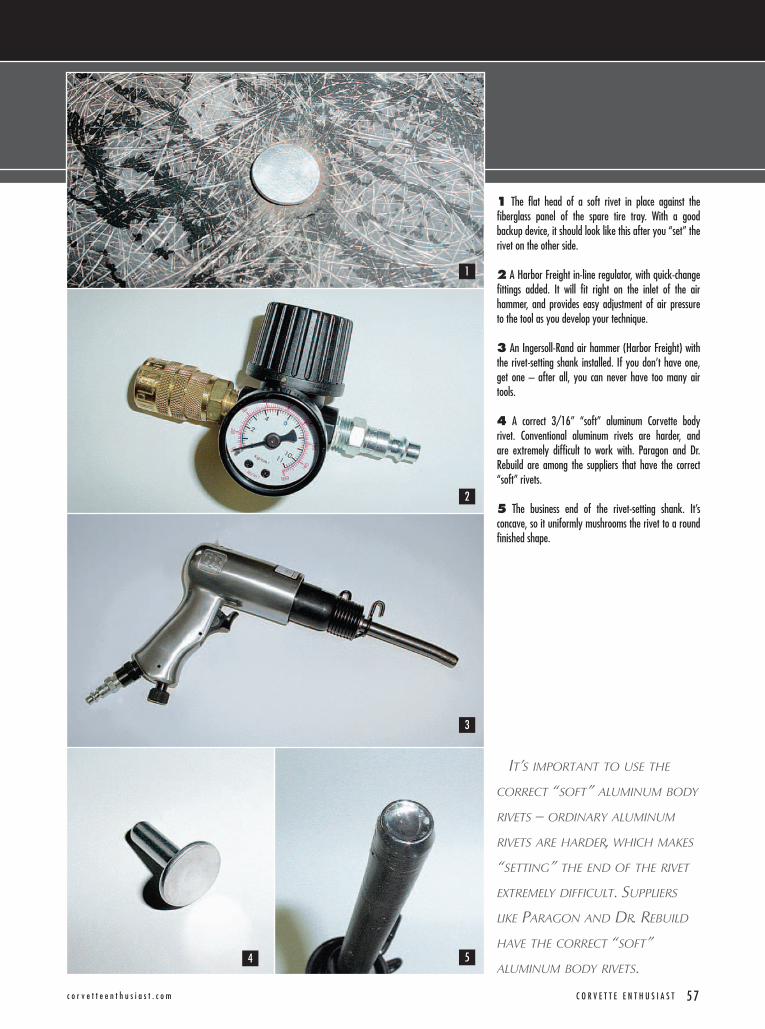
1 The flat head of a soft rivet in place against the fiberglass panel of the spare tire tray. With a good backup device, it should look like this after you “set” the rivet on the other side.
2 A Harbor Freight in-line regulator, with quick-change fittings added. It will fit right on the inlet of the air hammer, and provides easy adjustment of air pressure to the tool as you develop your technique.
3 An Ingersoll-Rand air hammer (Harbor Freight) with the rivet-setting shank installed. If you don’t have one, get one – after all, you can never have too many air tools.
4 A correct 3/16” “soft” aluminum Corvette body rivet. Conventional aluminum rivets are harder, and are extremely difficult to work with. Paragon and Dr. Rebuild are among the suppliers that have the correct “soft” rivets.
5 The business end of the rivet-setting shank. It’s concave, so it uniformly mushrooms the rivet to a round finished shape.
54
1
IT’S IMPORTANT TO USE THE
CORRECT “SOFT” ALUMINUM BODY
RIVETS – ORDINARY ALUMINUM
RIVETS ARE HARDER, WHICH MAKES
“SETTING” THE END OF THE RIVET
EXTREMELY DIFFICULT. SUPPLIERS
LIKE PARAGON AND DR. REBUILD
HAVE THE CORRECT “SOFT”
ALUMINUM BODY RIVETS.

5 8 C O R V E T T E E N T H U S I A S T c o r v e t t e e n t h u s i a s t . c o m
8
compressor). Practice on some scrap parts first and experiment to find the pressure that works best with your air hammer – it will probably be between 15-35 psi, depending on your particular tool.
If you don’t have an air hammer or an in-line regulator, places like Harbor Freight have them at bargain prices (about $40 for the air hammer, and $7 for the regulator); after all, you can never have too many air tools. The 3/16” rivet-setting shank is available from some of the Corvette parts vendors, or Aircraft Tool Supply (www.aircraft-tool.com) has a great selection to pick from. The rivet-setting shank has a concave end, which mushrooms the end of the rivet very neatly; a similar flat-ended shank will set the rivet and be perfectly functional, but it’s harder to control and doesn’t have a finished appearance.
Using our spare tire tray and brace example, let’s set some rivets. If you don’t have a helper, insert the rivet through the fiberglass, and tape the head down (so it doesn’t fall out while you’re handling the parts); then place the steel brace over the protruding rivet shank on the other side, and position the panel (rivet head side down) on whatever you’re using as a solid backup. If you have a helper, just stand the assembly up vertically and your
helper can hold a hammer or similar solid object firmly against the head of the rivet.
Using a pair of diagonal cutters, snip off the end of the rivet so you have about 3/8” of the shank protruding above the metal part, and you’re ready to go. Make sure the head of the rivet is firmly seated against your backup device, position the burp gun so the business end of the concave shank is squarely placed on the end of the rivet, and pull the trigger. Hold the trigger until the end of the concave tool has bottomed out on the surface of the metal part. The result will be a properly set rivet with a nice, rounded head. Repeat the process for the rest of the rivets, and you’ll have a factory-looking assembly. If you do one and aren’t happy with the appearance, just pop the “set” end of the rivet off with a sharp chisel and do it over again. If you keep the axis of the tool parallel with the axis of the rivet shank, you’ll get a nice uniformly mushroomed round finished rivet head.
THE BOTTOM LINE: This is only “rocket science” if you haven’t done it before. With the right “soft” rivets and some simple tools, you can set Corvette body rivets at home with no problem, just like they did at St. Louis.
������������������������������������������������������������������������� ���������������������������������������������������������������������������������������������������������������������������� ���������������������������������������������������������������������������� ������������������������������������������������������������������������������������ �����������������������������������������
�������������������������������� ��������������������������
��������������������������������������������������� ������ ���
������� ������ ��������������������������������������
��� ������������������������� �������������
��������������������������������������� ������ ���
����� ������ ���������������������������������������
����� �����������������������������������
���� ������ ���
������� ������ ����������������������������������������
�������������������������������������� ������ ������
�� ����������������������������������������������
����������������������� � ����
������� ������������ ��� ������������������������������������������������������������������� ������� ��������������������������������������������������� ���������� ���������
����������������������������������� ��������������������������������������������������������� ������������������������������������������������������������ �����������������������������������������������������������������������������������
��������������������
��������������������
6 7
6 Everything you need to set body rivets – air hammer, rivet-setting shank, and pressure regulator. Just use something solid to back up the flat head end of the rivet.
7 With the rivet backed up, pull the trigger until the setting tool shank bottoms out on the metal part.
8 Here’s the result – a nicely formed, rounded rivet head. Keep the setting tool squarely on the end of the rivet and the axis of the tool parallel with the axis of the rivet, and they’ll all look like this. Practice on some scrap parts first to refine your technique.