rigging knots - bc plant health care...piece of rope. valdotain tresse (vt), machard tresse (mt) •...
TRANSCRIPT
CHAPI'ER i
Rigging Knots
Objectives The arborist will learn to
• identify the various parts of a line.
• select knots that are appropriate for use in various rigging scenarios.
• tie, dress , and set the primary knots used in rigging.
bend
bend radius
bight
bowline
bowline on a bight
butterfly knot
clove hitch
cow hitch
endline loop
fall
Key Terms fixed loop midline loop
girth hitch Prusik hitch
half hitch round turn
hitch running bowline
knot running end
lead sheet bend
loop slip knot
loop knot slipped
Machard tresse (Mt) slippery bend
marline hitch spliced eye
Parts of a Line
standing part
T.D.S. timber hitch
turn
Valdotain tresse (Vt)
working end
zeppelin bend
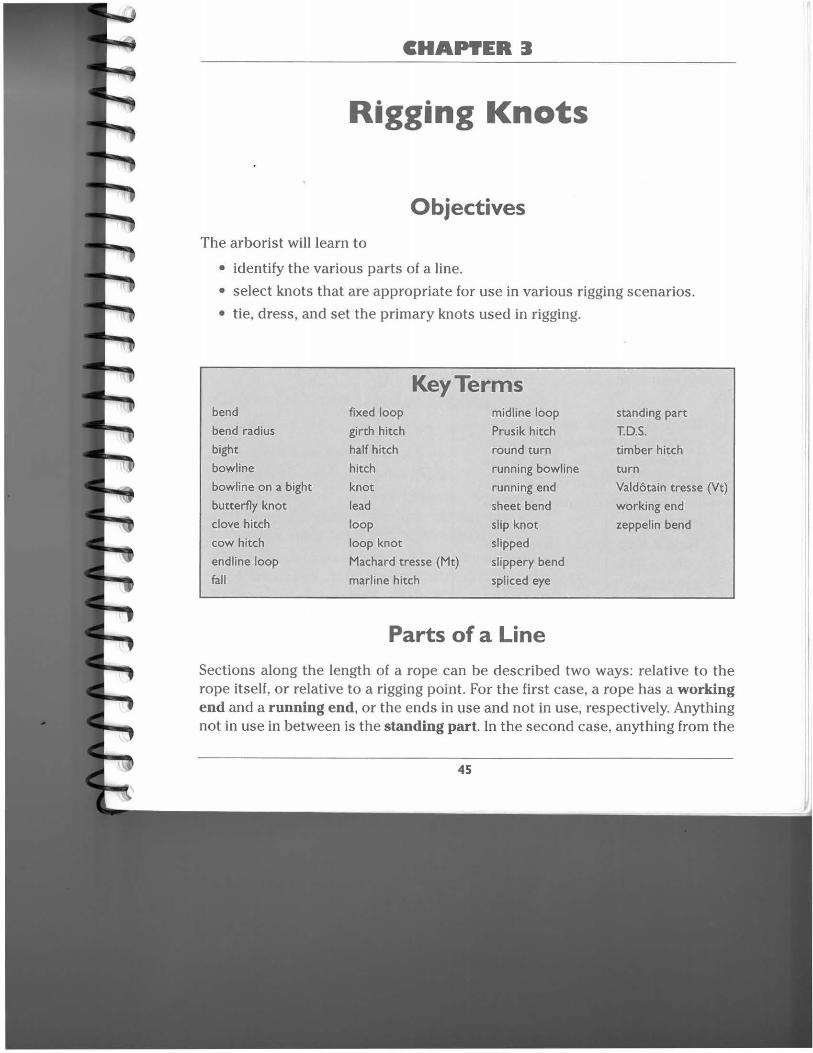
Sections along the length of a rope can be described two ways: relative to the rope itself, or relative to a rigging point. For the first case, a rope has a working end and a running end, or the ends in use and not in use, respectively. Anything not in use in between is the standing part. In the second case, anything from the
45
The Art and Science of Practical Rigging
end
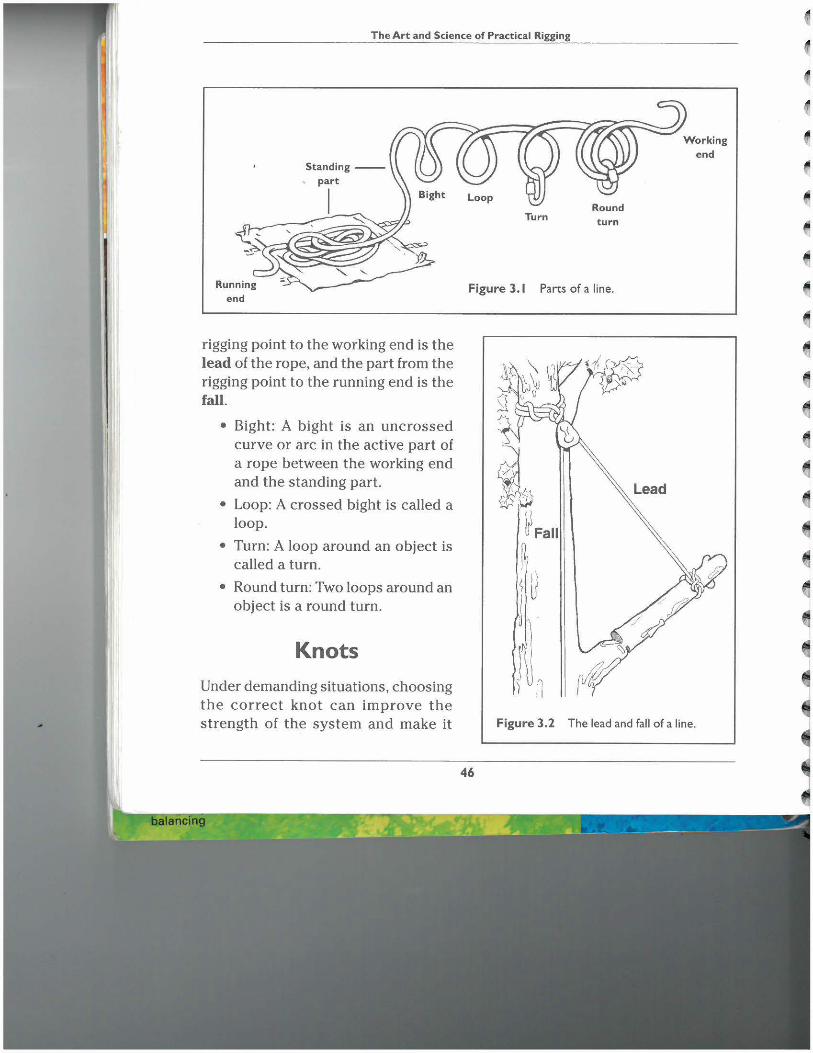
rigging point to the working end is the lead of the rope, and the part from the rigging point to the running end is the fall.
• Bight: A bight is an uncrossed curve or arc in the active part of a rope between the working end and the standing part.
• Loop: A crossed bight is called a loop.
• Turn: A loop around an object is called a turn.
• Round turn: Two loops around an object is a round turn.
Knots
Under demanding situations, choosing the correct knot can improve the strength of the system and make it
turn
Figure 3.1 Parts of a line.
Figure 3.2 The lead and fall of a line.
46
Chapter 3 • Rigging Knots
possible to untie the ropes when finished. Knots are classified as several different types.
• Loop: A loop can be made fast with a knot. A loop can be at the end of a line (an endline loop) or in the bight (a midline loop) . .
• Hitch: A hitch is made when a rope is secured around an object or its own standing part.
• Bend: A bend is a type of knot that secures two ends to each other. A bend formed with two ends of the same line forms a fixed loop.
Tie, Dress, and Set (T.D.S.)
With any knot employed, it is important to
T-tie D-dress (align the parts)
S-set (tighten the knot or make ready for use)
Common Knots Used in Rigging
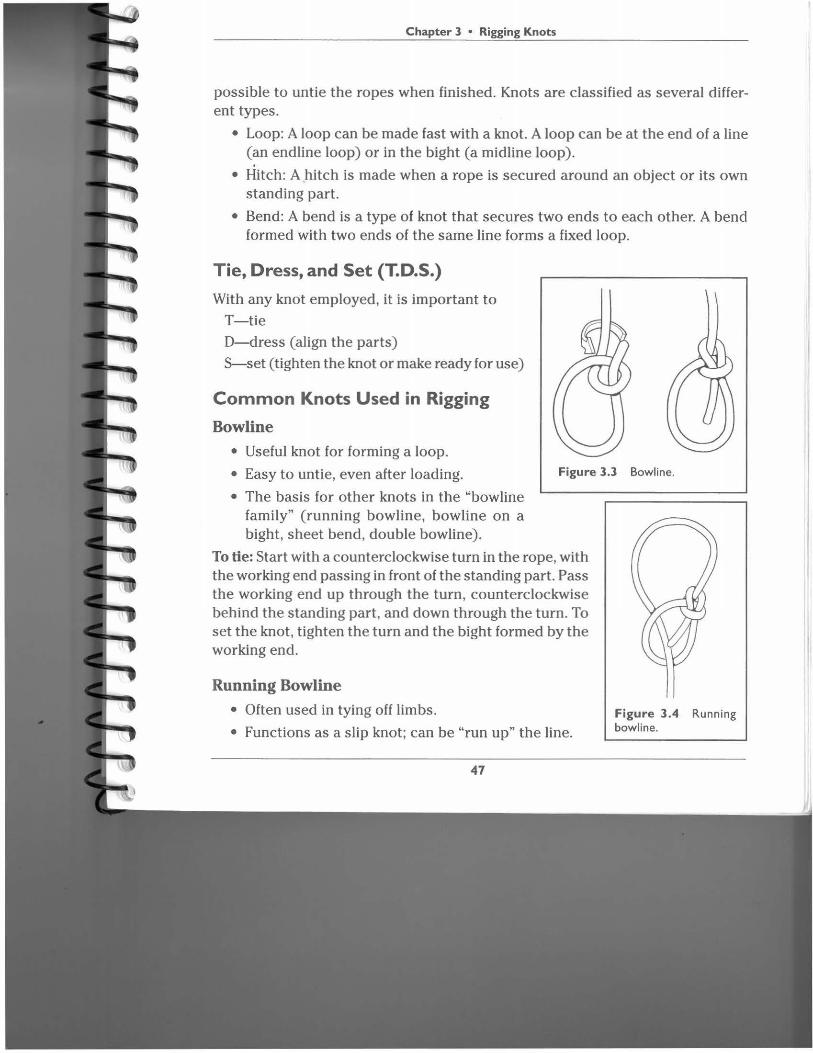
Bowline
• Useful knot for forming a loop.
• Easy to untie, even after loading. Figure 3.3 Bowline.
• The basis for other knots in the "bowline family" (running bowline, bowline on a bight, sheet bend, double bowline).
To tie: Start with a counterclockwise turn in the rope, with the working end passing in front of the standing part. Pass the working end up through the turn, counterclockwise behind the standing part, and down through the turn. To set the knot, tighten the turn and the bight formed by the working end.
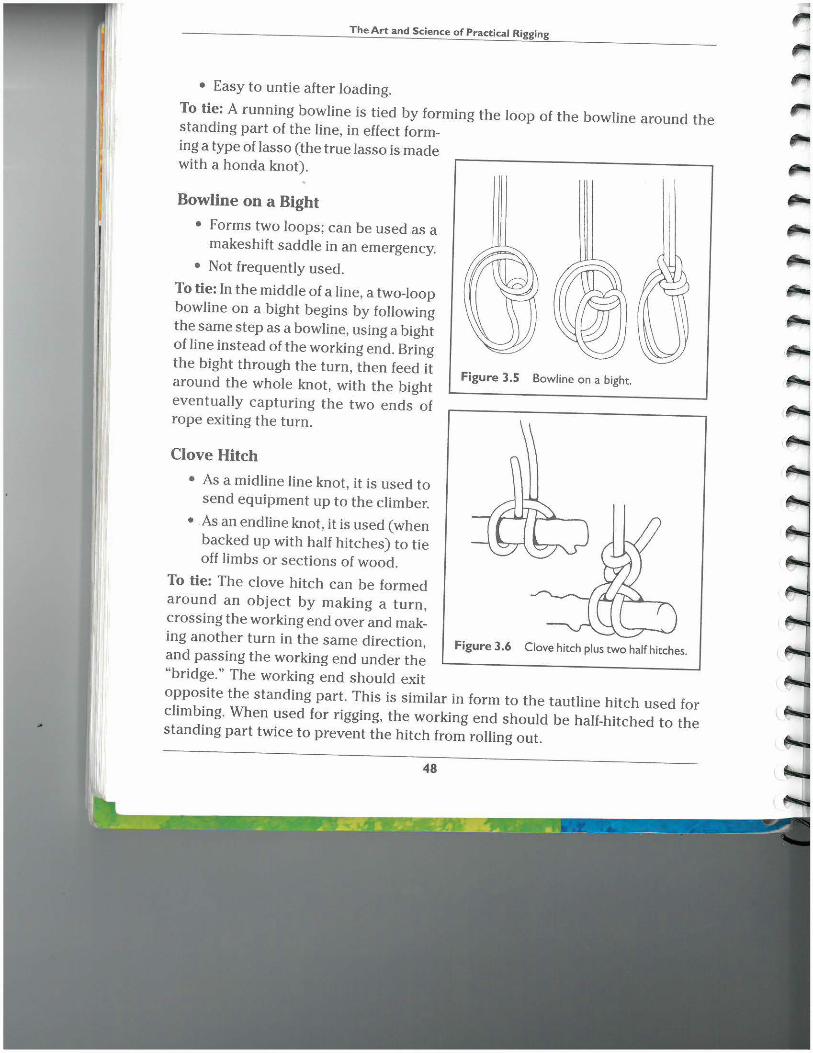
Running Bowline • Often used in tying off limbs.
• Functions as a slip knot; can be "run up" the line.
47
Figure 3.4 Running bowline.
The Art and Science of Practical Rigging
• Easy to untie after loading.
To tie: A running bowline is tied by forming the loop of the bowline around the standing part of the line, in effect form-ing a type of lasso (the true lasso is made with a honda knot).
Bowline on a Bight
• Forms two loops; can be used as a makeshift saddle in an emergency.
• Not frequently used.
To tie: In the middle of a line, a two-loop bowline on a bight begins by following the same step as a bowline, using a bight of line instead of the working end. Bring the bight through the turn, then feed it around the whole knot, with the bight eventually capturing the two ends of rope exiting the turn.
Clove Hitch
• As a midline line knot, it is used to send equipment up to the climber.
• As an endline knot, it is used (when backed up with half hitches) to tie off limbs or sections of wood.
To tie: The clove hitch can be formed around an object by making a turn, crossing the working end over and mak-
Figure 3.5 Bowline on a bight.
ing another turn in the same direction, Figure 3.6 Clove hitch plus two half hitches. and passing the working end under the "bridge." The working end should exit
opposite the standing part. This is similar in form to the tautline hitch used for climbing. When used for rigging, the working end should be half-hitched to the standing part twice to prevent the hitch from rolling out.
48
Chapter 3 • Rigging Knots
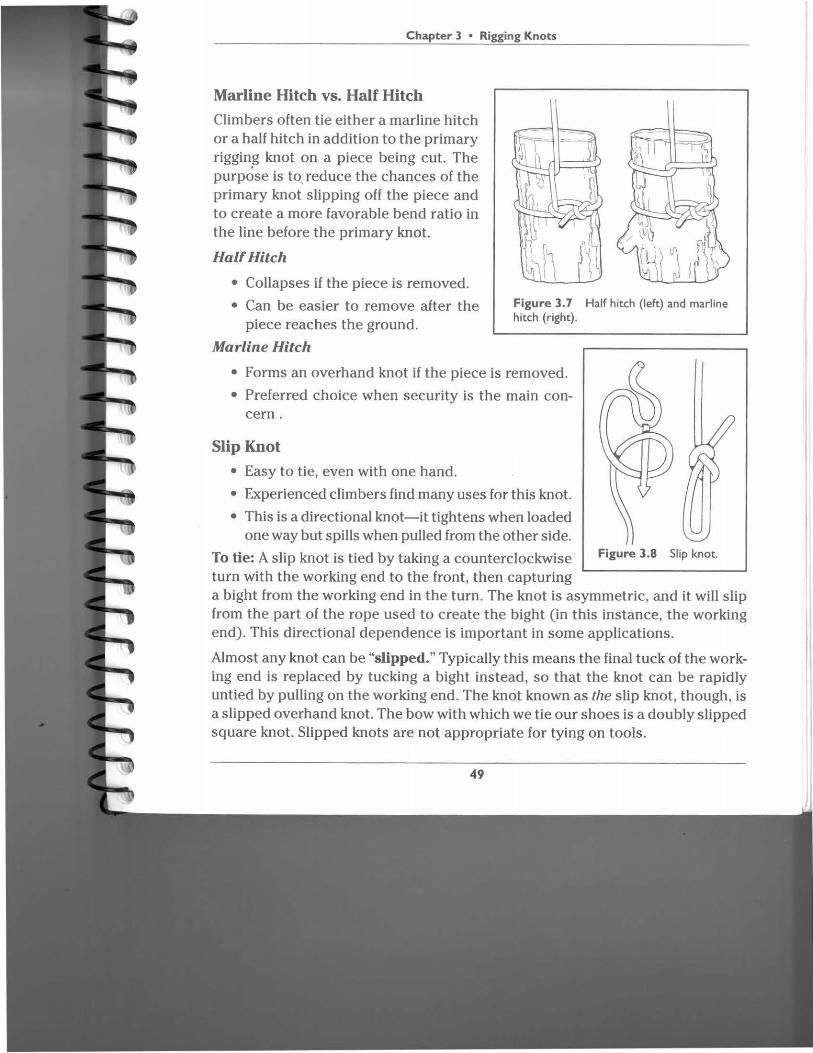
Marline Hitch vs. Half Hitch
Climbers often tie either a marline hitch or a half hitch in addition to the primary rigging knot on a piece being cut. The purpose is to_ reduce the chances of the primary knot slipping off the piece and to create a more favorable bend ratio in the line before the primary knot.
Half Hitch
• Collapses if the piece is removed.
• Can be easier to remove after the piece reaches the ground.
Marline Hitch
Figure 3.7 Half hitch (left) and marline hitch (right).
• Forms an overhand knot if the piece is removed.
• Preferred choice when security is the main concern.
Slip Knot
• Easy to tie, even with one hand.
• Experienced climbers find many uses for this knot.
• This is a directional knot-it tightens when loaded one way but spills when pulled from the other side.
To tie: A slip knot is tied by taking a counterclockwise Figure 3.8 Slip knot.
turn with the working end to the front, then capturing a bight from the working end in the turn. The knot is asymmetric, and it will slip from the part of the rope used to create the bight (in this instance, the working end). This directional dependence is important in some applications.
Almost any knot can be "slipped." Typically this means the final tuck of the working end is replaced by tucking a bight instead, so that the knot can be rapidly untied by pulling on the working end. The knot known as the slip knot, though, is a slipped overhand knot. The bow with which we tie our shoes is a doubly slipped square knot. Slipped knots are not appropriate for tying on tools.
49
The Art and Science of Practical Rigging
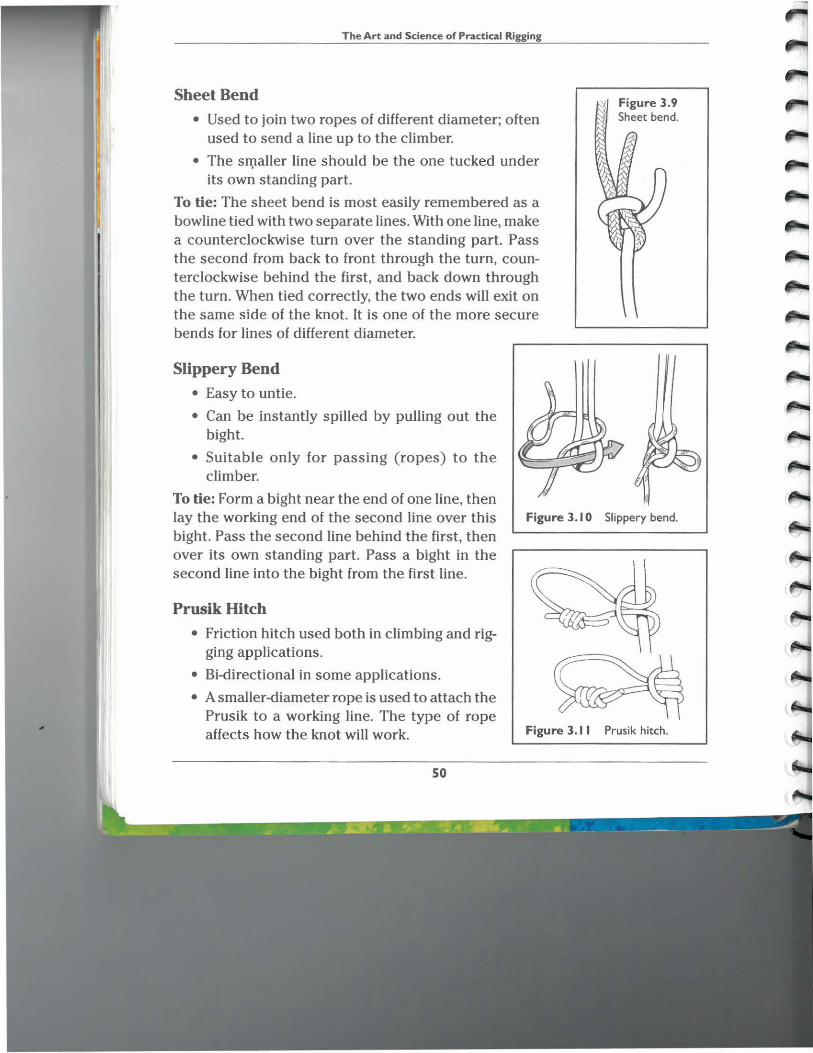
Sheet Bend
• Used to join two ropes of different diameter; often used to send a line up to the climber.
• The Sll).aller line should be the one tucked under its own standing part.
To tie: The sheet bend is most easily remembered as a bowline tied with two separate lines. With one line, make a counterclockwise turn over the standing part. Pass the second from back to front through the turn, counterclockwise behind the first, and back down through the turn. When tied correctly, the two ends will exit on the same side of the knot. It is one of the more secure bends for lines of different diameter.
Slippery Bend
• Easy to untie.
• Can be instantly spilled by pulling out the bight.
• Suitable only for passing (ropes) to the climber.
Figure 3.9 Sheet bend.
To tie: Form a bight near the end of one line, then lay the working end of the second line over this bight. Pass the second line behind the first, then over its own standing part. Pass a bight in the second line into the bight from the first line.
Figure 3.10 Slippery bend.
Prusik Hitch
• Friction hitch used both in climbing and rigging applications.
• Bi-directional in some applications.
• A smaller-diameter rope is used to attach the Prusik to a working line. The type of rope affects how the knot will work.
50
Figure 3.11 Prusik hitch.
Chapter 3 • Rigging Knots
To tie: Hold a fixed loop behind a line and pass the bight from one side through the other side two or three times. This now forms a hitch that will lock securely when pulled in either direction along the line. It also can be tied with a single piece of rope.
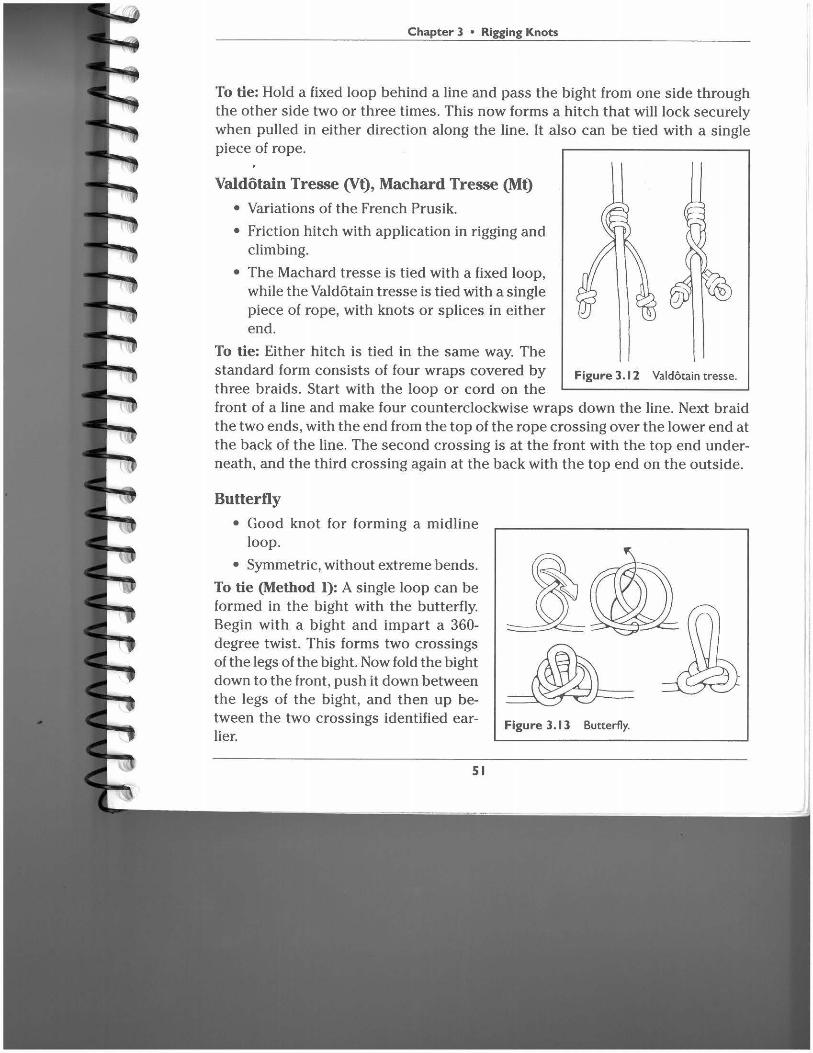
Valdotain Tresse (Vt), Machard Tresse (Mt)
• Variations of the French Prusik.
• Friction hitch with application in rigging and climbing.
• The Machard tresse is tied with a fixed loop, while the Vald6tain tresse is tied with a single piece of rope, with knots or splices in either end.
To tie: Either hitch is tied in the same way. The standard form consists of four wraps covered by Figure 3.12 Valdotain tresse.
three braids. Start with the loop or cord on the front of a line and make four counterclockwise wraps down the line. Next braid the two ends, with the end from the top of the rope crossing over the lower end at the back of the line. The second crossing is at the front with the top end underneath, and the third crossing again at the back with the top end on the outside.
Butterfly
• Good knot for forming a midline loop.
• Symmetric, without extreme bends.
To tie (Method 1): A single loop can be formed in the bight with the butterfly. Begin with a bight and impart a 360-degree twist. This forms two crossings of the legs of the bight. Now fold the bight down to the front, push it down between the legs of the bight, and then up between the two crossings identified earlier.
51
Figure 3.13 Butterfly.
The Art and Science of Practical Rigging
To tie (Method 2): With your palm facing up, make three turns around your hand. Pick up the turn on the left and place it between the other two. Pick up the turn that is now on the left and place it to the right of the other two, then take this same turn, which is now on the far right, and pass it under and up between the two other Wrns, passing it from right to left. Pull it through to make a loop, then dress and set the knot.
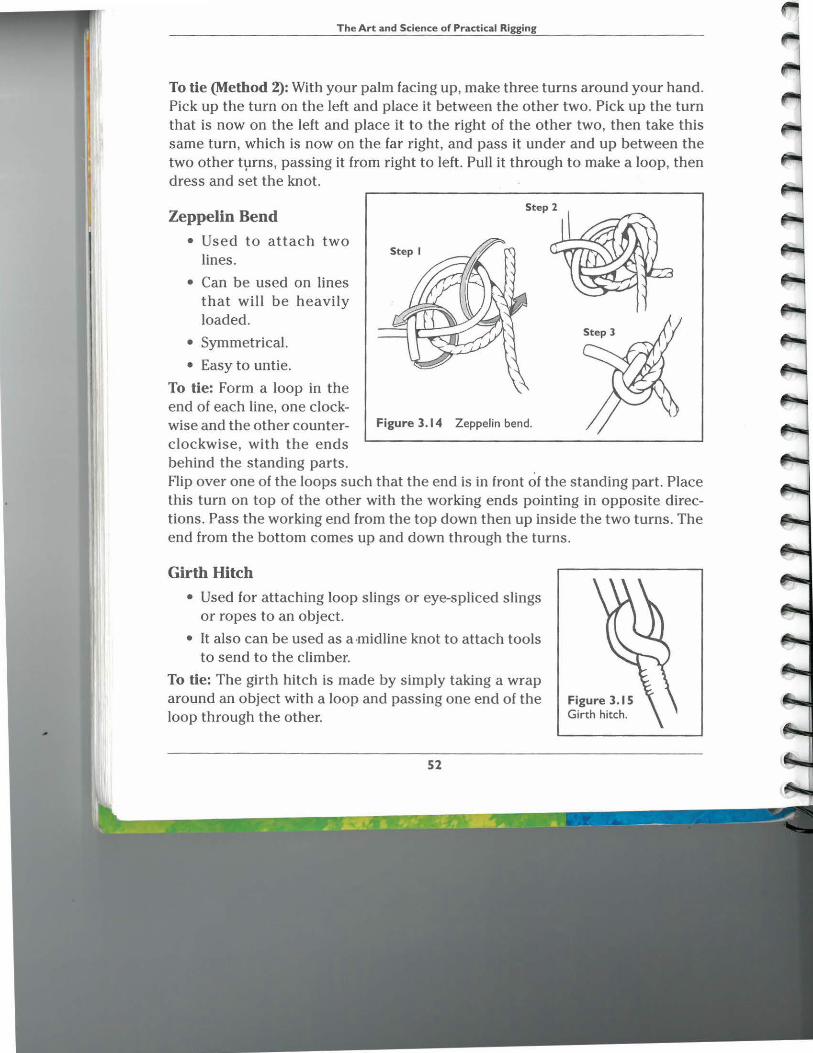
Zeppelin Bend
• Used to attach two lines.
• Can be used on lines that will be heavily loaded.
• Symmetrical.
• Easy to untie.
To tie: Form a loop in the end of each line, one clock-wise and the other counter- Figure 3.14 Zeppelin bend.
clockwise, with the ends behind the standing parts. Flip over one of the loops such that the end is in front of the standing part. Place this turn on top of the other with the working ends pointing in opposite directions. Pass the working end from the top down then up inside the two turns. The end from the bottom comes up and down through the turns.
Girth Hitch
• Used for attaching loop slings or eye-spliced slings or ropes to an object.
• It also can be used as a midline knot to attach tools to send to the climber.
To tie: The girth hitch is made by simply taking a wrap around an object with a loop and passing one end of the loop through the other.
52
Figure 3.15 Girth hitch.
Chapter 3 • Rigging Knots
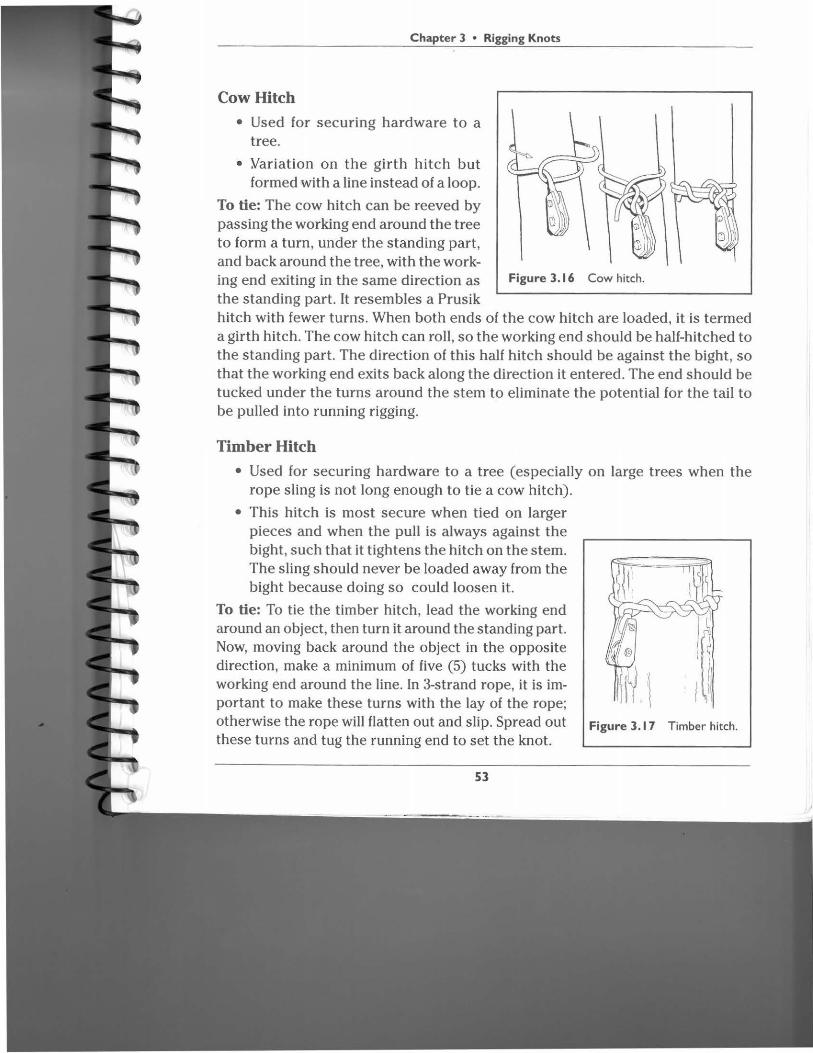
Cow Hitch
• Used for securing hardware to a tree.
• Yariation on the girth hitch but formed with a line instead of a loop.
To tie: The cow hitch can be reeved by passing the working end around the tree to form a turn, under the standing part, and back around the tree, with the work-ing end exiting in the same direction as Figure 3.16 Cow hitch.
the standing part. It resembles a Prusik hitch with fewer turns. When both ends of the cow hitch are loaded, it is termed a girth hitch. The cow hitch can roll, so the working end should be half-hitched to the standing part. The direction of this half hitch should be against the bight, so that the working end exits back along the direction it entered. The end should be tucked under the turns around the stem to eliminate the potential for the tail to be pulled into running rigging.
Timber Hitch
• Used for securing hardware to a tree (especially on large trees when the rope sling is not long enough to tie a cow hitch).
• This hitch is most secure when tied on larger pieces and when the pull is always against the bight, such that it tightens the hitch on the stem. The sling should never be loaded away from the bight because doing so could loosen it.
To tie: To tie the timber hitch, lead the working end around an object, then turn it around the standing part. Now, moving back around the object in the opposite direction, make a minimum of five (5) tucks with the working end around the line. In 3-strand rope, it is important to make these turns with the lay of the rope; otherwise the rope will flatten out and slip. Spread out Figure 3.17 Timber hitch.
these turns and tug the running end to set the knot.
53