rfs class i rocket assembly instructions i construction.pdf · put on a pair of plastic or rubber...
TRANSCRIPT

Instructions & Photos by:
Great Lakes Space Port Sheboygan Education Foundation, Inc.
RFS Class I Rocket
Assembly Instructions

Additional Items and Supplies You Will Need 150 Grit & 220 Grit Sandpaper 3/32”, 5/32”, 3/16” drill Bits and Drill 3/4” Masking Tape Plastic Gloves Ruler Pencil Primer Paint
General Assembly Tips (PLEASE READ) Before you start building your rocket, familiarize yourself with these
instructions and the proper sequence of assembly steps as outlined. This rocket is flown with high-impulse rocket motors. For maximum strength
and model integrity you must use the supplied epoxy throughout its entire construction unless noted otherwise.
IMPORTANT: Before epoxying any parts to the phenolic tubing, make sure you rough it up by sanding the mating surfaces with 150 grit sandpaper to create a better bond.
Test fit all components prior to bonding them together with epoxy. Some components may require light sanding to ensure a proper fit.
Welcome and thank you for joining the
Rockets for Schools Competition
We have developed these expanded instructions for those of you who may not have much mod-
eling experience. If you have any problems during your rocket’s construction, feel free to call
me with your questions.
Randy Lutz Daytime Phone — 920.451.3801
Co-Director Evening Phone — 920.458.6299
Rockets for Schools

ID No. Quant. Description
1 1 36” length / 4” diameter Pre-slotted Booster Tube
2 1 18” length / 4” diameter Payload Tube
3 1 12” length / 38mm dia. Motor Tube
4 1 6” length payload coupler
5 1 Plastic Nose Cone
6 3 .093” G-10 Fiberglass Fins
7 1 Payload Bulkhead
8 1 Forward Centering Ring
9 1 Aft Centering Ring
10 1 28” Round Nylon Parachute
11 1 5/8” Wide Tubular Nylon Cord
12 1 Bag Hardware
Not Shown: 1 5 Minute Epoxy
Step #1
Parts Identification
1.1 Layout all the parts from the kit and identify them with the parts list below
Step #2
Assembly of the Motor Tube
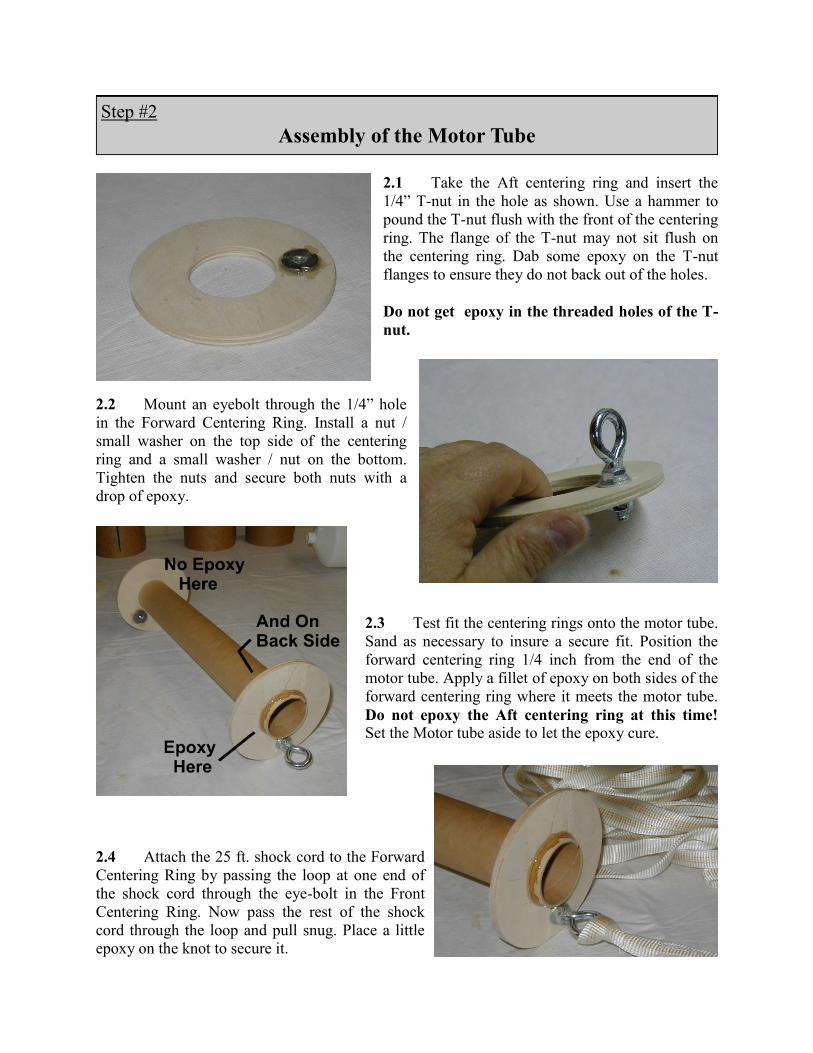
2.1 Take the Aft centering ring and insert the
1/4” T-nut in the hole as shown. Use a hammer to
pound the T-nut flush with the front of the centering
ring. The flange of the T-nut may not sit flush on
the centering ring. Dab some epoxy on the T-nut
flanges to ensure they do not back out of the holes.
Do not get epoxy in the threaded holes of the T-
nut.
2.2 Mount an eyebolt through the 1/4” hole
in the Forward Centering Ring. Install a nut /
small washer on the top side of the centering
ring and a small washer / nut on the bottom.
Tighten the nuts and secure both nuts with a
drop of epoxy.
2.3 Test fit the centering rings onto the motor tube.
Sand as necessary to insure a secure fit. Position the
forward centering ring 1/4 inch from the end of the
motor tube. Apply a fillet of epoxy on both sides of the
forward centering ring where it meets the motor tube.
Do not epoxy the Aft centering ring at this time!
Set the Motor tube aside to let the epoxy cure.
2.4 Attach the 25 ft. shock cord to the Forward
Centering Ring by passing the loop at one end of
the shock cord through the eye-bolt in the Front
Centering Ring. Now pass the rest of the shock
cord through the loop and pull snug. Place a little
epoxy on the knot to secure it.

Step #3
Mounting the Motor Tube in the Airframe
2.5 Now place the shock cord into the motor tube to
keep it out of the way for the next step.
3.1 Start out by mixing up some epoxy. Using a
stick or similar item apply a ring of epoxy 11” from
the AFT end of the Booster Tube. The aft end of the
tube contains the slots for the fins to be added later.
3.2 Position the Forward Centering
Ring into the AFT end of the Booster
Tube.
3.3 You can now slide the motor
mount assembly up the airframe.
3.4 Double-check that the motor tube is flush with
the AFT end of the airframe. Do NOT epoxy the
AFT centering at this time! Stand the airframe up-
right and allow the epoxy to cure.

4.1 Apply an epoxy bead to the root edge of the fin.
4.2 Push the root edge of the fin through the slot in
the airframe onto the motor tube. Make sure the fin is
perpendicular to the airframe as shown.
Step #4
Attaching the Fins
4.3 Use masking tape to hold the fin in position
while the epoxy cures. Repeat this process for all
fins. Allow the epoxy to fully cure before proceed-
ing to the next step.
4.4 Apply an epoxy fillet to both sides of
each fin where the fin meets the exterior part of
the airframe. Put on a pair of plastic or rubber
gloves. Dip your finger in rubbing alcohol and
carefully smooth each epoxy fillet with your
finger before it starts to cure. Allow the epoxy
to fully cure before rotating the rocket to do
the next set of fillets. When the epoxy is fully
cured sand with 220 grit sand paper. This
gives better adhesion when the primer is ap-
plied.
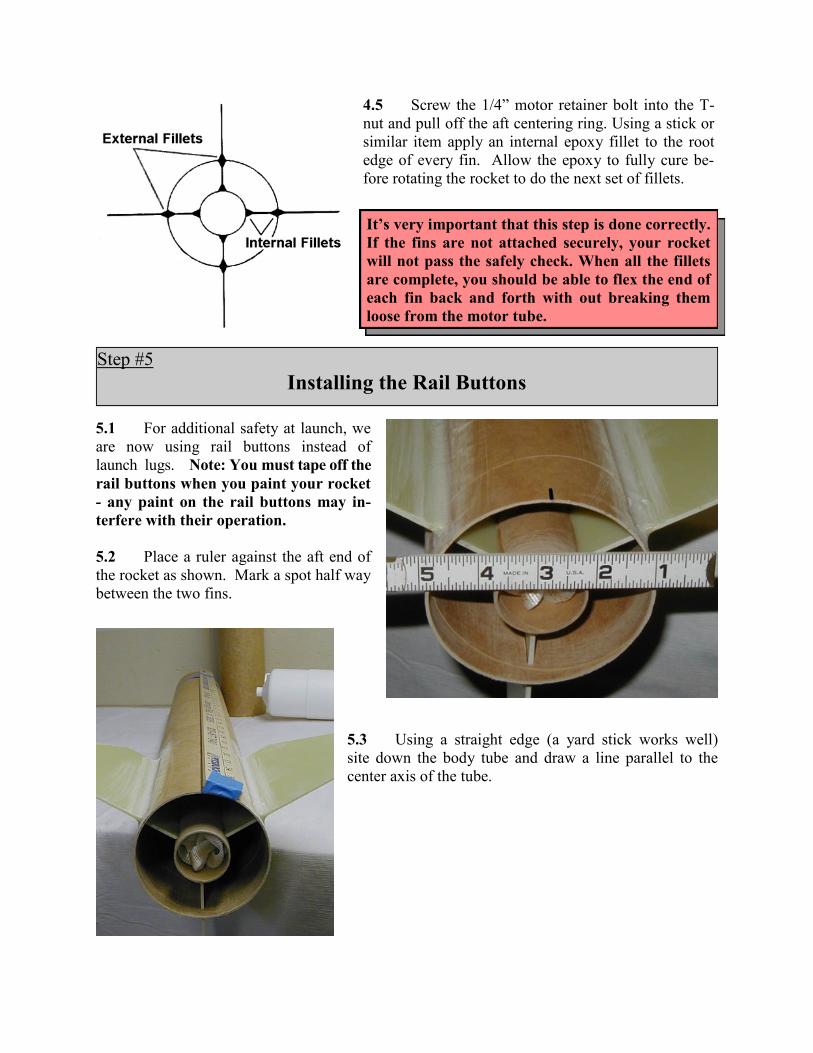
4.5 Screw the 1/4” motor retainer bolt into the T-
nut and pull off the aft centering ring. Using a stick or
similar item apply an internal epoxy fillet to the root
edge of every fin. Allow the epoxy to fully cure be-
fore rotating the rocket to do the next set of fillets.
Step #5
Installing the Rail Buttons
5.1 For additional safety at launch, we
are now using rail buttons instead of
launch lugs. Note: You must tape off the
rail buttons when you paint your rocket
- any paint on the rail buttons may in-
terfere with their operation.
5.2 Place a ruler against the aft end of
the rocket as shown. Mark a spot half way
between the two fins.
5.3 Using a straight edge (a yard stick works well)
site down the body tube and draw a line parallel to the
center axis of the tube.
It’s very important that this step is done correctly.
If the fins are not attached securely, your rocket
will not pass the safely check. When all the fillets
are complete, you should be able to flex the end of
each fin back and forth with out breaking them
loose from the motor tube.

Step #6
Epoxying the AFT Centering Ring
6.1 You can now epoxy the AFT centering in place.
Place a ring of epoxy just inside the Aft end of the
booster tube. Install the AFT Centering Ring so it is re-
cessed approximately 1/8” into the airframe. Apply a
generous epoxy fillet where the motor tube meets the
centering ring and where the centering ring meets the
airframe. Allow to cure.
5.4 Drill a 5/32” hole 1” and 20” from the
Aft end of the body tube along the center
line.
5.5 Screw the rail buttons into
the two holes using the #8 - 1/2”
screws. Install the #8 nut on the
screw to secure it.
Caution: Do not over-tighten the
nut. This may deform the rail button.
5.6 Place a drop of epoxy on
each of the nuts to lock them in
place. After the epoxy hardens,
place a piece of duct tape on the in-
side of the tube over the upper nut to
prevent the parachute from snagging
on it.

Step #7
Assembling the Payload Section
7.1 Start by test fitting the Payload Bulkhead
into the 6” long payload coupler. Sand as neces-
sary to ensure a proper fit. Put one nut and large
washer on the eyebolt, thread the eyebolt through
the hole. On the other side put on a large washer,
thread the nut and then tighten. You may want to
epoxy the nut in place to lock it in place.
7.2 Recess the bulkhead 1/8” into the 6” long payload
coupler. Epoxy the aft side of bulkhead in place using
stick or similar item. Once cured, epoxy forward side us-
ing a straw or similar item.
7.3 Measure and make a mark in the mid-
dle on the coupler. Smear a 2 inch band of
epoxy just inside the AFT end of payload
tube. Slide coupler into payload section up
to the mark. Allow to cure.

8.1 Now would be a good time to attach the
nose cone using the sheet metal screws provided.
Make three evenly spaced marks 1.5” down from
FORWARD end of payload section. Insert the
nose cone into the payload section tube and drill
three 3/32” holes. Install the sheet metal screws
through the payload tube and nose cone to secure
it in place.
Step #8
Finishing Up
8.2 Mark a spot 4 1/2 inches
down from the forward end of the
booster tube. Drill a 3/16” hole at this
point.
As the rocket rises in the atmosphere,
the air pressure around the rockets
drops. This hole bleeds off the higher
pressure air in the booster tube to pre-
vent the payload section from
“popping off” due to a pressure
buildup.
Step #9
Attaching the Recovery System
9.1 Tie an overhand loop knot 8 feet from the
free end of the shock cord. See example below.

9.3 Pass the shroud lines through the loop
in the white Tubular Nylon Cord. Then pass
the parachute through the shroud lines and pull
taut.
Note: Put a small amount of epoxy on all the
knots to ensure they do not unravel.
9.2 Lay the parachute flat. Pick up the shroud
line loops on at a time and drape them over your
hand.
9.2 Grasp the parachute at the apex (the center of the
chute) and pull the shroud lines taut.

Congratulations!
Step #10
Finishing
Use the following steps to finish your rocket
10.1 Let’s start using 150 grit sandpaper to sand the leading edges of the fins (refer to the pic-
ture in Step #4 to determine the leading edge), tapering them to a point.
10.2 Lightly sand the airframe and cone with a fine sandpaper to allow better adhesion of the
primer.
10.3 Important - Cover the two rail buttons with masking tape before painting your rock-
et. Any paint on the rail buttons may interfere with their operation.
10.4 Prime the rocket using primer of choice, following the instructions of the primer.
10.5 Fill any imperfections with Bondo or spot putty. Allow to dry and sand again.
10.6 Using a tack cloth or rubbing alcohol wipe down entire rocket to remove dust or any other
dirt.
10.7 Prime the rocket again and when dry, lightly sand with fine sandpaper.
10.8 Paint the kit using your choice or spray paint, Krylon is the choice of the manufacturer.
This is obviously a fictional kit, so there is no “correct” paint scheme. Let your imagina-
tion run wild!!
10.8 Once paint is applied and fully dry, clear coat the rocket using clear coat of choice. This
seals the rocket and helps keep water from penetrating.
This completes the assembly of your Class I rocket!