rev. ad163axztg8am2h.cloudfront.net/static/doc/92/0d/...bscan_ubm_rev_a.pdf · rev. a . 1 accutome...
TRANSCRIPT

Rev. A

1 Accutome Inc. • 3222 Phoenixville Pike • Malvern, PA USA • P: 800.979.2020 • F: 610.889.3233
ATTENTION
PLEASE READ ALL
ENCLOSED INFORMATION PRIOR TO
USING ACCUTOME ULTRASOUND EQUIPMENT
2 Accutome Inc. • 3222 Phoenixville Pike • Malvern, PA USA • P: 800.979.2020 • F: 610.889.3233
ATTENTION
IF A LAPTOP HAS BEEN PURCHASED FROM ACCUTOME, ALL SOFTWARE NECESSARY TO
RUN THE ACCUTOME SYSTEM IS PRE-INSTALLED ON ACCOMPANYING LAPTOP.
ACCOMPANYING SOFTWARE DISK IS TO BE USED IF INSTALLING SOFTWARE ON NON-
ACCUTOME SUPPLIED COMPUTER.

3 Accutome Inc. • 3222 Phoenixville Pike • Malvern, PA USA • P: 800.979.2020 • F: 610.889.3233
Table of Contents
Recommended PC Specifications ........................................................................................................ 4
Installation Instructions
Windows 8 64-bit ...................................................................................................................................... 6
Windows 8 32-bit .................................................................................................................................... 13
Windows 7 and Vista 64-bit .................................................................................................................... 19
Windows 7 and Vista 32-bit .................................................................................................................... 25
Windows XP ............................................................................................................................................ 31
Quick Start ....................................................................................................................................... 33
Installing Example Scans (Optional) .................................................................................................. 34

Recommended Computer Specifications
4 Accutome Inc. • 3222 Phoenixville Pike • Malvern, PA USA • P: 800.979.2020 • F: 610.889.3233
1. Processor Intel Core 2 Duo 2.20 GHz, Core i3 2.2 GHz or higher
2. Memory
3.0 GB, DDR2-667 SDRAM or higher 3. Video Card or Chip
Desktop PC: Any NVIDIA or ATI Video Card with 256MB graphic memory or more. Laptop PC: Any NVIDIA, ATI or Intel Video Chip
4. Screen Resolution of Monitor High resolution monitor (minimum 1366 X 768 pixels; recommended 1600 X 900 pixels or higher) 19 inch for desktop 15.4 inches or higher screen size for laptop.
5. Hard Disk
Minimum 80 GB, 7200 RPM, recommended 160 GB or higher for high patient flow site (more than 30 B-Scans per month).
6. Optical Drive
8X (or higher) DVD+/-RW with control software (needed for archiving)
7. USB Ports Minimum of 4 USB 2.0
8. Medical Grade Power Supply 9. Software and Operation System (OS)
Microsoft Word® 2003, 2007 and 2010 (for report generation) Windows 8®, Windows 7®, Microsoft Windows® Vista or Microsoft Windows® XP Professional Edition, SP2
Recommended Computer Specifications
5 Accutome Inc. • 3222 Phoenixville Pike • Malvern, PA USA • P: 800.979.2020 • F: 610.889.3233
If the computer on which you intend to load the software does not meet or exceed the listed specifications, we highly recommend that you do not install the software. It is recommended that the computer used in conjunction with the system you have purchased be dedicated for the sole use of Accutome’s product. Installation of software not vital to the operation of the system is highly discouraged, as it may detrimentally affect the performance of the system. Additionally, accessing the Internet will greatly affect the performance of the equipment and open the system to viruses and other harmful external factors and is therefore not recommended by Accutome.

Installation Instructions for Windows 8 (64-Bit)
6 Accutome Inc. • 3222 Phoenixville Pike • Malvern, PA USA • P: 800.979.2020 • F: 610.889.3233
Installation – Phase One: Turn off user account controls
Control Panel o If user is in tile screen, type control with cursor anywhere on screen
and select Control Panel
Select User Accounts and Family Safety
Select User Accounts
Select Change User Account Control Settings
Drag Slide-bar to Never Notify

Installation Instructions for Windows 8 (64-Bit)
7 Accutome Inc. • 3222 Phoenixville Pike • Malvern, PA USA • P: 800.979.2020 • F: 610.889.3233
Installation Phase Two: Change PC Settings (Windows 8)
Settings o If user is in tile screen, move cursor over minus sign
on the bottom right hand corner of the screen. A side menu will appear and the bottom option will be a cog which is the icon for the Settings menu
o Select Change PC Settings o Select the General tab on the left hand side of the menu
Scroll to the bottom of the General settings tab to a heading labeled Advanced Setup
Under Advanced Setup heading click on the box labeled Restart Now

Installation Instructions for Windows 8 (64-Bit)
8 Accutome Inc. • 3222 Phoenixville Pike • Malvern, PA USA • P: 800.979.2020 • F: 610.889.3233
Change PC Settings (Windows 8.1)
Settings o If user is in tile screen, move cursor over minus sign on
the bottom right hand corner of the screen. A side menu will appear and the bottom option will be a cog which is the icon for the Settings menu
o Select Change PC Settings
o Select Update and Recovery on the left hand side of the menu
On the Update and Recovery page find Advance Startup
Select Restart Now

Installation Instructions for Windows 8 (64-Bit)
9 Accutome Inc. • 3222 Phoenixville Pike • Malvern, PA USA • P: 800.979.2020 • F: 610.889.3233
Restart Screen
Select the box labeled Trouble Shoot o In Trouble Shoot Menu select Advanced Options
o Select Startup Settings Under Startup Settings select the Restart box in the bottom
right corner
In the next screen you will either select Disable Driver Signature Enforcement or press either 7 or F7. This will then restart the computer with the DSE disabled.
Installation Instructions for Windows 8 (64-Bit)
10 Accutome Inc. • 3222 Phoenixville Pike • Malvern, PA USA • P: 800.979.2020 • F: 610.889.3233
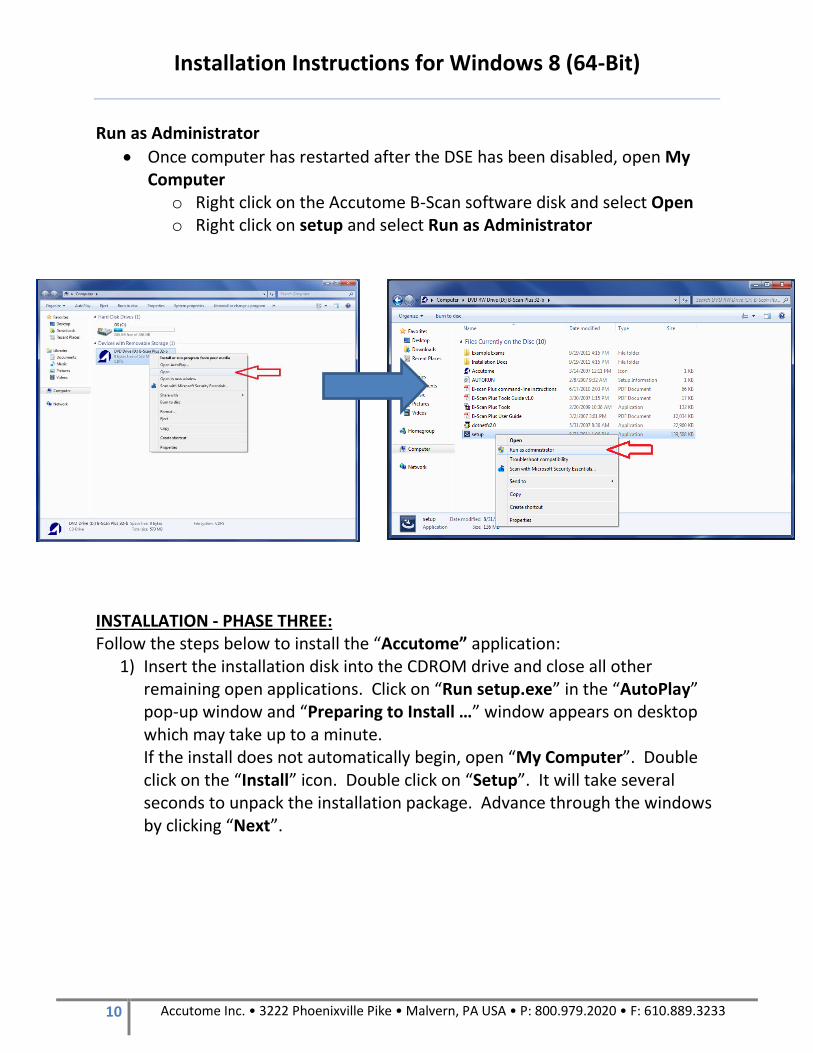
Run as Administrator
Once computer has restarted after the DSE has been disabled, open My Computer
o Right click on the Accutome B-Scan software disk and select Open o Right click on setup and select Run as Administrator
INSTALLATION - PHASE THREE: Follow the steps below to install the “Accutome” application:
1) Insert the installation disk into the CDROM drive and close all other remaining open applications. Click on “Run setup.exe” in the “AutoPlay” pop-up window and “Preparing to Install …” window appears on desktop which may take up to a minute. If the install does not automatically begin, open “My Computer”. Double click on the “Install” icon. Double click on “Setup”. It will take several seconds to unpack the installation package. Advance through the windows by clicking “Next”.

Installation Instructions for Windows 8 (64-Bit)
11 Accutome Inc. • 3222 Phoenixville Pike • Malvern, PA USA • P: 800.979.2020 • F: 610.889.3233
2) When the “Welcome to the InstallShield Wizard for Accutome” window appears, click “Next”. Click “I accept the terms in the license agreement” when the “License Agreement” window appears. Click “Next”. Click “Install”. After files are copied onto your computer a few icons will appears on your desktop.
3) The “Welcome to Setup foe
DirectX” window will appear on desktop at this time. If it does not appear automatically, Double click on the icon “Launch DXSETUP.exe” on the desktop to install Microsoft DirectX 9.0 manually.
4) Click “I Accept Agreement”. Click “Next”. Click “Next” to start installation
of Direct X. Click “Finish” to complete installation Direct X on your system.
5) After install Microsoft DirectX
9.0 the “Would you like to install this device software? Name: Jungo” window will appear on the desktop. Click “Install” button to install the Jungo device driver.
Installation Instructions for Windows 8 (64-Bit)
12 Accutome Inc. • 3222 Phoenixville Pike • Malvern, PA USA • P: 800.979.2020 • F: 610.889.3233
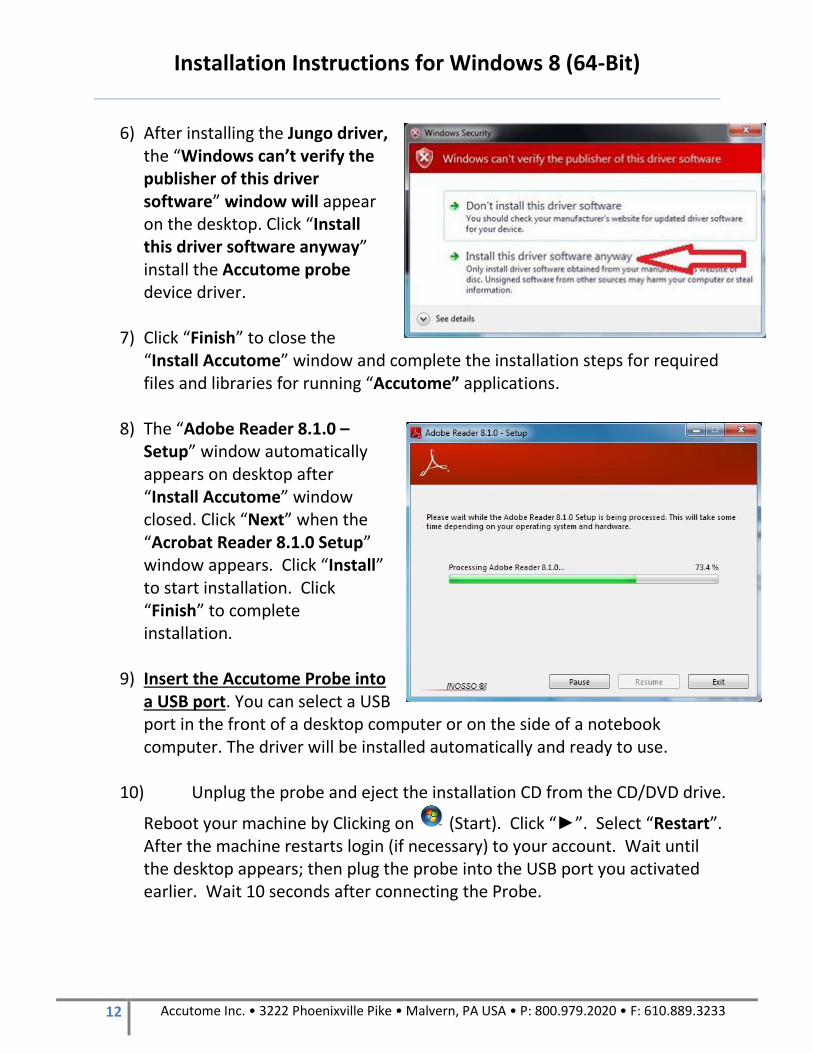
6) After installing the Jungo driver, the “Windows can’t verify the publisher of this driver software” window will appear on the desktop. Click “Install this driver software anyway” install the Accutome probe device driver.
7) Click “Finish” to close the “Install Accutome” window and complete the installation steps for required files and libraries for running “Accutome” applications.
8) The “Adobe Reader 8.1.0 –
Setup” window automatically appears on desktop after “Install Accutome” window closed. Click “Next” when the “Acrobat Reader 8.1.0 Setup” window appears. Click “Install” to start installation. Click “Finish” to complete installation.
9) Insert the Accutome Probe into
a USB port. You can select a USB port in the front of a desktop computer or on the side of a notebook computer. The driver will be installed automatically and ready to use.
10) Unplug the probe and eject the installation CD from the CD/DVD drive.
Reboot your machine by Clicking on (Start). Click “►”. Select “Restart”. After the machine restarts login (if necessary) to your account. Wait until the desktop appears; then plug the probe into the USB port you activated earlier. Wait 10 seconds after connecting the Probe.
Installation Instructions for Windows 8 (64-Bit)
13 Accutome Inc. • 3222 Phoenixville Pike • Malvern, PA USA • P: 800.979.2020 • F: 610.889.3233
You can either read the user guide by double clicking the icon “Launch User Guide” on the desktop or double click the "Launch Accutome.exe" icon on the desktop to start the program. NOTE: If your computer does not have Microsoft Word 2003 or 2007 installed, please install a valid copy of either one the program because you will need Word to generate reports.

Installation Instructions for Windows 8 (32-Bit)
14 Accutome Inc. • 3222 Phoenixville Pike • Malvern, PA USA • P: 800.979.2020 • F: 610.889.3233
Installation - Phase One: Turn off user account controls
Control Panel o If user is in tile screen, type control with cursor anywhere on screen
and select Control Panel
Select User Accounts and Family Safety
Select User Accounts
Select Change User Account Control Settings
Drag Slide-bar to Never Notify
Installation Instructions for Windows 8 (32-Bit)
15 Accutome Inc. • 3222 Phoenixville Pike • Malvern, PA USA • P: 800.979.2020 • F: 610.889.3233
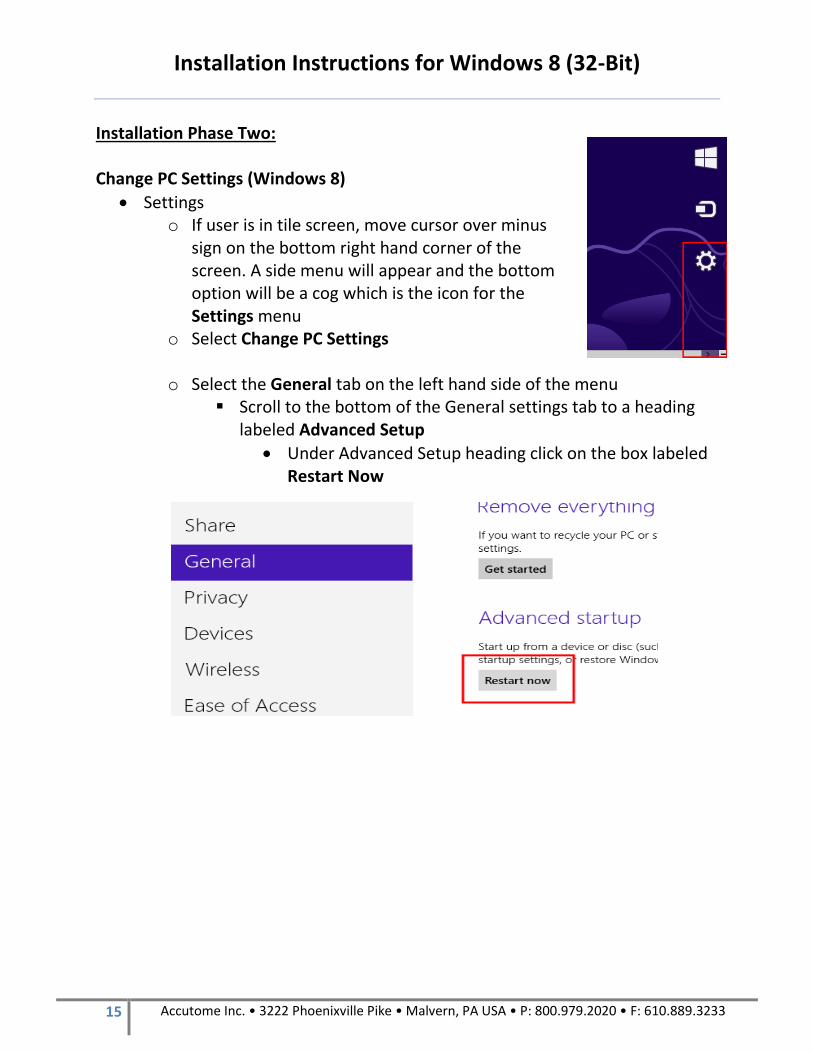
Installation Phase Two: Change PC Settings (Windows 8)
Settings o If user is in tile screen, move cursor over minus
sign on the bottom right hand corner of the screen. A side menu will appear and the bottom option will be a cog which is the icon for the Settings menu
o Select Change PC Settings o Select the General tab on the left hand side of the menu
Scroll to the bottom of the General settings tab to a heading labeled Advanced Setup
Under Advanced Setup heading click on the box labeled Restart Now
Installation Instructions for Windows 8 (32-Bit)
16 Accutome Inc. • 3222 Phoenixville Pike • Malvern, PA USA • P: 800.979.2020 • F: 610.889.3233
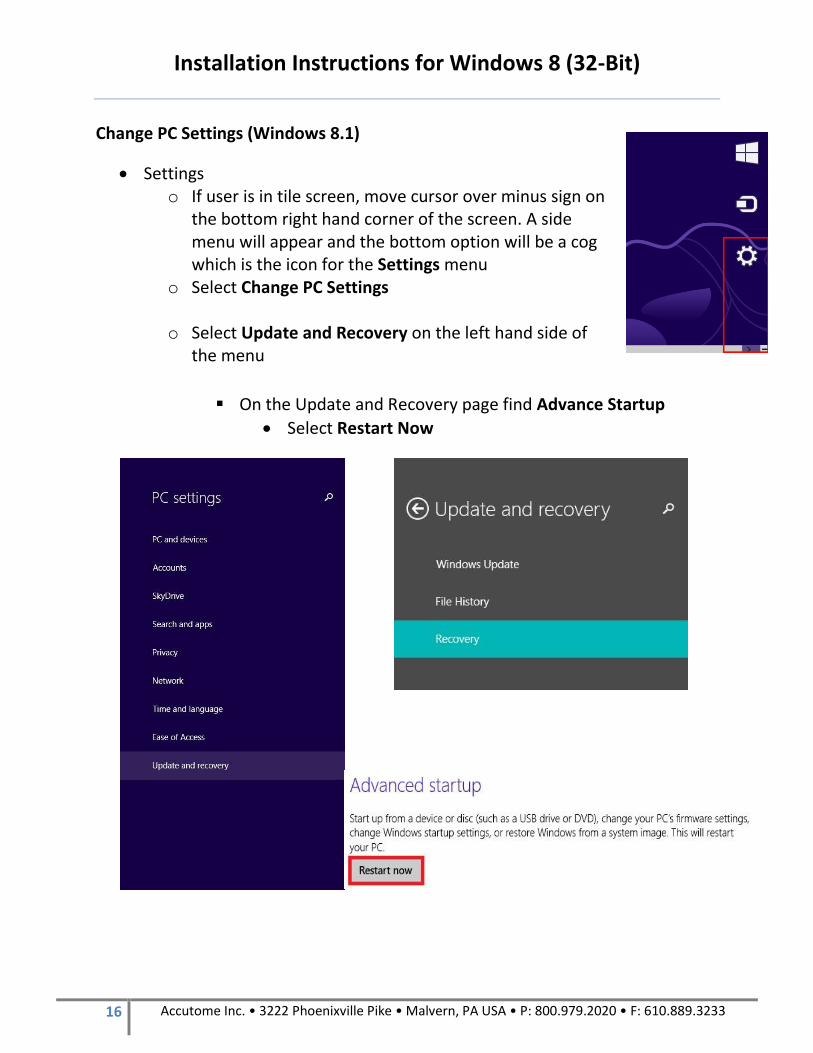
Change PC Settings (Windows 8.1)
Settings o If user is in tile screen, move cursor over minus sign on
the bottom right hand corner of the screen. A side menu will appear and the bottom option will be a cog which is the icon for the Settings menu
o Select Change PC Settings
o Select Update and Recovery on the left hand side of the menu
On the Update and Recovery page find Advance Startup
Select Restart Now
Installation Instructions for Windows 8 (32-Bit)
17 Accutome Inc. • 3222 Phoenixville Pike • Malvern, PA USA • P: 800.979.2020 • F: 610.889.3233
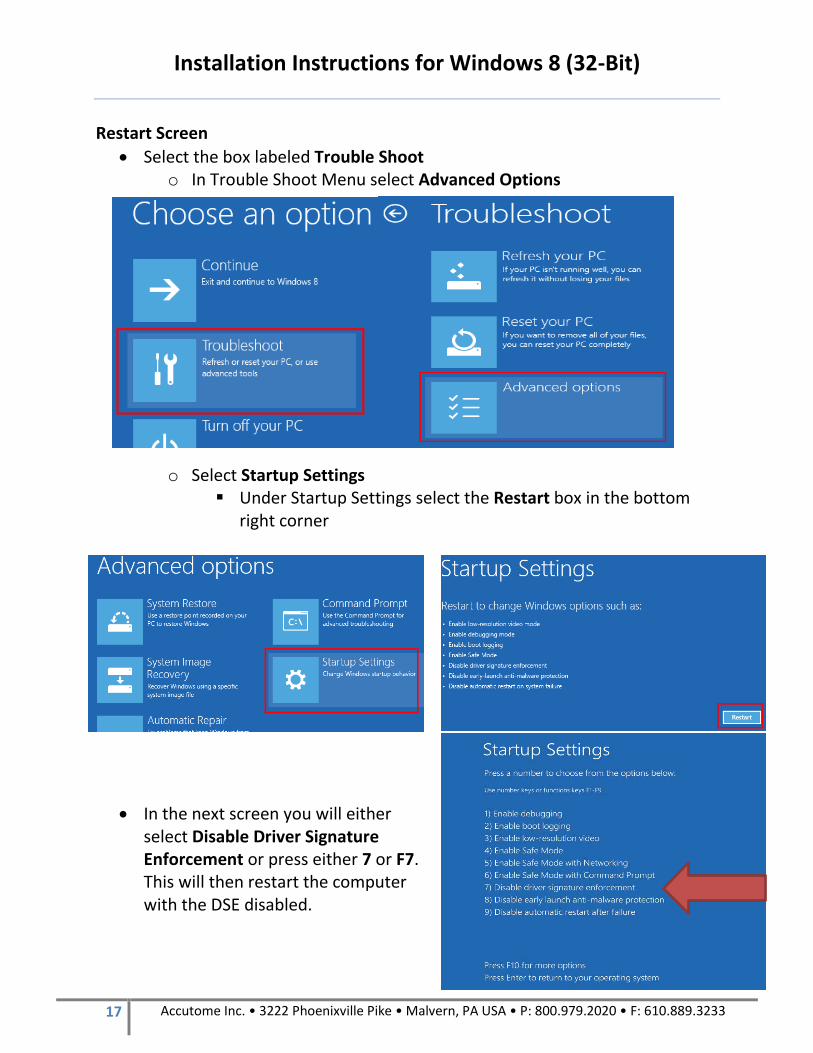
Restart Screen
Select the box labeled Trouble Shoot o In Trouble Shoot Menu select Advanced Options
o Select Startup Settings Under Startup Settings select the Restart box in the bottom
right corner
In the next screen you will either select Disable Driver Signature Enforcement or press either 7 or F7. This will then restart the computer with the DSE disabled.

Installation Instructions for Windows 8 (32-Bit)
18 Accutome Inc. • 3222 Phoenixville Pike • Malvern, PA USA • P: 800.979.2020 • F: 610.889.3233
Run as Administrator
Once computer has restarted after the DSE has been disabled, open My Computer
o Right click on the Accutome software disk and select Open o Right click on setup and select Run as Administrator
INSTALLATION - PHASE THREE: Follow the steps below to install the “Accutome” application:
1) It will take several seconds to unpack the installation package. Advance through the windows by clicking “Next”.
2) When the “Welcome to the InstallShield Wizard” window appears, click
“Next”. Click “I accept the terms in the license agreement” when the “License Agreement” window appears. Click “Next”. Click “Install”. After files are copied onto your computer a few icons will appear.

Installation Instructions for Windows 8 (32-Bit)
19 Accutome Inc. • 3222 Phoenixville Pike • Malvern, PA USA • P: 800.979.2020 • F: 610.889.3233
3) The “Welcome to Setup for DirectX” window will appear on desktop at this time. If it does not appear automatically, Double click on the icon “Launch DXSETUP.exe” on the desktop to install Microsoft DirectX 9.0 manually.
4) Click “I Accept Agreement”.
Click “Next”. Click “Next” to start installation of Direct X. Click “Finish” to complete installation Direct X on your system.
5) The “Adobe Reader 8.1.0 –
Setup” window automatically appears on desktop after the “Install Accutome” window is closed. Click “Next” when the “Acrobat Reader 8.1.0 Setup” window appears. Click “Install” to start installation. Click “Finish” to complete installation.
6) Insert the Accutome Probe into a USB port. You can select a USB port in the
front of a desktop computer or on the side of a notebook computer. The driver will be installed automatically and ready to use.
7) Unplug the probe and eject the installation CD from the CD/DVD drive.
Reboot your machine by Clicking on (Start). Click “►”. Select “Restart”. After the machine restarts login (if necessary) to your account. Wait until the desktop appears; then plug the probe into the USB port you activated

Installation Instructions for Windows 8 (32-Bit)
20 Accutome Inc. • 3222 Phoenixville Pike • Malvern, PA USA • P: 800.979.2020 • F: 610.889.3233
earlier. Wait 10 seconds after connecting the Probe.
You can either read the user guide by double clicking the icon “Launch User Guide” on the desktop or double click the "Launch Accutome.exe" icon on the desktop to start the program. NOTE: If your computer does not have Microsoft Word 2003 or 2007 installed, please install a valid copy of either one the program because you will need Word to generate reports.
Installation Instructions for Windows 7 & Vista (64-Bit)
21 Accutome Inc. • 3222 Phoenixville Pike • Malvern, PA USA • P: 800.979.2020 • F: 610.889.3233
PLEASE READ THROUGH INSTRUCTIONS BEFORE INSTALLING SOFTWARE
IMPORTANT:
DO NOT plug the Accutome probe into the USB port until instructions ask you to do so.
The computer must be running Microsoft Windows 7 or Vista 64-bit operating system (OS).
If install to Vista 64-bit OS please make sure it has Service Pack 1 (SP1) or newer.
The computer must have a local hard disk drive which is labeled “C:”.
The screen resolution (DPI setting) must be set to “Normal Size” (96DPI) or 100%.
The account used to install and run the program must belong to Administrators Group.
The computer must have Microsoft Word 2003 or higher to generate reports.
The computer must have Adobe Acrobat Reader version 5.0 or higher to read the “User Guide” (PDF).
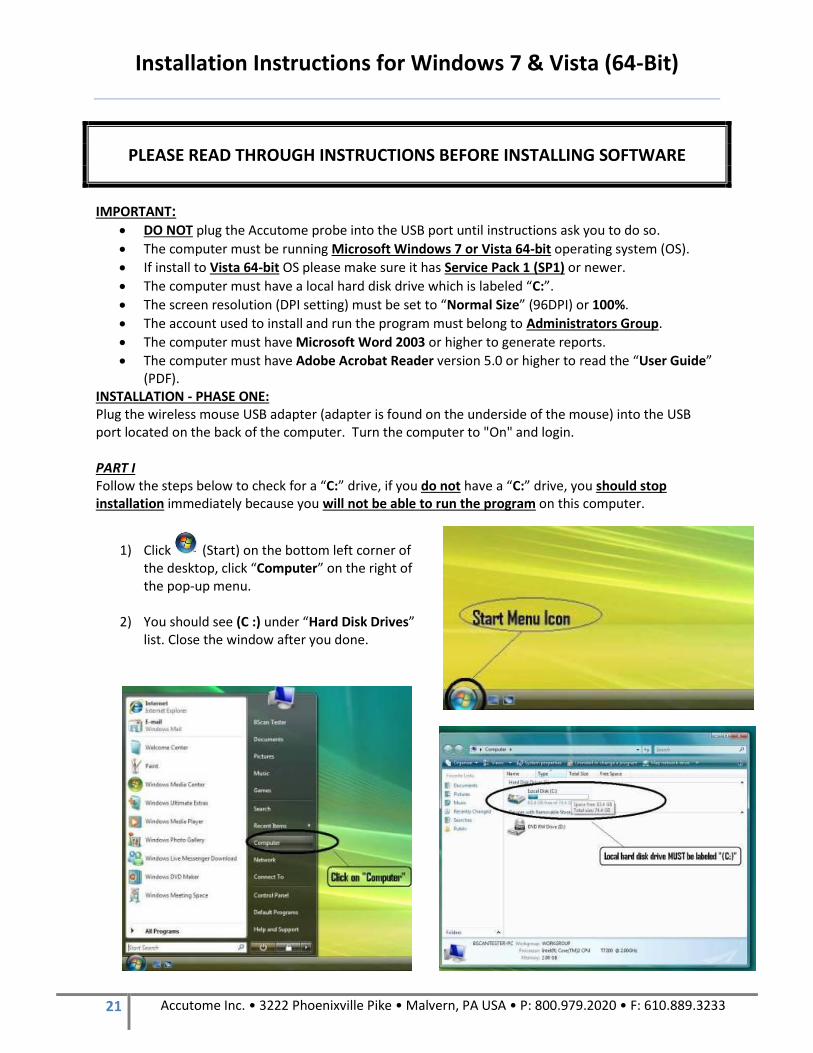
INSTALLATION - PHASE ONE: Plug the wireless mouse USB adapter (adapter is found on the underside of the mouse) into the USB port located on the back of the computer. Turn the computer to "On" and login. PART I Follow the steps below to check for a “C:” drive, if you do not have a “C:” drive, you should stop installation immediately because you will not be able to run the program on this computer.
1) Click (Start) on the bottom left corner of the desktop, click “Computer” on the right of the pop-up menu.
2) You should see (C :) under “Hard Disk Drives”
list. Close the window after you done.

Installation Instructions for Windows 7 & Vista (64-Bit)
22 Accutome Inc. • 3222 Phoenixville Pike • Malvern, PA USA • P: 800.979.2020 • F: 610.889.3233
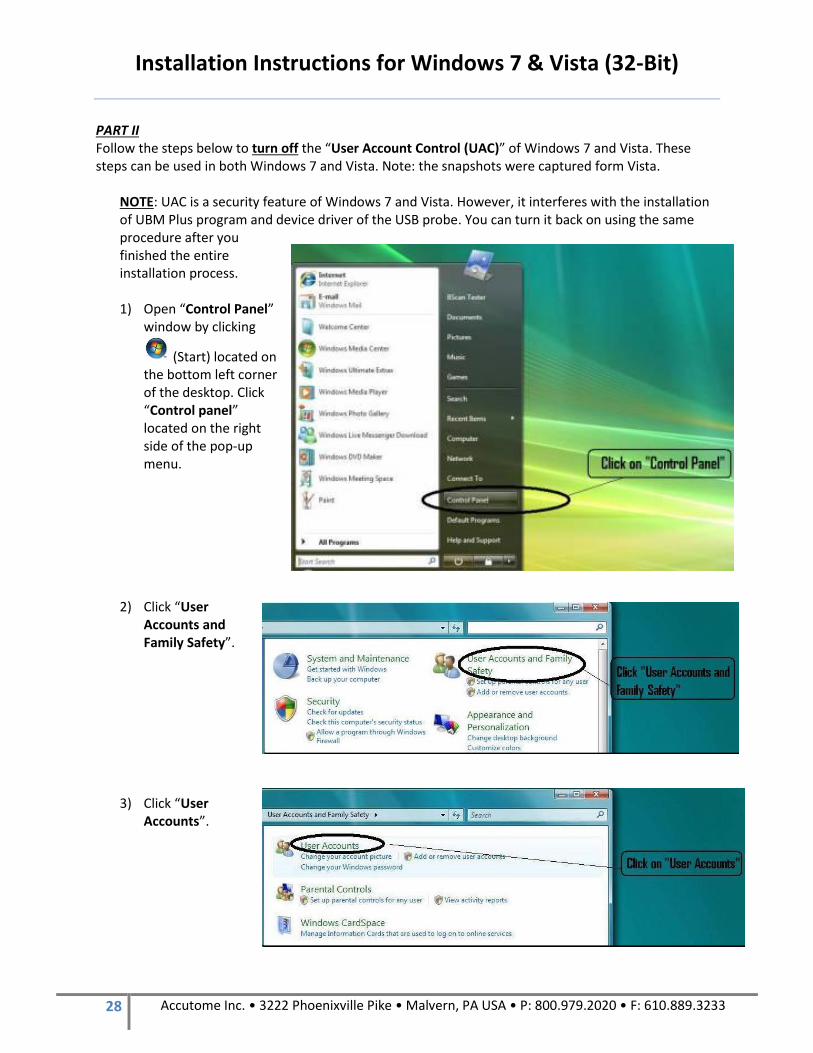
PART II Follow the steps below to turn off the “User Account Control (UAC)” of Windows 7 and Vista. These steps can be used in both Windows 7 and Vista. Note: the snapshots were captured form Vista.
NOTE: UAC is a security feature of Windows 7 and Vista. However, it interferes with the installation of UBM Plus program and device driver of the USB probe. You can turn it back on using the same procedure after you finished the entire installation process. Open “Control Panel”
window by clicking (Start) located on the bottom left corner of the desktop. Click “Control panel” located on the right side of the pop-up menu.
Click “User Accounts and Family Safety”.
Click “User Accounts”.
Installation Instructions for Windows 7 & Vista (64-Bit)
23 Accutome Inc. • 3222 Phoenixville Pike • Malvern, PA USA • P: 800.979.2020 • F: 610.889.3233
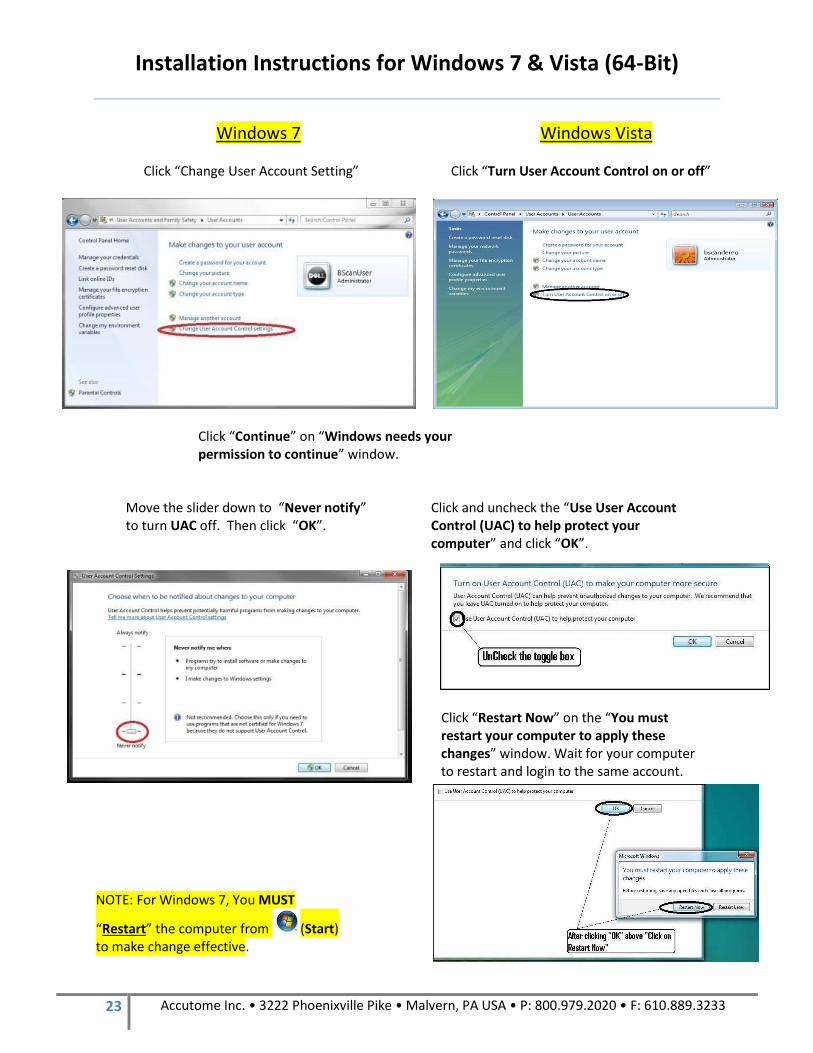
Windows 7 Windows Vista
Click “Change User Account Setting” Click “Turn User Account Control on or off”
Click “Continue” on “Windows needs your permission to continue” window.
Move the slider down to “Never notify” Click and uncheck the “Use User Account to turn UAC off. Then click “OK”. Control (UAC) to help protect your
computer” and click “OK”.
Click “Restart Now” on the “You must restart your computer to apply these changes” window. Wait for your computer to restart and login to the same account.
NOTE: For Windows 7, You MUST
“Restart” the computer from (Start) to make change effective.

Installation Instructions for Windows 7 & Vista (64-Bit)
24 Accutome Inc. • 3222 Phoenixville Pike • Malvern, PA USA • P: 800.979.2020 • F: 610.889.3233
PART III Follow the steps below to check and set the screen resolution (DIP setting):
Right click your mouse on an empty space on the desktop and select “Personalize”.
Windows 7 Windows Vista
Click “Display” Click “Adjust font size (DPI)”
Select “Smaller – 100%” and click “Apply” Select “Default scale (96 DPI)” and Click “OK”.
Installation Instructions for Windows 7 & Vista (64-Bit)
25 Accutome Inc. • 3222 Phoenixville Pike • Malvern, PA USA • P: 800.979.2020 • F: 610.889.3233
INSTALLATION - PHASE TWO: Follow the steps below to install the application:
1) Insert the installation disk into the CDROM drive and close all other remaining open applications. Click on “Run setup.exe” in the “AutoPlay” pop-up window and “Preparing to Install …” window appears on desktop which may take up to a minute. If the install does not automatically begin, open “My Computer”. Double click on the “UBM Install” icon. Double click on “Setup”. It will take several seconds to unpack the installation package. Advance through the windows by clicking “Next”.
2) When the window of “Welcome to the InstallShield Wizard” appears, click “Next”. Click “I accept
the terms in the license agreement” when the “License Agreement” window appears. Click “Next”. Click “Install”. After application files are copied onto your computer a few icons will appears on your desktop.
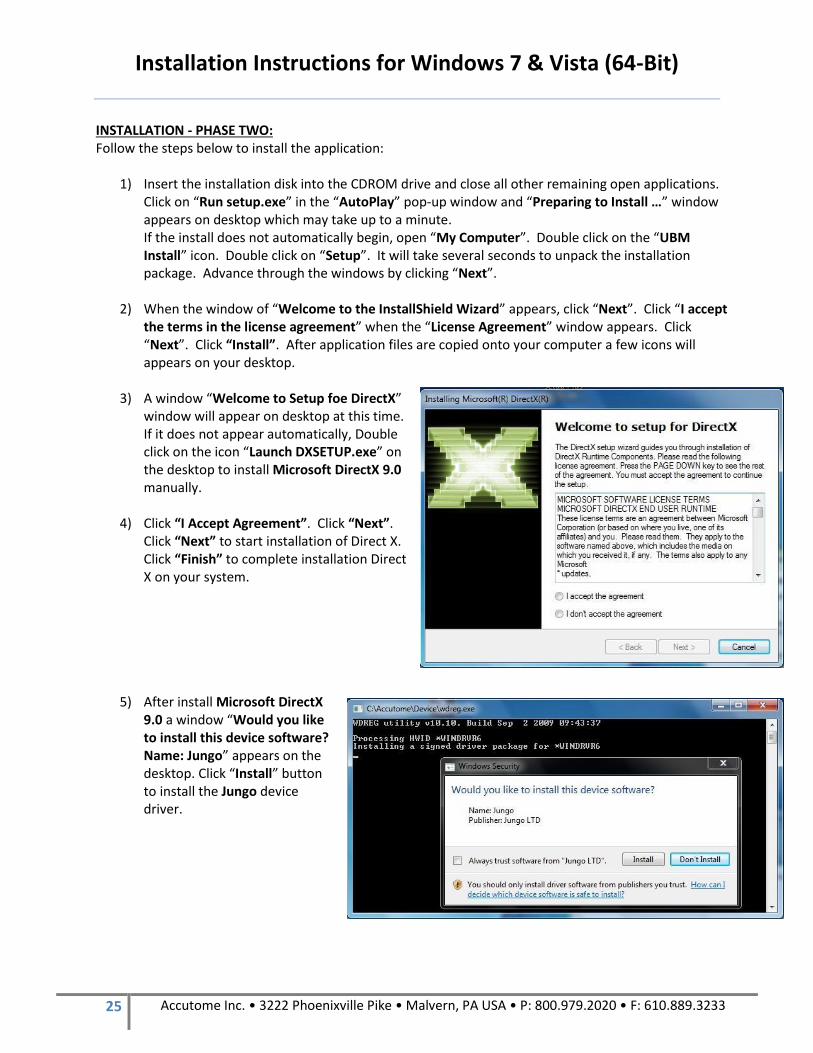
3) A window “Welcome to Setup foe DirectX” window will appear on desktop at this time. If it does not appear automatically, Double click on the icon “Launch DXSETUP.exe” on the desktop to install Microsoft DirectX 9.0 manually.
4) Click “I Accept Agreement”. Click “Next”.
Click “Next” to start installation of Direct X. Click “Finish” to complete installation Direct X on your system.
5) After install Microsoft DirectX 9.0 a window “Would you like to install this device software? Name: Jungo” appears on the desktop. Click “Install” button to install the Jungo device driver.
Installation Instructions for Windows 7 & Vista (64-Bit)
26 Accutome Inc. • 3222 Phoenixville Pike • Malvern, PA USA • P: 800.979.2020 • F: 610.889.3233
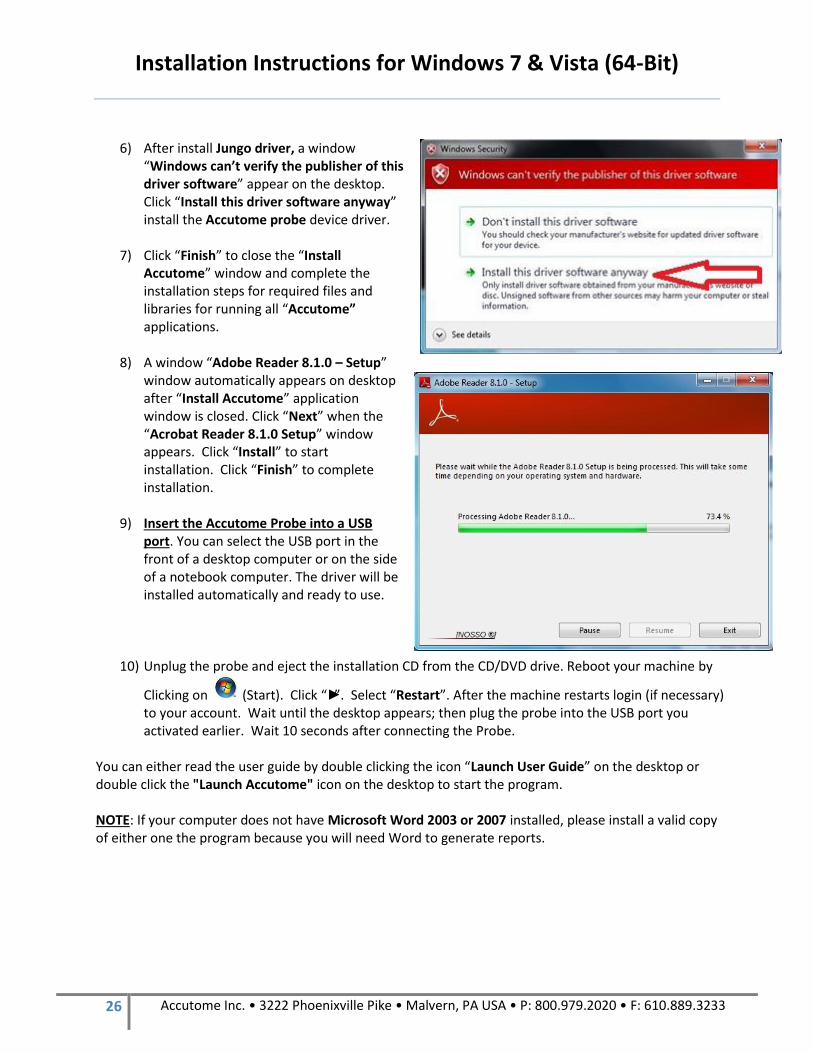
6) After install Jungo driver, a window
“Windows can’t verify the publisher of this driver software” appear on the desktop. Click “Install this driver software anyway” install the Accutome probe device driver.
7) Click “Finish” to close the “Install Accutome” window and complete the installation steps for required files and libraries for running all “Accutome” applications.
8) A window “Adobe Reader 8.1.0 – Setup”
window automatically appears on desktop after “Install Accutome” application window is closed. Click “Next” when the “Acrobat Reader 8.1.0 Setup” window appears. Click “Install” to start installation. Click “Finish” to complete installation.
9) Insert the Accutome Probe into a USB
port. You can select the USB port in the front of a desktop computer or on the side of a notebook computer. The driver will be installed automatically and ready to use.
10) Unplug the probe and eject the installation CD from the CD/DVD drive. Reboot your machine by
Clicking on (Start). Click “►”. Select “Restart”. After the machine restarts login (if necessary) to your account. Wait until the desktop appears; then plug the probe into the USB port you activated earlier. Wait 10 seconds after connecting the Probe.
You can either read the user guide by double clicking the icon “Launch User Guide” on the desktop or double click the "Launch Accutome" icon on the desktop to start the program. NOTE: If your computer does not have Microsoft Word 2003 or 2007 installed, please install a valid copy of either one the program because you will need Word to generate reports.

Installation Instructions for Windows 7 & Vista (32-Bit)
27 Accutome Inc. • 3222 Phoenixville Pike • Malvern, PA USA • P: 800.979.2020 • F: 610.889.3233
PLEASE READ THROUGH INSTRUCTIONS BEFORE INSTALLING SOFTWARE
IMPORTANT:
DO NOT plug the Accutome probe into the USB port until instructions ask you to do so.
The computer must be running Microsoft Windows 7 or Vista 32-bit operating system (OS).
The computer must have a local hard disk drive which is labeled “C:”.
The screen resolution (DPI setting) must be set to “Normal Size” (96DPI).
The account used to install and run the program must belong to Administrators Group.
The computer must have Microsoft Word 2003 or higher to generate reports.
The computer must have Adobe Acrobat Reader version 5.0 or higher to read the “User Guide” (PDF).
INSTALLATION - PHASE ONE: Plug the wireless mouse USB adapter (adapter is found on the underside of the mouse) into the USB port located on the back of the computer. Turn the computer to "On" and login. PART I Follow the steps below to check for a “C:” drive, if you do not have a “C:” drive, you should stop installation immediately because you will not be able to run the program on this computer.
1) Click (Start) on the bottom left corner of the desktop, click “Computer” on the right of the pop-up menu.
2) You should see (C :) under “Hard Disk
Drives” list. Close the window after you done.
Installation Instructions for Windows 7 & Vista (32-Bit)
28 Accutome Inc. • 3222 Phoenixville Pike • Malvern, PA USA • P: 800.979.2020 • F: 610.889.3233
PART II Follow the steps below to turn off the “User Account Control (UAC)” of Windows 7 and Vista. These steps can be used in both Windows 7 and Vista. Note: the snapshots were captured form Vista.
NOTE: UAC is a security feature of Windows 7 and Vista. However, it interferes with the installation of UBM Plus program and device driver of the USB probe. You can turn it back on using the same procedure after you finished the entire installation process.
1) Open “Control Panel”
window by clicking
(Start) located on the bottom left corner of the desktop. Click “Control panel” located on the right side of the pop-up menu.
2) Click “User Accounts and Family Safety”.
3) Click “User Accounts”.

Installation Instructions for Windows 7 & Vista (32-Bit)
29 Accutome Inc. • 3222 Phoenixville Pike • Malvern, PA USA • P: 800.979.2020 • F: 610.889.3233
Windows 7 Windows Vista
Click “Change User Account Setting” Click “Turn User Account Control on or off”
Click “Continue” on “Windows needs your permission to continue” window.
Move the slider down to “Never notify” Click and uncheck the “Use User Account to turn UAC off. Then click “OK”. Control (UAC) to help protect your
computer” and click “OK”.
Click “Restart Now” on the “You must restart your computer to apply these changes” window. Wait for your computer to restart and login to the same account.
NOTE: For Windows 7, You MUST
“Restart” the computer from (Start) to make change effective.

Installation Instructions for Windows 7 & Vista (32-Bit)
30 Accutome Inc. • 3222 Phoenixville Pike • Malvern, PA USA • P: 800.979.2020 • F: 610.889.3233
PART III Follow the steps below to check and set the screen resolution (DIP setting):
Right click your mouse on an empty space on the desktop and select “Personalize”.
Windows 7 Windows Vista
Click “Display” Click “Adjust font size (DPI)”
Select “Smaller – 100%” and click “Apply” Select “Default scale (96 DPI)” and Click “OK”.

Installation Instructions for Windows 7 & Vista (32-Bit)
31 Accutome Inc. • 3222 Phoenixville Pike • Malvern, PA USA • P: 800.979.2020 • F: 610.889.3233
INSTALLATION - PHASE TWO: Follow the steps below to install the “Accutome” application:
1) Insert the installation disk into the CDROM drive and close all other remaining open applications. Click on “Run setup.exe” in the “AutoPlay” pop-up window and “Preparing to Install …” window appears on desktop which may take up to a minute. If the install does not automatically begin, open “My Computer”. Double click on the “Install” icon. Double click on “Setup”. It will take several seconds to unpack the installation package. Advance through the windows by clicking “Next”.
2) When the window of “Welcome to the InstallShield Wizard” appears, click “Next”. Click “I accept
the terms in the license agreement” when the “License Agreement” window appears. Click “Next”. Click “Install”. After application files are copied onto your computer a few icons will appears on your desktop. “Installing Microsoft® DirectX®” window will automatically appear on desktop at this time. If it does not appear automatically, Double click on the icon “Launch DXSETUP.exe” on the desktop to install Microsoft DirectX 9.0 manually.
3) Click “I Accept Agreement”. Click “Next”. Click “Next” to start installation of Direct X. Click “Finish” to complete installation Direct X on your system. Click “Finish” to close the “Install Accutome” window and complete the installation steps for required files and libraries for running “Accutome” applications.
4) A window “Adobe Reader 8.1.0 – Setup”
window automatically appears on desktop after “Install Accutome” window closed. Click “Next” when the “Acrobat Reader 8.1.0 Setup” window appears. Click “Install” to start installation. Click “Finish” to complete installation.

Installation Instructions for Windows 7 & Vista (32-Bit)
32 Accutome Inc. • 3222 Phoenixville Pike • Malvern, PA USA • P: 800.979.2020 • F: 610.889.3233
5) Insert the Accutome Probe into a USB port. You can select the USB port in the front of a desktop computer or on the side of a notebook computer.
a. The “Found New Hardware Wizard” will appear on the desktop. Click on “Locate and install driver software (recommended)”. It takes a minute for searching the driver.
b. In the “Windows Security” window, click on “Install this driver software anyway” and the system will install the driver for the probe.
c. After the driver has been installed and all windows are closed, the window “Found New Hardware Wizard” will reappear. You will need to repeat steps a and b one additional time to complete driver installation.
d. If you wish to activate a second or all USB drives to operate the footswitch and/or probe from any USB port, simply plug the probe into those USB drives at this time and drivers will automatically install.
6) Unplug the probe and eject the installation CD from the CD/DVD drive. Reboot your machine by
Clicking on (Start). Click “►”. Select “Restart”. After the machine restarts login (if necessary) to your account. Wait until the desktop appears; then plug the probe into the USB port you activated earlier. Wait 10 seconds after connecting the Probe.
You can either read the user guide by double clicking the icon “Launch User Guide” on the desktop or double click the "Launch Accutome.exe" icon on the desktop to start the program. NOTE: If your computer does not have Microsoft Word 2003 or 2007 installed, please install a valid copy of either one the program because you will need Word to generate reports.

Installation Instructions for Windows XP
33 Accutome Inc. • 3222 Phoenixville Pike • Malvern, PA USA • P: 800.979.2020 • F: 610.889.3233
PLEASE READ THROUGH INSTRUCTIONS BEFORE INSTALLING SOFTWARE
IMPORTANT:
DO NOT plug the Accutome probe into the USB port until all applications and drivers have been installed.
The computer must have a local hard disk drive which is labeled “C:”.
The screen resolution (DPI setting) must be set to “Normal Size” (96DPI).
The computer must have Microsoft Windows XP SP2 and .NET Framework 2.0.
The account used to install and run the program must belong to Administrators Group.
The computer must have Adobe Acrobat Reader version 5.0 or higher to display the “User Guide”.
Follow the steps below to install “Accutome” application to a personal computer. INSTALLATION - PHASE ONE: Plug the wireless mouse USB adapter (adapter is found on the underside of the mouse) into the USB port located on the back of the computer. Turn the computer to "On". PART I Follow the steps below to check for a “C:” drive, if you do not have a “C:” drive you will not be able to install the program on your computer. Go to “Start”, click on “My Computer”. You should see (C:) under “Hard Disk Drives”. PART II Follow the steps below to set the screen resolution (DIP setting):
1) Right click your mouse on an empty space on the desktop, select “Properties”. “Display Properties” window will appear on the desktop. Click “Setting” tab in the window. Click “Advanced” button and select “General” tab.
2) Set “DPI Setting” to “Normal Size (96 DPI)”. Click on “OK”. Return to “Display Properties”
window. Set “Screen Resolution” to either “1280 by 1024” or “1680 by 1050”. If your screen supports a higher resolution we recommend setting it to “1680 by 1050”. Click “OK” to close “Display Properties” window and proceed to Installation - Phase Two.
INSTALLATION - PHASE TWO: Follow the steps below to install the “Accutome” application:
1) Insert the installation disk into the CDROM drive. “Preparing to Install …” will automatically appears. In case the install does not start automatically, open “My Computer”. Double click on the “Install” icon. Double click on “Setup”. It will take several seconds to unpack the installation package. Advance through the windows by clicking “Next”.

Installation Instructions for Windows XP
34 Accutome Inc. • 3222 Phoenixville Pike • Malvern, PA USA • P: 800.979.2020 • F: 610.889.3233
2) When the window of “Welcome to the InstallShield Wizard” appears, click “Next”. Click “I accept the terms in the license agreement” when the “License Agreement” window appears. Click “Next”. Click “Install”. After applications files are copied onto your computer and few icons appears on desktop, a window “Installing Microsoft® DirectX®” will automatically appears on desktop. If it does not appear automatically, Double click on the icon “Launch DXSETUP.exe” on the desktop to install Microsoft DirectX 9.0 manually.
3) Click “I Accept Agreement”. Click “Next”. Click “Next” to start installation of Direct X. Click
“Finish” to complete installation Direct X on your system. Click “Finish” to close the “Install Accutome” window and complete the installation steps for required files and libraries for running “Accutome” applications.
4) If a “Microsoft .NET Framework 2.0 Setup” window automatically appears on the desktop means that the installation program could NOT find “.NET Framework 2.0” package on your system and try to install it. Click “Next”. Click “I accept the terms of the License Agreement” and then click “Install” to start installing the package. Click “Finish” to complete installation.
5) A window “Adobe Reader 8.1.0 – Setup” window automatically appears on desktop either after
“Install Accutome” window closed or after “Microsoft .NET Framework 2.0 Setup” window closed. Click “Next” when the “Acrobat Reader 8.1.0 Setup” window appears. Click “Install” to start installation. Click “Finish” to complete installation.
6) Insert the Accutome Probe into a USB port. You can insert the probe in the front of a desktop
computer or on the side of a notebook computer. a. The “Found New Hardware Wizard” will appear on the desktop. Select “No, not this
time” and click “Next” to advance screens. b. In the next screen, make sure “Install the Software Automatically (Recommended)” is
selected. Click “Next”. The system will find the driver for the probe and the window “Hardware Installation” will appear. Click “Continue Anyway”. Click “Finish”.
c. After the driver has been installed and all windows are closed, the window “Found New Hardware Wizard” will reappear. You will need to repeat steps a and b one additional time to complete driver installation.
7) We recommend that you install the driver on at least two USB ports (either on the front of a
desktop PC or on the side of a notebook PC) in the event one port is already being used by another device. Be sure to unplug the probe from the current USB port and insert it into the other USB port. Repeat the steps under step 4 a, b, and c.
8) Unplug the probe and eject the installation CD from the CD/DVD drive. Reboot your machine by
Clicking on “Start”. Click “Turn Off Computer”. Select “Restart” then click on “OK”. After the machine restarts login (if necessary) to your account. Wait until the desktop appears; then plug the probe into the USB port you activated earlier. Wait 10 seconds after connecting the B-Probe. You can either read the user guide by double clicking the icon “Launch User Guide” on the desktop or double click the "Launch Accutome.exe" icon on the desktop to start the program.
QUICK START GUIDE FOR ACCUTOME B SCAN PLUS, UBM PLUS, B SCAN AND UBM VET
35 Accutome Inc. • 3222 Phoenixville Pike • Malvern, PA USA • P: 800.979.2020 • F: 610.889.3233
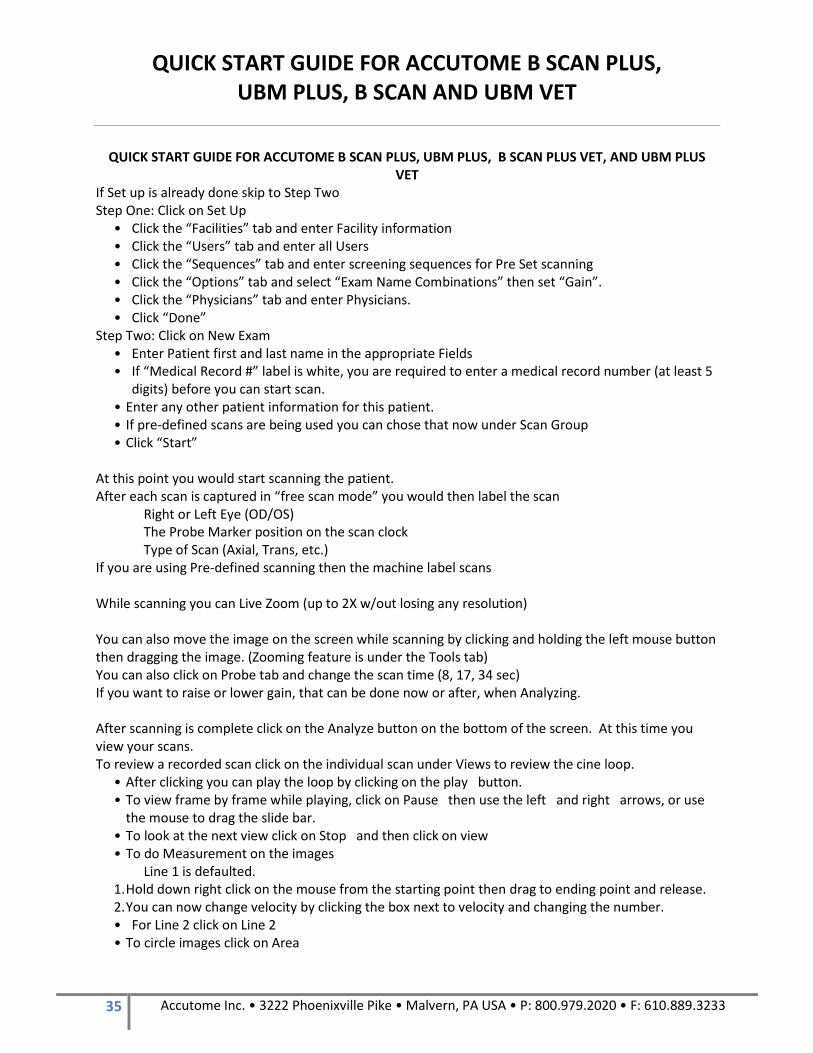
QUICK START GUIDE FOR ACCUTOME B SCAN PLUS, UBM PLUS, B SCAN PLUS VET, AND UBM PLUS VET
If Set up is already done skip to Step Two Step One: Click on Set Up
• Click the “Facilities” tab and enter Facility information • Click the “Users” tab and enter all Users • Click the “Sequences” tab and enter screening sequences for Pre Set scanning • Click the “Options” tab and select “Exam Name Combinations” then set “Gain”. • Click the “Physicians” tab and enter Physicians. • Click “Done”
Step Two: Click on New Exam • Enter Patient first and last name in the appropriate Fields • If “Medical Record #” label is white, you are required to enter a medical record number (at least 5
digits) before you can start scan. • Enter any other patient information for this patient. • If pre-defined scans are being used you can chose that now under Scan Group • Click “Start”
At this point you would start scanning the patient. After each scan is captured in “free scan mode” you would then label the scan Right or Left Eye (OD/OS) The Probe Marker position on the scan clock Type of Scan (Axial, Trans, etc.) If you are using Pre-defined scanning then the machine label scans While scanning you can Live Zoom (up to 2X w/out losing any resolution) You can also move the image on the screen while scanning by clicking and holding the left mouse button then dragging the image. (Zooming feature is under the Tools tab) You can also click on Probe tab and change the scan time (8, 17, 34 sec) If you want to raise or lower gain, that can be done now or after, when Analyzing. After scanning is complete click on the Analyze button on the bottom of the screen. At this time you view your scans. To review a recorded scan click on the individual scan under Views to review the cine loop.
• After clicking you can play the loop by clicking on the play button. • To view frame by frame while playing, click on Pause then use the left and right arrows, or use
the mouse to drag the slide bar. • To look at the next view click on Stop and then click on view • To do Measurement on the images Line 1 is defaulted. 1. Hold down right click on the mouse from the starting point then drag to ending point and release. 2. You can now change velocity by clicking the box next to velocity and changing the number. • For Line 2 click on Line 2 • To circle images click on Area

Installing Example Scans (Optional)
36 Accutome Inc. • 3222 Phoenixville Pike • Malvern, PA USA • P: 800.979.2020 • F: 610.889.3233
Install Example Exams – OPTIONAL
• Insert the installation disk into the CDROM drive. “Preparing to Install …” will appear
automatically. Click “Cancel” and stop the installation process. • Open “My Computer” window by clicking on “Start” located on the bottom left corner of the
window. Click “My Computer” located on the right side of the pop-up menu.
• Right click the “Install” icon (CDROM drive) and select “Open”. Double clicking on “Example Exams” folder in the window “Install” to show folder contents. To extract the exam by double clicking on the file “Test Exams.zip” and a folder named “HYPEMA,OS_2006-11-3T13” appears in the window.
• Double clicking on the folder icon called “Accutome” on the desktop then double clicking on “Exam
Data” folder in the “Accutome” window appears in desktop. • Drag the folder “HYPEMA,OS_2006-11-3T13” in “Test Exams” window and drop it into the “Exam
Data” window. It takes few minutes to copy entire folder. • Close all windows and eject the CD after you done. For Help Contact Accutome 1-800-979-2020 OR 610-889-0200