restoration of a 1908 franz schwarzer concert · pdf filerestoration of a 1908 franz...
TRANSCRIPT

Restoration of a 1908 Franz Schwarzer Concert Zither
Completed by Ron Cook
November 2013
For Joyce Jenkins

Franz Schwarzer Zither Background This fine zither was crafted in Washington, Missouri, at a small company founded by a German immigrant, Franz Schwarzer. Washington began as a Missouri River boat landing. The St. Johns settlement from which it grew was at the extreme western edge of the frontier when Lewis and Clark's "Corps of Discovery" camped nearby in May of 1804. By 1818, when Franklin County was formed, thousands of American settlers had already arrived. Many of these were friends, family and followers of Daniel Boone and his sons who had come to the area in 1799. Daniel Boone served as the Spanish syndic (judge) on the north side of the River. The first ferry in the area was licensed to run in 1814. It connected the settlements of La Charrette and Marthasville on the north bank to the Franklin County settlements. An early German visitor was so taken by his trip to the area that he returned to Germany and convinced many German immigrants to settle there, making Washington the largest German community west of Pennsylvania. Franz Schwarzer arrived in Washington in 1865. By 1869 he had started a zither factory, soon turning out International Award winning instruments. By the 1920s, when the Washington factory closed, over 11,000 zithers had been made. The history of Washington, Missouri, of the German immigrants who settled the region, and of Franz Schwarzer, is a fascinating look at the era of westward expansion, at a new American experience for a group of people, and at one of those people who adapted old-world music, musical instruments, and craftsmanship into a business that lasted over 85 years.
Home of world famous zither maker Franz Schwarzer. Washington, Missouri
Photo courtesy of the Washington Historical Society © 2001

Valuation With 11,000+ zithers made, there are quite a few Schwarzer zithers tucked away in attics and closets around the world, and some occasionally show up at auction and music dealer websites. I found one 1890 Franz Schwarzer zither, with case, and the dealer was asking $300 for it. The case was missing all the bottom padding and zither-shaped framework, and the back had a huge blemish. The finish was rubbed off one area showing the wood beneath. At least two of the ivory feet were replaced with pieces nearly twice as large as the remaining original. Prices for other Schwarzer zithers I found ran from $50 to over a $1000. The higher valued ones often have very intricate carving and inlay work. Valuation is difficult since prices vary so much. I feel that this instrument, when restored, can be worth up to $500. It is not one of the earliest of Schwarzer zithers. The serial number, 9486, shows that this zither was made in 1908. However, it does have lovely mother-of-pearl inlay around the sound hole, which places this model in the medium price range when it was sold.

Day 1: Assessment
On the first day I always do a thorough assessment of the instrument. This beautiful old zither, found in a church belfry, had many problems, starting with the opening caused by failed glue joints on the back. This is due to moisture getting into the joints, which made the old hide glue lose its strength. The string tension pulled the tail block up, separating part of the back from the frame. Another problem was all the missing pieces on the fingerboard. I found a few of the largest pieces in the zither’s case. The rest I would have to fabricate. Also missing on the fingerboard were the string guide pins. Four of the five had broken off. Again, I would have to fabricate new pins.

Day 2: String and Hardware Removal
On the second day, I removed the strings and the tuning gears. The nickel silver plate that covered the gears was corroded and needed cleaning. Once I removed the plate, I found that several wood pieces it was screwed into had broken off of the frame. Also, after removing the strings, the pin bridge, next to the tuning pins, popped off. The hide glue on it had also failed.

Day 3: Removing the Back
To do a thorough restoration, the back needed to come off. Today I removed the back. Even though part of it was already apart, it took several hours to get it all off. I sponged warm water along the seam, and as the remaining glue got gummy, I carefully pried it apart. After removing the back I noticed it had a couple of hairline cracks I would have to repair. Also, a couple of the interior bracing pieces were loose, both right next to the tail block, which was also loose. I did notice inside a penciled signature of the maker: F. Burlage. I’ve checked out other maker’s names with the Washington, Missouri, historical museum, and wasn’t able to find any information on Burlage.

Day 4: Fixing the Tailblock
On Day 4, I got the tailpiece straightened up by injecting glue into the joints and using several long bar clamps to pull it all together.

Day 5: Frame and Back Repairs
After re-gluing the tail block, I then fixed the loose internal pieces. Another piece had broken off where the tuning gear plate was, so I re-glued it back in place. This day I also injected glue into the small cracks on the back, and also fixed a couple of places where the bracing was attached to the back.
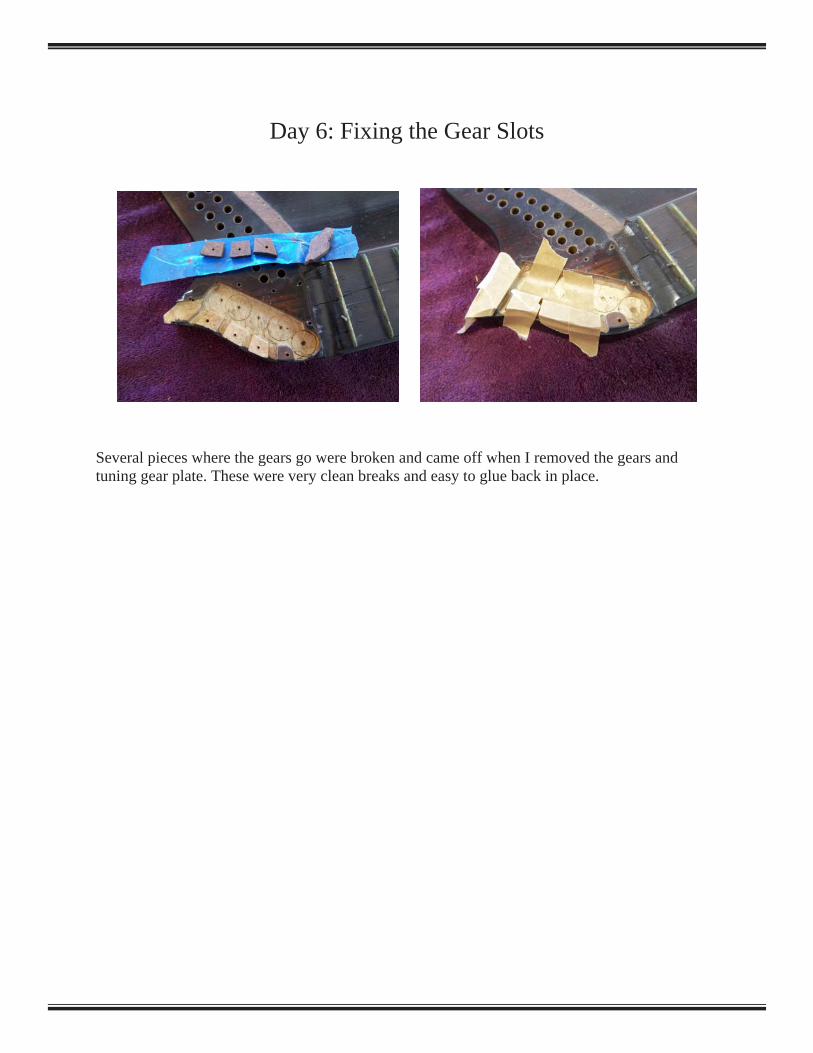
Day 6: Fixing the Gear Slots
Several pieces where the gears go were broken and came off when I removed the gears and tuning gear plate. These were very clean breaks and easy to glue back in place.

Day 7: Beginning to Repair the Fingerboard
The fingerboard needed a lot of work. It had several shrinkage cracks and a lot of pieces were missing. Fortunately, I found a few in the zither’s case, and the largest had been rattling inside the zither itself. I started first by cleaning off the fingerboard with 0000 steel wool to prepare it for the repairs. I then found the areas that the remaining pieces fit and glued them in place.
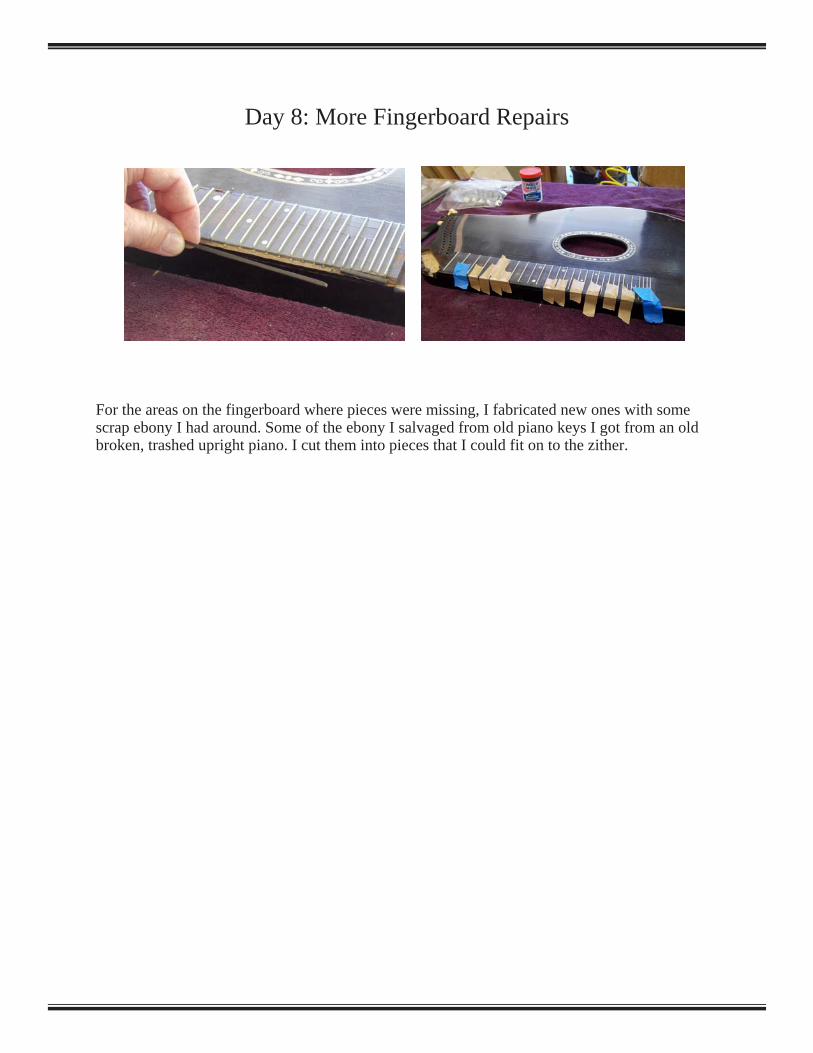
Day 8: More Fingerboard Repairs
For the areas on the fingerboard where pieces were missing, I fabricated new ones with some scrap ebony I had around. Some of the ebony I salvaged from old piano keys I got from an old broken, trashed upright piano. I cut them into pieces that I could fit on to the zither.

Day 9: Continuing Fingerboard Repairs
Day 9: Cleaning and Reinstalling the Tuning Pins
After the glue dried on the fingerboard replacement pieces, I scraped them down to match the old pieces as best as possible. The fingerboard had many cracks that were the result of being in an extremely dry environment. Being in a church belfry, this zither could have gone through many temperature extremes. It was fortunate the top didn’t exhibit large cracks too, which is common on a lot of old zithers stored away in basements or attics. These cracks, which are wood shrinkage cracks, can’t be closed up. Instead I first injected glue down in the cracks to help stabilize them, then, after it dried, filled the crack with an ebony paste filler.

Day 10: Re-ebonizing the Fingerboard
Many zither fingerboards were a lighter hard wood stained black to look like ebony. This zither’s fingerboard showed wear and the lighter wood was showing through, showing it had been played quite a bit. To fix this, I re-ebonized the fingerboard using a black water-based stain.

Day 11: Oiling the Fingerboard
Finally, after all the new strings arrived, I was able to finish stringing the zither. After the stain dried, I again rubbed and cleaned the entire fingerboard with 0000 steel wool, then applied a fretboard finishing oil, wiping off the excess. This type of oil brings life back into dry fingerboards. It is good practice to re-apply fingerboard oil twice a year for one to two years, then once a year after that.

Day 12: Strengthening the Frame
When many zithers made in the late 19th and early 20th centuries were new, they held their shape well and no problems with the frames would happen. However, when they stopped being used and were stored away for years, perhaps decades, problems started. As I mentioned before, damp basements and attics that could alternate between damp, dry, hot, or cold, wreaked havoc with any instruments stored there. On Day 12 I added some small blocks to the corners of the frame to help strengthen it. These small additions will help stabilize the frame better when it is strung up again.

Day 13: Re-gluing the Back
On day 13 it was finally time to glue on the back. After applying glue to all the surfaces, I used nearly all my spool clamps to hold it in place until the glue set.

Day 14: Scraping off Glue Squeeze-out
When applying glue and clamping, there is often “squeeze-out”. This is where glue is squeezed out when the clamps are tightened. To take care of this squeeze-out, and before the glue hardened too much, I took a cabinet scraper and ran it along the zither’s edges to scrap off the excess glue.

Day 15: Cleaning the Tuning Pins
The tuning pins were very rusty, another evidence of this zither being in an area where moisture got to it. Using an electric rotary carving tool with a wire brush attachment, I cleaned and polished every one of the 30+ tuning pins. This process took several hours (with a few breaks to rest my wrists and fingers).

Days 16-18: Refinishing the Sides and Back Scraping the edges and a portion of the back removed some of the painted finish. Since the original finish was a gloss black lacquer, I sprayed on the same. I sprayed on several light coats over the period of three days, letting it dry for 24 hours between coats.

Day 19: Cleaning and Polishing the Gear Plate
This day I cleaned and polished the tuning gear plate. These plates are made of nickel silver, often called German silver, which is a copper alloy (no silver) that is approximately 60% copper, 20% nickel and 20% zinc. This type of alloy has been around for over 200 years. In the mid 1800s, electroplating was developed that made it easier to create silver-looking pieces, like the tuning gear plates on zithers. I use a specially formulated metal polishing paste to clean and polish the gear plate.

Day 20: Polishing the Zither
This day I did a thorough cleaning and polishing of the entire instrument. Because the surfaces are glossy, I used a non-abrasive paste wax on the front, back, and sides.

Day 21: Gluing the Pin Bridge
One area to which I did not apply any polish was where the pin bridge goes. Today I glued the pin bridge back in place. So as not to bend the pins when clamping, I made a couple of slotted blocks to fit over the pins.

Day 22: New Fingerboard String Guide Pins, and a Small Problem
As I mentioned earlier, all but one string pin guides on the fingerboard were missing. When I had removed the one remaining pin, it broke, so I needed to replace all 5 pins. To do this, I needed to try to remove the broken pieces. Three were broken flush, and two had come out. I was able to get all but one out. I carefully drilled new pilot holes for some stainless steel brads that were about the same size as the original pins. I then tapped the brads into the holes, cut them to the proper length, and filed down the ends. One problem: when I tapped in the fifth brad, a piece of fingerboard’s side popped off. This was a small section I had not repaired, thinking the area didn’t need it. It is repaired now.

Day 23: Swelling the Tuning Pin Holes
Many of the tuning pins were loose when I removed them. This was because the wood around the pins had dried and shrunk a little. A few pins actually wobbled in place. To make the tuning pins fit more snuggly, I filled each pin hole with a special liquid formulated to swell the wood. I let it set for 24 hours.

Day 24: Cleaning Out the Tuning Pin Holes
Now that the liquid had done its “swell” job, I needed to clean it out of the pin holes. Around a dozen cotton swabs were needed to get all the remaining liquid out.

Days 25-26: Re-installing the Hardware
On this day it was time to begin the re-installation of the tuning pins, the tuning gears, and the gear plate. It actually took me two days to do this, since I was only able to screw in half of the pins each day. The tuning pins are an old style with rectangular heads, not square like newer tuning pins. Since no tuning key came with this zither, I had to adapt a hex-driver to fit the pins. Unfortunately, this type of device is hard on the wrist and palm, so it took two days to put all the pins in. The tuning gears were very easy to re-install compared to the pins.

Day 27: Re-installing the Feet
The three spiked feet on the bottom are an early plastic called Bakelite. They have threads on them so they screw into the threaded holes. One hole, where I had repaired and strengthened part of the frame, needed re-tapping so the foot could screw in. I had a metal tap with nearly the same threads as the foot. After using it, I was able to screw the last foot in.

Day 28: Beginning to String up the Zither
With all the hardware re-installed it was time to string it up. On this day I only strung up the fingerboard. I couldn’t continue stringing yet, because I had to wait nearly a week while I waited for an order of strings to arrive from my source in Germany. When this zither arrived for me to restore, it came with many new strings. Actually, they were new perhaps 75 years ago, but never used. There were several boxes of single accompaniment strings, 10 to a box, some unopened, and many single bass and contrabass strings. However, there were only about half of the needed accompaniment strings, the bass was missing one string, and the contrabass were missing the first three strings. I added strings from my stock to complete the bass set and a couple to add to the accompaniment set. The rest I had to order.

Day 29: Continue Stringing
After the strings finally arrived from Germany, I was able to start stringing the rest of the zither.

Day 30: Completion
On the last day, I completed the stringing with the last few contra bass strings. It took a few hours to tune it up, but by the end of the day, this lovely Franz Schwarzer zither was fully restored and playable.
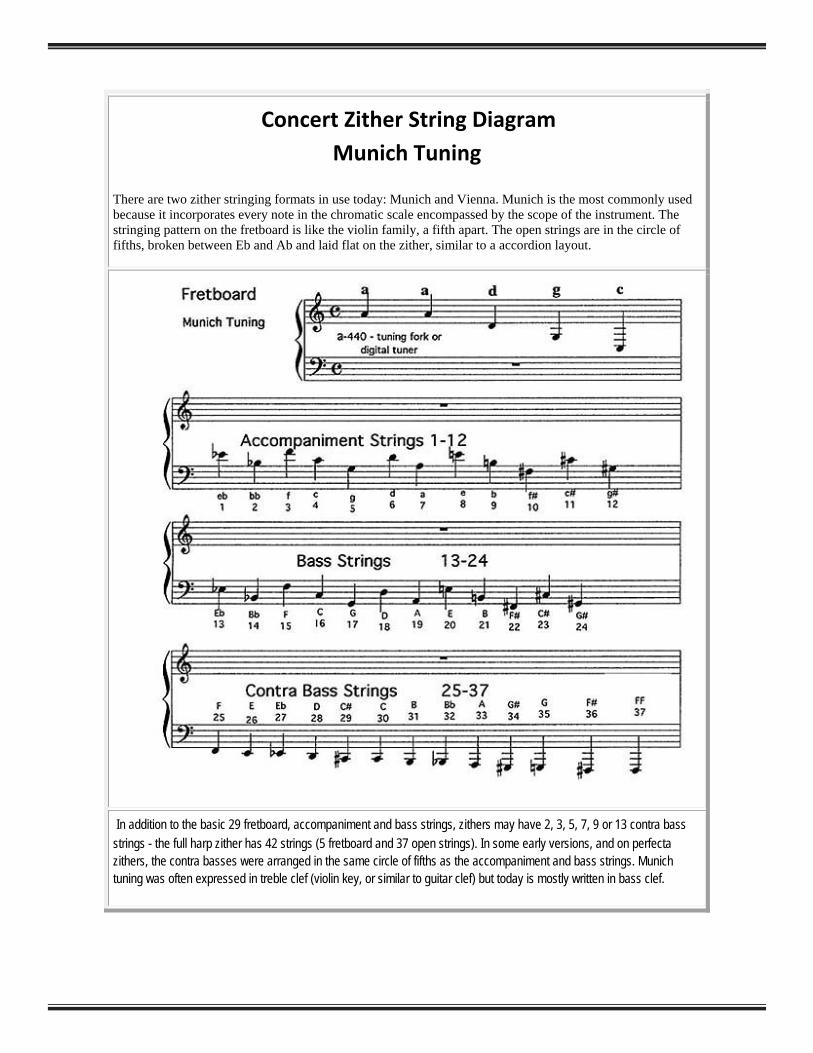
Concert Zither String Diagram Munich Tuning
There are two zither stringing formats in use today: Munich and Vienna. Munich is the most commonly used because it incorporates every note in the chromatic scale encompassed by the scope of the instrument. The stringing pattern on the fretboard is like the violin family, a fifth apart. The open strings are in the circle of fifths, broken between Eb and Ab and laid flat on the zither, similar to a accordion layout.
In addition to the basic 29 fretboard, accompaniment and bass strings, zithers may have 2, 3, 5, 7, 9 or 13 contra bass strings - the full harp zither has 42 strings (5 fretboard and 37 open strings). In some early versions, and on perfecta zithers, the contra basses were arranged in the same circle of fifths as the accompaniment and bass strings. Munich tuning was often expressed in treble clef (violin key, or similar to guitar clef) but today is mostly written in bass clef.