resizing, translating and rotating shapes in...
TRANSCRIPT

Resizing, Translating and
Rotating Shapes in Excel
by George Lungu
<excelunusual.com>
1

<excelunusual.com>
Resizing Shapes
The distance between two points of coordinates (xA,yA) and (xB,yB) can be
increased by a factor of “n” through multiplication of all its coordinates by “n”:
22 )()(),( BABA yyxxBADist
22 )''()''()','( BABA yyxxBADist
22 )()( BABA ynynxnxn
),()()( 22 BADistnyyxxn BABA
After resizing by a factor of “n” the distance
between the points becomes:
More general, resizing can also be performed by separate factors on
each axis independently as we can see in the following example:
2

<excelunusual.com>
Shape generation:
- Insert a Worksheet named: “Size_Translate_Rotate”
- Create a 2x1 rectangle centered in origin
- Display the rectangle on a 2D scatter plot with axes
sized from -4 to 4
Shape resizing buttons:
- The resize factors will be contained in cells:
“C20” for X-dimension and
“C23” for Y-dimension using the following macros:
Private Sub Size_X_Change()
Range("C20") = Size_X.Value / 10
End Sub
Private Sub Size_Y_Change()
Range("C23") = Size_Y.Value / 10
End Sub
Button properties:
The names of the buttons are “Size_X” and “Size_Y”
I arbitrarily changed their colors to red and yellow
respectively
Min=0, Max=20 for both buttons
3

<excelunusual.com>Shape resizing – continuation
Create new data for the resized
rectangle:
- Cell B25: “=C$20*B6”
- Copy B25 down to B29
- Cell C25: “=C$23*C6”
- Copy C25 down to C29
Plot the shifted rectangle:
Use the data in the area
“B25:C29” to create a plot of
the resized rectangle (the
green chart in the picture)
Verify the functionality:
Click two spin buttons and
verify that the rectangle is
indeed scaled independen-
tly on either X axis or Y axis
4
<excelunusual.com>
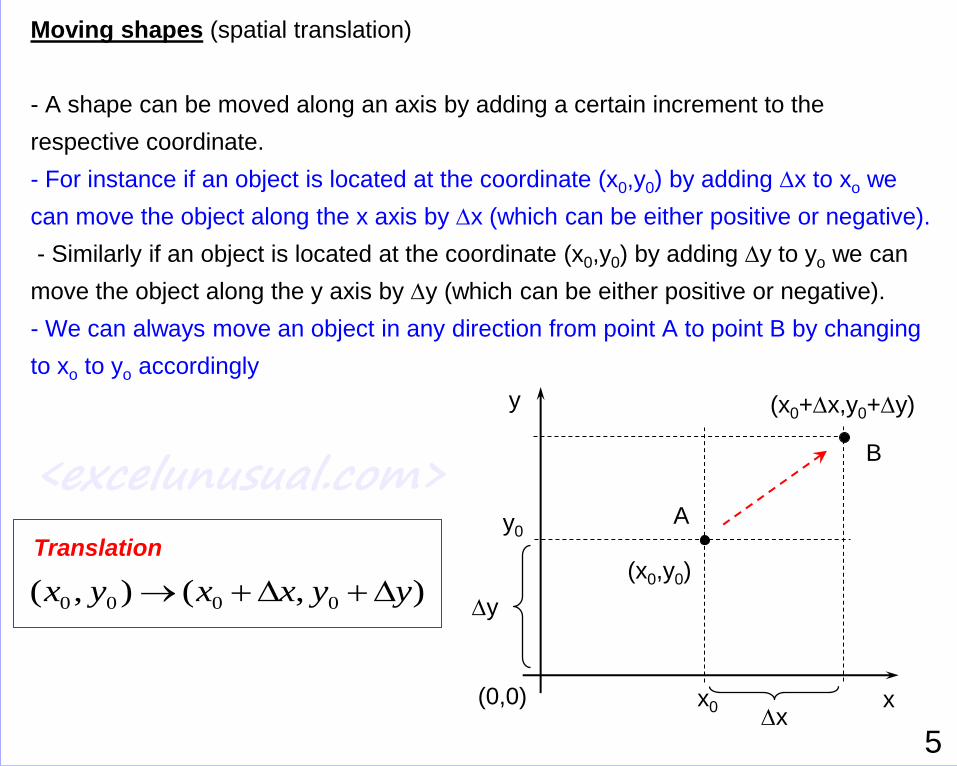
Moving shapes (spatial translation)
- A shape can be moved along an axis by adding a certain increment to the
respective coordinate.
- For instance if an object is located at the coordinate (x0,y0) by adding Dx to xo we
can move the object along the x axis by Dx (which can be either positive or negative).
- Similarly if an object is located at the coordinate (x0,y0) by adding Dy to yo we can
move the object along the y axis by Dy (which can be either positive or negative).
- We can always move an object in any direction from point A to point B by changing
to xo to yo accordingly
(x0,y0)
(x0+Dx,y0+Dy)
y0
x0 x(0,0)Dx
y
Dy
A
B
),(),( 0000 yyxxyx DD
Translation
5
<excelunusual.com>
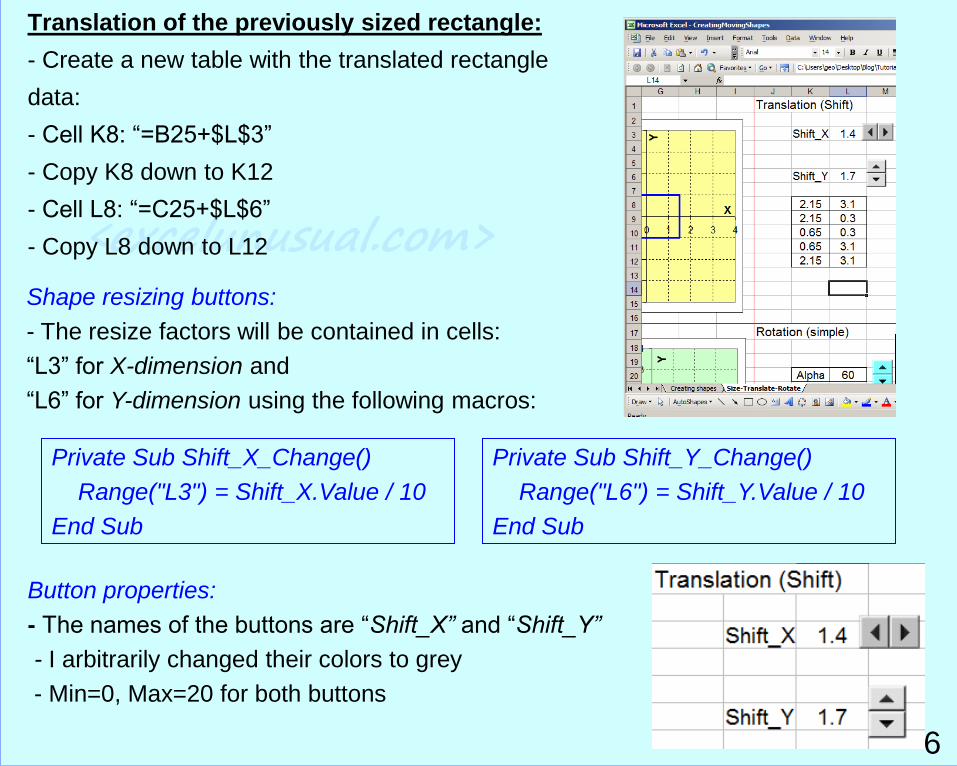
Translation of the previously sized rectangle:
- Create a new table with the translated rectangle
data:
- Cell K8: “=B25+$L$3”
- Copy K8 down to K12
- Cell L8: “=C25+$L$6”
- Copy L8 down to L12
Shape resizing buttons:
- The resize factors will be contained in cells:
“L3” for X-dimension and
“L6” for Y-dimension using the following macros:
Private Sub Shift_Y_Change()
Range("L6") = Shift_Y.Value / 10
End Sub
Private Sub Shift_X_Change()
Range("L3") = Shift_X.Value / 10
End Sub
Button properties:
- The names of the buttons are “Shift_X” and “Shift_Y”
- I arbitrarily changed their colors to grey
- Min=0, Max=20 for both buttons
6

Translation - continuation
Plot the shifted rectangle:
- Use the data in the area “K8:L12” to create a plot of the resized rectangle (the grey
chart in the picture)
Verify the functionality:
- Click the two spin buttons and verify that the rectangle is indeed translated indepen-
dently on either X axis or Y axis
7

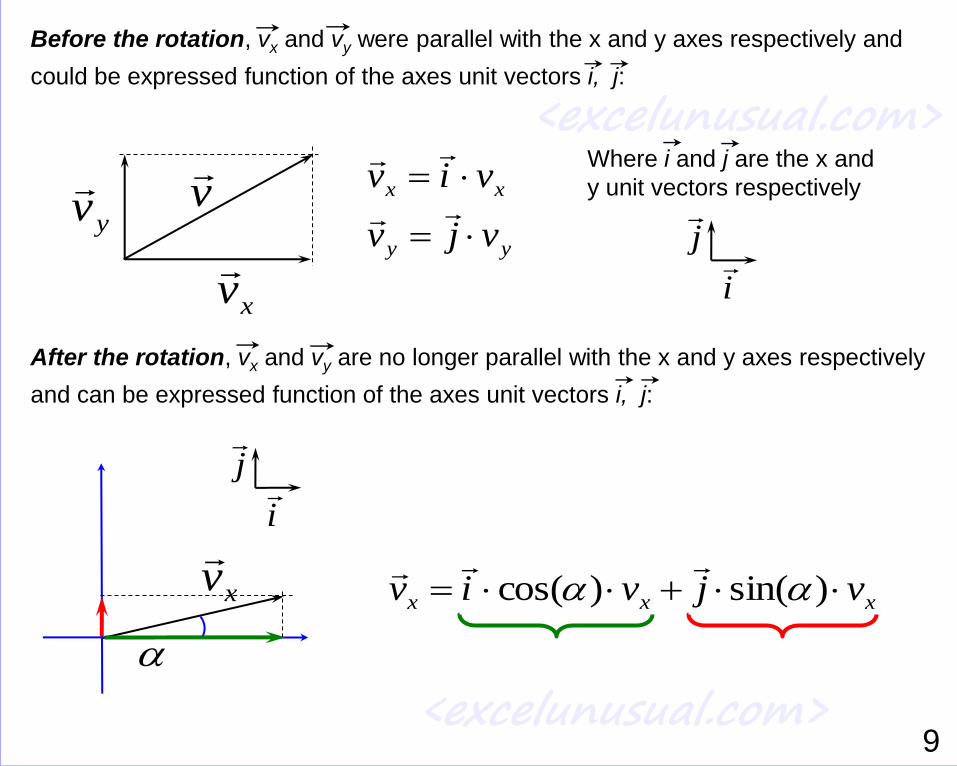
<excelunusual.com>Rotating shapes
Let’s review the definitions of two basic trigonometric functions on a right triangle:
a
c
a
c
bSin
)cos(
)(
Let’s take a vector with its (x,y) components:
b
c
v
yv
xv
and let’s rotate it by angle :v
yv
xv
8
<excelunusual.com>
<excelunusual.com>
Before the rotation, vx and vy were parallel with the x and y axes respectively and
could be expressed function of the axes unit vectors i, j:
v
yv
xv
xv
yy
xx
vjv
viv
j
i
Where i and j are the x and
y unit vectors respectively
After the rotation, vx and vy are no longer parallel with the x and y axes respectively
and can be expressed function of the axes unit vectors i, j:
xxx vjviv )sin()cos(
j
i
9
<excelunusual.com>
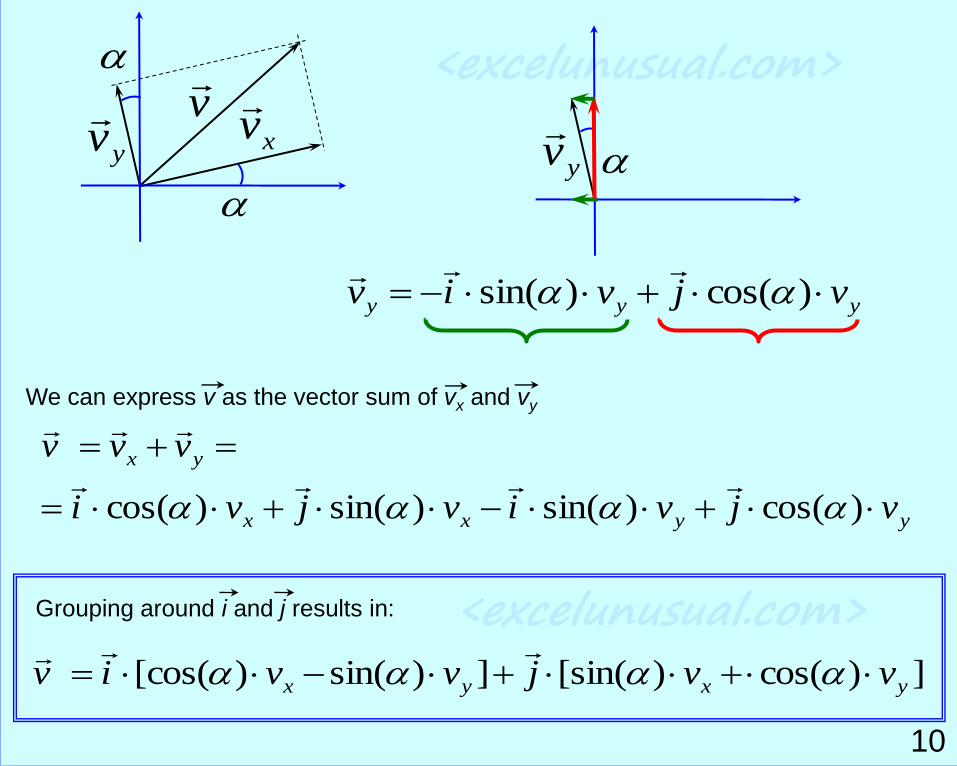
<excelunusual.com>v
yv
xv
We can express v as the vector sum of vx and vy
])cos()[sin(])sin()[cos( yxyx vvjvviv
yv
yyy vjviv )cos()sin(
yyxx
yx
vjvivjvi
vvv
)cos()sin()sin()cos(
Grouping around i and j results in:
10
<excelunusual.com>
yxy
yxx
vvv
vvv
)cos()sin('
)sin()cos('
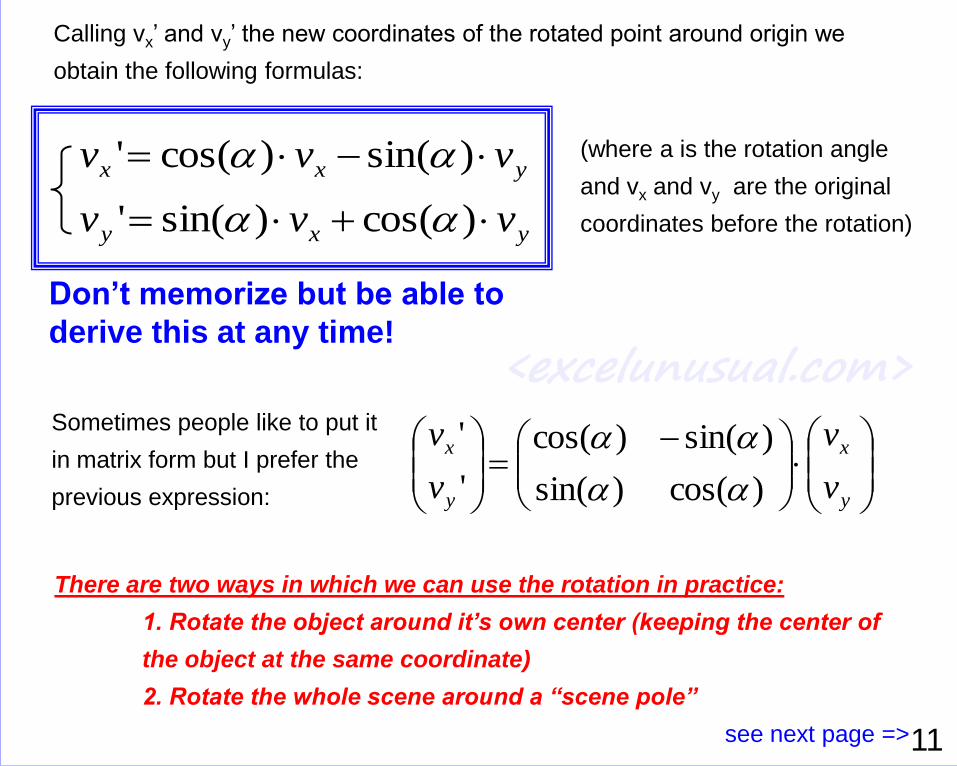
Calling vx’ and vy’ the new coordinates of the rotated point around origin we
obtain the following formulas:
(where a is the rotation angle
and vx and vy are the original
coordinates before the rotation)
y
x
y
x
v
v
v
v
)cos()sin(
)sin()cos(
'
'
Sometimes people like to put it
in matrix form but I prefer the
previous expression:
There are two ways in which we can use the rotation in practice:
1. Rotate the object around it’s own center (keeping the center of
the object at the same coordinate)
2. Rotate the whole scene around a “scene pole”
see next page =>
Don’t memorize but be able to
derive this at any time!
11

<excelunusual.com>
Case#1: Simple Rotation:
- Create a new table with the rotated rectangle data:
- Cell K23: “=B25*COS(RADIANS(L$20))-C25*SIN(RADIANS(L$20))”
- Cell L23: “=B25*SIN(RADIANS(L$20))+C25*COS(RADIANS(L$20))”
- Copy K23 down to K27
- Copy L23 down to L27
Rotation button:
- The rotation angle “Alpha” will be
contained in cell: “L20”
- The name of the button is “Rot_simple”
- Min = -1, Max = 75
- The VBA macro is shown below
in blue
Private Sub Rot_simple_Change()
If Rot_simple > 71 Then Rot_simple = 0
If Rot_simple < 0 Then Rot_simple = 71
Range("L20") = 5 * Rot_simple.Value
End Sub 12

Case#1: Simple Rotation (continuation)
Plot the shifted rectangle:
- Use the data in the area “K23:L27” to create a plot of the resized rectangle (the blue
chart in the picture)
Verify the functionality:
- The plotted rectangle must be a rotated version of the rectangle in the green graph
- Click the spin button and verify that the rectangle rotates smoothly around origin
13

<excelunusual.com>
Case#2: Shape rotation around its own center:
In this case the rotation is done while the shape is centered in the origin and
followed by the translation to the final position. On our spread sheet the object is
rotated in origin then translated afterward but in real life (let’s say a game) the
object is applied a translation to origin, then a rotation and then a translation back
to its normal position.
Note:
For this case I won’t give
detailed Excel instructions.
The implementation is left to
the reader. The macro is
almost identical to the
previous macro and the
formulas for translation and
simple rotation were covered
previously.
14
<excelunusual.com>
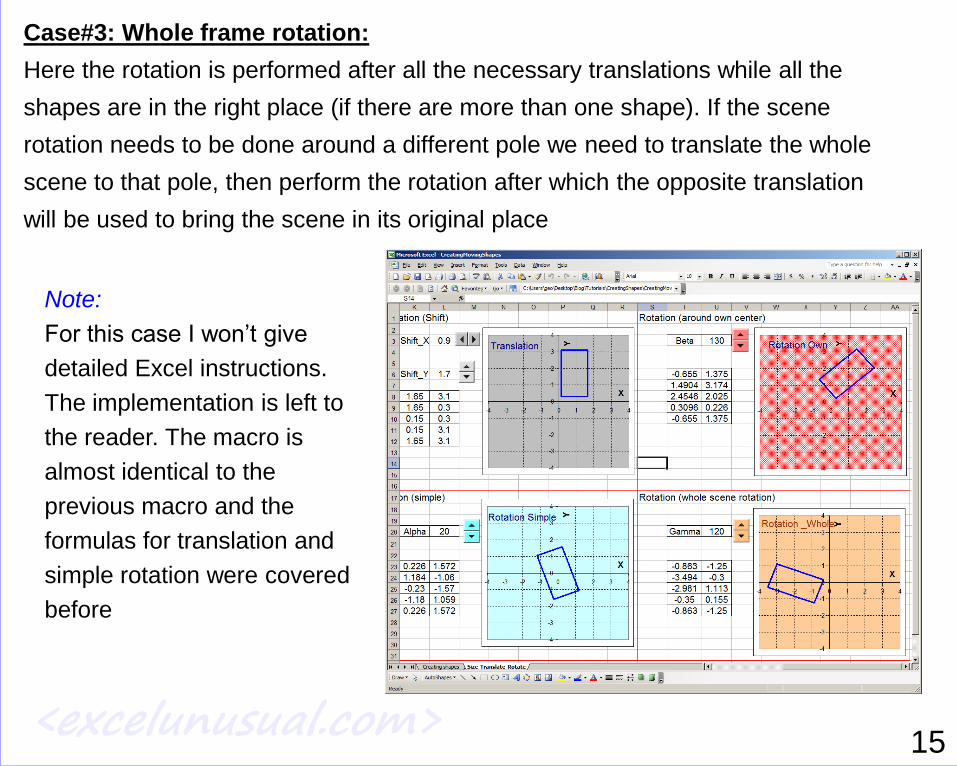
Case#3: Whole frame rotation:
Here the rotation is performed after all the necessary translations while all the
shapes are in the right place (if there are more than one shape). If the scene
rotation needs to be done around a different pole we need to translate the whole
scene to that pole, then perform the rotation after which the opposite translation
will be used to bring the scene in its original place
Note:
For this case I won’t give
detailed Excel instructions.
The implementation is left to
the reader. The macro is
almost identical to the
previous macro and the
formulas for translation and
simple rotation were covered
before
15
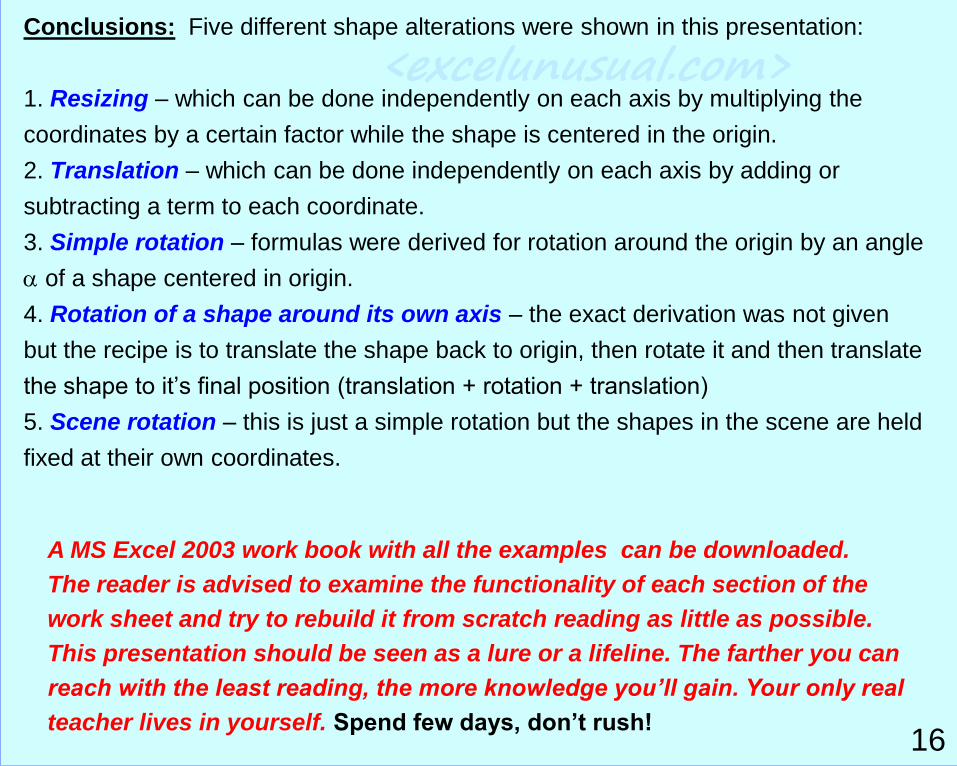
<excelunusual.com>Conclusions: Five different shape alterations were shown in this presentation:
1. Resizing – which can be done independently on each axis by multiplying the
coordinates by a certain factor while the shape is centered in the origin.
2. Translation – which can be done independently on each axis by adding or
subtracting a term to each coordinate.
3. Simple rotation – formulas were derived for rotation around the origin by an angle
of a shape centered in origin.
4. Rotation of a shape around its own axis – the exact derivation was not given
but the recipe is to translate the shape back to origin, then rotate it and then translate
the shape to it’s final position (translation + rotation + translation)
5. Scene rotation – this is just a simple rotation but the shapes in the scene are held
fixed at their own coordinates.
A MS Excel 2003 work book with all the examples can be downloaded.
The reader is advised to examine the functionality of each section of the
work sheet and try to rebuild it from scratch reading as little as possible.
This presentation should be seen as a lure or a lifeline. The farther you can
reach with the least reading, the more knowledge you’ll gain. Your only real
teacher lives in yourself. Spend few days, don’t rush!16