resident chart: main, contacts, and other · pdf fileresident chart: main, contacts, and other...
TRANSCRIPT

Resident Chart: Main, Contacts, and Other Tab
The majority of data for a resident is entered in the Resident Chart. The Resident Chart has the following tabs: Main,
Monthly Charges, Contacts, Medical Info, Medical History, Orders, Health Monitoring, Assessments, Services, Care Plan,
Notes, LOA, and Other. The tabs available may vary depending on users’ access level or by which modules the
communtiy utilizes.
This manual covers admitting a resident, discharging a resident, completion of Resident Chart Main, Contacts, and Other
tabs. The Main tab includes resident demographic information, Unit History, and Admittance & Discharge information.
The Contacts tab includes personal and professional contacts, Health and Dental Plan details, and preferences for
pharmacies, hospitals, ambulance, transportation, Church/Temple, Funeral Arrangements, and interests. The Other tab
includes User Defined fields and is where users import resident photos and can choose to include icon alerts on resident
photos.
To access, click the ‘Resident Chart’ icon on the Service Minder home screen, or select File – Resident.
The Resident listing screen will open.
To find a resident, type a portion of their first or last name into the find field. Do not press the ‘Enter’ on the keyboard, as the system will perform the search automatically. Two filters are available to shorten the list of residents displayed.
Hide Discharged: Check to remove discharged residents from the active list.

Resident Chart: Main, Contacts, and Other Tab | Reviewed 03/06/17 2
Unit Station: Click on the drop down to select a Unit Station to display. Residents assigned to a unit that have the selected unit station assigned in the unit setup will be displayed. The selected station will then be displayed. To remove the unit station filter, click on the drop down and select ALL Stations.
To view or edit resident information, double click on the resident name in the list to open the record.
Entering a new Resident:
To add a new resident, click ‘New’.
The Add Resident window will open. There are 3 options: new resident, re-admission, or copy a resident discharged or pending discharge from another facility. Highlight the appropriate option and click ‘OK’.
Note: Do not add a new resident into Service Minder directly, if the community uses Market Minder. Rather, the prospect chart within Market Minder should be converted to Service Minder. If this workflow is not followed, the system will result in having duplicate resident charts once marketing staff converts the prospect to Service Minder. In the case of duplicate resident charts present, always call Eldermark support for assistance in merging duplicate charts. New Resident: Use to add a brand new, resident record. Select ‘New Resident’ if individual has never been admitted to this community, or any other community sharing this database. When selected, the New Resident window will open.
Enter the resident’s first name and last name. If your community has the option turned on to prevent duplicate Social
Security Numbers, you will also need to enter that. Click ‘OK’. The Resident Chart: Main tab window will open.

Resident Chart: Main, Contacts, and Other Tab | Reviewed 03/06/17 3
Re-admit a Discharged Resident: Use to re-admit a previously discharged resident record within the same community. Once selected, click ‘OK’ and the list of previously discharged residents, from the same community, will be appear. Type a portion of the resident name in the Filter By field to find the resident in the list. The scroll bar on the right hand side of the window can also be used to search for resident.
Highlight the desired name and click ‘OK’. The Resident Chart: Main Tab window of the previous chart will open. Enter the Admit Date and Unit History information to complete the admission. Review and update all demographic information on this resident to ensure complete accuracy.
Copy a Resident Discharged or Pending Discharge from Another Community: Use to admit a resident record that was previously discharged in a separate community using Eldermark. This option is used within a multi-community database. Once selected, the Select a Resident window will appear, listing all previously discharged residents from other communities within the same database. The Community (previous), DOB, and Gender columns are included to assist in selecting the correct resident to admit. Click to highlight the desired resident name and click 'OK' or double click on resident’s name to select.
Note: Residents with a discharge date equal to or prior to the current date and residents with a discharge date 30 days into the future are available for selection. If the resident has been discharged from multiple communities, the last community the resident was living in will be shown.
Resident Chart: Main, Contacts, and Other Tab | Reviewed 03/06/17 4
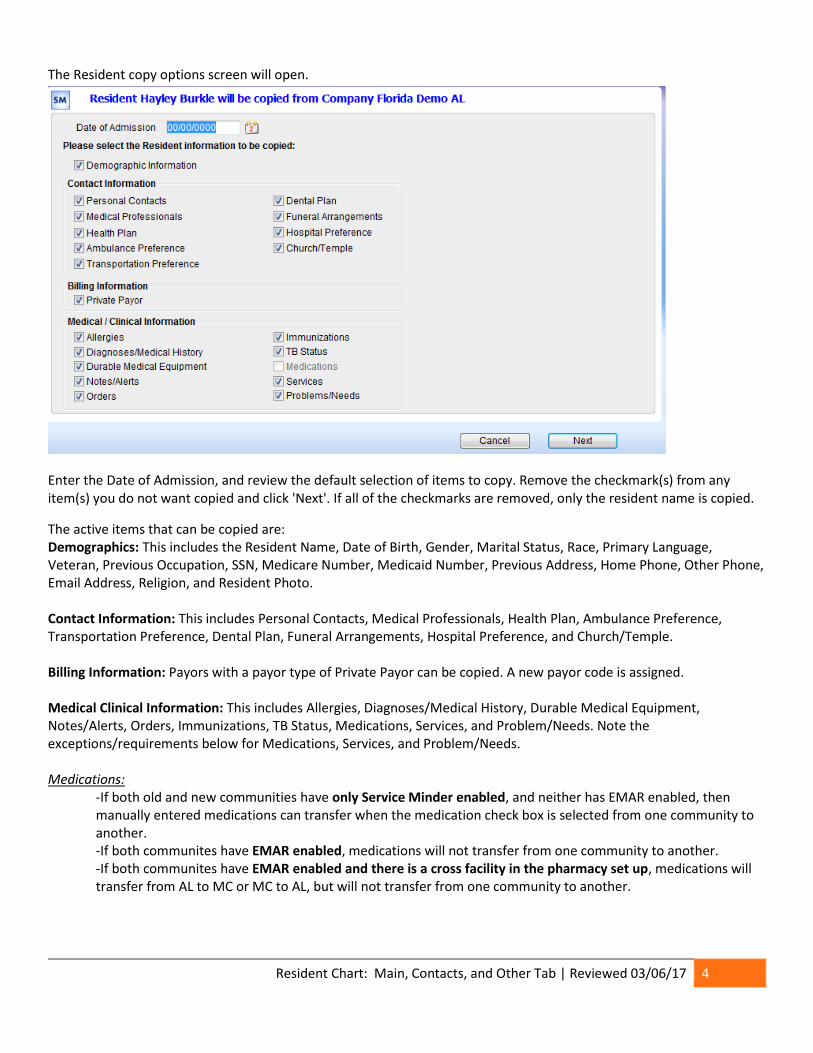
The Resident copy options screen will open.
Enter the Date of Admission, and review the default selection of items to copy. Remove the checkmark(s) from any item(s) you do not want copied and click 'Next'. If all of the checkmarks are removed, only the resident name is copied.
The active items that can be copied are: Demographics: This includes the Resident Name, Date of Birth, Gender, Marital Status, Race, Primary Language, Veteran, Previous Occupation, SSN, Medicare Number, Medicaid Number, Previous Address, Home Phone, Other Phone, Email Address, Religion, and Resident Photo. Contact Information: This includes Personal Contacts, Medical Professionals, Health Plan, Ambulance Preference, Transportation Preference, Dental Plan, Funeral Arrangements, Hospital Preference, and Church/Temple. Billing Information: Payors with a payor type of Private Payor can be copied. A new payor code is assigned. Medical Clinical Information: This includes Allergies, Diagnoses/Medical History, Durable Medical Equipment, Notes/Alerts, Orders, Immunizations, TB Status, Medications, Services, and Problem/Needs. Note the exceptions/requirements below for Medications, Services, and Problem/Needs. Medications:
-If both old and new communities have only Service Minder enabled, and neither has EMAR enabled, then manually entered medications can transfer when the medication check box is selected from one community to another. -If both communites have EMAR enabled, medications will not transfer from one community to another. -If both communites have EMAR enabled and there is a cross facility in the pharmacy set up, medications will transfer from AL to MC or MC to AL, but will not transfer from one community to another.

Resident Chart: Main, Contacts, and Other Tab | Reviewed 03/06/17 5
Services: If the Service Types are shared, there is an option to copy Services. Only active Services are copied. Some of the service plan information is community specific and Monthly Charges are not copied. Each Service Plan will require you to review for completion. The Provider, Package, and Payor may need to be completed or updated. Verify that all other information is correct. Note: If both communities utilize Auto Assign Provider based on the Resident Unit, the services with the provider Assigned by Unit will have the provider copied. All other services will need to have a provider assigned. Problems/Needs: This option is enabled if the Care Plan is enabled. Once you have admitted the resident from another community, be sure to complete the admission by completing Unit History. Review and update any data that was copied from the previous community. Main Tab: There are three distinct sections on this tab: Demographics, Unit History, and Admittance & Discharge.
Resident Chart: Main, Contacts, and Other Tab | Reviewed 03/06/17 6
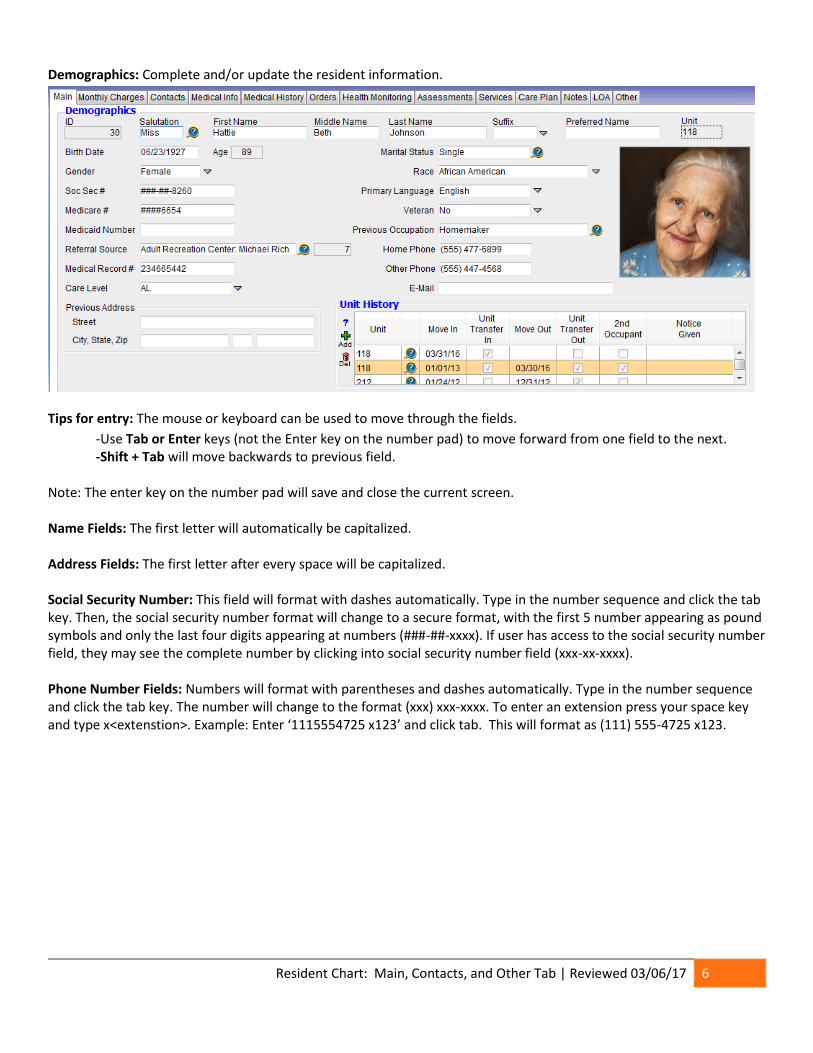
Demographics: Complete and/or update the resident information.
Tips for entry: The mouse or keyboard can be used to move through the fields.
-Use Tab or Enter keys (not the Enter key on the number pad) to move forward from one field to the next. -Shift + Tab will move backwards to previous field.
Note: The enter key on the number pad will save and close the current screen. Name Fields: The first letter will automatically be capitalized. Address Fields: The first letter after every space will be capitalized. Social Security Number: This field will format with dashes automatically. Type in the number sequence and click the tab key. Then, the social security number format will change to a secure format, with the first 5 number appearing as pound symbols and only the last four digits appearing at numbers (###-##-xxxx). If user has access to the social security number field, they may see the complete number by clicking into social security number field (xxx-xx-xxxx). Phone Number Fields: Numbers will format with parentheses and dashes automatically. Type in the number sequence and click the tab key. The number will change to the format (xxx) xxx-xxxx. To enter an extension press your space key and type x<extenstion>. Example: Enter ‘1115554725 x123’ and click tab. This will format as (111) 555-4725 x123.
Resident Chart: Main, Contacts, and Other Tab | Reviewed 03/06/17 7
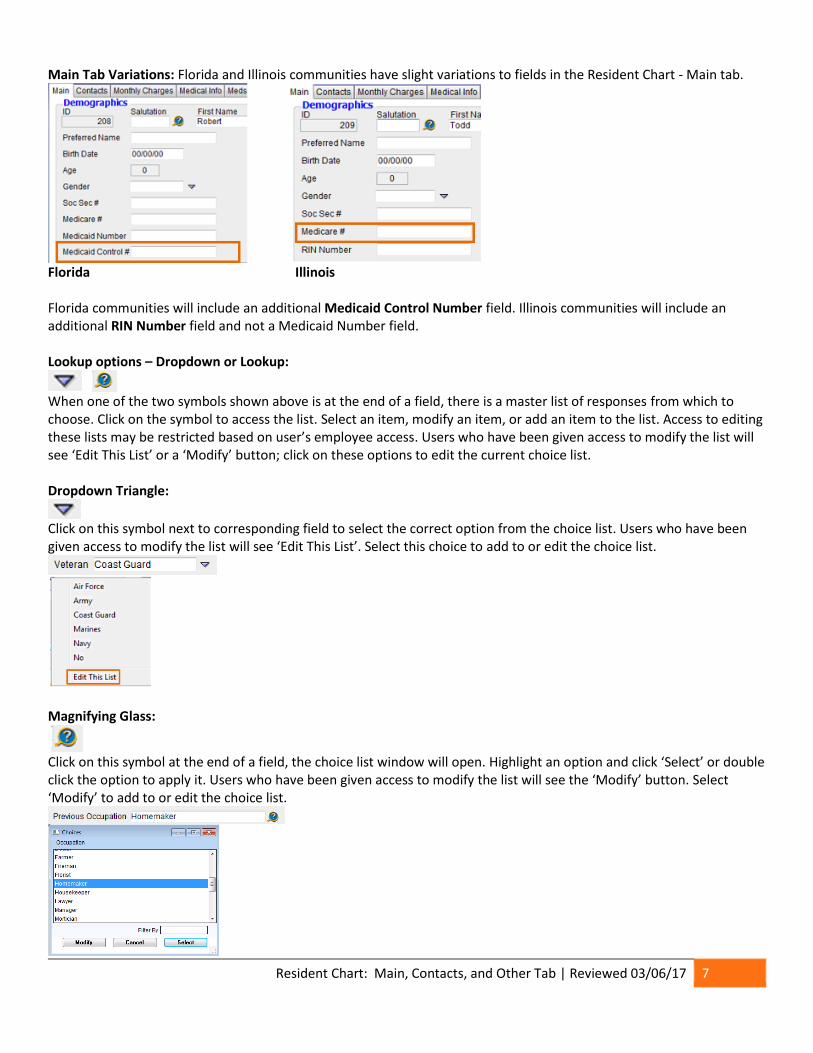
Main Tab Variations: Florida and Illinois communities have slight variations to fields in the Resident Chart - Main tab.
Florida Illinois Florida communities will include an additional Medicaid Control Number field. Illinois communities will include an additional RIN Number field and not a Medicaid Number field. Lookup options – Dropdown or Lookup:
When one of the two symbols shown above is at the end of a field, there is a master list of responses from which to choose. Click on the symbol to access the list. Select an item, modify an item, or add an item to the list. Access to editing these lists may be restricted based on user’s employee access. Users who have been given access to modify the list will see ‘Edit This List’ or a ‘Modify’ button; click on these options to edit the current choice list. Dropdown Triangle:
Click on this symbol next to corresponding field to select the correct option from the choice list. Users who have been given access to modify the list will see ‘Edit This List’. Select this choice to add to or edit the choice list.
Magnifying Glass:
Click on this symbol at the end of a field, the choice list window will open. Highlight an option and click ‘Select’ or double click the option to apply it. Users who have been given access to modify the list will see the ‘Modify’ button. Select ‘Modify’ to add to or edit the choice list.

Resident Chart: Main, Contacts, and Other Tab | Reviewed 03/06/17 8
Note: If no choices are added or the dropdown/lookup list has not been created, a prompt will appear to set up the list.
A blue question mark, , contains help/explanations for the field. These are found throughout the entire program.
Common Keyboarding Short Cuts:
Copy: Highlight the text you wish to copy, hold down the Ctrl key and press C. (Ctrl + C)
Paste: Click in the field you wish to paste into, hold down the Ctrl key and press V. (Ctrl + V)
Cut: Highlight the text you wish to move, hold down the Ctrl key and press X. (Ctrl + X)
Undo: Hold down the Ctrl key and press Z. (Ctrl + Z)
Buttons at the bottom of the Resident Chart screens:
Add Another: Allows you to save the current record and add another record of the same type in the current screen.
Save and Duplicate: Allows you to add another similar record in the current screen. The current record is duplicated and
you will just need to edit and save your changes.
Save: Click to save the record and return to the previous screen.
First, Prev, Next, and Last: Will move you from record to record on the same open window.
Calendar Icon and Drop down: Dates can be entered manually or by using the calendar icon. Most date fields have a calendar icon.
Resident Chart: Main, Contacts, and Other Tab | Reviewed 03/06/17 9
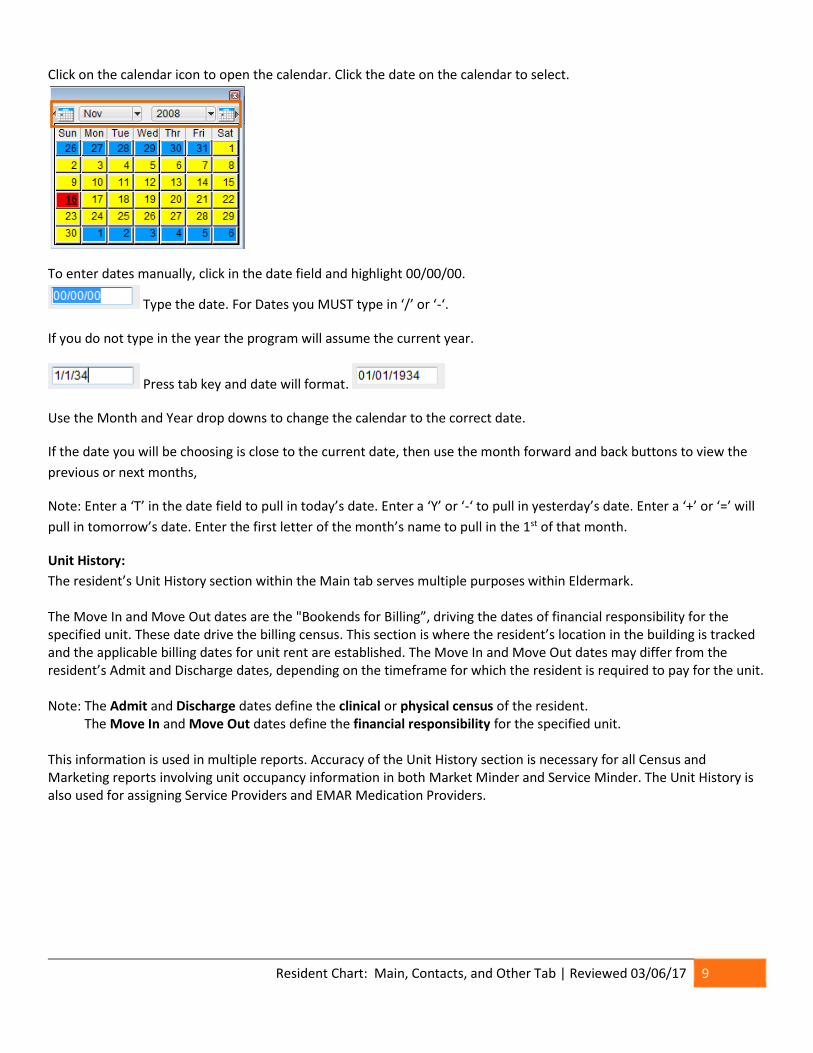
Click on the calendar icon to open the calendar. Click the date on the calendar to select.
To enter dates manually, click in the date field and highlight 00/00/00.
Type the date. For Dates you MUST type in ‘/’ or ‘-‘.
If you do not type in the year the program will assume the current year.
Press tab key and date will format.
Use the Month and Year drop downs to change the calendar to the correct date.
If the date you will be choosing is close to the current date, then use the month forward and back buttons to view the
previous or next months,
Note: Enter a ‘T’ in the date field to pull in today’s date. Enter a ‘Y’ or ‘-‘ to pull in yesterday’s date. Enter a ‘+’ or ‘=’ will
pull in tomorrow’s date. Enter the first letter of the month’s name to pull in the 1st of that month.
Unit History:
The resident’s Unit History section within the Main tab serves multiple purposes within Eldermark. The Move In and Move Out dates are the "Bookends for Billing”, driving the dates of financial responsibility for the specified unit. These date drive the billing census. This section is where the resident’s location in the building is tracked and the applicable billing dates for unit rent are established. The Move In and Move Out dates may differ from the resident’s Admit and Discharge dates, depending on the timeframe for which the resident is required to pay for the unit. Note: The Admit and Discharge dates define the clinical or physical census of the resident. The Move In and Move Out dates define the financial responsibility for the specified unit. This information is used in multiple reports. Accuracy of the Unit History section is necessary for all Census and Marketing reports involving unit occupancy information in both Market Minder and Service Minder. The Unit History is also used for assigning Service Providers and EMAR Medication Providers.

Resident Chart: Main, Contacts, and Other Tab | Reviewed 03/06/17 10
Unit History Entry: To enter a new line of Unit History, click ‘Add’.
The Select Unit window will open.
Available Units tab: Lists all open, unoccupied units. All Units tab: Lists all units, regardless of unit status (occupied and unoccupied). Assign the resident to appropriate unit by either double clicking on the unit or highlighting the line and clicking on ‘Select’. If the resident’s unit is not displayed, click the ‘All Units’ tab to see the entire list of units. Unit History Fields:
Move In: This is the date that the resident begins paying rent for the unit. Update the Move In date as needed (double
click in the date field).
Unit Transfer In: Check this box when transferring in from one unit to another within the community. This field affects occupancy reports. When Unit Transfer In is not marked, this Move In date is counted as a new Move In for occupancy. When a resident moves to a new unit, the subsequent row(s) of rate history will default to having Unit Transfer In marked, and the transfer will not be counted as a new move in on any occupancy reports. The first move in cannot be marked as a Unit Transfer In, to ensure resident Move Ins are counted correctly on Census Reports. Move Out: This is the date the resident stops paying rent for the unit.
Resident Chart: Main, Contacts, and Other Tab | Reviewed 03/06/17 11
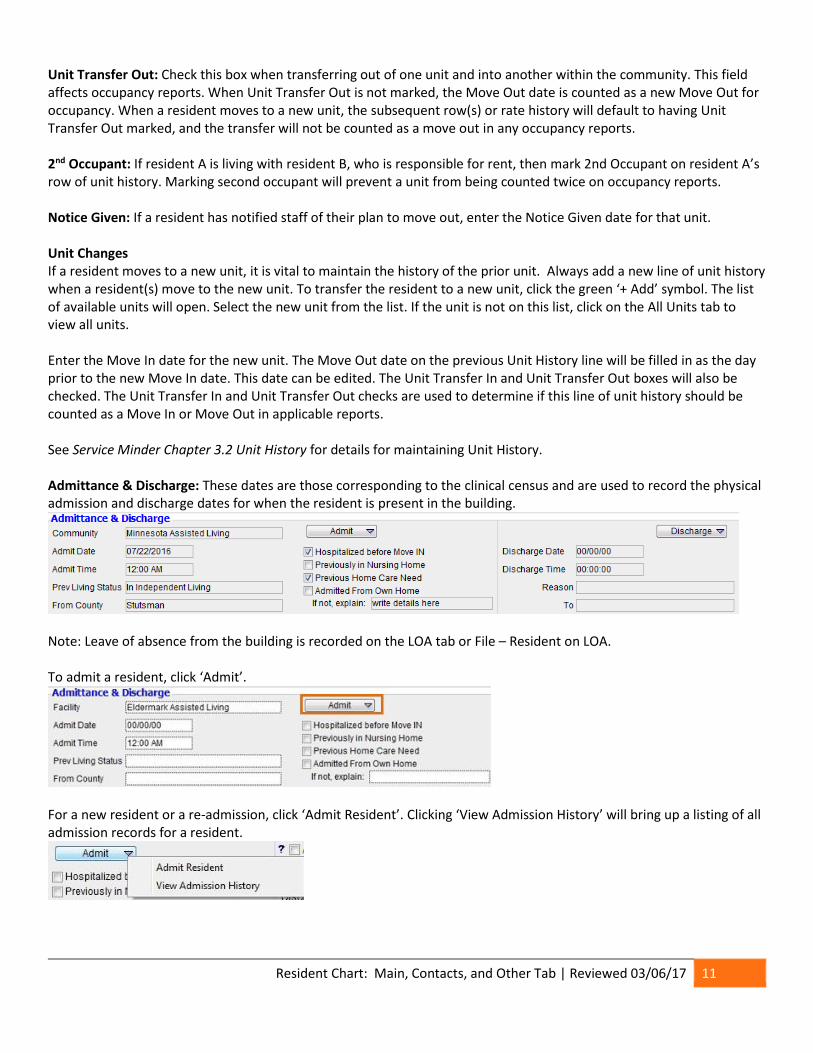
Unit Transfer Out: Check this box when transferring out of one unit and into another within the community. This field affects occupancy reports. When Unit Transfer Out is not marked, the Move Out date is counted as a new Move Out for occupancy. When a resident moves to a new unit, the subsequent row(s) or rate history will default to having Unit Transfer Out marked, and the transfer will not be counted as a move out in any occupancy reports. 2nd Occupant: If resident A is living with resident B, who is responsible for rent, then mark 2nd Occupant on resident A’s row of unit history. Marking second occupant will prevent a unit from being counted twice on occupancy reports. Notice Given: If a resident has notified staff of their plan to move out, enter the Notice Given date for that unit. Unit Changes If a resident moves to a new unit, it is vital to maintain the history of the prior unit. Always add a new line of unit history when a resident(s) move to the new unit. To transfer the resident to a new unit, click the green ‘+ Add’ symbol. The list of available units will open. Select the new unit from the list. If the unit is not on this list, click on the All Units tab to view all units. Enter the Move In date for the new unit. The Move Out date on the previous Unit History line will be filled in as the day prior to the new Move In date. This date can be edited. The Unit Transfer In and Unit Transfer Out boxes will also be checked. The Unit Transfer In and Unit Transfer Out checks are used to determine if this line of unit history should be counted as a Move In or Move Out in applicable reports. See Service Minder Chapter 3.2 Unit History for details for maintaining Unit History. Admittance & Discharge: These dates are those corresponding to the clinical census and are used to record the physical admission and discharge dates for when the resident is present in the building.
Note: Leave of absence from the building is recorded on the LOA tab or File – Resident on LOA. To admit a resident, click ‘Admit’.
For a new resident or a re-admission, click ‘Admit Resident’. Clicking ‘View Admission History’ will bring up a listing of all admission records for a resident.

Resident Chart: Main, Contacts, and Other Tab | Reviewed 03/06/17 12
Note: If an admit date has already been entered, the option to Modify Admittance will replace Admit Resident.
The Admit Resident screen will open.
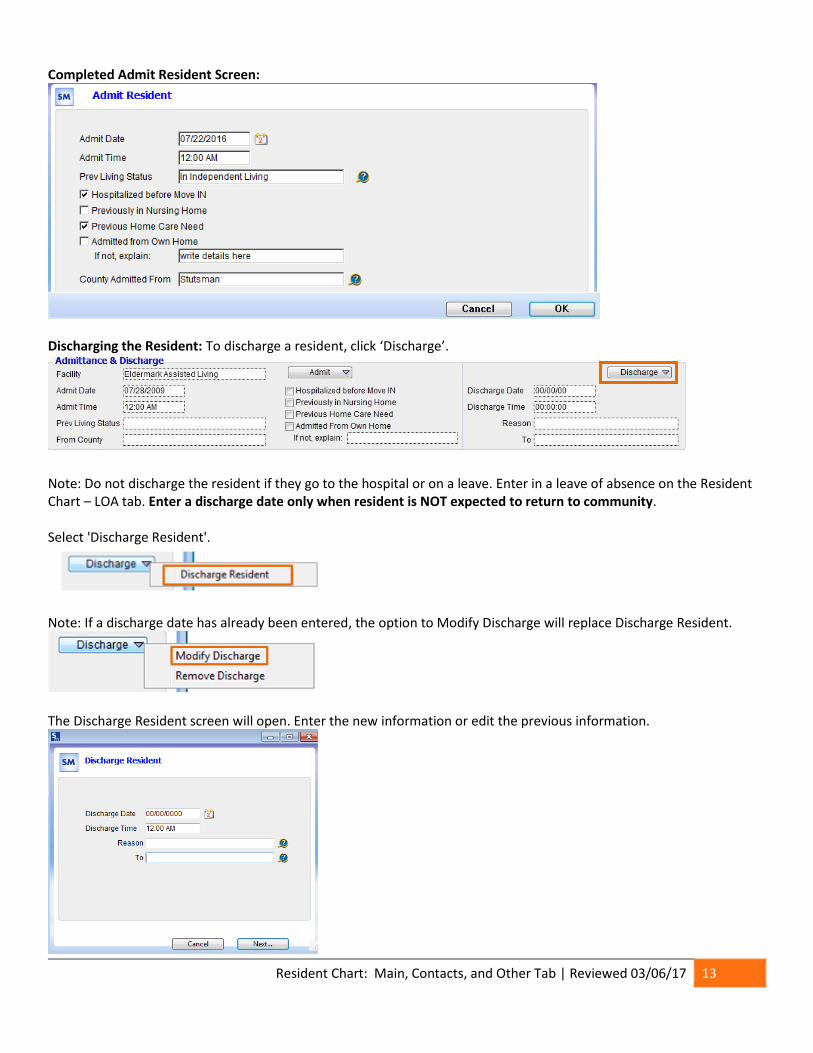
Enter new, or modify the previous information and click ‘OK’. The first Admit Resident record can have an Admit Date of 00/00/00 if the admit date is unkown at the time of data entry. All subsequent admit records require a valid date to be entered in order to save the record. Prev (Previous) Living Status: Use the lookup option to select the resident’s previous living status - where the resident lived prior to admission. The previous living status may be printed on the Face Sheet and pulls to various other reports. Several common previous living status locaction are listed, each with a check box. Check all that apply. This information also pulls to several standard reports.
Note: If Admitted from Own Home is checked, then the If not, explain: field is removed from view.
County Admitted From: Use the lookup option to select the previous county from which the resident came. Note: The ability to modify lookup choice lists is based on employee access.
Resident Chart: Main, Contacts, and Other Tab | Reviewed 03/06/17 13
Completed Admit Resident Screen:
Discharging the Resident: To discharge a resident, click ‘Discharge’.
Note: Do not discharge the resident if they go to the hospital or on a leave. Enter in a leave of absence on the Resident Chart – LOA tab. Enter a discharge date only when resident is NOT expected to return to community. Select 'Discharge Resident'.
Note: If a discharge date has already been entered, the option to Modify Discharge will replace Discharge Resident.
The Discharge Resident screen will open. Enter the new information or edit the previous information.
Resident Chart: Main, Contacts, and Other Tab | Reviewed 03/06/17 14
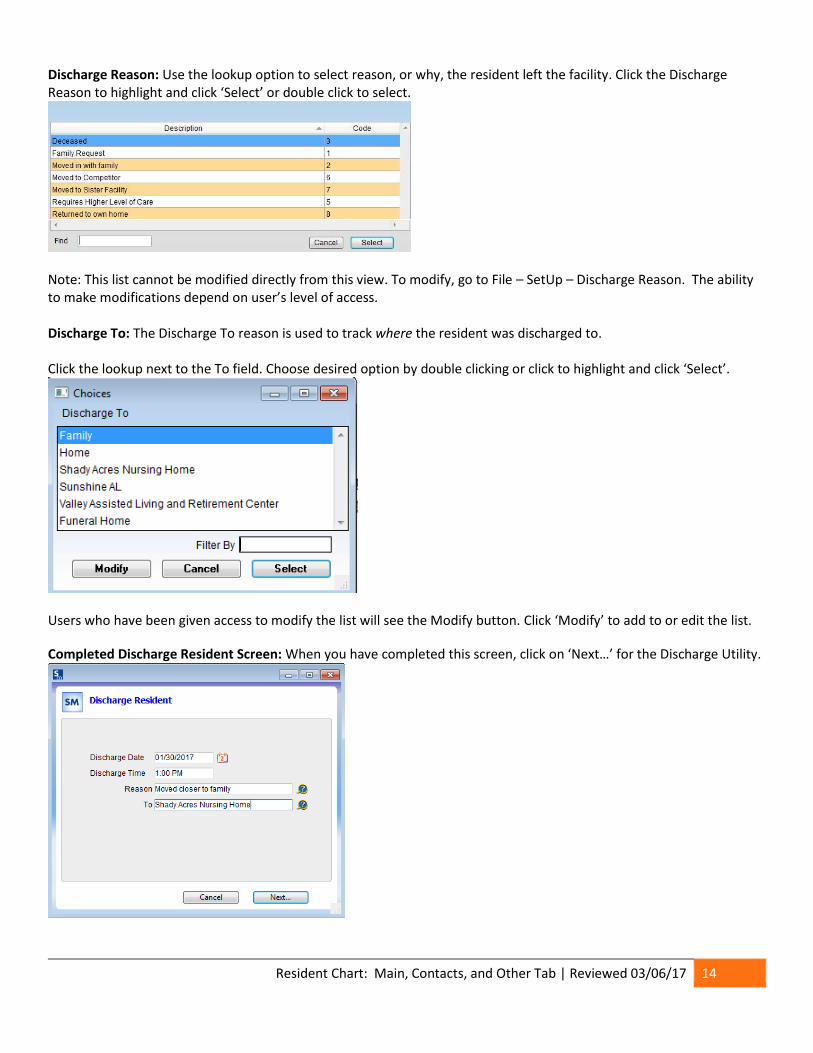
Discharge Reason: Use the lookup option to select reason, or why, the resident left the facility. Click the Discharge Reason to highlight and click ‘Select’ or double click to select.
Note: This list cannot be modified directly from this view. To modify, go to File – SetUp – Discharge Reason. The ability to make modifications depend on user’s level of access. Discharge To: The Discharge To reason is used to track where the resident was discharged to. Click the lookup next to the To field. Choose desired option by double clicking or click to highlight and click ‘Select’.
Users who have been given access to modify the list will see the Modify button. Click ‘Modify’ to add to or edit the list.
Completed Discharge Resident Screen: When you have completed this screen, click on ‘Next…’ for the Discharge Utility.
Resident Chart: Main, Contacts, and Other Tab | Reviewed 03/06/17 15
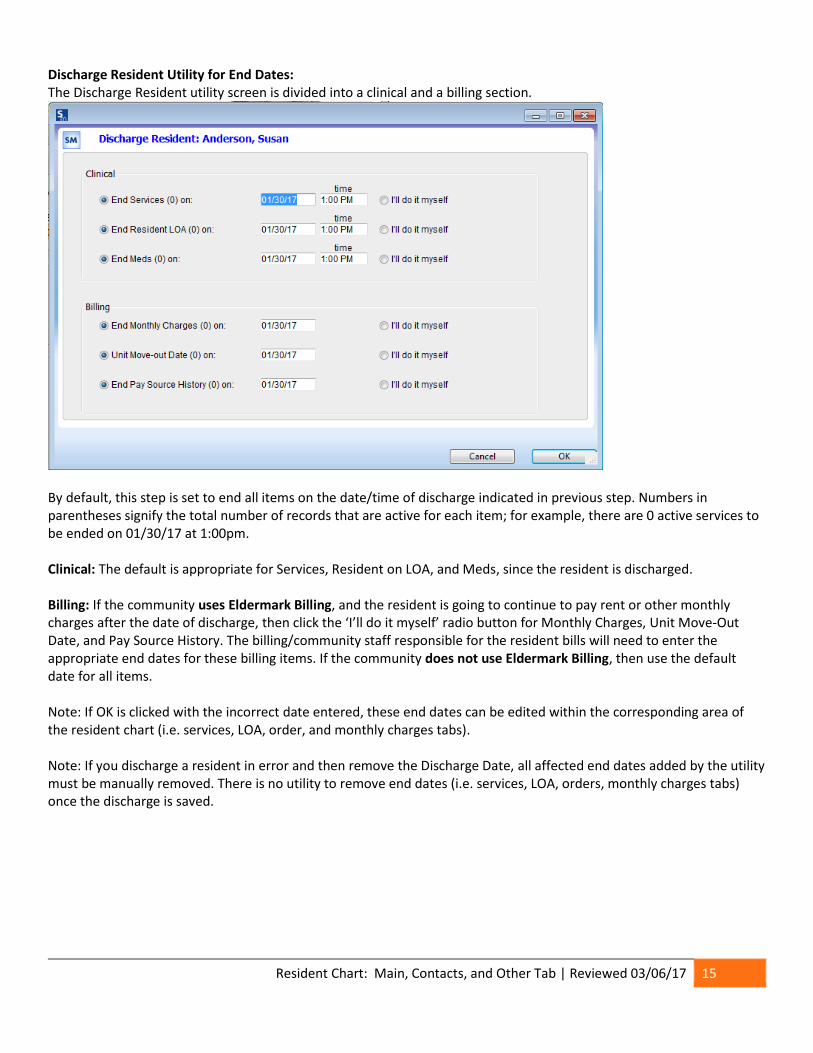
Discharge Resident Utility for End Dates: The Discharge Resident utility screen is divided into a clinical and a billing section.
By default, this step is set to end all items on the date/time of discharge indicated in previous step. Numbers in parentheses signify the total number of records that are active for each item; for example, there are 0 active services to be ended on 01/30/17 at 1:00pm. Clinical: The default is appropriate for Services, Resident on LOA, and Meds, since the resident is discharged. Billing: If the community uses Eldermark Billing, and the resident is going to continue to pay rent or other monthly charges after the date of discharge, then click the ‘I’ll do it myself’ radio button for Monthly Charges, Unit Move-Out Date, and Pay Source History. The billing/community staff responsible for the resident bills will need to enter the appropriate end dates for these billing items. If the community does not use Eldermark Billing, then use the default date for all items. Note: If OK is clicked with the incorrect date entered, these end dates can be edited within the corresponding area of the resident chart (i.e. services, LOA, order, and monthly charges tabs). Note: If you discharge a resident in error and then remove the Discharge Date, all affected end dates added by the utility must be manually removed. There is no utility to remove end dates (i.e. services, LOA, orders, monthly charges tabs) once the discharge is saved.

Resident Chart: Main, Contacts, and Other Tab | Reviewed 03/06/17 16
Contacts Tab: To access Contacts, click on the ‘Resident Chart’ icon to open the Resident list. Double click on resident name to open the record. Click on the ‘Contacts’ tab.
Contacts: The Contacts section is where you add personal contacts (i.e. family and friends) for the resident. Click ‘Add’ to add a new contact. Double click on an existing contact to edit the record.
Resident Chart: Main, Contacts, and Other Tab | Reviewed 03/06/17 17
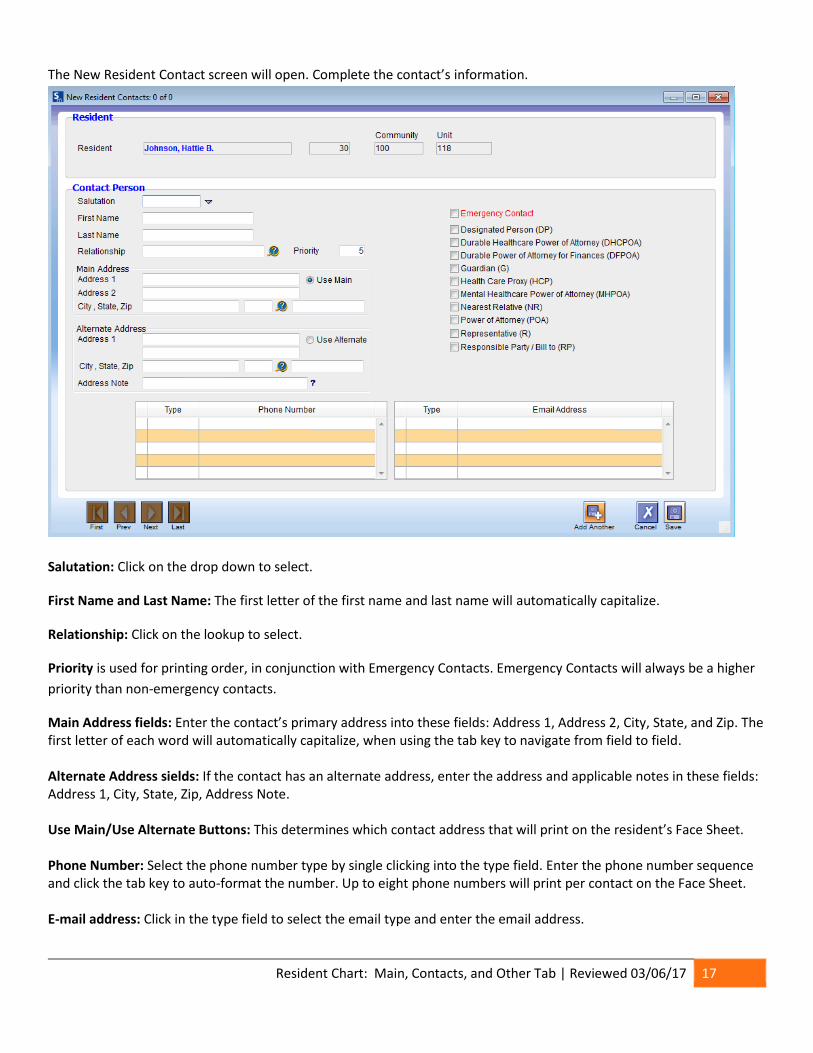
The New Resident Contact screen will open. Complete the contact’s information.
Salutation: Click on the drop down to select.
First Name and Last Name: The first letter of the first name and last name will automatically capitalize.
Relationship: Click on the lookup to select.
Priority is used for printing order, in conjunction with Emergency Contacts. Emergency Contacts will always be a higher
priority than non-emergency contacts.
Main Address fields: Enter the contact’s primary address into these fields: Address 1, Address 2, City, State, and Zip. The first letter of each word will automatically capitalize, when using the tab key to navigate from field to field. Alternate Address sields: If the contact has an alternate address, enter the address and applicable notes in these fields: Address 1, City, State, Zip, Address Note. Use Main/Use Alternate Buttons: This determines which contact address that will print on the resident’s Face Sheet. Phone Number: Select the phone number type by single clicking into the type field. Enter the phone number sequence and click the tab key to auto-format the number. Up to eight phone numbers will print per contact on the Face Sheet. E-mail address: Click in the type field to select the email type and enter the email address.

Resident Chart: Main, Contacts, and Other Tab | Reviewed 03/06/17 18
Note: To change the priority of phone numbers or Email Addresses, click, drag, and drop each into the correct order on the list. Emergency and Other Types of Relationships: Select 1 or more applicable relationships. When ‘Emergency Contact’ is selected, the word “Emergency” will print in red font on the Face Sheet, following the contact’s name. When another relationship check box item is selected, the letters in the parentheses will print on the Face Sheet. For example, selecting Power of Attorney (POA), will result in the word “POA” printed on the Face Sheet in the contact’s relationship field.
Click ‘Save’ to save and close or ‘Add Another’ to save and enter additional Contacts.
To change the priority order of contacts, you can click, drag, and drop them on the list. Any contact marked as an
Emergency Contact will always be a higher priority than a Non-Emergency Contact. You can have multiple Emergency
Contacts for a resident.
Medical Professionals: Click ‘Add’ to add a new Medical Professional.
Resident Chart: Main, Contacts, and Other Tab | Reviewed 03/06/17 19
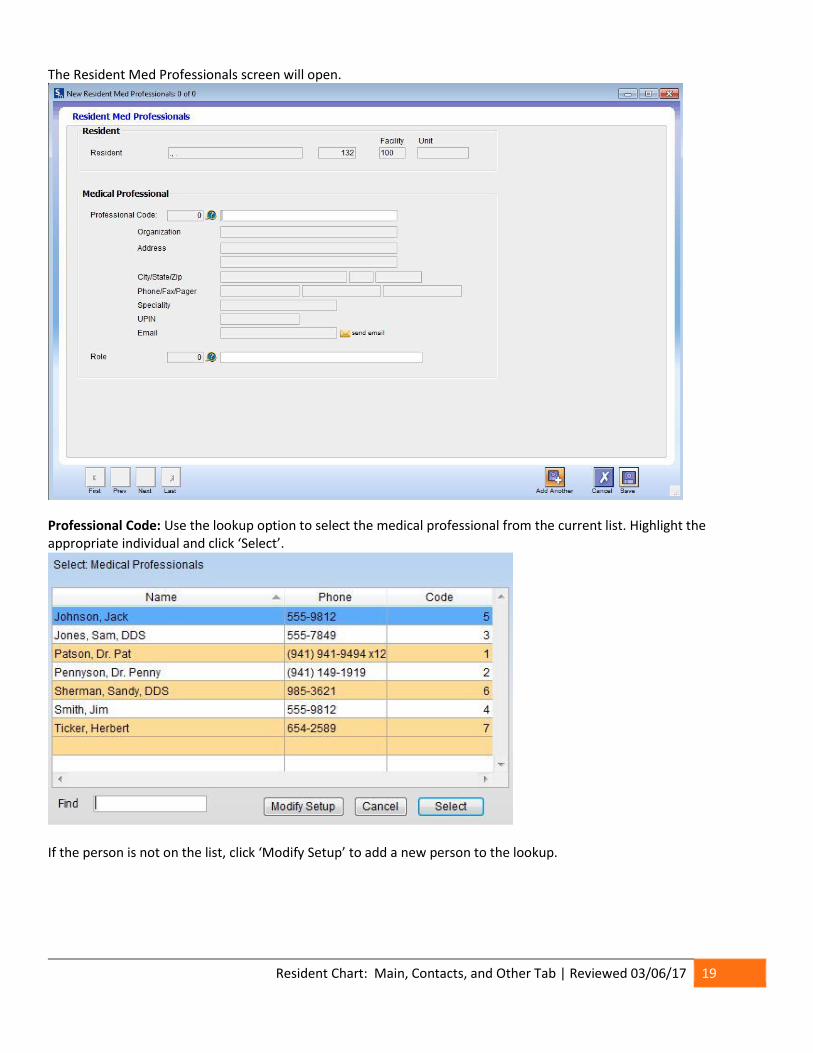
The Resident Med Professionals screen will open.
Professional Code: Use the lookup option to select the medical professional from the current list. Highlight the appropriate individual and click ‘Select’.
If the person is not on the list, click ‘Modify Setup’ to add a new person to the lookup.

Resident Chart: Main, Contacts, and Other Tab | Reviewed 03/06/17 20
Role: This defines the category of the selected Medical Professional, and will print on the Face Sheet. Use the lookup option to select the appropriate Medical professional Role from the current list. Highlight the role and click ‘Select’. Role: The role defines the category of this Medical Professional and will print on the Face Sheet. Click the Role lookup. The Select Medical Professional Role screen will open.
Users who have been given access to modify the list will see the Modify Setup button. Click ‘Modify Setup’ to add to or
edit the list.
After selecting the Medical Professional and the Role, click ‘Save’ to save and close or ‘Add Another’ to save and enter
additional Medical Professionals.
Health Plan: Click ‘Add’ to add a Health Plan.
The Health Plan choice list will open. Click the Health Plan to highlight and click ‘Select’ or double click to select.
Users who have been given access to modify the list will see the Modify button. Click ‘Modify’ to add to or edit the list.
Note: If no choices have been added or the list has not been created, you will be prompted to setup the list.
Once the Health Plan is selected, press tab once to enter the Policy Number and/or twice to enter the Group Number. Enter them by clicking directly into the field(s) as well.
Resident Chart: Main, Contacts, and Other Tab | Reviewed 03/06/17 21
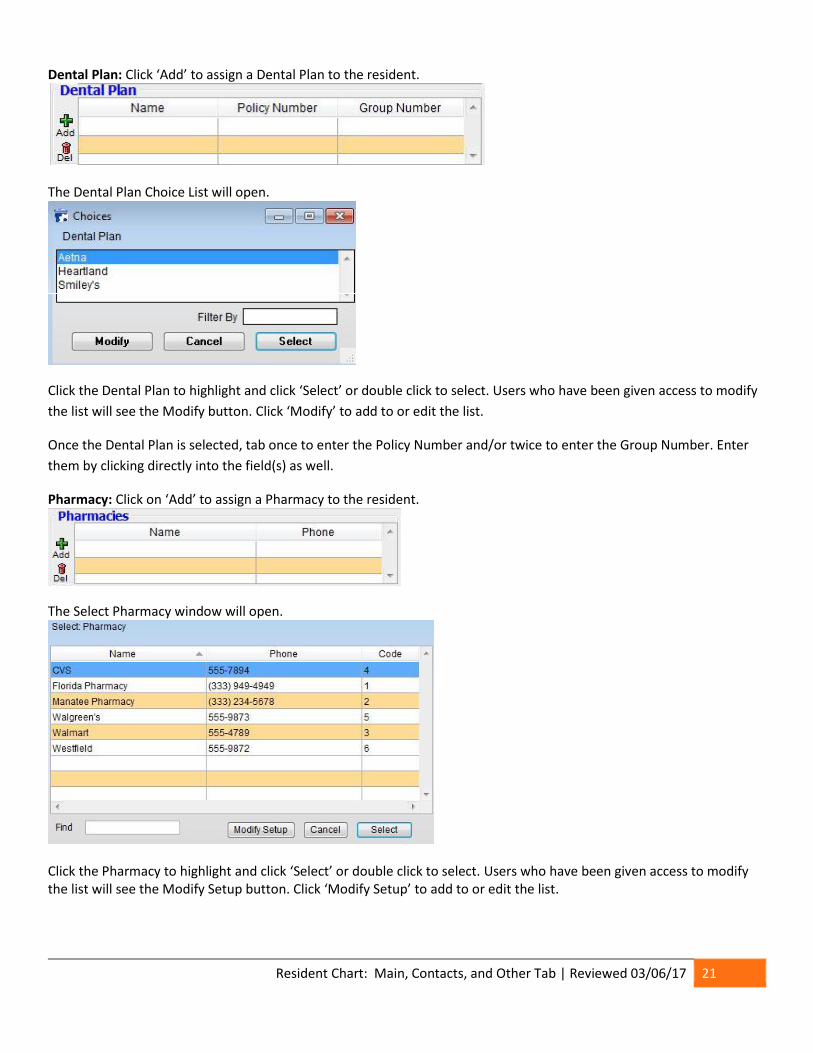
Dental Plan: Click ‘Add’ to assign a Dental Plan to the resident.
The Dental Plan Choice List will open.
Click the Dental Plan to highlight and click ‘Select’ or double click to select. Users who have been given access to modify
the list will see the Modify button. Click ‘Modify’ to add to or edit the list.
Once the Dental Plan is selected, tab once to enter the Policy Number and/or twice to enter the Group Number. Enter
them by clicking directly into the field(s) as well.
Pharmacy: Click on ‘Add’ to assign a Pharmacy to the resident.
The Select Pharmacy window will open.
Click the Pharmacy to highlight and click ‘Select’ or double click to select. Users who have been given access to modify the list will see the Modify Setup button. Click ‘Modify Setup’ to add to or edit the list.

Resident Chart: Main, Contacts, and Other Tab | Reviewed 03/06/17 22
Hospital/Ambulance/Transportation Preference:
Click on the lookup at the end of each field to select. If there are no items in the listing, you will be prompted to create
the list. If the item you need is not in the list, click ‘Modify’ to add to the list.
Church/Temple/Religion:
Manually enter the Church or Temple Name, Contact, and Phone. Select the religion from the lookup.
Funeral Home: Click on the lookup to select the Funeral Home.
The Select Funeral Home screen will open.
Click the Funeral Home to highlight and click ‘Select’ or double click to select. Users who have been given access to
modify the list will see the Modify button. Click ‘Modify’ to add to or edit the list.
The text box below the Funeral Home name can be used to enter resident specific information.

Resident Chart: Main, Contacts, and Other Tab | Reviewed 03/06/17 23
Interests: Click ‘Add’ to add a new interest. Click on the lookup/drop down to complete the Description, Interest, and Skill Level fields.
To delete items from any of the listings, highlight the row you want to delete and click on the ‘Del’.
Note: If there are no items in the any current choice lists, the user will be prompted to create the list.
Other tab: There are five distinct sections are included on this tab: Custom Fields, Health Exchange, Resident Photo,
Yearly Income Sources, Miscellaneous, and Home Health Client Roster.
Custom Fields:
If User Defined Fields have been set up in your community, they will be displayed in the custom fields section of the
screen. Enter the resident’s information by clicking into the field to type your response.
Note: The options shown in this screen may not match the options in your database.
Resident Chart: Main, Contacts, and Other Tab | Reviewed 03/06/17 24
Health Exchange: A check box is available to Opt Out of the Health Exchange. This is not selected by default. If you have a resident who has decided to Opt Out or not include their health information in the Health Information Exchange check this box. Resident Picture: Refer to the reference How to Upload a Resident Photo for more information. Informational photo icons can now be displayed on the resident photos. These icons are configurable under the community set up and will pull to the EMAR Medication Pass. Note: The resident’s photo needs to be added into their chart before the photo icons will be enabled for that resident. Yearly Income Source: Available if using Eldermark’s Billing module.
Miscellaneous: Pharmacy PID is the resident ID for the pharmacy interface if applicable. This field does not allow edits.
Home Health Client Roster: This feature is available to all clients, it applies to an older report within the system. It can be disabled/enabled by Eldermark Administrators per company request.