requester training guide - queen's...
TRANSCRIPT

acQuire Training Requester Guide
Requester Training Guide
QUEEN’S UNIVERSITY
ACQUIRE TEAM

1 acQuire Training Requester Guide
The following tutorial will provide step-by-step instructions of how to complete and submit a Purchase
Requisition within the Queen’s University acQuire e-Procurement system.
Time to review this tutorial is estimated at 10-15 minutes.
Time to complete this action in acQuire is estimated at under 10 minutes.
ACQUIRE REQUESTER TRAINING GUIDE:
Catalogue & Non-Catalogue Orders
Note: Prior to reviewing this guide (or attending a Requester training session), attending Shopper
training is required. The Shopper training session will cover how to create carts (catalogue and non-
catalogue, and will discuss acQuire Remittance Forms available for use – see acQuire Remittance
Forms Training Guide for further details).
As a Requester, you have the ability to shop from preferred Queen’s University Suppliers within Queen’s
University’s e-Procurement marketplace (acQuire) and create/submit Purchase Requisitions for goods
and services they provide.

2 acQuire Training Requester Guide
HOME PAGE (Shopping Dashboard)
CREATING A CART (Shopping)
Step1: Refer to Shopper’s Training Guide
Note: Carts can be created as either catalogue orders or non-catalogue orders

3 acQuire Training Requester Guide
ASSIGNED A CART
Step1: Notifications
Aside from having access to shop & create Requisitions for goods/services, Requesters can also be
assigned shopping carts from Shoppers (Shoppers cannot submit their own orders, so they must assign
their cart to a Requester for order completion) or other Requesters (Requesters can assign their cart to
another Requester, if they want the other Requester to finish completing the order and/or submit the
order).
When a cart has been assigned to you as a Requester, you will receive a notification as shown below
labelled as “Carts Assigned to Me”.
Step2: Activate Cart
In order to pick up a Requisition assigned to you and finish completing it/review it, you have to activate
the cart.
Either click on the shopping cart icon to create an active cart then click on the “shopping cart
name” (or skip clicking on the shopping cart name and click on the cart tally in the top right
notification bar instead), OR click on the “shopping cart name” to go directly into the cart
contents.

4 acQuire Training Requester Guide
CHECK OUT (Requisition Submission)
Step1: Review Shopping Cart
Once items have been added to your cart, review the cart contents.
Ensure the products in your cart are correct (quantity, pricing, product, etc.). If they are not,
update as appropriate (adjust the quantity, remove the item from your cart, etc.).
If you want to add more products to your cart, click “continue shopping”
Name your cart to make it easier to search for later (this field will automatically populate with
the current date and your userID if you do not give it a distinct name)
Step2: Proceed to Checkout
Once the cart has been reviewed and deemed accurate, the next step to complete the order is
proceeding to checkout.
Note: If you want to have another Requester complete the order or review it in its current state, next
steps would be to “Assign Cart” (steps detailed on page 32).
Click Proceed to Checkout

5 acQuire Training Requester Guide
Step3: Complete Requisition
Once in the checkout screen of the Requisition, the “completion tracking bar” will indicate what tabs
still require content before the Requisition can be submitted.
Once a tab has been completed (minimum information filled in so Req can be submitted), the initial red
triangle displayed on the completion tracking bar will switch to a green check mark.
Note: Some tabs may require more information than the minimum submission requirements, based on
your order specifications
Once all tabs on the completion tracking bar are marked with a green check mark, the “Submit
Requisition” button on the right hand side of the page will become available.
The following instructions will take you through how to complete each tab in the Requisition Checkout
screen.
Note: The tab you land on once proceeding to checkout and/or the order of which tab to complete on the
Requisition may differ depending on what information the Requisition already has assigned. The
following sequence has you landing on the Shipping tab first after proceeding to checkout, operating
under the assumption that a Ship To location has not already been populated on the Requisition.

6 acQuire Training Requester Guide
Shipping Tab
Ship To
The Shipping tab should define the Ship To address (location) you wants the goods delivered, or the
service performed.
There are pre-loaded ship to locations provided for selection through the search options, as well as
options to type in a location not already available. Ship to location nicknames are set up by building
short form (or street name), then room number (or street number).
Note: If ordering chemicals, please ensure you assign the Chernoff shipping location (details to be
provided).
There are 2 ways to add Shipping Addresses to your order: Header (one ship to address for the entire
cart contents), or Line Level (specified ship to locations per line item of your order)
Add Shipping Address (Header)
Click “Required Field” or the “edit” button to access list of organization ship-to
locations
Click the “select from org addresses” to access the list of pre-loaded addresses
Shipping Address (Line Level)
If you need a different Shipping Address per line on your order, click the “edit” at the
line level
Note: There will be one ship to per PO generated, so if each of your product lines has a
different ship to assigned, each of those lines will generate into their own Purchase
Order.
7 acQuire Training Requester Guide
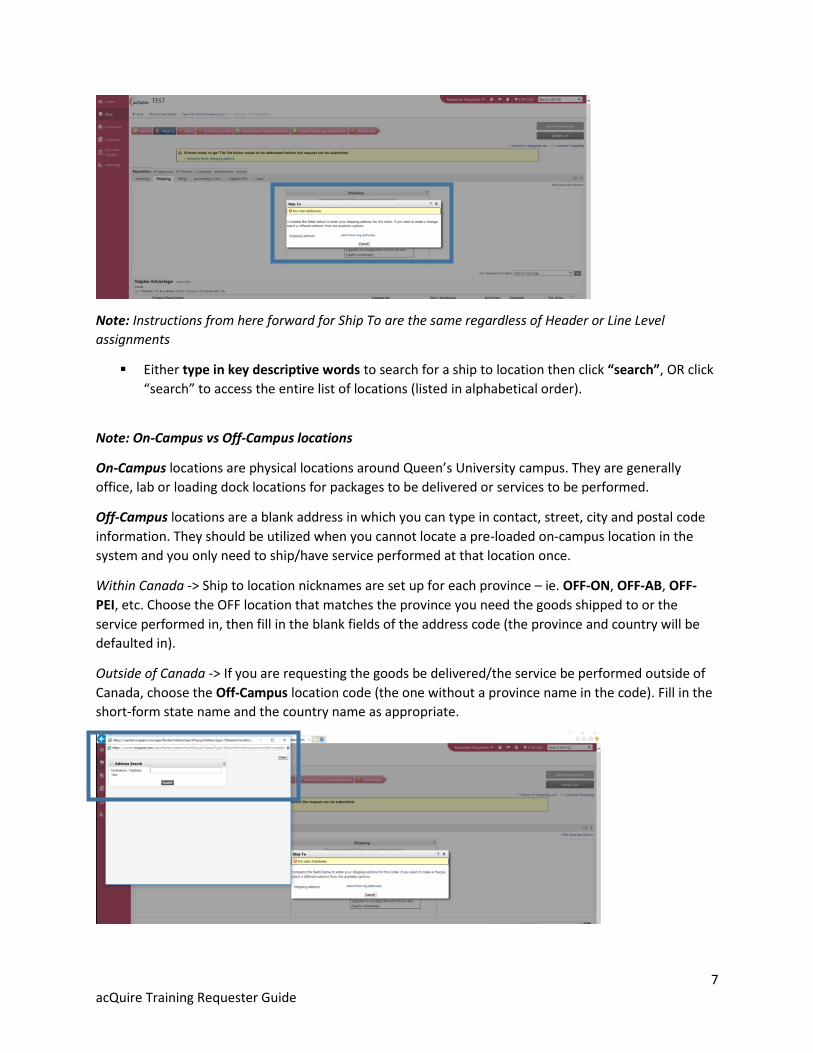
Note: Instructions from here forward for Ship To are the same regardless of Header or Line Level
assignments
Either type in key descriptive words to search for a ship to location then click “search”, OR click
“search” to access the entire list of locations (listed in alphabetical order).
Note: On-Campus vs Off-Campus locations
On-Campus locations are physical locations around Queen’s University campus. They are generally
office, lab or loading dock locations for packages to be delivered or services to be performed.
Off-Campus locations are a blank address in which you can type in contact, street, city and postal code
information. They should be utilized when you cannot locate a pre-loaded on-campus location in the
system and you only need to ship/have service performed at that location once.
Within Canada -> Ship to location nicknames are set up for each province – ie. OFF-ON, OFF-AB, OFF-
PEI, etc. Choose the OFF location that matches the province you need the goods shipped to or the
service performed in, then fill in the blank fields of the address code (the province and country will be
defaulted in).
Outside of Canada -> If you are requesting the goods be delivered/the service be performed outside of
Canada, choose the Off-Campus location code (the one without a province name in the code). Fill in the
short-form state name and the country name as appropriate.

8 acQuire Training Requester Guide
Click the “select” button once you find the location you want to use
Ensure the Attn: and Room/Floor/Hall are correct (if not, edit)
Note: A few of the Catalogue suppliers can only accept limited characters in this field –
shorten the name details to something like “J.Doe” instead of “Jane Doe”, to ensure
accurate order delivery.
Click “save” and/or “Save this address for future use” (save for future use will allow you to
“select from your addresses” next time you edit the ship-to location on an order)
Delivery Options
Click “edit” to mark the order as “expedite” and/or to request a specific “delivery date”
for the goods/service (some catalogue suppliers cannot accept a requested delivery
date – a note will be displayed in that case, as seen below). Requested Delivery Date can
also relate to the end date of your “blanket/standing” order (ie. When the PO is
expected to be completed).

9 acQuire Training Requester Guide
Billing Tab
Billing Address is the location the invoice(s) for the Purchase Order will be issued to
The Bill To “Billing Address” should be pre-populated for you as the Queen’s Financial Services
office location and Accounts Payable email address. If it’s not, click the “edit” button to add the
location (QUE002).
Note: Select groups at Queen’s have been set up with their own Billing Address to accommodate specific
invoicing requirements. The standard billing address for acQuire Purchase Orders should be Queen’s
Financial Services, AP location.
Credit Card Info -> This will not be available for editing
Billing Options, Accounting Date -> Accounting Date will populate for you, no editing/assigning
of a date is required here

10 acQuire Training Requester Guide
Accounting Codes (Chartfields) Tab
The Accounting Codes tab is where you need to enter the chartfields you would like the Purchase Order
encumbered to and ultimately paid from.
Click the “edit” button to add the chartfield values
The Fund, Dept, Program, Class and Project fields will be blank. Account will be filled in based
on the “commodity (category)” code you selected earlier (or that was selected for you) while
completing your cart – if you need to update the pre-populated Account ID, you can do so.
If you want to select a value from a list instead of typing it in, click on the “Select from all
values” link below each value field. Search through the filters provided, then click “select” on
the value you want to assign to the order.

11 acQuire Training Requester Guide
If you know the values you want to fill into the fields, type them in (instead of using the search)
Split Distribution (Optional)
Note: Assign a split distribution to your order if you need to pay for the goods/service from more than
one chartfield (ie. Split between departments, or research projects)
Click “add split” to add more distribution lines

12 acQuire Training Requester Guide
Choose split method – Options:
1. Split by % of Price
2. Split by % of Amount
3. Split by Amount of Qty
4. Split by Amount of Price
Assign split logic (put the split values into the fields), then click “recalculate/validate
values” to ensure the split you want to assign will work
Click “Save”

13 acQuire Training Requester Guide
Note: If you have multiple product lines on your order, and you want to assign the same chartfield to
each line, click “Copy to other lines” and select the lines you wish to copy the chartfields to.
Supplier Info Tab
Supplier Info tab will provide details of the supplier(s) you’ve assigned to your order

14 acQuire Training Requester Guide
Taxes Tab
The Taxes tab is where specific tax rates will be applied to your order.
The tax rate should default to 13% HST for most Canadian HST registered suppliers. If the tax rate is
showing up as 0%, the supplier is not HST registered.
If you need to apply a different tax rate to your order, you can do so here.
Note: This is considered the first step to adjusting tax calculations on a Requisition. The second step is
within the “Summary” tab and can be accessed by the Enhanced Requester role or the Tax Review role
held by the acQuire team members. If you do not hold either of these roles, and you make an adjustment
to the tax rate percentage, your Requisition will vet to a Tax Review acQuire team member for review
before becoming a Purchase Order.
Option 1: Adjust tax rate to be the same for each line on the Requisition
Click the “Edit taxes, shipping and handling for all line items in this group”
Click the drop down field and select “override”, then type in the new tax percentage
rate to apply to each line on the Requisition
Click “Save”

15 acQuire Training Requester Guide
Option 2: Adjust tax rate per line item only
Click the “edit” button on the line
Steps same as b & c above
Enhanced Requester/acQuire Tax Review Team Member Next Steps
Click the “Summary” tab
Click the “edit” button on the line level
Under “Delivered To” click the “Select from all values” drop down menu

16 acQuire Training Requester Guide
Choose the province that represents where the goods were delivered or the service was
performed (if outside of Canada, choose “Outside of Canada”)
Click “Tax Treatment to Apply”
Click “Select from all values”
Choose the tax treatment that represents the order
Click “Save”
17 acQuire Training Requester Guide
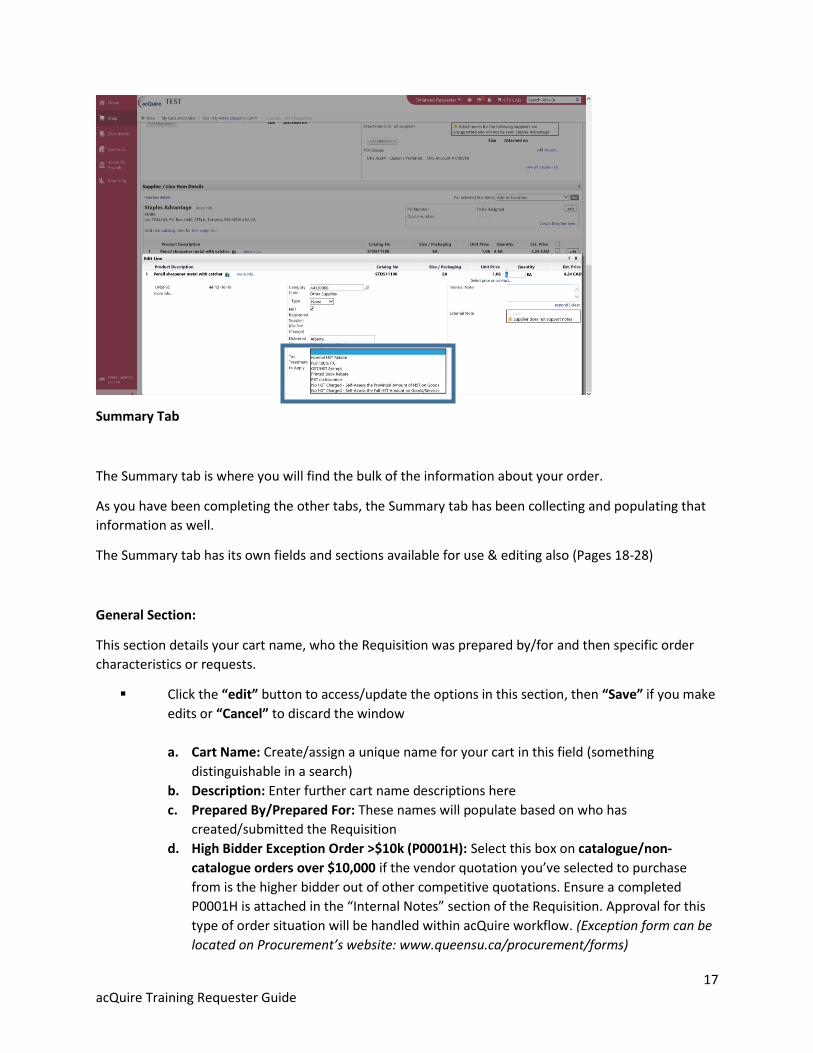
Summary Tab
The Summary tab is where you will find the bulk of the information about your order.
As you have been completing the other tabs, the Summary tab has been collecting and populating that
information as well.
The Summary tab has its own fields and sections available for use & editing also (Pages 18-28)
General Section:
This section details your cart name, who the Requisition was prepared by/for and then specific order
characteristics or requests.
Click the “edit” button to access/update the options in this section, then “Save” if you make
edits or “Cancel” to discard the window
a. Cart Name: Create/assign a unique name for your cart in this field (something
distinguishable in a search)
b. Description: Enter further cart name descriptions here
c. Prepared By/Prepared For: These names will populate based on who has
created/submitted the Requisition
d. High Bidder Exception Order >$10k (P0001H): Select this box on catalogue/non-
catalogue orders over $10,000 if the vendor quotation you’ve selected to purchase
from is the higher bidder out of other competitive quotations. Ensure a completed
P0001H is attached in the “Internal Notes” section of the Requisition. Approval for this
type of order situation will be handled within acQuire workflow. (Exception form can be
located on Procurement’s website: www.queensu.ca/procurement/forms)

18 acQuire Training Requester Guide
e. Goods/Service Exception Order >$10k (P0001): Select this box on catalogue/non-
catalogue orders over $10,000 if the vendor quotation you’ve selected to purchase
from is the only vendor able to provide the goods or service (competitive quotations are
not available), or the purchase situation is unique and requires urgent exclusion from
normal Queen’s Procurement Policies. Ensure a completed P0001 is attached in the
“Internal Notes” section of the Requisition Approval for this type of order situation will
be handled within acQuire workflow. (Exception form can be located on Procurement’s
website: www.queensu.ca/procurement/forms)
f. Construction/Renovations Exception Order >$10k (P0001PPS): Select this box on
catalogue/non-catalogue orders over $10,000 if the vendor quotation you’ve selected
to purchase from is construction/renovation related and is the only vendor able to
provide the goods or service (competitive quotations are not available), or the purchase
situation is unique and requires urgent exclusion from normal Queen’s Procurement
Policies. Ensure a completed P0001PPS is attached in the “Internal Notes” section of the
Requisition. Approval for this type of order situation will be handled within acQuire
workflow. (Exception form can be located on Procurement’s website:
www.queensu.ca/procurement/forms)
g. Consulting Services Order >$0 (P0001C): Select this box on catalogue/non-catalogue
orders over $10,000 if the order is consulting services related in any way. Ensure a
completed P0001C is attached in the “Internal Notes” section of the Requisition.
Approval for this type of order situation will be handled within acQuire workflow.
(Exception form can be located on Procurement’s website:
www.queensu.ca/procurement/forms)
h. Contract Approvals Obtained (Signed contract attached and/or provide RFP# with SPS
Contract): Select this box if a Queen’s coordinated contract/RFP has been issued ahead
of the Purchase Requisition submission. Include the signed contract or the RFP# in the
Internal Notes section of the Requisition. Approval for this type of order situation will be
handled within acQuire workflow.
i. Blanket/Standing Order: Select this box if the Purchase Requisition you’re creating is
intended to be a blanket/standing Purchase Order (the order is for a set-term, with
goods or service being provided regularly throughout the term and invoices to come in
over time).
j. Do Not Send PO to Vendor: Click this box if you do not need the Purchase Order to be
sent to the vendor (if not selected, the PO will be dispatched to the vendor).
k. (Auto-Return possible) Shipping Acknowledgement: Click this box if the Requisition has
Research chartfields assigned to it and you have considered shipping as a possible extra
charge to come at the time of invoicing (or known ahead of time based upon an initially
quoted price). Upon Requisition submission, if you have assigned Research chartfields
and the box has not been selected, the Requisition will auto-return to you and you will
need to submit the Requisition again (before you do, ensuring the Shipping
Acknowledgement box has been selected).
l. (Auto-Return possible) Accessibility (AODA) has been considered for this purchase:
(required for non-catalogue orders only) Select this box if you have considered
accessibility (Accessibility for Ontarians with Disabilities Act) requirements for the

19 acQuire Training Requester Guide
purchase. If you have not considered accessibility and therefore have not checked this
box, the Requisition will auto-return to you at the time of submission.
i. The accessibility hub:
http://www.queensu.ca/accessibility/facultystaff/procurement
ii. SPS website: http://www.procurement/procurement-accessible-goods-and-
services
m. Chartfield will change on invoice: Select this box if the chartfield you need the future
related invoice(s) remitted from for the Requisition will be different from those you
have assigned to the Requisition (ie. You’ve put a placeholder chartfield on the
Requisition, but the invoice(s) will need to be remitted from something different). The
incoming invoice(s) will be stopped in an AP review at the voucher stage and you will be
contacted with a request for the new chartfield details to be applied to the payment.
n. Requires Invoice Approval: All invoices over $10,000 will automatically (by acQuire
voucher workflow) be stopped and approvals requested from signing authority
approvers before released for payment, but invoices under $10,000 will not be (unless
they are service related). Select this box if you want the anticipated under $10,000
invoice(s) for this order to be approved before being paid.
CFI Section:
The fields in this section should be filled in when the purchase is CFI funded and CFI chartfields are to be
assigned to the Requisition. Some information will need to be entered here, and other pieces entered
elsewhere (within the Accounting Codes tab).
Click the “edit” button to access/update the fields in this section, then “Save” if you make
edits or “Cancel” to discard the window
a. Net Price (minus educational and in-kind discount): The cash consideration paid or
payable by an institution
b. In-Kind Amount: A non-monetary resource that an external partner offers as a
contribution toward a CFI funded project. It may include the value, in whole or in part,
of eligible capital items or non-capital items that are needed to bring the infrastructure

20 acQuire Training Requester Guide
into service. The eligible in-kind contribution is equal to the fair market value of the item
less the net selling price (if any).
c. CFI Project #: The number assigned in the application process (different from the CFI
Account number, which is typically 301xxx).
d. Line Item #: All CFI purchases must contain a line item # that corresponds with the line
item number as approved by CFI. For example, CFI approved budget line 1 – please
enter 98001 (All line items begin with 980xx).
Shipping & Billing Sections:
These sections should have been completed via the Shipping & Billing tabs mentioned previously, but if
not, can be completed/edited here (see above instructions on Shipping/Billing if necessary).
Payment Method Section:
This section should be utilized if you have specific payment method requirements for the expected
invoice(s).
Click the “edit” button to access/update the fields in this section, then “Save” if you make
edits or “Cancel” to discard the window
a. Override Default Payment Method: Click the dropdown menu to access a list of other
available payment methods to have the expected remittance come from for a supplier,
if the supplier has indicated this is necessary. If the supplier currently isn’t set up for the

21 acQuire Training Requester Guide
method you override to, the method will have to be set up on the supplier profile (to be
done by acQuire/Financial Services team members).
b. Instructions to be Printed on Cheque Stub (70 Characters): If you need specific
instructions to be printed on the expected cheque, indicate them here (you have up to
70 characters space).
c. Deliver on Campus: If you need the expected cheque to be delivered somewhere on
campus rather than directly to the supplier, click this box.
Accounting Codes Section (header level):
This section should be blank, as specific line-item account codes should have been populated within the
Accounting Codes tab. If codes are appearing here (because you’ve saved default chartfield codes on
your profile) they will be overruled by any values assigned to the line items on your order.
Internal Notes and Attachments Section:
This section should be populated with notes/comments for Queen’s users only – not for suppliers to
view. P0001 forms, competitive quotations, notes for Approvers or Procurement Buyers should be
indicated here. Any communication you want to be relayed to the Queen’s Accounts Payable team,
should be added here as well (the AP team will see Internal Notes easier than “comments”).
Note: Queen’s Procurement Policy should be adhered to when determining what supporting notes or
documentation you require for your purchase.

22 acQuire Training Requester Guide
Procurement Policy:
Up to $9,999 - If you cannot purchase your good or service through an acQuire catalogue supplier, use a
Queen’s Procurement Card (PCard) to purchase goods or services (excluding consulting services and CFI
Orders) up to $10,000.
$10-000 - $49,999 - Two (2) invitational quotations are mandatory for purchases of goods and or non-
consulting (“professional”) services over $10,000 and under $50,000. Purchases must be processed using
a duly authorized Purchase Order.
$50,000 - $99,999 - Three (3) invitational quotations are mandatory for purchases of goods or non-
consulting (‘professional’) services over $50,000. Purchases must be processed using a duly authorized
Purchase Order.
$100,000 and greater - Open Competitive (RFP) process is mandatory. Contact Strategic Procurement
Services for assistance.
*please note: multiple quotations are not required for purchases made from a Vendor with an
established Vendor of Record (VOR) contract. VOR contracts and threshold requirements can be found
at http://www.queensu.ca/procurement/preferred-suppliers. If you have additional questions, please
contact Strategic Procurement Services.
Notes: Click the “edit” button to access/update the fields in this section (expand to view a
bigger note section or clear to remove what you’ve written), then “Save” if you’ve made
edits or “Cancel” to discard the window.
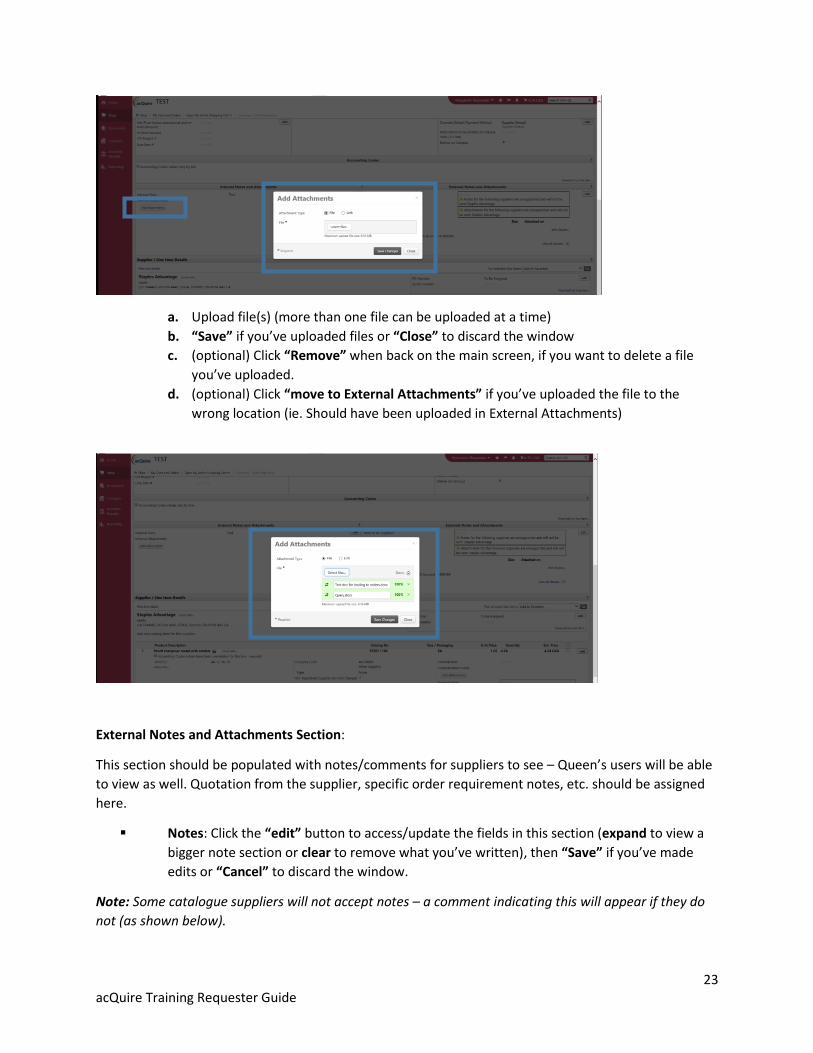
Attachments: Click the “Add Attachments” button to access the attachment upload tool
a. Click “Select files” to browse for the file you want to upload
23 acQuire Training Requester Guide
a. Upload file(s) (more than one file can be uploaded at a time)
b. “Save” if you’ve uploaded files or “Close” to discard the window
c. (optional) Click “Remove” when back on the main screen, if you want to delete a file
you’ve uploaded.
d. (optional) Click “move to External Attachments” if you’ve uploaded the file to the
wrong location (ie. Should have been uploaded in External Attachments)
External Notes and Attachments Section:
This section should be populated with notes/comments for suppliers to see – Queen’s users will be able
to view as well. Quotation from the supplier, specific order requirement notes, etc. should be assigned
here.
Notes: Click the “edit” button to access/update the fields in this section (expand to view a
bigger note section or clear to remove what you’ve written), then “Save” if you’ve made
edits or “Cancel” to discard the window.
Note: Some catalogue suppliers will not accept notes – a comment indicating this will appear if they do
not (as shown below).

24 acQuire Training Requester Guide
Attachments: Click the “Add Attachments” button to access the attachment upload tool
a. Click “Select files” to browse for the file you want to upload
b. Upload file(s) (more than one file can be uploaded at a time)
c. “Save” if you’ve uploaded files or “Close” to discard the window
d. (optional) Click “Remove” when back on the main screen, if you want to delete a file
you’ve uploaded
e. (optional) Click “move to Internal Attachments” if you’ve uploaded the file to the
wrong location (ie. should have been uploaded in Internal Attachments)
PO Clauses: Clauses are standard comments loaded in the system and can be added to your
order as applicable. The “UPS Acct# - Queen’s Preferred” clause will be added to every
Purchase Order as a default.
a. Click “Edit Clauses”
b. Click in the checkbox within the “Assigned” column to assign a clause to your order
c. Click “Save” to secure your selection or “Close” to back out of the pop-up

25 acQuire Training Requester Guide
Supplier/Line Item Details Section:
This section details the supplier information and product details.
Supplier “more info”: Provides further detail of the chosen supplier
“Add non-catalog item for this supplier”: If you decide at this point you need to add more
(non-catalogue) product lines to the Requisition (like a shipping, freight, delivery or

26 acQuire Training Requester Guide
installation charge), select this link. See the “Shopper Training Guide” for further details on
creating/adding non-catalogue Requisitions & product lines.
Product “more info”: Provides further detail on the product you have assigned to the order.
If the order is non-catalogue, this link opens up to the original non-catalogue creation
screen so you can update pricing, quantity, currency, etc.

27 acQuire Training Requester Guide
Line level edit: Click the “edit” button on the line level to adjust line item quantities, add
internal notes or external notes specific to the line item (this is useful if you are creating a
multi-supplier order and need to upload notes specific to the line item only).
Note: This is also where Enhanced Requesters and Tax Review acQuire team members can access
detailed tax treatment fields.
Actions for “selected line items”: Select items at the line level, then click the “For selected
line items” dropdown menu to access/use the available options here.
a. Add to Favourites -> Adds selected item to your favourites list for further use
b. Remove Selected Items -> Removes the selected item from your cart
c. Remove All Items -> Removes all items from your cart
d. More to Another Cart -> Moves selected item to another one of your carts
e. Add to Draft Cart or Pending PR/PO -> Moves selected item to one of your draft carts or
Pending Requisitions
f. Line Item History -> Provides the history of activity for the selected line item
g. Change Commodity Code -> Provides the option to change the commodity code for the
line item good or service

28 acQuire Training Requester Guide
Supplier only fields: Mentions a PO Number will be assigned (by the system), and allows for
a Quote Number to be entered into the “Quote number” field.
History Tab
The History tab lists ALL the details of the activity on the Requisition, complete with date & time stamps,
users who accessed the document and what activity specifically occurred on the document.
Each document in the system (Requisition, Purchase Order, Voucher) has a History tab.
Information found here can be exported as a CSV file for reviewing/saving.
This is a location you can review to see if your Requisition has auto-returned for any reason and find out
the details why (ie AODA checkbox not selected, CFI section not filled in, Requisition budget error).
29 acQuire Training Requester Guide
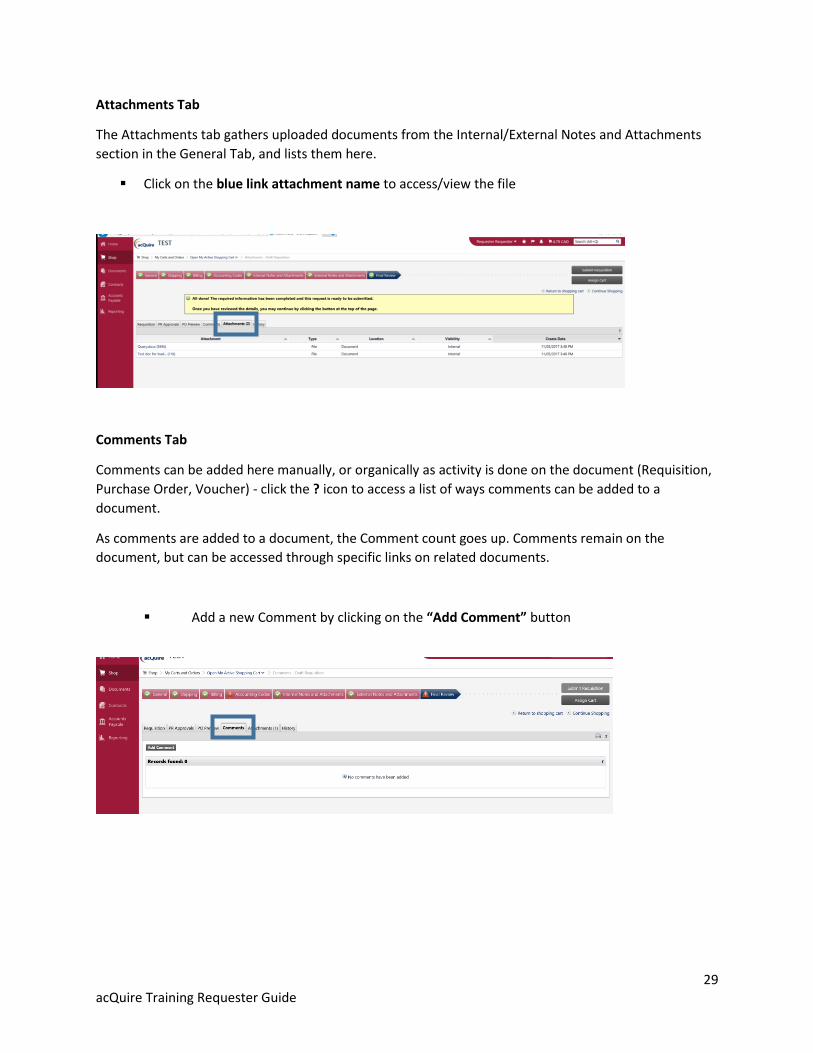
Attachments Tab
The Attachments tab gathers uploaded documents from the Internal/External Notes and Attachments
section in the General Tab, and lists them here.
Click on the blue link attachment name to access/view the file
Comments Tab
Comments can be added here manually, or organically as activity is done on the document (Requisition,
Purchase Order, Voucher) - click the ? icon to access a list of ways comments can be added to a
document.
As comments are added to a document, the Comment count goes up. Comments remain on the
document, but can be accessed through specific links on related documents.
Add a new Comment by clicking on the “Add Comment” button

30 acQuire Training Requester Guide
PO Preview Tab
The PO Preview tab provides a basic preview of the Purchase Order(s) that will be created from the
Requisition.
PR Approvals Tab
The PR Approvals tab provides details of what approval workflow the Requisition will go through, who
has approved aspects of the Requisition and where the Requisition sits awaiting approval (and from
whom).
The specific workflow steps the Requisition will need to go through will be confirmed and updated once
the Requisition has been submitted, but can be viewed at any time throughout the order creation as
well.
The descriptions surrounded by text boxes are called “Workflow buckets”.
Click on the “view approvers” link if it is available in a workflow bucket, to see what approvers
will be/have been notified of the order and are required to review/approve for that workflow
step.
Note: Again, the workflow steps will be finalized and updated once the Requisition has been submitted
and a Requisition ID is assigned. Come back to this tab after the Requisition has been submitted to get a
clear picture of the related workflow.

31 acQuire Training Requester Guide
Step4: Submit (or Assign) the Requisition
Once all the progress bar tabs have green check marks and you are satisfied the order is completed, you
can Submit the Requisition OR Assign the Requisition to another Requester (for their review, then
assignment back to you, OR so they can submit the Requisition).
Assign Cart (optional)
Instead of submitting the order, a Requester can “Assign Cart” to another Requester for review/order
submission.
Click “Assign Cart”
Search for Assignee
Type in a note for the assignee
Click “Assign”

32 acQuire Training Requester Guide
Submit
Click “Submit Requisition”
Once submitted, you will receive a “Requisition Submitted” page, detailing your Requisition
ID, Requisition date and links to access the Requisition again.

33 acQuire Training Requester Guide
Step5: Review the Requisition
If you have chosen to submit the Requisition, you can then review it either to check the workflow steps
it is going through or print/save copies of the Requisition.
Print a Copy of Requisition (optional)
Printing a copy of your Requisition is completely optional, because the Requisition details will always be
stored within acQuire.
To view a printable version of the Requisition, click on the printer icon
Check Requisition Workflow Step
Review the Requisition to see that it hasn’t auto-returned, and that it has successfully entered workflow.
Check the “status” to see what workflow stage the Requisition is in
Check the PR Approvals tab to see further details of what workflow step the Requisition
is in

34 acQuire Training Requester Guide

35 acQuire Training Requester Guide
NEXT STEPS
Approver(s) Notified
Once a Requisition enters workflow, applicable notifications will trigger to Approvers who will be able to
log into acQuire and perform a review/approval/return of the Requisition.
The following screenshot details what Approvers will see when notified of an acQuire Requisition
requiring their attention.
Workflow Notification(s)
Once your Requisition has completed workflow steps, you will/can be notified within acQuire and/or via
email.
Preferences for how you would like to be notified can be set up on your profile at any time.

36 acQuire Training Requester Guide
A fully approved Requisition workflow can look as follows.
PO Creation
Once a Requisition has completed all necessary workflow steps and become a Purchase Order (“Create
PO” workflow step is complete), the related PO ID can be located back on the Summary tab of the
Requisition.
Click on the PO ID to view the Purchase Order details and related workflow steps the PO will go
through/has gone through.

37 acQuire Training Requester Guide
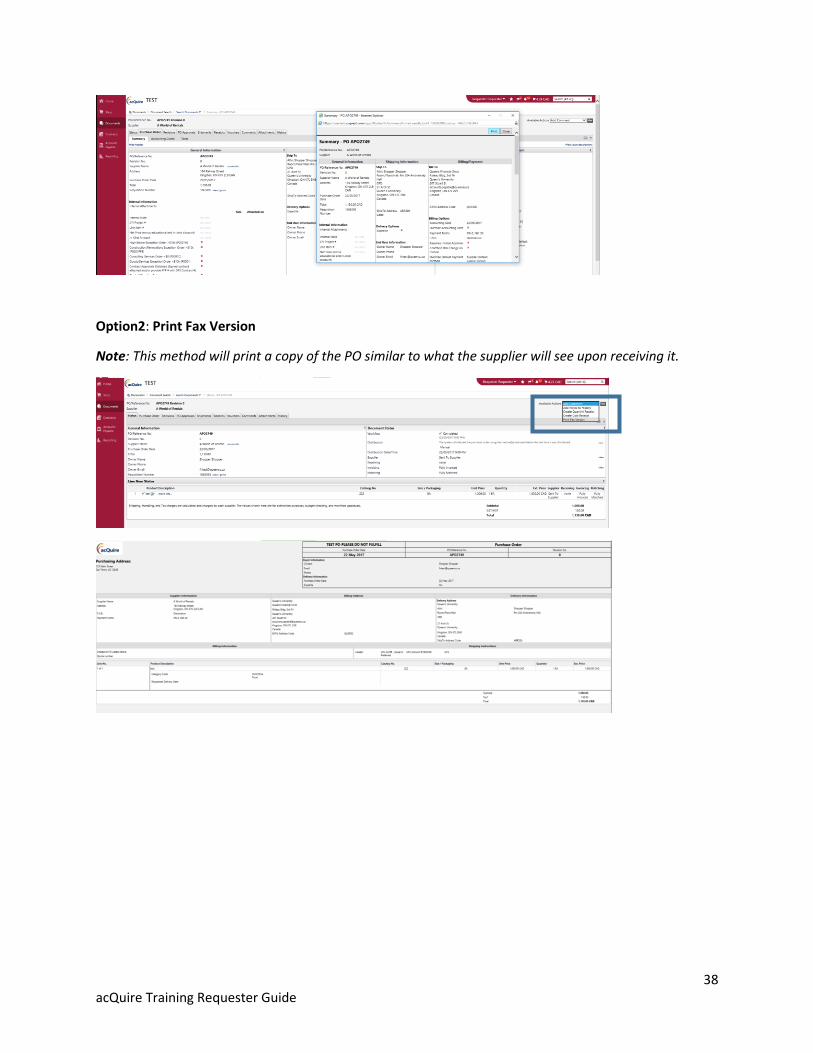
Print/Save a Copy of Purchase Order (optional)
Printing or saving a PDF copy of your Purchase Order is completely optional, because the Purchase Order
details will always be stored within acQuire.
Note: The Purchase Order will be issued to the supplier through the acQuire system – you are not
required to dispatch the PO to the supplier directly, nor should you as doing so would be a risk to order
duplication. If you need a PO resent to a supplier, please contact the acQuire support team.
There are two ways to print a copy of a your PO:
Option1: Printer Icon
Note: This method is not the version the supplier will receive
To view a printable version of the Purchase Order, click on the printer icon
Note: The information printed this way will only contain details for the tab you are on at the
moment of printing. If you want to see a version of the PO that the supplier will see, proceed
to Option2.
38 acQuire Training Requester Guide
Option2: Print Fax Version
Note: This method will print a copy of the PO similar to what the supplier will see upon receiving it.
39 acQuire Training Requester Guide
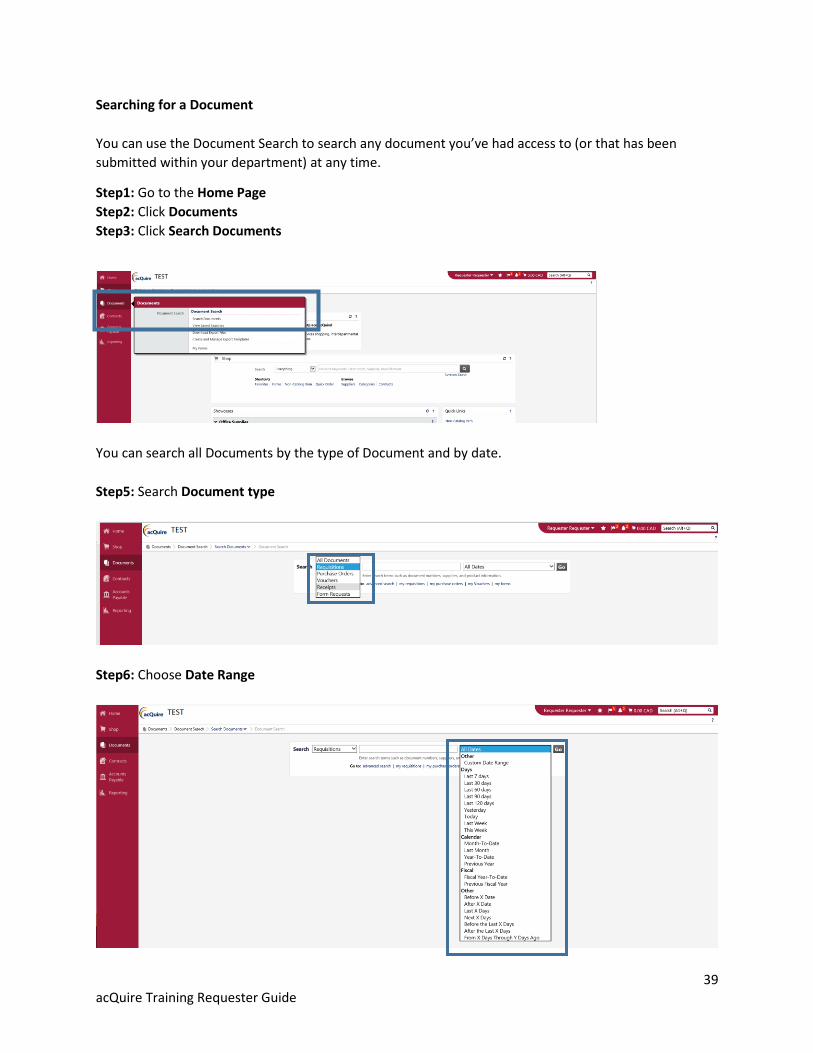
Searching for a Document
You can use the Document Search to search any document you’ve had access to (or that has been
submitted within your department) at any time.
Step1: Go to the Home Page
Step2: Click Documents
Step3: Click Search Documents
You can search all Documents by the type of Document and by date.
Step5: Search Document type
Step6: Choose Date Range

40 acQuire Training Requester Guide
Step7: Click Go
Step8: Review the results, access the document you want to