rekall and grr - dfrws...we will install from source and build our own clients. we run all...
TRANSCRIPT

Rekall and GRRSearching for evil, together!
Michael CohenGoogle Inc

Rekall - What is it?● A suite of Digital Forensic/Incident Response tools:
○ Pmem suite of memory acquisition tools.■ MacPmem - only driver (commercial or opensource) that works with latest OSX.■ WinPmem - the most advanced and reliable windows memory acquisition tool.■ LinPmem - Linux acquisition driver (We usually use /proc/kcore though).
○ Live analysis capability:■ Automatically load driver and access raw memory without taking an image first.■ Used for triaging and collecting a more complete image.■ Focus on automated acquisition with live analysis.
○ The largest repository for memory analysis profiles:■ Rekall usually autodetects the right profile to use automatically.
○ Focus on user experience.■ Automate as much as possible■ Provide a complete working environment with a user friendly interface.

Installing Rekall
$ virtualenv /path/to/MyEnvNew python executable in /path/to/MyEnv/bin/pythonInstalling setuptools, pip...done.$ source /path/to/MyEnv/bin/activate$ pip install --upgrade setuptools pip wheel$ pip install rekall
On Windows:
● Install Python MSI from python.org● Install Microsoft compiler from
http://aka.ms/vcpython27● There is also a pyinstaller built single binary.

Workshop Notes
In this workshop we work in "Stand alone" mode.
● Because we don't want to rely on wireless.● All dependencies were previously
downloaded into a directory on the thumbdrive (wheelhouse):○ pip download rekall
● We can install from this directory instead of the pypi index:○ set PIP_FIND_LINKS=XXX○ set PIP_NO_INDEX=y○ pip install rekall

PIP Crash course
● PIP is the python packaging tool.○ pip install rekall - fetches Rekall and all its dependencies from
the public index.● Installing offline:
○ pip download rekall - downloads Rekall and all dependencies to the current directory then,
○ pip install -f wheelhouse rekall - fetches packages from local directory before the index.
○ set PIP_FIND_LINKS=e:\wheelhouse - Implicitly adds the -f flag to all pip commands.

Running Rekall for the first time.
● Rekall offers command line help○ rekall --help
● For this exercise we run Rekall in live mode.○ For this workshop we recommend using
the -v flag to see what Rekall is doing under the covers.
○ There are two modes currently:■ rekall -v --live API■ rekall -v --live Memory

Working Offline Rekall normally fetches the needed profile from the repository over the network.
What if I want to work offline or my internet connection sucks?
$ git clone https://github.com/google/rekall-profiles.git
Or download the zip file from the github page: https://github.com/google/rekall-profiles/archive/master.zip
Edit ~/.rekallrc:profile_path: - /path/to/my/rekall-profiles/
Note: For this workshop I have provided a copy of the main branch on the thumbdrive. Unzip it somewhere and point Rekall at it if the internet does not work for you. (c:\python27\python -m zipfile -e foo.zip path)

Rekall tips Use command completion by typing tab twice
Follow the name of a command by ? for help

Rekall profiles
What is a profile?
● OS specific information required for parsing the specific image involved.○ Every OS version has a unique profile.
● Profiles live in the profile repository - stored as JSON data files.○ Profile repository currently has
■ > 2000 windows profiles■ > 600 Linux profiles■ > 50 OSX profiles.
● Rekall autodetects the needed profile by itself.

Memory Analysis - Lightning introduction.

(1) What is memory and how does it work?

Handmade Core memory

Physical physical memory
Z80 RAM chip under microscope

Logical view of memory
Computer Block Diagram

System Boot: Part I1. The hardware sets up DMA2. BIOS is loaded, and assigns
addresses to devices3. A Physical Memory Layout map is
built and stored in RAM4. (EFI) BootServices exits and leaves
behind a copy5. Registers are configured with high
and low pointers to MMIO and DMA6. Boot loader is started and the boot
process ends

Reading reserved memory will blow up your computer.

(2) Virtual Memory

Boot Process: Part II● The CPU starts in Real
Mode○ 16 bits○ Addresses are real○ 1 MiB addressable
● The kernel writes early page tables, setting up “identity mapping”
● CR3 value is set to address of (Page) Directory Table Base (DTB)
● Switch to protected mode

Boot Process: Part II cont.● In protected mode:
○ 32 bits○ Jumps are absolute○ Segment registers work○ 4 GiB addressable○ Addresses are virtual
● On 64 bit, kernel further switches to long mode:○ 64 bits (48 bit pointers)○ Jumps are relative
○ Large (but not as large as you
think) amounts of memory addressable

Virtual Memory● Each process/task has a
DTB pointer● CR3 values are
swapped on context switch
● Result: each process sees different memory
● Kernel (upper half) can see all and be seen by all

Navigating our way through memory
In the next exercise we navigate our way through memory to get a feel to how physical memory relates to virtual memory. There are some useful plugins:
● cc - Switch the process context to the process address space.○ Makes the dis (disassembler), dump (hexdump a region of memory),
address resolver etc - work with the specified process context.● Rammap - just prints what each physical page is doing.● vtop - Shows the Virtual to physical address translation process● ptov - Translates the physical address to its virtual addresses.● vad - Shows each process's memory regions and what they are used for.

The rammap plugin
File mapped into a process
Private memory for a process

The ptov plugin
File mapped into a process
This file is still mapped into memory but not in any process! This file is in the file cache.

Example 2: Shared pages
Lets look at the lsass.exe process.

Switch context to lsass.exe

Find physical address for a virtual address
Rekall is showing all the steps in translating the virtual address to a physical address.
NOTE: This depends on the currently loaded process context.

Find virtual address for a physical address
Note that the same physical page can be mapped in many processes at the same time - shared memory.
The file ntdll.dll is mapped in every process in windows. In theory it does not have to be mapped to the same address but it seems to be.

Questions
1. Can I dump files from memory?
Yes, but ....
2. What happens when a dll is patched in memory?
Page goes from shared to private (Copy on write).
3. My yarascan is showing an interesting string in physical memory. Who owns it?

Live analysis and TriagingAs memory sizes get bigger it is becoming more important to triage analysis before acquisition.
rekall --liveInsert memory drivers and gain access to raw physical
memory.
rekall --live APILoad the API analysis mode. Analysis is done using the OS APIs.

rekall ---liveInserts driver to gain access to physical memory.
Operates against physical memory instead of image.

rekall ---live APIUses OS APIs to analyse memory.

API access Vs. Memory analysisAPI Access:
● Will always work.● Does not need profiles.● Very fast.● Not very thorough - can only
see what the OS APIs allow.● More susceptible to malware
manipulation.● Fewer plugins available (Let's
write more!)
Memory analysis
● May fail due to profile issues.● Needs profiles with debugging
info.● Less fast.● Can perform deep analysis
(undocumented structs).● Less susceptible to
anti-forensics.

Memory acquisition
● After initial triage we would like to acquire memory.○ Capture system state
for later analysis.

Winpmem acquisition❖ Winpmem is a C++ self contained acquisition tool.
➢ Small footprint.➢ Minimal analysis.
❖ Usage examples:➢ AFF4 Zip file: winpmem -o output.aff4 -c snappy➢ AFF4 Directory: winpmem -o output.dir\ -c snappy➢ Raw, padded format in a zip file: winpmem -o output.aff4 --format raw➢ Raw, padded format in a directory: winpmem -o output.dir/--format raw
More information:
http://rekall-forensic.blogspot.ch/2016/05/the-pmem-suite-of-memory-acquisition.html

Acquisition through Rekall● Rekall itself may be used to acquire memory.
○ This allows triaging and analysis to be done prior to acquisition.○ Allows Artifact Collector to be used (more on that later).

Structured output● Most Rekall plugins produce tabular output:
What if we wanted to customize the output?

Structured output● We can describe each plugin output

Efilter queriesEfilter queries are SQL like but the plugins are executed immediately

Rekall response plugins
When operating in live mode it is possible to execute many incident response plugins through Rekall:
glob - search for files using a glob expression.
file_yara - Apply yara signatures on files.
wmi - Run WMI queries
and many more.

Run a yara rule against all executables in the windows directory.
rule r1 { strings: $a = "Microsoft" wide condition: any of them}
select path.filename from glob("c:\windows\*.exe")
select * from file_yara( paths: (select path.filename from glob("c:\windows\*.exe")).filename, yara_expression: "rule r1 {strings: $a = \"Microsoft\" wide condition: any of them}")
Yara rule
Path glob

Glob for all *.exe files in the windows directory, and yara scan them for "Microsoft" encoded in UTF16.
glob "c:\windows\*.exe"
Now use the search plugin to insert query parameters:
plugins.search('select * from file_yara(paths: (select path.filename from glob("c:\windows\*.exe")).filename, binary_string: {str})', query_parameters=dict(str="Microsoft".encode("utf-16-le").encode("hex")))

Example - process listing through WMI● WMI plugin allows arbitrary
WMI queries to be issued.● There are many resources for
good IR WMI queries to issue.● The wmi plugin allows to
specify a different base object

Excercise - Use WMI1. List local user accounts.2. List installed hotfixes.3. Which AV product is installed?4. What are the MAC addresses? What IP addresses are currently assigned?
WMI is a very powerful IR tool!
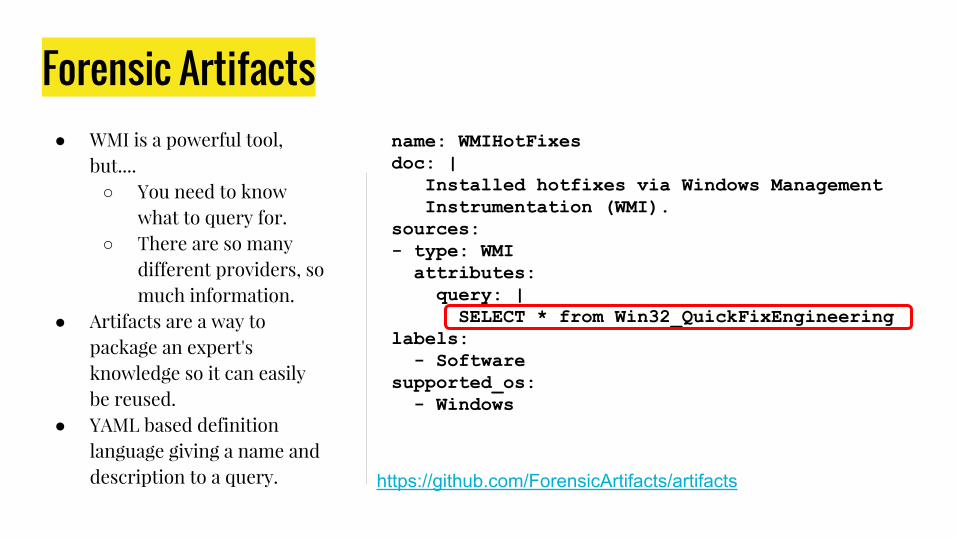
Forensic Artifacts● WMI is a powerful tool,
but....○ You need to know
what to query for.○ There are so many
different providers, so much information.
● Artifacts are a way to package an expert's knowledge so it can easily be reused.
● YAML based definition language giving a name and description to a query.
name: WMIHotFixesdoc: | Installed hotfixes via Windows Management Instrumentation (WMI).sources:- type: WMI attributes: query: | SELECT * from Win32_QuickFixEngineeringlabels: - Softwaresupported_os: - Windows
https://github.com/ForensicArtifacts/artifacts

Also available with Images
Forensic Artifacts
Available in Live Mode
● Artifacts maintained in a public repository.● Rekall automatically checks latest artifacts
definitions from profile repository.● Types of artifacts available:
○ FILE - Collect files○ REGISTRY_KEY/REGISTRY_VALUE○ WMI
○ REKALL_EFILTER - Run Rekall plugin and collect output.
○ ARTIFACT_GROUPS - A way to group similar artifacts.

Forensic Artifacts

REKALL EFILTER artifacts
name: WindowsKernelModulesLoadPathdoc: | On windows, kernel modules should be loaded from the Windows directory. This artifact locates modules which are not loaded from this location. Such kernel modules might be suspicious because they are loaded from temporary paths or dropped by first stage loaders.
sources: - type: REKALL_EFILTER attributes: query: > select offset_v, file_name, module_base, module_size, path from modules() where not (path =~ "(?i)Windows") image_type: - Windows type_name: modules fields: - name: offset_v type: int style: address - name: file_name type: unicode - name: module_base type: int style: address - name: module_size type: int style: address - name: path type: unicode

Collecting Artifacts

Collecting Artifacts - ARTIFACT_GROUPS

Collecting Artifacts - Collecting files

Collecting Artifacts - Collecting timelines
Load the timeline into Timesketch https://github.com/google/timesketch

Timesketch - a timeline analysis tool

Timesketch - a timeline analysis tool

GRR Response Rig

What is GRR ● GRR Is an Agent based incident response framework.
● Agents deployed in advance● Agents poll the server for jobs● Server schedules
○ Jobs for specific clients.○ Hunts to search for indicators on all
clients.

Architecture● Client
○ grr_client + client components
● Frontend Server○ grr_server --component http_server
● Admin UI○ grr_server --component ui
● Worker○ grr_server --component worker
● Console○ grr_console

Workshop● In this workshop we will learn about GRR internals.● We will install from source and build our own clients.● We run all components by hand and watch debugging messages.● Try to understand how the different components fit together.● In real life you would install on an Ubuntu server with proper systemd
support - logs go to syslog.● For this workshop we assume that we do not have internet connectivity
○ All software is distributed in the wheelhouse.

Install GRR ● Create a new Virtual Env.c:\python27\scripts\virtualenv e:\GRRDev
● Activate it
e:\GRRDev\Scripts\activate
● Install the core of GRR
set PIP_FIND_LINKS=e:\wheelhouse
set PIP_NO_INDEX=1
pip install grr-response-server
Please specify this to make PIP use the local wheelhouse directory. Wifi is really slow and we don't all want to wait.
Please specify this to make PIP ignore the public pypi index.


Initialize the GRR installtion.
● When installing GRR you need○ To generate your own keys.○ Configure your own data store○ Point GRR clients at your public front
end address.○ Build customized clients with your own
configuration.■ GRR comes with many templates for
multiple OS's and versions.■ A template is basically a binary
without a configuration.■ Repacking the template means to
inject the configuration and produce an installable package.

First thing to do: Initialize.

Configure GRR
We will just connect locally - be sure to set hostname to 127.0.0.1

Client Templates
GRR Will normally download all the templates for all supported OSs and then repack them.
For this workshop we will do it by hand because this is a large download and we also want to learn how these are built.
Answer no to download the templates and no to repack them.

Building client templates from source.
We can just build the template and write it into the templates directory.
This template is for windows.

Anatomy of a template.
A template is just a zip file with binaries in it.
build.yaml contains information about the template (architecture, OS, version etc).
You can not install the template yet - you need to repack it.

Repacking the template.
grr_client_build --context "DebugClientBuild Context" repack --output_dir templates --template templates\GRR_3.1.3.0_amd64.exe.zip

Install the client.
Debug client will show exactly what is going on.
Non-debug client has silent install and runtime.
For now stop the service: sc stop "grr monitor"

Build client components

Upload client component
● Components are pushed to the clients.● Components are architecture dependent.
○ File name indicates the architecture.● Clients will refuse to run components which
are not properly signed.● grr_config_updater will sign and upload the
component.

Run the client, frontend and worker.
Use three different shells to run each component. Add the --verbose flag to see exactly what each component is doing.
Don't forget to activate the virtual env in each new terminal.

Start debug client by hand
The client runs with its own configuration file.
Windows clients are configured through the registry.

The end.