refrigerators top-freezer
TRANSCRIPT

Safety Information . . . . . . . . . . .2, 3For Australia and New Zealand . . .24
Operating InstructionsAutomatic Icemaker . . . . . . . . . . . .8Care and Cleaning . . . . . . . . . . .9, 10Shelves . . . . . . . . . . . . . . . . . . . . .5, 6Storage Drawers . . . . . . . . . . . . . .7, 8Temperature Controls . . . . . . . . . . .4
Installation InstructionsFor Australia and New Zealand . . . . . . . . . . . . . .25–27Preparing to Installthe Refrigerator . . . . . . . . . . . . . . .11Reversing the Door Swing . . . .14–20Water Line Installation . . . . . .12, 13
Troubleshooting TipsBefore You Call for Service . . .21–23Normal Operating Sounds . . . . . .21
EXPORT 162D7739P009 49-60356 01-05 JR
Write your model and serial numbers here:
Model # ____________________________
Serial # ____________________________
You can find them on a label on the upperleft side of the fresh food compartment.
RéfrigérateursCompartiment congélation supérieur
Manuel d’utilisation et d’installation
La section française commence à la page 29
FrigoríficosCongelador superior
Models 16, 17
Owner’s Manual andInstallation Instructions
Manual del propietarioe instalación
La sección en español empieza en la página 53
RefrigeratorsTop-Freezer
æ˘Á›·Ì ÕÓˆ ∫·Ù·„‡ÎÙË
∂Á¯ÂÈÚ›‰ÈÔ √‰ËÁÈÒÓÃÚ‹Û˘ Î·È √‰ËÁÈÒÓ
∂ÁηٿÛÙ·Û˘
To ∂ÏÏËÓÈΕ ÎÂÊ¿Ï·ÈÔ ·Ú¯›˙ÂÈ ÛÙË ÛÂÏ›‰·77
ªÔÓ٤Ϸ 16, 17

WARNING!Use this appliance only for its intended purpose as described in this Owner’s Manual.
SAFETY PRECAUTIONSWhen using electrical appliances, basic safety precautions should be followed, including the following:
�� This refrigerator must be properly installed and located in accordance with the InstallationInstructions before it is used. Also see the How To Connect Electricity section.
�� Do not attempt to stand on top of the refrigerator.Doing so may result in bodily injury or damage tothe refrigerator.
�� Do not allow children to play with the refrigeratoror tamper with the controls.
�� Do not allow children to climb, stand or hang on the shelves in the refrigerator. They coulddamage the refrigerator and seriously injurethemselves.
�� Do not touch the cold surfaces in the freezercompartment when hands are damp or wet. Skin may stick to these extremely cold surfaces.
�� Do not store or use gasoline or other flammablevapors and liquids in the vicinity of this or anyother appliance.
�� Keep fingers out of the “pinch point” areas;clearances between the doors and between the doors and cabinet are necessarily small. Be careful closing doors when children are in the area.
�� In refrigerators with automatic icemakers, avoid contact with the moving parts of the ejector mechanism, or with the heating elementthat releases the cubes. Do not place fingers orhands on the automatic icemaking mechanismwhile the refrigerator is plugged in.
�� Unplug the refrigerator before cleaning andmaking repairs.
NOTE: We strongly recommend that any servicing beperformed by a qualified individual.
�� Before replacing a burned-out light bulb, therefrigerator should be unplugged in order to avoidcontact with a live wire filament. (A burned-outlight bulb may break when being replaced.)
NOTE: Turning the control to the 0 position does not remove power to the light circuit.
�� Do not refreeze frozen foods which have thawed completely.
2
PROPER DISPOSAL OF THE REFRIGERATORChild entrapment and suffocation are not problemsof the past. Junked or abandoned refrigerators arestill dangerous…even if they will sit for “just a fewdays.” If you are getting rid of your old refrigerator,please follow the instructions below to help preventaccidents.
Before You Throw Away Your Old Refrigeratoror Freezer:� Take off the doors and discard separately.
� Leave the shelves in place so that children may not easily climb inside.
� If the refrigerator has a lock, make it unusable.
RefrigerantsAll refrigeration products contain refrigerants, whichunder federal law must be removed prior to product disposal. If you are getting rid of an old refrigeration product, check with the companyhandling the disposal about what to do.
DANGER! RISK OF CHILD ENTRAPMENT
IMPORTANT SAFETY INFORMATION.READ ALL INSTRUCTIONS BEFORE USING.

3
WARNING!HOW TO CONNECT ELECTRICITY
The power cord of this appliance is equipped withan earthing plug which mates with a standardearthed wall outlet to minimize the possibility ofelectric shock hazard from this appliance.
Have the wall outlet and circuit checked by aqualified electrician to make sure the outlet isproperly earthed.
Where an unearthed wall outlet is encountered, it is your personal responsibility and obligation tohave it replaced with a properly earthed wall outlet.
The refrigerator should always be plugged into itsown individual electrical outlet.
This provides the best performance and alsoprevents overloading house wiring circuits whichcould cause a fire hazard from overheated wires.
Please refer to the rating plate on the refrigeratorfor the correct voltage, wattage and frequency.
If the product plug does not fit your outlet, the productshould be fitted with a new plug.
IMPORTANT: The refitting of electric plugs and cables should bedone by a qualified technician or service agent. In some countriesthe refitting of electric plugs and cables is only permitted when thework is completed by a qualified technician.
If the power supply cord becomes damaged, it must bereplaced by a qualified service agent in order to avoid a safety hazard.
Never unplug your refrigerator by pulling on thepower cord. Always grip plug firmly and pull straightout from the outlet.Repair or replace immediately all power cords thathave become frayed or otherwise damaged. Do notuse a cord that shows cracks or abrasion damagealong its length or at either end.
When moving the refrigerator away from the wall, becareful not to roll over or damage the power cord.
Mains lead replacementIf the mains lead on your refrigerator needsreplacing at any time, it must be replaced by aspecial lead which is obtainable from your localdealer. A charge will be made for the replacement of the mains lead if you have damaged the lead.
The refrigerator must be positioned so that the plug is accessible.
READ AND FOLLOW THIS SAFETY INFORMATION CAREFULLY.SAVE THESE INSTRUCTIONS
Insure proper earthingexists before using.
Earthing plug
For personal safety, this appliance must be properly earthed.
4
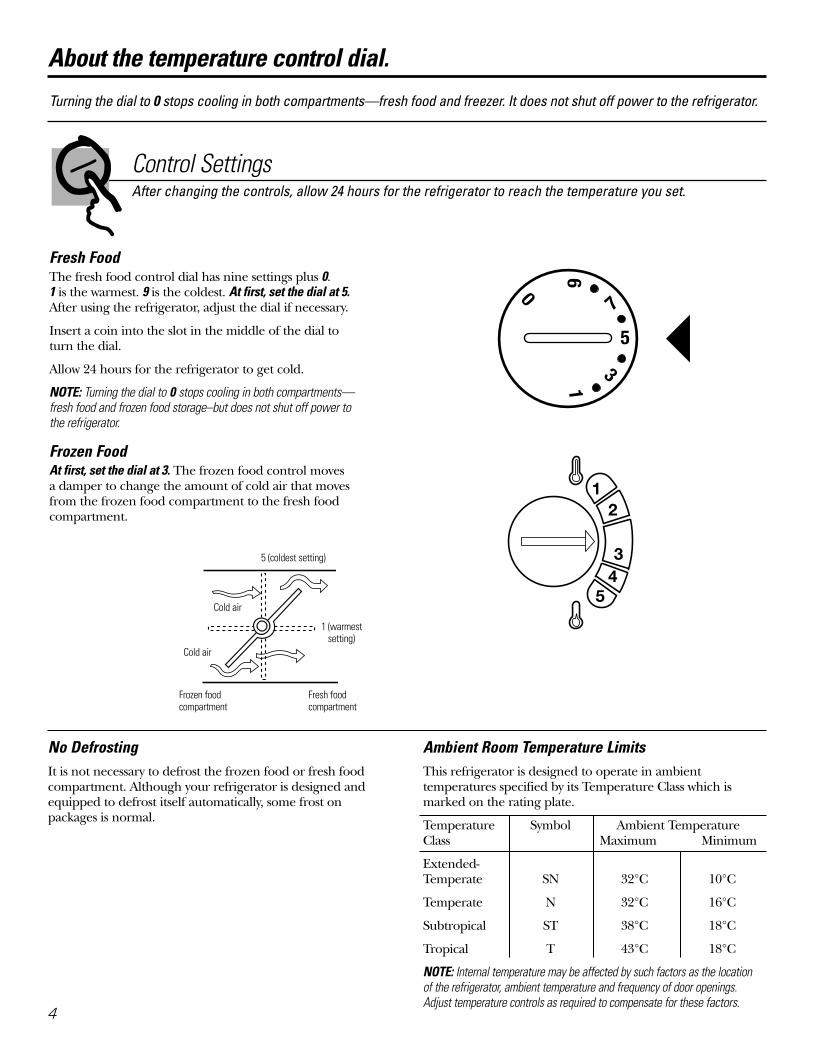
About the temperature control dial.
Control Settings
Turning the dial to 0 stops cooling in both compartments—fresh food and freezer. It does not shut off power to the refrigerator.
After changing the controls, allow 24 hours for the refrigerator to reach the temperature you set.
Frozen foodcompartment
Fresh foodcompartment
5 (coldest setting)
No Defrosting Ambient Room Temperature LimitsIt is not necessary to defrost the frozen food or fresh foodcompartment. Although your refrigerator is designed andequipped to defrost itself automatically, some frost onpackages is normal.
This refrigerator is designed to operate in ambienttemperatures specified by its Temperature Class which ismarked on the rating plate.
Temperature Symbol Ambient TemperatureClass Maximum Minimum
Extended-Temperate SN 32°C 10°C
Temperate N 32°C 16°C
Subtropical ST 38°C 18°C
Tropical T 43°C 18°C
NOTE: Internal temperature may be affected by such factors as the location of the refrigerator, ambient temperature and frequency of door openings.Adjust temperature controls as required to compensate for these factors.
12
34
5
Cold air
Cold air
1 (warmest setting)
Fresh FoodThe fresh food control dial has nine settings plus 0.1 is the warmest. 9 is the coldest. At first, set the dial at 5. After using the refrigerator, adjust the dial if necessary.
Insert a coin into the slot in the middle of the dial to turn the dial.
Allow 24 hours for the refrigerator to get cold.
NOTE: Turning the dial to 0 stops cooling in both compartments—fresh food and frozen food storage–but does not shut off power to the refrigerator.
Frozen FoodAt first, set the dial at 3. The frozen food control movesa damper to change the amount of cold air that movesfrom the frozen food compartment to the fresh foodcompartment.

About the fresh food compartment shelves.Shelf supports at various levels allow you to custom-space your shelves. Not all features are on all models.
Full-Width ShelvesSome models have a steel wire sliding shelf,a stationary tempered glass shelf or two steelwire stationary shelves. These shelves can bemoved to another place in the fresh foodcompartment.
The full-width sliding shelf has stop-locks.When placed correctly on the shelf supports,the shelf will stop before coming completelyout of the refrigerator and will not tilt whenyou place food on it or remove food from it.
To remove the full-width shelves, lift the rearof the shelf and pull forward.
To remove a full-width shelf when the freshfood compartment door cannot be opened fully,lift the rear of the shelf, pull forward anddown, tilt the shelf and take it out.
Half-Width ShelvesOne end of the shelf rests on a molded side-wall support; a bracket on the other endhooks into a track on the rear cabinet wall.
To remove, lift the shelf up at front, then offthe support and out of the track.
To replace, select desired shelf height. Withshelf front raised slightly, hook the bracket’stop lug into the track, then lower the shelfonto the support.
NOTE: The shelf to the right of the track is designedto hook into the right-hand slot; the shelf to the leftis designed to hook into the left-hand slot.
2 Lift up and out
1 Tilt up
5
6
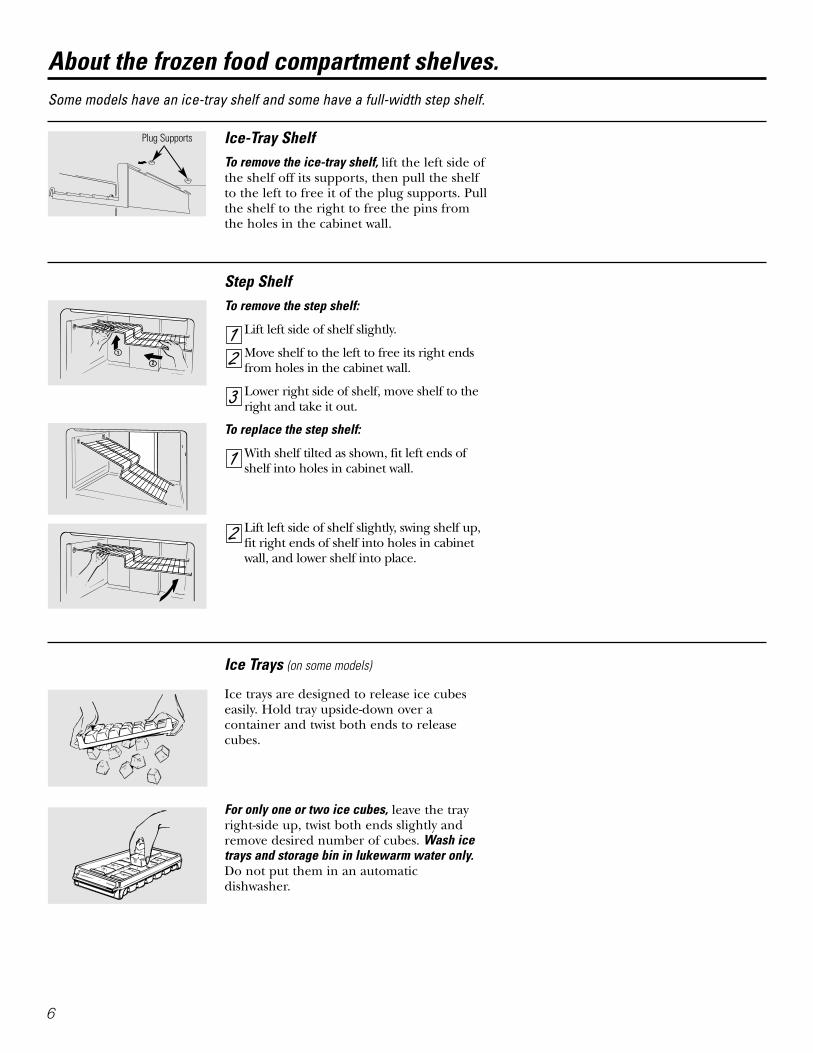
About the frozen food compartment shelves.Some models have an ice-tray shelf and some have a full-width step shelf.
Ice-Tray ShelfTo remove the ice-tray shelf, lift the left side ofthe shelf off its supports, then pull the shelfto the left to free it of the plug supports. Pullthe shelf to the right to free the pins fromthe holes in the cabinet wall.
Step ShelfTo remove the step shelf:
Lift left side of shelf slightly.
Move shelf to the left to free its right endsfrom holes in the cabinet wall.
Lower right side of shelf, move shelf to theright and take it out.
To replace the step shelf:
With shelf tilted as shown, fit left ends ofshelf into holes in cabinet wall.
Lift left side of shelf slightly, swing shelf up,fit right ends of shelf into holes in cabinetwall, and lower shelf into place.
2
1
3
21
Plug Supports
Ice Trays (on some models)
Ice trays are designed to release ice cubeseasily. Hold tray upside-down over acontainer and twist both ends to releasecubes.
For only one or two ice cubes, leave the trayright-side up, twist both ends slightly andremove desired number of cubes. Wash icetrays and storage bin in lukewarm water only.Do not put them in an automaticdishwasher.

About storage drawer and cover removal.Not all features are on all models.
Drawer and Cover RemovalDrawers can be removed easily by graspingthe sides and lifting up slightly while pullingdrawers past the stop location.
Full-Width Drawer with Plastic CoverTo remove the cover, lift it off its supports, pullit forward, tilt it and take it out.
Fruit and Vegetable DrawersExcess water that may accumulate in thebottom of the drawers should be emptiedand the drawers wiped dry.
Utility Drawer The utility drawer can be moved to the mostuseful location for your family’s needs.
7
Freezer Performance
This Refrigerator/Freezer has an overall“Four Star” rating.
Freezer peformance is classified by starratings defined by ISO 8561 STANDARDAND SUMMARIZED BELOW:
CODE
or
FREEZING–LOAD TEMP.(FOOD TEMPERATURE)
Below -6°C.
Below -12°C.
Below -18°C.

8
A newly-installed refrigerator may take 12 to 24 hours to begin making ice.
Icemaker
Feeler Arm
PowerSwitch
Icemaker Accessory KitIf your refrigerator did not already comeequipped with an automatic icemaker, an icemaker accessory kit is available at extra cost.
Check the back of the refrigerator for thespecific icemaker kit needed for your model.
Automatic IcemakerThe icemaker will produce seven cubes per cycle—approximately 100–130 cubes in a 24-hour period, depending on freezercompartment temperature, roomtemperature, number of door openings and other use conditions.
If the refrigerator is operated before thewater connection is made to the icemaker, set the power switch to O (off).
When the refrigerator has been connected to the water supply, set the power switch to I (on). The green power light will come on.
The icemaker will fill with water when it cools to freezing. A newly installedrefrigerator may take 12 to 24 hours to begin making ice cubes.
Throw away the first few batches of ice to allow the water line to clear.
Be sure nothing interferes with the sweep of the feeler arm.
When the bin fills to the level of the feelerarm, the icemaker will stop producing ice.
It is normal for several cubes to be joinedtogether.
If ice is not used frequently, old ice cubeswill become cloudy, taste stale and shrink.
If ice cubes get stuck in the icemaker, the green power light will blink. To correctthis, set the power switch to O (off) andremove the cubes. Set the power switch to I (on) to restart the icemaker.
NOTE: In homes with lower-than-average waterpressure, you may hear the icemaker cycle multipletimes when making one batch of ice.
GreenPower Light
About the automatic icemaker. (on some models)
About storage drawer and cover removal.
Twin Drawers with Glass CoverTo remove:
Remove the drawers.
Reach in, push the front of glass coverup, and at the same time, pull it forwardas far as it will come.
Tilt it and take it out. Avoid cleaning thecold glass cover with hot water because theextreme temperature difference may cause it to break.
Remove the drawer frame. (Alwaysremove the glass cover before you takeout the drawer frame.)
Lift the frame off the supports at each side and back, pull it forward, tilt it and take it out.
To replace:
Lower the frame until it rests on thesupports at each side and back.
Replace the glass cover, pushing its rearedge firmly into the rear frame channeland gently lowering the front into place.
Replace the drawers.3
2
1
3
21

Care and cleaning of the refrigerator.
Cleaning the OutsideThe door handles and trim (on some models).Clean with a cloth dampened with soapywater. Dry with a soft cloth.
Keep the outside clean. Wipe with a cleancloth lightly dampened with kitchenappliance wax or mild liquid dish detergent.Dry and polish with a clean, soft cloth.
Do not wipe the refrigerator with a soiled dish clothor wet towel. These may leave a residue that canerode the paint. Do not use scouring pads, powderedcleaners, bleach or cleaners containing bleachbecause these products can scratch and weaken the paint finish.
Cleaning the InsideTo help prevent odors, leave an open box ofbaking soda in the fresh food and freezercompartments.
Unplug the refrigerator before cleaning.If this is not practical, wring excess moistureout of sponge or cloth when cleaningaround switches, lights or controls.
Use warm water and baking soda solution—about 15 ml of baking soda to 1 liter of water.This both cleans and neutralizes odors. Rinse and wipe dry.
After cleaning the door gaskets, apply a thin layer of petroleum jelly to the doorgaskets at the hinge side. This helps keepthe gaskets from sticking and bending out of shape.
Avoid cleaning cold glass shelves (on some models)with hot water because the extreme temperaturedifference may cause them to break. Handle glassshelves carefully. Bumping tempered glass can causeit to shatter.
Do not wash any plastic refrigerator parts in the dishwasher.
CondenserThere is no need for routine condensercleaning in normal home operatingenvironments. However, in environmentsthat may be particularly dusty or greasy, thecondenser should be cleaned periodicallyfor efficient refrigerator operation.
To clean the condenser, turn thetemperature control dial to 0. Sweep away or vacuum up dust.
For best results, use a brush speciallydesigned for this purpose. It is available at most appliance parts stores.
Cleaning the condenser coils.
Squeeze to release the hook.
Light Bulb Replacement (on some models)
A light bulb and socket are located at thetop of the fresh food compartment oppositethe temperature control panel.
To replace the bulb, first unplug therefrigerator from its electrical outlet. Put your hand under the light shield andrelease the hook at the bulb end of theshield. (The light shield is on some models.)
9

10
Care and cleaning of the refrigerator.Behind the RefrigeratorBe careful when moving the refrigeratoraway from the wall. All types of floorcoverings can be damaged, particularlycushioned coverings and those withembossed surfaces.
Turn the leveling legs at each front corner of the refrigerator counterclockwise until the rollers support the refrigerator. Pull therefrigerator straight out and return it toposition by pushing it straight in. Moving therefrigerator in a side direction may result indamage to the floor covering or refrigerator.
When pushing the refrigerator back, make sure youdon’t roll over the power cord or icemaker supply line(on some models).
After rolling the refrigerator back into place,turn the legs clockwise until the legs againbear the weight of the refrigerator.
Preparing for VacationFor long vacations or absences, remove foodand unplug the refrigerator. Move thetemperature control dial to the 0 position,and clean the interior with a baking sodasolution of 15 ml of baking soda to 1 litre of water. Leave the doors open.
Set the icemaker power switch to O (off) andshut off the water supply to the refrigerator.
If the temperature can drop below freezing,have a qualified servicer drain the watersupply system (on some models) to preventserious property damage due to flooding.
Preparing to MoveSecure all loose items such as grille, shelves and drawers by taping them securely in place to prevent damage.
Be sure the refrigerator stays in an upright positionduring moving.

BEFORE YOU BEGINRead these instructions completely and carefully.
• IMPORTANT – Save theseinstructions for local inspector’s use.
• IMPORTANT – Observe allgoverning codes and ordinances.
• Note to Installer – Be sure to leave theseinstructions with the Consumer.
• Note to Consumer – Keep these instructionsfor future reference.
• Skill level – Installation of this appliance requiresbasic mechanical skills.
• Completion time – Refrigerator Installation15 minutesReversing the Door Swing1 hour
• Proper installation is the responsibility of theinstaller.
• Product failure due to improper installation is notcovered under the Warranty.
• Do not install the refrigerator where the temperaturewill go below 16°C because it will not run often enoughto maintain proper temperatures.
• Install it on a floor strong enough to support it fullyloaded.
REFRIGERATOR LOCATION
Installation RefrigeratorInstructions Models 16, 17
Allow the following clearances for ease of installation,proper air circulation and plumbing and electricalconnections.
• Sides 19 mm• Top 25 mm• Back 25 mm
CLEARANCES
If the refrigerator has an icemaker, it will have to beconnected to a cold drinking water line. A water supplykit is available at extra cost from your dealer.
Installation of the icemaker must be done by aqualified service technician.
WATER SUPPLY TO THE ICEMAKER(on some models)
DIMENSIONS
Model 16 17
A* 1556 mm 1632 mm
B 711 mm 711 mm
C** 787 mm 787 mm
D 1394 mm 1394 mm
E 657 mm 657 mm
F 1346 mm 1346 mm
* Height does not include hinge—Add 22 mm for hinge.** Depth includes handle.
11

12
Installation Instructions
The water line installation is not warranted by therefrigerator or icemaker manufacturer. Follow theserecommendations carefully to minimize the risk ofexpensive water damage.
Water hammer (water banging in the pipes) in houseplumbing can cause damage to refrigerator parts andlead to water leakage or flooding. Call a qualifiedplumber to correct water hammer before installing the water supply line to the refrigerator.
To prevent burns and product damage, do not hook up the water line to the hot water line.
If you use your refrigerator before connecting thewater line, make sure the icemaker power switch is in the O (off) position.
BEFORE YOU BEGIN
INSTALLING THE WATER LINE1
Do not install the icemaker tubing in areas wheretemperatures fall below freezing.
When using any electrical device (such as a powerdrill) during installation, be sure the device isinsulated or wired in a manner to prevent the hazardof electric shock.
All installations must be in accordance with localplumbing code requirements.
Installation of the icemaker must be done by aqualified service technician.
WARNING! Connect to potablewater supply only.
BEFORE YOU BEGIN (CONT.)
Leveling legs near each front corner of the refrigeratorare adjustable. They firmly position the refrigeratorand prevent it from moving when the doors areopened. Leveling legs should be set so the front of therefrigerator is raised just enough that the doors closeeasily when opened about halfway.
Turn the leveling legs clockwise to raise therefrigerator, counterclockwise to lower it.
Rollers next to the leveling legs allow you to move therefrigerator away from the wall for cleaning.
Turn the legs counterclockwise until the weight of therefrigerator is transferred from them to the rollers.After rolling the refrigerator back into place, turn thelegs clockwise until the legs again bear the weight ofthe refrigerator.
ROLLERS AND LEVELING LEGS

13
INSTALLING THE WATER LINE (CONT.)1
Installation Instructions
Place the compression nut and ferrule (sleeve) onto the end of the tubing as shown.
Insert the end of the tubing into the water valveconnection as far as possible. While holding thetubing, tighten the fitting.
Fasten the tubing into the clamp provided to hold it in a vertical position. You may need to pry openthe clamp.
Remove the plastic flexible cap from the water valve.
NOTES:• Before making the connection to the refrigerator,
be sure the refrigerator power cord is notplugged into the wall outlet.
• We recommend installing a water filter if yourwater supply has sand or particles that could clogthe screen of the refrigerator’s water valve. Installit in the water line near the refrigerator.
Remove the access cover.
CONNECT THE TUBING TO THEREFRIGERATOR
1
Reattach the access cover.
Typical CompressionNut
TubingTubing Clamp
Refrigerator Connection
Ferrule (sleeve)
Arrange the coil of tubing so that it does not vibrateagainst the back of the refrigerator or against thewall. Push the refrigerator back to the wall.
TURN THE WATER ON AND PLUGIN THE REFRIGERATOR
2
Set the icemaker power switch to the I (on) position.The icemaker will not begin to operate until itreaches its operating temperature of -9°C or below.It will then begin operation automatically if theicemaker power switch is in the I (on) position.
NOTE: In lower water pressure conditions, thewater valve may turn on up to 3 times to deliverenough water to the icemaker.
START THE ICEMAKER3
Powerswitch

1.1 Unplug the refrigerator from its electricaloutlet.
BEFORE YOU START1
1.2 Empty all door shelves, including the dairycompartment.
CAUTION: Do not let either door drop to thefloor. To do so could damage the door stop.
14
Installation Instructions
REVERSING THE DOOR SWING2
When reversing the door swing:• Read the instructions all the way through before
starting.• Handle parts carefully to avoid scratching paint.• Set screws down by their related parts to avoid using
them in the wrong places.• Provide a non-scratching work surface for the doors.
IMPORTANT: Once you begin, do not move thecabinet until door-swing reversal is completed.
These instructions are for changing the hinges from the right side to the left side—if you ever want tochange the hinges back to the right side, follow thesesame instructions and reverse all references to left and right.
IMPORTANT NOTES
Phillips screwdriver
TOOLS REQUIRED
Masking tape
T20 or T25Torxdriver,(needed forsome models)
5/16″ hex-headsocket driver
5/16″ open-endwrench
Putty knife or thin-blade screwdriver

2.3 Lift the hinge (and the shim glued to it) straight up to free the hinge pin from the socketin the top of the door and set it aside, alongwith its screws.
15
Installation Instructions
2.1 Tape the door shut with masking tape.
REMOVE THE FROZEN FOODCOMPARTMENT DOOR
2 REMOVE THE FROZEN FOODCOMPARTMENT DOOR (CONT.)
2
Top Hinge
2.2 With a 5/16″ hex-head socket driver, remove thescrews that hold the top hinge to the cabinet.
2.5 Set the door on a non-scratching surface withthe outside up.
2.4 Remove the tape and tilt the door away from thecabinet. Lift it off the center hinge pin.
2.6 Transfer the 2 screws from the opposite side ofthe cabinet to the screw holes vacated by thetop hinge removal.

REVERSING THE DOOR SWING (CONT.)2
16
Installation Instructions
3.1 Tape the door shut with masking tape.
REMOVE THE FRESH FOOD DOOR3
3.4 Set the door outside-up on a non-scratchingsurface.
REMOVE THE FRESH FOODDOOR (CONT.)
3
3.3 Remove the tape and tilt the door away from thecabinet. Lift the door from the pin in the bottomhinge bracket. (If the plastic washer sticks to thedoor bottom, put it back on the hinge.)
3.2 Using a 5/16″ hex-head socket screwdriver anda 5/16″ open-end wrench, remove the twoscrews holding the center hinge (and the shimglued to it) to the cabinet. Lift the center hingeto free its pin from the socket in the top of thedoor, and set hinge and screws aside. Be carefulnot to lose the center hinge spacer and washer.
3.7 Take one of the screws removed in step 2 and start it in the outermost screw hole on the opposite side.Do not drive it all the way down—leave enoughspace under the screw head for thickness of shimand bracket.
3.6 Transfer the washer (if your model has one) to theopposite side.
3.5 Transfer the two screws from the opposite side ofthe cabinet to the screw holes vacated by the centerhinge removal.

Screws forHandle Holes
17
Installation Instructions
REVERSING THE HARDWARE4
4.1 Remove the base grille (if your refrigerator hasone) by pulling it straight out.
4.3 Interchange hinge (and the shim glued to it) andscrews at top right with screws at top left of cabinet.Do not tighten screws on hinge side at this time.
NOTES:
• Some hinges have four holes. Which holes youuse for installing the hinge depends on whichside you install the hinge.
• The outer edge of the hinge should be parallelto the edge of the case for correct installation.
Installing the hinge on the left. Installing the hinge on the right.
REVERSING THE DOOR HANDLES5
5.1 Transfer fresh food door handle
5.1.1 Remove the bottom cap by pushing it towardthe bottom of the door, and remove thescrew underneath. Remove the two screwsholding the handle to the top of the door.
5.1.2 Remove the handle.
5.1.3 Remove the screws from the right edge of thedoor top and insert them into the handle screwholes on the opposite side.
Top
4.2 Move the bottom hinge bracket (and shim glued to it) and plastic washer from the right side to theleft side.
PlasticWasher
HingeBracket
Models with a hinge bracketthat has 2 screw holes.
Models with a hinge bracketthat has 4 screw holes. Switch the hinge pin to theopposite side of the bracket.
PlasticWasher
HingeBracket

REVERSING THE DOOR SWING (CONT.)2
18
5.1.5 Pull the plug button from the front of the doorand transfer it to the opposite side.
5.2 Transfer door stop (cont.)
5.2.2 Move any screws from the left end to the right end.
5.2 Transfer door stop
5.2.1 Move the metal door stop from the right end tothe left end.
Installation Instructions
5.1 Transfer fresh food door handle (cont.)
5.1.4 With tape-tipped putty knife or thin-bladescrewdriver, pry out the plug button from thehinge hole on the left side of the door andinsert it into the hole on the opposite sidethat was vacated by removal of the top hinge.
REVERSING THE DOOR HANDLES(CONT.)
5
To reattach the handle on theopposite side.
Plug Button
Door Stop
Left Side
Right Side
5.3 Reinstalling the Fresh Food Door
Handle
5.3.1 Attach the handle to the right side of thedoor with screws at the top and under thehandle plug.
5.3.2 Reinstall the handle plug.
Plug Button

19
Installation Instructions
5.4 Transfer Frozen Food Compartment
Door Handle
5.4.1 Remove the screw holding the handle to thetop of the door and the two screws holding thehandle to the bottom of the door.
5.4.2 Remove the handle.
5.4.3 Remove the screw from the right top edge ofthe door and insert it into the handle screwhole on the left side.
5.4 Transfer Frozen Food Compartment
Door Handle (cont.)
5.4.4 Transfer the door stop as shown on thepreceding page.
5.4.5 Attach the handle to the right edge of the doorwith screws at top and bottom, using bottomholes vacated by removal of the door stop screws.
TOP
BOTTOM
Top
Bottom

20
6.2 Rehang the frozen food
compartment door
6.2.1 Lower the freezer door onto the center hingepin. Be sure the washer and spacer are in placeon the pin.
Installation Instructions
6.1.2 Insert the pin on the center hinge into thesocket in the top of the door. Place the spacer,then the washer, on the hinge pin. NOTE: Thecenter hinge must be turned over as shown whenmounted on the left side.
Plastic Washerand Spacer
Hinge Pin
REHANGING THE DOORS (CONT.)6
Center Hinge Pin
Plastic Washerand Spacer
6.2.2 Tilt the door toward the cabinet, lifting the tophinge so the pin fits into the socket on the topof the door.
6.2.3 Make sure the door is slightly above the top ofthe cabinet and the gap between the doors iseven across the front. Tighten the top hingescrews. Do not overtighten these screws—tighten them until they are just snug, then turnthem another one-half turn.
REVERSING THE DOOR SWING (CONT.)2
6.1.3 Tilt the door toward the cabinet. As the door isbrought into position, slide the hinge under thehead of the screw which earlier had been partlydriven into the outermost hole. Insert theremaining screw, then tighten both screws securely.
6.1 Rehang the fresh food door
6.1.1 Lower the fresh food door onto the bottom hinge pin. Be sure the washer is in place on the pin.
REHANGING THE DOORS6
HingeBracket
PlasticWasher
PlasticWasher
HingeBracket
Models with a hinge bracketthat has 2 screw holes.
Models with a hinge bracketthat has 4 screw holes.

Normal operating sounds.Depending on the placement of the refrigerator in your kitchen, you may want to place a piece of rubber-backed carpet under the refrigerator to reduce noise.
The fan circulating air inside the freezer which keeps the temperatures even.
Boiling water or a gurgling noise. The flow of refrigerant through the freezercooling coils.
Sizzling, hissing or popping sound. Water dropping on the defrost heater duringthe defrost cycle.
Cracking or popping sound. Cooling coils expanding and contracting during thedefrosting cycle.
Water dripping as it melts from the evaporator and flows to the drain pan duringthe defrost cycle.
Icemaker (on some models)
The icemaker water valve will buzz when the icemaker fills with water. If the powerswitch is in the I (on) position it will buzz even if it has not yet been hooked up towater. Keeping the power switch in the I (on) position before it is hooked up towater can damage the icemaker. To prevent this, move the power switch to the O (off) position. This will stop the buzzing.
The sound of cubes dropping into the bin and water running in pipes as icemakerrefills.
Before you call for service…Troubleshooting Tips Save time and money! Review the charts on the followingpages first and you may not need to call for service.
Problem Possible Causes What To Do
Refrigerator does not Refrigerator in defrost cycle. • Wait about 30 minutes for defrost cycle to end.operate
Temperature control dial • Move the temperature control dial to a temperaturein 0 position. setting.
Refrigerator is unplugged. • Push the plug completely into the outlet.
The fuse is blown/circuit • Replace fuse or reset the breaker. breaker is tripped.
Vibration or rattling Roller screws or leveling legs • See Rollers and Leveling Legs.(slight vibration need adjusting.is normal)
These sounds are normal and are due mostly to highly efficientoperation.
21

Troubleshooting Tips
22
Before you call for service…
Problem Possible Causes What To Do
Motor operates for Normal when refrigerator • Wait 24 hours for the refrigerator to completely long periods or cycles is first plugged in. cool down.on and off frequently.
Often occurs when large • This is normal.(Modern refrigeratorsamounts of food arewith more storageplaced in refrigerator.space and a largerDoor left open. • Check to see if package is holding door open.freezer require more
Hot weather or frequent • This is normal.operating time. They
door openings.start and stop often
Temperature control dial • See About the temperature control dial.to maintain even
set at the coldest setting.temperatures.)
Grille and condenser • See Care and cleaning.need cleaning.
Fresh food or freezer Temperature control dial • See About the temperature control dial.compartment too warm not set cold enough.
Warm weather or frequent • Set the temperature control dial one step colder. door openings. See About the temperature control dial.
Door left open. • Check to see if package is holding door open.
Package blocking air duct in • Check to see if package is blocking air duct in freezer freezer compartment. compartment.
Frost or ice crystals Door left open. • Check to see if package is holding door open.on frozen food
Too frequent or too long (frost within package door openings.is normal)
Automatic icemaker Icemaker power switch in •Move the switch to the I (on) position.does not work the O (off) position. •Cubes may have fused to the side of the mold. Move (on some models) the switch to the O (off) position, then remove the cubes.
Water supply turned off or •See Installing the water line.not connected.
Freezer compartment •Wait 24 hours for the refrigerator to completely too warm. cool down.
Piled up cubes in the storage •Level cubes by hand.bin cause the icemaker to shut off.
Cubes too small Water shutoff valve connecting •Call the plumber to clear the valve.refrigerator to water line may be clogged.

Problem Possible Causes What To DoSlow ice cube freezing Door left open. •Check to see if package is holding door open.
Temperature control dial •See About the temperature control dial.not set cold enough.
Ice cubes have Ice storage bin needs cleaning. •Empty and wash bin. Discard old cubes.odor/taste
Food transmitting odor/taste •Wrap foods well.to ice cubes.
Interior of refrigerator •See Care and cleaning.needs cleaning.
Moisture forms on Not unusual during •Wipe surface dry and reset temperature control dial cabinet surface periods of high humidity. one setting colder.between the doors
Moisture collects inside Too frequent or too(in humid weather, air long door openings.carries moisture intorefrigerator when doors are opened)
Refrigerator has odor Foods transmitting • Foods with strong odors should be tightly wrapped.odor to refrigerator. • Keep an open box of baking soda in the refrigerator;
replace every three months.
Interior needs cleaning. • See Care and cleaning.
23

24
Special Safety Instructions for Australia and New Zealand.(in addition to other information in Owner’s Manual)
IMPORTANT SAFETY INSTRUCTIONSTo reduce the risk of personal injury or damage to property, follow basic safety precautions when using thisrefrigerator, including the following:
When using any Electrical Product, basic precautions should always be followed, including the following:
READ THESE INSTRUCTIONS CAREFULLY BEFOREUSING THE REFRIGERATOR. KEEP THE INSTRUCTIONSHANDY FOR FUTURE REFERENCE.
�� IMPORTANT: Always operate the refrigerator from a power source of the same Voltage,Frequency and Rating as indicated on therefrigerator identification plate. Operate therefrigerator from an Earthed (Grounded) 3 pinpower outlet fully accessible when the refrigeratoris located in its normal operating position.
�� Close supervision is necessary when any electricalproduct is used by or operated near children orinfirm persons; young children should besupervised to ensure that they do not play with the refrigerator.
�� IMPORTANT: Do not operate the refrigerator with a damaged Supply cord or Plug. If it is damaged itmust be replaced by the manufacturer, distributoror its service agent or a similarly qualified personin order to avoid a hazard. Special tools arerequired to replace the Supply flexible cord.
��WARNING: Avoid the use of extensioncords. If it is necessary to use an extension cord,prior to its use, make sure the extension cord issafe to use, capable of handling the electrical loadof the product (refer Product identification plate)and has been checked and tested by yourelectricity supplier or a qualified technician.
To avoid becoming entangled in the cord, neverlay it through or along a walkway or thoroughfare.
�� Do not allow the cord to hang over the edge of a bench top where it may be grabbed by childrenor become entangled with the user.
25
Installing the Water LineFor Australian and New Zealand installation, read these instructions completely and carefully.
�� IMPORTANT: Government legislation and Codes in most States and Territories of Australia require installation by a licensed plumber. The installation must conform to AustralianStandard AS 3500.1 Water supply.
�� Water hammer (water banging in the pipes) in house plumbing can cause damage to therefrigerator parts and lead to water leakage orflooding. Call a qualified plumber to correctwater hammer before installing the water supplyline to the refrigerator.
�� To prevent burns and refrigerator damage, donot hook up the water line to the hot water line.
�� If you use your refrigerator before connecting thewater line, make sure the icemaker power switchis set to the O position.
�� Do not install the icemaker tubing in areas wherethe temperatures fall below freezing.
Before You Begin
For models fitted with an icemaker, a water supplykit (containing flexible tubing and fittings) issupplied with the refrigerator.
The water pressure must be between 138 and 827 kPa on models without a water filter fitted and between 275 and 827 kPa on models with a water filter fitted.
Turn Off the water and open a low tap to drain thewater from the pipe.
Complying with the plumbing codes, install asuitable branch fitting (not supplied) to the coldwater supply.
Extend the branch to a suitable location adjacent tothe refrigerator when it is located in its operatingposition. Terminate the branch with a shutoff valve(not supplied).
IMPORTANT: The shut-off valve should be accessible(such as in an adjacent cupboard, as close to thewall as possible) when the refrigerator is in itsnormal operating position.
If your water supply pressure is higher than 690 kPaduring the day (if so, it may reach higher levels atnight), install a suitable Pressure limiting valve (not supplied), after the shut-off valve, making surethe “flow arrows” on the body of the device face thesame direction as the water flow.
If necessary, assemble a suitable fitting (notsupplied) to the up-stream end of the shutoff valve(or pressure limiting valve) for attachment of thefitting supplied with the water supply kit.
NOTE: PTFE tape should be used for a water tightseal when assembling all the above fittings.
Do not turn the water supply On at this time.
Shut Off the Main Water Supply

26
Special Installation Instructions for Australia and New Zealand.
Attach the fitting with the male thread suppliedwith the water supply kit to the shutoff valve (or pressure limiting valve, if fitted), and tighten.
NOTE: PTFE tape should be used for a water tightseal when assembling all the above fittings.
Route the tubing through a hole drilled in the sideof the cupboard as close to the wall as possible.
Make sure there is sufficient length of tubing[approximately 240 cm coiled into 3 turns ofapproximately 25 cm] to allow the refrigerator to move out from the wall after installation.
Insert and push the end of the tubing into thefitting as far as possible.
With the free end of the tubing located in asuitable container, turn the main water supply Onand flush out the tubing until the water is clear.
Turn Off the shutoff valve after approximately 1 litreof water has been flushed through the tubing.
Connecting the Tubing to the Shutoff Valve
Before making the connection to the refrigerator, besure the power is turned OFF and the power cord isdisconnected from the Power Outlet.
If your refrigerator does not include a water filter,we recommend installing one in the water line near the refrigerator if your water supply has sandor particles that could clog the screen of therefrigerator’s water valve.
Remove the refrigerator access cover.
Remove the plastic flexible cap from the water valve (refrigerator connection).
Attach the fitting with the female thread suppliedwith the water supply kit to the water valve andtighten.
Insert and push the end of the tubing into thefitting as far as possible.
Fasten the tubing into the clamp provided to holdit in position. You may need to pry open the clamp.
Connecting the Tubing to the Refrigerator
Installing the Water Line (continued)

27
Turn the water On at the shutoff valve.
Tighten any connection that leaks.
Replace the access cover and tighten all screws (on some models).
Turn the Water On
Plug in the refrigerator to the Power Outlet and turn On. IMPORTANT: Always operate theRefrigerator from a power source of the sameVoltage, Frequency and Rating as indicated on the Refrigerator Identification Plate. Operate theRefrigerator from an Earthed (Grounded) 3 PinPower Outlet fully accessible when the refrigeratoris located in its normal operating position.
Arrange the coil of tubing so that it does notvibrate against the back of the refrigerator oragainst the wall.
Push the refrigerator back to the wall making surethe power cord and the water line tubing are nottrapped, entangled or squashed by the refrigerator(including the wheels) or wall.
Plug In the Refrigerator
Set the icemaker power switch to the I position.
The icemaker will not begin to operate until itreaches its operating temperature of -9° C or below.It will then begin operation automatically if theicemaker power switch is in the I position.
NOTE: In lower water pressure conditions, the watervalve may turn on up to 3 times to make sureenough water reaches the icemaker.
Start the Icemaker
Powerswitch

28
Notes.
Mesures de sécuritéBranchement électrique . . . . . . . . .31Mesures de sécurité . . . . . . . . . . . .30
Instructions de fonctionnementClayettes . . . . . . . . . . . . . . . . . .33, 34Machine à glaçons automatique . . .36Réglage de température . . . . . . . . .32Soins et nettoyage . . . . . . . . . . .37, 38Tiroirs de rangement . . . . . . . .35, 36
Instructions d’installationInstallation de la conduite d’eau . . . . . . . . . . . . .41, 42Inversion du sens d’ouverture des portes . . . . . . .42–49Préparation d’installation du réfrigérateur . . . . . . . . . . . . . . .39
Liste de vérifications préventivesAvant d’appeler un réparateur . .50–52Bruits normaux de fonctionnement . . . . . . . . . . . . . . .50
Inscrivez le numéro de modèle et le numérode série ci-dessous :
Numéro de modèle __________________
Numéro de série ____________________
Vous les trouverez sur une étiquette située en haut à gauche du compartimentréfrigération.
29

AVERTISSEMENT!N’utilisez cet appareil qu’aux fins prévues dans le présent Manuel du propriétaire.
MESURES DE SÉCURITÉLorsque vous utilisez un appareil électrique, observez toujours les mesures de sécurité de base, y compris les suivantes.� Vous devez bien installer et placer votre réfrigérateur,
conformément aux Instructions de montage avant del’utiliser. Consultez également la section Commentraccorder au réseau électrique.
� N’essayez jamais de monter sur votre réfrigérateur.Cela peut occasionner des blessures corporelles etdes dommages au réfrigérateur.
� Ne permettez jamais aux enfants de jouer avec votreréfrigérateur ou de modifier ses réglages.
� Ne permettez jamais aux enfants de grimper, demonter, de se tenir ou de se pendre aux clayettes de votre réfrigérateur. Ils peuvent endommager le réfrigérateur et se blesser sérieusement.
� Ne touchez jamais les surfaces froides dans lecompartiment congélation quand vos mains sonthumides ou mouillées. Votre peau peut coller à cessurfaces extrêmement froides.
� Ne conservez jamais ou n’utilisez jamais d’essence ou d’autres liquides ou gaz inflammables à proximitéde votre réfrigérateur ou de tout autre appareilélectroménager.
� Ne laissez jamais vos doigts dans des endroits où ilsrisquent d’être pincés. L’écartement entre les porteset l’armoire est nécessairement petit. Faites attentionde fermer les portes quand des enfants se trouvent à proximité.
� Dans les réfrigérateurs qui ont des machines àglaçons, évitez tout contact avec les éléments mobilesdu mécanisme d’éjection, ou avec les éléments dechauffage qui libèrent les glaçons. Ne mettez jamaisvos doigts ou vos mains sur le mécanisme defabrication automatique de glaçons quand leréfrigérateur est branché.
� Débranchez votre réfrigérateur avant de le nettoyer et de le réparer.
NOTE : Nous vous recommandons fortement de faire accomplirtout service par un technicien qualifié.
� Avant de remplacer une ampoule brûlée, vous devezdébrancher votre réfrigérateur pour vous éviterd’entrer en contact avec un filament porteurd’électricité (vous pouvez briser une lampe brûlée en essayant de la changer).
NOTE : Vous n’enlèverez pas le courant électrique du circuit de la lumière en tournant le réglage en position 0.
� Ne recongelez jamais des aliments congelés qui ontcomplètement dégelé.
30
BONNE MISE AU REBUT DE VOTRE RÉFRIGÉRATEURL’enfermement et l’asphyxie des enfants ne sont pasdes histoires du passé. Les réfrigérateurs jetés ouabandonnés sont toujours dangereux...même s’ils nedoivent rester là que «quelques jours». Si vous vousdébarrassez de votre vieux réfrigérateur, suivez lesinstructions suivantes pour prévenir tout accident.
Avant de jeter votre vieux réfrigérateur oucongélateur :� Enlevez les portes et jetez-les séparément.
� Laissez les clayettes montées, pour éviter que desenfants puissent facilement tenir dans votreréfrigérateur.
� Si votre réfrigérateur a une serrure, cassez-la.
RéfrigérantsTous les appareils de réfrigération contiennent desréfrigérants qui, conformément aux lois fédérales,doivent être enlevés avant toute élimination del’appareil. Si vous vous débarrassez de vieuxappareils de réfrigération, vérifiez, auprès de lasociété qui s’occupe de leur élimination, ce que vous devez faire.
DANGER! RISQUE DE PRISE AU PIÈGE
MESURES DE SÉCURITÉ IMPORTANTES. LISEZ TOUTES LES INSTRUCTIONS AVANT D’UTILISER VOTRE RÉFRIGÉRATEUR.

Le cordon d’alimentation de cet appareil est munid’une fiche avec mise à la terre qui se met dans uneprise murale avec terre, pour réduire le risque desecousse électrique occasionné par cet appareil.
Faites vérifier la prise murale et le circuit électrique par un électricien qualifié pour vous assurer que la prise murale est bien mise à la terre.
Si vous avez une prise murale sans terre, vous êtespersonnellement responsable et obligé de la faireremplacer par une bonne prise murale avec terre, bien mise à la terre.
Vous devez toujours brancher votre réfrigérateur à sa propre prise électrique.
Le rendement de votre réfrigérateur sera meilleur et vous éviterez ainsi de surcharger les circuitsélectriques et de surchauffer le câblage de votremaison, avec tous les risques d’incendie connexes.
Veuillez consulter la plaque signalétique de votreréfrigérateur pour trouver le bon voltage, wattage et fréquence.
Si la fiche de votre appareil ne correspond pas à votreprise murale, vous devez monter une nouvelle fiche survotre appareil.
IMPORTANT : Vous devez faire effectuer la pose des ficheset des cordons d’alimentation électrique par un électricienqualifié ou un agent de service. Dans certains pays, la reposede fiches et de cordons d’alimentation électrique n’estautorisée que si elle a été effectuée par un électricien qualifié.
Si le cordon d’alimentation est endommagé, vous devezle faire remplacer par un agent de service qualifié pouréviter tout risque en matière de sécurité.
Ne débranchez jamais votre réfrigérateur en tirant surle cordon d’alimentation. Tenez toujours la fichefermement et enlevez-la de la prise en tirant droit.
Réparez ou remplacez immédiatement tout cordond’alimentation usé ou endommagé. N’utilisez jamais decordon fissuré ou usé sur sa longueur ou à l’une de sesextrémités.
Pour écarter votre réfrigérateur du mur, faites attentionde ne pas écraser ou d’endommager le cordond’alimentation.
Remplacement du cordon d’alimentation Pour remplacer n’importe quand le cordond’alimentation de votre réfrigérateur, vous devez leremplacer par un cordon spécial qui n’est disponibleque chez votre revendeur local. Vous devrez payer lesfrais de remplacement du cordon d’alimentation sivous l’avez endommagé.
Vous devez placer le réfrigérateur dans un endroit oùvous avez accès à la prise.
31
AVERTISSEMENT!BRANCHEMENT ÉLECTRIQUE
VEUILLEZ LIRE ET SUIVRE ATTENTIVEMENT CES MESURES DE SÉCURITÉ.CONSERVEZ CES DIRECTIVES
Assurez-vous qu’unebonne mise à la terreexiste avant d’utiliser
Fiche avec miseà la terre
Pour votre sécurité personnelle, vous devez bien mettre à la terre cet appareil électroménager.

Le bouton de réglage de température.
Compartiment réfrigération
En tournant le bouton en position 0, vous arrêtez le refroidissement dans les deux compartiments—le compartimentréfrigération et le compartiment congélation. Vous n’arrêtez pas le réfrigérateur de marcher.
Après avoir réglé la commande, attendez 24 heures pour laisser le réfrigérateur atteindre la température que vous avez réglée.
Compartimentcongélation
Compartimentréfrigération
5 (réglage le plus froid)
Fonctionnement sans givre Limites de température ambiante dans la pièceIl n’est pas nécessaire de dégivrer le compartimentréfrigération ou le compartiment congélation. Votreréfrigérateur est conçu et équipé pour se dégivrerautomatiquement, mais il est normal d’avoir un peu de gel sur les paquets d’aliments.
Votre réfrigérateur est conçu pour fonctionner dans lestempératures ambiantes indiquées par sa Classe detempérature qui est marquée sur sa plaque signalétique.
Classe de Symbole Température ambiante température Maximale Minimale
Tempérée-Étendue SN 32 °C 10 °C
Tempérée N 32 °C 16 °C
Subtropicale ST 38 °C 18 °C
Tropicale T 43 °C 18 °C
NOTE : La température interne peut être influencée par des facteurs tels que l’emplacement du réfrigérateur, la température ambiante et lafréquence des ouvertures de porte. Ajustez les boutons de réglage detempérature de manière à compenser l’action de ces facteurs.
Air froid
Air froid
1 (réglage le plus chaud)
32
Compartiment réfrigérationLe bouton de réglage du compartiment réfrigération a neufnuméros plus le zéro. 1 est le plus chaud, 9 le plus froid. Au début, mettez le bouton sur le 5. Après avoir utilisé leréfrigérateur, réglez le bouton si nécessaire.
Pour tourner le bouton, insérez une pièce dans la fente du milieu.
Attendez 24 heures que le réfrigérateur se refroidisse.
NOTE : En tournant le bouton en position 0, vous arrêtez lerefroidissement dans les deux compartiments – le compartimentréfrigération et le compartiment congélation. Vous n’arrêtez pas leréfrigérateur de marcher.
Compartiment congélationAu début, mettez le bouton sur 3. Le réglage de congélation faitbouger un volet pour changer le montant d’air froid qui va ducompartiment congélation au compartiment réfrigération.
12
34
5

33
Clayettes du compartiment réfrigération.Les supports de clayette à divers niveaux vous permettent de régler la hauteur de vos clayettes. Tous les modèles n’ont pastoutes ces caractéristiques.
Clayettes pleine largeurCertains modèles ont une clayette coulissanteen fil de fer, une clayette fixe en verre trempéou deux clayettes fixes en fil de fer. Vouspouvez changer l’emplacement de ces clayettesdans le compartiment réfrigération.
La clayette coulissante pleine largeur a desarrêts automatiques. Si vous la placez bien surses soutiens, elle s’arrête avant de sortircomplètement du réfrigérateur et ne basculepas si vous mettez ou si vous enlevez desaliments sur elle.
Pour enlever les clayettes pleine largeur,soulevez l’arrière de la clayette et poussez versl’avant.
Pour enlever une clayette pleine largeur quandvous ne pouvez pas ouvrir complètement laporte du compartiment réfrigération, soulevezl’arrière de la clayette, tirez vers l’avant et versle bas, soulevez la clayette et faites-la sortir.
Clayettes demi-largeurUne extrémité de la clayette repose sur unsoutien moulé de paroi latérale; à l’autreextrémité, un support entre dans un rail situésur la paroi arrière du compartiment.
Pour enlever, soulevez l’avant de la clayette,puis enlevez le support et faites-le sortir du rail.
Pour remettre en place, choisissez la bonnehauteur de clayette. Après avoir soulevélégèrement l’avant de la clayette, accrochez letaquet supérieur du support dans le rail, puisabaissez la clayette dans le soutien.
NOTE : La clayette à droite du rail est conçue pours’accrocher dans la fente de droite; la clayette àgauche du rail est conçue pour s’accrocher dans lafente de gauche.
2 Soulevez et faites sortir
1 Faites basculer vers le haut
34
Plateau à glaçons (dans certains modèles)
Les plateaux à glaçons sont conçus pour unenlèvement facile des glaçons. Tenez le plateauà l’envers sur un contenant et tournez les deuxextrémités pour libérer les glaçons.
Pour uniquement un ou deux glaçons, laissez leplateau à l’endroit, tournez chaque extrémitélégèrement et enlevez le nombre de glaçonsdésiré. Lavez les plateaux à glaçons et les bacs à glace uniquement dans de l’eau tiède.Ne les mettez jamais dans un lave-vaisselleautomatique.
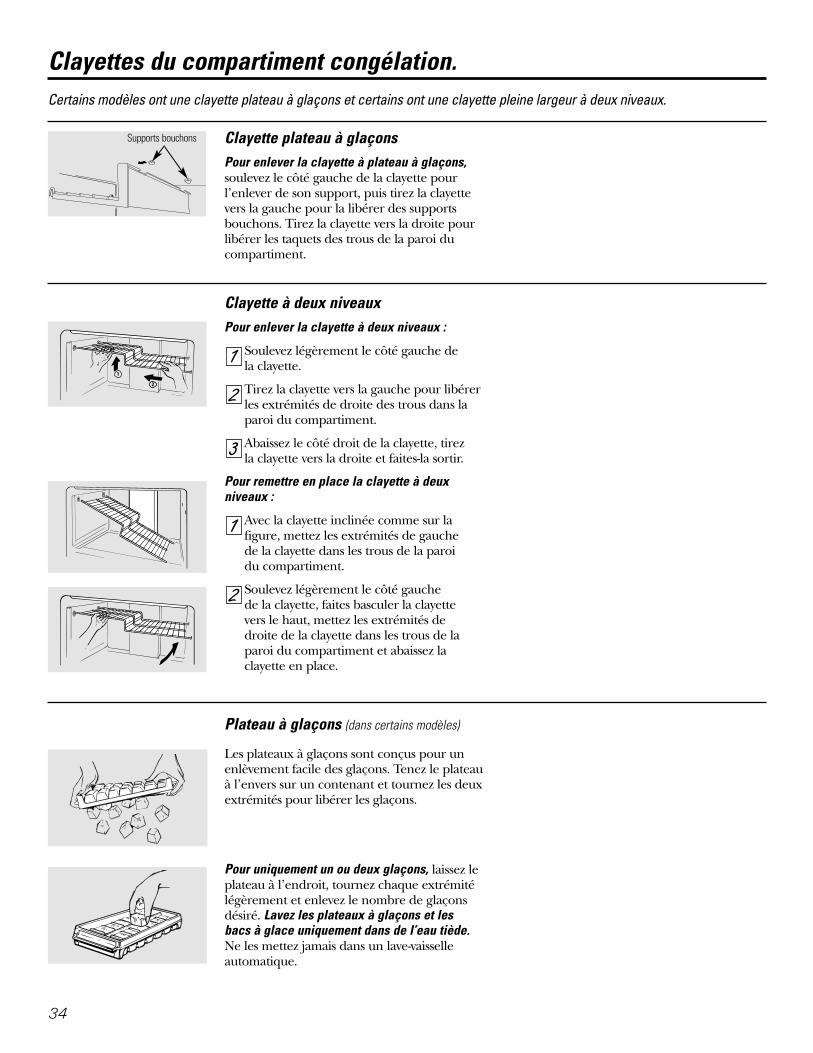
Clayettes du compartiment congélation.Certains modèles ont une clayette plateau à glaçons et certains ont une clayette pleine largeur à deux niveaux.
Clayette plateau à glaçonsPour enlever la clayette à plateau à glaçons,soulevez le côté gauche de la clayette pourl’enlever de son support, puis tirez la clayettevers la gauche pour la libérer des supportsbouchons. Tirez la clayette vers la droite pourlibérer les taquets des trous de la paroi ducompartiment.
Clayette à deux niveauxPour enlever la clayette à deux niveaux :
Soulevez légèrement le côté gauche de la clayette.
Tirez la clayette vers la gauche pour libérerles extrémités de droite des trous dans laparoi du compartiment.
Abaissez le côté droit de la clayette, tirez la clayette vers la droite et faites-la sortir.
Pour remettre en place la clayette à deuxniveaux :
Avec la clayette inclinée comme sur lafigure, mettez les extrémités de gauche de la clayette dans les trous de la paroi du compartiment.
Soulevez légèrement le côté gauche de la clayette, faites basculer la clayette vers le haut, mettez les extrémités de droite de la clayette dans les trous de laparoi du compartiment et abaissez laclayette en place.
2
1
3
2
1
Supports bouchons
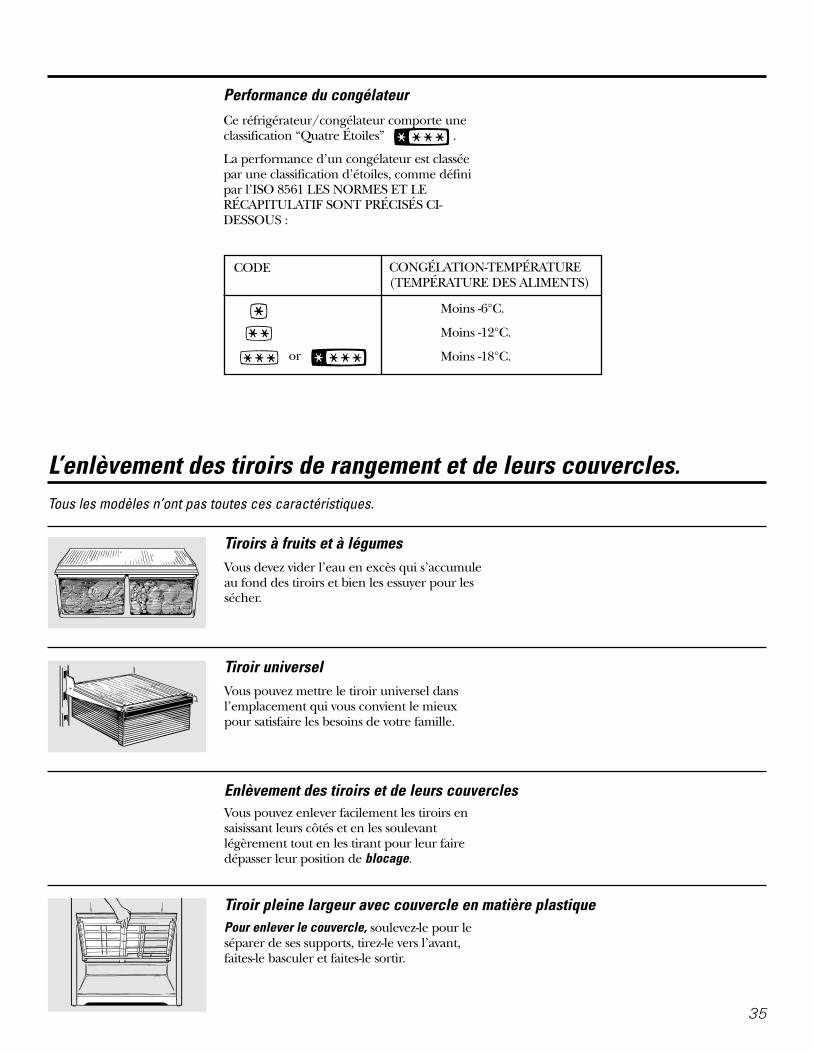
L’enlèvement des tiroirs de rangement et de leurs couvercles. Tous les modèles n’ont pas toutes ces caractéristiques.
Enlèvement des tiroirs et de leurs couverclesVous pouvez enlever facilement les tiroirs ensaisissant leurs côtés et en les soulevantlégèrement tout en les tirant pour leur fairedépasser leur position de blocage.
Tiroir pleine largeur avec couvercle en matière plastiquePour enlever le couvercle, soulevez-le pour leséparer de ses supports, tirez-le vers l’avant,faites-le basculer et faites-le sortir.
Tiroirs à fruits et à légumesVous devez vider l’eau en excès qui s’accumuleau fond des tiroirs et bien les essuyer pour lessécher.
Tiroir universelVous pouvez mettre le tiroir universel dansl’emplacement qui vous convient le mieuxpour satisfaire les besoins de votre famille.
35
Performance du congélateurCe réfrigérateur/congélateur comporte uneclassification “Quatre Étoiles” .
La performance d’un congélateur est classéepar une classification d’étoiles, comme définipar l’ISO 8561 LES NORMES ET LERÉCAPITULATIF SONT PRÉCISÉS CI-DESSOUS :
CODE
or
CONGÉLATION-TEMPÉRATURE(TEMPÉRATURE DES ALIMENTS)
Moins -6°C.
Moins -12°C.
Moins -18°C.

36
Un réfrigérateur juste branché peut prendre de 12 à 24 heures pour commencer à faire des glaçons.
Machine àglaçons
Bras palpeur
Commutateurde marche
Ensemble accessoire de machine à glaçonsSi votre réfrigérateur n’est pas déjà équipéd’une machine à glaçons, vous pouvez acheterun ensemble accessoire de machine à glaçon.
Vous trouverez derrière votre réfrigérateur lemodèle d’ensemble de machine à glaçons quiconvient à votre modèle de réfrigérateur.
Machine à glaçons automatiqueLa machine à glaçons produit sept glaçons parcycle, soit environ 100 à 130 glaçons par 24heures, selon la température du compartimentcongélation, la température de la pièce, lenombre de fois que la porte est ouverte et lesautres conditions d’utilisation.
Si vous faites fonctionner le réfrigérateur avantde raccorder l’eau à la machine à glaçons,mettez le commutateur de marche en positionO (arrêt).
Après avoir raccordé le réfrigérateur àl’alimentation d’eau, mettez le commutateurde marche en position I (marche). La lumièreverte de marche s’allume.
La machine à glaçons se remplit d’eau quand elle atteint le point de congélation. Un réfrigérateur nouvellement installé prend de 12 à 24 heures pour commencer à fabriquer des glaçons.
Jetez les premiers lots de glaçons pourpermettre à la conduite d’eau de se purger.
Assurez-vous que rien ne gène la course du bras palpeur.
Quand le bac se remplit jusqu’au niveau dubras palpeur, la machine à glaçons s’arrête defabriquer des glaçons.
Il est normal de trouver des glaçons qui soientsoudés ensemble.
Si vous n’utilisez pas souvent vos glaçons, lesvieux glaçons deviennent opaques, prennentun mauvais goût et rétrécissent.
Si des glaçons se coincent dans la machine à glaçons, la lumière verte se met à clignoter.Pour corriger cette situation, mettez lecommutateur de marche en position O (arrêt)et enlevez les glaçons. Remettez lecommutateur de marche en position I (marche)pour remettre en marche la machine à glaçons.
NOTE : Dans les maisons qui ont une pression d’eauplus faible que la moyenne, vous pouvez entendre lamachine à glaçons à plusieurs reprises quand ilfabrique un lot de glaçons.
Lumière verteindiquant lamarche
Machine à glaçons automatique. (sur certains modèles)
Tiroirs doubles avec couvercle en verreEnlèvement :
Enlevez les tiroirs.
Mettez votre main à l’intérieur, soulevez ledevant du couvercle en verre et, en mêmetemps, tirez-le vers l’avant aussi loin quepossible.
Faites-le basculer et faites-le sortir. Évitez denettoyer les couvercles en verre froid avec del’eau chaude parce que la grande différence de température peut les casser.
Enlevez le cadre de tiroirs (Enlevez toujoursles couvercles en verre avant d’enlever lecadre de tiroirs).
Soulevez le cadre pour le séparer de sessupports de chaque côté et en arrière, tirez vers l’avant, faites-le basculer et enlevez-le.
Remise en place :
Abaissez le cadre jusqu’à ce qu’il repose surles supports, de chaque côté et en arrière.
Remettez en place le couvercle en verre, enpoussant fermement son bord arrière dansla rainure arrière à cadre et en abaissantdoucement l’avant en place.
Remettez en place les tiroirs.3
2
1
3
21
L’enlèvement des tiroirs de rangement et de leurs couvercles.

Soins et nettoyage de votre réfrigérateur.Nettoyage de l’extérieurLes poignées de porte et les garnitures (surcertains modèles). Nettoyez avec un lingetrempé dans l’eau savonneuse. Séchez avec un linge doux.
Conservez l’extérieur propre. Essuyez avec unlinge propre légèrement humecté de cire àappareil électroménager ou de détersif liquideà vaisselle doux. Séchez et polissez avec unlinge doux, propre.
N’essuyez jamais votre réfrigérateur avec un torchonsale ou une serviette mouillée. Cela peut laisser unrésidu qui risque d’endommager la peinture.N’utilisez jamais de tampon à récurer, de nettoyanten poudre, d’eau de javel ou de produit nettoyantcontenant un agent de blanchiment, car ces produitspeuvent rayer et endommager la peinture.
Nettoyage de l’intérieurPour aider à empêcher les odeurs, laissez uneboîte ouverte de bicarbonate de soude dans lescompartiments réfrigération et congélation.
Débranchez votre réfrigérateur avant de lenettoyer. Si ce n’est pas pratique, enlevez toutehumidité au moyen d’une éponge ou d’unchiffon pour nettoyer autour descommutateurs, des lumières ou des réglages.
Utilisez une solution d’eau chaude et debicarbonate de soude (15 ml de bicarbonate de soude dans 1 litre d’eau). Cette solutionnettoie tout en neutralisant les odeurs. Rincez et séchez en essuyant.
Après avoir nettoyé les joints de portes, mettezune couche mince de pétrolatum sur les jointsde portes du côté de la charnière. Cela aide àempêcher les joints de coller et de se déformer.
Évitez de nettoyer les clayettes froides en verre (surcertains modèles) à l’eau chaude, parce qu’ellesrisquent de se casser à cause de la grande différencede températures. Manipulez avec soins le verre. Vouspouvez briser en éclats le verre trempé en le heurtant.
Ne lavez aucune pièce en matière plastique de votreréfrigérateur dans votre machine à laver la vaisselle.
Le condenseurVous n’avez pas besoin de nettoyerroutinièrement le condenseur en milieudomestique normal. Cependant, en milieuparticulièrement gras ou poussiéreux, vousdevez nettoyer périodiquement le condenseurpour obtenir un fonctionnement efficace devotre réfrigérateur.
Pour nettoyer le condenseur, mettez le boutonde contrôle de température en position 0.Utilisez une brosse ou un aspirateur pournettoyer la poussière.
Pour obtenir de meilleurs résultats, utilisez unebrosse spécialement conçue à cette fin. Vous en trouverez dans votre magasin de piècesd’appareils électroménagers.
Nettoyage du serpentin de condenseur.
Pressez pour libérer le crochet.
Remplacement de l’ampoule (sur certains modèles)
Une ampoule électrique et sa douille sontsituées en haut du compartiment réfrigération,en face du panneau de réglage de latempérature.
Pour remplacer l’ampoule, débranchezd’abord le réfrigérateur de sa prise électrique.Mettez votre main sous l’ampoule et relâchez lecrochet situé à l’extrémité de l’écran, du côtéde l’ampoule (il y a un écran anti-éblouissantsur certains modèles).
37
38
Soins et nettoyage de votre réfrigérateur.
Pour de longues vacances ou absences,enlevez tous vos aliments et débranchezvotre réfrigérateur. Mettez le bouton de réglage de température en position 0et nettoyez l’intérieur avec une solution de bicarbonate de soude, 15 ml debicarbonate de soude pour 1 litre d’eau.Laissez les portes ouvertes.
Mettez le commutateur de marche de lamachine à glaçons en position O (arrêt)et fermez l’alimentation d’eau duréfrigérateur.
Si la température risque de descendre en dessous du point de congélation,demandez à un technicien qualifié depurger votre système d’alimentation d’eau(sur certains modèles) pour empêcher desinondations pouvant occasionner desdégâts sérieux.
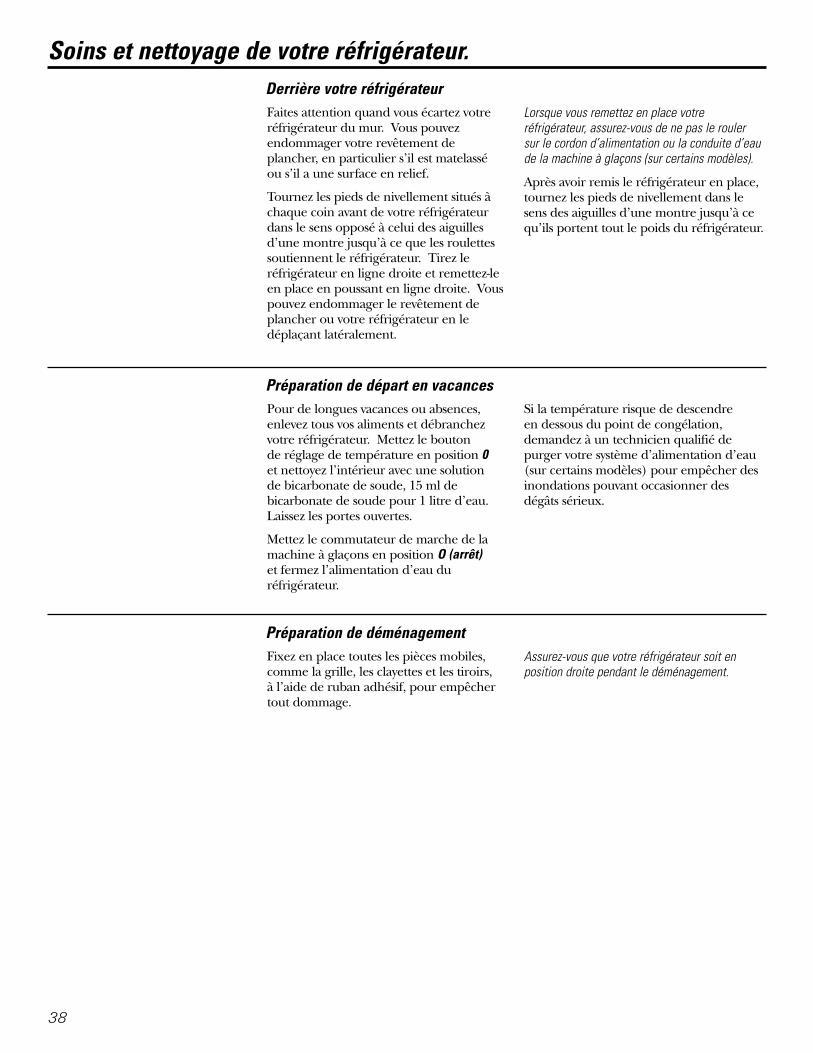
Derrière votre réfrigérateurFaites attention quand vous écartez votreréfrigérateur du mur. Vous pouvezendommager votre revêtement deplancher, en particulier s’il est matelassé ou s’il a une surface en relief.
Tournez les pieds de nivellement situés àchaque coin avant de votre réfrigérateurdans le sens opposé à celui des aiguillesd’une montre jusqu’à ce que les roulettessoutiennent le réfrigérateur. Tirez leréfrigérateur en ligne droite et remettez-leen place en poussant en ligne droite. Vouspouvez endommager le revêtement deplancher ou votre réfrigérateur en ledéplaçant latéralement.
Lorsque vous remettez en place votreréfrigérateur, assurez-vous de ne pas le roulersur le cordon d’alimentation ou la conduite d’eaude la machine à glaçons (sur certains modèles).
Après avoir remis le réfrigérateur en place,tournez les pieds de nivellement dans lesens des aiguilles d’une montre jusqu’à cequ’ils portent tout le poids du réfrigérateur.
Préparation de départ en vacances
Préparation de déménagement Fixez en place toutes les pièces mobiles,comme la grille, les clayettes et les tiroirs, à l’aide de ruban adhésif, pour empêchertout dommage.
Assurez-vous que votre réfrigérateur soit enposition droite pendant le déménagement.

AVANT DE COMMENCERLisez les instructions complètement et attentivement.
• IMPORTANT – Conservez cesinstructions pour votre inspecteur local.
• IMPORTANT – Observez tous lescodes et les ordonnances en vigueur.
• Note à l’installateur – Assurez-vous de laisserces instructions au consommateur.
• Note au consommateur – Conservez cesinstructions pour références futures.
• Niveau de compétence – L’installation de cetappareil électroménager nécessite des compétencesmécaniques de base.
• Durée requise pour l’installation – Installation du réfrigérateur :15 minutesRenversement du sens d’ouverture des portes :1 heure
• L’installateur est responsable d’une bonneinstallation.
• Toute panne de l’appareil due à une mauvaiseinstallation est exclue de la garantie.
• N’installez jamais votre réfrigérateur dans une pièceoù la température ambiance risque d’être inférieure à 16°C, parce qu’il ne se mettra pas en marchesuffisamment souvent pour maintenir de bonnestempératures.
• Installez votre réfrigérateur sur un planchersuffisamment solide pour le supporter quand il est plein.
EMPLACEMENT DURÉFRIGÉRATEUR
Instructions Réfrigérateurd’installation Modèles 16, 17
Si votre réfrigérateur a une machine à glaçons, il faudra le brancher à une conduite d’eau froide. Vous trouverez une trousse d’alimentation d’eau chez votre revendeur.
La machine à glaçons doit être installée par untechnicien de service qualifié.
ALIMENTATION D’EAU DE LAMACHINE À GLAÇONS (sur certains modèles)
39

40
Les pieds de nivellement situés près de chaque coinavant du réfrigérateur sont réglables. Ils tiennentfermement en position votre réfrigérateur etl’empêchent de bouger quand vous ouvrez les portes.Vous devez régler les pieds de nivellement de tellesorte que votre réfrigérateur soit suffisamment élevépour vous permettre de fermer facilement les portesquand elles sont à moitié ouvertes.
Tournez les pieds de nivellement dans le sens desaiguilles d’une montre pour soulever votreréfrigérateur, dans le sens opposé à celui des aiguillesd’une montre pour l’abaisser.
Les roulettes situées près des pieds de nivellement vous permettent d’écarter votre réfrigérateur du murpour nettoyer.
Tournez les pieds dans le sens opposé à celui desaiguilles d’une montre jusqu’à ce que le poids de votreréfrigérateur soit transféré aux roulettes. Après avoirremis votre réfrigérateur en place en le roulant,tournez à nouveau les pieds dans le sens des aiguillesd’une montre jusqu’à ce que les pieds portent ànouveau tout le poids de votre réfrigérateur.
ROULETTES ET PIEDS DENIVELLEMENT
Instructions d’installation
DIMENSIONS
Modèle 16 17
A* 1556 mm 1632 mm
B 711 mm 711 mm
C** 787 mm 787 mm
D 1394 mm 1394 mm
E 657 mm 657 mm
F 1346 mm 1346 mm
* La hauteur ne comprend pas la charnière – Ajoutez 22 mm pour la charnière.
** La largeur comprend la poignée.
Prévoyez les dégagements suivants pour faciliter votreinstallation, permettre une bonne circulation d’air etles raccordements d’électricité et de plomberie.
• Côtés 19 mm• Haut 25 mm• Arrière 25 mm
DÉGAGEMENTS
Largeur
41
Instructions d’installation
L’installation d’une conduite d’eau n’est pas exigéepar le fabricant du réfrigérateur ou de la machine àglaçons. Respectez ces recommandationssoigneusement afin de réduire les risques dedommages onéreux causés par l’eau.
Les coups de bélier (eau qui donne des coups dans les tuyaux) dans la tuyauterie de la maison peutoccasionner des dommages aux pièces de votreréfrigérateur, ainsi que des fuites ou des inondations.Appelez un plombier certifié pour corriger les coupsde bélier avant d’installer la conduite d’eau de votreréfrigérateur.
Pour prévenir toute brûlure et tout dommage à votreréfrigérateur, ne branchez jamais la conduite d’eau àune canalisation d’eau chaude.
Si vous utilisez votre réfrigérateur avant de brancher laconduite d’eau, assurez-vous de laisser le commutateurde la machine à glaçon en position O (arrêt).
N’installez jamais les tuyaux de la machine à glaçondans des endroits où la température risque dedescendre en dessous du point de congélation.
Si vous utilisez un outil électrique (comme uneperceuse électrique) pendant l’installation, assurez-vous que l’isolement ou le câblage de cet outilempêche tout danger de secousse électrique.
Vous devez procéder à toutes vos installationsconformément aux exigences de votre code local de plomberie.
Un technicien de service qualifié doit installer votremachine à glaçons.
AVERTISSEMENT!Branchez uniquement à une alimentation d’eaupotable.
AVANT DE COMMENCER
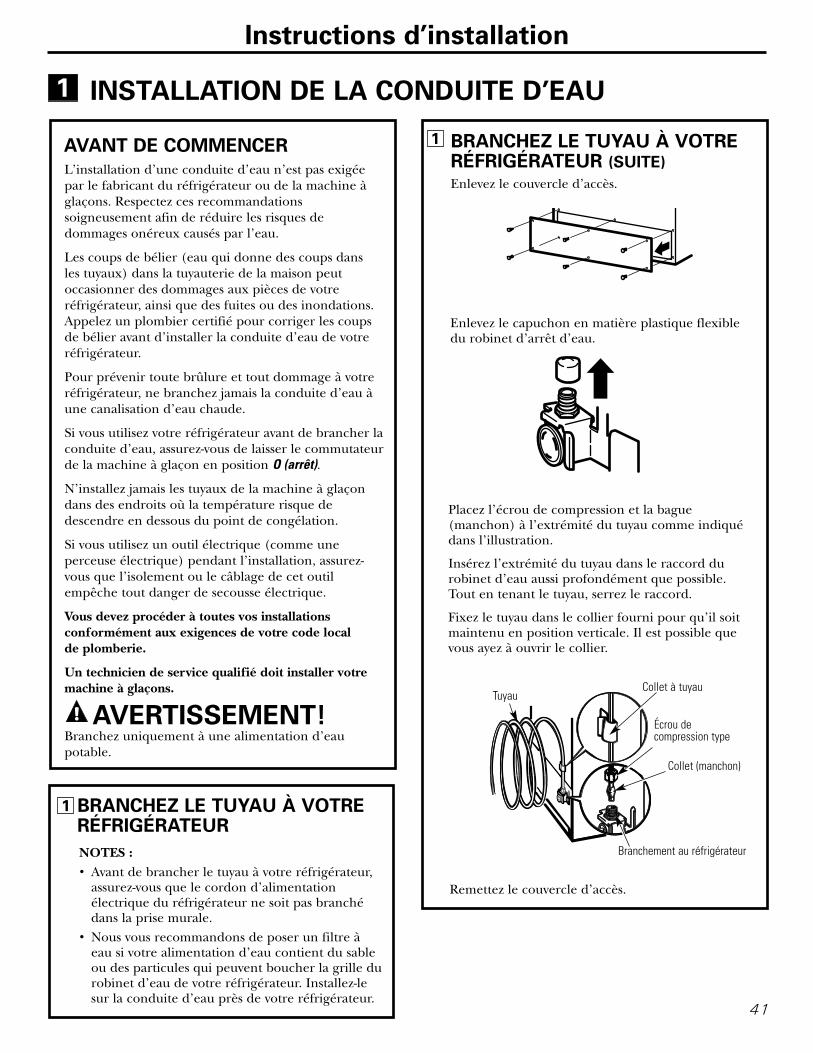
INSTALLATION DE LA CONDUITE D’EAU1
Placez l’écrou de compression et la bague(manchon) à l’extrémité du tuyau comme indiquédans l’illustration.
Insérez l’extrémité du tuyau dans le raccord durobinet d’eau aussi profondément que possible.Tout en tenant le tuyau, serrez le raccord.
Fixez le tuyau dans le collier fourni pour qu’il soitmaintenu en position verticale. Il est possible quevous ayez à ouvrir le collier.
Enlevez le capuchon en matière plastique flexibledu robinet d’arrêt d’eau.
BRANCHEZ LE TUYAU À VOTRERÉFRIGÉRATEUR (SUITE)
1
Enlevez le couvercle d’accès.
Remettez le couvercle d’accès.
Écrou decompression type
TuyauCollet à tuyau
Branchement au réfrigérateur
Collet (manchon)
NOTES :• Avant de brancher le tuyau à votre réfrigérateur,
assurez-vous que le cordon d’alimentationélectrique du réfrigérateur ne soit pas branchédans la prise murale.
• Nous vous recommandons de poser un filtre àeau si votre alimentation d’eau contient du sableou des particules qui peuvent boucher la grille durobinet d’eau de votre réfrigérateur. Installez-lesur la conduite d’eau près de votre réfrigérateur.
BRANCHEZ LE TUYAU À VOTRERÉFRIGÉRATEUR
1

INVERSION DU SENS D’OUVERTURE DES PORTES2
Pour inverser le sens d’ouverture des portes :• Lisez toutes les directives avant de commencer.• Manipulez les pièces avec précaution pour éviter de
rayer la peinture.• Posez les vis à côté des pièces correspondantes pour
ne pas les utiliser aux mauvais endroits.• Posez les portes sur un plan de travail qui ne risque
pas de rayer la peinture.
IMPORTANT : Une fois commencée votre inversiondu sens d’ouverture des portes, ne déplacez jamaisvotre réfrigérateur avant d’avoir terminé.
Ces directives s’appliquent à l’inversion des charnièresdu côté droit au côté gauche. Si vous voulez remettreles charnières à droite, suivez les mêmes directives en inversant toutes les références aux côtés gauche et droit.
NOTES IMPORTANTES
Tournevis Phillips
OUTILS REQUIS
Ruban-cache
Tournevis à tête deforce T 20 ou T 25,(nécessaire pourquelques-unsmodèle)
Tourne-écrouhexagonal de 5/16″
Clé à fourche de5/16″ (0,8 cm)
Couteau à mastiquerou tournevis à lamemince
42
Instructions d’installation
Mettez le commutateur de la machine à glaçons enposition I (marche). La machine à glaçons ne se meten marche que lorsqu’elle atteint une températurede fonctionnement de –9 °C ou moins. Ellecommence immédiatement à fonctionner si lecommutateur de la machine à glaçons est enposition I (marche).
METTEZ EN MARCHE LAMACHINE À GLAÇONS
3
NOTE : Si votre pression d’eau est trop faible, lerobinet peut se remettre en marche jusqu’à troisfois pour envoyer suffisamment d’eau à la machineà glaçons.
Commutateurde marche
INSTALLATION DE LA CONDUITE D’EAU (SUITE)1
Disposez la spire du tuyau de telle façon que celui-ci ne vibre pas contre la parois arrière duréfrigérateur ou contre le mur. Repoussez leréfrigérateur contre le mur.
OUVREZ LE ROBINET D’EAU ETBRANCHEZ LE RÉFRIGÉRATEUR.
2

1.1 Débranchez votre réfrigérateur de sa prise de courant.
AVANT DE COMMENCER1
2.1 Fermez la porte et attachez-la à l’aide de ruban-cache.
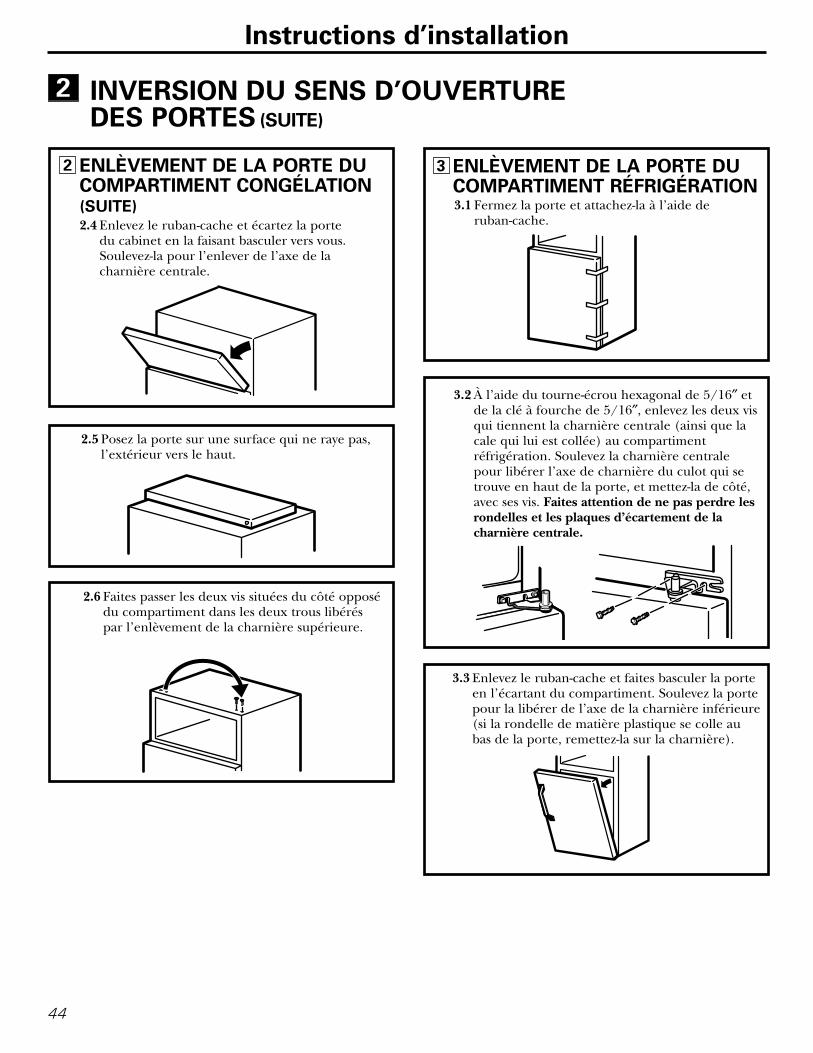
ENLÈVEMENT DE LA PORTE DUCOMPARTIMENT CONGÉLATION
2
1.2 Videz tous les balconnets de porte, y compris lecompartiment à produits laitiers.
ATTENTION : Ne laissez jamais tomber une porte.Vous risquez d’endommager sa butée.
43
Instructions d’installation
INVERSION DU SENS D’OUVERTURE DES PORTES (SUITE)
2
2.3 Soulevez la charnière (ainsi que la cale qui luiest collée) droit vers le haut, pour libérer l’axede charnière du culot qui se trouve en haut dela porte, et mettez-la de côté, avec ses vis.
Charnièresupérieure
2.2 À l’aide du tourne-écrou hexagonal de 5/16″,enlevez les vis qui tiennent la charnièresupérieure au compartiment congélation.
44
Instructions d’installation
ENLÈVEMENT DE LA PORTE DUCOMPARTIMENT CONGÉLATION(SUITE)
2
2.5 Posez la porte sur une surface qui ne raye pas,l’extérieur vers le haut.
2.4 Enlevez le ruban-cache et écartez la porte du cabinet en la faisant basculer vers vous.Soulevez-la pour l’enlever de l’axe de lacharnière centrale.
2.6 Faites passer les deux vis situées du côté opposédu compartiment dans les deux trous libéréspar l’enlèvement de la charnière supérieure.
3.1 Fermez la porte et attachez-la à l’aide de ruban-cache.
ENLÈVEMENT DE LA PORTE DUCOMPARTIMENT RÉFRIGÉRATION
3
3.3 Enlevez le ruban-cache et faites basculer la porteen l’écartant du compartiment. Soulevez la portepour la libérer de l’axe de la charnière inférieure(si la rondelle de matière plastique se colle aubas de la porte, remettez-la sur la charnière).
3.2 À l’aide du tourne-écrou hexagonal de 5/16″ etde la clé à fourche de 5/16″, enlevez les deux visqui tiennent la charnière centrale (ainsi que lacale qui lui est collée) au compartimentréfrigération. Soulevez la charnière centralepour libérer l’axe de charnière du culot qui setrouve en haut de la porte, et mettez-la de côté,avec ses vis. Faites attention de ne pas perdre lesrondelles et les plaques d’écartement de lacharnière centrale.
INVERSION DU SENS D’OUVERTURE DES PORTES (SUITE)
2

4.1 Enlevez la grille de base (si votre réfrigérateuren a une) en la tirant droit vers vous.
4.3 Changez de côté la charnière (et la cale qui lui estcollée) et les vis en haut à droite avec les vis enhaut à gauche du compartiment. Ne serrez pas lesvis lors de cette opération.
NOTES :
• Certaines charnières ont quatre trous. Les trousque vous utilisez pour monter la charnièredépendent du côté où vous montez la charnière.
• L’arête extérieure de la charnière doit êtreparallèle à l’arête du compartiment, pour unbon montage.
Montage de la charnière àgauche
Montage de la charnière àdroite.
Instructions d’installation
3.4 Posez la porte sur une surface qui ne raye pas.
ENLÈVEMENT DE LA PORTE DUCOMPARTIMENT RÉFRIGÉRATION(SUITE)
3
3.7 Prenez l’une des vis enlevée lors de la deuxièmeétape et engagez-la dans le trou à vis le plusextérieur du côté opposé. Ne le vissez pasjusqu’au bout. Laissez suffisamment d’espacelibre sous la tête de vis pour l’épaisseur de la cale et du support.
3.6 Faites passer la rondelle (si votre modèle en a une) du côté opposé.
3.5 Faites passer les deux vis situées du côté opposédu compartiment dans les deux trous libérés parl’enlèvement de la charnière centrale.
INVERSION DE LAQUINCAILLERIE DE MONTAGE
4
45
4.2 Déplacez le support de la charnière inférieure (et lacale qui est collée) et la rondelle en plastique du côtédroit au côté gauche.
Rondelle enplastique
Support de charnière
Modèles avec support decharnière qui ont deux trous de vis.
Modèles avec support decharnière qui ont quatre trous devis.Changez l’axe de charnière aucôté opposite de la charnière.
Rondelle enplastique
Support de charnière

INVERSION DU SENS D’OUVERTURE DES PORTES (SUITE)
2
46
Vis pour lestrous de lapoignée
Instructions d’installation
INVERSION DES POIGNÉES DEPORTE
5
5.1 Transfert de la poignée du
compartiment réfrigération
5.1.1 Enlevez le bouchon inférieur en le poussantvers le bas de la porte et enlevez la vis qui setrouve sous ce bouchon. Enlevez les deux visqui tiennent la poignée au haut de la porte.
5.1.2 Enlevez la poignée.
5.1.3 Enlevez les vis à droite de l’arête du haut de laportes et insérez-les dans les trous de vis de lapoignée du côté opposé.
Haut
5.1.5 Enlevez le bouchon du devant de la porte en letirant et faites le passer de l’autre côté.
5.2 Transfert de la butée de porte
5.2.1 Faites passer la butée de porte de l’extrémité dedroite à celle de gauche.
5.1.4 À l’aide d’un couteau à mastic ou d’untournevis à lame mince, dont vous aurezrecouvert le tranchant par du ruban adhésif,enlevez soigneusement le bouchon du trou dela charnière du côté gauche de la porte etinsérez-le dans le trou du côté opposé, qui a été libéré par l’enlèvement de la charnièresupérieure.
Pour retirer la poignée du côté opposé
Bouchon
Butée de porte
Côté gauche
Bouchon

5.2 Transfert de la butée de porte (suite)
5.2.2 Faites passer toutes les vis du côté gauche aucôté droit.
5.4 Transfert de la poignée du
compartiment congélation
5.4.1 Enlevez la vis qui tient la poignée en haut de laporte et les deux vis qui tiennent la poignée enbas de la porte.
5.4.2 Enlevez la poignée.
5.4.3 Enlevez la vis située à droite de l’arête du hautde la porte et remettez la dans le trou de vis depoignée du côté gauche.
TOP
BOTTOM
Haut
Bas
Instructions d’installation
Côté droit
5.3 Remontage de la poignée du
compartiment réfrigération
5.3.1 Fixez la poignée sur le côté droit de la porte àl’aide des vis en haut et en dessous du bouchonde poignée.
5.3.2 Remontez le bouchon de poignée.
47

48
INVERSION DU SENS D’OUVERTURE DES PORTES (SUITE)
2
Instructions d’installation
5.4 Transfert de la poignée du
compartiment congélation (suite)
5.4.4 Transférez la butée de porte comme indiqué auxpages précédentes.
5.4.5 Fixez la poignée à droite de l’arête de la porteavec des vis en haut et en bas, en utilisant lestrous du bas libérés par l’enlèvement des vis dela butée de porte.
6.1.2 Insérez l’axe de la charnière centrale dans le culot du haut de la porte. Placez la cale, puis la rondelle, sur l’axe de charnière. NOTE : La charnière centrale doit êtreretournée comme l’indique l’illustration pour être montée du côté gauche.
6.1.3 Faites basculer la porte vers le compartiment.En mettant la porte en place, faites glisser lacharnière sous la tête de la vis que vous avezauparavant en partie vissée dans le trouextérieur. Insérez la vis restante, puis serrez fort les deux vis.
Cale et rondelle enmatière plastique
Axe de charnière
6.1 Remontage de la porte du réfrigérateur
6.1.1 Placez la porte du réfrigérateur surl’axe de charnière inférieure. Assurez-vous que la rondelle se trouve bien sur l’axe.
REMONTAGE DES PORTES6
Axe decharnière
Rondelle en plastique
Rondelle enplastique
Axe decharnière
Modèles avec support decharnière qui ont deux trous de vis.
Modèles avec support decharnière qui ont quatre trousde vis.

6.2 Réaccrochez la porte du
compartiment congélation
6.2.1 Placez la porte du compartiment congélation sur l’axe de la charnière centrale en la faisantdescendre. Assurez-vous que la cale et larondelle soient en place sur l’axe de charnière.
Instructions d’installation
RÉACCROCHAGE DES PORTES(SUITE)
6
Axe de charnière centrale
Rondelle de matièreplastique et cale
6.2.2 Faites basculer la porte vers le compartiment,en soulevant la charnière du haut de manière àfaire entrer l’axe dans le culot situé en haut dela porte.
6.2.3 Assurez-vous que la porte dépasse légèrement le haut du compartiment et que l’écartemententre les portes soit bien parallèle à l’avant duréfrigérateur. Serrez les vis de la charnièresupérieure. Ne serrez pas trop fort ces vis, maisserrez-les jusqu’à ce qu’elles tiennent, puisajoutez un demi-tour.
49

Bruits normaux de fonctionnement.Selon son emplacement dans votre cuisine, vous pouvez mettre un morceau de tapis caoutchouté sous votre réfrigérateur pour réduire son bruit.
Selon son emplacement dans votre cuisine, vous pouvez mettre un morceau de tapiscaoutchouté sous votre réfrigérateur pour réduire son bruit.
Bruit de ventilateur. Le ventilateur fait circuler de l’air dans le compartimentcongélation pour maintenir une température uniforme.
Sifflement, crépitement ou craquement. L’eau coule sur le chauffage du dégivreurpendant le cycle de dégivrage.
Sifflement, crépitement ou craquement. Les bobines de refroidissement se contractentou s’élargissent pendant le cycle de dégivrage.
Gouttes d’eau qui tombent. De l’eau s’égoutte quand elle se condense dansl’évaporateur et s’écoule dans le plateau de dégivrage pendant le cycle de dégivrage.
Machine à glaçons (sur certains modèles)
Le robinet d’alimentation d’eau de la machine à glaçons émet un bourdonnementquand la machine à glaçons se remplit d’eau. Si le commutateur est en position I (marche), un bourdonnement se fait entendre même si la machine n’a pas encoreété branchée à l’alimentation d’eau. Si vous conservez le commutateur en position
I (marche) avant de brancher la machine à l’alimentation d’eau, vous risquezd’endommager votre machine. Pour éviter tous dégâts, mettez le commutateur en position O (arrêt). Le bourdonnement s’arrêtera.
Les glaçons tombent dans le bac et l’eau coule dans les canalisations pendant leremplissage de la machine à glaçons.
Avant d’appeler un réparateur. . .Liste de vérifications préventivesÉconomisez votre temps et votre argent! Consultez les tableaux despages suivantes, vous éviterez peut-être d’appeler un réparateur.
Votre problème Causes possibles Solutions
Votre réfrigérateur ne Votre réfrigérateur se trouve • Attendez environ 30 minutes la fin du dégivrage.fonctionne pas dans son cycle de dégivrage.
Le bouton de réglage de • Tournez le bouton de réglage de température en température est en position 0. position plus élevée.
Le réfrigérateur est débranché. • Poussez la fiche complètement dans la prise murale.
Le fusible a sauté ou le • Changez le fusible ou rebranchez le disjoncteur.disjoncteur a sauté.
Vibrations ou bruits Les vis des roulettes ou les • Consultez Roulettes et pieds de nivellement.de casse pieds de nivellement ont besoin
de réglage.
Ces bruits sont normaux et sontprincipalement occasionnés parun fonctionnement hautementefficace.
50

Votre problème Causes possibles SolutionsC’est normal quand on met enmarche le réfrigérateur pour lapremière fois.
Cela arrive souvent quand onmet beaucoup d’aliments dans le réfrigérateur.
La porte est restée ouverte.
Il fait chaud ou vous ouvrezsouvent la porte.
Le bouton de réglage detempérature est mis à saposition la plus froide.
La grille et le condensateur ontbesoin d’être nettoyés.
Le bouton de réglage detempérature est mis à unetempérature trop basse.
Il fait chaud ou vous ouvrezsouvent la porte.
La porte est restée ouverte.
Un paquet d’aliments bloque la circulation d’air dans lecompartiment congélation.
La porte est restée ouverte.
Vous ouvrez la porte tropsouvent ou trop longtemps.
Le commutateur de marche est en position O (arrêt).
L’alimentation d’eau est arrêtéeou n’est pas branchée.
Le compartiment congélateurest trop chaud.
Une accumulation de glaçonsdans le tiroir à glaçons peutcauser un arrêt de la machine àglaçons.
Le robinet d’arrêt de l’eau quirelie le réfrigérateur à lacanalisation d’eau peut êtrebouché.
La porte est restée ouverte.
Le bouton de réglage detempérature est mis à unetempérature trop basse.
• Attendez 24 heures que le réfrigérateur se refroidissecomplètement.
• C’est normal.
• Vérifiez que la porte se ferme bien.
• C’est normal.
• Consultez Bouton de réglage de température.
• Consultez Soins et nettoyage de votre réfrigérateur.
• Consultez Bouton de réglage de température.
• Mettez le bouton de réglage de température un numéro plusfroid. Consultez Bouton de réglage de température.
• Vérifiez que la porte se ferme bien.
• Vérifiez que des aliments ne bloquent pas la sortie d’air dans lecompartiment congélation.
• Vérifiez que la porte se ferme bien.
• Mettez le commutateur de marche en position I (marche).
• Des glaçons se sont collés sur les côtés du moule. Mettez lecommutateur en position O (arrêt), puis enlevez les glaçons.
• Consultez Installation de la conduite d’eau.
• Attendez 24 heures que le réfrigérateur soit complètementfroid.
• Égalisez les glaçons à la main.
• Appelez un plombier ou purgez le robinet.
• Vérifiez que la porte se ferme bien.
• Consultez Bouton de réglage de température.
51
Le moteur fonctionnependant de longuespériodes ou se met enmarche et s’arrêtefréquemment (lesréfrigérateurs modernes,qui ont davantage d’espace de rangement etun compartimentcongélation plus grand,nécessitent plus de tempsde fonctionnement. Ils semettent en marche ets’arrêtent souvent pourmaintenir des températures constantes).
Le compartimentréfrigération oucongélation est trop chaud
Du givre ou des cristaux de glace se forment sur les aliments congelés (dugivre à l’intérieur despaquets d’aliments estnormal)La machine à glaçonsautomatique ne fonctionnepas (sur certains modèles)
Les glaçons sont trop petits
La formation des glaçonsest lente

Avant d’appeler un réparateur. . .
Votre problème Causes possibles Solutions
Liste de vérifications préventives
Les glaçons ont une odeur ou un goût
De l’humidité se forme sur la surface descompartiments entre les portes
De l’humidité se forme àl’intérieur (quand il faithumide, l’aire transporte de l’humidité à l’intérieurdu réfrigérateur quandvous ouvrez les portes)
Le réfrigérateur sent
Le bac à glaçons doit êtrenettoyé.
Les aliments donnent de l’odeurou du goût aux glaçons.
L’intérieur du réfrigérateur abesoin d’être nettoyé.
Ce n’est pas inhabituel pendantdes périodes d’humidité élevée.
Vous ouvrez les portes tropsouvent ou trop longtemps.
Les aliments donnent une odeur au réfrigérateur.
L’intérieur a besoin d’unnettoyage.
• Videz et lavez le bac à glaçons. Jetez les vieux glaçons.
• Emballez bien les aliments.
• Consultez Soins et nettoyage de votre réfrigérateur.
• Essuyez la surface pour bien la sécher et mettez le bouton deréglage de température un numéro plus froid.
• Vous devez bien empaqueter les aliments.
• Conservez une boîte ouverte de bicarbonate de soude dansvotre réfrigérateur; remplacez-la tous les trois mois.
• Consultez Soins et nettoyage de votre réfrigérateur.
52

Información de seguridadCómo conectar a la red eléctrica.... 55Normas de seguridad ...................... 54
Instrucciones de funcionamientoCajones de almacenaje ...............59, 60Controles de temperatura ................56Cuidado y limpieza .................... 61, 62Dispositivo automático para fabricar hielo.....................................60Estantes........................................57, 58
Instrucciones de instalaciónCambio de lado de apertura de la puerta ................................ 66–72Instalación de la toma de agua ....................................... 64, 65Preparación de instalación del frigorífico ................................... 63
Consejos de Solución de ProblemasAntes de llamar al servicio técnico........................73–75Sonidos normales de operación ......73
Anote aquí los números de modelo y de serie:
Número de modelo ____________________
Número de serie ______________________
Podrá encontrarlos en una etiqueta en la parte superior izquierda delcompartimiento de productos frescos.
53

¡PRECAUCIÓN!Use este aparato sólo para los fines que se describen en este Manual del usuario.
NORMAS DE SEGURIDADCuando use electrodomésticos, siga las normas básicas de seguridad, incluyendo las siguientes:
�� Antes de usarse, este frigorífico deberá estarinstalado y ubicado de acuerdo con lasinstrucciones de instalación. Ver también lasección Cómo Conectar la Electricidad.
�� No intente ponerse de pie sobre el frigorífico. Eso podría resultar en daños personales o delfrigorífico.
�� Evite que los niños jueguen con el frigorífico oque manipulen indebidamente los controles.
�� No permita que los niños se suban, se pongan de pie en los entrepaños del frigorífico o secuelguen de los mismos. Podría dañarse elfrigorífico y además causarles serias lesiones.
�� No toque las superficies frías del congelador conlas manos húmedas o mojadas. La piel se podríaadherir a las superficies extremadamente frías.
�� No almacene ni use gasolina ni otros vapores olíquidos inflamables cerca de éste o de cualquierotro aparato.
�� No toque las áreas donde se puede pinchar losdedos; los espacios entre las puertas y entre las puertas y los gabinetes son estrechos por
necesidad. Cierre las puertas con cuidado cuandohayan niños cerca.
�� Si su frigorífico tiene un dispositivo automáticopara hacer hielo, evite el contacto con las partesmóviles del mecanismo de expulsión, o con elelemento calefactor que desprende los cubos. No ponga los dedos ni las manos en el mecanismoautomático para hacer hielo mientras el frigoríficoesté conectado.
�� Desconecte el frigorífico antes de limpiarlo o efectuar reparaciones.
OBSERVACIÓN: Recomendamos enfáticamente encargarcualquier reparación servicio de asistencia técnica.
�� Antes de reemplazar una bombilla fundida, elfrigorífico deberá ser desconectado para evitar el contacto con un cable con corriente. (Una bombilla quemada podría romperse alreemplazarla.)
OBSERVACIÓN: El colocar el control del congelador enposición 0 no quita la corriente del circuito de la luz.
�� No vuelva a congelar los alimentos congeladosuna vez que se hayan descongelado por completo.
54
CÓMO ELIMINAR SU FRIGORÍFICO DE FORMA APROPIADAEl riesgo de que los niños queden atrapados y seasfixien no es un problema del pasado. Losfrigoríficos abandonados o tirados…aunque sea sólo por unos pocos días siguen siendo un peligro.Si se deshace de su viejo aparato, por favor siga lasinstrucciones que le damos a continuación, paraayudar a prevenir accidentes.
Antes de deshacerse de su viejo frigorífico o congelador:� Quite todas las puertas y tírelas por separado.
� Deje los entrepaños en su sitio para que los niños no se suban encima.
� Si su viejo frigorífico tiene un candado,inutilícelo.
RefrigerantesTodos los aparatos de refrigeración contienenrefrigerantes, los cuales se deben retirar antes de laeliminación del producto de acuerdo con la leyfederal. Si va a desechar algún aparato antiguo derefrigeración, consulte con la compañía a cargo dedesechar el aparato para saber qué hacer.
¡PELIGRO! RIESGO DE QUE UN NIÑO PUEDAQUEDAR ATRAPADO
INFORMACIÓN IMPORTANTE DE SEGURIDAD. PRIMERO LEA COMPLETAMENTE LAS INSTRUCCIONES.
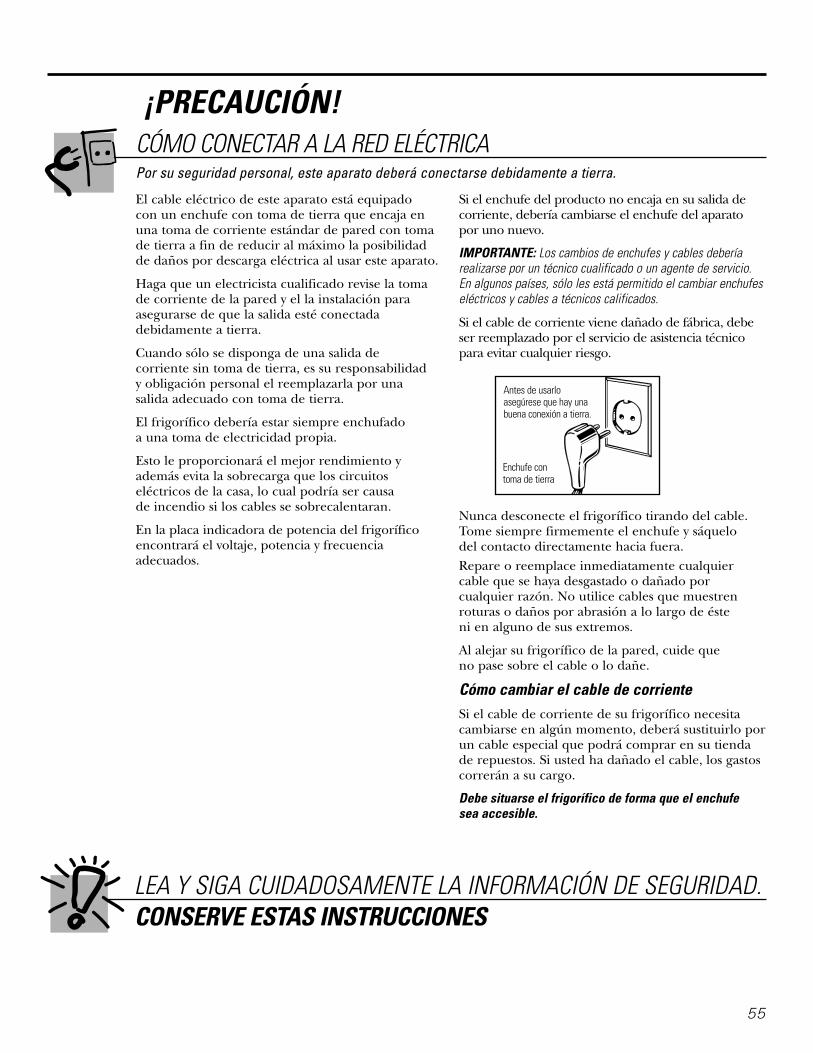
El cable eléctrico de este aparato está equipado con un enchufe con toma de tierra que encaja enuna toma de corriente estándar de pared con tomade tierra a fin de reducir al máximo la posibilidadde daños por descarga eléctrica al usar este aparato.
Haga que un electricista cualificado revise la tomade corriente de la pared y el la instalación paraasegurarse de que la salida esté conectadadebidamente a tierra.
Cuando sólo se disponga de una salida de corriente sin toma de tierra, es su responsabilidad y obligación personal el reemplazarla por una salida adecuado con toma de tierra.
El frigorífico debería estar siempre enchufado a una toma de electricidad propia.
Esto le proporcionará el mejor rendimiento yademás evita la sobrecarga que los circuitoseléctricos de la casa, lo cual podría ser causa de incendio si los cables se sobrecalentaran.
En la placa indicadora de potencia del frigoríficoencontrará el voltaje, potencia y frecuenciaadecuados.
Si el enchufe del producto no encaja en su salida decorriente, debería cambiarse el enchufe del aparatopor uno nuevo.
IMPORTANTE: Los cambios de enchufes y cables deberíarealizarse por un técnico cualificado o un agente de servicio.En algunos países, sólo les está permitido el cambiar enchufeseléctricos y cables a técnicos calificados.
Si el cable de corriente viene dañado de fábrica, debeser reemplazado por el servicio de asistencia técnicopara evitar cualquier riesgo.
Nunca desconecte el frigorífico tirando del cable.Tome siempre firmemente el enchufe y sáquelo del contacto directamente hacia fuera.Repare o reemplace inmediatamente cualquiercable que se haya desgastado o dañado porcualquier razón. No utilice cables que muestrenroturas o daños por abrasión a lo largo de éste ni en alguno de sus extremos.
Al alejar su frigorífico de la pared, cuide que no pase sobre el cable o lo dañe.
Cómo cambiar el cable de corrienteSi el cable de corriente de su frigorífico necesitacambiarse en algún momento, deberá sustituirlo porun cable especial que podrá comprar en su tiendade repuestos. Si usted ha dañado el cable, los gastoscorrerán a su cargo.
Debe situarse el frigorífico de forma que el enchufe sea accesible.
55
¡PRECAUCIÓN!CÓMO CONECTAR A LA RED ELÉCTRICA
LEA Y SIGA CUIDADOSAMENTE LA INFORMACIÓN DE SEGURIDAD.CONSERVE ESTAS INSTRUCCIONES
Antes de usarloasegúrese que hay unabuena conexión a tierra.
Enchufe contoma de tierra
Por su seguridad personal, este aparato deberá conectarse debidamente a tierra.

El selector de control de temperatura.
Ajuste de controles
Al girar el control a 0 se detiene el enfriado en ambos compartimientos: cajón de alimentos frescos y congelador. No desconecta el frigorífico.
Después de ajustar los controles, espere 24 horas para que el aparato alcance la temperatura deseada.
Compartimiento dealimentos congelados
Compartimiento dealimentos frescos
5 (ajuste más frío)
Sin escarcha Límites de temperatura ambiente No hay necesidad de descongelar el congelador o el compartimiento de alimentos frescos. Aunque sufrigorífico está diseñado y equipado para descongelarseautomáticamente, es normal que aparezca un poco de escarcha en los envases.
Este aparato está diseñado para funcionar en las temperaturasambientes especificadas por su Clase de Temperatura, queestá marcada en la placa indicadora de potencia.
Temperatura Símbolo Temperatura AmbienteClase de Máximo Mínimo
ExtendidoTemplado SN 32 °C 10 °C
Templado N 32 °C 16 °C
Subtropical ST 38 °C 18 °C
Tropical T 43 °C 18 °C
OBSERVACIÓN: La temperatura interna puede verse afectada porfactores como la ubicación del aparato, la temperatura ambiente y lafrecuencia con que se abren las puertas. Ajuste los controles detemperatura según lo requiera a fin de compensar estos factores.
Aire frío
Aire frío
1 (ajuste más cálido)
56
Alimentos frescosEl selector de control de alimentos frescos tiene nueveposiciones más 0. 1 es el más cálido. 9 es el más frío.Inicialmente, fije el selector en 5. Al usar el frigorífico, ajuste el selector de temperatura, en caso de ser necesario.
Inserte una moneda en la ranura del centro del selector para girarlo.
Espere 24 horas para que el aparato se enfríe.
OBSERVACIÓN: Cuando ajusta el control a 0 ambos compartimientosdejan de enfriar–el cajón de alimentos frescos y el congelador–peroel frigorífico no se apaga.
Alimentos congeladosAl principio, ponga el botón en 3. El control de alimentoscongelados mueve un regulador de tiro para variar la cantidadde aire frío que se desplaza desde el compartimiento dealimentos congelados al de alimentos frescos.
12
34
5

57
Los estantes del compartimiento de alimentos frescos.El soporte de los estantes a distintos niveles le permite ajustar el espacio a sus necesidades. No todos los modelostienen todas las características.
Estantes completosAlgunos modelos cuentan con un estantedeslizante sobre alambre de acero, otro fijode vidrio templado o dos fijos de alambre de acero. Estos estantes pueden moverse acualquier parte del compartimiento dealimentos frescos.
El estante deslizante completo cuenta con topes. Cuando se los coloca los topescorrectamente sobre su soporte, el estante se detendrá antes de que quedarcompletamente fuera del frigorífico y no se moverá cuando coloque o retirealimentos del mismo.
Para retirar los estantes anchos, levántelos porla parte posterior y llévelos hacia adelante.
Para retirar un estante ancho cuando la puertadel compartimiento de alimentos frescos no sepuede abrir por completo, levante la parteposterior del estante, tire hacia adelante yhacia abajo, levante el estante y sáquela.
Estantes semiampliosUn extremo del estante se apoya en unsoporte lateral; en el otro extremo otrosoporte se sujeta a una guía en la paredposterior del frigorífico.
Para retirar, levante el estante hacia el frentey quítelo del soporte y de las guías.
Para volver a colocarlo, seleccione la alturadeseada para el estante. Con el frente delestante levemente levantado, introduzca elsoporte en la guía, y luego baje el estantehasta el soporte.
OBSERVACIÓN: El estante a la derecha de la guíaestá diseñado para sujetarse en la ranura del ladoderecho, el estante a la izquierda está diseñado parasujetarse en la ranura del lado izquierdo.
2 Tire hacia arriba y hacia fuera
1 Levántelo

58
Los estantes del compartimiento de alimentos congelados.Algunos modelos tienen un estante con bandeja para hielo y otros cuentan con un estante completo.
Estante para la bandeja del hieloPara retirar el estante de la bandeja del hielo,levante el lado izquierdo del estante fuera de su soporte, luego tire del mismo a laizquierda para soltarlo del soporte de clavija.Mueva el estante a la derecha para soltar lospivotes de los orificios en la pared delfrigorífico.
Estante graduado Para retirar el estante graduado:
Levante levemente el lado izquierdo delestante.
Mueva el estante a la izquierda para sacar suextremo derecho de los orificios en lapared del frigorífico.
Baje el lado derecho del estante, despláceloa la derecha y sáquelo.
Para volver a colocar el estante graduado:
Con el estante inclinado como se mostró,ajuste el extremo izquierdo del estante enlos orificios de la pared del frigorífico.
Levante levemente el lado izquierdo delestante, desplácelo hacia arriba, ajuste suextremo derecho en los orificios en lapared del frigorífico y baje el estante a sulugar.
2
1
3
2
1
Soportes de clavija
Bandejas de hielo (en algunos modelos)
Las bandejas de hielo están diseñadas paraliberar los cubitos fácilmente. Invierta labandeja sobre un recipiente, y curve ambosextremos para liberar los cubitos.
Para sacar solamente uno o dos cubitos, deje la bandeja hacia arriba, gire ligeramenteambos extremos y saque el número deseadode cubitos. Lave las bandejas y el recipiente de almacenamiento sólo con agua tibia. No lascoloque en el lavavajillas.

Cómo sacar el cajón de almacenaje y la cubierta.No todos los modelos tienen todas las características.
Cómo sacar el cajón y la cubiertaLos cajones se pueden extraer fácilmentecogiéndolos por los lados y levantándolossuavemente mientras se tira de ellos hastapasar el punto de tope.
Cajón ancho con cubierta de plásticoPara sacar la cubierta, levántela de sussoportes, tire hacia adelante, levántela y sáquela.
Cajones para frutas y verdurasEl exceso de agua que pueda acumularse en el fondo de las gavetas debe ser vaciado y las gavetas deben ser secadas.
CajónEl cajón se puede mover para colocarlodonde sea más práctico para su familia.
59
Rendimiento del congeladorEste refrigerador/congelador tiene unacalificación general de “Cuatro Estrellas”
.
El rendimiento del congelador está evaluadopor calificaciones de estrellas definidas por elESTÁNDAR Y RESUMEN ISO 8561ESPECIFICADO MÁS ADELANTE:
CÓDIGO:
or
TEMP. DE LA CARGA CONGELADA(TEMPERATURA DE LOS ALIMENTOS)
Menos que -6°C.
Menos que -12°C.
Menos que -18°C.

60
Un frigorífico recién instalado puede tardar de 12 a 24 horas en empezar a hacer hielo.
Dispositivo dehacer hielo
Brazo detector
Interruptorde corriente
Accesorios del dispositivo automático para hacer hieloSi su frigorífico no estaba equipado de seriecon un dispositivo automático para hacerhielo, puede adquirir un dispositivo parahacer hielo, por un precio adicional.
Vea la parte trasera de su frigorífico parasaber el juego de accesorios de dispositivopara hacer hielo que su modelo necesitaespecíficamente.
Dispositivo automático para fabricar hieloEl dispositivo para hacer hielo dispensarásiete cubitos por ciclo—aproximadamente100–130 cubitos en un período de 24 horas,dependiendo de la temperatura delcongelador, de la temperatura ambiente, del número de veces que se abra la puertay de otras condiciones de uso.
Si el frigorífico se conecta antes de instalar latoma de agua en el dispositivo para fabricarhielo, ponga el interruptor de corriente en O (apagado).
Cuando el frigorífico se haya conectado alsuministro de agua, ponga el interruptor en la posición I (activado). La luz verde decorriente se encenderá.
El dispositivo para hacer hielo se llenará de agua cuando la temperatura alcance elpunto de congelación. Un frigorífico reciéninstalado puede tardar entre 12 y 24 horasen empezar a fabricar hielo.
Tire las primeras cargas de cubitos de hielopara permitir que el circuito de agua selimpie.
Asegúrese que nada impida el movimiento del brazo detector.
Cuando el recipiente se llene hasta el niveldel brazo detector, el dispositivo para hacerhielo dejará de fabricarlo.
Es normal que algunos cubitos salganpegados.
Si no se usa hielo con frecuencia, los cubitosde hielo viejos se opacan, disminuyen detamaño y adquieren un sabor desagradable.
Si los cubitos se atascaron en el dispositivopara hacer hielo, la luz verde de corrienteparpadeará. Para corregir esto, ponga elinterruptor de corriente en la posición O (apagado) y retire los cubitos. Ponga elinterruptor de corriente en la posición I (activado) para volver a poner en marcha el dispositivo para hacer hielo.
OBSERVACIÓN: En hogares con una presión deagua inferior al promedio, escuchará varias veces elciclo de producción de hielo cuando se fabrica unaremesa de cubitos.
Luz verde decorriente
El dispositivo automático para fabricar hielo. (en algunos modelos)
Cajones gemelos con cubierta de vidrioPara sacarla:
Retire los cajones.
Tire del frente de la cubierta de vidrio, y al mismo tiempo, tire hacia adelantetanto como pueda.
Levántelo y sáquelo. Evite limpiar la cubiertade vidrio fría con agua caliente, dado que elcambio extremo de temperatura podríahacer que se rompiera.
Retire el marco del cajón. (Retiresiempre la cubierta de vidrio antes de retirar el marco del cajón).
Saque el marco de sus soportes a amboslados y atrás, tire hacia adelante, levántelo y sáquelo.
Para cambiarla:
Baje el marco hasta que se apoye sobrelos soportes a ambos lados y hacia atrás.
Vuelva a colocar la cubierta de vidrio,empuje su borde trasero firmemente enel canal del marco posterior y bajesuavemente el frente a su sitio.
Vuelva a colocar los cajones.3
2
1
3
21
Cómo sacar el cajón de almacenaje y la cubierta.

Cuidado y limpieza del frigorífico.Limpieza del exteriorMangos y adornos de la puerta (en algunosmodelos). Se limpian con un pañohumedecido con una solución de detergentesuave y agua. Seque con un paño suave.
Mantenga limpio el exterior. Límpielo con unpaño limpio ligeramente humedecido concera para aparatos de cocina o con undetergente neutro y agua. Seque y abrillantecon un paño limpio y suave.
No limpie el frigorífico con un paño sucio nihúmedo. Estos podrían dejar residuos quedañen la pintura. No use estropajos, detergentesen polvo, lejía ni limpiadores que contenganlejía, ya que estos productos podrían rayar ydesprender el acabado de pintura.
Limpieza del interiorPara evitar olores, deje una recipiente debicarbonato de sodio destapado en loscompartimientos de alimentos frescos y del congelador.
Desconecte el frigorífico antes de limpiarlo.Si no fuera posible, escurra el exceso dehumedad de la esponja o del paño cuandolimpie alrededor de botones, bombillas o controles.
Use agua caliente y una solución debicarbonato de sodio—aproximadamente 15 ml de bicarbonato de sodio por cada litrode agua. Esta solución limpia y neutralizaolores. Aclare bien y séquelo.
Después de limpiar las juntas de las puertas,aplique una capa delgada de vaselina al ladode la bisagra. Esto ayuda a evitar que lasjuntas se doblen o se peguen.
Evite limpiar los estantes de vidrio fríos (enalgunos modelos) con agua caliente dado que el cambio extremo de temperatura podría hacerque se rompieran. Maneje los estantes de vidriocon cuidado. Golpear un vidrio templado puedehacer que se rompa en pedazos.
No lave ninguna parte plástica del frigorífico en el lavavajillas.
CondensadorEn ambientes de uso casero normal lalimpieza rutinaria del condensador no esnecesaria. Sin embargo, en ambientes quepuedan ser particularmente grasientos o conmucho polvo, el condensador deberíalimpiarse de forma periódica para el buenfuncionamiento del frigorífico.
Para limpiar el condensador, gire el selectorde control de temperatura a 0. Barra o aspireel polvo.
Para obtener los mejores resultados, use un cepillo para este propósito. Puedeadquirir uno en la mayoría de las tiendas de repuestos para electrodomésticos.
Limpieza del serpentín del condensador.
Apriete para liberar el gancho.
Sustitución de la bombilla (en algunos modelos)Hay una bombilla y un toma eléctrica en la parte superior del compartimiento dealimentos frescos, al lado contrario del panelde control de temperatura.
Para reemplazar la bombilla, desenchufeprimero el aparato. Coloque su mano bajo la pantalla de luz y libere el gancho en elextremo de la bombilla. (La pantalla de labombilla sólo se encuentra en algunosmodelos).
61
62
Cuidado y limpieza del frigorífico.Detrás del frigoríficoSe deberá tener cuidado al retirar elfrigorífico de la pared. Todos los tipos derecubrimiento de pisos se pueden dañar,sobre todo los recubrimientos acojinados y los que tienen superficies repujadas.
Gire las patas de nivelación en cada esquinafrontal del frigorífico en sentido contrario a las agujas del reloj hasta que los rodillos densostén al frigorífico. Tire del frigorífico enforma recta y empuje nuevamente paradevolverlo a su posición. Mover el frigoríficoen dirección lateral puede causar daños alrecubrimiento del piso o al frigorífico.
Cuando empuje el frigorífico hacia atrás, debeasegurarse de que no esté pasando por encima del cable de corriente o de la línea de agua deldispositivo automático de hielo (en algunos modelos).
Después de colocar el frigoríficonuevamente en su lugar, gire las patas en el sentido de las agujas del reloj hasta quevuelvan a soportar el peso del frigorífico.
Preparación para vacacionesEn el caso de vacaciones o ausenciasprolongadas, retire los alimentos ydesenchufe el frigorífico. Mueva el controlde temperatura a la posición 0 y limpie elinterior con una solución de bicarbonato de sodio de 15 ml de bicarbonato por 1 litro de agua. Deje las puertas abiertas.
Ponga el interruptor de corriente deldispositivo de hielo en la posición O (apagado)y cierre el paso del agua al frigorífico.
Si la temperatura ambiente pudiera llegar aestar por debajo del punto de congelación,haga que una persona cualificada desagüe elsistema de suministro de agua (en algunosmodelos) para evitar daños a la propiedadcausados por inundación.
Preparación para mudanzasFije todos los elementos sueltos comorejillas, estantes y cajones sujetándolos concinta adhesiva en su lugar para evitar daños.
Asegúrese de que el frigorífico se mantenga derechodurante el desplazamiento.

ANTES DE QUE EMPIECELea todo este manual cuidadosamente.
• IMPORTANTE – Guarde estemanual para que lo pueda usar el inspector local.
• IMPORTANTE – Siga todos loscódigos y leyes relacionados.
• Nota para el instalador – Asegúrese dedevolver el manual de instrucciones al consumidor.
• Nota al consumidor – Guarde este manualpara revisarlo en el futuro.
• Nivel de conocimientos – La instalación de esteelectrodoméstico requiere conocimientosmecánicos básicos.
• Tiempo de montaje – Instalación del frigorífico 15 minutosCambio de lado de aperturade la puerta 1 hora
• El instalador es el responsable de que la instalaciónse efectúe de forma adecuada.
• Los fallos del producto fruto de una instalaciónincorrecta no están cubiertos por la garantía.
• No instale el frigorífico en un lugar donde latemperatura ambiente bajará de los 16 °C ya que nose pondrá en marcha lo suficiente para mantener una temperatura apropiada.
• Instálelo sobre una superficie suficientemente fuertepara aguantar su peso cuando esté lleno.
UBICACIÓN DEL FRIGORÍFICO
Instrucciones Frigoríficode Instalación Modelos 16 y 17
Deje suficiente espacio para facilitar la instalación, la circulación adecuada de aire y las conexiones defontanería y electricidad.
• Por los lados 19 mm
• Por arriba 25 mm
• Por arriba 25 mm
ESPACIOS DE SEGURIDAD
Si el frigorífico tiene un dispositivo de hielo, deberáestar conectado a la tubería de agua potable fría.Puede adquirirse, con un costo adicional, un juego de suministro de agua en su distribuidor local.
La instalación del dispositivo automático de hielo deberealizarse únicamente por un técnico cualificado.
SUMINISTRO DE AGUA AL DISPOSITIVO DE HIELO (en algunos modelos)
DIMENSIONES
Modelo 16 17
A* 1556 mm 1632 mm
B 711 mm 711 mm
C** 787 mm 787 mm
D 1394 mm 1394 mm
E 657 mm 657 mm
F 1346 mm 1346 mm
* La altura no incluye la bisagra—Añada 22 mm para labisagra.
** La profundidad incluye la manija.
63
Anchura
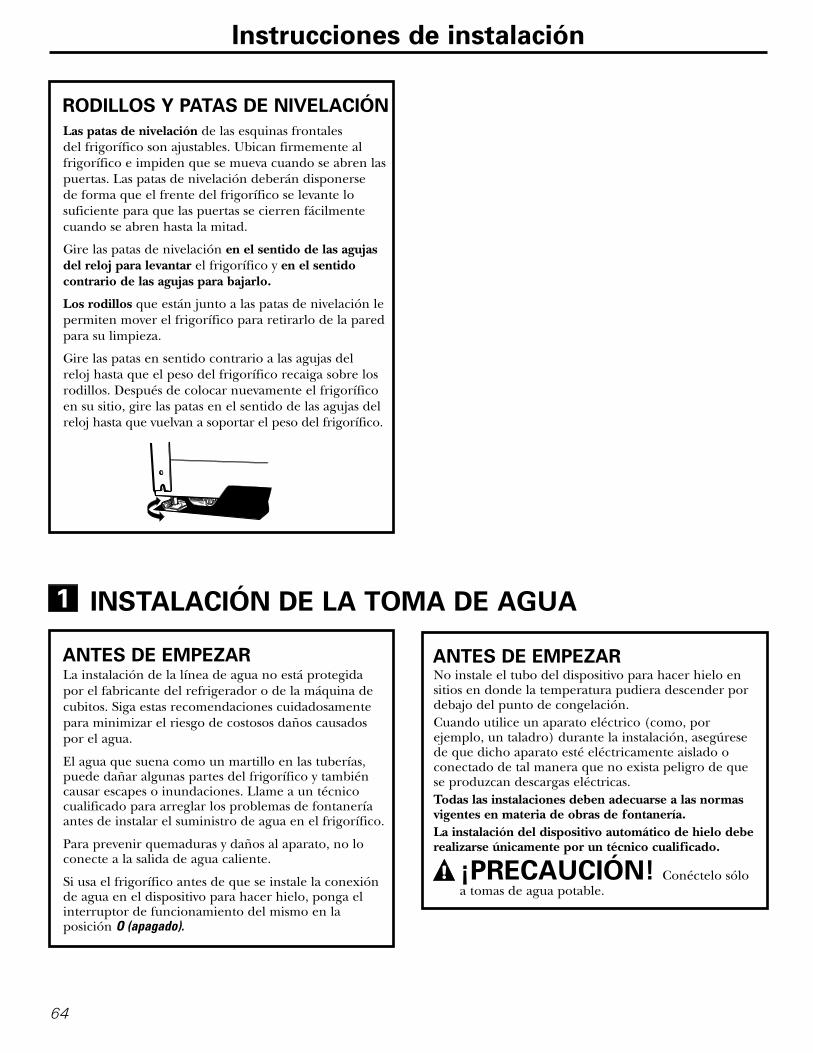
64
Instrucciones de instalación
La instalación de la línea de agua no está protegidapor el fabricante del refrigerador o de la máquina decubitos. Siga estas recomendaciones cuidadosamentepara minimizar el riesgo de costosos daños causadospor el agua.
El agua que suena como un martillo en las tuberías,puede dañar algunas partes del frigorífico y tambiéncausar escapes o inundaciones. Llame a un técnicocualificado para arreglar los problemas de fontaneríaantes de instalar el suministro de agua en el frigorífico.
Para prevenir quemaduras y daños al aparato, no loconecte a la salida de agua caliente.
Si usa el frigorífico antes de que se instale la conexiónde agua en el dispositivo para hacer hielo, ponga elinterruptor de funcionamiento del mismo en laposición O (apagado).
No instale el tubo del dispositivo para hacer hielo ensitios en donde la temperatura pudiera descender pordebajo del punto de congelación.Cuando utilice un aparato eléctrico (como, porejemplo, un taladro) durante la instalación, asegúresede que dicho aparato esté eléctricamente aislado oconectado de tal manera que no exista peligro de quese produzcan descargas eléctricas.Todas las instalaciones deben adecuarse a las normasvigentes en materia de obras de fontanería.La instalación del dispositivo automático de hielo deberealizarse únicamente por un técnico cualificado.
¡PRECAUCIÓN! Conéctelo sóloa tomas de agua potable.
ANTES DE EMPEZAR ANTES DE EMPEZAR
INSTALACIÓN DE LA TOMA DE AGUA1
Las patas de nivelación de las esquinas frontales del frigorífico son ajustables. Ubican firmemente alfrigorífico e impiden que se mueva cuando se abren laspuertas. Las patas de nivelación deberán disponerse de forma que el frente del frigorífico se levante losuficiente para que las puertas se cierren fácilmentecuando se abren hasta la mitad.
Gire las patas de nivelación en el sentido de las agujasdel reloj para levantar el frigorífico y en el sentidocontrario de las agujas para bajarlo.
Los rodillos que están junto a las patas de nivelación lepermiten mover el frigorífico para retirarlo de la paredpara su limpieza.
Gire las patas en sentido contrario a las agujas del reloj hasta que el peso del frigorífico recaiga sobre losrodillos. Después de colocar nuevamente el frigoríficoen su sitio, gire las patas en el sentido de las agujas delreloj hasta que vuelvan a soportar el peso del frigorífico.
RODILLOS Y PATAS DE NIVELACIÓN

65
Instrucciones de instalación
INSTALACIÓN DE LA TOMA DE AGUA (CONT.)1
OBSERVACIONES:• Antes de efectuar la conexión al frigorífico,
asegúrese de que el cable no esté enchufado a latoma de corriente de la pared.
• Si su abastecimiento de agua contiene arena opartículas que pudieran obstruir la válvula delagua del frigorífico, recomendamos que instale un filtro para agua. Instálelo en el tubo de aguacerca del frigorífico.
Retire la cubierta de acceso.
CONECTE EL TUBO ALFRIGORÍFICO
1
Coloque la tuerca de compresión y la férula(manga) al extremo del tubo, tal como se indica en la ilustración.
Inserte el extremo de la tubería en la conexión dela válvula de agua hasta donde sea posible. Mientrasusted sostiene el tubo, apriete el ajuste.
Apriete la tubería en la abrazadera proporcionadapara sostenerla en una posición vertical. Quizásusted necesite hacer un pequeño esfuerzo para abrir la abrazadera.
Retire el tapón de plástico flexible de la válvula de agua.
Vuelva a colocar la cubierta de acceso.
Tuerca decompresión típica
Tubos Abrazadera del tubo
Conexión del frigorífico
Férula (manga)
Arregle el rollo de tuberías para que no vibrecontra la parte posterior del refrigerador o contrala pared. Empuje el congelador contra la paredotra vez.
ENCIENDA EL AGUA Y CONECTEEL CONGELADOR.
2
Ponga el interruptor de marcha del dispensador dehielo en la posición I (activado). El dispositivo parahacer hielo no entrará en funcionamiento hastaque haya alcanzado su temperatura de operación de –9 °C, o menos. En dicho momento entrará enfuncionamiento, si el interruptor de corriente deldispositivo está en la posición I (activado).
PONGA EN MARCHA ELDISPOSITIVO PARA FABRICARHIELO
3
Interruptorde corriente
OBSERVACIÓN: En casos en que la presión delagua sea baja, la llave de paso del agua podríatardar hasta tres veces más en llenar de aguasuficiente el dispositivo de hielo.

66
1.1 Desconecte el frigorífico de la red eléctrica.
ANTES DE EMPEZAR1
1.2 Vacíe todos los estantes de la puerta, incluyendoel compartimiento para lácteos.
PRECAUCIÓN: No deje caer la puerta al suelo.Esto podría dañar el tope de la puerta.
Instrucciones de instalación
CAMBIO DE LADO DE APERTURA DE LA PUERTA2
Cuando cambie el lado de apertura de la puerta:• Lea cuidadosamente todas las instrucciones antes
de comenzar.• Maneje las piezas cuidadosamente para evitar dañar
la pintura.• Coloque los tornillos junto a sus respectivas piezas
para evitar colocarlos en los lugares equivocados.• Utilice una superficie que no raspe las puertas.
IMPORTANTE: Una vez que comience no mueva el frigorífico hasta completar el cambio de lado deapertura de la puerta.
Estas instrucciones sirven para cambiar las bisagras dellado derecho al izquierdo—si desea volver a cambiar lasbisagras al lado derecho, siga las mismas instrucciones e invierta todas las referencias a izquierda y derecha.
OBSERVACIONES IMPORTANTES:
DestornilladorPhilips
HERRAMIENTAS REQUERIDAS
Cinta adhesiva
DestornilladorTorx T20 o T25,(necesitado paraalgunos modela)
5/16″ llave decabeza hexagonal
5/16″ llave inglesaEspátula para enmasillaro destornillador de hojadelgada.

2.3 Levante la bisagra (y el ajuste adherido a ella) derecha para soltar la clavija de la bisagra delcasquillo de la parte superior de la puerta ypóngalo a un lado, junto con sus tornillos.
Instrucciones de instalación
2.1 Cierre la puerta herméticamente con cintaadhesiva.
RETIRE LA PUERTA DELCOMPARTIMIENTO DEALIMENTOS CONGELADOS
2 LA PUERTA DELCOMPARTIMIENTO DEALIMENTOS CONGELADOS(CONT.)
2
Bisagrasuperior
2.2 Con un destornillador de cabeza hexagonal de5/16″, retire los tornillos que sostienen labisagra superior al armario.
2.5 Coloque la puerta sobre una superficie que nola raye, con el lado exterior hacia arriba.
2.4 Retire la tapa y separe la puerta del frigorífico.Extraiga el eje de la bisagra central.
67
2.6 Pase los dos tornillos del lado opuesto delfrigorífico a los orificios de los tornillos quehan quedado libres al retirar la bisagrasuperior.

68
CAMBIO DE LADO DE APERTURA DE LA PUERTA (CONT.)2
3.7 Tome uno de los tornillos que retiró en el paso 2 y colóquelo en el orificio más externo del ladoopuesto. No lo introduzca totalmente—dejesuficiente espacio bajo la cabeza del tornillo para la cuña y la abrazadera.
Instrucciones de instalación
3.1 Cierre la puerta herméticamente con cintaadhesiva.
RETIRE LA PUERTA DELCOMPARTIMIENTO DEALIMENTOS FRESCOS
3 3.4 Coloque la puerta sobre una superficie que no laraye con el lado exterior hacia arriba.
3.3 Retire la tapa y separe la puerta del frigorífico.Saque la puerta de la clavija de la bisagra inferior.(Si la arandela plástica se adhiere al suelo, vuélvalaa colocar en la bisagra).
3.2 Usando un destornillador 5/16″ de cabezahexagonal y una llave de tuercas 5/16″ deextremo abierto, retire los dos tornillos queunen la bisagra central (y la cuña adherida a losmismos) al frigorífico. Levante la bisagra centralpara soltar su clavija del casquillo y coloque labisagra y los tornillos aparte. Tenga cuidado deno perder el espaciador y la arandela de la bisagracentral.
3.6 Transfiera la arandela (si su modelo la incluye) allado opuesto.
3.5 Pase los dos tornillos del lado opuesto delfrigorífico a los orificios de los tornillos que hanquedado libres al retirar la bisagra central.

Instrucciones de instalación
CAMBIO DE LADO DELHARDWARE
4
4.1 Retire la rejilla de la base (si su frigorífico laincluye) desplazándola a la derecha.
4.3 Intercambie la bisagra (y la cuña unida a ella) yatorníllela en la parte superior derecha con lostornillos de la parte superior izquierda delfrigorífico. No ajuste los tornillos sobre el lado de la bisagra en este momento.
OBSERVACIONES:• Algunas bisagras tienen cuatro orificios. Los
orificios a utilizar para la instalación de la bisagradependen del lado al que instale la bisagra.
• Para una instalación correcta, el lado exterior de la bisagra debe estar paralelo al borde frontalde la encimera.
Instalación de la bisagra a laizquierda.
Instalación de la bisagra a laderecha.
CAMBIO DE LADO DE APERTURADE LA PUERTA
5
5.1 Transfiera el tirador de la puerta de
alimentos frescos
5.1.1 Retire la tapa inferior empujándola hacia la base de la puerta y retire el tornillo dedebajo. Retire los dos tornillos sosteniendoel tirador en la parte superior de la puerta.
5.1.2 Quite el tirador.
Parte superior
69
5.1.3 Retire los tornillos del borde derecho de laparte superior de la puerta e insértelos en losorificios de los tornillos del tirador del ladoopuesto.
Tornillos paraorificios de lostiradores
4.2 Mueva el gancho de la bisagra inferior (y láminapegada a ésta) y la arandela plástica del ladoderecho al izquierdo.
ArandelaPlástica
Soporte dela bisagra
Modelos con un soporte debisagra que tiene dos orificiospara tornillo.
Modelos con un soporte debisagra que tiene cuatro orificiospara tornilloCambie el pasador de la bisagraal lado opuesto del soporte.
ArandelaPlástica
Soporte dela bisagra

70
5.1.5 Quite el embellecedor del frontal de la puerta ypáselo al lado contrario.
5.2.2 Lleve todos los tornillos del lado izquierdo alderecho.
5.2 Transfiera el tope de la puerta
5.2.1 Mueva el tope metálico de la puerta del extremoderecho al izquierdo.
Instrucciones de instalación
5.1.4 Con una espátula para enmasillar de puntao un destornillador de hoja fija, desprendael embellecedor del orificio de la bisagra enel lado izquierdo de la puerta e insértelo enel orificio del lado opuesto que ha quedadovacío al quitar la bisagra superior.
CAMBIO DE LADO DE LOSTIRADORES DE LA PUERTA(CONT.)
5
Para volver a colocar el tiradoren el lado opuesto
Embellecedor
Tope de la puerta
Lado izquierdo
5.3 Reinstalación del tirador de la puerta
de alimentos frescos.
5.3.1 Fije el tirador al lado derecho de la puerta con tornillos en la parte superior y bajo elembellecedor del tirador.
5.3.2 Vuelva a montar el tapón del tirador.
Embellecedor
Lado derecho
5.1 Transfiera el tirador de la puerta
de alimentos frescos (cont.)
CAMBIO DE LADO DE APERTURA DE LA PUERTA (CONT.)2

Instrucciones de instalación
5.4 Transfiera el tirador de la puerta
del compartimiento de alimentos
congelados
5.4.1 Retire el tornillo que fija el tirador a la partesuperior de la puerta y los dos tornillos que lounen a su base.
5.4.2 Quite el tirador.
5.4.3 Retire el tornillo del borde superior derecho dela puerta e insértelo en el orificio del tornillodel tirador del lado izquierdo.
5.4 Transfiera el tirador de la puerta
del compartimiento de alimentos
congelados (cont.)
5.4.4 Transfiera el tope de la puerta como se observaen la página anterior.
5.4.5 Fije el tirador al borde derecho de la puertacon tornillos en la parte superior y la base,usando los orificios de los tornillos que hanquedado vacíos al quitar los tornillos del topede la puerta.
TOP
BOTTOM
Parte superior
Base
71

72
6.2 Vuelva a colgar la puerta de
alimentos congelados
6.2.1 Baje la puerta del congelador al centroclavija de la bisagra inferior. Asegúrese de que la arandela y el espaciador esténcorrectamente colocados en la clavija.
Instrucciones de instalación
6.1.2 Inserte la clavija en la bisagra central delcasquillo de la parte superior de la puerta.Coloque el espaciador, y luego la arandela, en laclavija de la bisagra. OBSERVACIÓN: La bisagracentral debe girarse como se observó en lainstalación al lado izquierdo.
Arandela plástica yespaciador
Clavija de labisagra
CÓMO VOLVER A COLGAR LASPUERTAS (CONT.)
6
Clavija de labisagra central
Arandela plástica yespaciador
6.2.2 Incline la puerta hacia el frigorífico, levantandola bisagra superior hasta que la clavija se ajusteen el casquillo en la parte superior de la puerta.
6.2.3 Asegúrese de que la puerta se encuentreligeramente por encima de la parte superior delfrigorífico y que el espacio entre las puertas seauniforme en el frente. Ajuste los tornillos de labisagra superior. No ajuste estos tornillos enexceso—ajústelos hasta que estén firmes, luegogírelos otra media vuelta.
CAMBIO DE LADO DE APERTURA DE LA PUERTA (CONT.)2
Arandelaplástica
Soportede labisagra
6.1 Vuelva a colgar la puerta de losalimentos frescos
6.1.1 Baje la puerta de los alimentos frescos al pasador de la bisagra inferior. Asegúrese de que la arandela esté en su lugar en el pasador.
CÓMO VOLVER A COLGAR LAS PUERTAS
6
Soportede labisagra
Arandelaplástica
Modelos con un soporte debisagra que tiene dos orificiospara tornillo.
Modelos con un soporte debisagra que tiene cuatro orificiospara tornillo.
6.1.3 Incline la puerta hacia el gabinete. A medidaque la puerta vuelve a su posición, deslice labisagra debajo de la cabeza del tornillo queanteriormente se había insertado parcialmenteen el orificio más externo. Inserte el tornillorestante, luego apriete ambos tornillosfirmemente.

Sonidos normales de operación.Según la ubicación del frigorífico en su cocina, tal vezquiera usar un trozo de alfombra, con caucho en la parteinferior, por debajo del frigorífico y así reducir el ruido.
El ventilador haciendo circular aire dentro del congelador mantiene unatemperatura uniforme.
Agua hirviendo o un ruido de gorgoteo. El flujo del refrigerante a través de loscables de enfriamiento del congelador.
Sonido sibilante, susurrante o seco. Agua que cae en el descongelador durante el ciclo de descongelado.
Sonido de chasquido o seco. Los cables de enfriamiento se expanden y contraendurante el ciclo de descongelado.
El goteo de agua se derrite del vaporizador y fluye a la bandeja de desagüe en elciclo de descongelamiento.
Dispositivo automático para hacer hielo (en algunos modelos)
La válvula de agua del dispositivo para hacer hielo zumba cuando se llena de agua.Si el interruptor está en posición I (activado) zumbará aun sin estar conectada alagua. Tener el interruptor en la posición I (activado) antes de que esté conectado alagua puede dañar el dispositivo. Para evitar esto, ponga el interruptor de marchaen la posición O (apagado). Esto evitará el ruido.
El sonido de los cubos de hielo cayendo al recipiente y el flujo del agua en lastuberías para llenar el dispositivo.
Antes de llamar al servicio técnico…Solución de problemas ¡Ahorre tiempo y dinero! Revise las tablas en las páginassiguientes y tal vez no necesite llamar al servicio técnico.
Problema Posibles Causas Qué hacerEl frigorífico no El frigorífico está en • Espere unos 30 minutos a que termine el ciclo de funciona ciclo de descongelación. descongelación.
El control temperatura • Ponga el control en una posición de temperatura.en posición 0.
El frigorífico está • Apriete el enchufe hasta el fondo de la toma de corriente.desenchufado.
Se ha fundido un fusible/ • Cambie el fusible o reconecte el diferencial.ha saltado el diferencial.
Vibraciones o sacudidas Los rodillos frontales o las patas • Ver Rodillos y patas de nivelación.(una vibración ligera– de nivelación necesita ajuste.esto es normal)
Estos sonidos son normales y se deben a su elevada eficaciaoperativa.
73

Solucionar problemas
Antes de llamar al servicio técnico…
Problema Posibles Causas Qué hacerEl motor está en marcha Es normal cuando • Espere 24 horas a que el frigorífico se enfríe por mucho tiempo o se se enchufa al principio. por completo.enciende y apaga con
Sucede a menudo cuando se • Es normal.frecuencia. (Los guardan cantidades grandesfrigoríficos modernosde comida.con más espacio y Puerta quedó abierta. • Revise que no haya un paquete que impida cerrar la puerta.mayores congeladores
Hace calor o la puerta • Es normal.necesitan más tiempo
se abre frecuentemente.tiempo de funcionamiento.
Selector de control de • Ver El selector de control de temperatura.Se poner en marcha
temperatura el control más frío. y detener con
Rejilla y condensador • Ver Cuidado y limpieza.
frecuencia para mantener
necesita limpieza.
uniforme temperaturas).
Compartimiento de Control de temperatura en • Ver Control de temperatura.alimentos frescos posición poco fría.o congelador
Clima cálido o frecuente • Ajuste el control de temperatura a un nivel más bajo.demasiado templadoapertura de la puerta. Ver Selector de control de la temperatura.
Puerta quedó abierta. • Revise que no haya un paquete que no permite cerrar la puerta.
Paquete bloquea el conducto • Asegúrese de que no haya un paquete bloqueando el conductor de aire en compartimiento de aire en el congelador compartimiento.del congelador.
Se ha acumulado hielo Puerta quedó abierta. • Revise que no haya un paquete que impida cerrar la puerta.en los alimentos
La puerta se abre con congelados (es normal demasiada frecuencia.que haya hielo dentro
del paquete)
El dispositivo de hielo El interruptor del dispositivo •Ponga el interruptor en posición I (activado).no funciona en la posición O (apagado). •Los cubitos se pegaron a un lado de la bandeja. Mueva (en algunos modelos) el interruptor a la posición O (apagado), luego retire los cubitos.
Toma de agua cerrada o •Ver Instalación de la toma de agua.no conectado.
Congelador demasiado •Espere 24 horas para que el aparato se enfríe por completo.caliente.
Hay cubitos amontonados en el •Nivele los cubitos con la mano.recipiente que hacen que el dispositivo se apague.
Cubitos muy pequeños Conexión de la válvula de •Llame al fontanero para desatascar la válvula.paso del agua la toma de agua al frigorífico puedeestar obstruida.
74

Problema Posibles Causas Qué hacerCongelación de Puerta quedó abierta. •Revise que no haya un paquete que no permite cerrar la puerta.cubitos lenta
Control de temperatura •Ver El selector del control de temperatura.no fue ajustado suficientemente frío.
Los cubitos tienen Hay que limpiar el recipiente. •Vacíe y limpie el recipiente. Tire los cubitos viejos.olor/sabor
La comida está dando •Envuelva bien los alimentos.mal olor/sabor a los cubitos.
El interior del frigorífico •Ver Cuidado y limpieza.necesita limpiarse.
Se forma humedad No es inusual en períodos •Seque la superficie y vuelva a ajustar el selector de control desuperficie del frigorífico de mucha humedad. temperatura un nivel más frío. entre las puertas
Se acumula humedad Las puertas se abren demasiadoen el interior (cuando veces o por mucho rato.hace humedad, el aire introduce humedad en el frigorífico cuando las puertas se abren)
El frigorífico huele mal Alguna comida está • Las comidas que desprendan fuertes olores deben envolverse desprendiendo olores muy bien.en el frigorífico. • Deje una caja de bicarbonato sódico abierta en el frigorífico;
cámbiela cada tres meses.
El interior del frigorífico • Ver Cuidado y limpieza.necesita limpiarse.
75

76
Notas

¶ÏËÚÔÊÔڛ˜ ÁÈ· ÙËÓ ∞ÛÊ¿ÏÂÈ¿ Û·˜..................................78, 79
√‰ËÁ›Â˜ ÃÚ‹Û˘√‰ËÁ›Â˜ ÃÚ‹Û˘ .........................................84ºÚÔÓÙ›‰· Î·È ∫·ı·ÚÈÛÌfi˜ ....................85, 86ƒ¿ÊÈ· ....................................................81, 82™˘ÚÙ¿ÚÈ· ∞Ôı‹Î¢Û˘ ........................83, 84ƒ˘ıÌ›ÛÂȘ £ÂÚÌÔÎÚ·Û›·˜ ..........................80
√‰ËÁ›Â˜ ∂ÁηٿÛÙ·Û˘¶ÚÔÂÙÔÈÌ·Û›· ÁÈ· ÙËÓ ∂ÁηٿÛÙ·ÛË ÙÔ˘ æ˘Á›Ԣ ...............................................87∞Ó·ÛÙÚÔÊ‹ ºÔÚ¿˜ ∞ÓÔ›ÁÌ·ÙÔ˜ Ù˘ ¶fiÚÙ·˜ ...........................................90–96∂ÁηٿÛÙ·ÛË °Ú·ÌÌ‹˜ ¡ÂÚÔ‡..............88, 89
¶ÏËÚÔÊÔڛ˜ ÁÈ· ÙËÓ ∞ÓÙÈÌÂÙÒÈÛ˶ÚÔ‚ÏËÌ¿ÙˆÓ¶ÚÈÓ ∫·Ï¤ÛÂÙ ÙÔ Service....................97–99º˘ÛÈÔÏÔÁÈÎÔ› ◊¯ÔÈ §ÂÈÙÔ˘ÚÁ›·˜.................97
°Ú¿„ÙÂ Â‰Ò ÙÔ ÌÔÓÙ¤ÏÔ Î·È ÙÔÓ ·ÚÈıÌfiÛÂÈÚ¿˜ ÙÔ˘ „˘Á›Ԣ Û·˜:
ªÔÓÙ¤ÏÔ ___________________________
∞Ú. ™ÂÈÚ¿˜ _________________________
∆· ÛÙÔȯ›· ·˘Ù¿ ÌÔÚ›Ù ӷ Ù· ‚Ú›ÙÂÛÙËÓ ÂÙÈΤٷ Ô˘ Â›Ó·È ÂÈÎÔÏÏË̤ÓË ÛÙËÓ ¿Óˆ ·ÚÈÛÙÂÚ‹ ÏÂ˘Ú¿ ÙÔ˘ ¯ÒÚÔ˘Û˘ÓÙ‹ÚËÛ˘ ÙÚÔÊ›ÌˆÓ ÙÔ˘ „˘Á›Ԣ.
77

™∏ª∞¡∆π∫∂™ ¶§∏ƒ√º√ƒπ∂™ °π∞ ∆∏¡ ∞™º∞§∂π∞ ™∞™¢π∞µ∞™∆∂ √§∂™ ∆π™ √¢∏°π∂™ ¶ƒπ¡ Ã∏™πª√¶√π∏™∂∆∂ ∆√ æÀ°∂π√.
¶ƒ√™√Ã∏!∏ Û˘Û΢‹ ·˘Ù‹ ı· Ú¤ÂÈ Ó· ¯ÚËÛÈÌÔÔÈÂ›Ù·È ÌfiÓÔ ÁÈ· ÙÔÓ ÛÎÔfi ÁÈ· ÙÔÓ ÔÔ›Ô ÚÔÔÚ›˙ÂÙ·È,fiˆ˜ ÂÚÈÁÚ¿ÊÂÙ·È ÛÙÔ ∂Á¯ÂÈÚ›‰ÈÔ √‰ËÁÈÒÓ ÃÚ‹Û˘.
ª∂∆ƒ∞ ¶ƒ√ºÀ§∞•∏™ °π∞ ∆∏¡ ∞™º∞§∂π∞ ™∞™ ŸÙ·Ó ¯ÚËÛÈÌÔ•Ôț٠ËÏÂÎÙÚÈΤ˜ Û˘Û΢¤˜ ı· •Ú¤•ÂÈ Ó· ÙËÚ›Ù ٷ ‚·ÛÈο ̤ÙÚ·•ÚÔʇϷ͢, Ù· Ô•Ô›· •ÂÚÈÏ·Ì‚¿ÓÔ˘Ó Ù· ÂÍ‹˜:
�� ∆Ô „˘ÁÂ›Ô ·˘Ùfi ı· Ú¤ÂÈ Ó· ÂÁηٷÛÙ·ı› Î·È Ó·ÙÔÔıÂÙËı› ηٿÏÏËÏ· Û‡Ìʈӷ Ì ÙȘ √‰ËÁ›Â˜∂ÁηٿÛÙ·Û˘ ÚÈÓ ¯ÚËÛÈÌÔÔÈËı›. ¢Â›Ù ›Û˘ ÙËÓ·Ú¿ÁÚ·ÊÔ ™‡Ó‰ÂÛË Ì ÙÔ ∏ÏÂÎÙÚÈÎfi ƒÂ‡Ì·.
�� ªËÓ ÂȯÂÈÚ‹ÛÂÙ ӷ ·Ó‚›Ù ¿Óˆ ÛÙÔ „˘Á›Ô.ªÔÚ› Ó· ÙÚ·˘Ì·ÙÈÛÙ›Ù ‹ Ó· ÚÔηϤÛÂÙ ˙ËÌÈ¿ÛÙÔ „˘Á›Ô.
�� ªËÓ ÂÈÙÚ¤ÂÙ Û ·È‰È¿ Ó· ·›˙Ô˘Ó Ì ÙÔ „˘ÁÂ›Ô ‹Ó· ÂÈÚ¿˙Ô˘Ó Ù· ¯ÂÈÚÈÛÙ‹ÚÈ¿ ÙÔ˘.
�� ªËÓ ÂÈÙÚ¤ÂÙ Û ·È‰È¿ Ó· ·Ó‚·›ÓÔ˘Ó ‹ Ó·ÛÙ¤ÎÔÓÙ·È ¿Óˆ ÛÙÔ „˘ÁÂ›Ô ‹ Ó· ÎÚ¤ÌÔÓÙ·È ·fi Ù·ÂÛˆÙÂÚÈο ÙÔ˘ Ú¿ÊÈ·. ªÔÚ› Ó· ÚÔηϤÛÔ˘Ó ˙ËÌÈ¿ÛÙÔ „˘ÁÂ›Ô ‹ Ó· ÙÚ·˘Ì·ÙÈÛÙÔ‡Ó ÛÔ‚·Ú¿.
�� ªËÓ ·ÁÁ›˙ÂÙ ÙȘ „˘¯Ú¤˜ ÂÈÊ¿ÓÂȘ ̤۷ ÛÙÔÓηٷ„‡ÎÙË Ì ÓÔÙÈṲ̂ӷ ‹ ‚ÚÂÁ̤ӷ ¯¤ÚÈ·. ∆Ô ‰¤ÚÌ·ÌÔÚ› Ó· ÎÔÏÏ‹ÛÂÈ Û ·˘Ù¤˜ ÙȘ ÂÍ·ÈÚÂÙÈο „˘¯Ú¤˜ÂÈÊ¿ÓÂȘ.
�� ªËÓ ·ÔıË·ÂÙ ‹ ¯ÚËÛÈÌÔÔț٠‚ÂÓ˙›ÓË ‹ ¿ÏϷ‡ÊÏÂÎÙ· ˘ÁÚ¿ Î·È ·ÙÌÔ‡˜ ÎÔÓÙ¿ ÛÙÔ „˘ÁÂ›Ô ‹ Û¿ÏϘ ËÏÂÎÙÚÈΤ˜ Û˘Û΢¤˜.
�� ªËÓ ÏËÛÈ¿˙ÂÙ ٷ ‰¿ÎÙ˘Ï¿ Û·˜ Û ÛËÌ›· fiÔ˘ÌÔÚ› Ó· ·ÁÈ‰Â˘ÙÔ‡Ó. √È ·ÔÛÙ¿ÛÂȘ ·Ó¿ÌÂÛ· ÛÙȘfiÚÙ˜ Î·È ·Ó¿ÌÂÛ· ÛÙȘ fiÚÙ˜ Î·È ÙÔ˘˜ ¯ÒÚÔ˘˜„‡Í˘ Â›Ó·È Î·Ù' ·Ó¿ÁÎË ÌÈÎÚ¤˜. ¶ÚÔÛ¤¯ÂÙ fiÙ·ÓÎÏ›ÓÂÙ ÙȘ fiÚÙ˜ ·Ó ˘¿Ú¯Ô˘Ó ·È‰È¿ ÎÔÓÙ¿ ÛÙÔ„˘Á›Ô.
�� ™Ù· „˘Á›· Ì ·˘ÙfiÌ·ÙË ·ÁÔÌ˯·Ó‹, ·ÔʇÁÂÙÂÙËÓ Â·Ê‹ Ì ٷ ÎÈÓÔ‡ÌÂÓ· ̤ÚË ÙÔ˘ Ì˯·ÓÈÛÌÔ‡ÂÍ·ÁˆÁ‹˜ ‹ Ì ÙÔ ıÂÚÌ·ÓÙÈÎfi ÛÙÔÈ¯Â›Ô Ô˘·ÂÏ¢ıÂÚÒÓÂÈ Ù· ·Á¿ÎÈ·. ªËÓ ‚¿˙ÂÙ ٷ ‰¿ÎÙ˘Ï· ‹Ù· ¯¤ÚÈ· Û·˜ ÛÙÔÓ ·˘ÙfiÌ·ÙÔ Ì˯·ÓÈÛÌfi Ù˘·ÁÔÌ˯·Ó‹˜ fiÙ·Ó ÙÔ „˘ÁÂ›Ô Â›Ó·È Û˘Ó‰Â‰Â̤ÓÔ ÛÙËÓÚ›˙·.
�� ¶ÚÈÓ ·fi ÙÔÓ Î·ı·ÚÈÛÌfi ‹ ÙËÓ ÂÎÙ¤ÏÂÛË ÂÈÛ΢ÒÓ ı·Ú¤ÂÈ Ó· ‚Á¿˙ÂÙ ÙÔ „˘ÁÂ›Ô ·fi ÙËÓ Ú›˙·.¶∞ƒ∞∆∏ƒ∏™∏: ™˘ÓÈÛÙԇ̠ȉȷ›ÙÂÚ·, ÔÔÈ·‰‹ÔÙÂÂÈÛ΢‹ ‹ ÙÔ service Ó· Á›ÓÂÙ·È ·fiÂÍÔ˘ÛÈÔ‰ÔÙË̤ÓÔ˘˜ Ù¯ӛÙ˜.
�� ∞Ó Ô Ï·ÌÙ‹Ú·˜ ʈÙÈÛÌÔ‡ ÙÔ˘ ÂÛˆÙÂÚÈÎÔ‡ ÙÔ˘„˘Á›Ԣ η›, ÚÈÓ ÙÔÓ ·ÓÙÈηٷÛÙ‹ÛÂÙ ı· Ú¤ÂÈ Ó·‚Á¿˙ÂÙ ÙÔ „˘ÁÂ›Ô ·fi ÙËÓ Ú›˙· ÒÛÙ ӷÂÌÔ‰›˙ÂÙ·È Ë Â·Ê‹ Ì ÙÔ Ó‹Ì· ˘Ú¿ÎÙˆÛ˘ Ô˘‚Ú›ÛÎÂÙ·È ˘fi Ù¿ÛË (ŒÓ·˜ η̤ÓÔ˜ Ï·ÌÙ‹Ú·˜ ÌÔÚ›ӷ Û¿ÛÂÈ Î·Ù¿ ÙË ‰È¿ÚÎÂÈ· Ù˘ ·ÓÙÈηٿÛÙ·Û˘).
¶∞ƒ∞∆∏ƒ∏™∏: °˘Ú›˙ÔÓÙ·˜ ÙÔÓ Ú˘ıÌÈÛÙ‹ ıÂÚÌÔÎÚ·Û›·˜ÛÙË ı¤ÛË 0 ‰ÂÓ ‰È·ÎfiÙÂÙ·È Ë ·ÚÔ¯‹ Ú‡̷ÙÔ˜ ÛÙÔ·Îψ̷ ʈÙÈÛÌÔ‡ ÙÔ˘ „˘Á›Ԣ.
�� ªËÓ Î·Ù·„‡¯ÂÙ ÂÎ Ó¤Ô˘ ηÙ„˘Á̤ӷ ÙÚfiÊÈÌ· Ô˘¤¯Ô˘Ó ·Ô„˘¯ı› ÂÓÙÂÏÒ˜.
78
™ø™∆∏ ∞¶√ƒƒπæ∏ ∆√À æÀ°∂π√À∆Ô ÂӉ¯fiÌÂÓÔ ·Á›‰Â˘Û˘ ·È‰ÈÒÓ Î·È ÚfiÎÏËÛ˘·ÛÊ˘Í›·˜ ‰ÂÓ ·ÔÙÂÏ› Úfi‚ÏËÌ· Ô˘ ·Ó‹ÎÂÈ ÛÙÔ·ÚÂÏıfiÓ. ∆· Âٷ̤ӷ ‹ ·Ú·ÙË̤ӷ „˘Á›··Ú·Ì¤ÓÔ˘Ó ÂÈΛӉ˘Ó·... ·ÎfiÌË ÎÈ ·Ó ÚfiÎÂÈÙ·È Ó·Ì›ÓÔ˘Ó ¤ÙÛÈ "ÌfiÓÔ ÁÈ· Ï›Á˜ ̤Ú˜". ∞Ó Â›ÛÙ ¤ÙÔÈÌÔÈ Ó·ÂÙ¿ÍÂÙ ÙÔ ·ÏÈfi Û·˜ „˘ÁÂ›Ô , ·Ú·Î·Ïԇ̷ÎÔÏÔ˘ı‹ÛÙ ÙȘ ·Ú·Î¿Ùˆ Ô‰ËÁ›Â˜ ÒÛÙ ӷ ÚÔÏ¿‚ÂÙÂÙ˘¯fiÓ ·Ù˘¯‹Ì·Ù·.
¶ÚÈÓ ¶ÂÙ¿ÍÂÙ ÙÔ ¶·ÏÈfi Û·˜ æ˘ÁÂ›Ô ‹ ÙÔÓ¶·ÏÈfi Û·˜ ∫·Ù·„‡ÎÙË:� ∞Ê·ÈÚ¤ÛÙ ÙȘ fiÚÙ˜ Î·È ·ÔÚÚ›„Ù ÙȘ ͯˆÚÈÛÙ¿.� ∞Ê‹ÛÙ ٷ Ú¿ÊÈ· Û Ù Ë ı¤ÛË ÙÔ˘˜ ÒÛÙ ӷ ÌËÓ
‰È¢ÎÔχÓÔÓÙ·È Ù· ·È‰È¿ Ó· ÛηÚÊ·ÏÒÛÔ˘Ó ÛÙÔÂÛˆÙÂÚÈÎfi ÙÔ˘ „˘Á›Ԣ.
� ∞Ó ÙÔ „˘ÁÂ›Ô ‰È·ı¤ÙÂÈ ÎÏÂȉ·ÚÈ¿, ·¯ÚËÛÙ¤„Ù ÙËÓ.
æ˘ÎÙÈο ÀÁÚ¿ŸÏ˜ ÔÈ Û˘Û΢¤˜ „‡Í˘ ÂÚȤ¯Ô˘Ó „˘ÎÙÈο ˘ÁÚ¿, Ù·ÔÔ›· Û‡Ìʈӷ Ì ÙÔÓ (ÔÌÔÛÔӉȷÎfi) ÓfiÌÔ Ú¤ÂÈ Ó··Ê·ÈÚÔ‡ÓÙ·È ÚÈÓ ·fi ÙËÓ ·fiÚÚÈ„Ë Ù˘ οıÂ Û˘Û΢‹˜.∞Ó ÚfiÎÂÈÙ·È Ó· ÂÙ¿ÍÂÙ ÌÈ· ·ÏÈ¿ Û·˜ Û˘Û΢‹ „‡Í˘ÂÈÎÔÈÓˆÓ‹ÛÙ Ì ÙËÓ ÂÙ·ÈÚ›· ·ÔÎÔÌȉ‹˜ ÁÈ· ÙÔ ÙÈ ı·Ú¤ÂÈ Ó· οÓÂÙÂ.
¶ƒ√™√Ã∏! ∫π¡¢À¡√™ ¶∞°π¢∂À™∏™ ¶∞π¢πø¡

79
¶ƒ√™√Ã∏!™À¡¢∂™∏ ª∂ ∆√ ∏§∂∫∆ƒπ∫√ ƒ∂Àª∞
∆Ô Î·ÏÒ‰ÈÔ ÙÚÔÊÔ‰ÔÛ›·˜ Ù˘ Û˘Û΢‹˜ ‰È·ı¤ÙÂÈ ÊȘ ÌÂÁ›ˆÛË, ηٿÏÏËÏÔ ÁÈ· Û‡Ó‰ÂÛË ÛÂ Û˘ÓËıÈṲ̂Ó˜ Ú›˙˜Ì Á›ˆÛË (ÛÔ‡ÎÔ) ÒÛÙ ӷ ÂÏ·¯ÈÛÙÔÔÈÂ›Ù·È ÔÂӉ¯fiÌÂÓÔ˜ ΛӉ˘ÓÔ˜ ËÏÂÎÙÚÔÏËÍ›·˜ ·fi ÙË Û˘Û΢‹.∑ËÙ‹ÛÙ ·fi ¤Ó·Ó ‰Èψ̷ÙÔ‡¯Ô ËÏÂÎÙÚÔÏfiÁÔ Ó·ÂϤÁÍÂÈ ÙËÓ Ú›˙· Î·È ÙÔ Î‡Îψ̿ Ù˘ ÒÛÙ ӷ ›ÛÙÂÛ›ÁÔ˘ÚÔÈ ˆ˜ Ë Ú›˙· ‰È·ı¤ÙÂÈ Î·Ù¿ÏÏËÏË Á›ˆÛË.∞Ó Ë Ú›˙· ‰ÂÓ ‰È·ı¤ÙÂÈ Á›ˆÛË Â›Ó·È ÚÔÛˆÈ΋ Û·˜Â˘ı‡ÓË Î·È ˘Ô¯Ú¤ˆÛË Ó· ÊÚÔÓÙ›ÛÂÙ ÁÈ· ÙËÓ·ÓÙÈηٿÛÙ·Û‹ Ù˘ Ì ¿ÏÏË, ηٿÏÏËÏ· ÁÂȈ̤ÓË Ú›˙·.∆Ô „˘ÁÂ›Ô ı· Ú¤ÂÈ ¿ÓÙÔÙ ӷ Û˘Ó‰¤ÂÙ·È ÛÙËÓ ‰È΋ÙÔ˘ ·ÓÂÍ¿ÚÙËÙË Ú›˙·.ŒÙÛÈ ÂÍ·ÛÊ·Ï›˙ÂÙ·È Ë ‚¤ÏÙÈÛÙË ·fi‰ÔÛË Î·ÈÂÌÔ‰›˙ÔÓÙ·È ÔÈ ˘ÂÚÊÔÚÙ›ÛÂȘ ÙˆÓ Î˘ÎÏˆÌ¿ÙˆÓ Ù˘ÂÁηٿÛÙ·Û˘ ÙÔ˘ ÛÈÙÈÔ‡, ÔÈ Ôԛ˜ ÌÔÚ› Ó·ÚÔηϤÛÔ˘Ó ˘ÚηÁÈ¿ ÏfiÁˆ ˘ÂÚı¤ÚÌ·ÓÛ˘ ÙˆÓηψ‰›ˆÓ.¶·Ú·Î·Ïԇ̠·Ó·ÙÚ¤ÍÙ ÛÙÔ Ï·Î›‰ÈÔ ÔÓÔÌ·ÛÙÈÎÒÓÙÈÌÒÓ ÏÂÈÙÔ˘ÚÁ›·˜ ÙÔ˘ „˘Á›Ԣ ÁÈ· ÙË ÛˆÛÙ‹ Ù¿ÛË, ÈÛ¯‡Î·È Û˘¯ÓfiÙËÙ· ÙÔ˘ Ú‡̷ÙÔ˜.
∞Ó ÙÔ ÊȘ Ù˘ Û˘Û΢‹˜ ‰ÂÓ Â›Ó·È Î·Ù¿ÏÏËÏÔ ÁÈ· ÙËÓÚ›˙· Û·˜, ı· Ú¤ÂÈ Ó· ·ÓÙÈηٷÛÙ‹ÛÂÙ ÙÔ ÊȘ ÙË˜Û˘Û΢‹˜.™∏ª∞¡∆π∫√: ∏ ·ÓÙÈηٿÛÙ·ÛË ÙÔ˘ ÊȘ Î·È ÙˆÓηψ‰›ˆÓ ı· Ú¤ÂÈ Ó· ÂÎÙÂÏÂ›Ù·È ·fiÂÍÔ˘ÛÈÔ‰ÔÙË̤ÓÔ˘˜ Ù¯ӛÙ˜ ‹ ·ÓÙÈÚÔÛÒÔ˘˜ ÙÔ˘service. ™Â ÔÚÈṲ̂Ó˜ ¯ÒÚ˜ Ë ·ÓÙÈηٿÛÙ·ÛË ÙÔ˘ ÊÈ˜Î·È ÙˆÓ Î·Ïˆ‰›ˆÓ ÂÈÙÚ¤ÂÙ·È Ó· ÂÎÙÂÏÂ›Ù·È ÌfiÓÔ ·fiÂÍÔ˘ÛÈÔ‰ÔÙË̤ÓÔ˘˜ Ù¯ӛÙ˜.∞Ó ¿ıÂÈ ˙ËÌÈ¿ ÙÔ Î·ÏÒ‰ÈÔ ÙÚÔÊÔ‰ÔÛ›·˜, Ë·ÓÙÈηٿÛÙ·Û‹ ÙÔ˘ ı· Ú¤ÂÈ Ó· Á›ÓÂÙ·È ·fiÂÍÔ˘ÛÈÔ‰ÔÙË̤ÓÔ ·ÓÙÈÚfiÛˆÔ ÁÈ· ÙÔ service ÒÛÙ ӷ·ÔʇÁÂÙ·È Ô Î›Ó‰˘ÓÔ˜ ÁÈ· ÙËÓ ·ÛÊ¿ÏÂÈ¿ Û·˜.
¶ÔÙ¤ ÌËÓ ‚Á¿˙ÂÙ ÙÔ „˘ÁÂ›Ô ·fi ÙËÓ Ú›˙·ÙÚ·‚ÒÓÙ·˜ ÙÔ Î·ÏÒ‰ÈÔ ÙÚÔÊÔ‰ÔÛ›·˜. £· Ú¤ÂÈ¿ÓÙÔÙ ӷ È¿ÓÂÙ ηϿ ÙÔ ÊȘ Î·È Ó· ÙÔ ÙÚ·‚¿Ù·fi ÙËÓ Ú›˙·.ŸÏ· Ù· ηÏ҉ȷ Ô˘ ¤¯Ô˘Ó ÍÂÊÙ›ÛÂÈ ‹ Êı·Ú› ı·¶Ú¤ÂÈ ·Ì¤Ûˆ˜ Ó· ÂÈÛ΢¿˙ÔÓÙ·È ‹ Ó··ÓÙÈηıÈÛÙÒÓÙ·È. ªËÓ ¯ÚËÛÈÌÔÔț٠οÔÈÔηÏÒ‰ÈÔ Ô˘ ¤¯ÂÈ ÂÌÊ·Ó‹ Û¯È̷ۛٷ ‹ ÊıÔÚ¤˜ÏfiÁˆ ÙÚÈ‚‹˜ Û fiÏÔ ÙÔ˘ ÙÔ Ì‹ÎÔ˜ ‹ ÛÙ· ¿ÎÚ· ÙÔ˘.ŸÙ·Ó ·ÔÌ·ÎÚ‡ÓÂÙ ÙÔ „˘ÁÂ›Ô ·fi ÙÔÓ ÙÔ›¯Ô ı·Ú¤ÂÈ Ó· ÚÔÛ¤¯ÂÙ ÒÛÙ ӷ ÌËÓ ·Ù‹ÛÂÈ ¿ÓˆÛÙÔ Î·ÏÒ‰ÈÔ Î·È Ó· ÌËÓ ÙÔ˘ ÚÔηϤÛÂÈ ˙ËÌÈ¿.∞ÓÙÈηٿÛÙ·ÛË ÙÔ˘ ηψ‰›Ô˘ ÙÚÔÊÔ‰ÔÛ›·˜∞Ó ÔÙ¤ ¯ÚÂÈ·ÛÙ› ·ÓÙÈηٿÛÙ·ÛË ÙÔ Î·ÏÒ‰ÈÔÙÚÔÊÔ‰ÔÛ›·˜ ÙÔ˘ „˘Á›Ԣ Û·˜, ı· Ú¤ÂÈ Ó·ÚÔÌËı¢Ù›Ù ÂȉÈÎfi ·ÓÙ·ÏÏ·ÎÙÈÎfi ηÏÒ‰ÈÔ ·fiÙËÓ ÙÔÈ΋ Û·˜ ·ÓÙÈÚÔۈ›·. ∞Ó ÙÔ Î·ÏÒ‰ÈÔ¤¯ÂÈ ˘ÔÛÙ› ˙ËÌÈ¿, ı· ¯Úˆı›Ù ÁÈ· ÙËÓ·ÓÙÈηٿÛÙ·Û‹ ÙÔ˘.∆Ô „˘ÁÂ›Ô ı· Ú¤ÂÈ Ó· ÙÔÔıÂÙÂ›Ù·È ¤ÙÛÈ ÒÛÙ ÙÔÊȘ Ó· Â›Ó·È ÚÔÛ‚¿ÛÈÌÔ.
¢π∞µ∞™∆∂ ∫∞π ∞∫√§√À£∏™∆∂ ¶ƒ√™∂∫∆π∫∞ ∞À∆∂™∆π™ ¶§∏ƒ√º√ƒπ∂™ °π∞ ∆∏¡ ∞™º∞§∂π∞
µÂ‚·Èˆı›Ù fiÙÈ˘¿Ú¯ÂÈ ÛˆÛÙ‹Á›ˆÛË ÚÈÓ ·fi Ù˯ڋÛË
ºÈ˜ ÌÂÁ›ˆÛË
°È· ÙËÓ ÚÔÛˆÈ΋ Û·˜ ·ÛÊ¿ÏÂÈ·, Ë Û˘Û΢‹ ı· Ú¤ÂÈ Ó· ÁÂȈı› ÛˆÛÙ¿.
ºÀ§∞•∆∂ ∞À∆∂™ ∆π™ √¢∏°π∂™.

80
™¯ÂÙÈο Ì ÙÔÓ ÂÚÈÛÙÚÔÊÈÎfi Ú˘ıÌÈÛÙ‹ ıÂÚÌÔÎÚ·Û›·˜
ƒ˘ıÌ›ÛÂȘ Ù˘ ıÂÚÌÔÎÚ·Û›·˜
°˘Ú›˙ÔÓÙ·˜ ÙÔÓ Ú˘ıÌÈÛÙ‹ ÛÙÔ 0 ÛÙ·Ì·Ù¿ Ë „‡ÍË Î·È ÛÙÔ˘˜ ‰‡Ô ¯ÒÚÔ˘˜ ÙÔ˘ „˘Á›Ԣ, ‰ËÏ·‰‹ ÛÙÔÓ ¯ÒÚÔ ÙË˜Û˘ÓÙ‹ÚËÛ˘ Î·È ÛÙÔÓ ¯ÒÚÔ Ù˘ ηٿ„˘Í˘. ¢ÂÓ ‰È·ÎfiÙÂÙ·È Ë ËÏÂÎÙÚÈ΋ ÙÚÔÊÔ‰ÔÛ›· ÙÔ˘ „˘Á›Ԣ.
∞ÊÔ‡ ·ÏÏ¿ÍÂÙ ÙȘ Ú˘ıÌ›ÛÂȘ, ÂÚÈ̤ÓÂÙ 24 ÒÚ˜ ÒÛÔ˘ ÙÔ „˘ÁÂ›Ô Ó· ÊÙ¿ÛÂÈ ÛÙËÓ ıÂÚÌÔÎÚ·Û›· Ô˘ÔÚ›Û·ÙÂ.
ÃÒÚÔ˜∫·Ù„˘Á̤ӈÓ∆ÚÔʛ̈Ó
ÃÒÚÔ˜ ºÚ¤ÛΈÓ∆ÚÔʛ̈Ó
5 (Ú‡ıÌÈÛË Ì¤ÁÈÛÙ˘ „‡Í˘)
¢ÂÓ ÃÚÂÈ¿˙ÂÙ·È ∞fi„˘ÍË ŸÚÈ· £ÂÚÌÔÎÚ·Û›·˜ ¶ÂÚÈ‚¿ÏÏÔÓÙÔ˜ ÃÒÚÔ˘∆fiÛÔ Ô ¯ÒÚÔ˜ Ù˘ ηٿ„˘Í˘ fiÛÔ Î·È Ô ¯ÒÚÔ˜ ÙË˜Û˘ÓÙ‹ÚËÛ˘ ‰ÂÓ ¯ÚÂÈ¿˙ÔÓÙ·È ·fi„˘ÍË. ∞Ó Î·È ÙÔ „˘Á›ÔÛ·˜ Â›Ó·È Û¯Â‰È·Ṳ̂ÓÔ Î·È Î·Ù¿ÏÏËÏ· ÂÍÔÏÈṲ̂ÓÔ ÒÛÙÂÓ· ·Ô„‡¯ÂÙ·È ·˘ÙfiÌ·Ù·, Ô Û¯ËÌ·ÙÈÛÌfi˜ ÌÈÎÚ‹˜ÔÛfiÙËÙ·˜ ¿ÁÔ˘ ¿Óˆ ÛÙȘ Û˘Û΢·Û›Â˜ Â›Ó·È Î¿ÙÈÊ˘ÛÈÔÏÔÁÈÎfi.
∆Ô „˘ÁÂ›Ô ·˘Ùfi Â›Ó·È Û¯Â‰È·Ṳ̂ÓÔ Ó· ÏÂÈÙÔ˘ÚÁ› ÛÙȘηıÔÚÈṲ̂Ó˜ ıÂÚÌÔÎڷۛ˜ ÂÚÈ‚¿ÏÏÔÓÙÔ˜ Û‡Ìʈӷ ÌÂÙËÓ ∫·ÙËÁÔÚ›· £ÂÚÌÔÎÚ·ÛÈÒÓ §ÂÈÙÔ˘ÚÁ›·˜ ÙÔ˘ , Ë ÔÔ›··Ó·ÁÚ¿ÊÂÙ·È ÛÙÔ Ï·Î›‰ÈÔ ¯·Ú·ÎÙËÚÈÛÙÈÎÒÓ.
∫·ÙËÁÔÚ›· ™‡Ì‚ÔÏÔ £ÂÚÌ. ¶ÂÚÈ‚¿ÏÏÔÓÙÔ˜ª¤ÁÈÛÙË ∂Ï¿¯ÈÛÙË
¶·Ú·ÙÂٷ̤ӷ-∂‡ÎÚ·Ù˜ SN 32ÔC 10ÔC
∂‡ÎÚ·Ù˜ N 32ÔC 16ÔC
ÀÔÙÚÔÈΤ˜ ST 38ÔC 18ÔC∆ÚÔÈΤ˜ T 43ÔC 18ÔC
¶∞ƒ∞∆∏ƒ∏™∏: ∏ ÂÛˆÙÂÚÈ΋ ıÂÚÌÔÎÚ·Û›· ÌÔÚ› Ó·ÂËÚ¿˙ÂÙ·È ·fi ‰È¿ÊÔÚÔ˘˜ ·Ú¿ÁÔÓÙ˜ fiˆ˜ Ë ı¤ÛËÙÔ˘ „˘Á›Ԣ, Ë ıÂÚÌÔÎÚ·Û›· ÂÚÈ‚¿ÏÏÔÓÙÔ˜ Î·È ËÛ˘¯ÓfiÙËÙ· ·ÓÔ›ÁÌ·ÙÔ˜ Ù˘ fiÚÙ·˜. ƒ˘ıÌ›ÛÙ ηٿÏÏËÏ·ÙË ıÂÚÌÔÎÚ·Û›· ÁÈ· Ó· ·ÓÙÈÛÙ·ıÌ›ÛÂÙ ·˘ÙÔ‡˜ ÙÔ˘˜·Ú¿ÁÔÓÙ˜.
12
34
5
æ˘¯Úfi˜ ·¤Ú·˜
æ˘¯Úfi˜ ·¤Ú·˜
1 (Ú‡ıÌÈÛË ÂÏ¿¯ÈÛÙ˘„‡Í˘)
ÃÒÚÔ˜ ºÚ¤ÛÎˆÓ ∆ÚÔʛ̈Ó√ ÂÚÈÛÙÚÔÊÈÎfi˜ Ú˘ıÌÈÛÙ‹˜ ÁÈ· ÙÔÓ ¯ÒÚÔ Û˘ÓÙ‹ÚËÛË˜ÙˆÓ ÊÚ¤ÛÎˆÓ ÙÚÔÊ›ÌˆÓ ‰È·ı¤ÙÂÈ ÂÓÓ¤· ı¤ÛÂȘڇıÌÈÛ˘ Û˘Ó ÙË ı¤ÛË 0. ∆Ô 1 ·ÓÙÈÛÙÔȯ› ÛÙËÓÂÏ¿¯ÈÛÙË „‡ÍË Î·È ÙÔ 9 ÛÙË Ì¤ÁÈÛÙË „‡ÍË. ∞Ú¯Èο, Á˘Ú›ÛÙ ÙÔÓ Ú˘ıÌÈÛÙ‹ ÛÙÔ 5. ∞ÊÔ‡ ·Ú¯›ÛÂÙ ӷ¯ÚËÛÈÌÔÔț٠ÙÔ „˘Á›Ô, ÙÚÔÔÔÈ‹ÛÙ ÙË Ú‡ıÌÈÛË·Ó ¯ÚÂÈ¿˙ÂÙ·È.°È· Ó· ÂÚÈÛÙÚ¤„ÂÙ ÙÔ Ú˘ıÌÈÛÙ‹ ÙÔÔıÂÙ‹ÛÙ ¤Ó·Î¤ÚÌ· ÛÙË Û¯ÈÛÌ‹ Ô˘ ˘¿Ú¯ÂÈ ÛÙÔ Ì¤ÛÔÓ ÙÔ˘.∞Ê‹ÛÙ ÙÔ „˘ÁÂ›Ô Ó· ÏÂÈÙÔ˘ÚÁ‹ÛÂÈ Â› 24 ÒÚ˜ ÒÛÙÂÓ· ÂÈÙ¢¯ı› Ë „‡ÍË.¶∞ƒ∞∆∏ƒ∏™∏: °˘Ú›˙ÔÓÙ·˜ ÙÔÓ Ú˘ıÌÈÛÙ‹ ÛÙÔ 0ÛÙ·Ì·Ù¿ Ë „‡ÍË Î·È ÛÙÔ˘˜ ‰‡Ô ¯ÒÚÔ˘˜ ÙÔ˘ „˘Á›Ԣ,‰ËÏ·‰‹ ÛÙÔÓ ¯ÒÚÔ Ù˘ Û˘ÓÙ‹ÚËÛ˘ Î·È ÛÙÔÓ ¯ÒÚÔ Ù˘ηٿ„˘Í˘, ·ÏÏ¿ ‰ÂÓ ‰È·ÎfiÙÂÙ·È Ë ËÏÂÎÙÚÈ΋ÙÚÔÊÔ‰ÔÛ›· ÙÔ˘ „˘Á›Ԣ.
ÃÒÚÔ˜ ∫·Ù„˘ÁÌ¤ÓˆÓ ∆ÚÔʛ̈Ó∞Ú¯Èο, Á˘Ú›ÛÙ ÙÔÓ Ú˘ıÌÈÛÙ‹ ıÂÚÌÔÎÚ·Û›·˜ Ù˘ηٿ„˘Í˘ ÛÙÔ 3. √ Ú˘ıÌÈÛÙ‹˜ ıÂÚÌÔÎÚ·Û›·˜ Ù˘ηٿ„˘Í˘ ÎÈÓ› ¤Ó· Ù¿ÌÂÚ (ÂÙ·ÏÔ‡‰·) ÌÂÙ·‚¿ÏÏÔÓÙ·˜ÙËÓ ÔÛfiÙËÙ· „˘¯ÚÔ‡ ·¤Ú· Ô˘ ‰ÈÔ¯ÂÙ‡ÂÙ·È ·fi ÙÔÓ¯ÒÚÔ Ù˘ ηٿ„˘Í˘ ÛÙÔÓ ¯ÒÚÔ Ù˘ Û˘ÓÙ‹ÚËÛ˘.

™¯ÂÙÈο Ì ٷ Ú¿ÊÈ· ÙÔ˘ ¯ÒÚÔ˘ Û˘ÓÙ‹ÚËÛ˘ ÊÚ¤ÛΈÓÙÚÔʛ̈Ó
∏ ‡·ÚÍË ˘ÔÛÙËÚÈÁÌ¿ÙˆÓ ÁÈ· Ù· Ú¿ÊÈ· Û ‰È¿ÊÔÚ· ‡„Ë Û·˜ ÂÈÙÚ¤ÂÈ Ó· ÚÔÛ·ÚÌfiÛÂÙ ÙȘ ·ÔÛÙ¿ÛÂÈ˜ÙˆÓ Ú·ÊÈÒÓ Û‡Ìʈӷ Ì ÙȘ ÚÔÙÈÌ‹ÛÂȘ Û·˜. ∆· ÂÚÈÁÚ·ÊfiÌÂÓ· ¯·Ú·ÎÙËÚÈÛÙÈο ‰ÂÓ ˘¿Ú¯Ô˘Ó Û fiÏ· Ù·ÌÔÓ٤Ϸ.
ƒ¿ÊÈ· ¶Ï‹ÚÔ˘˜ ¶Ï¿ÙÔ˘˜
√ÚÈṲ̂ӷ ÌÔÓ٤Ϸ ‰È·ı¤ÙÔ˘Ó ¤Ó·Û˘ÚfiÌÂÓÔ Ú¿ÊÈ Ì ¯·Ï‡‚‰ÈÓ· Û‡ÚÌ·Ù· ‹¤Ó· ÛÙ·ıÂÚfi Ú¿ÊÈ ·fi Ì·Ù Á˘·Ï› ‹ ‰‡ÔÛÙ·ıÂÚ¿ Ú¿ÊÈ· Ì ¯·Ï‡‚‰ÈÓ· Û‡ÚÌ·Ù·. ∆·Ú¿ÊÈ· ·˘Ù¿ ÌÔÚÔ‡Ó Ó· ÌÂÙ·ÎÈÓËıÔ‡Ó Û¿ÏÏË ı¤ÛË Ì¤Û· ÛÙÔÓ ¯ÒÚÔ Û˘ÓÙ‹ÚËÛË˜ÙˆÓ ÊÚ¤ÛÎˆÓ ÙÚÔʛ̈Ó.∆Ô Û˘ÚfiÌÂÓÔ Ú¿ÊÈ Ï‹ÚÔ˘˜ Ï¿ÙÔ˘˜‰È·ı¤ÙÂÈ ‰È·Ù¿ÍÂȘ ·ÛÊ¿ÏÈÛ˘. ŸÙ·ÓÙÔÔıÂÙËı› ÛˆÛÙ¿ ¿Óˆ ÛÙ· ÛÙËÚ›ÁÌ·Ù¿ÙÔ˘, ÂÌÔ‰›˙ÂÙ·È Ó· ÂͤÏıÂÈ ÙÂÏ›ˆ˜ ·fiÙÔ „˘ÁÂ›Ô Î·È ‰ÂÓ Á¤ÚÓÂÈ fiÙ·Ó ÙÔÔıÂÙ›ÙÂÙÚfiÊÈÌ· ¿Óˆ ÙÔ˘ ‹ fiÙ·Ó ‚Á¿˙ÂÙ ٷÙÚfiÊÈÌ· ·fi ¿Óˆ ÙÔ˘.°È· Ó· ·Ê·ÈÚ¤ÛÂÙ ٷ Ú¿ÊÈ· Ï‹ÚÔ˘˜Ï¿ÙÔ˘˜, ·Ó·ÛËÎÒÛÙ ÙËÓ ›Ûˆ ÏÂ˘Ú¿ÙÔ˘˜ Î·È ÙÚ·‚‹ÍÙ ٷ ÚÔ˜ Ù· ÂÌÚfi˜.°È· Ó· ·Ê·ÈÚ¤ÛÂÙ ÙÔ Ú¿ÊÈ Ï‹ÚÔ˘˜Ï¿ÙÔ˘˜ fiÙ·Ó Ë fiÚÙ· ÙÔ˘ ¯ÒÚÔ˘Û˘ÓÙ‹ÚËÛ˘ ‰ÂÓ ÌÔÚ› Ó· ·ÓÔ›ÍÂÈÂÓÙÂÏÒ˜, ·Ó·ÛËÎÒÛÙ ÙËÓ ›Ûˆ ÏÂ˘Ú¿ÙÔ˘, ÙÚ·‚‹ÍÙ ÙÔ ÚÔ˜ Ù· ÂÌÚfi˜ Î·È Î¿Ùˆ,Á›ÚÂÙ ÙÔ Ú¿ÊÈ Î·È ·Ê·ÈÚ¤ÛÙ ÙÔ.
ƒ¿ÊÈ· ªÈÛÔ‡ ¶Ï¿ÙÔ˘˜∆Ô ¤Ó· ¿ÎÚÔ ÙÔ˘ Ú·ÊÈÔ‡ ·ÎÔ˘Ì¿ ÛÙÔÚÔÂͤ¯ÔÓ ˘ÔÛÙ‹ÚÈÁÌ· ÙÔ˘ Ï¢ÚÈÎÔ‡ÙÔȯÒÌ·ÙÔ˜. √ ‚Ú·¯›ÔÓ·˜ Ô˘ ˘¿Ú¯ÂÈ ÛÙÔ¿ÏÏÔ ¿ÎÚÔ ·ÁÎÈÛÙÚÒÓÂÙ·È ÛÙË Ú¿Á· Ô˘˘¿Ú¯ÂÈ ÛÙÔ ›Ûˆ ÙÔ›¯ˆÌ·.°È· Ó· ·Ê·ÈÚ¤ÛÂÙ ÙÔ Ú¿ÊÈ, ·Ó·ÛËÎÒÛÙÂÙËÓ ÂÌÚfi˜ ÏÂ˘Ú¿ ÙÔ˘, ÌÂÙ·ÎÈÓ‹ÛÙ ÙÔ·fi ÙÔ Ï¢ÚÈÎfi ÛÙ‹ÚÈÁÌ· ηȷ·ÁÎÈÛÙÚÒÛÙ ÙÔ ·fi ÙË Ú¿Á·.°È· Ó· ‚¿ÏÂÙ ͷӿ ÙÔ Ú¿ÊÈ ÛÙË ı¤ÛË ÙÔ˘,ÂÈϤÍÙ ÚÒÙ· ÙÔ ÂÈı˘ÌËÙfi ‡„Ô˜.
∞Ó·ÛËÎÒÓÔÓÙ·˜ ÂÏ·ÊÚ¿ ÙÔ Ú¿ÊÈ ÛÙËÓÂÌÚfi˜ ÏÂ˘Ú¿ ÙÔ˘, ÙÔÔıÂÙ‹ÛÙ ÙÔ ¿Óˆ¿ÁÎÈÛÙÚÔ ÙÔ˘ ‚Ú·¯›ÔÓ· ÛÙË Ú¿Á· ηÈηÙ‚¿ÛÙ ÙÔ Ú¿ÊÈ ÒÛÙ ӷ ·ÎÔ˘Ì‹ÛÂÈÛÙÔ ÛÙ‹ÚÈÁÌ·.¶∞ƒ∞∆∏ƒ∏™∏: ∆Ô Ú¿ÊÈ Ô˘ ÙÔÔıÂÙ›ٷȉÂÍÈ¿ ·fi ÙË Ú¿Á· Â›Ó·È Û¯Â‰È·Ṳ̂ÓÔ Ó··ÁÎÈÛÙÚÒÓÂÈ ÛÙËÓ ‰ÂÍÈ¿ ˘Ô‰Ô¯‹. ∆Ô Ú¿ÊÈÔ˘ ÙÔÔıÂÙÂ›Ù·È ·ÚÈÛÙÂÚ¿ ·fi ÙË Ú¿Á·Â›Ó·È ۯ‰ȷṲ̂ÓÔ Ó· ·ÁÎÈÛÙÚÒÓÂÈ ÛÙËÓ·ÚÈÛÙÂÚ‹ ˘Ô‰Ô¯‹.
2 ∞Ó·ÛËÎÒÛÙÂ ÚÔ˜ Ù·
¿Óˆ Î·È ¤Íˆ
1 °˘Ú›ÛÙÂ ÚÔ˜Ù· ¿Óˆ
81

82
™¯ÂÙÈο Ì ٷ Ú¿ÊÈ· ÙÔ˘ ¯ÒÚÔ˘ ηÙ„˘ÁÌ¤ÓˆÓ ÙÚÔʛ̈Ó
√ÚÈṲ̂ӷ ÌÔÓ٤Ϸ ‰È·ı¤ÙÔ˘Ó Ú¿ÊÈ ÁÈ· ·ÁÔı‹Î˜ ‹ Ú¿ÊÈ Ï‹ÚÔ˘˜ Ï¿ÙÔ˘˜ Ì ÛηÏÔ¿ÙÈ.
ƒ¿ÊÈ ÁÈ· ¶·ÁÔı‹Î˜
°È· Ó· ·Ê·ÈÚ¤ÛÂÙ ÙÔ Ú¿ÊÈ ÁÈ· ÙȘ·ÁÔı‹Î˜, ·Ó·ÛËÎÒÛÙ ÙËÓ ·ÚÈÛÙÂÚ‹ÙÔ˘ ÏÂ˘Ú¿ ÒÛÙ ÙÔ Ú¿ÊÈ Ó· ‚ÁÂÈ ·fiÙ· ÛÙËÚ›ÁÌ·Ù¿ ÙÔ˘ Î·È ÙÚ·‚‹ÍÙ ÙÔÚÔ˜ Ù· ·ÚÈÛÙÂÚ¿ ÒÛÙ ӷ·ÂÏ¢ıÂÚˆı› ·fi Ù· ‚˘ÛÌ·ÙÔ‡ÌÂÓ·
˘ÔÛÙËÚ›ÁÌ·Ù·. ∆Ú·‚‹ÍÙ ÙÔ Ú¿ÊÈ ÚÔ˜Ù· ‰ÂÍÈ¿ ÁÈ· Ó· ·ÂÏ¢ıÂÚÒÛÂÙ ÙÔ˘˜Â›ÚÔ˘˜ ·fi ÙȘ Ô¤˜ Ô˘ ˘¿Ú¯Ô˘ÓÛÙ· ÙÔȯÒÌ·Ù·.
ƒ¿ÊÈ Ì ™Î·ÏÔ¿ÙÈ
°È· Ó· ·Ê·ÈÚ¤ÛÂÙ ÙÔ Ú¿ÊÈ Ì ÛηÏÔ¿ÙÈ:
∞Ó·ÛËÎÒÛÙ ÂÏ·ÊÚ¿ ÙËÓ ·ÚÈÛÙÂÚ‹ÏÂ˘Ú¿ ÙÔ˘ Ú·ÊÈÔ‡.
ªÂÙ·ÎÈÓ‹ÛÙ ÙÔ Ú¿ÊÈ ÚÔ˜ Ù· ·ÚÈÛÙÂÚ¿ÁÈ· Ó· ·ÂÏ¢ıÂÚÒÛÂÙ ٷ ‰ÂÍÈ¿ ÙÔ˘¿ÎÚ· ·fi ÙȘ Ô¤˜ ÙÔ˘ ÙÔȯÒÌ·ÙÔ˜.
÷ÌËÏÒÛÙ ÙËÓ ‰ÂÍÈ¿ ÏÂ˘Ú¿ ÙÔ˘Ú·ÊÈÔ‡, ÌÂÙ·ÎÈÓ‹ÛÙ ÙÔ Ú¿ÊÈ ÚÔ˜ Ù·‰ÂÍÈ¿ Î·È ·Ê·ÈÚ¤ÛÙ ÙÔ.
°È· Ó· ÙÔÔıÂÙ‹ÛÂÙ ͷӿ ÛÙË ı¤ÛË ÙÔ˘ÙÔ Ú¿ÊÈ Ì ÛηÏÔ¿ÙÈ:
ªÂ ÙÔ Ú¿ÊÈ Á˘ÚÙfi fiˆ˜ Ê·›ÓÂÙ·È ÛÙËÓÂÈÎfiÓ·, ÛÙÂÚÂÒÛÙ ٷ ·ÚÈÛÙÂÚ¿ ¿ÎÚ·ÙÔ˘ Ú·ÊÈÔ‡ ÛÙȘ Ô¤˜ Ô˘ ˘¿Ú¯Ô˘Ó ÛÙÔÙÔ›¯ˆÌ·.
∞Ó·ÛËÎÒÛÙ ÂÏ·ÊÚ¿ ÙËÓ ·ÚÈÛÙÂÚ‹ÏÂ˘Ú¿ ÙÔ˘ Ú·ÊÈÔ‡, ÛÙÚ¤„Ù ÙÔ ÚÔ˜ Ù·¿Óˆ, ÛÙÂÚÂÒÛÙ ٷ ‰ÂÍÈ¿ ÙÔ˘ ¿ÎÚ·ÛÙȘ Ô¤˜ ÙÔ˘ ÙÔȯÒÌ·ÙÔ˜ ηȯ·ÌËÏÒÛÙ ÙÔ ÒÛÙ ӷ ¤ÚıÂÈ ÛÙËÓηÓÔÓÈ΋ ÙÔ˘ ı¤ÛË.
2
1
3
2
1
ÀÔÛÙËÚ›ÁÌ·Ù·
¶·ÁÔı‹Î˜ (Û ÔÚÈṲ̂ӷ ÌÔÓ٤Ϸ)
∏ ۯ‰›·ÛË ÙˆÓ ·ÁÔıËÎÒÓ ÂÈÙÚ¤ÂÈ ÛÙ··Á¿ÎÈ· Ó· ‚Á·›ÓÔ˘Ó Â‡ÎÔÏ·. ∫Ú·Ù‹ÛÙ ÙËÓ·ÁÔı‹ÎË ·Ó·Ô‰ÔÁ˘ÚÈṲ̂ÓË ¿Óˆ ·fi ¤Ó·‰Ô¯Â›Ô Î·È ÛÙÚ¤„Ù ٷ ‰‡Ô ¿ÎÚ· Ù˘ ÁÈ· Ó··ÂÏ¢ıÂÚˆıÔ‡Ó Ù· ·Á¿ÎÈ·.
∞Ó ı¤ÏÂÙ ӷ ‚Á¿ÏÂÙ ÌfiÓÔ ¤Ó· ‹ ‰‡Ô·Á¿ÎÈ·, ÛÙÚ¤„Ù ÂÏ·ÊÚ¿ Ù· ‰‡Ô ¿ÎÚ· Ù˘·ÁÔı‹Î˘ ¯ˆÚ›˜ Ó· ÙËÓ ·Ó·Ô‰ÔÁ˘Ú›ÛÂÙÂÎ·È ·Ê·ÈÚ¤ÛÙ fiÛ· ·Á¿ÎÈ· ÂÈı˘Ì›ÙÂ. √È·ÁÔı‹Î˜ Î·È ÙÔ Û˘ÚÙ¿ÚÈ ·Ôı‹Î¢Û˘ ı·Ú¤ÂÈ Ó· ϤÓÔÓÙ·È ÌfiÓÔ Ì ¯ÏÈ·Úfi ÓÂÚfi.ªËÓ Ù· ÙÔÔıÂÙ›Ù Û ·˘ÙfiÌ·ÙÔÏ˘ÓÙ‹ÚÈÔ È¿ÙˆÓ.
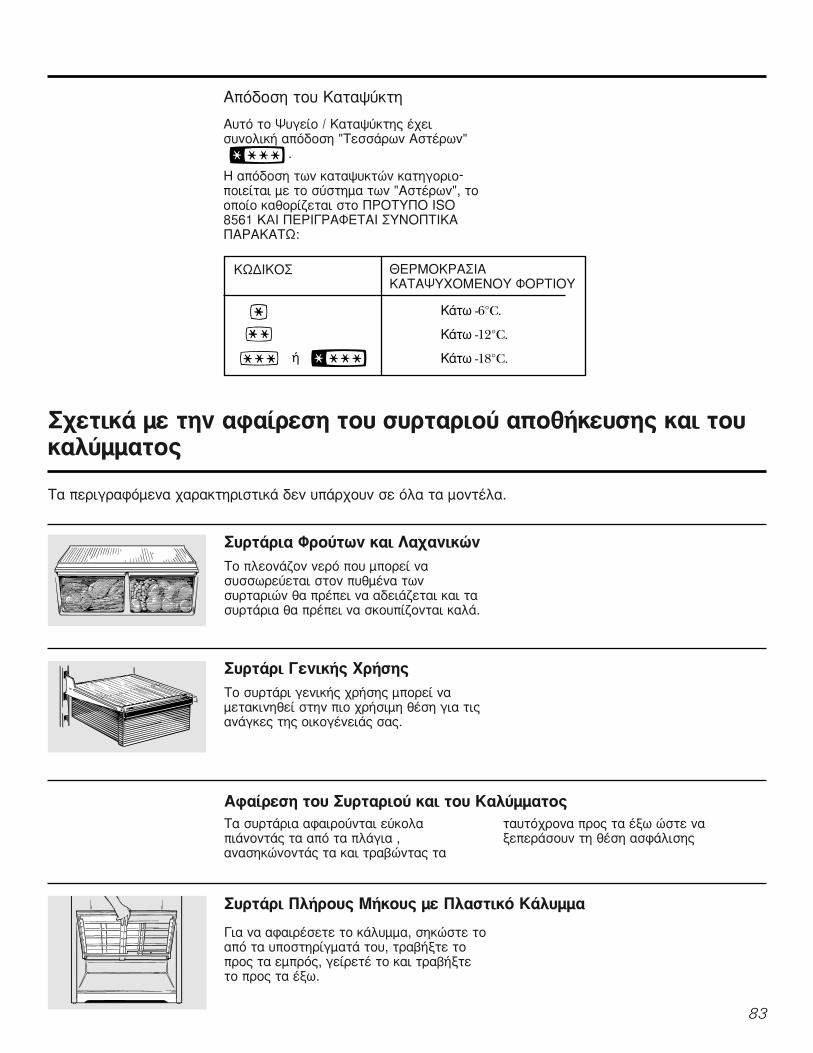
™¯ÂÙÈο Ì ÙËÓ ·Ê·›ÚÂÛË ÙÔ˘ Û˘ÚÙ·ÚÈÔ‡ ·Ôı‹Î¢Û˘ Î·È ÙÔ˘Î·Ï‡ÌÌ·ÙÔ˜
∆· ÂÚÈÁÚ·ÊfiÌÂÓ· ¯·Ú·ÎÙËÚÈÛÙÈο ‰ÂÓ ˘¿Ú¯Ô˘Ó Û fiÏ· Ù· ÌÔÓ٤Ϸ.
∞Ê·›ÚÂÛË ÙÔ˘ ™˘ÚÙ·ÚÈÔ‡ Î·È ÙÔ˘ ∫·Ï‡ÌÌ·ÙÔ˜∆· Û˘ÚÙ¿ÚÈ· ·Ê·ÈÚÔ‡ÓÙ·È Â‡ÎÔÏ·È¿ÓÔÓÙ¿˜ Ù· ·fi Ù· Ï¿ÁÈ· ,·Ó·ÛËÎÒÓÔÓÙ¿˜ Ù· Î·È ÙÚ·‚ÒÓÙ·˜ Ù·
Ù·˘Ùfi¯ÚÔÓ· ÚÔ˜ Ù· ¤Íˆ ÒÛÙ ӷÍÂÂÚ¿ÛÔ˘Ó ÙË ı¤ÛË ·ÛÊ¿ÏÈÛ˘
™˘ÚÙ¿ÚÈ ¶Ï‹ÚÔ˘˜ ª‹ÎÔ˘˜ Ì ¶Ï·ÛÙÈÎfi ∫¿Ï˘ÌÌ·
°È· Ó· ·Ê·ÈÚ¤ÛÂÙ ÙÔ Î¿Ï˘ÌÌ·, ÛËÎÒÛÙ ÙÔ·fi Ù· ˘ÔÛÙËÚ›ÁÌ·Ù¿ ÙÔ˘, ÙÚ·‚‹ÍÙ ÙÔÚÔ˜ Ù· ÂÌÚfi˜, Á›ÚÂÙ¤ ÙÔ Î·È ÙÚ·‚‹ÍÙÂÙÔ ÚÔ˜ Ù· ¤Íˆ.
™˘ÚÙ¿ÚÈ· ºÚÔ‡ÙˆÓ Î·È §·¯·ÓÈÎÒÓ
∆Ô ÏÂÔÓ¿˙ÔÓ ÓÂÚfi Ô˘ ÌÔÚ› Ó·Û˘ÛÛˆÚ‡ÂÙ·È ÛÙÔÓ ˘ı̤ӷ ÙˆÓÛ˘ÚÙ·ÚÈÒÓ ı· Ú¤ÂÈ Ó· ·‰ÂÈ¿˙ÂÙ·È Î·È Ù·Û˘ÚÙ¿ÚÈ· ı· Ú¤ÂÈ Ó· ÛÎÔ˘›˙ÔÓÙ·È Î·Ï¿.
™˘ÚÙ¿ÚÈ °ÂÓÈ΋˜ ÃÚ‹Û˘
∆Ô Û˘ÚÙ¿ÚÈ ÁÂÓÈ΋˜ ¯Ú‹Û˘ ÌÔÚ› Ó·ÌÂÙ·ÎÈÓËı› ÛÙËÓ ÈÔ ¯Ú‹ÛÈÌË ı¤ÛË ÁÈ· ÙȘ·Ó¿ÁΘ Ù˘ ÔÈÎÔÁ¤ÓÂÈ¿˜ Û·˜.
83
∞fi‰ÔÛË ÙÔ˘ ∫·Ù·„‡ÎÙË
∞˘Ùfi ÙÔ æ˘ÁÂ›Ô / ∫·Ù·„‡ÎÙ˘ ¤¯ÂÈÛ˘ÓÔÏÈ΋ ·fi‰ÔÛË "∆ÂÛÛ¿ÚˆÓ ∞ÛÙ¤ÚˆÓ"
.
∏ ·fi‰ÔÛË ÙˆÓ Î·Ù·„˘ÎÙÒÓ Î·ÙËÁÔÚÈÔ-ÔÈÂ›Ù·È Ì ÙÔ Û‡ÛÙËÌ· ÙˆÓ "∞ÛÙ¤ÚˆÓ", ÙÔÔÔ›Ô Î·ıÔÚ›˙ÂÙ·È ÛÙÔ ¶ƒ√∆À¶√ ISO8561 KAI ¶∂ƒπ°ƒ∞º∂∆∞π ™À¡√¶∆π∫∞¶∞ƒ∞∫∞∆ø:
∫ø¢π∫√™
‹
£∂ƒª√∫ƒ∞™π∞∫∞∆∞æÀÃ√ª∂¡√À º√ƒ∆π√À
∫¿Ùˆ -6°C.
∫¿Ùˆ -12°C.
∫¿Ùˆ -18°C.

84
ŒÓ· ηÈÓÔ‡ÚÈÔ „˘ÁÂ›Ô ÌÂÙ¿ ÙËÓ ÂÁηٿÛÙ·Û‹ ÙÔ˘ ÌÔÚ› Ó· ¯ÚÂÈ·ÛÙ› 12 ¤ˆ˜ 24 ÒÚ˜ ÁÈ· Ó··Ú¯›ÛÂÈ Ó· ·Ú¿ÁÂÈ ·Á¿ÎÈ·.
¶·ÁÔÌ˯·Ó‹
∞ÈÛıËÙ‹ÚÈÔ˜µÚ·¯›ÔÓ·˜
¢È·ÎfiÙ˘§ÂÈÙÔ˘ÚÁ›·˜
∫ÈÙ ¶·ÁÔÌ˯·Ó‹˜ Û·Ó ∞ÍÂÛÔ˘¿Ú
∞Ó ÙÔ „˘ÁÂ›Ô Û·˜ ‰ÂÓ ‰È·ı¤ÙÂÈ·ÁÔÌ˯·Ó‹, ·˘Ù‹ ‰È·Ù›ıÂÙ·È Î·È Û·ÓͯˆÚÈÛÙfi ÎÈÙ Ì ÂÈϤÔÓ ÎfiÛÙÔ˜.
∂ϤÁÍÙ ÙËÓ ›Ûˆ ÏÂ˘Ú¿ ÙÔ˘ „˘Á›Ԣ ÁÈ·ÙÔ Û˘ÁÎÂÎÚÈ̤ÓÔ ÎÈÙ ·ÁÔÌ˯·Ó‹˜ Ô˘··ÈÙÂ›Ù·È ÁÈ· ÙÔ ‰ÈÎfi Û·˜ ÌÔÓÙ¤ÏÔ.
∞˘ÙfiÌ·ÙË ¶·ÁÔÌ˯·Ó‹∏ ·ÁÔÌ˯·Ó‹ ·Ú¿ÁÂÈ ÂÙ¿ ·Á¿ÎÈ· ÛÂοı ·ÎÏÔ ÏÂÈÙÔ˘ÚÁ›·˜ - ÂÚ›Ô˘ 100-130·Á¿ÎÈ· ÙÔ 24ˆÚÔ, ·Ó¿ÏÔÁ· Ì ÙË ıÂÚÌÔ-ÎÚ·Û›· ÙÔ˘ ηٷ„‡ÎÙË, ÙË ıÂÚÌÔÎÚ·Û›· ÙÔ˘¯ÒÚÔ˘, ÙÔÓ ·ÚÈıÌfi ·ÓÔÈÁÌ¿ÙˆÓ Ù˘ fiÚÙ·˜Î·È ¿ÏÏÔ˘˜ ·Ú¿ÁÔÓÙ˜ Ô˘ ÂÍ·ÚÙÒÓÙ·È·fi ÙȘ Û˘Óı‹Î˜ ¯Ú‹Û˘.∞Ó ÙÔ „˘ÁÂ›Ô ÙÂı› Û ÏÂÈÙÔ˘ÚÁ›· ÚÈÓÁ›ÓÂÈ Ë Û‡Ó‰ÂÛË ÙÔ˘ ÓÂÚÔ‡ Ì ÙËÓ ·ÁÔ-Ì˯·Ó‹, ı¤ÛÙ ÙÔÓ ‰È·ÎfiÙË ÛÙÔ 0 (off).∞ÊÔ‡ Û˘Ó‰Âı› ÙÔ „˘ÁÂ›Ô Ì ÙËÓ ·ÚÔ¯‹ÓÂÚÔ‡, ı¤ÛÙ ÙÔÓ ‰È·ÎfiÙË ÛÙÔ I (on). ∆ÔÚ¿ÛÈÓÔ ÊˆÙ¿ÎÈ ÏÂÈÙÔ˘ÚÁ›·˜ ı· ·Ó¿„ÂÈ.∏ ·ÁÔÌ˯·Ó‹ ÁÂÌ›˙ÂÈ Ì ÓÂÚfi fiÙ·Ó ÊÙ¿ÛÂÈÛÙË ıÂÚÌÔÎÚ·Û›· ‹Í˘ ÙÔ˘ ÓÂÚÔ‡. ŒÓ·Î·ÈÓÔ‡ÚÈÔ „˘ÁÂ›Ô ÌÂÙ¿ ÙËÓ ÂÁηٿÛÙ·Û‹ÙÔ˘ ÌÔÚ› Ó· ¯ÚÂÈ·ÛÙ› 12 ¤ˆ˜ 24 ÒÚ˜ÁÈ· Ó· ·Ú¯›ÛÂÈ Ó· ·Ú¿ÁÂÈ ·Á¿ÎÈ·.¶ÂÙ¿ÍÙ ÙȘ ÚÒÙ˜ ·ÚÙ›‰Â˜ ·fi Ù··Ú·ÁfiÌÂÓ· ·Á¿ÎÈ· ÒÛÔ˘ Ó· ηı·Ú›ÛÂÈÂÓÙÂÏÒ˜ Ë ÁÚ·ÌÌ‹ ·ÚÔ¯‹˜ ÙÔ˘ ÓÂÚÔ‡.µÂ‚·Èˆı›Ù fiÙÈ ‰ÂÓ ·ÚÂÌ‚¿ÏÏÂÙ·ÈηӤӷ ÂÌfi‰ÈÔ ÛÙËÓ Î›ÓËÛË ÙÔ˘·ÈÛıËÙ‹ÚÈÔ˘ ‚Ú·¯›ÔÓ·.
ŸÙ·Ó Ë ÛÙ¿ıÌË ÙÔ˘ ÓÂÚÔ‡ ÛÙÔ ‰Ô¯Â›ÔÊÙ¿ÛÂÈ ÛÙÔ ‡„Ô˜ ÙÔ˘ ·ÈÛıËÙ‹ÚÈÔ˘‚Ú·¯›ÔÓ·, Ë ·ÁÔÌ˯·Ó‹ ÛÙ·Ì·Ù¿ Ó··Ú¿ÁÂÈ ·Á¿ÎÈ·.∂›Ó·È Ê˘ÛÈÔÏÔÁÈÎfi ÔÚÈṲ̂ӷ ·Á¿ÎÈ· Ó·Â›Ó·È ÎÔÏÏË̤ӷ ÌÂٷ͇ ÙÔ˘˜.∞Ó ‰ÂÓ ¯ÚËÛÈÌÔÔÈ›ÙÂ Û˘¯Ó¿ ·Á¿ÎÈ·, Ù··Ï·È¿ ·Á¿ÎÈ· ıÔÏÒÓÔ˘Ó, ·ÔÎÙÔ‡Ó"Ì·ÁÈ¿ÙÈÎË" Á‡ÛË Î·È Û˘ÚÚÈÎÓÒÓÔÓÙ·È.∞Ó Ù· ·Á¿ÎÈ· ÎÔÏÏ‹ÛÔ˘Ó Ì¤Û· ÛÙËÓ·ÁÔÌ˯·Ó‹, ÙÔ Ú¿ÛÈÓÔ ÊˆÙ¿ÎÈÏÂÈÙÔ˘ÚÁ›·˜ ·Ú¯›˙ÂÈ Ó· ·Ó·‚ÔÛ‚‹ÓÂÈ. °È· Ó·ÙÔ ‰ÈÔÚıÒÛÂÙ ·˘Ùfi, ı¤ÛÙ ÙÔÓ ‰È·ÎfiÙËÏÂÈÙÔ˘ÚÁ›·˜ ÛÙÔ 0 (off) Î·È ‚Á¿ÏÙ ٷ·Á¿ÎÈ·. °È· Ó· ÍÂÎÈÓ‹ÛÂÈ Í·Ó¿ ËÏÂÈÙÔ˘ÚÁ›· Ù˘ ·ÁÔÌ˯·Ó‹˜ ı¤ÛÙ ÙÔӉȷÎfiÙË ÛÙÔ π (on).™∏ª∂πø™∏: ™Â Û›ÙÈ· fiÔ˘ Ë ›ÂÛË ÙÔ˘ÓÂÚÔ‡ Â›Ó·È ¯·ÌËÏfiÙÂÚË ·fi ÙÔÓ Ì¤ÛÔ fiÚÔ,ÌÔÚ› Ó· ·ÎÔ‡Ù ÙËÓ ·ÁÔÌ˯·Ó‹ Ó·ÂÎÙÂÏ› ÔÏÏÔ‡˜ ·ÎÏÔ˘˜ ÏÂÈÙÔ˘ÚÁ›·˜ ÁÈ·ÙËÓ ·Ú·ÁˆÁ‹ ÌÈ·˜ ·ÚÙ›‰·˜ ·fi ·Á¿ÎÈ·.
¶Ú¿ÛÈÓÔºˆÙ¿ÎȧÂÈÙÔ˘ÚÁ›·˜
™¯ÂÙÈο Ì ÙËÓ ·˘ÙfiÌ·ÙË ·ÁÔÌ˯·Ó‹ (Û ÔÚÈṲ̂ӷ ÌÔÓ٤Ϸ)
™¯ÂÙÈο Ì ÙËÓ ·Ê·›ÚÂÛË ÙÔ˘ Û˘ÚÙ·ÚÈÔ‡ ·Ôı‹Î¢Û˘ Î·È ÙÔ˘Î·Ï‡ÌÌ·ÙÔ˜
¢ÈÏ¿ ™˘ÚÙ¿ÚÈ· Ì °˘¿ÏÈÓÔ ∫¿Ï˘ÌÌ·°È· ÙËÓ ·Ê·›ÚÂÛË
∞Ê·ÈÚ¤ÛÙ ٷ Û˘ÚÙ¿ÚÈ·.
µ¿ÏÙ ÙÔ ¯¤ÚÈ Û·˜ ÛÙÔ ›Ûˆ ¿ÎÚÔ ÙÔ˘Á˘¿ÏÈÓÔ˘ ηχÌÌ·ÙÔ˜ Î·È È¤ÛÙ ÙËÓÂÌÚfi˜ ÏÂ˘Ú¿ ÙÔ˘ ÚÔ˜ Ù· ¿ÓˆÙÚ·‚ÒÓÙ·˜ ÙÔ Ù·˘Ùfi¯ÚÔÓ· ÚÔ˜ Ù·ÂÌÚfi˜ ÒÛÙ ӷ ÌÂÙ·ÎÈÓËı› ÚÔ˜ Ù·¤Íˆ fiÛÔ Â›Ó·È ‰˘Ó·ÙfiÓ.
°Â›ÚÂÙ¤ ÙÔ Î·È ÙÚ·‚‹ÍÙ ÙÔ ÚÔ˜ Ù· ¤Íˆ.∞ÔʇÁÂÙ ӷ ηı·Ú›˙ÂÙ ÙÔ „˘¯ÚfiÁ˘¿ÏÈÓÔ Î¿Ï˘ÌÌ· Ì ˙ÂÛÙfi ÓÂÚfi ‰ÈfiÙÈ ËÌÂÁ¿ÏË ‰È·ÊÔÚ¿ ıÂÚÌÔÎÚ·Û›·˜ ÌÔÚ› Ó·ÚÔηϤÛÂÈ ıÚ·‡ÛË ÙÔ˘ Á˘·ÏÈÔ‡.
∞Ê·ÈÚ¤ÛÙ ÙÔ Ï·›ÛÈÔ ÙÔ˘ Û˘ÚÙ·ÚÈÔ‡(£· Ú¤ÂÈ ¿ÓÙÔÙ ӷ ·Ê·ÈÚ›Ù ÙÔÁ˘¿ÏÈÓÔ Î¿Ï˘ÌÌ· ÚÈÓ ‚Á¿ÏÂÙ ÙÔÏ·›ÛÈÔ ÙÔ˘ Û˘ÚÙ·ÚÈÔ‡).
∞Ó·ÛËÎÒÛÙ ÙÔ Ï·›ÛÈÔ ·fi Ù· ÛÙËÚ›ÁÌ·Ù¿ÙÔ˘ Û οı ÏÂ˘Ú¿ Î·È ›Ûˆ, ÙÚ·‚‹ÍÙ ÙÔÚÔ˜ Ù· ÂÌÚfi˜, Á›ÚÂÙ¤ ÙÔ Î·È ÙÚ·‚‹ÍÙÂÙÔ ÚÔ˜ Ù· ¤Íˆ.
°È· ÙËÓ Â·Ó·ÙÔÔı¤ÙËÛË:
∫·Ù‚¿ÛÙ ÙÔ Ï·›ÛÈÔ ÒÛÔ˘ Ó··ÎÔ˘Ì‹ÛÂÈ ÛÙ· ÛÙËÚ›ÁÌ·Ù· Ô˘˘¿Ú¯Ô˘Ó ÛÙ· Ï¿ÁÈ· Î·È ›Ûˆ.
∆ÔÔıÂÙ‹ÛÙ ͷӿ ÛÙË ı¤ÛË ÙÔ˘ ÙÔÁ˘¿ÏÈÓÔ Î¿Ï˘ÌÌ·, Ȥ˙ÔÓÙ·˜ ηϿ ÙËÓ›Ûˆ ÏÂ˘Ú¿ ÙÔ˘ ÒÛÙ ӷ ÌÂÈ ÛÙÔ›Ûˆ ηӿÏÈ ÙÔ˘ Ï·ÈÛ›Ô˘ ηÈηÙ‚¿ÛÙ ÚÔÛÂÎÙÈο ÙËÓ ÂÌÚfi˜ÏÂ˘Ú¿ ÙÔ˘ ÒÛÙ ӷ ¤ÚıÂÈ ÛÙËÓηÓÔÓÈ΋ Ù˘ ı¤ÛË.
∆ÔÔıÂÙ‹ÛÙ ͷӿ Ù· Û˘ÚÙ¿ÚÈ· ÛÙËı¤ÛË ÙÔ˘˜.3
2
1
3
21
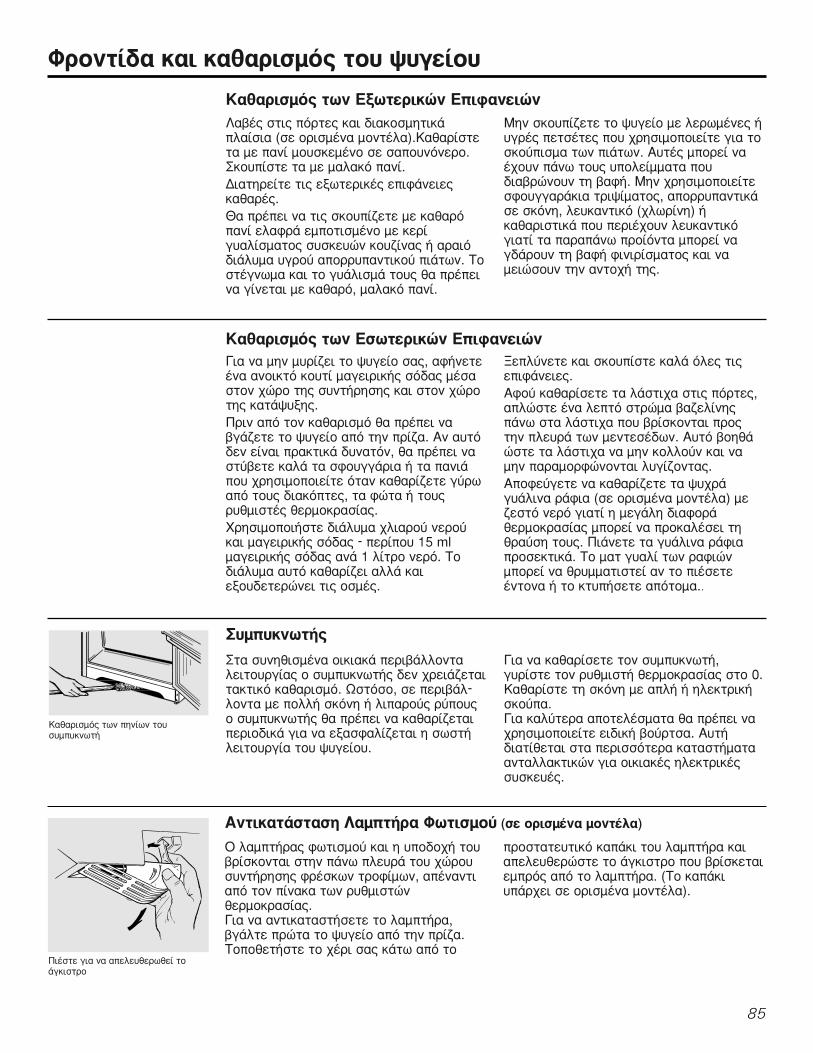
ºÚÔÓÙ›‰· Î·È Î·ı·ÚÈÛÌfi˜ ÙÔ˘ „˘Á›Ԣ
∫·ı·ÚÈÛÌfi˜ ÙˆÓ ∂͈ÙÂÚÈÎÒÓ ∂ÈÊ·ÓÂÈÒÓ§·‚¤˜ ÛÙȘ fiÚÙ˜ Î·È ‰È·ÎÔÛÌËÙÈοϷ›ÛÈ· (Û ÔÚÈṲ̂ӷ ÌÔÓ٤Ϸ).∫·ı·Ú›ÛÙÂÙ· Ì ·Ó› ÌÔ˘ÛÎÂ̤ÓÔ ÛÂ Û·Ô˘ÓfiÓÂÚÔ.™ÎÔ˘›ÛÙ ٷ Ì ̷ϷÎfi ·Ó›.¢È·ÙËÚ›Ù ÙȘ Â͈ÙÂÚÈΤ˜ ÂÈÊ¿ÓÂȘηı·Ú¤˜.£· Ú¤ÂÈ Ó· ÙȘ ÛÎÔ˘›˙ÂÙ Ì ηı·Úfi·Ó› ÂÏ·ÊÚ¿ ÂÌÔÙÈṲ̂ÓÔ Ì ÎÂÚ›Á˘·Ï›ÛÌ·ÙÔ˜ Û˘Û΢ÒÓ ÎÔ˘˙›Ó·˜ ‹ ·Ú·Èfi‰È¿Ï˘Ì· ˘ÁÚÔ‡ ·ÔÚÚ˘·ÓÙÈÎÔ‡ È¿ÙˆÓ. ∆ÔÛÙ¤Áӈ̷ Î·È ÙÔ Á˘¿ÏÈÛÌ¿ ÙÔ˘˜ ı· Ú¤ÂÈÓ· Á›ÓÂÙ·È Ì ηı·Úfi, Ì·Ï·Îfi ·Ó›.
ªËÓ ÛÎÔ˘›˙ÂÙ ÙÔ „˘ÁÂ›Ô Ì ÏÂڈ̤Ó˜ ‹˘ÁÚ¤˜ ÂÙÛ¤Ù˜ Ô˘ ¯ÚËÛÈÌÔÔț٠ÁÈ· ÙÔÛÎÔ‡ÈÛÌ· ÙˆÓ È¿ÙˆÓ. ∞˘Ù¤˜ ÌÔÚ› Ó·¤¯Ô˘Ó ¿Óˆ ÙÔ˘˜ ˘ÔÏ›ÌÌ·Ù· Ô˘‰È·‚ÚÒÓÔ˘Ó ÙË ‚·Ê‹. ªËÓ ¯ÚËÛÈÌÔÔÈ›ÙÂÛÊÔ˘ÁÁ·Ú¿ÎÈ· ÙÚÈ„›Ì·ÙÔ˜, ·ÔÚÚ˘·ÓÙÈοÛ ÛÎfiÓË, Ï¢ηÓÙÈÎfi (¯ÏˆÚ›ÓË) ‹Î·ı·ÚÈÛÙÈο Ô˘ ÂÚȤ¯Ô˘Ó Ï¢ηÓÙÈÎfiÁÈ·Ù› Ù· ·Ú·¿Óˆ ÚÔ›fiÓÙ· ÌÔÚ› Ó·Á‰¿ÚÔ˘Ó ÙË ‚·Ê‹ ÊÈÓÈÚ›ÛÌ·ÙÔ˜ Î·È Ó·ÌÂÈÒÛÔ˘Ó ÙËÓ ·ÓÙÔ¯‹ Ù˘.
∫·ı·ÚÈÛÌfi˜ ÙˆÓ ∂ÛˆÙÂÚÈÎÒÓ ∂ÈÊ·ÓÂÈÒÓ°È· Ó· ÌËÓ Ì˘Ú›˙ÂÈ ÙÔ „˘ÁÂ›Ô Û·˜, ·Ê‹ÓÂÙ¤ӷ ·ÓÔÈÎÙfi ÎÔ˘Ù› Ì·ÁÂÈÚÈ΋˜ Ûfi‰·˜ ̤۷ÛÙÔÓ ¯ÒÚÔ Ù˘ Û˘ÓÙ‹ÚËÛ˘ Î·È ÛÙÔÓ ¯ÒÚÔÙ˘ ηٿ„˘Í˘.¶ÚÈÓ ·fi ÙÔÓ Î·ı·ÚÈÛÌfi ı· Ú¤ÂÈ Ó·‚Á¿˙ÂÙ ÙÔ „˘ÁÂ›Ô ·fi ÙËÓ Ú›˙·. ∞Ó ·˘Ùfi‰ÂÓ Â›Ó·È Ú·ÎÙÈο ‰˘Ó·ÙfiÓ, ı· Ú¤ÂÈ Ó·ÛÙ‡‚ÂÙ ηϿ Ù· ÛÊÔ˘ÁÁ¿ÚÈ· ‹ Ù· ·ÓÈ¿Ô˘ ¯ÚËÛÈÌÔÔț٠fiÙ·Ó Î·ı·Ú›˙ÂÙ Á‡Úˆ·fi ÙÔ˘˜ ‰È·ÎfiÙ˜, Ù· ÊÒÙ· ‹ ÙÔ˘˜Ú˘ıÌÈÛÙ¤˜ ıÂÚÌÔÎÚ·Û›·˜.ÃÚËÛÈÌÔÔÈ‹ÛÙ ‰È¿Ï˘Ì· ¯ÏÈ·ÚÔ‡ ÓÂÚÔ‡Î·È Ì·ÁÂÈÚÈ΋˜ Ûfi‰·˜ - ÂÚ›Ô˘ 15 mlÌ·ÁÂÈÚÈ΋˜ Ûfi‰·˜ ·Ó¿ 1 Ï›ÙÚÔ ÓÂÚfi. ∆Ô‰È¿Ï˘Ì· ·˘Ùfi ηı·Ú›˙ÂÈ ·ÏÏ¿ ηÈÂÍÔ˘‰ÂÙÂÚÒÓÂÈ ÙȘ ÔṲ̂˜.
•ÂχÓÂÙÂ Î·È ÛÎÔ˘›ÛÙ ηϿ fiϘ ÙȘÂÈÊ¿ÓÂȘ.∞ÊÔ‡ ηı·Ú›ÛÂÙ ٷ Ï¿ÛÙȯ· ÛÙȘ fiÚÙ˜,·ÏÒÛÙ ¤Ó· ÏÂÙfi ÛÙÚÒÌ· ‚·˙ÂÏ›Ó˘¿Óˆ ÛÙ· Ï¿ÛÙȯ· Ô˘ ‚Ú›ÛÎÔÓÙ·È ÚÔ˜ÙËÓ ÏÂ˘Ú¿ ÙˆÓ ÌÂÓÙÂÛ¤‰ˆÓ. ∞˘Ùfi ‚ÔËı¿ÒÛÙ ٷ Ï¿ÛÙȯ· Ó· ÌËÓ ÎÔÏÏÔ‡Ó Î·È Ó·ÌËÓ ·Ú·ÌÔÚÊÒÓÔÓÙ·È Ï˘Á›˙ÔÓÙ·˜.∞ÔʇÁÂÙ ӷ ηı·Ú›˙ÂÙ ٷ „˘¯Ú¿Á˘¿ÏÈÓ· Ú¿ÊÈ· (Û ÔÚÈṲ̂ӷ ÌÔÓ٤Ϸ) ÌÂ˙ÂÛÙfi ÓÂÚfi ÁÈ·Ù› Ë ÌÂÁ¿ÏË ‰È·ÊÔÚ¿ıÂÚÌÔÎÚ·Û›·˜ ÌÔÚ› Ó· ÚÔηϤÛÂÈ ÙËıÚ·‡ÛË ÙÔ˘˜. ¶È¿ÓÂÙ ٷ Á˘¿ÏÈÓ· Ú¿ÊÈ·ÚÔÛÂÎÙÈο. ∆Ô Ì·Ù Á˘·Ï› ÙˆÓ Ú·ÊÈÒÓÌÔÚ› Ó· ıÚ˘ÌÌ·ÙÈÛÙ› ·Ó ÙÔ È¤ÛÂÙ¤ÓÙÔÓ· ‹ ÙÔ ÎÙ˘‹ÛÂÙ ·fiÙÔÌ·..
™˘Ì˘ÎÓˆÙ‹˜
™Ù· Û˘ÓËıÈṲ̂ӷ ÔÈÎȷο ÂÚÈ‚¿ÏÏÔÓÙ·ÏÂÈÙÔ˘ÚÁ›·˜ Ô Û˘Ì˘ÎÓˆÙ‹˜ ‰ÂÓ ¯ÚÂÈ¿˙ÂÙ·ÈÙ·ÎÙÈÎfi ηı·ÚÈÛÌfi. øÛÙfiÛÔ, Û ÂÚÈ‚¿Ï-ÏÔÓÙ· Ì ÔÏÏ‹ ÛÎfiÓË ‹ ÏÈ·ÚÔ‡˜ Ú‡Ô˘˜Ô Û˘Ì˘ÎÓˆÙ‹˜ ı· Ú¤ÂÈ Ó· ηı·Ú›˙ÂÙ·ÈÂÚÈÔ‰Èο ÁÈ· Ó· ÂÍ·ÛÊ·Ï›˙ÂÙ·È Ë ÛˆÛÙ‹ÏÂÈÙÔ˘ÚÁ›· ÙÔ˘ „˘Á›Ԣ.
°È· Ó· ηı·Ú›ÛÂÙ ÙÔÓ Û˘Ì˘ÎÓˆÙ‹,Á˘Ú›ÛÙ ÙÔÓ Ú˘ıÌÈÛÙ‹ ıÂÚÌÔÎÚ·Û›·˜ ÛÙÔ 0.∫·ı·Ú›ÛÙ ÙË ÛÎfiÓË Ì ·Ï‹ ‹ ËÏÂÎÙÚÈ΋ÛÎÔ‡·.°È· ηχÙÂÚ· ·ÔÙÂϤÛÌ·Ù· ı· Ú¤ÂÈ Ó·¯ÚËÛÈÌÔÔț٠ÂȉÈ΋ ‚Ô‡ÚÙÛ·. ∞˘Ù‹‰È·Ù›ıÂÙ·È ÛÙ· ÂÚÈÛÛfiÙÂÚ· ηٷÛÙ‹Ì·Ù··ÓÙ·ÏÏ·ÎÙÈÎÒÓ ÁÈ· ÔÈÎȷΤ˜ ËÏÂÎÙÚÈΤ˜Û˘Û΢¤˜.
∫·ı·ÚÈÛÌfi˜ ÙˆÓ ËÓ›ˆÓ ÙÔ˘Û˘Ì˘ÎÓˆÙ‹
¶È¤ÛÙ ÁÈ· Ó· ·ÂÏ¢ıÂÚˆı› ÙÔ¿ÁÎÈÛÙÚÔ
∞ÓÙÈηٿÛÙ·ÛË §·ÌÙ‹Ú· ºˆÙÈÛÌÔ‡ (Û ÔÚÈṲ̂ӷ ÌÔÓ٤Ϸ)
√ Ï·ÌÙ‹Ú·˜ ʈÙÈÛÌÔ‡ Î·È Ë ˘Ô‰Ô¯‹ ÙÔ˘‚Ú›ÛÎÔÓÙ·È ÛÙËÓ ¿Óˆ ÏÂ˘Ú¿ ÙÔ˘ ¯ÒÚÔ˘Û˘ÓÙ‹ÚËÛ˘ ÊÚ¤ÛÎˆÓ ÙÚÔʛ̈Ó, ·¤Ó·ÓÙÈ·fi ÙÔÓ ›Ó·Î· ÙˆÓ Ú˘ıÌÈÛÙÒÓıÂÚÌÔÎÚ·Û›·˜.°È· Ó· ·ÓÙÈηٷÛÙ‹ÛÂÙ ÙÔ Ï·ÌÙ‹Ú·,‚Á¿ÏÙ ÚÒÙ· ÙÔ „˘ÁÂ›Ô ·fi ÙËÓ Ú›˙·.∆ÔÔıÂÙ‹ÛÙ ÙÔ ¯¤ÚÈ Û·˜ οو ·fi ÙÔ
ÚÔÛٷ٢ÙÈÎfi η¿ÎÈ ÙÔ˘ Ï·ÌÙ‹Ú· ηȷÂÏ¢ıÂÚÒÛÙ ÙÔ ¿ÁÎÈÛÙÚÔ Ô˘ ‚Ú›ÛÎÂÙ·ÈÂÌÚfi˜ ·fi ÙÔ Ï·ÌÙ‹Ú·. (∆Ô Î·¿ÎÈ˘¿Ú¯ÂÈ Û ÔÚÈṲ̂ӷ ÌÔÓ٤Ϸ).
85

86
ºÚÔÓÙ›‰· Î·È Î·ı·ÚÈÛÌfi˜ ÙÔ˘ „˘Á›Ԣ
¶›Ûˆ ·fi ÙÔ æ˘Á›ԶÚÔÛ¤¯ÂÙ fiÙ·Ó ·ÔÌ·ÎÚ‡ÓÂÙ ÙÔ „˘Á›Էfi ÙÔÓ ÙÔ›¯Ô. ŸÏ· Ù· ˘ÏÈο ÂÈÎ¿Ï˘„˘‰·¤‰ˆÓ ÌÔÚ› Ó· ˘ÔÛÙÔ‡Ó ˙ËÌÈ¿, ÂȉÈοٷ ˘ÏÈο Ì ̷Ϸ΋ ›ÛÙÚˆÛË ‹ ·Ó¿ÁÏ˘ÊËÂÈÊ¿ÓÂÈ·.
¶ÂÚÈÛÙÚ¤„Ù ÚÔ˜ Ù· ·ÚÈÛÙÂÚ¿ (·ÓÙ›ıÂÙ··fi ÙË ÊÔÚ¿ ÙˆÓ ‰ÂÈÎÙÒÓ ÙÔ˘ ÚÔÏÔÁÈÔ‡) Ù·Ô‰·Ú¿ÎÈ· ÔÚÈ˙ÔÓÙ›ˆÛ˘ ÛÙȘ ÂÌÚfi˜ÁˆÓ›Â˜ ÙÔ˘ „˘Á›Ԣ ÒÛÔ˘ ÙÔ „˘ÁÂ›Ô Ó··Ù‹ÛÂÈ ¿Óˆ ÛÙ· ÚÔ‰¿ÎÈ·.
∆Ú·‚‹ÍÙ ÙÔ „˘ÁÂ›Ô Â˘ı›· ÚÔ˜ Ù·ÂÌÚfi˜. °È· Ó· ͷӷʤÚÂÙ ÙÔ „˘ÁÂ›Ô ÛÙËÓηÓÔÓÈ΋ ÙÔ˘ ı¤ÛË ÛÚÒÍÙ ÙÔ Â˘ı›· ÚÔ˜Ù· ›Ûˆ. ªÂÙ·ÎÈÓÒÓÙ·˜ ÙÔ „˘ÁÂ›Ô ÚÔ˜ Ù·
Ï¿ÁÈ· ÌÔÚ› Ó· ÚÔηϤÛÂÙ ˙ËÌÈ¿ ÛÙËÓÂÈÎ¿Ï˘„Ë ÙÔ˘ ‰·¤‰Ô˘ ‹ ÛÙÔ ›‰ÈÔ ÙÔ„˘Á›Ô
ŸÙ·Ó Ȥ˙ÂÙ ÙÔ „˘ÁÂ›Ô ÚÔ˜ Ù· ›Ûˆ,‚‚·Èˆı›Ù fiÙÈ ‰ÂÓ ¤¯ÂÈ ·Ù‹ÛÂÈ ¿ÓˆÛÙÔ Î·ÏÒ‰ÈÔ ‹ ÛÙË ÁÚ·ÌÌ‹ ÙÚÔÊÔ‰ÔÛ›·˜ÓÂÚÔ‡ Ù˘ ·ÁÔÌ˯·Ó‹˜ (Û ÔÚÈṲ̂ӷÌÔÓ٤Ϸ).
∞ÊÔ‡ ÙÔÔıÂÙ‹ÛÂÙ ÙÔ „˘ÁÂ›Ô Í·Ó¿ ÛÙËı¤ÛË ÙÔ˘, ÂÚÈÛÙÚ¤„Ù ٷ Ô‰·Ú¿ÎÈ· ÚÔ˜Ù· ‰ÂÍÈ¿ (Ì ÙË ÊÔÚ¿ ÙˆÓ ‰ÂÈÎÙÒÓ ÙÔ˘ÚÔÏÔÁÈÔ‡) ÒÛÔ˘ ÙÔ ‚¿ÚÔ˜ ÙÔ˘ „˘Á›Ԣ Ó·ÛÙËÚȯÙ› Í·Ó¿ Û ·˘Ù¿.
¶ÚÔÂÙÔÈÌ·Û›· ÚÈÓ Ê‡ÁÂÙ ÁÈ· ¢È·ÎÔ¤˜
¶ÚÈÓ Ê‡ÁÂÙ ÁÈ· ‰È·ÎÔ¤˜ ‹ ÚÈÓ ·fiÂÚÈfi‰Ô˘˜ Ì·ÎÚ¿˜ ·Ô˘Û›·˜ Û·˜, ı· Ú¤ÂÈÓ· ‚Á¿˙ÂÙ fiÏ· Ù· ÙÚfiÊÈÌ· ·fi ÙÔ „˘Á›ÔÎ·È Ó· ÙÔ ·ÔÛ˘Ó‰¤ÂÙ ·fi ÙËÓ Ú›˙· .°˘Ú›ÛÙ ÙÔÓ Ú˘ıÌÈÛÙ‹ ıÂÚÌÔÎÚ·Û›·˜ ÛÙÔ 0Î·È Î·ı·Ú›ÛÙ ÙȘ ÂÛˆÙÂÚÈΤ˜ ÂÈÊ¿ÓÂȘÙÔ˘ „˘Á›Ԣ Ì ‰È¿Ï˘Ì· Ì·ÁÂÈÚÈ΋˜ Ûfi‰·˜(15 ml Ì·ÁÂÈÚÈ΋˜ Ûfi‰·˜ ·Ó¿ 1 Ï›ÙÚÔÓÂÚÔ‡). ∞Ê‹ÛÙ ÙȘ fiÚÙ˜ ÙÔ˘ „˘Á›Ԣ·ÓÔÈÎÙ¤˜.
£¤ÛÙ ÙÔÓ ‰È·ÎfiÙË Ù˘ ·ÁÔÌ˯·Ó‹˜ ÛÙÔ0 (off) Î·È ÎÏ›ÛÙ ÙËÓ ·ÚÔ¯‹ ÓÂÚÔ‡ ÛÙÔ„˘Á›Ô.
∞Ó ˘¿Ú¯ÂÈ Èı·ÓfiÙËÙ· Ë ıÂÚÌÔÎÚ·Û›· Ó·¤ÛÂÈ Î¿Ùˆ ·fi ÙÔ Ìˉ¤Ó, ηϤÛÙÂÂÍÔ˘ÛÈÔ‰ÔÙË̤ÓÔ Ù¯ӛÙË ÁÈ· Ó· Û·˜·‰ÂÈ¿ÛÂÈ ÙÔ Û‡ÛÙËÌ· ·ÚÔ¯‹˜ ÓÂÚÔ‡ (ÛÂÔÚÈṲ̂ӷ ÌÔÓ٤Ϸ) ÒÛÙ ӷ ÚÔÏ¿‚ÂÙÂÙ˘¯fiÓ ÛÔ‚·Ú¤˜ ˙ËÌȤ˜ ÏfiÁˆ ˘Âگ›ÏÈÛ˘.
¶ÚÔÂÙÔÈÌ·Û›· ÁÈ· ªÂÙ·ÎfiÌÈÛË
™ÙÂÚÂÒÛÙ ηϿ Ì ·˘ÙÔÎfiÏÏËÙË Ù·ÈÓ›·fiÏ· Ù· ÎÈÓÔ‡ÌÂÓ· ÂÍ·ÚÙ‹Ì·Ù·, .¯. Û¯¿Ú˜,Ú¿ÊÈ· Î·È Û˘ÚÙ¿ÚÈ·, ÒÛÙ ӷ ÚÔÏ¿‚ÂÙÂÙ˘¯fiÓ ˙ËÌȤ˜.
∫·Ù¿ ÙË ‰È¿ÚÎÂÈ· Ù˘ ÌÂÙ·ÎfiÌÈÛ˘‚‚·Èˆı›Ù fiÙÈ ÙÔ „˘ÁÂ›Ô ·Ú·Ì¤ÓÂÈ ÛÂfiÚıÈ· ı¤ÛË.
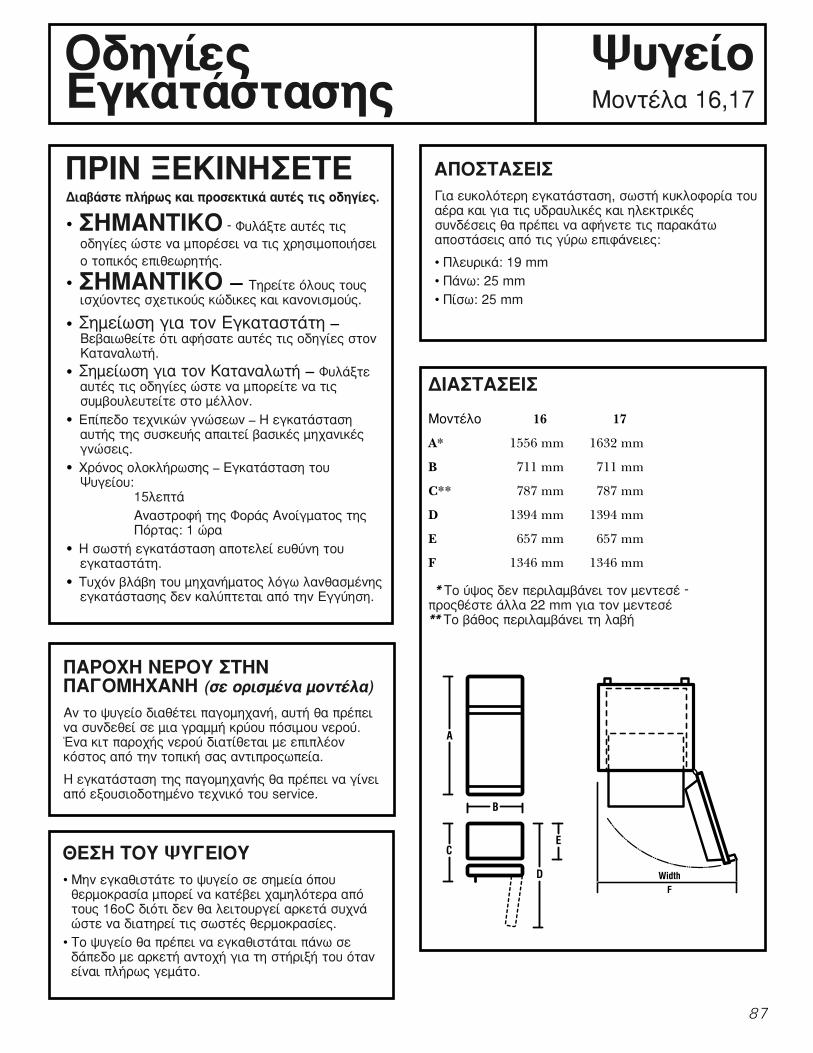
¶ƒπ¡ •∂∫π¡∏™∂∆∂¢È·‚¿ÛÙ ϋڈ˜ Î·È ÚÔÛÂÎÙÈο ·˘Ù¤˜ ÙȘ Ô‰ËÁ›Â˜.
• ™∏ª∞¡∆π∫√ - º˘Ï¿ÍÙ ·˘Ù¤˜ ÙȘԉËÁ›Â˜ ÒÛÙ ӷ ÌÔÚ¤ÛÂÈ Ó· ÙȘ ¯ÚËÛÈÌÔÔÈ‹ÛÂÈÔ ÙÔÈÎfi˜ ÂÈıˆÚËÙ‹˜.
• ™∏ª∞¡∆π∫√ – ∆ËÚ›Ù fiÏÔ˘˜ ÙÔ˘˜ÈÛ¯‡ÔÓÙ˜ Û¯ÂÙÈÎÔ‡˜ ÎÒ‰ÈΘ Î·È Î·ÓÔÓÈÛÌÔ‡˜.
• ™ËÌ›ˆÛË ÁÈ· ÙÔÓ ∂ÁηٷÛÙ¿ÙË –µÂ‚·Èˆı›Ù fiÙÈ ·Ê‹Û·Ù ·˘Ù¤˜ ÙȘ Ô‰ËÁ›Â˜ ÛÙÔÓ∫·Ù·Ó·ÏˆÙ‹.
• ™ËÌ›ˆÛË ÁÈ· ÙÔÓ ∫·Ù·Ó·ÏˆÙ‹ – º˘Ï¿ÍÙ·˘Ù¤˜ ÙȘ Ô‰ËÁ›Â˜ ÒÛÙ ӷ ÌÔÚ›Ù ӷ ÙÈ˜Û˘Ì‚Ô˘Ï¢Ù›Ù ÛÙÔ Ì¤ÏÏÔÓ.
• ∂›Â‰Ô Ù¯ÓÈÎÒÓ ÁÓÒÛÂˆÓ – ∏ ÂÁηٿÛÙ·ÛË·˘Ù‹˜ Ù˘ Û˘Û΢‹˜ ··ÈÙ› ‚·ÛÈΤ˜ Ì˯·ÓÈΤ˜ÁÓÒÛÂȘ.
• ÃÚfiÓÔ˜ ÔÏÔÎÏ‹ÚˆÛ˘ – ∂ÁηٿÛÙ·ÛË ÙÔ˘æ˘Á›Ԣ:
15ÏÂÙ¿∞Ó·ÛÙÚÔÊ‹ Ù˘ ºÔÚ¿˜ ∞ÓÔ›ÁÌ·ÙÔ˜ Ù˘ ¶fiÚÙ·˜: 1 ÒÚ·
• ∏ ÛˆÛÙ‹ ÂÁηٿÛÙ·ÛË ·ÔÙÂÏ› ¢ı‡ÓË ÙÔ˘ÂÁηٷÛÙ¿ÙË.
• ∆˘¯fiÓ ‚Ï¿‚Ë ÙÔ˘ Ì˯·Ó‹Ì·ÙÔ˜ ÏfiÁˆ Ï·Óı·Ṳ̂Ó˘ÂÁηٿÛÙ·Û˘ ‰ÂÓ Î·Ï‡ÙÂÙ·È ·fi ÙËÓ ∂ÁÁ‡ËÛË.
• ªËÓ ÂÁηıÈÛٿ٠ÙÔ „˘ÁÂ›Ô Û ÛËÌ›· fiÔ˘ıÂÚÌÔÎÚ·Û›· ÌÔÚ› Ó· η٤‚ÂÈ ¯·ÌËÏfiÙÂÚ· ·fiÙÔ˘˜ 16oC ‰ÈfiÙÈ ‰ÂÓ ı· ÏÂÈÙÔ˘ÚÁ› ·ÚÎÂÙ¿ Û˘¯Ó¿ÒÛÙ ӷ ‰È·ÙËÚ› ÙȘ ÛˆÛÙ¤˜ ıÂÚÌÔÎڷۛ˜.
• ∆Ô „˘ÁÂ›Ô ı· Ú¤ÂÈ Ó· ÂÁηıÈÛÙ¿Ù·È ¿Óˆ Û‰¿Â‰Ô Ì ·ÚÎÂÙ‹ ·ÓÙÔ¯‹ ÁÈ· ÙË ÛÙ‹ÚÈÍ‹ ÙÔ˘ fiÙ·ÓÂ›Ó·È Ï‹Úˆ˜ ÁÂÌ¿ÙÔ.
£∂™∏ ∆√À æÀ°∂π√À
√‰ËÁ›Â˜ æ˘Á›Ô∂ÁηٿÛÙ·Û˘ ªÔÓ٤Ϸ 16,17
°È· ¢ÎÔÏfiÙÂÚË ÂÁηٿÛÙ·ÛË, ÛˆÛÙ‹ ΢ÎÏÔÊÔÚ›· ÙÔ˘·¤Ú· Î·È ÁÈ· ÙȘ ˘‰Ú·˘ÏÈΤ˜ Î·È ËÏÂÎÙÚÈΤ˜Û˘Ó‰¤ÛÂȘ ı· Ú¤ÂÈ Ó· ·Ê‹ÓÂÙ ÙȘ ·Ú·Î¿Ùˆ·ÔÛÙ¿ÛÂȘ ·fi ÙȘ Á‡Úˆ ÂÈÊ¿ÓÂȘ:
• ¶Ï¢ÚÈο: 19 mm• ¶¿Óˆ: 25 mm• ¶›Ûˆ: 25 mm
∞¶√™∆∞™∂π™
∞Ó ÙÔ „˘ÁÂ›Ô ‰È·ı¤ÙÂÈ ·ÁÔÌ˯·Ó‹, ·˘Ù‹ ı· Ú¤ÂÈÓ· Û˘Ó‰Âı› Û ÌÈ· ÁÚ·ÌÌ‹ ÎÚ‡Ô˘ fiÛÈÌÔ˘ ÓÂÚÔ‡.ŒÓ· ÎÈÙ ·ÚÔ¯‹˜ ÓÂÚÔ‡ ‰È·Ù›ıÂÙ·È Ì ÂÈϤÔÓÎfiÛÙÔ˜ ·fi ÙËÓ ÙÔÈ΋ Û·˜ ·ÓÙÈÚÔ˜ˆÂ›·.
∏ ÂÁηٿÛÙ·ÛË Ù˘ ·ÁÔÌ˯·Ó‹˜ ı· Ú¤ÂÈ Ó· Á›ÓÂÈ·fi ÂÍÔ˘ÛÈÔ‰ÔÙË̤ÓÔ Ù¯ÓÈÎfi ÙÔ˘ service.
¶∞ƒ√Ã∏ ¡∂ƒ√À ™∆∏¡¶∞°√ª∏Ã∞¡∏ (Û ÔÚÈṲ̂ӷ ÌÔÓ٤Ϸ)
¢π∞™∆∞™∂π™
ªÔÓÙ¤ÏÔ 16 17
A* 1556 mm 1632 mm
B 711 mm 711 mm
C** 787 mm 787 mm
D 1394 mm 1394 mm
E 657 mm 657 mm
F 1346 mm 1346 mm
* ∆Ô ‡„Ô˜ ‰ÂÓ ÂÚÈÏ·Ì‚¿ÓÂÈ ÙÔÓ ÌÂÓÙÂÛ¤ -ÚÔ˜ı¤ÛÙ ¿ÏÏ· 22 mm ÁÈ· ÙÔÓ ÌÂÓÙÂÛ¤** ∆Ô ‚¿ıÔ˜ ÂÚÈÏ·Ì‚¿ÓÂÈ ÙË Ï·‚‹
87

∆· Ô‰·Ú¿ÎÈ· (ÛΤÏË) ÔÚÈ˙ÔÓÙ›ˆÛ˘ ÎÔÓÙ¿ Û οıÂÂÌÚfi˜ ÁˆÓ›· ÙÔ˘ „˘Á›Ԣ Â›Ó·È Ú˘ıÌÈ˙fiÌÂÓ·.™Ù·ıÂÚÔÔÈÔ‡Ó ÙÔ „˘ÁÂ›Ô Î·È ÂÌÔ‰›˙Ô˘Ó ÙËÌÂٷΛÓËÛ‹ ÙÔ˘ fiÙ·Ó ·ÓÔ›ÁÔ˘Ó ÔÈ fiÚÙ˜. ∆·Ô‰·Ú¿ÎÈ· ÔÚÈ˙ÔÓÙ›ˆÛ˘ ı· Ú¤ÂÈ Ó· Ú˘ıÌ›˙ÔÓٷȤÙÛÈ ÒÛÙÂ Ë ÂÌÚfi˜ ÏÂ˘Ú¿ ÙÔ˘ „˘Á›Ԣ Ó· ›ӷÈÂÏ·ÊÚ¿ ·Ó˘„ˆÌ¤ÓË ÁÈ· Ó· ÎÏ›ÓÔ˘Ó Â‡ÎÔÏ· ÌfiÓ˜ÙÔ˘˜ ÔÈ fiÚÙ˜ ·fi ÙÔ Ì¤ÛÔÓ ÂÚ›Ô˘ Ù˘ ‰È·‰ÚÔÌ‹˜ÙÔ˘˜.¶ÂÚÈÛÙÚ¤„Ù ٷ Ô‰·Ú¿ÎÈ· ÚÔ˜ Ù· ‰ÂÍÈ¿ (ÚÔ˜ ÙËÊÔÚ¿ ÙˆÓ ‰ÂÈÎÙÒÓ ÙÔ˘ ÚÔÏÔÁÈÔ‡) ÁÈ· Ó· ·Ó˘„ˆı› ÙÔ„˘ÁÂ›Ô Î·È ÚÔ˜ Ù· ·ÚÈÛÙÂÚ¿ (·ÓÙ›ıÂÙ· ·fi ÙË ÊÔÚ¿ÙˆÓ ‰ÂÈÎÙÒÓ ÙÔ˘ ÚÔÏÔÁÈÔ‡) ÁÈ· Ó· η٤‚ÂÈ ÙÔ „˘Á›ԯ·ÌËÏfiÙÂÚ·.∆· ÚÔ‰¿ÎÈ· (ÙÚÔ¯›ÛÎÔÈ) ‰›Ï· ·fi Ù· Ô‰·Ú¿ÎÈ·ÔÚÈ˙ÔÓÙ›ˆÛ˘ Û·˜ ÂÈÙÚ¤Ô˘Ó Ó· ·ÔÌ·ÎÚ‡ÓÂÙ ÙÔ„˘ÁÂ›Ô ·fi ÙÔÓ ÙÔ›¯Ô ÁÈ· Ó· ÙÔ Î·ı·Ú›ÛÂÙÂ.¶ÂÚÈÛÙÚ¤„Ù ٷ Ô‰·Ú¿ÎÈ· ÚÔ˜ Ù· ·ÚÈÛÙÂÚ¿ ÒÛÔ˘ÙÔ ‚¿ÚÔ˜ ÙÔ˘ „˘Á›Ԣ Ó· ÌÂÙ·ÙÂı› ÛÙ· ÚÔ‰¿ÎÈ·.∞ÊÔ‡ ͷӷʤÚÂÙ ÙÔ „˘ÁÂ›Ô ÛÙË ı¤ÛË ÙÔ˘,ÂÚÈÛÙÚ¤„Ù ٷ Ô‰·Ú¿ÎÈ· ÚÔ˜ Ù· ‰ÂÍÈ¿ ÒÛÔ˘ ÙÔ‚¿ÚÔ˜ ÙÔ˘ „˘Á›Ԣ Ó· ÌÂÙ·ÙÂı› Í·Ó¿ ·fi Ù·ÚÔ‰¿ÎÈ· ÛÙ· Ô‰·Ú¿ÎÈ·.
ƒ√¢∞∫π∞ ∫∞π ¶√¢∞ƒ∞∫π∞√ƒπ∑√¡∆πø™∏™
88
√‰ËÁ›Â˜ ∂ÁηٿÛÙ·Û˘
∏ ÂÁηٿÛÙ·ÛË Ù˘ ÁÚ·ÌÌ‹˜ ÓÂÚÔ‡ ‰ÂÓ Î·Ï‡fiÙÂÙ·È·fi ÙËÓ ÂÁÁ‡ËÛË ÙÔ˘ „˘Á›Ԣ ‹ ·fi ÙÔÓηٷÛ΢·ÛÙ‹ Ù˘ ·ÁÔÌ˯·Ó‹˜. ∞ÎÔÏÔ˘ı‹ÛÙÂÚÔÛÂÎÙÈο ·˘Ù¤˜ ÙȘ Û˘ÛÙ¿ÛÂȘ ÁÈ· Ó·ÂÏ·¯ÈÛÙÔÔÈ‹ÛÂÙ ÙÔÓ Î›Ó‰˘ÓÔ ‰··ÓËÚÒÓ ˙ËÌÈÒÓ·fi ÙÔ ÓÂÚfi.
∆Ô "ÎÙ‡ËÌ·" ÙˆÓ ÛˆÏ‹ÓˆÓ (ÏfiÁˆ ÎÚÔ‡ÛÂˆÓ ÙÔ˘ÓÂÚÔ‡) ÛÙËÓ ˘‰Ú·˘ÏÈ΋ ÂÁηٿÛÙ·ÛË ÙÔ˘ ÛÈÙÈÔ‡ÌÔÚ› Ó· ÚÔηϤÛÂÈ ˙ËÌÈ¿ Û ÔÚÈṲ̂ӷ ÂÍ·ÚÙ‹Ì·Ù·ÙÔ˘ „˘Á›Ԣ, ‰È·ÚÚÔ¤˜ Î·È ÏËÌ̇ÚÈÛÌ· ÙˆÓ ¯ÒÚˆÓ.∫·Ï¤ÛÙ ‰Èψ̷ÙÔ‡¯Ô ˘‰Ú·˘ÏÈÎfi ÁÈ· Ó· ‰ÈÔÚıÒÛÂÈÙÔ "ÎÙ‡ËÌ·" ÙˆÓ ÛˆÏ‹ÓˆÓ ÚÈÓ ÚÔ¯ˆ- Ú‹ÛÂÙ ÛÙËÓÂÁηٿÛÙ·ÛË Ù˘ ÁÚ·ÌÌ‹˜ ÓÂÚÔ‡ ÛÙÔ „˘Á›Ô. °È· Ó··ÔʇÁÂÙ ٷ ÂÁη‡Ì·Ù· Î·È ÙȘ ˙ËÌȤ˜ ÛÙÔ „˘Á›Ô,ÌËÓ ÙÔ Û˘Ó‰¤ÛÂÙ Ì ÙË ÁÚ·ÌÌ‹ ˙ÂÛÙÔ‡ ÓÂÚÔ‡.
∞Ó ¯ÚËÛÈÌÔÔÈ‹ÛÂÙ ÙÔ „˘ÁÂ›Ô ÚÈÓ Á›ÓÂÈ Ë Û‡Ó‰ÂÛËÙ˘ ÁÚ·ÌÌ‹˜ ÓÂÚÔ‡, ‚‚·Èˆı›Ù fiÙÈ Ô ‰È·ÎfiÙ˘ Ù˘·ÁÔÌ˯·Ó‹˜ ‚Ú›ÛÎÂÙ·È ÛÙË ı¤ÛË 0 (off).
¶ƒπ¡ •∂∫π¡∏™∂∆∂
∂°∫∞∆∞™∆∞™∏ ∆∏™ °ƒ∞ªª∏™ ¡∂ƒ√À1
ªËÓ ÂÁηٷÛÙ‹ÛÂÙ ÙȘ ÛˆÏËÓÒÛÂȘ Ù˘·ÁÔÌ˯·Ó‹˜ Û ÛËÌ›· fiÔ˘ Ë ıÂÚÌÔÎÚ·Û›· ¤ÊÙÂÈοو ·fi ÙÔ Ìˉ¤Ó.
∞Ó ¯ÚËÛÈÌÔÔÈ‹ÛÂÙ ÔÔÈ·‰‹ÔÙ ËÏÂÎÙÚÈ΋ Û˘Û΢‹(.¯. ËÏÂÎÙÚÈÎfi ‰Ú¿·ÓÔ) ηٿ ÙË ‰È¿ÚÎÂÈ· Ù˘ÂÁηٿÛÙ·Û˘, ‚‚·Èˆı›Ù fiÙÈ Ë Û˘Û΢‹ ›ӷÈÌÔӈ̤ÓË ‹ ηψ‰ÈˆÌ¤ÓË Ì ÙÚfiÔ Ô˘ ÂÌÔ‰›˙ÂÈÙËÓ ÚfiÎÏËÛË ËÏÂÎÙÚÔÏËÍ›·˜.
ŸÏ˜ ÔÈ ÂÁηٷÛÙ¿ÛÂȘ ı· Ú¤ÂÈ Ó· ÂÎÙÂÏÔ‡ÓÙ·ÈÛ‡Ìʈӷ Ì ÙȘ ··ÈÙ‹ÛÂȘ ÙˆÓ ÙÔÈÎÒÓ Îˆ‰›ÎˆÓ ÁÈ·ÙȘ ˘‰Ú·˘ÏÈΤ˜ ÂÁηٷÛÙ¿ÛÂȘ.
∏ ÂÁηٿÛÙ·ÛË Ù˘ ·ÁÔÌ˯·Ó‹˜ ı· Ú¤ÂÈ Ó·Á›ÓÂÙ·È ·fi ÂÍÔ˘ÛÈÔ‰ÔÙË̤ÓÔ Ù¯ÓÈÎfi ÙÔ˘ service.
¶ƒ√™√Ã∏! ∏ Û‡Ó‰ÂÛË ı· Ú¤ÂÈ Ó·Á›ÓÂÙ·È ÌfiÓÔ Ì ÙË ÁÚ·ÌÌ‹ fiÛÈÌÔ˘ ÓÂÚÔ‡.
¶ƒπ¡ •∂∫π¡∏™∂∆∂ (Û˘Ó¤¯ÂÈ·)

89
∂°∫∞∆∞™∆∞™∏ ∆∏™ °ƒ∞ªª∏™ ¡∂ƒ√À (™À¡∂Ã∂π∞).1
√‰ËÁ›Â˜ ∂ÁηٿÛÙ·Û˘
∆ÔÔıÂÙ‹ÛÙ ÙÔ ÂÚÈÎfi¯ÏÈÔ Û˘Ì›ÂÛ˘ Î·È ÙÔÓÂÚ›‰ÂÛÌÔ (ÎÔÏ¿ÚÔ) ÛÙÔ ¿ÎÚÔ ÙÔ˘ ۈϋӷ, fiˆ˜Ê·›ÓÂÙ·È ÛÙÔ Û¯‹Ì·.™ÚÒÍÙ ÙÔ ¿ÎÚÔ ÙÔ˘ ۈϋӷ ̤۷ ÛÙÔ Ú·ÎfiÚ Ù˘‚·Ï‚›‰·˜ ÓÂÚÔ‡ ÒÛÙ ӷ ÌÂÈ fiÛÔ ÈÔ ‚·ıÈ¿ Á›ÓÂÙ·È.∫Ú·ÙÒÓÙ·˜ ÙÔÓ ÛˆÏ‹Ó·, ÛÊ›ÍÙ ÙÔ Ú·ÎfiÚ.¢¤ÛÙ ÙÔÓ ÛˆÏ‹Ó· ÛÙÔÓ ·Ú¯fiÌÂÓÔ ÛÊÈÁÎÙ‹Ú· ÒÛÙÂÓ· ÛÙÂÚˆı› Û ηٷÎfiÚ˘ÊË ı¤ÛË. ÿÛˆ˜ ¯ÚÂÈ·ÛÙ› Ó··ÓÔ›ÍÂÙ ÙÔÓ ÛÊÈÁÎÙ‹Ú· Ì οÔÈÔ ÂÚÁ·Ï›Ô.
∞Ê·ÈÚ¤ÛÙ ÙÔ Â‡Î·ÌÙÔ Ï·ÛÙÈÎfi ÒÌ· ·fi ÙË‚·Ï‚›‰· ÓÂÚÔ‡.valve.
¶∞ƒ∞∆∏ƒ∏™∂π™:• ¶ÚÈÓ Î¿ÓÂÙ ÙË Û‡Ó‰ÂÛË Ì ÙÔ „˘Á›Ô
‚‚·Èˆı›Ù fiÙÈ ÙÔ Î·ÏÒ‰ÈÔ ÙÚÔÊÔ‰ÔÛ›·˜ ÙÔ˘„˘Á›Ԣ ‰ÂÓ Â›Ó·È Û˘Ó‰Â‰Â̤ÓÔ ÛÙËÓ Ú›˙·.
• ∞Ó ÙÔ ÓÂÚfi ÂÚȤ¯ÂÈ ¿ÌÌÔ ‹ ¿ÏÏ· ۈ̷ٛ‰È· Ô˘ı· ÌÔÚÔ‡Û·Ó Ó· ÊÚ¿ÍÔ˘Ó ÙÔ Ï¤ÁÌ· Ù˘‚·Ï‚›‰·˜ ÓÂÚÔ‡ ÙÔ˘ „˘Á›Ԣ, Û˘ÓÈÛÙԇ̠ӷÂÁηıÈÛٿ٠ηٿÏÏËÏÔ Ê›ÏÙÚÔ ÓÂÚÔ‡. ∆ÔÊ›ÏÙÚÔ ı· Ú¤ÂÈ Ó· ÂÁηıÈÛÙ¿Ù·È ÛÙË ÁÚ·ÌÌ‹ÓÂÚÔ‡ ÎÔÓÙ¿ ÛÙÔ „˘Á›Ô.
∞Ê·ÈÚ¤ÛÙ ÙÔ Î¿Ï˘ÌÌ· ÚfiÛ‚·Û˘.
™À¡¢∂™∆∂ ∆√¡ ™ø§∏¡∞ ™∆√æÀ°∂π√
1
∆ÔÔıÂÙ‹ÛÙ ͷӿ ÛÙË ı¤ÛË ÙÔ˘ ÙÔ Î¿Ï˘ÌÌ·ÚfiÛ‚·Û˘.
∆˘ÈÎfiÂÚÈÎfi¯ÏÈÔÛ˘Ì›ÂÛ˘
™ˆÏ‹Ó·˜ ™ÊÈÁÎÙ‹Ú·˜ÛˆÏ‹Ó·
ƒ·ÎfiÚ æ˘Á›Ԣ
¶ÂÚ›‰ÂÛÌÔ˜(ÎÔÏ¿ÚÔ)
¢È¢ıÂÙ‹ÛÙ ÙȘ Û›Ú˜ ÙÔ˘ ۈϋӷ ¤ÙÛÈ ÒÛÙ ӷÌËÓ Ù·Ï·ÓÙÒÓÔÓÙ·È ÎÙ˘ÒÓÙ·˜ ÛÙËÓ Ï¿ÙË ÙÔ˘„˘Á›Ԣ ‹ ÛÙÔÓ ÙÔ›¯Ô. ™ÚÒÍÙ ÙÔ „˘ÁÂ›Ô ÒÛÙ ӷ·ӤÏıÂÈ ÎÔÓÙ¿ ÛÙÔÓ ÙÔ›¯Ô.
∞¡√π•∆∂ ∆∏¡ ¶∞ƒ√Ã∏ ¡∂ƒ√À∫∞π ™À¡¢∂™∆∂ ∆√ æÀ°∂π√ ™∆∏¡¶ƒπ∑∞
2
£¤ÛÙ ÙÔÓ ‰È·ÎfiÙË Ù˘ ·ÁÔÌ˯·Ó‹˜ ÛÙÔ π (on).∏ ·ÁÔÌ˯·Ó‹ ‰ÂÓ ı· ·Ú¯›ÛÂÈ Ó· ÏÂÈÙÔ˘ÚÁ› ÚÈÓÊÙ¿ÛÂÈ ÛÙËÓ Î·ÓÔÓÈ΋ ıÂÚÌÔÎÚ·Û›· ÏÂÈÙÔ˘ÚÁ›·˜Ù˘ (-9oC ‹ ¯·ÌËÏfiÙÂÚË). ™ÙË Û˘Ó¤¯ÂÈ· ı· ·Ú¯›ÛÂÈÓ· ÏÂÈÙÔ˘ÚÁ› ·˘ÙfiÌ·Ù· ·Ó Ô ‰È·ÎfiÙ˘ Ù˘‚Ú›ÛÎÂÙ·È ÛÙË ı¤ÛË π (on).
¶∞ƒ∞∆∏ƒ∏™∏: Àfi Û˘Óı‹Î˜ ¯·ÌËÏ‹˜ ›ÂÛ˘ÓÂÚÔ‡, Ë ‚·Ï‚›‰· ÓÂÚÔ‡ ÌÔÚ› Ó· Ù›ıÂÙ·È ÛÂÏÂÈÙÔ˘ÚÁ›· ¤ˆ˜ Î·È 3 ÊÔÚ¤˜ ÒÛÙ ӷ ·Ú¤¯ÂÈ·Ú΋ ÔÛfiÙËÙ· ÓÂÚÔ‡ ÛÙËÓ ·ÁÔÌ˯·Ó‹.
£∂™∆∂ ™∂ §∂π∆√Àƒ°π∞ ∆∏¡¶∞°√ª∏Ã∞¡∏
3
¢È·ÎfiÙ˘ÏÂÈÙÔ˘ÚÁ›·˜

1.1 ∞ÔÛ˘Ó‰¤ÛÙ ÙÔ „˘ÁÂ›Ô ·fi ÙËÓ Ú›˙·.
¶ƒπ¡ •∂∫π¡∏™∂∆∂1
1.2 ∞‰ÂÈ¿ÛÙ fiÏ· Ù· Ú¿ÊÈ· ÙÔ˘ „˘Á›Ԣ,ÂÚÈÏ·Ì‚·ÓÔ̤ÓÔ˘ ÙÔ˘ Ú·ÊÈÔ‡Á·Ï·ÎÙÔÎÔÌÈÎÒÓ.
¶ƒ√™√Ã∏: ªËÓ ·Ê‹ÛÂÙ η̛· ·fi ÙȘ fiÚÙ˜ Ó·¤ÛÂÈ ÛÙÔ ¿ÙˆÌ·. ∞˘Ùfi ÌÔÚ› Ó· ÚÔηϤÛÂÈ˙ËÌÈ¿ ÛÙÔÓ Ì˯·ÓÈÛÌfi ·Ó¿Û¯ÂÛ˘ Ù˘ fiÚÙ·˜.
90
√‰ËÁ›Â˜ ∂ÁηٿÛÙ·Û˘
∞¡∞™∆ƒ√º∏ ∆∏™ º√ƒ∞™ ∞¡√π°ª∞∆√™ ∆∏™ ¶√ƒ∆∞™2
ŸÙ·Ó ·ÓÙÈÛÙÚ¤ÊÂÙ ÙË ÊÔÚ¿ ·ÓÔ›ÁÌ·ÙÔ˜ Ù˘ fiÚÙ·˜:
• ¢È·‚¿ÛÙ fiϘ ÙȘ Û¯ÂÙÈΤ˜ Ô‰ËÁ›Â˜ ¤ˆ˜ ÙÔ Ù¤ÏÔ˜ÚÈÓ ÍÂÎÈÓ‹ÛÂÙÂ.
• £· Ú¤ÂÈ Ó· È¿ÓÂÙ ÚÔÛÂÎÙÈο fiÏ· Ù·ÂÍ·ÚÙ‹Ì·Ù· ÒÛÙ ӷ ÌËÓ Á‰¿ÚÂÙ ÙËÓ ‚·Ê‹.
• ∆ÔÔıÂÙ›Ù ÙȘ ‚›‰Â˜ ÎÔÓÙ¿ ÛÙ· ·ÓÙ›ÛÙÔȯ·ÂÍ·ÚÙ‹Ì·Ù¿ ÙÔ˘˜ ÒÛÙ ӷ ÌËÓ ÙȘ ÌÂÚ‰¤„ÂÙ ηÈÙȘ ¯ÚËÛÈÌÔÔÈ‹ÛÂÙ ·ÏÏÔ‡.
• ∂Í·ÛÊ·Ï›ÛÙ ÌÈ· Ï›· ÂÈÊ¿ÓÂÈ· ÂÚÁ·Û›·˜ (‰ËÏ.¯ˆÚ›˜ ÚÔÂÍÔ¯¤˜ Ô˘ ÌÔÚ› Ó· ÚÔηϤÛÔ˘ÓÁ‰·Ú̷ۛٷ) ÁÈ· ÙȘ fiÚÙ˜.
™∏ª∞¡∆π∫√: ∞ÊÔ‡ ÍÂÎÈÓ‹ÛÂÙ ÙË ‰È·‰Èηۛ·, ÌËÓÌÂÙ·ÎÈÓ‹ÛÂÙ ÙÔ Î˘Ú›ˆ˜ ÛÒÌ· ÙÔ˘ „˘Á›Ԣ ÒÛÔ˘ Ó·ÔÏÔÎÏËÚˆı› Ë ·Ó·ÛÙÚÔÊ‹ Ù˘ ÊÔÚ¿˜ ·ÓÔ›ÁÌ·ÙÔ˜ Ù˘fiÚÙ·˜. √È Ô‰ËÁ›Â˜ ·˘Ù¤˜ ÂÚÈÁÚ¿ÊÔ˘Ó ÙËÓÌÂٷΛÓËÛË ÙˆÓ ÌÂÓÙÂÛ¤‰ˆÓ ·fi ÙË ‰ÂÍÈ¿ ÛÙËÓ·ÚÈÛÙÂÚ‹ ÏÂ˘Ú¿ - ·Ó ÔÙ¤ ıÂÏ‹ÛÂÙ ӷ ·ӷʤÚÂÙÂÙÔ˘˜ ÌÂÓÙÂÛ¤‰Â˜ ÛÙË ‰ÂÍÈ¿ ÏÂ˘Ú¿ ·ÎÔÏÔ˘ı‹ÛÙ ÙȘ›‰È˜ Ô‰ËÁ›Â˜ ıˆÚÒÓÙ·˜ fiÙÈ Ë Ï¤ÍË "‰ÂÍÈ¿"·ÓÙÈÛÙÔȯ› ÛÙÔ "·ÚÈÛÙÂÚ¿" Î·È ·ÓÙÈÛÙÚfiʈ˜.
™∏ª∞¡∆π∫∂™ ¶∞ƒ∞∆∏ƒ∏™∂π™
∫·ÙÛ·‚›‰È Ù‡Ô˘ Phillips(ÛÙ·˘ÚÔηÙÛ¿‚ȉÔ)
∞¶∞π∆√Àª∂¡∞ ∂ƒ°∞§∂π∞
∞˘ÙÔÎfiÏÏËÙ˯·ÚÙÔÙ·ÈÓ›·
ƒÔÔηÙÛ¿‚ȉÔ∆20 ‹ ∆25(··ÈÙÂ›Ù·È ÁÈ·ÔÚÈṲ̂ӷ ÌÔÓ٤Ϸ)
∫·ÙÛ·‚›‰È ÌÂÂÍ·ÁˆÓÈ΋˘Ô‰Ô¯‹ 5/16''
°·ÏÏÈÎfi ÎÏÂȉ›5/16'' Ì·ÓÔÈÎÙ¿ ¿ÎÚ·
™¿ÙÔ˘Ï· ‹Î·ÙÛ·‚›‰È Ì ›ÛÈ·ÏÂÙ‹ ̇ÙË

2.3ªÂÙ·ÎÈÓ‹ÛÙ ÙÔÓ ÌÂÓÙÂÛ¤ (Î·È ÙÔÓ ‰·ÎÙ‡ÏÈÔÔ˘ Â›Ó·È ÎÔÏÏË̤ÓÔ˜ ¿Óˆ ÙÔ˘) ›ÛÈ· ÚÔ˜ Ù·¿Óˆ ÒÛÙ ӷ ·ÂÏ¢ıÂÚˆı› Ô Â›ÚÔ˜ ÙÔ˘ÌÂÓÙÂÛ¤ ·fi ÙËÓ ˘Ô‰Ô¯‹ Ô˘ ˘¿Ú¯ÂÈ ÛÙËÓ¿Óˆ ÏÂ˘Ú¿ Ù˘ fiÚÙ·˜. º˘Ï¿ÍÙ ÙÔÓÌÂÓÙÂÛ¤ Ì·˙› Ì ÙȘ ‚›‰Â˜ ÙÔ˘.
91
√‰ËÁ›Â˜ ∂ÁηٿÛÙ·Û˘
2.1™ÙÂÚÂÒÛÙ ÙËÓ fiÚÙ· Ì ·˘ÙÔÎfiÏÏËÙ˯·ÚÙÔÙ·ÈÓ›· ÒÛÙ ӷ ÌËÓ ·ÓÔ›ÁÂÈ.
∞º∞πƒ∂™∆∂ ∆∏¡ ¶√ƒ∆∞ ∆∏™∫∞∆∞æÀ•∏™
2 ∞º∞πƒ∂™∆∂ ∆∏¡ ¶√ƒ∆∞ ∆∏™∫∞∆∞æÀ•∏™ (™À¡∂Ã∂π∞)
2
¶¿ÓˆÌÂÓÙÂÛ¤˜
2.2ªÂ ¤Ó· ηÙÛ·‚›‰È Ì ÂÍ·ÁˆÓÈ΋ ˘Ô‰Ô¯‹ 1/16''·Ê·ÈÚ¤ÛÙ ÙȘ ‚›‰Â˜ Ô˘ Û˘ÁÎÚ·ÙÔ‡Ó ÙÔÓ ¿ÓˆÌÂÓÙÂÛ¤ ÛÙÔ Î˘Ú›ˆ˜ ÛÒÌ· ÙÔ˘ „˘Á›Ԣ.
2.5∞ÎÔ˘Ì‹ÛÙ ÙËÓ fiÚÙ· Û ÌÈ· Ï›· ÂÈÊ¿ÓÂÈ·Ì ÙËÓ Â͈ÙÂÚÈ΋ Ù˘ ÏÂ˘Ú¿ ÚÔ˜ Ù· ¿Óˆ.
2.4∞Ê·ÈÚ¤ÛÙ ÙË ¯·ÚÙÔÙ·ÈÓ›· Î·È Á›ÚÂÙ ÙËÓfiÚÙ· ·ÔÌ·ÎÚ‡ÓÔÓÙ¿˜ ÙËÓ ·fi ÙÔ Î˘Ú›ˆ˜ÛÒÌ· ÙÔ˘ „˘Á›Ԣ. ∞Ó·ÛËÎÒÛÙ ÙËÓ ÒÛÙ ӷ‚ÁÂÈ ·fi ÙÔÓ Â›ÚÔ ÙÔ˘ ÎÂÓÙÚÈÎÔ‡ ÌÂÓÙÂÛ¤.
2.6µÁ¿ÏÙ ÙȘ ‰‡Ô ‚›‰Â˜ ·fi ÙËÓ ·ÓÙ›ıÂÙËÏÂ˘Ú¿ ÙÔ˘ „˘Á›Ԣ Î·È ÙÔÔıÂÙ‹ÛÙ ÙȘ ÛÙȘԤ˜ Ô˘ ‹Ù·Ó ÚÔËÁÔ˘Ì¤Óˆ˜ ‚ȉˆÌ¤Ó˜ ÔÈ‚›‰Â˜ ÙÔ˘ ¿Óˆ ÌÂÓÙÂÛ¤.

∞¡∞™∆ƒ√º∏ ∆∏™ º√ƒ∞™ ∞¡√π°ª∞∆√™ ∆∏™ ¶√ƒ∆∞™ (™À¡.)2
92
√‰ËÁ›Â˜ ∂ÁηٿÛÙ·Û˘
3.1™ÙÂÚÂÒÛÙ ÙËÓ fiÚÙ· Ì ·˘ÙÔÎfiÏÏËÙ˯·ÚÙÔÙ·ÈÓ›· ÒÛÙ ӷ ÌËÓ ·ÓÔ›ÁÂÈ.
∞º∞πƒ∂™∆∂ ∆∏¡ ¶√ƒ∆∞ ∆∏™™À¡∆∏ƒ∏™∏™
3 ∞º∞πƒ∂™∆∂ ∆∏¡ ¶√ƒ∆∞ ∆∏™™À¡∆∏ƒ∏™∏™ (™À¡∂Ã∂π∞)
3
3.3∞Ê·ÈÚ¤ÛÙ ÙËÓ Ù·ÈÓ›· Î·È Á›ÚÂÙ ÙËÓ fiÚÙ··ÔÌ·ÎÚ‡ÓÔÓÙ¿˜ ÙËÓ ·fi ÙÔ Î˘Ú›ˆ˜ ÛÒÌ· ÙÔ˘„˘Á›Ԣ. ∞Ó·ÛËÎÒÛÙ ÙËÓ ÒÛÙ ӷ ‚ÁÂÈ ·fiÙÔÓ Â›ÚÔ ÙÔ˘ ‚Ú·¯›ÔÓ· ÙÔ˘ οو ÌÂÓÙÂÛ¤. (∞ÓË Ï·ÛÙÈ΋ ÚÔ‰¤Ï· ÎÔÏÏ‹ÛÂÈ ÛÙËÓ Î¿ÙˆÏÂ˘Ú¿ Ù˘ fiÚÙ·˜, ÙÔÔıÂÙ‹ÛÙ ÙËÓ Í·Ó¿ÛÙÔÓ ÌÂÓÙÂÛ¤).
3.2ÃÚËÛÈÌÔÔÈÒÓÙ·˜ ηÙÛ·‚›‰È Ì ÂÍ·ÁˆÓÈ΋˘Ô‰Ô¯‹ 5/16'' Î·È Á·ÏÏÈÎfi ÎÏÂȉ› 5/16'' Ì·ÓÔÈÎÙ¿ ¿ÎÚ·, ·Ê·ÈÚ¤ÛÙ ÙȘ ‰‡Ô ‚›‰Â˜ Ô˘Û˘ÁÎÚ·ÙÔ‡Ó ÙÔÓ ÎÂÓÙÚÈÎfi ÌÂÓÙÂÛ¤ (Î·È ÙÔÓ‰·ÎÙ‡ÏÈÔ Ô˘ Â›Ó·È ÎÔÏÏË̤ÓÔ˜ ¿Óˆ ÙÔ˘) ÛÙÔ΢ڛˆ˜ ÛÒÌ· ÙÔ˘ „˘Á›Ԣ. ∞Ó·ÛËÎÒÛÙ ÙÔÓÎÂÓÙÚÈÎfi ÌÂÓÙÂÛ¤ ÁÈ· Ó· ·ÂÏ¢ıÂÚÒÛÂÙ ÙÔÓ›ÚÔ ÙÔ˘ ·fi ÙËÓ ˘Ô‰Ô¯‹ Ô˘ ˘¿Ú¯ÂÈ ÛÙÔ¿Óˆ ̤ÚÔ˜ Ù˘ fiÚÙ·˜. º˘Ï¿ÍÙ ÙÔÓ ÌÂÓÙÂ̷ۤ˙› Ì ÙȘ ‚›‰Â˜ ÙÔ˘. ¶ÚÔÛ¤ÍÙ ӷ ÌËÓ ¯¿ÛÂÙÂÙÔÓ ‰È·¯ˆÚÈÛÙ‹Ú· Î·È ÙË ÚÔ‰¤Ï· ÙÔ˘ ÎÂÓÙÚÈÎÔ‡ÌÂÓÙÂÛ¤
3.7¶¿ÚÙ ̛· ·fi ÙȘ ‚›‰Â˜ Ô˘ ·Ê·ÈÚ¤Û·Ù ÛÙÔ‚‹Ì· 2 Î·È ·Ú¯›ÛÙ ӷ ÙË ‚ȉÒÓÂÙ ÛÙËÓÂ͈ÙÂÚÈ΋ Ô‹ Ù˘ ·¤Ó·ÓÙÈ ÏÂ˘Ú¿˜. ªËÓ Ù˂ȉÒÛÂÙ ÂÓÙÂÏÒ˜ - ·Ê‹ÛÙ ·ÚÎÂÙ‹ ·fiÛÙ·ÛËοو ·fi ÙËÓ ÎÂÊ·Ï‹ Ù˘, ·ÓÙ›ÛÙÔÈ¯Ë Ì ÙÔ¿¯Ô˜ Ù˘ ÚÔ‰¤Ï·˜ Î·È ÙÔ˘ ‚Ú·¯›ÔÓ· ÙÔ˘ÌÂÓÙÂÛ¤.
3.6ªÂÙ·ÎÈÓ‹ÛÙ ÙË ÚÔ‰¤Ï· (·Ó ‰È·ı¤ÙÂÈ ÙÔ „˘Á›ÔÛ·˜) ÛÙËÓ ·ÓÙ›ıÂÙË ÏÂ˘Ú¿.
3.5µÁ¿ÏÙ ÙȘ ‰‡Ô ‚›‰Â˜ ·fi ÙËÓ ·ÓÙ›ıÂÙË ÏÂ˘Ú¿ÙÔ˘ „˘Á›Ԣ Î·È ÙÔÔıÂÙ‹ÛÙ ÙȘ ÛÙȘ Ô¤˜ Ô˘‹Ù·Ó ÚÔËÁÔ˘Ì¤Óˆ˜ ‚ȉˆÌ¤Ó˜ ÔÈ ‚›‰Â˜ ÙÔ˘ÎÂÓÙÚÈÎÔ‡ ÌÂÓÙÂÛ¤.
3.4∞ÎÔ˘Ì‹ÛÙ ÙËÓ fiÚÙ· Û ÌÈ· Ï›· ÂÈÊ¿ÓÂÈ·Ì ÙËÓ Â͈ÙÂÚÈ΋ Ù˘ ÏÂ˘Ú¿ ÚÔ˜ Ù· ¿Óˆ.

µ›‰Â˜ ÁÈ· ÙȘ√¤˜ Ù˘ §·‚‹˜
93
√‰ËÁ›Â˜ ∂ÁηٿÛÙ·Û˘
∞¡∞™∆ƒ√º∏ ∂•∞ƒ∆∏ª∞∆ø¡ 4
4.1∞Ê·ÈÚ¤ÛÙ ÙË Û¯¿Ú· Ù˘ ‚¿Û˘ (·Ó‰È·ı¤ÙÂÈ ÙÔ „˘ÁÂ›Ô Û·˜) ÙÚ·‚ÒÓÙ·˜ ÙËÓ¢ı›· ÚÔ˜ Ù· ¤Íˆ.
4.3∞ÓÙÈÌÂÙ·ı¤ÛÙ ÙÔÓ ÌÂÓÙÂÛ¤ (Î·È ÙÔÓ ‰·ÎÙ‡ÏÈÔÔ˘ Â›Ó·È ÎÔÏÏË̤ÓÔ˜ ¿Óˆ ÙÔ˘) Î·È ÙȘ ‚›‰Â˜Ù˘ ¿Óˆ ‰ÂÍÈ¿˜ ÏÂ˘Ú¿˜ Ì ÙȘ ‚›‰Â˜ Ù˘¿Óˆ ·ÚÈÛÙÂÚ‹ ˜ ÏÂ˘Ú¿˜ ÙÔ˘ ΢ڛˆ˜ÛÒÌ·ÙÔ˜ ÙÔ˘ „˘Á›Ԣ. ªËÓ ÛÊ›ÍÂÙ ·ÎfiÌË ÙȘ‚›‰Â˜ ÛÙËÓ ÏÂ˘Ú¿ ÙÔ˘ ÌÂÓÙÂÛ¤.
¶∞ƒ∞∆∏ƒ∏™∂π™:• √ÚÈṲ̂ÓÔÈ ÌÂÓÙÂÛ¤‰Â˜ ‰È·ı¤ÙÔ˘Ó Ù¤ÛÛÂÚȘ
Ô¤˜.√È Ô¤˜ Ô˘ ı· ¯ÚËÛÈÌÔÔÈ‹ÛÂÙ ÁÈ· Ó·ÂÁηٷÛÙ‹ÛÂÙ ÙÔÓ ÌÂÓÙÂÛ¤ ÂÍ·ÚÙÒÓÙ·È ·fiÙËÓ ÏÂ˘Ú¿ Ô˘ ı· ÂÁηٷÛÙ‹ÛÂÙ ÙÔÓÌÂÓÙÂÛ¤.
• °È· Ó· Â›Ó·È ÛˆÛÙ‹ Ë ÂÁηٿÛÙ·ÛË, Ë Â͈ÙÂÚÈ΋ÏÂ˘Ú¿ ÙÔ˘ ÌÂÓÙÂÛ¤ ı· Ú¤ÂÈ Ó· ›ӷȷڿÏÏËÏË ÚÔ˜ ÙËÓ ÏÂ˘Ú¿ ÙÔ˘ „˘Á›Ԣ.
∂ÁηٿÛÙ·ÛË ÙÔ˘ÌÂÓÙÂÛ¤ ·ÚÈÛÙÂÚ¿
∂ÁηٿÛÙ·ÛË ÙÔ˘ÌÂÓÙÂÛ¤ ‰ÂÍÈ¿
∞¡∞™∆ƒ√º∏ ∆ø¡ §∞µø¡ ™∆π™¶√ƒ∆∂™
5
5.1 ªÂÙ·ÎÈÓ‹ÛÙ ÙË Ï·‚‹ Ù˘ fiÚÙ·˜ÙÔ˘ ¯ÒÚÔ˘ Û˘ÓÙ‹ÚËÛ˘
5.1.1 ∞Ê·ÈÚ¤ÛÙ ÙËÓ Î¿Ùˆ Ù¿· Ȥ˙ÔÓÙ¿˜ ÙËÓÚÔ˜ ÙËÓ Î¿Ùˆ ÏÂ˘Ú¿ Ù˘ fiÚÙ·˜ ηȂÁ¿ÏÙ ÙË ‚›‰· Ô˘ ‚Ú›ÛÎÂÙ·È ·fi οو.∞Ê·ÈÚ¤ÛÙ ÙȘ ‰‡Ô ‚›‰Â˜ Ô˘ Û˘ÁÎÚ·-ÙÔ‡Ó ÙË Ï·‚‹ ÛÙËÓ ¿Óˆ ÏÂ˘Ú¿ Ù˘fiÚÙ·˜.
5.1.2 ∞Ê·ÈÚ¤ÛÙ ÙË Ï·‚‹
5.1.3 ∞Ê·ÈÚ¤ÛÙ ÙȘ ‚›‰Â˜ ·fi ÙËÓ ¿Óˆ ‰ÂÍÈ¿ÏÂ˘Ú¿ Ù˘ fiÚÙ·˜ Î·È ÙÔÔıÂÙ‹ÛÙ ÙȘÛÙȘ ·ÓÙ›ÛÙÔȯ˜ Ô¤˜ ‚ȉÒÌ·ÙÔ˜ Ù˘ Ï·‚‹˜ÛÙËÓ ·¤Ó·ÓÙÈ ÏÂ˘Ú¿.
¶¿Óˆ ÏÂ˘Ú¿
4.2.ªÂÙ·ÎÈÓ‹ÛÙ ÙÔÓ ‚Ú·¯›ÔÓ· ÙÔ˘ οو ÌÂÓÙÂÛ¤(Î·È ÙÔÓ ‰·ÎÙ‡ÏÈÔ Ô˘ Â›Ó·È ÎÔÏÏË̤ÓÔ˜ ¿ÓˆÙÔ˘) Î·È ÙËÓ Ï·ÛÙÈ΋ ÚÔ‰¤Ï· ·fi ÙË ‰ÂÍÈ¿ÛÙËÓ ·ÚÈÛÙÂÚ‹ ÏÂ˘Ú¿.
¶Ï·ÛÙÈ΋ƒÔ‰¤Ï·
µÚ·¯›ÔÓ·˜ªÂÓÙÂÛ¤
ªÔÓ٤Ϸ Ì ‚Ú·¯›ÔÓ·ÌÂÓÙÂÛ¤ Ô˘ ‰È·ı¤ÙÂÈ 2Ô¤˜ ÁÈ· ‚›‰Â˜.
ªÔÓ٤Ϸ Ì ‚Ú·¯›ÔÓ·ÌÂÓÙÂÛ¤ Ô˘ ‰È·ı¤ÙÂÈ 4Ô¤˜ ÁÈ· ‚›‰Â˜.°˘Ú›ÛÙ ÙÔÓ Â›ÚÔ ÙÔ˘ÌÂÓÙÂÛ¤ ÛÙËÓ ·ÓÙ›ıÂÙËÏÂ˘Ú¿ ÙÔ˘ ‚Ú·¯›ÔÓ·.
¶Ï·ÛÙÈ΋ƒÔ‰¤Ï·
µÚ·¯›ÔÓ·˜ªÂÓÙÂÛ¤
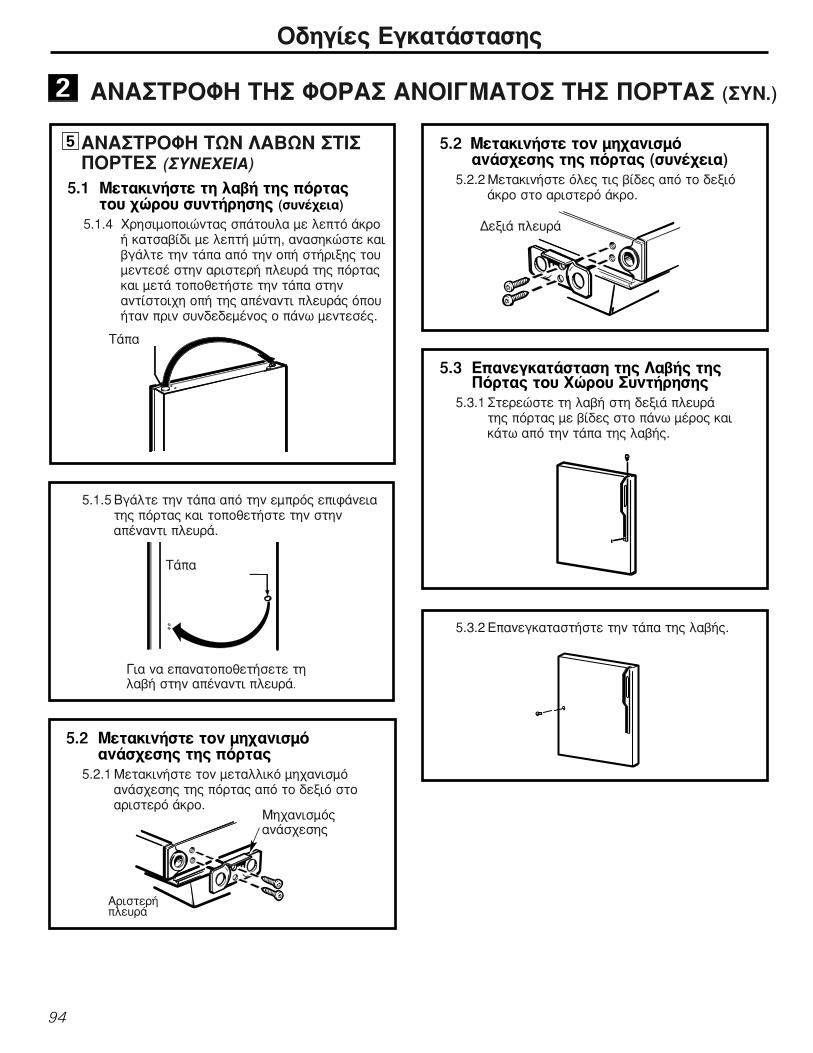
∞¡∞™∆ƒ√º∏ ∆∏™ º√ƒ∞™ ∞¡√π°ª∞∆√™ ∆∏™ ¶√ƒ∆∞™ (™À¡.)2
94
5.1.5 µÁ¿ÏÙ ÙËÓ Ù¿· ·fi ÙËÓ ÂÌÚfi˜ ÂÈÊ¿ÓÂÈ·Ù˘ fiÚÙ·˜ Î·È ÙÔÔıÂÙ‹ÛÙ ÙËÓ ÛÙËÓ·¤Ó·ÓÙÈ ÏÂ˘Ú¿.
5.2 ªÂÙ·ÎÈÓ‹ÛÙ ÙÔÓ Ì˯·ÓÈÛÌfi·Ó¿Û¯ÂÛ˘ Ù˘ fiÚÙ·˜ (Û˘Ó¤¯ÂÈ·)
5.2.2 ªÂÙ·ÎÈÓ‹ÛÙ fiϘ ÙȘ ‚›‰Â˜ ·fi ÙÔ ‰ÂÍÈfi¿ÎÚÔ ÛÙÔ ·ÚÈÛÙÂÚfi ¿ÎÚÔ.
5.2 ªÂÙ·ÎÈÓ‹ÛÙ ÙÔÓ Ì˯·ÓÈÛÌfi·Ó¿Û¯ÂÛ˘ Ù˘ fiÚÙ·˜
5.2.1 ªÂÙ·ÎÈÓ‹ÛÙ ÙÔÓ ÌÂÙ·ÏÏÈÎfi Ì˯·ÓÈÛÌfi·Ó¿Û¯ÂÛ˘ Ù˘ fiÚÙ·˜ ·fi ÙÔ ‰ÂÍÈfi ÛÙÔ·ÚÈÛÙÂÚfi ¿ÎÚÔ.
√‰ËÁ›Â˜ ∂ÁηٿÛÙ·Û˘
5.1 ªÂÙ·ÎÈÓ‹ÛÙ ÙË Ï·‚‹ Ù˘ fiÚÙ·˜ ÙÔ˘ ¯ÒÚÔ˘ Û˘ÓÙ‹ÚËÛ˘ (Û˘Ó¤¯ÂÈ·)
5.1.4 ÃÚËÛÈÌÔÔÈÒÓÙ·˜ Û¿ÙÔ˘Ï· Ì ÏÂÙfi ¿ÎÚÔ‹ ηÙÛ·‚›‰È Ì ÏÂÙ‹ ̇ÙË, ·Ó·ÛËÎÒÛÙ ηȂÁ¿ÏÙ ÙËÓ Ù¿· ·fi ÙËÓ Ô‹ ÛÙ‹ÚÈ͢ ÙÔ˘ÌÂÓÙÂÛ¤ ÛÙËÓ ·ÚÈÛÙÂÚ‹ ÏÂ˘Ú¿ Ù˘ fiÚÙ·˜Î·È ÌÂÙ¿ ÙÔÔıÂÙ‹ÛÙ ÙËÓ Ù¿· ÛÙËÓ·ÓÙ›ÛÙÔÈ¯Ë Ô‹ Ù˘ ·¤Ó·ÓÙÈ ÏÂ˘Ú¿˜ fiÔ˘‹Ù·Ó ÚÈÓ Û˘Ó‰Â‰Â̤ÓÔ˜ Ô ¿Óˆ ÌÂÓÙÂÛ¤˜.
∞¡∞™∆ƒ√º∏ ∆ø¡ §∞µø¡ ™∆π™¶√ƒ∆∂™ (™À¡∂Ã∂π∞)
5
°È· Ó· ·ӷÙÔÔıÂÙ‹ÛÂÙ ÙËÏ·‚‹ ÛÙËÓ ·¤Ó·ÓÙÈ ÏÂ˘Ú¿.
∆¿·
ªË¯·ÓÈÛÌfi˜·Ó¿Û¯ÂÛ˘
∞ÚÈÛÙÂÚ‹ÏÂ˘Ú¿
¢ÂÍÈ¿ ÏÂ˘Ú¿
5.3 ∂·ÓÂÁηٿÛÙ·ÛË Ù˘ §·‚‹˜ Ù˘¶fiÚÙ·˜ ÙÔ˘ ÃÒÚÔ˘ ™˘ÓÙ‹ÚËÛ˘
5.3.1 ™ÙÂÚÂÒÛÙ ÙË Ï·‚‹ ÛÙË ‰ÂÍÈ¿ ÏÂ˘Ú¿Ù˘ fiÚÙ·˜ Ì ‚›‰Â˜ ÛÙÔ ¿Óˆ ̤ÚÔ˜ ηÈοو ·fi ÙËÓ Ù¿· Ù˘ Ï·‚‹˜.
5.3.2 ∂·ÓÂÁηٷÛÙ‹ÛÙ ÙËÓ Ù¿· Ù˘ Ï·‚‹˜.
∆¿·

95
√‰ËÁ›Â˜ ∂ÁηٿÛÙ·Û˘
5.4 ªÂÙ·ÎÈÓ‹ÛÙ ÙË Ï·‚‹ Ù˘ fiÚÙ·˜ Ù˘ηٿ„˘Í˘
5.4.1 ∞Ê·ÈÚ¤ÛÙ ÙË ‚›‰· Ô˘ Û˘ÁÎÚ·Ù› ÙË Ï·‚‹ÛÙËÓ ¿Óˆ ÏÂ˘Ú¿ Ù˘ fiÚÙ·˜ Î·È ÙȘ ‰‡Ô‚›‰Â˜ Ô˘ Û˘ÁÎÚ·ÙÔ‡Ó ÙË Ï·‚‹ ÛÙËÓ Î¿ÙˆÏÂ˘Ú¿ Ù˘ fiÚÙ·˜.
5.4.2 ∞Ê·ÈÚ¤ÛÙ ÙË Ï·‚‹
5.4.3 ∞Ê·ÈÚ¤ÛÙ ÙË ‚›‰· ·fi ÙËÓ ¿Óˆ ‰ÂÍÈ¿ÏÂ˘Ú¿ Ù˘ fiÚÙ·˜ Î·È ÙÔÔıÂÙ‹ÛÙ ÙËÓÛÙËÓ ·ÓÙ›ÛÙÔÈ¯Ë Ô‹ Ù˘ ·ÚÈÛÙÂÚ‹˜ÏÂ˘Ú¿˜.
5.4 ªÂÙ·ÎÈÓ‹ÛÙ ÙË Ï·‚‹ Ù˘ fiÚÙ·˜ Ù˘ηٿ„˘Í˘ (Û˘Ó¤¯ÂÈ·)
5.4.4 ªÂÙ·ÎÈÓ‹ÛÙ ÙÔÓ Ì˯·ÓÈÛÌfi ·Ó¿Û¯ÂÛ˘ Ù˘fiÚÙ·˜ fiˆ˜ ˘Ô‰ÂÈÎÓ‡ÂÙ·È ÛÙËÓÚÔËÁÔ‡ÌÂÓË ÛÂÏ›‰·.
5.4.5 ™ÙÂÚÂÒÛÙ ÙË Ï·‚‹ ÛÙË ‰ÂÍÈ¿ ÏÂ˘Ú¿ Ù˘fiÚÙ·˜ Ì ‚›‰Â˜ ÛÙÔ ¿Óˆ Î·È Î¿Ùˆ ̤ÚÔ˜,¯ÚËÛÈÌÔÔÈÒÓÙ·˜ ÙȘ οو Ô¤˜ Ô˘·ÂÏ¢ıÂÚÒıËÎ·Ó Ì ÙËÓ ·Ê·›ÚÂÛË ÙˆÓ‚È‰ÒÓ ÙÔ˘ Ì˯·ÓÈÛÌÔ‡ ·Ó¿Û¯ÂÛ˘ Ù˘fiÚÙ·˜.
TOP
BOTTOM
¶¿Óˆ
∫¿Ùˆ
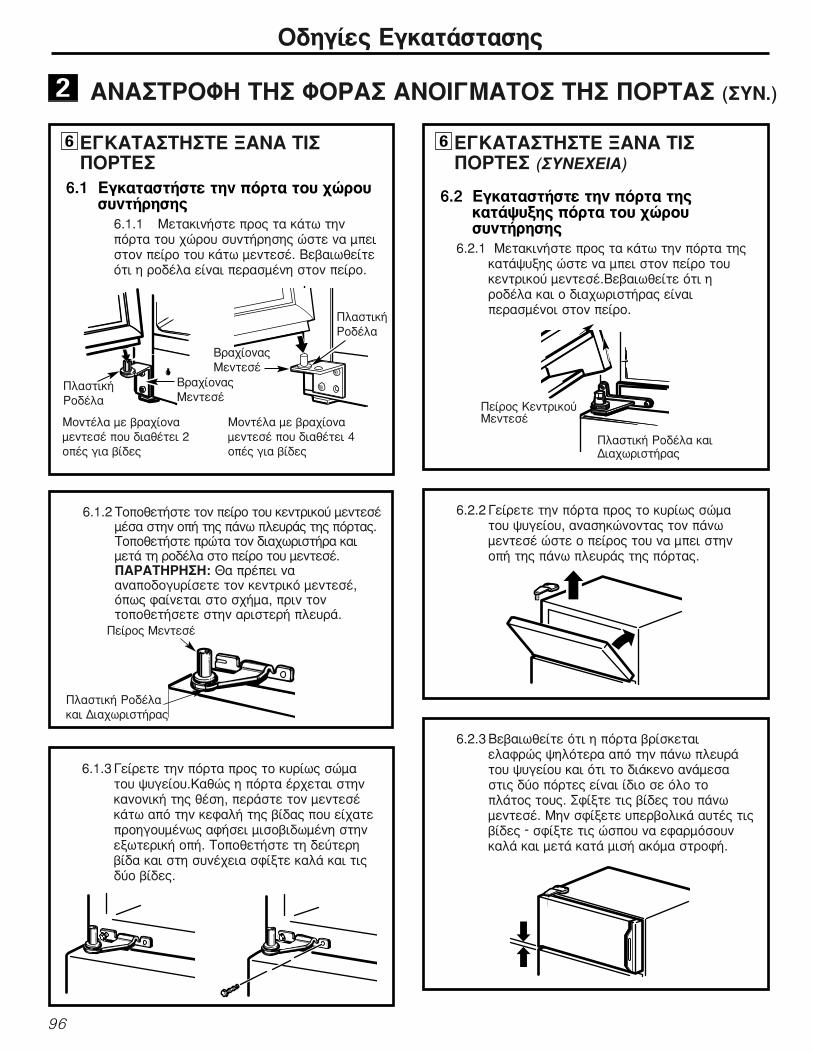
96
6.2 ∂ÁηٷÛÙ‹ÛÙ ÙËÓ fiÚÙ· Ù˘ηٿ„˘Í˘ fiÚÙ· ÙÔ˘ ¯ÒÚÔ˘Û˘ÓÙ‹ÚËÛ˘
6.2.1 ªÂÙ·ÎÈÓ‹ÛÙ ÚÔ˜ Ù· οو ÙËÓ fiÚÙ· Ù˘ηٿ„˘Í˘ ÒÛÙ ӷ ÌÂÈ ÛÙÔÓ Â›ÚÔ ÙÔ˘ÎÂÓÙÚÈÎÔ‡ ÌÂÓÙÂÛ¤.µÂ‚·Èˆı›Ù fiÙÈ ËÚÔ‰¤Ï· Î·È Ô ‰È·¯ˆÚÈÛÙ‹Ú·˜ ›ӷÈÂÚ·Ṳ̂ÓÔÈ ÛÙÔÓ Â›ÚÔ.
√‰ËÁ›Â˜ ∂ÁηٿÛÙ·Û˘
6.1.2 ∆ÔÔıÂÙ‹ÛÙ ÙÔÓ Â›ÚÔ ÙÔ˘ ÎÂÓÙÚÈÎÔ‡ ÌÂÓÙÂ̤ۤ۷ ÛÙËÓ Ô‹ Ù˘ ¿Óˆ ÏÂ˘Ú¿˜ Ù˘ fiÚÙ·˜.∆ÔÔıÂÙ‹ÛÙ ÚÒÙ· ÙÔÓ ‰È·¯ˆÚÈÛÙ‹Ú· ηÈÌÂÙ¿ ÙË ÚÔ‰¤Ï· ÛÙÔ Â›ÚÔ ÙÔ˘ ÌÂÓÙÂÛ¤.¶∞ƒ∞∆∏ƒ∏™∏: £· Ú¤ÂÈ Ó··Ó·Ô‰ÔÁ˘Ú›ÛÂÙ ÙÔÓ ÎÂÓÙÚÈÎfi ÌÂÓÙÂÛ¤,fiˆ˜ Ê·›ÓÂÙ·È ÛÙÔ Û¯‹Ì·, ÚÈÓ ÙÔÓÙÔÔıÂÙ‹ÛÂÙ ÛÙËÓ ·ÚÈÛÙÂÚ‹ ÏÂ˘Ú¿.
¶Ï·ÛÙÈ΋ ƒÔ‰¤Ï·Î·È ¢È·¯ˆÚÈÛÙ‹Ú·˜
¶Â›ÚÔ˜ ªÂÓÙÂÛ¤
∂°∫∞∆∞™∆∏™∆∂ •∞¡∞ ∆π™¶√ƒ∆∂™ (™À¡∂Ã∂π∞)
6
¶Â›ÚÔ˜ ∫ÂÓÙÚÈÎÔ‡ªÂÓÙÂÛ¤
¶Ï·ÛÙÈ΋ ƒÔ‰¤Ï· ηȢȷ¯ˆÚÈÛÙ‹Ú·˜
6.2.2 °Â›ÚÂÙ ÙËÓ fiÚÙ· ÚÔ˜ ÙÔ Î˘Ú›ˆ˜ ÛÒÌ·ÙÔ˘ „˘Á›Ԣ, ·Ó·ÛËÎÒÓÔÓÙ·˜ ÙÔÓ ¿ÓˆÌÂÓÙÂÛ¤ ÒÛÙÂ Ô Â›ÚÔ˜ ÙÔ˘ Ó· ÌÂÈ ÛÙËÓÔ‹ Ù˘ ¿Óˆ ÏÂ˘Ú¿˜ Ù˘ fiÚÙ·˜.
6.2.3 µÂ‚·Èˆı›Ù fiÙÈ Ë fiÚÙ· ‚Ú›ÛÎÂÙ·ÈÂÏ·ÊÚÒ˜ „ËÏfiÙÂÚ· ·fi ÙËÓ ¿Óˆ ÏÂ˘Ú¿ÙÔ˘ „˘Á›Ԣ Î·È fiÙÈ ÙÔ ‰È¿ÎÂÓÔ ·Ó¿ÌÂÛ·ÛÙȘ ‰‡Ô fiÚÙ˜ Â›Ó·È ›‰ÈÔ Û fiÏÔ ÙÔÏ¿ÙÔ˜ ÙÔ˘˜. ™Ê›ÍÙ ÙȘ ‚›‰Â˜ ÙÔ˘ ¿ÓˆÌÂÓÙÂÛ¤. ªËÓ ÛÊ›ÍÂÙ ˘ÂÚ‚ÔÏÈο ·˘Ù¤˜ ÙȘ‚›‰Â˜ - ÛÊ›ÍÙ ÙȘ ÒÛÔ˘ Ó· ÂÊ·ÚÌfiÛÔ˘ÓηϿ Î·È ÌÂÙ¿ ηٿ ÌÈÛ‹ ·ÎfiÌ· ÛÙÚÔÊ‹.
∞¡∞™∆ƒ√º∏ ∆∏™ º√ƒ∞™ ∞¡√π°ª∞∆√™ ∆∏™ ¶√ƒ∆∞™ (™À¡.)2
6.1.3 °Â›ÚÂÙ ÙËÓ fiÚÙ· ÚÔ˜ ÙÔ Î˘Ú›ˆ˜ ÛÒÌ·ÙÔ˘ „˘Á›Ԣ.∫·ıÒ˜ Ë fiÚÙ· ¤Ú¯ÂÙ·È ÛÙËÓηÓÔÓÈ΋ Ù˘ ı¤ÛË, ÂÚ¿ÛÙ ÙÔÓ ÌÂÓÙÂۤοو ·fi ÙËÓ ÎÂÊ·Ï‹ Ù˘ ‚›‰·˜ Ô˘ ›¯·ÙÂÚÔËÁÔ˘Ì¤Óˆ˜ ·Ê‹ÛÂÈ ÌÈÛԂȉˆÌ¤ÓË ÛÙËÓÂ͈ÙÂÚÈ΋ Ô‹. ∆ÔÔıÂÙ‹ÛÙ ÙË ‰Â‡ÙÂÚË‚›‰· Î·È ÛÙË Û˘Ó¤¯ÂÈ· ÛÊ›ÍÙ ηϿ Î·È ÙȘ‰‡Ô ‚›‰Â˜.
6.1 ∂ÁηٷÛÙ‹ÛÙ ÙËÓ fiÚÙ· ÙÔ˘ ¯ÒÚÔ˘Û˘ÓÙ‹ÚËÛ˘
6.1.1 ªÂÙ·ÎÈÓ‹ÛÙ ÚÔ˜ Ù· οو ÙËÓfiÚÙ· ÙÔ˘ ¯ÒÚÔ˘ Û˘ÓÙ‹ÚËÛ˘ ÒÛÙ ӷ ÌÂÈÛÙÔÓ Â›ÚÔ ÙÔ˘ οو ÌÂÓÙÂÛ¤. µÂ‚·Èˆı›ÙÂfiÙÈ Ë ÚÔ‰¤Ï· Â›Ó·È ÂÚ·Ṳ̂ÓË ÛÙÔÓ Â›ÚÔ.
∂°∫∞∆∞™∆∏™∆∂ •∞¡∞ ∆π™¶√ƒ∆∂™
6
µÚ·¯›ÔÓ·˜ªÂÓÙÂÛ¤
¶Ï·ÛÙÈ΋ƒÔ‰¤Ï·
¶Ï·ÛÙÈ΋ƒÔ‰¤Ï·
µÚ·¯›ÔÓ·˜ªÂÓÙÂÛ¤
ªÔÓ٤Ϸ Ì ‚Ú·¯›ÔÓ·ÌÂÓÙÂÛ¤ Ô˘ ‰È·ı¤ÙÂÈ 2Ô¤˜ ÁÈ· ‚›‰Â˜
ªÔÓ٤Ϸ Ì ‚Ú·¯›ÔÓ·ÌÂÓÙÂÛ¤ Ô˘ ‰È·ı¤ÙÂÈ 4Ô¤˜ ÁÈ· ‚›‰Â˜

º˘ÛÈÔÏÔÁÈÎÔ› ‹¯ÔÈ ÏÂÈÙÔ˘ÚÁ›·˜∞Ó¿ÏÔÁ· Ì ÙË ı¤ÛË ÙÔ˘ „˘Á›Ԣ ÛÙËÓ ÎÔ˘˙›Ó· Û·˜, ÌÔÚ› Ó· ÂÈı˘Ì›Ù ӷ ÙÔÔıÂÙ‹ÛÂÙ ¤Ó· ÎÔÌÌ¿ÙÈ ÌÔΤٷ Ì ÂÏ·ÛÙÈÎfi ˘fiÛÙڈ̷ οو ·fi ÙÔ „˘ÁÂ›Ô ÁÈ· Ó· ÌÂȈı› Ô ıfiÚ˘‚Ô˜.
√ ·ÓÂÌÈÛÙ‹Ú·˜ ÁÈ· ÙËÓ Î˘ÎÏÔÊÔÚ›· ÙÔ˘ ·¤Ú· ÛÙÔ ÂÛˆÙÂÚÈÎfi Ù˘ ηٿ„˘Í˘, ÔÔÔ›Ô˜ ‰È·ÙËÚ› ÔÌÔÈfiÌÔÚÊË ÙË ıÂÚÌÔÎÚ·Û›·.£fiÚ˘‚Ô˜ Ô˘ ÌÔÈ¿˙ÂÈ Ì ÓÂÚfi Ô˘ ‚Ú¿˙ÂÈ ‹ Ì ÙÔÓ ‹¯Ô Ù˘ Á·ÚÁ¿Ú·˜.∏ ÚÔ‹ ÙÔ˘ „˘ÎÙÈÎÔ‡ ˘ÁÚÔ‡ ̤۷ ·fi Ù· ËÓ›· „‡Í˘ Ù˘ ηٿ„˘Í˘.◊¯Ô˜ Û·Ó ÛʇÚÈÁÌ· ‹ Û·Ó ˘ÁÚfi Ô˘ ·ÊÚ›˙ÂÈ. ¡ÂÚfi Ô˘ ¤ÊÙÂÈ ¿Óˆ ÛÙÔÓıÂÚÌ·ÓÙ‹Ú· ·fi„˘Í˘ ηٿ ÙË ‰È¿ÚÎÂÈ· ÙÔ˘ ·ÎÏÔ˘ ·fi„˘Í˘.◊¯Ô˜ ıÚ·‡Û˘ ‹ ˘ÁÚÔ‡ Ô˘ ·ÊÚ›˙ÂÈ. ¢È·ÛÙÔÏ‹ Î·È Û˘ÛÙÔÏ‹ ÙˆÓ ËÓ›ˆÓ „‡Í˘ηٿ ÙË ‰È¿ÚÎÂÈ· ÙÔ˘ ·ÎÏÔ˘ ·fi„˘Í˘.¡ÂÚfi Ô˘ ÛÙ¿˙ÂÈ Î·ıÒ˜ ÏÈÒÓÂÈ ·fi ÙÔÓ ÂÍ·ÂÚˆÙ‹ Î·È Ú¤ÂÈ ÛÙÔÓ ‰›ÛÎÔ·ÔÛÙÚ¿ÁÁÈÛ˘ ηٿ ÙË ‰È¿ÚÎÂÈ· ÙÔ˘ ·ÎÏÔ˘ ·fi„˘Í˘.¶·ÁÔÌ˯·Ó‹ (Û ÔÚÈṲ̂ӷ ÌÔÓ٤Ϸ)∏ ‚·Ï‚›‰· ÓÂÚÔ‡ Ù˘ ·ÁÔÌ˯·Ó‹˜ ·Ú¿ÁÂÈ ¤Ó· ‚fiÌ‚Ô Î·ıÒ˜ Ë ·ÁÔÌ˯·Ó‹ÁÂÌ›˙ÂÈ Ì ÓÂÚfi. ∞Ó Ô ‰È·ÎfiÙ˘ ÏÂÈÙÔ˘ÚÁ›·˜ Â›Ó·È ÛÙË ı¤ÛË π (on), Ô ‚fiÌ‚Ô˜ÎÔ‡ÁÂÙ·È ·ÎfiÌ· ÎÈ ·Ó ‰ÂÓ ¤¯ÂÈ Û˘Ó‰Âı› Ë ÁÚ·ÌÌ‹ ÙÔ˘ ÓÂÚÔ‡.∞Ó ·Ê‹ÛÂÙ ÙÔÓ ‰È·ÎfiÙË ÏÂÈÙÔ˘ÚÁ›·˜ ÛÙË ı¤ÛË π (on) ÚÈÓ Û˘Ó‰Âı› Ë ÁÚ·ÌÌ‹ÓÂÚÔ‡ ÌÔÚ› Ó· ÚÔÎÏËı› ˙ËÌÈ¿ ÛÙËÓ ·ÁÔÌ˯·Ó‹.°È· Ó· ÌË Û˘Ì‚Â› οÙÈ Ù¤ÙÔÈÔ ı¤ÛÙ ÙÔÓ ‰È·ÎfiÙË Ù˘ ·ÁÔÌ˯·Ó‹˜ ÛÙË ı¤ÛË 0(off). ŒÙÛÈ ÛÙ·Ì·Ù¿ Î·È Ô ‚fiÌ‚Ô˜.√ ‹¯Ô˜ ·fi Ù· ·Á¿ÎÈ· Ô˘ ¤ÊÙÔ˘Ó ÛÙÔ ‰Ô¯Â›Ô ·Ôı‹Î¢Û˘ Î·È ·fi ÙÔ ÓÂÚfiÔ˘ ‰È·ÚÚ¤ÂÈ ÙÔ˘˜ ۈϋÓ˜ ηıÒ˜ Í·Ó·ÁÂÌ›˙ÂÈ Ë ·ÁÔÌ˯·Ó‹.
¶ÚÈÓ Î·Ï¤ÛÂÙ ÙÔ service...
¶ÏËÚÔÊÔڛ˜ ÁÈ· ÙËÓ ∞ÓÙÈÌÂÙÒÈÛË ¶ÚÔ‚ÏËÌ¿ÙˆÓ∂ÍÔÈÎÔÓÔÌ‹ÛÙ ¯ÚfiÓÔ Î·È ¯Ú‹Ì·! ∂ϤÁÍÙ ÚÒÙ· ÙÔ˘˜ ›Ó·Î˜ ÛÙȘ ·Ú·Î¿ÙˆÛÂÏ›‰Â˜ Î·È ›Ûˆ˜ Ó· ÌË ¯ÚÂÈ·ÛÙ› Ó· ηϤÛÂÙ ÙÔ service.
¶Èı·Ó¤˜ ∞Èٛ˜
∆Ô „˘ÁÂ›Ô ÂÎÙÂÏ› ÙÔÓ Î‡ÎÏÔ·fi„˘Í˘
√ Ú˘ıÌÈÛÙ‹˜ ıÂÚÌÔÎÚ·Û›·˜‚Ú›ÛÎÂÙ·È ÛÙË ı¤ÛË 0
∆Ô „˘ÁÂ›Ô ‰ÂÓ Â›Ó·ÈÛ˘Ó‰Â‰Â̤ÓÔ ÛÙËÓ Ú›˙·
Œ¯ÂÈ Î·Â› Ë ·ÛÊ¿ÏÂÈ· ‹ ¤¯ÂÈ"¤ÛÂÈ" Ë ·˘ÙfiÌ·ÙË ·ÛÊ¿ÏÂÈ·
√È ‚›‰Â˜ ÛÙ· ÚÔ‰¿ÎÈ· ‹ Ù·Ô‰·Ú¿ÎÈ· ÔÚÈ˙ÔÓÙ›ˆÛ˘¯ÚÂÈ¿˙ÔÓÙ·È Ú‡ıÌÈÛË
√È ‹¯ÔÈ ·˘ÙÔ› Â›Ó·È Ê˘ÛÈÔÏÔÁÈÎÔ›Î·È Î·Ù¿ ·ÚÈÔ ÏfiÁÔ ÔÊ›ÏÔÓÙ·ÈÛÙËÓ È‰È·›ÙÂÚ· ·Ô‰ÔÙÈ΋ÏÂÈÙÔ˘ÚÁ›· ÙÔ˘ „˘Á›Ԣ
97
¶Úfi‚ÏËÌ·
∆Ô „˘ÁÂ›Ô ‰ÂÓ Ù›ıÂÙ·ÈÛ ÏÂÈÙÔ˘ÚÁ›·
¢fiÓËÛË ‹ ıfiÚ˘‚Ô˜ÎÚÔÙ·Ï›ÛÌ·ÙÔ ̃(ÌÈ· ÂÏ·ÊÚ¿ ‰fiÓËÛË Â›Ó·ÈÊ˘ÛÈÔÏÔÁÈ΋)
∆È ı· ¶Ú¤ÂÈ Ó· ∫¿ÓÂÙÂ
• ¶ÂÚÈ̤ÓÂÙ ÂÚ›Ô˘ 30 ÏÂÙ¿ ÒÛÔ˘ Ó·ÔÏÔÎÏËÚˆı› Ô Î‡ÎÏÔ˜ ·fi„˘Í˘
• °˘Ú›ÛÙ ÙÔÓ Ú˘ıÌÈÛÙ‹ ıÂÚÌÔÎÚ·Û›·˜ ÛÂοÔÈ· ¿ÏÏË ı¤ÛË (¤Ó‰ÂÈÍË) ÂÎÙfi˜ ÙÔ˘ 0
• ¶È¤ÛÙ ÙÔ ÊȘ ÒÛÙ ӷ ÌÂÈ Î·Ï¿ ÛÙËÓÚ›˙·.
• ∞ÓÙÈηٷÛÙ‹ÛÙ ÙËÓ ·ÛÊ¿ÏÂÈ· ‹Â·Ó·Ê¤ÚÂÙ ÙËÓ ·˘ÙfiÌ·ÙË ·ÛÊ¿ÏÂÈ· ÛÙËÓηÓÔÓÈ΋ ı¤ÛË ÏÂÈÙÔ˘ÚÁ›·˜
• ¢Â›Ù ÙËÓ ·Ú¿ÁÚ·ÊÔ ƒÔ‰¿ÎÈ· ηȶԉ·Ú¿ÎÈ· √ÚÈ˙ÔÓÙ›ˆÛ˘

¶ÏËÚÔÊÔڛ˜ ÁÈ· ÙËÓ ∞ÓÙÈÌÂÙÒÈÛË ¶ÚÔ‚ÏËÌ¿ÙˆÓ
98
¶ÚÈÓ Î·Ï¤ÛÂÙ ÙÔ service...
¶Úfi‚ÏËÌ·
∆Ô ÌÔÙ¤Ú ÏÂÈÙÔ˘ÚÁ› ÁÈ· ·Ú·ÙÂٷ̤Ó˜ÂÚÈfi‰Ô˘˜ ‹ ·ÎÏÔ˘˜,ÍÂÎÈÓÒÓÙ·˜ ηÈÛÙ·Ì·ÙÒÓÙ·˜ Û˘¯Ó¿.(∆· Û‡Á¯ÚÔÓ· „˘Á›·Ô˘ ¤¯Ô˘Ó ÌÂÁ·Ï‡ÙÂÚÔ·ÔıË΢ÙÈÎfi ¯ÒÚÔ··ÈÙÔ‡Ó ÂÚÈÛÛfiÙÂÚÔ¯ÚfiÓÔ ÏÂÈÙÔ˘ÚÁ›·˜.™Ù·Ì·ÙÔ‡Ó Î·ÈÍ·Ó·Ú¯›˙Ô˘Ó Û˘¯Ó¿ÒÛÙ ӷ ‰È·ÙËÚÔ‡ÓÙ·ÈÔÈ ÛˆÛÙ¤˜ıÂÚÌÔÎڷۛ˜).
∞Ó·Ú΋˜ „‡ÍË ÛÙÔÓ¯ÒÚÔ Ù˘ Û˘ÓÙ‹ÚËÛ˘ ‹ Ù˘ ηٿ„˘Í˘
™¯ËÌ·ÙÈÛÌfi ̃¿ÁÔ ̆‹·ÁÔÎÚ˘ÛÙ¿ÏÏˆÓ ¿ÓˆÛÙ· ηÙ„˘Á̤ӷ ÙÚfiÊÈÌ·(Ô ¿ÁÔ ̤̃۷ ÛÙÈ̃Û˘Û΢·Û›Â ̃›ӷÈÊ˘ÛÈÔÏÔÁÈÎfi )̃
∏ ·˘ÙfiÌ·ÙË·ÁÔÌ˯·Ó‹ (ÛÂÔÚÈṲ̂ӷ ÌÔÓ٤Ϸ) ‰ÂÓÙ›ıÂÙ·È Û ÏÂÈÙÔ˘ÚÁ›·
∆· ·Á¿ÎÈ· Â›Ó·È ÔχÌÈÎÚ¿
¶Èı·Ó¤˜ ∞Èٛ˜
º˘ÛÈÔÏÔÁÈÎfi fiÙ·Ó ÙÔ „˘ÁÂ›Ô Û˘Ó‰¤ÂÙ·È ÁÈ·ÚÒÙË ÊÔÚ¿ ÛÙËÓ Ú›˙·.
™˘Ì‚·›ÓÂÈ Û˘¯Ó¿ fiÙ·Ó ÙÔÔıÂÙ›Ù ÌÂÁ¿Ï˜ÔÛfiÙËÙ˜ ÙÚÔÊ›ÌˆÓ ÛÙÔ „˘Á›Ô.
∏ fiÚÙ· ¤¯ÂÈ Ì›ÓÂÈ ·ÓÔÈÎÙ‹.
∑ÂÛÙfi˜ ηÈÚfi˜ ‹ Û˘¯Ó¿ ·ÓÔ›ÁÌ·Ù· Ù˘ fiÚÙ·˜.
√ Ú˘ıÌÈÛÙ‹˜ ıÂÚÌÔÎÚ·Û›·˜ Â›Ó·È ÛÙË ı¤ÛË̤ÁÈÛÙ˘ „‡Í˘.
∏ Û¯¿Ú· Î·È Ô Û˘Ì˘ÎÓˆÙ‹˜ ¯ÚÂÈ¿˙ÔÓÙ·Èηı¿ÚÈÛÌ·.
√ Ú˘ıÌÈÛÙ‹˜ ıÂÚÌÔÎÚ·Û›·˜ ‰ÂÓ ‚Ú›ÛÎÂÙ·È ÛÂı¤ÛË Â·ÚÎÔ‡˜ „‡Í˘.
∑ÂÛÙfi˜ ηÈÚfi˜ ‹ Û˘¯Ó¿ ·ÓÔ›ÁÌ·Ù· Ù˘ fiÚÙ·˜.
∏ fiÚÙ· ¤¯ÂÈ Ì›ÓÂÈ ·ÓÔÈÎÙ‹.
∫¿ÔÈ· Û˘Û΢·Û›· ¤¯ÂÈ ÊÚ¿ÍÂÈ ÙÔÓ ·ÂÚ·ÁˆÁfi̤۷ ÛÙÔÓ ¯ÒÚÔ Ù˘ ηٿ„˘Í˘.
∏ fiÚÙ· ¤¯ÂÈ Ì›ÓÂÈ ·ÓÔÈÎÙ‹.
¶Ôχ Û˘¯Ó¿ ‹ ·Ú·ÙÂٷ̤ӷ ·ÓÔ›ÁÌ·Ù· Ù˘fiÚÙ·˜.
√ ‰È·ÎfiÙ˘ ÏÂÈÙÔ˘ÚÁ›·˜ Ù˘ ·ÁÔÌ˯·Ó‹˜‚Ú›ÛÎÂÙ·È ÛÙË ı¤ÛË 0 (off).
∏ ·ÚÔ¯‹ ÓÂÚÔ‡ Â›Ó·È ÎÏÂÈÛÙ‹ ‹ ‰ÂÓ ¤¯ÂÈÛ˘Ó‰Âı›.
√ ¯ÒÚÔ˜ Ù˘ ηٿ„˘Í˘ ‰ÂÓ ¤¯ÂÈ Â·ÚÎÒ˜¯·ÌËÏ‹ ıÂÚÌÔÎÚ·Û›·.
™˘ÛÛˆÚÂ˘Ì¤Ó· ·Á¿ÎÈ· ÛÙÔ ‰Ô¯Â›Ô·Ôı‹Î¢Û˘ ÚÔηÏÔ‡Ó ‰È·ÎÔ‹ ÏÂÈÙÔ˘ÚÁ›·˜Ù˘ ·ÁÔÌ˯·Ó‹˜.
∏ ‚·Ï‚›‰· ‰È·ÎÔ‹˜ Ù˘ ·ÚÔ¯‹˜ ÓÂÚÔ‡ Ô˘Û˘Ó‰¤ÂÈ ÙÔ „˘ÁÂ›Ô Ì ÙË ÁÚ·ÌÌ‹ ÙÔ˘ ÓÂÚÔ‡ÌÔÚ› Ó· ¤¯ÂÈ ÊÚ¿ÍÂÈ.
∆È ı· ¶Ú¤ÂÈ Ó· ∫¿ÓÂÙÂ
• ¶ÂÚÈ̤ÓÂÙ 24 ÒÚ˜ ÒÛÔ˘ ÙÔ „˘ÁÂ›Ô Ó··ÔÎÙ‹ÛÂÈ Ï‹Úˆ˜ ÙË ÛˆÛÙ‹ „‡ÍË
• ∞˘Ùfi Â›Ó·È Ê˘ÛÈÔÏÔÁÈÎfi
• ∂ϤÁÍÙ ̋ˆ˜ οÔÈ· Û˘Û΢·Û›· ‰ÂÓ·Ê‹ÓÂÈ ÙËÓ fiÚÙ· Ó· ÎÏ›ÛÂÈ
• ∞˘Ùfi Â›Ó·È Ê˘ÛÈÔÏÔÁÈÎfi
• ¢Â›Ù ÙËÓ ·Ú¿ÁÚ·ÊÔ ™¯ÂÙÈο Ì ÙÔÓÂÚÈÛÙÚÔÊÈÎfi Ú˘ıÌÈÛÙ‹ ıÂÚÌÔÎÚ·Û›·˜
• ¢Â›Ù ÙËÓ ·Ú¿ÁÚ·ÊÔ ºÚÔÓÙ›‰· ηÈ∫·ı·ÚÈÛÌfi˜
• ¢Â›Ù ÙËÓ ·Ú¿ÁÚ·ÊÔ ™¯ÂÙÈο Ì ÙÔÓÂÚÈÛÙÚÔÊÈÎfi Ú˘ıÌÈÛÙ‹ ıÂÚÌÔÎÚ·Û›·˜
• °˘Ú›ÛÙ ÙÔÓ Ú˘ıÌÈÛÙ‹ ıÂÚÌÔÎÚ·Û›·˜ ÛÙËӷ̤ۈ˜ ÂfiÌÂÓË ı¤ÛË (¤Ó‰ÂÈÍË). ¢Â›Ù ÙËÓ·Ú¿ÁÚ·ÊÔ ™¯ÂÙÈο Ì ÙÔÓ ÂÚÈÛÙÚÔÊÈÎfiÚ˘ıÌÈÛÙ‹ ıÂÚÌÔÎÚ·Û›·˜.
• ∂ϤÁÍÙ ̋ˆ˜ οÔÈ· Û˘Û΢·Û›· ‰ÂÓ·Ê‹ÓÂÈ ÙËÓ fiÚÙ· Ó· ÎÏ›ÛÂÈ
• ∂ϤÁÍÙ ̋ˆ ̃οÔÈ· Û˘Û΢·Û›· ¤¯ÂÈ ÊÚ¿ÍÂÈÙÔÓ ·ÂÚ·ÁˆÁfi ̤۷ ÛÙËÓ Î·Ù¿„˘ÍË
• ∂ϤÁÍÙ ̋ˆ˜ οÔÈ· Û˘Û΢·Û›· ‰ÂÓ·Ê‹ÓÂÈ ÙËÓ fiÚÙ· Ó· ÎÏ›ÛÂÈ
• £¤ÛÙ ÙÔÓ ‰È·ÎfiÙË ÛÙÔ π (on).
• ªÔÚ› Ó· ¤¯Ô˘Ó ÎÔÏÏ‹ÛÂÈ ·Á¿ÎÈ· ÛÙ· ÏÂ˘Ú¿ÙË ̃·ÁÔı‹ÎË .̃ £¤ÛÙ ÙÔÓ ‰È·-ÎfiÙË ÛÙÔ 0 (off)Î·È ·Ê·ÈÚ¤ÛÙ ٷ ·Á¿ÎÈ·.
• ¢Â›Ù ÙËÓ ·Ú¿ÁÚ·ÊÔ ∂ÁηٿÛÙ·ÛË Ù˘ÁÚ·ÌÌ‹˜ ÓÂÚÔ‡
• ¶ÂÚÈ̤ÓÂÙ 24 ÒÚ˜ ÒÛÔ˘ ÙÔ „˘ÁÂ›Ô Ó··ÔÎÙ‹ÛÂÈ Ï‹Úˆ˜ ÙË ÛˆÛÙ‹ „‡ÍË
• πÛÈÒÛÙ ٷ ·Á¿ÎÈ· Ì ÙÔ ¯¤ÚÈ.
• ∫·Ï¤ÛÙ ˘‰Ú·˘ÏÈÎfi ÁÈ· Ó· ηı·Ú›ÛÂÈ ÙË‚·Ï‚›‰·.

99
¶Úfi‚ÏËÌ·∆· ·Á¿ÎÈ· ·ÚÁÔ‡Ó Ó··ÁÒÛÔ˘Ó
∆· ·Á¿ÎÈ· Ì˘Ú›˙Ô˘Ó /¤¯Ô˘Ó ¿Û¯ËÌË Á‡ÛË
™¯ËÌ·ÙÈÛÌfi˜ ˘ÁÚ·Û›·˜ÛÙËÓ ÂÈÊ¿ÓÂÈ· ÙÔ˘„˘Á›Ԣ ·Ó¿ÌÂÛ· ÛÙȘfiÚÙ˜
™˘ÁΤÓÙÚˆÛË ˘ÁÚ·Û›·˜ÛÙÔ ÂÛˆÙÂÚÈÎfi ÙÔ˘„˘Á›Ԣ (fiÙ·Ó ÔηÈÚfi˜ Â›Ó·È ˘ÁÚfi˜, Ô·¤Ú·˜ ÌÂٷʤÚÂÈ˘ÁÚ·Û›· ̤۷ ÛÙÔ„˘ÁÂ›Ô fiÙ·Ó ·ÓÔ›ÁÂÈ ËfiÚÙ·)
∆Ô „˘ÁÂ›Ô Ì˘Ú›˙ÂÈ
¶Èı·Ó¤˜ ∞Èٛ˜∏ fiÚÙ· ¤¯ÂÈ Ì›ÓÂÈ·ÓÔÈÎÙ‹.
√ Ú˘ıÌÈÛÙ‹˜ ıÂÚÌÔÎÚ·Û›·˜‰ÂÓ ‚Ú›ÛÎÂÙ·È Û ı¤ÛË·ÚÎÔ‡˜ „‡Í˘.
∆Ô ‰Ô¯Â›Ô ·Ôı‹Î¢Û˘ ÁÈ·Ù· ·Á¿ÎÈ· ¯ÚÂÈ¿˙ÂÙ·Èηı¿ÚÈÛÌ·.
∆· ÙÚfiÊÈÌ· ÌÂÙ·‰›‰Ô˘ÓÔṲ̂˜/Á‡ÛÂȘ ÛÙ· ·Á¿ÎÈ·.
∆Ô ÂÛˆÙÂÚÈÎfi ÙÔ˘ „˘Á›Ԣ¯ÚÂÈ¿˙ÂÙ·È Î·ı¿ÚÈÛÌ·.
¢ÂÓ Â›Ó·È ·Û˘Ó‹ıÈÛÙÔ Î·Ù¿ÙË ‰È¿ÚÎÂÈ· ÂÚÈfi‰ˆÓ˘„ËÏ‹˜ ˘ÁÚ·Û›·˜.
¶Ôχ Û˘¯Ó¿ ‹·Ú·ÙÂٷ̤ӷ ·ÓÔ›ÁÌ·Ù·Ù˘ fiÚÙ·˜.
∆· ÙÚfiÊÈÌ· ÌÂÙ·‰›‰Ô˘ÓÔṲ̂˜ ÛÙÔ „˘Á›Ô.
∆Ô ÂÛˆÙÂÚÈÎfi ÙÔ˘ „˘Á›Ԣ¯ÚÂÈ¿˙ÂÙ·È Î·ı¿ÚÈÛÌ·.
∆È ı· ¶Ú¤ÂÈ Ó· ∫¿ÓÂÙ• ∂ϤÁÍÙ ̋ˆ˜ οÔÈ· Û˘Û΢·Û›· ‰ÂÓ ·Ê‹ÓÂÈ ÙËÓ
fiÚÙ· Ó· ÎÏ›ÛÂÈ
• ¢Â›Ù ÙËÓ ·Ú¿ÁÚ·ÊÔ Û¯ÂÙÈο Ì ÙÔÓ ÂÚÈÛÙÚÔÊÈÎfiÚ˘ıÌÈÛÙ‹ ıÂÚÌÔÎÚ·Û›·˜
• ∞‰ÂÈ¿ÛÙÂ Î·È Ï‡ÓÂÙ ÙÔ ‰Ô¯Â›Ô.¶ÂÙ¿ÍÙ ٷ ·ÏÈ¿ ·Á¿ÎÈ·.
• ∆˘Ï›ÁÂÙ ηϿ Ù· ÙÚfiÊÈÌ·.
• ¢Â›Ù ÙËÓ ·Ú¿ÁÚ·ÊÔ ºÚÔÓÙ›‰· Î·È ∫·ı·ÚÈÛÌfi˜
• ™ÎÔ˘›ÛÙ ηϿ ÙËÓ ÂÈÊ¿ÓÂÈ· Î·È Á˘Ú›ÛÙ ÙÔÓÚ˘ıÌÈÛÙ‹ ıÂÚÌÔÎÚ·Û›·˜ ÛÙËÓ ·Ì¤Ûˆ˜ ÂfiÌÂÓË ı¤ÛË(¤Ó‰ÂÈÍË)
• ∆· ÙÚfiÊÈÌ· Ì ¤ÓÙÔÓË ÔÛÌ‹ ı· Ú¤ÂÈ Ó· Ù˘Ï›ÁÔÓÙ·ÈηϿ
• ¢È·ÙËÚ›Ù ¤Ó· ·ÓÔÈÎÙfi ÎÔ˘Ù› Ì·ÁÂÈÚÈ΋˜ Ûfi‰·˜ ̤۷ÛÙÔ „˘ÁÂ›Ô (ÙÔ ÎÔ˘Ù› ı· Ú¤ÂÈ Ó· ·ÓÙÈηı›ÛÙ·Ù·È Î¿ıÂÙÚÂȘ Ì‹Ó˜)
• ¢Â›Ù ÙËÓ ·Ú¿ÁÚ·ÊÔ ºÚÔÓÙ›‰· Î·È ∫·ı·ÚÈÛÌfi˜

Printed in the United States.Imprimé aux États-Unis.Impreso en los Estados Unidos.
This appliance conforms to the following EEC Directives:Cet appareil ménager est conforme aux directives CEE suivantes :Este electrodoméstico se adecúa a los requisitos de la CEE:
Low Voltage EquipmentAppareils ménagers à bas voltageElectrodomésticos de bajo voltaje73/23/EEC93/68/EEC
Electromagnetic CompatibilityCompatabilité électromagnétiqueCompatibilidad electromagnética89/338/EEC92/31/EEC93/68/EEC