reflection for the web - attachmate is now micro focus ... for the web 2014 r2 (12.1) the reflection...
TRANSCRIPT

Reflection for the WebInstallation Guide
version 12.3

© 2017 Attachmate Corporation, a Micro Focus company. All rights reserved.
No part of the documentation materials accompanying this Attachmate software product may be reproduced, transmitted, transcribed, or translated into any language, in any form by any means, without the written permission of Attachmate Corporation. The content of this document is protected under copyright law even if it is not distributed with software that includes an end user license agreement.
The content of this document is furnished for informational use only, is subject to change without notice, and should not be construed as a commitment by Attachmate Corporation. Attachmate Corporation assumes no responsibility or liability for any errors or inaccuracies that may appear in the informational content contained in this document.
Attachmate, the Attachmate logo, FileXpress, and Reflection are registered trademarks of Attachmate Corporation, in the USA. All other trademarks, trade names, or company names referenced herein are used for identification only and are the property of their respective owners.

Contents
Reflection for the Web 12.3 Installation Guide 5
1 What’s New in version 12.3 7
Installation Changes. . . . . . . . . . . . . . . . . . . . . . . . . . . . . . . . . . . . . . . . . . . . . . . . . . . . . . . . . . . . . . . 7About Upgrading . . . . . . . . . . . . . . . . . . . . . . . . . . . . . . . . . . . . . . . . . . . . . . . . . . . . . . . . . . . . . . . . . 8
Upgrading from Reflection for the Web version 12.2 or Reflection for the Web 2014 R2 (12.1) . . . . . . . . . . . . . . . . . . . . . . . . . . . . . . . . . . . . . . . . . . . . . . . . . . . . . . . . . . . . . . . . 8Upgrading from an earlier version . . . . . . . . . . . . . . . . . . . . . . . . . . . . . . . . . . . . . . . . . . . . . 8
If you are Evaluating . . . . . . . . . . . . . . . . . . . . . . . . . . . . . . . . . . . . . . . . . . . . . . . . . . . . . . . . . . . . . . 8
2 Introduction 9
Reflection for the Web Overview . . . . . . . . . . . . . . . . . . . . . . . . . . . . . . . . . . . . . . . . . . . . . . . . . . . . . 9
3 Preparing to Install 13
Prerequisites . . . . . . . . . . . . . . . . . . . . . . . . . . . . . . . . . . . . . . . . . . . . . . . . . . . . . . . . . . . . . . . . . . . 13System Requirements . . . . . . . . . . . . . . . . . . . . . . . . . . . . . . . . . . . . . . . . . . . . . . . . . . . . . . . . . . . . 14
Server Requirements . . . . . . . . . . . . . . . . . . . . . . . . . . . . . . . . . . . . . . . . . . . . . . . . . . . . . . 14Terminal Session Requirements . . . . . . . . . . . . . . . . . . . . . . . . . . . . . . . . . . . . . . . . . . . . . 14Management and Security Server Requirements . . . . . . . . . . . . . . . . . . . . . . . . . . . . . . . . 15
4 Using the Automated Installer 17
Installing Reflection for the Web 12.3. . . . . . . . . . . . . . . . . . . . . . . . . . . . . . . . . . . . . . . . . . . . . . . . . 17A. Install Management and Security Server 12.3 on the same machine.. . . . . . . . . . . . . . . . . . . . . . 17
Next steps . . . . . . . . . . . . . . . . . . . . . . . . . . . . . . . . . . . . . . . . . . . . . . . . . . . . . . . . . . . . . . 19B. Use an existing installation of Management and Security Server 12.3 on the same machine. . . . . . . . . . . . . . . . . . . . . . . . . . . . . . . . . . . . . . . . . . . . . . . . . . . . . . . . . . . . . . . . . . . 19
Continue with the automated installer. . . . . . . . . . . . . . . . . . . . . . . . . . . . . . . . . . . . . . . . . . 19Next steps . . . . . . . . . . . . . . . . . . . . . . . . . . . . . . . . . . . . . . . . . . . . . . . . . . . . . . . . . . . . . . 20
C. Use an existing installation of Management and Security Server 12.3 on a different machine.. . . . . . . . . . . . . . . . . . . . . . . . . . . . . . . . . . . . . . . . . . . . . . . . . . . . . . . . . . . . . . . . 20
If you are upgrading from version 12.2 . . . . . . . . . . . . . . . . . . . . . . . . . . . . . . . . . . . . . . . . 20Step 1. Install Reflection for the Web 12.3 on a different machine. . . . . . . . . . . . . . . . . . . . 21Step 2. Install the Reflection for the Web activation file. . . . . . . . . . . . . . . . . . . . . . . . . . . . 21Next steps . . . . . . . . . . . . . . . . . . . . . . . . . . . . . . . . . . . . . . . . . . . . . . . . . . . . . . . . . . . . . . 22
5 Manual Installation 23
Prerequisites and System Requirements . . . . . . . . . . . . . . . . . . . . . . . . . . . . . . . . . . . . . . . . . . . . . . 23Manual Installation Procedures . . . . . . . . . . . . . . . . . . . . . . . . . . . . . . . . . . . . . . . . . . . . . . . . . . . . . 23
Step 1. Download and extract the product file. . . . . . . . . . . . . . . . . . . . . . . . . . . . . . . . . . . 24Step 2. Edit and deploy the component war files. . . . . . . . . . . . . . . . . . . . . . . . . . . . . . . . . 24Step 3. Install the Reflection for the Web activation file. . . . . . . . . . . . . . . . . . . . . . . . . . . . 25Step 4. Copy other activation files to the correct locations. . . . . . . . . . . . . . . . . . . . . . . . . 26Step 5. Optional: Install add-on products. . . . . . . . . . . . . . . . . . . . . . . . . . . . . . . . . . . . . . . 26
Installation Variations . . . . . . . . . . . . . . . . . . . . . . . . . . . . . . . . . . . . . . . . . . . . . . . . . . . . . . . . . . . . . 26Installing with no JRE. . . . . . . . . . . . . . . . . . . . . . . . . . . . . . . . . . . . . . . . . . . . . . . . . . . . . . 26
Contents 3

4 Insta
Installing Individual Components . . . . . . . . . . . . . . . . . . . . . . . . . . . . . . . . . . . . . . . . . . . . 26
6 Upgrading to version 12.3 27
Upgrading from Reflection for the Web 12.2 . . . . . . . . . . . . . . . . . . . . . . . . . . . . . . . . . . . . . . . . . . . 27Upgrading from Reflection for the Web 2014 or earlier . . . . . . . . . . . . . . . . . . . . . . . . . . . . . . . . . . . 28Update the Activation Files for Components and Add-On Products . . . . . . . . . . . . . . . . . . . . . . . . . 28Use of JSP templates to customize pages or sessions . . . . . . . . . . . . . . . . . . . . . . . . . . . . . . . . . . . 29Upgrading Custom Static Sessions . . . . . . . . . . . . . . . . . . . . . . . . . . . . . . . . . . . . . . . . . . . . . . . . . . 29
To upgrade static sessions: . . . . . . . . . . . . . . . . . . . . . . . . . . . . . . . . . . . . . . . . . . . . . . . . . 29Installing the rweb-client web application context . . . . . . . . . . . . . . . . . . . . . . . . . . . . . . . . . . . . . . . 30
7 Uninstalling version 12.3 31
Terms 33
llation Guide

Reflection for the Web 12.3 Installation Guide
The Reflection for the Web Installation Guide is also available in French and German:
Français
Deutsch
The most up-to-date version of this guide is available online in English.
See What’s New in version 12.3
Reflection for the Web 12.3 Installation Guide 5

6 Installation Guide

1 1What’s New in version 12.3
Beginning in version 12.3, Reflection for the Web is a separate web application that requires Host Access Management and Security Server to configure and manage secure web-based sessions to a variety of hosts.
Your Reflection for the Web 12.3 license entitles you to:
Host Access Management and Security Server
Security Proxy (except in the Limited Edition)
Terminal ID Manager
What’s New at a Glance:
Installation Changes
About Upgrading
If you are Evaluating
Installation ChangesReflection for the Web version 12.3 is installed independently of Management and Security Server. Consider these installation options.
Automated installation. The automated installer provides the option to install both Reflection for the Web and Management and Security Server.
Or, you can use an existing installation of Management and Security Server.
Manual installation. Reflection for the Web is installed using a .war file.
NOTE: When manually upgrading to Management and Security Server version 12.3 or higher, you must install the rweb-client.war file separately. See Installing the rweb-client web application context.
For information about installing or using Management and Security Server, refer to the product documentation.
What’s New in version 12.3 7

About UpgradingThe upgrade process varies depending on the version you are upgrading from. Details are in the Upgrading chapter.
Upgrading from Reflection for the Web version 12.2 or Reflection for the Web 2014 R2 (12.1)
The Reflection for the Web automated installer looks for an installation of Management and Security Server. You are prompted for options, depending on what is detected.
The installation path will not change.
Upgrading from an earlier version
If you are upgrading from either Reflection for the Web 2014 R1 (12.0) or Reflection for the Web 2011 (11.0), you must first upgrade to Reflection for the Web 12.2, and then upgrade to version 12.3.
NOTE: As of version 12.2, several Management and Security Server components were renamed:
Management Server is called Administrative Server.
ReflectionData folder is called MSSData.
ID Manager is called Terminal ID Manager.
The default installation path (on Windows) is C:\Program Files\Micro Focus\MSS.
If you are EvaluatingIf you are running an evaluation copy, the product will be fully functional for 120 days. During that time you can install, configure, and test Reflection for the Web.
Follow the installation steps in this guide, and then walk through the evaluation scenario presented in Technical Note 2818: Evaluating Reflection for the Web.
Please contact Micro Focus or your authorized reseller to obtain the full-use version of the software.
8 Installation Guide

2 2Introduction
Reflection for the Web version 12.3 is a web application that requires Management and Security Server to create, secure, and manage terminal sessions.
The Reflection for the Web automated installer looks for a compatible installation of Management and Security Server. If detected, you can use the existing one. If not, then you can install Management and Security Server as part of the Reflection for the Web installation.
NOTE: In Reflection for the Web versions prior to 12.2, the management server was used to create and configure sessions. Versions 12.2 and later use the administrative server, which is part of Management and Security Server.
Reflection for the Web OverviewReflection for the Web provides Java-based applets to deploy web-based terminal emulation sessions to your users. Reflection for the Web’s terminal sessions are centrally managed and secured using Management and Security Server’s Administrative Server.
Using Reflection for the Web and Management and Security Server, you can configure secure web-based terminal emulations sessions that connect to host applications located inside or outside the firewall.
Briefly, here’s how it works:
1 An administrator installs Reflection for the Web on a server and either installs or uses an existing installation of Management and Security Server.
2 The administrator uses the Administrative WebStation (in Management and Security Server) to create, configure, and secure terminal emulation sessions. Optional security settings can be configured on a per-session basis.
3 The Reflection for the Web launcher is downloaded to the user's workstation.
4 A user clicks a link to start a terminal session.
5 The user connects to and communicates with the host system using the downloaded emulation applet.
________________________________________________________________________________
Introduction 9

The diagram below depicts the interaction between Reflection for the Web, Management and Security Server (the Administrative Server), and the optional Security Proxy Server to provide enhanced security.
1. Reflection for the Web user connects to the Administrative Server.
2. User authenticates to a directory server (LDAP/Active Directory) or other identity management system – optional.
3. Directory server provides user and group identity - optional.
4. The Administrative Server sends the emulation session to the authenticated client.
5. When the optional Security Proxy Server is configured for use by a session, emulation applet makes a TLS connection to Security Proxy Server and sends it a signed token.
6. When present, the Security Proxy Server validates session token and establishes a connection to the host:port it specifies.
7. When no Security Proxy Server is present or a session is not configured to use it, an authenticated user connects directly to the host.
Administrative Server
The Administrative Server, in Management and Security Server, includes the Administrative WebStation and terminal emulation files, which are installed together on a web server.
After you install (or point to an existing) Management and Security Server, you can open the Administrative WebStation, which is a self-contained web application. Use the Administrative WebStation to manage and configure web-based terminal sessions. With Reflection for the Web, Java-based applets deploy terminal emulation sessions to your users.
10 Installation Guide

Optional Components
Your Reflection for the Web license entitles you to these optional components in Management and Security Server:
Metering Server monitors the use of terminal sessions.
Security Proxy Server * acts as a proxy for terminal sessions, routing encrypted network traffic to and from user workstations. (The Security Proxy is not included with the Reflection for the Web Limited Edition.)
Terminal ID Manager * spools terminal IDs, tracks ID usage, and manages inactivity timeout values for specific users.
* Your Reflection for the Web licence (except the Limited Edition) includes the Security Proxy and Terminal ID Manager, which are Add-On Products to Management and Security Server.
For information about installing, configuring, and using these components, see the Management and Security Server Installation Guide.
Introduction 11

12 Installation Guide

3 3Preparing to Install
Reflection for the Web is a web application that requires Management and Security Server.
During installation, the Reflection for the Web automated installer looks for an installation of Management and Security Server on your machine, and presents several options:
Install Management and Security Server on the same machine where Reflection for the Web will be installed.
Use the existing local installation of Management and Security Server on your system.
Use a remotely hosted installation of Management and Security Server.
NOTE: For initial testing, you can install Reflection for the Web and Management and Security Server on a workstation; however, we recommend installing on a server operating system for production.
In this section:
Prerequisites
System Requirements
PrerequisitesBefore installing Reflection for the Web 12.3, be sure that:
Your version of Management and Security Server is 12.2 or higher. You can use an existing installation or use the Reflection for the Web automated installer to install version 12.3.
Any Reflection for the Web or Management and Security Server component currently running is shut down. (If an earlier version was installed with an automated installer, the 12.3 automated installer will close the components for you.)
The necessary account permissions to install components on the target server are available.
If you plan to use X.509 client certificates or secure LDAP access control, make sure the account used to run the Administrative Server has permission to write to the Java SDK certificate authority certificates file (cacerts). The default location in Windows is:
C:\Program Files\Micro Focus\MSS\jre\lib\security
Note: If you are upgrading, the Windows location remains
C:\Program Files\Attachmate\ReflectionServer\jre\lib\security
Note: Optional components, including Metering Server, Security Proxy Server, and Terminal ID
Manager can be installed along with Reflection for the Web or added later.
Preparing to Install 13

System RequirementsReflection for the Web components can be installed on a single server or on separate servers. Reflection for the Web requires:
Server Requirements
Terminal Session Requirements
Management and Security Server Requirements
Server Requirements
Server-class operating system
For production, a server-class system is required.
For initial testing or evaluation, a workstation could be used.
Server or Application Server running JRE 8 or later
JRE 8 is installed by the automated installer.
Terminal Session Requirements
A web browser using JRE 8 or later that can run trusted applets.
For TLS connections to your host, Java Cryptography Extension (JCE) Unlimited Strength Jurisdiction Policy Files may be required.
Unlimited strength policy files contain no restrictions on cryptographic strengths, in contrast to the strong but limited cryptography policy files bundled in a JRE.
To apply the JCE Unlimited Strength Jurisdiction Policy Files:
1. Download the Java Cryptography Extension (JCE) Unlimited Strength Jurisdiction Policy Files from Oracle or IBM.
Be sure to download the correct policy file updates for your version of Java:
Java 8: http://www.oracle.com/technetwork/java/javase/downloads/index.html
IBM: https://www14.software.ibm.com/webapp/iwm/web/preLogin.do?source=jcesdk
2. Uncompress and extract the downloaded file. The download includes a Readme.txt and two .jar files with the same names as the existing policy files.
3. Locate the two existing policy files:
local_policy.jar
US_export_policy.jar
On UNIX, look in <java-home>/lib/security/
On Windows, look in C:\Program Files\Java\jre<version>\lib\security\
4. Replace the existing policy files with the unlimited strength policy files you extracted.
NOTE: The JCE Unlimited Strength Jurisdiction Policy Files must be applied each time you upgrade your JRE.
14 Installation Guide

Management and Security Server Requirements
The requirements for Management and Security Server are specified in the Management and Security Server Installation Guide.
Preparing to Install 15

16 Installation Guide

4 4Using the Automated Installer
Installing Reflection for the Web by using the automated installer is the simplest way to get up and running. You can use the automated installer on Linux, Solaris SPARC64, and Windows.
In this section:
Installing Reflection for the Web 12.3
A. Install Management and Security Server 12.3 on the same machine.
B. Use an existing installation of Management and Security Server 12.3 on the same machine.
C. Use an existing installation of Management and Security Server 12.3 on a different machine.
Installing Reflection for the Web 12.3Follow these steps to install Reflection for the Web with either a new or existing installation of Management and Security Server.
1 Run the automated installer for your Reflection for the Web 12.3 edition and platform. For example:
rwebenterprise-12.3.<nnn>-prod-wx64.exe
rwebairlines-12.3.<nnn>-prod-linuxx64.sh
NOTE: You can run the automated installer in console mode, using a -c parameter.
This option, frequently for non-Windows systems, uses a command line for input and output rather than a graphical interface. All screens present the information on the console and allow you to enter the same information as in the automated installer.
2 Click Next to install Reflection for the Web.
3 The Reflection for the Web automated installer detects whether Management and Security Server is installed on the same machine and provides options for installation.
Continue with the instructions for your installation scenario:
A. Install Management and Security Server 12.3 on the same machine where Reflection for the Web will be installed.
B. Use an existing installation of Management and Security Server 12.3 on the same machine where Reflection for the Web will be installed.
C. Use an existing installation of Management and Security Server on a different machine.
A. Install Management and Security Server 12.3 on the same machine.This scenario is for a new installation of both Reflection for the Web and Management and Security Server on the same machine. When the automated installer does not detect an installation of Management and Security Server on the machine where you are installing Reflection for the Web, you are prompted as follows:
Using the Automated Installer 17
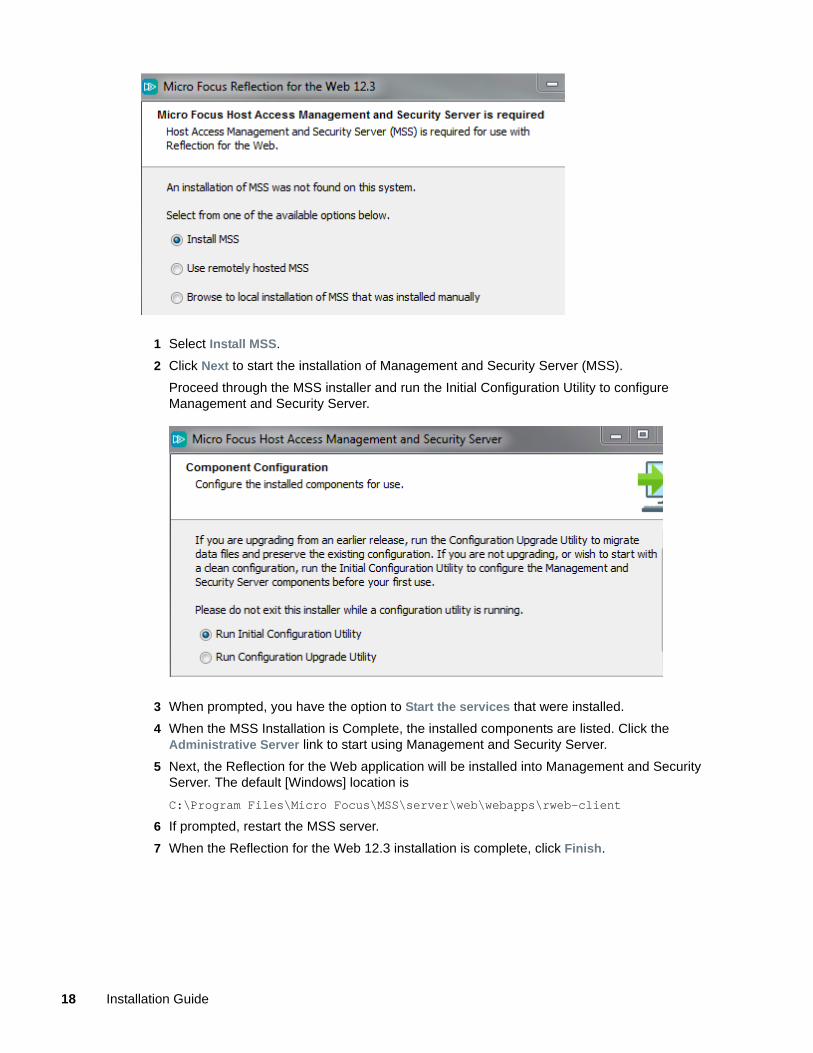
1 Select Install MSS.
2 Click Next to start the installation of Management and Security Server (MSS).
Proceed through the MSS installer and run the Initial Configuration Utility to configure Management and Security Server.
3 When prompted, you have the option to Start the services that were installed.
4 When the MSS Installation is Complete, the installed components are listed. Click the Administrative Server link to start using Management and Security Server.
5 Next, the Reflection for the Web application will be installed into Management and Security Server. The default [Windows] location is
C:\Program Files\Micro Focus\MSS\server\web\webapps\rweb-client
6 If prompted, restart the MSS server.
7 When the Reflection for the Web 12.3 installation is complete, click Finish.
18 Installation Guide

Next steps
At this point, Reflection for the Web 12.3 is installed. You can begin using the Administrative WebStation to create and configure sessions.
Refer to the Management and Security Server Installation Guide to
Set up Metering
Set up Security Proxy
Set up Terminal ID Manager
Set up Management and Security Server Add-Ons
B. Use an existing installation of Management and Security Server 12.3 on the same machine.When the automated installer detects an installation of Management and Security Server, you are prompted as follows:
NOTE: If an upgrade of Management and Security Server is needed and supported, select the option to Upgrade existing local MSS installation.
Continue with the automated installer.
1 Select Use existing local MSS installation. Click Next.
2 The Reflection for the Web application will be installed into Management and Security Server. The default [Windows] location is
C:\Program Files\Micro Focus\MSS\server\web\webapps\rweb-client
3 If prompted, restart the MSS Server.
4 When the Reflection for the Web 12.3 installation is complete, click Finish.
Using the Automated Installer 19

Next steps
At this point, Reflection for the Web 12.3 is installed. You can begin using the Administrative WebStation to create and configure sessions.
Refer to the Management and Security Server Installation Guide to
Set up Metering
Set up Security Proxy
Set up Terminal ID Manager
Set up Management and Security Server Add-Ons
C. Use an existing installation of Management and Security Server 12.3 on a different machine.If you select the option to Use remotely hosted MSS with a new installation of Reflection for the Web 12.3, be aware of these requirements:
The version of Management and Security Server must be 12.3. (An earlier version must be upgraded.)
CAUTION: If you use MSS to manage multiple Micro Focus products that run on remote servers, be sure to check the MSS version requirements for all of those products, before upgrading MSS. MSS must be version-compatible with all of the client products being managed.
When Reflection for the Web and Management and Security Server (MSS) are installed on separate machines, or when using the RWeb WAR in a separate Servlet runner, we recommend that all web applications are accessed through the machine running Reflection for the Web.
For example: https://rwebhost/mss
When ready, proceed with Step 1.
If you are upgrading from version 12.2
If you are upgrading from Reflection for the Web 12.2 and want to switch to a multi-server solution (where Management and Security Server and Reflection for the Web are on separate servers), proceed as follows:
1 On the machine where Reflection for the Web 12.2 is installed, upgrade to Management and Security Server 12.3:
1a Run the MSS installer, found in the mss directory where you downloaded your product.
1b For assistance, see the Host Access Management and Security Server Installation Guide.
2 Continue with Step 1 to install Reflection for the Web 12.3 on a different machine.
20 Installation Guide

Step 1. Install Reflection for the Web 12.3 on a different machine.
On a different machine, install Reflection for the Web 12.3 as a stand-alone product, using the automated installer. The automated installer installs a default web application container and performs some basic configuration.
1 Run the automated installer for your Reflection for the Web edition.
2 When prompted, select Use remotely hosted MSS.
Click Next. and enter the location where Management and Security Server 12.3 is installed.
3 The Reflection for the Web automated installer installs:
a JRE.
Server-side components, including a web proxy for handling /mss URLs, a redirector for handling /rweb URLs, and the rweb emulator client.
4 Secure the connection between Reflection for the Web and Management and Security Server. Enter your settings:
Host or DNS name, or IP address.
Port. The default is 443.
Management Servlet context.
Protocol. The default is HTTPS.
5 When the Reflection for the Web installation is complete, click Finish.
6 Continue with Step 2 to install the activation file.
Step 2. Install the Reflection for the Web activation file.
The Reflection for the Web activation file is required for Management and Security Server to interact with Reflection for the Web on a different machine.
To install the activation file:
1 Open Management and Security Server > Administrative WebStation > Resources > About Management and Security Server.
2 Browse* to the location where you downloaded the Reflection for the Web automated installer. The activation file has this format:
Using the Automated Installer 21

activation.rweb_<product>_edition-12.3.jaw
3 Select the file and click Install.
4 Then refresh or restart your browser. The Reflection for the Web features appear in the Administrative WebStation:
The About box then lists your Reflection for the Web edition.
Session Manager enables Web-based sessions.
References > Advanced provides scripting and code samples.
* Or, download the activation file from the site where you downloaded Reflection for the Web, and then Browse to that location.
Next steps
At this point, Reflection for the Web 12.3 is installed. You can begin using the Administrative WebStation to create and configure sessions.
Refer to the Management and Security Server Installation Guide to
Set up Metering
Set up Security Proxy
Set up Terminal ID Manager
Set up Management and Security Server Add-Ons
22 Installation Guide

5 5Manual Installation
Although automated installation is recommended, you can manually install Management and Security Server. A WAR file is available for Reflection for the Web.
Use a manual installation when any of the following is true:
You want to use a servlet runner other than the one automatically installed with the product.
You are installing on a platform for which an automated installer is not supported.
You cannot run the automated installer for any other reason.
In this section:
Prerequisites and System Requirements
Manual Installation Procedures
Installation Variations
Prerequisites and System Requirements For a manual installation, Reflection for the Web must be installed on either a different host or in
a different servlet runner than Management and Security Server.
Host Access Management and Security Server 12.3 must be installed and accessible from Reflection for the Web’s servlet runner.
A JRE version 8 or higher must be installed.
If you do not already have one, download the latest JRE from the Oracle web site. You should download a version of the JRE that includes the server JVM. The JRE that is provided with the JDK includes the server JVM.
NOTE: If your system requires a JRE other than the default, you can use this manual installation on z/OS, Mac, HP-UX, and other Linux systems.
Manual Installation Procedures To manually install and configure Reflection for the Web, you need to extract, edit, and deploy the component war files, and then activate the product.
Step 1. Download and extract the product file.
Step 2. Edit and deploy the component war files.
Step 3. Install the Reflection for the Web activation file.
Step 4. Copy other activation files to the correct locations.
Step 5. Optional: Install add-on products.
Manual Installation 23

Step 1. Download and extract the product file.
1 From the product Download site, download the file for your Reflection for the Web edition and your platform.
For example: rwebenterprise-12.3.<nnn>-prod-war.zip
2 Extract the .zip file.
3 In the install_manual/components directory, locate three war files:
mss.war
rweb.war
rweb-client.war
Step 2. Edit and deploy the component war files.
To configure the Reflection for the Web web application, you must edit the web.xml file to replace the <placeholder> values in the mss.war and rweb.war files. Then, each war file needs to be deployed.
NOTE: When Reflection for the Web and Management and Security Server (MSS) are installed on separate machines, or when using the RWeb WAR in a separate Servlet runner, we recommend that all web applications are accessed through the machine or application running Reflection for the Web. For example: https://rwebhost/mss
A. Edit and deploy mss.war.
B. Edit and deploy rweb.war.
C. Deploy rweb-client.war.
A. Edit and deploy mss.war.
The mss.war file is the mss web proxy, which is required for Reflection for the Web to interact with Management and Security Server.
1 Extract mss.war.
2 Open WEB-INF, and then open web.xml in a text editor.
3 Locate the three trust-store [placeholder] entries. The trust-store entries are required to put a certificate into the trust store.
trust-store-file
trust-store-type
trust-store-password
4 Replace each trust-store [placeholder] value with the value for your configuration.
5 Locate the [mss-url] placeholder and replace it with the URL of the MSS server.
For example: https://msshost/mss
6 Deploy mss.war to your servlet runner.
24 Installation Guide

B. Edit and deploy rweb.war.
The rweb.war file redirects client requests from the /rweb URL path, used in Reflection for the Web and Management and Security Server versions prior to 12.2, to the current /mss URL path.
Edit the trust-store placeholders in the rweb.war file:
1 Extract rweb.war.
2 Open WEB-INF, and then open web.xml in a text editor.
3 Locate and replace the three trust-store [placeholder] entries:
trust-store-file
trust-store-type
trust-store-password
4 Deploy rweb.war to your servlet runner.
C. Deploy rweb-client.war.
1 Copy rweb-client.war to this MSS webapps folder:
<MSS install directory>\server\web\webapps
The servlet runner will expand the war file and an rweb-client context will be created.
2 Start (or restart) the MSS Server.
3 Continue with Step 3 to install the activation file.
Step 3. Install the Reflection for the Web activation file.
The Reflection for the Web activation file is required for Management and Security Server to interact with Reflection for the Web on a different machine.
To install the activation file:
1 Open Management and Security Server > Administrative WebStation > Resources > About Management and Security Server.
2 Browse* to the location where you downloaded the Reflection for the Web media. The activation file has this format:
activation.rweb_<product>_edition-12.3.jaw
3 Select the file and click Install.
4 Refresh or restart your browser. The Reflection for the Web features appear in the Administrative WebStation:
The About box displays your Reflection for the Web edition.
Session Manager enables Web-based sessions.
References > Advanced provides scripting and code samples.
* Or, download the activation file from the site where you downloaded Reflection for the Web, and then Browse to that location.
Manual Installation 25

Step 4. Copy other activation files to the correct locations.
If you use these components, copy the activation file for each in the following directories.
Security Proxy: MSS\securityproxy\lib\modules
Terminal ID Manager: MSS\server\web\webapps\tidm\WEB-INF\lib\modules
Metering: MSS\server\web\webapps\meter\WEB-INF\lib\modules
Step 5. Optional: Install add-on products.
If you purchased any add-on products, such as Automated Sign-On for Mainframe, you need to install its activation file.
To install the activation file:
1 Download the activation file for the add-on product, which has this format: activation.<product_name>.jaw
2 Copy the activation file into the rweb-client.war file at this location: ex\modules
3 Restart the web application.
Installation Variations Installing with no JRE
Installing Individual Components
Installing with no JRE
Follow these steps.
1 To use any of these -unix-nojre- installation packages, confirm that a Java runtime environment appropriate for your platform is already installed. For example, to install Reflection for the Web on a z/Linux machine, download the JRE from this location:
http://www.ibm.com/developerworks/java/jdk/linux/download.html
2 Expand the package you want to use, such as
rwebenterprise-prod-unix-nojre-manual.tar.gz
Note: Your JRE must be Java version 8 or higher.
Installing Individual Components
The following components are part of Management and Security Server. To install a component manually, see the Host Access Management and Security Server Installation Guide.
Administrative Server
Metering Server
Terminal ID Manager
Security Proxy
26 Installation Guide
6 6Upgrading to version 12.3
To prepare for your upgrade, refer to the appropriate section(s):
Upgrading from Reflection for the Web 12.2
Upgrading from Reflection for the Web 2014 or earlier
Update the Activation Files for Components and Add-On Products
Use of JSP templates to customize pages or sessions
Upgrading Custom Static Sessions
Installing the rweb-client web application context
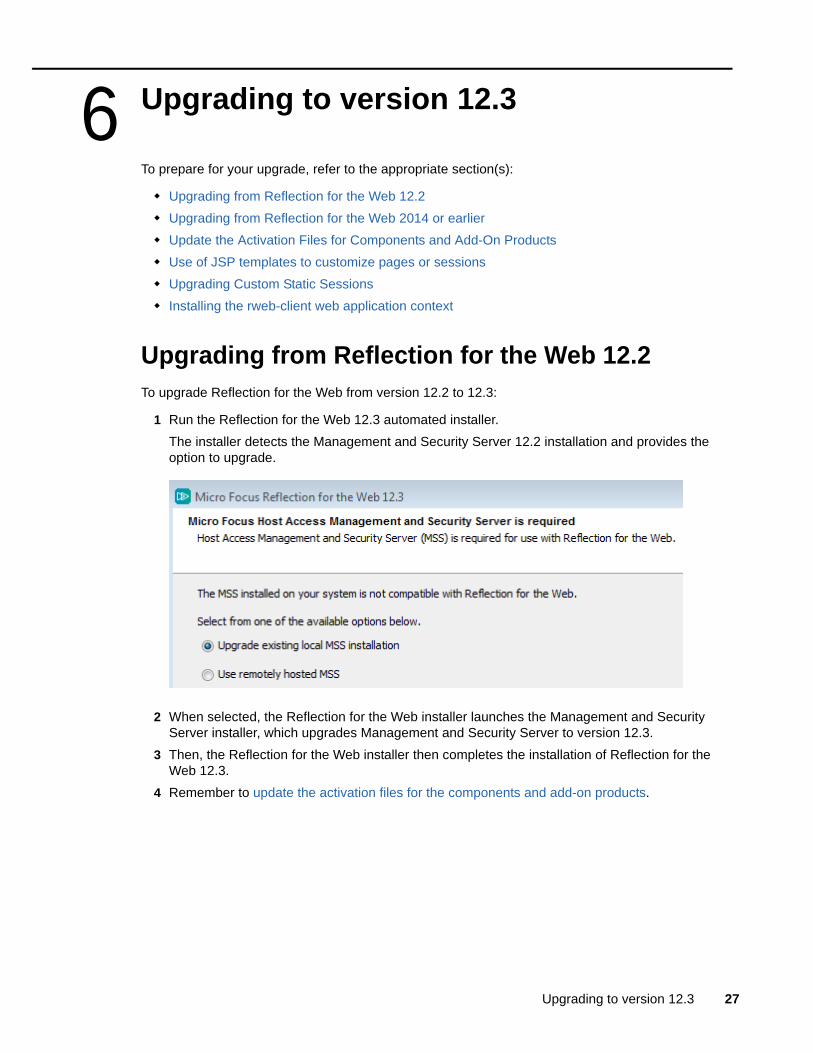
Upgrading from Reflection for the Web 12.2To upgrade Reflection for the Web from version 12.2 to 12.3:
1 Run the Reflection for the Web 12.3 automated installer.
The installer detects the Management and Security Server 12.2 installation and provides the option to upgrade.
2 When selected, the Reflection for the Web installer launches the Management and Security Server installer, which upgrades Management and Security Server to version 12.3.
3 Then, the Reflection for the Web installer then completes the installation of Reflection for the Web 12.3.
4 Remember to update the activation files for the components and add-on products.
Upgrading to version 12.3 27

Upgrading from Reflection for the Web 2014 or earlierTo upgrade to Reflection for the Web 12.3 from an earlier version:
1 First, you must upgrade to Reflection for the Web 12.2, which includes Management and Security Server 12.2. For assistance, see Technical Note 2875.
NOTE: As of version 12.2, several Management and Security Server components were renamed:
Management Server is called Administrative Server.
ReflectionData folder is called MSSData.
ID Manager is called Terminal ID Manager.
The default installation path (on Windows) is C:\Program Files\Micro Focus\MSS.
2 Then, proceed with Upgrading from Reflection for the Web 12.2.
3 Remember to update the activation files for components and add-on products.
For assistance, contact Technical Support.
Update the Activation Files for Components and Add-On ProductsAfter installing Reflection for the Web, you need to update specific activation files to ensure continued operation of your installed components and add-on products. Management and Security Server 12.3 checks for version compatibility and may block operation until the activation files is updated.
The Reflection for the Web components and the Management and Security Server add-on products include:
Security Proxy
Terminal ID Manager
Automated Sign-On for Mainframe Add-On
Micro Focus Advanced Authentication Add-On
To upgrade:
1 From your download location, download the 12.3 activation files for your components and add-on products.
2 Place the activation files in the same directory as the Reflection for the Web installer.
3 Run the Reflection for the Web installer.
The activation files will be propagated to the expected locations for both Reflection for the Web and Management and Security Server.
NOTE: When the activation files are in the installer directory, you do not need to use the Administrative WebStation to install the activation file, as described when installing the product.
28 Installation Guide

Use of JSP templates to customize pages or sessionsIf you used JSP templates to customize your login page or links list page, or to customize Reflection for the Web embedded sessions, you may need to make some modifications. Changes to the applet tag are needed to accommodate the changes to the version 12.3 Reflection for the Web and Management and Security Server installation locations.
For more information about syntax changes, see the templates.txt file. Sample templates are available in templates/samples.
Other references:
Technical Note 2386: Using Templates in Reflection for the Web
Technical Note 2580: Programming with Reflection for the Web
Upgrading Custom Static SessionsWhen terminal sessions are created or modified using the Session Manager, the protected sessions are upgraded during the upgrade procedures when using an automated installer or during startup (when the default web server is started) after a manual installation.
Because Reflection for the Web and Management and Security Server are separate products in version 12.3, the custom static session pages may need to be manually updated to load the Reflection for the Web applet from its new installation location. This update may require modifying applet attributes and parameters such as codebase, archive, and cache_archive.
If any of these conditions exist, follow the steps to upgrade static sessions.
The sessions were not saved using Session Manager.
The HTML in your session(s) was manually modified.
You want to upgrade the static sessions for any reason.
NOTE: If you have keyboard map files that are not contained within a configuration file, then you must upgrade these files before you upgrade the sessions.
To upgrade static sessions:
1 Open a Command Prompt, and change directories to find the location below. For Windows, the location is:
[installation path]\apache-tomcat\webapps\rweb\WEB-INF\lib
2 On the same command line, on one continuous line, enter the appropriate syntax (displayed below) to upgrade your specified configuration files:
Language. On the command line, include the language you want to use: German (de), English (en), or French (fr).
Name of relative or absolute directory or file that contains the configuration files. (You must be able to access this file or directory from the machine where you are upgrading.)
Enter this command as one continuous line:
java -classpath RWebServlet.jar com.wrq.util.upgrade.ConfigUpgrade -locale <de|en|fr> <file name|directory>
Upgrading to version 12.3 29

Example. To upgrade the configuration files in the session directory for use with the English version, follow these steps.
1 In the Command Prompt, change directories to arrive at this location in Windows:
C:\Program Files\Micro Focus\MSS\server\web\webapps\rweb-client\WEB-INF\lib
2 Enter the following command on a single line:
java -classpath RWebServlet.jar com.wrq.util.upgrade.ConfigUpgrade -locale en "C:\Program Files\Micro Focus\MSS\apache-tomcat\webapps\rweb\session"
Installing the rweb-client web application contextWhen you manually upgrade Management and Security Server to version 12.3 or higher, you must install the rweb-client.war file to complete the upgrade.
To install rweb-client.war:
1 In your Reflection for the Web download location, open the install_manual\components directory.
2 Locate and copy rweb-client.war to this MSS webapps folder:
<MSS install directory>\server\web\webapps
The servlet runner will expand the war file and an rweb-client context will be created.
3 Start (or restart) the MSS Server.
30 Installation Guide

7 7Uninstalling version 12.3
To uninstall:
On Windows:
Use Add/Remove Programs to uninstall Reflection for the Web.
If MSS is on the same machine, you have the option to uninstall it as well.
On Linux or UNIX systems:
Run the uninstaller found in the Reflection for the Web installation directory.
If MSS is on the same machine, the Reflection for the Web uninstaller is found in this directory: mss/server/web/webapps/rweb-client.
You also have the option to uninstall MSS.
Uninstalling version 12.3 31

32 Installation Guide

Terms
Java Cryptography Extension (JCE) . The Java Cryptography Extension (JCE) provides a framework and implementations for encryption, key generation and key agreement, and Message Authentication Code (MAC) algorithms.
Java Runtime Environment (JRE). The JRE is a subset of the JDK for end-users. It includes a Java Virtual Machine and a Java interpreter and provides a unified interface to Java programs, regardless of the underlying operating system.
Java Server Pages (JSP) . A Java technology that helps software developers serve dynamically generated web pages based on HTML, XML, or other document types.
Java Software Development Kit (JDK). The JDK (previously called the Java SDK) is the software development environment for writing Java applets or applications; it is a superset of the Java Runtime Environment and the Java Virtual Machine.
Java Virtual Machine (JVM or VM). The JVM is the part of Java that interprets Java bytecode. Because the JVM is part of the JDK, it has the same version number. When a browser supports a specific version of the JDK, this includes the JVM.
Terms 33

34 Installation Guide