red hat openshift container platform on the aws cloud · architecture ... deploying red hat...
TRANSCRIPT

Page 1 of 27
Red Hat OpenShift Container Platform on the AWS Cloud
Quick Start Reference Deployment
September 2017
Last updated: May 2018 (see revisions)
Jay McConnell, Andrew Glenn, Tony Vattathil, Mandus Momberg, and David Duncan
Amazon Web Services (AWS)
AWS can provide you with AWS credits for this deployment. Please
fill out our form and we will reach out to you.
Contents
Overview ................................................................................................................................. 2
OpenShift Container Platform on AWS ............................................................................. 3
OpenShift Components ...................................................................................................... 3
Costs and Licenses .............................................................................................................. 3
Architecture ............................................................................................................................ 4
Auto Scaling Use ................................................................................................................. 5
Auto Scaling Workflow ....................................................................................................... 5
AWS Service Broker ........................................................................................................... 6
Prerequisites .......................................................................................................................... 7
Specialized Knowledge ....................................................................................................... 7
Deployment Options .............................................................................................................. 7
Deployment Steps ..................................................................................................................8
Step 1. Sign up for a Red Hat Subscription ........................................................................8
Step 2. Prepare Your AWS Account ................................................................................... 9
Step 3. Launch the Quick Start .......................................................................................... 9

Amazon Web Services – Red Hat OpenShift Container Platform on the AWS Cloud March 2018
Page 2 of 27
Step 4. Set up DNS ........................................................................................................... 18
Step 5. Test the Deployment ............................................................................................ 18
Best Practices for Using OpenShift Container Platform on AWS ....................................... 24
Security ............................................................................................................................. 24
Ansible Playbook Releases ............................................................................................... 25
Troubleshooting ................................................................................................................... 25
Additional Resources ........................................................................................................... 26
GitHub Repository ............................................................................................................... 26
Document Revisions ............................................................................................................ 27
Quick Starts are automated reference deployments for key technologies on the Amazon
Web Services (AWS) Cloud, based on AWS best practices for security and high availability.
Overview
This Quick Start reference deployment guide provides step-by-step instructions for
deploying Red Hat OpenShift Container Platform on the AWS Cloud.
Red Hat OpenShift Container Platform is based on Docker-formatted Linux containers,
Google Kubernetes orchestration, and Red Hat Enterprise Linux (RHEL) 7.
Red Hat OpenShift Container Platform gives application development and IT operations
teams the ability to accelerate application delivery. It provides the following features:
Support for standardized containers through the Red Hat APIs for Docker
Container orchestration, scheduling, and management at scale with Kubernetes
Integration with container-optimized RHEL 7 operating system
Extensive selection of programming languages, frameworks, and services
Rich set of tools and interfaces, including a web console and collaboration features, for
development and operations
Distributed application platform with container networking, streamlined deployment,
and administration
For more information about Red Hat OpenShift Container Platform, see the OpenShift documentation.
Amazon Web Services – Red Hat OpenShift Container Platform on the AWS Cloud March 2018
Page 3 of 27
This Quick Start is primarily for developers, engineers, architects, or DevOps or systems
engineering staff who want to deploy OpenShift on the AWS Cloud. As an optional feature,
the Quick Start also allows deployments using the upstream version of Ansible Playbook,
for development purposes only.
OpenShift Container Platform on AWS The Quick Start includes AWS CloudFormation templates that build the AWS infrastructure
using AWS best practices, and then pass that environment to Ansible playbooks to build out
the OpenShift environment. The AWS CloudFormation templates use AWS Lambda to
generate a dynamic SSH key pair that is loaded into an Auto Scaling group. The Ansible
inventory file is auto-generated accordingly. The combination of AWS CloudFormation and
Ansible enables you to deploy and tear down your OpenShift environment by using
CloudFormation stacks.
OpenShift Components
The Quick Start deploys the following OpenShift Container Platform components:
Master provides master components such as the following:
– API server (responsible for handling requests from clients, including nodes,
users, administrators, and other infrastructure systems deployed to OpenShift)
– Controller manager server (includes the scheduler and replication controller)
– OpenShift client tools (oc and oadm).
etcd stores the persistent master state while other components watch etcd for changes
to bring themselves into the desired state.
Nodes provide the runtime environments for containers.
Costs and Licenses
You are responsible for the cost of the AWS services used while running this Quick Start
reference deployment. There is no additional cost for using the Quick Start.
The AWS CloudFormation template for this Quick Start includes configuration parameters
that you can customize. Some of these settings, such as instance type, will affect the cost of
deployment. For cost estimates, see the pricing pages for each AWS service you will be
using. Prices are subject to change.
This Quick Start requires a Red Hat subscription.
Amazon Web Services – Red Hat OpenShift Container Platform on the AWS Cloud March 2018
Page 4 of 27
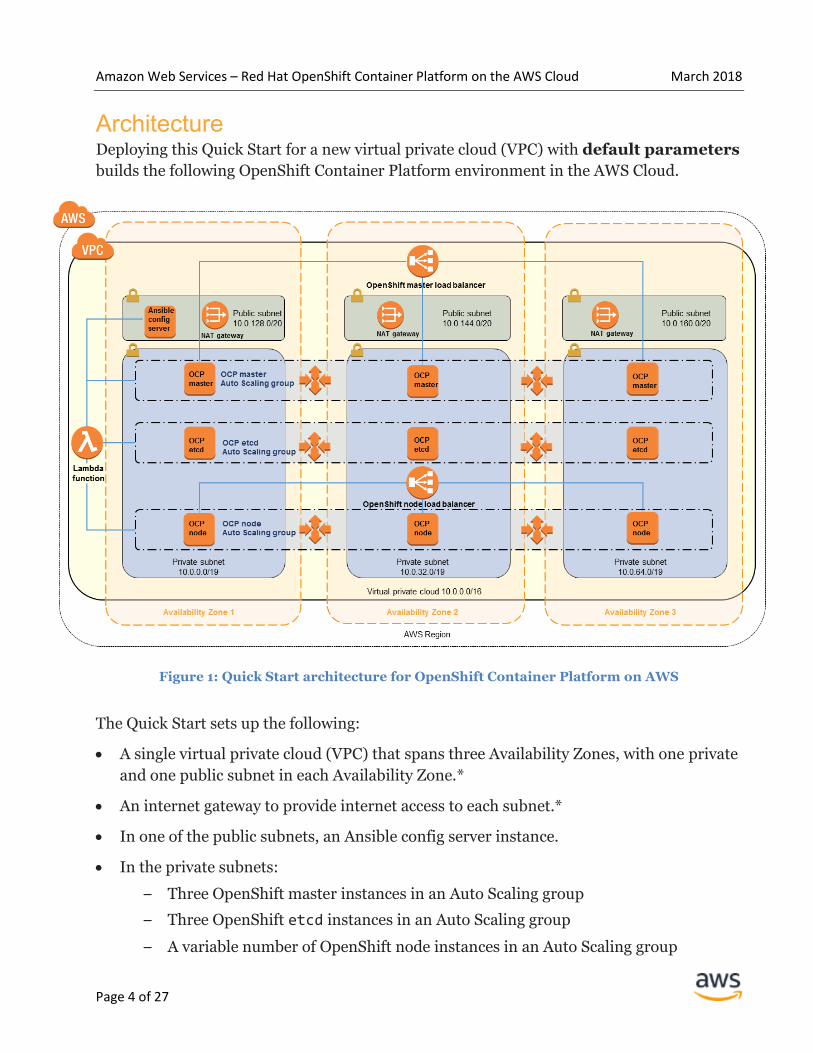
Architecture Deploying this Quick Start for a new virtual private cloud (VPC) with default parameters
builds the following OpenShift Container Platform environment in the AWS Cloud.
Figure 1: Quick Start architecture for OpenShift Container Platform on AWS
The Quick Start sets up the following:
A single virtual private cloud (VPC) that spans three Availability Zones, with one private
and one public subnet in each Availability Zone.*
An internet gateway to provide internet access to each subnet.*
In one of the public subnets, an Ansible config server instance.
In the private subnets:
– Three OpenShift master instances in an Auto Scaling group
– Three OpenShift etcd instances in an Auto Scaling group
– A variable number of OpenShift node instances in an Auto Scaling group
Amazon Web Services – Red Hat OpenShift Container Platform on the AWS Cloud March 2018
Page 5 of 27
Note The template that deploys the Quick Start into an existing VPC skips the
tasks marked by asterisks.
Auto Scaling Use In this release, the Quick Start places the OpenShift instances in Auto Scaling groups, but
doesn’t enable scaling. The number of master and etcd instances are fixed at three (one per
Availability Zone). Nodes can be set to a variable number and will be distributed among the
selected Availability Zones.
Auto Scaling Workflow
The Auto Scaling components of the Quick Start use Amazon CloudWatch Events and AWS
Systems Manager Run Command to call on-instance scripts to configure instances that
have just launched within the OpenShift cluster.
When an Auto Scaling group increases or reduces its capacity, a CloudWatch Event is
triggered, sending a signal to a specific Systems Manager target to execute a shell script.
The target is the Ansible config server of the cluster, identified by its instance ID. The script
executed within the Ansible config server is /bin/aws-ose-qs-scale --scale-in-
progress.
This script queries the Amazon EC2 Auto Scaling APIs to determine whether any changes
were made to the Auto Scaling groups within the cluster. If changes are found, the script
takes appropriate action based on the events that have occurred:
In the case of a scale-out event, the script generates cluster-related metadata for the new
instances and adds it to the Ansible hosts inventory located at /etc/ansible/hosts.
Next, the script verifies that each instance is reachable, and then triggers the
appropriate Ansible Playbook(s).
If instances have been removed from the cluster, the script removes their node
definitions from the Ansible hosts inventory.
The Quick Start Auto Scaling scripts store workflow logs in /var/log/openshift-
quickstart-scaling.log.
Ansible Playbook-specific logs are stored in /var/log/aws-quickstart-openshift-
scaling.
Amazon Web Services – Red Hat OpenShift Container Platform on the AWS Cloud March 2018
Page 6 of 27
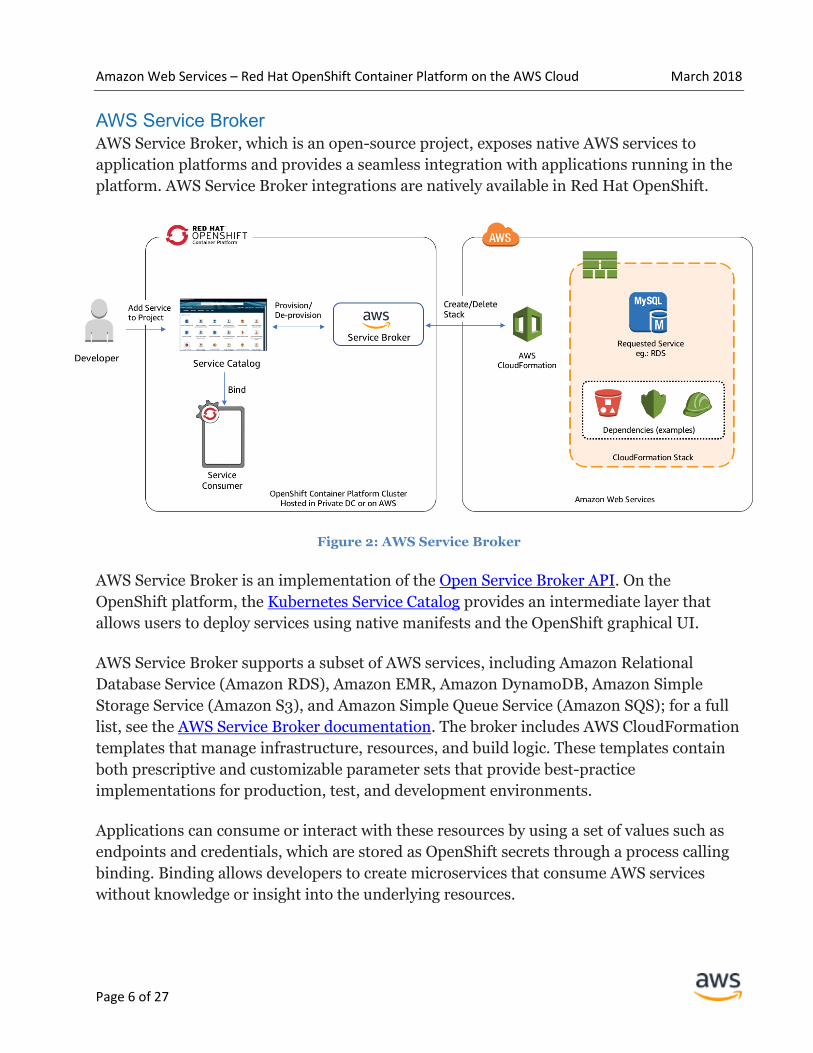
AWS Service Broker AWS Service Broker, which is an open-source project, exposes native AWS services to
application platforms and provides a seamless integration with applications running in the
platform. AWS Service Broker integrations are natively available in Red Hat OpenShift.
Figure 2: AWS Service Broker
AWS Service Broker is an implementation of the Open Service Broker API. On the
OpenShift platform, the Kubernetes Service Catalog provides an intermediate layer that
allows users to deploy services using native manifests and the OpenShift graphical UI.
AWS Service Broker supports a subset of AWS services, including Amazon Relational
Database Service (Amazon RDS), Amazon EMR, Amazon DynamoDB, Amazon Simple
Storage Service (Amazon S3), and Amazon Simple Queue Service (Amazon SQS); for a full
list, see the AWS Service Broker documentation. The broker includes AWS CloudFormation
templates that manage infrastructure, resources, and build logic. These templates contain
both prescriptive and customizable parameter sets that provide best-practice
implementations for production, test, and development environments.
Applications can consume or interact with these resources by using a set of values such as
endpoints and credentials, which are stored as OpenShift secrets through a process calling
binding. Binding allows developers to create microservices that consume AWS services
without knowledge or insight into the underlying resources.
Amazon Web Services – Red Hat OpenShift Container Platform on the AWS Cloud March 2018
Page 7 of 27
Service Role for AWS Service Broker
AWS Service Broker requires an AWS CloudFormation service role. This IAM role requires
permissions to manage AWS services that you would like to deploy through AWS Service
Broker. By default, the Quick Start creates a role with the AdministratorAccess IAM
policy attached. If you want to limit cluster users to a subset of the available services, you
can specify a custom role that allows access to only your subset of services by using the
ExistingAWSServiceBrokerRole parameter during deployment.
Prerequisites
Specialized Knowledge
Before you deploy this Quick Start, we recommend that you become familiar with the
following AWS services. (If you are new to AWS, see Getting Started with AWS.)
Amazon EBS
Amazon EC2
Amazon Lambda
Amazon Route 53
Amazon VPC
AWS Certificate Manager (ACM)
Deployment Options This Quick Start provides two deployment options:
Deploy OpenShift Container Platform into a new VPC (end-to-end
deployment). This option builds a new AWS environment consisting of the VPC,
subnets, NAT gateways, security groups, and other infrastructure components, and
then deploys OpenShift Container Platform into this new VPC.
Deploy OpenShift Container Platform into an existing VPC. This option
provisions OpenShift Container Platform in your existing AWS infrastructure.
The Quick Start provides separate templates for these options. It also lets you configure
CIDR blocks, instance types, and OpenShift Container Platform settings, as discussed later
in this guide.
Amazon Web Services – Red Hat OpenShift Container Platform on the AWS Cloud March 2018
Page 8 of 27
Deployment Steps
Step 1. Sign up for a Red Hat Subscription
This Quick Start requires a Red Hat account and valid Red Hat subscription. During the
deployment of the Quick Start, you’ll need to provide your Red Hat subscription user name,
password, and pool ID. You can sign up for a subscription at
https://www.redhat.com/wapps/ugc/register.html.
If you don’t have an Red Hat account, you can register on the Red Hat website. (Note that
registration may require a non-personal email address.)
Registrations and subscriptions are handled through the Red Hat Subscription Manager. If
you do have a Red Hat account, but you don’t have easy access to the Subscription
Manager, you can launch a RHEL instance on AWS to determine whether your account
includes the necessary subscription and associated pool ID.
Launch an RHEL instance and run the following on the instance to access your account:
$ sudo subscription-manager register
You’ll be prompted for your account name and password.
Now you can get a list of your available subscriptions:
$ sudo subscription-manager list --available --all
The output may include a number of sections. If it includes something like Red Hat
OpenShift Enterprise, look for a pool ID (Pool ID: xxx) after that string, and make a
note of the ID. You’ll need to specify that value during deployment in step 3.
You also need to confirm that you have entitlements available. If the Entitlements
Available value is zero or doesn’t appear at all, you might not be able to use the Quick
Start.
After you determine what you need, you can unregister the host:
$ sudo subscription-manager unregister
and then terminate the RHEL instance.
Amazon Web Services – Red Hat OpenShift Container Platform on the AWS Cloud March 2018
Page 9 of 27
Important This Quick Start will allocate from your subscription entitlements.
Before you use the Quick Start, make sure that you will not be taking entitlements
away from a pool that needs to be available for your company’s usage.
We recommend that you go to your Red Hat account portal and ensure that your
hosts and subscription entitlements have been removed after you are finished with
Subscription Manager and your instances have been terminated.
Step 2. Prepare Your AWS Account
1. If you don’t already have an AWS account, create one at https://aws.amazon.com by
following the on-screen instructions.
2. Use the region selector in the navigation bar to choose the AWS Region where you want
to deploy OpenShift Container Platform on AWS.
3. Create a key pair in your preferred region.
4. If necessary, request a service limit increase for the Amazon EC2 M4 instance type. You
might need to do this if you already have an existing deployment that uses this instance
type, and you think you might exceed the default limit with this reference deployment.
Step 3. Launch the Quick Start
Note You are responsible for the cost of the AWS services used while running this
Quick Start reference deployment. There is no additional cost for using this Quick
Start. For full details, see the pricing pages for each AWS service you will be using in
this Quick Start. Prices are subject to change.
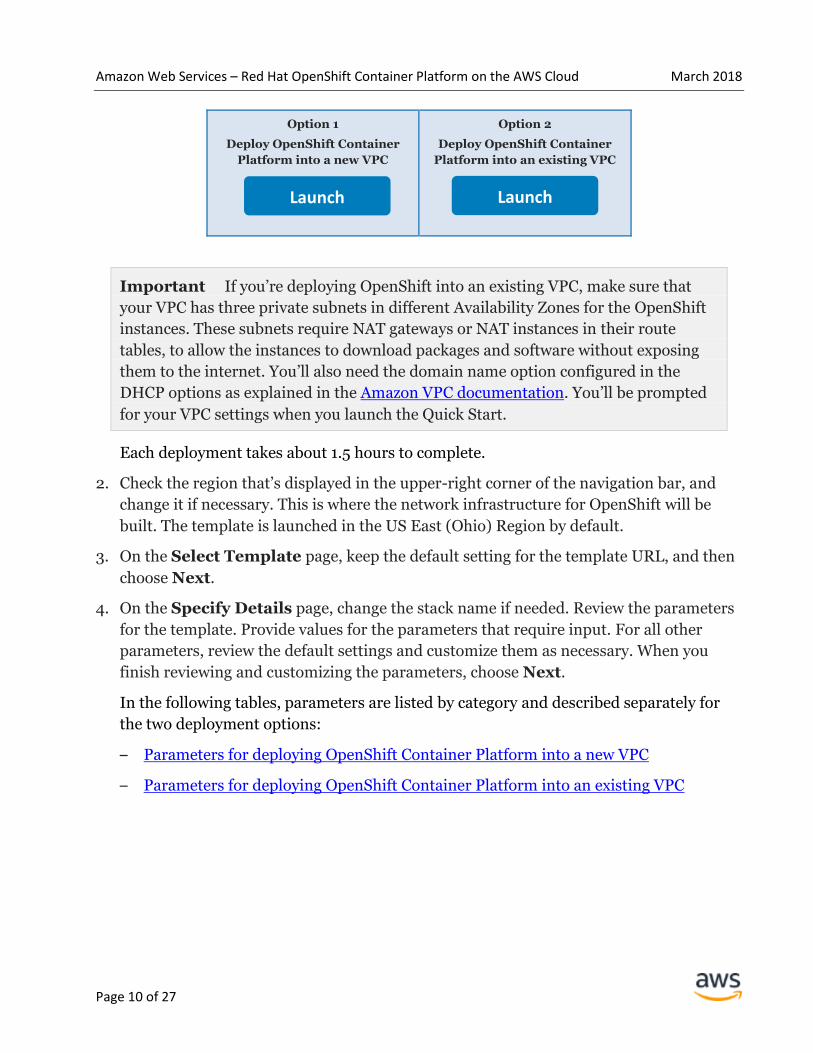
1. Choose one of the following options to launch the AWS CloudFormation template into
your AWS account. For help choosing an option, see deployment options earlier in this
guide.
Important Before you launch the Quick Start, make sure that you have a
delegated domain that is publicly resolvable.
Amazon Web Services – Red Hat OpenShift Container Platform on the AWS Cloud March 2018
Page 10 of 27
Option 1
Deploy OpenShift Container
Platform into a new VPC
Option 2
Deploy OpenShift Container
Platform into an existing VPC
Important If you’re deploying OpenShift into an existing VPC, make sure that
your VPC has three private subnets in different Availability Zones for the OpenShift
instances. These subnets require NAT gateways or NAT instances in their route
tables, to allow the instances to download packages and software without exposing
them to the internet. You’ll also need the domain name option configured in the
DHCP options as explained in the Amazon VPC documentation. You’ll be prompted
for your VPC settings when you launch the Quick Start.
Each deployment takes about 1.5 hours to complete.
2. Check the region that’s displayed in the upper-right corner of the navigation bar, and
change it if necessary. This is where the network infrastructure for OpenShift will be
built. The template is launched in the US East (Ohio) Region by default.
3. On the Select Template page, keep the default setting for the template URL, and then
choose Next.
4. On the Specify Details page, change the stack name if needed. Review the parameters
for the template. Provide values for the parameters that require input. For all other
parameters, review the default settings and customize them as necessary. When you
finish reviewing and customizing the parameters, choose Next.
In the following tables, parameters are listed by category and described separately for
the two deployment options:
– Parameters for deploying OpenShift Container Platform into a new VPC
– Parameters for deploying OpenShift Container Platform into an existing VPC
Launch Launch
Amazon Web Services – Red Hat OpenShift Container Platform on the AWS Cloud March 2018
Page 11 of 27
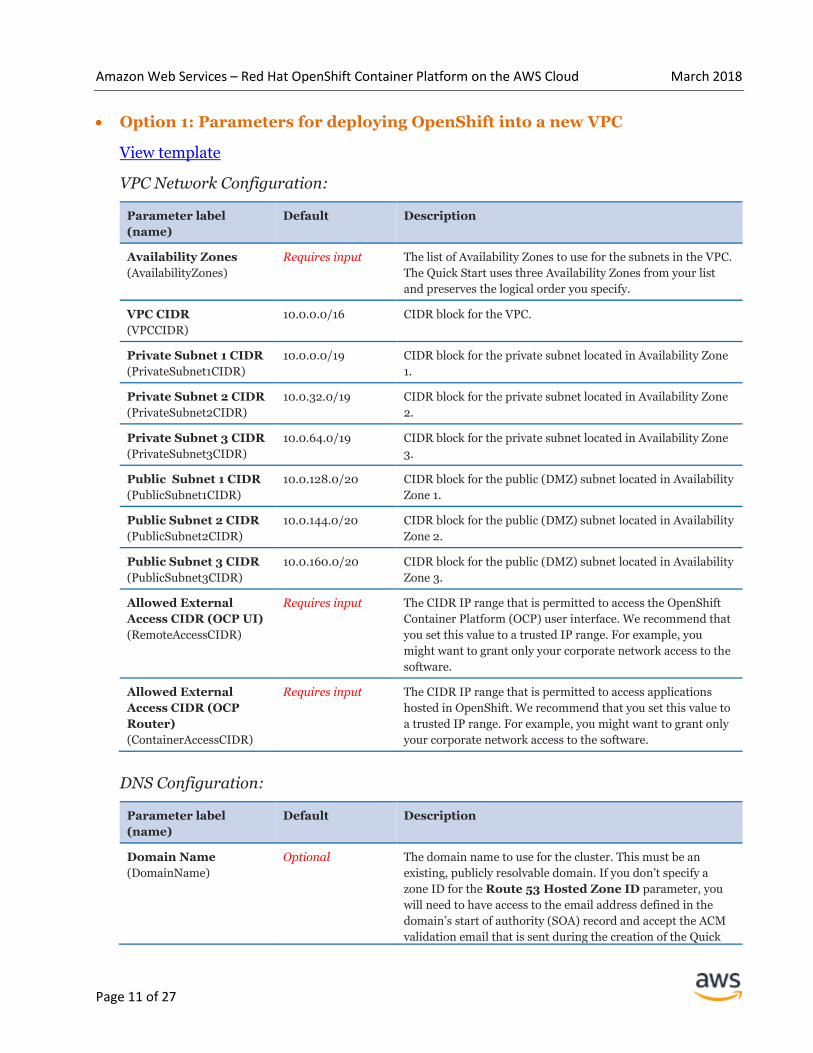
Option 1: Parameters for deploying OpenShift into a new VPC
View template
VPC Network Configuration:
Parameter label
(name)
Default Description
Availability Zones
(AvailabilityZones)
Requires input The list of Availability Zones to use for the subnets in the VPC.
The Quick Start uses three Availability Zones from your list
and preserves the logical order you specify.
VPC CIDR
(VPCCIDR)
10.0.0.0/16 CIDR block for the VPC.
Private Subnet 1 CIDR
(PrivateSubnet1CIDR)
10.0.0.0/19 CIDR block for the private subnet located in Availability Zone
1.
Private Subnet 2 CIDR
(PrivateSubnet2CIDR)
10.0.32.0/19 CIDR block for the private subnet located in Availability Zone
2.
Private Subnet 3 CIDR
(PrivateSubnet3CIDR)
10.0.64.0/19 CIDR block for the private subnet located in Availability Zone
3.
Public Subnet 1 CIDR
(PublicSubnet1CIDR)
10.0.128.0/20 CIDR block for the public (DMZ) subnet located in Availability
Zone 1.
Public Subnet 2 CIDR
(PublicSubnet2CIDR)
10.0.144.0/20 CIDR block for the public (DMZ) subnet located in Availability
Zone 2.
Public Subnet 3 CIDR
(PublicSubnet3CIDR)
10.0.160.0/20 CIDR block for the public (DMZ) subnet located in Availability
Zone 3.
Allowed External
Access CIDR (OCP UI)
(RemoteAccessCIDR)
Requires input The CIDR IP range that is permitted to access the OpenShift
Container Platform (OCP) user interface. We recommend that
you set this value to a trusted IP range. For example, you
might want to grant only your corporate network access to the
software.
Allowed External
Access CIDR (OCP
Router)
(ContainerAccessCIDR)
Requires input The CIDR IP range that is permitted to access applications
hosted in OpenShift. We recommend that you set this value to
a trusted IP range. For example, you might want to grant only
your corporate network access to the software.
DNS Configuration:
Parameter label
(name)
Default Description
Domain Name
(DomainName)
Optional The domain name to use for the cluster. This must be an
existing, publicly resolvable domain. If you don’t specify a
zone ID for the Route 53 Hosted Zone ID parameter, you
will need to have access to the email address defined in the
domain’s start of authority (SOA) record and accept the ACM
validation email that is sent during the creation of the Quick
Amazon Web Services – Red Hat OpenShift Container Platform on the AWS Cloud March 2018
Page 12 of 27
Parameter label
(name)
Default Description
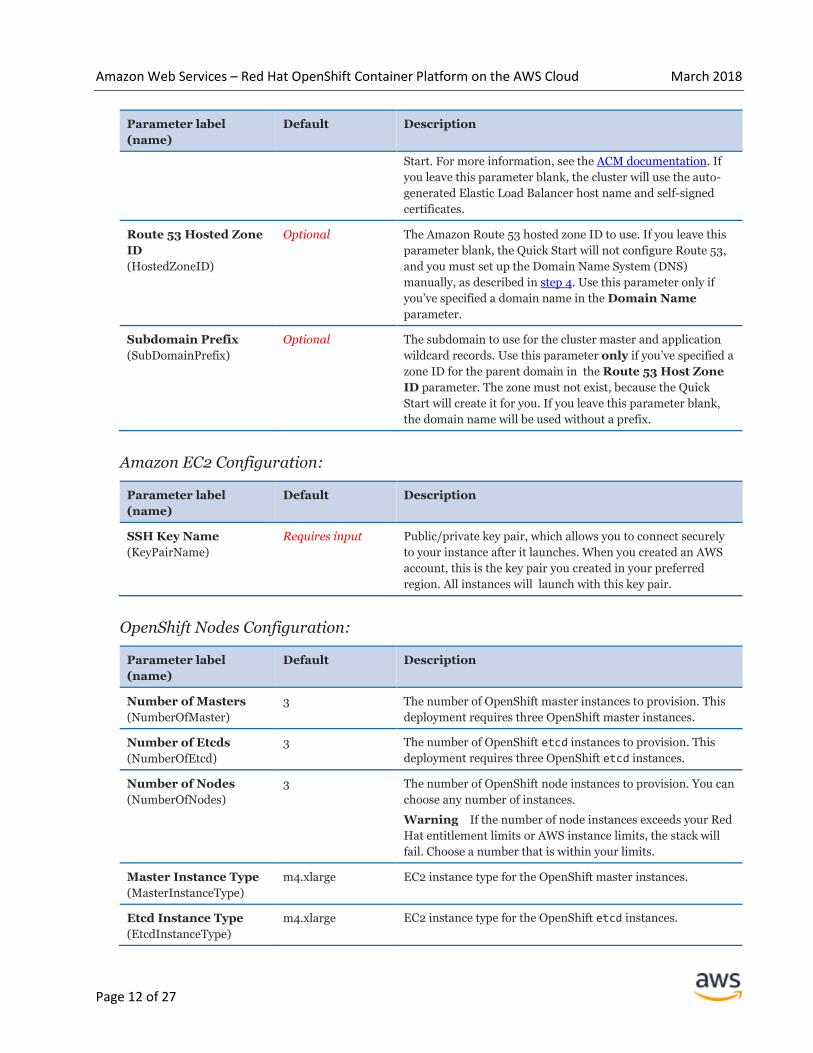
Start. For more information, see the ACM documentation. If
you leave this parameter blank, the cluster will use the auto-
generated Elastic Load Balancer host name and self-signed
certificates.
Route 53 Hosted Zone
ID
(HostedZoneID)
Optional The Amazon Route 53 hosted zone ID to use. If you leave this
parameter blank, the Quick Start will not configure Route 53,
and you must set up the Domain Name System (DNS)
manually, as described in step 4. Use this parameter only if
you’ve specified a domain name in the Domain Name
parameter.
Subdomain Prefix
(SubDomainPrefix)
Optional The subdomain to use for the cluster master and application
wildcard records. Use this parameter only if you’ve specified a
zone ID for the parent domain in the Route 53 Host Zone
ID parameter. The zone must not exist, because the Quick
Start will create it for you. If you leave this parameter blank,
the domain name will be used without a prefix.
Amazon EC2 Configuration:
Parameter label
(name)
Default Description
SSH Key Name
(KeyPairName)
Requires input Public/private key pair, which allows you to connect securely
to your instance after it launches. When you created an AWS
account, this is the key pair you created in your preferred
region. All instances will launch with this key pair.
OpenShift Nodes Configuration:
Parameter label
(name)
Default Description
Number of Masters
(NumberOfMaster)
3 The number of OpenShift master instances to provision. This
deployment requires three OpenShift master instances.
Number of Etcds
(NumberOfEtcd)
3 The number of OpenShift etcd instances to provision. This
deployment requires three OpenShift etcd instances.
Number of Nodes
(NumberOfNodes)
3 The number of OpenShift node instances to provision. You can
choose any number of instances.
Warning If the number of node instances exceeds your Red
Hat entitlement limits or AWS instance limits, the stack will
fail. Choose a number that is within your limits.
Master Instance Type
(MasterInstanceType)
m4.xlarge EC2 instance type for the OpenShift master instances.
Etcd Instance Type
(EtcdInstanceType)
m4.xlarge EC2 instance type for the OpenShift etcd instances.
Amazon Web Services – Red Hat OpenShift Container Platform on the AWS Cloud March 2018
Page 13 of 27
Parameter label
(name)
Default Description
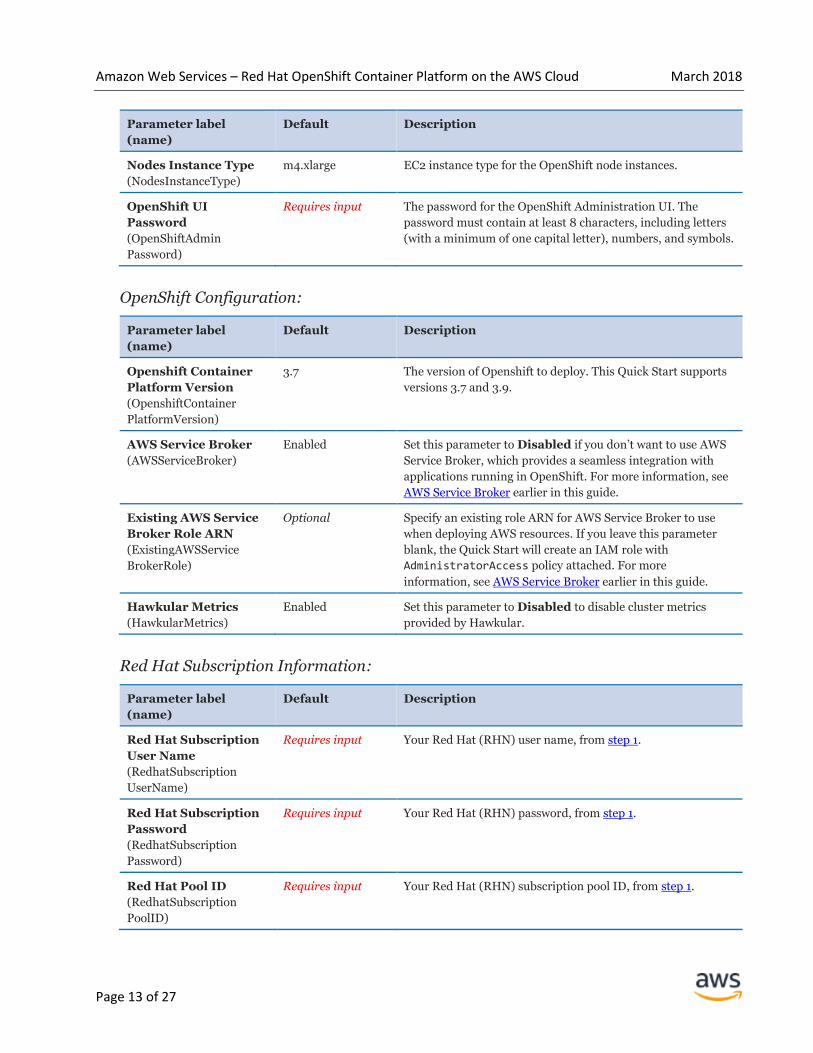
Nodes Instance Type
(NodesInstanceType)
m4.xlarge EC2 instance type for the OpenShift node instances.
OpenShift UI
Password
(OpenShiftAdmin
Password)
Requires input The password for the OpenShift Administration UI. The
password must contain at least 8 characters, including letters
(with a minimum of one capital letter), numbers, and symbols.
OpenShift Configuration:
Parameter label
(name)
Default Description
Openshift Container
Platform Version
(OpenshiftContainer
PlatformVersion)
3.7 The version of Openshift to deploy. This Quick Start supports
versions 3.7 and 3.9.
AWS Service Broker
(AWSServiceBroker)
Enabled Set this parameter to Disabled if you don’t want to use AWS
Service Broker, which provides a seamless integration with
applications running in OpenShift. For more information, see
AWS Service Broker earlier in this guide.
Existing AWS Service
Broker Role ARN
(ExistingAWSService
BrokerRole)
Optional Specify an existing role ARN for AWS Service Broker to use
when deploying AWS resources. If you leave this parameter
blank, the Quick Start will create an IAM role with
AdministratorAccess policy attached. For more
information, see AWS Service Broker earlier in this guide.
Hawkular Metrics
(HawkularMetrics)
Enabled Set this parameter to Disabled to disable cluster metrics
provided by Hawkular.
Red Hat Subscription Information:
Parameter label
(name)
Default Description
Red Hat Subscription
User Name
(RedhatSubscription
UserName)
Requires input Your Red Hat (RHN) user name, from step 1.
Red Hat Subscription
Password
(RedhatSubscription
Password)
Requires input Your Red Hat (RHN) password, from step 1.
Red Hat Pool ID
(RedhatSubscription
PoolID)
Requires input Your Red Hat (RHN) subscription pool ID, from step 1.

Amazon Web Services – Red Hat OpenShift Container Platform on the AWS Cloud March 2018
Page 14 of 27
AWS Quick Start Configuration:
Parameter label
(name)
Default Description
Quick Start S3 Bucket
Name
(QSS3BucketName)
aws-quickstart S3 bucket where the Quick Start templates and scripts are
installed. You can specify the S3 bucket name you’ve created
for your copy of Quick Start assets, if you decide to customize
or extend the Quick Start for your own use. The bucket name
can include numbers, lowercase or uppercase letters, and
hyphens, but should not start or end with a hyphen.
Quick Start S3 Key
Prefix
(QSS3KeyPrefix)
quickstart-redhat-
openshift/
The S3 key name prefix used to simulate a folder for your copy
of Quick Start assets, if you decide to customize or extend the
Quick Start for your own use. This prefix can include numbers,
lowercase letters, uppercase letters, hyphens, and forward
slashes.
Output S3 Bucket
Name
(OutputBucketName)
Optional The name of the S3 bucket to place the zip files for all Lambda
functions included in this Quick Start. If you leave this
parameter blank, the Quick Start will auto-generate a bucket
name.
Option 2: Parameters for deploying OpenShift into an existing VPC
View template
Network Configuration:
Parameter label
(name)
Default Description
VPC ID
(VPCID)
Requires input ID of your existing VPC (e.g., vpc-0343606e).
VPC CIDR
(VPCCIDR)
10.0.0.0/16 CIDR block for the VPC.
Private Subnet 1 ID
(PrivateSubnet1ID)
Requires input ID of the private subnet in Availability Zone 1 in your
existing VPC (e.g., subnet-a0246dcd).
Private Subnet 2 ID
(PrivateSubnet2ID)
Requires input ID of the private subnet in Availability Zone 2 in your
existing VPC (e.g., subnet-b58c3d67).
Private Subnet 3 ID
(PrivateSubnet3ID)
Requires input ID of the private subnet in Availability Zone 3 in your
existing VPC (e.g., subnet-b1f4a2cd).
Public Subnet 1 ID
(PublicSubnet1ID)
Requires input ID of the public subnet in Availability Zone 1 in your
existing VPC (e.g., subnet-9bc642ac).
Public Subnet 2 ID
(PublicSubnet2ID)
Requires input ID of the public subnet in Availability Zone 2 in your
existing VPC (e.g., subnet-e3246d8e).
Public Subnet 3 ID
(PublicSubnet3ID)
Requires input ID of the public subnet in Availability Zone 3 in your
existing VPC (e.g., subnet-e3246d7f).
Amazon Web Services – Red Hat OpenShift Container Platform on the AWS Cloud March 2018
Page 15 of 27
Parameter label
(name)
Default Description
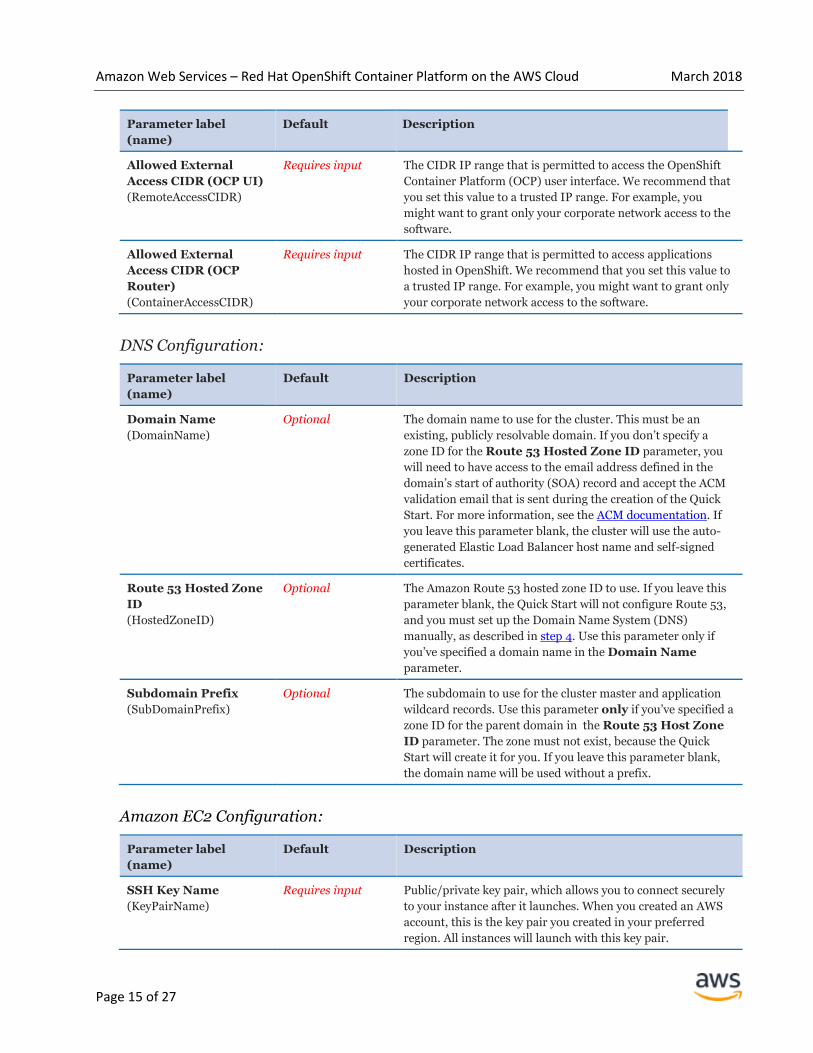
Allowed External
Access CIDR (OCP UI)
(RemoteAccessCIDR)
Requires input The CIDR IP range that is permitted to access the OpenShift
Container Platform (OCP) user interface. We recommend that
you set this value to a trusted IP range. For example, you
might want to grant only your corporate network access to the
software.
Allowed External
Access CIDR (OCP
Router)
(ContainerAccessCIDR)
Requires input The CIDR IP range that is permitted to access applications
hosted in OpenShift. We recommend that you set this value to
a trusted IP range. For example, you might want to grant only
your corporate network access to the software.
DNS Configuration:
Parameter label
(name)
Default Description
Domain Name
(DomainName)
Optional The domain name to use for the cluster. This must be an
existing, publicly resolvable domain. If you don’t specify a
zone ID for the Route 53 Hosted Zone ID parameter, you
will need to have access to the email address defined in the
domain’s start of authority (SOA) record and accept the ACM
validation email that is sent during the creation of the Quick
Start. For more information, see the ACM documentation. If
you leave this parameter blank, the cluster will use the auto-
generated Elastic Load Balancer host name and self-signed
certificates.
Route 53 Hosted Zone
ID
(HostedZoneID)
Optional The Amazon Route 53 hosted zone ID to use. If you leave this
parameter blank, the Quick Start will not configure Route 53,
and you must set up the Domain Name System (DNS)
manually, as described in step 4. Use this parameter only if
you’ve specified a domain name in the Domain Name
parameter.
Subdomain Prefix
(SubDomainPrefix)
Optional The subdomain to use for the cluster master and application
wildcard records. Use this parameter only if you’ve specified a
zone ID for the parent domain in the Route 53 Host Zone
ID parameter. The zone must not exist, because the Quick
Start will create it for you. If you leave this parameter blank,
the domain name will be used without a prefix.
Amazon EC2 Configuration:
Parameter label
(name)
Default Description
SSH Key Name
(KeyPairName)
Requires input Public/private key pair, which allows you to connect securely
to your instance after it launches. When you created an AWS
account, this is the key pair you created in your preferred
region. All instances will launch with this key pair.
Amazon Web Services – Red Hat OpenShift Container Platform on the AWS Cloud March 2018
Page 16 of 27
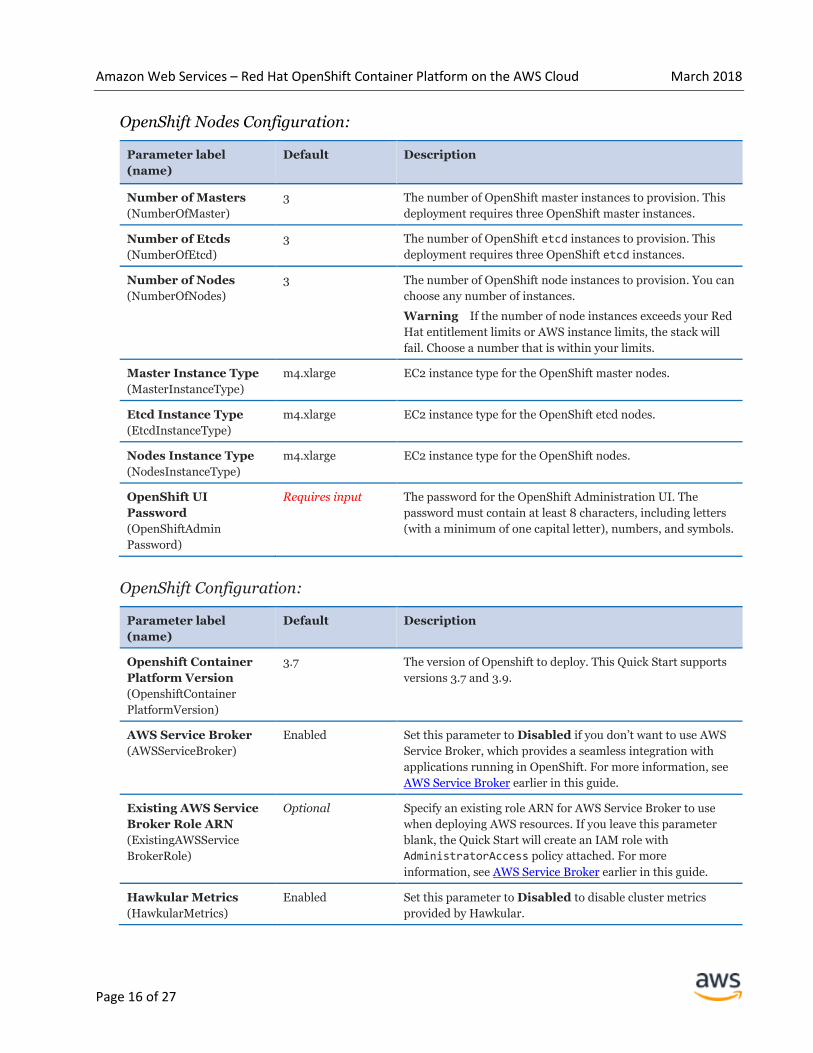
OpenShift Nodes Configuration:
Parameter label
(name)
Default Description
Number of Masters
(NumberOfMaster)
3 The number of OpenShift master instances to provision. This
deployment requires three OpenShift master instances.
Number of Etcds
(NumberOfEtcd)
3 The number of OpenShift etcd instances to provision. This
deployment requires three OpenShift etcd instances.
Number of Nodes
(NumberOfNodes)
3 The number of OpenShift node instances to provision. You can
choose any number of instances.
Warning If the number of node instances exceeds your Red
Hat entitlement limits or AWS instance limits, the stack will
fail. Choose a number that is within your limits.
Master Instance Type
(MasterInstanceType)
m4.xlarge EC2 instance type for the OpenShift master nodes.
Etcd Instance Type
(EtcdInstanceType)
m4.xlarge EC2 instance type for the OpenShift etcd nodes.
Nodes Instance Type
(NodesInstanceType)
m4.xlarge EC2 instance type for the OpenShift nodes.
OpenShift UI
Password
(OpenShiftAdmin
Password)
Requires input The password for the OpenShift Administration UI. The
password must contain at least 8 characters, including letters
(with a minimum of one capital letter), numbers, and symbols.
OpenShift Configuration:
Parameter label
(name)
Default Description
Openshift Container
Platform Version
(OpenshiftContainer
PlatformVersion)
3.7 The version of Openshift to deploy. This Quick Start supports
versions 3.7 and 3.9.
AWS Service Broker
(AWSServiceBroker)
Enabled Set this parameter to Disabled if you don’t want to use AWS
Service Broker, which provides a seamless integration with
applications running in OpenShift. For more information, see
AWS Service Broker earlier in this guide.
Existing AWS Service
Broker Role ARN
(ExistingAWSService
BrokerRole)
Optional Specify an existing role ARN for AWS Service Broker to use
when deploying AWS resources. If you leave this parameter
blank, the Quick Start will create an IAM role with
AdministratorAccess policy attached. For more
information, see AWS Service Broker earlier in this guide.
Hawkular Metrics
(HawkularMetrics)
Enabled Set this parameter to Disabled to disable cluster metrics
provided by Hawkular.
Amazon Web Services – Red Hat OpenShift Container Platform on the AWS Cloud March 2018
Page 17 of 27
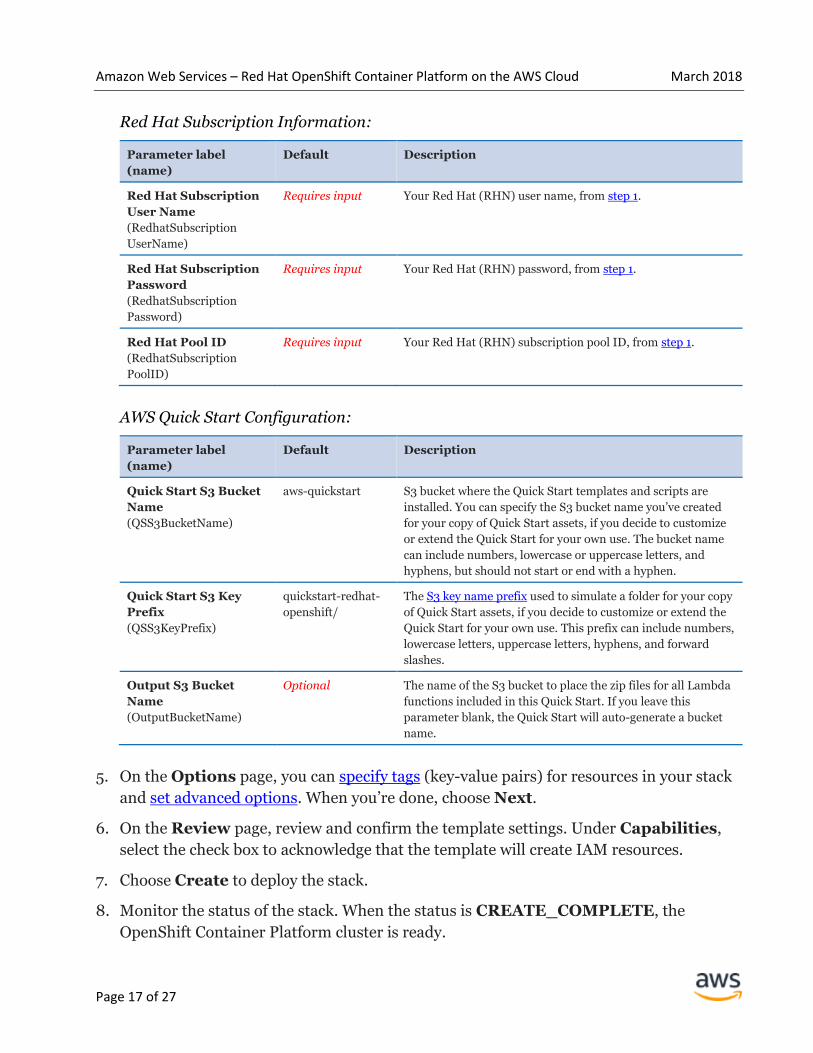
Red Hat Subscription Information:
Parameter label
(name)
Default Description
Red Hat Subscription
User Name
(RedhatSubscription
UserName)
Requires input Your Red Hat (RHN) user name, from step 1.
Red Hat Subscription
Password
(RedhatSubscription
Password)
Requires input Your Red Hat (RHN) password, from step 1.
Red Hat Pool ID
(RedhatSubscription
PoolID)
Requires input Your Red Hat (RHN) subscription pool ID, from step 1.
AWS Quick Start Configuration:
Parameter label
(name)
Default Description
Quick Start S3 Bucket
Name
(QSS3BucketName)
aws-quickstart S3 bucket where the Quick Start templates and scripts are
installed. You can specify the S3 bucket name you’ve created
for your copy of Quick Start assets, if you decide to customize
or extend the Quick Start for your own use. The bucket name
can include numbers, lowercase or uppercase letters, and
hyphens, but should not start or end with a hyphen.
Quick Start S3 Key
Prefix
(QSS3KeyPrefix)
quickstart-redhat-
openshift/
The S3 key name prefix used to simulate a folder for your copy
of Quick Start assets, if you decide to customize or extend the
Quick Start for your own use. This prefix can include numbers,
lowercase letters, uppercase letters, hyphens, and forward
slashes.
Output S3 Bucket
Name
(OutputBucketName)
Optional The name of the S3 bucket to place the zip files for all Lambda
functions included in this Quick Start. If you leave this
parameter blank, the Quick Start will auto-generate a bucket
name.
5. On the Options page, you can specify tags (key-value pairs) for resources in your stack
and set advanced options. When you’re done, choose Next.
6. On the Review page, review and confirm the template settings. Under Capabilities,
select the check box to acknowledge that the template will create IAM resources.
7. Choose Create to deploy the stack.
8. Monitor the status of the stack. When the status is CREATE_COMPLETE, the
OpenShift Container Platform cluster is ready.
Amazon Web Services – Red Hat OpenShift Container Platform on the AWS Cloud March 2018
Page 18 of 27
9. Use the URLs displayed in the Outputs tab for the stack to view the resources that were
created.
Step 4. Set up DNS
Note Skip this step if you provided a Route 53 hosted zone ID by using the
HostedZoneID parameter in step 3, or if you didn’t provide a domain name in the
DomainName parameter in step 3.
If you are managing your DNS with a DNS service other than Route 53, or if you opted to
set up DNS manually, you must create the following DNS records:
<SubDomainPrefix>.<DomainName> CNAME <OpenShiftMasterELB-DNSName>
*.<SubDomainPrefix>.<DomainName> CNAME <ContainerAccessELB-DNSName>
where SubDomainPrefix and DomainName refer to the settings of those parameters in step
3. To retrieve the DNS names for OpenShiftMasterELB and ContainerAccessELB,
open the Amazon EC2 console at https://console.aws.amazon.com/ec2/, choose Load
Balancers, and then select the load balancer from the list.
If you left the SubDomainPrefix parameter blank during deployment, the record names
must be created using only the value provided for the DomainName parameter.
Important If you specified a domain name in the DomainName parameter in step
3, you must have a delegated domain that is publicly resolvable.
Step 5. Test the Deployment
Verify that OpenShift services are running
OpenShift components are deployed into multiple private subnets. You can access the
OpenShift web console by using the OpenShiftMasterELB on port 8443. You can also
connect to one of the OpenShift master nodes and use the OpenShift command line
interface (CLI). To log in, you’ll use SSH agent forwarding to hop from the Ansible config
server to the master node. (The SSH agent will provide your private key on connection.)
Important Do not copy your private key to the Ansible config server.
For more information on SSH agents, see the GitHub documentation.
Amazon Web Services – Red Hat OpenShift Container Platform on the AWS Cloud March 2018
Page 19 of 27
1. Use an SSH agent to access the Ansible config server environment on MacOS or Linux,
by using the command:
ssh-add ~/.ssh/id_rsa
2. At the prompt, type your passphrase or press Enter for no passphrase.
Enter passphrase (empty for no passphrase): [Press Enter again or type passphrase] Enter same passphrase again: [Press Enter again or type passphrase]
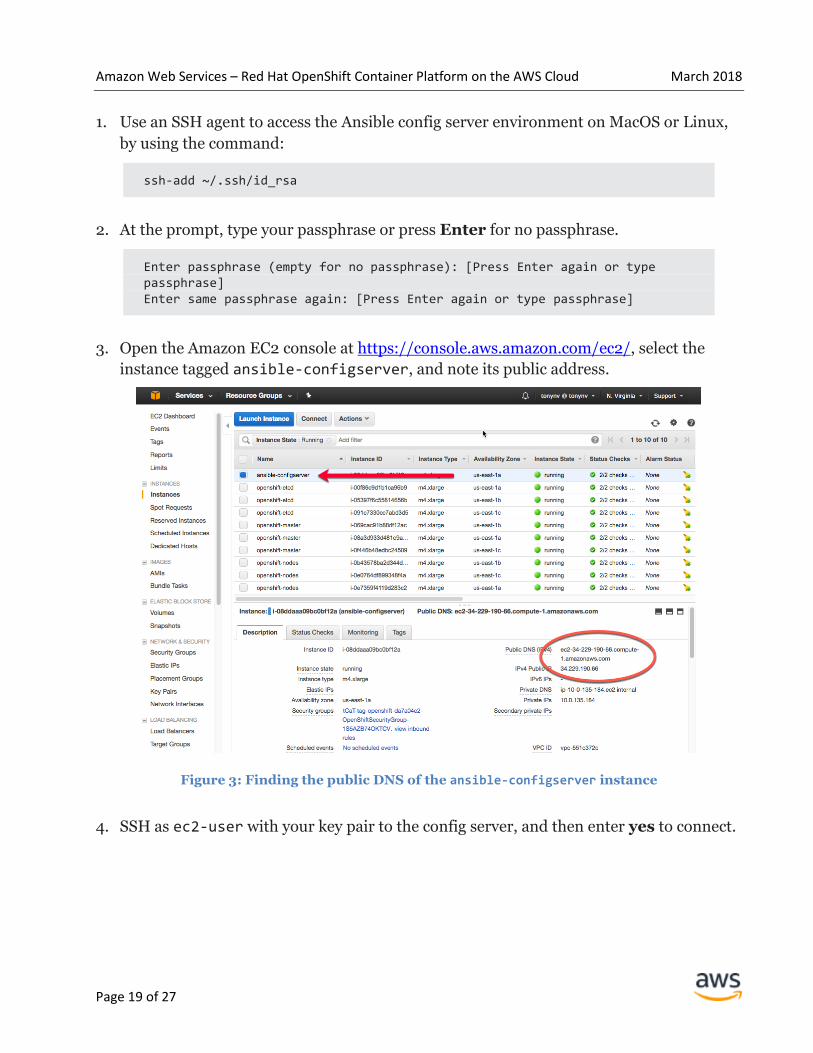
3. Open the Amazon EC2 console at https://console.aws.amazon.com/ec2/, select the
instance tagged ansible-configserver, and note its public address.
Figure 3: Finding the public DNS of the ansible-configserver instance
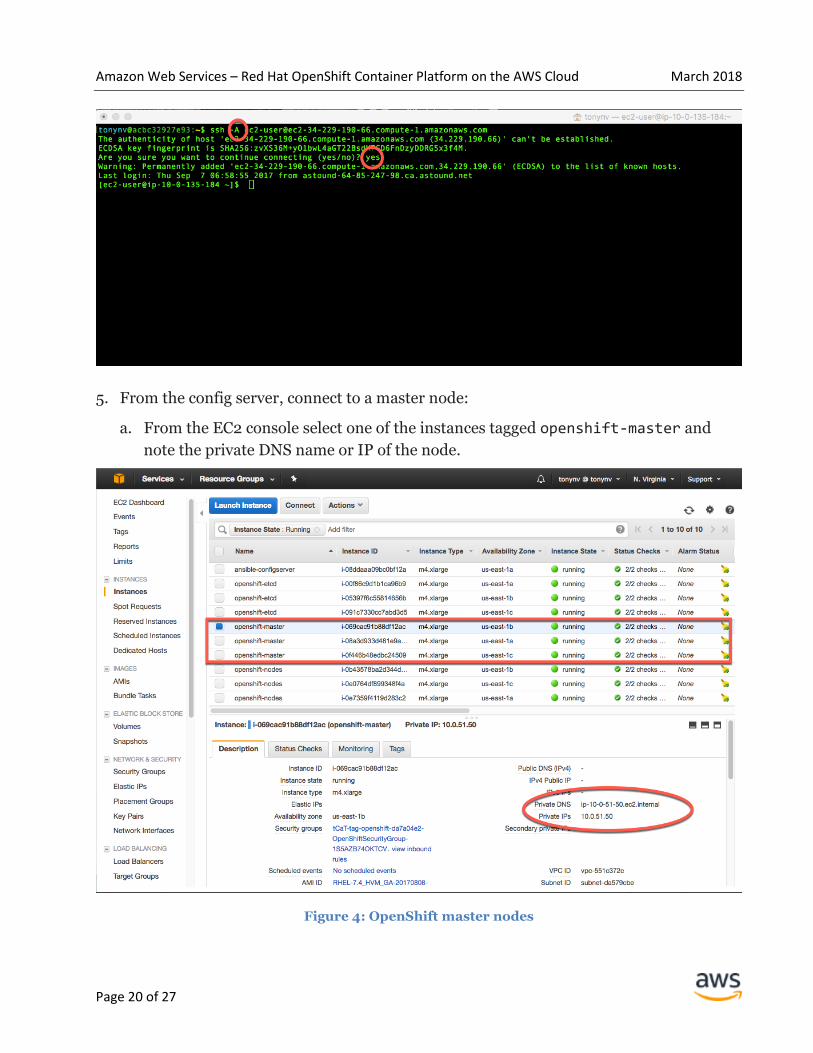
4. SSH as ec2-user with your key pair to the config server, and then enter yes to connect.
Amazon Web Services – Red Hat OpenShift Container Platform on the AWS Cloud March 2018
Page 20 of 27
5. From the config server, connect to a master node:
a. From the EC2 console select one of the instances tagged openshift-master and
note the private DNS name or IP of the node.
Figure 4: OpenShift master nodes
Amazon Web Services – Red Hat OpenShift Container Platform on the AWS Cloud March 2018
Page 21 of 27
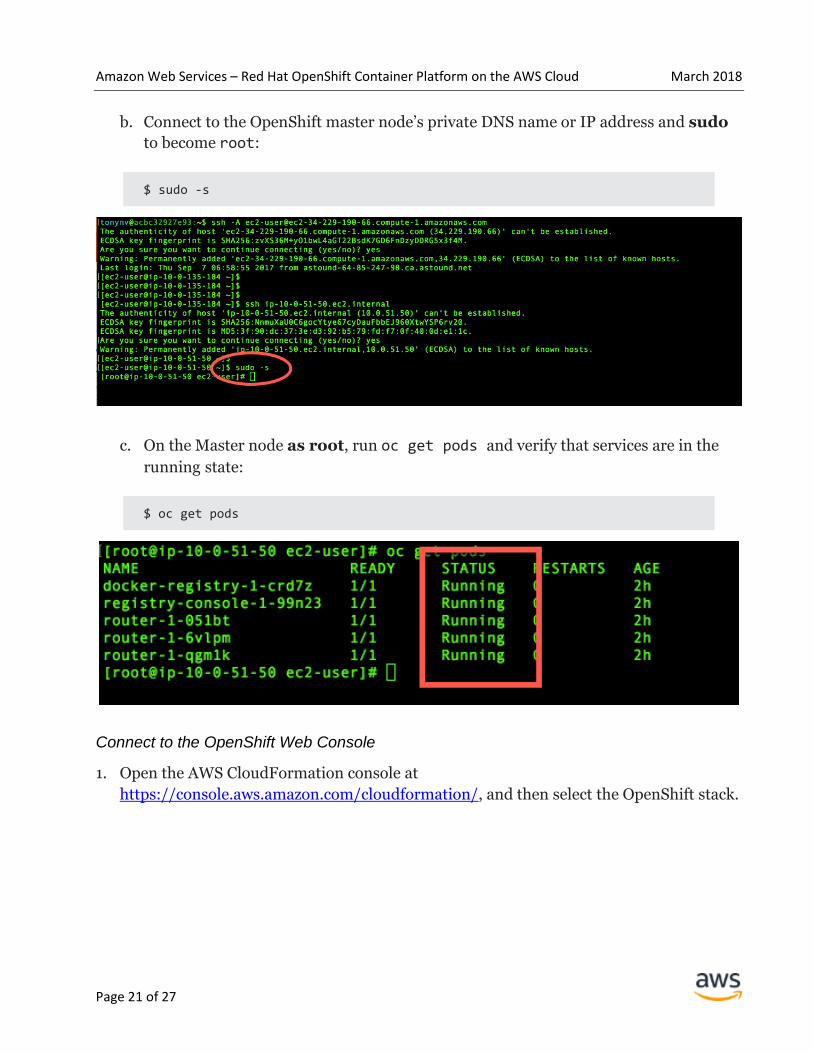
b. Connect to the OpenShift master node’s private DNS name or IP address and sudo
to become root:
$ sudo -s
c. On the Master node as root, run oc get pods and verify that services are in the
running state:
$ oc get pods
Connect to the OpenShift Web Console
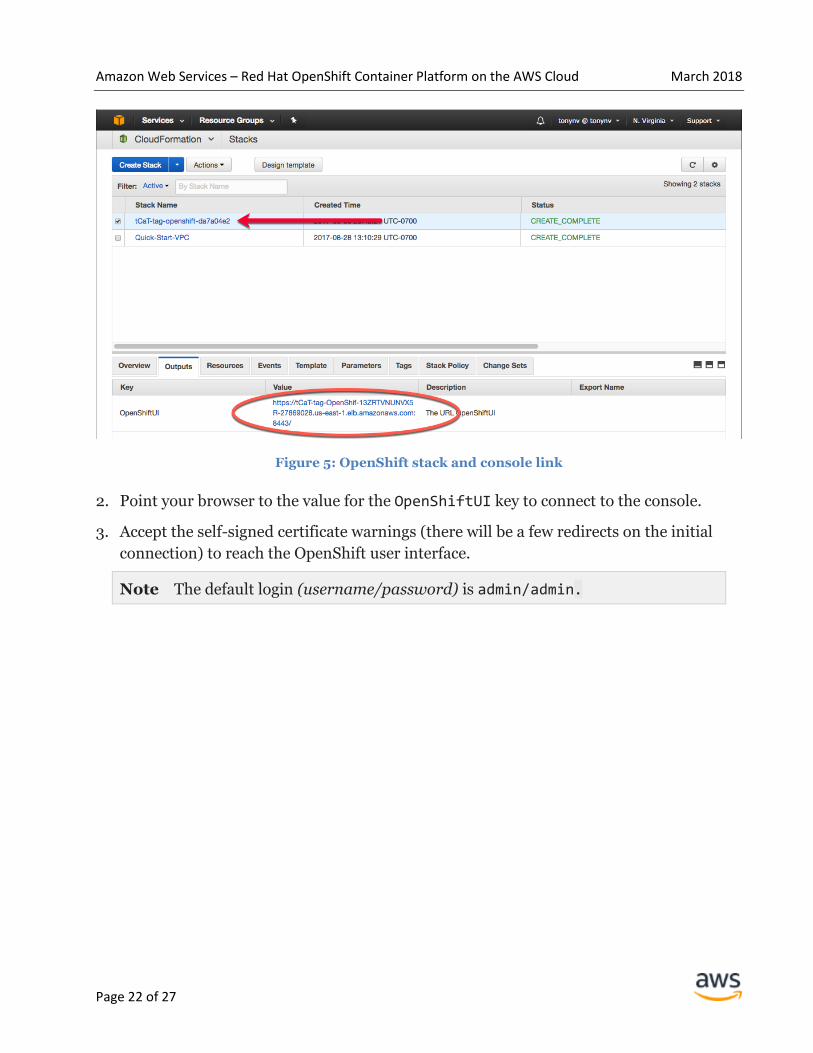
1. Open the AWS CloudFormation console at
https://console.aws.amazon.com/cloudformation/, and then select the OpenShift stack.
Amazon Web Services – Red Hat OpenShift Container Platform on the AWS Cloud March 2018
Page 22 of 27
Figure 5: OpenShift stack and console link
2. Point your browser to the value for the OpenShiftUI key to connect to the console.
3. Accept the self-signed certificate warnings (there will be a few redirects on the initial
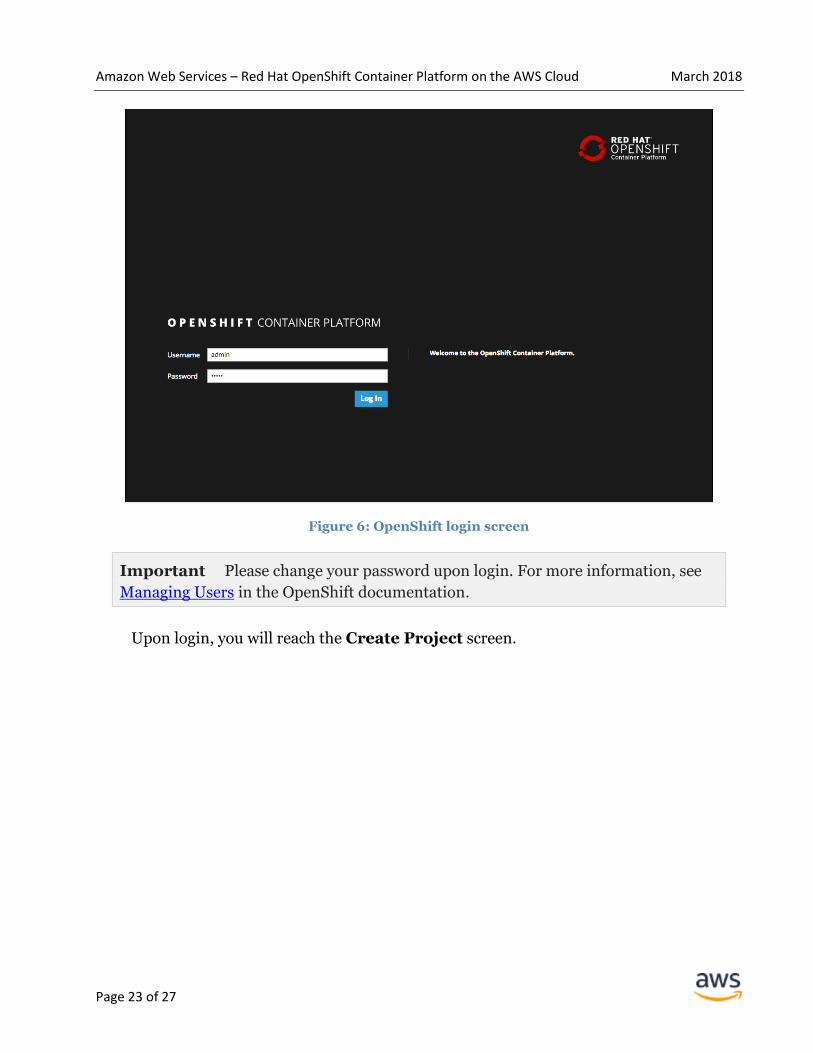
connection) to reach the OpenShift user interface.
Note The default login (username/password) is admin/admin.
Amazon Web Services – Red Hat OpenShift Container Platform on the AWS Cloud March 2018
Page 23 of 27
Figure 6: OpenShift login screen
Important Please change your password upon login. For more information, see
Managing Users in the OpenShift documentation.
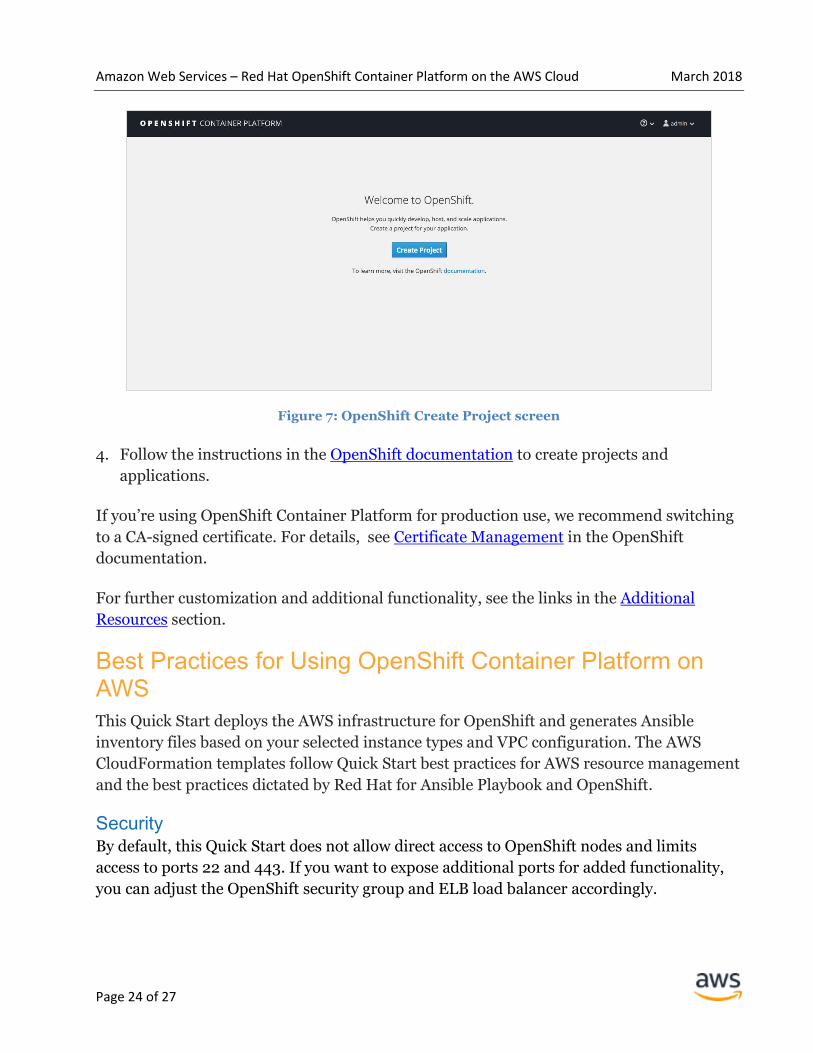
Upon login, you will reach the Create Project screen.
Amazon Web Services – Red Hat OpenShift Container Platform on the AWS Cloud March 2018
Page 24 of 27
Figure 7: OpenShift Create Project screen
4. Follow the instructions in the OpenShift documentation to create projects and
applications.
If you’re using OpenShift Container Platform for production use, we recommend switching
to a CA-signed certificate. For details, see Certificate Management in the OpenShift
documentation.
For further customization and additional functionality, see the links in the Additional
Resources section.
Best Practices for Using OpenShift Container Platform on AWS
This Quick Start deploys the AWS infrastructure for OpenShift and generates Ansible
inventory files based on your selected instance types and VPC configuration. The AWS
CloudFormation templates follow Quick Start best practices for AWS resource management
and the best practices dictated by Red Hat for Ansible Playbook and OpenShift.
Security By default, this Quick Start does not allow direct access to OpenShift nodes and limits
access to ports 22 and 443. If you want to expose additional ports for added functionality,
you can adjust the OpenShift security group and ELB load balancer accordingly.
Amazon Web Services – Red Hat OpenShift Container Platform on the AWS Cloud March 2018
Page 25 of 27
Ansible Playbook Releases This Quick Start has been tested with the officially released version of Ansible Playbook for
production environments, as specified by the default setting (Subscription-Version) of
the Ansible Playbook Mode parameter. If you’re using this deployment in a
development environment, you can select OpenSource-Version for the Ansible
Playbook Mode parameter, and specify a development release from
https://github.com/openshift/openshift-ansible/releases. However, note that this Quick
Start hasn’t been tested with all development releases, which may include changes to core
components.
Troubleshooting
Q. I encountered a CREATE_FAILED error when I launched the Quick Start.
A. If AWS CloudFormation fails to create the stack, we recommend that you relaunch the
template with Rollback on failure set to No. (This setting is under Advanced in the
AWS CloudFormation console, Options page.) With this setting, the stack’s state will be
retained and the instance will be left running, so you can troubleshoot the issue. (You'll
want to look at the log files in %ProgramFiles%\Amazon\EC2ConfigService and
C:\cfn\log.)
Important When you set Rollback on failure to No, you’ll continue to
incur AWS charges for this stack. Please make sure to delete the stack when
you’ve finished troubleshooting.
For additional information, see Troubleshooting AWS CloudFormation on the AWS
website.
Q. I encountered a size limitation error when I deployed the AWS Cloudformation
templates.
A. We recommend that you launch the Quick Start templates from the location we’ve
provided or from another S3 bucket. If you deploy the templates from a local copy on your
computer or from a non-S3 location, you might encounter template size limitations when
you create the stack. For more information about AWS CloudFormation limits, see the AWS
documentation.
Q. I encountered an error using AWS Service Broker.
A. For detailed troubleshooting steps, see the troubleshooting section of the AWS Service
Broker documentation. If the steps outlined in the documentation do not resolve your issue,
contact the team using the Issues section of the AWS Service Broker GitHub repository.
Amazon Web Services – Red Hat OpenShift Container Platform on the AWS Cloud March 2018
Page 26 of 27
Additional Resources AWS services
Amazon EC2
https://docs.aws.amazon.com/AWSEC2/latest/WindowsGuide/
AWS CloudFormation
https://aws.amazon.com/documentation/cloudformation/
Amazon VPC
https://aws.amazon.com/documentation/vpc/
AWS Service Broker
https://github.com/awslabs/aws-servicebroker-documentation/wiki
OpenShift Container Platform
Getting Started with the CLI
https://docs.openshift.com/container-platform/3.7/cli_reference/get_started_cli.html
Web console walkthrough
https://docs.openshift.com/container-
platform/3.7/getting_started/developers_console.html
Quick Start reference deployments
AWS Quick Start home page
https://aws.amazon.com/quickstart/
GitHub Repository You can visit our GitHub repository to download the templates and scripts for this Quick
Start, to post your comments, and to share your customizations with others.
Amazon Web Services – Red Hat OpenShift Container Platform on the AWS Cloud March 2018
Page 27 of 27
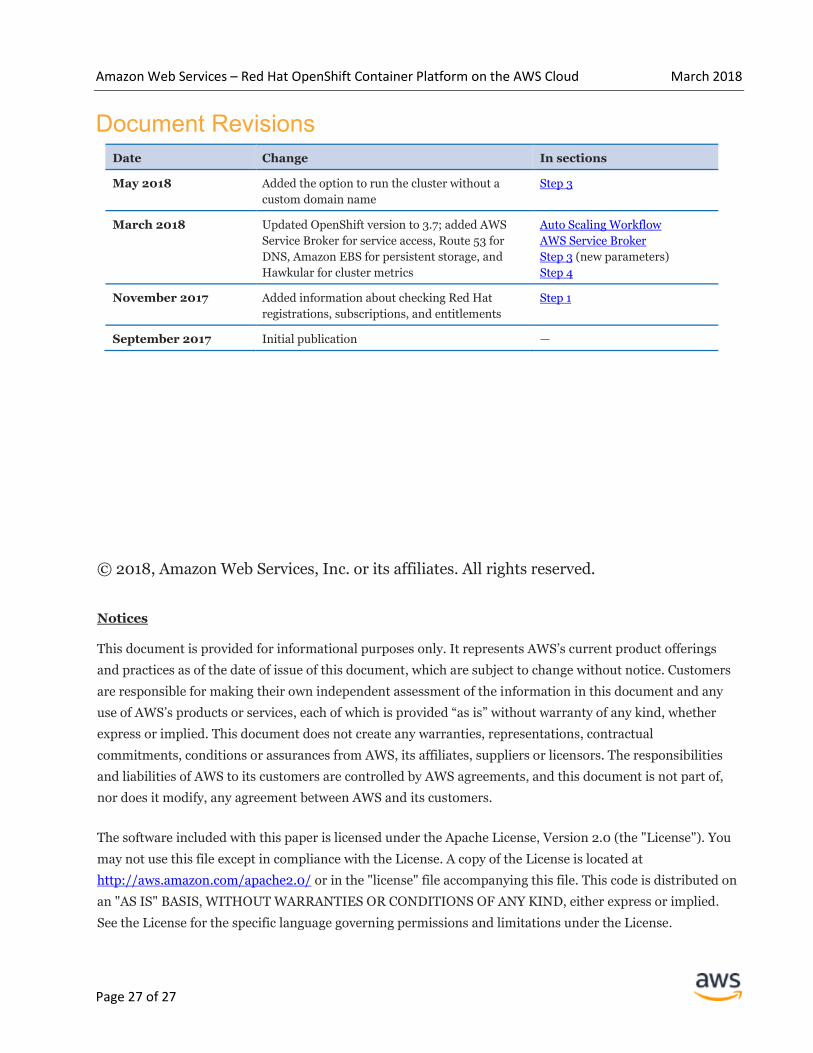
Document Revisions
Date Change In sections
May 2018 Added the option to run the cluster without a
custom domain name
Step 3
March 2018 Updated OpenShift version to 3.7; added AWS
Service Broker for service access, Route 53 for
DNS, Amazon EBS for persistent storage, and
Hawkular for cluster metrics
Auto Scaling Workflow
AWS Service Broker
Step 3 (new parameters)
Step 4
November 2017 Added information about checking Red Hat
registrations, subscriptions, and entitlements
Step 1
September 2017 Initial publication —
© 2018, Amazon Web Services, Inc. or its affiliates. All rights reserved.
Notices
This document is provided for informational purposes only. It represents AWS’s current product offerings
and practices as of the date of issue of this document, which are subject to change without notice. Customers
are responsible for making their own independent assessment of the information in this document and any
use of AWS’s products or services, each of which is provided “as is” without warranty of any kind, whether
express or implied. This document does not create any warranties, representations, contractual
commitments, conditions or assurances from AWS, its affiliates, suppliers or licensors. The responsibilities
and liabilities of AWS to its customers are controlled by AWS agreements, and this document is not part of,
nor does it modify, any agreement between AWS and its customers.
The software included with this paper is licensed under the Apache License, Version 2.0 (the "License"). You
may not use this file except in compliance with the License. A copy of the License is located at
http://aws.amazon.com/apache2.0/ or in the "license" file accompanying this file. This code is distributed on
an "AS IS" BASIS, WITHOUT WARRANTIES OR CONDITIONS OF ANY KIND, either express or implied.
See the License for the specific language governing permissions and limitations under the License.