red hat jboss data virtualization 6 · red hat jboss data virtualization provides a plug-in for the...
TRANSCRIPT

Red Hat JBoss Data Virtualization 6.2
Administration and Configuration Guide
This guide is for administrators.
Last Updated: 2017-10-20


Red Hat JBoss Data Virtualization 6.2 Administration and Configuration
Guide
This guide is for administrators.
Red Hat Customer Content Services

Legal Notice
Copyright © 2017 Red Hat, Inc.
This document is licensed by Red Hat under the Creative Commons Attribution-ShareAlike 3.0Unported License. If you distribute this document, or a modified version of it, you must provideattribution to Red Hat, Inc. and provide a link to the original. If the document is modified, all RedHat trademarks must be removed.
Red Hat, as the licensor of this document, waives the right to enforce, and agrees not to assert,Section 4d of CC-BY-SA to the fullest extent permitted by applicable law.
Red Hat, Red Hat Enterprise Linux, the Shadowman logo, JBoss, OpenShift, Fedora, the Infinitylogo, and RHCE are trademarks of Red Hat, Inc., registered in the United States and othercountries.
Linux ® is the registered trademark of Linus Torvalds in the United States and other countries.
Java ® is a registered trademark of Oracle and/or its affiliates.
XFS ® is a trademark of Silicon Graphics International Corp. or its subsidiaries in the UnitedStates and/or other countries.
MySQL ® is a registered trademark of MySQL AB in the United States, the European Union andother countries.
Node.js ® is an official trademark of Joyent. Red Hat Software Collections is not formally relatedto or endorsed by the official Joyent Node.js open source or commercial project.
The OpenStack ® Word Mark and OpenStack logo are either registered trademarks/service marksor trademarks/service marks of the OpenStack Foundation, in the United States and othercountries and are used with the OpenStack Foundation's permission. We are not affiliated with,endorsed or sponsored by the OpenStack Foundation, or the OpenStack community.
All other trademarks are the property of their respective owners.
Abstract
Read this guide to learn how to administer Red Hat JBoss Data Virtualization.

. . . . . . . . . . . . . . . . . . . . . . . . . . . . . . . . . . . . . . . . . . . . . . . . . . . . . . . . . . . . . . . . . . . . . . . . . . . . . . . . . . . . . . . . . . . . . . . . . . . . . . . . . . . . . . . . . . . . . . . . . . . . . . . . . . . . . . . . . . . . . . . . . . . . . . . . . . . . . . . . . . . . . . . . . . . . . . . . . . . . . . . . . . . . . . . . . . . . . . . . . . . . . . . . . . . . . . . . . . . . . . . . . . . . . . . . . . . . . . . . . . . . . . . . . . . . . . . . . . . . . . . . . . . . . . . . . . . . . . . .
. . . . . . . . . . . . . . . . . . . . . . . . . . . . . . . . . . . . . . . . . . . . . . . . . . . . . . . . . . . . . . . . . . . . . . . . . . . . . . . . . . . . . . . . . . . . . . . . . . . . . . . . . . . . . . . . . . . . . . . . . . . . . . . . . . . . . . . . . . . . . . . . . . . . . . . . . . . . . . . . . . . . . . . . . . . . . . . . . . . . . . . . . . . . . . . . . . . . . . . . . . . . . . . . . . . . . . . . . . . . . . . . . . . . . . . . . . . . . . . . . . . . . . . . . . . . . . . . . . . . . . . . . . . . . . . . . . . . . . . .
. . . . . . . . . . . . . . . . . . . . . . . . . . . . . . . . . . . . . . . . . . . . . . . . . . . . . . . . . . . . . . . . . . . . . . . . . . . . . . . . . . . . . . . . . . . . . . . . . . . . . . . . . . . . . . . . . . . . . . . . . . . . . . . . . . . . . . . . . . . . . . . . . . . . . . . . . . . . . . . . . . . . . . . . . . . . . . . . . . . . . . . . . . . . . . . . . . . . . . . . . . . . . . . . . . . . . . . . . . . . . . . . . . . . . . . . . . . . . . . . . . . . . . . . . . . . . . . . . . . . . . . . . . . . . . . . . . . . . . . .
. . . . . . . . . . . . . . . . . . . . . . . . . . . . . . . . . . . . . . . . . . . . . . . . . . . . . . . . . . . . . . . . . . . . . . . . . . . . . . . . . . . . . . . . . . . . . . . . . . . . . . . . . . . . . . . . . . . . . . . . . . . . . . . . . . . . . . . . . . . . . . . . . . . . . . . . . . . . . . . . . . . . . . . . . . . . . . . . . . . . . . . . . . . . . . . . . . . . . . . . . . . . . . . . . . . . . . . . . . . . . . . . . . . . . . . . . . . . . . . . . . . . . . . . . . . . . . . . . . . . . . . . . . . . . . . . . . . . . . . .
. . . . . . . . . . . . . . . . . . . . . . . . . . . . . . . . . . . . . . . . . . . . . . . . . . . . . . . . . . . . . . . . . . . . . . . . . . . . . . . . . . . . . . . . . . . . . . . . . . . . . . . . . . . . . . . . . . . . . . . . . . . . . . . . . . . . . . . . . . . . . . . . . . . . . . . . . . . . . . . . . . . . . . . . . . . . . . . . . . . . . . . . . . . . . . . . . . . . . . . . . . . . . . . . . . . . . . . . . . . . . . . . . . . . . . . . . . . . . . . . . . . . . . . . . . . . . . . . . . . . . . . . . . . . . . . . . . . . . . . .
. . . . . . . . . . . . . . . . . . . . . . . . . . . . . . . . . . . . . . . . . . . . . . . . . . . . . . . . . . . . . . . . . . . . . . . . . . . . . . . . . . . . . . . . . . . . . . . . . . . . . . . . . . . . . . . . . . . . . . . . . . . . . . . . . . . . . . . . . . . . . . . . . . . . . . . . . . . . . . . . . . . . . . . . . . . . . . . . . . . . . . . . . . . . . . . . . . . . . . . . . . . . . . . . . . . . . . . . . . . . . . . . . . . . . . . . . . . . . . . . . . . . . . . . . . . . . . . . . . . . . . . . . . . . . . . . . . . . . . . .
. . . . . . . . . . . . . . . . . . . . . . . . . . . . . . . . . . . . . . . . . . . . . . . . . . . . . . . . . . . . . . . . . . . . . . . . . . . . . . . . . . . . . . . . . . . . . . . . . . . . . . . . . . . . . . . . . . . . . . . . . . . . . . . . . . . . . . . . . . . . . . . . . . . . . . . . . . . . . . . . . . . . . . . . . . . . . . . . . . . . . . . . . . . . . . . . . . . . . . . . . . . . . . . . . . . . . . . . . . . . . . . . . . . . . . . . . . . . . . . . . . . . . . . . . . . . . . . . . . . . . . . . . . . . . . . . . . . . . . . .
. . . . . . . . . . . . . . . . . . . . . . . . . . . . . . . . . . . . . . . . . . . . . . . . . . . . . . . . . . . . . . . . . . . . . . . . . . . . . . . . . . . . . . . . . . . . . . . . . . . . . . . . . . . . . . . . . . . . . . . . . . . . . . . . . . . . . . . . . . . . . . . . . . . . . . . . . . . . . . . . . . . . . . . . . . . . . . . . . . . . . . . . . . . . . . . . . . . . . . . . . . . . . . . . . . . . . . . . . . . . . . . . . . . . . . . . . . . . . . . . . . . . . . . . . . . . . . . . . . . . . . . . . . . . . . . . . . . . . . . .
. . . . . . . . . . . . . . . . . . . . . . . . . . . . . . . . . . . . . . . . . . . . . . . . . . . . . . . . . . . . . . . . . . . . . . . . . . . . . . . . . . . . . . . . . . . . . . . . . . . . . . . . . . . . . . . . . . . . . . . . . . . . . . . . . . . . . . . . . . . . . . . . . . . . . . . . . . . . . . . . . . . . . . . . . . . . . . . . . . . . . . . . . . . . . . . . . . . . . . . . . . . . . . . . . . . . . . . . . . . . . . . . . . . . . . . . . . . . . . . . . . . . . . . . . . . . . . . . . . . . . . . . . . . . . . . . . . . . . . . .
. . . . . . . . . . . . . . . . . . . . . . . . . . . . . . . . . . . . . . . . . . . . . . . . . . . . . . . . . . . . . . . . . . . . . . . . . . . . . . . . . . . . . . . . . . . . . . . . . . . . . . . . . . . . . . . . . . . . . . . . . . . . . . . . . . . . . . . . . . . . . . . . . . . . . . . . . . . . . . . . . . . . . . . . . . . . . . . . . . . . . . . . . . . . . . . . . . . . . . . . . . . . . . . . . . . . . . . . . . . . . . . . . . . . . . . . . . . . . . . . . . . . . . . . . . . . . . . . . . . . . . . . . . . . . . . . . . . . . . . .
Table of Contents
PART I. INTRODUCTION
CHAPTER 1. READ ME1.1. BACK UP YOUR DATA1.2. VARIABLE NAME: EAP_HOME1.3. VARIABLE NAME: MODE1.4. RED HAT DOCUMENTATION SITE
PART II. INTRODUCTION TO ADMINISTERING JBOSS DATA VIRTUALIZATION
CHAPTER 2. ADMINISTRATION TOOLS2.1. ADMINISTRATION TOOLS OVERVIEW2.2. MANAGEMENT CONSOLE2.3. MANAGEMENT CLI2.4. ADMINSHELL2.5. JBOSS OPERATIONS NETWORK2.6. DASHBOARD BUILDER
PART III. USER MANAGEMENT
CHAPTER 3. USER ACCOUNTS3.1. USER ACCOUNTS3.2. DATA ROLES3.3. ADDING A JBOSS EAP MANAGEMENT USER3.4. ADDING A MODESHAPE USER
PART IV. CONFIGURING THE PRODUCT
CHAPTER 4. VIRTUAL DATABASES4.1. VIRTUAL DATABASES AND JBOSS DATA VIRTUALIZATION4.2. VIRTUAL DATABASE DEPLOYMENT4.3. DEPLOY A VDB VIA FILE DEPLOYMENT4.4. DEPLOY A VDB VIA MANAGEMENT CONSOLE4.5. DEPLOY A VDB VIA CLI4.6. DEPLOY A VDB VIA ADMINSHELL4.7. DEPLOY A VDB VIA ADMIN API4.8. VDB DEPENDENCIES4.9. DATA SOURCE DEPLOYMENT4.10. MANAGING DEPLOYED VIRTUAL DATABASES USING MANAGEMENT CONSOLE
CHAPTER 5. VERSIONING5.1. VIRTUAL DATABASE VERSIONING5.2. SET THE VDB VERSION5.3. VIRTUAL DATABASE CONNECTION TYPE5.4. SET THE VDB CONNECTION TYPE VIA ADMIN API
CHAPTER 6. RESOURCE ADAPTERS6.1. RESOURCE ADAPTERS IN JBOSS DATA VIRTUALIZATION6.2. CONFIGURING RESOURCE ADAPTERS6.3. EXAMPLE CONFIGURATION6.4. RESOURCE ADAPTER PROPERTIES6.5. CONFIGURING RESOURCE ADAPTERS USING CLI SCRIPTS6.6. FILE ADAPTER PROPERTIES6.7. GOOGLE SPREADSHEET RESOURCE ADAPTER PROPERTIES
5
66666
7
888
12142425
31
3232323236
37
3838383939404041414261
6262626262
6363636464646465
Table of Contents
1

. . . . . . . . . . . . . . . . . . . . . . . . . . . . . . . . . . . . . . . . . . . . . . . . . . . . . . . . . . . . . . . . . . . . . . . . . . . . . . . . . . . . . . . . . . . . . . . . . . . . . . . . . . . . . . . . . . . . . . . . . . . . . . . . . . . . . . . . . . . . . . . . . . . . . . . . . . . . . . . . . . . . . . . . . . . . . . . . . . . . . . . . . . . . . . . . . . . . . . . . . . . . . . . . . . . . . . . . . . . . . . . . . . . . . . . . . . . . . . . . . . . . . . . . . . . . . . . . . . . . . . . . . . . . . . . . . . . . . . . .
. . . . . . . . . . . . . . . . . . . . . . . . . . . . . . . . . . . . . . . . . . . . . . . . . . . . . . . . . . . . . . . . . . . . . . . . . . . . . . . . . . . . . . . . . . . . . . . . . . . . . . . . . . . . . . . . . . . . . . . . . . . . . . . . . . . . . . . . . . . . . . . . . . . . . . . . . . . . . . . . . . . . . . . . . . . . . . . . . . . . . . . . . . . . . . . . . . . . . . . . . . . . . . . . . . . . . . . . . . . . . . . . . . . . . . . . . . . . . . . . . . . . . . . . . . . . . . . . . . . . . . . . . . . . . . . . . . . . . . . .
. . . . . . . . . . . . . . . . . . . . . . . . . . . . . . . . . . . . . . . . . . . . . . . . . . . . . . . . . . . . . . . . . . . . . . . . . . . . . . . . . . . . . . . . . . . . . . . . . . . . . . . . . . . . . . . . . . . . . . . . . . . . . . . . . . . . . . . . . . . . . . . . . . . . . . . . . . . . . . . . . . . . . . . . . . . . . . . . . . . . . . . . . . . . . . . . . . . . . . . . . . . . . . . . . . . . . . . . . . . . . . . . . . . . . . . . . . . . . . . . . . . . . . . . . . . . . . . . . . . . . . . . . . . . . . . . . . . . . . . .
. . . . . . . . . . . . . . . . . . . . . . . . . . . . . . . . . . . . . . . . . . . . . . . . . . . . . . . . . . . . . . . . . . . . . . . . . . . . . . . . . . . . . . . . . . . . . . . . . . . . . . . . . . . . . . . . . . . . . . . . . . . . . . . . . . . . . . . . . . . . . . . . . . . . . . . . . . . . . . . . . . . . . . . . . . . . . . . . . . . . . . . . . . . . . . . . . . . . . . . . . . . . . . . . . . . . . . . . . . . . . . . . . . . . . . . . . . . . . . . . . . . . . . . . . . . . . . . . . . . . . . . . . . . . . . . . . . . . . . . .
. . . . . . . . . . . . . . . . . . . . . . . . . . . . . . . . . . . . . . . . . . . . . . . . . . . . . . . . . . . . . . . . . . . . . . . . . . . . . . . . . . . . . . . . . . . . . . . . . . . . . . . . . . . . . . . . . . . . . . . . . . . . . . . . . . . . . . . . . . . . . . . . . . . . . . . . . . . . . . . . . . . . . . . . . . . . . . . . . . . . . . . . . . . . . . . . . . . . . . . . . . . . . . . . . . . . . . . . . . . . . . . . . . . . . . . . . . . . . . . . . . . . . . . . . . . . . . . . . . . . . . . . . . . . . . . . . . . . . . . .
. . . . . . . . . . . . . . . . . . . . . . . . . . . . . . . . . . . . . . . . . . . . . . . . . . . . . . . . . . . . . . . . . . . . . . . . . . . . . . . . . . . . . . . . . . . . . . . . . . . . . . . . . . . . . . . . . . . . . . . . . . . . . . . . . . . . . . . . . . . . . . . . . . . . . . . . . . . . . . . . . . . . . . . . . . . . . . . . . . . . . . . . . . . . . . . . . . . . . . . . . . . . . . . . . . . . . . . . . . . . . . . . . . . . . . . . . . . . . . . . . . . . . . . . . . . . . . . . . . . . . . . . . . . . . . . . . . . . . . . .
. . . . . . . . . . . . . . . . . . . . . . . . . . . . . . . . . . . . . . . . . . . . . . . . . . . . . . . . . . . . . . . . . . . . . . . . . . . . . . . . . . . . . . . . . . . . . . . . . . . . . . . . . . . . . . . . . . . . . . . . . . . . . . . . . . . . . . . . . . . . . . . . . . . . . . . . . . . . . . . . . . . . . . . . . . . . . . . . . . . . . . . . . . . . . . . . . . . . . . . . . . . . . . . . . . . . . . . . . . . . . . . . . . . . . . . . . . . . . . . . . . . . . . . . . . . . . . . . . . . . . . . . . . . . . . . . . . . . . . . .
. . . . . . . . . . . . . . . . . . . . . . . . . . . . . . . . . . . . . . . . . . . . . . . . . . . . . . . . . . . . . . . . . . . . . . . . . . . . . . . . . . . . . . . . . . . . . . . . . . . . . . . . . . . . . . . . . . . . . . . . . . . . . . . . . . . . . . . . . . . . . . . . . . . . . . . . . . . . . . . . . . . . . . . . . . . . . . . . . . . . . . . . . . . . . . . . . . . . . . . . . . . . . . . . . . . . . . . . . . . . . . . . . . . . . . . . . . . . . . . . . . . . . . . . . . . . . . . . . . . . . . . . . . . . . . . . . . . . . . . .
6.8. JBOSS DATA GRID RESOURCE ADAPTER PROPERTIES6.9. LDAP ADAPTER PROPERTIES6.10. SALESFORCE ADAPTER PROPERTIES6.11. WEB SERVICES ADAPTER PROPERTIES6.12. MONGODB ADAPTER PROPERTIES
CHAPTER 7. CXF CONFIGURATION7.1. CXF CONFIGURATION7.2. CONFIGURE CXF FOR A WEB SERVICE DATA SOURCE7.3. CONFIGURE CXF FOR A WEB SERVICE DATA SOURCE: WS-SECURITY7.4. CONFIGURE CXF FOR A WEB SERVICE DATA SOURCE: LOGGING7.5. CONFIGURE CXF FOR A WEB SERVICE DATA SOURCE: TRANSPORT SETTINGS7.6. CONFIGURE CXF FOR A WEB SERVICE DATA SOURCE: SSL SUPPORT (HTTPS)7.7. CONFIGURE CXF FOR A SALESFORCE DATA SOURCE
CHAPTER 8. JDBC DATA SOURCES8.1. CONFIGURING JDBC DATA SOURCES8.2. EXAMPLE CONFIGURATION8.3. INSTALL A JDBC DRIVER WITH THE MANAGEMENT CLI8.4. INSTALL A JDBC DRIVER WITH THE MANAGEMENT CONSOLE8.5. CREATE A NON-XA DATASOURCE WITH THE MANAGEMENT INTERFACES8.6. CREATE AN XA DATASOURCE WITH THE MANAGEMENT INTERFACES8.7. DATASOURCE PARAMETERS8.8. JDBC DRIVER DOWNLOAD LOCATIONS
CHAPTER 9. LOGGING9.1. OVERVIEW OF LOGGING9.2. DEFAULT LOG FILE LOCATIONS9.3. JBOSS DATA VIRTUALIZATION LOG CATEGORIES9.4. COMMAND LOGGING9.5. AUDIT LOGGING9.6. ENABLE AUDIT AND COMMAND LOGGING9.7. COMMAND LOG OUTPUT
CHAPTER 10. CLUSTERING10.1. CLUSTERING IN JBOSS DATA VIRTUALIZATION10.2. ENABLE CLUSTERING IN JBOSS DATA VIRTUALIZATION10.3. CONFIGURE LOAD BALANCING
CHAPTER 11. CACHING11.1. RESULT SET CACHING
PART V. MONITORING AND PERFORMANCE
CHAPTER 12. MONITORING12.1. MONITORING JBOSS DATA VIRTUALIZATION12.2. QUERY/SESSION DETAILS12.3. SESSION/QUERY METRICS12.4. BUFFER MANAGER METRICS12.5. CACHE METRICS
CHAPTER 13. PERFORMANCE TUNING13.1. USAGE TIPS13.2. MEMORY MANAGEMENT CONSIDERATIONS13.3. SCALABILITY CONSIDERATIONS
6667676869
70707071
72737475
777777777778808288
9090909091939393
95959595
9696
97
9898989899
100
101101103105
Administration and Configuration Guide
2

. . . . . . . . . . . . . . . . . . . . . . . . . . . . . . . . . . . . . . . . . . . . . . . . . . . . . . . . . . . . . . . . . . . . . . . . . . . . . . . . . . . . . . . . . . . . . . . . . . . . . . . . . . . . . . . . . . . . . . . . . . . . . . . . . . . . . . . . . . . . . . . . . . . . . . . . . . . . . . . . . . . . . . . . . . . . . . . . . . . . . . . . . . . . . . . . . . . . . . . . . . . . . . . . . . . . . . . . . . . . . . . . . . . . . . . . . . . . . . . . . . . . . . . . . . . . . . . . . . . . . . . . . . . . . . . . . . . . . . . .
. . . . . . . . . . . . . . . . . . . . . . . . . . . . . . . . . . . . . . . . . . . . . . . . . . . . . . . . . . . . . . . . . . . . . . . . . . . . . . . . . . . . . . . . . . . . . . . . . . . . . . . . . . . . . . . . . . . . . . . . . . . . . . . . . . . . . . . . . . . . . . . . . . . . . . . . . . . . . . . . . . . . . . . . . . . . . . . . . . . . . . . . . . . . . . . . . . . . . . . . . . . . . . . . . . . . . . . . . . . . . . . . . . . . . . . . . . . . . . . . . . . . . . . . . . . . . . . . . . . . . . . . . . . . . . . . . . . . . . . .
. . . . . . . . . . . . . . . . . . . . . . . . . . . . . . . . . . . . . . . . . . . . . . . . . . . . . . . . . . . . . . . . . . . . . . . . . . . . . . . . . . . . . . . . . . . . . . . . . . . . . . . . . . . . . . . . . . . . . . . . . . . . . . . . . . . . . . . . . . . . . . . . . . . . . . . . . . . . . . . . . . . . . . . . . . . . . . . . . . . . . . . . . . . . . . . . . . . . . . . . . . . . . . . . . . . . . . . . . . . . . . . . . . . . . . . . . . . . . . . . . . . . . . . . . . . . . . . . . . . . . . . . . . . . . . . . . . . . . . . .
. . . . . . . . . . . . . . . . . . . . . . . . . . . . . . . . . . . . . . . . . . . . . . . . . . . . . . . . . . . . . . . . . . . . . . . . . . . . . . . . . . . . . . . . . . . . . . . . . . . . . . . . . . . . . . . . . . . . . . . . . . . . . . . . . . . . . . . . . . . . . . . . . . . . . . . . . . . . . . . . . . . . . . . . . . . . . . . . . . . . . . . . . . . . . . . . . . . . . . . . . . . . . . . . . . . . . . . . . . . . . . . . . . . . . . . . . . . . . . . . . . . . . . . . . . . . . . . . . . . . . . . . . . . . . . . . . . . . . . . .
13.4. DISK USAGE CONSIDERATIONS13.5. THREADING CONSIDERATIONS13.6. CACHING CONSIDERATIONS13.7. TRANSPORT CONSIDERATIONS13.8. LARGE OBJECTS (LOBS)13.9. LOB CONSIDERATIONS13.10. OTHER PERFORMANCE TUNING CONSIDERATIONS
PART VI. REFERENCE
CHAPTER 14. GENERAL CONFIGURATION14.1. JBOSS DATA VIRTUALIZATION SETTINGS14.2. VIEWING JBOSS DATA VIRTUALIZATION SETTINGS USING MANAGEMENT CLI14.3. CHANGING JBOSS DATA VIRTUALIZATION SETTINGS USING MANAGEMENT CLI14.4. MANAGING TRANSPORT AND SSL SETTINGS USING MANAGEMENT CLI14.5. MANAGING TRANSLATOR SETTINGS USING MANAGEMENT CLI14.6. TRANSPORT SECURITY AUTHENTICATION MODES14.7. MANAGING CORE CONFIGURATION USING JBOSS MANAGEMENT CONSOLE14.8. PORTS USED BY RED HAT JBOSS DATA VIRTUALIZATION14.9. CHANGE THE DEFAULT JDBC PORT USING MANAGEMENT CONSOLE14.10. SYSTEM PROPERTIES14.11. TEIID MANAGEMENT CLI
CHAPTER 15. DIRECTORY STRUCTURE15.1. DIRECTORY STRUCTURE
APPENDIX A. REVISION HISTORY
106107107108109110110
112
113113113114114114115115116116116121
123123
125
Table of Contents
3

Administration and Configuration Guide
4

PART I. INTRODUCTION
PART I. INTRODUCTION
5

CHAPTER 1. READ ME
1.1. BACK UP YOUR DATA
WARNING
Red Hat recommends that you back up your system settings and data beforeundertaking any of the configuration tasks mentioned in this book.
1.2. VARIABLE NAME: EAP_HOME
EAP_HOME refers to the root directory of the Red Hat JBoss Enterprise Application Platforminstallation on which JBoss Data Virtualization has been deployed.
1.3. VARIABLE NAME: MODE
MODE will either be standalone or domain depending on whether JBoss Data Virtualization isrunning in standalone or domain mode. Substitute one of these whenever you see MODE in a file path inthis documentation. (You need to set this variable yourself, based on where the product has beeninstalled in your directory structure.)
1.4. RED HAT DOCUMENTATION SITE
Red Hat's official documentation site is available at https://access.redhat.com/site/documentation/.There you will find the latest version of every book, including this one.
Administration and Configuration Guide
6

PART II. INTRODUCTION TO ADMINISTERING JBOSS DATAVIRTUALIZATION
PART II. INTRODUCTION TO ADMINISTERING JBOSS DATA VIRTUALIZATION
7

CHAPTER 2. ADMINISTRATION TOOLS
2.1. ADMINISTRATION TOOLS OVERVIEW
The following tools are available for you to use to administer Red Hat JBoss Data Virtualization:
Management Console
Management Command Line Interface (CLI)
AdminShell
Admin API
JBoss Operations Network
2.2. MANAGEMENT CONSOLE
2.2.1. Management Console and JBoss Data Virtualization
Red Hat JBoss Data Virtualization provides a plug-in for the web-based Management Console. Itprovides a web interface that allows you to configure and monitor Data Virtualization servicesdeployed upon a running JBoss EAP instance.
NOTE
For more information about general use of the Management Console, not specific toJBoss Data Virtualization, see the Red Hat JBoss Enterprise Application PlatformAdministration and Configuration Guide.
2.2.2. Log in to the Management Console
Prerequisites
JBoss EAP 6 must be running.
You must have already created a user with permissions to access the Console.
1. Launch your web browser and go to this address: http://localhost:9990/console/App.html
NOTE
Port 9990 is predefined as the Management Console socket binding.
2. Enter your username and password to log in to the Management Console.
Administration and Configuration Guide
8

Figure 2.1. Log in screen for the Management Console
Result
Once logged in, you are redirected to the following address and the Management Console landing pageappears: http://localhost:9990/console/App.html#home
2.2.3. Management Console - Configuration tab
The Configuration tab contains both general and Data Virtualization-specific configurationproperties. Click Teiid in the left-hand navigational tree to view Teiid configuration. These are thesub-categories:
Figure 2.2. Configuration tab
Query Engine - view and configure core Teiid engine properties.
Translators - view and remove the Translators configured in Teiid.
Transports - view, add and remove transports to the Teiid engine.
CHAPTER 2. ADMINISTRATION TOOLS
9

Audit Logs - turn on or off audit logging for Teiid.
Use the Configuration tab to change any aspect of Teiid's configuration. Various differentconfiguration properties are organised on different tabs. Click the Need Help link on each tab to seedescription of each field.
NOTE
Some properties require you to restart the server before changes you have made willtake affect.
2.2.4. Management Console - Runtime tab
The Runtime tab shows runtime information about JBoss EAP server and Teiid subsystem. You canview runtime information about Teiid by clicking Virtual Databases in the left-hand sidenavigational tree.
Figure 2.3. Runtime tab
All the VDBs deployed on the server are shown in top level table. When you select and highlight a VDB,more details about that VDB are displayed in the tabs below. Each of these tabs are divided intogrouping of the functionality.
Summary: This panel shows the details about the selected VDB and also any properties thatare associated with that VDB, along with any other VDBs this VDB imports. This tab is designedto give a quick overview of the VDB status.
Models: This panel shows all the models that are defined in a given VDB, and shows eachmodel's translator name and source connection JNDI name. It also shows the type of modelsand if it is multi-source or not. When a particular model is selected it shows all properties ofthat model that are defined and also shows any errors associated with the model. When yourVDB is not deployed in the active status, you must verify these errors and fix to resolve anydeployment issues.
The DDL button in the Models panel shows the schema for the given model. Note that this does
Administration and Configuration Guide
10

not work for XML based models that are designed using Teiid Designer. The tool lets you editthe JNDI name by double clicking on them and modifying them. This useful if you would like tochange the JNDI name in a given environment.
Overrides: This panel shows the all the overridden translators in the Teiid Designer and theirproperties.
Caching: Caching panel shows caching statistics of resultset cache as to how effectively thecache is being used. It also shows all the internal materialized views in the VDB and their loadstatus as to when they were loaded. It also gives options to invalidate a specific view or all theviews in a VDB, so that they can refresh or reload the contents from source. This panel alsoprovides a UI to flush the entire the resultset cache contents or prepared plan cache contentsfor the selected VDB.
Data Roles: Data Roles panel shows the all the policies that defined in the VDB using the TeiidDesigner or hand coded in the vdb.xml file. For each selected policy, it also lists thepermissions for that policy as to what kind of authorizations user has and shows the mappedenterprise role assignments to that policy. You can even add or remove an enterprise role fromthe policy using the this UI.
Requests: This panel shows all the current requests against the selected VDB at the time ofVDB selection. You can click refresh to get a more up to date requests. The top table in thepanel shows the user submitted requests to the teiid engine, when one of those requests areselected, then the bottom table shows all the source level queries that are submitted to thephysical sources by Teiid engine. Using this UI, user can also submit a cancel request to a userlevel query. Since cancel is an asynchronous operation, the operation is not guaranteed asquery may already been finished, by the time cancel is submitted.
Sessions: This panel shows all the active sessions that are connected to the selected VDB. Itshows their connection properties and also gives an option to terminate either a selectedsession or all the sessions.
2.2.5. Management Console - Administration tab
You can configure roles and groups using Administration tab. Roles for a user to be included in andexcluded from can be configured in the Management Console. You can also configure groups to beincluded or excluded from a role. Only users in the SuperUser or Administrator roles can perform thisconfiguration.
CHAPTER 2. ADMINISTRATION TOOLS
11

Figure 2.4. Administration tab
For more information related to User Management, see Red JBoss EAP Administration and Configurationguide.
2.3. MANAGEMENT CLI
2.3.1. Launch the Management CLI
Procedure 2.1. Launch CLI in Linux or Microsoft Windows Server
Launch the CLI in LinuxRun the EAP_HOME/bin/jboss-cli.sh file by entering the following at a command line:
$ EAP_HOME/bin/jboss-cli.sh
Launch the CLI in Microsoft Windows ServerRun the EAP_HOME\bin\jboss-cli.bat file by double-clicking it, or by entering thefollowing at a command line:
C:\>EAP_HOME\bin\jboss-cli.bat
2.3.2. Quit the Management CLI
From the Management CLI, enter the quit command:
[domain@localhost:9999 /] quit
2.3.3. Connect to a Managed Server Instance Using the Management CLI
Prerequisites
Administration and Configuration Guide
12

Section 2.3.1, “Launch the Management CLI”
Procedure 2.2. Connect to a Managed Server Instance
Run the connect commandFrom the Management CLI, enter the connect command:
[disconnected /] connectConnected to domain controller at localhost:9999
Alternatively, to connect to a managed server when starting the Management CLI on aLinux system, use the --connect parameter:
$ EAP_HOME/bin/jboss-cli.sh --connect
The --connect parameter can be used to specify the host and port of the server. Toconnect to the address 192.168.0.1 with the port value 9999 the following would apply:
$ EAP_HOME/bin/jboss-cli.sh --connect --controller=192.168.0.1:9999
2.3.4. Obtain Help with the Management CLI
Summary
Sometimes you might need guidance if you need to learn a CLI command or feel unsure about what todo. The Management CLI features a help dialog with general and context-sensitive options. (Note thatthe help commands dependent on the operation context require an established connection to either astandalone or domain controller. These commands will not appear in the listing unless the connectionhas been established.)
Prerequisites
Section 2.3.1, “Launch the Management CLI”
1. For general helpFrom the Management CLI, enter the help command:
[standalone@localhost:9999 /] help
2. Obtain context-sensitive helpFrom the Management CLI, enter the help -commands extended command:
[standalone@localhost:9999 /] help --commands
3. For a more detailed description of a specific command, enter the command, followed by --help.
[standalone@localhost:9999 /] deploy --help
Result
CHAPTER 2. ADMINISTRATION TOOLS
13
The CLI help information is displayed.
2.4. ADMINSHELL
2.4.1. AdminShell Features
AdminShell provides the following features:
Administration
AdminShell can be used to connect to a JBoss Data Virtualization instance in order to performvarious administrative tasks.
Data Access
AdminShell can be used to connect to a virtual database (VDB) and run SQL commands to queryVDB data and view results.
Migration
AdminShell can be used to develop scripts that will move VDBs and associated components fromone development environment to another. (Users can test and automate migration scripts beforeexecuting them in production deployments.)
Testing
The built-in JUnit Test Framework allows users to write regression tests to check system healthand data integrity. The written tests validate system functionality automatically, removing the needfor manual verification by QA Personnel.
2.4.2. AdminShell Scripting
Use the Groovy language to write AdminShell scripts to automate tasks. AdminShell provides a customlibrary of Groovy functions to help administer JBoss Data Virtualization. These custom functions canbe used in isolation or alongside other Groovy code.
Here are some basic rules. Memorise these to become familiar with the syntax:
All commands and functions are case sensitive.
Groovy commands are not required to end with a semicolon; this is optional.
A function will take zero or more parameters as input.
Function parameters are provided within parentheses.
String parameters must be provided within single or double quotes.
Other Java classes and methods can be accessed and invoked from within scripts as long asrequired libraries are already in the class path. (JAR files added to the lib directory will beincluded in the class path automatically.)
connectAsAdmin("localhost", "9999", "user", "password", "conn1")
Administration and Configuration Guide
14

NOTE
You should disconnect from JBoss Data Virtualization before exiting AdminShell byentering the disconnect() command.
References
For more information about Groovy scripting, refer to http://groovy.codehaus.org/.
For more information about Groovy scripting and SQL, refer tohttp://groovy.codehaus.org/Database+features.
For more information about testing using Groovy scripting, refer tohttp://groovy.codehaus.org/Unit+Testing and http://junit.org/.
2.4.3. AdminShell Help
All of the custom administrative methods available in AdminShell can be listed by using the adminHelp() method (note that only the custom AdminShell methods will be shown):
If you require a specific method's definition and input parameters, use adminHelp("METHOD"):
Use the sqlHelp() method to list all SQL extension methods:
If you want to obtain a specific method's definition and input parameters, use sqlHelp("METHOD").
2.4.4. AdminShell Basic Commands
Table 2.1. AdminShell Basic Commands
Command Description
adminHelp(); Displays all of the custom AdminShell methods available.
import my.package.*;myObject = new MyClass();myObject.doSomething();
adminHelp()
adminHelp("deploy")
/**Deploy a VDB from file*/void deploy(String /* file name */)throws AdminExceptionthrows FileNotFoundException
sqlHelp()
CHAPTER 2. ADMINISTRATION TOOLS
15

adminHelp("METHOD"); Displays the definition and input parameters for the AdminShellmethod supplied.
sqlHelp(); Displays all of the custom SQL AdminShell methods available.
sqlHelp("METHOD"); Displays the definition and input parameters for the SQLAdminShell method supplied.
println "STRING"; Print something to console.
sql = connect(); Get an extended Groovy SQL connection using the defaultconnection specified in the connection.properties file.
sql.execute("SQL"); Run any SQL command.
connectAsAdmin(); Connects as an admin user using the default connectionspecified in the connection.properties file. Thiscommand does not require a VDB name. Note that this is anadmin connection, not a JDBC connection, so you cannot issueSQL commands using this connection. Note that if SSL is beingused, you would need to adjust the connection URL and theclient SSL settings as necessary (typically only for 2-way SSL).
println getConnectionName(); Returns the active connection name.
useConnection("cNAME"); Switches to using the given connection.
disconnect(); Disconnects the active connection.
disconnectAll(); Disconnects all connections (both active and suspended).
Command Description
2.4.5. Execute a Script in Non-interactive AdminShell
Procedure 2.3. Execute a Script in Non-interactive AdminShell
1. Open a Command Line Terminal
2. Run the ScriptRun the /adminshell.sh load [-Dparam=value] PATH/FILENAME command.
NOTE
Optional properties passed in using -D can be accessed from within the script file byusing System.getProperty().
value = System.getProperty("param")
Administration and Configuration Guide
16

IMPORTANT
Any connections established within the script should be disconnected before the scriptfinishes.
2.4.6. Launch the Interactive AdminShell
Procedure 2.4. Launch the Interactive AdminShell
1. Navigate to the adminshell Directory
a. Open a command line terminal.
b. Navigate to the AdminShell directory: cd /EAP_HOME/dataVirtualization/teiid-adminshell/.
2. Unzip the AdminShell: unzip teiid-VERSION-adminshell-dist.zip
3. Launch the adminshell ScriptRun the ./adminshell.sh command.
The log output is as follows:
======================================================================
Teiid AdminShell Bootstrap Environment
TEIID_HOME = /EAP_HOME/dataVirtualization/teiid-adminshell-VERSION CLASSPATH = /EAP_HOME/dataVirtualization/teiid-adminshell-VERSION/lib/patches/*:/EAP_HOME/dataVirtualization/teiid-adminshell-VERSION/lib/teiid-adminshell-VERSION.jar:/EAP_HOME/dataVirtualization/teiid-adminshell-VERSION/lib/* JAVA = /usr/lib/jvm/java-1.7.0-openjdk.x86_64/bin/java
======================================================================
===> [import static org.teiid.adminshell.AdminShell.*; import static org.teiid.adminshell.GroovySqlExtensions.*; import org.teiid.adminapi.*;]Groovy Shell (1.7.2, JVM: 1.7.0_25)Type 'help' or '\h' for help.-------------------------------------------------------------------------------groovy:000>
Result
The interactive AdminShell is running. At this point you can execute individual commands line by line.
CHAPTER 2. ADMINISTRATION TOOLS
17

NOTE
You can exit the interactive AdminShell at any time by entering the exit command.
2.4.7. Helpful Tips for the Interactive AdminShell
Table 2.2. Interactive AdminShell Commands
Command Description
↑ ('up arrow') Displays previous commands executed, starting with the mostrecent.
help Displays additional commands provided specifically for usewithin the interactive shell.
Shell Behavior
The interactive shell uses a special interpreter and displays behavior different from what would beexpected from running a Groovy script:
def statements do not define a variable in the context of the shell; For example, do not use def x = 1, use x = 1.
The shell cannot parse Groovy classes that use annotations.
2.4.8. Save a Script in Interactive AdminShell
Procedure 2.5. Save a Script in Interactive AdminShell
1. Open the Interactive AdminShell
a. Open a command line terminal.
b. Navigate to /EAP_HOME/dataVirtualization/teiid-adminshell-VERSION/.
c. Run the ./adminshell.sh command.
2. Start Recording to a FileEnter the record start PATH/FILENAME command.
3. Enter Desired Commands to RecordEnter a series of commands for which you want to record the input/output.
4. Stop Recording to the FileEnter the record stop command.
Result
All input and output between the moments you issue the record start and record stopcommands are captured in PATH/FILENAME.
Administration and Configuration Guide
18

NOTE
Since both input and output are recorded, the file will need some editing before it can beexecuted as a script file.
2.4.9. Execute a Script in Interactive AdminShell
Procedure 2.6. Execute a Script in Interactive AdminShell
1. Open the Interactive AdminShell
a. Open a command line terminal.
b. Navigate to /EAP_HOME/dataVirtualization/teiid-adminshell-VERSION/.
c. Run the ./adminshell.sh command.
2. Run the Script
Run the Script using the Interactive Shell load CommandRun the load PATH/FILENAME command.
Run the Script using the Groovy evaluate CommandRun the evaluate("PATH/FILENAME" as File) command.
NOTE
You can also execute a script by entering it line by line after opening the interactiveshell.
2.4.10. Launch the AdminShell GUI
Procedure 2.7. Launch the AdminShell GUI
1. Navigate to the adminshell Directory
a. Open a command line terminal.
b. Navigate to /EAP_HOME/dataVirtualization/teiid-adminshell-VERSION/.
2. Launch the adminshell-console ScriptRun the ./adminshell-console.sh command.
Result
The AdminShell GUI is displayed.
NOTE
You can exit the AdminShell GUI at any time by clicking on File → Exit.
2.4.11. Save a Script in AdminShell GUI
Procedure 2.8. Save a Script in AdminShell GUI
CHAPTER 2. ADMINISTRATION TOOLS
19

Procedure 2.8. Save a Script in AdminShell GUI
1. Navigate to the adminshell Directory
a. Open a command line terminal.
b. Navigate to /EAP_HOME/dataVirtualization/teiid-adminshell-VERSION/.
2. Type a ScriptType your script in the upper script window of the AdminShell GUI. You may find it useful to testthe script as you are preparing it by executing it via Script → Run.
3. Save the Script
a. Select File → Save As.
b. Choose a location and filename for the script and click on Save.
2.4.12. Execute a Script in AdminShell GUI
Procedure 2.9. Execute a Script in AdminShell GUI
1. Open the AdminShell GUI
a. Open a command line terminal.
b. Navigate to /EAP_HOME/dataVirtualization/teiid-adminshell-VERSION/.
c. Run the ./adminshell-console.sh command.
2. Prepare the Script
Type a New ScriptType your script in the upper script window of the AdminShell GUI.
Load a Saved Script
a. Select File → Open.
b. Locate the desired script file and click on Open.
The script will appear in the upper script window of the AdminShell GUI.
3. Run the ScriptSelect Script → Run.
2.4.13. AdminShell Connection Properties
The EAP_HOME/dataVirtualization/teiid-adminshell-VERSION/connection.properties file provides the default connection propertiesused by AdminShell to connect to an JBoss Data Virtualization instance:
jdbc.user=userjdbc.password=userjdbc.url=jdbc:teiid:admin@mm://localhost:31000;
admin.host=localhost
Administration and Configuration Guide
20

A call to connect() or connectionAsAdmin() without any input parameters will connect to JBossData Virtualization using the settings defined in this properties file. connect() uses those propertiesprefixed with jdbc and connectAsAdmin() uses those properties prefixed with admin. Alternatively,you can include parameters in the connect() or connectAsAdmin() methods to connect usingproperties of your choice:
WARNING
Do not leave passwords stored in clear text. The example above is fordemonstration purposes only.
If you want to store your password in the file, take the necessary measures tosecure it. Otherwise, do not use this feature at all and, instead, input your passwordinteractively (or some other secure way.)
2.4.14. Multiple Connections in AdminShell
Using AdminShell, users can manage more than one connection to one or more JBoss DataVirtualization instances. For example, a user might want to have one connection to a developmentserver and another to an integration server, simultaneously.
Every time a new connection is made, it is assigned a unique name and it becomes the activeconnection. If there is already a connection, it will be suspended (it will not be closed).
The getConnectionName() method returns the name of the active connection. The connection namecan be assigned to a variable cName by the following command:
The name of the current connection is required in order to switch from one to another. To change theactive connection, use the useConnection() command, supplying the name (or a variable with thename assigned) of the connection you wish to use:
Example
The following example demonstrates how to use two connections and switch between them:
admin.port=9999admin.user=adminadmin.password=admin
connect("URL", "USER", "PASSWORD")
cName = getConnectionName();
useConnection(cName);
// Create a connectionconnectAsAdmin();
//Assign the connection name to conn1
CHAPTER 2. ADMINISTRATION TOOLS
21

2.4.15. Example Scripts
Example 2.1. Deploying a VDB
Example 2.2. Create a Datasource (Oracle)
Example 2.3. Execute SQL Query against Teiid
conn1 = getConnectionName();
deploy("file.vdb")
// Create a second connection (which is now the active connection)connectAsAdmin();
//Assign the new connection name to conn2conn2 = getConnectionName();
deploy("file.vdb")
// Switch the active connection back to conn1useConnection(conn1);
// Close the active connection (conn1)disconnect();
connectAsAdmin();deploy("/path/to/<name>.vdb");
// check to validate the deploymentVDB vdb = getVDB("<name>", 1);if (vdb != null){ print (vdb.getName()+"."+vdb.getVersion()+" is deployed";}else { print ("<name>.vdb failed to deploy";}
connectAsAdmin();
// first deploy the JDBC jar file for Oracledeploy("ojdbc6.jar");
props = new Properties();props.setProperty("connection-url","jdbc:oracle:thin:@<host>:1521:<sid>");props.setProperty("user-name", "scott");props.setProperty("password", "tiger");
createDataSource("oracleDS", "ojdbc6.jar", props);
Administration and Configuration Guide
22

A:
Q:
A:
Q:
A:
Q:
A:
Q:
A:
Q:
A:
Q:
2.4.16. AdminShell FAQ
Why won't the adminhelp command work in the GUI tool?
The AdminShell GUI environment does not understand shell commands such as load, help, and adminhelp, since they are not directly supported by Groovy. In the GUI you should use theequivalent functional form; for example, instead of using adminhelp use adminHelp().
Are there any pre-built scripts available?
Not currently.
What is the difference between connectAsAdmin() and connect()?
The connectAsAdmin() method creates a contextual connection to the AdminAPI of JBossData Virtualization. The connect() method returns an extension of the Groovy SQL object to beused for SQL calls to JBoss Data Virtualization.
What does getAdmin() do? Why do I need it?
The getAdmin() method returns the current contextual connection object that was createdwhen you connected with connectAsAdmin(). This object implements the interfaceorg.teiid.adminapi.Admin . The AdminShell commands provided are wrappers around this API.Advanced users can use this API directly if the provided wrapper commands do not meet theirneeds.
Is IDE support available for writing the scripts?
The AdminShell GUI tool is a light-weight IDE. Full IDE support is available for Groovy, butrequires manual manipulation of the class path and script imports.
Can I use AdminShell methods in other environments?
The AdminShell methods (including the named contextual connections, AdminAPI wrapper, andhelp system) have no direct dependencies on Groovy and can be used in other scriptinglanguages.
To use the AdminShell methods in another language, simply import the static methods andAdmin classes into your script. You will also need to ensure that the EAP_HOME/dataVirtualization/teiid-
sql = connect("jdbc:teiid:<vdb>@mm://<host>:31000", "user", "user");
// selectsql.eachRow("select * from sys.tables") { println "${it}" }
// update, insert, deletesql.execute(<sql command>);
CHAPTER 2. ADMINISTRATION TOOLS
23
A:
Q:
adminshell-VERSION/lib/teiid-VERSION.jar and EAP_HOME/dataVirtualization/teiid-adminshell-VERSION/lib/teiid-adminshell-VERSION.jar are in your class path.
The following snippet shows import statements that would work in Java, BeanShell, Groovy andothers:
Is debugging support available?
The Interactive AdminShell and GUI have built-in support for inspection of the current state;however, line based debugging is beyond the scope of this document.
2.5. JBOSS OPERATIONS NETWORK
2.5.1. Installing JBoss Agent Plug-in Packs
JBoss Operations Network has additional agent plug-ins to manage other JBoss products. Althoughthese are JBoss ON resource plug-ins, they are included in separate packages and require a separatesubscription to download them.
1. Download the plug-in JAR files from the Customer Support Portal.
a. Navigate to https://access.redhat.com/jbossnetwork/.
b. Select JBoss ON for PRODUCT.
c. Select Download.
2. Extract the plug-in JAR files into the JON_HOME/plugins directory.
3. Have the JBoss ON server update its plug-ins. This can be done through the JBoss ON GUI orby restarting the server.
4. To load the plug-ins through the GUI:
a. Open the Administration tab.
b. In the Configuration area on the left, select the Agent Plug-ins link.
c. At the bottom of the list of loaded agent plug-ins, click the SCAN FOR UPDATES button.
5. Have the agents reload their plug-ins to load the new plug-ins. This can be done from theagent's command prompt using the plugins command:
import static org.teiid.adminshell.AdminShell.*;import org.teiid.adminapi.*;
> plugins update
Administration and Configuration Guide
24

NOTE
This can also be done in the JBoss ON GUI by scheduling an update pluginsoperation for an agent or a group or agents. Alternatively, restart the agents.
2.6. DASHBOARD BUILDER
2.6.1. Data sources
Red Hat JBoss Dashboard Builder can be connected to an external database, be it using JNDI of thecontainer or connecting directly only using the JDBC driver to access the database. Connections todatabases can be configured in workspace Showcase on page External Connections. After you haveestablished the connection to the database, you need to create a data provider that will collect thedata from the database and allow you to visualize it as an indicator in the dashboard area of a page.
When connecting to CSV files to acquire data, the connection is estabished directly through the dataprovider.
Note that Red Hat JBoss Dashboard Builder makes use of its own local internal database to store itslocal data. This database is read-only for Dashboard Builder, but is accessible from outside.
2.6.2. Connecting to data sources
You can connect either to a JNDI data source, that is, a data source set up and accessible from theapplication container, or directly to the data source as a custom data source, if the applicationcontainer has the correct JDBC driver deployed.
To connect to an external data source, do the following:
1. Make sure the data source is up and running and that the application server has access to thedata source. (Check the driver, the login credentials, etc. In Red Hat JBoss EAP 6, you can doso in the Management Console under Subsystems → Connector → Datasources)
2. In Dashboard Builder, on the Tree Menu (by default located on the of the Showcaseperspective), go to Administration → External connections .
3. On the displayed External Connection panel, click the New DataSource
button.
4. Select the data source type (JNDI or Custom DataSource) and provide the respective datasource parameters below.
2.6.3. Creating data providers
To create a new data provider, do the following:
1. In the Tree Menu (the panel in the lateral menu of the Showcase workspace), clickAdministration → Data providers .
2. In the Data Providers panel, click the Create new data provider
button.
CHAPTER 2. ADMINISTRATION TOOLS
25

3. In the updated Data Providers panel, select in the Type dropdown menu the type of thedata provider depending on the source you want the data provider to operate on.
4. Define the data provider parameters:
Data provider over a CSV file
Name: user-friendly name and its locale
CSV file URL: the url of the file (for example, file:///home/me/example.csv)
Data separator: the symbol used as separator in the CSV file (the default value issemicolon; if using comma as the separator sign, make sure to adapt the number formatif applicable)
Quoting symbol: the symbol used for quotes (the default value is the double-quotessymbol; note that the symbol may vary depending on the locale)
Escaping symbol: the symbol used for escaping the following symbol in order to keepits literal value
Date format: date and time format
Number format: the format of numbers as resolved to thousands and decimals
Data provider over a database (SQL query)
Name: user-friendly name and its locale
Data source: the data source to query (the default value is local, which allows you toquery the Dashboard Builder database)
Query: query that returns the required data
5. Click Attempt data load to verify the parameters arecorrect.
6. Click Save.
7. In the table with the detected data, define the data type and if necessary provide a user-friendly name for the data. Click Save.
The data provider can now be visualized in an indicator on a page of your choice.
2.6.4. Dashboard Builder Workspace
2.6.4.1. Creating a workspace
To create a new workspace, do the following:
1. Click the Create workspace button on the top menu.
The management console with the Workspace node expanded and workspace managementarea with workspace details on the right is displayed.
Administration and Configuration Guide
26

2. In the Create workspace table on the right, set the workspace parameters:
Name: workspace name and its locale
Title: workspace title and its locale
Skin: skin to be applied on the workspace resources
Envelope: envelope to be applied on the workspace resources
3. Click Create workspace.
4. Optionally, click the workspace name in the tree menu on the left and in the area withworkspace properties on the right define additional workspace parameters:
URL: the workspace URL
User home search: the home page setting
If set to Role assigned page, the home page configured in the page permissions isapplied. Hence, you can set different home page for every role. (If you set it to Current page, all users will use the current home page as their home page.)
2.6.4.2. Creating Pages
To create a new page, do the following:
1. Make sure you are in the correct workspace.
2. Next to the Page dropdown box in the top menu, click
the Create new page button .
3. The management console with the Pages node expanded and page management area withpage details on the right is displayed.
4. In the Create new page table on the right, set the page parameters:
Name: page name and its locale
Parent page: parent page of the new page
Skin: skin to be applied on the page
Envelope: envelope to be applied on the page
Page layout: layout of the page
5. Click Create new page.
6. Optionally, click the page name in the tree menu on the left and in the area with workspaceproperties on the right define additional page parameters:
URL: the page URL
Visible page: visibility of the page
CHAPTER 2. ADMINISTRATION TOOLS
27

Spacing between regions and panels
2.6.4.3. Defining Page permissions
Although users are usually authorized using the authorization method setup for the underlyingapplication container (on Red Hat JBoss EAP, the other security domain by default), the Red HatJBoss Dashboard Builder has its own role-based access control (RBAC) management tool to facilitatepermission management on an individual page or multiple pages.
To define permissions on a page or all workspace pages for a role, do the following:
1. On the top menu, click the General configuration button : the management consoleis displayed.
2. Under the Workspace node on the left, locate the page or the Pages node.
3. Under the page/pages node, click the Page permissions node.
4. In the Page permissions area on the right, delete previously defined permission definition ifapplicable and define the rights for the required role:
a. In the Permission assignation table, locate the Select role dropdown menu andpick the respective role.
b. In the Actions column of the table, enable or disable individual permissions.
5. Click Save.
2.6.4.4. Panels
A panel is a GUI widget, which can be placed on a page. There are three main types of panels:
Dashboard panels
are the primary BAM panels and include the following:
Data provider manager: a panel with a list of available data providers and data providermanagement options
Filter and Drill-down: a panel that displays all KPIs and their values to facilitate filtering inindicators on the given page defined over a data provider
HTML Editor panel: a panel with static content
Key Performance Indicator (indicator): a panel that visualizes the data of a data provider
Navigation panels
are panels that provide navigation functions and include the following:
Breadcrumb: a panel with the full page hierarchy pointing to the current page
Language menu: a panel with available locales (by default in the top center)
Logout panel: a panel with the name of the currently logged-in user and the logout button
Administration and Configuration Guide
28

Page menu custom: a panel with vertically arranged links to all pages in the workspace (thelist of pages can be adjusted) and general controls for the HTML source of the page
Page menu vertical: a panel with vertically arranged links to all pages in the workspace (thelist of pages can be adjusted)
Page menu horizontal: a panel with horizontally arranged links to all pages in theworkspace (the list of pages can be adjusted)
Tree menu: a panel with the links to essential features such as Administration, Home (onthe Home page of the Showcase workspace displayed on the left, in the lateral menu)
Workspace menu custom: a panel with links to available workspaces (the list of workspacescan be adjusted) and general controls for the HTML source of the workspace
Workspace menu horizontal: a horizontal panel with links to available workspaces (the listof workspaces can be adjusted)
Workspace menu vertical: a vertical panel with links to available workspaces (the list ofworkspaces can be adjusted)
System panels
are panels that provide access to system setting and administration facilities and include thefollowing:
Data source manager: a panel for management of external data sources
Export dashboards: a panel export of dashboards
Export/Import workspaces: a panel for exporting and importing of workspaces
2.6.4.5. Adding panels
To add an existing panel to a page or to create a new panel, do the following:
1. Make sure the respective page is open (in the Page dropdown menu of the top menu select thepage).
2. In the top menu, click the Create a new panel in current page button.
3. In the displayed dialog box, expand the panel type you want to add (Dashboard, Navigation,or System) and click the panel you wish to add.
4. From the Components menu on the left, drag and drop the name of an existing panel instanceor the Create panel item into the required location on the page.
If inserting a new indicator, the Panel view with the graph settings will appear. Define the graphdetails and close the dialog.
If adding an instance of an already existing indicator, you might not be able to use it, if it islinked to the KPIs on the particular original page. In such a case, create a new panel.
5. If applicable, edit the content of the newly added panel.
CHAPTER 2. ADMINISTRATION TOOLS
29

2.6.5. Dashboard Builder Filters
Filters work in the following way:
You can define "shared" properties across several data set providers. A shared property is aproperty with the same id number in at least two different data providers.
If you build a dashboard which refers to two or more data providers containing sharedproperties and try to filter by a shared property, then any of the KPIs containing this propertywill be filtered.
Shared properties can be useful for implementing "join"-like filter behaviour. This allows youto filter several KPIs belonging to different data providers simultaneously.
To disable the join-like behaviour, adjust the property ids on the Data Provider Column Definition screen. (Ensure the property ids are unique and do not clash between dataprovider definitions)
Administration and Configuration Guide
30

PART III. USER MANAGEMENT
PART III. USER MANAGEMENT
31

CHAPTER 3. USER ACCOUNTS
3.1. USER ACCOUNTS
The following account types are available for you to use in JBoss Data Virtualization:
JBoss EAP Management User
You must have a JBoss EAP Management User in order to administer your JBoss DataVirtualization installation via the Management Console, Management CLI, JBoss Developer Studio,and Admin API.
JBoss Data Virtualization User
JBoss Data Virtualization users can access the virtual databases (VDBs). You can define whatpermissions each of these users has to dictate what they can do with these databases.
Hierarchical Database User
Hierarchical database users can access the provided hierarchical database. You can define whatpermissions each of these users has to dictate what they can do with this database.
NOTE
User/role names and details are independent of any other accounts such as operatingsystem accounts. They relate only to JBoss EAP and JBoss Data Virtualization.
3.2. DATA ROLES
All authenticated users have access to a VDB. To restrict access, configure data roles. Set these in theTeiid Designer or the dynamic VDB's META-INF/vdb.xml file.
As part of the data role definition, you can map them to JAAS roles specified in <mapped-role-name> tags. (Establish these mappings using the addDataRoleMapping() method.)
How these JAAS roles are associated with users depends on which particular JAAS login module youuse. For instance, the default UsersRolesLoginModule associates users with JAAS roles in plaintext files.
For more information about data roles, see Red Hat JBoss Data Virtualization Development Guide:Reference Material.
IMPORTANT
Do not use "admin" or "user" as JAAS role names as these are reserved specifically forDashboard Builder permissions.
3.3. ADDING A JBOSS EAP MANAGEMENT USER
3.3.1. Add the User for the Management Interfaces
The following procedure documents how to create the initial administrative user, in the event such auser is not created by the chosen installation method. This initial administrative user can use the web-
Administration and Configuration Guide
32

based Management Console and remote instances of the Management CLI to configure and administerJBoss EAP 6 from remote systems.
Procedure 3.1. Create the Initial Administrative User for the Remote Management Interfaces
1. Run the add-user.sh or add-user.bat script.Change to the EAP_HOME/bin/ directory. Invoke the appropriate script for your operatingsystem.
Red Hat Enterprise Linux
[user@host bin]$ ./add-user.sh
Microsoft Windows Server
C:\bin> add-user.bat
2. Choose to add a Management user.Press ENTER to select the default option a to add a Management user.
This user is added to the ManagementRealm and is authorized to perform managementoperations using the web-based Management Console or command-line based ManagementCLI. The other choice, b, adds a user to the ApplicationRealm, and provides no particularpermissions. That realm is provided for use with applications.
3. Enter the desired username and password.When prompted, enter the username and password. You will be prompted to confirm thepassword.
4. Enter group information.Add the group or groups to which the user belongs. If the user belongs to multiple groups, entera comma-separated list. Leave it blank if you do not want the user to belong to any groups.
5. Review the information and confirm.You are prompted to confirm the information. If you are satisfied, type yes.
6. Choose whether the user represents a remote JBoss EAP 6 server instance.Besides administrators, the other type of user which occasionally needs to be added to JBossEAP 6 in the ManagementRealm is a user representing another instance of JBoss EAP 6,which must be able to authenticate to join a cluster as a member. The next prompt allows youto designate your added user for this purpose. If you select yes, you will be given a hashed secret value, representing the user's password, which would need to be added to a differentconfiguration file. For the purposes of this task, answer no to this question.
7. Enter additional users.You can enter additional users if desired, by repeating the procedure. You can also add them atany time on a running system. Instead of choosing the default security realm, you can addusers to other realms to fine-tune their authorizations.
8. Create users non-interactively.You can create users non-interactively, by passing in each parameter at the command line.This approach is not recommended on shared systems, because the passwords will be visible inlog and history files. The syntax for the command, using the management realm, is:
CHAPTER 3. USER ACCOUNTS
33

[user@host bin]$ ./add-user.sh username password
To use the application realm, use the -a parameter.
[user@host bin]$ ./add-user.sh -a username password
9. You can suppress the normal output of the add-user script by passing the --silentparameter. This applies only if the minimum parameters username and password have beenspecified. Error messages will still be shown.
Result
Any users you add are activated within the security realms you have specified. Users active within the ManagementRealm realm are able to manage JBoss EAP 6 from remote systems.
3.3.2. Default User Security Configuration
Introduction
All management interfaces in JBoss EAP 6 are secured by default. This security takes two differentforms:
Local interfaces are secured by a SASL contract between local clients and the server theyconnect to. This security mechanism is based on the client's ability to access the localfilesystem. This is because access to the local filesystem would allow the client to add a user orotherwise change the configuration to thwart other security mechanisms. This adheres to theprinciple that if physical access to the filesystem is achieved, other security mechanisms aresuperfluous. The mechanism happens in four steps:
NOTE
HTTP access is considered to be remote, even if you connect to the localhostusing HTTP.
1. The client sends a message to the server which includes a request to authenticate with thelocal SASL mechanism.
2. The server generates a one-time token, writes it to a unique file, and sends a message tothe client with the full path of the file.
3. The client reads the token from the file and sends it to the server, verifying that it has localaccess to the filesystem.
4. The server verifies the token and then deletes the file.
Remote clients, including local HTTP clients, use realm-based security. The default realm withthe permissions to configure the JBoss EAP 6 instance remotely using the managementinterfaces is ManagementRealm. A script is provided which allows you to add users to thisrealm (or realms you create). For more information on adding users, see the User Managementchapter of the JBoss EAP 6 Administration and Configuration Guide. For each user, the usernameand a hashed password are stored in a file.
Managed domain
EAP_HOME/domain/configuration/mgmt-users.properties
Administration and Configuration Guide
34

Standalone server
EAP_HOME/standalone/configuration/mgmt-users.properties
Even though the contents of the mgmt-users.properties are masked, the file must still betreated as a sensitive file. It is recommended that it be set to the file mode of 600, which givesno access other than read and write access by the file owner.
3.3.3. Adding a JBoss Data Virtualization User
JBoss Data Virtualization's default configuration uses hashed files to define users and their roles.Follow these steps to add a new user for this default configuration.
1. Navigate to the bin director.
2. Launcn the ./add-user.sh script.
3. Selection option the "b) Application User (application-users.properties)" and add theusername and password you desire.
IMPORTANT
The "admin" and "user" role names are reserved specifically for Dashboard Builderpermissions.
3.3.4. Adding an Hierarchical Database User
JBoss Data Virtualization's default configuration uses plain text files to define users and their roles.Follow these steps to add a new user for this default configuration.
IMPORTANT
In previous versions of JBoss Data Virtualization, users could directly add a usernameand password in plain text to the application-users.properties file. Thepassword is now hashed, and therefore adding this information directly into a file is nolonger applicable or supported.
1. Use the EAP_HOME/bin/add-user.sh file to add a new username and password. For detailedsteps, see Section 3.3.1, “Add the User for the Management Interfaces” and remember toselect b) Application User (application-users.properties) instead of a) in thesecond step.
2. Save and close the file.
3. Open the EAP_HOME/MODE/configuration/application-roles.properties file in atext editor.
4. Add the user and assigned roles to the file as a new line with the syntax: username=role1,role2,.... Any number of roles can be assigned. If no roles are assignedto the user then no entry is required. For example:
administrator=administratorharold=accounts, inventory, reports
CHAPTER 3. USER ACCOUNTS
35

5. Save and close the file.
NOTE
To temporarily disable user accounts, insert a hash (#) at the beginning of a line. Whenyou remove the hash, functionality is restored.
3.4. ADDING A MODESHAPE USER
3.4.1. Create a Modeshape Publishing User
To use Modeshape publishing, you need to ensure that at least one user has the connect and readwriteroles or the connect and admin roles.
By default, all the roles are assigned to all anonymous-roles users.
Administration and Configuration Guide
36

PART IV. CONFIGURING THE PRODUCT
PART IV. CONFIGURING THE PRODUCT
37

CHAPTER 4. VIRTUAL DATABASES
4.1. VIRTUAL DATABASES AND JBOSS DATA VIRTUALIZATION
JBoss Data Virtualization uses virtual databases (VDBs) to facilitate an enterprise data integrationsolution.
4.2. VIRTUAL DATABASE DEPLOYMENT
A virtual database (VDB) must be deployed before it can be accessed by client applications.
A VDB can be deployed by the following means:
File Deployment
File deployment is recommended for quick deployment during development, when the server isrunning locally on the developer's workstation.
Management Console
Deployment via the web-based Management Console is recommended for a simple way of deployinga VDB to a remote server.
Management Command Line Interface
Deployment via the EAP Management Command Line Interface (CLI) is another simple option fordeployment.
AdminShell
Deployment via the AdminShell is recommended for more advanced deployments such as when youwant to automate the deployment of artifacts in your environment.
Admin API
Deployment via the Admin API is recommended for more advanced deployments such as when youwant to deploy a VDB from within other applications.
NOTE
A VDB can also be deployed within the Teiid Designer. See the Red Hat JBoss DataVirtualization User Guide.
IMPORTANT
Removal of a VDB cleans up all of its resources automatically; however, existingsessions will not be terminated automatically.
Administration and Configuration Guide
38

WARNING
When deploying a VDB, overwriting a VDB with one of the same name willterminate all connections to the old VDB unless VDB versioning is used.
Red Hat recommends the use of VDB versioning on production systems.
WARNING
You can locally name VDB artifacts as you wish, but the runtime names of yourdeployed VDB artifacts must have an extension of *.vdb for a zip file or *-vdb.xmlfor an xml file. Failure to name your file correctly will result in a deployment failureas the Teiid subsystem will not know how to handle it.
4.3. DEPLOY A VDB VIA FILE DEPLOYMENT
Prerequisites
Red Hat JBoss Data Virtualization must be installed.
Procedure 4.1. Deploy a VDB via File Deployment
1. Copy your VDB into the deploy directoryCopy your VDB file into the EAP_HOME/standalone/deployments directory.
2. Create a marker fileCreate an empty marker file of the same name with extension .dodeploy in the samedirectory. For example, if your VDB name is enterprise.vdb, then the marker file name mustbe enterprise.vdb.dodeploy.
NOTE
This only works in standalone mode. For domain mode, you must use one of the otheravailable methods.
4.4. DEPLOY A VDB VIA MANAGEMENT CONSOLE
Prerequisites
Red Hat JBoss Data Virtualization must be installed.
The JBoss Enterprise Application Platform (EAP) server must be running.
You must have a JBoss EAP Management User registered.
CHAPTER 4. VIRTUAL DATABASES
39

Procedure 4.2. Deploy a VDB via Management Console
1. Launch the console in a Web browserOpen http://localhost:9990/console/ in a web browser.
2. Authenticate to the consoleEnter your JBoss EAP administrator username and password when prompted.
3. Open the Deployments panelIn the Runtime view, select Server → Manage Deployments.
4. Add the virtual database
a. Select the Add button.
b. Select Choose File and choose the VDB file you want to deploy.
c. Select Next to review the deployment names then select Save.
d. Select En/Disable to enable the VDB.
4.5. DEPLOY A VDB VIA CLI
Prerequisites
Red Hat JBoss Data Virtualization must be installed.
The JBoss Enterprise Application Platform (EAP) server must be running.
Procedure 4.3. Deploy a VDB via CLI
1. Open the command line interfaceRun the EAP_HOME/bin/jboss-cli.sh command.
2. Connect to the serverRun the connect command.
3. Deploy the virtual databaseIf in standalone mode, run deploy PATH/DATABASE.vdb.
If in domain mode, run deploy -all-server-groups PATH/DATABASE.vdb.
NOTE
In domain mode, you need to select a particular "server-group" or all available servergroups are deployment options.
4.6. DEPLOY A VDB VIA ADMINSHELL
Prerequisites
Red Hat JBoss Data Virtualization must be installed.
The JBoss Enterprise Application Platform (EAP) server must be running.
Administration and Configuration Guide
40

Procedure 4.4. Deploy a VDB via AdminShell
1. Open the interactive AdminShell interfaceRun the ./adminshell.sh command.
2. Open a connectionWithin the interactive AdminShell, run the connectAsAdmin() command.
3. Deploy your virtual databaseRun the deploy("PATH/DATABASE.vdb") command.
4. Close the connectionRun the disconnect() command.
5. Exit the interactive shell
a. Enter the exit command to leave the interactive shell.
NOTE
In domain mode, when deploying using AdminShell, the VDB is deployed to all availableservers.
A VDB can also be deployed via the AdminShell console or using a script via the non-interactive AdminShell. For more information on using these, refer to topics on theAdministration Shell.
4.7. DEPLOY A VDB VIA ADMIN API
You can deploy a VDB using the deploy method provided by the Admin interface within the AdminAPI package (org.teiid.adminapi).
Javadocs for Red Hat JBoss Data Virtualization can be found on the Red Hat Customer Portal .
NOTE
In domain mode, when deploying using the Admin API, the VDB is deployed to allavailable servers.
4.8. VDB DEPENDENCIES
When deploying a virtual database (VDB) in JBoss Data Virtualization, you also have to providedependency libraries and configuration settings for accessing the physical data sources used by yourVDB. (You can identify all dependent physical data sources by looking in META-INF/vdb.xml withinthe EAP_HOME/MODE/deployments/DATABASE.vdb file.)
For example, if you are trying to integrate Oracle and file sources in your VDB, then you areresponsible for providing both the JDBC driver for the Oracle source, and any necessary documentsand configuration files that are needed by the file translator.
Data source instances may be shared between multiple VDBs and applications. Consider sharingconnections to sources that are heavy-weight and resource-constrained.
Once you have deployed the VDB and its dependencies, client applications can connect using the JDBC
CHAPTER 4. VIRTUAL DATABASES
41

API. If there are any errors in the deployment, the connection attempt will fail and a message will belogged. Use the Management Console (or check the log files) to identify any errors and correct them soyou can proceed. See Red Hat JBoss Data Virtualization Development Guide: Server Development forinformation on how to use JDBC to connect to your VDB.
WARNING
Some data source configuration files may contain passwords or other sensitiveinformation. For instructions on how to avoid storing passwords in plaintext, referto the JBoss Enterprise Application Platform Security Guide.
4.9. DATA SOURCE DEPLOYMENT
4.9.1. Accumulo Data Sources
Accumulo data sources use a Teiid specific JCA connector that is deployed into JBoss EAP duringinstallation. There are many ways to create a Accumulo data source, using CLI, AdminShell, admin-console, etc. The example shown below uses the CLI tool, as this works in both Standalone and Domainmodes.
Execute the following command using the CLI once you connected to the Server. Ensure you providethe correct URL and user credentials. Add any additional properties required by the connector byduplicating the "connection-definitions" command below. Edit the JNDI name to match the JNDI nameyou used in VDB. batch /subsystem=resource-adapters/resource-adapter=accumulo/connection-definitions=teiid:add(jndi-name=java:/accumulo-ds, class-name=org.teiid.resource.adapter.accumulo.AccumuloManagedConnectionFactory, enabled=true, use-java-context=true) /subsystem=resource-adapters/resource-adapter=accumulo/connection-definitions=teiid/config-properties=ZooKeeperServerList:add(value=localhost:2181) /subsystem=resource-adapters/resource-adapter=accumulo/connection-definitions=teiid/config-properties=Username:add(value=user) /subsystem=resource-adapters/resource-adapter=accumulo/connection-definitions=teiid/config-properties=Password:add(value=password) /subsystem=resource-adapters/resource-adapter=accumulo/connection-definitions=teiid/config-properties=InstanceName:add(value=instancename) /subsystem=resource-adapters/resource-adapter=accumulo/connection-definitions=teiid/config-properties=Roles:add(value=public) /subsystem=resource-adapters/resource-adapter=accumulo:activate runbatch
These are the properties defined in the RAR file:
Table 4.1. Properties
Property Description Required? Default?
Administration and Configuration Guide
42

ZooKeeperServerList A comma-separated listof zoo keeper serverlocations. Each locationcan contain an optionalport, of the formathost:port
True. None.
ZooKeeperServerList A comma-separated listof zoo keeper serverlocations. Each locationcan contain an optionalport, of the formathost:port
True. None.
Username Connection User'sName
True. None.
Password Connection User'spassword
True. None.
InstanceName Accumulo instancename
True. None.
Password Connection User'spassword
True. None.
Roles optional visibility foruser, supply multiplewith comma separated
False. None.
Property Description Required? Default?
To find out all the properties that are supported by this Accumulo Connector execute this command inthe CLI: /subsystem=teiid:read-rar-description(rar-name=accumulo)
4.9.2. Amazon SimpleDB Data Sources
SimpleDB data sources use a Teiid specific JCA connector that is deployed into EAP duringinstallation. There are many ways to create a SimpleDB data source, using CLI, AdminShell, admin-console, and so forth. The example shown below uses the CLI tool, as this works in both Standalone andDomain modes.
Execute the following command using the CLI once you connected to the Server. Make sure youprovide the correct access keys. Add any additional properties required by the connector byduplicating the "connection-definitions" command below. Edit the JNDI name to match the JNDI nameyou used in VDB. batch /subsystem=resource-adapters/resource-adapter=simpledb/connection-definitions=simpledbDS:add(jndi-name=java:/simpledbDS, class-name=org.teiid.resource.adapter.simpledb.SimpleDBManagedConnectionFactory, enabled=true, use-java-context=true) /subsystem=resource-adapters/resource-adapter=simpledb/connection-definitions=simpledbDS/config-properties=AccessKey:add(value=xxx) /subsystem=resource-adapters/resource-
CHAPTER 4. VIRTUAL DATABASES
43

adapter=simpledb/connection-definitions=simpledbDS/config-properties=SecretAccessKey:add(value=xxx) /subsystem=resource-adapters/resource-adapter=simpledb:activate runbatch
To find out all the properties that are supported by this SimpleDB Connector execute the followingcommand in the CLI: /subsystem=teiid:read-rar-description(rar-name=simpledb)
4.9.3. Cassandra Data Sources
WARNING
Technology Preview features are not supported, may not be functionally complete,and are not intended for production use. These features are included to providecustomers with early access to upcoming product innovations, enabling them totest functionality and provide feedback during the development process.
Cassandra's data sources use a Teiid specific JCA connector that is deployed into EAP duringinstallation. There are many ways to create a Cassandra data source, using CLI, AdminShell, admin-console, etc. The example shown below uses the CLI tool, as this works in both Standalone and Domainmodes.
Execute the following command using the CLI once you connected to the Server. Make sure youprovide the correct URL and user credentials. Add any additional properties required by the connectorby duplicating the "connection-definitions" command below. Edit the JNDI name to match the JNDIname you used in VDB: batch /subsystem=resource-adapters/resource-adapter=cassandra/connection-definitions=cassandraDS:add(jndi-name=java:/cassandraDS, class-name=org.teiid.resource.adapter.cassandra.CassandraManagedConnectionFactory, enabled=true, use-java-context=true) /subsystem=resource-adapters/resource-adapter=cassandra/connection-definitions=cassandraDS/config-properties=Address:add(value=127.0.0.1) /subsystem=resource-adapters/resource-adapter=cassandra/connection-definitions=cassandraDS/config-properties=Keyspace:add(value=my-keyspace) /subsystem=resource-adapters/resource-adapter=cassandra:activate runbatch
To find out all the properties that are supported by this Cassandra Connector execute the followingcommand in the CLI: /subsystem=teiid:read-rar-description(rar-name=cassandra)
4.9.4. File Data Source
File data sources use a Teiid specific JCA connector that is deployed into EAP during installation.There are many ways to create the file data source, using CLI, AdminShell, admin-console, and soforth. The example shown below uses the CLI tool, as this works in both Standalone and Domain modes.
Execute following command using the CLI once you connected to the Server. Make sure you providethe correct directory name and other properties below. Add any additional properties required by theconnector by duplicating the "connection-definitions" command below. Edit the JNDI name to matchthe JNDI name you used in VDB: batch /subsystem=resource-adapters/resource-adapter=file/connection-definitions=fileDS:add(jndi-name=java:/fileDS, class-
Administration and Configuration Guide
44

name=org.teiid.resource.adapter.file.FileManagedConnectionFactory, enabled=true, use-java-context=true) /subsystem=resource-adapters/resource-adapter=file/connection-definitions=fileDS/config-properties=Parentdirectory:add(value=/home/rareddy/testing/) /subsystem=resource-adapters/resource-adapter=file/connection-definitions=fileDS/config-properties=AllowParentPaths:add(value=true) /subsystem=resource-adapters/resource-adapter=file:activate runbatch
To find out all the properties that are supported by this File Connector execute the following commandin the CLI: /subsystem=teiid:read-rar-description(rar-name=file)
4.9.5. Google Spreadsheet Data Sources
You can authenticate your Google account in either of two ways: ClientLogin (which requires login andpassword) or OAuth (more complicated as it requires the user to supply a refresh token).
The Google JCA connector is named teiid-connector-google.rar. The examples include a samplegoogle.xml file. The JCA connector has number of config-properties that facilitate authentication. TheJCA connector connects to one spreadsheet:
Table 4.2. Configuration Properties
Property Description
AuthMethod Method to access Google. Thisproperty can be set to one of:ClientLogin, OAuth2. If the setting isClientLogin it is necessary toprovide additional two configproperties Username, Password. Ifthe setting is OAuth2 it is necessaryto provide RefreshToken.
Username Username to Google account.Applicable only ifAuthMethod=ClientLogin
Password Password to Google account.Applicable only ifAuthMethod=ClientLogin
SpreadsheetName Required property with name of theSpreadsheet that is datasource forthis connector.
BatchSize Maximum number of rows that canbe fetched at a time. Defaults to4096.
To obtain an OAuth Refresh Token, go to Google's authentication site:
https://accounts.google.com/o/oauth2/auth?scope=https%3A%2F%2Fwww.googleapis.com%2Fauth%2Fdrive+https%3A%2F%2Fspreadsheets.google.com%2Ffeeds&redirect_uri=urn:ietf:wg:oauth:2.0:oob&response_type=code&client_id=217138521084.apps.googleusercontent.com
CHAPTER 4. VIRTUAL DATABASES
45

Next, copy the authorization code into the following POST request and run it on command line. (Therefresh token will be in the response.)
4.9.6. Infinispan Data Sources
Infinispan data sources use a Teiid specific JCA connector that is deployed into EAP duringinstallation. This connector can be configured to support the following modes of Infinispan caches:
Table 4.3. Registry Properties
Cache Type How to Obtain This Cache
Local Cache JNDI
Local Cache Configuration file
Remote Cache JNDI
Remote Cache Specify one or more host porrts.
Local Cache Specify one or more Hot Rod client property files.
You can configure these properties for this connector:
Table 4.4. Registry Properties
Property Required
Property Template Description
CacheTypeMap Yes
cacheName:className[;pkFieldName][,cacheName:className[;pkFieldName]..]
Map the root Java Object class name tothe cache, and identify which attributeis the primary key to the cache.
module No Nil Specify the JBoss AS module thatcontains the cache classes that weredefined in CacheTypeMap
CacheJndiName
No Nil JNDI name to fine the CacheContainer
curl \--data-urlencode code=<AUTH_CODE> \--data-urlencode client_id=217138521084.apps.googleusercontent.com \--data-urlencode client_secret=gXQ6-lOkEjE1lVcz7giB4Poy \--data-urlencode redirect_uri=urn:ietf:wg:oauth:2.0:oob \--data-urlencode grant_type=authorization_code https://accounts.google.com/o/oauth2/token
Administration and Configuration Guide
46
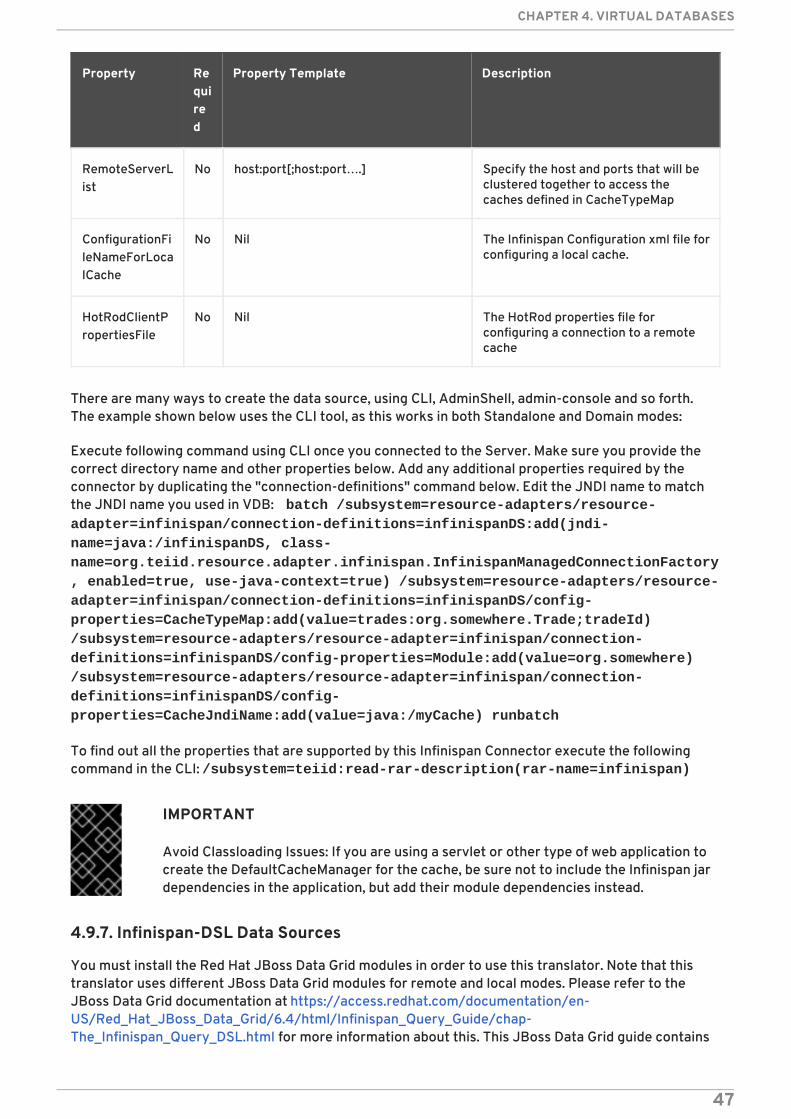
RemoteServerList
No host:port[;host:port….] Specify the host and ports that will beclustered together to access thecaches defined in CacheTypeMap
ConfigurationFileNameForLocalCache
No Nil The Infinispan Configuration xml file forconfiguring a local cache.
HotRodClientPropertiesFile
No Nil The HotRod properties file forconfiguring a connection to a remotecache
Property Required
Property Template Description
There are many ways to create the data source, using CLI, AdminShell, admin-console and so forth.The example shown below uses the CLI tool, as this works in both Standalone and Domain modes:
Execute following command using CLI once you connected to the Server. Make sure you provide thecorrect directory name and other properties below. Add any additional properties required by theconnector by duplicating the "connection-definitions" command below. Edit the JNDI name to matchthe JNDI name you used in VDB: batch /subsystem=resource-adapters/resource-adapter=infinispan/connection-definitions=infinispanDS:add(jndi-name=java:/infinispanDS, class-name=org.teiid.resource.adapter.infinispan.InfinispanManagedConnectionFactory, enabled=true, use-java-context=true) /subsystem=resource-adapters/resource-adapter=infinispan/connection-definitions=infinispanDS/config-properties=CacheTypeMap:add(value=trades:org.somewhere.Trade;tradeId) /subsystem=resource-adapters/resource-adapter=infinispan/connection-definitions=infinispanDS/config-properties=Module:add(value=org.somewhere) /subsystem=resource-adapters/resource-adapter=infinispan/connection-definitions=infinispanDS/config-properties=CacheJndiName:add(value=java:/myCache) runbatch
To find out all the properties that are supported by this Infinispan Connector execute the followingcommand in the CLI: /subsystem=teiid:read-rar-description(rar-name=infinispan)
IMPORTANT
Avoid Classloading Issues: If you are using a servlet or other type of web application tocreate the DefaultCacheManager for the cache, be sure not to include the Infinispan jardependencies in the application, but add their module dependencies instead.
4.9.7. Infinispan-DSL Data Sources
You must install the Red Hat JBoss Data Grid modules in order to use this translator. Note that thistranslator uses different JBoss Data Grid modules for remote and local modes. Please refer to theJBoss Data Grid documentation at https://access.redhat.com/documentation/en-US/Red_Hat_JBoss_Data_Grid/6.4/html/Infinispan_Query_Guide/chap-The_Infinispan_Query_DSL.html for more information about this. This JBoss Data Grid guide contains
CHAPTER 4. VIRTUAL DATABASES
47

some basic information on using the Infinispan Query DSL. The jar required for library mode isinfinispan-embedded-query, and in remote client-server mode the .jar is infinispan-query, which isinstalled by default with jboss-datagrid-server.
Infinispan-DSL data sources use a Teiid-specific JCA connector that is deployed into EAP duringinstallation. This connector can be configured to support the following modes of Infinispan caches thatwill be accessed using the Hot Rod client:
Table 4.5. Properties
Cache Type Property Name How to Obtain Cache
Remote Cache CacheJndiName JNDI
Remote Cache RemoteServerList Server list: specify one or morehost ports
Remote Cache HotRodClientPropertiesFile HotRod client properties file
This requires, at a minimum, JDG 6.3 or better, that is configured to use Google Protobuf for objectserialization. This will enable Teiid to query the cache as if it was a local cache configured with Luceneindexes.
You can configure the following properties for this connector:
Table 4.6. Properties
Property Required?
Property Template Description
CacheTypeMap Yes
cacheName:className[;pkFieldName][,cacheName:className[;pkFieldName]..]
Map the root Java Object class name tothe cache, and identify which attributeis the primary key to the cache.
ProtobinFile Yes
Nil Path to the Google Protobin file that'spackaged in a jar (such as/quickstart/addressbook.protobin)
MessageMarshallers
Yes
marshaller [,marshaller,..] Contains Class names mapped itsrespective message marshaller,(class:marshaller,[class:marshaller,..]),that are to be registered forserialization
MessageDescriptor
Yes
Nil Message descriptor class name for theroot object in cache
module No Nil Specify the JBoss EAP module thatcontains the cache classes that need tobe loaded.
Administration and Configuration Guide
48

CacheJndiName
No Nil JNDI name to find the CacheContainer
RemoteServerList
No host:port[;host:port….] Specify the host and ports that will beclustered together to access thecaches.
HotRodClientPropertiesFile
No Nil The HotRod properties file forconfiguring a connection to a remotecache
Property Required?
Property Template Description
Here is the XML code for a resource-adapter that is used to connect to the JDG remote-query quickstart:
<resource-adapter id="infinispanRemQS"> <module slot="main" id="org.jboss.teiid.resource-adapter.infinispan.dsl"/> <connection-definitions> <connection-definition class-name="org.teiid.resource.adapter.infinispan.dsl.InfinispanManagedConnectionFactory" jndi-name="java:/infinispanRemote" enabled="true" use-java-context="true" pool-name="infinispanDS"> <config-property name="CacheTypeMap"> addressbook:org.jboss.as.quickstarts.datagrid.hotrod.query.domain.Person;id </config-property> <config-property name="ProtobinFile"> /quickstart/addressbook.protobin </config-property> <config-property name="MessageDescriptor"> quickstart.Person </config-property> <config-property name="Module"> com.client.quickstart.pojos </config-property> <config-property name="MessageMarshallers"> org.jboss.as.quickstarts.datagrid.hotrod.query.domain.Person:org.jboss.as.quickstarts.datagrid.hotrod.query.marshallers.PersonMarshaller,org.jboss.as.quickstarts.datagrid.hotrod.query.domain.PhoneNumber:org.jboss.as.quickstarts.datagrid.hotrod.query.marshallers.PhoneNumberMarshaller,org.jboss.as.quickstarts.datagrid.hotrod.query.domain.PhoneType:org.jboss.as.quickstarts.datagrid.hotrod.query.marshallers.PhoneTypeMarshaller </config-property> <config-property name="RemoteServerList"> 127.0.0.1:11322 </config-property>
CHAPTER 4. VIRTUAL DATABASES
49

4.9.8. JDBC Data Sources
Here is an example highlighting configuring an Oracle data source. The process is nearly identicalregardless of the database vendor. Typically the JDBC jar and the configuration like connection URLand user credentials change.
There are configuration templates for all the data sources in the jboss-install/docs/teiid/datasources directory. A complete description how a data source can beadded into JBoss EAP is also described here. Here are two different ways to create a datasource:
Firstly, deploy the required JDBC jar file. For example, if you are trying to create a Oracle data source,first you need to deploy the "ojdbc6.jar" file: deploy /path/to/ojdbc6.jar
NOTE
If JBoss EAPis running in standalone mode, you can also manually copy this 'ojdbc6.jar"to the jboss-install>/standalone/deployments directory, to automaticallydeploy without using the CLI tool.
Now create a data source using this driver. There are many ways to create the datasource using CLI,AdminShell or admin-console. The example shown below uses the CLI tool, as this works in bothStandalone and Domain modes.
Execute the following command using the CLI once you connected to the Server. Make sure youprovide the correct URL and user credentials and edit the JNDI name to match the JNDI name youused in VDB: /subsystem=datasources/data-source=oracel-ds:add(jndi-name=java:/OracleDS, driver-name=ojdbc6.jar, connection-url=jdbc:oracle:thin:{host}:1521:orcl,user-name={user}, password={password}) /subsystem=datasources/data-source=oracel-ds:enable
4.9.9. LDAP Data Sources
LDAP data sources use a Teiid specific JCA connector which is deployed into EAP during installation.There are many ways to create the ldap data source, using CLI, AdminShell, admin-console etc. Theexample shown below uses the CLI tool, as this works in both Standalone and Domain modes.
Execute the following command using the CLI once you connected to the Server. Make sure youprovide the correct URL and user credentials. Add any additional properties required by the connectorby duplicating the "connection-definitions" command below. Edit the JNDI name to match the JNDIname you used in VDB: batch /subsystem=resource-adapters/resource-adapter=ldap/connection-definitions=ldapDS:add(jndi-name=java:/ldapDS, class-name=org.teiid.resource.adapter.ldap.LDAPManagedConnectionFactory, enabled=true, use-java-context=true) /subsystem=resource-adapters/resource-adapter=ldap/connection-definitions=ldapDS/config-properties=LdapUrl:add(value=ldap://ldapServer:389) /subsystem=resource-adapters/resource-adapter=ldap/connection-definitions=ldapDS/config-properties=LdapAdminUserDN:add(value={cn=???,ou=???,dc=???}) /subsystem=resource-adapters/resource-adapter=ldap/connection-definitions=ldapDS/config-properties=LdapAdminUserPassword:add(value={pass})
</connection-definition> </connection-definitions> </resource-adapter>
Administration and Configuration Guide
50

/subsystem=resource-adapters/resource-adapter=ldap/connection-definitions=ldapDS/config-properties=LdapTxnTimeoutInMillis:add(value=-1) /subsystem=resource-adapters/resource-adapter=ldap:activate runbatch
To find out all the properties that are supported by this LDAP Connector execute the followingcommand in the CLI. /subsystem=teiid:read-rar-description(rar-name=ldap)
4.9.10. MongoDB Data Sources
MongoDB data sources use a Teiid-specific JCA connector that is deployed into EAP duringinstallation. There are many ways to create a MongoDB data source, using CLI, AdminShell, admin-console and so forth. The example shown below uses the CLI tool, as this works in both Standalone andDomain modes.
Execute the following command using the CLI once you connected to the Server. Make sure youprovide the correct URL and user credentials. Add any additional properties required by the connectorby duplicating the "connection-definitions" command below. Edit the JNDI name to match the JNDIname you used in VDB: batch /subsystem=resource-adapters/resource-adapter=mongodb/connection-definitions=mongodbDS:add(jndi-name="java:/mongoDS", class-name=org.teiid.resource.adapter.mongodb.MongoDBManagedConnectionFactory, enabled=true, use-java-context=true) /subsystem=resource-adapters/resource-adapter=mongodb/connection-definitions=mongodbDS/config-properties=RemoteServerList:add(value="{host}:27017") /subsystem=resource-adapters/resource-adapter=mongodb/connection-definitions=mongodbDS/config-properties=Database:add(value="{db-name}") /subsystem=resource-adapters/resource-adapter=mongodb:activate runbatch
These are the properties that are defined in the RAR file:
Table 4.7. Properties
Property Description Required? Default
RemoteServerList A comma-separated listof server locations. Eachlocation can contain anoptional port, of theformat host:port
Not applicable. Not applicable.
Username Connection User'sName
False None.
Password Connection User'spassword
False None.
Database MongoDB databasename
True None.
To find out all the properties that are supported by this MongoDB Connector execute the followingcommand in the CLI: /subsystem=teiid:read-rar-description(rar-name=mongodb)
4.9.11. Phoenix Data Source
CHAPTER 4. VIRTUAL DATABASES
51
The following is a example for setting up Phoenix Data Sources, which is precondition for ApacheHBase Translator. In addition to the Data Sources set up, this article also cover mapping Phoenix tableto an existing HBase table and creating a new Phoenix table.
There are configuration templates for Phoenix data sources in theEAP_HOME>/docs/teiid/datasources directory. A complete description how a data source can beadded into Red Hat JBoss EAP is also described here.
Configuring a Phoenix data source is nearly identical to configuring JDBC Data Sources. The first stepis deploying the Phoenix driver jar. Using below CLI command to deploy Phoenix driver: module add --name=org.apache.phoenix --resources=/path/to/phoenix-[version]-client.jar --dependencies=javax.api,sun.jdk,org.apache.log4j,javax.transaction.api /subsystem=datasources/jdbc-driver=phoenix:add(driver-name=phoenix,driver-module-name=org.apache.phoenix,driver-class-name=org.apache.phoenix.jdbc.PhoenixDriver
The driver jar can be download from phoenix document.
Next, create the Data Source base on above deployed driver, which is also like creating JDBC DataSource. Using below CLI command to create the data source: /subsystem=datasources/data-source=phoenixDS:add(jndi-name=java:/phoenixDS, driver-name=phoenix, connection-url=jdbc:phoenix:{zookeeper quorum server}, enabled=true, use-java-context=true, user-name={user}, password={password})
Ensure the URL, Driver, and other properties are configured correctly: The JNDI name need to matchthe JNDI name you used in the VDB. The driver name need to match the driver you deployed in abovesteps
The URL need to match the HBase zookeeper quorum server. Here is an example:
user-name/password - The user credentials for Phoenix Connection
Mapping a Phoenix table to an existing HBase table takes two steps. The first step is installingphoenix-[version]-server.jar to the classpath of every HBase region server. An easy way to do this is tocopy it into the HBase lib. (For more details see the Phoenix documentation.)
Next, you must executing the DDL to map a Phoenix table to an existing HBase table. The DDL caneither be executed via the Phoenix Command Line, or executed by JDBC.
The Following is a example for mapping an existing HBase Customer with the following structure:
As depicted above, the HBase Customer table have 2 column families, customer and sales, and eachhas 2 column qualifiers, name, city, product and amount respectively.Map this table to Phoenix viaDDL:
For more about mapping Phoenix table to an existing HBase table please refer to the Phoenixdocumentation.
jdbc:phoenix [ :<zookeeper quorum> [ :<port number> ] [ :<root node> ] ], 'jdbc:phoenix:127.0.0.1:2181'
CREATE TABLE IF NOT EXISTS "Customer"("ROW_ID" VARCHAR PRIMARY KEY, "customer"."city" VARCHAR, "customer"."name" VARCHAR, "sales"."amount" VARCHAR, "sales"."product" VARCHAR)
Administration and Configuration Guide
52

Creating a new Phoenix table is just like mapping to an existing HBase table. Phoenix will create anymetadata (table, column families) that do not exist. Similar to the above example the DDL to create thePhoenix/HBase Customer table would be:
4.9.12. Salesforce Data Sources
Salesforce data sources use a Teiid specific JCA connector that is deployed into EAP duringinstallation. There are many ways to create the salesforce data source, using CLI,AdminShell, admin-console etc. The example shown below uses the CLI tool, as this works in both Standalone and Domainmodes.
Execute the following command using the CLI once you connected to the server. Make sure youprovide the correct URL and user credentials. Add any additional properties required by the connectorby duplicating the "connection-definitions" command below. Edit the JNDI name to match the JNDIname you used in VDB: batch /subsystem=resource-adapters/resource-adapter=salesforce/connection-definitions=sfDS:add(jndi-name=java:/sfDS, class-name=org.teiid.resource.adapter.salesforce.SalesForceManagedConnectionFactory, enabled=true, use-java-context=true) /subsystem=resource-adapters/resource-adapter=salesforce/connection-definitions=sfDS/config-properties=URL:add(value=https://www.salesforce.com/services/Soap/u/22.0) /subsystem=resource-adapters/resource-adapter=salesforce/connection-definitions=sfDS/config-properties=username:add(value={user}) /subsystem=resource-adapters/resource-adapter=salesforce/connection-definitions=sfDS/config-properties=password:add(value={password}) /subsystem=resource-adapters/resource-adapter=salesforce:activate runbatch
To find out all the properties that are supported by this Salesforce Connector execute the followingcommand in the CLI: /subsystem=teiid:read-rar-description(rar-name=salesforce)
4.9.13. Solr Data Sources
Solr data sources use a Teiid specific JCA connector that is deployed into EAP during installation.There are many ways to create a Solr data source, using CLI, AdminShell, admin-console, etc. Theexample shown below uses the CLI tool, as this works in both Standalone and Domain modes.
Execute the following command using the CLI once you connected to the Server. Make sure youprovide the correct URL and user credentials. Add any additional properties required by the connectorby duplicating the "connection-definitions" command below. Edit the JNDI name to match the JNDIname you used in VDB: batch /subsystem=resource-adapters/resource-adapter=solr/connection-definitions=solrDS:add(jndi-name=java:/solrDS, class-name=org.teiid.resource.adapter.solr.SolrManagedConnectionFactory, enabled=true, use-java-context=true) /subsystem=resource-adapters/resource-adapter=solr/connection-definitions=solrDS/config-properties=url:add(value=http://localhost:8983/solr/) /subsystem=resource-adapters/resource-adapter=solr/connection-definitions=solrDS/config-properties=CoreName:add(value=collection1) /subsystem=resource-adapters/resource-adapter=solr:activate runbatch
CREATE TABLE IF NOT EXISTS "Customer"("ROW_ID" VARCHAR PRIMARY KEY, "customer"."city" VARCHAR, "customer"."name" VARCHAR, "sales"."amount" VARCHAR, "sales"."product" VARCHAR)
CHAPTER 4. VIRTUAL DATABASES
53

To find out all the properties that are supported by this Solr Connector execute the following commandin the CLI: /subsystem=teiid:read-rar-description(rar-name=solr)
4.9.14. Web Service Data Sources
Web service data sources use a Teiid specific JCA connector that is deployed into EAP duringinstallation. There are many ways to create the file data source, using CLI, AdminShell, admin-consoleetc. The example shown below uses the CLI tool, as this works in both Standalone and Domain modes.
Execute following command using the CLI once you connected to the Server. Make sure you providethe correct endpoint and other properties below. Add any additional properties required by theconnector by duplicating the "connection-definitions" command below. Edit the JNDI name to matchthe JNDI name you used in VDB: batch /subsystem=resource-adapters/resource-adapter=webservice/connection-definitions=wsDS:add(jndi-name=java:/wsDS, class-name=org.teiid.resource.adapter.ws.WSManagedConnectionFactory, enabled=true, use-java-context=true) /subsystem=resource-adapters/resource-adapter=webservice/connection-definitions=wsDS/config-properties=EndPoint:add(value={end_point}) /subsystem=resource-adapters/resource-adapter=webservice:activate runbatch
To find out all the properties that are supported by this Web Service Connector execute the followingcommand in the CLI. /subsystem=teiid:read-rar-description(rar-name=webservice).The Web Service Data Source supports specifying a WSDL using the Wsdl property. If the Wsdl propertyis set, then the ServiceName, EndPointName, and NamespaceUri properties should also be set. TheWsdl property may be a URL or file location or the WSDL to use. You must restart the server.
Table 4.8. Registry Properties
Property Application Required? Default? Description
EndPoint HTTP andSOAP.
True Notapplicable.
URL for HTTP ans service endpointfor SOAP.
SecurityType HTTP andSOAP.
false none Type of Authentication to used withthe web service. Allowed values are"None","HTTPBasic","WSSecurity"and "Kerberos".
AuthUserName
HTTP andSOAP.
false Notapplicable.
Name value for authentication, usedin HTTPBasic and WsSecurity.
AuthPassword
HTTP andSOAP.
false Notapplicable.
Password value for authentication,used in HTTPBasic and WsSecurity
ConfigFile HTTP andSOAP.
False Notapplicable.
CXF client configuration File or URL.
EndPointName
HTTP andSOAP.
False Teiid Local part of the end point QNameto use with this connection, needs tomatch one defined in CXF file.
ServiceName SOAP False Notapplicable.
Local part of the service QName touse with this connection.
Administration and Configuration Guide
54
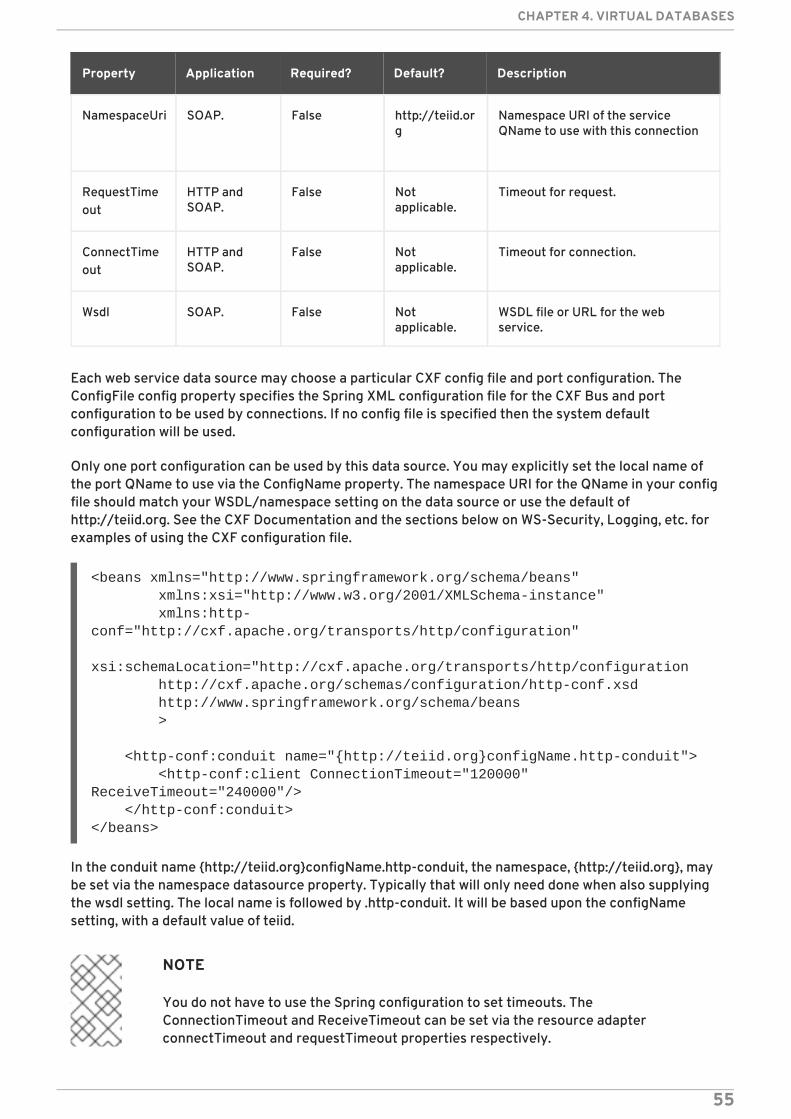
NamespaceUri SOAP. False http://teiid.org
Namespace URI of the serviceQName to use with this connection
RequestTimeout
HTTP andSOAP.
False Notapplicable.
Timeout for request.
ConnectTimeout
HTTP andSOAP.
False Notapplicable.
Timeout for connection.
Wsdl SOAP. False Notapplicable.
WSDL file or URL for the webservice.
Property Application Required? Default? Description
Each web service data source may choose a particular CXF config file and port configuration. TheConfigFile config property specifies the Spring XML configuration file for the CXF Bus and portconfiguration to be used by connections. If no config file is specified then the system defaultconfiguration will be used.
Only one port configuration can be used by this data source. You may explicitly set the local name ofthe port QName to use via the ConfigName property. The namespace URI for the QName in your configfile should match your WSDL/namespace setting on the data source or use the default ofhttp://teiid.org. See the CXF Documentation and the sections below on WS-Security, Logging, etc. forexamples of using the CXF configuration file.
In the conduit name {http://teiid.org}configName.http-conduit, the namespace, {http://teiid.org}, maybe set via the namespace datasource property. Typically that will only need done when also supplyingthe wsdl setting. The local name is followed by .http-conduit. It will be based upon the configNamesetting, with a default value of teiid.
NOTE
You do not have to use the Spring configuration to set timeouts. TheConnectionTimeout and ReceiveTimeout can be set via the resource adapterconnectTimeout and requestTimeout properties respectively.
<beans xmlns="http://www.springframework.org/schema/beans" xmlns:xsi="http://www.w3.org/2001/XMLSchema-instance" xmlns:http-conf="http://cxf.apache.org/transports/http/configuration" xsi:schemaLocation="http://cxf.apache.org/transports/http/configuration http://cxf.apache.org/schemas/configuration/http-conf.xsd http://www.springframework.org/schema/beans > <http-conf:conduit name="{http://teiid.org}configName.http-conduit"> <http-conf:client ConnectionTimeout="120000" ReceiveTimeout="240000"/> </http-conf:conduit></beans>
CHAPTER 4. VIRTUAL DATABASES
55

To enable the use of WS-Security, the SecurityType should be set to WSSecurity. At this time Teiiddoes not expect a WSDL to describe the service being used. Thus a Spring XML configuration file is notonly required, it must instead contain all of the relevant policy configuration. And just as with thegeneral configuration, each data source is limited to specifying only a single port configuration to use: batch /subsystem=resource-adapters/resource-adapter=webservice/connection-definitions=wsDS:add(jndi-name=java:/wsDS, class-name=org.teiid.resource.adapter.ws.WSManagedConnectionFactory, enabled=true, use-java-context=true) /subsystem=resource-adapters/resource-adapter=webservice/connection-definitions=wsDS/config-properties=ConfigFile:add(value=${jboss.server.home.dir}/standalone/configuration/xxx-jbossws-cxf.xml) /subsystem=resource-adapters/resource-adapter=webservice/connection-definitions=wsDS/config-properties=ConfigName:add(value=port_x) /subsystem=resource-adapters/resource-adapter=webservice/connection-definitions=wsDS/config-properties=SecurityType:add(value=WSSecurity) /subsystem=resource-adapters/resource-adapter=webservice:activate runbatch
This is the corresponding xxx-jbossws-cxf.xml file that adds a timestamp to the SOAP header
Note that the client port configuration is matched to the data source instance by the QName{http://teiid.org}port_x, where the namespace will match your namespace setting or the default ofhttp://teiid.org. The configuration may contain other port configurations with different local names.
WS-Security Kerberos is only supported when the WSDL property is defined in resource-adapterconnection configuration and only when WSDL Based Procedures are used. WSDL file must containWS-Policy section, then WS-Policy section is correctly interpreted and enforced on the endpoint. Thisis what the sample CXF configuration looks like:
<beans xmlns="http://www.springframework.org/schema/beans" xmlns:xsi="http://www.w3.org/2001/XMLSchema-instance" xmlns:jaxws="http://cxf.apache.org/jaxws" xsi:schemaLocation="http://www.springframework.org/schema/beans http://www.springframework.org/schema/beans/spring-beans.xsd http://cxf.apache.org/jaxws http://cxf.apache.org/schemas/jaxws.xsd"> <jaxws:client name="{http://teiid.org}port_x" createdFromAPI="true"> <jaxws:outInterceptors> <bean/> <ref bean="Timestamp_Request"/> </jaxws:outInterceptors> </jaxws:client> <bean id="Timestamp_Request"> <constructor-arg> <map> <entry key="action" value="Timestamp"/> <map> </constructor-arg> </bean> </beans>
Administration and Configuration Guide
56

Nexst, configure the security-domain in the standalone-teiid.xml file under 'security' subsystemlike this:
<?xml version="1.0" encoding="UTF-8"?><beans xmlns="http://www.springframework.org/schema/beans" xmlns:xsi="http://www.w3.org/2001/XMLSchema-instance" xmlns:http="http://cxf.apache.org/transports/http/configuration" xmlns:jaxws="http://cxf.apache.org/jaxws" xmlns:cxf="http://cxf.apache.org/core" xmlns:p="http://cxf.apache.org/policy" xmlns:sec="http://cxf.apache.org/configuration/security" xsi:schemaLocation="http://www.springframework.org/schema/beans http://www.springframework.org/schema/beans/spring-beans.xsd http://cxf.apache.org/jaxws http://cxf.apache.org/schemas/jaxws.xsd http://cxf.apache.org/transports/http/configuration http://cxf.apache.org/schemas/configuration/http-conf.xsd http://cxf.apache.org/configuration/security http://cxf.apache.org/schemas/configuration/security.xsd http://cxf.apache.org/core http://cxf.apache.org/schemas/core.xsd http://cxf.apache.org/policy http://cxf.apache.org/schemas/policy.xsd"> <bean class="org.springframework.beans.factory.config.PropertyPlaceholderConfigurer"/> <cxf:bus> <cxf:features> <p:policies/> <cxf:logging/> </cxf:features> </cxf:bus> <jaxws:client name="{http://webservices.samples.jboss.org/}HelloWorldPort" createdFromAPI="true"> <jaxws:properties> <entry key="ws-security.kerberos.client"> <bean class="org.apache.cxf.ws.security.kerberos.KerberosClient"> <constructor-arg ref="cxf"/> <property name="contextName" value="alice"/> <property name="serviceName" value="[email protected]"/> </bean> </entry> </jaxws:properties> </jaxws:client></beans>
<security-domain name="alice" cache-type="default"> <authentication> <login-module code="Kerberos" flag="required"> <module-option name="storeKey" value="true"/> <module-option name="useKeyTab" value="true"/> <module-option name="keyTab" value="/home/alice/alice.keytab"/>
CHAPTER 4. VIRTUAL DATABASES
57

The CXF config property may also be used to control the logging of requests and responses for specificor all ports. Logging, when enabled, will be performed at an INFO level to theorg.apache.cxf.interceptor context: batch /subsystem=resource-adapters/resource-adapter=webservice/connection-definitions=wsDS:add(jndi-name=java:/wsDS, class-name=org.teiid.resource.adapter.ws.WSManagedConnectionFactory, enabled=true, use-java-context=true) /subsystem=resource-adapters/resource-adapter=webservice/connection-definitions=wsDS/config-properties=ConfigFile:add(value=${jboss.server.home.dir}/standalone/configuration/xxx-jbossws-cxf.xml) /subsystem=resource-adapters/resource-adapter=webservice/connection-definitions=wsDS/config-properties=ConfigName:add(value=port_x) /subsystem=resource-adapters/resource-adapter=webservice:activate runbatch
Here is the corresponding xxx-jbossws-cxf.xml file:
The CXF config property may also be used to control low level aspects of the HTTP transport:
<module-option name="principal" value="[email protected]"/> <module-option name="doNotPrompt" value="true"/> <module-option name="debug" value="true"/> <module-option name="refreshKrb5Config" value="true"/> </login-module> </authentication></security-domain>
<beans xmlns="http://www.springframework.org/schema/beans" xmlns:xsi="http://www.w3.org/2001/XMLSchema-instance" xmlns:jaxws="http://cxf.apache.org/jaxws" xsi:schemaLocation="http://www.springframework.org/schema/beans http://www.springframework.org/schema/beans/spring-beans.xsd http://cxf.apache.org/jaxws http://cxf.apache.org/schemas/jaxws.xsd"> <jaxws:client name="{http://teiid.org}port_y" createdFromAPI="true"> <jaxws:features> <bean class="org.apache.cxf.feature.LoggingFeature"/> </jaxws:features> </jaxws:client> </beans>
<beans xmlns="http://www.springframework.org/schema/beans" xmlns:xsi="http://www.w3.org/2001/XMLSchema-instance" xmlns:http-conf="http://cxf.apache.org/transports/http/configuration" xsi:schemaLocation="http://cxf.apache.org/transports/http/configuration http://cxf.apache.org/schemas/configuration/http-conf.xsd http://www.springframework.org/schema/beans http://www.springframework.org/schema/beans/spring-beans.xsd">
Administration and Configuration Guide
58

To use HTTPS, configure the CXF file like this (You can also configure HTTPBasic, kerberos and soforth):
The kerberos support is based SPNEGO as described in http://cxf.apache.org/docs/client-http-transport-including-ssl-support.html#ClientHTTPTransport%28includingSSLsupport%29-SpnegoAuthentication%28Kerberos%29. There two types of kerberos support, this first of which isNegotiation. With this configuration, the REST service is configured with a Kerberos JAAS domain, tonegotiate a token, which is then used to access the web service. For this first create a security domainin the standalone.xml file:
<http-conf:conduit name="{http://teiid.org}port_z.http-conduit"> <!-- WARNING ! disableCNcheck=true should NOT be used in production --> <http-conf:tlsClientParameters disableCNcheck="true" /> </http-conf:conduit></beans>
<beans xmlns="http://www.springframework.org/schema/beans" xmlns:xsi="http://www.w3.org/2001/XMLSchema-instance" xmlns:sec="http://cxf.apache.org/configuration/security" xmlns:http-conf="http://cxf.apache.org/transports/http/configuration" xmlns:jaxws="http://java.sun.com/xml/ns/jaxws" xsi:schemaLocation="http://cxf.apache.org/transports/http/configuration http://cxf.apache.org/schemas/configuration/http-conf.xsd http://www.springframework.org/schema/beans http://www.springframework.org/schema/beans/spring-beans-2.0.xsd http://cxf.apache.org/configuration/security http://cxf.apache.org/schemas/configuration/security.xsd"> <http-conf:conduit name="*.http-conduit"> <http-conf:client ConnectionTimeout="120000" ReceiveTimeout="240000"/> <http-conf:tlsClientParameters secureSocketProtocol="SSL"> <sec:trustManagers> <sec:keyStore type="JKS" password="changeit" file="/path/to/truststore.jks"/> </sec:trustManagers> </http-conf:tlsClientParameters> </http-conf:conduit></beans>
<security-domain name="MY_REALM" cache-type="default"> <authentication> <login-module code="Kerberos" flag="required"> <module-option name="storeKey" value="true"/> <module-option name="useKeyTab" value="true"/> <module-option name="keyTab" value="/home/username/service.keytab"/> <module-option name="principal" value="host/testserver@MY_REALM"/> <module-option name="doNotPrompt" value="true"/>
CHAPTER 4. VIRTUAL DATABASES
59

Set the jboss-cxf-xxx.xml file like this:
The resource adapter creation needs to define these properties:
IMPORTANT
Even though above configuration configures the value of "ConfigName", the cxfframework currently in the case of JAX-RS client does not give option to use it. For thatreason use "*.http-conduit" which will apply to all the HTTP communications under thisresource adapter.
The second method is Delegation. If the user is already logged into Teiid using Kerberos usingJDBC/ODBC or used SPNEGO in web-tier and used pass-through authentication into Teiid, then thereis no need to negotiate a new token for the Kerberos. The system can delegate the existing token. Toconfigure for delegation, set up security domain defined exactly as defined in "negotiation", and jboss-cxf-xxx.xml file, however remove the following line from jboss-cxf-xxx.xml file, as it is not going tonegotiate new token.
Add the following properties in web service resource adapter creation. One determines that "kerberos"security being used, the second defines a security domain to be used at the data source, in this casewe want to use a security domain that passes through a logged-in user:
<module-option name="debug" value="false"/> </login-module> </authentication></security-domain>
<beans xmlns="http://www.springframework.org/schema/beans" xmlns:xsi="http://www.w3.org/2001/XMLSchema-instance" xmlns:sec="http://cxf.apache.org/configuration/security" xmlns:http-conf="http://cxf.apache.org/transports/http/configuration" xsi:schemaLocation="http://cxf.apache.org/transports/http/configuration http://cxf.apache.org/schemas/configuration/http-conf.xsd http://www.springframework.org/schema/beans http://www.springframework.org/schema/beans/spring-beans-2.0.xsd http://cxf.apache.org/configuration/security http://cxf.apache.org/schemas/configuration/security.xsd"> <http-conf:conduit name="*.http-conduit"> <http-conf:authorization> <sec:AuthorizationType>Negotiate</sec:AuthorizationType> <sec:Authorization>MY_REALM</sec:Authorization> </http-conf:authorization> </http-conf:conduit></beans>
<config-property name="ConfigFile">path/to/jboss-cxf-xxxx.xml</config-property><config-property name="ConfigName">test</config-property>
<sec:Authorization>MY_REALM</sec:Authorization>
Administration and Configuration Guide
60

To configure the "passthrough-security" security domain you must add the "security" subsystemsettings:
NOTE
The username and password are optional. If there is no authenticated subject availablein the context, these can help create a simple static user, but that user will not work withkerberos authentication as the subject will not have the kerberos token that is required.
4.10. MANAGING DEPLOYED VIRTUAL DATABASES USINGMANAGEMENT CONSOLE
4.10.1. Managing Deployed Virtual Databases Using Management Console
Administrators can manage deployed virtual databases from within the Virtual Databases panel.
4.10.2. Opening the Virtual Databases Panel
1. Log in to the JBoss Management Console.
2. Select the Runtime tab.
3. From the navigation tree, select Status → Subsystems → Virtual Databases .
<config-property name="SecurityType">Kerberos</config-property><security> <security-domain>passthrough-security</security-domain> </security>
<security-domain name="passthrough-security" cache-type="default"> <authentication> <login-module code="org.teiid.jboss.PassthroughIdentityLoginModule" flag="required" module="org.jboss.teiid"> <module-option name="username" value="guest"/> <module-option name="password" value="guest"/> </login-module> </authentication> </security-domain>
CHAPTER 4. VIRTUAL DATABASES
61

CHAPTER 5. VERSIONING
5.1. VIRTUAL DATABASE VERSIONING
Virtual database (VDB) versioning allows you to deploy multiple versions of a VDB simultaneously, andto specify which version will be used in certain scenarios.
When an application connects to JBoss Data Virtualization, you can set the desired version of a VDBusing a connection property. (Refer to the Red Hat JBoss Data Virtualization User Guide for moreinformation.)
If a specific version is set, then you can only connect to that VDB. If no version is set, the deployedVDBs are searched until the appropriate version is found. This feature helps support more dynamicmigration scenarios.
5.2. SET THE VDB VERSION
You can set the version in one of two ways: through the vdb.xml file, (which is useful for dynamicVDBs), or by specifying a naming convention in the deployment file (such as VDBNAME.VERSION.vdb).The deployer is responsible for choosing an appropriate version number. If there is already a VDBname and version combination that matches the current deployment, then connections to the previousVDB will be terminated and its cache entries will be flushed. Any new connections will then be made tothe new VDB.
5.3. VIRTUAL DATABASE CONNECTION TYPE
Once your VDB is deployed, you can configure a property called connection type. Use this to determinewhat connections can be made to the VDB. The connection type can be one of:
NONE: disallow new connections.
BY_VERSION: (the default setting) allow connections only if the version is specified or if this isthe earliest BY_VERSION VDB and there are no VDBs marked as ANY.
ANY: allow connections with or without a version specified.
If you only want to migrate a few of your applications to the new version of the VDB, then set it toBY_VERSION. This ensures that only applications that know of the new version may use it.
If only a select few applications are to remain on the current VDB version, then you will need to updatetheir connection settings to reference the current VDB by its version. The newly deployed VDB willthen have its connection type set to ANY, which allows all new connections to be made against thenewer version.
If you need to undertake a rollback in this scenario, then the newly-deployed VDB will, accordingly,have its connection type set to NONE or BY_VERSION.
5.4. SET THE VDB CONNECTION TYPE VIA ADMIN API
You can change a VDB connection type using the changeVDBConnectionType method provided bythe Admin interface within the Admin API package (org.teiid.adminapi).
Javadocs for Red Hat JBoss Data Virtualization can be found on the Red Hat Customer Portal .
Administration and Configuration Guide
62

CHAPTER 6. RESOURCE ADAPTERS
6.1. RESOURCE ADAPTERS IN JBOSS DATA VIRTUALIZATION
With the exception of JDBC data sources, JBoss Data Virtualization provides a JCA adapter for eachsupported data source. These are the resource adapter identifiers, as specified in the serverconfiguration file:
File Adapter - file
Google Spreadsheet Adapter - google
Red Hat JBoss Data Grid (6.1 & 6.2) Adapter - infinispan
LDAP Adapter - ldap
Salesforce Adapter - salesforce
Web Services Adapter - webservice
Mongo DB Adapter (technical preview) - mongodb
NOTE
A resource adapter for the JDBC translator is provided with JBoss EAP by default.
6.2. CONFIGURING RESOURCE ADAPTERS
You can use Management Console, AdminShell, or Management CLI (or, in standalone mode, directlyedit the server configuration file) to configure resource adapters for data sources required by a VDB.
NOTE
Note that in domain mode, you must use Management CLI, Management Console orAdminShell to configure data sources. Refer to the JBoss Enterprise ApplicationPlatform Administration and Configuration Guide for an example of how to configureresource adapters using the Management Console.
IMPORTANT
If you configure a resource adapter using either a CLI script or the AdminShell, the nameof the resource adapter must not be the same as that of an existing one. (Teiid Designerhandles this by creating a unique name for the resource adapter.)
The reasons for this are as follows:
Any time a resource adapter with a duplicate name is added, the server has tobe restarted. This conforms with the way Red Hat JBoss EAP's JCA system wasdesigned, in that multiple instances of resource adapters with the same nameare only recognised when the server is launched.
Anytime you delete a resource adapter by name, all instances with the samename will be deleted.
CHAPTER 6. RESOURCE ADAPTERS
63

6.3. EXAMPLE CONFIGURATION
Example configuration, as it would appear in the server configuration file, can be found in the EAP_HOME/docs/teiid/datasources/ directory.
NOTE
This configuration will need to be adjusted with file paths and properties appropriate toyour installation. The JNDI name must be the same JNDI name used in the VDB.
6.4. RESOURCE ADAPTER PROPERTIES
For a full listing of configuration properties, you can run the following command from within theManagement CLI:
ADAPTER_ID refers to the identifier of the resource adapter as specified in the server configuration file.
6.5. CONFIGURING RESOURCE ADAPTERS USING CLI SCRIPTS
This is the preferred method for configuring resource adapters.
JBoss Data Virtualization provides an example Management CLI script for configuring each of theprovided resource adapters. A script for a particular resource adapter can be found in the EAP_HOME/docs/teiid/datasources/DATASOURCE directory.
When configuring resource adapters using the Management CLI, you must provide a properties file.Sample properties files are provided in the same directory as the sample scripts.
You can run these scripts (once JBoss Data Virtualization is running) by executing the followingcommand:
For more information about using the Management CLI, see the JBoss Enterprise Application PlatformAdministration and Configuration Guide.
NOTE
These scripts will need to be adjusted with file paths and properties appropriate to yourinstallation. The JNDI name must be the same JNDI name used in the VDB.
6.6. FILE ADAPTER PROPERTIES
The following table describes the configuration properties that can be configured for the File resourceadapter:
/subsystem=teiid:read-rar-description(rar-name=ADAPTER_ID)
./EAP_HOME/bin/jboss-cli.sh --connect --file=EAP_HOME/docs/teiid/datasources/DATASOURCE/SCRIPT.cli --properties=EAP_HOME/docs/teiid/datasources/DATASOURCE/SCRIPT.properties
Administration and Configuration Guide
64

Config property Example Description
ParentDirectory Directory where the data files arestored.
FileMapping file1.txt=fileX.txt,file2.txt=fileY.txt
Set FileMapping to redirectspecific relative paths (casesensitive) to alternative locations.The string value specifies a mapin the formatkey=value(,key=value)*. Optional.
AllowParentPaths true Set AllowParentPaths to false todisallow '..' in paths. This preventsrequesting files that are notcontained in the parent directory.Optional.
6.7. GOOGLE SPREADSHEET RESOURCE ADAPTER PROPERTIES
6.7.1. Google Spreadsheet Resource Adapter Properties
The following table describes the configuration properties that can be configured for the GoogleSpreadsheet resource adapter:
Config property Description
AuthMethod This is the authentication method used to accessGoogle. This property can be set to either ClientLogin or OAuth2. If the setting is ClientLogin it is necessary to provide twoadditional properties: Username and Password. Ifthe setting is OAuth2 it is necessary to provide a RefreshToken.
RefreshToken This is required only if AuthMethod=OAuth2
Username Username for the Google account. Required only if AuthMethod=ClientLogin
Password Password for the Google account. Required only if AuthMethod=ClientLogin
SpreadsheetName The name of the spreadsheet to which this resourceadapter is connecting. Required.
BatchSize The maximum number of rows that can be fetched ata time. Default is 4096.
6.7.2. Obtaining an OAuth Refresh Token
CHAPTER 6. RESOURCE ADAPTERS
65

When using the Google Spreadsheet resource adapter with OAuth authentication, you will need toobtain an OAuth refresh token.
Procedure 6.1. Obtaining an OAuth Refresh Token
1. Get an authorization codeClick on the following link: Get Authorization Code
Click on Allow access to allow the Teiid Google Connector to access the Google account inwhich the spreadsheet resides.
2. Obtain the refresh tokenCopy the authorization code from the previous step into the code field of the following POSTrequest and run it from the command line:
The refresh token will be in the response.
6.8. JBOSS DATA GRID RESOURCE ADAPTER PROPERTIES
The JBoss Data Grid (JDG) resource adapter can be configured to support the following cachingmodes:
Cache Type Obtain Cache By
Remote Cache using JNDI
Remote Cache 1 or more host:port combinations specified
Remote Cache referring to HotRod client properties file specified
The following table describes the configuration properties that can be configured for the resourceadapter:
Property Name Required Property Template Description
CacheTypeMap Y cacheName:className[;pkFieldName][,cacheName:className[;pkFieldName]..]
This property maps theroot Java class name tothe cache and identifiesthe primary key.
curl \--data-urlencode code=AUTH_CODE \--data-urlencode client_id=217138521084.apps.googleusercontent.com \--data-urlencode client_secret=gXQ6-lOkEjE1lVcz7giB4Poy \--data-urlencode redirect_uri=urn:ietf:wg:oauth:2.0:oob \--data-urlencode grant_type=authorization_code https://accounts.google.com/o/oauth2/token
Administration and Configuration Guide
66

module N This property specifiesthe JBoss EAP modulecontaining the cacheclasses defined inCacheTypeMap.
CacheJndiName N This is the JNDI nameused to find theCacheContainer.
RemoteServerList N host:port[;host:portâ ¦.] This property specifiesthe host (and ports) thatwill be clusteredtogether to access thecaches defined inCacheTypeMap.
ConfigurationFileNameForLocalCache
N This is the XMLconfiguration file forconfiguring a localcache.
HotRodClientPropertiesFile
N This is the HotRodproperties file forconfiguring aconnection to a remotecache.
Property Name Required Property Template Description
6.9. LDAP ADAPTER PROPERTIES
The following table describes the configuration properties that can be configured for the LDAPresource adapter:
Config property Property Template Description
LdapUrl LDAP Directory URL. Thisproperty is mandatory.
LdapAdminUserDN cn=???,ou=???,dc=??? LDAP administration user DN.This property is mandatory.
LdapAdminUserPassword LDAP administration password.This property is mandatory.
LdapTxnTimeoutInMillis LDAP transaction timeout inmilliseconds. -1 = no timeout. Thisproperty is optional.
6.10. SALESFORCE ADAPTER PROPERTIES
CHAPTER 6. RESOURCE ADAPTERS
67

The following table describes the configuration properties that can be configured for the Salesforceresource adapter:
Config property Description
URL The URL to connect to.
username The username.
password The password.
requestTimeout This is an optional property for setting timeouts,which can also be done through the CXF config.
connectTimeout This is an optional property for setting timeouts,which can also be done through the CXF config.
configFile Use this property to supply specific configuration forthe SalesForce service. This configuration mustcontain config for "SforceService" service withnamespace "urn:partner.soap.sforce.com".
6.11. WEB SERVICES ADAPTER PROPERTIES
The following table describes the configuration properties that can be configured for the Web Servicesresource adapter:
Config property Example Description
EndPoint End point URL for the web service
SecurityType HTTPBasic Use for http basic security.
AuthUserName Use for http basic security.
AuthPassword Use for http basic security.
RequestTimeout This is an optional property forsetting timeouts, which can alsobe done through the CXF config.
ConnectTimeout This is an optional property forsetting timeouts, which can alsobe done through the CXF config.
ConfigFile Use these properties to supplyspecific CXF configuration for thisservice. This file must contain aconfiguration for the namedefined on the "EndPointName"property.
Administration and Configuration Guide
68

EndPointName WebSVC Use with ConfigFile. Theseproperties to supply specific CXFconfiguration for this service.
Config property Example Description
6.12. MONGODB ADAPTER PROPERTIES
The following table describes the configuration properties that can be configured for the MongoDBresource adapter:
Config property Example Description
RemoteServerList localhost:27017 MongoDB server list in this formhost:port[;host:port...]*
Database Database name.
Username Use this property together withPassword to supply credentials.
Password Use this property together withUsername to supply credentials.
CHAPTER 6. RESOURCE ADAPTERS
69
CHAPTER 7. CXF CONFIGURATION
7.1. CXF CONFIGURATION
If your configuration uses CXF, you need to specify the data source configuration file and portconfiguration.
The ConfigFile property, set in the server configuration file for the resource-adapter subsystem,specifies the Spring XML configuration file. (The system's default configuration is used if theconfiguration file is not specified.)
The ConfigName property, also set in the server configuration file for the resource-adapter subsystem,specifies the port configuration. Set this to the local part of the desired port QName.
The configuration file property is specified via /subsystem=resource-adapters/resource-adapter=webservice/connection-definitions=wsDS/config-properties=ConfigFile:add(value=${jboss.server.home.dir}/standalone/configuration/xxx-jbossws-cxf.xml)
7.2. CONFIGURE CXF FOR A WEB SERVICE DATA SOURCE
Prerequisites
You must have configured a web service data source.
Procedure 7.1. Configure CXF for a Web Service Data Source
1. Specify the Web Service CXF ConfigFileRun the following command from within the Management CLI, specifying the CXF configurationfile for the data source:
2. Specify the Web Service CXF ConfigNameSpecify the port configuration by running the following command from within the ManagementCLI, using the port QName (local part only) for the value:
3. Create/Edit the CXF Configuration FileOpen/create the EAP_HOME/MODE/configuration/CONFIG-FILE.xml configuration file.
/subsystem=resource-adapters/resource-adapter=webservice/connection-definitions=wsDS/config-properties=ConfigFile:add(value=CONFIG-FILE.xml)
/subsystem=resource-adapters/resource-adapter=webservice/connection-definitions=wsDS/config-properties=ConfigName:add(value=CONFIG-NAME)
<http-conf:conduit name="{NAMESPACE}CONFIG-NAME.http-conduit">...</http-conf:conduit>
Administration and Configuration Guide
70

NOTE
CONFIG-NAME is the same as that specified above, with a default value of teiid.NAMESPACE is the namespace URI for the QName in your config file, whichshould match your WSDL/namespace setting on the data source or use thedefault of "http://teiid.org". The namespace may be set via the namespacedatasource property. Typically that will only need done when also supplying theWSDL setting.
The following is an example of a CXF file configuring timeouts:
NOTE
For web service data sources, CXF configuration is only applicable to non-binary calls.
7.3. CONFIGURE CXF FOR A WEB SERVICE DATA SOURCE: WS-SECURITY
Prerequisites
The web service data source must be configured and the ConfigFile and ConfigNameproperties must be configured for CXF.
Procedure 7.2. Configure CXF for a Web Service Data Source: WS-Security
1. Specify the CXF SecurityTypeRun the following command from within the Management CLI, using WSSecurity as the valuefor SecurityType:
2. Modify the CXF Configuration File
<beans xmlns="http://www.springframework.org/schema/beans" xmlns:xsi="http://www.w3.org/2001/XMLSchema-instance" xmlns:http-conf="http://cxf.apache.org/transports/http/configuration" xsi:schemaLocation="http://cxf.apache.org/transports/http/configuration http://cxf.apache.org/schemas/configuration/http-conf.xsd http://www.springframework.org/schema/beans http://www.springframework.org/schema/beans/spring-beans.xsd">
<http-conf:conduit name="{NAMESPACE}CONFIG-NAME.http-conduit"> <http-conf:client ConnectionTimeout="120000" ReceiveTimeout="240000"/> </http-conf:conduit></beans>
/subsystem=resource-adapters/resource-adapter=webservice/connection-definitions=wsDS/config-properties=SecurityType:add(value=WSSecurity)
CHAPTER 7. CXF CONFIGURATION
71

Open the CXF configuration file for the web service data source and add your desiredproperties.
The following is an example of a web service data source CXF configuration file adding atimestamp to the SOAP header:
NOTE
A WSDL is not expected to describe the service being used.
The Spring XML configuration file must contain the relevant policyconfiguration.
The client port configuration is matched to the data source instance by the CONFIG-NAME. The configuration may contain other port configurations withdifferent local names.
References
For more information about WS-Security and CXF configuration options refer tohttp://cxf.apache.org/docs/ws-security.html.
7.4. CONFIGURE CXF FOR A WEB SERVICE DATA SOURCE: LOGGING
CXF configuration can control the logging of requests and responses for specific or all ports. Logging,when enabled, is performed at an INFO level to the org.apache.cxf.interceptor context.
<beans xmlns="http://www.springframework.org/schema/beans" xmlns:xsi="http://www.w3.org/2001/XMLSchema-instance" xmlns:jaxws="http://cxf.apache.org/jaxws" xsi:schemaLocation="http://www.springframework.org/schema/beans http://www.springframework.org/schema/beans/spring-beans.xsd http://cxf.apache.org/jaxws http://cxf.apache.org/schemas/jaxws.xsd">
<jaxws:client name="{http://teiid.org}.teiid" createdFromAPI="true"> <jaxws:outInterceptors> <ref bean="Timestamp_Request"/> </jaxws:outInterceptors> </jaxws:client>
<bean id="Timestamp_Request"> <constructor-arg> <map> <entry key="action" value="Timestamp"/> </map> </constructor-arg> </bean> </beans>
Administration and Configuration Guide
72

Prerequisites
The web service data source must be configured and the ConfigFile and ConfigNameproperties must be configured for CXF.
Procedure 7.3. Configure CXF for a Web Service Data Source: Logging
Modify the CXF Configuration FileOpen the CXF configuration file for the web service data source and add your desired loggingproperties.
The following is an example of a CXF configuration file for a web service data source thatenables logging:
References
For more information about CXF logging configuration options seehttp://cxf.apache.org/docs/debugging-and-logging.html.
7.5. CONFIGURE CXF FOR A WEB SERVICE DATA SOURCE:TRANSPORT SETTINGS
CXF configuration can also control low level aspects of the HTTP transport.
Prerequisites
The web service data source must be configured and the ConfigFile and ConfigNameproperties must be configured for CXF.
Procedure 7.4. Configure CXF for a Web Service Data Source: Transport Settings
Open the CXF configuration file for the web service data source and add your desired transportproperties.
<beans xmlns="http://www.springframework.org/schema/beans" xmlns:xsi="http://www.w3.org/2001/XMLSchema-instance" xmlns:jaxws="http://cxf.apache.org/jaxws" xsi:schemaLocation="http://www.springframework.org/schema/beans http://www.springframework.org/schema/beans/spring-beans.xsd http://cxf.apache.org/jaxws http://cxf.apache.org/schemas/jaxws.xsd">
<jaxws:client name="{http://teiid.org}teiid" createdFromAPI="true"> <jaxws:features> <bean class="org.apache.cxf.feature.LoggingFeature"/> </jaxws:features> </jaxws:client> </beans>
CHAPTER 7. CXF CONFIGURATION
73

The following is an example of a CXF configuration file for a web service data source thatdisables hostname verification:
WARNING
disableCNcheck=true must NOT be used in production.
7.6. CONFIGURE CXF FOR A WEB SERVICE DATA SOURCE: SSLSUPPORT (HTTPS)
For using HTTPS, you can configure the CXF configuration file as below:
<beans xmlns="http://www.springframework.org/schema/beans" xmlns:xsi="http://www.w3.org/2001/XMLSchema-instance" xmlns:jaxws="http://cxf.apache.org/jaxws" xsi:schemaLocation="http://cxf.apache.org/transports/http/configuration http://cxf.apache.org/schemas/configuration/http-conf.xsd http://www.springframework.org/schema/beans http://www.springframework.org/schema/beans/spring-beans.xsd">
<http-conf:conduit name="{http://teiid.org}teiid.http-conduit"> <http-conf:tlsClientParameters disableCNcheck="tru" /> </http-conf:conduit> </beans>
<beans xmlns="http://www.springframework.org/schema/beans" xmlns:xsi="http://www.w3.org/2001/XMLSchema-instance" xmlns:sec="http://cxf.apache.org/configuration/security" xmlns:http-conf="http://cxf.apache.org/transports/http/configuration" xmlns:jaxws="http://java.sun.com/xml/ns/jaxws" xsi:schemaLocation="http://cxf.apache.org/transports/http/configuration http://cxf.apache.org/schemas/configuration/http-conf.xsd http://www.springframework.org/schema/beans http://www.springframework.org/schema/beans/spring-beans-2.0.xsd http://cxf.apache.org/configuration/security http://cxf.apache.org/schemas/configuration/security.xsd"> <http-conf:conduit name="*.http-conduit"> <http-conf:client ConnectionTimeout="120000" ReceiveTimeout="240000"/> <http-conf:tlsClientParameters secureSocketProtocol="SSL"> <sec:trustManagers> <sec:keyStore type="JKS" password="changeit" file="/path/to/truststore.jks"/>
Administration and Configuration Guide
74

For more information about http-conduit based configuration see http://cxf.apache.org/docs/client-http-transport-including-ssl-support.html . You can also configure for services such as HTTPBasic andKerberos.
7.7. CONFIGURE CXF FOR A SALESFORCE DATA SOURCE
Prerequisites
You must have configured a Salesforce data source.
Procedure 7.5. Configure CXF for a Salesforce Data Source
1. Run the following command from within the Management CLI, specifying the CXF configurationfile for the data source:
2. Specify the port configuration by running the following command from within the ManagementCLI, using the port QName (local part only) for the value, in this case Soap:
3. Open/create the EAP_HOME/MODE/configuration/CONFIG-FILE.xml configuration file.Set the namespace URI for the QName to {urn:partner.soap.sforce.com}, using Soapas the value for ConfigName:
The following is an example of a CXF file that configures timeout values:
</sec:trustManagers> </http-conf:tlsClientParameters> </http-conf:conduit></beans>
/subsystem=resource-adapters/resource-adapter=salesforce/connection-definitions=sfDS/config-properties=ConfigFile:add(value=CONFIG-FILE.xml)
/subsystem=resource-adapters/resource-adapter=salesforce/connection-definitions=sfDS/config-properties=ConfigName:add(value=Soap)
<http-conf:conduit name="{urn:partner.soap.sforce.com}Soap.http-conduit">...</http-conf:conduit>
<beans xmlns="http://www.springframework.org/schema/beans" xmlns:xsi="http://www.w3.org/2001/XMLSchema-instance" xmlns:http-conf="http://cxf.apache.org/transports/http/configuration" xsi:schemaLocation="http://cxf.apache.org/transports/http/configuration http://cxf.apache.org/schemas/configuration/http-conf.xsd http://www.springframework.org/schema/beans http://www.springframework.org/schema/beans/spring-beans.xsd">
<http-conf:conduit name="{urn:partner.soap.sforce.com}Soap.http-
CHAPTER 7. CXF CONFIGURATION
75

NOTE
CXF configuration for Salesforce data sources is only used for http bus configuration. Itis not used for WS-Security. Salesforce has its own security authentication.
conduit"> <http-conf:client ConnectionTimeout="120000" ReceiveTimeout="240000"/> </http-conf:conduit></beans>
Administration and Configuration Guide
76

CHAPTER 8. JDBC DATA SOURCES
8.1. CONFIGURING JDBC DATA SOURCES
For JBoss Data Virtualization to connect to JDBC data sources, you must configure the data source inthe JBoss EAP instance with the following two steps:
1. Install (or deploy) the JDBC JAR driver file.
2. Create (or configure) it as a data source in JBoss EAP.
NOTE
See the Red Hat JBoss Enterprise Application Platform Administration and ConfigurationGuide for more comprehensive information about configuring data sources.
8.2. EXAMPLE CONFIGURATION
Example configuration, as it would appear in the server configuration file, can be found in the EAP_HOME/docs/teiid/datasources/ directory.
NOTE
This configuration will need to be adjusted with file paths and properties appropriate toyour installation. The JNDI name must be the same JNDI name used in the VDB.
8.3. INSTALL A JDBC DRIVER WITH THE MANAGEMENT CLI
Procedure 8.1. Install a JDBC Driver with the Management CLI
1. Start the Management CLI: ./EAP_HOME/bin/jboss-cli.sh
2. Enter the connect command.
3. Enter the deploy PATH/FILE.jar command: deploy ojdbc6.jar
4. Enter the quit command.
8.4. INSTALL A JDBC DRIVER WITH THE MANAGEMENT CONSOLE
Summary
Before your application can connect to a JDBC datasource, your datasource vendor's JDBC driversneed to be installed in a location where JBoss EAP 6 can use them. JBoss EAP 6 allows you to deploythese drivers like any other deployment. This means that you can deploy them across multiple serversin a server group, if you use a managed domain.
Prerequisites
Before performing this task, you need to meet the following prerequisites:
Download the JDBC driver from your database vendor.
CHAPTER 8. JDBC DATA SOURCES
77

NOTE
Any JDBC 4-compliant driver is automatically recognized and installed in the system byname and version. A JDBC JAR is identified using the Java service provider mechanism.Such JARs contain the META-INF/services/java.sql.Driver text, which contains thename of the Driver classes in that JAR.
Procedure 8.2. Modify the JDBC Driver JAR
If the JDBC driver JAR is not JDBC 4-compliant, it can be made deployable using the followingmethod.
1. Change to, or create, an empty temporary directory.
2. Create a META-INF subdirectory.
3. Create a META-INF/services subdirectory.
4. Create a META-INF/services/java.sql.Driver file, which contains one line indicating the fully-qualified class name of the JDBC driver.
5. Use the JAR command-line tool to update the JAR like this:
jar \-uf jdbc-driver.jar META-INF/services/java.sql.Driver
6. Section 2.2.2, “Log in to the Management Console”
7. If you use a managed domain, deploy the JAR file to a server group. Otherwise, deploy it toyour server. See the Deploy with the Management Console section of the Administration andConfiguration Guide for JBoss EAP 6 for more information.
Result:
The JDBC driver is deployed, and is available for your applications to use.
8.5. CREATE A NON-XA DATASOURCE WITH THE MANAGEMENTINTERFACES
Summary
This topic covers the steps required to create a non-XA datasource, using either the ManagementConsole or the Management CLI.
Prerequisites
The JBoss EAP 6 server must be running.
NOTE
Prior to version 10.2 of the Oracle datasource, the <no-tx-separate-pools/> parameterwas required, as mixing non-transactional and transactional connections would result inan error. This parameter may no longer be required for certain applications.
Administration and Configuration Guide
78

NOTE
To prevent issues such as duplication of driver listing, selected driver not available in aprofile, or driver not displayed if a server for the profile is not running, in JBoss EAP 6.4onwards, only JDBC drivers that are installed as modules and correctly referenced fromprofiles are detectable while creating a datasource using the Management Console indomain mode.
Procedure 8.3. Create a Datasource using either the Management CLI or the Management Console
Management CLI
a. Launch the CLI tool and connect to your server.
b. Run the following Management CLI command to create a non-XA datasource,configuring the variables as appropriate:
NOTE
The value for DRIVER_NAME depends on the number of classes listed inthe /META-INF/services/java.sql.Driver file located in theJDBC driver JAR. If there is only one class, the value is the name of theJAR. If there are multiple classes, the value is the name of the JAR +driverClassName + "_" + majorVersion +"_" + minorVersion. Failure todo so will result in the following error being logged:
JBAS014775: New missing/unsatisfied dependencies
For example, the DRIVER_NAME value required for the MySQL 5.1.31driver, is mysql-connector-java-5.1.31-bin.jarcom.mysql.jdbc.Driver_5_1.
data-source add --name=DATASOURCE_NAME --jndi-name=JNDI_NAME --driver-name=DRIVER_NAME --connection-url=CONNECTION_URL
c. Enable the datasource:
data-source enable --name=DATASOURCE_NAME
Management Console
a. Login to the Management Console.
b. Navigate to the Datasources panel in the Management Console
i. Select the Configuration tab from the top of the console.
ii. For Domain mode only, select a profile from the drop-down box in the top left.
iii. Expand the Subsystems menu on the left of the console, then expand theConnector menu.
iv. Select Datasources from the menu on the left of the console.
CHAPTER 8. JDBC DATA SOURCES
79

c. Create a new datasource
i. Click Add at the top of the Datasources panel.
ii. Enter the new datasource attributes in the Create Datasource wizard andproceed with the Next button.
iii. Enter the JDBC driver details in the Create Datasource wizard and click Nextto continue.
iv. Enter the connection settings in the Create Datasource wizard.
v. Click the Test Connection button to test the connection to the datasource andverify the settings are correct.
vi. Click Done to finish
Result
The non-XA datasource has been added to the server. It is now visible in either the standalone.xmlor domain.xml file, as well as the management interfaces.
8.6. CREATE AN XA DATASOURCE WITH THE MANAGEMENTINTERFACES
Summary
This topic covers the steps required to create an XA datasource, using either the Management Consoleor the Management CLI.
NOTE
Prior to version 10.2 of the Oracle datasource, the <no-tx-separate-pools/> parameterwas required, as mixing non-transactional and transactional connections would result inan error. This parameter may no longer be required for certain applications.
Procedure 8.4. Create an XA Datasource, Using Either the Management CLI or the ManagementConsole
Management CLI
a. Section 2.3.1, “Launch the Management CLI” .
b. Run the following Management CLI command to create an XA datasource, configuringthe variables as appropriate:
Administration and Configuration Guide
80

NOTE
The value for DRIVER_NAME depends on the number of classes listed inthe /META-INF/services/java.sql.Driver file located in theJDBC driver JAR. If there is only one class, the value is the name of theJAR. If there are multiple classes, the value is the name of the JAR +driverClassName + "_" + majorVersion +"_" + minorVersion. Failure todo so will result in the following error being logged:
JBAS014775: New missing/unsatisfied dependencies
For example, the DRIVER_NAME value required for the MySQL 5.1.31driver, is mysql-connector-java-5.1.31-bin.jarcom.mysql.jdbc.Driver_5_1.
xa-data-source add --name=XA_DATASOURCE_NAME --jndi-name=JNDI_NAME --driver-name=DRIVER_NAME --xa-datasource-class=XA_DATASOURCE_CLASS
c. Configure the XA datasource properties
i. Set the server nameRun the following command to configure the server name for the host:
/subsystem=datasources/xa-data-source=XA_DATASOURCE_NAME/xa-datasource-properties=ServerName:add(value=HOSTNAME)
ii. Set the database nameRun the following command to configure the database name:
/subsystem=datasources/xa-data-source=XA_DATASOURCE_NAME/xa-datasource-properties=DatabaseName:add(value=DATABASE_NAME)
d. Enable the datasource:
xa-data-source enable --name=XA_DATASOURCE_NAME
Management Console
a. Section 2.2.2, “Log in to the Management Console” .
b. Navigate to the Datasources panel in the Management Console
i. Select the Configuration tab from the top of the console.
ii. For Domain mode only, select a profile from the drop-down box at the top left.
iii. Expand the Subsystems menu on the left of the console, then expand theConnector menu.
iv. Select Datasources.
CHAPTER 8. JDBC DATA SOURCES
81

c. Select the XA Datasource tab.
d. Create a new XA datasource
i. Click Add.
ii. Enter the new XA datasource attributes in the Create XA Datasource wizardand click Next.
iii. Enter the JDBC driver details in the Create XA Datasource wizard and click Next.
iv. Enter the XA properties and click Next.
v. Enter the connection settings in the Create XA Datasource wizard.
vi. Click the Test Connection button to test the connection to the XA datasourceand verify the settings are correct.
vii. Click Done to finish
Result
The XA datasource has been added to the server. It is now visible in either the standalone.xml or domain.xml file, as well as the management interfaces.
8.7. DATASOURCE PARAMETERS
Table 8.1. Datasource parameters common to non-XA and XA datasources
Parameter Description
jndi-name The unique JNDI name for the datasource.
pool-name The name of the management pool for thedatasource.
enabled Whether or not the datasource is enabled.
use-java-context Whether to bind the datasource to global JNDI.
spy Enable spy functionality on the JDBC layer. Thislogs all JDBC traffic to the datasource. Note that thelogging category jboss.jdbc.spy must also beset to the log level DEBUG in the logging subsystem.
use-ccm Enable the cached connection manager.
new-connection-sql A SQL statement which executes when theconnection is added to the connection pool.
Administration and Configuration Guide
82

transaction-isolation One of the following:
TRANSACTION_READ_UNCOMMITTED
TRANSACTION_READ_COMMITTED
TRANSACTION_REPEATABLE_READ
TRANSACTION_SERIALIZABLE
TRANSACTION_NONE
url-selector-strategy-class-name A class that implements interface org.jboss.jca.adapters.jdbc.URLSelectorStrategy.
security Contains child elements which are security settings.See Table 8.6, “Security parameters”.
validation Contains child elements which are validationsettings. See Table 8.7, “Validation parameters”.
timeout Contains child elements which are timeout settings.See Table 8.8, “Timeout parameters”.
statement Contains child elements which are statementsettings. See Table 8.9, “Statement parameters”.
Parameter Description
Table 8.2. Non-XA datasource parameters
Parameter Description
jta Enable JTA integration for non-XA datasources.Does not apply to XA datasources.
connection-url The JDBC driver connection URL.
driver-class The fully-qualified name of the JDBC driver class.
connection-property Arbitrary connection properties passed to themethod Driver.connect(url,props). Eachconnection-property specifies a string name/valuepair. The property name comes from the name, andthe value comes from the element content.
pool Contains child elements which are pooling settings.See Table 8.4, “Pool parameters common to non-XAand XA datasources”.
url-delimiter The delimiter for URLs in a connection-url for HighAvailability (HA) clustered databases.
CHAPTER 8. JDBC DATA SOURCES
83

Table 8.3. XA datasource parameters
Parameter Description
xa-datasource-property A property to assign to implementation class XADataSource. Specified by name=value. If asetter method exists, in the format setName, theproperty is set by calling a setter method in theformat of setName(value).
xa-datasource-class The fully-qualified name of the implementation class javax.sql.XADataSource.
driver A unique reference to the class loader module whichcontains the JDBC driver. The accepted format isdriverName#majorVersion.minorVersion.
xa-pool Contains child elements which are pooling settings.See Table 8.4, “Pool parameters common to non-XAand XA datasources” and Table 8.5, “XA poolparameters”.
recovery Contains child elements which are recoverysettings. See Table 8.10, “Recovery parameters”.
Table 8.4. Pool parameters common to non-XA and XA datasources
Parameter Description
min-pool-size The minimum number of connections a pool holds.
max-pool-size The maximum number of connections a pool canhold.
prefill Whether to try to prefill the connection pool. Thedefault is false.
use-strict-min Whether the idle connection scan should strictlystop marking for closure of any further connections,once the min-pool-size has been reached. Thedefault value is false.
flush-strategy Whether the pool is flushed in the case of an error.Valid values are:
FailingConnectionOnly
IdleConnections
EntirePool
The default is FailingConnectionOnly.
Administration and Configuration Guide
84

allow-multiple-users Specifies if multiple users will access the datasourcethrough the getConnection(user, password) method,and whether the internal pool type accounts for thisbehavior.
Parameter Description
Table 8.5. XA pool parameters
Parameter Description
is-same-rm-override Whether the javax.transaction.xa.XAResource.isSameRM(XAResource) class returns true or false.
interleaving Whether to enable interleaving for XA connectionfactories.
no-tx-separate-pools Whether to create separate sub-pools for eachcontext. This is required for Oracle datasources,which do not allow XA connections to be used bothinside and outside of a JTA transaction.
Using this option will cause your total pool size to betwice max-pool-size, because two actual poolswill be created.
pad-xid Whether to pad the Xid.
wrap-xa-resource Whether to wrap the XAResource in an org.jboss.tm.XAResourceWrapperinstance.
Table 8.6. Security parameters
Parameter Description
user-name The username to use to create a new connection.
password The password to use to create a new connection.
security-domain Contains the name of a JAAS security-managerwhich handles authentication. This name correlatesto the application-policy/name attribute of the JAASlogin configuration.
reauth-plugin Defines a reauthentication plug-in to use toreauthenticate physical connections.
CHAPTER 8. JDBC DATA SOURCES
85

Table 8.7. Validation parameters
Parameter Description
valid-connection-checker An implementation of interface org.jboss.jca.adaptors.jdbc.ValidConnectionChecker which provides a SQLException.isValidConnection(Connection e) method to validate a connection. Anexception means the connection is destroyed. Thisoverrides the parameter check-valid-connection-sql if it is present.
check-valid-connection-sql An SQL statement to check validity of a poolconnection. This may be called when a managedconnection is taken from a pool for use.
validate-on-match Indicates whether connection level validation isperformed when a connection factory attempts tomatch a managed connection for a given set.
Specifying "true" for validate-on-match istypically not done in conjunction with specifying"true" for background-validation. Validate-on-match is needed when a clientmust have a connection validated prior to use. Thisparameter is false by default.
background-validation Specifies that connections are validated on abackground thread. Background validation is aperformance optimization when not used with validate-on-match. If validate-on-matchis true, using background-validation couldresult in redundant checks. Background validationdoes leave open the opportunity for a badconnection to be given to the client for use (aconnection goes bad between the time of thevalidation scan and prior to being handed to theclient), so the client application must account forthis possibility.
background-validation-millis The amount of time, in milliseconds, that backgroundvalidation runs.
use-fast-fail If true, fail a connection allocation on the firstattempt, if the connection is invalid. Defaults to false.
stale-connection-checker An instance of org.jboss.jca.adapters.jdbc.StaleConnectionChecker which provides a Boolean isStaleConnection(SQLException e)method. If this method returns true, the exceptionis wrapped in an org.jboss.jca.adapters.jdbc.StaleConnectionException, which is a subclass of SQLException.
Administration and Configuration Guide
86

exception-sorter An instance of org.jboss.jca.adapters.jdbc.ExceptionSorter which provides a Boolean isExceptionFatal(SQLException e)method. This method validates whether anexception is broadcast to all instances of javax.resource.spi.ConnectionEventListener as a connectionErrorOccurredmessage.
Parameter Description
Table 8.8. Timeout parameters
Parameter Description
use-try-lock Uses tryLock() instead of lock(). This attemptsto obtain the lock for the configured number ofseconds, before timing out, rather than failingimmediately if the lock is unavailable. Defaults to 60seconds. As an example, to set a timeout of 5minutes, set <use-try-lock>300</use-try-lock>.
blocking-timeout-millis The maximum time, in milliseconds, to block whilewaiting for a connection. After this time is exceeded,an exception is thrown. This blocks only whilewaiting for a permit for a connection, and does notthrow an exception if creating a new connectiontakes a long time. Defaults to 30000, which is 30seconds.
idle-timeout-minutes The maximum time, in minutes, before an idleconnection is closed. If not specified, the default is 30 minutes. The actual maximum time dependsupon the idleRemover scan time, which is half of thesmallest idle-timeout-minutes of any pool.
set-tx-query-timeout Whether to set the query timeout based on the timeremaining until transaction timeout. Any configuredquery timeout is used if no transaction exists.Defaults to false.
query-timeout Timeout for queries, in seconds. The default is notimeout.
allocation-retry The number of times to retry allocating a connectionbefore throwing an exception. The default is 0, so anexception is thrown upon the first failure.
CHAPTER 8. JDBC DATA SOURCES
87

allocation-retry-wait-millis How long, in milliseconds, to wait before retrying toallocate a connection. The default is 5000, which is5 seconds.
xa-resource-timeout If non-zero, this value is passed to method XAResource.setTransactionTimeout.
Parameter Description
Table 8.9. Statement parameters
Parameter Description
track-statements Whether to check for unclosed statements when aconnection is returned to a pool and a statement isreturned to the prepared statement cache. If false,statements are not tracked.
Valid values
true: statements and result sets aretracked, and a warning is issued if they arenot closed.
false: neither statements or result setsare tracked.
nowarn: statements are tracked but nowarning is issued. This is the default.
prepared-statement-cache-size The number of prepared statements per connection,in a Least Recently Used (LRU) cache.
share-prepared-statements Whether JBoss EAP should cache, instead of closeor terminate, the underlying physical statementwhen the wrapper supplied to the application isclosed by application code. The default is false.
Table 8.10. Recovery parameters
Parameter Description
recover-credential A username/password pair or security domain touse for recovery.
recover-plugin An implementation of the org.jboss.jca.core.spi.recoveryRecoveryPlugin class, to be used for recovery.
8.8. JDBC DRIVER DOWNLOAD LOCATIONS
Administration and Configuration Guide
88

The following table gives the standard download locations for JDBC drivers of common databases usedwith JBoss EAP 6.
NOTE
These links point to third-party websites which are not controlled or actively monitoredby Red Hat. For the most up-to-date drivers for your database, check your databasevendor's documentation and website.
Table 8.11. JDBC driver download locations
Vendor Download Location
MySQL http://www.mysql.com/products/connector/
PostgreSQL http://jdbc.postgresql.org/
Oracle http://www.oracle.com/technetwork/database/features/jdbc/index-091264.html
IBM http://www-306.ibm.com/software/data/db2/java/
Sybase http://www.sybase.com/products/allproductsa-z/softwaredeveloperkit/jconnect
Microsoft http://msdn.microsoft.com/data/jdbc/
CHAPTER 8. JDBC DATA SOURCES
89

CHAPTER 9. LOGGING
9.1. OVERVIEW OF LOGGING
JBoss EAP 6 provides highly configurable logging facilities for both its own internal use and for use bydeployed applications. The logging subsystem is based on JBoss LogManager and it supports severalthird party application logging frameworks in addition to JBoss Logging.
The logging subsystem is configured using a system of log categories and log handlers. Log categoriesdefine what messages to capture, and log handlers define how to deal with those messages (write todisk, send to console etc).
Logging Profiles allow uniquely named sets of logging configuration to be created and assigned toapplications independent of any other logging configuration. The configuration of logging profiles isalmost identical to the main logging subsystem.
9.2. DEFAULT LOG FILE LOCATIONS
These are the log files that get created for the default logging configurations. The default configurationwrites the server log files using periodic log handlers
Table 9.1. Default Log File for a standalone server
Log File Description
EAP_HOME/standalone/log/server.log Server Log. Contains all server log messages,including server startup messages.
EAP_HOME/standalone/log/gc.log Garbage collection log. Contains details of allgarbage collection.
Table 9.2. Default Log Files for a managed domain
Log File Description
EAP_HOME/domain/log/host-controller.log
Host Controller boot log. Contains log messagesrelated to the startup of the host controller.
EAP_HOME/domain/log/process-controller.log
Process controller boot log. Contains log messagesrelated to the startup of the process controller.
EAP_HOME/domain/servers/SERVERNAME/log/server.log
The server log for the named server. Contains all logmessages for that server, including server startupmessages.
9.3. JBOSS DATA VIRTUALIZATION LOG CATEGORIES
Within EAP log files, all information specific to JBoss Data Virtualization is prefixed with the org.teiid log category identifier.
Administration and Configuration Guide
90
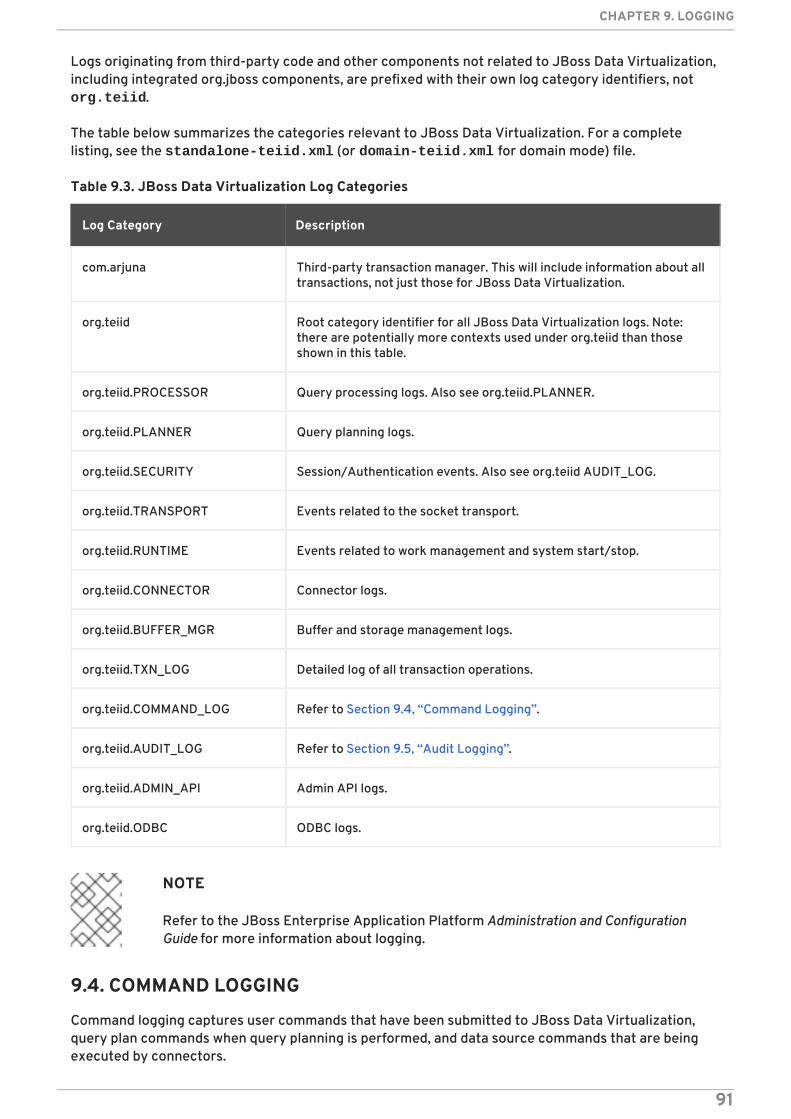
Logs originating from third-party code and other components not related to JBoss Data Virtualization,including integrated org.jboss components, are prefixed with their own log category identifiers, not org.teiid.
The table below summarizes the categories relevant to JBoss Data Virtualization. For a completelisting, see the standalone-teiid.xml (or domain-teiid.xml for domain mode) file.
Table 9.3. JBoss Data Virtualization Log Categories
Log Category Description
com.arjuna Third-party transaction manager. This will include information about alltransactions, not just those for JBoss Data Virtualization.
org.teiid Root category identifier for all JBoss Data Virtualization logs. Note:there are potentially more contexts used under org.teiid than thoseshown in this table.
org.teiid.PROCESSOR Query processing logs. Also see org.teiid.PLANNER.
org.teiid.PLANNER Query planning logs.
org.teiid.SECURITY Session/Authentication events. Also see org.teiid AUDIT_LOG.
org.teiid.TRANSPORT Events related to the socket transport.
org.teiid.RUNTIME Events related to work management and system start/stop.
org.teiid.CONNECTOR Connector logs.
org.teiid.BUFFER_MGR Buffer and storage management logs.
org.teiid.TXN_LOG Detailed log of all transaction operations.
org.teiid.COMMAND_LOG Refer to Section 9.4, “Command Logging”.
org.teiid.AUDIT_LOG Refer to Section 9.5, “Audit Logging”.
org.teiid.ADMIN_API Admin API logs.
org.teiid.ODBC ODBC logs.
NOTE
Refer to the JBoss Enterprise Application Platform Administration and ConfigurationGuide for more information about logging.
9.4. COMMAND LOGGING
Command logging captures user commands that have been submitted to JBoss Data Virtualization,query plan commands when query planning is performed, and data source commands that are beingexecuted by connectors.
CHAPTER 9. LOGGING
91

The user command, "START USER COMMAND", is logged when JBoss Data Virtualization startsworking on the query for the first time. This does not include the time the query was waiting in thequeue. A corresponding user command, "END USER COMMAND", is logged when the request iscomplete (that is, when the statement is closed or all the batches are retrieved). There is only one pairof these for every user query.
The query plan command, "PLAN USER COMMAND", is logged when JBoss Data Virtualization finishesthe query planning process. There is no corresponding ending log entry.
The data source command, "START DATA SRC COMMAND", is logged when a query is sent to the datasource. And a corresponding data source command, "END SRC COMMAND", is logged when theexecution is closed (that is, all the rows has been read). There can be one pair for each data sourcequery that has been executed by JBoss Data Virtualization, and there can be number of pairsdepending upon your query.
With this information being captured, the overall query execution time can be calculated. Additionally,each source query execution time can be calculated. If the overall query execution time is showing aperformance issue, then look at each data source execution time to see where the issue may be.
With this information being captured, the overall query execution time in Teiid can be calculated.Additionally, each source query execution time can be calculated. If the overall query execution time isshowing a performance issue, then look at each data source execution time to see where the issuemaybe.
To enable command logging to the default log location, simply enable the DETAIL level of logging forthe org.teiid.COMMAND_LOG context.
To enable command logging to an alternative file location, configure a separate file appender for theDETAIL logging of the org.teiid.COMMAND_LOG context. An example of this is shown below and canalso be found in the standalone-teiid.xml distributed with Teiid.
See Red Hat JBoss Data Virtualization Development Guide: Server Development for information ondeveloping a custom logging solution if file based (or any other built-in log4j) logging is not sufficient.
The following is an example of a data source command and what one would look like when printed tothe command log:
<periodic-rotating-file-handler name="COMMAND_FILE"> <level name="DEBUG" /> <formatter> <pattern-formatter pattern="%d{HH:mm:ss,SSS} %-5p [%c] (%t) %s%E%n" /> </formatter> <file relative-to="jboss.server.log.dir" path="command.log" /> <suffix value=".yyyy-MM-dd" /></periodic-rotating-file-handler> <logger category="org.teiid.COMMAND_LOG"> <level name="DEBUG" /> <handlers> <handler name="COMMAND_FILE" /> </handlers></logger>
2012-02-22 16:01:53,712 DEBUG [org.teiid.COMMAND_LOG] (Worker1_QueryProcessorQueue11 START DATA SRC COMMAND: startTime=2012-02-
Administration and Configuration Guide
92

Note the following pieces of information:
modelName: this represents the physical model for the data source that the query is beingissued.
translatorName: shows type of translator used to communicate to the data source.
principal: shows the user account who submitted the query
startTime/endTime: the time of the action, which is based on the type command beingexecuted.
sql: is the command submitted to the translator for execution, which is NOT necessarily thefinal sql command submitted to the actual data source. But it does show what the query enginedecided to push down.
9.5. AUDIT LOGGING
Audit logging captures important security events, including the enforcement of permissions, andauthentication success/failure.
See Red Hat JBoss Data Virtualization Development Guide: Server Development for information ondeveloping a custom logging solution if file based (or any other built-in log4j) logging is not sufficient.
9.6. ENABLE AUDIT AND COMMAND LOGGING
You need to enable audit and command logging via the Admin Console. You will also need to grant atleast some users the logging role.
NOTE
If using a data base to store the logging, then the Dashboard logging workspace can beused.
The teiidUser requires logging role permissions for this to work (you most likelyconfigured this through the installer.)
9.7. COMMAND LOG OUTPUT
The following is an example of what a data source command looks like when printed to the commandlog:
22 16:01:53.712 requestID=Ku4/dgtZPYk0.5 sourceCommandID=4 txID=null modelName=DTHCP translatorName=jdbc-simple sessionID=Ku4/dgtZPYk0 principal=user@teiid-security sql=HCP_ADDR_XREF.HUB_ADDR_ID, CPN_PROMO_HIST.PROMO_STAT_DT FROM CPN_PROMO_HIST, HCP_ADDRESS, HCP_ADDR_XREF WHERE (HCP_ADDRESS.ADDR_ID = CPN_PROMO_HIST.SENT_ADDR_ID) AND (HCP_ADDRESS.ADDR_ID = HCP_ADDR_XREF.ADDR_ID) AND (CPN_PROMO_HIST.PROMO_STAT_CD NOT LIKE 'EMAIL%') AND (CPN_PROMO_HIST.PROMO_STAT_CD <> 'SENT_EM') AND (CPN_PROMO_HIST.PROMO_STAT_DT > {ts'2010-02-22 16:01:52.928'})
CHAPTER 9. LOGGING
93

Note the following pieces of information:
modelName represents the physical model on which the query is being issued.
translatorName shows type of translator used to communicate to the data source.
principal shows the account of the user who submitted the query.
startTime/endTime is the time of the action, which is based on the type of command beingexecuted.
sql is the command submitted to the translator for execution, which is NOT necessarily thefinal SQL command submitted to the actual data source, but it does show what the queryengine decided to push down.
2012-02-22 16:01:53,712 DEBUG [org.teiid.COMMAND_LOG] (Worker1_QueryProcessorQueue11 START DATA SRC COMMAND: startTime=2012-02-22 16:01:53.712requestID=Ku4/dgtZPYk0.5 sourceCommandID=4 txID=null modelName=DTHCP translatorName=jdbc-simple sessionID=Ku4/dgtZPYk0principal=user@teiid-security sql=HCP_ADDR_XREF.HUB_ADDR_ID, CPN_PROMO_HIST.PROMO_STAT_DT FROM CPN_PROMO_HIST, HCP_ADDRESS, HCP_ADDR_XREF WHERE (HCP_ADDRESS.ADDR_ID = CPN_PROMO_HIST.SENT_ADDR_ID) AND (HCP_ADDRESS.ADDR_ID = HCP_ADDR_XREF.ADDR_ID) AND (CPN_PROMO_HIST.PROMO_STAT_CD NOT LIKE 'EMAIL%') AND (CPN_PROMO_HIST.PROMO_STAT_CD <> 'SENT_EM') AND (CPN_PROMO_HIST.PROMO_STAT_DT > {ts'2010-02-22 16:01:52.928'})
Administration and Configuration Guide
94

CHAPTER 10. CLUSTERING
10.1. CLUSTERING IN JBOSS DATA VIRTUALIZATION
Clustering may be used to improve the performance of the system through:
Load Balancing
See Red Hat JBoss Data Virtualization Development Guide: Client Development for information on loadbalancing between multiple nodes.
Failover
See Red Hat JBoss Data Virtualization Development Guide: Client Development for information onfailover with multiple nodes.
Distributed Caching
This is done automatically when clustering is configured.
Event Distribution
Metadata and data modifications will be distributed to all members of a cluster automatically whenclustering is configured.
10.2. ENABLE CLUSTERING IN JBOSS DATA VIRTUALIZATION
Ensure JBoss Data Virtualization is installed on each JBoss EAP node and that JBoss EAP has startedusing either the standalone-ha.xml or the standalone-full-ha.xml profile before starting thecluster. (These profiles provide high availability, or clustering, as their names imply.)
For more information, see the Red Hat JBoss Data Virtualization Installation Guide and Red Hat JBossEnterprise Application Platform documentation.
NOTE
Artifacts such as VDBs cannot be deployed via file deployment when clustering is used.Use other methods of VDB deployment.
10.3. CONFIGURE LOAD BALANCING
The Teiid JDBC driver does not perform true load-balancing. You can use it to route queries across thehost:port combinations defined in the URL but it will not do it based on the load. Instead, you need touse HAProxy.
CHAPTER 10. CLUSTERING
95

CHAPTER 11. CACHING
11.1. RESULT SET CACHING
11.1.1. Result Set Caching
JBoss Data Virtualization can cache the results of specific user queries and virtual procedure calls.This caching technique can yield significant performance gains if users of the system submit the samequeries or execute the same procedures often.
11.1.2. Result Set Caching Features
Result set caching provides support for the following features:
User query results can be cached, including XML document model results.
Virtual procedure results can be cached.
Results can be scoped automatically as either VDB/user (replicated) or session level.
Users can configure the number of cache entries and time to live.
Cache can be cleared via administration tools.
11.1.3. Learn About Caching
To learn about caching in Red Hat JBoss Data Virtualization, please refer to Development Guide Volume5: Caching Guide. This discusses the topic in detail.
Administration and Configuration Guide
96

PART V. MONITORING AND PERFORMANCE
PART V. MONITORING AND PERFORMANCE
97

CHAPTER 12. MONITORING
12.1. MONITORING JBOSS DATA VIRTUALIZATION
JBoss Data Virtualization provides information about its current operational state. This information canbe useful in tuning, monitoring, and managing load and throughput. Runtime data can be accessedusing administrative tools such as Management Console, AdminShell or Admin API.
12.2. QUERY/SESSION DETAILS
Name Description
Current Sessions List current connected sessions
Current Request List current executing requests
Current Transactions List current executing transactions
Query Plan Retrieves the query plan for a specific request
There are administrative options for terminating sessions, queries, and transactions.
12.3. SESSION/QUERY METRICS
Name Property Description Comment
Session Count sessionCount Indicates the number ofuser connectionscurrently active.
To ensure number ofsessions are notrestricted at peak times,check max-sessions-allowed (default 5000)is set accordingly andreview sessions-expiration-timelimit.
Query Count queryCount Indicates the number ofqueries currently active.
Active Query PlanCount
ENGINE_STATISTIC.active-plans-count
Number of query planscurrently beingprocessed.
To ensure maximumthroughput, see theperformance tuningsection on QueryEngineand threading.
Waiting Query PlanCount
ENGINE_STATISTIC.waiting-plans-count
Number of query planscurrently waiting.
Administration and Configuration Guide
98

Max Waiting Query PlanWatermark
ENGINE_STATISTIC.max-waitplan-watermark
The maximum numberof query plans that havebeen waiting at onetime, since the last timethe server started.
Long Running Queries longRunningQueries List current executingqueries that havesurpassed the querythreshold ( query-threshold-in-seconds. ).
Setup alert to warnwhen one or morequeries are consumingresources for anextended period of time.If running too long, anoption is to cancelrequest or increasethreshold.
Name Property Description Comment
12.4. BUFFER MANAGER METRICS
Name Property Description Comment
Disk Write Count ENGINE_STATISTIC.buffermgr-disk-write-count
Disk write count for thebuffer manager.
Disk Read Count ENGINE_STATISTIC.buffermgr-disk-read-count
Disk read count for thebuffer manager.
Cache Write Count ENGINE_STATISTIC.buffermgr-cache-write-count
Cache write count forthe buffer manager.
Cache Read Count ENGINE_STATISTIC.buffermgr-cache-read-count
Cache read count forthe buffer manager.
Disk Space Used (MB) ENGINE_STATISTIC.buffermgr-diskspace-used-mb
Indicates amount ofstorage space currentlyused by buffer files
Setup alert to warnwhen used buffer spaceis at an unacceptablelevel, based on thesetting of max-buffer-space
Total memory in use(KB)
ENGINE_STATISTIC.total-memory-inuse-kb
Estimate of the currentmemory usage inkilobytes.
Total memory in use byactive plans (KB)
ENGINE_STATISTIC.total-memory-inuse-active-plans-kb
Estimate of the currentmemory usage by activeplans in kilobytes
CHAPTER 12. MONITORING
99

12.5. CACHE METRICS
Name Property Description
Prepared Plan Cache Size PREPARED_PLAN_CACHE.total-entries
Current number of entries incache.
Prepared Plan Cache # ofRequests
PREPARED_PLAN_CACHE.request-count
Total number of requests madeagainst cache.
Prepared Plan Cache Hit Ratio % PREPARED_PLAN_CACHE.hit-ratio
Percentage of positive cache hits
ResultSet Cache Size QUERY_SERVICE_RESULT_SET_CACHE.total-entries
Current number of entries incache.
ResultSet Cache # of Requests QUERY_SERVICE_RESULT_SET_CACHE.request-count
Total number of requests madeagainst cache.
ResultSet Cache Hit Ratio % QUERY_SERVICE_RESULT_SET_CACHE.hit-ratio
Percentage of positive cache hits.
Administration and Configuration Guide
100

CHAPTER 13. PERFORMANCE TUNING
13.1. USAGE TIPS
Study the documentation, particularly the Getting Started Guide, to find out what datafederation can do for your enterprise.
Use a standard naming convention for JNDI Data Source names to enable VDBs to be portableacross EAP/DV server environments because the JNDI references defined in the VDB do nothave to be changed as its being ported from server to server.
NOTE
You can reset the JNDI name by using the AdminConsole, without having tomodify the VDB.
b) For consistency, decide on naming conventions so that it does not lead to confusion of thedifferent types. Items to consider include Designer project names, source model names, newmodel names, function/procedures names, data sources, VDB names, and web service names.
Standardize on a common JDBC driver version across server instances. That is, if the source isMySQL, all servers should use the same MySQL JDBC driver JAR.
It is preferable to use JDBC type 4 drivers, if you can, for ease of deployment and when doingdata previews in Teiid Designer. Otherwise, you can manually change the driver to type 4 orconfigure the module on the server for the driver, prior to use.
Include UDF jars with your VDB when packaging it in Teiid Designer as this makes it easier todeploy and does not require you to undertake server module configuration.
Use VDB Versioning of the format vdbname.version.vdb. If you do so VDB updates can bedeployed without impacting current processing. It will also be easier for you to visually identifywhat version of the VDB is utilizing, without having to open it up.
Pick a suitable deployment strategy:
JBoss Operations Network – good for pushing a VDB to a cluster of Teiid instances all atonce.
Admin shell – a command line tool which can be useful for scripting and automating task,and incorporating into other tools (see example: DeployAndVerifyVDB.groovy in the DVkit)
Admin-console can be used to deploy the VDB
Teiid Designer can deploy the VDB, but Red Hat recommends that you do not use it beyondthe development phase
Manual copying of artifacts - you are likely to do this only during upgrades or as a meansfor promoting through your development life cycle.
With regard to the software development lifecycle, consider the following VDB connectiontype changes during the deployment life cycle:
When a VDB is deployed, use connection type default of BY_VERSION
CHAPTER 13. PERFORMANCE TUNING
101

When the VDB is to be updated on the server with a new version change the current VDB(if exist) connection type from ANY to NONE (to stop allowing connections), so newconnections will go to new version and now change the newly deployed VDB connectiontype from BY_VERSION to ANY, making it the target VDB to be connected to, andpositioning it for the next time a new version is to be deployed.
If rollback is required, change the new (bad) VDB connection type from ANY to NONE andchange old VB connection type from NONE to ANY
When you are in a multi-developer environment, use an SCM (such as github, SVN, or CVS) tomanage your artifacts. Red Hat does not recommend any particular source controlmanagement system, but does advise you to use one that integrates with JBoss DeveloperStudio
Consider using the VDB reuse feature with DV 6 via import-vdb. This allows VDBs to importother VDBs at deploy/startup time. This allows a bigger project to be broken out into separateVDBs that work together at runtime. This will allow developers to work on different VDB's thatreference the same underlying models. By partitioning and layering, it can limit the impact ofdeployment changes.
Decide on a VDB / Model design pattern.
a) A general design approach is based on building a Data Virtualization Abstraction layer (alsoreferred to as Enterprise or Federated Data Layer) The Abstraction Layer is what clientapplications use. Its referred to as the abstraction layer because the underlying data sourcesare abstracted away from client use. A recommended approach to building the abstractionlayer is to start by creating a Virtual Base Layer (VBL) between the 'Data Source Layer' andthe 'Abstraction Layer'. This decouples the physical data from the canonical business model,allowing flexibility to change the data layer without affecting the client and providing a level ofisolation on top of the physical sources. This is a one-to-one mapping of each physical source toa virtual model. These VBL components can then be used as building blocks for higher levelservices; all of the transformations built on top of them will not need to be changed should theneed arise to accommodate a change in the source(s)
b) In laying out your design pattern, consider using VDB reuse (multiple VDBs) such as VDBs atthe abstraction layer and VDBs at the physical layer
Performance Tips
Consider your naming conventions. The naming convention you use can reduce the size ofmessages.
Remember to undeploy any unused old VDBs.
JBDS Teiid Plug-In Tips
When you are developing in a collaborative environment, developers need to use the sameproject names. There can be multiple projects (for example, by application) and there can besharing of models across projects when creating a VDB. However, in the designer, thereferences from a VDB to a model includes the project name, so using a different project namewill result in the VDB's models not being resolved correctly.
Establish a standard naming convention and configuration for Connection Profiles acrosseclipse/JBDS environments Otherwise, when a model is imported and the connection profiledoes not match, the connection profile will need to be reset for the source model before datapreviewing or VDB deployment can be done.
Administration and Configuration Guide
102

When modelling, and you go to build a View model, create children of type "Base Table". Do notuse "View Table". There is no functional difference. The problem comes in later when you wantto create PK/FK/Indexes on the table. The "View Table" does not allow you to do this.
(a) If you are going to be doing updates, it is recommended to use XA data sources. Therefore,do not use Designer to create the data sources. This is due to a limitation in DTP, which willcreate a 'local' data source, not an XA data source. To create XA data source, look in JBoss AS"doc" directory for example templates, or use the "admin-console" to create the XA datasources
Tips for Custom Translators and Connectors
Use the Teiid translator and/or connector archetypes.
When used, they will create the project template, with resources, to immediately begin addingyour custom code and compiling to package for deployment.
Using JBDS, create a new Maven project by creating the project from the archetype. In thewizard, select the “JBoss Nexus Archetypes” catalog, and filter on “teiid”.
13.2. MEMORY MANAGEMENT CONSIDERATIONS
Here is some information about settings related to memory management.
The JBoss Data Virtualization engine uses batching to reduce the number of memory rows processedat a given time. The batch sizes may be adjusted to larger values as more clients will be accessing theserver simultaneously.
buffer-service-max-reserve-kb
Default is -1. This setting determines the total size in kilobytes of batches that can be held by thebuffer manager in memory. This number does not account for persistent batches held by soft (suchas index pages) or weak references. The default value of -1 will automatically calculate a typicalmaximum based on the maximum heap available to the VM. The calculated value assumes a 64bitarchitecture and will limit buffer usage to 50% of the first gigabyte of memory beyond the first 300megabytes (which are assumed for use by JBoss EAP) and 75% of the memory beyond that.
For example, with default settings and an 8GB VM size, then buffer-service-max-reserve-kbwill at a maximum use: (((1024-300) * 0.5) + (7 * 1024 * 0.75)) = 5738 MB or 5875712 KB.
The buffer manager automatically triggers the use of a canonical value cache if enabled when morethan 25% of the buffer-service-max-reserve-kb is in use. This can dramatically cut memoryusage in situations where similar value sets are being read by JBoss Data Virtualization, but doesintroduce a lookup cost. If you are processing small or highly similar datasets using JBoss DataVirtualization, and wish to conserve memory, you should consider enabling value caching.
NOTE
Memory consumption can be significantly more or less than the nominal targetdepending on actual column values and whether value caching is enabled. Large nonbuilt-in type objects can exceed their default size estimate. If out of memory errorsoccur, lower the buffer-service-max-reserve-kb value. Also note that sourceLOB values are held by memory references that are not cleared when a batch ispersisted. With heavy LOB usage you should ensure that buffers of other memoryassociated with LOB references are appropiately sized.
CHAPTER 13. PERFORMANCE TUNING
103

buffer-service-max-processing-kb
Default is -1. This setting determines the total size in kilobytes of batches that can be guaranteedfor use by one active plan and may be in addition to the memory held based on buffer-service-max-reserve-kb. Typical minimum memory required by JBoss Data Virtualization when all theactive plans are active is #(active-plans) * buffer-service-max-processing-kb. The defaultvalue of -1 will automatically calculate a typical maximum based upon the maximum heap availableto the VM and max active plans. The calculated value assumes a 64bit architecture and will limitprocessing batch usage to 10% of memory beyond the first 300 megabytes (which are assumed foruse by JBoss EAP).
For example, with default settings including 20 active-plans and an 8GB VM size, then buffer-service-max-processing-kb will be: (((1024-300) * 0.1) + (7 * 1024 * 0.1))/20 = 789.2 MB/20 =39.46 MB or 40407 KB per plan. This implies a range between 0 and 789 MB that may be reservedwith roughly 40 MB per plan.
In systems where large intermediate results are expected you can consider increasing buffer-service-max-processing-kb and decreasing buffer-service-max-reserve-kb so thateach request has access to an effectively smaller buffer space.
buffer-service-max-file-size
Default is 2GB. Each intermediate result buffer, temporary LOB, and temporary table is stored in itsown set of buffer files, where an individual file is limited to buffer-service-max-file-sizemegabytes. Consider increasing the storage space available to all such files using buffer-service-max-buffer-space if your installation makes use of internal materialization, makesheavy use of SQL/XML, or processes large row counts.
TEIID_AUDIT_LOGGING and TEIID_COMMAND_LOGGING
The logging queue-length for TEIID_AUDIT_LOGGING and TEIID_COMMAND_LOGGING should beincreased. As a minimum, you must set it to the expected concurrency level for that node. In otherwords, if you expect 1,000 users to use the system concurrently then set each of the queue-lengthsto 1k and then tune it from there.
Limitations
It is also important to keep in mind that Teiid has memory and other hard limits which breaks downalong several lines in terms of # of storage objects tracked, disk storage, streaming data size/rowlimits, and so forth.
The buffer manager has a max addressable space of 16 terabytes - but due to fragmentation you'dexpect that the max usable would be less. This is the maximum amount of storage available to Teiid forall temporary lobs, internal tables, intermediate results, etc.
The max size of an object (batch or table page) that can be serialized by the buffer manager is 32 GB -but you should not get near that (the default limit is 8 MB). A batch is set or rows that are flowingthrough Teiid engine. Teiid temporary tables (also used for internal materialization) can only support2^31-1 rows per table.
However handling a source that has tera/petabytes of data doesn't by itself impact Teiid in any way.What matters is the processing operations that are being performed and/or how much of that data dowe need to store on a temporary basis in Teiid. With a simple forward-only query, as long as the resultrow count is less than 2^31, Teiid be perfectly happy to return a petabyte of data.
Other Considerations for Sizing
Administration and Configuration Guide
104

Each batch/table page requires an in memory cache entry of approximately ~ 128 bytes - thus the totaltracked max batches are limited by the heap and is also why we recommend to increase theprocessing batch size on larger memory or scenarios making use of large internal materializations. Theactual batch/table itself is managed by buffer manager, which has layered memory buffer structurewith spill over facility to disk.
Using internal materialization is based on the buffermanager. Buffermanager settings may need to beupdated based upon the desired amount of internal materialization performed by deployed VDBs.
13.3. SCALABILITY CONSIDERATIONS
Although, you can find information about all JBoss Data Virtualization settings using the ManagementCLI (see Section 14.1, “JBoss Data Virtualization Settings”), this section provides some additionalinformation about those settings related to scalability.
buffer-service-processor-batch-size
Default is 256. This property specifies the maximum row count of a batch sent internally within thequery processor. Additional considerations are needed if extremely large VM sizes and or datasetsare being used. JBoss Data Virtualization has a non-negligible amount of overhead per batch/tablepage on the order of 100-200 bytes. Depending on the data types involved, each full batch/tablepage will represent a variable number of rows (a power of two multiple above or below the processorbatch size).
If you are working with extremely large datasets and you run into memory issues, considerincreasing the buffer-service-processor-batch-size property to force the allocation oflarger batches and table pages.
buffer-service-max-storage-object-size
Default is 8288608 or 8MB. This value is the maximum size of a buffered managed object in bytesand represents the individual batch page size.
If buffer-service-processor-batch-size is increased or you are dealing with extremelywide result sets, then the default setting of 8MB for the buffer-service-max-storage-object-size may be too low. The inline LOBS also contribute to this size if the batch containsthem. The sizing for buffer-service-max-storage-object-size is in terms of serialized size,which will be much closer to the raw data size than the Java memory footprint estimation used for buffer-service-max-reserve-kb.
buffer-service-max-storage-object-size should not be set too large relative to buffer-service-memory-buffer-space since it will reduce the performance of the memory buffer. Thememory buffer supports only 1 concurrent writer for each buffer-service-max-storage-object-size of the buffer-service-memory-buffer-space.
NOTE
JBoss Data Virtualization temporary tables (also used for internal materialization)can only support 2^31-1 rows per table.
buffer-service-memory-buffer-space
Default is -1. This controls the amount of on or off heap memory allocated as byte buffers for use bythe JBoss Data Virtualization buffer manager. This setting defaults to -1, which automaticallydetermines a setting based upon whether it is on or off heap and the value for buffer-service-
CHAPTER 13. PERFORMANCE TUNING
105

max-reserve-kb.
NOTE
When left at the default setting the calculated memory buffer space will beapproximately one quarter of the buffer-service-max-reserve-kb setting. Ifthe memory buffer is off heap and the buffer-service-max-reserve-kb settingis automatically calculated, the memory buffer space will be subtracted out of theeffective buffer-service-max-reserve-kb.
buffer-service-memory-buffer-off-heap
Default is false. Determines whether to take advantage of the buffer manager memory buffer toaccess system memory without allocating it to the heap. Setting buffer-service-memory-buffer-off-heap to true will allocate the JBoss Data Virtualization memory buffer off heap.Depending on whether your installation is dedicated to JBoss Data Virtualization and the amount ofsystem memory available, this may be preferred over on-heap allocation.
The primary benefit of off-heap memory is additional memory usage for JBoss Data Virtualizationwithout additional garbage collection tuning. This becomes especially important in situations wheremore than 32GB of memory is desired for the JVM. Note that when using off-heap allocation, thememory must still be available to the java process and that setting the value of buffer-service-memory-buffer-space too high may cause the JVM to swap rather than reside in memory. Withlarge off-heap buffer sizes (greater than several gigabytes) you may also need to adjust JVMsettings.
For Sun JVMs the relevant JVM settings are MaxDirectMemorySize and UseLargePages. Forexample adding:
to the JVM process arguments would allow for an effective allocation of an (approximately) 11GBJBoss Data Virtualization memory buffer (the buffer-service-memory-buffer-spaceproperty) accounting for any additional direct memory that may be needed by JBoss EAP orapplications running within it.
13.4. DISK USAGE CONSIDERATIONS
Although, you can find information about all JBoss Data Virtualization settings using the ManagementCLI (see Section 14.1, “JBoss Data Virtualization Settings”), this section provides some additionalinformation about those settings related to disk usage.
buffer-service-max-buffer-space
Default is 51200. For table page and result batches, the buffer manager will limit the number of filesthat are dedicated to a particular storage size. However, creation of Large Object (LOB) values (forexample through SQL/XML) will typically create one file per LOB once the LOB exceeds theallowable in memory size of 8KB. In heavy usage scenarios, consider pointing the buffer directoryon a partition that is routinely defragmented. By default, JBoss Data Virtualization will use up to50GB of disk space. This is tracked in terms of the number of bytes written by JBoss DataVirtualization. For large data sets, you may need to increase the buffer-service-max-buffer-space property.
-XX:MaxDirectMemorySize=12g -XX:+UseLargePages
Administration and Configuration Guide
106

13.5. THREADING CONSIDERATIONS
Although, you can find information about all JBoss Data Virtualization settings using the ManagementCLI (see Section 14.1, “JBoss Data Virtualization Settings”), this section provides some additionalinformation about those settings related to threading.
max-threads
Default is 64. The query engine has several settings that determine its thread utilization. max-threads sets the total number of threads available in the process pool for query engine work (suchas processing plans, transaction control operations, and processing source queries).
You should consider increasing the maximum threads on systems with a large number of availableprocessors and/or when it is necessary to issue non-transactional queries involving a large numberof concurrent source requests.
max-active-plans
Default is 20. This value should always be smaller than max-threads. By default, thread-count-for-source-concurrency is calculated by (max-threads / max_active_plans) * 2 to determine thethreads available for processing concurrent source requests for each user query. Increasing themax-active-plans should be considered for workloads with a high number of long running queriesand/or systems with a large number of available processors. If memory issues arise from increasingthe max-threads and max-active-plans, then consider decreasing the amount of heap held by thebuffer manager or decreasing the processor-batch-size to limit the base number of memory rowsconsumed by each plan.
Increasing max-active-plans should be considered for workloads with a high number of longrunning queries and/or systems with a large number of available processors. If memory issues arisefrom increasing max-threads and max-active-plans, then consider decreasing buffer-service-processor-batch-size to limit the base number of memory rows consumed by eachplan.
thread-count-for-source-concurrency
Default is 0. This value should always be smaller than max-threads. This property sets the numberof concurrently executing source queries per user request. 0 indicates to use the default calculatedvalue based on 2 * (max-threads / max-active-plans). Setting this to 1 forces serial executionof all source queries by the processing thread. Any number greater than 1 limits the maximumnumber of concurrently executing source requests accordingly.
Using the defaults, each user request would be allowed 6 concurrently executing source queries. Ifthe default calculated value is not applicable to your workload, for example, if you have queries thatgenerate more concurrent long running source queries, you should adjust this value.
Also see Section 13.7, “Transport Considerations” for max-socket-threads.
13.6. CACHING CONSIDERATIONS
Although, you can find information about all JBoss Data Virtualization settings using the ManagementCLI (see Section 14.1, “JBoss Data Virtualization Settings”), this section provides some additionalinformation about those settings related to caching.
JBoss Data Virtualization settings regarding cache tuning are divided amongst:
Resultset Cache Tuning
CHAPTER 13. PERFORMANCE TUNING
107
Prepared Plan Cache Tuning
Cache statistics can be obtained through the Management Console or AdminShell. The statistics can beused to help tune cache parameters and ensure a hit ratio.
Plans are currently fully held in memory and may have a significant memory footprint. When makingextensive use of prepared statements and/or virtual procedures, the size of the plan cache may beincreased proportionally to number of gigabytes intended for use by JBoss Data Virtualization.
While the result cache parameters control the cache result entries (such as max number, and eviction),the result batches themselves are accessed through the buffer manager. If the size of the result cacheis increased, you may need to tune the buffer manager configuration to ensure there is enough bufferspace.
Result set and prepared plan caches have their entries invalidated by data and metadata events. Bydefault, these events are captured by running commands through JBoss Data Virtualization (see theRed Hat JBoss Data Virtualization Developer Guide for further customization). JBoss Data Virtualizationstores compiled forms of update plans or trigger actions with the prepared plan so that if metadatachanges, the changes may take effect immediately.
The default resultset-cache-max-staleness for resultset caching is 60 seconds to improveefficiency with rapidly changing sources. Consider decreasing this value to make the resultset cachemore consistent with the underlying data. Even with a setting of 0, full transactional consistency is notguaranteed.
WARNING
Disabling or constraining these caches will lead to poor performance.
13.7. TRANSPORT CONSIDERATIONS
Although, you can find information about all JBoss Data Virtualization settings using the ManagementCLI (see Section 14.1, “JBoss Data Virtualization Settings”), this section provides some additionalinformation about those settings related to transports.
JBoss Data Virtualization provides three transports by default: odbc, jdbc and embedded. Transportsettings (such as those listed below) are configured for each.
max-socket-threads
Default is 0. Determines the maximum number of threads dedicated to the initial requestprocessing. Zero indicates to use the system default of maximum available processors. Socketthreads handle NIO non-blocking IO operations as well as directly servicing any operation that canrun without blocking. For longer running operations, the socket threads queue works with the queryengine. (The query engine has two properties that determine its thread utilization: max-threadsand max-active-plans.)
All JDBC/ODBC socket operations are non-blocking, so setting the number of max-socket-threads higher than the maximum effective parallelism of the machine should not result in greaterperformance.
Administration and Configuration Guide
108

ODBC queries are executed synchronously from the socket thread. Simultaneous long-runningqueries may exhaust the available threads. If you expect a higher concurrent load of long-runningqueries, consider increasing the default max-socket-threads (for example, to 15).
input-buffer-size
Default is 0 which will use the system default. Before adjusting input-buffer-size for any of thetransports, keep in mind that each client will create a new socket connection. Increasing this valueshould only be done if the number of clients is constrained.
output-buffer-size
Default is 0 which will use the system default. Before adjusting output-buffer-size for any ofthe transports, keep in mind that each client will create a new socket connection. Increasing thisvalue should only be done if the number of clients is constrained.
JDBC clients may need to adjust low-level transport values, in addition to SSL client connectionproperties via a teiid-client-settings.properties file placed in the client application'sclasspath. (An example file can be found within the EAP_HOME/modules/system/layers/base/org/jboss/teiid/client/main/teiid-client-VERSION.jar file.)
NOTE
Typical installations will not need to have any of these settings adjusted.
13.8. LARGE OBJECTS (LOBS)
Large Objects (LOBs) consist of data. The three main large object runtime data types used by JBossare:
1. Binary (BLOB)
Contains multimedia objects such as images and audio.
2. Character (CLOB)
Contains ASCII characters.
3. Extensible Markup Language (XML)
Contains textual data.
LOBs and JBoss
The JBoss Data Services Connector API returns a reference to the LOB if allowed by the JBoss DataServices server. The JBoss Data Services server or JDBC driver can then access the data via a streamrather than retrieving the data all at once. This is useful for several reasons:
Reduces memory usage when returning the result set to the user.
Improves performance by passing less data in the result set.
Enables access to LOBs when required rather than assuming that users will always use theLOB data.
CHAPTER 13. PERFORMANCE TUNING
109

Enables handling of arbitrarily large data values within a fixed JBoss Data Services memoryusage.
These benefits are achieved if the Connector itself does not materialize an entire LOB all at once. Forexample, the JDBC API supports a streaming interface for BLOB and CLOB data.
Source LOB values are typically accessed by reference, rather than having the value copied to atemporary location. Care must be taken to ensure that source LOBs are returned in a memory-safemanner.
LOBs are broken into pieces when being created and streamed. The size of each piece when fetched bythe client can be configured.
Cached lobs will be copied rather than relying on the reference to the source lob.
Temporary lobs created by Teiid will be cleaned up when the result set or statement is closed. To relyon implicit garbage collection based cleanup instead of statement close, the Teiid session variableclean_lobs_onclose can be set to false (by issuing the query "SELECTteiid_session_set('clean_lobs_onclose', false)" - which can be done for example via the new connectionsql in the datasource definition). This can be used for local client scenarios that relied on the implicitbehavior, such as Designer generated REST VDBs.
13.9. LOB CONSIDERATIONS
Although, you can find information about all JBoss Data Virtualization settings using the ManagementCLI (see Section 14.1, “JBoss Data Virtualization Settings”), this section provides some additionalinformation about those settings related to large objects (LOBs).
lob-chunk-size-in-kb
LOBs and XML documents are streamed from the JBoss Data Virtualization server to the JDBCAPI. Normally, these values are not materialized in the server memory, avoiding potential out-of-memory issues. When using style sheets, or XQuery, whole XML documents must be materialized onthe server. Even when using the XMLQuery or XMLTable functions and document projection isapplied, memory issues may occur for large documents.
LOBs are broken into pieces when being created and streamed. The maximum size of each piecewhen fetched by the client can be configured with the lob-chunk-size-in-kb property.
The default value is 100. When dealing with extremely large LOBs, you may consider increasing lob-chunk-size-in-kb to decrease the amount of round-trips to stream the result. Setting thevalue too high may cause the server or client to have memory issues.
Source LOB values are typically accessed by reference, rather than having the value copied to atemporary location. Thus care must be taken to ensure that source LOBs are returned in amemory-safe manner. This caution is more for the source driver vendors not to consume VMmemory for LOBs.
13.10. OTHER PERFORMANCE TUNING CONSIDERATIONS
Although, you can find information about all JBoss Data Services settings using the Management CLI(see Section 14.1, “JBoss Data Virtualization Settings”), this section provides some additionalinformation about the max-source-rows setting.
max-source-rows
Administration and Configuration Guide
110

When using JBoss Data Services in a development environment, you may consider setting max-source-rows to a small value (for example, 10000) to prevent large amounts of data from beingpulled from sources. Leaving the exception-on-max-source-rows property set to true willalert the developer through an exception that an attempt was made to retrieve more than thespecified number of rows.
CHAPTER 13. PERFORMANCE TUNING
111

PART VI. REFERENCE
Administration and Configuration Guide
112

CHAPTER 14. GENERAL CONFIGURATION
14.1. JBOSS DATA VIRTUALIZATION SETTINGS
The following types of JBoss Data Virtualization settings are available for viewing and modification:
Buffer service settings
Cache settings (including result set and prepared plan cache settings)
Runtime engine deployer settings
Authorization validator and policy decider settings
Transport and SSL settings
Translator settings
To view all of the available settings for JBoss Data Virtualization, run the following command within theManagement CLI:
NOTE
To look further into translator and transport (including SSL) settings see Section 14.4,“Managing Transport and SSL Settings Using Management CLI” and Section 14.5,“Managing Translator Settings Using Management CLI”.
14.2. VIEWING JBOSS DATA VIRTUALIZATION SETTINGS USINGMANAGEMENT CLI
To view all of the current settings for JBoss Data Virtualization, run the following command within theManagement CLI:
To view a particular JBoss Data Virtualization setting, run the following command within theManagement CLI:
For example:
NOTE
To view current translator and transport (including SSL) settings refer to Section 14.4,“Managing Transport and SSL Settings Using Management CLI” and Section 14.5,“Managing Translator Settings Using Management CLI”.
/subsystem=teiid:read-resource-description
/subsystem=teiid:read-resource
/subsystem=teiid:read-attribute(name=SETTING_NAME)
/subsystem=teiid:read-attribute(name=max-active-plans)
CHAPTER 14. GENERAL CONFIGURATION
113

14.3. CHANGING JBOSS DATA VIRTUALIZATION SETTINGS USINGMANAGEMENT CLI
To edit a particular JBoss Data Virtualization setting, run the following command within theManagement CLI:
NOTE
To change translator and transport (including SSL) settings refer to Section 14.4,“Managing Transport and SSL Settings Using Management CLI” and Section 14.5,“Managing Translator Settings Using Management CLI”.
For example:
For more information about the Management CLI, refer to the Red Hat JBoss Enterprise ApplicationPlatform Administration and Configuration Guide.
NOTE
After modifying any of these settings, you will be prompted to reload the server.Changes to these settings will not take effect until the server is restarted. You canreload the server by running the reload command from within the Management CLI.After the server reloads, you may have to reconnect by running the connect commandto continue working within the Management CLI.
14.4. MANAGING TRANSPORT AND SSL SETTINGS USINGMANAGEMENT CLI
To manage JBoss Data Virtualization transport settings, you can use the same commands as thoseused for the base JBoss Data Virtualization settings, specifying a particular transport in the command.For example:
Available transport names are listed under transport when you run the following command to outputcurrent JBoss Data Virtualization settings:
14.5. MANAGING TRANSLATOR SETTINGS USING MANAGEMENT CLI
To manage JBoss Data Virtualization translator settings, you can use the same commands as thoseused for the base JBoss Data Virtualization settings, specifying a particular translator in the command.For example:
/subsystem=teiid:write-attribute(name=SETTING_NAME, value=VALUE)
/subsystem=teiid:write-attribute(name=max-active-plans, value=50)
/subsystem=teiid/transport=TRANSPORT_NAME:read-resource
/subsystem=teiid:read-resource
/subsystem=teiid/translator=TRANSLATOR_NAME:read-resource
Administration and Configuration Guide
114

Available translator names are listed under translator when you run the following command tooutput current JBoss Data Virtualization settings:
14.6. TRANSPORT SECURITY AUTHENTICATION MODES
The following authentication modes are available:
anonymous
No certificates are exchanged. Settings are not needed for the keystore and truststore properties.The client must have org.teiid.ssl.allowAnon set to true (the default) to connect to ananonymous server. Communications are encrypted using theTLS_DH_anon_WITH_AES_128_CBC_SHA SSL cipher suite. This is suitable for most secureintranets.
1-way
Athenticates the server to the client. The server presents a certificate which is signed by theprivate key stored in the server's keystore. The server's corresponding public key must be in theclient's truststore.
2-way
Mutual client and server authentication. The server presents a certificate which is signed by theprivate key stored in the server's keystore. The server's corresponding public key must be in theclient's truststore. Additionally, the client presents a certificate signed by its private key stored inthe client's keystore. The client's corresponsing public key must be in the server's truststore.
NOTE
You can use keytool to generate encryption keys; however, you should first consideryour local requirements for managing public key cryptography.
14.7. MANAGING CORE CONFIGURATION USING JBOSS MANAGEMENTCONSOLE
1. Log in to the JBoss Management Console.
2. Select the Profile tab.
3. From the navigation tree, select Subsystems → Teiid.
4. Select one of the following options:
Query Engine - From here you can view and configure core query engine properties.
Translators - From here you can view, add and remove translators.
Transports - From here you can view, add and remove transports.
5. View and modify configuration as necessary.
/subsystem=teiid:read-resource
CHAPTER 14. GENERAL CONFIGURATION
115

NOTE
If you need help at any stage, select the Need Help? link.
WARNING
Some properties require you to restart the server before they will take effect.
14.8. PORTS USED BY RED HAT JBOSS DATA VIRTUALIZATION
Red Hat JBoss Data Virtualization inherits the ports used by JBoss Enterprise Application Platform.You can find a full list here: https://access.redhat.com/documentation/en-US/JBoss_Enterprise_Application_Platform/6/html/Administration_and_Configuration_Guide/Network_Ports_Used_By_JBoss_Enterprise_Application_Platform_62.html
In addition, to these, ports 31000 and 35432 must also be kept open.
14.9. CHANGE THE DEFAULT JDBC PORT USING MANAGEMENTCONSOLE
1. Login to the Management Console.
2. Navigate to the Socket Binding panel in the Management Console
a. Standalone ModeSelect the Profile tab from the top-right of the console.
Domain Mode
i. Select the Profiles tab from the top-right of the console.
ii. Select the appropriate profile from the drop-down box in the top left.
iii. Expand the Subsystems menu on the left of the console.
b. Select General Configuration → Socket Binding from the menu on the left of the console.
3. Modify the port number
a. Select the teiid-jdbc configuration.
b. Select the Edit button.
c. Set the Port to the new port number.
d. Select Save.
14.10. SYSTEM PROPERTIES
Administration and Configuration Guide
116

Some behavior can be configured via system properties, rather than configuration files. A typical placeto set system properties for JBoss Data Virtualization is in the EAP_HOME/bin/MODE.conf. A propertysetting has the format -Dproperty=value.
Table 14.1. System Properties
Setting Description Default Value
org.teiid.allowNanInfinity Set to true to allow numericfunctions to return NaN (Not ANumber) and +-Infinity. Note thatthese values are not covered bythe SQL specification.
Defaults to false.
org.teiid.useValueCache Set to true to enable thecanonical value cache. Valuecaching is used dynamically whenbuffer memory is running low toreuse identical values, reducingthe memory consumed by JBossData Virtualization. However,there is a computation costassociated with the cache lookup,so enabling this setting is notappropriate for installationshandling large volumes ofdissimilar data.
Defaults to false.
org.teiid.ansiQuotedIdentifiers Set to false to emulate priorbehavior of treating doublequoted values without leadingidentifier parts as string literals,which is not expected by the SQLspecification.
Defaults to true.
org.teiid.subqueryUnnestDefault Set to true to aggressively unnestsubquery IN and EXISTSpredicates. If possible, thepredicate will be unnested to atraditional join and will be eligiblefor dependent join planning. If atraditional join is not possible(such as with NOT IN) a mergejoin version of the semijoin orantijoin will be considered basedupon the costing informationavailable.
Defaults to false.
org.teiid.ODBCPacketSize Target size in bytes of the ODBCresults buffer. This is not a hardmaximum, LOBS and wide rowsmay use larger buffers.
Defaults to 307200.
CHAPTER 14. GENERAL CONFIGURATION
117

org.teiid.decimalAsDouble Set to true to parse exact fixedpoint literals (for example, 1.0) asdouble values rather than asdecimal/BigDecimal values andto return a double value from theAVG function for integral valuesin the same way as previousversions.
Defaults to false.
org.teiid.comparableLobs Set to true to allow BLOB andCLOB column values to becomparable in JBoss DataVirtualization. Source typemetadata will determine if thecomparison can be pushed down.
Defaults to false.
org.teiid.comparableObject Set to true to allow objectcolumn values to be comparablein JBoss Data Virtualization.Source type metadata willdetermine if the comparison canbe pushed down. The objectinstances are expected tocorrectly implement java.lang.Comparable.compareTo. If the instance objectis not Comparable, then ClassCastExceptions maythe thrown.
Defaults to false.
org.teiid.padSpace Set to true to compare strings asif PAD SPACE collation is beingused. This means strings will beright padded to the same lengthfor comparison. If this property isset, it is not necessary to use the trimStrings translatoroption.
Defaults to false.
org.teiid.collationLocale Set to a Java locale stringlanguage[_country[_varient]],where language, country, andvariant are two letter codes - seejava.util.Locale for more on validcodes. Note that even if org.teiid.comparableLobs is set, CLOB values will not becompared using the localecollator.
Not set by default, which meansthat Java's natural (UTF-16)string comparison will be used.
Setting Description Default Value
Administration and Configuration Guide
118

org.teiid.clientVdbLoadTimeoutMillis
The default amount of time aclient (currently only localclients) will wait to make aconnection to an active VDBbefore throwing an exception.Clients may override this settingvia the waitForLoadconnection property.
Defaults to 5 minutes.
org.teiid.enDateNames Set to true to use English monthand day names for the systemfunction dayName and monthName, rather thanreturning names from the Javadefault locale. Prior to thisrelease, dayName and monthName always returnedEnglish names.
Defaults to false.
org.teiid.pushdownDefaultNullOrder
Set to true to mimic prior releasebehavior of pushing the defaultnull order of nulls low if thesource has a different default nullorder and supports explicit nullordering.
Defaults to false.
org.teiid.implicitMultiSourceJoin Set to false to disable priorrelease behavior of implicitlypartitioning joins between multi-source tables. When set to falsean explicit predicate such as tbl1.source_name = tbl2.source_name isrequired to partition the results ofthe join.
Defaults to true.
org.teiid.joinPrefetchBatches Sets the number of batches thatcan be pre-fetched/buffered forjoin processing that mayotherwise be streamed from thesource. Consider increasing whenyou have slowALREADY_SORTED sourcesparticipating in a non-dependentjoin that return significantly morebatches. Note however thatincreasing this value can lead toan increase in disk utilization toperform the buffering.
Defaults to 10.
Setting Description Default Value
CHAPTER 14. GENERAL CONFIGURATION
119

org.teiid.maxStringLength Sets the nominal maximumlength of strings in JBoss DataVirtualization. Most operationswill truncate strings that arelarger than this value. Setting thisvalue can also adjust themaximum size of LOB bytes heldin memory. Note that sourcesmay not appropriately handlestring values that are larger thanwhat the source supports.
WARNING
Strings areheldentirely inmemory.Do not setthis valuetoo high asyou mayexperienceout ofmemoryerrors.
Defaults to 4000.
org.teiid.calendarTimestampDiff Set to false to use thetimestampdiff behaviour fromprevious versions. Note thatusing the old behavior can resultin differing results betweenpushed and non-pushed versionsof timestampdiff for intervalsgreater than seconds. This isbecause sources use the datepart and not approximate intervaldifferences.
Defaults to true
Setting Description Default Value
The following properties are provided for PostgreSQL compatibility.
Table 14.2. System Properties for PostgreSQL Compatibility
Setting Description Default Value
Administration and Configuration Guide
120

org.teiid.iso8601Week Set to true to use ISO 8601 rulesfor week calculations regardlessof the locale. When set to true,the dayOfWeek function willbegin with 1 for MONDAY ratherthan SUNDAY, and the weekfunction will require that week 1of a year contains the year's firstThursday.
Defaults to false.
org.teiid.backslashDefaultMatchEscape
Set to true to use '\' as thedefault escape character for LIKEand SIMILAR TO predicates whenno escape is specified. OtherwiseJBoss Data Virtualizationassumes the SQL specificationcompliant behavior of treatingeach non-wildcard character asan exact match character.
Defaults to false.
Setting Description Default Value
NOTE
These properties for PostgreSQL compatibility affect JBoss Data Virtualization globally,not just through the ODBC transport.
14.11. TEIID MANAGEMENT CLI
The AS CLI is a command line based administrative and monitoring tool for Teiid. AdminShell provides abinding into the Groovy scripting language and higher level methods that are often needed wheninteracting with Teiid. It is still useful to know the underlying CLI commands in many circumstances.The below is a series useful CLI commands for administering a Teiid Server.
VDB Operations
Source Operations
deploy adminapi-test-vdb.xmlundeploy adminapi-test-vdb.xml
/subsystem=teiid:restart-vdb(vdb-name=AdminAPITestVDB, vdb-version=1, model-names=TestModel)
/subsystem=teiid:list-vdbs()/subsystem=teiid:get-vdb(vdb-name=AdminAPITestVDB,vdb-version=1)/subsystem=teiid:change-vdb-connection-type(vdb-name=AdminAPITestVDB, vdb-version=1,connection-type=ANY)
/subsystem=teiid:add-data-role(vdb-name=AdminAPITestVDB, vdb-version=1, data-role=TestDataRole, mapped-role=test)/subsystem=teiid:remove-data-role(vdb-name=AdminAPITestVDB, vdb-version=1, data-role=TestDataRole, mapped-role=test)
CHAPTER 14. GENERAL CONFIGURATION
121
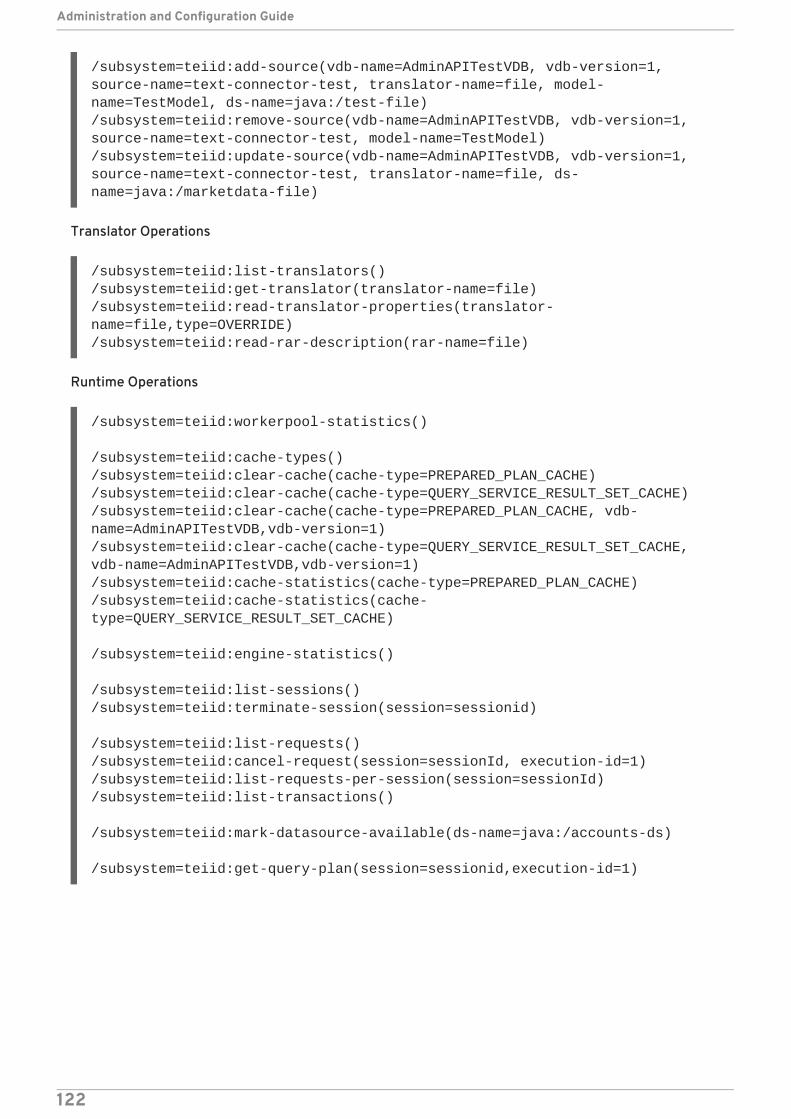
Translator Operations
Runtime Operations
/subsystem=teiid:add-source(vdb-name=AdminAPITestVDB, vdb-version=1, source-name=text-connector-test, translator-name=file, model-name=TestModel, ds-name=java:/test-file)/subsystem=teiid:remove-source(vdb-name=AdminAPITestVDB, vdb-version=1, source-name=text-connector-test, model-name=TestModel)/subsystem=teiid:update-source(vdb-name=AdminAPITestVDB, vdb-version=1, source-name=text-connector-test, translator-name=file, ds-name=java:/marketdata-file)
/subsystem=teiid:list-translators()/subsystem=teiid:get-translator(translator-name=file)/subsystem=teiid:read-translator-properties(translator-name=file,type=OVERRIDE)/subsystem=teiid:read-rar-description(rar-name=file)
/subsystem=teiid:workerpool-statistics()
/subsystem=teiid:cache-types()/subsystem=teiid:clear-cache(cache-type=PREPARED_PLAN_CACHE)/subsystem=teiid:clear-cache(cache-type=QUERY_SERVICE_RESULT_SET_CACHE)/subsystem=teiid:clear-cache(cache-type=PREPARED_PLAN_CACHE, vdb-name=AdminAPITestVDB,vdb-version=1)/subsystem=teiid:clear-cache(cache-type=QUERY_SERVICE_RESULT_SET_CACHE, vdb-name=AdminAPITestVDB,vdb-version=1)/subsystem=teiid:cache-statistics(cache-type=PREPARED_PLAN_CACHE)/subsystem=teiid:cache-statistics(cache-type=QUERY_SERVICE_RESULT_SET_CACHE)
/subsystem=teiid:engine-statistics()
/subsystem=teiid:list-sessions()/subsystem=teiid:terminate-session(session=sessionid)
/subsystem=teiid:list-requests()/subsystem=teiid:cancel-request(session=sessionId, execution-id=1)/subsystem=teiid:list-requests-per-session(session=sessionId)/subsystem=teiid:list-transactions()
/subsystem=teiid:mark-datasource-available(ds-name=java:/accounts-ds)
/subsystem=teiid:get-query-plan(session=sessionid,execution-id=1)
Administration and Configuration Guide
122

CHAPTER 15. DIRECTORY STRUCTURE
15.1. DIRECTORY STRUCTURE
The following shows the contents of the JBoss Data Virtualization deployment within an EAP instance.
bin/scripts
This directory contains installation and utility CLI scripts.
docs/teiid
This directory contains documents, examples, sample data source XML fragments and schema files.
standalone/configuration
standalone.xml is the master configuration file for JBoss Data Virtualization. This filemanages configuration for the JBoss Data Virtualization subsystem in addition to thestandard JBoss EAP web profile subsystems.
application-users.properties and application-roles.properties define theallowed users and their defined roles using the default security domain. Edit these files toadd users. If you want to use a different security domain, change the security domaindetails in the main configuration file.
domain/configuration
application-users.properties and application-roles.properties define theallowed users and their defined roles in JBoss Data Virtualization using the default securitydomain. Edit these files to add users. If you want to use a different security domain, change
/bin /scripts/docs /teiid /datsources /schema /examples/domain /configuration application-users.properties application-roles.properties/dataVirtualization /modules /system /layers /dv /dv modules /base /eap modules/standalone /configuration standalone.xml application-users.properties application-roles.properties
CHAPTER 15. DIRECTORY STRUCTURE
123

the security domain details in main configuration file.
/modules/system/layers/base/org/jboss/teiid/*
This directory defines JBoss Data Virtualization modules for JBoss EAP.
/modules/system/layers/base/org/jboss/teiid/client
This directory contains JBoss Data Virtualization client libraries. It has the JBoss DataVirtualization JDBC driver JAR file, teiid-8.4.0.Final-jdbc.jar, and also contains teiid-hibernate-dialect-8.4.0.Final.jar that contains the JBoss Data Virtualization Hibernatedialect.
{standalone,domain}/tmp/teiid
This directory contains temporary files created by JBoss Data Virtualization. These are mostlycreated by the buffer manager. These files are not needed across a VM restart. Creation of JBossData Virtualization LOB values (for example through SQL/XML) will typically create one file perLOB once it exceeds the allowable in memory size of 8KB. In heavy usage scenarios, considerpointing the buffer directory at a partition that is routinely defragmented.
{standalone,domain}/data/teiid-data
This directory contains cached VDB metadata files. Do not edit them manually.
dataVirtualization
This directory contains JDBC drivers, adminshell, the ModeShape VDB and some WARs.
Administration and Configuration Guide
124

APPENDIX A. REVISION HISTORY
Revision 6.2.0-17 Thu Dec 10 2015 David Le SageUpdates for 6.2.
APPENDIX A. REVISION HISTORY
125