red hat enterprise linux openstack platform 5 on netapp ... · technical report red hat enterprise...
TRANSCRIPT

Technical Report
Red Hat Enterprise Linux OpenStack Platform 5 on NetApp Clustered Data ONTAP Solution Deployment
Jeff Applewhite, NetApp
January 2015 | TR-4378-DEPLOY
Abstract
As enterprises make the shift to an OpenStack-based cloud infrastructure, there is an
increasing need for best practices and deployment procedures that maximize availability and
reduce deployment risk. This guide is targeted at architects, administrators, and others who
are responsible for the deployment and maintenance of an OpenStack-based cloud. This
guide shows how to use advanced deployment toolsets such as the Red Hat Enterprise Linux
OpenStack Platform (RHEL-OSP) installer to greatly reduce initial deployment time,
standardize components, and produce a highly available, easily maintainable cloud based on
RHEL-OSP and NetApp Clustered Data ONTAP. This combination is a certified and proven
solution in use today by both enterprises and service providers.

2 Red Hat Enterprise Linux OpenStack Platform 5 on NetApp Clustered Data ONTAP © 2015 NetApp, Inc. All right reserved
TABLE OF CONTENTS
1 Solution Overview ................................................................................................................................ 3
1.1 Solution Technology .......................................................................................................................................3
1.2 Use Case Summary ........................................................................................................................................5
2 Cloud Deployment Methodology ........................................................................................................ 5
2.1 Technology Requirements ..............................................................................................................................5
2.2 Deployment Procedures .................................................................................................................................7
3 Validation and Postinstallation ......................................................................................................... 29
4 Troubleshooting ................................................................................................................................. 30
5 Known Issues ...................................................................................................................................... 30
6 Additional Use Cases ......................................................................................................................... 30
7 Conclusion .......................................................................................................................................... 30
References ................................................................................................................................................. 30
Version History ......................................................................................................................................... 31
LIST OF TABLES
Table 1) Hardware requirements. ...................................................................................................................................5
Table 2) Software requirements. ....................................................................................................................................5
Table 3) Logical network configuration for laboratory setup. ..........................................................................................6
Table 4) Smart class parameters. ................................................................................................................................ 28
LIST OF FIGURES
Figure 1) Solution overview. ...........................................................................................................................................4
Figure 2) Network overview. ...........................................................................................................................................6
Figure 3) NetApp clustered Data ONTAP objects. .........................................................................................................8

3 Red Hat Enterprise Linux OpenStack Platform 5 on NetApp Clustered Data ONTAP © 2015 NetApp, Inc. All right reserved
1 Solution Overview
Red Hat Enterprise Linux OpenStack Platform (RHEL-OSP) version 5.0 provides the tools needed to
deploy an Icehouse-based OpenStack cloud on NetApp® FAS storage using Network File System (NFS)
and iSCSI protocols. This solution deployment guide provides a deployer with the steps needed to create
a highly available OpenStack cloud that can fulfill the stringent service level agreements (SLAs) typically
found in both enterprises and service providers. These components are pretested and validated and
provide a solution that is supportable, maintainable, and has a low total cost of ownership.
1.1 Solution Technology This deployment guide follows the design principles set forth in the document Highly Available OpenStack Deployments Built on NetApp Storage Systems: Solution Design, which serves as a foundation for specific use cases and deployments, and many technological challenges arising from clustering and high availability (HA) are addressed there by using the RHEL-OSP Installer and the underlying Puppet manifests. This deployment guide outlines deployment methodologies and provides higher-level commentary, but those looking for a more thorough discussion of the theory and practice associated with this solution should refer to the solution design guide.
OpenStack
OpenStack is an open-source project released under the Apache 2.0 license that implements services
that establish infrastructure as a service (IaaS). The project is managed by the OpenStack Foundation, a
nonprofit corporate entity established in 2012 to promote, protect, and empower OpenStack software and
its associated community. OpenStack technology consists of a series of modular projects that control
large pools of processing, storage, and networking resources throughout a data center, all managed
through a single dashboard that gives administrators control and empowers users with self-service
provisioning of resources.
NetApp for OpenStack
OpenStack in its earliest inception was an open competitor to Amazon Web Services (AWS) and shared
many of the same design principles as AWS. Therefore, it lacked a focus on traditional enterprise
applications that benefit from highly available storage, relying instead on the applications themselves to
manage data redundancy, availability, and archiving. This is changing, however, as enterprises deploy
OpenStack and look to migrate all of their workloads into an internal cloud, due to the inherent efficiencies
of this approach.
OpenStack has steadily gained features and deployment tools that allow for HA at the control plane,
hypervisor, and storage tiers. Enterprises are looking for a single solution that can meet all of their
workloads, rather than piecing together various different solutions. NetApp is the only storage solution
provider that has proven deployments and the data management features to accommodate all workloads
in a fully supportable manner.
Red Hat and NetApp for OpenStack
One of the key lessons of the last few years is that tightly integrated solutions are the key to unlocking
business value. Just having a good stand-alone technology is no longer adequate. Such a technology
must also be tightly integrated into the full stack of components (network, application, and storage) to
deliver a low total cost of operations and ownership.
Another key lesson is that customers do not want integration at the expense of best-in-class components.
Rather, customers want excellence in integration as well as high quality in the individual components of a
solution. This is where the partnership between NetApp and Red Hat comes to the fore. The leading
provider of enterprise-class storage for OpenStack deployments has joined with the leading provider of
Linux and OpenStack distributions to make a compelling solution that delivers on this promise.

4 Red Hat Enterprise Linux OpenStack Platform 5 on NetApp Clustered Data ONTAP © 2015 NetApp, Inc. All right reserved
Description of the Solution
This solution leverages the RHEL-OSP installer, a graphical tool that deploys and manages highly
available OpenStack installations. This toolset provides ease of deployment, standardization, and
reduced project risk. Red Hat OpenStack has been prevalidated by Red Hat and NetApp and certified
with NetApp Cinder drivers.
The storage foundation for an OpenStack cloud is the NetApp clustered Data ONTAP® operating system
(OS) on NetApp FAS hardware. Features found in RHEL-OSP and Data ONTAP protect all critical
components of the infrastructure. HA for the network components is achieved by using the Link
Aggregation Control Protocol (LACP) and network interface bonding of the two 10GbE interfaces with
virtual LAN (VLAN) tagging to provide for the separation and security of any virtual networks. This
approach provides the benefits of redundancy, failover, and high throughput during normal operations
with a minimum number of switch ports.
Fabric-attached storage (FAS) controllers, deployed using the same network design principles, enable
seamless live migration of workloads in a shared infrastructure and can grow both horizontally and
vertically. Data ONTAP does not suffer from the lack of data density or high replica counts that some
open-source object and block storage solutions do. This is critical at scale and can greatly reduce the use
of data center floor space, heating, cooling, and power. Data center cost per square foot becomes clearer
when existing space is 100% utilized, thereby necessitating the creation of new space.
Figure 1 depicts the technical components of this solution.
Figure 1) Solution overview.

5 Red Hat Enterprise Linux OpenStack Platform 5 on NetApp Clustered Data ONTAP © 2015 NetApp, Inc. All right reserved
1.2 Use Case Summary
The primary use cases for this solution are:
Public cloud deployment
Private cloud deployment
Hybrid cloud deployment
2 Cloud Deployment Methodology
2.1 Technology Requirements
The deployment of RHEL-OSP on NetApp Data ONTAP requires a number of hardware and software
components to achieve high availability (HA).
Hardware Requirements
Table 1 lists the hardware components required to implement the primary use case.
Table 1) Hardware requirements.
Hardware Quantity
x86_64 servers 5 or more
NetApp FAS controllers A minimum of 1 Data ONTAP HA cluster
Layer 3 network switches with support for link aggregation and LACP
2 or more
Software Requirements
Table 2 lists the software components required to implement the primary use case.
Table 2) Software requirements.
Software Count / Version
FAS NFS license 1 (minimum version: NetApp Data ONTAP 8.1)
FAS FlexClone license 1
RHEL-OSP 5 licensing 5
Overview of Laboratory Setup
The laboratory environment used for this deployment included a Cisco® Nexus
® 5020 switch running
Cisco Nexus 5000 Series Switch Release 5.2(1)N1(7) with edge connectivity to the rack though Nexus
2232P 10GbE fabric extenders with four 10GbE uplinks to the 5020. For the 1GbE connections to the
management network, Cisco Nexus 2248TP-E fabric extenders were used with two 10GbE uplinks to the
5020.
All storage controllers and servers were connected through two 10GbE network ports that were bonded
or paired and a single 1GbE connection for management network traffic. All servers and storage were
also equipped for out-of-band management through 1GbE links. Redundant network tiers were used, as
in the HA reference architecture, and were provided through redundant connections to physically
separate fabric extenders behaving as a single logical switch.
6 Red Hat Enterprise Linux OpenStack Platform 5 on NetApp Clustered Data ONTAP © 2015 NetApp, Inc. All right reserved
The servers were standard x86_64-compatible hardware with full virtualization support, 128GB of RAM,
and dual Intel® Xeon
® CPU E5-2630 v2 @ 2.60GHz processors. The FAS controllers used for this
deployment were FAS 2240-4 nodes in a two-node cluster. The specific host configurations, described in
Table 3, only apply to Cisco switches, but the Linux host settings are generic and could be used with any
switch supporting LACP 802.3ad link aggregation.
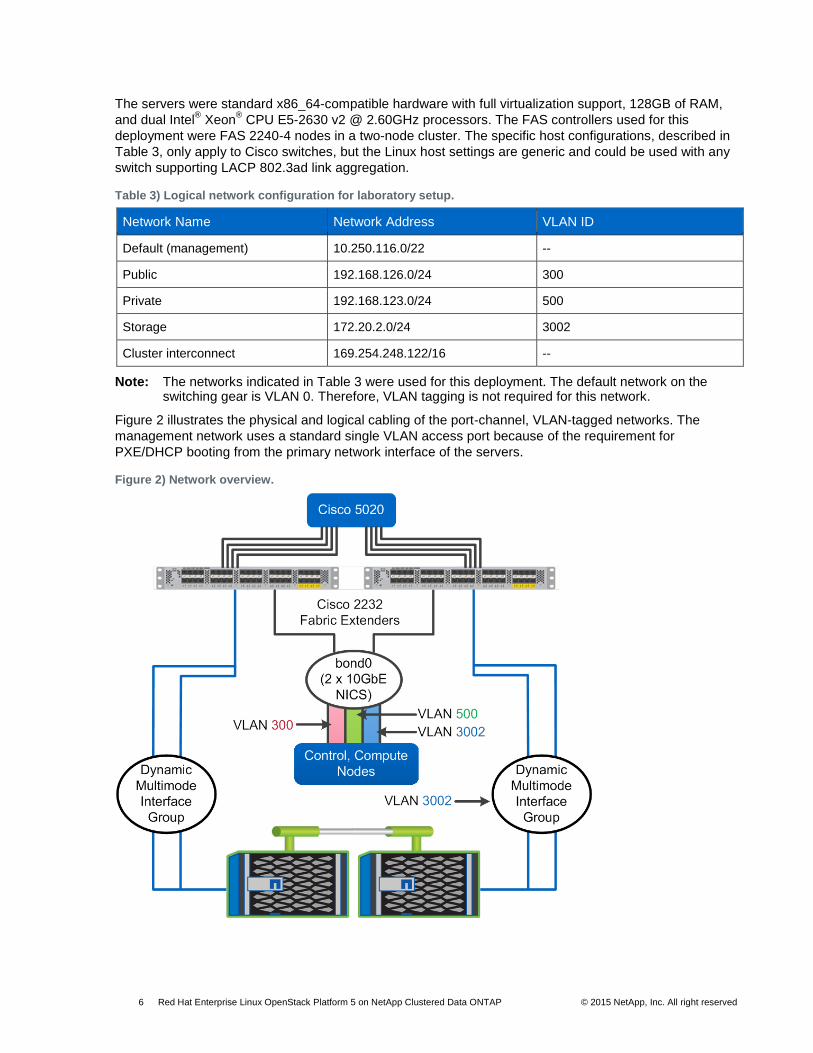
Table 3) Logical network configuration for laboratory setup.
Network Name Network Address VLAN ID
Default (management) 10.250.116.0/22 --
Public 192.168.126.0/24 300
Private 192.168.123.0/24 500
Storage 172.20.2.0/24 3002
Cluster interconnect 169.254.248.122/16 --
Note: The networks indicated in Table 3 were used for this deployment. The default network on the switching gear is VLAN 0. Therefore, VLAN tagging is not required for this network.
Figure 2 illustrates the physical and logical cabling of the port-channel, VLAN-tagged networks. The
management network uses a standard single VLAN access port because of the requirement for
PXE/DHCP booting from the primary network interface of the servers.
Figure 2) Network overview.

7 Red Hat Enterprise Linux OpenStack Platform 5 on NetApp Clustered Data ONTAP © 2015 NetApp, Inc. All right reserved
2.2 Deployment Procedures
Deploying RHEL-OSP on NetApp clustered Data ONTAP requires the following high-level tasks:
Set up switch ports using link aggregation for all nodes
Setup Cinder and Glance volumes
Copy installation media to the HTTP server
Build and configure the RHEL-OSP Installer
Perform discovery on all target hosts in the cluster
Perform a test kickstart
Update the NetApp Puppet module
Configure your networks
Configure an HA deployment
Configure the network interfaces
Modify necessary host-group values
Modify the Puppet values for the cinder::volume::netapp class
Deploy HA
Set Up Switch Ports Using Link Aggregation for All Nodes
All hosts used a single standard interface for management and a pair of 10GbE bonded interfaces for
other traffic. To set up switch ports using link aggregation for all nodes, apply the following switch settings
for the bonded interface ports:
stl5020-L2E33(config-if)# show run int e104/1/8
interface Ethernet104/1/8
switchport mode trunk
switchport trunk allowed vlan 300,500,3002
channel-group 1029
stl5020-L2E33(config-if)# show run int e104/1/24
interface Ethernet104/1/24
switchport mode trunk
switchport trunk allowed vlan 300,500,3002
channel-group 1029
stl5020-L2E33(config-if)# show run int port-channel 1029
interface port-channel1029
description "rx300s8-29 10g"
switchport mode trunk
switchport trunk allowed vlan 300,500,3002
speed 10000
Set Up Cinder and Glance Volumes
Prior to creating FlexVol® volumes, you must have a working storage virtual machine (SVM, previously
called Vserver) in the Data ONTAP cluster with either the NFS or iSCSI protocol enabled. NetApp
recommends having a dedicated SVM (or SVMs) for OpenStack services. Assign FlexVol volumes to
aggregates with the recommended minimum number of disks for good performance and allocate enough
available free space for future growth.
Figure 3 illustrates how SVMs can span aggregates, although a flexible volume, and thus any Cinder
volumes within it, must reside in a single aggregate. A larger number of spinning disks in an aggregate
typically provides higher disk throughput for the flexible volumes contained within them.

8 Red Hat Enterprise Linux OpenStack Platform 5 on NetApp Clustered Data ONTAP © 2015 NetApp, Inc. All right reserved
Figure 3) NetApp clustered Data ONTAP objects.
Notably, NetApp Flash Cache™
and/or NetApp Flash Pool™
can also dramatically improve the
performance and latency characteristics of a given flexible volume by accelerating frequently accessed
data by using flash memory or solid-state disks as a caching tier. NetApp highly recommends these
applications when large numbers of hypervisors are hosting bootable Cinder volumes on NetApp
controllers.

9 Red Hat Enterprise Linux OpenStack Platform 5 on NetApp Clustered Data ONTAP © 2015 NetApp, Inc. All right reserved
You can also elect to NFS mount ephemeral disk storage space for your hypervisors (normally
/var/lib/libvirt/images with KVM) to enable features such as live migration. For either of these
scenarios, a caching tier based on Flash Cache or Flash Pool is highly desirable.
For HA and throughput, it is best practice to set up network interface groups. Whenever possible, employ
dynamic multimode or static multimode interface groups. NetApp also recommends enabling jumbo
frames on all storage network ports used for storage (switches, FAS, and servers) to achieve the best
performance. Most importantly, test your failover configuration prior to deploying a production setup. For
more information, refer to the Clustered Data ONTAP 8.2 Network Management Guide. For more details
on NFS considerations, refer to the Clustered Data ONTAP NFS Best Practice and Implementation
Guide.
The sizes of your Cinder and Glance volumes can vary greatly depending on your specific deployment,
but you should generally allocate sufficient space to accommodate the number of virtual machines you
plan to have in the cluster. You should also allocate sufficient free space for future growth in data. A
reasonable starting place is 300GB to 500GB per hypervisor, but this may vary considerably depending
on the hardware you deploy.
NetApp does not recommend using autosize with Cinder volumes because of the way the Cinder
scheduler creates Cinder volumes by choosing the volume with the most free space. The scheduler does
periodically re-scan for free space, however. Frequent resizing of NetApp FlexVol® volumes could lead to
inconsistent behavior in the Cinder scheduler and should be minimized.
For highest performance, use at least four FlexVol volumes or exports per aggregate to maximize
throughput with multiple threads. This comes into play in larger installations and is handled by changing
the Puppet $nfs_shares parameter to include multiple mount points. The NetApp Snapshot® policy for
individual FlexVol volumes should reflect the need to perform global backups, which are multi-tenant
backups, on the files in Cinder.
Applications that require file-system consistency should operate at the level of individual Cinder snapshot
instances, which generates a file-based NetApp FlexClone® instance through the NetApp Cinder driver,
rather than a Snapshot copy of the entire FlexVol volume. Hourly (or more frequent) disaster-recovery
Snapshot copies with remote, asynchronous NetApp SnapMirror® backups make the most sense in an
OpenStack environment.
In this scenario, a remote data center with free Nova or hypervisor capacity and a Cinder or Glance
SnapMirror target can be brought online rapidly in the event of a geography-dependent outage. To
implement this strategy, boot from Cinder volumes rather than ephemeral disks. Data on ephemeral disks
is not included in the remote mirror unless special care is taken to mount this disk space on a NetApp
NFS export residing on a mirrored FlexVol volume. The ephemeral files are stored in
/var/lib/nova/instances by default on Red Hat hosts.
In very large installations, it might be desirable to maximize the access patterns of Glance (high reads)
versus Cinder (mixed read and write I/O) by placing these two volumes in different disk aggregates.
However, this should not be necessary in relatively small installations on aggregates with a sufficient
number of disks.
The NetApp Cinder NFS driver automatically caches the Glance image on the Cinder volume after the
first Nova boot command is issued, further reducing the data being pulled from Glance. After the cached
image is in Cinder, the Nova boot initiates an automatic, file-based FlexClone copy from the image file,
which dramatically speeds up creation and instance boot times.
In general, Data ONTAP is affected by the total number of spindles in an aggregate, and more spindles
are better. The SVM used for these purposes can be the same or different, because SVMs can have
more than one backing disk aggregate. You specify which aggregate hosts the FlexVol volume in the
vol_create command. It is best practice to use RAID DP on your disk aggregates.
To setup Cinder export, log into the administrative console, and complete the following steps:

10 Red Hat Enterprise Linux OpenStack Platform 5 on NetApp Clustered Data ONTAP © 2015 NetApp, Inc. All right reserved
1. Enable the desired NFS protocol version(s). The NetApp Cinder driver automatically mounts at the highest level enabled. This deployment enabled all versions and utilized NFS v4.1 with parallel NFS (pNFS) support.
OSTK-06::> vserver nfs modify -vserver openstack -v3 enabled -v4.0 enabled –v4.1 enabled -v4.1-
pnfs enabled -vstorage enabled
Note: The -vstorage enabled command enables the NetApp copy offload feature.
2. Verify that the NFS service is running.
OSTK-06::> vserver nfs status
The NFS server is running.
3. Verify that the ontapi service is enabled on the FAS controller or the target SVM if you plan to use
the vsadmin account. The NetApp Cinder driver requires this.
OSTK-06::> vserver service web show -vserver OSTK-06
Vserver Type Service Name Description Enabled
-------------- -------- ---------------- ----------------------------- -------
OSTK-06 admin cem OBSOLETE true
OSTK-06 admin disco Data ONTAP Discovery true
OSTK-06 admin ontapi Remote Administrative API true
Support
OSTK-06 admin portal Data ONTAP Web Services true
Portal
OSTK-06 admin spi Service Processor true
Infrastructure
5 entries were displayed.
4. If the ontapi service is not enabled, run the following command to enable it:
OSTK-06::> vserver services web modify -vserver openstack -name ontapi -enabled true
5. Create an export policy and a rule for OpenStack (modify for your storage network).
OSTK-06::> vserver export-policy create -policyname openstack -vserver openstack
OSTK-06::> vserver export-policy rule create -vserver openstack -policyname openstack -
clientmatch 172.20.2.0/24 -rorule any -rwrule any -anon 0
6. Verify that the client network has access to the new volume.
OSTK-06::> vserver export-policy rule show
Policy Rule Access Client RO
Vserver Name Index Protocol Match Rule
------------ --------------- ------ -------- --------------------- ---------
openstack default 1 any 0.0.0.0/0 any
openstack openstack 1 any 172.20.2.0/24 any
2 entries were displayed.
7. Create FlexVol volumes for Cinder and Glance.
OSTK-06::> OSTK-06::> volume create -volume cinder -aggregate aggr1 -size 1TB -state online -
type RW -policy openstack -unix-permissions ---rwxrwxr-x -space-guarantee volume -snapshot-policy
default -foreground true -security-style unix -junction-path /vol/cinder -vserver openstack
[Job 3088] Job succeeded: Successful
OSTK-06::> volume create -volume glance -aggregate aggr1 -size 300G -state online -type RW -
policy openstack -unix-permissions ---rwxrwxr-x -space-guarantee volume -snapshot-policy default
-foreground true -security-style unix -junction-path /vol/glance -vserver openstack
[Job 3093] Job succeeded: Successful
8. Enable deduplication on the Glance volume. Typical space savings can exceed 90% with deduplication on Glance stores.
OSTK-06::> vol efficiency on -vserver openstack -volume glance
(volume efficiency on)
Efficiency for volume "glance" of Vserver "openstack" is enabled.
Already existing data could be processed by running "volume efficiency start -vserver openstack -
volume glance -scan-old-data true".

11 Red Hat Enterprise Linux OpenStack Platform 5 on NetApp Clustered Data ONTAP © 2015 NetApp, Inc. All right reserved
Note: For more information on deduplication and compression for FlexVol volumes, refer to the NetApp support documentation.
9. Test the NFS exports from a host with network access to the OpenStack storage network.
[root@foreman ~]# mkdir /mnt/cinder
[root@foreman ~]# mount 172.20.2.18:/vol/cinder /mnt/cinder
[root@foreman ~]# touch /mnt/cinder/test
[root@foreman ~]# mkdir /mnt/glance
[root@foreman ~]# mount 172.20.2.18:/vol/glance /mnt/glance
[root@foreman ~]# touch /mnt/glance/test
10. Unmount the Cinder and Glance mounts. The NetApp driver automounts the Cinder export and the installer sets up the Glance mount.
[root@foreman ~]# umount /mnt/cinder ; umount /mnt/glance
Copy Installation Media to HTTP Server
To copy installation media to the HTTP server, complete the following steps:
1. Download the RHEL 7.0 x86_64 DVD ISO file, put it on a web server that is collocated with the
RHEL-OSP Installer, and move it to /var/opt/rhel-server-7.0-x86_64-dvd.iso.
Note: The installation server cannot function in this role without changes to the Apache configuration (discouraged).
2. Create the following directory on the web server.
[root@webhost ~]# mkdir –p /var/www/html/rhel/7.0/os/x86_64
3. Mount the DVD ISO media to the correct location.
[root@webhost ~]# mount -t iso9660 -o loop,ro /var/opt/rhel-server-7.0-x86_64-dvd.iso
/var/www/html/rhel/7.0/os/x86_64
Build and Configure Red Hat Enterprise Linux OpenStack Platform Installer
To setup the RHEL-OSP Installer, refer to the Red Hat documentation.
To build and configure the RHEL-OSP Installer, complete the following steps:
1. When the installer asks for the installation media, select the HTTP protocol, name it RHEL, and use
the following URL, in which 10.250.117.41 is replaced by the management network address of
your web host:
http://10.250.117.41/rhel/7.0/os/x86_64
2. Configure the OS installation media in the RHEL-OSP Installer administrative interface to use the RHEL source as follows:

12 Red Hat Enterprise Linux OpenStack Platform 5 on NetApp Clustered Data ONTAP © 2015 NetApp, Inc. All right reserved
Test Kickstart
To test Kickstart, complete the following steps:
1. Boot one machine using PXE/DHCP (network interface boot). Upon successful boot, the following menu is displayed:

13 Red Hat Enterprise Linux OpenStack Platform 5 on NetApp Clustered Data ONTAP © 2015 NetApp, Inc. All right reserved
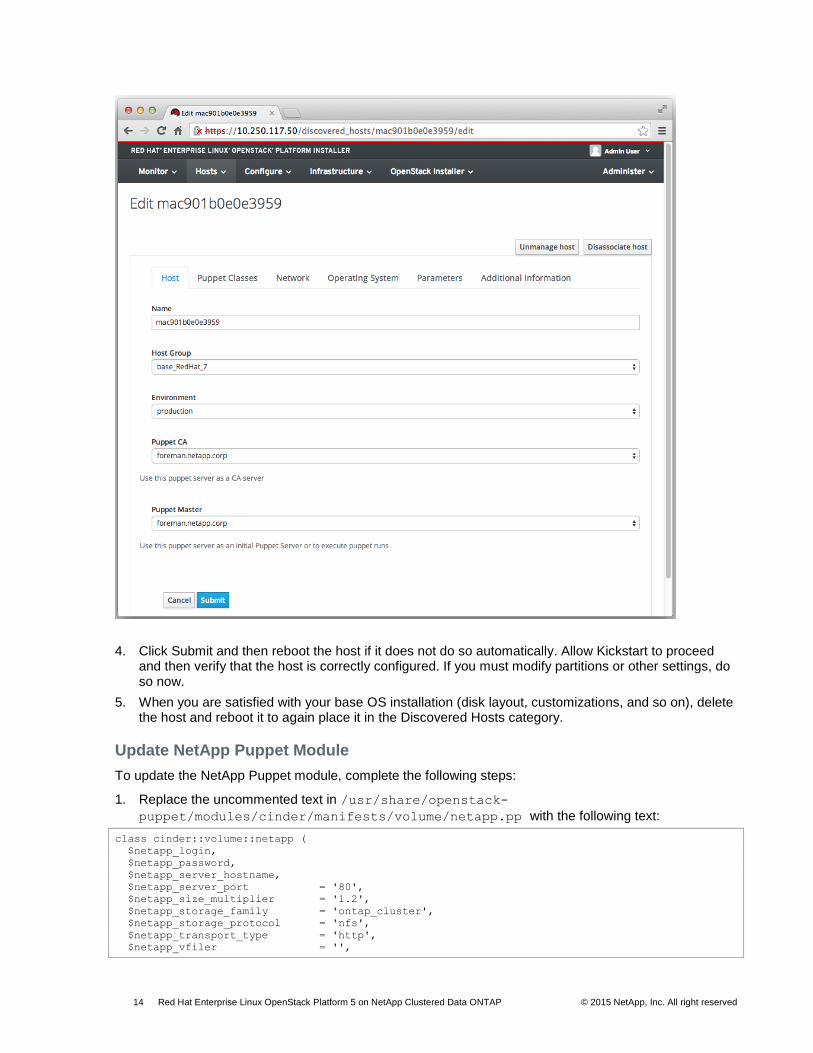
2. Allow the machine to boot and register with the RHEL-OSP Installer. The machine should then show up as discovered in the administrative console. Select the host name in blue (host names are auto-assigned by the RHEL platform installer) and select the Provision option.
3. Select the base_RedHat_7 host group.
Note: Host names in the RHEL-OSP Installer are automatically assigned by using the MAC address of the network interface card (NIC) that PXE boots from.
14 Red Hat Enterprise Linux OpenStack Platform 5 on NetApp Clustered Data ONTAP © 2015 NetApp, Inc. All right reserved
4. Click Submit and then reboot the host if it does not do so automatically. Allow Kickstart to proceed and then verify that the host is correctly configured. If you must modify partitions or other settings, do so now.
5. When you are satisfied with your base OS installation (disk layout, customizations, and so on), delete the host and reboot it to again place it in the Discovered Hosts category.
Update NetApp Puppet Module
To update the NetApp Puppet module, complete the following steps:
1. Replace the uncommented text in /usr/share/openstack-
puppet/modules/cinder/manifests/volume/netapp.pp with the following text:
class cinder::volume::netapp (
$netapp_login,
$netapp_password,
$netapp_server_hostname,
$netapp_server_port = '80',
$netapp_size_multiplier = '1.2',
$netapp_storage_family = 'ontap_cluster',
$netapp_storage_protocol = 'nfs',
$netapp_transport_type = 'http',
$netapp_vfiler = '',

15 Red Hat Enterprise Linux OpenStack Platform 5 on NetApp Clustered Data ONTAP © 2015 NetApp, Inc. All right reserved
$netapp_volume_list = '',
$netapp_vserver = '',
$expiry_thres_minutes = '720',
$thres_avl_size_perc_start = '20',
$thres_avl_size_perc_stop = '60',
$nfs_shares = [],
$nfs_shares_config = '/etc/cinder/shares.conf',
$netapp_copyoffload_tool_path = '',
$netapp_controller_ips = '',
$netapp_sa_password = '',
$netapp_storage_pools = '',
$netapp_webservice_path = '/devmgr/v2',
) {
cinder::backend::netapp { 'DEFAULT':
netapp_login => $netapp_login,
netapp_password => $netapp_password,
netapp_server_hostname => $netapp_server_hostname,
netapp_server_port => $netapp_server_port,
netapp_size_multiplier => $netapp_size_multiplier,
netapp_storage_family => $netapp_storage_family,
netapp_storage_protocol => $netapp_storage_protocol,
netapp_transport_type => $netapp_transport_type,
netapp_vfiler => $netapp_vfiler,
netapp_volume_list => $netapp_volume_list,
netapp_vserver => $netapp_vserver,
expiry_thres_minutes => $expiry_thres_minutes,
thres_avl_size_perc_start => $thres_avl_size_perc_start,
thres_avl_size_perc_stop => $thres_avl_size_perc_stop,
nfs_shares => $nfs_shares,
nfs_shares_config => $nfs_shares_config,
netapp_copyoffload_tool_path => $netapp_copyoffload_tool_path,
netapp_controller_ips => $netapp_controller_ips,
netapp_sa_password => $netapp_sa_password,
netapp_storage_pools => $netapp_storage_pools,
netapp_webservice_path => $netapp_webservice_path,
}
}
2. Replace the uncommented text at the bottom of /usr/share/openstack-
puppet/modules/cinder/manifests/backend/netapp.pp with the following text:
define cinder::backend::netapp (
$netapp_login,
$netapp_password,
$netapp_server_hostname,
$volume_backend_name = $name,
$netapp_server_port = '80',
$netapp_size_multiplier = '1.2',
$netapp_storage_family = 'ontap_cluster',
$netapp_storage_protocol = 'nfs',
$netapp_transport_type = 'http',
$netapp_vfiler = '',
$netapp_volume_list = '',
$netapp_vserver = '',
$expiry_thres_minutes = '720',
$thres_avl_size_perc_start = '20',
$thres_avl_size_perc_stop = '60',
$nfs_shares = [],
$nfs_shares_config = '/etc/cinder/shares.conf',
$netapp_copyoffload_tool_path = '',
$netapp_controller_ips = '',
$netapp_sa_password = '',
$netapp_storage_pools = '',
$netapp_webservice_path = '/devmgr/v2',
) {
if $nfs_shares {
file {$nfs_shares_config:
content => join($nfs_shares, "\n"),

16 Red Hat Enterprise Linux OpenStack Platform 5 on NetApp Clustered Data ONTAP © 2015 NetApp, Inc. All right reserved
require => Package['cinder'],
notify => Service['cinder-volume']
}
}
cinder_config {
"${volume_backend_name}/volume_backend_name": value => $volume_backend_name;
"${volume_backend_name}/volume_driver": value =>
'cinder.volume.drivers.netapp.common.NetAppDriver';
"${volume_backend_name}/netapp_login": value => $netapp_login;
"${volume_backend_name}/netapp_password": value => $netapp_password, secret =>
true;
"${volume_backend_name}/netapp_server_hostname": value => $netapp_server_hostname;
"${volume_backend_name}/netapp_server_port": value => $netapp_server_port;
"${volume_backend_name}/netapp_size_multiplier": value => $netapp_size_multiplier;
"${volume_backend_name}/netapp_storage_family": value => $netapp_storage_family;
"${volume_backend_name}/netapp_storage_protocol": value => $netapp_storage_protocol;
"${volume_backend_name}/netapp_transport_type": value => $netapp_transport_type;
"${volume_backend_name}/netapp_vfiler": value => $netapp_vfiler;
"${volume_backend_name}/netapp_volume_list": value => $netapp_volume_list;
"${volume_backend_name}/netapp_vserver": value => $netapp_vserver;
"${volume_backend_name}/expiry_thres_minutes": value => $expiry_thres_minutes;
"${volume_backend_name}/thres_avl_size_perc_start": value => $thres_avl_size_perc_start;
"${volume_backend_name}/thres_avl_size_perc_stop": value => $thres_avl_size_perc_stop;
"${volume_backend_name}/nfs_shares_config": value => $nfs_shares_config;
"${volume_backend_name}/netapp_copyoffload_tool_path": value =>
$netapp_copyoffload_tool_path;
"${volume_backend_name}/netapp_controller_ips": value => $netapp_controller_ips;
"${volume_backend_name}/netapp_sa_password": value => $netapp_sa_password, secret
=> true;
"${volume_backend_name}/netapp_storage_pools": value => $netapp_storage_pools;
"${volume_backend_name}/netapp_webservice_path": value => $netapp_webservice_path;
}
if $netapp_storage_family == 'eseries' {
cinder_config {
"${volume_backend_name}/use_multipath_for_image_xfer": value => true;
}
}
}
3. To prevent future updates from affecting these changes, set these specific files to be immutable.
[root@foreman ] chattr +i /usr/share/openstack-puppet/modules/cinder/manifests/backend/netapp.pp
[root@foreman ] chattr +i /usr/share/openstack-puppet/modules/cinder/manifests/volume/netapp.pp
Configure Your Networks
To configure the networks, complete the following steps:
1. Select Infrastructure > Storage. Then select the Subnets tab and precreate all of the networks used in your deployment.
a. Enter the network, mask, gateway, and so on.
b. Select the internal DB value from the IPAM options.
c. Provide the installer a start and end of range for IP addresses it can use for auto-suggesting IP addresses within that network.
Note: This entire range should be free from other hosts and have no IP conflicts.
d. Enter the correct VLAN ID for the network.

17 Red Hat Enterprise Linux OpenStack Platform 5 on NetApp Clustered Data ONTAP © 2015 NetApp, Inc. All right reserved
2. From the Domain tab, select the domain of which this network is a part.
3. From the Capsules tab, select the DNS capsule so that DNS records are created for each network.
4. Repeat steps 1 through 3 for all of the networks except for the default or management network, which was setup during the RHEL-OSP installation process.
The following networks should then be listed:

18 Red Hat Enterprise Linux OpenStack Platform 5 on NetApp Clustered Data ONTAP © 2015 NetApp, Inc. All right reserved
Configure HA Deployment
To configure HA deployment, complete the following steps:
1. In the OpenStack Installer, select New Deployment and configure the deployment settings:
a. Name this deployment HA OpenStack.
b. Select High Availability Controllers/Compute.
c. Configure the remaining required fields (as shown in the following screenshot).
d. Click Next.

19 Red Hat Enterprise Linux OpenStack Platform 5 on NetApp Clustered Data ONTAP © 2015 NetApp, Inc. All right reserved
2. Configure networking to meet the requirements of your particular environment by dragging the desired network from Available Network Traffic Types onto the target subnet. Click Next.
Note: The installer does not allow you to place External, Storage, or Tenant service types onto a single subnet, in accordance with the installer’s predefined rules. Attempting to do so produces the following warning. You can create more subnets on this page if you need more isolation of service types by clicking New Subnet. Refer to the Highly Available OpenStack Deployments Built on NetApp Storage Systems Solution Design guide for more information on exposing various network types in an OpenStack deployment. The installer is tolerant of shared functions on the default network.
3. Review the summary on the Services Overview window and click Next.

20 Red Hat Enterprise Linux OpenStack Platform 5 on NetApp Clustered Data ONTAP © 2015 NetApp, Inc. All right reserved
4. On the Neutron Service Configuration window, select VLAN segmentation and enter a range of VLANs that are free and from which Neutron can create new networks. Leave the core plug-ins alone, as indicated in the default settings.

21 Red Hat Enterprise Linux OpenStack Platform 5 on NetApp Clustered Data ONTAP © 2015 NetApp, Inc. All right reserved
5. On the Glance Service Configuration window, enter the NetApp Data LIF address and path to the Glance export created in step 7 in the section “Setup Cinder and Glance Volumes”.

22 Red Hat Enterprise Linux OpenStack Platform 5 on NetApp Clustered Data ONTAP © 2015 NetApp, Inc. All right reserved
6. On the Cinder Service Configuration window, enter the NetApp Data LIF address and export that was created in step 7 in the section “Setup Cinder and Glance Volumes”. Do not enter the NetApp management address. That setting is configured later with Puppet.

23 Red Hat Enterprise Linux OpenStack Platform 5 on NetApp Clustered Data ONTAP © 2015 NetApp, Inc. All right reserved
7. Click submit, but do not deploy at this time.
Configure Network Interfaces
To configure the network interfaces, complete the following steps:
1. Select OpenStack Installer > Deployments, and then click HA OpenStack.
2. Click the Hosts tab.
3. Assign hosts within the cluster by clicking the deployment roles for the HA Controller and Compute (Neutron), assigning hosts as desired, and then clicking Assign Hosts.
4. Select all of the nodes in your deployment for which you want to configure network interface bonding.
In this example, we bonded the 10GbE NICs that are the third and fourth interfaces (enp4s0f0 and
enp4s0f1 in this example).
Note: When configuring with a bulk method, all hardware and cabling must be the same. Otherwise, each host must be configured individually.
5. Click Configure Networks.

24 Red Hat Enterprise Linux OpenStack Platform 5 on NetApp Clustered Data ONTAP © 2015 NetApp, Inc. All right reserved
6. The resulting window presents the option to bond interfaces. Select them as follows:
7. Select the bonding mode as follows:

25 Red Hat Enterprise Linux OpenStack Platform 5 on NetApp Clustered Data ONTAP © 2015 NetApp, Inc. All right reserved
8. Drag the following networks to the shared, bonded 10GbE network interfaces, as shown in the following example. VLAN tagging and separation preserve the security of these traffic types and prevent intermixing of traffic on the virtual LAN.
Note: Place the most critical networks on the bond0 pair. This arrangement might vary according to your internal network scheme and use case.
9. Click Submit to save the settings.
Modify Necessary Host-Group Values
To modify the necessary host-group values, complete the following steps:
1. Select Configure > Host Groups and select the base_RedHat_7/HA OpenStack/HA Controller
host group.
2. Click the Puppet Classes tab and search for netapp.
3. Click the cinder::volume::netapp class to add it to the list of classes included in the host group.
The following window is displayed:

26 Red Hat Enterprise Linux OpenStack Platform 5 on NetApp Clustered Data ONTAP © 2015 NetApp, Inc. All right reserved
4. Click Submit.
Modify the Puppet Values for the cinder::volume::netapp Class
To modify the Puppet values for the cinder::volume netapp class, complete the following steps:
1. Select Configure > Puppet Classes and search for netapp.
2. Click to modify the cinder::volume:netapp class.
3. Click Smart Class Parameter to produce the following window:

27 Red Hat Enterprise Linux OpenStack Platform 5 on NetApp Clustered Data ONTAP © 2015 NetApp, Inc. All right reserved
4. Scroll down to the section for the parameter NetApp Server Hostname that says Override Value for
Specific Hosts. Enter hostgroup=base_RedHat_7/HA OpenStack/HA Controller in the
Match* field and then the NetApp controller administrative IP address in the Value field
(10.250.117.106 in this example). If you do not see the following fields, click Add Matcher-Value.

28 Red Hat Enterprise Linux OpenStack Platform 5 on NetApp Clustered Data ONTAP © 2015 NetApp, Inc. All right reserved
5. Repeat steps 1 through 4 for the following smart class parameters, in each case using the same filter as in the previous example. This sets the values you specify on all hosts that match the
base_RedHat_7/HA OpenStack/HA Controller host group (all of the OpenStack controller
hosts).
Table 4) Smart class parameters.
Smart Class Parameter Sample Value and Explanation
netapp_server_hostname 10.250.117.106
Covered previously—the administrative IP for the NetApp controller
netapp_password NetApp21
The administrative password for the NetApp controller
netapp_server_port 443
The port through which the NetApp Cinder driver makes ZAPI and administrative calls
netapp_transport_type https
Protocol used for administrative calls
netapp_vserver openstack
The name of the SVM that hosts volumes
nfs_shares 172.20.2.18:/vol/cinder
The ip:/share path in which Cinder creates
volumes
nfs_shares_config /etc/cinder/shares.conf
The file that stores the NFS shares data
Deploy HA
To deploy HA, complete the following steps:
1. Verify that all hosts to be deployed are in the discovered state and do not yet have an OS.
2. When you are satisfied with the configuration of the HA deployment and node layout, click Deploy. The following installations are displayed.

29 Red Hat Enterprise Linux OpenStack Platform 5 on NetApp Clustered Data ONTAP © 2015 NetApp, Inc. All right reserved
3 Validation and Postinstallation
When the deployment is complete, log on to one of the controllers and source the keystonerc_admin
file and run the following command:
[root@mac901b0e0e3959 ~(openstack_admin)]# cinder create 1
Note: This command validates that NetApp Cinder configuration.
Run the command # cinder show <id>, in which the ID is the actual volume ID. Verify that the Cinder
volume has in fact been created on a back end that corresponds to a backend owned by NetApp Cinder
driver. You can see the backends by running the # cinder service-list command. In addition, you
can disable or enable backends with the # cinder service-[disable/enable] command. NetApp
recommends disabling the generic NFS driver by running the following command:
[root@mac901b0e0e3959 ~(openstack_admin)]# cinder service-disable ha-
controller@nfs cinder-volume
+-------------------+---------------+----------+
| Host | Binary | Status |
+-------------------+---------------+----------+
| ha-controller@nfs | cinder-volume | disabled |
+-------------------+---------------+----------+
To verify that the Glance NFS mounts are active, run the following command on the controller nodes:
[root@mac901b0e0e3959 ] systemctl status var-lib-glance-images.mount
var-lib-glance-images.mount - /var/lib/glance/images
Loaded: loaded (/proc/self/mountinfo)
Active: active (mounted) since Mon 2014-12-01 09:41:21 EST; 9min ago
Where: /var/lib/glance/images
What: 172.20.2.18:/vol/glance

30 Red Hat Enterprise Linux OpenStack Platform 5 on NetApp Clustered Data ONTAP © 2015 NetApp, Inc. All right reserved
4 Troubleshooting
If the deployment runs into any issues, it might hang at some point. Go to the console, click Hosts, and
then select a specific host. From there, select Reports, and investigate any red reports.
NetApp recommends correcting any issues or mistakes with the Puppet configurations that arise and then
running the puppet agent –t command on any node that requires a refresh, rather than restarting the
deployment without understanding what change is needed. If you receive a message that Puppet is
already running, you can try the change on another node that is in the same host group. This invokes a
new Puppet run in the console and shows the results of your changes, facilitating further corrections.
If there are issues with the Cinder deployment, messages might be hidden until you enable debug and
verbose logging in the /etc/cinder/cinder.conf file and restart the Cinder volume service.
Note: This change is overridden on the next Puppet run and should not be allowed to persist in a production setting.
5 Known Issues
In some cases, the bonding configuration files in /etc/sysconfig/network-scripts/ifcfg-
bond0.xxx are not properly formed. If this happens, these files can be corrected manually by making the
necessary changes on a host and then running ifup bond.300 for the specific interface having the
issue. The bonding configuration is not under the control of Puppet, and therefore this manual
intervention is not overridden on subsequent Puppet runs.
6 Additional Use Cases
This guide does not cover the deployment of Swift object stores on NetApp E-Series controllers, but this
information is covered in the NetApp OpenStack Deployment and Operations Guide.
7 Conclusion
Red Hat is the leading provider of open-source software solutions and a top contributor to OpenStack.
Red Hat provides industry-leading services and support that provides its customers with an edge in the
design, deployment, and maintenance of OpenStack. NetApp is the provider of the number one storage
OS in the world with Data ONTAP, has the greatest number of OpenStack deployments in the enterprise
storage market, and has a proven track record of providing storage for cloud environments at scale.
Together, these two companies can support your OpenStack deployment, minimize risk at the critical
storage layer, and provide you with reliable partners with vision and a development roadmap to support
your continued success as the cloud evolves.
References
This report references the following documents and resources:
Highly Available OpenStack Deployments Built on NetApp Storage Systems: Solution Design
http://www.netapp.com/us/system/pdf-reader.aspx?m=tr-4323.pdf
Creating a Highly Available Red Hat OpenStack Platform Configuration (RHEL-OSP5 and RHEL7)
https://access.redhat.com/articles/1150463
The NetApp OpenStack Deployment and Operations Guide
http://netapp.github.io/openstack-deploy-ops-guide/icehouse/content/ch_executive-summary.html
Clustered Data ONTAP NFS Best Practice and Implementation Guide

31 Red Hat Enterprise Linux OpenStack Platform 5 on NetApp Clustered Data ONTAP © 2015 NetApp, Inc. All right reserved
http://www.netapp.com/us/system/pdf-reader.aspx?m=tr-4067.pdf
Clustered Data ONTAP 8.2 Network Management Guide
https://library.netapp.com/ecm/ecm_download_file/ECMP1196907
NetApp compression and deduplication support documentation
https://library.netapp.com/ecmdocs/ECMP1196906/html/GUID-9C88C1A6-990A-4826-83F8-0C8EAD6C3613.html
Version History
Version Date Document Version History
Version 1.0 January 2015 Initial release

32 Red Hat Enterprise Linux OpenStack Platform 5 on NetApp Clustered Data ONTAP © 2015 NetApp, Inc. All right reserved
Refer to the Interoperability Matrix Tool (IMT) on the NetApp Support site to validate that the exact product and feature versions described in this document are supported for your specific environment. The NetApp IMT defines the product components and versions that can be used to construct configurations that are supported by NetApp. Specific results depend on each customer's installation in accordance with published specifications.
Copyright Information
Copyright © 1994–2015 NetApp, Inc. All rights reserved. Printed in the U.S. No part of this document covered by copyright may be reproduced in any form or by any means—graphic, electronic, or mechanical, including photocopying, recording, taping, or storage in an electronic retrieval system—without prior written permission of the copyright owner.
Software derived from copyrighted NetApp material is subject to the following license and disclaimer:
THIS SOFTWARE IS PROVIDED BY NETAPP "AS IS" AND WITHOUT ANY EXPRESS OR IMPLIED WARRANTIES, INCLUDING, BUT NOT LIMITED TO, THE IMPLIED WARRANTIES OF MERCHANTABILITY AND FITNESS FOR A PARTICULAR PURPOSE, WHICH ARE HEREBY DISCLAIMED. IN NO EVENT SHALL NETAPP BE LIABLE FOR ANY DIRECT, INDIRECT, INCIDENTAL, SPECIAL, EXEMPLARY, OR CONSEQUENTIAL DAMAGES (INCLUDING, BUT NOT LIMITED TO, PROCUREMENT OF SUBSTITUTE GOODS OR SERVICES; LOSS OF USE, DATA, OR PROFITS; OR BUSINESS INTERRUPTION) HOWEVER CAUSED AND ON ANY THEORY OF LIABILITY, WHETHER IN CONTRACT, STRICT LIABILITY, OR TORT (INCLUDING NEGLIGENCE OR OTHERWISE) ARISING IN ANY WAY OUT OF THE USE OF THIS SOFTWARE, EVEN IF ADVISED OF THE POSSIBILITY OF SUCH DAMAGE.
NetApp reserves the right to change any products described herein at any time, and without notice. NetApp assumes no responsibility or liability arising from the use of products described herein, except as expressly agreed to in writing by NetApp. The use or purchase of this product does not convey a license under any patent rights, trademark rights, or any other intellectual property rights of NetApp.
The product described in this manual may be protected by one or more U.S. patents, foreign patents, or pending applications.
RESTRICTED RIGHTS LEGEND: Use, duplication, or disclosure by the government is subject to restrictions as set forth in subparagraph (c)(1)(ii) of the Rights in Technical Data and Computer Software clause at DFARS 252.277-7103 (October 1988) and FAR 52-227-19 (June 1987).
Trademark Information
NetApp, the NetApp logo, Go Further, Faster, ASUP, AutoSupport, Campaign Express, Cloud ONTAP, Customer Fitness, Data ONTAP, DataMotion, Fitness, Flash Accel, Flash Cache, Flash Pool, FlashRay, FlexArray, FlexCache, FlexClone, FlexPod, FlexScale, FlexShare, FlexVol, FPolicy, GetSuccessful, LockVault, Manage ONTAP, Mars, MetroCluster, MultiStore, NetApp Insight, OnCommand, ONTAP, ONTAPI, RAID DP, SANtricity, SecureShare, Simplicity, Simulate ONTAP, Snap Creator, SnapCopy, SnapDrive, SnapIntegrator, SnapLock, SnapManager, SnapMirror, SnapMover, SnapProtect, SnapRestore, Snapshot, SnapValidator, SnapVault, StorageGRID, Tech OnTap, Unbound Cloud, and WAFL are trademarks or registered trademarks of NetApp, Inc., in the United States and/or other countries. A current list of NetApp trademarks is available on the Web at http://www.netapp.com/us/legal/netapptmlist.aspx.
Cisco and the Cisco logo are trademarks of Cisco in the U.S. and other countries. All other brands or products are trademarks or registered trademarks of their respective holders and should be treated as such.