recyclable material. low emissions during production ... · pdf filethe basics your polar...
TRANSCRIPT

LALA
PROTRAINER NV
STORE/LAP
Polar Electro OyProfessorintie 5
FIN-90440 KEMPELEFinland
Tel. +358-8-520 2100Fax +358-8-520 2300
www.polar.fi
GBR 179102.C
GBR
US
ER
'S
M
AN
UA
L
POLAR
PROT
RAINE
R NV™
HRM
POLAR
PROT
RAINE
R NV™
HRM
Rec
ycla
ble
mat
eria
l. L
ow e
mis
sion
s du
ring
prod
uctio
n.P
rinte
d in
Fin
land
. Gra
phic
des
ign
CIS
, Kaj
aani
, Fin
land
.

CONTENTS
Polar Protrainer NV HRM...................................4How to wear your Transmitter ...........................8The Basics.........................................................9Programming Polar Protrainer NV...................12Setting the time ...............................................13Setting the alarm .............................................15Setting the date ...............................................17Setting target heart rate zone limits ................23Exercising with Polar Protrainer NV.................27Recall ..............................................................30Care and maintenance....................................32Precautions .....................................................34Troubleshooting ..............................................35Service ............................................................37Polar books and accessories..........................38Technical specifications..................................40Limited one year warranty...............................41Disclaimer .......................................................42
3

a variety of sports ranging from track and field,cross country skiing, cycling, running, triathlon,swimming and aerobics into different racketsports, ice hockey and football.
For today’s competitive athlete a carefullyplanned personal training program includesmeasuring time intervals, intermediate and laptimes etc. For full benefit one should addtesting of baseline physiological functions, suchas: • Heart Rate (Beats Per Minute) • Efficiency in oxygen use
(maximal aerobic capacity - VO 2max) • Accumulation of lactic acid
(anaerobic threshold - AT).
When these internal functions are accuratelymeasured, areas for improvement can beidentified. A planned training program can beimplemented, focusing on improving weakness-es through controlled use of exercise intensity,duration and frequency. Stress (intensity) andrecovery levels can be predetermined allowingyou to reach your peak condition in time forcompetition and/or avoid injury through over-training.
Your Polar Protrainer NV Heart Rate Monitorprovides an accurate and reliable method forcontrolling your exercise intensity while pre-cisely tracking your progress through yourtraining program.
The Polar Protrainer NV HRM provides you with: • A watch with an alarm and a calendar • A wireless heart rate monitor with ECG
POLAR PROTRAINER NV™ HRM
ou have purchased an essential piece ofequipment for scientific training basedon today’s most advanced athletic
concepts - the Polar Protrainer NV Heart RateMonitor (HRM). Now, with a sophisticated andmost accurate performance monitor available,you are ready to gauge your training to reachyour full potential, no matter what your sport is.
Everyone cannot become a champion, buteveryone can train like one! Polar Protrainer NVHRM is an essential tool in helping you reachyour athletic ambitions. To optimise the time youinvest into your training and to eliminate hit-or-miss activity, modern athletic training requiresprecise measurements. The Polar Protrainer NVHRM lets you take advantage of the samemeasuring technology used by winning World-Class Olympic Teams and World Champions in
4 5
STORE/LAP
LAPLAP
PROTRAINER NV
Y

maker, consult your physician and/or the manu-facturer of the pacemaker prior to using thePolar Protrainer NV HRM.
POLAR PROTRAINER NVHRM COMPONENTS
There are three parts to your Polar Protrainer NVHRM: 1. The Wrist Receiver2. The Polar Transmitter 3. The Elastic Strap
Take a moment to familiarise yourself with eachof these components carefully, noting the
features highlighted in the diagramsbelow:
accurate continuous measurement including the following functions - Programmable target heart rate zone in
one beat per minute increments, - Two programmable timers to track workout
intervals, - Record performance information, split/lap
times and corresponding heart rates,into 44 memory banks for later analysis,
- Average heart rate of the total exercise period,
- Stopwatch with split/lap time counter, - Record your recovery heart rate, - Time spent above, within and below the
target heart rate zone, - Electroluminescent back light, - Target zone limit alarm (sound) together
with visual alarm (blinking display), - Wireless button to toggle the time of
day/split time in the measurement mode, - Wireless button to activate the HR
measurement.
For a coach or trainer, the use of the PolarProtrainer NV HRM gives a lot of qualitativeinformation over the athlete’s progress.
This owner’s manual is designed toshow precisely what the Polar Protrainer NV HRMcan do and how you can use each feature tobest accomplish personal fitness and per-formance goals.
Before starting any exercise program, alwaysconsult your physician. If you have a pace-
6 7
STORE/LAP
LAPLAP
PROTRAINER NV
• The Polar Transmitter
• The Elastic Strap
• The Wrist Receiver
Three line displaya. Lap timeb. Total elapsed
time or time of dayc. Heart rate
Lock system for adjusting
the length

6. Put on the Polar Protrainer NV Wrist Receiver as you would put on an ordinary watch.
Note: The Transmitter will switch on automatic-ally when you’re wearing it. It will also turn itselfoff when it’s not connected to your body. How-ever, moisture can activate the Transmitter andreduce battery life, so remember to dry it tho-roughly after the exercise.
THE BASICS
Your Polar Protrainer NV Heart Rate Monitor is ahighly sophisticated computer that allows youto get the most from exercising by monitoringyour workouts accurately and in great detail.While the Polar Protrainer NV HRM is a state-of-the-art instrument, it’s not complicated to use, ifyou keep the following basic principles in mind:
Principle I. Two levels of operations areavailable when you program your PolarProtrainer NV HRM for workouts:
1. There are four basic selections, and 2. There are various functions under each
selection.
The diagram on next page provides a “roadmap” for the basic Polar Protrainer NV HRMprogramming.
HOW TO WEAR YOURPOLAR TRANSMITTER
1. Attach the Polar Transmitter to the elastic strap.
2. Adjust the strap length to fit snugly, but not too tight.
3. With the Polar Transmitter facing outward, andthe Polar logo in the right position, as shown in the illustration. insert the round end of the strap lock into the buckle to secure the straparound your chest.
4. Center the Trans-mitter on your chest below the pectoral muscles (breasts) as shown in the illustration.
5. Pull the Transmitter away from chest stretching the belt and moisten the conductive electrode strips. Wearing the Polar Transmitter again-st your bare skin ensures a flawlessoperation of the Transmitter. If youwish to wear the Transmitter over a shirt,moisten the shirt well under the Transmitter.
8 9
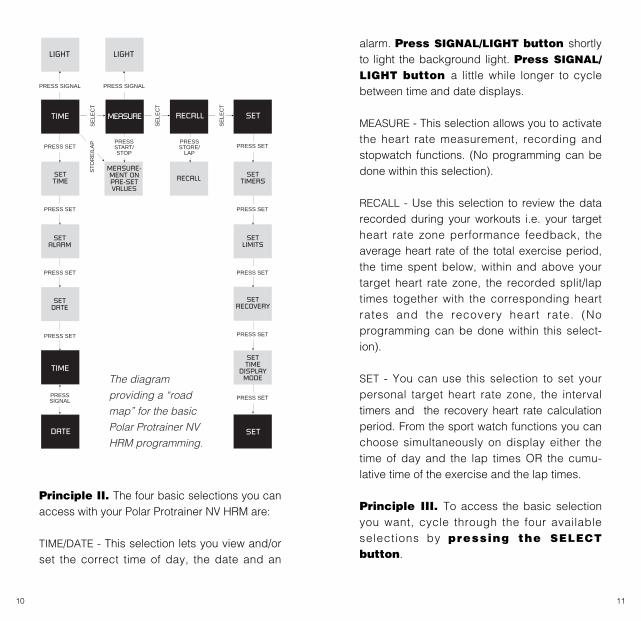
alarm. Press SIGNAL/LIGHT button shortlyto light the background light. Press SIGNAL/LIGHT button a little while longer to cyclebetween time and date displays.
MEASURE - This selection allows you to activatethe heart rate measurement, recording andstopwatch functions. (No programming can bedone within this selection).
RECALL - Use this selection to review the datarecorded during your workouts i.e. your targetheart rate zone performance feedback, theaverage heart rate of the total exercise period,the time spent below, within and above yourtarget heart rate zone, the recorded split/laptimes together with the corresponding heartrates and the recovery heart rate. (Noprogramming can be done within this select-ion).
SET - You can use this selection to set yourpersonal target heart rate zone, the intervaltimers and the recovery heart rate calculationperiod. From the sport watch functions you canchoose simultaneously on display either thetime of day and the lap times OR the cumu-lative time of the exercise and the lap times.
Principle III. To access the basic selectionyou want, cycle through the four availableselections by pressing the SELECTbutton.
Principle II. The four basic selections you canaccess with your Polar Protrainer NV HRM are:
TIME/DATE - This selection lets you view and/orset the correct time of day, the date and an
10 11
SET
PRESS SET
PRESS SET
SET RECOVERY
SETTIME
DISPLAYMODE
SETTIME
SETALARM
SETDATE
TIME
TIME
DATE
MEASURE RECALL SET
SE
LEC
T
SE
LEC
T
PRESS SET
PRESS SET
PRESS SET
PRESS SET
PRESSSIGNAL
PRESS SET
PRESS SET
PRESS SETPRESSSTART/STOP
PRESSSTORE/
LAP
SETTIMERS
SETLIMITS
RECALLMEASURE-MENT ON PRE-SETVALUES
SE
LEC
TS
TO
RE
/LA
PPRESS SIGNAL
LIGHT
PRESS SIGNAL
LIGHT
The diagramproviding a “roadmap” for the basicPolar Protrainer NVHRM programming.

Why might you use this selection ?
To set the correct time or date when you takethe Wrist Receiver into use for the first time, orto change the time if you travel to other timezones. You may use the alarm function to wakeyou up, or as a reminder.
STEP-BY-STEP INSTRUCTIONS
FOR SETTING THE TIME
1. Time of day being displayedon the face of the Wrist Receiver,press the SET /START/STOPbutton. The word TIME
appears at the top of thedisplay, and the AM or PMindicator is flashing.
Note: At any point you canpress SET/START/STOP
button once more to go to thealarm setting.
2. Press the SELECT button to select AM orPM.
3. When the correct choice appears on thedisplay, press the STORE/LAP button tolock in your selection.
Principle IV. To use the various functions ofa basic selection, press the SET/START/STOP button to move from function tofunction within each of the four selections.
Principle V. Once you have entered the SET
selection, using the SET/START/STOPbutton (one digit flashing on display), theSELECT button assumes a different role. Nowthe SELECT button enables you to programsingle digits within a function, while the SET/START/STOP button cycles you between thefunctions under SET selection. Having cycledthrough the functions, using the SET/START/STOP button, the flashing of onesingle digit stops and the SELECT buttonassumes it’s original role enabling you to returnto the selection cycle.
PROGRAMMINGYOUR POLAR
PROTRAINER NV HRM
• TIME •
What does this selection do ?
In the basic mode it shows you the time of dayand the date. It also allows you to set thecorrect time, the date and an alarm. You canlight up the display in the dark by pressing theSIGNAL/LIGHT button.
12 13
PROTRAINER NV
STORE/LAP
PMPM

STEP-BY-STEP INSTRUCTIONS
FOR SETTING THE ALARM
1. In the time of day display,press the SET button twice.The letters ALM and the alarmtime, 10:00, will appear onthe display, as shown (orany other previously setalarm time).
2. The AM or PM indicator isflashing now.
3. At this point, select AM or PMas you did above, by pressingthe SELECT button.
4. Press STORE/LAP to lock in your choice.
5. At this point, the first two digits, representingthe hours, are flashing.
6. Set the correct hour by moving up with theSELECT button or down with the SIGNAL/LIGHT button.
7. When the correct hour is displayed, pressthe STORE/LAP button to lock in yourselection.
8. The full ten minutes digit is flashing now.Again, use the SELECT button to move up,or the SIGNAL/LIGHT button to movedown.
4. At this point, the first two digits (representingthe hours) are flashing.
5. Set the correct hour by moving up with theSELECT button or down with theSIGNAL button.
6. When the correct hour is displayed, pressthe STORE/LAP button to lock in yourselection.
7. The full ten minutes digit flashes now. Again,use the SELECT button to move up, or theSIGNAL/LIGHT button to move down.
8. When the correct number is displayed,press the STORE/LAP button to lock inyour selection.
9. The one minutes digit is flashing now. Again,use the SELECT button to move up, or theSIGNAL/LIGHT button to move down.
10. When the number you want is displayed,press the STORE/LAP button to lock inyour selection. The two digits representingseconds are zeroes.
11. At this point the AM/PM indicator will startflashing again, and the seconds start runningfrom double zero. You can start over at step 2to repeat the time setting procedure or move tosetting the alarm by pressing the SET/START/STOP button.
14 15
STORE/LAP
PROTRAINER NV
AMAM

STEP-BY-STEP INSTRUCTIONS
FOR SETTING THE DATE
1. In the time display modepress the SET button threetimes. The date will appear asshown.
2. The full ten years digit isflashing now.
3. At this point, set thecorrect digit by using theSELECT and/or the SIGNAL/LIGHT button.
4. Store the correct number by pressing theSTORE/LAP button.
5. The one year digit is flashing now.
6. Set the correct digit by using the SELECTand/or the SIGNAL/LIGHT button.
7. Store the correct number by pressing theSTORE/LAP button.
8. The month indicator is flashing now. Use theSELECT and/or the SIGNAL/LIGHT buttonto select the correct month. Lock in theselection by pressing the STORE/LAPbutton.
9. When the correct number is displayed,press the STORE/LAP button to lock inyour selection.
10. The one minutes digit is flashing now.Again, use the SELECT button to move up,or the SIGNAL/LIGHT button to movedown.
11. When the correct number is displayed,press the STORE/LAP button to lock inyour choice.
12. The alarm symbol is flashing now. Toactivate the alarm, press the STORE/LAPbutton and the alarm symbol stops flashing.(To turn the alarm off later on, enter the alarmsetting mode as you did before and press theSIGNAL/LIGHT button and the alarm symboldisappears).
13. At this point, or at any point during settingthe alarm, you can press SET to enter thedate setting mode (continue at step two of thenext section). By pressing the SET buttontwice you can return to the time display.
Note: The alarm will sound for one minute, butyou can turn it off by pressing theSTORE/LAP button.
16 17
STORE/LAP
PROTRAINER NV
DAY
MONTHYEAR
DAY
MONTHYEAR

Example 1. Warm up and cool down: Youcould set Timer 1 to sound at 10 minutes foryour warm up period. Timer 2 at 20 minutes forfull strength exercise, and then use the 10minute timer again for your cool down period.
Example 2. Interval Training: You could setTimer 1 to sound at 1 minute intervals for all-outrunning and Timer 2 to sound at 2 minuteintervals for rest periods between the intervals.The Timer 1 would tell you when to go againafter the recovery period.
The flexible programmability of the target heartrate zone in one beat per minute accuracyallows you to monitor your workouts to greatdetail securing the correct exercise intensity foryou (audio and/or visual alarm).
The recovery heart rate calculation allows youto follow very concretely your way to improvedperformance. As your training program takeseffect, you will start seeing a distinct improve-ment in your recovery rate after an exerciseroutine. This means that you will reach a lowerheart rate level faster once you stop exercising.
Choosing between the time of day andcumulative time of the total exercise, in additionto the lap times, gives you the option toprogram on display the sport watch functionsaccording to your own preferences.
9. The full ten day digit is flashing now. Set thecorrect digit by using the SELECT and/or theSIGNAL/LIGHT button. Lock in the selectionby pressing the STORE/LAP button.
10. The single one day digit is flashing now. Setthe correct digit by using the SELECT and/orthe SIGNAL/LIGHT button. Lock in the se-lection by pressing the STORE/LAP button.
11. As soon as the correct date is set, pressthe SET/START/STOP button to enter thetime of day display.
• SET •
What does this selection do ?
You can set two different timers to better controlyour workouts. You can also program yourpersonal target heart rate zone in one beat perminute increments and set the recovery timer.Further, you can choose on display simul-taneously either the time of day and the laptimes OR the cumulative time of the exerciseand the lap times.
Why would you use this selection ?
The two timers allow you to segment yourexercise periods according to your particularneeds.
18 19

If you do not program Timer 1, you will not beable to program Timer 2 either.
2. At any point, you can press SET/START/STOP button and the word TIME 1 will lock ondisplay.
3. The tens of the minutes will now be flashing.As in the TIME selection, use the SELECTbutton to move up, or the SIGNAL/LIGHTbutton to move down.
4. When the number you want is displayed,press the STORE/LAP button to lock inyour selection.
5. The single minute’s digit flashes now. Again,use the SELECT button to move up, orthe SIGNAL/LIGHT button to movedown.
6. When the correct digit is displayed, pressSTORE/LAP button to lock in your selection.
7. The first digit representing tens of secondsflashes now. Again, use the SELECT buttonto move up, or the SIGNAL/LIGHT buttonto move down.
8. When the correct digit is displayed, pressthe STORE/LAP button to lock in your se-lection.
STEP-BY-STEP INSTRUCTIONS
FOR SETTING THE TIMERS
1. In the time mode press the SELECTbutton three times. SET appears on theprogram status line (bottom of the display), andthe display cycles through TIME 1, LIM, Re-covery and SPLI or TIME.
Note: In case you do not wish to program theTimers at all and wish to proceed directly toprogramming your personal target heart ratezone, please, press SET/START/STOPbutton twice.
Note: Timer 2 may also be displayed at thispoint, if Timer 1 has already been set. However,
20 21
STORE/LAP
PROTRAINER NV
RECOVERYRECOVERY
STORE/LAP
PROTRAINER NV
STORE/LAP
PROTRAINER NV
STORE/LAP
PROTRAINER NV PROTRAINER NV
STORE/LAP
PMPM
OR

STEP-BY-STEP INSTRUCTIONS
FOR SETTING TARGET HEART
RATE ZONE LIMITS
1. In the time of day mode, press SELECTbutton three times. SET will appear on theprogram status line (bottom of the display), andthe display will cycle through automaticallyTIME1, LIM (limits), Recovery and Time DisplayMode, the latter indicated either by text SPLI
(splits) or TIME (time of day).
2. At any point, you can press the SET/START/STOP button, and the option LIM willlock on the display, while the first digit of theupper heart rate target zone limit starts flashing.
9. The last digit representing single secondsflashes now. Again, use the SELECT buttonto move up, or the SIGNAL/LIGHT buttonto move down.
10. When the correct digit is displayed, pressthe STORE/LAP button to lock in yourselection.
11. You have now set the Timer 1, and the firstdigit flashes again. At this point, you canaccess Timer 2 by pressing the SET/START/STOP button. The phrase TIME 2 will appearon the display. If you wish to program the Timer2, repeat steps 3. through 10.
12. In case you do not wish to program Timer 2,simply press the SET/START/STOPbutton to exit this function. The LIM functionstarts flashing. Proceed to step 3 on the nextpage to set your personal target heart ratezone.
Note: As you have set Timer 1 and Timer 2according to instructions, Timer 1 will start at thesame time you start the stopwatch. You will hearone beep when the time of Timer 1 is up. Timer2 will start automatically after the beep. You willhear two beeps when the time of Timer 2 is up.The timers alternate until you stop the stop-watch.
22 23
STORE/LAP
PROTRAINER NV
RECOVERYRECOVERY
STORE/LAP
PROTRAINER NV
STORE/LAP
PROTRAINER NV
STORE/LAP
PROTRAINER NV PROTRAINER NV
STORE/LAP
PMPM
OR

2. Lock in your selection bypressing STORE/LAP button.The digit representing tens ofseconds starts flashing.
3. Repeat steps 1. and 2.again. Finally the digitrepresenting single sec-onds starts flashing.
4. Repeat once more the steps1. and 2.
5. Exit this function by pressingthe SET/START/STOP button. The SPLI orthe TIME function starts flashing.
STEP-BY-STEP INSTRUCTIONS
FOR SETTING THE TIME DISPLAY
MODE
1. Either one of the following displays is flashingnow, depending on your earlier selection.
3. Set your desired upper limit for your targetzone, digit by digit, by using the SELECTand/ or SIGNAL/LIGHT button to move upor down. Lock your selection by pressing theSTORE/LAP button. The next digit startsflashing automatically. Once the upper limit hasbeen set, the first digit of the lower limit startsflashing.
Note: If you are trying to enter by mistake alower upper limit than the lower limit is, theupper limit value increases automatically to thelower limit value. Repeat the same routine forthe lower limit.
Note: When setting the lower limit the firstdigit’s value 0 is replaced by 21 at first. Onceyou move onto programming the second digit21 disappears from the display. Once the lowerlimit has also been set, and the first digit of theupper limit starts flashing again, exit thisfunction by pressing the SET/START/STOP button. The first one of the threerecovery timer digits flashes now.
STEP-BY-STEP INSTRUCTIONS
FOR SETTING THE RECOVERY
TIMER
1. Use the SELECT or the SIGNAL/LIGHTbutton to move up or to move down inincrements of one second.
Note: Recovery time is in seconds, for example2 min = 120 s.
24 25
STORE/LAP
PROTRAINER NV
RECOVERYRECOVERY
STORE/LAP
PROTRAINER NV PROTRAINER NV
STORE/LAP
PMPM

EXERCISING WITH THE POLAR
PROTRAINER NV HRM
After you have programmed in your heart ratelimits, you are ready to use your Polar ProtrainerNV HRM.
Step-by-step instructions
1. Put on the Polar Wrist Receiver and the PolarTransmitter as described earlier.
2. If you just finished using the SET selection,press the SELECT button twice and theword MEASURE appears on theselection status line. In the basictime of day mode, press theSELECT button once.
3. Your heart rate wil l beshown on the bottom line ofthe triple line display after sixseconds. To start the stopwatchfunctions, press the SET/START/STOP button. The laptimer on the top and the stopwatchon the middle line of digits will be counting(Alternatively the middle line may show the timeof day).
4. If you hear a beeping sound, you are exer-cising above or below your target heart ratezone. The heart rate display shows a flashing
If the SPLIT was activated, the top line in theMEASURE mode shows the lap split times andthe mid line shows the total time of the exerciseperiod time. If the TIME was activated, the midline shows the time of day. The selection canbe swapped by pressing the SELECT orSIGNAL/LIGHT button. Lock in your selectionby pressing the SET/START/STOP button. Return to time of day mode by pressingSELECT button once. If you want to proceedinto measurement mode, press SELECTbutton twice.
• MEASURE •
What does this selection do ?
This selection allows you to measure your heartrate continuously as well as mark split/laptimes. In addition, in this mode you will be ableto follow concretely whether you are exercisingin, above or below your pre-programmed targetheart rate zone. Also, as we learned before, youcan choose between cumulative time of exer-cise and time of day functions on display in thismode. No programming can be done in this se-lection, but you can, however, start and stopthe sport watch and the recording as manytimes as you want during the exercise (stop-ping in traffic lights etc.).
26 27
STORE/LAP
PROTRAINER NV
LAP
TZ
LAP
TZ

displayed after 3 seconds. You can take andrecord up to 44 split/lap times per workout.
2. Temporarily stop the recording operation andthe stopwatch. • Press SET/START/STOP button. • To continue, press SET/START/STOP
button again.
Note: The average heart rate is calculated onlyfrom the time the stopwatch is running.
3. Turn the sound signal off or on. Press andhold the SIGNAL/LIGHT button for 1second.
4. Activate the backlight for three seconds,press the SIGNAL/LIGHT button briefly(0,5 seconds).
5. Toggle the cumulative time of exercisedisplay and the time of day display on themiddle row of digits, bring the receiver watchclose to the Transmitter for a few seconds. Thealternative display will be on for 5 seconds.
6. Stop recording operations completely andstart recovery calculation:• Press the SELECT button. The stop-watch stops and RECOVERY text appears inthe display. Wait now until you hear two longbeeps informing you that the recovery calcu-lation time is up. To review the recorded infor-mation, including the results of the recoveryheart rate calculation, continue to RECALLmode by pressing SELECT button once.
heart symbol as well as your actual heart rateflashing on the display along with an arrowpointing up or down, to indicate that you areabove or below your target heart rate zone. Youcan turn the TZ alarm off/on by pressing theSIGNAL/LIGHT button.
Note: For a quick start, to activate the heart ratemeasurement, the stopwatch and the targetzone calculation, press the STORE/LAPbutton or bring the wrist receiver close to thetransmitter for a “magic start”.
5. You can stop and start the stopwatch bypressing SET/START/STOP button.
During recording if you want to:
1. Check the lap and split time while exercising. • Press the STORE/LAP button . Thecurrent split/lap time is shown for 3 seconds.The sequence number of the next lap will be
28 29
STORE/LAP
PROTRAINER NV
LAP
TZ
LAP
TZ
STORE/LAP
PROTRAINER NV
LAP
TZ
LAP
TZ

2. When you press the STORE/LAP button , the top line willdisplay the time spent in thetarget heart rate zone. Thebottom line remains unchanged.
3. In order to view the timespent below the target heartrate zone, press STORE/LAPbutton again. Here again thebottom line remains unchanged.
4. In order to view the re-covery heart rate recording,press STORE/LAP buttononce again. On display you willhave now the predeterminedrecovery period in seconds inmid line as well as the de-crease in heart rate duringthat period in the bottom line.
5. To view the split/lap timestogether with the correspondingheart rates, press SET/START/STOP button. Thetop line will show split/laptime, the mid line will showcumulative t ime, and thebottom line wil l show thecorresponding heart rate. Thelap number will be displayed in thelower right hand corner.
STORE/LAP
PROTRAINER NV
TZTZ
STORE/LAP
PROTRAINER NV
TZTZ
• RECALL •
What does this selection do ? This selection allows you to view • Time spent below, in and above your target
heart rate zone, • Average heart rate of the exercise period, • Up to 44 split/lap times with corresponding
heart rates together with the finishing time. • Recovery heart rate
Why might you use this selection ?To analyse your workout intensity and duration,collect data on changes in your average heartrates and/or exercise time for the same type ofexercises. To collect data on changes in re-covery heart rates over time or recall split/laptimes and related heart rates per workout.
STEP-BY-STEP INSTRUCTIONS
TO ANALYSE YOUR WORKOUT
1. Cycle through the selectionsusing the SELECT button, until
the word RECALL appears on theprogram status line. You cannow view the time spent abovethe target heart rate zone on
the top line, as indicated by theupwards arrow symbol and the
letters TZ on the display. Thebottom line indicates the averageheart rate of the exercise period.
30 31
STORE/LAP
PROTRAINER NV
TZTZ
STORE/LAP
PROTRAINER NV
RECOVERYRECOVERY
STORE/LAP
PROTRAINER NV
LAPLAP

and clean the Transmitter when needed. The Transmitter and the elastic strapcan be washed with a mild soap and watersolution. However, never use alcohol or anyabrasives such as steel wool or cleaningchemicals. They will cause permanent damageto the electrodes.
Note: Do not stretch or bend the electrode stripsof the Polar Transmitter, especially when storingit (more than is needed to store it in the originalcontainer), because this could damage theirconductivity.
BATTERIES
In order to ensure the water resistance of theHRM, the batteries of the Wrist Receivershould only be replaced by a personauthorised by Polar Electro Oy . Fordetails, contact your dealer or distributor.
To conserve battery life, the Wrist Receiver isprogrammed to automatically return to the TIME
selection after ten minutes, when no buttonshave been pushed and no heart rate has beenreceived from the Transmitter. In MEASURE
mode, the receiver circuitry voltage is cut offwithin 10 minutes, if no heart rate has beenreceived. As an indication of this the lowest lineof digits will show --, but the stopwatch keepson going to facilitate time measurement withoutheart rate information.
6. Press the STORE/LAP button repeat-edly to cycle through all the recorded split/laptimes and heart rates.
7. Once the first lap/split time appears ondisplay again, press SET/START/STOPbutton to return to step 1 on this list.
8. To leave the selection, press the SELECTbutton (twice to go to TIME mode).
CARE ANDMAINTENANCE
WRIST RECEIVER
The rubber gasket seals that ensure waterresistance on the Wrist Receiver will deteriorateover time. It is recommended that these sealsare replaced after two years of use. This isparticularly important if you are using your PolarProtrainer NV HRM for swimming.
POLAR TRANSMITTER AND
THE ELASTIC STRAP
The Polar Transmitter is in an active mode onlywhen it is attached to the chest for measure-ment. It should not be activated when it is notworn. However, sweat and other moisture onthe Transmitter can keep it running after it isremoved from the body. Therefore, to avoidwasting battery energy, you should wipe dry
32 33

picks up transmitter signals within 3 feet/1 meter.Therefore, when you are using your Wrist Re-ceiver, make sure no other Transmitter is withinthat range. Signals from more than one Trans-mitter picked up simultaneously can cause anincorrect readout. When your Polar Transmitterand Wrist Receiver are in use, strong electro-magnetic sources such as television sets,electric motors, vehicles, radio and TV mastsand high voltage power lines can cause erraticheart rate reception.
This can also happen if you attempt to use theheart rate monitor in an aircraft.
Avoid exposing your Polar Protrainer NV HRMto extremes of hot and cold, and keep it out ofdirect sunlight.
Don’t pull clothing on or off over your PolarProtrainer NV HRM Wrist Receiver repeatedly,as this may cause static electricity, which caninterfere with its performance, especially if verylow air humidity prevails.
TROUBLESHOOTING
What if there is some irregularity inthe operation of your Polar ProtrainerNV HRM ?
Start with pressing all the four Receiver buttonssimultaneously to reset it. Thereafter startprogramming the Wrist Receiver from scratch.
Note: The estimated average battery lifeis 2500 hours in all Polar Transmitters. TheTransmitter battery cannot be replaced, which iswhy Polar recycles used transmitters with arefund to the customer. Contact your distributor/dealer for details.
PRECAUTIONS
Polar Protrainer NV HRM is water resistant. Youcan wear it for swimming, go off a diving boardwith it on, wear it in a rainstorm, or perspireheavily while exercising without damaging it.You should not, however, wear it underwater atany great depth. If you go deep sea diving,leave your Polar Protrainer NV HRM behind.
Further, do not operate the buttons of the WristReceiver underwater as the pressure maycause the Receiver to leak. Buttons should onlybe pressed when the Receiver is out of water.
If your Polar Protrainer NV HRM does get wet, itis important to dry it thoroughly before storing it(Never put a wet Polar Protrainer NV HRM intoan athletic bag or a locker).
The Polar Protrainer NV HRM needs to “breathe”.Never store it in any kind of “non breathing”material, such as a plastic bag, where moisturefrom humid air might become trapped. Store itin a dry place.
The Polar Protrainer NV HRM Wrist Receiver
34 35

What if the heart symbol flashes ir-regularly?
Check to see if your Wrist Receiver is outsidethe 3 ft/1 meter range of heart rate transmissionfrom the Transmitter.
Make sure the elastic strap has not loosenedduring exercise.
If you are wearing the Polar Transmitter over ashirt, make sure there is moisture to make theneeded contact with the electrodes.
Check your surroundings. If you are in anelectromagnetic f ield created by otherequipment (such as a monitor or television set),move away. If you are near another athleteusing a heart rate monitor, move away.
What do I do if the Monitor goes blank?
Have the batteries checked by authorised Polarservice personnel. Contact your distributor/dealer for details.
SERVICE
Should your Polar Protrainer NV HRM needservicing, please, follow the instructions below:
• Carefully pack the Polar Protrainer NV HRM Wrist Receiver and the Transmitter in a shipping carton so it will not be damaged (original package will suit this purpose well).
37
This is called Global Clear. When a three linedisplay appears, press STORE/LAP button,and a time display of 10 o’clock will appear.Start the programming cycle here with the TIME
setting.
Note: Global Clear clears the memory totally.
The Global Clear setting is also very useful, iffor any reason, you want to start from scratch toenter information into the Wrist Receiver’smemory.
What if there is no heart rate reading?
Check to see that the elastic strap is tightenough. The strap should be adjusted with theelectrodes flat against your skin. You may haveto move the Polar Transmitter leftward to findthe best position. Make sure that the position ofthe Polar logo is correct.
Check to make sure that the electrode stripsare thoroughly moistened. The Transmitter willnot function properly without moisture to makegood electrical contact.
Accumulated sweat and dirt may interfere withclear reception of the signal from the skin to theTransmitter. Check to see if your Transmitterneeds cleaning.
36

• Yvonne Lin: Precision Sports Aerobics• Dr. James M. Rippe: Target Your Fitness and
Weight Management Goals• Dr. James M. Rippe: The Polar Fat Free and
Fit Forever Program
POLAR ACCESSORIES
• Polar Bike Mount for all bikes and Polar Heart Rate Monitors
• Extra Transmitter for other family members• Polar Heart Bra for women• Test handle for groups and trainers
Contact your local dealer or distributor for moredetails.
39
• Enclose proof of purchase (or a photocopy) and your daytime telephone number.
• Include a statement explaining why the unit is being returned for repair.
• Mail postage prepaid to your dealer or distributor. Any service procedures requiring opening of the Wrist Receiver is strongly recommended to be done by the distributor’s service department. Warranty does not coverdamage or consequential damage caused by service not authorised by Polar Electro Oy.
POLAR BOOKS ANDACCESSORIES
POLAR BOOKS AND
BOOKLETS
• Roy Benson, MPE: Precision Running• Dr. Matthew Brick: Precision Multi-Sport• Edmund R. Burke, Ph.D.: Precision Cycling• Neil Craig: Scientific Heart Rate Training• Sally Edwards: The Heart Rate Monitor Book• Mark Fenton and Dave McGovern: Precision
Walking• Ute Haas, M.Sc., Tarja Suomi, M.Sc. and
Dr. Raija Laukkanen, Ph.D:. Precision Aerobics
• Dr. Peter J.G.M. Janssen: Training, Lactate, Pulse Rate
• Dr. Katriina Kukkonen-Harjula, MD and Dr. Raija Laukkanen, Ph.D.: Precision Weight Management
• Dr. Raija Laukkanen, Ph.D.: Research Index
38
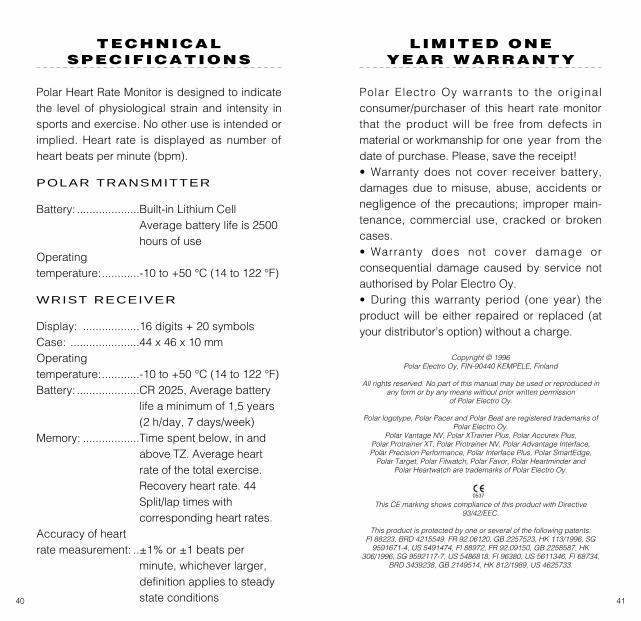
LIMITED ONE YEAR WARRANTY
Polar Electro Oy warrants to the originalconsumer/purchaser of this heart rate monitorthat the product will be free from defects inmaterial or workmanship for one year from thedate of purchase. Please, save the receipt!• Warranty does not cover receiver battery,damages due to misuse, abuse, accidents ornegligence of the precautions; improper main-tenance, commercial use, cracked or brokencases.• Warranty does not cover damage orconsequential damage caused by service notauthorised by Polar Electro Oy.• During this warranty period (one year) theproduct will be either repaired or replaced (atyour distributor’s option) without a charge.
Copyright © 1996Polar Electro Oy, FIN-90440 KEMPELE, Finland
All rights reserved. No part of this manual may be used or reproduced inany form or by any means without prior written permission
of Polar Electro Oy.
Polar logotype, Polar Pacer and Polar Beat are registered trademarks ofPolar Electro Oy.
Polar Vantage NV, Polar XTrainer Plus, Polar Accurex Plus, Polar Protrainer XT, Polar Protrainer NV, Polar Advantage Interface, Polar Precision Performance, Polar Interface Plus, Polar SmartEdge,
Polar Target, Polar Fitwatch, Polar Favor, Polar Heartminder and Polar Heartwatch are trademarks of Polar Electro Oy.
This CE marking shows compliance of this product with Directive93/42/EEC.
This product is protected by one or several of the following patents:FI 88223, BRD 4215549, FR 92.06120, GB 2257523, HK 113/1996, SG
9591671-4, US 5491474, FI 88972, FR 92.09150, GB 2258587, HK306/1996, SG 9592117-7, US 5486818, FI 96380, US 5611346, FI 68734,
BRD 3439238, GB 2149514, HK 812/1989, US 4625733.
4140
TECHNICALSPECIFICATIONS
Polar Heart Rate Monitor is designed to indicatethe level of physiological strain and intensity insports and exercise. No other use is intended orimplied. Heart rate is displayed as number ofheart beats per minute (bpm).
POLAR TRANSMITTER
Battery: ....................Built-in Lithium Cell Average battery life is 2500 hours of use
Operating temperature:............-10 to +50 °C (14 to 122 °F)
WRIST RECEIVER
Display: ..................16 digits + 20 symbols Case: ......................44 x 46 x 10 mmOperating temperature:............-10 to +50 °C (14 to 122 °F)Battery: ....................CR 2025, Average battery
life a minimum of 1,5 years (2 h/day, 7 days/week)
Memory: ..................Time spent below, in and above TZ. Average heart rate of the total exercise. Recovery heart rate. 44 Split/lap times with corresponding heart rates.
Accuracy of heart rate measurement: ..±1% or ±1 beats per
minute, whichever larger, definition applies to steady state conditions
0537

DISCLAIMER
The material in this manual is for informationalpurposes only. The products it describes aresubject to change without prior notice due tomanufacturer's continuous development prog-rams.
Polar Electro Oy makes no representations orwarranties with respect to this manual or withrespect to the products described herein.Polar Electro Oy shall not be liable for anydamages, direct or incidental, consequential orspecial, arising out of or related to the use ofthis manual or the products described herein.
42