recoverpoint for virtual machines administrator's guide · vms 5.2.1 and later versions, you...
TRANSCRIPT

RecoverPoint for Virtual MachinesVersion 5.2
Administrator's Guide302-005-002
REV 03

Copyright © 2017-2019 Dell Inc. or its subsidiaries. All rights reserved.
Published May 2019
Dell believes the information in this publication is accurate as of its publication date. The information is subject to change without notice.
THE INFORMATION IN THIS PUBLICATION IS PROVIDED “AS-IS.“ DELL MAKES NO REPRESENTATIONS OR WARRANTIES OF ANY KIND
WITH RESPECT TO THE INFORMATION IN THIS PUBLICATION, AND SPECIFICALLY DISCLAIMS IMPLIED WARRANTIES OF
MERCHANTABILITY OR FITNESS FOR A PARTICULAR PURPOSE. USE, COPYING, AND DISTRIBUTION OF ANY DELL SOFTWARE DESCRIBED
IN THIS PUBLICATION REQUIRES AN APPLICABLE SOFTWARE LICENSE.
Dell, EMC, and other trademarks are trademarks of Dell Inc. or its subsidiaries. Other trademarks may be the property of their respective owners.
Published in the USA.
Dell EMCHopkinton, Massachusetts 01748-91031-508-435-1000 In North America 1-866-464-7381www.DellEMC.com
2 RecoverPoint for Virtual Machines 5.2 Administrator's Guide

5
7
Before you begin 9Create your license files.............................................................................. 10Access the RecoverPoint for VMs vSphere plugin....................................... 11License and register RecoverPoint for VMs................................................ 12
Protecting VMs 15Protect a virtual machine in a consistency group........................................ 16Add a copy to a consistency group............................................................. 23
Monitoring protection 25The RecoverPoint for VMs Dashboard....................................................... 26Monitoring replication................................................................................ 26Monitoring system alerts and events.......................................................... 28Identifying a RecoverPoint for VMs system................................................29
VM automation and orchestration 31Create a bookmark..................................................................................... 32Create an application-consistent bookmark................................................33Create a group set......................................................................................35Protection orchestration............................................................................ 37
Group start-up sequence............................................................... 37Virtual machine start-up sequence.................................................37Defining user prompts................................................................... 38Defining user scripts......................................................................39Automatic copy VM network configuration (Re-IP).......................39
Protection automation................................................................................43Disabling automatic protection of new VMDKs.............................. 43Provisioning VMDKs...................................................................... 43Adding a new VMDK...................................................................... 43Removing a VMDK.........................................................................44Excluding a VMDK from replication................................................44Automatic replication of VM hardware changes.............................45Automatically expanding copy VMDKs...........................................45
Recovering VMs 47Test a copy.................................................................................................48Fail over to a copy and fail back to production........................................... 50Recover production from a copy................................................................ 52Monitor recovery activities.........................................................................54
Tables
Preface
Chapter 1
Chapter 2
Chapter 3
Chapter 4
Chapter 5
CONTENTS
RecoverPoint for Virtual Machines 5.2 Administrator's Guide 3

Managing RecoverPoint for VMs 55Managing system licenses.......................................................................... 56Managing system registration.................................................................... 56Managing system support...........................................................................57Managing system component registration..................................................58
Managing vCenter Server registration...........................................58Managing ESX cluster registration................................................ 59Managing journal datastore registration........................................ 60Managing external host registration............................................... 61
Managing system protection policy templates............................................ 61Managing virtual machines......................................................................... 62
Stop protecting a virtual machine..................................................62Managing consistency groups.................................................................... 62
Disabling or enabling a consistency group......................................63Managing the protection policies of groups................................... 63
Managing copies........................................................................................ 65Modifying copy policies................................................................. 65Configuring copy VM failover networks.........................................66Managing the protection policies of cloud copies.......................... 67
Managing group sets.................................................................................. 68Modifying a group set....................................................................68Removing a group set....................................................................69
Troubleshooting 71Finding the vRPA cluster management IP...................................................72Collecting system information.................................................................... 72Collecting RecoverPoint for VMs splitter logs............................................ 73Recovering from a cluster disaster............................................................. 73RecoverPoint for VMs licensing..................................................................73Register RecoverPoint by email or phone................................................... 75Creating VMkernel ports............................................................................ 75Load balancing............................................................................................76Manual copy VM network configuration (RE-IP)........................................ 77Copy VM network configuration guidelines.................................................79Changing the network adapter configuration of a protected VM................84
85
Appendix A
Appendix B
Glossary
CONTENTS
4 RecoverPoint for Virtual Machines 5.2 Administrator's Guide

KVSS syntax...............................................................................................................34Glue script samples.....................................................................................................78Virtual machine network settings available through the GUI....................................... 79Network settings only available through the CSV file................................................. 83
1234
TABLES
RecoverPoint for Virtual Machines 5.2 Administrator's Guide 5

TABLES
6 RecoverPoint for Virtual Machines 5.2 Administrator's Guide

Preface
As part of an effort to improve product lines, we periodically release revisions ofsoftware and hardware. Therefore, some functions described in this document mightnot be supported by all versions of the software or hardware currently in use. Theproduct release notes provide the most up-to-date information on product features.
Contact your technical support professional if a product does not function properly ordoes not function as described in this document.
Note
This document was accurate at publication time. Go to Online Support (https://support.emc.com) to ensure that you are using the latest version of this document.
PurposeThis document includes conceptual information on managing a RecoverPoint forVirtual Machines system.
AudienceThis document is intended for use by storage administrators who are responsible formanaging the RecoverPoint for Virtual Machines system.
Related documentationThe following publications provide additional information:
l RecoverPoint for Virtual Machines Release Notes
l RecoverPoint for Virtual Machines Installation and Deployment Guide
l RecoverPoint for Virtual Machines Deployment REST API Programming Guide
l RecoverPoint for Virtual Machines REST API Programmer's Guide
l RecoverPoint for Virtual Machines Security Configuration Guide
l RecoverPoint for Virtual Machines Scale and Performance Guide
l RecoverPoint for Virtual Machines FAQ
l Recoverpoint for Virtual Machines Simple Support Matrix
In addition to the core documents, we also provide White papers and Technical Noteson applications, arrays, and splitters.
Typographical conventionsThis document uses the following style conventions:
Bold Used for names of interface elements, such as names of windows,dialog boxes, buttons, fields, tab names, key names, and menu paths(what the user specifically selects or clicks)
Italic Used for full titles of publications referenced in text
Monospace Used for:
l System code
l System output, such as an error message or script
l Pathnames, filenames, prompts, and syntax
RecoverPoint for Virtual Machines 5.2 Administrator's Guide 7

l Commands and options
Monospace italic Used for variables
Monospace bold Used for user input
[ ] Square brackets enclose optional values
| Vertical bar indicates alternate selections - the bar means “or”
{ } Braces enclose content that the user must specify, such as x or y orz
... Ellipses indicate nonessential information omitted from the example
Where to get helpTechnical support, product, and licensing information can be obtained as follows:
Product information
For documentation, release notes, software updates, or information aboutproducts, go to Online Support at https://support.emc.com.
Technical support
Go to Online Support and click Service Center. You will see several options forcontacting Technical Support. Note that to open a service request, you musthave a valid support agreement. Contact your sales representative for detailsabout obtaining a valid support agreement or with questions about your account.
Your commentsYour suggestions will help us continue to improve the accuracy, organization, andoverall quality of the user publications. Send your opinions of this document to [email protected].
Preface
8 RecoverPoint for Virtual Machines 5.2 Administrator's Guide

CHAPTER 1
Before you begin
Before you start protecting your data in RecoverPoint for VMs, you must perform thefollowing tasks:
Before deploying the cloud solution, refer to the RecoverPoint for Virtual MachinesScale and Performance Guide and the RecoverPoint for Virtual Machines Release Notesfor information of how to scale your environment, and the limitations of this solution.
NOTICE
This guide provides the procedures for protecting, recovering and managing VMs withon-premises local and/or remote RecoverPoint for VMs copies. In RecoverPoint forVMs 5.2.1 and later versions, you can also protect your VMs by creating a copy ofthem in the Amazon Cloud. To deploy the RecoverPoint for VMs Cloud Solution andprotect your virtual machines with a cloud copy, see the RecoverPoint for VMs CloudSolutions Guide.
l Create your license files......................................................................................10l Access the RecoverPoint for VMs vSphere plugin...............................................11l License and register RecoverPoint for VMs........................................................ 12
Before you begin 9

Create your license filesWhen a RecoverPoint for Virtual Machines sales order is approved, a LicenseAuthorization Code is automatically sent to the email addresses provided during orderentry. The License Authorization Code contains your entitlements. You must activateeach entitlement and then save it as a license file before it can be entered into theRecoverPoint for VMs vSphere plugin.
For a detailed description of how RecoverPoint for VMs is licensed, see RecoverPointfor VMs licensing on page 73.
Procedure
1. Access the entitlements on support.emc.com:
l If you have the License Authorization Code email, open it and click theClick here link. Clicking the link automatically accesses PowerlinkLicensing on the support site, and searches for all entitlements associatedwith the License Authorization Code.
l If you do not have the License Authorization Code email but you do havethe LACs or sales order numbers, log into support.emc.com, and:
a. Select Support > Service Center from the main menu.
b. Select Get and Manage Licenses.
c. Select RecoverPoint for Virtual Machines.
d. Type the customer's License Authorization Code and click Activate tosearch for all inactive entitlements that are associated with a customer'sprofile, or access all of the features of the Licensing site by clicking ManageEntitlements. Whichever option you chose, the Search Entitlements toActivate screen is displayed.
2. Activate the entitlements and download the license files:
a. In the Search Entitlements to Activate screen, select an entitlement toactivate. Each entitlement must be selected and activated separately.
b. Click Start Activation Process.
c. In the Search Machines dialog box, click Add a Machine.
d. In the Add Machine dialog box, type a new machine name, and click Save. Aunique machine name must be specified for each entitlement.
A machine name is like a folder. It is used to group items together logically.
e. In the Register screen, verify the machine name, and click Next.
f. In the Activate screen, type the Locking ID, and click Next.
The Locking ID is the field that is displayed in the Machine Informationcolumn. Its value is the entity that the license is enforced for, namely, thevCenter Server ID. To find the vCenter Server ID, type https://<vCenterServerIP>/mob into the browser address bar or SSH client, andtype the credentials to log in to the vCenter Server. Select Content >About. The instanceUuid is the vCenter Server (Locking) ID that the licenseis enforced for.
g. In the Confirm screen, type the email addresses of the recipients of thelicense file in the Email to field of the Additional Email Options section, andclick Finish. Separate multiple email addresses with commas.
Before you begin
10 RecoverPoint for Virtual Machines 5.2 Administrator's Guide

h. In the Complete screen, click Save to File to download the license file andsave the file locally. The resulting license file has a *.lic extension and is inplain text format (can be opened in any text editor).
i. Repeat this procedure for all inactive entitlements in each LicenseAuthorization Code email.
Results
The entitlements are converted to license files.
After you finish
Transfer the license files to the computer from which you will be runningRecoverPoint for VMs.
Access the RecoverPoint for VMs vSphere pluginThere are two ways in which you can access the RecoverPoint for VMs plugin in thevSphere Web Client.
Before you begin
Connect to the vSphere Web Client of your production site.
Procedure
1. Click the RecoverPoint for VMs menu item in your vSphere Web Client >Navigator.
2. Click the RecoverPoint for VMs icon in your vSphere Web Client >Navigator > Inventories.
Before you begin
Access the RecoverPoint for VMs vSphere plugin 11

Results
The RecoverPoint for Virtual Machines Dashboard is displayed.
To monitor the status of your vRPA clusters, click the Dashboard > Components taband ensure that a green checkbox appears next to each vRPA cluster and that thevRPA cluster Status column contains an OK.
To monitor the environment, click the Overall Health, Recovery Activities,Components, Alerts,System Limits, and Events Log sub-tabs of the systemDashboard.
License and register RecoverPoint for VMsThe Getting Started Wizard will guide you through the process of entering a licensefile, registering the product, and enabling system support.
Before you begin
l To transfer system reports and alerts using SMTP or Secure Remote Services,ensure that port 25 is open and available for SMTP traffic.
l To transfer system reports and alerts using FTPS, ensure that ports 990 and 989are open and available for FTPS traffic.
Procedure
1. In the RecoverPoint for VMs vSphere plug-in, click Administration > vCenterServers > Licensing.
2. Click Add... under the Registered Licenses table.
The Getting Started Wizard is displayed.
3. In the Welcome screen, click Next.
4. In the Licensing screen, click Browse... to locate and select the license file(*.lic extension). Click Next.
Before you begin
12 RecoverPoint for Virtual Machines 5.2 Administrator's Guide

5. In the Support screen, to provide communication between the RecoverPointfor VMs system and the System Reports database, select Enable pre-emptivesupport for RecoverPoint for VMs.
a. Define the transfer method:
l To transfer system notifications through an SMTP server, in theTransfer Method section, select SMTP. In the SMTP server addressfield, specify the IP address or DNS name of the dedicated SMTP server,in IPv4 format. In the Sender address field, specify the email address tosend the system notifications from.
l To transfer system notifications through the FTPS server, in theTransfer Method section, select FTPS.
l To transfer system notifications through the Secure Remote Servicesgateway, in the Transfer Method section, select ESRS. In the ESRSgateway IP address field, specify the IP address of the Secure RemoteServices gateway in IPv4 format..
b. Click Test Connectivity. Wait 10 minutes. Then, click Dashboard > EventsLog and look for event 1020: "Failed to send system report".
l If this event does not appear in the Events Log, the system notificationsmechanism is correctly configured.
l If you do receive event 1020: "Failed to send system report",check whether there is an issue with the selected method of transfer. If aproblem exists, fix it, re-configure support, and click Test Connectivityagain. If the problem persists, contact Customer Support.
c. Click Next.
6. In the Registration screen:
a. Register your RecoverPoint for VMs system, at the current vRPA cluster:
l Company name: The name of your company, as it appears on your salesorder.
l Connect home method: The method that is used to send configurationreports and alerts to Dell EMC. The connect home method allows DellEMC to pro-actively address issues within the RecoverPoint for VMsenvironment, should they arise.
l Connect in method The method that is used to allow remoteconnectivity to the RecoverPoint environment. Enabling this feature isrecommended as it enables secure access to the RecoverPoint for VMsenvironment to gather logs and resolve issues as quickly as possible. Ifyou already have a Secure Remote Services Gateway servicing otherproducts, use the Secure Remote Services Config Tool to add theRecoverPoint devices to the list of Secure Remote Services monitoredenvironments. When the device is added, click the request update buttonto send the new device information to EMC and contact the localCustomer Engineer to approve the update. Refer to the Secure RemoteServices Gateway Operation Guide for further instructions on Config Toolusage. If you do not have a Gateway at the site, contact the AccountManager to find out more about the benefits of Secure Remote Services.
l License type: Displays the type of the license that has been registered inRecoverPoint for VMs. Ensure the displayed license type isRecoverPoint for VMs.
Before you begin
License and register RecoverPoint for VMs 13

l Location: The city, state, and country where your company is located.
l Sales order number If you don't have your sales order, your CustomerEngineer can provide it.
l Site (party) ID: The unique ID of the customer site. This value isautomatically retrieved from the registered license file and can only bemodified by Customer Service.
b. If your company does not have outside connectivity, click Export to CSV toexport the registration information to a CSV file.
c. Enter the email address to which a verification email should be sent whenthe registration information is updated in the Install Base in the Sendverfiication email to field.
Note
Skip this step if your company does not have outside connectivity.
d. Click Next.
7. In the Ready to complete screen, verify that the information is correct, andclick Finish.
Results
If your company has outside connectivity, a service request is opened and sends anemail to the specified verification email address from Customer Support to verify thatthe registration details were updated successfully in the Install Base for every vRPAcluster in the RecoverPoint for VMs system.
After you finish
If your company does not have outside connectivity, use the exported CSV file toregister by email or phone, as described in Register RecoverPoint by email or phone onpage 75.
Before you begin
14 RecoverPoint for Virtual Machines 5.2 Administrator's Guide

CHAPTER 2
Protecting VMs
In RecoverPoint for VMs, consistency groups are used to protect virtual machines andreplicate virtual machine application data to a consistent point in time. A consistencygroup is a logical entity that constitutes a container for virtual machines and all of theircopies.
Consistency groups can protect many VMs. If this is the first time you are usingRecoverPoint for VMs, protect your virtual machines by creating new consistencygroups for them, or by adding them to an existing consistency group. If you alreadyhave RecoverPoint for VMs consistency groups, you can create a new copy to protectyour production VMs, alongside your existing copy.
Before protecting VMs, refer to the RecoverPoint for Virtual Machines Scale andPerformance Guide and the RecoverPoint for Virtual Machines Release Notes forinformation of how to scale your environment, and the limitations of this solution.
NOTICE
This Administrator's Guide provides the procedures for protecting, recovering andmanaging VMs with on-premises local and/or remote RecoverPoint for VMs copies. InRecoverPoint for VMs 5.2.1 and later versions, you can also protect your VMs bycreating a copy of them in the Amazon Cloud. To deploy the RecoverPoint for VMsCloud Solution and protect your virtual machines with a cloud copy, see theRecoverPoint for VMs Cloud Solutions Guide.
l Protect a virtual machine in a consistency group................................................16l Add a copy to a consistency group.....................................................................23
Protecting VMs 15

Protect a virtual machine in a consistency groupThe RecoverPoint for VMs Protect VMs Wizard will guide you through the process ofprotecting your production VMs.
Before you begin
Ensure all vCenter Servers that manage production VMs and copy VMs are registeredaccording to Managing vCenter Server registration on page 58
Procedure
1. Connect to the vSphere Web Client of your production site.
2. Select VMs and Templates view.
3. Power on the virtual machine that you want to protect.
4. Right-click on the virtual machine and select All RecoverPoint for VirtualMachines Actions > Protect.
Note
Protecting a virtual machine with fault tolerance enabled is not supported.
The Protect VMs Wizard is displayed.The minimum input required in each screen of the Protect VMs Wizard isindicated in red, in the following screenshots.
5. In the Select VM protection method screen:
Protecting VMs
16 RecoverPoint for Virtual Machines 5.2 Administrator's Guide

l Create a new consistency group for this VM. Type a descriptive name forthe new consistency group. Best practice is to use the VM or applicationname as your consistency group name. Ensure the production vRPA clusteris selected. If you want to add additional virtual machines to protect, markthe Protect additional VM(s) using this group checkbox, select theadditional virtual machines to protect in the consistency group, and clickAdd. If you do not want to add additional virtual machines, click Next.
l Add this VM to an existing consistency group. Select an existingconsistency group. If you want to add additional virtual machines to protect,mark the Protect additional VM(s) using this group checkbox select theadditional virtual machines to protect in the consistency group, and clickAdd. If you do not want to add additional virtual machines, click Next.
Note
When a virtual machine is added to an existing consistency group, if thevirtual machine image is larger than the allotted journal size, the systemautomatically enters one-phase distribution mode.
6. In the Configure production settings screen:
Protecting VMs
Protect a virtual machine in a consistency group 17

a. Enter a name for the production copy. Best practice is to differentiate theproduction copy name from the replica copy name (for example, use"Production" or the production site location).
b. If you chose to create a new consistency group in the previous step (notrelevant if adding a VM to an existing group):
l Accept or define the minimum Journal Size for the production copy. Thedefault size (3GB) is the most practical size for most production journals.
l Optionally, select a specific datastore to use for the production journal.By default, RecoverPoint automatically registers up to 15 datastores forthe production journal and automatically selects the datastore with themost free space.
NOTICE
RecoverPoint for VMs will attempt to create the journal on the selecteddatastore. If for any reason journal creation fails, the system will attemptto create the journal on another registered datastore.
n If you want to select a specific datastore from the registereddatastores, select Manually select a registered datastore from thetable below and select it in the table.
n If you want to select a datastore that hasn't been registered, clickRegister Datastore. Select the datastore and click Register. Ensurethe required datastore is selected in the table.
c. Expand and configure the Advanced options per virtual machine:
l VMDK(s): Displays the number of included VMDKs at the relevantproduction copy, and their total size. Uncheck a VMDK to exclude it fromreplication.
l Protection policy: Default = Enabled. Selecting Automatically protectnew VMDKs ensures all new VMDKs are automatically protected.
l Disk provisioning: Default = Same as source. Defines the way in whichthe copy VMDKs are to be provisioned; Same as source, Thickprovisioning lazy zeroed, Thick provisioning eager zeroed orThin provisioning.
l Hardware changes: Default = Enabled. Automatically replicates thehardware settings of all production virtual machines to their copy VMswhenever an image is accessed on the copy VMs. When enabled,RecoverPoint for VMs replicates the virtual machine version, CPU,memory, resource reservations, and network adapter status and type.Replication of SR-IOV Passthrough Adapter is not supported. If the ESXat a copy does not support the production VM version, no hardwareresources are replicated.
l MAC address replication to local copy VMs on the same vCenter:Default = Disabled. If two remote copies of the same production VM areon the same vCenter and in the same network, you cannot power on bothcopy VMs simultaneously, as they have the same MAC address.Therefore, by default, the MAC address of remote copy VMs on adifferent vCenter than their production VMs is replicated to the copy.However:
n When Replicate hardware changes is disabled, MAC addressreplication is also disabled.
Protecting VMs
18 RecoverPoint for Virtual Machines 5.2 Administrator's Guide

n To avoid IP conflicts, by default, the MAC address is not replicatedfor local copy VMs on the same vCenter as their production VMs. If acopy VM is not on the same network and ESX as its production VM,select Enable for local copy VMs managed by this vCenter toreplicate the MAC address.
d. Click Next.
7. In the Add a copy screen, define the copy.
a. Enter a name for the copy. Best practice is differentiate the replica copyname from the production copy name (for example, use "Remote Copy" orthe copy site location) .
NOTICE
There is no need to change the value of the Select copy type field unlessyou want to protect your VM with a copy on the AWS cloud. For theinstructions on how to protect VMs on the AWS cloud, see the RecoverPointfor VMs Cloud Solutions Guide.
b. Ensure the vRPA cluster that will manage the group data is selected.
c. Click Next
8. In the Configure copy settings screen:
Protecting VMs
Protect a virtual machine in a consistency group 19

a. Configure the copy journal settings:
l Define or accept the minimum Journal Size for the copy journal. Thelarger the copy journal, the more history can be saved.
l By default, RecoverPoint automatically selects a datastore for the copyjournal. Either allow RecoverPoint for VMs to automatically select aregistered datastore for the specified journal size or manually select onefrom the table. If the table does not contain the required datastore, clickRegister Datastore... and select the datastore to register.
NOTICE
RecoverPoint for VMs will attempt to create the journal on the selecteddatastore. If for any reason journal creation fails, the system will attemptto create the journal on another registered datastore.
l Load the replication policy for this copy from a template or manuallydefine it. By default, the replication policy is set to Synchronous modeand the RPO (Recovery Point Objective) is set to 25 Seconds. The RPOis the point in time to which you are required to recover data, for aspecific application, as defined by the organization. RPO defines themaximum lag that is allowed on a link, and is set manually in Bytes, KB,MB, GB, TB, Writes, Seconds, Minutes, or Hours.
b. Click Next.
9. In the Select copy resources screen, select where and how to create the copyVM which will protect the virtual machine:
Protecting VMs
20 RecoverPoint for Virtual Machines 5.2 Administrator's Guide
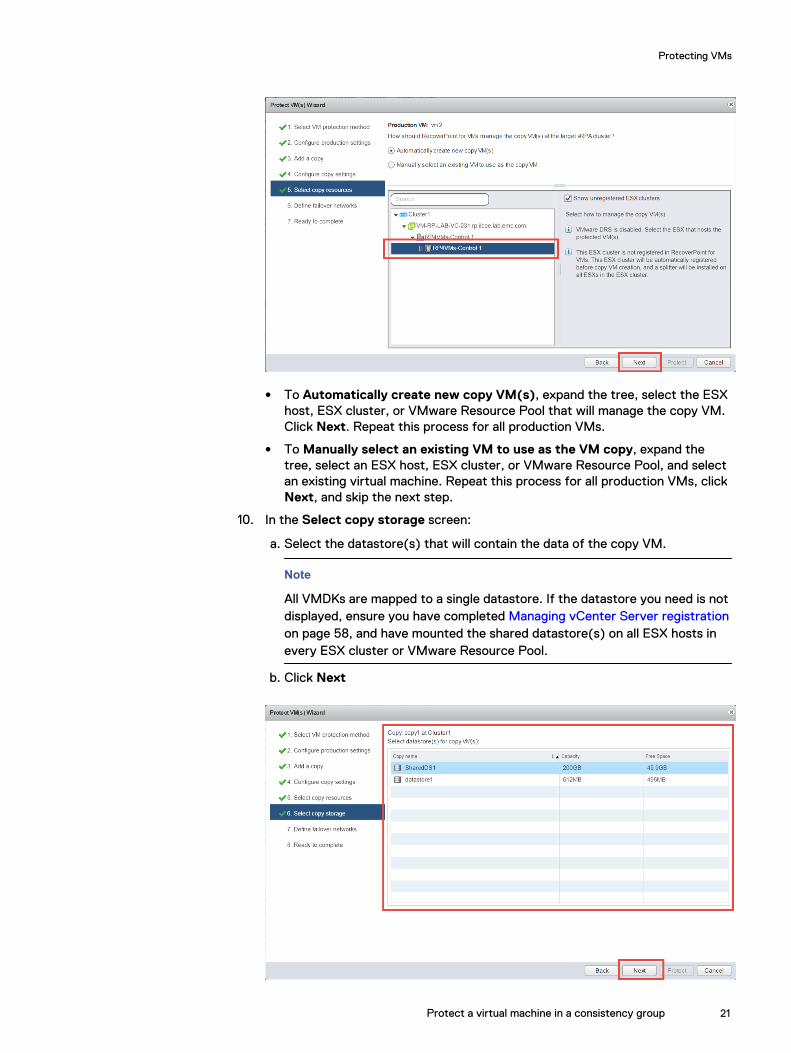
l To Automatically create new copy VM(s), expand the tree, select the ESXhost, ESX cluster, or VMware Resource Pool that will manage the copy VM.Click Next. Repeat this process for all production VMs.
l To Manually select an existing VM to use as the VM copy, expand thetree, select an ESX host, ESX cluster, or VMware Resource Pool, and selectan existing virtual machine. Repeat this process for all production VMs, clickNext, and skip the next step.
10. In the Select copy storage screen:
a. Select the datastore(s) that will contain the data of the copy VM.
Note
All VMDKs are mapped to a single datastore. If the datastore you need is notdisplayed, ensure you have completed Managing vCenter Server registrationon page 58, and have mounted the shared datastore(s) on all ESX hosts inevery ESX cluster or VMware Resource Pool.
b. Click Next
Protecting VMs
Protect a virtual machine in a consistency group 21

11. (Optionally) In the Define failover networks screen, for each network adapterof each production VM, specify the port groups to use when Fail over to a copyand fail back to production on page 50, and when Test a copy on page 48,and click Next. See Configuring copy VM failover networks on page 66 formore information.
NOTICE
Skip this step or select System-defined to allow RecoverPoint for VMs toautomatically select the networks to be used.
12. In the Ready to complete screen:
a. Ensure your protection settings are as required:
l Expand the Production and Copy settings to ensure that they arecorrect.
l If need be, click Edit... to change a setting before clicking Protect.
l Note if a warning is displayed regarding a potential communicationsproblem (no action required at this time).
Protecting VMs
22 RecoverPoint for Virtual Machines 5.2 Administrator's Guide

l If you do not want to start replicating data from the production VMimmediately, uncheck Start replicating this group when I clickProtect.
l Click Add a Copy to add more copies to the group.
Note
If a warning regarding a potential communications problem is displayed, see Creating VMkernel ports on page 75.
b. Click Protect to create the copy(s) and enable VM protection.
Results
The specified virtual machine(s) are protected. If you added a virtual machine to anexisting consistency group, a volume sweep occurs on the newly added virtualmachine and a short initialization on all other virtual machines in the consistencygroup.
Note
If an unregistered ESX cluster, or an ESX host or VMware Resource Pool of anunregistered ESX cluster were selected to manage the copy, the unregistered clusteris automatically registered with the specified vRPA cluster, a splitter is installed on allESXs in the cluster, and replication is temporarily paused for all relevant VMs while thesplitter is being installed.
After you finish
l Use the Protection > Consistency Groups screen for Monitoring replication onpage 26.
l Use The RecoverPoint for VMs Dashboard on page 26 to monitor the system.
l To stop replicating a VM, see Stop protecting a virtual machine on page 62.
Add a copy to a consistency groupThe RecoverPoint for VMs Add a Copy Wizard will guide you through the process ofprotecting your virtual machines with a new local and/or remote copy.
Before you begin
l Create your license files on page 10
l License and register RecoverPoint for VMs on page 12
l Ensure all vCenter Servers that manage production VMs and copy VMs areregistered according to Managing vCenter Server registration on page 58
Procedure
1. Select Protection > Consistency Groups.
2. Click the Add a copy icon:
3. Follow the instructions for protecting VMs, starting from step 7 on page 19.
Protecting VMs
Add a copy to a consistency group 23

Protecting VMs
24 RecoverPoint for Virtual Machines 5.2 Administrator's Guide
CHAPTER 3
Monitoring protection
After protecting your VMs, use the RecoverPoint for VMs Dashboard to monitor thesystem. Use the Protection > Consistency Groups screen to monitor replication.
l The RecoverPoint for VMs Dashboard............................................................... 26l Monitoring replication........................................................................................ 26l Monitoring system alerts and events..................................................................28l Identifying a RecoverPoint for VMs system....................................................... 29
Monitoring protection 25

The RecoverPoint for VMs DashboardUse the RecoverPoint for VMs Dashboard to attain a high-level overview of theRecoverPoint for VMs system. The RecoverPoint for VMs Dashboard and its sub-tabspresent important system information to help you analyze and monitor yourRecoverPoint for VMs system.
Procedure
1. In your vSphere Web Client > Navigator, select RecoverPoint for VMs toaccess the system Dashboard.
2. To monitor your RecoverPoint for VMs system, click the Overall Health,Recovery Activities, Components, Alerts, System Limits, and Events Logsub-tabs.
Monitoring replicationUse the RecoverPoint for VMs Protection tab to monitor all aspects of replication.
Procedure
1. In the RecoverPoint for VMs vSphere plug-in, select Protection >Consistency Groups.
In the Transfer column, note the Transfer State of each consistency group.
l Active: Data is being transferred asynchronously to a copy.
Monitoring protection
26 RecoverPoint for Virtual Machines 5.2 Administrator's Guide

l Active (Synchronized): Data is being transferred synchronously to a copy.
l Init (n%): A copy is being initialized or undergoing a full sweep.
l High-load (n%): The system enters a temporary high-load state while datais being transferred to a copy. High-load occurs when the journal is full andcannot accept new writes. The system will attempt to resolve the high-loadstate without user action.
l High-load: The system enters a permanent high-load state while data isbeing transferred to a copy. A permanent high-load can occur after atemporary high-load. The system pauses replication and waits for useraction.
l Paused: Data is not being transferred to a copy, because transfer has beenpaused by the user.
l Paused by System: Data is not being transferred to a copy, becausetransfer has been paused by the system. If this state occurs for long periodsof time, check the system alerts and events in the Dashboard for moreinformation.
l N/A: Data is not being transferred to a copy, because the copy has beendisabled by the user.
2. Select a specific consistency group. The state of transfer to each of the copiesin the group, and other important information about the replication process, isdisplayed in the group Topology diagram.
3. Select the Details and Statistics sub-tabs for more detailed information aboutyour replication environment, configuration, and performance.
Results
If after protecting a VM, the transfer state of its group does not become Active, see Creating VMkernel ports on page 75.
Monitoring protection
Monitoring replication 27

Monitoring system alerts and eventsUse RecoverPoint for VMs events and alerts to understand and troubleshoot events inyour RecoverPoint for VMs environment.
To monitor your system events, use the RecoverPoint for VMs vSphere plugin >Dashboard > Events Log tab.An event is a notification that a change has occurred in the state of a systemcomponent. In some cases, the change indicates an error or warning condition for thecomponent. Multiple events can occur simultaneously on a single component. A singleincident can generate events across multiple system components.
In RecoverPoint for VMs, events have a:
l Level: Info, Warning, or Errorl Scope: Normal, Detailed, or Advancedl Topic: All, vRPA Cluster, vRPA, Group, Splitter, or Management
In the events log:
1. Select an event to display the event Details.
2. If there is detailed event information that can help you to troubleshoot, a Readmore link is displayed. Click this link to display additional information about theselected event.
3. Click the Event Filter icon to configure which events are displayed in the EventsLog.
NOTICE
For more event monitoring and troubleshooting options, log into the RecoverPoint forVMs Command Line Interface (CLI) and run the get_events_log command. Formore information, see the RecoverPoint for Virtual Machines CLI Command ReferenceGuide.
To monitor your system alerts, click the RecoverPoint for VMs vSphere plugin >Dashboard > Alerts tab. System alerts are a mechanism that allows vRPAs to send
Monitoring protection
28 RecoverPoint for Virtual Machines 5.2 Administrator's Guide

events about system components in real-time, to a specified email, or the systemreports database, via SMTP.
l To manage your system alerts settings, see Managing system support on page57.
l You can also monitor the alerts of specific consistency groups from theProtection > Consistency Groups screen, when you select a specific consistencygroup. Click the More info... link under the alert box for more details about thesealerts.
Identifying a RecoverPoint for VMs systemWhen a vRPA cluster is selected, the GUI displays all other vRPA clusters (besides theone you are connected to) that constitute a RecoverPoint for VMs system.
Procedure
1. In the RecoverPoint for VMs vSphere plugin, select Administration > vRPAClusters > vRPA System
2. Select a vRPA cluster.
3. Note the value of Other vRPA clusters in system.
Monitoring protection
Identifying a RecoverPoint for VMs system 29

Monitoring protection
30 RecoverPoint for Virtual Machines 5.2 Administrator's Guide

CHAPTER 4
VM automation and orchestration
RecoverPoint for VMs provides the following features that automate and orchestratethe protection of your VM copies.
l Create a bookmark.............................................................................................32l Create an application-consistent bookmark....................................................... 33l Create a group set............................................................................................. 35l Protection orchestration.................................................................................... 37l Protection automation....................................................................................... 43
VM automation and orchestration 31

Create a bookmarkCreate a snapshot of a virtual machine, a consistency group, or a group set, and labelit for easy identification during testing and recovery.
Crash-consistent bookmarks are created using RecoverPoint for VMs plug-in forvCenter. Application-consistent bookmarks are created using RecoverPoint’s VSS-based utility, called KVSS.
Procedure
1. In the RecoverPoint for VMs vSphere plugin, click Protection.
l To bookmark a virtual machine, select the Virtual Machines tab.
l To bookmark a consistency group, select the Consistency Groups tab.
l To bookmark a group set, select the Group Sets tab.
2. Select the consistency group or group set that you want to bookmark.
3. Click the Create Bookmark button at the top of the screen:
4. In the Create Bookmark dialog box:
l Name - Type a name for the snapshot. This is the bookmark. The bookmarkis the name that will be used to identify the snapshot during testing andrecovery.
l Label Bookmark As - Select:
VM automation and orchestration
32 RecoverPoint for Virtual Machines 5.2 Administrator's Guide

n Crash-Consistent: Labels the snapshot as crash-consistent.
n Application-Consistent: Labels the snapshot as application-consistent.Selecting this option does not create an application-consistent snapshot,it only labels the snapshot as application-consistent.
l Consolidation Policy - Specifies how the consolidation policy will bemanaged the next time that the process runs.
n Never consolidate this bookmark
n This bookmark snapshot must survive Daily / Weekly / Monthlyconsolidations:
– Daily - Snapshot will survive daily consolidations, but is consolidatedweekly and monthly.
– Weekly - Snapshot will survive daily and weekly consolidations, but isconsolidated monthly.
– Monthly - Snapshot will survive daily, weekly, and monthlyconsolidations.
5. Click OK.
Results
A crash-consistent snapshot is created with the specified name for the specifiedvirtual machine, consistency group, or group set.
Create an application-consistent bookmarkKVSS bookmarks are created using the kvss.exe bookmark command. The workingfolder for running KVSS commands is %SystemDriver%/EMCRecoverPointVSSProvider/.
Before you begin
When using KVSS to apply bookmarks:
l Surround parameter values with quotation marks.
l You can use the vssadmin list writers command to obtain a list ofregistered writers on the host virtual machine.
l You can use the kvss.exe list command to display the components of each ofthe writers found using the vssadmin list writers command.
l You can run the kvss.exe set_credentials command once per Windowsuser to define the ip, user, and password. After doing so, you will not need totype these values again.
l If they are separated by a space, you can type multiple writers and groupssimultaneously.
l Only the application on which KVSS is run is application consistent, and only whenrun on the same virtual machine. Best practice is to name the bookmark to containboth the name of the application and the virtual machine.
l Upgrade the vRPA clusters before upgrading KVSS. An older version of KVSSworks with a vRPA cluster running a newer version of RecoverPoint for VMs. Anewer version of KVSS does not work with a vRPA cluster running an older versionof RecoverPoint for VMs.
VM automation and orchestration
Create an application-consistent bookmark 33

The syntax is as follows:
kvss.exe bookmarkbookmark=bookmark_name writers=writer_name writer_name [groups=group_name group_name] [consolidation_policy=never|survive_daily|survive_weekly|survive_monthy|always] [type=[FULL|COPY]][ip=RecoverPoint_cluster_management_ip_address] [user=RecoverPoint_username] [password=RecoverPoint password]
NOTICE
Parameters that are surrounded by square brackets [ ] are optional. Using the -versionflag prints out the KVSS version number.
Where:
Table 1 KVSS syntax
Option Description
writers A VSS-aware host application
groups RecoverPoint consistency group
bookmark Name by which you can identify the appliedbookmark
consolidation_policy Consolidation policy to set for this snapshot.Valid values are:
never. Snapshot is never consolidated.
survive_daily. Snapshot remains after
daily consolidations, but is consolidated inweekly, monthly, and manualconsolidations.
survive_weekly. Snapshot remains
after daily and weekly consolidations, butis consolidated in monthly and manualconsolidations.
survive_monthly. Snapshot remains
after daily, weekly, and monthlyconsolidations, but is consolidated inmanual consolidations.
always. Snapshot is consolidated in every
consolidation process, whether manual orautomatic.
Default = always. If the
consolidation_policy parameter is not
specified, the snapshot is consolidated in bothautomatic and manual consolidationprocesses.
type The shadow copy type:
VM automation and orchestration
34 RecoverPoint for Virtual Machines 5.2 Administrator's Guide

Table 1 KVSS syntax (continued)
Option Description
l FULL
l COPY
This setting is optional. Default = COPY. The
writer application determines the settings.Generally, when type = full, backup logs
are truncated. When type = copy, backup
logs are not truncated.
ip vRPA cluster management IP
user RecoverPoint for VMs username
password RecoverPoint for VMs password
Procedure
l To create a bookmark for a Microsoft Exchange application for the first time:
kvss.exe set_credentials ip=”10.10.0.145” user=”admin” password=”admin”
kvss.exe bookmark writers="Microsoft Exchange Writer" groups="exchange\comp1" “exchange\comp2” bookmark="exchange hourly snapshot" consolidation_policy=”survive_daily”
l To create a bookmark every subsequent time for a Microsoft Exchange applicationafter defining the ip, user, and passwordthrough the kvss.exeset_credentials command:
kvss.exe bookmarkwriters="Microsoft Exchange Writer"groups="exchange\comp1" “exchange\comp2”bookmark="exchange hourly snapshot"consolidation_policy=”survive_daily”
Create a group setA group set is a collection of consistency groups to which the system applies parallelbookmarks at a user-defined frequency. Group sets are useful for consistency groupsthat are dependent on one another or that must work together as a single unit. If anyof the groups in the group set are part of another group set that has parallelbookmarking enabled, you cannot enable parallel bookmarking for that group set.
VM automation and orchestration
Create a group set 35

NOTICE
If a group set contains a consistency group with both an on-premises copy and a cloudcopy, parallel bookmarks can be enabled even though this feature is not supported forcloud copies. In this case, parallel bookmarks are applied only to the on-premises copy.
Procedure
1. Click Protection > Group Sets.
2. Click the Add Group Set icon:
3. In the Add Group Set dialog box:
a. Enter a descriptive name for the group set.
b. Choose the vRPA cluster from which to select consistency groups.
c. Select the consistency groups to add to the group set.
d. To create bookmarks for all of the consistency groups in this group set, atthe same pre-defined intervals, select Enable Parallel Bookmarking and setthe Frequency value.
4. Click OK.
Results
The group set is created.
After you finish
Select a group set and use the buttons at the top of the screen to bookmark, enable/disable, modify the start-up sequence, and pause/start replication for multiple groups,simultaneously.
VM automation and orchestration
36 RecoverPoint for Virtual Machines 5.2 Administrator's Guide

Protection orchestrationThis section describes the RecoverPoint for VMs features for orchestrating theprotection of virtual machines and VMDKs.
Group start-up sequenceThe Group start-up sequence defines the order in which the consistency groups in agroup set power on when image access is enabled during a recovery activity (such astesting a copy, failover, or production recovery). The group start-up sequenceoverrides the virtual machine start-up sequence. For more information, see VM start-up sequence.
Procedure
1. In the vSphere web client home page, click the RecoverPoint for VMsManagement icon > Protection tab > Group Sets.
2. Select a group set.
3. Click the Edit Start-up Sequence icon.
4. Select each group and set its Start-up priority.
Virtual machine start-up sequenceThe virtual start-up sequence defines the order of the power on sequence of thevirtual machines in a consistency group. The sequence is initiated when image accessis enabled during a RecoverPoint for VMs recovery activity (test a copy, after failoveror recover production). Virtual machines are powered on in order of priority, asdefined by the user. All virtual machines with the same priority power onsimultaneously. The startup-sequence can also be defined between consistencygroups within the same group set. The start-up sequence can be set as Critical. If acritical virtual machine fails to power on, the start-up sequence pauses, and no othervirtual machines power on.
Before you begin
l Best practice is to install VMware Tools on each production virtual machine.
l One user script and one user prompt can be configured to run before power onand to run after power on in a strict sequence: script > prompt > power-up >script > prompt.
When VMware Tools are installed on a production virtual machine, the virtual machineis considered powered on only after its operating system loads. When VMware Toolsare not installed on a production VM, the virtual machines is considered powered on as
VM automation and orchestration
Protection orchestration 37

soon as it is powered on. Once a virtual machine is powered on, the system moves tothe next virtual machine in the start-up sequence that you define.
The following graphic illustrates the order of sequences:
Procedure
1. Select Protection > Consistency Groups.
2. Expand the consistency group tree, and select the consistency group that youare defining the start-up sequence for.
3. Click the Edit Start-up Sequence icon.
The Start-up Sequence of VMs in this Group dialog box is displayed.
4. Set the order of the power on sequence by selecting each virtual machine andsetting a start-up priority for it.
Option Description
1 The first virtual machine to power on
3 Default
5 The last virtual machine to power on
5. Optionally, select each virtual machine whose start-up sequence you want tostop if the virtual machine does not power on, and set it to Critical.
After you finish
See Defining user prompts on page 38 and Defining user scripts on page 39.
Defining user promptsUser prompts define a message to be displayed in the RecoverPoint Dashboard toprompt the user to perform specified tasks before continuing with the start-upsequence. The user must dismiss the prompt before the start-up sequence continues.If the user defines a time-out, the user prompt automatically dismisses if the set time-out period passes. If no time-out is defined and the user does not dismiss the start-upprompt, the start-up sequence does not continue until the user dismisses the prompt.
VM automation and orchestration
38 RecoverPoint for Virtual Machines 5.2 Administrator's Guide

Before you begin
l You can define one user prompt before power on and one user prompt after poweron.
Procedure
1. In the The Start-up Sequence of VMs in this Group dialog box, select Promptuser.
2. Type a logical name for the prompt.
3. Type the prompt message.
4. Optionally, type a time-out period.
Defining user scriptsA user script runs commands immediately before or after powering on virtualmachines. The scripts are executed with ssh on the External Host that is provided bythe user. Each script has a mandatory time-out period. The recovery flow is blockeduntil the script executes successfully. If the script does not run within the set time orthe script fails or becomes stuck, the system retries the script a pre-defined numberof times (set by the user). A prompt indicates if the script failed.
Before you begin
l Maximum size of the script name and parameters = 1024 bytes.
l You can define one user script before power on, and one user script after poweron per VM.
l External host must be configured.
l One external host can be defined per vRPA cluster.
l An SSH server must be installed on each external host.
Procedure
1. In the The Start-up Sequence of VMs in this Group pane, check Run script.
2. Type a logical name for the script.
3. Type the script command, including parameters (separated by a space).
4. Type the time-out period (mandatory).
5. Type the number of retries.
Automatic copy VM network configuration (Re-IP)Use one of the following procedures to change a copy VM's network settings whentesting a copy, failing over, or recovering production. Use the GUI to change thenetwork configuration of a small number of VMs, or use a comma-separated values(*.CSV) file to change the network configuration of many VMs in a copy or system.
Before you begin
l Automatic network configuration is supported for VMs running MS Windowsserver versions 8, 10, 2008 R2, 2012, and 2016, Red Hat Linux server versions 6.5and 7.2, Red Hat Enterprise Linux (RHEL) server version 7.1, and Ubuntu Studio15.10.
l Best practice is to ensure that VMware Tools are installed on each relevantproduction VM.
n For Linux CentOS 7.x, automatic network configuration is not supported unlessVMware Tools version 10.1.0.57774 has been manually installed, and the value
VM automation and orchestration
Defining user scripts 39

of each production VM's ifconfig version has been changed to 1.6 in the VMsettings.
n For Linux SLES12, automatic network configuration is not supported unlessOpen VM Tools version 9.4.0.25793 and deployPkg has been manuallyinstalled. See VMWare KB article 2075048 for detailed information on how toinstall deployPkg.
n For VMs running Open VM Tools versions lower than 9.10, automatic networkconfiguration is not supported unless deployPkg has been manually installed.See VMWare KB article 2075048 for detailed information on how to installdeployPkg.
n For all other operating systems, see Manual copy VM network configuration(RE-IP) on page 77
l By default, the Network Configuration Method is set to Automatic. Best practiceis to leave this setting as is. However, if you want to use glue scripts (for example,because you have upgraded from a previous version of RecoverPoint for VMs andhave already implemented glue scripts), ensure Use glue scripts is selected andsee Manual copy VM network configuration (RE-IP) on page 77.
Note
If you are planning a temporary failover, to ensure that you don't lose your productionVM network configuration when you fail back to the production, ensure that you editthe copy network configuration of your production VMs too.
The following diagram illustrates how it works.
Note
If you have upgraded from a RecoverPoint for VMs version prior to 5.0.1, see Manualcopy VM network configuration (RE-IP) on page 77 for how it works.
VM automation and orchestration
40 RecoverPoint for Virtual Machines 5.2 Administrator's Guide

Copy VM network configuration for a few virtual machines at a copy
Before you begin
You should be familiar with:
l Test a copy on page 48
l Fail over to a copy and fail back to production on page 50
l Recover production from a copy on page 52
l Copy VM network configuration guidelines on page 79
Procedure
1. Select Protection > Consistency Groups. Expand the consistency group,select the copy, and click the Edit Copy Network Configuration icon.
2. Select a virtual machine in the table.
To import the production VM setting value, select a setting in the GUI. When arelevant setting is selected, a Get Value from Production button is displayednext to it.
l To retrieve a specific setting value from the production VM. Click Get Valuefrom Production.
l To retrieve all relevant setting values from the production VM, click Get AllValues From Production.
3. Type new network values for the copy VM.
4. To apply the new values, click OK.
5. Repeat for each virtual machine at the copy.
VM automation and orchestration
Automatic copy VM network configuration (Re-IP) 41

Results
The new copy VM network configuration is used when testing a copy, failing over, orrecovering production.
Copy VM network configuration for many virtual machines at a copy
Before you begin
You should be familiar with:
l Test a copy on page 48
l Fail over to a copy and fail back to production on page 50
l Recover production from a copy on page 52
l Copy VM network configuration guidelines on page 79
Procedure
1. Select Protection > Consistency Groups. Expand the relevant consistencygroup, select the relevant copy, and click the Edit Copy NetworkConfiguration icon.
2. To save the current network configuration of all virtual machines at the selectedcopy to a local *.csv file, click Export....
3. Open the CSV file and modify the network configuration of relevant virtualmachines.
4. To apply the new network configuration, click Import... and select the modifiedCSV file .
Results
The new copy VM network configuration is used when testing a copy, failing over, orrecovering production.
Copy VM network configuration for many virtual machines in a system
Before you begin
You should be familiar with:
l Test a copy on page 48
l Fail over to a copy and fail back to production on page 50
l Recover production from a copy on page 52
l Copy VM network configuration guidelines on page 79
Procedure
1. Select Administration > vRPA Clusters > vRPA System, and select the vRPAof the relevant RecoverPoint for VMs system.
2. To retrieve the network configuration of all copy VMs at all vRPA clusters in thesystem, in the Network Configuration section, click Get Network Settings.
3. To save the current network configuration to a local CSV file, click Export....
4. Open the CSV file and modify the network configuration of relevant virtualmachines.
5. To apply the new network configuration to the system, click Import... andselect the modified CSV file.
VM automation and orchestration
42 RecoverPoint for Virtual Machines 5.2 Administrator's Guide

Results
The new copy VM network configuration is used when testing a copy, failing over, orrecovering production.
Protection automationThis section describes the RecoverPoint for VMs features for automating theprotection of virtual machines and VMDKs.
Disabling automatic protection of new VMDKsBy default, all newly added VMDKs are automatically protected. Use this procedure tochange the default behavior.
Procedure
1. In the RecoverPoint for VMs vSphere plug-in, select Protection > VirtualMachines.
2. Select the virtual machine for which you want to disable the automaticprotection of any newly added VMDKs, in the future.
3. Under the Protected VMDKs widget, click Edit....
4. In the Edit VMDK Protection Policy dialog, clear the Automatically protectnew VMDKs checkbox to disable automatic protection of any newly addedVMDKs to this VM.
5. Click OK.
Results
Any VMDKs added to this VM in the future will not be automatically protected.
Provisioning VMDKsBy default, VMDKs are provisioned Same as source.
Procedure
1. Select Protection > Virtual Machines.
2. Select the virtual machine.
3. In the Hardware Settings widget, click Edit...
4. In the Disk provisioning drop-down, select Same as source, Thickprovisioning lazy zeroed, Thick provisioning eager, or Thinprovisioning.
Results
The VMDK is provisioned according to the specified settings.
Adding a new VMDKRecoverPoint for VMs automatically detects when a hard disk is added to a protectedvirtual machine using the vSphere client > Virtual Machine Properties, andorchestrates VMDK addition.
When adding VMDKs to a protected VM, RecoverPoint for VMs automatically startsprotecting each added VMDK by creating copies of it, as specified by the VM'sconsistency group link and copy settings.
VM automation and orchestration
Protection automation 43

l To disable automatic protection for all VMDKs added to a protected VM in thefuture, see Disabling automatic protection of new VMDKs on page 43.
l To exclude specific VMDKs of a protected VM from protection, see Excluding aVMDK from replication on page 44.
RecoverPoint for VMs does not automatically protect VMDKs of type shared whenthey are added to a protected VM.
Results
A volume sweep occurs on the added VMDK(s) and a short initialization occurs on allother VMDKs in the consistency group, but no history is lost.
Removing a VMDKRecoverPoint for VMs automatically detects when a hard disk is removed from aprotected virtual machine using the vSphere client > Virtual Machine Properties,and orchestrates VMDK removal.
If you don't want to replicate a specific VMDK of a protected VM to the copy, you canremove the VMDK from the production VM through the vSphere client VirtualMachine Properties, or exclude it from replication, as described in Excluding a VMDKfrom replication on page 44.
Note
Removing VMDKs from a protected VM does not delete their copies and does notremove their history from the copy journal.
Results
During recovery, the VM snapshots will not include the removed VMDK, even whenrecovering a snapshot from a point in time that precedes the removal of the VMDK.Future VM snapshots will not include the removed VMDK.
After you finish
The removed VMDKs can be recovered by Recovering VMs, and selecting a snapshotthat precedes the removal of the VMDK.
After removing VMDKs from a production VM in vSphere, you can:
l Add the missing VMDKs to the production VM with the same port type, ID, andsize as the copy VMDK. This action causes a volume sweep on the added VMDKand a short initialization on all other VMDKs in the group.
l Follow the instructions for Excluding a VMDK from replication on page 44.
Excluding a VMDK from replicationIf required, you can mark individual VMDKs for exclusion from replication. Forexample, virtual machines containing shared or non-persistent VMDKs cannot bereplicated. You can, however, change the VMDK type in vSphere, or mark theseVMDKs to be excluded from replication in the RecoverPoint plugin for vSphere, andreplicate the virtual machines without them. You can also use the following procedureto include an excluded VMDK.
l The excluded production VMDKs are not replicated, but the corresponding copyVMDKs are not deleted.
VM automation and orchestration
44 RecoverPoint for Virtual Machines 5.2 Administrator's Guide

Note
VMDKs that are excluded are created at the copy and attached to the copy VM,but any writes going to excluded VMDKs are not replicated to the copy.
l Changing the disk type of an excluded shared or non-persistent VMDK to asupported type (such as non-shared or persistent) does not automatically includethe VMDK, regardless of the value of the Automatically protect new VMDKssetting.
Procedure
1. In the RecoverPoint for VMs vSphere plug-in, select Protection > VirtualMachines.
2. Under the Protected VMDKs widget, click Edit....
3. Clear the checkbox next to the VMDKs that you want to exclude fromreplication.
4. Click OK.
Results
In the future, the excluded VMDKs are not displayed in the list of snapshots that youcan select when Recovering VMs on page 47 from a previous point in time, evenwhen recovering snapshots from a time previous to the VMDK removal.
Automatic replication of VM hardware changesBy default, RecoverPoint for VMs automatically detects any hardware changes thatare made to a protected VM (through the vSphere client > Virtual MachineProperties), and orchestrates the replication of hardware changes to all copy VMs.Use this procedure to change the default behavior.
Note
Replication of the SR-IOV network adapter type is not supported. If the ESX at a copydoes not support the production VM version, no hardware resources are replicated.
RecoverPoint for VMs replicates the protected VM's version, MAC address, CPU,memory, resource reservations, network adapter status and network adaptertype to all copy VMs in the consistency group, upon image access.
Procedure
1. Select Protection > Virtual Machines.
2. Select a protected VM.
3. In the Hardware Settings widget, click Edit... and uncheck Replicatehardware changes.
Results
RecoverPoint for VMs stops replicating changes to the protected VM's hardware.
Automatically expanding copy VMDKsWhen a production VMDK is expanded, RecoverPoint for VMs automatically expandsall corresponding copy VMDKs, with the following limitations:
l VMDKs can be expanded, but they cannot be shrunk.
VM automation and orchestration
Automatic replication of VM hardware changes 45

l When a production VMDK is expanded, the system pauses replication of theconsistency group while the system is busy resizing the corresponding copyVMDK.
l Automatic VMDK expansion fails if:
n Replicating to RDM. After expanding the production VMDK/RDM, you will needto manually expand the copy RDM.
n The datastore does not contain enough free space. In this case, free up spacein the copy VM datastore.
n A snapshot has been taken of the virtual machine containing the copy VMDK. Inthis case, enable image access to the copy VM containing the VMDK and thenuse the vCenter snapshot manager to delete all snapshots before disablingimage access.
n The version of the file system that you are running does not support the VMDKsize. In this case, consider upgrading the file system version.
After fixing any of these issues, wait 15 minutes for the automatic expansion processto restart and the error to resolve itself. If the problem persists, try manually resizingthe copy VMDKs or contact Customer Support.
l The system pauses replication of the consistency group if:
n Replicating to RDM. After expanding the production VMDK/RDM, you will needto manually expand the copy RDM for replication to resume.
n The user accesses a copy containing a VMDK marked for automatic expansion.
n A production VMDK is smaller than the size registered in the system settings(for example, because the production VMDK has been removed and re-addedwith a smaller size). To mitigate this situation, contact Customer Support.
n One or more copy VMDKs has been marked for automatic expansion, but thesystem cannot automatically resize a raw device. In this case, enable imageaccess to the copy VM with the problematic VMDK and manually expand itbefore disabling image access. If problem persists, contact Customer Support.
l If the size of a copy VMDK is larger than the size of its corresponding productionVMDK. In this case, to begin the automatic VMDK expansion process, you mustmanually expand the production VMDK. This manual expansion might be required ifyou failed over while automatic expansion was in progress, or if the copy VMDKwas manually expanded.
VM automation and orchestration
46 RecoverPoint for Virtual Machines 5.2 Administrator's Guide

CHAPTER 5
Recovering VMs
Periodically test copy images. In a disaster, fail over to a copy, or recover productionto an earlier point-in-time.
Before recovering VMs, refer to the RecoverPoint for Virtual Machines Scale andPerformance Guide and the RecoverPoint for Virtual Machines Release Notes forinformation of how to scale your environment, and the limitations of this solution.
NOTICE
This Administrator's Guide provides the procedures for protecting, recovering andmanaging VMs with on-premises local and/or remote RecoverPoint for VMs copies. InRecoverPoint for VMs 5.2.1 and later versions, you can also protect your VMs bycreating a copy of them in the Amazon Cloud. To deploy the RecoverPoint for VMsCloud Solution and protect your virtual machines with a cloud copy, see theRecoverPoint for VMs Cloud Solutions Guide.
l Test a copy........................................................................................................ 48l Fail over to a copy and fail back to production................................................... 50l Recover production from a copy........................................................................52l Monitor recovery activities................................................................................ 54
Recovering VMs 47

Test a copyProcedure
1.Select the Protection tab and click the Test Copy icon to open the Test aCopy Wizard.
2. In the Define a scope screen, select whether you want to test the consistencygroup or the group set.
Uncheck the Power on copy VMs during testing checkbox if you want thecopy VMs powered off during image access. The default, checked, powers onthe virtual machine during image access. Unselecting this option skips the post-power up steps (including copy VM network reconfiguration) in the start-upsequence.
3. In the Select an image screen, select the image to access. You may want tostart with the last image that is known to be valid.
When selecting the image, you have the following options:
l Current image: The current image, as displayed in the wizard.
l The latest image: The last snapshot that was created at the production, andtransferred to the copy journal.
l An image from the image list: When selecting an image from the list, thenumber of snapshots available in the image list is limited. You can still selectsnapshots that are not in the image list by specific point in time. Duringsnapshot dilution, priority is given to bookmarked images.
l A specific point in time or bookmark: Allows you to perform a customizedsearch.
n Point in Time: Searches for a bookmark that was created at thespecified date and time.
n Max Range: Searches for a bookmark that was created between thespecified number of minutes/hours before and after the specified Pointin Time.
n Bookmark: Searches for bookmarks with the specified text in thebookmark name.
n Exact: Searches for bookmarks that contain the exact text that wasentered in the Bookmark field.
n Image Type: Searches for the specified image type with the specifiedbookmark name.
4. In the Define testing network screen, to avoid IP conflicts between theproduction and copy VMs, best practice is to used a dedicated testing network.
Recovering VMs
48 RecoverPoint for Virtual Machines 5.2 Administrator's Guide

When defining the testing network, you can:
l Create an isolated network for each group: RecoverPoint for VMs auto-provisions an isolated network for virtual machines in this group or group setto avoid IP conflicts between the production VM and the tested virtualmachine.
l Create an isolated network for each ESX: RecoverPoint for VMsautomatically creates an isolated network for each ESX splitter.
l Use my dedicated network: Manually select a preconfigured network. Notrelevant for group sets.
l Use preconfigured failover networks: RecoverPoint for VMs uses thepreconfigured failover networks for each copy VM. To view or edit failovernetworks, see Configuring copy VM failover networks on page 66. Notrelevant for group sets.
5. In the Ready to complete screen, verify that the displayed image access detailsare correct.
Recovering VMs
Test a copy 49

The Image Access Progress Bar indicates the progress of image access. Afterimage access is enabled, the Image Access Log Capacity progress barindicates how long you can access the copy image before the image access logis full and all writes to the copy fail.
l To exit the Test a Copy wizard and start testing the image, click Hide.When testing is complete, re-open the Test a Copy wizard to disable accessto the copy image. Select the Recovery Activities widget in the systemDashboard, select the activity and click Next Action > Back to Wizard. Inthe Test a Copy wizard, click Stop Testing.
l To roll back all of the writes made to the copy during image access, clickUndo Writes.
l To write directly to the copy storage click Direct Access. Any changesmade to the copy storage in direct access mode cannot be automaticallyundone, because when an image is directly accessed, the journal at the copyis deleted. However, direct access mode does not impose a limit to theamount of data that you can write to a copy storage.
Fail over to a copy and fail back to productionUse the Failover Wizard to guide you through the process of selecting a copy image,testing it, failing over, and (if need be) failing back to the production.
Before you begin
In environments containing multiple RecoverPoint for VMs systems, to lessen the loadon back-end storage arrays, best practice is to fail over the consistency groups of upto seven systems concurrently.Procedure
1. Select Protection > <Select a Consistency Group, Group Set, or VM> > Fail
Over icon .
The Failover Wizard is displayed.
2. In the Define a scope screen, select whether you want to test the consistencygroup or the group set. If there are no group sets, the option is grayed out.
3. In the Select image screen, select the image to access. You may want to startwith the last image that is known to be valid.
When selecting the image, you have the following options:
l Current image: The current image, as displayed in the wizard.
l The latest image: The last snapshot that was created at the production, andtransferred to the copy journal.
l An image from the image list: When selecting an image from the list, thenumber of snapshots available in the image list is limited. You can still selectsnapshots that are not in the image list by specific point in time. Duringsnapshot dilution, priority is given to bookmarked images.
l A specific point in time or bookmark: Allows you to perform a customizedsearch.
n Point in Time: Searches for a bookmark that was created at thespecified date and time.
Recovering VMs
50 RecoverPoint for Virtual Machines 5.2 Administrator's Guide

n Max Range: Searches for a bookmark that was created between thespecified number of minutes/hours before and after the specified Pointin Time.
n Bookmark: Searches for bookmarks with the specified text in thebookmark name.
n Exact: Searches for bookmarks that contain the exact text that wasentered in the Bookmark field.
n Image Type: Searches for the specified image type with the specifiedbookmark name.
4. In the Define testing network screen, to avoid IP conflicts between theproduction and copy VMs, best practice is to use a dedicated testing network.
When defining the testing network, you can:
l Create an isolated network for each group: RecoverPoint for VMs auto-provisions an isolated network for virtual machines in this group or group setto avoid IP conflicts between the production VM and the tested virtualmachine.
l Create an isolated network for each ESX: RecoverPoint for VMsautomatically creates an isolated network for each ESX splitter.
l Use my dedicated network: Manually select a preconfigured network. Notrelevant for group sets.
l Use preconfigured failover networks: RecoverPoint for VMs uses thepreconfigured failover networks for each copy VM. To view or edit failovernetworks, see Configuring copy VM failover networks on page 66. Notrelevant for group sets.
5. In the Ready to complete screen:
Clicking Hide keeps access to the image enabled at the specified copies andexits the wizard. After clicking Hide, you can re-open the wizard through theRecovery Activities widget in the system Dashboard, by selecting Back toWizard in the relevant recovery activity bar.
a. To ensure that the failover is configured correctly, review the displayedsummary information.
b. To define the Target Networks for failover, click Edit....
c. To roll back all of the writes made to the copy during image access, clickUndo Writes.
d. To write directly to the copy storage click Direct Access. Any changesmade to the copy storage in direct access mode cannot be automaticallyundone, because when an image is directly accessed, the journal at the copyis deleted. However, direct access mode does not impose a limit to theamount of data that you can write to a copy storage.
e. Once image access is enabled, click Fail Over to start failover.
Results
l The production and copy VM change roles, but the names do not change.Therefore, after failover, the new production VM will still be YourVMName.copyand the new copy VM name is still named YourVMName.
l The production journal becomes the copy journal and the copy journal becomesthe production journal.
Recovering VMs
Fail over to a copy and fail back to production 51

l The marking information in the production journal is deleted, the copy journal isdeleted, and the consistency group undergoes a full sweep synchronization.
After you finish
l You may want to add VMDKs to the new copy journal to ensure that you haveample space for copy testing. To add VMDKs, see Adding a new VMDK on page43.
l To fail back to the production, use the Failover Wizard to select an image at theproduction that predates the failover, and test the image before permanentlyselecting it as the image you want to fail back to.
l After failing back to the production, if you added VMDKs to the production journalafter failover, to reset the production journal to its original size (by default, 3GB)without triggering a full sweep click Protection > Consistency Groups, select thegroup's production copy, and click Reset Size in the Journal Volumes section.
Recover production from a copyCorrects file or logical corruption by rolling the production back to a previous point-in-time. Guides you through the process of selecting a copy image, testing it, andrecovering the production from the selected image.
Before you begin
The Recover Production Wizard screens contain the following options:
l Hide: Keeps access enabled to the image at the specified copy(s) and exits thewizard.
Note
After clicking Hide, you can re-open the wizard through the Recovery Activitieswidget in the system Dashboard, by selecting Back to Wizard in the relevantrecovery activity bar.
l Cancel: Disables access to the image at the specified copy(s) and exits thewizard.
l Recover Production: Starts failing over to the image at the specified copy(s).
Procedure
1. To recover production, in the vSphere Web Client home page, click theRecoverPoint for VMs Management icon > Protectiontab. Click the RecoverProduction icon:
The Recovery Wizard appears.
2. In the Define a Scope screen, select whether you want to test the consistencygroup or the group set. If there are no group sets, the option is grayed out.
3. In the Select an Image screen, select the image to access. You may want tostart with the last image known to be valid.
When selecting the image, you have the following options:
l Current image: The current image, as displayed in the wizard.
l The latest image: The last snapshot that was created at the production, andtransferred to the copy journal.
Recovering VMs
52 RecoverPoint for Virtual Machines 5.2 Administrator's Guide

l An image from the image list: When selecting an image from the list, thenumber of snapshots available in the image list is limited. You can still selectsnapshots that are not in the image list by specific point in time. Duringsnapshot dilution, priority is given to bookmarked images.
l A specific point in time or bookmark: Allows you to perform a customizedsearch.
n Point in Time: Searches for a bookmark that was created at thespecified date and time.
n Max Range: Searches for a bookmark that was created between thespecified number of minutes/hours before and after the specified Pointin Time.
n Bookmark: Searches for bookmarks with the specified text in thebookmark name.
n Exact: Searches for bookmarks that contain the exact text that wasentered in the Bookmark field.
n Image Type: Searches for the specified image type with the specifiedbookmark name.
4. In the Define testing network screen, define the testing environment byspecifying Testing Network options. Best practice to avoid IP conflicts betweenthe production VM and the copy VM, is to use a dedicated testing network.
When defining the testing network, you can:
l Create an isolated network for each group: RecoverPoint for VMs auto-provisions an isolated network for virtual machines in this group or group setto avoid IP conflicts between the production VM and the tested virtualmachine.
l Create an isolated network for each ESX: RecoverPoint for VMsautomatically creates an isolated network for each ESX splitter.
l Use my dedicated network: Manually select a preconfigured network. Notrelevant for group sets.
l Use preconfigured failover networks: RecoverPoint for VMs uses thepreconfigured failover networks for each copy VM. To view or edit failovernetworks, see Configuring copy VM failover networks on page 66. Notrelevant for group sets.
5. In the Verify image to access screen, verify that the image access detailsdisplayed are correct, and click Next.
6. In the Ready to complete screen, detailed information about the selected copyis displayed.
The Image Access Progress bar will indicate the progress of image access. Youcan close the wizard without interfering with the process. You can reopen thewizard from the Recovery Activities widget on the Dashboard. After imageaccess is enabled, the buffer progress bar indicates how long you can accessthe copy image before the image access log is full and all writes to the copy fail.
l To roll back all of the writes made to the copy during image access, clickUndo Writes.
l To write directly to the copy storage click Direct Access. Any changesmade to the copy storage in direct access mode cannot be automaticallyundone, because when an image is directly accessed, the journal at the copy
Recovering VMs
Recover production from a copy 53

is deleted. However, direct access mode does not impose a limit to theamount of data that you can write to a copy storage.
l Once image access is enabled, click Recover Production.
Results
l Host access to storage is blocked.
l The marking information in the production journal is deleted, the copy journal isdeleted, and the consistency group undergoes a full sweep synchronization.
l The group undergoes a short initialization process to synchronize the newproduction data at the copy.
Monitor recovery activitiesRecovery Activity Reports display each of the steps in a recovery activity, the timethat each step took, and the completion status of each step.
Before you begin
Every vRPA clock must be synchronized within its time zone to preventinconsistencies in the report timestamps.Procedure
1. Click the Reports tab.
2. Expand the consistency group tree in the left pane, and select the group thatyou want to monitor.
The Recovery Activities of the selected group are displayed in the right pane.
3. Select the recovery activity that you want to monitor.
l To export the selected activity report, click the Export to CSV button.
l To remove an activity report from the list, click the Remove button.
l To change the time zone, click Change to GMT or Change to local time.
The Activity Report for the selected activity is displayed. Expand the report toview each step. Up to 10 reports per consistency group are displayed.
Recovering VMs
54 RecoverPoint for Virtual Machines 5.2 Administrator's Guide

APPENDIX A
Managing RecoverPoint for VMs
This section describes how to use the RecoverPoint for VMs vSphere plugin tomanage the components of the RecoverPoint for VMs system, after initial systemconfiguration.
l Managing system licenses..................................................................................56l Managing system registration............................................................................56l Managing system support.................................................................................. 57l Managing system component registration......................................................... 58l Managing system protection policy templates....................................................61l Managing virtual machines.................................................................................62l Managing consistency groups............................................................................ 62l Managing copies................................................................................................ 65l Managing group sets..........................................................................................68
Managing RecoverPoint for VMs 55

Managing system licensesYou can remove a RecoverPoint for VMs license from the system or add a new license.
Before you begin
l For a detailed description of RecoverPoint for VMs licensing, see RecoverPoint forVMs licensing on page 73.
l To add a new license, you must first Create your license files on page 10.
Procedure
1. In the RecoverPoint for VMs vSphere plug-in, select Administration >vCenter Servers > Licensing.
2. Modify your system license configuration:
l To remove an existing license, select the license file and click Remove.
l To add a new license file, click Add. The Getting Started Wizard isdisplayed to guide you through the process. Follow the instructions in License and register RecoverPoint for VMs on page 12 to add the licence tothe system, and register the system.
Managing system registrationRegister your RecoverPoint for VMs system whenever you complete a RecoverPointsystem installation, connect vRPA clusters in a RecoverPoint system, or upgrade aRecoverPoint system.
Before you begin
A permanent RecoverPoint for VMs license must exist in the system, see Managingsystem licenses on page 56. System registration does not work with a temporarylicense.
Procedure
1. In the RecoverPoint for VMs vSphere plug-in, select Administration > vRPAClusters > Support.
2. Select a vRPA cluster.
3. In the Registration widget, enter the new registration settings for your vRPAcluster:
l Connect in method: The method that is used to allow remote connectivityto the RecoverPoint environment. Enabling this feature is recommended asit enables secure access to the RecoverPoint environment to gather logsand resolve issues as quickly as possible. If you already have a SecureRemote Services Gateway servicing other products, use the Secure RemoteServices Config Tool to add the RecoverPoint devices to the list of SecureRemote Services monitored environments. When the device is added, clickthe request update button to send the new device information to EMC andcontact the local Customer Engineer to approve the update. Refer to theSecure Remote Services Gateway Operation Guide for further instructions onConfig Tool usage. If you do not have a Gateway at the site, contact theAccount Manager to find out more about the benefits of Secure RemoteServices.
Managing RecoverPoint for VMs
56 RecoverPoint for Virtual Machines 5.2 Administrator's Guide

l Location: The city, state, and country where the customer is located.
l Sales order number: The customer or Customer Engineer should providethis information.
l Site (party) ID: The unique ID of the customer site. This value isautomatically inserted and taken from the license file and can only bemodified by contacting Customer Support.
l Activity type: The kind of activity you are performing (upgrade,installation).
l Resource performing this upgrade/installation: The role of the personperforming this upgrade or installation activity.
l Connect home method: The method that is used to send configurationreports and alerts to Dell EMC. Enabling this feature is recommended as itallows Dell EMC to pro-actively address issues within the RecoverPointenvironment, should they arise.
4. Click Register.
Results
A service request is opened and sends an email to the specified verification emailaddress from Customer Support to verify that the registration details were updatedsuccessfully in the Install Base.
After you finish
If your company does not have outside connectivity, export the registrationinformation to a CSV file and register by email or phone, as described in RegisterRecoverPoint by email or phone on page 75.
Managing system supportBefore you begin
l A permanent RecoverPoint for VMs license must exist in the system, see Managing system licenses on page 56. System reports and alerts do not work witha temporary license. Best practice is to keep both system reports and alerts, andcompression and encryption enabled.
l To transfer system reports and alerts using SMTP or Secure Remote Services,ensure that port 25 is open and available for SMTP traffic.
l To transfer system reports and alerts using FTPS, ensure that ports 990 and 989are open and available for FTPS traffic.
Procedure
1. In the RecoverPoint for VMs vSphere plug-in, select Administration > vRPAClusters > Support.
2. Select a vRPA cluster.
3. Select Enable pre-emptive support for RecoverPoint for VMs to providecommunication between the RecoverPoint for VMs system and the SystemReports database.
4. Define the transfer method:
l To transfer system notifications through an SMTP server, in the TransferMethod section, select SMTP. In the SMTP server address field, specifythe IP address or DNS name of the dedicated SMTP server, in IPv4 format.
Managing RecoverPoint for VMs
Managing system support 57

In the Sender address field, specify the email address to send the systemnotifications from.
l To transfer system notifications through the FTPS server, in the TransferMethod section, select FTPS.
l To transfer system notifications through the Secure Remote Servicesgateway, in the Transfer Method section, select ESRS. In the ESRSgateway IP address field, specify the IP address of the Secure RemoteServices gateway in IPv4 format..
5. Click Test Connectivity.
After you finish
Wait 10 minutes. Then, click Dashboard > Events Log and look for event 1020:"Failed to send system report".
l If this event does not appear in the Events Log, the system notificationsmechanism is correctly configured.
l If you do receive event 1020: Failed to send system report, checkwhether there is an issue with the selected method of transfer. If a problem exists,fix it, configure support, and click Test Connectivity again. If the problempersists, contact Customer Support.
Managing system component registrationThis section describes how to manage the registration of the components of yourRecoverPoint for VMs system, after the system has already been configured.
.After initial system configuration, manage the system configuration through theRecoverPoint for VMs vSphere plugin > Administration tab. Select a vRPA clusterto display the management options for that vRPA cluster.
For a detailed description of how to deploy the RecoverPoint for VMs system, see theRecoverPoint for Virtual Machines Installation and Deployment Guide..
For a detailed description of how to configure the RecoverPoint for VMs system, see Before you begin on page 9.
Managing vCenter Server registrationRegisters the vCenter Servers used to manage your production VMs and copy VMs, ata vRPA cluster.
Before you begin
l All vCenters that manage production VMs and copy VMs must be registered at therelevant vRPA cluster before you protect VMs.
l When a vCenter is registered, all ESX clusters hosted by the vCenter areautomatically registered, and a splitter is installed on all ESXs in the cluster.
Managing RecoverPoint for VMs
58 RecoverPoint for Virtual Machines 5.2 Administrator's Guide

l Best practice is to configure the vCenter Server to require a certificate, becauseonce RecoverPoint has read the certificate, it does not need further access to thelocation.
l The default certificate locations are:
n Windows 2003 Server:C:\Documents and Settings\All Users\Application Data\VMware\VMware VirtualCenter\SSL\rui.crt.
n Windows 2008 Server:C:\Users\All Users\Application Data\VMware\VMwareVirtualCenter\SSL\rui.crt.
For more information about the location of the security certificate, refer to "ReplacingvCenter Server Certificates in VMware vSphere 5.0, 5.5 and 6.0," available at www.vmware.com.
Procedure
1. In the RecoverPoint for VMs vSphere plug-in, select the Administration tab.
2. Access the vCenter registration information:
l To manage the registration of all vCenter servers in a RecoverPoint for VMssystem select vCenter Servers > Registration and use the Edit icon to editthe vCenter settings. Use this option to:
n Edit the vCenter server information, upload a new vCenter certificate, ordelete an existing certificate.
n Propagate the changes to the specified vCenter server at the specifiedvRPA cluster using the Apply button.
n Propagate the changes to all vRPA clusters in the system using theApply changes to all clusters button.
l To manage the registration of a vCenter server at a specific vRPA clusterselect vRPA Clusters > vCenter Servers, select a vRPA cluster, and:
n To edit the registration details of an existing vCenter server at theselected vRPA cluster, click the Edit icon.
n To register a new vCenter server at the selected vRPA cluster, clickAdd....
3. Click OK.
Results
The specified vCenter Server is registered at the specified vRPA cluster. All ESXclusters hosted by the vCenter are automatically registered with the specified vRPAcluster, a splitter is installed on all ESXs in the cluster, and replication is temporarilypaused for all relevant VMs while the splitter is being installed.
Managing ESX cluster registrationRegisters the ESX cluster of a production VM or copy VM, at a vRPA cluster.
By default, ESX clusters are automatically registered in RecoverPoint for VMs duringVM protection and copy addition. Use this procedure to register ESX clusters in therare case that the system cannot automatically register an ESX cluster.
Procedure
1. In the RecoverPoint for VMs vSphere plug-in, select Administration > vRPAClusters.
Managing RecoverPoint for VMs
Managing ESX cluster registration 59

2. Select the vRPA cluster at which you want to register ESX clusters.
3. Select the ESX Clusters tab.
4. Click Add.
5. In the Register ESX Clusters dialog box:
a. Select the ESX cluster that you want to register.
b. Click OK.
Results
The specified ESX cluster is registered at the specified vRPA cluster.
Note
When an ESX cluster of an unregistered vCenter Server is registered with a vRPAcluster, a splitter is installed on all ESXs in the cluster, and replication is temporarilypaused for all relevant VMs while the splitter is being installed.
Managing journal datastore registrationRegister the datastores that are to contain the history of the data that you want toprotect, at each vRPA cluster. Up to 15 shared datastores of ESX clusters runningvRPAs are automatically registered in RecoverPoint for VMs. Use this procedure toregister a datastore in the rare case that a datastore that you need is notautomatically registered.
NOTICE
When you Protect a virtual machine in a consistency group on page 16, the ProtectVMs Wizard will automatically select a datastore from the list of registereddatastores, unless you specify a specific registered datastore to use. RecoverPoint forVMs will attempt to create the journal on the selected datastore. If for any reasonjournal creation fails, the system will attempt to create the journal on a differentregistered datastore.
Procedure
1. Select Administration > vRPA Clusters > Related Objects.
2. Select the vRPA cluster at which you want to register datastores, and clickAdd... under the Journal Datastores widget.
The Register Journal Datastores dialog box is displayed.
3. In the Register Journal Datastores dialog box:
a. Select the vCenter Server that manages the datastores.
b. Select one or more datastores to register.
c. Click OK.
Results
The datastore is registered at the specified vRPA cluster.
Managing RecoverPoint for VMs
60 RecoverPoint for Virtual Machines 5.2 Administrator's Guide

Managing external host registrationDefines the external host on which user scripts are run during virtual machine start-upsequences.
Before you begin
l SSH must be installed on the external host.
l Only one external host can be configured per vRPA cluster.
l Define the external host before defining virtual machine start-up scripts in a virtualmachine startup Sequence. For information on how to define start-up scripts, see VM start-up sequence.
Procedure
1. Browse to the external host management tab.
Select Administration > vRPA Clusters > Related Objects. Select the vRPAcluster for which you want to define an external host, and click Edit... under theExternal Host widget.
2. In the Edit External Host Configuration dialog box, type the Name, IP, User,and Password of the external host for the selected vRPA cluster.
3. Optionally:
l To verify connectivity with the external host, click Check Connectivity .
l To unregister the external host from the specified vRPA cluster, clickRemove.
Managing system protection policy templatesYou can add a new protection policy template, or edit, import, or remove an existingpolicy template.
Procedure
1. Browse to the policy template management tab:
Select Administration > vRPA Clusters > vRPA System .
2. Manage the Policy Templates:
l To add a policy template, click Add.
l To modify the settings of an existing policy template, select a policytemplate and click Edit....
3. In the Add/Edit Policy Template dialog box:
l To configure a link policy template, type a name for the policy template and define the group or link policy settings.
l To configure a copy policy template, type a name for the policy template and define the copy policy settings.
4. Optionally:
l To delete a policy template, select a policy template and click Remove.
Managing RecoverPoint for VMs
Managing external host registration 61

l To import to all RPA clusters in the system, click Import, and select a policytemplate.
Managing virtual machinesThis section describes how to manage the protection of virtual machines, after theyare initially protected.
After initial protection, virtual machines are managed through the RecoverPoint forVMs vSphere plugin > Protection > Virtual Machines tab. Select a virtual machine todisplay the management options for that machine. For a detailed description of how toprotect virtual machines, see Protecting VMs on page 15.
Stop protecting a virtual machineUnprotect a VM to stop replication and remove it from its consistency group.
Procedure
1. In the RecoverPoint for VMs vSphere plug-in, select Protection > VirtualMachines.
2. Select the production VM that you want to stop protecting.
3. Click the Unprotect button to the top of the screen:
Results
Replication stops and the virtual machine is removed from its consistency group. Thecopy VM is not automatically deleted. If there are no other virtual machines in theconsistency group, the consistency group is removed. If other virtual machines remainin the consistency group, the journal is lost.
Managing consistency groupsThis section describes how to manage consistency groups, after they are created.
After initial creation, consistency groups are managed through the RecoverPoint forVMs vSphere plugin > Protection > Consistency Groups tab. Select a consistencygroup to display the management options for that group. For a detailed description ofconsistency groups and how to create them, see Protecting VMs on page 15.
Managing RecoverPoint for VMs
62 RecoverPoint for Virtual Machines 5.2 Administrator's Guide

Disabling or enabling a consistency groupDisabling a consistency group stops all replication, and deletes journals. Enabling aconsistency group starts replication and causes a full sweep.
Procedure
1. In the vSphere Web Client home page, click RecoverPoint for VMsManagement icon > Protection tab. Click Consistency Groups.
2. Select the consistency group that you want to enable or disable. Click theEnable Group icon or the Disable Group icon:
or
Managing the protection policies of groupsChange the protection policies of groups.
Procedure
1. In the RecoverPoint for vSphere plugin, select Protection > ConsistencyGroups.
2. Expand the list of consistency groups, and select the consistency group whosepolicies you want to change.
3. Click the Modify group policy link:
Modify the policy settings as required:
l Name: The name of the consistency group.
l Primary vRPA: The vRPA that you prefer to replicate the consistencygroup. When the primary vRPA is not available, the consistency group willswitch to another vRPA in the vRPA cluster. When the primary vRPAbecomes available, the consistency group will switch back to it.
NOTICE
If your vRPA cluster is the only vRPA cluster in the system, it is a singlepoint of failure in cases of disaster. Consider adding additional vRPAs to thiscluster to ensure high availability.
l Priority: Only relevant for remote replication when two or more consistencygroups are using the same Primary vRPA.Default = Normal
Managing RecoverPoint for VMs
Disabling or enabling a consistency group 63

Select the priority assigned to this consistency group. The prioritydetermines the amount of bandwidth allocated to this consistency group inrelation to all other consistency groups using the same Primary RPA.
4. Expand the group, select a group copy and click the Modify link policy link toedit the protection policy of the link between the production and the selectedcopy:
l Replication Mode
n Dynamic by Latency:
Note
Only relevant for synchronous replication mode.
Default =disabledWhen Enabled, RecoverPoint for VMs alternates between synchronousand asynchronous replication modes, as necessary, according to latencyconditions.
– Start async replication above: When the specified limit is reached,RecoverPoint for VMs automatically starts replicating asynchronously
– Resume sync replication below: When the specified limit is reached,RecoverPoint goes back to replicating synchronously.
n Dynamic by Throughput
Note
Only relevant for synchronous replication mode.
Default = disabledWhen enabled, RecoverPoint for VMs alternates between synchronousand asynchronous replication modes, as necessary, according tothroughput conditions.
– Start async replication above: When the specified limit is reached,RecoverPoint for VMs automatically starts replicating asynchronously
– Resume sync replication below : When the specified limit is reached,RecoverPoint goes back to replicating synchronously.
l RPO: Defines the maximum lag allowed on a link, and is set manually in MB,GB, writes, seconds, minutes, or hours.
l Compression: Only relevant for asynchronous remote replication.Default = enabledTo compress data before transferring it to a remote vRPA cluster, select alevel of compression. Compression can reduce transfer time significantly,but increases the source vRPA’s CPU utilization.
Enabling and disabling compression causes a short pause in transfer and ashort initialization.
l Enable Deduplication
Note
Only relevant for asynchronous remote replication.
Default =enabled
Managing RecoverPoint for VMs
64 RecoverPoint for Virtual Machines 5.2 Administrator's Guide

Select this to eliminate repetitive data before transferring the data to aremote vRPA cluster. Deduplication can reduce transfer time significantly,but increases the source vRPA’s CPU utilization.
Enabling and disabling deduplication causes a short pause in transfer and ashort initialization.
l Snapshot GranularityFor local replication: default = fixed per second.
For remote replication: default = dynamic.
n Fixed per write: Creates a snapshot for every write operation.
n Fixed per second: Creates one snapshot per second. Use this for localreplication.
n Dynamic: The system determines the snapshot granularity according toavailable resources. Use this for remote replication.
5. Click OK.
Results
The group protection policies are updated.
Managing copiesThis section describes how to manage copies, after they are initially created.
After initial creation, copies are managed through the RecoverPoint for VMsvSphere plugin > Protection > Consistency Groups tab. Select a copy to display themanagement options for that copy. For a detailed description of copies and how tocreate them, see Protecting VMs on page 15.
Modifying copy policiesTo edit the protection policy of a consistency group copy:
Procedure
1. In the vSphere Web Client home page, go to the RecoverPoint for VMsvSphere plugin > Protection tab and select Consistency Groups.
2. Expand the list of consistency groups and select the consistency group whosecopy protection policy you want to modify.
3. Expand the consistency group and select the copy whose protection policy youwant to modify.
4. To change the copy protection policy, click the Modify copy policy link:
l Journal CompressionDefault = none
Compresses snapshots in the journal so that more images can be saved inthe same journal capacity. Best practice is to compress the journal whenforcing synchronous replication. Compression impacts the CPU resources ofthe target vRPA of the consistency group.
Enabling journal compression while a consistency group is enabled results inthe loss of all snapshots in the journal.
l Maximum Journal LagDefault = unlimited
Managing RecoverPoint for VMs
Managing copies 65

Defines the maximum amount of snapshot data (in bytes, KB, MB, or GB)that can be held in the copy journal before distribution to the copy. In termsof RTO, this lag is the maximum amount of data that would bring the copyup to date with production.
l Required Protection WindowThe protection window indicates how far in time the copy image can berolled back.
To define a required protection window and to specify the length of therequired window, select this option. You will be notified if the currentwindow is less than the required window.
l Enable RecoverPoint Snapshot Consolidation - Select this option toenable automatic snapshot consolidation.Automatic snapshot consolidation cannot be enabled for a group that is partof a group set. When enabled, the Predicted Protection Window is notcalculated.
l Do not consolidate any snapshots for at leastDefault = 2 days
Define the period during which snapshot data is not to be consolidated. If nodaily or weekly consolidations are specified, the remaining snapshots areconsolidated monthly.
l Consolidate snapshots that are older than x to one snapshot per day fory daysDefault = 5 days
Snapshots are consolidated every 24 hours. Select Indefinitely toconsolidate all subsequent snapshots in 24-hour intervals.
n If Indefinitely is not selected, and no weekly consolidations are specified,the remaining snapshots are consolidated monthly.
n If Indefinitely is selected, weekly and monthly consolidations are disabled,and the remaining snapshots are consolidated daily.
l Consolidate snapshots that are older than x to one snapshot per weekfor y weeksDefault = 4 weeks
Snapshots are consolidated every 7 days.
Select Indefinitely to consolidate all subsequent snapshots in seven-dayintervals.
n If Indefinitely is not selected, the remaining snapshots are consolidatedmonthly.
n If Indefinitely is selected, monthly consolidations are disabled, and theremaining snapshots are consolidated weekly.
5. To load an existing copy policy template, click the Load copy policy fromtemplate link and select the template.
Configuring copy VM failover networksUse the following procedure to automatically associate the VM network adapters(vNICs) of a copy VM with specific port groups upon failover. Failover networks canbe configured during VM protection, through the Protect VMs Wizard, or after VMprotection, using this procedure.
Configured failover networks are made available for selection when Fail over to a copyand fail back to production on page 50, and when Test a copy on page 48.
Managing RecoverPoint for VMs
66 RecoverPoint for Virtual Machines 5.2 Administrator's Guide

Procedure
1. Select Protection > Consistency Groups.
2. Expand the list of consistency groups, expand the relevant group, and selectthe relevant copy.
3. Click Modify failover networks.
4. In the Failover Networks of <CopyName> screen, select a virtual machine todisplay its network adapters, and for each adapter, select the network to beused after failover.
Results
To use these settings, select preconfigured failover networks when defining thetesting network for Test a copy on page 48 and when defining the Target Networkbefore Fail over to a copy and fail back to production on page 50.
Managing the protection policies of cloud copiesModify the protection policies of cloud copies.
Procedure
1. In the RecoverPoint for VMs vSphere plug-in, select Protection >Consistency Groups.
2. Expand the list of consistency groups.
3. Expand the consistency group whose copy protection policies you want to edit.
4. Select the cloud copy.
5. Click the Modify copy policy link.
Edit the copy policy settings, as required:
l Copy Name: Default = copy<num>The name of the cloud copy. Best practice is to differentiate the cloud copyname from the production copy name.
l Retention Policy: Default = 5 daysDefines the period of time that snapshots will be retained in the cloud.Snapshots can be retained for a minimum of 1 day, and a maximum of 90days. Once every 24 hours, a temporary Retention Service EC2 instance islaunched in AWS to consolidate the snapshots of every copy whoseretention policy has expired.
6. Click the Modify link policy link, and edit the settings, as required:
l RPO: Default = 90 minutesThe maximum data lag that is required between the production copy and thelatest snapshot uploaded to the S3 bucket. If the specified RPO is exceeded,
Managing RecoverPoint for VMs
Managing the protection policies of cloud copies 67

a warning is displayed in the The RecoverPoint for VMs Dashboard on page26. RPO can be defined in Minutes, Hours, or Days.
Note
Specify an RPO value that is higher than the specified snap replicationInterval. Best practice is to specify an RPO value that is 1.5 times thespecified snap replication Interval. For example, if you require an RPO of 1hour, specify a snap replication interval of 90 minutes.
l Snap Replication: Default = Periodic at 1 hour intervalsSets the periodic Interval between snapshots in Minutes, Hours, or Days.The minimum interval value is 15 minutes and the maximum interval value is 7days. A new snapshot starts after the specified interval has passed since theprevious snapshot was started. If the time interval has passed and theprevious snapshot is incomplete, the next snapshot will start as soon as theprevious one has completed.
Note
Specify a snap replication Interval value that is lower than the specifiedRPO value. Best practice is to specify an RPO value that is 1.5 times thespecified snap replication Interval. For example, if you require an RPO of 1hour, specify a snap replication interval of 90 minutes.
After you finish
See Managing the protection policies of groups on page 63 for protection policiesspecific to groups.
Managing group setsThis section describes how to manage group sets, after they are created.
After initial creation, group sets are managed through the RecoverPoint for VMsvSphere plugin > Protection > Group Sets tab. Select a group set to display themanagement options for that group set. For a detailed description of group sets andhow to create them, see Create a group set on page 35.
Modifying a group setProcedure
1. Click Protection > Group Sets.
2. Select the group set that you want to modify.
3. Click the Edit Group Set icon:
4. In the Edit Group Set dialog box.
a. If required, modify the name of the group set.
b. Select the consistency groups to add or remove from the group set.
c. Enable or disable parallel bookmarking using the Enable ParallelBookmarking and Frequency fields. If any of the groups in the group set are
Managing RecoverPoint for VMs
68 RecoverPoint for Virtual Machines 5.2 Administrator's Guide

part of another group set that has parallel bookmarking enabled, you cannotenable parallel bookmarking for that group set.
5. Click OK.
Removing a group setProcedure
1. Click Protection > Group Sets.
2. Select the group set to remove.
3. Click the Remove Group Set icon:
Managing RecoverPoint for VMs
Removing a group set 69

Managing RecoverPoint for VMs
70 RecoverPoint for Virtual Machines 5.2 Administrator's Guide

APPENDIX B
Troubleshooting
Use the following information, features and tools to troubleshoot your RecoverPointfor VMs system.
l Finding the vRPA cluster management IP.......................................................... 72l Collecting system information............................................................................ 72l Collecting RecoverPoint for VMs splitter logs.................................................... 73l Recovering from a cluster disaster..................................................................... 73l RecoverPoint for VMs licensing......................................................................... 73l Register RecoverPoint by email or phone...........................................................75l Creating VMkernel ports.................................................................................... 75l Load balancing................................................................................................... 76l Manual copy VM network configuration (RE-IP)................................................77l Copy VM network configuration guidelines........................................................ 79l Changing the network adapter configuration of a protected VM........................84
Troubleshooting 71

Finding the vRPA cluster management IPDisplays the vRPA cluster management IP of a specific vRPA cluster.
Procedure
1. Select Administration > vRPA Clusters > vRPA System
2. Select the vRPA cluster.
3. Note the vRPA cluster management IP of the selected vRPA cluster.
Collecting system informationCollecting system information is only relevant in support cases, and should only beperformed when instructed to do so by Customer Support. Use the RecoverPoint forVMs vSphere plugin to collect system information, and retrieve it from the vRPAcluster, or a specified FTP server.
Procedure
1. In the vSphere Web Client home page, select Administration > vRPAClusters > Log Collection.
2. Under Collection Period, define a date and time for the start and end of thecollection process.
3. Optionally, click Change to GMT to change the collection time display to GMT.
GMT is not adjusted for daylight savings time. Although the system informationof the past 30 days is available for collection, only 3 days of system informationcan be collected at a time.
4. Select the vRPA Clusters from which to collect the logs.
5. Optionally, select Include core files.
Core files might be large. Subsequently, including these files in the collectionprocess could substantially increase collection time.
6. By default, Full system log collection is selected. If you are instructed to do soby Customer Support, use Advanced to select the specific logs that you wantto collect.
7. Optionally, select Copy the output file(s) to an FTP server and define theFTP server settings.
8. Click Start.
Results
Be patient. The collection process can take awhile, depending on the amount of databeing collected. After the collection process is complete, the results are displayed.
After you finish
If you selected the Copy the output file(s) to an FTP server checkbox, retrieve theoutput file from the specified FTP server.
Otherwise, click the relevant link in the Output Files on vRPA Cluster column toretrieve the vRPA cluster log files:
Troubleshooting
72 RecoverPoint for Virtual Machines 5.2 Administrator's Guide

1. At the login prompt, type boxmgmt as the User Name and enter the Password forthe boxmgmt user (Default password is boxmgmt).
2. Right-click the file and select Save link as... to download the file to the localvirtual machine.
3. Open the file using a data compression utility.
Collecting RecoverPoint for VMs splitter logsRecoverPoint for VMs splitter logs are in the ESXi logs. To export the ESXi systemlogs, use the following procedure.
Procedure
1. In the vSphere Web Client, select an ESXi host and click Actions.
2. Select All vCenter Actions > Export System Logs....
3. In the Export Logs screen, specify which system logs are to be exported. Ifrequired, select the Gather performance data option and specify aduration and interval.
4. Click Generate Log Bundle.
5. Click Download Log Bundle.
6. Upload the logs to the FTP site.
For information on how to upload logs for VMware products, see http://kb.vmware.com/selfservice/search.do?cmd=displayKC&docType=kc&docTypeID=DT_KB_1_1&externalId=1008525
Recovering from a cluster disasterAfter a full cluster disaster or a switch disaster, it may take 10 minutes or more for allthe components of the vRPA system to restart, reconnect, and restore full operation.
RecoverPoint for VMs licensingRecoverPoint for VMs supports two types of licensing models; VM-based licensingand socket-based licensing .
VM-based licensingWith VM-based licensing, licenses are based on the number of supported VMs pervCenter server. Only production VMs are counted in the number of supported VMsper vCenter server. Licensing is enforced using the vCenter Server ID.
All vCenter servers must be registered in RecoverPoint for VMs before their licensescan be added. vCenter server registration is performed in the RecoverPoint for VMsDeployer UI. Refer to the RecoverPoint for VMs Installation and Deployment Guide formore information.
When you reach the maximum number of VMs that the license supports for eachvCenter server, you cannot protect new VMs or enable disabled consistency groups.However, replication of existing VMs and consistency groups continues.
Failover has no effect on the license.
Troubleshooting
Collecting RecoverPoint for VMs splitter logs 73

Socket-based licensingWith socket-based licensing, licenses are based on the number of physical CPUsockets in the ESXi servers that host the production VMs. A VM does not 'belong' to aspecific socket.
When you reach the maximum number of sockets that the license supports for eachvCenter server, you cannot protect new VMs or enable disabled consistency groups.However, replication of existing VMs and consistency groups continues.
As with VM-based licensing, failover does not affect the socket-based license.However, vMotion of production VMs does affect the license and may cause a licenseviolation due to an increase in the number of sockets being used. ESXi servers thathost the production VMs are the ones that count in a socket-based license. To avoidlicense violations, it is a best practice to license all ESXi servers of the ESXi cluster.
Adding a socket-based license to a system with VM-based licensesWhen using VM-based licensing, license capacity is measured by the number of VMs.For example, when you view the license capacity in the UI, it may be listed as:
Capacity = 30 VMs
When using socket-based licensing, license capacity is measured by the number ofsockets. For example, the license capacity may be listed as:
Capacity = 2 sockets
When a socket-based license is installed on a RecoverPoint for VMs system that hasVM-based licenses, the system automatically converts VM-based licenses to socket-based licenses at a ratio of 15 VMs per socket. In this case, the license capacity wouldbe listed as:
Capacity = 30 VMs (2 sockets)
In cases where the ratio does not result in an even conversion, the value is rounded up.For example:
Capacity = 31 VMs (3 sockets)
Since licenses are applied per vCenter, and not per vRPA cluster, multiple vRPAclusters with VMs or CPU sockets may count towards the same license.
License subscriptionsVM- and socket-based licenses may be installed as subscriptions. Unlike a permanentlicense, a subscription license has a start date and an end date. The system sends analert beginning 30 days before license expiration to indicate the number of daysremaining. Subscription and permanent licenses may coexist.
You can install a subscription license before its start date. It automatically becomesactive on the start date.
Troubleshooting
74 RecoverPoint for Virtual Machines 5.2 Administrator's Guide

Register RecoverPoint by email or phoneIf your company is without external connectivity, and you cannot register yourRecoverPoint for VMs system online, you can also register by phone.
l Register the RecoverPoint system after:
n Installing a RecoverPoint system
n Connecting RPA clusters in a RecoverPoint system
n Upgrading a RecoverPoint system
l The registration process is incomplete if valid values are not provided for everyfield in the post-deployment form.
Procedure
1. Gather the required information.
l Download the post-deployment form:
a. Access https://support.emc.com
b. Search for the term Post-Deployment Form
c. Download and fill out the RecoverPoint and RecoverPoint for VMs Post-Deployment Form, for every vRPA cluster
l Export the RecoverPoint registration information, for every vRPA cluster:
a. Select Administration > vRPA Clusters.
b. Select the vRPA cluster for which you want to export a post-deploymentform, and then click Support.
c. In the Registration pane, click the Export to CSV button and save the fileto the computer.
2. Send the information to the Install Base group:
l Customers and partners: Email the post-deployment form to the Install Basegroup at [email protected].
l Employees:
n (Preferred) Use the IB Portal at http://emc.force.com/BusinessServices.
n Call in the information to the Install Base group at 1-866-436-2411 –Monday to Friday (normal Eastern Time Zone working hours).
Creating VMkernel portsIf before clicking Protect in the Protect VMs Wizard you received a warningregarding a potential communications problem, and after clicking Protect, transfer forthe consistency group does not eventually reach the Active status, you may need tocreate VMkernel ports for all ESXi hosts in the cluster.
Procedure
1. Select Administation > vRPA Clusters > ESX Clusters, and click the Settingsicon for an ESXi cluster.
Troubleshooting
Register RecoverPoint by email or phone 75

2. In the Create VMkernel Ports dialog box, specify the settings, including arange of available IPs, for creating VMkernel ports for all ESXi hosts in thecluster.
3. Click OK
Load balancingLoad balancing is the process of assigning preferred vRPAs to consistency groups sothat the preferred vRPA performs data transfer for that group. This is done to balancethe load across the system and to prevent the system from entering a high-load state.
Perform load balancing:
l When a new consistency group is added to the system. Wait 1 week after the newgroup is added to accumulate enough traffic history before performing loadbalancing.
l When a new vRPA is added to a vRPA cluster. Perform load balancing immediatelyafter the vRPA is added.
l If the system enters high load frequently. When load balancing is required, theevent logs display a message indicating so. When you see this message, performload balancing.
l Periodically, to ensure that the system is always handling distributing loads evenly.A script can be created to periodically perform load balancing.
Procedure
1. To balance the load on the vRPAs, use an ssh client to connect to the vRPAmanagement IP address, and type the RecoverPoint username andpassword to log in to the CLI.
2. Run the balance_load command to balance the load. To view commandparameters that can refine the search, run: balance_load ?
Troubleshooting
76 RecoverPoint for Virtual Machines 5.2 Administrator's Guide

Manual copy VM network configuration (RE-IP)Manually configure your copy VMs if you have upgraded from RecoverPoint for VMs5.0.1 or earlier and are already using glue scripts, or when your VMs operating systemdoes not support Automatic copy VM network configuration (Re-IP) on page 39.
The following diagram illustrates how it works:
Note
VMware Tools must be installed on a virtual machine copy's production VM forautomatic virtual machine network re-configuration. For virtual machines runningOpen VM Tools versions lower than 9.10, network configuration is not supportedunless deployPkg has been manually installed. See VMware KB article 2075048 fordetailed information on how to install deployPkg.
To manage a copy VM network configuration:
1. Create glue scripts or download the relevant glue script samples from https://download.emc.com/downloads/DL66792.
Troubleshooting
Manual copy VM network configuration (RE-IP) 77

Table 2 Glue script samples
Name Language TargetOS
Capabilities Prerequisites
glue_script_win.bat Windowsbatch
MicrosoftWindows2008 and2012
Modificationof IPv4,Subnet Mask,Gateway
l VMware Toolsthat are installedon each protectedVM
l Renameglue_script_win_this_bat_file.txt toglue_script_win.bat
glue_script_win.py Python MicrosoftWindows2008 and2012
Modificationof IPv4, IPv6,Subnet Mask,Gateway,DNS servers,DNS Suffix
l VMware Toolsthat are installedon each protectedvirtual machine
l Python 2.7
glue_script_rhel.bash
BASH LINUX Modificationof IPv4,Subnet Mask,Gateway
l VMware Toolsthat are installedon each protectedvirtual machine
l DNS Server and
Suffix are onlyapplied in Win2008
glue_script_rhel.py Python LINUX Modificationof IPv4, IPv6,Subnet Mask,Gateway,DNS servers,DNS Suffix
l VMware Toolsthat are installedon each protectedvirtual machine
l Python 2.7
2. Copy the relevant glue scripts to the relevant production VM:
l For virtual machines running a Windows operating system:
n Place the glue script in a directory that is accessible by all authorized users.
n To configure the script to run on startup, open the Windows TaskScheduler and select Action > Create Basic Task.... Select When thecomputer starts as the task trigger and Start a program as the taskaction. Select the glue script, set the Start in directory to the directorywhere you want to place the glue script output, select Open the Propertiesdialog for this task when I click Finish and finish creating the task.In the Properties dialog box that is displayed, select Run with highestprivileges, click Change User or Group..., type SYSTEM in the Objectname to select field, and click OK.
Troubleshooting
78 RecoverPoint for Virtual Machines 5.2 Administrator's Guide

n To configure the glue script to run on login, add the glue script path to theregistry by creating a string that is called IP in the HKEY_LOCAL_MACHINE\SOFTWARE\Microsoft\Windows\CurrentVersion\Run\ registry pathcontaining the full path to the script. For example: C:\my_directory\glue_script_win.bat.
l For virtual machines running a Linux operating system, add the relevant gluescript to the rc.local file under /etc/rc.d.
3. Perform Automatic copy VM network configuration (Re-IP) on page 39.
4. Customize the glue scripts on the production VMs until they run correctly on thecopy VMs.
Copy VM network configuration guidelinesUse the following guidelines for:
l Automatic copy VM network configuration (Re-IP) on page 39
l Manual copy VM network configuration (RE-IP) on page 77
Table 3 Virtual machine network settings available through the GUI
Setting Description Guidelines
(VM) OperatingSystem
The guest operatingsystem of thespecified VM.
l Not customizable.
l Automatically populated by the system.
l Possible values are Windows, Linux, orUnknown.
(VM) Host Name The hostname of thespecified VM.
l Only mandatory for virtual machines witha Linux operating system.
l Customizable.
l Value can be retrieved from production
VM using Get Value from Productionor Get All Values from Production.
(VM) DNS Domain The DNS domain forthe specified VM.
l Only relevant (and mandatory) for virtualmachines with a Linux operating system.
l Value should be in the formatexample.company.com.
(VM) DNSServer(s)
The global IP addressthat identifies one ormore DNS servers forall adapters of thespecified VM.
l Only relevant for virtual machines with aLinux operating system.
l Customizable.
l Can be left blank.
l This setting applies to all virtual networkadapters of the specified VM.
l Separate multiple values with a semicolon(;).
Troubleshooting
Copy VM network configuration guidelines 79

Table 3 Virtual machine network settings available through the GUI (continued)
Setting Description Guidelines
l Value can be retrieved from production
VM using Get Value from Productionor Get All Values from Production.
(VM) DNSSuffix(s)
The global settings ofthe suffixes for theDNS servers of alladapters on bothWindows and Linuxvirtual machines.
l Customizable.
l Can be left blank.
l Value can be retrieved from production
VM using Get Value from Productionor Get All Values from Production.
(VM) NetworkConfigurationMethod
The method by whichthe system configuresnew virtual networkadapters (NICs) forthe specified virtualmachines.
l Possible values are Automatic and Useglue scripts.
l Default is Automatic.
l When Automatic, RecoverPoint for VMsautomatically configures the virtualmachine copy network.
l Best practice is to leave this setting as is.However, to use glue scripts (forexample, because you upgradedRecoverPoint for VMs and already
implemented glue scripts), ensure Useglue scripts is selected and follow theinstructions for Manual copy VM networkconfiguration (RE-IP) on page 77.
Adapter ID ID of the virtualnetwork adapter tocustomize.
l When Network ConfigurationMethod is set to Automatic, this value isnot required, and should be left blank. Anyentered value is ignored by the system.
l Mandatory when NetworkConfiguration Method is set to Useglue scripts.
l To find this value:
n Windows - Type the interface index,which can be found by running routeprint.
The adapter ID should be setaccording to the IDX value that isdetermined by running NetShInterface IPv4 Show Interfaces on
the Windows computer anddetermining the correct adapter.
n Linux - The adapter ID should be setaccording to the Ethernet port value.Type the sequential number (1-based)
Troubleshooting
80 RecoverPoint for Virtual Machines 5.2 Administrator's Guide

Table 3 Virtual machine network settings available through the GUI (continued)
Setting Description Guidelines
of the adapter, and NOT the NICnumber.For example, eth0 = 1, eth1 = 2. If youhave eth2 and eth3, and want toupdate the network settings of thesecond one, set Adapter ID = 2.
(Adapter) IPAddress
IPv4 address for thisvirtual networkadapter.
l Can contain either a static IPv4 addressor DHCP string.
l Can be left blank when using IPv6.
l Define one IPv4 address, one IPv6address, or one of each, for the samevirtual network adapter. Entering multipleIPv4 or IPv6 addresses for the samevirtual network adapter is not supported.
l Value can be retrieved from production
VM using Get Value from Productionor Get All Values from Production.
(Adapter) Subnet IPv4 subnet mask forthis virtual networkadapter.
l Mandatory when an IP Address isentered.
l Can be left blank when using IPv6.
l Value can be retrieved from production
VM using Get Value from Productionor Get All Values from Production.
(Adapter)Gateway(s)
One or more IPv4gateways for thisvirtual networkadapter.
l Mandatory when an IP Address isentered.
l Can be left blank when using IPv6.
l Separate multiple values with a semicolon(;).
l Value can be retrieved from production
VM using Get Value from Productionor Get All Values from Production.
(Adapter) IPv6Address
IPv6 address for thisvirtual networkadapter.
l Can contain either a static IPv6 addressor it's DHCP string.
l Can be left blank when using IPv4.
l Define one IPv4 address, one IPv6address, or one of each, for the samevirtual network adapter. Entering multipleIPv4 or IPv6 addresses for the samevirtual network adapter is not supported.
Troubleshooting
Copy VM network configuration guidelines 81

Table 3 Virtual machine network settings available through the GUI (continued)
Setting Description Guidelines
l Value can be retrieved from production
VM using Get Value from Productionor Get All Values from Production.
(Adapter) IPv6Subnet PrefixLength
IPv6 subnet mask forthis virtual networkadapter.
l Customizable.
l Can be left blank when using IPv4.
l Value can be retrieved from production
VM using Get Value from Productionor Get All Values from Production.
(Adapter) IPv6Gateway(s)
One or more IPv6gateways for thisvirtual networkadapter.
l Customizable.
l Mandatory when an IPv6 format IPAddress is entered.
l Can be left blank when using IPv4.
l Separate multiple values with a semicolon(;).
l Value can be retrieved from production
VM using Get Value from Productionor Get All Values from Production.
(Adapter) DNSServer(s)
IP address of one ormore DNS server(s)for this virtualnetwork adapter.
l Can be left blank.
l Can contain one or more IPv4 DNSservers for each virtual network adapter(NIC).
l Applies only to the configured adapter
when a value other than Adapter ID 0 is
defined.
l Separate multiple values with a semicolon(;).
l Value can be retrieved from production
VM using Get Value from Productionor Get All Values from Production.
(Adapter)NetBIOS
Whether or not toactivate NetBIOS onthis virtual networkadapter.
l Cannot be left blank.
l Only relevant for virtual machines runninga Windows operating system.
l Default is Enabled.
l Net BIOS should be enabled.
l Valid values are DISABLED, ENABLED,
ENABLED_VIA_DHCP.
(Adapter) PrimaryWINS
Primary WINS serverof this virtual networkadapter.
l Relevant for windows virtual machinesonly.
l Customizable.
Troubleshooting
82 RecoverPoint for Virtual Machines 5.2 Administrator's Guide

Table 3 Virtual machine network settings available through the GUI (continued)
Setting Description Guidelines
l Can be left blank.
(Adapter)Secondary WINS
Secondary WINSserver of this virtualnetwork adapter.
l Relevant for windows virtual machinesonly.
l Customizable.
l Can be left blank.
Table 4 Network settings only available through the CSV file
Setting Description Guidelines
CG ID The consistencygroup ID in theRecoverPoint for VMssystem.
l Do not modify this field.
l Automatically populated by the system.
l Not customizable.
l Can be left blank.
CG Name Name of theconsistency group inthe RecoverPoint forVMs system.
l Automatically populated by the system.
l Must be the name associated with thespecified consistency ID in RecoverPointfor VMs.
l Customizable.
l Can be left blank.
VC ID The vCenter ServerID in VMware.
l Do not modify this field.
l Automatically populated by the system.
l Not customizable.
l Can be left blank.
VC Name The name of thevCenter Serverhosting the virtualmachine.
l Customizable.
l Can be left blank.
VM ID The virtual machine IDthat vCenter Serveruses.
l Do not modify this field.
l Automatically populated by the system.
l Not customizable.
l Cannot be left blank.
VM Name The name of thevirtual machine.
l Customizable.
l Automatically populated by the system.
l Can be left blank.
NIC Index invCenter
The index of theadapter in the orderof virtual network
l Customizable.
Troubleshooting
Copy VM network configuration guidelines 83

Table 4 Network settings only available through the CSV file (continued)
Setting Description Guidelines
adapters (NICs) inthe virtual machinesettings of thevCenter web client.
l Cannot be left blank.
l Enter a numeric value.
l Enter a value of 0 to define the first
virtual network adapter in the vSphereWeb Client. Enter a value of 1 to define
the next network adapter.
Changing the network adapter configuration of a protectedVM
When the virtual network adapter (NIC) configuration of a production VM changes,any pre-existing copy VM network configuration may be adversely affected and mayrequire re-configuration before it works. After adding or removing NICs from aprotected virtual machine, re-configure the copy VM network using Automatic copyVM network configuration (Re-IP) on page 39. If you are already using glue scripts,perform Manual copy VM network configuration (RE-IP) on page 77.If the NIC configuration of a production VM changes and the change is not reflected inthe copy VM, ensure Hardware changes is enabled and enable image access by Testa copy on page 48.
Troubleshooting
84 RecoverPoint for Virtual Machines 5.2 Administrator's Guide

GLOSSARY
A
account ID Part of a customer's account settings. The account ID is a unique identifier of aRecoverPoint for VMs customer account.
account settings The details that comprise a RecoverPoint customer account. The account settings arecomprised of:
l One account ID
l One installation ID per installed RecoverPoint for VMs system
l One software serial ID per vRPA cluster
l A RecoverPoint for VMs license key
ACK To send an acknowledgment, which is a signal to confirm receipt of data. Insynchronous replication, an acknowledgment must be sent before the next host writecan be made to the production storage. See also acknowledgment
action regulation A state that a copy can be placed into when the system quickly changes between twostates for a set period of time. See also control action regulation
activated license A RecoverPoint license for which an activation key has been defined. An activatedlicense can be a temporary license or a permanent license.
activation key A code that is used to activate or re-activate the RecoverPoint license, and isgenerated per installation ID. You get this code when you type the account ID andRecoverPoint license key into the RecoverPoint licensing server, and then request anactivation code. See also activation code
alert rule The rules that specify the events on which the system alert mechanism should sendnotifications, and the desired sending frequency. For each alert rule, you can specifythe following:
l Event topic (Site, RPA, Group, Splitter, or Management)
l Event level (Info, Warning, or Error)
l Event scope (Detailed or Advanced)
l Event type (Immediate, Daily)
l Email address (of alert recipient)
array throttling The act of controlling the write activity. RecoverPoint’s array throttling mechanismenables users to limit the storage read-rate of RPAs in a RecoverPoint cluster, allowingthe storage to handle the I/O rate during initialization.
RecoverPoint for Virtual Machines 5.2 Administrator's Guide 85

asynchronous replication A replication mode that uses ACKs from the local RPA to confirm data transfer. See also async, async replication
B
bookmark A label that is applied to a snapshot (PIT) so that the snapshot can be explicitly called(identified) during recovery processes (for example, during image access).
bottleneck One of a predefined set of potential types of RecoverPoint performance-relatedproblems resulting from a high write-rate (high-load), poor storage or journalperformance, or problems in communication between RPAs.
C
call home events A proactive online service capability that is built into RPAs to enable them tocontinuously monitor their own health, and the health of the RecoverPoint system,using a pre-defined set of event-filtering rules. If a serious problem arises, the call homeevent mechanism automatically opens a service request with Customer Support. Theservice request enables Customer Support to proactively engage the relevantpersonnel, start working with the relevant parties, or use a configured Secure RemoteServices gateway to resolve the issue as soon as possible.
CLI The RecoverPoint Command Line Interface. Using the RecoverPoint CLI, managementand monitoring activities can be run textually, interactively, or through scripts. Forinformation about the command line interface, see the RecoverPoint Command LineInterface Reference Guide.
cluster control The process that manages an RPA cluster.
cluster management IP A virtual, floating IP address assigned to the vRPA that is currently active (runs thecluster control).
compression The process of encoding data to reduce its size. RecoverPoint uses losslesscompression (compression using a technique that preserves the entire content of theoriginal data, and from which the original data can be reconstructed).There are two kinds of compression in RecoverPoint:
l Journal compression – Used to compress the data in the journal of each copy, andconfigured through each copy’s general settings.
l WAN compression – Used to compress consistency group data before transferringit over the WAN, and configured through the consistency group bandwidthreduction policy.
consistency group A logical entity that constitutes a container for virtual machines and all their copies,used to replicate virtual machine application data to a consistent point in time.
copy A logical entity that constitutes all of the data that is copied and used to protect theproduction data, at a specific location. A copy includes the replicated data, and a journalto hold the copy history.
Glossary
86 RecoverPoint for Virtual Machines 5.2 Administrator's Guide

current image The image that is either currently being distributed to the copy storage (typically), orthat has been distributed to the copy storage (when no more writes are received by thehost and all of the snapshots in the journal have been distributed to the storage).Also known as: latest image, latest snapshot, current image, current snapshot, currentPIT
D
delta marking The process of writing marking information that is used when the link between theproduction and a copy of a consistency group is down, and host writes cannot be savedas snapshots in the copy journal. In this case, a short initialization process is triggeredto synchronize the copy volumes with their production volumes, using the markinginformation. At least one RPA at the production RPA cluster must be available formarking to occur. See also marking on RPA, hotspots, write-folding
direct access An image access mode in which hosts write directly to the copy storage. These changescannot be automatically undone, because when an image is directly accessed, thejournal at the copy is deleted. However, direct access mode does not impose a limit tothe amount of data that you can write to a copy storage.
E
ESRS EMC Secure Remote Support (ESRS) is a server and set of services that allowcustomer support to remotely access vRPAs to collect system information and providepre-emptive support.
event A notification that a change has occurred in the state of a managed device orcomponent. In some cases, the change indicates an error or warning condition for thedevice or component. Multiple events can occur simultaneously on a single monitoreddevice or service module. A single incident can generate events across multiple systemcomponents. Events in RecoverPoint have a level (Info, Warning, Error), scope(Normal, Detailed, Advanced), and a topic (All, Cluster, RPA, Group, Splitter,Management).
F
failback Reversal of failover, that is, when the production and copy resume their original roles inthe replication process after a failover.
failover The process of changing the replication direction between the production and the copy.
flipover When a non-preferred RPA (at the same site) takes over replication responsibilities andis used to transfer the data of a consistency group, instead of the consistency group’spreferred RPA.Also known as: switchover
full sweep An initialization process that is performed on all of the volumes in a consistency group.
Glossary
RecoverPoint for Virtual Machines 5.2 Administrator's Guide 87

G
group set A collection of consistency groups to which the system applies parallel bookmarks at auser-defined frequency. Group sets are useful for consistency groups that aredependent on one another or that must work together as a single unit.
guest operating system The operating system running on a virtual machine. Each virtual machine can runoperating systems such as Windows, Linux, Solaris, or Netware. Applications are run onthe virtual machine unmodified.
H
high-load A system state that indicates resource depletion during replication. There are two kindsof high-loads in RecoverPoint:
l Permanent high-loads – RecoverPoint stops and waits for a user action in order tocome out of high-load (not relevant in the RecoverPoint for VMs cloud solution).
l Temporary high-load – RecoverPoint tries to recover from the high-load and keepstrying until the condition that triggered the high-load changes.
hot spot A single disk location to which multiple writes have been written.
I
image All of the snapshots that, together, constitute a specific point in time. An imageconsists of snapshots in the journal, and the data that has already been transferred tothe copy storage.
image access A user-triggered operation that is performed on a copy journal to enable read/writeaccess to a selected PIT at a copy.
image access log The dedicated area of the copy journal that is used to hold all of the information of thewrites to the copy that occur while image access is enabled.
initialization The process that is used to synchronize the data of the copy volumes with theircorresponding production volumes, and ensure consistency. Generally, allsynchronization processes are called Initialization. See also synchronization
initialization snapshot The first consistent snapshot in a copy journal. Whenever an initialization processcompletes, this initialization snapshot is created.
Install Base An database that is used to manage and support equipment installed at customer sites.When new equipment is installed, it is important to update the database with the newinformation and IDs of the newly installed equipment. The information in the installationbase is also used to enable the RecoverPoint system report mechanism.
Glossary
88 RecoverPoint for Virtual Machines 5.2 Administrator's Guide

J
journal One or more volumes that are dedicated on the storage at each copy in a system, tohold the production data history. Journals are defined per copy, and can consist ofmultiple volumes.
journal history The PIT images (or snapshots) in the journal.
journal lag The amount of data (represented by snapshots) in the copy journal that has not yetbeen distributed to the copy storage.
journal loss The loss of an entire copy journal and all of the data in it.
journal volume The volumes that make up a journal. Each journal can be composed of one or morejournal volumes.
L
lag The current RPO of the consistency group. In RecoverPoint, lag starts being measuredwhen a write made by the production host reaches the local RPA, and stops beingmeasured when the write reaches either the target RPA, or the target journal(depending on the transfer_by_non_preferred parameter of the set_policy CLIcommand).
latency The number of milliseconds or microseconds that it takes for data to get from the localvRPA to the vRPA or journal at the remote vRPA cluster.
latest image The most current image available in the journal. The last snapshot that was created atthe production and transferred to the journal at the copy. See also latest snapshot
link The communication pipe through which data is transferred between the production anda copy. See also pipe
load settings A user-triggered operation that is performed to recreate the system configuration. Thisoperation loads a configuration file that is created from the output of thesave_settings CLI command, which displays the current system settings in aconfiguration settings file.
local replication A replication configuration that continuously captures or tracks modified data andreplicates them to a copy at the local RPA cluster, storing changes independent of theprimary data, and enabling recovery from any point in the past. Local replicationprovides fine granularities and restorations to any point in time. See also local recovery
Glossary
RecoverPoint for Virtual Machines 5.2 Administrator's Guide 89

M
maintenance mode The RecoverPoint for VMs vSphere system enters maintenance mode when undergoingany of the following operations:
l minor version upgrade
l major version upgrade
l replacing an RPA in an existing cluster
l adding new RPAs to existing clusters
l converting an environment to a RecoverPoint/SE or RecoverPoint configuration
l modifying system settings
In maintenance mode, RecoverPoint for VMs can only monitor the system; user-initiated capabilities are disabled.
management defaultgateway
The default gateway IP address assigned to the RPA LAN interface and used for allnon-replication IP communication.
management interface An Ethernet interface that is used primarily for configuration maintenance andmonitoring. The management interface is usually accessed through a virtual site-management IP address using the CLI or the GUI.Also known as: LAN interface.
management IP The IP address assigned to the LAN interface in order to define the managementinterface network.Also known as: LAN IP
management subnetmask
A network subnet mask assigned to the LAN interface in order to define themanagement interface network.
manual snapshotconsolidation
The process of consolidating snapshots manually through the CLIconsolidate_snapshots command. This option is useful when you want to specifya specific PIT to consolidate to. For example, a script can be run once a day at aspecific time to create a bookmark, and set the specific bookmark as the startingsnapshot.
marking mode A system state that signifies the consistency group is enabled, the splitter is replicatingto the RPAs, but the RPAs are unable to transfer to the copy journal (for example,because the link is closed). When the remote RPA cluster is available again, only thedisk segments or blocks that have changed are synchronized, and both transfer andreplication are resumed. At least one RPA at the production RPA cluster must beavailable for marking to occur. See also marking mode, delta marking mode
metadata Metadata can be defined as either data about other data or data about the container ofother data. In RecoverPoint, metadata lists are used in the marking process (along withbitmaps) to ensure data consistency, and these metadata lists contain the followinginformation:
l The GUID of the source LUN
l The offset (for example, location) of the data in the target LUN
l The length (for example, size) of the data
Glossary
90 RecoverPoint for Virtual Machines 5.2 Administrator's Guide

MIB Management Information Base. A (virtual) database used to manage the devices in acommunications network (routers, switches, and so forth), and tune the networkaccording to real-time requirements.
O
oldest image The snapshot that was taken the longest time ago, and is still available in the journal.
P
parallel bookmark A RecoverPoint feature that enables you to apply a bookmark with the same name to asingle PIT across multiple consistency groups, while at the same time marking aconsistent PIT (with the same name) across all specified consistency groups.
PIT Point In Time. A fully usable copy of a defined collection of data that contains an imageof the data as it appeared at a single instant in time. See also snapshot
predefined user The RPA is shipped with the following predefined users, each has its own initialpassword (which can be modified) and set of permissions:
l security-admin
l admin
l boxmgmt
l monitor
l webdownload
See also preconfigured user
preferred RPA An RPA that whenever possible, handles replication for the consistency group. If anerror occurs in the preferred RPA, in most cases, another RPA at the same RPA clusterhandles replication. See also primary RPA, preferred primary RPA
pre-replication image An image that represents the state of the production data before initialization. See also initialization snapshot
private default gateway In local replication, the IP address that the RPA uses to route any private networkcommunications. See also WAN default gateway
private IP In local replication, the IP address assigned to the WAN interface of an RPA. See also WAN IP
Glossary
RecoverPoint for Virtual Machines 5.2 Administrator's Guide 91

private network The network that is created when a single RPA cluster is deployed (in local replication).The private network is used for inter-cluster communication (exchange state of RPAnodes and cluster LEP (cluster leader arbitration).
private subnet mask In local replication, the IP assigned to the WAN interface to define the managementinterface network. See also WAN subnet mask
production The data that is being replicated and protected. See also production source, protected copy
R
reboot regulation A state of regulation that allows the system to detach an RPA from its RPA cluster inthe event of frequent unexplained reboots or internal failures.
RecoverPoint for VMsplug-in
The vSphere web client user interface that is used for managing VM replication. Theplug-in is installed automatically after the vRPA cluster has been installed.
RecoverPoint for VMssplitter
Proprietary software that is installed on every ESXi host in an ESXi cluster that isinvolved in RecoverPoint for VMs replication or running virtual RPAs. The splitter splitsevery write to the VMDK and sends a copy of the write to the vRPA and then to thedesignated storage volumes. It is installed automatically after you register the ESXicluster.
Recoverpoint for VMssystem
One or more vRPA clusters that have been installed using the RecoverPoint for VMsDeployer.
recover production A user-triggered disaster recovery procedure that is used to repair the productionsource using the copy data.
remote replication A system configuration where data is transferred between RPA clusters. In thisconfiguration, the RPAs, storage, and splitters exist at both the local and the remoteRPA cluster. See also two-site configuration, remote recovery
replication policy A user-specified set of parameters driven by business objectives that control systemoperation during replication.
replication set A production source and the target(s) at a copy to which it replicates.
replication set volumes All of the sources that have been added to a replication set.
repository volume A dedicated volume that must be allocated at the production, for each RPA cluster.
resource allocation A consistency group policy that controls the bandwidth that RecoverPoint allocates forgroup replication, with regard to other groups using the same preferred RPA.
Glossary
92 RecoverPoint for Virtual Machines 5.2 Administrator's Guide

RPO Recovery Point Objective. The maximum amount of data, per application, that anorganization is willing to lose if there is a disaster. For example, an RPO of 5s meansthat if there is a disaster, RecoverPoint ensures that no more than the last 5s of datacan be lost.
RTO Recovery Time Objective. The duration of time and a service level within which abusiness process must be restored after a disaster (or disruption) in order to avoidunacceptable consequences associated with a break in business continuity.
S
secondary RPA When using distributed consistency groups, an additional RPA that can be the preferredRPA to transfer the data of a consistency group. See also preferred secondary RPA
shadow VM A secondary copy VM that RecoverPoint creates, configures, and manages to allowaccess to copy VMDK and RDM devices. A copy shadow VM has the .copy.shadowextension at the end of the virtual machine name. User action on copy shadow VMs isnot supported.
short initialization An initialization process that uses marking information to re-synchronize a copy's datawith its production sources. Because this initialization process uses delta markers tosynchronize the copy with the production, the initialization process is much faster andmore efficient. Generally occurs when restarting transfer for a consistency group aftera pause in transfer. See also short init, short resync, short resynchronization, resynchronization, resync
snapshot consolidation A manual or automatic process that consolidates the data of multiple snapshots into asingle snapshot.
snapshot dilution A process that is performed on snapshots in a copy journal to hide or display asnapshot, over others, according to a pre-set system algorithm.
software serial ID The identification that is used by the install base to support equipment that is installedat customer sites using the system reporting and Secure Remote Services mechanisms.A software serial ID is supplied per RPA cluster in a system installation. See also SSID
source The object that RecoverPoint is replicating from. For example, the source RPA or thesource copy (for example, production). After failover, the source becomes the targetand the target becomes the source.
splitter Proprietary software that is installed on storage subsystems that splits applicationwrites so that they are sent to their normally designated storage and the RPAsimultaneously.
synchronous replication A replication mode in which the production host application initiates a write, and thenwaits for an ACK from the remote RPA before initiating the next write, ensuring thatthe RPO value is always zero. See also sync, sync replication
Glossary
RecoverPoint for Virtual Machines 5.2 Administrator's Guide 93

system alerts A mechanism that allows RPAs to send system events about system components inreal-time, to a specified email or the system reports database, via SMTP.
system reports A mechanism that provides one-way communication between a system installation andthe system reports database. This mechanism supports two types of information:system alerts and system reports. See also SYR
system settings The output of the save_settings CLI command. See also configuration file, system configuration file, configuration settings
T
target The object at the copy that the protected data is being replicating to. For example, thetarget RPA, or the target storage. After failover, the target becomes the source, andthe source becomes the target.
temporary failover One of four disaster recovery methods that is only relevant for configurations withmore than one copy. Temporary failover is user-triggered when it is not possible to runhost applications at the production site, and therefore, there is a need to temporarilyfail over to a specific copy to work from the copy site until the production is repaired, oryou have recovered from the disaster at the production site. Temporary failovers arenot possible when there is only one copy of the production data. In these cases, everyfailover is a permanent failover.
testing a copy A user-triggered procedure used to ensure that a copy can be used to restore data,recover from disaster, or seamlessly take over for the production.
throughput The total amount of writes made by the production hosts and received by the localRPA.
tweak parameters A configuration parameter that only Customer Support can change. Tweak parametersenable Customer Support to change the hard-coded values of specific internal settingswithout requiring the RecoverPoint for VMs code to be recompiled or re-loaded ontothe vRPAs.
U
user authentication The method of establishing the authenticity of users in RecoverPoint. RecoverPointprovides two independent mechanisms for authenticating users:
l Appliance-based authentication
l Authentication through LDAP (Lightweight Directory Access Protocol)
user authorization The method of establishing user access permissions to RecoverPoint resources. Userauthorization is identical, regardless of whether RecoverPoint or an LDAP serverauthenticated the user.
Glossary
94 RecoverPoint for Virtual Machines 5.2 Administrator's Guide

V
volume sweep An Initialization process that is performed on a specific replication set in a consistencygroup.
vRPA The virtual RecoverPoint Appliance that manages data replication.
vRPA cluster A group of vRPAs that work together to replicate and protect data.
vRPA data network The IP data path network used for traffic between the vRPA and the splitter.
vRPA LAN network The vRPA cluster management network that is used for communication between vRPAsand to other entities such as the vCenter.
vRPA WAN network The vRPA inter-cluster network that is used for communication between vRPA clusters.A basic configuration that uses a unified topology (a single WAN + LAN network) doesnot require an additional gateway to communicate between sites.
W
WAN default gateway The default gateway IP address for replication IP communications assigned to the RPAWAN interface. In local replication, the WAN default gateway is referred to as theprivate default gateway.
WAN interface An Ethernet interface that is used primarily for the transfer of protected data to theremote vRPA cluster as well as for inter-cluster communication (management ofcomponent states, resource discovery, and cluster leader arbitration). In localreplication, the WAN interface is referred to as the private interface.
WAN IP The IP address assigned to the WAN interface to define the management interfacenetwork. In local replication, the WAN IP is referred to as the private IP.
WAN subnet mask A network subnet mask assigned to the WAN interface to define the WAN interfacenetwork. In local replication, the WAN subnet mask is referred to as the private subnetmask.
Glossary
RecoverPoint for Virtual Machines 5.2 Administrator's Guide 95

Glossary
96 RecoverPoint for Virtual Machines 5.2 Administrator's Guide