rear final drive d driveline/axle rfd ayariksteel.ru/manual/cedric/y34/manual(m45)/rfd.pdfrfd-1 rear...
TRANSCRIPT
RFD-1
REAR FINAL DRIVE
D DRIVELINE/AXLE
CONTENTS
C
E
F
G
H
I
J
K
L
M
SECTION RFDA
B
RFD
Revision: 2004 October 2004 M45
REAR FINAL DRIVE
PRECAUTIONS .......................................................... 2Precautions .............................................................. 2
PREPARATION ........................................................... 3Special Service Tools ............................................... 3Commercial Service Tools ........................................ 5
NOISE, VIBRATION AND HARSHNESS (NVH) TROUBLESHOOTING ................................................ 6
NVH Troubleshooting Chart ..................................... 6FRONT OIL SEAL ...................................................... 7
Removal and Installation .......................................... 7REMOVAL ............................................................. 7INSTALLATION ..................................................... 7
SIDE OIL SEAL .......................................................... 9Removal and Installation .......................................... 9
REMOVAL ............................................................. 9INSTALLATION ..................................................... 9
REAR FINAL DRIVE ASSEMBLY .............................11Removal and Installation .........................................11
REMOVAL ............................................................11INSTALLATION ....................................................11
Components ........................................................... 12R200 2–PINION .................................................. 12
Pre-Inspection ........................................................ 13TOTAL PRELOAD ............................................... 13DRIVE GEAR TO DRIVE PINION BACKLASH ... 13DRIVE GEAR RUNOUT ...................................... 13COMPANION FLANGE RUNOUT ...................... 14TOOTH CONTACT .............................................. 14
Disassembly and Assembly ................................... 14REMOVAL OF DIFFERENTIAL CASE ASSEM-
BLY ...................................................................... 14REMOVAL OF DRIVE PINION ASSEMBLY ........ 15DISASSEMBLY OF DIFFERENTIAL CASE ASSEMBLY ......................................................... 17INSPECTION ...................................................... 18ADJUSTMENT OF DIFFERENTIAL CASE ......... 19SIDE BEARING PRELOAD ................................. 20PINION GEAR HEIGHT ...................................... 21TOOTH CONTACT .............................................. 25ASSEMBLY OF DIFFERENTIAL CASE ASSEM-BLY ...................................................................... 26INSTALLATION OF DRIVE PINION ASSEMBLY ... 27INSTALLATION OF DIFFERENTIAL CASE ASSEMBLY ......................................................... 28
SERVICE DATA AND SPECIFICATIONS (SDS) ...... 31General Specifications ............................................ 31Drive Gear Runout .................................................. 31Side Gear Adjustment ............................................ 31
AVAILABLE SIDE GEAR THRUST WASHERS ... 31Drive Pinion Height Adjustment .............................. 32
AVAILABLE PINION HEIGHT ADJUSTING WASHERS .......................................................... 32
Drive Pinion Preload Adjustment ............................ 32Side Bearing Preload Adjustment ........................... 32
SIDE BEARING ADJUSTING WASHERS .......... 32Total Preload Adjustment ........................................ 32Companion Flange ................................................. 32

RFD-2
PRECAUTIONS
Revision: 2004 October 2004 M45
PRECAUTIONS PFP:00001
Precautions ADS000W6
CAUTION:● Before starting diagnosis of the vehicle, understand symptoms well. Perform correct and system-
atic operations. ● Check for the correct installation status prior removal or disassembly. When matching marks are
required, be sure they do not interfere with the function of the parts they are applied to. ● Carry out an overhaul in a clean work place, Using a dust proof room is recommended.● Before disassembly, using steam or white gasoline, completely remove sand and mud from the
exterior the unit, preventing them from entering into the unit during disassembly or assembly.● Check appearance of the disassembled parts for damage, deformation, and abnormal wear. If a
malfunction is detected, replace it with a new one. ● Normally replace lock pins, oil seals, and bearings with new ones every times they are removed.● In principle, tighten bolts or nuts gradually in several steps working diagonally from inside to out-
side. If tightening sequence is specified, observe it.● Clean and flush the parts sufficiently and blow them dry.● Be careful not to damage the sliding surfaces and mating surface.● When applying sealant, remove the old sealant from the mounting surface; then remove any mois-
ture, oil, and foreign materials from the application and mounting surfaces.● Always use shop paper for cleaning the inside of components.● Avoid using cotton gloves or a shop cloth to prevent entering of lint.● During assembly, observe the specified tightening torque, and new differential gear oil, Vaseline,
or multi-purpose grease, as specified for each vehicle, when necessary.
PREPARATION
RFD-3
C
E
F
G
H
I
J
K
L
M
A
B
RFD
Revision: 2004 October 2004 M45
PREPARATION PFP:00002
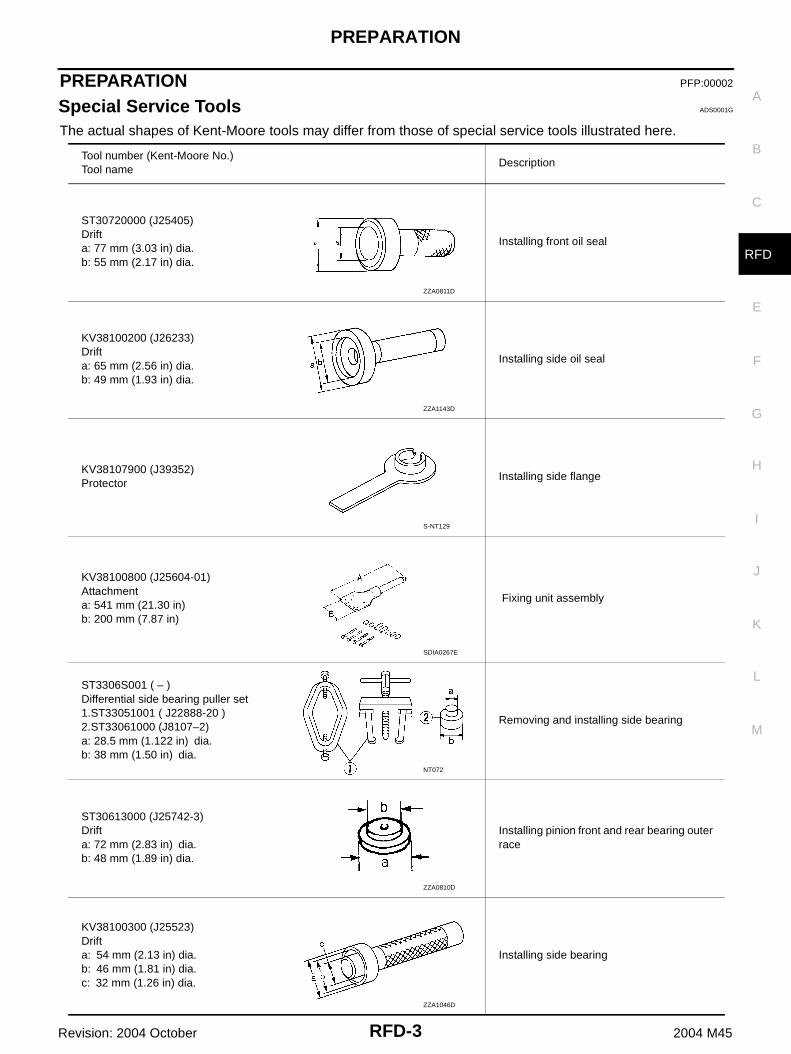
Special Service Tools ADS0001G
The actual shapes of Kent-Moore tools may differ from those of special service tools illustrated here.
Tool number (Kent-Moore No.)Tool name
Description
ST30720000 (J25405)Drifta: 77 mm (3.03 in) dia.b: 55 mm (2.17 in) dia.
Installing front oil seal
KV38100200 (J26233)Drifta: 65 mm (2.56 in) dia.b: 49 mm (1.93 in) dia.
Installing side oil seal
KV38107900 (J39352)Protector
Installing side flange
KV38100800 (J25604-01)Attachmenta: 541 mm (21.30 in)b: 200 mm (7.87 in)
Fixing unit assembly
ST3306S001 ( – )Differential side bearing puller set1.ST33051001 ( J22888-20 )2.ST33061000 (J8107–2)a: 28.5 mm (1.122 in) dia.b: 38 mm (1.50 in) dia.
Removing and installing side bearing
ST30613000 (J25742-3)Drifta: 72 mm (2.83 in) dia.b: 48 mm (1.89 in) dia.
Installing pinion front and rear bearing outer race
KV38100300 (J25523)Drifta: 54 mm (2.13 in) dia.b: 46 mm (1.81 in) dia.c: 32 mm (1.26 in) dia.
Installing side bearing
ZZA0811D
ZZA1143D
S-NT129
SDIA0267E
NT072
ZZA0810D
ZZA1046D

RFD-4
PREPARATION
Revision: 2004 October 2004 M45
KV40104000 ( – )Drive pinion flange wrencha : 85 mm (3.35 in) dia.b : 65 mm (2.56 in) dia.
Removing and installing drive pinion nut
ST36230000 (J25840-A)Sliding hammer
Removing side flange
KV40104100 ( – )Axle stand
Removing side flange
HT72400000 ( – )Sliding hammer
Removing differential case assembly
ST3090S000 ( – )Drive pinion rear inner race puller set1. ST30031000 (J22912-01) Puller2. ST30901000 ( – ) BaseEquivalent tool (J26010-01)a : 90 mm (3.54 in) dia.b : 80 mm (3.15 in) dia.c : 50 mm (1.97 in) dia.d : 79 mm (3.11 in) dia.e : 45 mm (1.77 in) dia.f : 35 mm (1.38 in) dia.
Removing and installing drive pinion rear bearing inner race
ST30611000 (J25742–1)Drift
Installing pinion rear bearing outer race (Use with ST30613000)
ST3127S000 (see J25765-A)Preload gauge1. GG91030000 Torque wrench (J25765)2. HT62940000 ( – ) Socket adapter (1/2″)3. HT62900000 ( – ) Socket adapter (3/8″)
Measuring pinion bearing preload and total preload
Tool number (Kent-Moore No.)Tool name
Description
NT659
ZZA0803D
ZZA0804D
S-NT125
S-NT640
S-NT090
NT124
PREPARATION
RFD-5
C
E
F
G
H
I
J
K
L
M
A
B
RFD
Revision: 2004 October 2004 M45
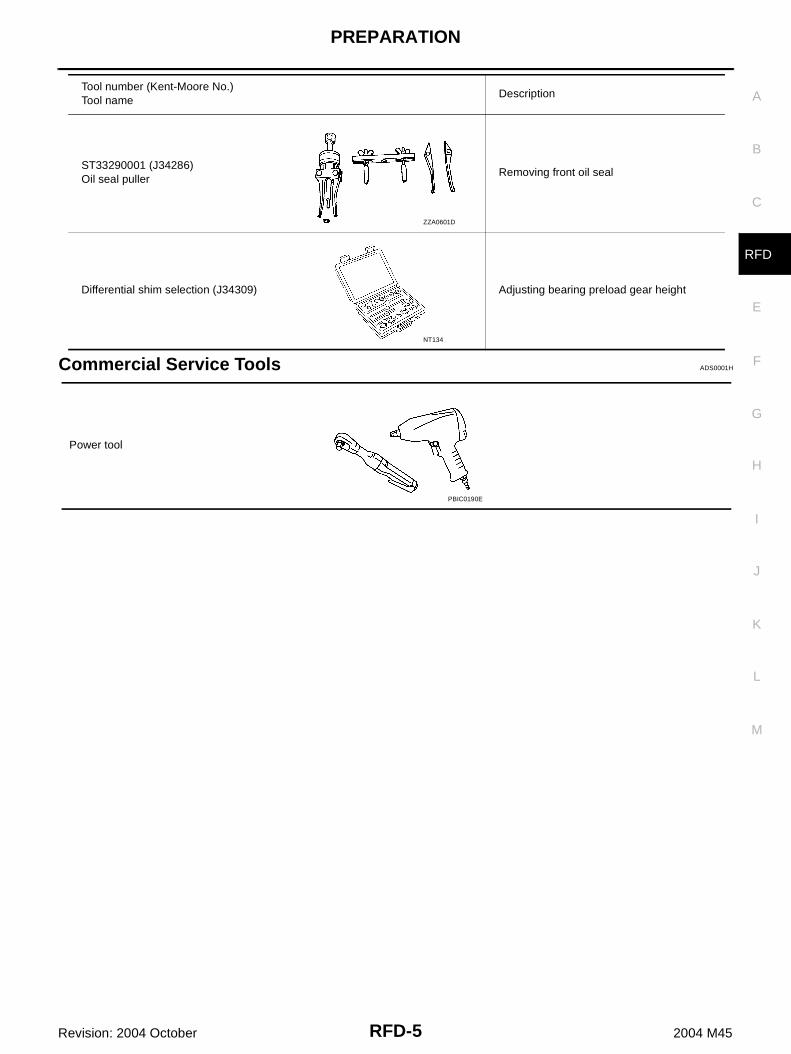
Commercial Service Tools ADS0001H
ST33290001 (J34286)Oil seal puller
Removing front oil seal
Differential shim selection (J34309) Adjusting bearing preload gear height
Tool number (Kent-Moore No.)Tool name
Description
ZZA0601D
NT134
Power tool
PBIC0190E

RFD-6
NOISE, VIBRATION AND HARSHNESS (NVH) TROUBLESHOOTING
Revision: 2004 October 2004 M45
NOISE, VIBRATION AND HARSHNESS (NVH) TROUBLESHOOTING PFP:00003
NVH Troubleshooting Chart ADS0001I
Use the chart below to help you find the cause of the symptom. If necessary, repair or replace these parts.
×: Applicable
Reference page
Ref
er to
RF
D-1
8, "
INS
PE
CT
ION
" .
Ref
er to
RF
D-2
5, "
TO
OT
H C
ON
TAC
T"
.
Ref
er to
RF
D-1
8, "
INS
PE
CT
ION
" .
Ref
er to
RF
D-1
3, "
Pre
-Ins
pect
ion"
.
—
Ref
er to
MA
-21,
"C
heck
ing
Diff
eren
tial G
ear
Oil"
.
NV
H in
PR
sec
tion.
NV
H in
FA
X, R
AX
, FS
U a
nd R
SU
sec
tions
.
NV
H in
WT
sec
tion.
NV
H in
WT
sec
tion.
NV
H in
RA
X s
ectio
n.
NV
H in
BR
sec
tion.
NV
H in
PS
sec
tion.
Possible cause and SUSPECTED PARTS
Rou
gh g
ear
toot
h
Impr
oper
gea
r co
ntac
t
Toot
h su
rfac
es w
orn
Inco
rrec
t bac
klas
h
Com
pani
on fl
ange
exc
essi
ve r
unou
t
Impr
oper
gea
r oi
l
PR
OP
ELL
ER
SH
AF
T
AX
LE A
ND
SU
SP
EN
SIO
N
TIR
ES
RO
AD
WH
EE
L
DR
IVE
SH
AF
T
BR
AK
ES
ST
EE
RIN
G
Symptom DIFFERENTIAL Noise × × × × × × × × × × × × ×

FRONT OIL SEAL
RFD-7
C
E
F
G
H
I
J
K
L
M
A
B
RFD
Revision: 2004 October 2004 M45
FRONT OIL SEAL PFP:38189
Removal and Installation ADS0001J
REMOVAL1. Remove the propeller shaft. Refer to PR-5, "Removal and Installation" .2. Put a mark on the end of the drive pinion corresponding to the C
position mark on the companion flange.CAUTION:● For matching mark, use paint. Never damage drive pin-
ion.● The mark C on the final drive companion flange indicates
the maximum vertical runout position.
3. Using the drive pinion flange wrench, Remove drive pinion nut.
4. Using the puller, remove the companion flange.
5. Using the side oil seal puller, remove front oil seal.
INSTALLATION1. Apply multi-purpose grease to sealing lips of oil seal. Press front
oil seal into carrier with tool.
CAUTION:● When installing the oil seal, be careful not to get it
inclined.● Discard the old oil seal. Always replace with new one.
SDIA0963E
Tool number : KV40104000 ( – )
SDIA1018E
Tool number : ST33290001 (J34286)
SDIA0485E
Tool number : ST30720000 (J25405)
SDIA0493E

RFD-8
FRONT OIL SEAL
Revision: 2004 October 2004 M45
2. Align the matching mark of drive pinion with the mark C of com-panion flange, then install the companion flange.
3. Apply oil or grease on the screw part of drive pinion and the seating surface of drive pinion nut. 4. Install drive pinion nut with tool, tighten the nut to the specified torque. Refer to RFD-12, "Components" .
CAUTION:The drive pinion nut is not reusable. Never reuse drive pinion nut.
5. Install propeller shaft. Refer to PR-5, "Removal and Installation" .
SDIA0963E
Tool number : KV40104000 (–)

SIDE OIL SEAL
RFD-9
C
E
F
G
H
I
J
K
L
M
A
B
RFD
Revision: 2004 October 2004 M45
SIDE OIL SEAL PFP:33142
Removal and Installation ADS0001K
REMOVAL1. Remove side flange with the following procedure for press-fitting.a. Remove rear wheel sensor. Refer to BRC-63, "Removal and Installation" .b. Remove drive shaft and axle assembly. Refer to RAX-10, "REAR DRIVE SHAFT" and RAX-6, "WHEEL
HUB" .c. Install axle stand to side flange.
d. Using a sliding hammer, pull out the side flange.
2. Remove oil seal using a flat-bladed screwdriver.
INSTALLATION1. Apply multi-purpose grease to sealing lips of side oil seal.
2. Using the drift, press-fit oil seal so that its surface comes face toface with the end surface of the case.
CAUTION:● When installing the oil seal be careful not to get it
inclined.● Discard the old oil seal. Always replace with new one.
3. Install the side flange with the following procedure.a. Attach the protector to side oil seal.
b. After the side flange is inserted and the serrated part of sidegear has engaged the serrated part of flange, remove the pro-tector.
Tool number A : KV40104100 ( – )
Tool number B : ST3623000 (J25840-A)
SDIA1005E
SDIA1036E
Tool number : KV38100200 (J26233)
SDIA1037E
Tool number : KV38107900 (J39352)
SDIA0822E

RFD-10
SIDE OIL SEAL
Revision: 2004 October 2004 M45
c. Put suitable drift on the center of side flange, then drive it untilsound changes.NOTE:When installation is completed, driving sound of the side flangeturns into a sound which seems to affect the whole final drive.
4. Confirm that the dimension of the side flange installation (Mea-surement A) in the illustration comes into the following.
5. Install the drive shaft and axle assembly. Refer to RAX-10,"REAR DRIVE SHAFT" and RAX-6, "WHEEL HUB" .
6. Align the installing position of the wheel sensor. Refer to BRC-63, "Removal and Installation" .
Measurement A : Approx. 326 - 328 mm (12.83 - 12.91 in)
SDIA1039E

REAR FINAL DRIVE ASSEMBLY
RFD-11
C
E
F
G
H
I
J
K
L
M
A
B
RFD
Revision: 2004 October 2004 M45
REAR FINAL DRIVE ASSEMBLY PFP:38300
Removal and Installation ADS0001L
REMOVAL1. Remove exhaust center tube with power tool. Refer to EX-3, "EXHAUST SYSTEM" .2. Remove rear cross bar with power tool. Refer to RSU-7, "Components" .3. Remove rear stabilizer bar with power tool. Refer to RSU-15, "STABILIZER BAR" .4. Remove rear propeller shaft from the final drive. Refer to PR-5, "Removal and Installation" .5. Remove rear drive shaft from final drive, then suspend it by wire etc. with power tool.6. Remove breather hose from the final drive.7. Remove rear wheel sensor. Refer to BRC-63, "WHEEL SENSORS" .8. Place a transmission jack on the final drive.
CAUTION:Do not place a transmission jack on the rear cover (aluminum case).
9. Remove the mounting bolts and nuts connecting to the suspension member, and remove the rear finaldrive.
INSTALLATIONInstall in the reverse order of removal.CAUTION:After installation, check the final drive oil level. Refer to MA-21, "Checking Differential Gear Oil" .
1. Breather hose 2. Gear carrier 3. Clip
4. Rear propeller shaft 5. Washer 6. Lower stopper
7. Drive shaft 8. Rear final drive assembly 9. Upper stopper
PDIA0882E
RFD-12
REAR FINAL DRIVE ASSEMBLY
Revision: 2004 October 2004 M45
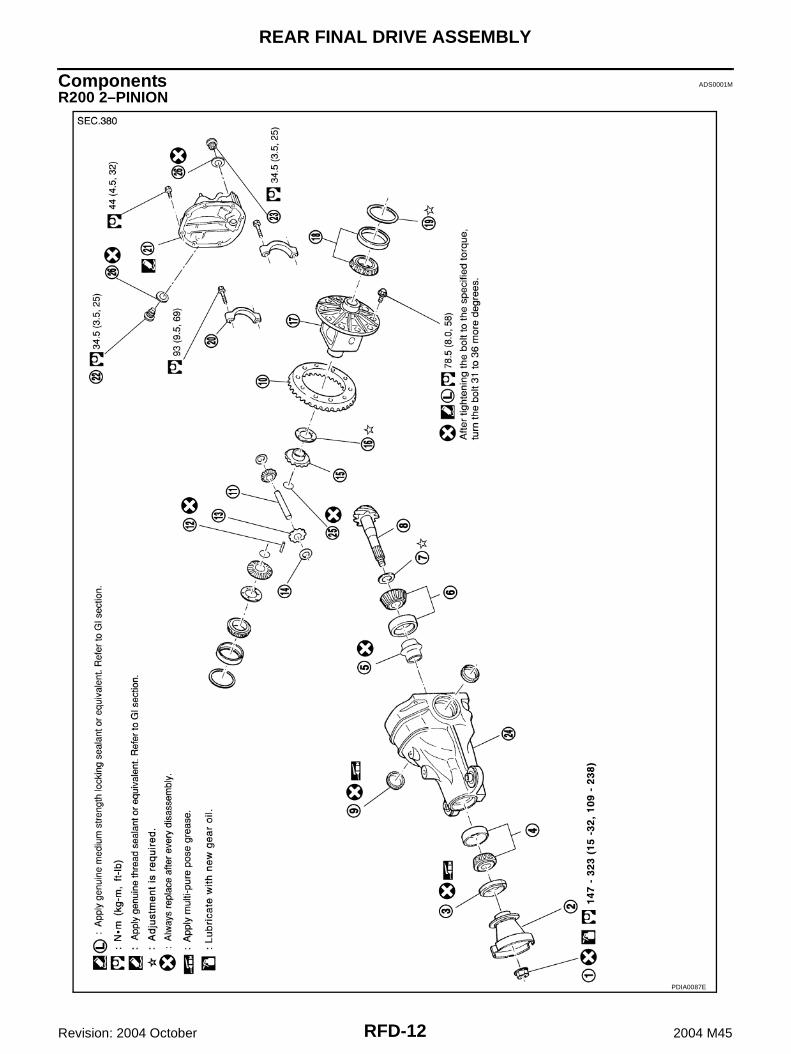
Components ADS0001M
R200 2–PINION
PDIA0087E

REAR FINAL DRIVE ASSEMBLY
RFD-13
C
E
F
G
H
I
J
K
L
M
A
B
RFD
Revision: 2004 October 2004 M45
Pre-Inspection ADS0001N
Before disassembling final drive, drain off oil from the gear and remove the rear cover. Then, perform the fol-lowing inspection.
TOTAL PRELOAD1. Turn drive pinion in both directions several times to set bearing
rollers.2. Check total preload with Tool.
DRIVE GEAR TO DRIVE PINION BACKLASHCheck drive gear to drive pinion backlash with a dial gauge at sev-eral points.
DRIVE GEAR RUNOUTCheck runout of drive gear with a dial gauge.
1. Drive pinion nut 2. Companion flange (Rebro joint type) 3. Front oil seal
4. Pinion front bearing 5. Pinion bearing adjusting spacer (Collapsible spacer)
6. Pinion rear bearing
7. Pinion height adjusting washer 8. Drive pinion 9. Side oil seal
10. Drive gear 11. Pinion mate shaft 12. Look pin
13. Pinion mate gear 14. Pinion mate thrust washer 15. Side gear
16. Side gear thrust washer 17. Differential case 18. Side bearing
19. Side bearing adjusting washer 20. Bearing cap 21. Rear cover
22. Filler plug 23. Drain plug 24. Gear carrier
25. Circular clip 26. Gasket
Tool number : ST3127S000 (see J25765-A)Total preload (with oil seal)
: 2.84 - 3.75 N·m (0.29 - 0.38 kg-m, 26 - 33 in-lb)
SDIA1007E
Drive gear backlash: 0.10 - 0.15 mm (0.0039 - 0.0059 in)
SPD513
Runout limit : 0.05 mm (0.0020 in) less
SPD886

RFD-14
REAR FINAL DRIVE ASSEMBLY
Revision: 2004 October 2004 M45
COMPANION FLANGE RUNOUT1. Fit a test indicator to the inner side of the companion flange
(socket diameter).2. Rotate the companion flange to check for runout.
3. If the runout value is outside the repair limit, follow the procedurebelow to adjust.
a. Check for runout while changing the phase between companionflange and drive pinion gear by 90° step, and search for thepoint where the runout is the minimum.
b. If the runout value is still outside of the limit after the phase hasbeen changed, replace the companion flange.
c. If the runout value still outside of the limit after the companion flange has been replaced, check pinionbearing and drive pinion assembly.
TOOTH CONTACTCheck tooth contact. Refer to RFD-25, "TOOTH CONTACT" .
Disassembly and Assembly ADS0001O
REMOVAL OF DIFFERENTIAL CASE ASSEMBLY1. Using two 45 mm (1.77 in) spacers, mount carrier on Tool.
2. For proper reinstallation, paint matching marks on one side ofthe bearing cap.Bearing caps are line-board during manufacture. Replace themin their proper positions.
3. Remove bearing caps.
Runout limit : 0.08 mm (0.0031 in)
SDIA2053E
Tool number : KV38100800 (J25604–01)
SDIA1008E
SPD889
S-PD343

REAR FINAL DRIVE ASSEMBLY
RFD-15
C
E
F
G
H
I
J
K
L
M
A
B
RFD
Revision: 2004 October 2004 M45
4. Lift differential case assembly out with Tool.
● Keep the side bearing outer races together with inner race.Do not mix them up.Also, keep adjusting washers together with bearings.
REMOVAL OF DRIVE PINION ASSEMBLY1. Put matching marks on companion flange and drive pinion with
paint.2. Loosen drive pinion nut with tool.
3. Remove companion flange using the suitable puller.
Tool number : HT72400000 ( – )
S-PD344
SPD919
Tool number : KV40104000 ( – )
SDIA2054E
SDIA1129E

RFD-16
REAR FINAL DRIVE ASSEMBLY
Revision: 2004 October 2004 M45
4. Take out drive pinion (together with rear bearing inner race, pin-ion bearing adjusting spacer).
5. Remove front oil seal. Refer to RFD-7, "FRONT OIL SEAL" .6. Remove pinion front bearing inner race.7. Remove side oil seal. Refer to RFD-9, "SIDE OIL SEAL" .
8. Remove pinion bearing outer races with a brass drift.
9. Remove pinion rear bearing inner race and drive pinion heightadjusting washer with Tool.
SPD892
SDIA0817E
Tool number : ST30031000 (J22912-01)
S-PD179

REAR FINAL DRIVE ASSEMBLY
RFD-17
C
E
F
G
H
I
J
K
L
M
A
B
RFD
Revision: 2004 October 2004 M45
DISASSEMBLY OF DIFFERENTIAL CASE ASSEMBLY1. Remove side bearing inner race.
To prevent damage to bearing, engage puller jaws in groove.
CAUTION:● To prevent damage to the side bearing and drive gear,
place copper plates between these parts and vise.● It is not necessary to remove side bearing except it is
replaced.
● Be careful not to confuse left- and right-hand parts. Keep bearing and bearing race for each side together.
2. Loosen drive gear bolts in a crisscross fashion.3. Tap drive gear off the differential case with a soft hammer.
● Tap evenly all around to keep drive gear from binding.
Tool number : A ST33051001 (J22888-20): B ST33061000 (J8107-2)
SPD920
SPD022
SPD024

RFD-18
REAR FINAL DRIVE ASSEMBLY
Revision: 2004 October 2004 M45
4. Drive out pinion mate shaft lock pin with punch from drive gearside.
5. Remove the pinion mate shaft.
6. Turn the pinion mate gear, then remove the pinion mate gear,pinion mate thrust washer, side gear and side gear thrustwasher from the differential case.
7. Check mating surfaces of differential case, side gears, pinionmate gears, pinion mate shaft and thrust washers.
INSPECTION● Clean up the disassembled parts. Then, inspect if the parts are wear or damaged. If so, follow the mea-
sures below.
SPD025
SDIA0031J
SDIA0032J
SDIA0187J
Content Measures
Drive gear and drive pinion
● If the gear teeth do not mesh or line-up correctly, determine the cause and adjust, repair, or replace as necessary.
● if the gear are worn, cracked, damaged, pitted or chipped (by friction) noticeably, replace with a new gears.
Bearing● If found any chipped (by friction), pitted, worn, rusted, scratched mark, or unusual noise from the
bearing, replace with a new bearing assembly (as a new set).

REAR FINAL DRIVE ASSEMBLY
RFD-19
C
E
F
G
H
I
J
K
L
M
A
B
RFD
Revision: 2004 October 2004 M45
ADJUSTMENT OF DIFFERENTIAL CASE Thrust Washer Selection1. Apply gear oil to contact surfaces of each gear, thrust washers
and differential case. 2. Install the removed thrust washer or same thickness washer to
side gear.
3. Install the side gears, thrust washers, pinion mate gears, thrustwashers into differential case.CAUTION:Install the circlip equipped side gear to the side retainerside.
4. Fit pinion mate shaft to differential case so that it meets lock pinholes.
Side gear thrust washer and pinion mate thrust washer
● Replace with a new one if found any cracks or damage on the surface of the tooth.
● Replace with a new one if found any worn or chipped mark on the contact sides of the thrust washer.
Side gear and pinion mate thrust washer
● Replace with a new one if found that it is chipped (by friction), damaged, or unusual worn.
Oil seal ● Oil seals must be replaced with a new one whenever disassembled.
Differential case ● Replace with a new one if found any wear or cracks on the contact sides of the differential case.
Companion flange● Replace with a new one if found any chipped marks (about 0.10mm, 0.0039in) or other damage
on the contact sides of the lips of the companion flange.
Content Measures
SDIA0193J
SDIA2025E
SDIA0195J

RFD-20
REAR FINAL DRIVE ASSEMBLY
Revision: 2004 October 2004 M45
5. Adjust clearance between rear face of side gear and thrustwasher by selecting side gear thrust washer. Refer to RFD-32,"AVAILABLE PINION HEIGHT ADJUSTING WASHERS" .Use two feeler gauges to prevent leaning of side gear as show-ing figure.
SIDE BEARING PRELOAD
A selection of carrier side bearing adjusting washers is required for successful completion of this procedure.1. Make sure all parts are clean. Also, make sure the bearings are
well lubricated with gear oil.2. Place the differential case assembly, with side bearing outer
races installed, into the gear carrier.
3. Insert left and right side bearing adjusting washers in placebetween side bearings and gear carrier.
4. Install the bearing caps in their correct locations and torque thebearing cap retaining bolts. Refer to RFD-12, "Components" .
5. Turn the carrier several times to seat the bearings.
Clearance between side gear thrust washer and dif-ferential case
: 0.20 mm (0.0079 in) or less
SPD828
SPD527
SPD924
SDIA1795E
REAR FINAL DRIVE ASSEMBLY
RFD-21
C
E
F
G
H
I
J
K
L
M
A
B
RFD
Revision: 2004 October 2004 M45
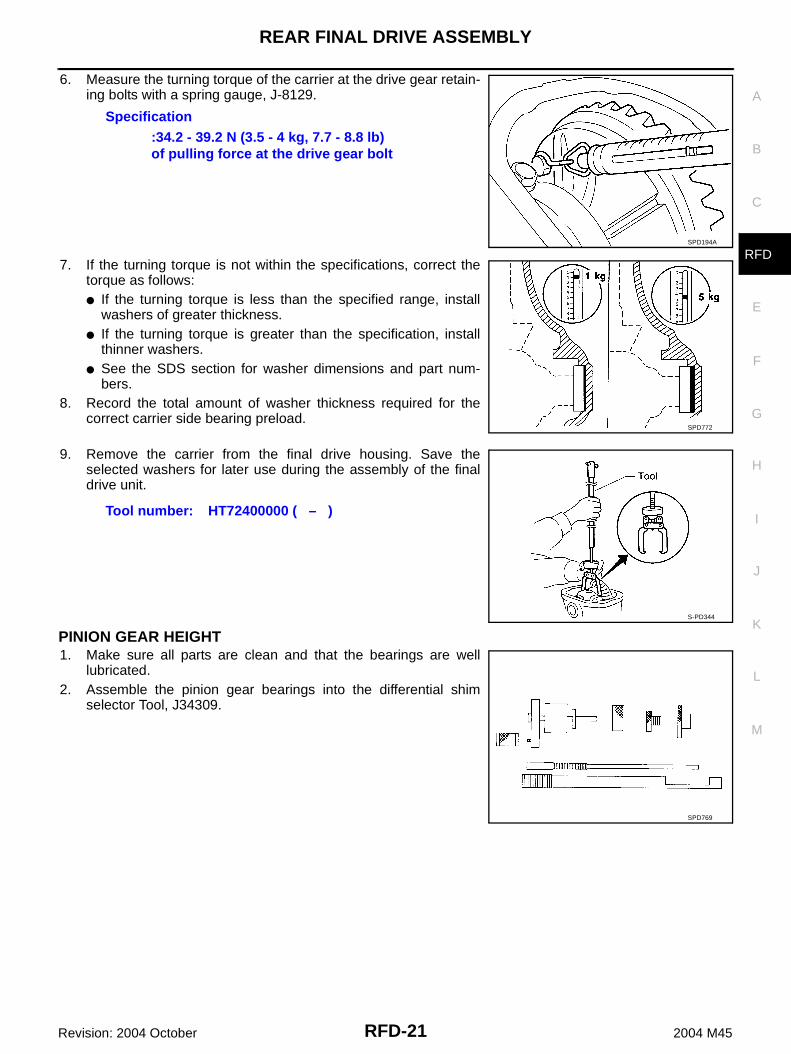
6. Measure the turning torque of the carrier at the drive gear retain-ing bolts with a spring gauge, J-8129.
7. If the turning torque is not within the specifications, correct thetorque as follows:● If the turning torque is less than the specified range, install
washers of greater thickness.● If the turning torque is greater than the specification, install
thinner washers.● See the SDS section for washer dimensions and part num-
bers. 8. Record the total amount of washer thickness required for the
correct carrier side bearing preload.
9. Remove the carrier from the final drive housing. Save theselected washers for later use during the assembly of the finaldrive unit.
PINION GEAR HEIGHT1. Make sure all parts are clean and that the bearings are well
lubricated.2. Assemble the pinion gear bearings into the differential shim
selector Tool, J34309.
Specification:34.2 - 39.2 N (3.5 - 4 kg, 7.7 - 8.8 lb)of pulling force at the drive gear bolt
SPD194A
SPD772
Tool number: HT72400000 ( – )
S-PD344
SPD769

RFD-22
REAR FINAL DRIVE ASSEMBLY
Revision: 2004 October 2004 M45
● Pinion front bearing; make sure the J34309-3 pinion frontbearing seat is secured tightly against the J34309-2 gaugeanvil. Then turn the pinion front bearing pilot, J34309-5, tosecure the bearing in its proper position.
● Rear pinion bearing; the pinion rear bearing pilot, J34309-8, isused to center the pinion rear bearing only. The pinion rearbearing locking seat, J34309-4, is used to lock the bearing tothe assembly.
● Installation of J34309-9 and J34309-16; place a suitable 2.5mm (0.098 in) thick plain washer between J34309-9 andJ34309-16. Both surfaces of J34309-9 and J34309-16 mustbe parallel with a clearance of 2.5 mm (0.098 in).
3. Install the pinion rear bearing inner race into the final drive hous-ing. Then place the pinion preload shim selector Tool, J34309-1,gauge screw assembly.
4. Assemble the front pinion bearing inner race and the J34309-2gauge anvil. Assemble them together with the J34309-1 gaugescrew in the final drive housing. Make sure that the pinion heightgauge plate, J34309-16, will turn a full 360 degrees. Tighten thetwo sections together by hand.
5. Turn the assembly several times to seat the bearings.
SPD197A
SPD893
SPD199A
SPD770

REAR FINAL DRIVE ASSEMBLY
RFD-23
C
E
F
G
H
I
J
K
L
M
A
B
RFD
Revision: 2004 October 2004 M45
6. Measure the turning torque at the end of the J34309-2 gaugeanvil using torque wrench J-25765A.
7. Place the J34309-11 “R200A” pinion height adapter onto thegauge plate and tighten it by hand.CAUTION:Make sure all machined surfaces are clean.
Pinion Height Adjusting Washer Selection1. Now, position the side bearing discs, J25269-4, and arbor firmly
into the side bearing bores. Install the bearing caps and tightenthe cap bolts to proper torque.
2. Select the correct standard pinion height adjusting washer thick-ness. Select by using a standard gauge of 3 mm (0.12 in) andyour J34309-101 feeler gauge. Measure the distance betweenthe J34309-11 pinion height adapter including the standardgauge and the arbor.
Tool number : ST3127S000 (J25765-A)
Turning torque specification: 1.0 - 1.3 N·m( 0.11 - 0.13 kg-m, 9 - 11 in-lb)
SPD234A
SPD208A
SPD211A
SPD204A

RFD-24
REAR FINAL DRIVE ASSEMBLY
Revision: 2004 October 2004 M45
3. Write down your exact measurement (the value of feeler gauge).
4. Correct the pinion height washer size by referring to the “pinionhead number”.
There are two numbers painted on the drive pinion. The first one refers to the drive pinion and drive gearas a matched set. This number should be the same as the number on the drive gear. The second numberis the “pinion head height number”. It refers to the ideal pinion height from standard for quietest operation.Use the following chart to determine the correct pinion height washer.
5. Select the correct pinion height adjusting washer as follows. Refer to RFD-32, "AVAILABLE PINIONHEIGHT ADJUSTING WASHERS" .
6. Remove the J34309 differential shim selector Tool from the finaldrive housing. Then disassemble to retrieve the pinion bearings.
SPD775
SPD542
Pinion head height numberAdd or remove from the standardpinion height washer thickness measurement
- 6- 5- 4- 3- 2- 10
+1+2+3+4+5 +6
Add 0.06 mm (0.0024 in)Add 0.05 mm (0.0020 in)Add 0.04 mm (0.0016 in)Add 0.03 mm (0.0012 in)Add 0.02 mm (0.0008 in)Add 0.01 mm (0.0004 in)Use the selected washer thicknessSubtract 0.01 mm (0.0004 in)Subtract 0.02 mm (0.0008 in)Subtract 0.03 mm (0.0012 in)Subtract 0.04 mm (0.0016 in)Subtract 0.05 mm (0.0020 in)Subtract 0.06 mm (0.0024 in)
SPD205A

REAR FINAL DRIVE ASSEMBLY
RFD-25
C
E
F
G
H
I
J
K
L
M
A
B
RFD
Revision: 2004 October 2004 M45
TOOTH CONTACTChecking gear tooth contact pattern is necessary to verify correct relationship between drive gear and drivepinion.Hypoid gears which are not positioned in proper arrangement may be noisy and/or have a short life. Checkgear tooth contact pattern to obtain the best contact for low noise and long life.
1. Thoroughly clean drive gear and drive pinion teeth.2. Lightly apply a mixture of powdered ferric oxide and oil or the
equivalent. Apply it to 3 or 4 teeth of drive gear drive side.
3. Hold companion flange steady by hand and rotate the drive gearin both directions.
SPD357
SDIA0813E
SDIA1910E
RFD-26
REAR FINAL DRIVE ASSEMBLY
Revision: 2004 October 2004 M45
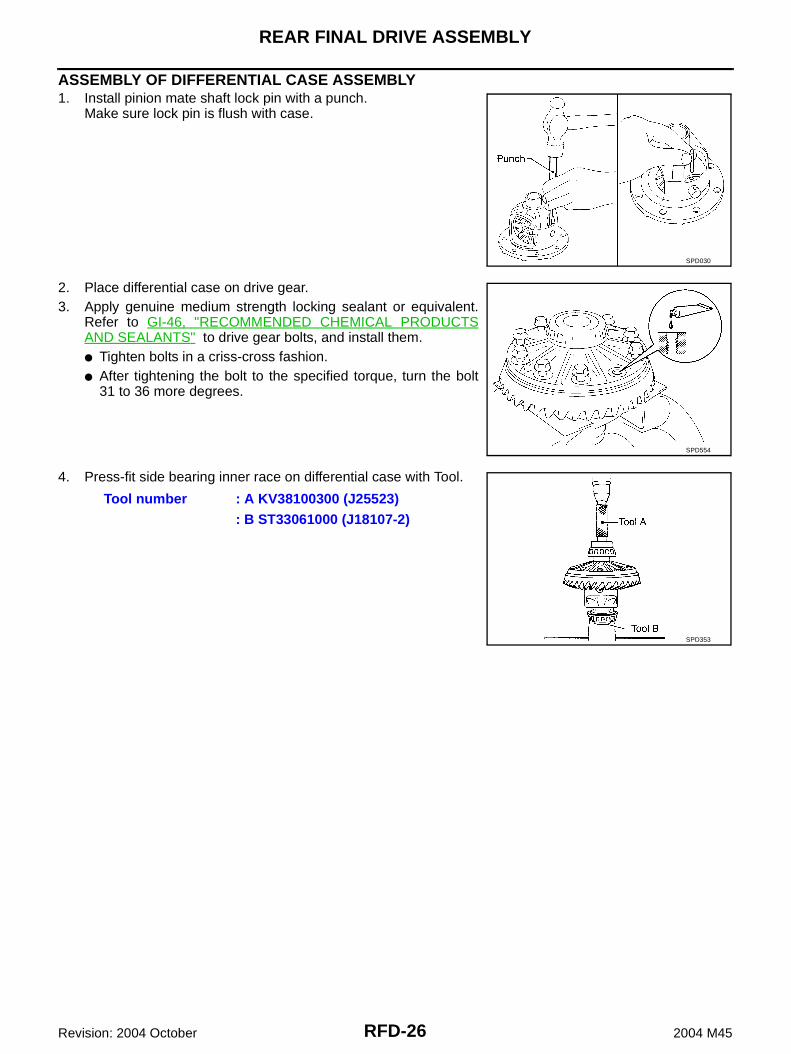
ASSEMBLY OF DIFFERENTIAL CASE ASSEMBLY 1. Install pinion mate shaft lock pin with a punch.
Make sure lock pin is flush with case.
2. Place differential case on drive gear.3. Apply genuine medium strength locking sealant or equivalent.
Refer to GI-46, "RECOMMENDED CHEMICAL PRODUCTSAND SEALANTS" to drive gear bolts, and install them.● Tighten bolts in a criss-cross fashion. ● After tightening the bolt to the specified torque, turn the bolt
31 to 36 more degrees.
4. Press-fit side bearing inner race on differential case with Tool.
SPD030
SPD554
Tool number : A KV38100300 (J25523): B ST33061000 (J18107-2)
SPD353

REAR FINAL DRIVE ASSEMBLY
RFD-27
C
E
F
G
H
I
J
K
L
M
A
B
RFD
Revision: 2004 October 2004 M45
INSTALLATION OF DRIVE PINION ASSEMBLY1. Press-fit front and rear bearing outer races with Tools.
2. Select pinion height adjusting washer. Refer to RFD-32, "AVAILABLE PINION HEIGHT ADJUSTINGWASHERS" .
3. Install selected pinion height adjusting washer in drive pinion.Using press and Tool, press-fit pinion rear bearing inner raceinto it.
4. Apply multi-purpose grease to pinion rear bearing inner raceand pinion front bearing inner race.
Tool number : A Suitable tool: B ST30611000 (J25742-1): C ST30613000 (J25742-3)
SPD992
Tool number : ST30901000 ( – )
SPD377
PDIA0243E

RFD-28
REAR FINAL DRIVE ASSEMBLY
Revision: 2004 October 2004 M45
5. Set drive pinion assembly (as shown in figure) in differential car-rier and install drive pinion, with press and suitable tool.Stop when drive pinion touches bearing.
6. Install front oil seal with Tool.Refer to RFD-7, "Removal and Installation" .
7. Install companion flange, and tighten pinion nut to minimum.Ascertain that threaded portion of drive pinion and drive pinionnut are free from oil or grease.
CAUTION:The drive pinion nut is not reusable. Never reuse drive pin-ion nut.
8. Tighten the drive pinion nut by very small degrees until the spec-ified preload in achieved, when checking the preload, turn drivepinion in both directions several times.
● If pinion bearing preload is too small, tighten the Drive pinion nut more.● If pinion bearing preload is too great, replace pinion bearing adjusting spacer.
INSTALLATION OF DIFFERENTIAL CASE ASSEMBLY1. Select side bearing adjusting washer.
Refer to RFD-32, "SIDE BEARING ADJUSTING WASHERS" .2. Install differential case assembly with side bearing outer races
into gear carrier.
SPD896
Tool number : ST30720000 (J25405)
Tool number : KV40104000 ( – )
SDIA1011E
Tool number: ST3127S000 (See J25765-A)
Pinion bearing preload : 2.65 - 3.23 N·m (0.27 - 0.32 kg-m, 24 - 28 in-lb)
SDIA1007E
SPD919

REAR FINAL DRIVE ASSEMBLY
RFD-29
C
E
F
G
H
I
J
K
L
M
A
B
RFD
Revision: 2004 October 2004 M45
3. Insert left and right side bearing adjusting washers in placebetween side bearings and carrier.
4. Align mark on bearing cap with that on gear carrier.5. Install the bearing cap, tighten the bolt to the specified torque.
Refer to RFD-12, "Components" .
6. Install side oil seal. Refer to RFD-9, "Removal and Installation" .
7. Measure drive gear to drive pinion backlash with a dial indicatorat several point.
● It backlash is too small, adjustment of washer thickness is required. Decrease thickness of left shimand increase thickness of right by the same amount.If backlash is too great, reverse the above procedure.
● Never change the total amount of washers as it will change the bearing preload.
SPD924
SPD889
Tool number : KV38100200 (J26233)
SPD560
Drive gear to drive pinion backlash: 0.10 - 0.15 mm (0.0039 - 0.0059 in) or less
SPD513

RFD-30
REAR FINAL DRIVE ASSEMBLY
Revision: 2004 October 2004 M45
8. Check total preload with Tool.
When checking preload, turn drive pinion in both directions several times to seat bearing rollers correctly.
● If preload is too great, remove the same amount of washer to each side.● If preload is too small, add the same amount of washer to each side.Never add or remove a different number of washers for each side. Difference in number of washers willchange drive gear to drive pinion backlash.
9. Recheck drive gear to drive pinion backlash. Increase or decrease in thickness of shims will causechange to drive gear to pinion backlash.● Check whether the backlash varies excessively in different places. Foreign matter may be caught
between the drive gear and the differential case causing the trouble.● The backlash can vary greatly even when the drive gear runout is within a specified range. In that case,
replace the hypoid gear set or differential case.10. Check runout of drive gear with a dial indicator.
11. Check tooth contact.Refer to RFD-25, "TOOTH CONTACT" .
12. Install rear cover. Apply liquid sealant to rear cover side andinstall gear carrier.
Tool number : ST3127S000 (See J25765-A)
SDIA1007E
Total preload : 2.84 - 3.75 N·m (0.29 - 0.38 kg-m, 26 - 33 in-lb)
Runout limit : 0.05 mm (0.0020 in) or less
SPD524
SDIA0970E

SERVICE DATA AND SPECIFICATIONS (SDS)
RFD-31
C
E
F
G
H
I
J
K
L
M
A
B
RFD
Revision: 2004 October 2004 M45
SERVICE DATA AND SPECIFICATIONS (SDS) PFP:00030
General Specifications ADS00090
Drive Gear Runout ADS00091
Unit: mm (in)
Side Gear Adjustment ADS00092
Unit: mm (in)
AVAILABLE SIDE GEAR THRUST WASHERS Unit: mm (in)
Applied modelVK45DE engine
5A / T
Final drive model R200 (2 − pinion)
Gear ratio 3.133
Number of teeth (Drive gear / drive pinion) 47 / 15
Oil capacity (Approx.) (US pt, lmp pt) 1.4 (3, 2 - 1/2)
Type R200
Drive gear runout limit 0.05 (0.0020) or less
Type R200
Clearance limit between side gear thrust washer and differential case mm (in)
0.20 (0.0079) or less
Type R200
Thrust washer
Thickness Part number
0.75 (0.0295) 38424 0C000
0.78 (0.0307) 38424 0C001
0.81 (0.0319) 38424 0C002
0.84 (0.0331) 38424 0C003
0.87 (0.0343) 38424 0C004
0.90 (0.0350) 38424 0C005
0.93 (0.0366) 38424 0C006

RFD-32
SERVICE DATA AND SPECIFICATIONS (SDS)
Revision: 2004 October 2004 M45
Drive Pinion Height Adjustment ADS00093
AVAILABLE PINION HEIGHT ADJUSTING WASHERSUnit: mm (in)
Drive Pinion Preload Adjustment ADS00094
Side Bearing Preload Adjustment ADS00095
SIDE BEARING ADJUSTING WASHERSUnit: mm (in)
Total Preload Adjustment ADS00096
Companion Flange ADS000W7
Type R200
Adjusting washer
Thickness Part number
3.05 (0.1201) 38154 0C000
3.08 (0.1213) 38154 0C001
3.11 (0.1224) 38154 0C002
3.14 (0.1236) 38154 0C003
3.17 (0.1248) 38154 0C004
3.20 (0.1260) 38154 0C005
3.23 (0.1272) 38154 0C006
3.26 (0.1283) 38154 0C007
Type R200
Drive pinion preload 2.65 − 3.23 N·m (0.27 − 0.32 kg−m, 24 − 28 in lb)
Type R200
Side bearing preload <Reference> 0.20 − 0.52 N·m (0.02 − 0.05 kg−m, 2 − 4 in lb)
Torque by spring gauge 34.2 − 39.2 N (3.5 − 4 kg, 7.7 − 8.8 lb)
Type R200
Adjusting washer
Thickness Part number Thickness Part number
2.00 (0.0787) 38453 N3100 2.35 (0.0925) 38453 N3107
2.05 (0.0807) 38453 N3101 2.40 (0.0945) 38453 N3108
2.10 (0.0827) 38453 N3102 2.45 (0.0965) 38453 N3109
2.15 (0.0846) 38453 N3103 2.50 (0.0984) 38453 N3110
2.20 (0.0866) 38453 N3104 2.55 (0.1004) 38453 N3111
2.25 (0.0886) 38453 N3105 2.60 (0.1024) 38453 N3112
2.30 (0.0906) 38453 N3106 2.65 (0.1043) 38453 N3113
Type R200
Total preload (with oil seal) 2.84 − 3.75 N·m (0.29 − 0.38 kg−m, 26 − 33 in lb)
Drive gear to drive pinion backlash 0.10 − 0.15 mm (0.0039 − 0.0059 in)
Type R200
Runout limit 0.08 mm (0.0031 in)