rear drum brakes
TRANSCRIPT

8/12/2019 Rear Drum Brakes
http://slidepdf.com/reader/full/rear-drum-brakes 1/22

8/12/2019 Rear Drum Brakes
http://slidepdf.com/reader/full/rear-drum-brakes 2/22
1
Any XJ rider knows that it’s fun to put in the key, push the starter button, twist the throttle, and go.
Every XJ rider also knows that it’s also a good thing to be able to bring your noble steed to a halt, sometimes quickly. After all, there aren’t many people out there whose goal in life is to eat the rear bumper of an SUV.
With that in mind, this file will go through the process of removing, cleaning, replacing, and reinstalling the rear drumbrakes on the XJ bikes. Needless to say, this doesn’t apply to those models with a rear disk brake (I’m looking at you, MrXJ900. And you, Mrs. XJ1100. Plus a cautious side glance at little XJ750RL for good measure). A list of currentlyavailable parts (which is subject to change at any time) can be found at the end of the document.
Tools you’ll be wanting:
Pliers for removing the cotter pins
Breaker bar, and a 19 or 22mm socket for removing the castle nut
A big honking torque wrench for putting it back on later
10mm wrench for removing the bolt holding on the brake actuator lever
12mm wrench for removing the nut for the tension bar
13mm wrench(es) for loosening the axle pinch bolt
Punch or long, thin rod for removing the axle
Brake cleaner. Get more if you need it… and you probably will
A vacuum cleaner for the brake dust
A respirator wouldn’t hurt, either
Gloves. Blue nitrile would be nice
Grease for the drive splines, and possibly the bearings
For the purposes of illustration, we’ll be using a ratty-looking 1982 XJ750 Maxim. Accordingly, the part numbers andtorque specs shown are appropriate for that model. Consult your reference material of choice (be it Haynes, Clymer orfactory) for proper specs for your model, be it XJ650, XJ700, or XJ750 (again, not the XJ750RL, which has a rear disk).XJ550 owners get the added joy of taking off and reinstalling the chain.

8/12/2019 Rear Drum Brakes
http://slidepdf.com/reader/full/rear-drum-brakes 3/22

8/12/2019 Rear Drum Brakes
http://slidepdf.com/reader/full/rear-drum-brakes 4/22
3
Removing the nut might help as well…
After removing the nut, flat washer and lockwasher,push the bar down out of the way. The bolt should popout of the brake assembly plate. Put the bolt backthrough the hole in the bar, then the washers and nutback on – this way you don’t lose them.
Next up on the hit parade: we disconnect the spring-loaded coupler rod going to the brake pedal. Pushforward on the lever (the whole plate might turn) andback the retaining nut off. Rotate the plate back theother direction so that the rod comes out of the hole inthe pin, then slide the pivot pin out the side.
8/12/2019 Rear Drum Brakes
http://slidepdf.com/reader/full/rear-drum-brakes 5/22
4
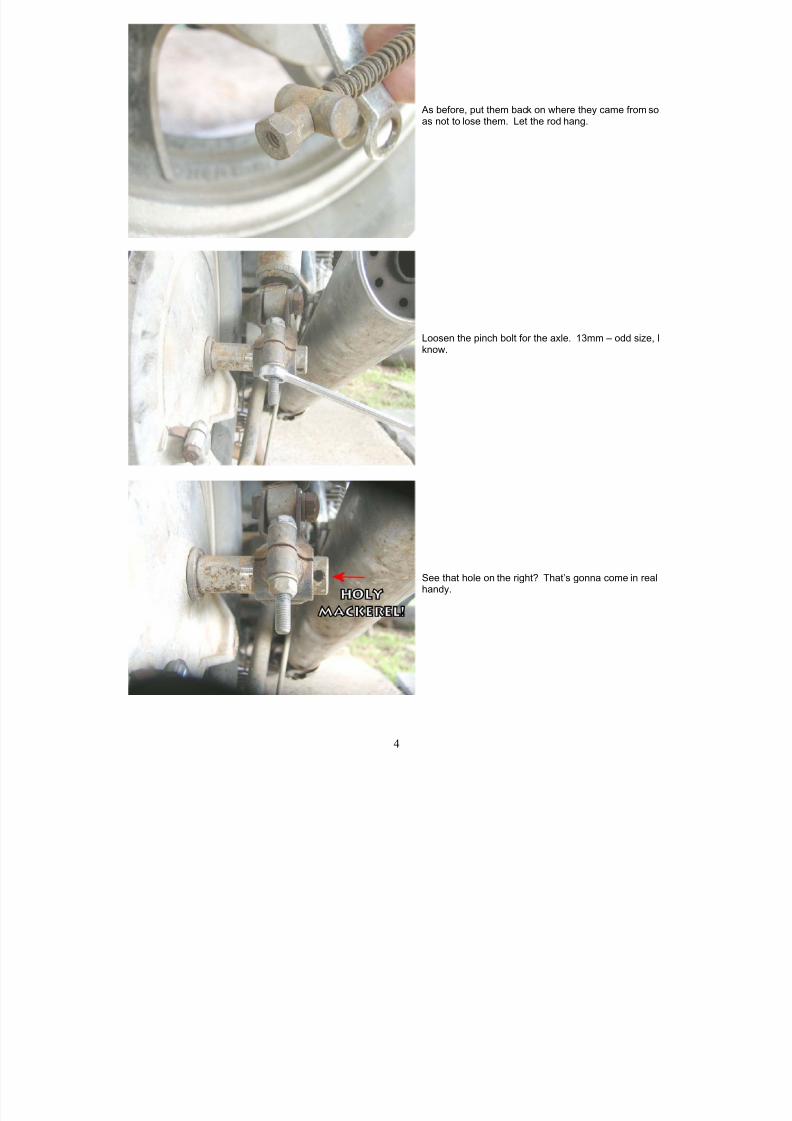
As before, put them back on where they came from soas not to lose them. Let the rod hang.
Loosen the pinch bolt for the axle. 13mm – odd size, Iknow.
See that hole on the right? That’s gonna come in realhandy.

8/12/2019 Rear Drum Brakes
http://slidepdf.com/reader/full/rear-drum-brakes 6/22
5
Stick a punch or some other long rod through the holeand wiggle it back and forth while pulling on it toremove the axle. (See that washer the red arrow ispointing to? Don’t drop it.) If the axle doesn’t want tocome out, you might need to drive it through from theleft side.
If it is necessary to drive it out, resist the urge tohammer on the castle nut. You’ll end up buying anHCP4801 replacement if you do.
After the axle is out, put the other washer and nut backon the shaft and set it aside… yes, we’re kinda funnyabout not wanting to lose things.
Now that the axle is off, the wheel should slide right offthe splines inside the final drive unit. If it doesn’t, then“wobble wobble” the wheel until it does. Push thetension bar down as far as it will go, and maneuver thewheel out from under the fender.
Oh, and do be wearing gloves and a respirator, unlessyou want to be calling the shyster on TV becauseyou’ve gotten yourself some mesothelioma.
“All these science spheres are made of asbestos, bythe way; keeps out the rats. Let us know if you feel ashortness of breath, a persistent dry cough or your
heart stopping, because that’s not part of the test –that’s asbestos.” – Cave Johnson, Aperture Science
Seriously, though, we don’t want to be inhaling brakedust, so wear a respirator.

8/12/2019 Rear Drum Brakes
http://slidepdf.com/reader/full/rear-drum-brakes 7/22
6
Lay the wheel down on your work surface; if youhaven’t noticed already, the plate pops right off.
Remember how we said we don’t want to be inhalingbrake dust? We don’t want anyone else to, either.Don’t blow out the wheel hub with air – use a vacuum.
To remove the shoes, grab the outsides, lift upwardsand twist them inward. They should pop out easily.

8/12/2019 Rear Drum Brakes
http://slidepdf.com/reader/full/rear-drum-brakes 8/22
7
Go ahead and remove the springs from the shoes, andset them aside.
Let’s go ahead and clean this puppy up before we putthe new shoes on. Gloves, degreaser/parts cleaner,green pad… we don’t open the rear wheel up veryoften, so when the opportunity presents itself, take it.
Oh, so it’s supposed to be THAT color.

8/12/2019 Rear Drum Brakes
http://slidepdf.com/reader/full/rear-drum-brakes 9/22

8/12/2019 Rear Drum Brakes
http://slidepdf.com/reader/full/rear-drum-brakes 10/22
9
Clean the shaft up, then a thin layer of grease. Put thewasher/spacer back on the shaft, reinstall the shaft intothe plate, followed by the wear indicator, then thelever. (Remember that mark?) Reinsert the pinch boltand snug it down.
Now we’re ready to put on our brand-spanking-newHCP1712 brake shoes. But wait… what’s this?
Hrm. Guess we didn’t need to remove those springsfrom the old shoes after all. Oopsie!
Actually, some kits don’t come with them, so you mightneed to do it anyway. If the new kit has springs, thenclean the old ones up and put them aside somewhere.
As we’ve said before – you likely won’t need them, butwhy throw away good used parts?

8/12/2019 Rear Drum Brakes
http://slidepdf.com/reader/full/rear-drum-brakes 11/22
10
Next step is to put a light coat of grease on the pin uptop, and the cam down at the bottom that turns whenyou press down on the pedal.
Install your brand new springs onto your brand newasbestos-free brake shoes.
We put the new shoes on the way we took the old onesoff – position them in a V shape on the pin and cam,and fold them down. They won’t sit flat at first – you’llhave to push down on them to get them to seat.
The bottom part with the cam is easier, but the pin hasa groove in it, and the shoes have a rib that fits in thatgroove. You’ll know when it’s in place.

8/12/2019 Rear Drum Brakes
http://slidepdf.com/reader/full/rear-drum-brakes 12/22
11
All set – the edge of the shoes are even with the edgeof the cam and the pin. This looks good; you can set itaside for now.
You’ll hear people suggest putting a chamfer, orbeveled edge, on the leading edge of the brakematerial to stop or reduce squeal. As you can see, thenice folks at EBC have done this for us.
Boy, these new ones on the bottom look a lot betterthan the old ones, don’t you think?
Now, let’s turn our attention to the wheel assembly.

8/12/2019 Rear Drum Brakes
http://slidepdf.com/reader/full/rear-drum-brakes 13/22
12
That hub we vacuumed out earlier? Go ahead andfinish cleaning it up. Maybe run some 200-400 gritsandpaper over the inside and deglaze the drum.
Call me crazy, but I’m thinking there should be a weebit more grease inside there than what we’re seeinghere. Remember, they don’t need to be swimming inthe stuff, but we do need some. Do both sides whilewe’ve got the chance.
Or, if they need it, now would be a good time toreplace those bearings outright. See our file onWheel Bearing Replacement for further details.
Once you’ve flipped it over (and serviced the otherbearing) you’ll see what’s known as a Clutch Hub O-ring Depending on model, there can be anywherefrom one to three of the things. Inspect and replace asrequired. It might not be a bad idea to replace themanyway – cheap insurance.
Put a light coat of grease on the hub splines and the o-ring.

8/12/2019 Rear Drum Brakes
http://slidepdf.com/reader/full/rear-drum-brakes 14/22
13
Perhaps some fresh rubber might be in order as well.
Shops usually charge less to put tires on when thewheel’s off the bike, after all…
Couldn’t hurt to clean the inner hub of the final drive.Oh, and that spacer tube in the middle that we’repointing out? Just go ahead and leave that handsomedevil where he is. We don’t want to throw off thewheel alignment and maybe have the tire rub againstthe driveshaft housing.
Add a coating of grease to the splines on the finaldrive.

8/12/2019 Rear Drum Brakes
http://slidepdf.com/reader/full/rear-drum-brakes 15/22
14
Go ahead and insert the plate into the drum; maneuverthe wheel back underneath the fender.
Pick up the wheel and slide it onto the final drivesplines. Lots of wiggle wiggle wobble wobble will ensuebefore you finally succeed.
Make sure your axle is nice and clean – if there’s anyrust on it, sand or wire-wheel it off. Add a thin coat ofgrease; makes it much easier to remove the next timearound.

8/12/2019 Rear Drum Brakes
http://slidepdf.com/reader/full/rear-drum-brakes 16/22
15
Slide the axle through the clamping hole in the rightside of the swingarm. Make sure you put that spacerback on before the axle goes into the brake plate.Some more wiggle wiggle wobble wobble and push theaxle as far as it will go.
Grease up that little pivot pin that goes through thebrake plate lever and put it back in. (You won’t be ableto do it after the castle nut is tightened down.) Rotatethe plate so that you can fit the threaded coupler rodthrough the pin, then the nut. We’ll adjust that nutmomentarily.
Reinstall the bolt through the tension bar at the bottomof the backing plate. Put the washers and nuts onfinger tight.
Tighten down your axle pinch bolt, otherwise the axlewill start turning when you tighten the castle nut. Thebook says 4.5 ft/lb, but you might need to go a wee bitmore.
8/12/2019 Rear Drum Brakes
http://slidepdf.com/reader/full/rear-drum-brakes 17/22
16
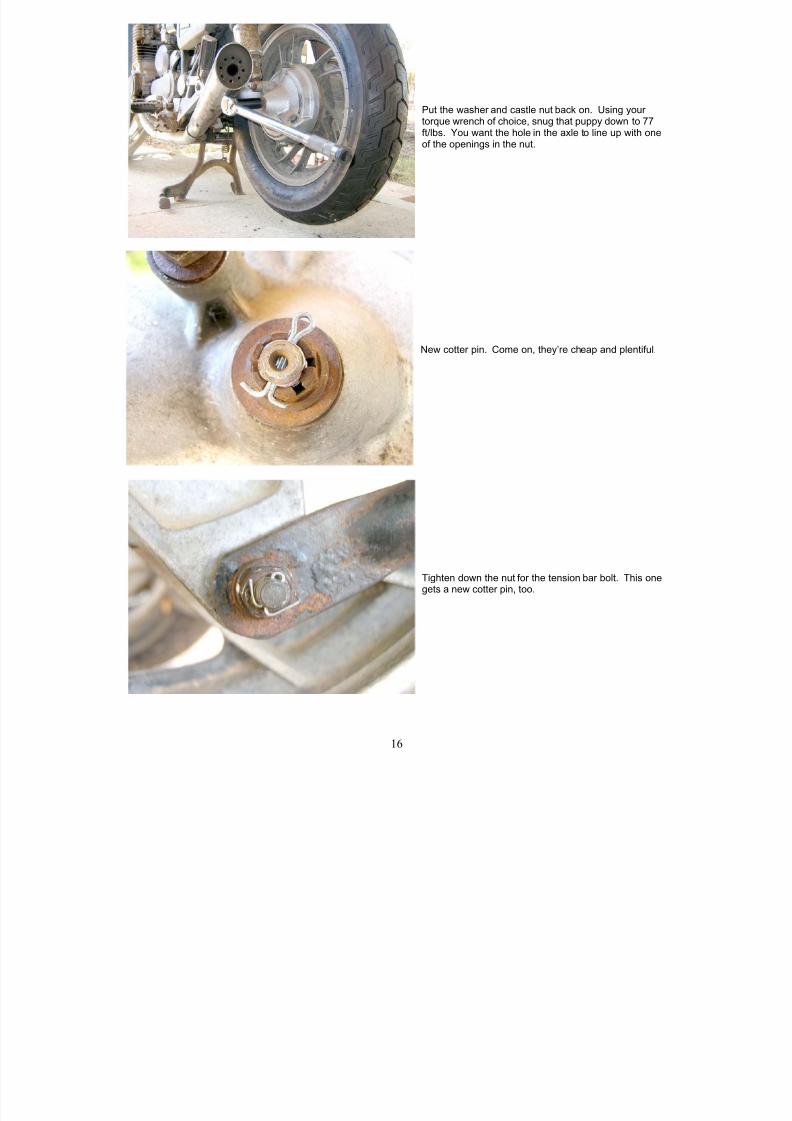
Put the washer and castle nut back on. Using yourtorque wrench of choice, snug that puppy down to 77ft/lbs. You want the hole in the axle to line up with oneof the openings in the nut.
New cotter pin. Come on, they’re cheap and plentiful.
Tighten down the nut for the tension bar bolt. This onegets a new cotter pin, too.

8/12/2019 Rear Drum Brakes
http://slidepdf.com/reader/full/rear-drum-brakes 18/22
17
Lastly, we adjust the brake pedal. With no load on thebrake lever, the wheel should spin freely. You shouldhear the pads start to grab when the foot pedal ispressed down about ½”, and the wheel should stopaltogether when the pedal travel (indicated by the redlines) is ¾” – 1”, or 20 – 30mm. Tweak the retainingnut on the threaded coupler rod to suit.
Please also bear in mind that when you first start to use your new rear brakes, you might not get quite the same stoppingpower that you’re used to, at least not right away. Why? Well, when the lever pushes the shoes against the drum, itdoesn’t push the whole shoe – just the bottom. Because these shoes are new and unworn, the contact patch between the
shoes and the drum will be smaller; smaller contact patch means less friction, which translates to less stopping power.This will increase over time as the shoes wear in and the size of the contact patch increases.

8/12/2019 Rear Drum Brakes
http://slidepdf.com/reader/full/rear-drum-brakes 19/22

8/12/2019 Rear Drum Brakes
http://slidepdf.com/reader/full/rear-drum-brakes 20/22
19
HCP4771 OEM rear drum brake shoes RETURN SPRING, use 2 per bike. A great idea to replace these every time youdo a rear brake shoe replacement. NOTE: these springs are already included in all of the aftermarket brake shoe kitslisted above. Fits all XJ550, XJ650, XJ700, and XJ750 models.
REAR DRUM BRAKE SYSTEM HARDWARE
HCP4812 OEM rear drum brake backing plate TENSION BAR. This is the large tubular rod that runs from the bottom of
the brake backing plate forward along the swingarm and holds the brake backing plate in rotational position. Fits all XJ550models.
HCP4811 OEM rear drum brake backing plate TENSION BAR. This is the large tubular rod that runs from the bottom ofthe brake backing plate forward along the swingarm and holds the brake backing plate in rotational position. Fits allXJ650, XJ700, and XJ750 models.
HCP4819 OEM rear drum brake backing plate tension bar RETAINING BOLT, tension bar to the backing plate. Fits allXJ550, XJ650, XJ700, and XJ750 models. Use 1 per bike.
HCP4814 OEM rear drum brake backing plate tension bar RETAINING BOLT, tension bar to the swingarm. Fits all XJ550XJ650, XJ700, and XJ750 models. Use 1 per bike.
HCP2537 OEM rear drum brake backing plate tension bar retaining bolt FLAT WASHER, tension bar to the backing plateor to the swingarm. Fits all XJ550, XJ650, XJ700, and XJ750 models. Use one on each end, total 2 per bike.
HCP2185 OEM rear drum brake backing plate tension bar retaining bolt LOCK WASHER, tension bar to the backing plateor to the swingarm. Fits all XJ550, XJ650, XJ700, and XJ750 models. Use one on each end, total 2 per bike.
HCP2109 OEM rear drum brake backing plate tension bar retaining bolt NUT, tension bar to the backing plate or to theswingarm. Fits all XJ550, XJ650, XJ700, and XJ750 models. Use one on each end, total 2 per bike:
HCP4112 OEM rear drum brake backing plate tension bar retaining bolt COTTER PIN, tension bar to the backing plate orto the swingarm. Fits all XJ550, XJ650, XJ700, XJ750, and XJ900 models. Use one on each end, total 2 per bike.
HCP16065 Aftermarket rear drum brake backing plate tension bar retaining bolt COTTER PIN, zinc-plated steel, for allXJ550, XJ650, XJ700, XJ750, and XJ900 models. Use one on each end, total 2 per bike.
HCP16066 Aftermarket rear drum brake backing plate tension bar retaining bolt COTTER PIN, stainless steel, for allXJ550, XJ650, XJ700, XJ750, and XJ900 models. Use one on each end, total 2 per bike.
REAR BRAKE SYSTEM ROD AND HARDWARE
The rear brake COUPLER ROD transmits the pedal motion from the pivot shaft to the rear brake LEVER ARM (on drumbrake systems), which turns actuates the brake shoes via a SHOE CAMSHAFT. A variety of special fasteners andhardware pieces are used in this system to insure its proper performance.
HCP3879 OEM rear brake COUPLER ROD, for all XJ550 Seca models.
HCP9134 OEM rear brake coupler rod CLEVIS PIN, connects the forward end of the rod to the pivot shaft arm. Fits allXJ550 models, XJ650 Maxim, XJ700 models, and XJ750-X models.
HCP11358 OEM rear brake coupler rod CLEVIS PIN, connects the forward end of the rod to the pivot shaft arm. Fits allXJ650 Midnight Maxim models.
HCP10571 OEM rear brake coupler rod CLEVIS PIN, connects the forward end of the rod to the pivot shaft arm. Fits allXJ650RJ Seca, XJ650 Turbo, and all 1981-83 XJ750 models.

8/12/2019 Rear Drum Brakes
http://slidepdf.com/reader/full/rear-drum-brakes 21/22
20
HCP11364 OEM rear brake coupler rod CLEVIS PIN, connects the forward joint rod to the rear coupler rod. Fits all XJ700and XJ750-X models.
HCP8387 OEM rear brake coupler rod CLEVIS PIN, connects the forward end of the rod to the pivot shaft arm. Fits all1984-85 FJ600 and all XJ900RK, RL, N/FN, and F models.
HCP3575 OEM rear brake coupler rod clevis pin FLAT WASHER, used with the clevis pin at the forward end of thecoupler rod to the pivot shaft arm connection. Use 1 on all XJ550 models and XJ650 Maxim, and 2 on all XJ700 modelsand XJ750-X models.
HCP11362 OEM rear brake coupler rod clevis pin FLAT WASHER, used with the clevis pin at the forward end of thecoupler rod to the pivot shaft arm connection. Use 1 on all XJ650 Midnight Maxim models.
HCP3559 OEM rear brake coupler rod clevis pin FLAT WASHER, used with the clevis pin at the forward end of thecoupler rod to the pivot shaft arm connection. Use 1 on all XJ650RJ Seca, XJ650 Turbo, 1981-83 all XJ750 (exceptMidnight Maxim) models, all XJ900RK, RL, N/FN, and F models, and XJ1100 models.
HCP4112 OEM rear brake coupler rod clevis pin COTTER PIN, used with the clevis pin at the forward end of the couplerrod to the pivot shaft arm connection. Use 1 on all XJ500, XJ650, and 1981 -84 XJ750 models, and use 2 on all XJ700and XJ750-X models.
HCP16065 Aftermarket rear brake coupler rod clevis pin COTTER PIN, zinc-plated steel, for all XJ500, XJ650, and 1981 -84 XJ750 models, and use 2 on all XJ700 and XJ750-X models.
HCP16066 Aftermarket rear brake coupler rod clevis pin COTTER PIN, stainless steel, for all XJ500, XJ650, and 1981 -84XJ750 models, and use 2 on all XJ700 and XJ750-X models:
HCP4046 OEM rear brake coupler rod clevis pin COTTER PIN, used with the clevis pin at the pivot shaft arm connection.Use 1 on all XJ1100 models.
HCP16061 Aftermarket rear brake coupler rod clevis pin COTTER PIN, zinc-plated steel, for all XJ1100 models. Use 1per bike.
HCP16062 Aftermarket rear brake coupler rod clevis pin COTTER PIN, stainless steel, for all XJ1100 models. Use 1 perbike.
HCP3874 OEM rear brake coupler rod COMPRESSION SPRING, used at the rear of the coupler rod where the brakeactuating lever arm attaches. Use on all XJ550, XJ650 (except Midnight Maxim), XJ700, and XJ750 (except MidnightMaxim) models.
HCP11494 Aftermarket rear brake coupler rod COMPRESSION SPRING, used at the rear of the coupler rod where thebrake actuating lever arm attaches. Use on all XJ550, XJ650 (except Midnight Maxim), XJ700, and XJ750 (exceptMidnight Maxim) models.
HCP11344 OEM rear brake coupler rod COMPRESSION SPRING, used at the rear of the coupler rod where the brakeactuating lever arm attaches. Use on all XJ650 Midnight Maxim and XJ750 Midnight Maxim models.
HCP9135 OEM rear brake coupler rod PIVOT PIN, used at the rear of the coupler rod where the brake actuating leverarm attaches. Use on all XJ550, XJ650 (except Midnight Maxim), XJ700, and XJ750 (except Midnight Maxim) models.NOTE: Midnight Maxim models used this same pin, but it was plated black.
HCP11495 Aftermarket rear brake coupler rod PIVOT PIN, used at the rear of the coupler rod where the brake actuatinglever arm attaches. Use on all XJ550, XJ650 (except Midnight Maxim), XJ700, and XJ750 (except Midnight Maxim)models. NOTE: Midnight Maxim models used this same pin, but it was plated black.
HCP9136 OEM rear brake coupler rod pivot pin RETAINING NUT, used at the rear of the coupler rod where the brakeactuating lever arm attaches. Use on all XJ550, XJ650 (except Midnight Maxim), XJ700, and XJ750 (except MidnightMaxim) models.

8/12/2019 Rear Drum Brakes
http://slidepdf.com/reader/full/rear-drum-brakes 22/22
HCP11496 Aftermarket rear brake coupler rod pivot pin RETAINING NUT, used at the rear of the coupler rod where thebrake actuating lever arm attaches. Use on all XJ550, XJ650 (except Midnight Maxim), XJ700, and XJ750 (exceptMidnight Maxim) models.
HCP11345 OEM rear brake coupler rod pivot pin RETAINING NUT, used at the rear of the rod where the lever armattaches. Use on all XJ650 Midnight Maxim and XJ750 Midnight Maxim models.
HCP9118 OEM rear brake actuating LEVER ARM, attaches to the rear of the coupler rod via the spring-loaded pin, andthen to the splined shoe actuator camshaft. Use on all XJ550 models and XJ650 Maxim models. Bright polished finish.
HCP1768 OEM rear brake actuating LEVER ARM, attaches to the rear of the coupler rod via the spring-loaded pin, andthen to the splined shoe actuator camshaft. Use on all XJ650 Midnight Maxim and XJ750 Midnight Maxim models. Blackplated finish.
HCP16420 Aftermarket rear brake actuating LEVER ARM, attaches to the rear of the coupler rod via the spring-loadedpin, and then to the splined shoe actuator camshaft. Use on all XJ650 Turbo models. Chrome plated finish. Cincho bolt isincluded.
HCP1769 OEM rear brake actuating LEVER ARM, attaches to the rear of the coupler rod via the spring-loaded pin, andthen to the splined shoe actuator camshaft. Use on all XJ650RJ Seca and XJ750 Seca models. Bright polished finish.
HCP1772 OEM rear brake actuating LEVER ARM, attaches to the rear of the coupler rod via the spring-loaded pin, andthen to the splined shoe actuator camshaft. Use on all XJ700 models and XJ750 (except Midnight Maxim) models. Bright
polished finish.
HCP4781 OEM rear brake actuating lever arm CINCH BOLT, attaches to the lever arm to the actuating camshaft. Use onall XJ550, XJ650, XJ700, and XJ750 models.
copyright 2013 xj4ever.com and Schmuckatelli Heavy [email protected]