raspberrypi: analogue input with capacitor (node.js)
DESCRIPTION
In this work package you can use a digital input to “calculate“ analogue values. We use a light sensor for analogue input and a capacitor which enables us to get different values at different light conditions. Overview:Node.js CodeUnderstand the CodeTest your CodeCircuit SchematicUseful ResourcesTRANSCRIPT
handson.dmt.fh-joanneum.at
© Carelse, Pauger, Pilz 1
RASPBERRY PI
Workpackage: Analogue Input with Capacitor (node.js)
Description: In this work package you can use a digital input to “calculate“ analogue values. We use a light sensor for analogue input and a capacitor which enables us to get different values at different light conditions.
Difficulty (1-10): 6
Overview: Node.js Code
Understand the Code
Test your Code
Circuit Schematic
Useful Resources
Requirements: Hardware: Raspberry Pi & Standard Equipment Capacitor (100uF) Light Sensor Straps
Software: node.js node Libraries: onoff, sleep

Instructions handson.dmt.fh-joanneum.at
© Carelse, Pauger, Pilz 2
ANALOGUE INPUT WITH CAPACITOR Due to the fact that the Raspberry Pi has no analogue input we simulate an analogue input with the help of a capacitor.
The capacitor acts like a bucket and the resistor (light sensor) like a thin pipe. To fill the bucket up with a thin pipe it takes some time. If there is much light the resistor (light sensor) is lower and so the capacitor is loaded faster. Depending on the light conditions the capacitor needs more or less time to load. So we get different “analogue” values.
If you use the (node.js) code below you need a 100uF capacitor. For the python code, which you can find on http://learn.adafruit.com/basic-resistor-sensor-reading-on-raspberry-pi/overview you need a 1uF capacitor. This is because the python code is much faster and so the capacitor does not need such a high capacity. If the capacity is to low, the capacitor “fills” the bucket before the complete code is executed and so you will get no results (this is the case if you use a 1uF capacitor with node.js code)
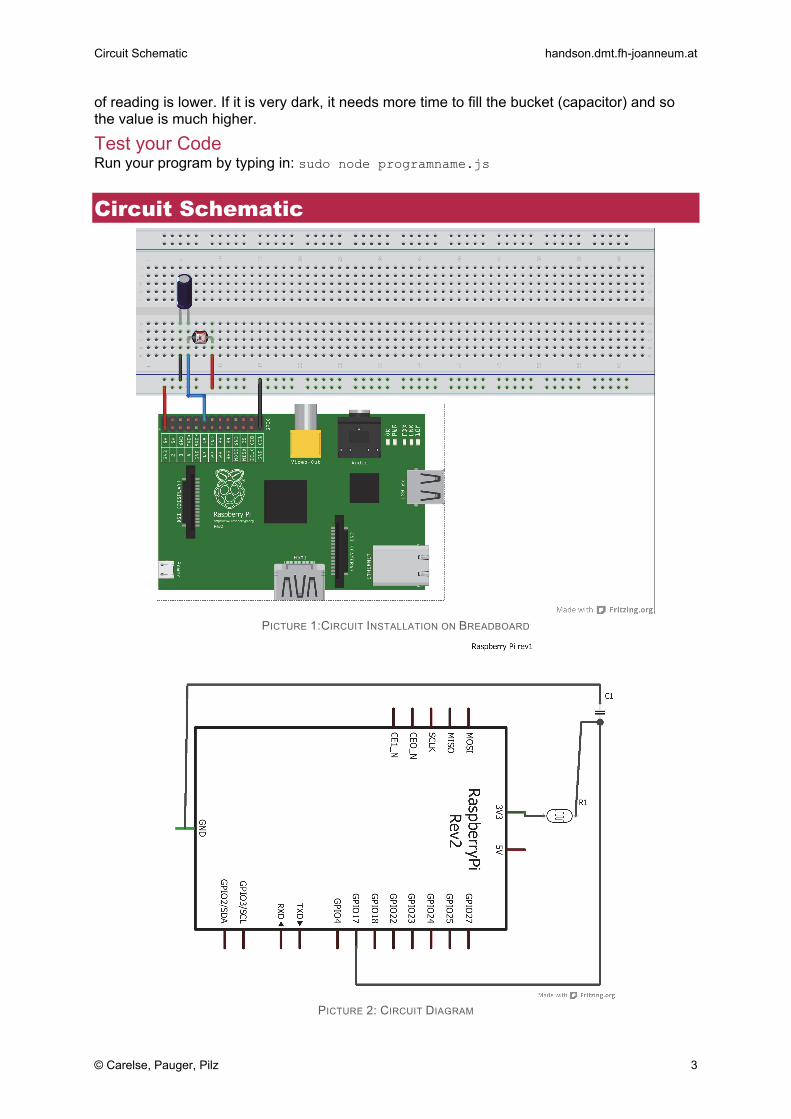
Instructions Create Circuit Schematic like described in picture 1 and 2. Be careful to connect the negative lead of the capacitor (shorter one, also marked with polarity band) to ground.
After that you can write your code:
node.js Code //require onoff to get access to gpios var gpio = require('onoff').Gpio; //require sleep to enable waiting for some time var sleep = require('sleep'); //function which always returns one value if the pin changes his value function RCtime(pin){ //variable for saving our own-created "analogue" value var reading = 0; //set pin to out and value to 0 var sensor = new gpio(pin, 'out'); sensor.write(0); //wait for 0.1 seconds sleep.usleep(100000); //set pin as input sensor = new gpio(pin, 'in', 'both'); //as long as the value of the pin is not reaching state 1 increase //value reading while (sensor.readSync() == false){ reading++; } //if value of pin is 1, return "analogue" value return reading; }; while (true){ //print analogue value console.log(RCtime(18)); };
Understand the code The while loop is adding 1 to the variable reading, as long as the value of the pin is digital 0. If there is much light (low resistor), the value of the pin changes faster to 1 and so the value
Circuit Schematic handson.dmt.fh-joanneum.at
© Carelse, Pauger, Pilz 3
of reading is lower. If it is very dark, it needs more time to fill the bucket (capacitor) and so the value is much higher.
Test your Code Run your program by typing in: sudo node programname.js
Circuit Schematic
PICTURE 1:CIRCUIT INSTALLATION ON BREADBOARD
PICTURE 2: CIRCUIT DIAGRAM
Trouble Shooting handson.dmt.fh-joanneum.at
© Carelse, Pauger, Pilz 4
Trouble Shooting If you have problems with importing/requiring the libraries, go to worksheet “Setup Node.js on the Raspberry Pi” and carefully read threw “Install Libraries”.
If you have problems with running your application with sudo rights go to worksheet “Setup Node.js on the Raspberry Pi” and read threw “quick2wire-gpio-admin”.
Useful Resources Library onoff
https://github.com/fivdi/onoff
Instruction with python code http://learn.adafruit.com/basic-resistor-sensor-reading-on-raspberry-pi/overview
All about Capacitors http://www.beavisaudio.com/techpages/Caps/