raspberry pi twitter monitor - amazon web services · can also sign up if you don’t have a...
TRANSCRIPT

Raspberry Pi Twitter MonitorBlink an LED whenever specific hashtag appears in a Tweet
Written By: Feitan
Raspberry Pi Twitter Monitor
© 2017 www.botsbits.org Page 1 of 15

INTRODUCTION
Like it or not, Twitter is a force to be reckoned with. Millions of people use Twitter to talk aboutgeneral happenings in the world and their lives. Large events like conventions, elections, anduprisings have a habit of crashing the Twitter servers.
You, an avid DIY hacker, want to know how to use that massive stream of digital social media. Thereare plenty of fun projects built around Tweeting something that happens. Today, we offer you analternative: make something happen when a specific Tweet occurs.
This is a basic project that will walk you through the steps to get an LED flashing when a specifichashtag appears in the Twitter stream. While a blinking LED might not be the most exciting ofoutcomes, attaching Twitter to the physical world will get you started on creating that Twittercontrolled robot.
Raspberry Pi Twitter Monitor
© 2017 www.botsbits.org Page 2 of 15

Step 1 — Raspberry Pi Twitter Monitor
Suggested Reading
We need to build a rather simpleLED circuit to connect to theRaspberry Pi’s GPIO header. Besure you are familiar with LEDsand resistors.
Light-emitting Diodes (LEDs)
Resistors
How to Use a Breadboard
Required Components
You will need to have a RaspberryPi running Linux of some sort. Werecommend the latest version ofRaspbian, as it comes pre-loadedwith Python and GPIO libraries.Additionally, the Pi will need to beconnected to the Internet so thatyou can monitor the Twitterstream.
This can be accomplished usingan Ethernet cable or a USB WiFidongle. If you like checklists, thisis for you:
Raspberry Pi Twitter Monitor
© 2017 www.botsbits.org Page 3 of 15

Step 2
Raspberry Pi
SD card loaded with Raspbian
USB Micro cable for power
Wall charger
Ethernet cable or USB WiFi dongle
Keyboard and monitor (unless youare using SSH to access your Pi)
2x Male-to-Female Jumper Wires
330 Ohm resistor
Raspberry Pi Twitter Monitor
© 2017 www.botsbits.org Page 4 of 15
Step 3
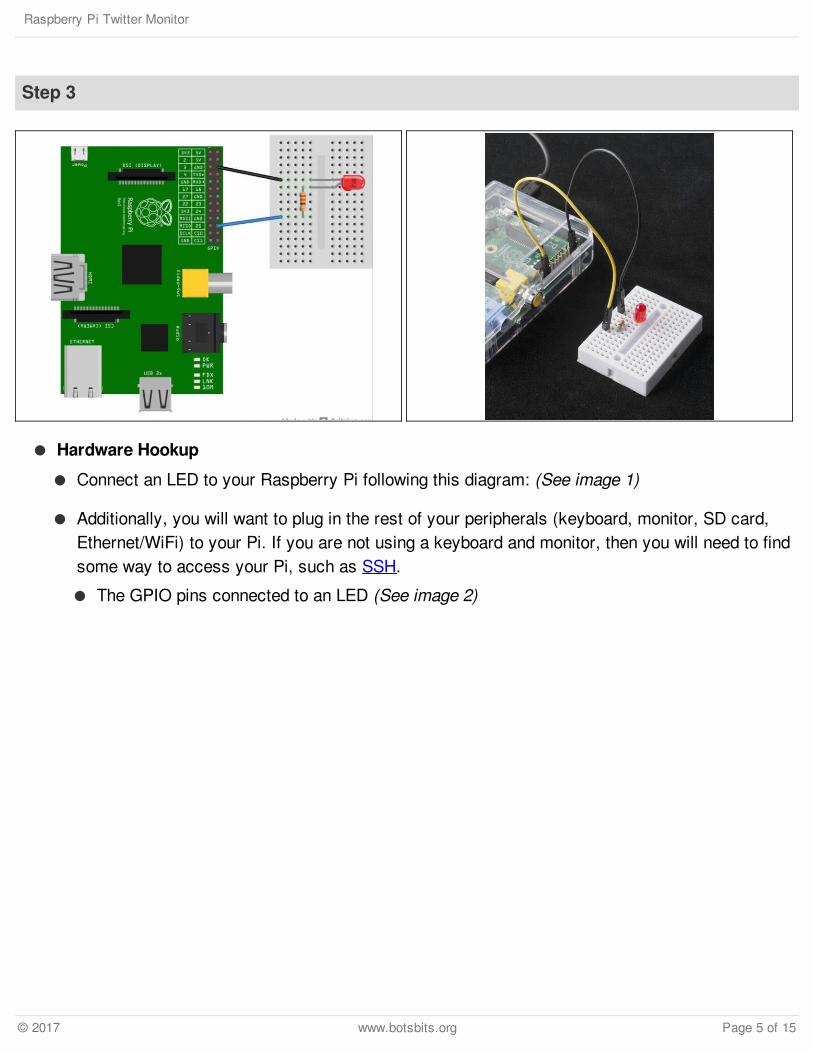
Hardware Hookup
Connect an LED to your Raspberry Pi following this diagram: (See image 1)
Additionally, you will want to plug in the rest of your peripherals (keyboard, monitor, SD card,Ethernet/WiFi) to your Pi. If you are not using a keyboard and monitor, then you will need to findsome way to access your Pi, such as SSH.
The GPIO pins connected to an LED (See image 2)
Raspberry Pi Twitter Monitor
© 2017 www.botsbits.org Page 5 of 15

Step 4
Register Your Twitter App
In order to interact with Twitter (including searching, monitoring, posting, etc.), you will need toregister your application. This is accomplished by going to https://dev.twitter.com/.
Click the “Sign In” button at the top-right of the screen and enter your Twitter credentials (youcan also sign up if you don’t have a Twitter account). (See image 1)
Once you have signed in, click on your user icon, and select “My Applications.” (See image 2)
Click the “Create a new application” button, and you will be presented with a form to fill out aboutyour application. Fill out the name and description fields. For “Website,” you can put somethingrandom, like http://github.com or something else that looks legitimate.
At the bottom of the page, click the checkbox to agree to the rules, fill out the Captcha, and clickthe “Create your Twitter application” button. (See image 3)
Raspberry Pi Twitter Monitor
© 2017 www.botsbits.org Page 6 of 15

Step 5
Once completed, you will be presented with a dashboard for your registered application. You needto create an access token, so click the “Create my access token” button at the bottom of thescreen. (See image 1)
Wait a few seconds and then refresh the page. You should see a section titled “Your access token”at the bottom. Copy down the “Consumer key,” “Consumer secret,” “Access token,” and “Accesstoken secret.” We will need these for our application. Note that we set up this Twitter application asan example.
It will have been deleted by the time you read this, so don’t be trying to use our tokens! (See image2)
Raspberry Pi Twitter Monitor
© 2017 www.botsbits.org Page 7 of 15

Step 6
Install Required Packages
If you are using a relatively newrelease of Raspbian, it shouldalready contain Python and thenecessary modules to talk to thePi’s GPIO pins. We will still needto install modules to searchTwitter with Python. Several exist,but I recommend Twython if youare following this tutorial.
Boot up your Pi and connect tothe Internet (Ethernet, WiFi, etc.).If you use the X Windowsinterface, open up a consolewindow and install Twython:
sudo apt-get update
sudo apt-get install python-pip
sudo pip install twython
Raspberry Pi Twitter Monitor
© 2017 www.botsbits.org Page 8 of 15

Step 7
Code
With our packages installed, we can write our program. Open up a text editor and make a newPython script. For example:
nano TweetBlinky.py
In the new file, (See image 1) for the code:
Alternatively, you can download a zip file of the script here.
IMPORTANT: You will need to change the Twitter authentication tokens! Right now, they are set tomy example application. Copy the strings from the your dev.twitter.com page (the single quotes areneeded):
(See image 2)
Save and exit (ctrl + X and ‘y’ if you are using nano).
Raspberry Pi Twitter Monitor
© 2017 www.botsbits.org Page 9 of 15

Step 8
Dissecting the Code
We could just give you the codeto copy-and-paste into your Pi(which we did). However, thePython script is a bit morecomplicated than just blinking anLED, so we should take a momentto discuss what is going on.
At the top of the code, we importour necessary Python modules.We need “time” to call our ½second delay when we blink ourLED. “RPi.GPIO” is a pre-buildPython package for the RaspberryPi that gives us access to theGPIO pins. This is why werecommend the Raspbian build ofLinux.
Finally, “twython” is the packagethat connects us to Twitterallowing us to monitor the stream,search, and post.
import time
import RPi.GPIO as GPIO
from twython importTwythonStreamer
Raspberry Pi Twitter Monitor
© 2017 www.botsbits.org Page 10 of 15

Step 9
Next, we add our global constants. TERMS holds a string (or strings) of things we want to searchfor on Twitter. LED contains the pin number for the GPIO header. Note that this is the pin numberof the header and not the GPIO number.
The Twitter authentication constants hold the token strings that we copied from the dev.twitter.compage. Remember: you need to change this section to your specific Twitter token strings. (Seeimage 1)
The next section is the crux of the Twitter monitor. If you have never dealt with class inheritance orcallbacks before, we recommend brushing up on those concepts in order to really understand thissection of code.
We create a new class that inherits TwythonStreamer (a class within Twython).WhileTwythonStreamer handles a bunch of stuff in the background (including communicating with theTwitter API), we are only concerned with the callback on_success(). Specially named method thatgets called whenever a Tweet appears matching our search terms criteria.
The important thing to understand is that we never call this method from within our script. Anoutside force (e.g. thread, program) calls on_success() for us. We just have to define whathappens when that method is called. To use it, we create a BlinkyStreamer object and Twythonhandles the rest.
Inside of on_success() is what we want to happen whenver a successful Twitter hit occurs. In thiscase, we make sure there is a ‘text’ field within the Tweet (meaning that the Tweet contains actualtext from a user), and we print the Tweet’s text to the console and flash the LED for ½ second.(See image 2)
Raspberry Pi Twitter Monitor
© 2017 www.botsbits.org Page 11 of 15

Step 10
For those of you that are code-savvy, you might say, “Hey, wait aminute! That sleep function isblocking! You can’t receive tweetswhile flashing the LED.” And youwould be correct. This is just a plainsimple way to monitor Tweets.
To “properly” do this, you wouldwant to set up a separate thread inPython that monitors Tweets andputs them into a queue. Anotherthread would read that queue andflash the LED as quickly as Tweetsare put into the queue. Threading isa bit too much for this tutorial, but ifyou would like to learn how,feel freeto check out Threading in Python.
The GPIO setup section should lookfamiliar if you have ever played withan Arduino or other microcontrollers.We need to tell the Raspberry Pi thatwe will be referencing its GPIOheaders by board number (pin 1, pin2, pin 3, etc.), that we want our LEDpin to be an output, and initialize theLED to off (logic LOW).
# Setup GPIO as output
GPIO.setmode(GPIO.BOARD)
GPIO.setup(LED, GPIO.OUT)
GPIO.output(LED, GPIO.LOW)
Raspberry Pi Twitter Monitor
© 2017 www.botsbits.org Page 12 of 15

Step 11
Finally, we create an instance of ourBlinkyStreamer class and let it do itsthing. When we create aTwythonStreamer object (remember:our BlinkyStreamer inheritsTwythonStreamer), we need to feedit our Twitter authenticationinformation that we set earlier.Twython uses this information toconnect to the Twitter servers.
We provide the filter() method withinTwythonStreamer some searchterms and the streamer begins tomonitor Twitter. Whenever one ofthe terms appears in the Twitterstream, the on_success() method(defined above) is called. (Seeimage 1)
Because the filter() method isblocking, the program will runforever until we manually kill it. Wecan terminate the program bypressing ctrl+c keys. We wrap thestreamer calls in a try/catchstatement so that the GPIO pins canbe released when we tell Python toexit.
If we do not do this, Python willissue a stern warning that the GPIOpins are in use by another program.
Raspberry Pi Twitter Monitor
© 2017 www.botsbits.org Page 13 of 15

Step 12
Run!
This is important. In order to use the GPIO pins from a Python script, you need to run the scriptwith superuser privileges. So, enter the following command:
sudo python TweetBlinky.py
Sit back and watch the fun! As people issue the ubiquitous #lol hashtag, you will see the Tweetsappear in your console.
DISCLAIMER: This is Twitter we are talking about. We can make no guarantee regarding theappropriateness of comments that might appear on your screen. (See image 1)
Now, look over at your Raspberry Pi. That LED that you hooked up should flash with everyincoming Tweet that contains the hashtag #lol. (See image 2)
The LED flashes for ½ second on an incoming Tweet with the appropriate hashtag
When you want to end the program, press ctrl+c.
Raspberry Pi Twitter Monitor
© 2017 www.botsbits.org Page 14 of 15

This document was last generated on 2017-06-26 05:08:52 AM.
Step 13
Going Further
So, you got something thatflashed to notify you of Tweets.Great! The LED is just a start.Just about anything can behooked up to the Raspberry Pi tonotify you of Twitter activity. Letyour imagination run wild…
A car horn to alert you ofincoming Tweets? Why not?!
If you want to dig deeper into theTwython package, check out theGithub repository here:https://github.com/ryanmcgrath/twython
The Raspberry Pi may not be asgood at connecting to low-levelperipherals as the Arduino, but itdoes offer a number of options onits 26-pin header. If you arelooking to hook up additionalhardware to the Pi, take a look atthe RPi’s Low-Level Peripheralspage. Remember: the Pi uses3.3V logic!
Raspberry Pi Twitter Monitor
© 2017 www.botsbits.org Page 15 of 15