rain gardens gardens are landscape features that capture water runoff from your property and manage...
TRANSCRIPT

Rain Gardens A How-To Guide

Introduction Rain gardens are landscape features that capture water runoff from your property and manage it onsite before it can enter our streets and waterways. The purpose of a rain garden is to reduce the amount of water entering our sewer system, which is accomplished by capturing runoff from your roof, yard, or parking lot and allowing it to infiltrate into the ground as would occur under natural conditions. In contrast, impervious surfaces such as pavement allow water to rush off the surface, often flowing untreated into our waterways where it can impact our health and aesthetic and recreational appeal of waterways. Rain gardens utilize “native” plants that have adapted to local conditions over thousands of years. This guide will assist you in the process of planting a rain garden. There are many ways to plant a rain garden, but the steps in this guide are designed to ensure your garden functions properly as a buffer to water runoff. By planting a rain garden you are not only beautifying your property and providing a haven for local wildlife, but you are also doing your part to protect your community from flooding and degraded water quality.
Landscape comparison
+ = YES × = NO − = Minimal Rain Garden Common Garden
Average Lawn
Beautiful plants throughout the year + + × Provides habitat for native wildlife such as butterfly’s + − × Reduces pollution in our waterways + − − Protects our communities from flooding and stream damage + − − Can survive regional weather conditions + × × Increases water infiltration into the soil + × × Purifies our water naturally + − × Reduces fossil costs by decreasing mowable land + + × Table 1: Landscape Comparison

1
Contents Location ________________________________________________________________________________ 4
Depth __________________________________________________________________________________ 5
Soil Characteristics ________________________________________________________________________ 7
Drainage Area ___________________________________________________________________________ 8
Garden Size _____________________________________________________________________________ 10
Garden Length and Width _________________________________________________________________ 11
Construction ____________________________________________________________________________ 11
Planting Your Garden _____________________________________________________________________ 13
Maintaining Your Garden _________________________________________________________________ 14
Rain Garden Pictures _____________________________________________________________________ 15
Sources of Rain Garden Information _________________________________________________________ 18
2
Frequently Asked Questions
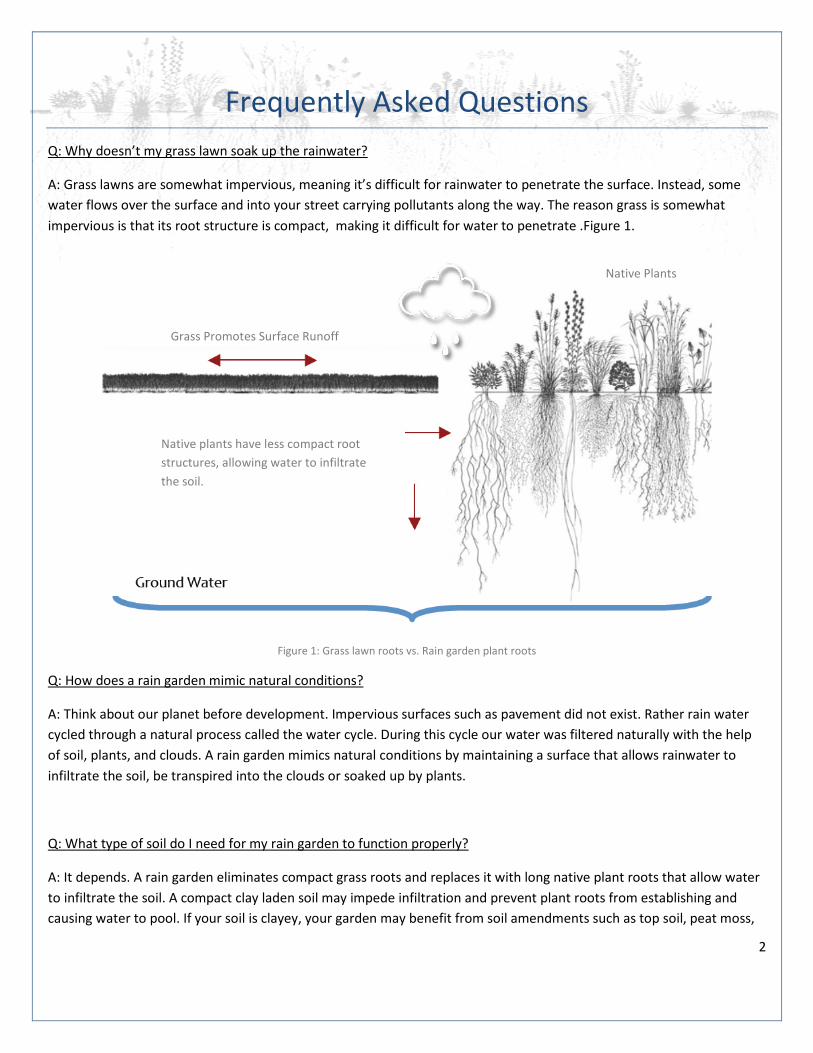
A: Grass lawns are somewhat impervious, meaning it’s difficult for rainwater to penetrate the surface. Instead, some water flows over the surface and into your street carrying pollutants along the way. The reason grass is somewhat impervious is that its root structure is compact, making it difficult for water to penetrate .Figure 1.
Q: Why doesn’t my grass lawn soak up the rainwater?
Figure 1: Grass lawn roots vs. Rain garden plant roots
A: Think about our planet before development. Impervious surfaces such as pavement did not exist. Rather rain water cycled through a natural process called the water cycle. During this cycle our water was filtered naturally with the help of soil, plants, and clouds. A rain garden mimics natural conditions by maintaining a surface that allows rainwater to infiltrate the soil, be transpired into the clouds or soaked up by plants.
Q: How does a rain garden mimic natural conditions?
A: It depends. A rain garden eliminates compact grass roots and replaces it with long native plant roots that allow water to infiltrate the soil. A compact clay laden soil may impede infiltration and prevent plant roots from establishing and causing water to pool. If your soil is clayey, your garden may benefit from soil amendments such as top soil, peat moss,
Q: What type of soil do I need for my rain garden to function properly?
Grass Promotes Surface Runoff
Native plants have less compact root structures, allowing water to infiltrate the soil.
Native Plants

3
compost, sand or a mixture specified by your nursery. Also, your plant selection should consider your soil type. Plants have adapted to certain conditions over thousands of years and you want to be sure your plants are adapted to the type of soil and lighting on your property.
A: Your garden may require weeding for the first couple of years. After the initial weeding period rain garden plants should out-compete the weeds. In the long run a rain garden likely requires less maintenance than your average flower garden. Keep in mind maintenance is subjective. If you desire a certain look for your garden then you may decide to undertake additional maintenance activities.
Q: Do rain gardens require a lot of maintenance?
A: A rain garden is strategically planted so that runoff from impervious surfaces is directed into the garden. Figure 2. Once water enters the garden it will either evaporate, infiltrate the soil, or be soaked up by plants. Your garden should not hold water for more than 48 hours. As a result, mosquito development should not be a problem.
Q: How does a rain garden function?
Figure 2: Capturing the runoff

4
Creating a Rain Garden Four variables are important in creating a well functioning rain garden: location, depth, soil type and drainage area. Once these variables have been determined you can use the results to calculate a size for your garden.
Location
It is important that your rain garden be located in an area where it can intercept water runoff. This could be near a downspout from your home or a parking lot. The front yard, back yard, side yard, or median are all appropriate locations for a rain garden as long as water runoff flows toward the garden. The top of a hill, for example, would be an inappropriate location to plant your garden as it would receive zero runoff. Other considerations include:
Rain Garden Capacity
A garden planted closer to your home will capture less water than a garden planted at the end of your yard. While a garden close to your home may receive water from a single downspout, a garden further away receives water from the downspout in addition to yard runoff. Figure 3. Generally, the further your garden is from the source of runoff the larger it will be.
Beautification
A rain garden with native plants produces amazing sights and smells and provides habitat for butterflies and other insects. You may want to locate your garden in a location appropriate to enjoy these benefits.
Property Constraints
• Your garden should be planted at least 10 feet from a foundation; • Avoid high traffic areas where soil compaction may be an issue; • Integrate into existing gardens; • Never plant over septic systems; • Avoid roots by planting away from large trees; • Avoid areas where water typically pools for long periods. This may indicate a lack of infiltration; • Planting the garden on a flat surface can make construction easier; • Choose a location in either full or partial sun.

5
Figure 3: Garden proximity to the source of runoff
Depth
A typical rain garden ranges between 4 to 8 inches deep. Generally, a garden less than 4 inches deep will need a larger surface area while a garden more than 8 inches deep would need less surface area to collect a comparable amount of runoff. The depth of your garden will depend on the slope of your property. If your property is flat, simply dig a 3-5 inch garden. However, if your yard slopes, you will have to do a simple calculation to determine the appropriate depth. An example of this calculation is provided below and the procedure is illustrated in Figure 4. The end goal is to make your garden surface as level as possible despite the slope. Digging the garden is covered in a later section.
Step 1
• Pound two stakes into your yard 15 feet apart. One should be uphill and another downhill.
• Tie a string to the bottom of your uphill stake. Tie the other end to the downhill stake at the point where the string is level.
• Measure the string width in inches
• Measure the string height on the downhill stake between the string and the ground.
.
Captures roof runoff only
Captures roof runoff and yard runoff

6
Step 2
• Slope Calculation
o Example
String height = 5 inches
String length = 15 feet or 180 inches
Calculation: String height in inches divided by string length in inches times 100 = slope percentage
Slope = 5 in ÷ 180 in × 100 = 2.7%
Step 3
Using the slope you just calculated, choose a depth for your garden.
• < 4% slope = 3-5 inch depth
• Between 5% - 7% slope = 6-7 inch depth
• Between 8% - 12% slope = 8 inch depth
Figure 4: Garden Depth

7
Soil Characteristics
It is important to know the soil type in the area of your planned rain garden. For a rain garden to be effective water must penetrate, also called infiltrate, into the soil. For instance, a heavy clay soil infiltrates water very slowly and also inhibits seed germination due to its dense, compact structure. If you know this beforehand you can take the necessary steps to amend your soil to make it suitable for planting. It is also good to know your soil type before choosing the plants for your garden. Plants have adapted to specific conditions over thousands of years and you want to be sure the plants you choose can thrive in your specific soil type. If you plan on seeking assistance from a nursery in selecting your plants, knowing your soil type beforehand will ensure you get the answers you want on your first visit. Figure 5 illustrates a simple approach to check your soil type.
Checking Your Soil Type
Figure 5: Soil Test

8
Testing Your Soil’s Infiltration
Soil infiltration is the permeation of rain water into the soil through pores and open spaces. A rain garden should be planted in an area where water can infiltrate, not pool for long periods. Consequently, a low area in your yard that pools constantly is likely not suitable for a rain garden. By understanding your soil infiltration you can get a rough estimate of the suitability of your site for a rain garden.
To test the infiltration of your soil dig a hole 6-8 inches deep in the potential garden location. Fill the hole with water and observe how long it takes for the water to infiltrate into the soil. If any water stays in the hole for 12 hours or longer, the soil may not be suitable for a rain garden.
Important Note on Clay Soils
Certain areas of the Lake Michigan coastal region have clayey soils. If you find that clay is the dominant soil type in your yard it is best to choose another location. If clay is less dominant but present in noticeable amounts, you may need to take a few additional steps to grow an effective rain garden. Those steps may include:
1. Mix 2 to 4 inches of organic matter into the soil e.g topsoil, peat, compost, or black dirt.
2. For soils with medium clay content, it may be beneficial to remove approximately 1-2 feet of the existing soil and replace it with a soil more suitable for rain gardens.
3. Consider a soil mixture of 50 - 60 percent sand, 20 – 30 percent topsoil, and 20 – 30 percent compost. The mix should contain no more than 10 percent clay.
Drainage Area
In general, the larger your drainage area the larger your rain garden should be. Typically, each downspout contributes 25% of drainage from a roof. However, you may want check on your own by making a visual inspecting during a rain storm. Keep in mind a garden further away from the downspout collects water from the lawn in addition to the roof. This surface area should be included in the drainage calculation to ensure your garden has the capacity to capture the amount of water you intend.
Calculating Your Drainage Area
The Goal: To determine the % of your roof that feeds your downspout. A rough estimate will do.
Your drainage area is equal to the square footage of the area draining to your garden and may include a roof and lawn. For gardens less than 30ft from your source, such as a roof or parking lot, a typical drainage area is simply the square footage of your source area. If you do not have this information use a measuring tape to determine the length and width of your building. Then, multiply the length times the width to get your total square footage. If your garden is receiving runoff from a single downspout,

9
multiply your square footage by .25. The resulting value represents 25% of your roof surface area in square feet. You will use this number later.
For gardens greater than 30ft from the source you should consider the lawn area in addition to the roof area. Measure the portion of the lawn that drains into the rain garden. For example, if you have 4 downspouts, visualize your building in 4 quadrants, each quadrant receiving water from a downspout (Figure 6). Next measure the length and width of the lawn area draining to your garden. Multiply the length and width together and add this number to the square footage you calculated for your roof or parking lot.
Example Drainage Area Calculations:
• Total roof surface area = length times width Single downspout less than 30 feet from a house
• Roof surface area multiplied by .25 = square feet from ¼ of your roof. • 2,100 sq. ft. x .25 = 525 sq. ft. • Your drainage area in this example would be 525 square feet.
• Total roof surface area = length times width Single downspout greater than 30 feet from a house
• Roof surface area multiplied by .25 = square feet from ¼ of your roof. • Yard drainage area = length times width of the yard quadrant draining to the garden • Add the roof surface area calculation to the yard calculation to get drainage area
• Multiply the length times the width of the surface area to get the drainage area General surface area such as a parking lot
Figure 6: Runoff Area

10
Garden Size
Finally, you will use the information determined in our previous calculations to calculate a recommended rain garden size.
The tables below include size factors for a rain garden, a number we can use to determine an appropriate rain garden size. The factor you choose will depend on your previous calculations in addition to your soil type and distance of your garden from the source. Follow the steps below.
1. Choose the table with the appropriate distance of your garden from the source
2. Find the column that includes your garden depth
3. Multiply the size factor from the table below by the total drainage area.
Example
Total drainage surface area times the size factor:
525 sq. ft x 0.19 = 99.74. So, your garden would be 99.75 square feet. In the next step you will determine the length and width of your garden.
Note: It is recommended that a garden over 300 square feet should be split into at least two gardens.
Table 2: Garden Size Factor

11
Garden Length and Width
GOAL: To ensure runoff is evenly distributed as it enters the garden.
Paying careful attention to the length and width of your garden will ensure it performs all the intended functions of runoff storage and infiltration.
Steps
1. Choose a width no greater than 15ft. The length is contingent on the width you choose.
2. Divide your garden square footage calculated in the previous step by the width you have just chosen. The result is your approximate garden length.
Example Calculation
Garden area i= 99.75 square feet
Chosen Width = 10 feet
Length = 99.75 / 10 = 9.9 ft
Construction
Killing the Grass (Optional)
If your rain garden is being constructed on an existing lawn, digging can be made easier by first killing the grass on your garden site. Killing the grass will also kill its root system, making it easier to dig the area. Grass can be killed with several non-chemical options, which are listed below. If you must use a chemical agent, Round-Up or something similar will work just fine.
Method 1: Place a non-clear plastic bag over the lawn in the shape of your garden. This process may take up to two-weeks before the grass is fully dead.
Method 2: Place newspapers approximately 10 pages thick over your proposed garden area. Place mulch on top of the newspapers to keep them in place.

12
Digging the Garden
1. You can use rope as a boundary guide for your garden. Dig the plot to the depth calculated previously. If your garden plot is on a slope, you will need to dig out high areas and fill in low areas with the same soil to make a level surface (Figure 7).
2. Place the soil on the edge where the berm will be located. A berm is a ridge around the bottom portion of the garden that prevents water from spilling over the garden. We will cover berms next.
3. Once dug, run a metal rake over the soil to decrease soil compaction and enhance root establishment.
4. If you are adding compost, you may do so after your garden is dug. However, remember that your original depth estimate does not include room for compost.
. Figure 7
Creating a Berm
Now that you have soil in the location of your berm, smooth and compact the soil by either stomping it with your feet or using a garden compaction tool. Any method will do as long as the soil is compacted enough to prevent it from eroding during a strong rain. You may wish to plant grass or mulch the berm for continued protection. Or, you may consider planting dry tolerant native plants on the berm since this location should not be in the path of water runoff.
Figure 8: Creating a Berm
13
Planting Your Garden
Native Plants
Native plants are an important component to a proper functioning rain garden. The term “native” is used to describe plants that are natural inhabitants of your region. These plants are important because they have adapted to the growing conditions in your region for thousands of years. As a result, they are more resilient to outside stressors and provide essential habitat for local wildlife that depend on these plants. Many plants sold in stores today are exotic or imported from outside regions. While these plants have gained popularity because of their availability and ornamental appeal, some are not well suited to your climate, nor do they offer habitat local wildlife is accustomed to.
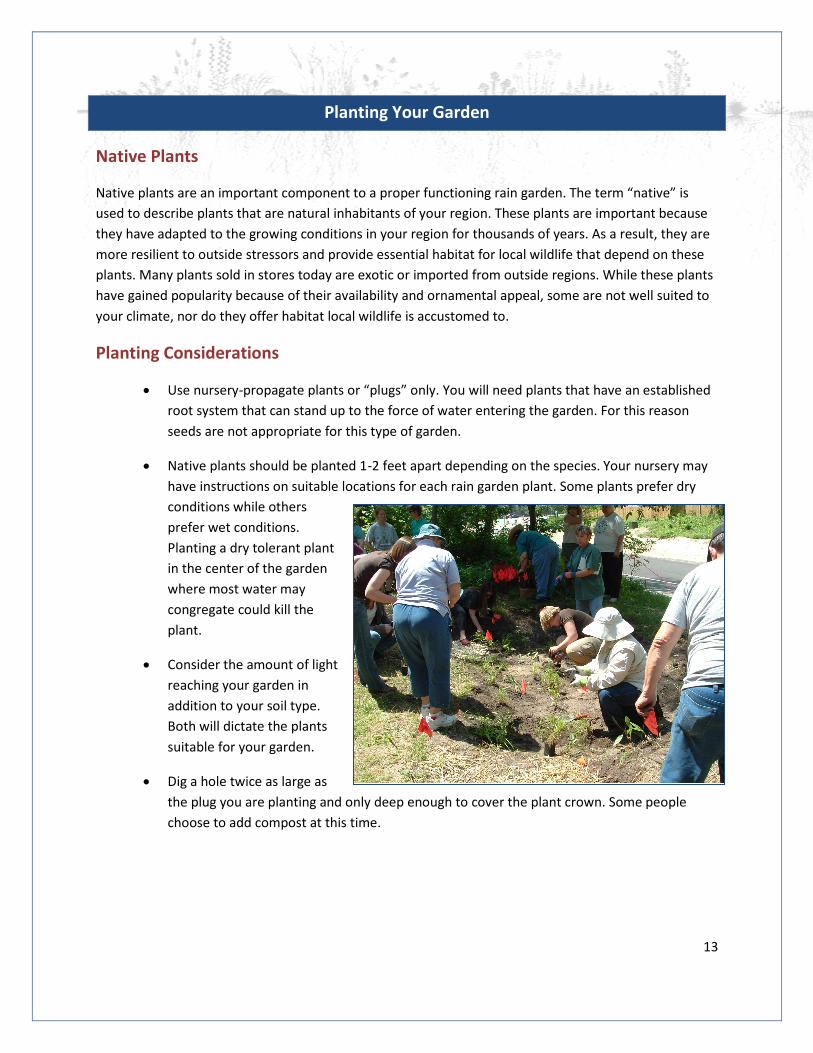
Planting Considerations
• Use nursery-propagate plants or “plugs” only. You will need plants that have an established root system that can stand up to the force of water entering the garden. For this reason seeds are not appropriate for this type of garden.
• Native plants should be planted 1-2 feet apart depending on the species. Your nursery may have instructions on suitable locations for each rain garden plant. Some plants prefer dry conditions while others prefer wet conditions. Planting a dry tolerant plant in the center of the garden where most water may congregate could kill the plant.
• Consider the amount of light reaching your garden in addition to your soil type. Both will dictate the plants suitable for your garden.
• Dig a hole twice as large as the plug you are planting and only deep enough to cover the plant crown. Some people choose to add compost at this time.

14
Native Plant Ideas
The links below list potential rain garden plants and their characteristics. Many nurseries offer rain gardens packages that include all the plants you’ll need for a rain garden. This is the easiest route to take because you avoid traveling to different locations looking for your plants. Often nurseries will ship plants, so if you don’t have a local provider you still have a source.
Resources
• Indiana Lake Michigan Coastal Program
o Rain garden plants by zone – dry, moist, or wet conditions.
• Indiana Native Plant and Wildflower Society*
o Indiana nurseries and landscape designers providing plants native to Indiana
o Comprehensive native plant information for Indiana
* The DNR does not endorse any single plant provider
Maintaining Your Garden
Water
Ensure the plants receive a minimum of 1 inch of water per week for 4-6 weeks. Once established, your plants will require little maintenance because they have adapted to your climate over thousands of years. This includes drought conditions.
Mulch
Apply mulch 3 inches thick while avoiding burying the crown of the plants. Also, choose denser mulch that will not float once rain enters the garden.

15
Weeds
Weeding will be necessary for the first several years to ensure your young plants become established. Over time your native plants will out-compete the weeds and weeding will become more infrequent. It is common for some native plants to look like weeds before they bloom. You may want to place identification tags next to your young plants or take pictures of them to remind you of their appearance.
Fertilizer
It should not be necessary to fertilize your garden. The native plants should thrive in your garden as long as they are appropriate to your soil conditions and sunlight availability.
Rain Garden Pictures
Early Rain Garden
3 month old rain garden
2) 200906-rain-garden.jpg. Prairie Fire. Accessed 3/23/11.
1) 200905-rain-garden.jpg. Prairie Fire. Accessed 3/23/11.
1
2

16
3) netpiclg.jpg. City of Lincoln, NE. Accessed 2/23/11. Link
4) 116127558075018.jpg. City of Lafayette, IN. Accessed 3/23/2011. Link
5) 100_2349.jpg. Manning Design Landscape Architecture. Accessed 3/23/11.
6) netpiclg.jpg. City of Lincoln, NE. Accessed 2/23/11. Link
3
4
5
6

17
10) 200904-rain-garden.jpg. Prairie Fire. Accessed 3/23/11. Link
8) DSC_0975.JPG. Watershed Wanderings. Accessed 3/23/2011. Link
7) 6.13.08.jpg. Yorkville, IL. Accessed 3/23/11. Link
9) Beautifulraingarden.jpg. Reimaging Cleveland. Accessed 3/23/11. Link
7
7
8
9
1 10

18
Sources of Rain Garden Information
*The DNR does not endorse any single provider of plants or rain garden information. If you feel that an organization or resource should be added to this list please email the coastal nonpoint coordinator at [email protected] .
Indiana Native Plant and Wildflower Society
Rain Garden Webpage: Indiana Association of Soil and Water Conservation Districts
Rain Garden Fact Sheet: Hamilton County Soil and Water Conservation District
Build Your Own Rain Garden: Wisconsin DNR Article: Wisconsin DNR, Gardens for a Rainy Day
Rain Gardens of West Michigan
Rain Garden Network
Healthy Landscapes
Blue Thumb: Includes an easy to use native plant selector
JFNew: Native plant nursery with great pictures of plants
Applied Ecological Services: Printable plant list with photos
West Central Indiana Watershed Alliance Plants by desired garden type: Hoosier Heartland RC&D Plants by type: Hoosier Heartland RC&D

19
For more information contact:
Colin Highlands Nonpoint Coordinator Indiana Lake Michigan Coastal Program Indiana Department of Natural Resources 1600 N. 25 E. Chesterton, IN 46304 219-921-0863 [email protected] Visit the Coastal Program nonpoint website for other helpful documents http://www.in.gov/dnr/lakemich/6084.htm Initial funding for this project was provided in part by a grant through the National Oceanic & Atmospheric Administration, Office of Coastal Resource Management.