rain catchment md water suppl inruralafrica: a manual · determine capacity of tanks calculation of...
TRANSCRIPT

Rain Catchmentmd Water SupplinRuralAfrica:= A Manual
2 1 3 . 0
8 2 R A


Rain Catchmentand Water Supply
in Rural Africa: A Manual
Erik Nissen-Petersen
UBRAHYIntern{or Community Walfei
HODDER AND STOUGHTON
LONDON SYDNEY AUCKLAND TORONTO
in association with the Danish National Fund for DevelopingCountries

British Library Cataloguing in Publication Data
Nissen-Petersen, ErikRain catchment and water supply in rural Africa,i. Water conservation—AfricaI. Title333.91 '0960 HD1698.A/
ISBN O 340 28429 3
First published 1982Copyright© 1982 by E. Nissen-PetersenAll rights reserved. No part of this publication may bereproduced or transmitted in any form or by any means,electronic or mechanical, including photocopy, recording, orany information storage or retrieval system, withoutpermission in writing from the publisher.Represented in East Africa by K. W. Martin, P.O. Box 30583,Nairobi, KenyaRepresented in Nigeria by Nigeria Publishers Services Ltd,P.O. Box 62, Ibadan, NigeriaPrinted in Great Britain for Hodder and Stoughton Educational,a division of Hodder and Stoughton Ltd,Mill Road, Dunton Green, Sevenoaks, Kent,by Richard Clay (The Chaucer Press) Ltd,Bungay, Suffolk

Contents
Acknowledgments vi
Conversion Tables vii
Introduction ix
1 Water Requirements iThree types of water for a homestead iConsumption rates i
Domestic water iWater for livestock 2
Your water requirements 3
2 The Source of Water 4The water's cycle 4Rainfall patterns in Kenya 5Monthly fluctuation in rainfall 6Rainfall patterns in Nigeria 7Monthly fluctuation in rainfall 8Rainfall patterns in Zambia i oMonthly fluctuations of rainfall ioRainfall patterns in the Sudan i oRainfall patterns in the Somali Republic 11
3 Catchment Areas 12Three types of catchment areas 12
Total run-off for domestic use 12Halfrun-offfor livestock, fish farming andbiogas 14Quarter run-off for irrigation and dam construction 15

iv Rain Catchment and Water Supply in Rural Africa
Subsurface damsEarth subsurface damConcrete gravity damConcrete arch dam
4 Storage Tanks and ReservoirsDetermine capacity of tanksCalculation of tank and reservoir volumes
Roof catchment tankCompound catchment tankSubsurface dam
Calibration of tanksSize and situation of tanks
Corrugated iron sheet tankConcrete ring tankConcrete block tankGranary basket tankLarge cement jarSmall cement jar
Guttering
5 WellsDefinition of wells, boreholes and tubewellsLocation of well sitesWell types
Oil barrel wellFerrocementwellConcrete ring wellConcrete block well
Aspects of handpumpsSimple lifts for wells
Calabash lift on rollerBucket on windlassBucket lift in closed wellRope washer lift in closed wellEgyptian shaduf
16161617
1919191920212122
23242425262628
292929303030323334343434353536

Contents v
6 Choice of Design 37Summary of possibilities 37Choosing solutions 37Simple solutions cost little money 38Limitation of evaporation 38Prevention of contamination 39
Storage of drinking water 39Surface water 39Underground water from wells 40
Reduced use of water 40Re-use of water 41
7 Build-It-YourselfConstructions 42Construction of a 23,000 litre roof catchment tankfor domestic water 42Fabrication of concrete blocks 5 5Construction of a 51,000 litre compound catchment tankfor livestock water and fish farming 57Construction of a concrete gravity dam for sinkingof wells and seepage irrigation 63Construction of a sinking well for domestic waterand livestock water 69Blockmaking for a sinking well 77
Bibliography 82

Acknowledgments
I am very thankful to the DANIDA (Danish InternationalDevelopment Agency) for its interest, and encouragement whichhave enabled me to experiment and test ideas over a period of 4-5years.
Publication of this manual was also made possible by a DanishNational Fund for Developing Countries grant and by DANIDAallowing me to spend working time on writing it.
Grateful thanks are also conveyed to Stan Stokoe and others whohave scrutinised the text and made many useful suggestions.
Finally, but not least, I owe great thanks to my wife Wanza, forher patience and support without which it would have been almostunbearable to work in the harsh conditions of such an arid part ofKenya.

Conversion Tables
Millimetres to Inches1 mm = 0.039 inches2 mm = 0.078 inches3 mm = 0.117 inches4 mm = o. 156 inches5 mm = 0.195 inches6 mm = 0.234 inches7 mm = 0.273 inches8 mm = 0.312 inches9 mm = 0.351 inches
10 mm — 0.394 inches
Centimetres to Inches1 cm = 0.394 inches2 cm = 0.788 inches3 cm = 1.182 inches4 cm = 1.576 inches5 cm = 1.97 inches6 cm = 2.364 inches7 cm = 2.758 inches8 cm = 3.152 inches9 cm = 3.546 inches
10 cm = 3.94 inches11 cm = 4.334 inches12 cm = 4.728 inches13 cm = 5.122 inches14 cm = 5.516 inches15 cm = 5.91 inches16 cm = 6.304 inches17 cm = 6.698 inches18 cm = 7.092 inches19 cm = 7.486 inches20 cm = 7.88 inches
30 cm = 1 foot61 cm = 2 feet91 cm = 3 feet
100 cm = 39.37 inches200 cm = 78.74 inches300 cm = 118.1 inches
Area1 sqm = i.i9sqyds1 sq km = 0.39 sq mile1 ha = 2.5 acres
4050 sq m = 1 acre
Volume1 cu m = 1000 litres1 cu m = 220 gallons1 cu m = 35.3 cuft1 litre = 0.22 gallons4.55 litres = 1 gallon1 oil barrel = 44 gallons1 oil barrel = 200 litres
Volume to Weight1 cu m water =1.0 tonne1 cu m sand =1.7 tonne1 cu m ballast =1.6 tonne
20 bags of cement = 1.0 tonne8 wheelbarrows sand =1.0
tonne1 oil barrel water = 0.2 tonne


Introduction
Modern water supply without pumps or pipes is possible whendomestic water is situated next to your house. It may seem a littlecontradictory to say that water can be available at your house withoutsome kind of piping, but if you have seen the rain on your roof and inyour compound, you will have seen the great source from which allwater originates; namely the rain.
Provided that it rains once or twice a year, it is possible to establish areliable water supply system based on the catchment of this rain.
Naturally, many people will claim that it rains so little in their area,that no catchment system will ever be able to accumulate enoughwater for a whole year's consumption.
To these people I can say that my family and I have lived on threerain catchment systems for more than four years in the arid land ofMakindu, in Kenya. Having only two rainy seasons, (and a rainyseason can be as little as ioo mm - 4 inches), it gives two long dryspells in which demand for water is very high. But even during thosedry periods we have been quite well-off for water.
One rain catchment system is a small earth dam built by hand. Itholds enough water to grow sugar cane, bananas and citrus fruit on a5-acre orchard irrigated by seepage only.
Another catchment system collects rain run-off from the compoundaround the house and diverts it to a storage tank in which we raise fishand ducks, as well as using the water for the production of biogas.
A roof catchment system, combined with a windpump and a solarpanel, provide all the hot and cold water we want in the housethroughout the year. In fact, during the last year my wife sold so muchwater that it paid back one quarter of the installation costs of ourdomestic water supply system.

x Rain Catchment and Water Supply in Rural Africa
Less complicated systems, which are still capable of supplyingdomestic water to a house, can be established for the cost of threegoats. It seems, therefore, reasonable to relieve one's wife and daugh-ters of the laborious work of carrying water long distances. The timeand energy saved would allow them to work more on improving thefamily's welfare at home.
From an economic point of view, these catchment systems need nofuel, no spare parts and very little skill. They save your money as wellas the country's foreign exchange.
These systems do not permit the breeding or spreading of thosediseases which are often found in common waterholes and otherwater-sources used in rural areas.
Furthermore, these low-cost systems, when used appropriately,promote rural employment, skill and self-reliance.
The only excuse for people not doing something about their waterproblems at home, is ignorance of what they are able to do themselves.
This manual is produced as an attempt to open the eyes and mindsof people as well as to help them to find a practical solution to theirwater problems.
The manual is not a complete list of all possible solutions to waterproblems in semi-arid and arid lands but it is hoped that it will createsome rethinking on the subject and that many new ideas will surface.
The author will be only too glad to hear your comments and yourideas.
Finally, it is hoped that this manual will be a valuable contributionto the International Drinking Water Supply and Sanitation Decade,1981-1990, sponsored by the United Nations Development Pro-gramme.

i Water Requirements
Three types of water for a homesteadFirst it is important to determine two things: (i) for which purposes doyou need water, and (ii) how much water do you need for thesepurposes.
For a homestead in a rural area use of water may be divided intothree groups:a) clean water for domestic use in the house,b) fairly clean water for livestock, poultry, etc, andc) unclean water for irrigation of crops.
Clean water can, of course, be used for all purposes, but since it isthe most difficult water to collect and store, it is not reasonable to use itwhere more easily accessible water can be utilised.
Unclean water can be treated for domestic use, but since it involvestwo extra operations - filtering and transporting it to your house - itshould not be defined as clean water in this connection.
Consumption ratesDomestic waterWhen calculating the required volume of clean water for domesticusage you have to decide which level of installation you want to designfor your water supply. Table i indicates five levels of which the middleone, having water next to house, will satisfy the majority of peoples'needs.
Table i Domestic consumption of water by i person.Living 15 km from a water source 2-3 litres dailyLiving 1 km from a water source 3-6 litres dailyHaving water next to house 10-20 litres daily

2 Rain Catchment and Water Supply in Rural Africa
Having a watertap, shower and adjusted WC 60-80 litres dailyHaving full sanitary installations 175-250 litres daily
Having decided which rate of consumption per person you want,then fill in the figure in Table 2. Also fill in the number of personsliving in your house and the number of days of the longest periodwithout rain.
Multiply the figures and you will reach the volume of waterrequired for domestic use, which is also the minimum size of storagetank to be built.
Table 2 Calculation formula for domestic water.Family members Average daily Longest periodliving in house. consumption. without rainNo. of persons. Litres per person No. of days.
. personsExample:8 persons
. litres
x 15 litres
. days =
x 180 days
Volume ofwater requiredto lastthrough dryseason
. . litres
— 2i,6oo| litres.
Water for livestockTo estimate the volume of water needed for your livestock fill in Table3-
Table 3 Calculation formula for livestock water.Type and No. of Daily consumption Longest period Volume oflivestock rates per animal, without water water required
Litres per animal. No. of days to lastthrough dry
. . . . upgraded x 100 litres x daysdairy cattle
. . . . upgraded X 50 litres X daysbeef cattle. . . . local X 20 litres x dayscattle. . . . sheep x 5 litres x days. . . . goats X 3 litres X days
Poultry, dipping, biogas, etc. x days
TOTAL
= litres
= litres
= litres
= litres= litres= litres. . . . litres

Water Requirements 3
Example:10 local cattle x 20 litres x 120 days = 24,000 litres60 goats x 3 litres x 120 days = 21,600 litres
Poultry, dipping, biogas, etc. x 120 days = 3,400 litres
Total 49,000 litres
If water for dipping livestock is to be drawn from the livestockwater reservoir, then add 3 litres per head of livestock per week to theestimated volume of the reservoir.
Fish can easily be raised and fed on chicken manure in the reservoirwithout needing any additional volume of water. Chickens, pigeonsand turkeys can live on used water from the house, so it is notnecessary to calculate any additional water for them, but ducks andgeese need about 1 litre of water daily per bird.
If you have production of biogas in mind, then a weekly consump-tion of about 20 litres of water must be included in the total require-ment of water for livestock.
Your water requirementsBy now your two types of water requirements should be known and itwill be useful later on to have the figures filled-in, as in Table 4.
Table 4a Total requirements for water consumption.litres of clean water for domestic use.litres of fairly clean water for livestock, etc.
Example
Table 4b Total requirements for water consumption.21,600 litres of clean water for domestic use.49,000 litres of fairly clean water for livestock, etc.
Your requirements of water are now known. The next problem is tofind a source of water which can fulfil your needs.
The next two chapters will deal with this interesting problem.

2 The Source of Water
The water's cycleAll water on the earth's surface is moved in large circular patterns bythe sun and the force of gravity.
From the sea and land the sun evaporates the water, and formsclouds. Differences in temperatures, created by the sun also createdifferences in pressure which generate the wind to blow the clouds toother regions where the moisture will fall as rain or snow.
There are four things which can happen to rain when it falls on land:
a) it flows to lower areas and ends up in seas or lakes - a processcalled run-off,
b) it seeps into the ground and slowly moves towards the sea - aprocess called ground-water flow,
c) it is sucked up by vegetation and evaporates - a process calledtranspiration,
d) it evaporates directly from the surface.
In all cases, sooner or later the water will evaporate somewhere andthe cycle goes on, as shown in Fig. I.
All water, even that being pumped up from deep boreholes,originates from rain. When rain falls it is clean water, but during itsrun-off some of it gets dirty or salty and has therefore to be treatedbefore it can be used.
By catching rain when it comes straight from the clouds we can getclean water, and if it is collected at a higher level than the place ofconsumption, eg on the roof, the water will flow by its own gravity toyour water tap.
Therefore collecting rain from your roof will provide you with freeclean water delivered to your door.
You do not need filters, pumps or pipes.

The Source of Water 5
Fig. 1 Water Cycle
Rainfall patterns in KenyaBefore going into details about rain catchment, it might be useful tounderstand some of the mechanics of the rains.
Fig. 2 The Two Monsoons Affecting Kenya

6 Rain Catchment and Water Supply in Rural Africa
The weather pattern over Eastern Kenya is mainly dominated bytwo monsoons, the south-east and the north-east. They are controlledby a large-scale pressure system over the western Indian Ocean. Otherareas to the west of the Rift Valley only experience one rainy and onedry season a year.
The south-east monsoon starts to blow from the southern IndianOcean in March-April. When it meets air masses of the north-eastmonsoon over East Africa, it results in the so-called Long Rains. Thesouth-east monsoon takes control of the area and sends dry, dull airfrom the southern part of Africa until September. Then the north-eastmonsoon regains power and with hot, dry air from the Horn of Africait forces back the south-east monsoon. The battle produces the ShortRains in November, and the south-east monsoon has to retreat untilMarch/April at which time the story repeats itself.
Depending to a certain extent on the situation of the monsoons'battlefields, the rains fall in various patterns over Kenya. The areaswith most reliable rainfalls are situated near Mount Kenya and LakeVictoria, while the semi-arid and arid zones of the lowland such asMakindu, receive more unstable rainfall, as illustrated in Fig. 3.
2000 r
KidrnbuHighland2300m
KIsNLake Zone
1400m
Fig. 3 Average Annual Rainfall
Monthly fluctuation of rainfallWhile the rains vary from year to year, they also vary from month tomonth, as shown in Fig. 4. Again we can see that the semi-arid andarid zones, such as Makindu, have little rainfall and a long, dry seasonwith virtually no rain at all.

The Source of Water 7
Despite this unfortunate situation, it is still possible to constructreliable water systems based on rain catchment. Just remember theresults described in the introduction to this manual.
300
200
ton
n
MAKINDU Arid zonr.Total 619mm,
—»—r~ (
Altitude 1000m
J F M A M J J A S 0 N D
300 KIAMBU Highland zoiw. Allitud* 2300 m.
200
100
Total 1045mm.
F lJ F M A M J J A S O N D
300 KISM, Lake zone Altitudt KOOm
200
ioc
Total 177Sm
mJ F M A M J J A S O N D
Fig. 4 Average Monthly Rainfall
Rainfall patterns in Nigeriak
Nigeria has a tropical climate which is hot and wet throughout the yearin the south-east, but has a marked dry season in the west and north,which increases inland from the coast.
Two air masses, the Equatorial Maritime air mass bringing rainfrom the Atlantic to the south, and the Tropical Continental air massbringing hot, dry winds from the Sahara to the north, dominate theweather system. Thus the length of the rainy season decreases fromnine months in the south (March to November) to only four and a halfmonths in the north (May to September), and the harmattan, a dry,dusty wind from the Sahara, blows for three months in the north butfor only a couple of weeks in the coastal belt. Figs. 5 and 6 show theseair masses and the resulting annual rainfall pattern in three regions ofNigeria.

8 Rain Catchment and Water Supply in Rural Africa
Fig. 5 Air Masses Affecting Nigeria
3000
2000
1000
n
-
-
Jjj
HIlipfill
Jos Forcodos MaiduguriPlateau Zone Coastal Arid
Fig, 6 Average Annual Rainfall
The Source of Water 9
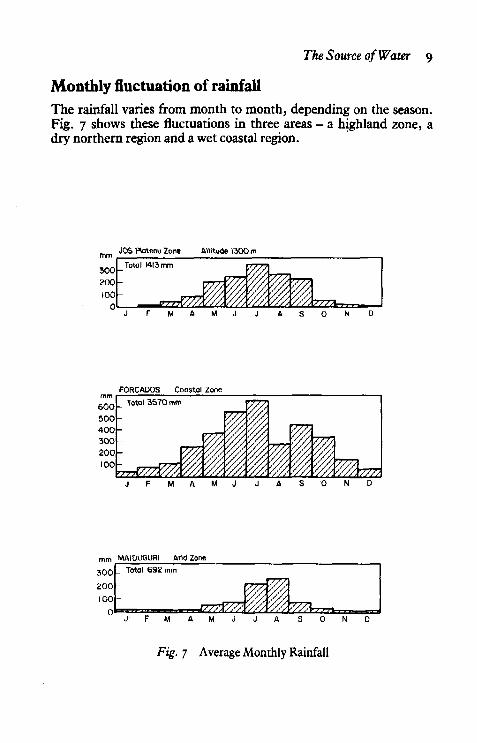
Monthly fluctuation of rainfallThe rainfall varies from month to month, depending on the season.Fig. 7 shows these fluctuations in three areas - a highland zone, adry northern region and a wet coastal region.
mm
30O|zoo100
JOS Ploteog Zone Altitude 1300 m
_ Total 1413 mm
1IfF M A M J J A S O N 0
mm600500400300200100
FORCADOS CoastolTotal 3570 mm
-
-
Zone
T777
i1i i ^ 7 7 7 .J F M A M J J A S ' O N D
mm MAIDUGURI Arid Zone
300
200
100
Total 692 mm
F M A M J J A S 0 N D
Fig. 7 Average Monthly Rainfall

10 Rain Catchment and Water Supply in Rural Africa
Rainfall patterns in ZambiaZambia, too, has a tropical climate with a short rainy season lastingfrom November to March or April and then little or no rain for the restof the year.
There are two airstreams which affect the Zambian climate. Humidair, which originates over the South Atlantic Ocean, brings rainduring the wet season to the northwest of the country. The northeastmonsoon originates over Asia, crosses the northern Indian Ocean andmay reach northeastern Zambia in midsummer. The air contains agreat deal of moisture after its long journey across the sea, so heavyrains often result. Tropical cyclones may also bring very heavy rain toparts of the country.
Fig. 8 below shows the annual rainfall pattern in three regions ofZambia.
SeshekeSemi-Arid
CliipataWoodland
Fig. 8 Average Annual Rainfall
Monthly fluctuation of rainfallOver most of the country there is a single rainfall peak, the rainiestmonth being January. However, in the north there is a tendencytowards two peaks of rainfall in December and March.
Rainfall patterns in the SudanLying completely within the tropics and far from the sea - the effectof the Red Sea to the east on the rainfall system is negligible - thecountry is very hot, especially in the central regions. Southwards fromthe deserts the rainfall increases slightly until a fairly dependablesupply is found in the south of the country where the savannahchanges to forest in the mountains.

The Source of Water 11
The level of rainfall fluctuates from month to month depending onthe region. The deserts tend to have one heavy fall a year, whereas therest of the country has two rainy seasons, as is typical in the tropics.
Fig. 9 below shows the annual rainfall for three different regions ofthe Sudan.
/ / / / • / / / / / / .
§§§inKhartoumSemi-Desert
WauMountain
Fig. 9 Average Annual Rainfall
Rainfall patterns in the Somali RepublicThe climate of the Somali Republic is hot and despite the countrybeing situated near the sea rainfall is very limited in many places. It isonly really in the mountains in the north that a moderate fall occurs.
There are two rainy seasons in the year, the amounts varying fromregion to region.

3 Catchment Areas
Three types of catchment areasRain catchment depends on two things: (i) rain, and (ii) the area onwhich the rain falls. These areas are called catchment areas and may bedivided into three types depending on the surfaces of the catchmentareas.1st type: Total Run-off occurs in areas with hard surfaces such as
roofs and rocks.2nd type: Half Run-off comes from semi-hard surfaces eg roads,
compounds around a house and rocky slopes.3rd type: Quarter Run-off may be collected from catchment areas
with loose soil surfaces such as fields and valleys.These types of run-offs correspond with those three groups of water
mentioned in Chapter i in the following ways:Total Run-off from roofs and rocks gives clean water for domestic
use.Half Run-off from roads and compounds provides fairly clean water
for livestock, fish farming and biogas.Quarter Run-off from fields and valleys is suitable for irrigation,
construction of dams or sinking of wells.
Total run-off for domestic useCollecting rain from the roof of one's house should be a must for everyhouseowner, because it can provide clean water for one's familythroughout the year.
To calculate the volume of water available from your roof do asfollows: First measure the length and the width of the roof in metres,then multiply the two figures and you will know the roof area in squaremetres (sq m).

Catchment Areas 13
Fig. 10 Roof Catchment
Thereafter ask your local agricultural adviser or meteorologicalofficer for the mean annual rainfall in millimetres (mm) at your place.Then multiply this annual rainfall figure with the sq m of your roofand you will get the average annual volume of water in cubic metres(cu m) which can be collected from your roofs.
Table 5 Calculation of Total Run-off from a Roof.Size of Roof.sq m
sq m
Rainfall.mmx nun
Example: Makindu region, Kenya.6osqm x 619 mm
Run-off.Cu m (tonnes).= cum (tonnes)
= 37,140 cu m (tonnes)
The example in Table 5 shows that from a roof of ordinary size in adry region you can collect 37 tonnes of clean water in an average year.That can provide 7 persons with 15 litres of clean water every day inthe year.
If more water is required for domestic use the roof can be extended,a rock catchment included or water can be drawn from one of the othercatchment systems mentioned below.

14 Rain Catchment and Water Supply in Rural Africa
In areas with rocks or mountains it is possible to catch rain waterfrom these structures. It can be done either from the rock itself or thewater can be fed to a storage tank situated nearer the house.
Fig. II Rock Catchment
The advantages of Total Run-off systems are that even a small rainshower will supply clean water, and that the run-off is easy to store in atank situated next to the house.
Half run-off for livestock, fishfarming and biogasAs the name of this type of catchment indicates, you can collect abouthalf of the annual run-off from, for example, the compound surround-ing your house or from the road leading to your house.
If your catchment area is well-sloped and hard-surfaced you cancollect as much as three-quarters of the annual rain, but if it has littleslope and a porous surface you may only catch about one quarter of therain.
Table 6 Calculation of Half-Run-Off from a Compound.Size of area.sqm
sq m
Rainfall.mm
x mm
Example: Makindu region, Kenya.200 sqm x 619 mm
Surface.ha rd - 'Amedium - Visoft -Vt—
- Vz
Run-offcu m (tonnes).
= cu m
= 61,900 cum

Catchment Areas 15
The run-off is led by way of a ditch to a storage tank dug into theground. This tank can either be a waterhole with a clayish surface or,more permanently, a tank made out of mortar reinforced with chickenwire (ferrocement).
Fig. 12 Compound Catchment
To compensate for little slope, soft surface or a need for more water,the catchment can either be extended or covered with a hard surface,eg clay or laterite (murram).
Build-it-yourself instructions and drawings are to be found on page57-
Quarter run-off for irrigation and construction of damsFor several reasons this type of rain catchment is not as easy to handleas the previous two types, but if we leave out construction of earthsurface dams and concentrate on subsurface dams and wells, we cankeep the subject within the do-it-yourself capability.
For those who would like to consider building a surface earth dam,a study of Mr N W Hudson's book, 'Field Engineering for Agricultu-ral Development', Oxford University Press, is recommended. Itdescribes, among other things, the importance and guidelines for theconstruction of a proper spillway design which is the most essentialfactor in designing a long-lasting dam.

16 Rain Catchment and Water Supply in Rural Africa
Subsurface damsThere are three ways of constructing subsurface dams:a) The easiest and cheapest method is to construct a clay or other
non-porous barrier across the riverbed, which rests on the solidbedrock of the watercourse (see Fig. 13).
Fig. 13 Earth Subsurface Dam
b) The second construction is a gravity concrete dam or weir whichis situated across the watercourse and also reaches to the non-porous bed-rock. It protrudes above the riverbed to catch morewater, thereby increasing the volume of the reservoir (see Fig.14).
Fig. 14 Concrete Gravity Dam

Catchment Areas 17
Building instructions for the concrete gravity dam are to be foundon page 63.c) The third construction is an arch weir built of blocks or
concrete as a thin walled arch across the riverbed. This typeof subsurface dam is fairly cheap to build, but it requires rockabutments on both river banks (see Fig. 15).
Fig. 75 Concrete Arch Dam
These dam types are easy to design and construct because surplusrun-off just passes over the top of the dam without damaging it, thusno spillway design is necessary. Other advantages are:a) As part of the dam structure the reservoir is silted up by coarse
sand- Thus silting is not a problem but a gain.b) Water is stored between the coarse sand, so evaporation is
eliminated to almost zero.c) Mosquitoes and bilharzia parasites cannot breed in a subsurface
reservoir. Therefore there will be no increase in malaria andbilharzia.
d) Because people, livestock and wild animals cannot see the water,it is easier to prevent contamination.

18 Rain Catchment and Water Supply in Rural Africa
e) By drawing water from the reservoir through a well situated eitherupstream or downstream of the dam structure, it is not difficult tomaintain a clean and reliable water source.

4 Storage Tanks andReservoirs
Determine capacity of tanksIn the previous chapters you have determined the volume of waterneeded and where to get it from. In this chapter we shall deal with thestorage of water.
The first thing to decide is the capacity of the tanks required forholding enough water from one rainy season, through the drought, tothe next rainy season. Using the example from the dry region again,we can see from Table 4 that we need a tank with a minimum volumeof 21,600 litres for domestic water and a 49,000 litre tank for livestock,fish-farming and the production of biogas.
Example from page 00
Table 4c Total requirements for water consumption.21,600 litres of clean water for domestic usage.49,000 litres for fairly clean water for livestock, etc.
Seepage from a concrete subsurface dam with a volume of 40,000 cumis sufficient to irrigate an area of 1 ha (2.5 acres). It must be noted,however, that this seepage will not prove effective for shallow-rootedcrops, but is totally adequate for tree and other long-rooted crops.
Calculation of tank and reservoir volumesRoof catchment tankThe strongest and cheapest tank for roof catchment is a cylinder with a

20 Rain Catchment and Water Supply in Rural Africa
diameter greater than its height. The height is always determined bythe distance between the surface of the tank foundation and the lowestpoint of the guttering. To check the lowest point pour water into theguttering or if no guttering is in place yet, then use a hose pipe filledwith water fixed onto the place of the planned guttering.
The formula for calculating the volume of a cylindrical tank is asfollows: Radius x Radius x 22 x Height
7(Diameter is the longest distance possible across the floor of a tank.
The Radius is half that of the Diameter and is measured from thecentre of the tank to its side.)
Fig. 16 Roof Catchment Tank
Therefore the measurements for a 23,383 litre tank with height of1.86 m will be:Radius 2.0 m x Radius 2.0 m x 22 x Height 1.86 m
= 23.383 cu m
In case you want another size for your tank, then insert other figuresfor height and radius and try it out until you find a combination whichsuits your purpose.
Compound catchment tankThe most economical shape and construction of a compound catch-ment tank is that of half a sphere dug into the ground.
The measurements for a 51,000 litre tank is according to the
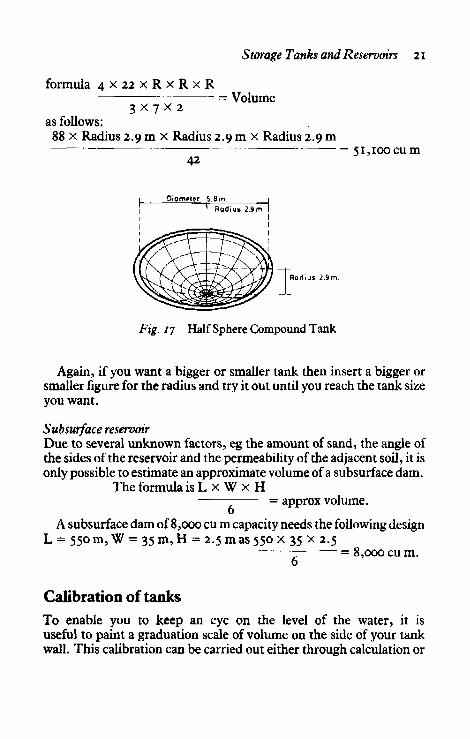
Storage Tanks and Reservoirs 21
formula 4 X 2 2 X R X R X R= Volume
3 x 7 x 2as follows:
88 x Radius 2.9 m x Radius 2.9 m x Radius 2.9 m
42= 51,100 cum
Diqmgttr 5.8m.'Radius 2.9m. I
Radius 2.9m,
Fig. 17 Half Sphere Compound Tank
Again, if you want a bigger or smaller tank then insert a bigger orsmaller figure for the radius and try it out until you reach the tank sizeyou want.
Subsurface reservoirDue to several unknown factors, eg the amount of sand, the angle ofthe sides of the reservoir and the permeability of the adjacent soil, it isonly possible to estimate an approximate volume of a subsurface dam.
The formula i s L x W x H= approx volume.
6A subsurface dam of 8,000 cu m capacity needs the following design
L = 550 m, W = 35 m, H = 2.5 m as 550 x 35 x 2.5_ g j 000 c u m
Calibration of tanksTo enable you to keep an eye on the level of the water, it isuseful to paint a graduation scale of volume on the side of your tankwall. This calibration can be carried out either through calculation or

22 Rain Catchment and Water Supply in Rural Africa
Fig. 18 Subsurface Dam
by putting a known volume, eg oil barrels, each containing 200 litresof water, into the tank until it is full. For every 1,000 litres poured intothe tank a mark and the number of 1,000 litres should be marked onthe wall with oil paint.
The calibration formula for a cylindric tank is:height of tank in cms
= height in cms per 1,000 litres.
volume of tank in cu m
To scale the 23,383 litre tank mentioned above:
186 cm23.383 cum-= 7.96 cm = 8 cm height per 1,000 litres.
The calculation formulae for half sphere and jar shaped tanks iscomplicated, but if you want to calibrate them, then work them out byfilling them with a known volume and marking them with oil paint.
Size and situation of tanksLooking at the former examples from the dry region, we said that atank capacity of 23,383 litres was needed and we know from Table 5

Storage Tanks and Reservoirs 23
Fig. jg Calibration Scale
that a roof area of 60 sq m in Makindu is required for filling that tank'svolume. In case the roof area of your house is less than that, you mightinclude one or two roofs of the other houses you have got on thecompound. If the latter is feasible, then you have to decide whether itis practical to lead all run-off into a 23,383 litre tank or whether it ismore suitable to build a smaller tank next to each house.
One large tank is usually cheaper than two or three smaller ones,but the cost depends mainly on the type of tank you prefer. Mentionedbelow are six different types of tanks which are easy to build andinstall.
Corrugated iron sheet tankThe quickest and easiest way of establishing a roof catchment systemis to buy and install corrugated iron sheet tanks but these tanks havesome drawbacks. Iron sheets are affected by rough handling andtransportation, and after some years leakage will occur due to corro-sion and other factors.
These drawbacks can be prevented by coating a new tank withbitumen all over and then placing it on a reinforced concrete foun-dation with an extension for a ferrocement coating of the outside wallof the tank. These precautions will, together with the cost of purchas-ing and transporation, make it an expensive enterprise and the timesaving aspect will also be minimal.
Another drawback is the limitation of tank size. Water is heavy, 1tonne per cubic metre, so iron sheet and especially its jointing andsoldering have a certain strength limitation which it is risky to exceed.

24 Rain Catchment and Water Supply in Rural Africa
Concrete ring tankTo avoid the disadvantages of corrugated iron sheets, and to maintaina single and easy construction procedure, concrete septic tank sectionscan be built to form water tanks 2 cu m in volume. The volume of thesmall tanks is suitable for rain catchment from small roofs scattered ona compound as well as for areas with monthly rainfall.
Fig. 20 Concrete Ring Tank
The cost of purchasing and transporting the tank sections can begreatly reduced by concreting the rings yourself, in a steel formwork.This formwork is, however, rather expensive for individuals, butquite reasonable for a community or a development agency.
Concrete block tankStorage of 23,000 litres of water in one tank requires cement or quarryblocks of a quality stronger than blocks for a house. If you would liketo control the quality and at the same time reduce the cost ofpurchasing and transporting blocks, you can make your own blocks.

Storage Tanks and Reservoirs 25
Fig. 21 Concrete Block Tank
The site for a tank of this size has to consist of firm soil which hasnever been dug out, for instance places where soil has been previouslydug out for plastering a house or a rubbish pit. Also new or old tree rootscan lead to cracks in the foundation and tank wall.
Build-it-yourself instructions and drawings are to be found on page42.
Granary basket tank (UNICEF design)This tank type uses a granary basket of woven sticks as a built-inframework for a ferrocement tank. The cost of the framework is thusreduced to a few days work in cutting and weaving sticks into an openweaved basket.
Using a method called ferrocement, it is possible to improve thestrength and increase the size of the tank by covering the outside of thebasket with a layer of chicken wire rounded up with barbed wirebefore plastering the basket inside as well as outside.
Without wire reinforcement the tank size should not exceed 3.5 cu mbut using the ferrocement technique it is possible to triple thevolume and the life of a tank.

26 Rain Catchment and Water Supply in Rural Africa
Fig. 22 Granary Basket Tank
Large cement jar (UNICEF design)The framework for this tank is a large bag made of cloth or sacking andstuffed with grass. Mortar is plastered onto the bag, chicken andbarbed wire are tied onto the plaster and the whole thing is plasteredonce more. 24 hours later the bag is removed from the inside of the jarand it is plastered to make it waterproof. The bag can be used for manywater jars, so the cost per tank is minimal.
Tank volumes can be as great as 10 cu m. Besides being designed forwater storage, they can also be used for storing grain.
Small cement jars (UNICEF design)These are similar to the above mentioned cement jars except for theirsmaller size and lack of reinforcement. They can store 1 cu m of wateror grain and they cost as little as a bag of cement each.

Storage Tanks and Reservoirs 27
Fig. 23 Large Cement Jar
Fig. 24 Small Cement Jar

28 Rain Catchment and Water Supply in Rural Africa
GutteringAlso worth considering is the type of gutters you would like to use.Iron sheet gutters are the best, but unfortunately also the mostexpensive.
To save costs in the initial stages of constructing your water supplysystem, it may be wise to use cheap local materials for a while.
Timber.
Fig. 25 Alternative Guttering
5 Wells
Definition of wells, boreholes and tubewellsThere is some confusion about the use of the words wells, boreholesand tubewells, so let us get these terms straight first.
In English a borehole is a drilled hole with a small diameter and itcan be several kilometres deep. A well is a hole dug with a diameter bigenough to allow a man to work in and with a maximum depth of about75 metres. A tubewell is a perforated pipe with a pointed end which ishammered into the ground.
When a well is less than 10 metres deep we call it a shallow well andwhen more than 10 metres deep, it is called a deep well. Also thevarious methods of constructing wells have got their special names: anearth well is just a hole in the ground, a masonry well is built of bricks,and a sinking well is constructed and then sunk in stages from theground level.
Location of well sitesIf you are not a geologist or someone with special knowledge, it isdifficult to know where water can be found a short distance under-ground. There are, however, some places where it is worthwhile tostart test digging:-a) Upstream and downstream of dam reservoirs.b) In sandy riverbeads, especially upstream of bedrocks.c) In foothills of mountains or big rocks. Look for green trees and
holes dug by animals.d) In areas with green vegetation during drought.e) Near existing wells and waterholes.
Having found a potential site, then dig as deep down as you can.

30 Rain Catchment and Water Supply in Rural Africa
Remember that loose soil can collapse on you, so don't excavate thesides of the hole too steeply. It is possible that you will hit a rock whichhas to be removed in small pieces. A small rock can be broken up by asledge hammer, and a bigger one by heating it with a charcoal fire andthen cooling it down quickly by pouring a drum of water on to theheated rock. The rapid temperature changes will crack it into smallpieces.
If you can get hold of an auger hand-drill, it will save you a lot ofexcavation work, because drilling in the bottom of a hole will tell youabout the ground further down. To ease the work with the auger drillpour water into the drilling holes to soften the soil.
The first hole might be a wasted effort, but don't let that discourageyou because by now you have learned a lot about siting, soil structureand digging methods. The next hole will certainly be more successfulas well as easier to dig.
Well typesThere are several ways and methods of constructing wells, all depend-ing on the purpose of the well, soil structure, water source and localskills. This manual will only mention four types of well, so if youwould like to learn more on the subject, it is recommended that youshould read some of the publications listed in the bibliography.
Oil barrel wellTo start with the construction of a well that everybody can afford andbuild himself, we have the oil barrel well. All you need is a hole in theground with water and some worn-out, perforated oil barrels. Cut thetops and bottoms out of the barrels and clean the remaining cylinders.Place the first barrel cylinder in the bottom of the well and put stonesor gravel around it. Place the next barrel on top of the first one, fillaround it, and then place the next barrel and so on until you havereached about half a meter above ground level.
Ferrocement wellA shallow earth well can be made safer and probably deeper byferrocementing the wall of the well and by building a well head aboveground level.
The wall of the earth well is excavated to a straight and smooth

Wells 31
\ \ \\N \ \
Fig. 26 Oil Barrel Well
surface which is then plastered with a layer of mortar, then reinforcedwith a layer of chicken wire, and finally plastered a second time.
This construction technique is called ferrocement.
Fig, 27 Ferrocement Well

32 Rain Catchment and Water Supply in Rural Africa
A so-called 'well head' is built above ground level to lessen the riskof children and animals falling into the well.
To prevent contamination of the well a concrete apron, slopingaway from the well head, is laid out on the surrounding soil.
Concrete ring well (Sinking well)This method requires either a steel cassion ring mould for concretingrings on the site, or the rings to be bought and transported from afactory to the construction site. Both alternatives are expensive for anindividual, but practicable when a number of wells are being made.(Read Shallow Wells, Forth Progress Report, P.O. Box 85, Amers-foort, The Netherlands.)
The rings, measuring a height of 1.0 metres and a diameter of1.2 metres, are stacked upon each other in an excavated well hole orthey can be used for sinking wells or a combination of both pro-cedures can be used.
\\\\\\\\\
\
\\\\\
\ \ \ \ \ \ \ \ \v\V\
\\\:>
\\
\
\\
Fig. 28 Concrete Ring Well (Sinking Well)
This and the following type of well are also called 'sinking wells',because they can be sunk safely through sandy soil.
By digging soil out from the bottom of the well, the whole structurewill sink. When the top of the well has reached the surface of thesurrounding soil a section is added onto the top of the well. Thereafterdigging is repeated until another section can be added onto the well atground-level and so on until a satisfactory depth is reached.

Wells 33
Concrete block well (Sinking well)Instead of using concrete rings, it is handier and cheaper to useconcrete blocks shaped in a wooden form. These blocks are built ontoa foundation concrete ring, which can be formed in a woodenshuttering, or more cheaply, in a ditch in the soil at the constructionsite.
Build-it-yourself instructions and drawings are to be found on page55-
Fig. 29 Concrete Block Well (Sinking Well)
Fig. 50 Section of Foundation and Reinforcement

34 Rain Catchment and Water Supply in Rural Africa
Aspects of hand-pumpsAccording to experience and with reference to an Oxfam paperHand-pump Maintenance, published by Intermediate Technology,London, 'as many as 40 to 80 per cent of hand-pumps are inoperativewithin 3 years of their installation.' Also quoted from the booklet:'Anybody who cannot afford or cannot maintain a factory-made pumpis generally better advised to resort to a bucket and rope, with awindlass for raising and lowering'.
Simple lifts for walls
Calabash lift on rollerThe simplest kind of locally made lift is a calabash on a sisal rope beingpulled over a wooden roller. Fix a stone in the handle of the calabash,so that it easily tips over into the water in the well.
Fig. 31 Calabash on Roller
Bucket on windlassFor centuries this device has been in use and it is still being used inmany places today. A rope holding a bucket is attached to a woodenroller on an iron axle with a handle. When the handle is turned thebucket goes either up or down in the well.
The bucket can be made out of a vehicle's inner tube which can beglued together at the bottom and sewn onto a wire at the top.

Wells 35
Fig. 32 Bucket on Windlass
Bucket lift in closed wellA closed well gives good protection against contamination. It workson the same principle as the lift mentioned above, the only differenceis that a hosepipe is attached to the bottom of the bucket. By liftingthe bucket, water will run out of the watertap on the well head.
Fig. 33 Bucket Lift in Closed Well
Rope washer lift in closed wellThis lift is also good for keeping a well clean. A rope with washersattached is raised through a pipe and water is thus lifted to the surface.The turning wheel can be made out of two half tyres bolted together.

36 Rain Catchment and Water Supply in Rural Africa
Fig. 34 Rope Washer Lift in Closed Well
Egyptian shadufThis has been in use since the early days of the Pharaohs.
Fig- 35 Egyptian Shaduf

6 Choice of Design
Summary of possibilitiesWe have now been through four types of water supply system whichfunction without pumps and pipes, and it may be helpful to summa-rise them:a) Catchment of roof run-off into tanks for domestic usage.b) Catchment of compound and road run-off s into a half sphere tank
or waterholes for water for livestock, biogas, etc.c) Catchment of field, valley and riverbend run-offs into surface and
subsurface reservoirs for irrigation or construction of dams andwells.
d) Construction of wells and simple lifts for water for all purposes.
Choosing SolutionsNow your question might be: 'Which system should I start with?' andthe answer will be: 'Select easy-to-build and cheap-to-finance solu-tions, because they will give you water and experience for a minimumof effort'.
For example build these three systems:a) a granary basket tank for household water,b) divert run-off from your road into a clay-covered waterhole for
your livestock and fields,c) sink an oil barrel well for all purpose water.
By doing so your investment of cash and time will not ruin yourbudget and, if you happen to make a beginner's mistake, it will besimple to rectify.

38 Rain Catchment and Water Supply in Rural Africa
Simple solutions cost little moneyWater, and not time, is worth a lot in arid lands. Therefore it is wise toselect labour-intensive solutions which, as soon as possible, canproduce a surplus of water and crops for sale.
For financing the three suggested water systems you need to sellthree goats only. The benefit of having water near your house and asurplus for sale will rapidly compensate you for having three goatsless.
After a rainy season or two you might start thinking of expandingyour rain catchment systems to include, for example a dam, but thenyou must have permission from the authorities concerned before youstart such an enterprise.
Procedure of dam constructionBefore you embark on construction of any dam, be it a surface or asubsurface reservoir, you must consult officials of your District WaterAuthority. They will probably ask you to fill in some forms with dataconcerning your proposed dam construction. There may be a small feeto pay at this stage. The data will then be submitted to the Ministryconcerned who, after approval, will make known your legal right toconstruct a dam on your land.
In some cases, Governments will even subsidise some of the expenseof your dam construction.
Limitation of evaporationIn a hot climate the evaporation rate can exceed i cm per day. Thismeans that a water depth of 2 metres can evaporate away completelywithin 7 months, if no measures are taken to prevent this.
It might be tempting to plant some shady trees around a water tank,but do not to this. The roots of a tree will go in searching water underthe foundation of the tank and break it up.
Plant trees at a certain distance from a dam reservoir only forreducing the wind, because if planted too near to the water the treeswill transpire more water than will evaporate from the surface. Noappropriate method of cooling down a dam surface has yet beeninvented. Attempts have been made to plant water lilies, duckweed and algae, but they were all eaten by fish or just died out.

Choice of Design 39
More successful results have been achieved by roofing cylindricaland half sphere tanks with chicken wire and letting passion fruit andloofah plants cover the wire with their green leaves. At the moment, acover of old sacks sewn together and tied onto the chicken wire isbeing tested, which seems to be functioning even better.
A tank can, of course, be roofed with corrugated iron sheets, butthis will raise the cost of the tank. Another solution is to build such atank, not outside but inside the house. In addition to solving theproblem of roofing and security of the water, it also regulates theclimate in the house, making the days cool and the nights warm.
Prevention of contaminationStorage of drinking waterLong term storage of drinking water does not give rise to problems aslong as some measures are followed.a) Tanks should always be properly cleaned and washed before the
start of the rains.b) To prevent lizards and other small animals from drowning in a
tank, a fine wiremesh should cover the top of the tank. The wireshould be so fine that it excludes mosquitoes from breeding in thewater.
c) Chemicals might be added to the water, but many people prefer tokeep a few tilapia fish in the tanks. They will eat all insects andalgae.
Surface waterWater in a surface dam or in a waterhole always attracts people andanimals. Children play in the water, women wash clothes and fetchdrinking water, men bath, and domestic and wild animals drink, bathand relieve thfcmselves in the same water.
Let us imagine that out of all these people and animals not a singleone is carrying infectious bacteria into the water. Even then, there isstill a health hazard, because mosquitoes will breed and transfermalaria, snails will transmit bilharzia and several other diseases whichcan easily be transmitted to persons who have been in contact withthat water.
The picture could be different.Keep people and animals out of the water by fencing it with cactus
and thorny bushes. Dig a ditch leading from the water, underground

40 Rain Catchment and Water Supply in Rural Africa
and beneath the fence, to three small waterholes outside the fence.The first hole for people's drinking water, the second for animals'drinking water and the third hole for children's play, women washingclothes and people bathing.
Keep the water and the area free of mosquitoes and malaria byraising tilapia fish in the water. The bilharzia snails will probably beeaten by ducks, which are also very effective eradicators of snakes,because they eat frogs, the snakes' main diet, and the snakes' young.
Another way of controlling the misuse of a surface reservoir is tosink a shallow well near the reservoir and draw all water from there.
Underground water from wellsHealth conditions at a well site are controllable, especially if a man,selected by the community, is in charge of the well.
Water from a well is normally clean and it will stay clean as long asthe following measures are observed:a) The area around the well should be elevated, so that surface and
waste water will not flow into the well.b) To prevent seepage from polluted water rinding its way into the
well, all use of water must take place downstream and at adistance from the well.
c) Nobody should be allowed to enter the well or to throw anythinginto the well.
d) To avoid dirty containers contaminating the well, only onebucket roped onto a windlass should be used for drawing water.
If the well, in spite of precautions, gets contaminated it should bedisinfected with chemicals fit for that purpose.
Reduced use of waterMany people think that there is no end to water, while other peoplehave experienced many shortages. In all cases we should preservewhat we have got, for nobody knows when a shortage will hit us.
Water for cooking can be reduced by cooking in pressure cookers,hayboxes or just by keeping a close-fitting lid on a cooking pot.
Bathing water can be minimised by using a shower. Hang a tin inthe bathroom ceiling, make a few nail holes in the bottom of the tin,pour water into the tin, and your shower is ready.
A water closet consumes about half of all domestic water, if it is notadjusted to work on less volume. Bend the arm holding the floatingball downwards and consumption will be greatly reduced.

Choice of Design 41
Re-use of waterWater should be re-used several times at your homestead before yougive it back to its natural cycle.
Water left over from cooking is rich in nutrients. If you do not use ityourself, then cool it down and give it to your poultry. They willreward you with healthy eggs and meat.
Used bathing water containing little soap can also be used forpoultry. Soapy water from bathing and_ washing is useful for small-scale irrigation of bananas and sugar-cane around your house.
Flush-out from a water closet can either enter an earth septic tankfrom where it can irrigate by seepage, particularly fruit trees, or it canenter a biogas digester. After having passed through a biogas digester,it can either be used as fertilizer for an orchard or as fish feed.
It may not sound appetising, but the Chinese people have practisedbio-dynamic fanning methods, even without biogas digesters, forthousands of years, so it is safe and properly tested.

7 Build-It-YourselfConstructions
The last chapter of this manual shows in step-by-step drawings andinstructions ways in which you can solve your water problems. Toassist you in estimating the cost of the constructions in this section,there are specified lists of working time and materials.
To obtain a good result from the construction work, it is importantto follow the instructions and not to use less cement or wire reinforce-ment than described.
Construction of a 23,000 litre roof catchment tank fordomestic water
Working time32 working days for 1 man
Materials (including making the blocks)31 bags of cement60 wheelbarrows (7V2 tonnes) of coarse sand30 wheelbarrows (4 tonnes) of 1 cm ballast (small, hard stones)20 wheelbarrows (2V2 tonnes) of 4-5 cm ballast
270 m of barbed wire2V2 m of any straight water pipe1 m of any water pipe with a water tapV2 m guttering
3V2 kg of 2" nailsI kg of 2 V2" nails5 kg roofing nails5 kg water proof cement4 lengths, each 5 m long, of 8 x 5 cm (3" x 2") timber1 length, 3V2 m long, of 13 x 2.5 cm (5" x 1") timber

Build-It-Yourself Constructions 43
16 sheets of galvanised corrugated iron sheets5 litres of white oilpaint
lh litre of red oilpaint1 litre of used motor oil
13 drums of water
1 Excavation of foundation
Working time1 man in 1 day.
MaterialsiVz m of any straight water pipe.
Instructionsa) Select a site for the tank which has no tree roots or filled-up holes.
The site should be next to the house and preferably at the lowestcorner of the roof.
b) Hammer a wooden peg into the ground at the centre of the site,which is 2.5 m from the wall of the house.
Attach a string to the peg. Tie a loose peg to the other end of thestring at 2.25 m from the centre of the fixed peg.
Draw a circle on the soil. This is the outline of the foundation.
Fig. 36

44 Rain Catchment and Water Supply in R ural Africa
c) Dig out all mulch and grass roots within the circle but don'tremove the fixed peg. Excavate the foundation floor until there is2.3 m between the lowest point of the gutters and the floor, whichmust be exactly horizontal. Check the level with a long spirit-levelplaced on a straight board of timber.
d) Remove the fixed peg and place a straight water pipe in itsposition. Hammer the pipe about 25 cm into the ground andmake sure that it is exactly vertical. Check it with the spirit-level.
Fig. 37
2 Concreting the foundation
Important: This concrete work must be completed within one day.
Working time2 men in 1 day.
Materials6 bags of cement.
12 wheelbarrows of coarse sand.20 wheelbarrows of 4-5 cm ballast.
160 m of barbed wire.1 drum of water.

Build-It-Yourself Constructions 45
Instructionsa) Mix 3 bags of cement with 6 wheelbarrows of sand until it is a
uniform colour. Then make a depression in the middle of the pileand pour water into it. Mix in water until the whole pile hasreached a consistency similar to that of thick porridge. Then add10 wheelbarrows of ballast and mix it thoroughly so that all theballast is coated with cement. Pour the concrete into the foun-dation and level it out in an equal layer.
b) Lay upon the concrete lines of barbed wires spaced 20 cm apart.Then place at right angles a second layer of barbed wires, alsospaced 20 cm apart.
Fig. JS
c) Mix a second portion of concrete similar to the one describedabove. Pour the well-mixed concrete onto the foundation. Leveland compact it. Use a spirit-level and a straight piece of timber tomake it exactly level. Roughen the surface with a broom. Checkthat the pipe is still in an exact vertical position. Cover theconcrete work with grass or wet sacks and keep it moist and undershade for a couple of weeks.

46 Rain Catchment and Water Supply in Rural Africa
Fig. 39
3 Building the first course of the wall
Working time2 men in i day.
Materials27 blocks, 13 X 23 x 46 cm (See fabrication of blocks on page 55.)V% bag of cement.1 wheelbarrow of sand.4 buckets of water.
14 m of barbed wire.V2 kg of 2" nails.1 m water pipe with a water tap. Any dimension can be used.
Instructionsa) Lay out 27 blocks in a circle 10 cm from the outline of the
foundation and space them equally apart. Each block must besituated so that the side where the lid was placed during itsmaking will be at the outer side of the tank wall.
b) Wrap a small ring of wire around the pipe in the middle of thefoundation and tie a piece of string to the ring. Make a knot on thestring exactly 2.15 cm from the centre of the pipe. This knotshows the correct position of the outer corners of each block in thetank wall.

Build-It-Yourself Constructions 47
Fig. 40
c) When all blocks are laid out, then water the blocks lightly. Mix V2bag of cement with 1 wheelbarrow of sand.
Lift one block at a time and place a layer of mortar in its place.Lay back the block and bring it into a level position by using aspirit-level and a hammer. Use a piece of timber on the block toprotect it from the hammer.
d) When the block has been cross-checked for level in both direc-tions, then use the knot on the string to determine the exactpositions of the outer corners of the block.
Follow this procedure for all 27 blocks. Remember to checkthat the distances between the blocks are the same and that thepipe in the centre of the foundation is still in an exactly verticalposition.
e) Take the outlet pipe and screw the water tap tightly onto one endand, to avoid the pipe being blocked with mortar, put a piece ofcloth into the other end.
Select a convenient space between two blocks and pour a littlemortar between them. Press the pipe as close as possible to thefoundation. Fill the space between the two blocks with mortar,compact it and make it flush with the two blocks.
Fill all other spaces between the blocks with mortar, compact itand make it flush with the blocks.

48 Rain Catchment and Water Supply in Rural Africa
Fig. 41
f) Lay barbed wire around on the top of the blocks. Nail the wireonto the middle of each joint between the blocks. Keep the wiretight and let the two ends overlap each other by at least 20 cm.
4 Building the remaining 6 courses of the wall
Working time2 men in 3 days.
Materials162 blocks, 13 x 23 x 46 cm.
3V2 bags of cement.7 wheelbarrows of sand.
90 m of barbed wire.3 kg of 2" nails.1 drum of water.
Instructionsa) Sprinkle the completed course lightly with water. Lay upon that
course a round of 27 blocks, each one to be placed with its middleexactly over the joint of the underlying course and with the rightside, the lid side, facing outwards. Sprinkle the blocks lightlyagain. Mix mortar and build the course as the first one was built.

Buitd-It-Yourself Constructions 49
b) Nail also a ring of barbed wire onto this second course.c) Finally, tie the timbers onto the barbed wire which is lying on the
top of the last course with other lengths of wire.Each course must have a ring of barbed wire nailed onto it.
Fig. 42
5 Fixing overflow and timber for the roof
Working time1 man in 1 day.
MaterialsV2 m of guttering.4 lengths, 5.0mlong, of 8 x 5 cm (3" x 2") timber.4 m of wire.
InstructionsOverflow The overflow gutter should be fixed vertically above theoutlet water pipe, so that overflowing water will splash onto theconcrete section around the water tap (see next page) and not erode thefoundation of the bank.
Chisel out for the gutter in the top course vertically above the outletpipe. Don't remove the barbed wire tied there but use it, together witha few nails, to keep the gutter in position.

50 Rain Catchment and Water Supply in Rural Africa
Fig. 43
Timber for the roof The purpose of the roof is to minimise evapora-tion which otherwise can empty a full tank within half a year. Tocollect run-off from the roof it should slope towards the centre of thetank.
To enable a person to enter and clean the tank, the two roof sectionsshould be at least 40 cm apart.a) Place the two strongest lengths of timber upon the tank. Situate
them along a diameter parallel to the roof of the house and 80 cmapart.
b) In order to lift the timber from the top of the tank 4 short pieces of5 cm timber should be placed on top of the blocks. Then place thetwo other lengths of timber parallel with the first two lengths butim apart. Raise the last two lengths by placing 4 pieces of 8 cmtimber under them.
Ftg. 44

Build-It-Yourself Constructions 51
c) Finally, tie the timbers onto the barbed wire which is lying on the topof the last course with other lengths of wire.
6 Roofing and water tapping section
Working time1 man in 2 days.
Materials16 galvanised corrugated iron sheets.5 kg of galvanised roofing nails.1 bag of cement.2 wheelbarrows of sand.4 buckets of water.
InstructionsRoofinga) Nail the corrugated iron sheets onto the timbers on the tank.
Remember to leave a space between the two roof sections bigenough to allow a person and a ladder to enter the tank.
b) Cut off the corners of the roof as shown. By using the cut-offcorners for the roof, it is possible to save 2 iron sheets.
Fig- 4$

52 Rain Catchment and Water Supply in Rural Africa
Water Tapping section In order to avoid erosion around the water tapand the overflow, the place should be concreted and a ditch dug forleading away any surplus water. Under and around the water tap theremust be sufficient room for a bucket and a jerrycan.a) Dig out a square hole under and next to the water tap. Measure
the size of the hole to be sure that a bucket and a jerrycan will fiteasily.
b) Plaster the hole and make a small apron around it. Make a groovein the lowest corner of the apron for leading away any surpluswater.
Fig. 46
c) Dig a ditch for leading away surplus water further away from theapron.
7 Interior plastering of the tankImportant. Plastering and curing must be carried out in shade.
Working time2 men in 3 days.

Build-It-Yourself Constructions 53
Materials8 bags of cement.5 kg of waterproof cement.
15 wheelbarrows of sand.4 drums of water.
InstructionsRemove the pipe in the centre of the foundation.a) Clean the interior of the tank with a hard brush. After all the sand
and dirt have been removed, dampen the tank wall throughout.b) Mortar should be mixed in portions consisting of 1 bag of cement
and 2 wheelbarrows of sand and a suitable volume of water.Throw well-mixed mortar onto the inside and the top edge of
the tank wall with a trowel. For vertical smoothing move astraight length of timber up and down. For a finer smoothing usea float. Continue to throw on and smooth portions of mortar untila smooth surface without holes or bulges is reached.
This work must be completed in one day.c) Clean and dampen lightly the foundation floor. Lay upon the floor
a layer of mortar, all of it sloping down towards the open end ofthe outlet pipe. Smooth it well, and make sure that the outlet pipedoesn't get blocked with mortar.
When the floor is dry enough to walk upon, place a line ofmortar along the corner of the wall and the floor.
Take an empty bottle and use it as a float for making around and smooth junction.
This work must also be completed in one day.d) Mix 1 kg of waterproof cement with 3 kg of cement and add
water. With a steel trowel coat the entire interior of the tank andthe top edge with this waterproof material. Start at the top of thetank and finish off at the floor.
e) For the next 2 to 3 weeks the tank and its plaster must be keptmoist and under shade.
8 Exterior pointing of the tank
Working time1 man in 2 days.

54 Rain Catchment and Water Supply in Rural Africa
Materials2 bags of cement.2 wheelbarrows of sand.4 buckets of water.
Instructionsa) Mix i bucket of cement with I bucket of fine sand and add water.b) Starting at the top of the tank, plaster a section of joints. Smooth
the plaster with a float and a trowel. Then, using a spirit-level,draw upon the wet plaster vertical and horizontal lines, 3 cmapart, showing the joints lying underneath the plaster.
After that has been done remove all the plaster which is outsidethe lines with a trowel and neat, watertight pointing will beachieved.
c) Fill the joint between the wall and the foundation on the outsideof the tank with a sloping apron of concrete.
9 Interior painting and calibration
Working time1 man in 2 days.
Materials5 litres of white oil paint.Vi litre of red oil paint.
Instructionsa) After the tank is completely cured and dried, paint the entire
interior of the tank with white oilpaint.b) On a visible part of the inner wall, mark with a pencil a straight
vertical line.c) Starting from the bottom of the tank, measure out every 8 cm
along the vertical line. Every 8 cm mark is equal to a volume of1,000 litres of water. Mark the lowest point with "1,000 L" andthe next lowest with "2,000 L" and so on until the top is reached.
d) Paint every 1,000 litre mark and the figures with red oil paint.

Build-It-Yourself Constructions 55
Fabrication of concrete blocksConstruction of the tank described requires 189 blocks size 13 X 23 X46 cm (5" x 9" x 18"). Each one of the blocks must be of strong andwell-cured quality.
Quarry blocks can be used but clay bricks are not recommended.
Working time1 man in 8 days.
Materials3.5m of 13 x 2.5 cm (5" x 1") timber planed on 4 sides.1 kg of 2V2" nails.1 litre of used motor oil.
10 bags of cement.20 wheelbarrows of sand.30 wheelbarrows of 1 cm ballast.5 drums of water.
Instructionsa) Cut the timber into pieces as shown, making sure you cut at right
angles. Nail the timbers together and reinforce the form with ironstraps or wires.
Coat the form with oil.
Fig. 47

56 Rain Catchment and Water Supply in Rural Africa
b) Find a suitable place, preferably under a shady tree, for mixingconcrete and forming blocks.
Clean and level the surface of the soil and spread out a thin layerof sand.
c) Mix i bag of cement with 2 wheelbarrows of sand. Mix in as littlewater as possible and then add 3 wheelbarrows of ballast. Thefinal mixture should be of a consistency which only allows a fewdrops of water to be squeezed out of a handful of concrete.
d) Place the form on the soil and fill it with concrete. Compact andlevel it off flush with the top of the form.
e) Place the lid upon the levelled concrete without touching thetimber of the form.
Fig. 48
Build-It-Yourself Constructions 57
f) Place one foot on the lid and your hands on the handles at the endsof the form. Now lift the form while still keeping your foot on thelid.
g)
1 3
Fig. 49
A concrete block will emerge. Cover it with grass or paper.Keep this block and the following 188 blocks moist and in the
shade for a couple of weeks.
Construction of a 51,000 litre compound catchmenttank for livestock water and fish farming
Working time2 men in 12 days.
Materials25 bags of cement.
120 sq m of 1" chicken wire.1 length, 4 m long, of any straight galvanised pipe.8 lengths, 0.8 m long, of any iron pipe or iron rod.
50 m of 3-5 mm galvanised wire.3 kg of waterproof cement
58 Rain Catchment and Water Supply in Rural Africa
20 kg of bitumen.88 wheelbarrows (8 tonnes) of coarse sand.
5 drums of water.I roll of barbed wire, 12V2 gauge.
Instructions
a)
b)
c)
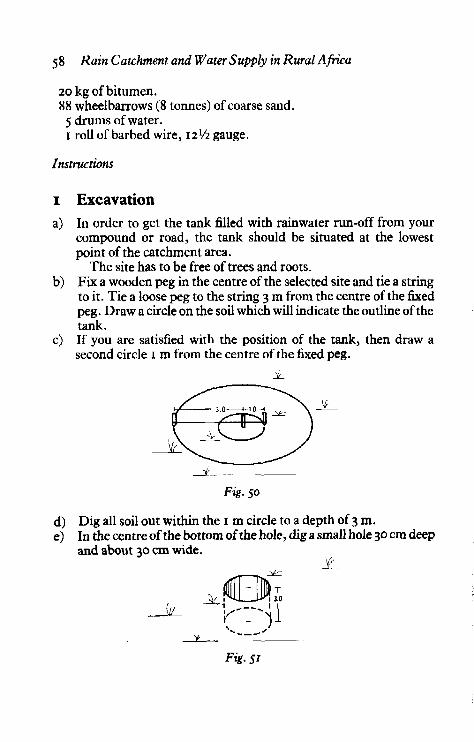
ExcavationIn order to get the tank filled with rainwater run-off from yourcompound or road, the tank should be situated at the lowestpoint of the catchment area.
The site has to be free of trees and roots.Fix a wooden peg in the centre of the selected site and tie a stringto it. Tie a loose peg to the string 3 m from the centre of the fixedpeg. Draw a circle on the soil which will indicate the outline of thetank.If you are satisfied with the position of the tank, then draw asecond circle 1 m from the centre of the fixed peg.
\j-
d)e)
Fig. so
Dig all soil out within the 1 m circle to a depth of 3 m.In the centre of the bottom of the hole, dig a small hole 30 cm deepand about 30 cm wide.
Fig- Si

Build-It-Yourself Constructions 59
f) Pour 10 cm of concrete into that small hole, place a straight 4 mlength of any galvanised iron pipe on the concrete and fill concreteall around the pipe until the small hole is filled up.
Position the pipe exactly vertically and check that it stays thatway during the whole construction period.
After completion of the tank that pipe will be standing there as apillar for the wire roof.
g)
Fig. S2
In case the line of the big circle has disappeared during digging,draw it once more.
h) Mark the pipe 3 m above the concrete in the bottom of the hole.This mark should also be level with the surface of the ground.
i) Cut a 3 m long measure stick for measuring the distance fromthe mark on the pipe to the wall of the hole to be excavated.
j) Start digging soil out along the drawn circle and continue down-wards. Use the measuring stick to keep correct distance from themark on the pipe.

6o Rain Catchment and Water Supply in Rural Africa
Fig. 54
k) You should now have a half-sphere excavation. Remove anybulges. Holes, if any, will later be filled with mortar.
Fig. 55
2 PlasteringImportant: Each of the coatings described below must be completedwithin one day.
The coatings must also be kept well shaded and moist by coveringthem with wet sacks when under construction and for 2 weeks aftercompletion.a) ist Coat: Mix about equal volumes of water and cement to a
creamy consistency. Brush it onto the surface of the excavationand its edge so as to bind the soil particles.
b) 2nd Coat: Mix i bag of cement with 2 wheelbarrows of sand andwater. Throw this mortar onto the coated surface. Repeat thisprocess until a 3-4 cm layer is produced.

Build-It-Yourself Constructions 6l
c) 3rd Coat: Starting at the upper edge of the excavation, roll outand nail the barbed wire onto the plaster. Nail two rounds at thetop edge. Then continue rolling and nailing the barbed wire in adescending spiral with the strands at intervals of roughly 30 cm.
Fig. 5<S
d) Nail 1" chicken wire onto the plaster which has to be totallycovered with chicken wire. All overlaps must be at least 15 cm.
Pig-57
e) 4th Coat: Mix mortar as in 2nd coat and throw it onto thechicken wire in a 3-4 cm thick layer. Smooth it with a float and abrush.
f) 5th Coat: Mix 1 kg of water proof cement with 3 kg of cement.Coat the surface with it. Repeat this process until the whole edge iscoated.
Start at the top edge using a steel trowel.g) 6th Coat: When the concrete work is completed and dried, it
should be coated twice with bitumen.

62 Rain Catchment and Water Supply in Rural Africa
3 Roofinga) Ram 8 pieces of i m long iron rod or pipe down around the edge
of the tank. They should be spaced equally apart and slope awayfrom the centre of the tank.
Fig. $8
b) Fill the centre pipe with mortar and insert a short piece of iron rodin the top of the pipe protruding about 5 cm.
Tie a 3-5 mm galvanised wire from that short iron rod to eachof the 8 irons around the tank.
c) To ensure that no child or animal can fall into the tank, it is nowessential to bind chicken wire onto the wire structure.
__£_
Fig. 59
d) To limit evaporation the chicken wire can be covered with sacksor green creeping plants.

Build-It-Yourself Constructions 63
Construction of a concrete gravity dam for sinking wellsand seepage irrigation
Working time2 men in 80 days.
Materials150 bags of cement.35 tonnes of sand.35 tonnes of ballast.50 tonnes of boulders (big stones).50 drums of water.
Instructions
1 Design and approval
Downsirtom
Fig. 60

64 Rain Catchment and Water Supply in Rural Africa
a) Find a suitable site in a semi-permanent riverbed. Preferably thesite should have a solid bedrock in the riverbed and hard rocksprotruding from both sides. Ideally the riverbed upstream shouldbe almost horizontal.
b) Measure the lengths (A and B) and the height (C) of the greatestarea of flooding which has occurred in the riverbed. Multiply thefigures and add 50% for security reasons. You will now know thesize of a spillway necessary for allowing exceptionally big floods topass over the dam wall safely.
c) Dig out all sand and loose stones covering the bedrock. Draw alevel string across the rocks to indicate the upper edge of thespillway. Draw a second string 1 m below the first string to showthe bottom of the spillway, which is also the top of the dam wall.
Measure the distance from the lower string to the bedrock.This measurement is the height of the dam wall and in theexample shown it is 2.5 m. This figure, plus 0.3 m gives thethickness of the dam wall at the bottom; namely 2.8 m.
Formula: w= h * 0.3m.'0.3
Downstream
Fig, 61

Build-It-Yourself Constructions 65
d) Provided that it still seems feasible to build a dam in that place,then mark the various measurements taken and their points withpaint on the rocks.
Draw a sketch of the proposed construction and ask yourDistrict Water Bailiff to assist you in getting the proposed damconstruction approved.
e) In order to get the reservoir silted up with as coarse sand aspossible, for the reason of holding a maximum of water, the damwall should be built in 0.5 m sections above the riverbed. Eachsection should be allowed to silt up before the next section is built.Although this method takes longer, it will enable the reservoir tohold twice as much water.
2 Construction of the first sectiona) When you have the approval of the Apportionment Board, you
can buy the cement and start constructing the first section.Remove all bushes, trees and their roots from the constructionsite.
Redraw the strings which indicate the spillway. Draw a thirdstring near the bedrock and vertically below the spillway strings.
b) Clean, sprinkle, and coat with cement slurry the rocks where youare going to work with concrete. If there are any cracks in orbetween the rocks, they must be blocked carefully with mortarmade by mixing 1 bag of cement and 3 wheelbarrows of sand. Usethe same mixture for concrete but add 3 wheelbarrows of ballast.
c) Build along the string at the bottom a line of big stones with theirplane sides facing upstream. Fill all spaces between the stones andthe rocks with concrete and smaller stones.
Stones and rocks should not touch one another but should havemortar or concrete in between.
d) When the wall has reached a height of 0.5 m above the riverbed,then plaster to a finish the upstream side of the wall. On thedownstream side fill concrete and stones up to the backtoe of thedam wall which is 2.8 m from the upstream side. The slope of thedownstream side should be 450, which is the same as saying thatfor every 0.5 m height the dam wall must be 0.5 m thinner.

66 Rain Catchment and Water Supply in Rural Africa
Downstream
Fig. 62
e) To achieve a good binding to the next construction section youshould make a rough surface at the top of the first section.
3 Construction of the second section
a) After a flood has silted up the reservoir, you can continue with thesecond section, which is built in the same way as the first section.
Remember to clean, sprinkle, and coat with cement slurry allthe surfaces to be built onto.
b) Build the wall 0.5 m high and 0.5 m thinner at the top. Plaster theupstream side and leave a rough surface at the top of the dam wall.

Build-It-Youmlf Constructions 67
Section
Fig. 63
4 Construction of the third and final section
a) After another flooding, the third and final section can be built aswith the former two sections. The thickness at the top of the wallwill be 0.3 m.
b) This 0.3 m thickness is extended 1 m above both ends of thedam wall to the spillway.
c) Plaster to finish the whole dam wall on all visible sides.

68 Rain Catchment and Water Supply in Rural Africa
Section
Fig. 64
5 Usefulness of the reservoira) Floods have now filled the reservoir with sand but water will not
yet be stored there for the maximum length of time. This will beachieved after several more fillings which will saturate the adja-cent land. That process will raise the subsoil watertable, whichprolongs the growing season and eliminates the risk of crop failuredue to drought.
b) Establishment of an orchard, vegetable garden and fodder treesfor livestock and for fertilising your field is also feasible aroundthe reservoir.
c) Due to the advantage of holding the water in a subsurfacereservoir, it does not tempt children or livestock to invade thereservoir.
d) It has also the advantage of not being suitable for mosquitobreeding, which minimises the danger of malaria. The reservoiralso will not attract snakes because there will be no frogs livingthere.

Build-It-Yourself Constructions 69
e) The most hygenic method of drawing water for domestic andlivestock purposes is to sink a shallow well in a riverbed near yourhouse.
Fig. 6s
Construction of a sinking well for domestic and live-stock water
Working timeDepends mainly on the depth of the well and the type of soil. As aguideline it will take 2 men 30 days to construct and complete a 5metre deep well with head and slab.
MaterialsMaterials for 5 metre deep well with head and slab:
17 bags of cement.30 wheelbarrows (j$Vi tonnes) of sand.10 m of 12 mm iron rod.
150 m of 5 mm iron wire.1 form for blockmaking (see page 77).1 windlass or another lifting device.5 drums of water.

70 Rain Catchment and Water Supply in Rural Africa
Instructions
i Siting and preliminary excavationa) Having found a potential site for a well, mark out a square
measuring 140 cm x 140 cm and dig as far down as possible.
Ground level
Fig. 66
In case the soil is sandy or otherwise unstable, it is necessary towiden the excavation at the top to eliminate the risk of the wallscollapsing in on you.
b) If you haven't found any evidence of water in the bottom of theexcavation, you have to find out whether there is water furtherdown in the soil or look for a better site.
To find out about that you can do three things: 1) widen anddeepen the excavation; 2) hammer down a length of 12 mm ironrod in several places; or 3) drill a few holes with a hand auger.
2 Concreting the foundation ringa) When you are sure that a well can be sunk further down into a
waterbearing layer (an aquifer), the work can proceed.b) Nail together pieces of timber as shown and use them to excavate
a round and level groove in the bottom of the excavation.This groove will be the form for concreting a reinforced cutting
ring which will also act as a sinking foundation for the well.

Build-It-Yourself Constructions 71
Fig. 67
c) Mix Vz bag of cement, % wheelbarrow of sand, 3A wheelbarrow ofballast and some water.
Pour the concrete into the toe of the groove. Lay an iron wire,tied together as a ring, into the concrete. Fill up half the groovewith concrete. Take another iron ring and tie 16 lengths of wire,each 50 cm long and with their ends bent, onto it and lay it into theconcrete with the 16 wires spaced equally apart.
Fill the groove with concrete and press another 2 iron rings intothe wet concrete. Smooth the concrete and let it harden for abouta week.

72 Rain Catchment and Water Supply in Rural Africa
fron rings
Fig. 68
3 Building the well up to ground levela) Clean the surface of the concrete ring. Mix mortar consisting of Vi
bag of cement, i wheelbarrow of sand, and water. Build the firstround of blocks upon the concrete ring. Each block has to be flushwith the inner side of the concrete ring and each of 16 wires mustbe placed in the middle of the holes in the blocks.
Fig. 69

Build-It-YourselfConstructions 73
When all blocks and wires are situated correctly, then fill theholes in the blocks with mortar. Compact and level the mortar.
b) Take another 16 lengths of iron wires, each 1 m long, and bendtheir ends. Fasten each of these wires to the 16 wires in theconcrete ring.
Place the second and third courses of blocks loosely on the firstcourse and with the iron wires going through all the holes. Don'tcement the blocks together.
c) At the third course a step must be built in. Cut a 70 cm long pieceof 12 mm iron rod and bend it as shown. Chisel holes for it in theblocks and fasten it with mortar using the blocks above it to keepit embedded solidly.
Fig. 70
d) After that place the fourth and the fifth course loosely withoutmortar.
Lay an iron ring upon the fifth course surrounding the ironwires.
Sprinkle the blocks and fill all the holes in the blocks withmortar. Use a stick to compact it.
e) Having filled and compacted all the holes, then cover the iron ringwith mortar and press the sixth course upon it.

74 Rain Catchment and Water Supply in Rural Africa
f) Continue to build up the well until it reaches about i m aboveground level.
Remember that every 3rd course must have a step solidlyembedded in it. In a deep well you might need a scaffolding. Thisis made by embedding extra steps at every 12th course justopposite the step which is there. Where two steps are situatedopposite each other you can place some timbers upon them anduse them as a floor for working.
g) Also remember that every 5th course must have an iron ringconcreted in and that the 16 iron wires have to be connected andextended at those rings.
Fig. 71
4 Sinking and extension of the wella) The well is now ready for the first sinking. A man wearing a
helmet enters the well and digs out sand from the bottom of thewell. He fills it into a strong bucket which is tied to a strong rope.

Build~It-Yourself Constructions 75
Another man standing at the ground level pulls up thebucket and empties its content into the corners between the welland the excavation.
Be very careful not to drop anything on the man in the bottomof the well! Slowly, as the digging proceeds, the well will sink.Stop digging when it has sunk to ground level.
Fig. 72
b) Build another section of 5 courses onto the well.c) Dig sand out from the bottom of the well until it has reached
ground level again.

76 Rain Catchment and Water Supply in Rural Africa
Ground level
Fig. 73
d) Continue building 5 courses and digging until the well hasreached the depth you want.
Ground level
Fig. 74
5 Well head, slab and windlassa) When you have reached the depth you want and the well has
stopped sinking, it is time to build the well head.From one course below ground level and to the top of the well,
build all blocks with mortar.b) Build two blocks onto the last course for holding the windlass.
Fix two pieces of hard wood in the holes of these blocks forbearings.

BuUd-It-Yourself Constructions 77
c) Split a wooden trunk into two halves and nail the pieces togetheron the windlass. Bend iron wires around the windlass and thebearings, and concrete them.
d) Plaster the edge of the well and point all joints (see pointing onpage 53).
e) Concrete a slab around the well to lead away any surplus waterfrom the well.
n
Fig- 75
Blockmaking for a sinking wellThe form for making these blocks may seem a bit complicated, buthopefully these almost self-explanatory drawings and a few commentsmay guide you.a) On a piece of cardboard draw the top and bottom shape of a block.
Note that the bottom shape is 0.5 cm wider than the top one andthat the patterns are exactly 1/8 of a circle.
b) Place the patterns on 6" x i " timbers equidistant from the endsand edges. Draw the pattern outlines onto the timbers.

78 Rain Catchment and Water Supply in Rural Africa
Fig. 76

Build-It-Yourself Constructions 79
c) Cut the marked areas away and nail the timbers together,d) Nail the two sets of timber together. Be sure that the outer circle
and the two ends of the cut-away areas are immediately over oneanother.
e) Cut two iron sheets and nail them onto the form.f) Cut and nail two wooden pieces onto the ends of the form.
1-2m.m, Iron sh*et
Fig. 77
g) Cut and nail together the form for making the middle hole in theblocks.

80 Rain Catchment and Water Supply in Rural Africa
h) Cut two pieces of timber, A and B, so that they can fit into the twoopen sections of the form.
i) Coat the form all over with used motor oil each time beforeyou use it.
Fig. 78

Build-It-Yourself Constructions 81
j) Mix i bag of cement with 22/2 wheelbarrows of sand, and water.Place the form on a clean and level place.Fill the form with concrete and compact it. Level it off flush
with the surface of the form.k) Place the two timbers, A and B, upon the concrete in the form but
without touching the form. Now one man keeps these twotimbers down with his hands while another man lifts the form. Ablock will have been formed.
1) Make 8 blocks and test that they make a circle measuring 130 cmin the outer diameter.

Recommended Reading
Subsurface damsa) 'Handbook for Simple Water-Engineering in Kitui District'
by J P de NooyDiocese of KituiKenya
b) 'Field Engineering for Agricultural Development'by NW HudsonOxford University PressEly HouseLondon Wi
Storage tanksa) 'Appropriate Technology' Vol 5 No 2
Intermediate Technology Publications Ltd9 King StreetLondon WC2E8HN
b) Granary Basket TankUNICEF/Kenya GovernmentVillage Technology UnitPO Box 44145Nairobi
c) Large and Small Cement JarsUNICEF/Kenya GovernmentVillage Technology UnitPO Box 44145Nairobi

Recommended Reading 83
Wellsa) 'Where Shall We Dig the Well'
'Appropriate Technology' Vol 4 No 1Intermediate Technology Publications Ltd9 King StreetLondon WC2E8HN
b) 'Wells Construction'Peace CorpsInformation Collection and ExchangeWashington DC 20525
c) 'Hand Dug Wells and Their Construction'by SB Watt and WE WoodIntermediate Technology Publications Ltd9 King StreetLondon WC2E 8HN
d) 'Self-help Wells'Irrigation and Drainage Paper No. 30FAOVia delle Terme di Caracalla00100 Rome
e) 'Water Lifting Devices'Irrigation and Drainage SeriesFAOVia delle Terme di Caracalla00100 Rome

e ezm ot>e o Nasi
N01H9D01S QNV d3QQOH
•eAu9>j
•esn leojpejd jeejB \O \\ eye\±i suoijejjsnni pue suotpmjsu!de^s-Aq-de^s gqi PUB 'Ae/v\ aidiujs B UJ U8};UM SI \XQ\ em
=-seaje asom UJ aiqe|iBAB Anpeaj siij^s puB siooj 'S|BU81BLU eqj
"A/uo Buisn }soo MO| B IB je^BM jo A|ddns je|n68J B uiejqo ojaiqissod si ii ;BL^ SMOIIS jomne am 'Aiddns ijoqs ui. si JG^BM
8J9L|W\ uoiBaj e ui BuiJOM pue 6UIAI| GSOLU lie JO^ pau6(sapsi >|ooq sim "spaau |eoo| o^ aieudojdde iou si peAoiduia
ajB BDUJV I6-1"-
1 u! sauj8L|os UOIIBBUJI papaeu Aipeq uaijo os