racing basics for catamarans - cobra catamaran...
TRANSCRIPT

RACING BASICS for CATAMARANS by Mark Johnson [copyright 1/19/95]. Reproduced with permission 18/10/2001
(Some alterations have been made to the original script that pertains to catamarans) This is a 51-page document if printing.
Table of Contents
Introduction
• Attitude
Chapter 1 - Priorities for Practice
Chapter 2 – Rigging
• Basic Sail Theory • Sail Controls
Chapter 3 – Starting
• Form a Plan and Execute it • Fleet Racing • Match Racing

Chapter 4 - Beating Upwind
• Boat Trim (as opposed to sail trim) • Apparent Wind • "Feeling the Edge" • Tacking • Basic Tactics
Chapter 5 - Rounding Marks
• Windward Mark • Reach Mark • Leeward Mark
Chapter 6 - Reaching and Running
• Basics • Jibing • Watching the Wind
Chapter 7 - Finishing
Conclusion
• Further Reference

Introduction This guide is a detailed introduction to the sport of sailboat racing. It focuses particularly on intercollegiate racing in dinghies, however the ideas can be applied to other boats, including catamarans, keelboats, windsurfers, and iceboats.
When a sailor begins to race, many questions come up, such as, "How do the sails work," "Why do I always get passed on the mark roundings," and "What's a mark rounding?" You can answer many of these questions by poring over various texts on aerodynamic theory and tactics manuals. In fact, that's one of the best ways to improve your knowledge about the sport in a thorough and detailed way. However, this short intro should provide some quick answers to basic questions in a relatively painless and comprehensive way. It should also provide some background to make the reading of other sailing literature more familiar.
I will assume a basic knowledge of sailing (being able to get the boat to move, without running into a lot of stuff), as well as a basic knowledge of how to get around a race course (knowing upwind, downwind, and mark roundings, as well as a few basic rules). This guide is separated into the major steps you will go through during a regatta, in chronological order. Each chapter outlines the main ideas and theory associated with these steps. Some chapters include "TECHNIQUE" sections explaining particular ideas which are important to boat speed, and which are mentioned in outside racing literature. Also, "SKILLS" sections may be included, providing particular tasks to practice, directly applicable to the leg of the race upon which the chapter focuses.
The remainder of this introduction and the following chapter, "PRIORITIES...," outline some major themes and gives you an idea of how to use the manual, and how to think about the sport.
Attitude: This is probably the most important aspect of racing-attitude. The one thing that can win or lose a race faster than anything is the attitude of the racer.
Mistakes
Every race, you'll make many mistakes. The key is to forget about them for the moment, and go on with the race. It never helps your game to dwell on a mistake. All the energy spent on the last blunder takes concentration-concentration that is needed for sailing a great race. It might help to say "@?#!", but only once.
After the race, it will be time to recall the mistakes and put them on paper. Get a notebook and write as much of the race as you can remember, outlining it from start to finish. The point of your notebook is not to dwell, but to compile a list of frequently made errors, which can be easily fixed. For instance, I often run into trouble at mark roundings with other boats. Knowing that, I try to concentrate a little harder on what will happen before I get to the mark, in order to avoid problems. Use your mistakes later to clean up your game, but don't let them interfere at the time they happen.
Being a Student
Another area in which attitude is important is in your ability to take criticism. No matter the form of the criticism or the messenger, it can almost always be used to advantage. It is too easy to take offence at helpful comments, not to mention those you consider derogatory. However, each may contain a bit of truth that you can use in the future to improve. Keep in mind that even well intentioned remarks can be wrong, so you must take each with a grain of salt. If you don't know if the advice is any good, give it a try-what the hell.
The most beneficial position in which to be is that of a student of the sport. Many times, when a person joins a club and begins to race, they will follow a faster boat and finish second or third. However, for some reason this stops, and they drop back in the fleet. It may be that "beginner's luck" runs out. But, more than likely, they just stop following faster racers.
Following a better racer is a great way to win, as well as to learn. These guys are often better for a reason, and there is much to learn. Follow them, figuring out why they went the way they did, or why they didn't do what you would have done. If you can't figure it out on your own, ask them after the race. Many people are flattered and will offer much more than just a quick answer. This applies at any level of the sport from club races to the national level in your class. Never be afraid to ask for help, or start a conversation on a part of a race that bothered you.
How to Practice
Keep in mind that sailing, like any other skill, should be practiced. It should be practiced with the intent of improving the slowest part of your game first. Roll tacks are fun, but if you can't "stay on the wind" on the first windward beat, you'll lose big, even if your tacks are the best in the world (if you don't know what a roll tack is, don't worry-it's explained a little later). You should always make a list of priorities, with the goal of making the biggest improvement possible. Here is a list for the beginning racer:
Priorities:
1. Beating-stay on the wind. Learn to "feel" the wind. 2. Transitions (tacking and jibing)-this does not mean roll tacks, just master the basics
first. 3. Sailing Close to Other Boats Without Getting Nervous-this mean centimetres. 4. Starting-learn to get a consistent start. This means lots of boat handling practice. 5. Mark Roundings-large gains and losses are made here. 6. Reaching and Running-
After learning the basics of this manual, you should be able to pinpoint weaknesses on which to focus, resetting your priorities accordingly. Most importantly, keep in mind that the easiest things to practice are the things that you can do well. You will improve your sailing most by concentrating on skills you don't do particularly well.
Many of the skills mentioned in the following chapters can be practiced alone with no props, or with one buoy in the water. It is always good to practice with other boats, if for no other reason than to combat boredom. However, there is much to be gained even if no one else is around. Read on.

Chapter 1 - Priorities for Practice 1. Beating 2. Transitions 3. Close Sailing 4. Starting 5. Mark Roundings 6. Reaching and Running
This set of priorities is listed again because of its extreme importance. Too many times new racers concentrate on skills that add very little to their speed, given their skill level in other, more important areas. It is far too easy to practice skills that are fun or that have already been mastered. Also, many of the "tricks" you can learn, like the roll tack, take a great deal of concentration and practice to do them correctly in a race. Don't crowd your brain with too many things to do-the basics are what are important.
You will notice the huge emphasis on boat speed and boat handling in the discussions below. Many times you will hear the phrase, "get your head out of the boat," meaning you should watch what's going on around you. That's BAD advice for the new racer. What you should be doing if you're new to the sport is "getting your head into the boat." You must develop the skills necessary to making the boat go fast before you can worry about strategy or other boats. Learn the basics first, or you will find yourself unable to use your new tactics and go-fast tricks because you will be 1/2 mile behind by the first mark.
The remainder of this guide is ordered chronologically, given the context of an actual race. This has been done to make reference to ideas quick and simple. The priorities in this chapter, however, outline the order you should follow to improve your racing skills.
Read this guide once, straight through, to see each idea. Then, following the list above and referring to the appropriate chapters, practice each skill and idea until it is mastered at a moderate level. At that point, you'll notice different weaknesses because of your improved skill level and awareness. You can then form a new priority set, requiring new resources. These new resources can include self-speed evaluation, observation of other racers, and conversation with other racers, aero/hydrodynamic texts, and sailing texts. Each offers a more detailed look at a particular area, such as downwind tactics or the causes and effects of induced drag.
When sailing, your attention should be split about 70% boat speed and 30% other things. As you improve, you will be able to put more emphasis on the other things, since your body and senses will take over most of the boat speed things. Going fast will just feel right. Learn to drive the car before you learn to change the radio station while flipping off the other drivers. After some practice, you can flip everybody off while listening to Led Zeppelin, without crashing.

Chapter 2 - Rigging This chapter contains information about how the sails work and how you can control them. You can learn theory details from other, more comprehensive, sail theory manuals, but this will give the basic ideas and how to use them. Sometimes what is written below is not the whole truth, but partial truth which has been simplified to keep this guide short, and the ideas easy to grasp.
Basic Sail Theory
For more information on the topic of sail theory and aerodynamics, one excellent source is, "The Art and Science of Sails," by Tom Whidden and Michael Levitt.
There are two themes that are important to understanding the theory of sails: lift and flow. Lift is the force, which makes the boat move, and the flow of air over the sails generates that lift. It also generates drag, which slows the boat down.
Lift
Sails, contrary to popular belief, are not merely "pushed" along by the wind. Have you ever thought about how the boat could go into the wind? This would not be possible if the sail was just pushed. Once, during the age of square-rigged boats, people thought this was true, and there's a story that says the first Viking that managed to go against the wind was burned at the stake for being a witch. How could he go against the wind? The idea is fairly simple to understand.
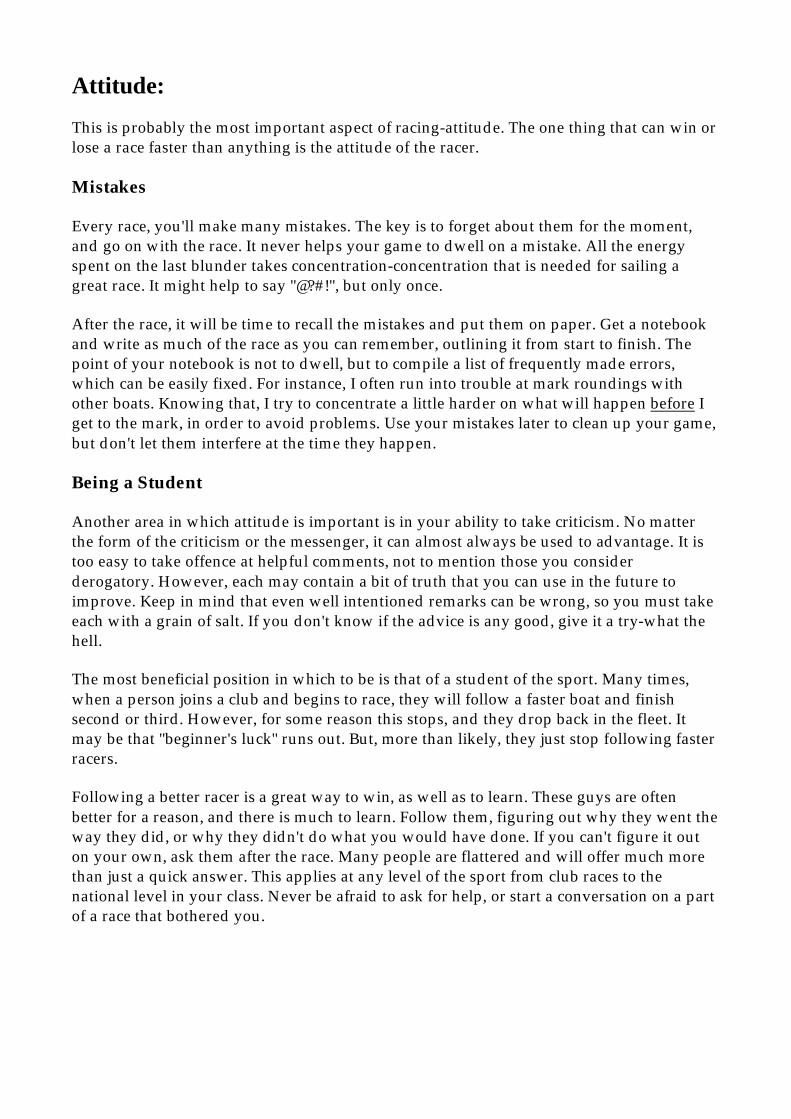
A sail, like a wing of an airplane, is an airfoil, which changes the shape of the wind as it flows over the surface of the sail.
figure 1
With this change in the shape of the wind come other effects such as pressure changes and directional changes. Looking at the top of the foil in figure 1, you can see an air particle will have further to travel than his little twin particle going over the bottom. These two want to reach the back of the sail at the same time, so what gives? The particle over the top needs to travel faster.
When the air is travelling faster over the top, a phenomenon known as the "Bernoulli Effect" kicks in. Since the speed is faster, the pressure drops, "sucking" the foil up. You can picture this by thinking about air coming through a fan. Watch a piece of dust outside the flow of the fan. It will drift slowly, then more quickly, toward the stream of the fan. Since the air in the stream is moving more quickly, it gets its particles through faster, calling for
more. The area over the foil gets its particles out of the way faster, pulling the foil upward to fill the gap.
Of course, while thinking of a sail versus a simple airplane wing, you must see that the foil is on its side, actually being sucked forward, not upward.
Figure 2
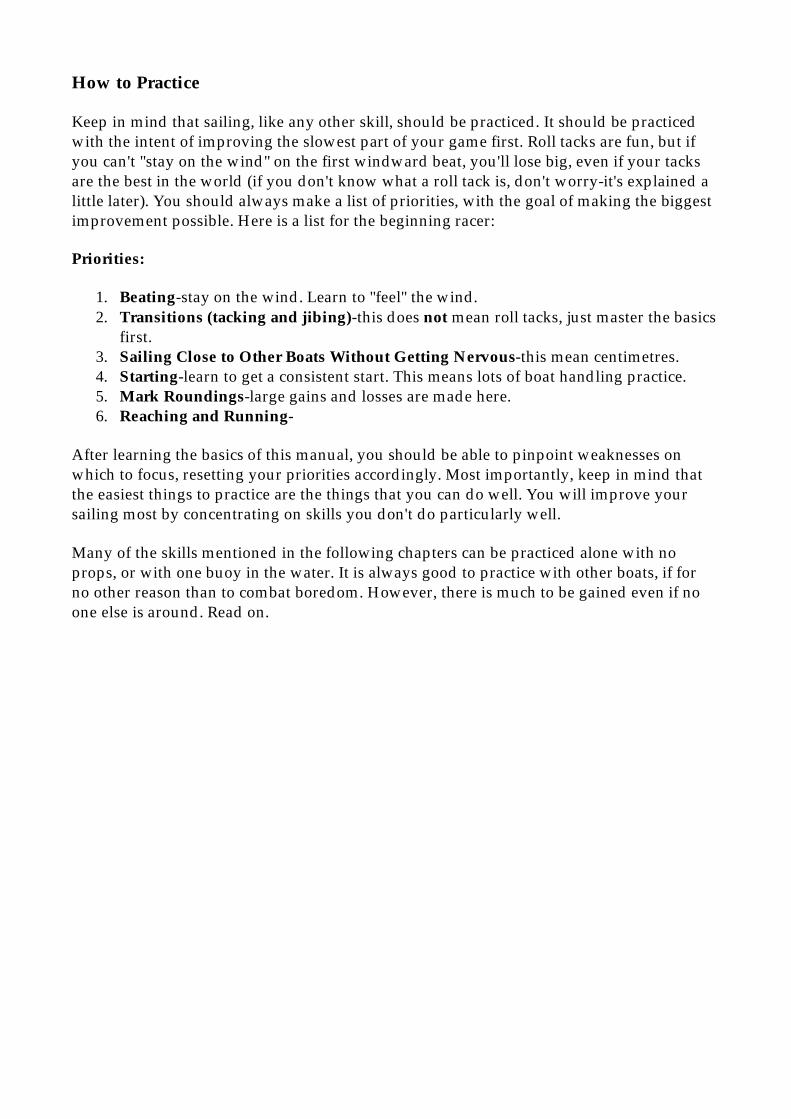
Upwind vs. Downwind
The preceding and following discussions apply to a boat going upwind. When the boat travels dead downwind, many things change, such as the way the wind is used. When travelling downwind, the wind simply pushes the sail. I will leave more discussion of downwind aerodynamics out for brevity, and will concentrate on the first priority: beating.
Draft of the Sail
The sail is the foil driving the boat. In order to maximize the speed of the boat in different conditions, you must change the depth of the foil. This depth is called the draft of the sail. Its size and location can be changed using the sail controls discussed below. These changes are important because the optimal draft position and size change with the condition of the wind and water.

Position: It will be best to have the draft of the sail a little forward of halfway.
Figure 3
Size: In general, the bigger the draft, the more power. A large draft is like first gear in your car, giving lots of power to accelerate, but topping out at a fairly low speed. A flat sail is fifth gear. The sail attains a higher speed, and will point higher into the wind, but it also takes longer to accelerate.
Sail Cuts
How is a flat piece of cloth transformed into the shape of an airfoil? Sails are made up of panels, which are sewn together. There are two basic methods to get draft into a sail using these panels.
One method consists of sewing a flat sail with a curve in the luff. For example, this is how Laser sails, as well as most windsurfer sails, are sewn. It is a very simple method of tailoring.
Figure 4
Once the mast is inserted, straightening out the luff, the extra material has to go somewhere, so it goes into the body of the sail, forming the draft.

The second method is called broad seaming. The panels, themselves, are cut with curves on the connecting edges. These edges are then sewn together and the draft is created. This is how early catamaran sails, as well as most other dinghy and keelboat sails, are made.
Figure 5
You will notice when laying a catamaran sail on the ground that it will not lie flat, as opposed to the Laser sail, which will. The effect, once raised on the mast, is mostly the same, with a curve or draft in the middle of the sail.
Light Winds
It should not be difficult to understand that air, when travelling slowly, does not have the same high energy as when it is travelling quickly. When a light wind hits the sail, it will try to get around the sail as best it can, but it gives up quickly if the draft is too large. Keeping the sail flat will help a very light wind get around the sail. You should notice when a puff hits, those with fuller sails will pass you. However, if the air is steady enough, your set-up will make you faster in the long run, at least upwind.
Moderate Winds
In moderate winds, you can follow the rule: "The bigger the draft, the more power-the smaller the draft, the more speed." Make the decision how to set the sail based on your experience before and during the day you are racing. If you are on the course, and are finding your speed is okay, but the boat is not accelerating as quickly as the others around, put more "bag," or draft, in the sail, using the sail controls discussed below. If your acceleration is good, but you're lacking in top speed upwind, flatten the sail.
Heavy Winds
In heavy winds, there will be an excess of power in the sails. As you will see below, whenever the boat heels too much, lots of bad things happen. Heavy winds and a large draft make it easy to heel the boat too much, so any excess power should be "squeezed" out of the sails by flattening them. It won't be difficult to get the boat up to speed since there will be plenty of power. Remember that everyone else around will have flatter sails as well.

Attached Flow
Lift is a product of the flow of air around the sails, which can be classified as either attached or unattached. The attached flow is a smooth flow of air that "sticks" to the sail. This is very desirable when going upwind as it generates much more lift than does unattached flow. Unattached flow breaks off the sails with little swirlies in it.
Certainly you can't directly see the action of the wind, but there are things you can do to help it stick to the sail. For instance, when the wind is light it separates from the sail when there is too much draft. Flattening the sail will help the air stay attached, generating more lift. Generally, the separation occurs when the wind has to make a sharp turn, like when the draft is too large:
Figure 6
There will be other instances mentioned below where separation occurs, which can be rectified through control of the sails.
Another product of airflow around the sails is drag, which slows the boat down.
Drag
There are basically two types of drag, which are important to the sailor. These forces, holding the boat back, can be reduced partially. It is important to understand how drag is formed, in order to lessen its effect.
Frictional and Form Drag
Frictional drag is what we all think of when we hear the word "drag." It is the scraping of a box on the ground as you try to push it across the driveway when you're moving. It is the reason there is oil in car engines, and one of many reasons we use edible body oils.
Frictional drag is generated from the side stays, from the seams in the sails, as well as from the skipper and crew. You can think of this force as friction on the form of each of the elements of the boat and crew.

Induced Drag
Watch a movie sometime with an airplane flying through a cloud. In that footage, it is easy to see large vortices of fog swirling off the tip of the wing of the airplane.
What is happening is that the low and high-pressure areas meet at the tips of the wings. Much of the air and fog "leak" suddenly from the high-pressure side (the windward side) to the lower pressure side, creating big swirlies. These swirlies require a lot of energy to form-energy, which could be better used in propelling the airplane or boat forward.
figure 7
There have been numerous solutions proposed to slow this effect, such as small vertical winglets on the ends of airplane wings. On a boat, there will be two places this leakage occurs: the head and the foot of the sail. In one of the early 1900's America's Cup races, the American yacht had a 4-foot wide boom, dubbed the "Park Avenue Boom" for its size. The purpose of this was to slow the flow from the windward, high-pressure side, to the leeward, low-pressure side. This slowed the creation of the induced drag.
There are other, more reasonable solutions to this problem. For instance, on modern windsurfers, the sail is built so that at high speeds, the sail can be leaned back all the way to the board. This closes the gap between the sail and the board, using the board as an "end plate" to stop the flow, much as the fuselage of an airplane does for its wings. Another instance of this end plating is the "deck sweeper" jib, which is cut to come all the way down to the deck of the boat. Deck sweeping jibs are now very common on most modern sloop-rigged boats.
Neither of these solutions addresses the problem of the leakage at the top of the sail. There is no way, so far, to prevent this type of leakage.

Trailing Edge of the Sail
One more place where vortices can form and sap energy from the sails is at the trailing edge, or the leech. The wind needs to have a smooth exit from the sail in order to keep it from getting angry and swirling. Two ways to make the wind angry are: 1.) put the draft too far back in the sail, so it has to make a sharp turn immediately before it exits; and 2.) curl the leech of the sail inwards with too much boom vang.
Figure 8
You will see below how you can use basic sail controls to fix this.
Sail Controls
This section outlines the major controls for the shape changes you have seen above. Many times, in the beginning, it's not obvious how to change the shape, location, or size of the draft in the sail. However, with some practice, it will become second nature. All the myriad lines, blocks, and grommets in the boat should begin to make sense, instead of looking like part of a big plate of spaghetti.
Wind Indicators
Before you learn to change the shape of your sail, you have to know what types of changes to make. Much of your sailing will be done by the feel of the wind, but there are also many visual aids for detecting wind direction, and how the wind is interacting with the sails. These aids are important when you begin to sail, and even after you have mastered the basics. They are especially useful in very light winds, when it's difficult to sense the wind by feel.

Windex
The Windex is a small weather vane attached to the top of the mast, or on a catamaran, as an attachment suspended below the centre of the bridle. This is a very gross method for measuring the direction of the wind, and is most useful downwind, when fine adjustments are not needed. The Windex’s at the top of the mast are often distracting since you have to look away from where the boat is going, so it's best not to have one here. One of the best racers I've ever known once said, "Windex’s are great, if they're on someone else's boat." You can watch someone near you, but don't forget where you're going.
Side stay Telltales
Side stay telltales accomplish the same task as the Windex. They are good for a gross indication of the wind direction
Jib Telltales
The jib telltales are the most sensitive, accurate, and thus useful, of the bunch. These should be placed about 1/3 of the way back from the luff of the sail, and at 1/4, 1/2, 3/4 the distance from the bottom to the top. They should be made of a light material, which does not stick to the sail, such as yarn or audiocassette tape.
Figure 9
Use these to see the attachment of the wind to the sail. Going upwind, with the sail mostly flat, there should be attachment on both sides. You will see both telltales flow straight back. Sometimes, as when reaching, it is not possible to make both flow back, because of a large draft in the jib. It's imperative that the flow be maintained on the outside surface, so keep the outside telltale streaming back.

Mainsail Telltales
When there is a jib, these indicators are not as important. The mainsail is used to keep the boat flat and it is best to trim it by feel, so it pays to ignore visual indicators on the mainsail. However, telltales can give a little information as to what's happening.
Draft Telltales
These give the same information as those on the jib. If they are flowing straight back, there is attachment, and if not, separation.
Leech Telltales
Attach these to the leech of the sail, at the points where the battens are inserted. When the air is leaving smoothly from the leech, these will flow straight back, as they do on the surface of the sails. The goal for these is to have them lifting (flowing) about 1/2 the time. The theory is a little sticky, but this is a good goal for speed and pointing.
If they lift more than 1/2 the time, there is too much air flowing freely off the leech, so you need to capture more by trimming the sail, or by tightening the vang (see discussions below on main sheet and boom vang). If they lift less than this, the leech is too tight, and you should let up on the mainsheet or the vang.
Outhaul - (bottom draft size)
One of the most basic of all the controls is the outhaul. It controls the size of the draft in the bottom 40% of the mainsail. To flatten the sail, pull on the outhaul-to give the sail more "bag", or draft, let out the outhaul. It does just what the name says-it hauls the back of the sail out.
This is not a very interactive sail control on a catamaran. Often, it is set at the beginning of the race and left in that position. If it is possible to adjust on the fly, its major purpose is to make the transition between beating and going downwind. When reaching, more draft in the sail will give more power. Dead downwind, the outhaul is let off to make more bag in the sail. This bag allows the sail to generate as much drag as possible, which is the driving force dead downwind. Right before the leeward mark, the outhaul is then brought back in to allow pointing. This is very important- try pointing upwind sometime with the outhaul all the way off. You won't ever get where you're going.
Downhaul / Cunningham - (draft location)
In one of the 1920 era America's Cup races, a skipper named Cunningham designed his namesake sail control. The sails at that time were made of canvas and were apt to stretch depending on the wind conditions. Given the maximum sail size restriction, the sails had to be cut short to meet that maximum when it was windy, leaving them small in less demanding conditions. He realized if he put a grommet through the sail near the tack and pulled it down, the sail area could be increased in light air.

The downhaul is no longer used for this purpose, but it still remains an important control. The modern purpose for this little line is to control the location of the draft. When the downhaul is pulled on, the draft in the sail moves forward.
As the wind speed increases, the draft tends to blow back in the sail towards the leech. This is undesirable as it causes overpowering and extra drag. The draft should be somewhere around 40% back from the luff of the sail.
A by-product of a tighter downhaul is that the leech of the sail begins to "open up." Sighting straight up above the boom, the top batten of the sail should be parallel with the boom. If the cunningham is pulled on tight, the top batten will then be pointing outward, away from the boom. To bring it back in, you can put on more boom vang, which is discussed below.
Of course, another by-product is that the sail will be flattened, partially. However, the downhaul should not be used to flatten, except in special cases, as it moves the draft while flattening.
Mast Bend - (draft size)
Referring back to figure 4 above, you can see the Laser sail laid out flat. When the mast is inserted, straightening out the luff, the sail gets its fuller shape. If that straight mast is bent back, closer to the shape of the flat sail's mast sleeve, the shape goes out. The main purpose of mast bend is to depower the sail, and this can be done in a variety of ways.
Sheeting
When sailing a catamaran, you will soon find that the mast can bend easily One of the ways to induce bend and decrease the draft of the sail is to sheet very hard. In fact, while beating upwind in all but the lightest winds, the two mainsheet blocks at the stern of the boat should almost be touching each other (called two- blocking).
Vang Sheeting
The boom vang can be used on a bendy mast, just like the main sheet, to pull the top 1/2 of the mast back. In fact, on a catamaran, this is often preferred, because the shape of the sail stays the same when it is sheeted in and out. If all the control were left to the main sheet, the sail would power up when eased and depower when pulled in. This way, only the angle with which the sail hits the wind changes.
Boom Vang - (leech shape)
The main job of the boom vang on most boats is to control the shape of the mainsail leech. When the vang is pulled on, the leech gets tighter, and when released, the leech gets loose, and "twists" off to leeward. The top batten, as mentioned above, should be approximately parallel with the boom. If pulled in too much, there will be excess drag. If left loose, too much power is lost out the back of the sail.
Jib Leads - (leech shape)
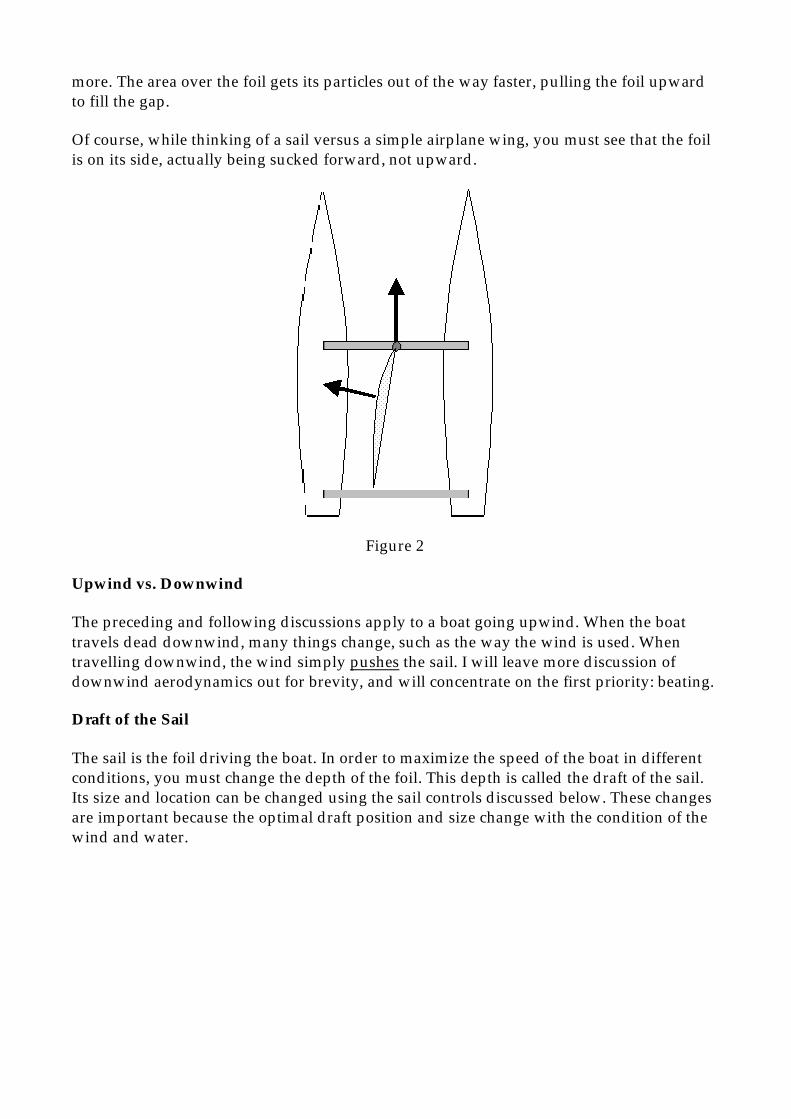
The jib does not have as many controls as the main. In fact, most of the time, the sheets offer the only interactive control. However, many of the above shape qualities can still be changed. One important point to keep in mind is that there is a "slot" between the jib and main. This slot should be kept fairly open to allow the correct flow to form. The jib leech should also be kept mostly parallel with the closest part of the main. That slot should be very nice and uniform, up its entire length.
Figure 10
If the slot is too wide at the top (i.e. leech of the jib is too open), too much of the air escapes through without affecting the jib. If it is too narrow, the flow is "choked," and the boat will not go as fast, or point as high. The way to control the slot is through the jib leads.
The two blocks for the sheets can often be moved forward and back. When moved backwards, think of the bottom of the sail being pulled toward the stern, flattening the sail. Also, consider that the leech of the sail will open up a little.
When the blocks are moved forward, the force of sheeting will mostly be down, closing the leech of the sail, and allowing more bag to go into the middle.

Main Sheet and Jib Sheets
These controls are the most interactive of all. Their major function is to control the angle of attack on the wind. This is the angle at which the wind hits the sail, with respect to the boom.
Figure 11
When the sail is brought in, the angle increases and the power increases, but hopefully you already know that. You should also know that if the angle of attack is too large (the sail is pulled in too tight), the sail will "stall" and the lift will be destroyed. It will look the same, but it won't be working as it should any longer. If the angle is too small (the sail isn't pulled in enough), it will luff, generating no lift at all. You can use the telltales on the sail to judge whether the flow you need is being generated. Remember that this flow can be created and destroyed by changing the angle of attack.

Chapter 3 - Starting Large gains and losses are made at the start. When your boat comes off the line, you want to be in clear air, have good speed, be on the preferred side of the line and course, and be on the right tack. If you haven't done each of these, you could be lost behind 50 boats, and going slowly. In large fleets, it's important to have a good start, so you must formulate a plan ahead of time, and spend the last few minutes of the starting sequence executing that plan.
Form a Plan and Execute it
It is imperative that you do formulate that plan, and stick to it. Too many times, snap decisions are made because of all the action on the starting line. It's much easier to think things through thoroughly, and then just execute those thoughts, than it is to "wing it." Almost invariably, "wing it" plans go awry.
Technique: Safety Start
If you are new to racing, starts can be very intimidating-you have to think of timing, where you want to be, how fast you're going, and most importantly, how not to run into anything. All this happens with boats all around you-sometimes up to 100 other boats. This section describes the simplest and most effective plan for starting for the beginning racer.
Basic Idea: The entire plan consists of sailing anywhere you want, until 1 1/2 minutes before the start. At that time, head for a point about 6 boat lengths to starboard of the committee boat.
Figure 12

You should reach this point with 1 minute left. Tack onto starboard and sit in that spot without moving (see "Skills: Sitting Still," below). At 10 seconds before the start, bear off and head for the line at full speed to start.
DANGER!! Your main goal in this process is to start with full speed without fouling or hitting anyone!! Keep in mind that other people with have your same idea, and you cannot be trapped between them and the committee boat. Look back to figure 12, and you will see two danger zones. These are the places you need to watch for boats you may hit.
During the 50 seconds while you sit still, you need to be constantly looking into these areas for boats heading your way. If there is anyone there, you must figure out where they will go. The best thing you can do if someone is converging on the same spot as you is to do a complete circle and start behind them.
Figure 13
If you have full speed when you reach the line, you will sail away from most of the fleet, even if you're late to the line! Most racers concentrate on being in the right place at the start, but not on their speed. They will be on the line but not moving, so you can sail right past them.
DANGER!! I must say this one more time-If you see someone who may hit you or trap you between themselves and the committee boat, GET THE HECK OUT OF THERE! Just tack around, and go in behind them. Late with speed is fine, indeed!
There are many types of starts, and this is just one. Below, you will find information on the best types of starts for different conditions, and how to determine your best approach, once you are comfortable in the boat.

Check the Wind, and Know What it Means
At the start, because of the way the line and the course are set, there are going to be some large possible gains at the outset. There are three questions you should answer during the beginning of the starting sequence: on which side of the line should you start, on what tack should you be at the starting gun, and to which side of the course should you go?
These questions can be answered in the pre-start, with more than 2 minutes to go. Once they are answered, formulate a plan, and use those last 2 minutes to execute.
Favoured end of the line
On which side of the line should you start? This question is simple. Go to the middle of the line and go head to wind. Then look to either side, left at the pin, and right at the committee boat. Whichever is further ahead is the preferred end. This will be the closest end to the windward mark, and why not begin with a head start?
Figure 14

Best tack off the line
On which tack should you be immediately after the start? This question is almost as simple. To decide the best tack, you need to decide which will take you straightest to the windward mark. When you are head to wind in the middle of the line, checking the favoured end, look also toward the windward mark and see which side of the boat it's on. If it's dead ahead, your initial tack doesn't matter. If it's to the right, the best tack is port, and to the left, starboard.
Figure 15
To remember these, just imagine the wind swinging a little further in the same direction. If it goes far enough, you will be able to go to the windward mark on one tack. A simple rule to follow is: take the tack that will take your boat straightest to the mark, always. This is useful, even on the other legs of the course.
Now, of course, you should keep in mind that starboard tack has right of way over port tack, and this will have a bearing on your decision. If port tack is the best to be on, it may pay to start on starboard, and then tack to port as soon as you can. That is, unless you have complete confidence in your ability to stay clear of the starboard (right of way) boats.
Favoured side of the course
The favoured side of the course is often a little more nebulous than the above considerations. The favoured side of the course should be the side where the most wind is. This you can tell by standing up in your boat and looking upwind. Do this about every 30 seconds before the start. Keep in mind that the wind may move to the other side of the course by the time you start. The time to start keeping track of the wind on the course is

about 1/2 hour before the start of your race. Get out to the course early to determine what's happening.
Now, reaching the favoured side of the course may be difficult, considering where you start, and your initial tack. Try to get there as quickly as possible, which means giving yourself room to tack. If you are pinned to leeward of a windward boat, on starboard tack, it will be hard to get to the right side of the course.
These three ingredients should be mixed and matched to get the most out of the start. If it seems there is much more wind on the right, then you might give up the favoured pin end of the line, for a quick port tack to the right. If there is no apparent advantage on either side, then go with the favoured end of the line, on the closest tack to the mark. Remember-PLAN AHEAD!!
Get Clear Air and Have Speed at the Start
There is more detailed discussion of clear air below in CHAPTER 4 - BEATING UPWIND, and you may want to read that now (BLANKETING and BACKWINDING).
The best way to get wind is to make sure you are not in someone's bad air. The biggest thing for which to watch is back winding at the start. This will slow you down, and make your pointing worse, and the worst part of it is you won't be able to feel that the air is bad. The initial goal, once the gun goes off, will be to get up to speed quickly, and this means getting clear air, so separate from those around you if you must.
Also, in the few seconds before the start, you should bear off (foot) about 5-10 degrees to build a little speed. Otherwise, you'll get rolled by everyone who does have speed.
A Sample Plan and Execution
The following is a sample starting scenario. This situation will not apply all the time, but it's a good example. The wind speed is about 10 mph and the line is the length of the 20 boats on the course. See figure 16 below.
Imagine yourself in the boat, and what you would see. Now, formulate a plan for the start, taking into account where you will start, and in what direction you want to go. Then look at the sample solution to see if you were close.

Figure 16
Solution: The first thing to notice is that the pin end is further to windward, so this is the favoured end. Also, the windward mark is a little to the right of straight upwind, so the proper starting tack is port tack. There is little difference in the wind between sides of the course.
Now, it may be difficult to start on port tack if there is a large fleet of boats, and they are all on starboard coming at you, so you may want to start on starboard, with the intention of tacking soon after the start. This means staying to the right of the bulk of the boats who will naturally want to start at the pin.
You also want to start at the pin, but keep in mind that everyone can't start in the same place. A safer thing to do is start about 1/3 of the way from the pin on starboard, with the intention of tacking soon.
With about 2 minutes to go, start lining up your final run. You will most likely want to be at the committee boat with about 20 seconds to go, heading for your spot. If you are going too fast, and will overshoot the target, slow down by letting the sail luff and heading up into the wind slightly.
With the final 10 seconds to go, start bearing off a little to build speed, keeping an eye on the boats to leeward and windward. You should hit the line at full speed, with a little room to leeward in case you want to foot for speed, and a little room to windward, if you want to tack. Then, since the port tack is preferred, tack as soon as possible.

Fleet Racing In fleet racing, you'll face many challenges, not the least of which is avoiding collisions before the start. In some races, there are as many as 50 boats swarming around a very small area. This can be unnerving, but try to stay cool.
One thing to remember is that starboard tack has right of way over port, but you're not allowed to manoeuvre your boat to keep someone from staying clear (i.e., you can't keep changing course in order to hit them, even if you have right of way), whether you're on port or starboard. If you're the starboard boat, go about your business, but keep sailing mostly straight lines. If you're port, change your course as little as possible around other boats, but stay clear.
Below are some skills, which will help in this manoeuvring, as well as in the execution of your plan.
Skills: Timing Practice
One skill that must be learned is that of timing an approach to an object. This will aid in getting to the starting line, in the position you want, at the correct time.
Set a buoy in the water, or pick a dock, or something fixed, to which you can sail. Then, set a time limit like 30 seconds for yourself. The goal is to sail at full speed and reach the marker at exactly 30 seconds. Keep going back to try changing your distance and speed, until you can judge the distance correctly.
Keep in mind that when the wind strength changes, so will your speed, and thus the time to the marker. Practice this drill in all conditions, when you're not racing. Another good time to do this is during the starting sequence. With about 5 minutes to go, time how long it takes to get from the pin to the committee boat on a beam reach. This will be important information in the plan formulation and execution.
Skills: Close Sailing
Almost everything listed above is simple to do when you're alone on the course, but that's not ever the case in a real race. To keep from getting flustered, you must learn to sail close to other boats, defining your limits. How close can you get while still in control?
When there is a group of boats on the water, you can try playing follow-the-leader. Have one boat be at the front, with each of the others following as closely as possible. The front boat should go through normal starting manoeuvres, such as tacking, jibing, heading up, bearing off, etc.
Think about staying the same distance behind that boat at all times, decreasing the distance as you get better. This will take concentration, and you will have to learn to speed up your boat, as well as slow it down, using the trim of the sails, crew placement, etc.
If you're alone, try sailing close to trees and docks and other fixed objects, without hitting them. This doesn't give you a feeling for the movement that other boats will, but you can
learn how quickly your boat moves, tacks, and jibes. Defining your sailing limits is important in control of the boat.
Skills: Sitting Still
A third skill to practice is sitting still, without losing control. This is important, since you will often misjudge the time to the line, and you will need to slow down or stop.
Sail on a close reach and then head up into the wind until almost head to wind. Then, practice staying in that position for as long as possible. You will be able to do this using the trim of the sails and the heel of the boat. Don't let the boat go straight into the wind, or you will end up in irons, with no steerage. Keep the boat off the wind by about 5-10 degrees.
Finally, when you have mastered sitting still, learn how to get boat under way quickly. This you can do by heeling to windward to turn the boat, and trimming in the sails to pick up speed.
Match Racing If you will only be racing fleet races, you may skip this section.
Match racing (one boat against one boat) is a much different animal than fleet racing. The goal during the starting sequence in match racing is to control the other boat to gain a right of way advantage. This is done from behind. The best thing to do is get directly behind the other boat, and don't let them do anything, except sail straight away from the line. It won't be important to start at the gun-only to start in front of the other boat.
If you are directly behind the other boat, and they start to bear off to jibe, bear off a little to leeward of them. Now you are the leeward boat, and they must stop bearing off, or they will hit and foul you. If they begin to head up to tack, head up with them. They can continue to head up, being the leeward boat, but they cannot tack. Thus, you can keep them in line.
Now, this can go wrong if, for instance, you become overlapped. Then, you will not be able to head up (bear off) without hitting them, and they can escape. To keep control, you must learn to slow the boat down.
Skills: Slowing the Boat Down
There are many ways to slow the boat using only sail trim and crew placement.
Sail on a beam reach, and then stop the boat by heading up into the wind and letting the sails go. Find out how long it takes to stop the boat completely. To add to your stopping power, try moving your weight back in the boat, dragging the transom in the water. You will see and hear lots of little swirlies come off the stern. These swirlies indicate drag, which slows the boat.

A way to slow the boat down when broad-reaching or running is to over trim the sails. This will affect your speed a little more gradually, but should often do the trick in the cases when you won't be able to luff the sails.
Finally, when going on a close reach or close haul, you can push the boom out to leeward further than it wants to go. This makes the sail act as a brake, slowing you down very quickly. However, the boat will be difficult to control. See the next section, "Skills: Sailing Backwards," to control the boat with the sails filled from the wrong side.
Skills: Sailing Backwards
One of the more fun things to practice is backwards sailing. It seems like the boat shouldn't go that way, but this is a handy skill if you happen to be going over the line early, or if you want someone behind you to pass quickly.
To begin, sail on a close-hauled course. Then head straight into the wind, and wait for the boat to stop. Once you are stopped, push the boom out until it is perpendicular to the wind. At this point, the boat should begin moving backwards. Now, the rudders will be acting completely differently from what they usually do. You will need to steer opposite the way in which you are accustomed.
To go backwards quickly, sail on a starboard tack, close-hauled course. Then head up until the bow just crosses head to wind, and the sail has gone over your head. Reach up and push it out, while simultaneously pulling the tiller back toward you, to pull the boat back to the starboard tack, but only about 5º off the wind. Then, wait for the boat to start backing up. At this point, you will need to push the tiller away again to keep the boat on course. This method works the same on the port tack.

Chapter 4 - Beating Upwind Going upwind is the most important skill for the new racer to learn. You can come back from a bad start and you won't lose that many places on the downwind legs, even if you are slow. If you can't go upwind well, though, you can give up the game, because it is on these legs that the most spots are gained and lost.
Boat Trim (as opposed to sail trim)
The first thing you have to think about is that you are sailing in a boat-a boat that floats in the water. Whatever movements you make when you're sailing affect the relationship between the two, and this relationship is vital to understand because it's the water that slows the boat down the most.
Fore and Aft Trim
Drag affecting the hull is sometimes a difficult thing to detect, but there are ways to find and reduce it. For instance, while you're sailing, move back in the boat until you're sitting on the transom. Look down behind the boat and you will notice a lot of little swirlies coming off the stern. You will also hear water rushing back there. That noise is drag-your boat spending some of its energy making pretty pictures in the water-ones that slow you down.
This is an easy problem to fix-just move forward until you see the water smooth out behind the boat. This reduces the drag generated by the stern sitting in the water. Now the water has a nice, smooth exit from the stern, and it won't make as much noise.
Side to Side Heel
Keep the Damn Boat Flat!!!
The most important rule for going upwind is to keep the boat as flat as possible. Sometimes having the bottom of the windward hull just skimming the top of the water does 2 things; firstly it reduces hull drag in the water, and secondly it allows the leeward hulls asymmetric shape point the boat a little more to windward. Be careful not to allow the boat to heel too much as you will start to spill air out of the top of the sail, when it should be generating power.
A Note About Light Winds
In very light winds, it is still important to be able to point into the wind, but the main emphasis should be on speed. For this reason, when the wind is so light that it doesn't have enough energy to keep the sails open, you must use gravity.
Heel the boat slightly to leeward, enough to hold the sails open. This way, when the next puff comes along, it will spend its energy pushing the boat forward, instead of just opening

the sail. Also, whatever flow you may have will detach itself from the sail if it doesn't have shape.
In this mode, the boat won't point very high, so don't force it. Let the sail out at least to the corner of the transom, and be very, very careful to keep the boat still. All your movements should be slow and easy, so as not to disturb the intimate relationship your sail is hopefully having with the wind. The goal is to keep the boat moving. If you stop, you're dead!
Technique: Ease-Hike-Trim
"Isn't it okay to let the boat heel up when the puff hits-then I can hike it flat and use all the energy the wind just sent my way?" NO WAY. Even if a puff hits and you feel you can hike it flat, it's much better to ease the sail a bit, and there are two reasons for this.
First, when the puff hits and heels the boat up, you will be blown immediately sideways-not the direction you want to go. If there is too much power in the sails, let some go-that's always better for your speed to the next mark.
Second, when the wind hits, the apparent wind moves back because of the new injection of true wind. I.e., every puff that heels your boat is a lift. This means the sail, if it's kept in, is over trimmed. You will lose the connection the wind has with the sail, so let it out.
EASE-HIKE-TRIM is a great rule to make the boat go fast when the puffs hit. Here's how it goes:
1. When the puff hits the boat, EASE the sail, but just enough to keep it flat. 2. Immediately afterwards, start to HIKE a little, and at the same time, 3. TRIM the sail back in.
The HIKE and TRIM steps should happen at the same time, counterbalancing each other.
Your concentration should be on keeping the boat completely flat, throughout the entire puff (and don't be afraid to dump a lot if the puff is a big one). The initial ease keeps the boat flat and prepares the sail for the new wind direction. The goal is to use the puff to its fullest, so as soon as you can rein in that power, with the hike and trim, do it. This whole manoeuvre should take about 3 seconds.
Whenever you're going upwind you should hear the ratchet of the mainsheet block almost constantly (in-out-in-out...). This is a sign that you are adjusting the sail enough to keep it trimmed correctly.
Practice this in the puffs until it's very smooth and natural. It will become ingrained the more you use it, and it soon won't take any concentration at all.

Technique: Proper Hiking
A note on hiking technique:
The best way to hike on a catamaran, is with your legs completely straight, and your back bent slightly. What this does is extend your weight out as far as possible, with the least amount of effort. You will agree, it is easier to use your legs to get your weight out, than it is to use your back muscles.
Once your weight is out, you can move it much more easily simply by bending your back. If you move your weight in and out by bending and straightening your legs, you are taking much longer to adjust, because it's the whole body that's moving. If the adjustments are made only with your upper body, the adjustments are quick and smooth.
Apparent Wind
This is a short discussion on a phenomenon that is important to keep in mind, no matter what leg of the course you're on. The breeze you feel in the boat is a mixing of two separate breezes-one, which is from the real direction (true wind), and the other, from straight ahead caused by the motion of your boat (generated wind). The product is the apparent wind.
Imagine riding a bike, with the true wind coming straight from the left at 5 kph. When you're standing still, you feel the force on your left arm. Now ride the bike forward at 5 kph. The wind will feel like it's coming at you at a 45 angle, between straight in front of you and straight from the left. This is the apparent wind.
As the bike picks up speed, the wind will feel as though it has moved more to the front of the bike. If you start riding down a hill at 45 kph, you won't be able to feel it from side any more-it's mostly from the front. That generated wind has taken over.
Conversely, if the bike is going 5 kph and the speed of the breeze from the left picks up to 30 kph, you probably won't feel the generated wind any longer. You will feel all the true wind, because it is much stronger.
Now, imagine the same situation in the boat. The boat is travelling forward at 5 kph, and the wind is straight across the beam at 5 kph. It will feel as though you are on a close reach, with the apparent wind coming at the boat from a 45 angle. When a puff hits, the wind will move back toward the beam, causing a lift-and when you hit a lull and slow down, the breeze moves to the bow, causing a header. Experiment with this by sailing into lulls and puffs and watching the side stay tell-tales.
"Feeling the Edge"
No matter the body of water on which you sail, there will be wind shifts-both headers and lifts. Often, these come with little or no warning, and those racers that notice and adapt the most quickly will pull ahead.

After sailing for a while, it will be simple to detect and react to the shifts-it will be second nature to do it while you are thinking of something else. It's a sort of voodoo, especially for the best sailors. They won't be able to tell you how they do it because they've done it for so long.
Technique: Watching the Telltales
The eventual goal for your upwind development is to be able to sail to windward by merely feeling the boat. However, in the beginning, and also in some conditions, such as very light air, you will need to watch the telltales on the jib (or the main if you're in a cat-rigged boat. Read the section, JIB TELLTALES, in CHAPTER 2 - RIGGING.
Pull the jib in as far as possible. By "as far as possible," I mean the point where it is as close to the centerline of the boat, without "squashing" all the power out). Don't flatten it completely. To determine where this point is, sail against someone while trying different settings on the jib. If the boat feels sluggish, let the jib out a little to put some power back in. Remember, also, that if the jib is cranked in too tight, this will close the slot between the jib and the main (read the section, JIB LEADS - ..., in CHAPTER 2 - RIGGING, especially discussion on the slot).
Once you have the jib trimmed correctly, you can start steering the boat, using the telltales as guides. If the outside telltale "piddles," this means the sail is over trimmed for the direction of the wind on the boat. You don't want to let the sail out, so you must head up. This, in effect, retrims the sails, except instead of bringing the sails in, you "brought the whole boat in."
If the inside telltale piddles constantly, or if the sail luffs (actual luffing, or just an inversion at the front edge of the sail), the jib is under trimmed. You don't want to crank in more on the sheet, so you must retrim by bearing off.
Your goal is to make the outside tale flow straight back and the inside tale "lift" occasionally, meaning some air is getting to it, but not all the time. If you don't know how often the inside tale should be lifting, err on the side of too often. It's better to have too much air flowing along the inside edge of the sail, than not enough.
When this happens, you should be pointing as high as possible. Remember through all this adjusting that if the boat is not up to speed, you won't be able to point, so make sure you're going as fast as you can. Also, you should be able to feel when the power is gone from the jib and the main. The following sections will give you an idea of how to develop this "feel."
Technique: Feathering
The most helpful article I've ever read about sailing a small boat was an article in Sailing World called "Ease-Hike-Trim." At first I thought this was a stupid article. "Doesn't everyone do this?" It didn't take long to realize this comes with experience.
Even though I thought the article was kind of silly at the time, I came away with one piece of information that has helped my racing more than any other, and that is the technique of

Feathering. This technique, when used in conjunction with Ease-Hike-Trim, can push your pointing up at least another 5 -10 degrees.
Basic Idea
Start by pointing into the wind as high as possible, and have the mainsheet pulled in tight. Now, every time a puff hits, head up into the wind until the boat is flat again. Then, when the puff has died off a little, you will be sailing in what feels like a header, so bear off until the power returns to the sail. You should be constantly making adjustments to your course.
Notes on Feathering
1. Before concentrating on this technique, you should have the basics of Ease-Hike-Trim mastered. Often a puff will hit too quickly to correct in time, and the boat will roll up on its side, killing all your speed, and washing you downwind. The only way to stop this is to Ease-Hike-Trim.
2. Ease-Hike-Trim should be used in conjunction with feathering. As mentioned above, the puffs sometimes strike too hard to compensate with only one method. The heading up should be done slowly, to keep control. Also, the boat should not ever heel more than 10 degrees. If it does, you're losing speed and ground.
3. The initial heel not only indicates the puff (or lift), but it also helps the boat to turn up into the wind to point higher. Use this heel to steer, minimizing rudder usage. The same is true when the lull (or header) hits. The boat will heel to windward, turning the boat away from the wind-exactly what you want.
4. It is important to recognize that, as mentioned above in the section, "Apparent Wind," a gust has almost the same effect on the boat that a lift does. Similarly, a lull feels like a header.
5. What you will be doing when you bear off, is building up speed-then, the "feather" up into the wind uses that speed to shoot you closer toward the windward mark.
Skills: Blindfolded Sailing
Now, once the above techniques have been mastered, you can sail upwind using only feel. A great way to practice is to close your eyes. If you are sailing with a crew, you can even go so far as to blindfold yourself, with the crew standing as a lookout for obstacles.
This may seem silly, but there is no better exercise to force yourself to get used to sailing without staring at your telltales. Your eventual goal should be to put your boat on auto pilot, as far as speed and pointing are concerned. This leaves your eyes open for tactical and strategic considerations.
Skills: Two-Boat Speed Testing
You will always find that competition improves your performance, and this is especially true with sailing. You can work on your upwind speed alone, but it is always nice to practice with someone else, both to gauge your progress and to provide incentive to sail harder. However, there are a few things you must know to maximize your practice with another boat.

First, the goal of speed testing is to gauge and improve your speed and pointing-not to practice tacking or tactics. Choose an open stretch of water where you won't have to tack for a while.
Second, get the boats far enough apart so neither is in the other's bad air (read the BLANKETING and BACKWINDING sections below), but close enough to be in the same wind. You must have the same conditions for each boat to get a true reading. See the figure below. Notice that these boats are on a parallel course, and they are about 3 boat lengths apart.
Figure 18
Third, set the sails on each of the boats to have the same shape. The object is to test and improve your sailing abilities, not to see if more draft is faster.
Start out in this position and sail until one boat is blanketing or backwinding the other. Then tack and start the process over. You will find your speed and pointing improve almost by themselves. Your body will start doing what it must to make the boat go fast and high, using the other boat as a reference. Use all the ideas outlined above and below, including ease-hike-trim and feathering.
Technique: Steering the Boat Using the Boat
If you've been reading this guide and paying attention, it should be obvious by now that any extra rudder movements not only turn the boat, but they also slow you down. A boat can be steered using only the trim of the sails and the trim of the hull.
Heel the boat to windward and the boat turns downwind. Likewise, it turns upwind when heeled to leeward. In fact, it won't take much heel to accomplish this, so try not to overdo it.

Now, imagine the boat as a big weathervane. The center of the boat is the pivot, and the sails are the rooster. By the way, the pivot point is referred to as the center of lateral resistance, located around the middle of the boat, there is a corresponding center of effort located in the middle of the sail plan.
Figure 19
The boat is called "balanced" when it doesn't want to head up (weather helm) or bear off (lee helm) when sailed flat. When a boat is balanced, this means the center of effort is directly above the center of lateral resistance. When the center of effort moves back, as it would if the main is trimmed and jib is not, the wind pushes the butt of the boat around, heading it up into the wind. The opposite happens when the jib, but not the main, is trimmed in.
Just a note about the desired feel for the boat: Your boat should have a very slight amount of weather helm to it. Make sure it's not too much, or the rudder will be used excessively to keep the boat straight. A balanced boat is not quite as fast as one with a tiny bit of weather helm, and lee helm is a big no-no.
Skills: Sailing Without a Rudder
With the information above, you should be able to grasp the idea of rudderless sailing. Get to the middle of your lake with the rudder on, then lift them from the water. Now, using the information above and the table below, sail the boat on a beam reach.
To Head Up:
• Trim the main • Ease the jib • Heel the boat to leeward

To Bear Off:
• Trim the jib • Ease the main • Heel the boat to windward
You will be doing a lot of circles at first, but eventually a little control will come.
With this control will come new ways to steer, even with the rudder in, allowing the boat to turn itself, without the braking action of the drag formed on the rudder.
Tacking Tacking is a very important transition. You can lose or gain many boat lengths relative to other boats, depending on the quality of your tacks. You'll notice in the PRIORITIES chapter that transitions are listed second. This is because of the great potential for costly mistakes on each tack. There are 3 keys to a good tack:
1. The turn through the tack should be gradual, not fast. A tack that begins too quickly bleeds off a lot of speed. Make sure you initiate the tack slowly, with as little rudder movement as possible, keeping the rudder drag to a minimum. Also, if the tack is gradual, your boat is actually going straight into the wind for a longer time (remember, however, that the boat is slowing down through this whole process, so don't make the tack too slow).
2. The boat should not tack through too large an angle. When you begin the tack, you should be on a close-hauled course. When finished, your angle should be 5° past close-hauled on the other side. If this angle is too large, you're wasting speed because you're going in the wrong direction. It's important to rehearse your tacks until you tack the right amount.
3. The boat should accelerate well after the tack. Every time you tack the boat, you lose speed. This is obvious, right? Half the tack you spend luffing the sails, with the wind pushing you backwards. This is why it's so important to accelerate immediately afterwards. To do that quickly, make sure you are 5° past close-hauled when you finish the tack. In this position, you can pick up speed quickly.
Then, when you are at full speed, you can begin to point. Head up into the wind slowly, while trimming in the sail. If you begin pointing while going slowly, the hulls will not have the speed they need to start working, and the boat will just slip sideways, and this is never fast.
You can think of the whole process of accelerating as shifting gears. Immediately after the tack, you want to shift down into first gear (footing mode), with the sails out, and the boat footing to pick up speed. Then, slowly shift up into fifth gear (pointing mode). If you try to start out in fifth gear, you'll eventually get up to speed, but just as in a car, it will take a long time.
These are the keys to executing a good tack without losing speed. If you follow them and concentrate on each tack, you won't lose ground to those around you. There is a method called roll tacking which allows you to speed the tacking process, and it helps to accelerate

the boat more quickly, especially in light winds. One note of caution: Roll tacking takes a lot of concentration, as well as perfect timing. If part of the tack is blown, it can really cut your speed, and you will lose ground. But if used correctly, it can be a powerful tool.
Technique: Roll Tacking
Roll tacking is a method for getting the boat through a tack quickly, without losing much speed or ground. Listed below are three basic advantages to a roll tack, which is used primarily in light air when boat speed out of a tack is important. However, keep in mind this is not the end-all, be-all of catamaran racing. The best roll tacks in the world do not guarantee a win, and sometimes they can blow your concentration if they are used before you have mastered them.
Roll Tacking Basics
1. Heel the boat to leeward about 10 degrees. This initial heel allows the boat to turn itself, cutting down on the rudder usage necessary to initiate the tack. Don't heel the boat too far. The object is to turn the boat slowly enough so you can control the tack. During this step, you should be able to let the tiller extension slip through your hand, with the hull of the boat doing all the work.
2. As the boat starts to come down on you, rock it hard to windward. Timing is important in this step. The goal here is to help the boat do what it wants. The biggest mistake you can make is to try to roll the boat too soon, "squashing" the tack, finding yourself head to wind, or on the same tack on which you started. This mistake costs much more than a regular tack would (and it feels horrible). Wait until the jib luffs and the boat feels as though it wants to come down on top of you. Then rock it hard.
Rocking the boat to windward may feel funny, as though you're going to capsize. However, it's important to rock it this way. Sometimes the boat will stop the rock on its own, if you don't help. In fact, it may be good to practice this manoeuvre until you capsize a few times. If you're afraid of capsizing, your tacks will be mediocre. You must get the feel for how far you can go.
The purpose for this step is to get the sail through the tack as quickly as possible. Notice that, usually when you're tacking, there is a long period of time where the sail luffs through the tack. This step will alleviate that luffing, with a telltale "pop" of the sails.
3. Once the boat is on the new tack, and still heeled up from the rock, flatten it quickly. This is the heart of the roll tack. The rock should have put the rail of the hull in the water. Now, when you flatten it, you are pulling the sails through the air, effectively increasing the wind speed over them. This gives you a nice push forward, accelerating you out of the tack.
Note the position of the sails. They should be trimmed in during the flattening, but not all the way. When this "wind" is created, it acts as a lift, so the sails should be eased slightly. Then, when the boat is flat and up to speed, trim in the sails to pointing mode again.

This flattening should be done after the sails fill, but as soon after the rock as possible. With the boat up on its ear at 45° , it will slip sideways very quickly. Just watch someone who doesn't flatten immediately. They will lose a lot of distance to leeward, much more quickly than you would think.
Basic Tactics
FYI, you will hear the words, strategy and tactics, often in sailing literature. There is a subtle difference between the two. Strategy is the overall plan you make for your path around the course. This plan accounts for wind speed and direction on the different legs of the course. Tactics is the name for what happens during the race, with respect to the other boats around you. This includes decisions such as tacking when a starboard boat is approaching, feeding someone bad air, or tacking back with the rest of the fleet so you don't lose them.
Covered below are some of the more important facets of tactics, as well as a little strategy. Read this section, keeping in mind there is much more to learn. There are many books that discuss strategy and tactics, but these should be consulted only after you have mastered the basics in this guide.
Get Out of the Bad Wind
If you're sailing in the bad air created by other boats, you will go much more slowly than they will, obviously. Your mission, if you choose to accept, is to get to clear air. The first step in this process is determining the location of the bad air, relative to the boats around you.
Blanketing
Figure 20

Blanketing is just as it sounds. The boat to windward is blanketing or stopping the air from getting to you. This is the dark patch in figure 20. It is fairly small, but it is intense. If you're caught in this area, there are two options. First, if it's possible to tack without hitting the blanketer, do it. The second option is to bear off and try to speed your way through the zone. You will lose distance to windward, but once you have clear air, you should be able to point again. For this method, you must have speed, or you will wallow for a while in little or no wind.
Backwinding
The backwind zone is the lighter area to windward of the boat in figure 20. You'll notice this area extends much further than the blanket zone. That is what makes it so dangerous. Its effect is slightly smaller, but the area through which you must sail is much larger.
The wind will be reduced here, and more importantly you will be sailing in a header, from the air deflected off the leeward boat's sails. Try sailing with someone on your lee bow. That is, you are just behind and to windward of them.
Figure 21
The wind coming of their sail is shot to windward as well as slowed down, causing the header.
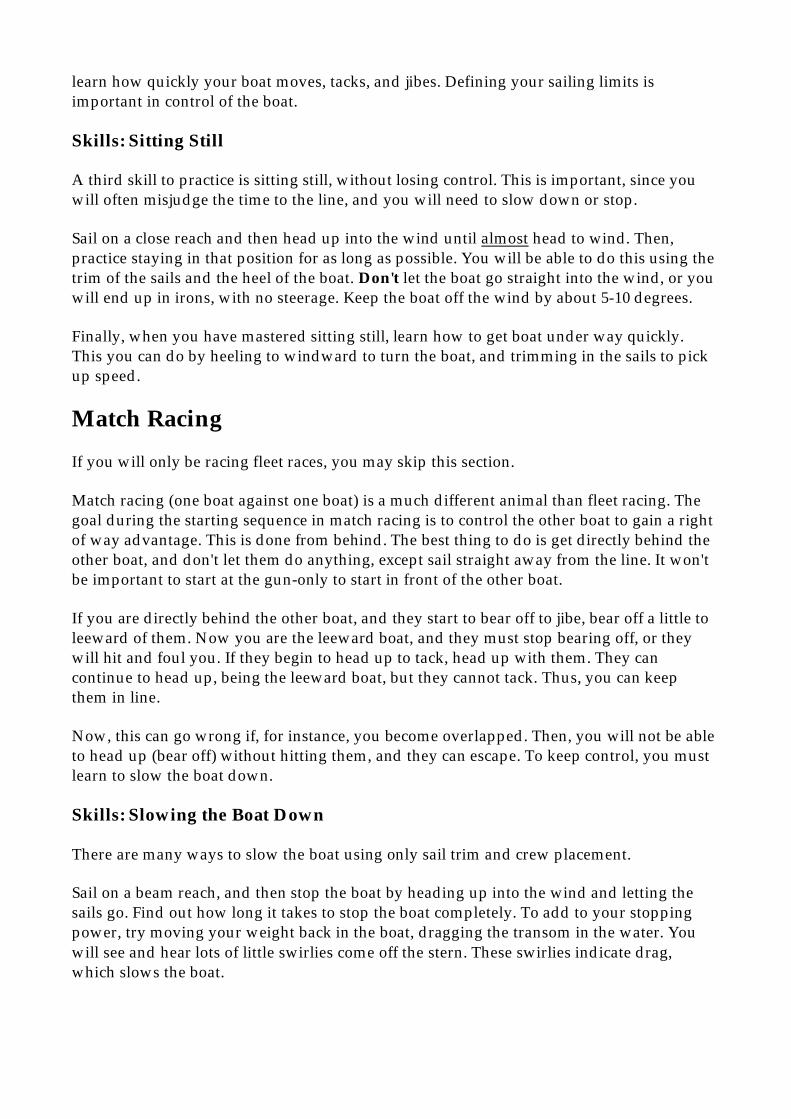
One of the main tactics in racing is to lee-bow an approaching starboard tacker. If you can do it, this is a great way to force them to tack to the bad side of the course. Simply sail on the port tack until just before you cross, then tack onto their lee bow.
Figure 22
If you have enough speed, you can feed the windward boat bad air. However, be careful, because if you're moving too slowly, the starboard tacker will drive right over you.
Sail in the Good Wind and Cover
Now for some basic wind shift philosophy and fleet tactics:
Lifts and Headers
If you haven't yet figured out the terms lift and header, now's the time. Both are wind shifts, and they get their names from their effect on your course. Sailing on a close-hauled course, a header is a shift, which forces you to bear off to keep the sails full. When this happens, you will not be heading as close to the windward mark as you were. If the header is severe enough, you should consider tacking, since those on the other tack are experiencing the same shift, but to them it's a lift. A lift is a shift, which allows your boat to head up toward the windward mark more. It "lifts" your course higher.
Overlapped Boats
One important aspect of lifts and headers is what it does to two boats, which are side-by-side. A lift will immediately give an inside boat an advantage.

Figure 23
Similarly, a header will give the outside boat the advantage.
Figure 24
Keep this effect in mind, but don't really worry about using it for the moment. To use this fact, you must know what the wind will do next, and this is difficult to do.
Tacking Lines
A talented sailor once gave me a piece of advice that seems stupidly simple, but it's often overlooked. "Take the tack that gets you where you're going the fastest." A simple piece of advice, but how do you know which tack is best?
Start by noticing that your boat tacks through about 90° . Then, notice that one of the tacks, either the one you're on or the opposite tack, usually points more closely at the mark.

Figure 25
It is important to determine which tack gets you closer to the mark, so you can take it. Now, consider when a lift or a header hits you. That tack may change, so as soon as you realize the wind shift, re-evaluate your course, and make changes accordingly.
Covering
One very simple rule to follow is to stay between your opponent and the next mark. If you are in the lead, or in front of someone you wish to beat, stay on their side of the course. You may sail in worse wind than if you were on the other side, but you will remain ahead of your opponent(s). If you're on opposite sides, they could get lucky with a favourable shift or more wind, while you don't.
Sometimes you will find yourself on the opposite side of the course from the rest of the fleet. This should scare you. If you happen to get lucky and get a good shift or an extra breeze, that's nice. However, if the other side gets lucky, the entire fleet can pass you by and pull away from you. If you're ahead, always cover.
If you watch the America's Cup, you'll see "tacking duels." This is because the boat behind is trying to get to the other side of the course. She can't lose-she could get unlucky and get a bad shift, but she's already behind. The boat in front can't afford to lose ground, so she tacks to "cover," or stay between her opponent and the next mark. It is always the rear boat initiating the "duel," trying to get away. The leading yacht must tack back to stay ahead.

Chapter 5 - Rounding Marks Rounding the marks on the course can actually be fun to practice. This is a good thing, because many gains and losses are made at mark roundings. Often a pack of boats will approach the mark, basically tied with each other. Because of the nature of the rounding, someone will come out on top, and depending on the number of boats and the skill of the skippers, the last boat could end up 20 boat lengths behind.
Windward Mark
The windward mark, with small fleets, often provides an uneventful rounding, but it can get exciting. The goal for this rounding is to come into the mark on starboard with a full head of steam, and accelerate evenly as you bear off for the next leg.
To have a full head of steam at the mark, you should plan to come in about 1/2 to 1 boat length above the layline, to be able to bear off as you approach. Then, as you bear off for the next leg, begin to let the sails out evenly. Let them out enough to keep the telltales flowing, but don't let them luff.
Occasionally, you will be below the layline by 1/2 boat length. In this case, the safe thing to do is tack once to get above it, and then tack again to round. However, it is possible, if you have enough speed, to get around the mark without the 2 extra tacks. The technique is to head straight at the mark until about 3/4 boat lengths, and then "shoot" straight up into the wind. With enough speed, the boat will coast past the mark, pissing off all those who thought you had to tack to get around. Then, just bear off, and continue the smooth acceleration.
Laylines
Laylines, if you don't know by now, are the lines upon which you can sail close-hauled and just make it around the mark.

Figure 26
It is best to avoid the laylines until the end of the windward leg. Don't get to them until there are about 10 boat lengths to go. There are many reasons for this:
1. While on the layline early, the boats who tack onto the layline in front of you, feed you bad air all the way to the mark.
Figure 27

You certainly won't want to tack away and sail a lot of extra distance, so you're stuck.
2. If you are on the layline with boats to leeward and you get a lift, the boats below you can now "fetch" the mark, while you overstood. This means you sailed further than you needed to get to the layline.
Figure 28
They simply waited for the layline to "come to them." This means if you sailed 4 boat lengths to get where you are, the boats around you that didn't go as far, gained 4 boat lengths from a shift of the wind.
3. If you get to the layline way early, and the fleet gets a header, those to leeward pull ahead. You can see this by looking back to figure 24.
Anything that happens with you on the layline early spells trouble. Just say WHOA!
Reach Mark
The reach mark, just like the windward mark, is often uneventful. The object here is to jibe nicely and smoothly, without tangling up with anyone. Also, it is often (not always) a good idea to head up for a short time after rounding the mark. This gives you clear air from those coming down after the reach mark, and it also puts you inside so you're in a good position for the leeward mark.
Leeward Mark Now, this is the exciting and challenging part of the course. This is the area where knowledge about the rules of racing, as well as skill in boat handling are at a premium. Just as at the windward mark, a lot of separation can occur afterwards, but everyone here is just

a little more aggressive and bunched up than before. The beat tends to spread boats out, while the reach tends to bunch them together, so there will be much more traffic.
The racing rules allow those with an inside overlap at the 2 boat length circle to round the mark more easily than those on the outside (please refer to the rule book for the exact rule). This means everyone will want to be there, and those on the outside must give room, invariably losing many boat lengths.
Below are some skills to practice for the leeward mark rounding. Follow them carefully and you will pick up many places, or at the very least, not lose a lot.
All the following skills can be practiced with one buoy in the water. They are good to practice in groups, but there are still gains you can make alone.
Skills: Rounding Wide, then Tight
When there are a few boats directly behind you (not overlapped) at the rounding, they will have an opportunity to pass you if your rounding is sloppy. The tendency here is to stay close to the mark, so they can't squeeze in at the last second and pass you. This tendency leads to the worst possible outcome.
Every boat has a certain optimal turning radius, and none have a turning radius tight enough to stay close to the mark.
Figure 29
If you approach the mark at some distance, then you can round up tight next to it. If those boats behind try to squeeze in too early, they may hit you, fouling you. Most racers will not try this if you look like you know what you're doing, i.e. if you're swinging wide early.

Figure 30
To practice this, set a mark in the water and approach it on a port broad reach. Aim to be 1 boat width away when the nose of your boat overlaps the mark. Then, start to head up, heeling the boat slightly, until you reach a close-hauled course. If you are more than 6 inches away from the mark at this point, you were too far. Try this exercise, moving in or out at the beginning, to get closer to the mark when you have assumed the close-hauled course.
Skills: Slowing Down
Often, coming into the mark, everyone ahead will begin to slow because of the wind shadow created by the boats behind. At this point, you will find yourself gaining an overlap on the outside, or worse yet, a late inside overlap, with no rights. This is disastrous, as you may have to do a circle just to keep from hitting everyone. One important thing to remember is, it's better to be right behind than it is to be outside or late inside.
The skill you'll need to learn is slowing down when sailing a broad reach or a run. This can be accomplished in many ways:
1. Over trim the mainsail. This will "stall" the sail and slow you down, but slowly. 2. Steer a curvy course, instead of straight ahead. This means really big rudder
movements. Make the tiller movements quickly enough (once a second), and your course changes won't even be that big, but you'll steer extra distance and slow down. Watch out for other boats around you.
3. Move your weight back to the transom. This creates drag from the stern sitting in the water. This, also, is a fairly quick way to slow down.
One great exercise to do is to get a group of boats and play follow the leader. The lead boat just steers normally, tacking and jibing and sailing straight, while the others stay close behind. Try to keep your bow about 1-2 ft. from the stern of the boat ahead. You will have

to learn how to slow down, or you'll hit them. This is also great for building confidence in close sailing conditions.
Skills: Sheeting with Both Hands
In order to round the leeward mark, and keep all your speed, you must not only steer a good course, but also the sail must come in quickly. This cannot be done with one hand.
Try sailing in a straight line on a broad reach, with the sail all the way out. Without turning, use both hands and sheet the sail quickly. Obviously, one hand will have the tiller extension, so you need to learn to steer at the same time. Going in a straight line is not too difficult-just move the tiller extension without affecting the tiller.
Once you've mastered the straight line while sheeting, get a buoy and attempt rounding and trimming. Concentrate on trimming and not necessarily on getting a good rounding. Be sure to pull in the sail as far as it will go when you're through.
The whole goal of the exercise is to make sheeting second nature. Eventually, your concentration at the mark will need to be on the rounding and not on sail trim.
Chapter 6 - Reaching and Running These legs are often the fastest legs because of the increased speed of the boat. This means that there aren't as many lead changes as in the beat legs. Your goal on these legs should be to set up for the leeward mark rounding, without getting passed. The boats behind will catch up, but you'll be pretty hard to pass on the downwind legs if you are doing things right. Even if you do get passed by 1 or 2 boats, don't let it bother you too much-there is always time to catch up at the mark rounding or on the next windward leg.
Basics
Below are a few basic techniques for keeping the boat moving. Keep in mind, also, that clear air is important. If someone is driving over you on top of your wind, try your best to get away without making too much of a course change (large course changes are mostly bad since you sail a lot of extra distance).
Technique: Sheeting Off the Boom
If the class rules allow, you should sheet the mainsail directly off the boom. This gives you a great feel for the sail, and it also allows much faster reaction time when you need to sheet in or out.
Your attention on the downwind leg should be split 70% speed watching and 30% watching what's happening around you. The 70% speed watching is imperative. You can gain or lose a lot on the downwind leg due to correct or incorrect sail trim. It can be the difference between grabbing the puff and passing 3 or 4 boats, and getting "rolled" by 3 or 4 others who did it right. Sheeting off the boom allows you to react more quickly, and it also allows you to feel the power in the sail, while you're watching your surroundings the other 30% of the time.
Jibing
Jibing is one of the two major transitions mentioned in the PRIORITIES chapter. It is a very important manoeuvre because there is a huge potential for things to go wrong. When going downwind, the boat is much less stable. When the force of the wind changes drastically during a jibe, the boat can carve up into the wind, running you way off course, into another boat, or at the very worst, capsizing. The key to keeping control of the jibe is to keep the boat steady.
First, don't make a large movement with the tiller to turn the boat. Keep a straight course as you bring the boom across the centre line. Also, keep your weight in the centre of the boat, and keep it mobile in case you need to throw it to either side to prevent a capsize.
Finally, and most importantly, if the winds are moderate or heavy, make sure the boat is up to speed. Think about that-make the boat go as fast as possible before jibing. The reason for this is: If the wind is from straight behind at 30kph and the boat is going 15kph, you feel

15kph of wind. That's a lot of force! If, however, you are going 25kph, you only feel 5kph of wind. This reduces the force on the sails considerably, keeping the jibe under control. Wait until you are up to speed, then, when a lull in the wind comes, throw the boom across the boat.
Watching the Wind
Keeping an eye out behind you on the reach or run is always a good idea, especially when you're looking for wind. The main idea is to pick a side of the course and stick with it, but within that side, you can move a little to use the wind.
When a puff is approaching from behind, you want to head up slightly, so it gets to you sooner. Then, when you're in it, bear off and ride it until it runs out. The idea here is to get to the puff quickly, and then stay in it as long as possible. You can increase your speed if you head up while in the puff, but this is not a good idea most of the time. If you're going quickly across it, you will come out the other side sooner than you want-so stay in it.

Chapter 7 - Finishing For this last part of the race, I have 4 comments:
1. As you come around the leeward mark, look to the finish line to see which side is closest to you. That is the side to which you should go. This idea is similar to that of choosing a favoured side of the line when starting. However, if the wind has stayed constant, and if the line is where it started, the favoured finishing end is the opposite end from the favoured starting end.
2. Once you set this plan, stick with it. Too many times racers tack at the last second, only to lose the place because they got worried. Set up your run so you're coming at the line at full speed, and don't tack too much. It throws off your concentration for going fast, and this is where you need the speed the most-the race is almost over.
3. Just like a runner throws his or her body forward into the tape when finishing, you "throw" the boat over the line. If you're confident you have the speed, once you're about 1 boat length from the finish, "shoot" the boat straight into the wind. This cuts down the distance you have to travel to finish.
You must make sure you have enough speed for this manoeuvre. It would be a shame to be in front, only to come to a dead stop just inches from the line.
4. Since you have read all the way through this guide, you should be so far ahead of the rest of the fleet that it won't matter what you do at the finish.

Conclusion Now that you've read this entire manual, you're ready to start practicing. I realize there is a lot here to digest. That's why it's important to keep your priorities set as in the "PRIORITIES FOR PRACTICE" chapter. The goal in this first reading was to introduce terms and ideas so you can read and converse intelligently on the subject. It is also to give you an idea of how to attack your practice.
Now, according to the priorities, read each section again, in that order. Read it thoroughly, always questioning why you're doing something. Practice each of the ideas until you're comfortable with them. Then go on to the next priority.
Once you get through this manual, it will be time to reset your goals and go to the appropriate sources. Two very important areas in which this guide is lacking are rules and strategy. I have kept this simple in order to get you off on the right foot. The ideas contained here are the ideas I think are the most important to understand before any others in strategy, rules, tactics, or boat tuning.
Further Reference
Rules
AYF Blue Book - 2001 - 2005
Sail Theory
"The Art and Science of Sails," by Tom Whidden and Michael Levitt
http://www.uiowa.edu/~sail/skills/racing_basics/index1.shtml last modified: Sat, Dec 13, 1997 - 07:04 AM by [email protected]