r/3 security guide : volume iiweb.mit.edu/its-alive/sap-docs/r3-secguide-vol2.pdf · r/3 security...
TRANSCRIPT

SAP AGNeurottstr. 16D-69190 Walldorf
R/3 Security
R/3 Security Guide : VOLUME II
R/3 Security Services in Detail
Version 2.0a : English
July 31, 1998


R/3 Security Services in Detail
Copyright
SAP AG Version 2.0a : July 31, 1998 i
Copyright
©Copyright 1997 SAP AG. All rights reserved.
No part of this documentation may be reproduced or transmitted in any form or for any purpose withoutthe express permission of SAP AG.
SAP AG further does not warrant the accuracy or completeness of the information, text, graphics, links orother items contained within these materials. SAP AG shall not be liable for any special, indirect,incidental, or consequential damages, including without limitation, lost revenues or lost profits, whichmay result from the use of these materials. The information in this documentation is subject to changewithout notice and does not represent a commitment on the part of SAP AG in the future.
Some software products marketed by SAP AG and its distributors contain proprietary softwarecomponents of other software vendors.
Microsoft®, WINDOWS®, NT® and EXCEL® and SQL-Server® are registered trademarks ofMicrosoft Corporation.
IBM®, OS/2®, DB2/6000®, AIX®, OS/400® and AS/400® are a registered trademark of IBMCorporation.
OSF/Motif® is a registered trademark of Open Software Foundation.
ORACLE® is a registered trademark of ORACLE Corporation, California, USA.
INFORMIX®-OnLine for SAP is a registered trademark of Informix Software Incorporated.
UNIX® and X/Open® are registered trademarks of SCO Santa Cruz Operation.
ADABAS® is a registered trademark of Software AG.
SECUDE is a registered trademark of GMD-German National Research Center for InformationTechnology.
SAP®, R/2®, R/3®, RIVA®, ABAP®, SAPoffice®, SAPmail®, SAPaccess®, SAP-EDI®, SAPArchiveLink®, SAP EarlyWatch®, SAP Business Workflow®, R/3 Retail® are registered trademarks ofSAP AG.
SAP AG assumes no responsibility for errors or omissions in these materials.
All rights reserved.
R/3 Security Guide : VOLUME II
Copyright
ii Version 2.0a : July 31, 1998 SAP AG
R/3 Security Services in Detail
Table of Contents
SAP AG Version 2.0a : July 31, 1998 iii
Table of Contents
CHAPTER 1 : INTRODUCTION ................................................................................ 1-1Chapter 1-1 : Security with R/3 ...................................................................................................... 1-1
Chapter 1-2 : How to Use the R/3 Security Guide .......................................................................... 1-3
The R/3 Security Guide VOLUME II : R/3 Security Services in Detail ...................................... 1-4
Chapter 1-3 : What is new in this guide? ....................................................................................... 1-6
Chapter 1-4 : Support and Feedback ............................................................................................. 1-7
Technical Consulting Services ..................................................................................................... 1-7Feedback....................................................................................................................................... 1-7
CHAPTER 2 : THE R/3 SECURITY TOOLBOX ........................................................ 2-1
Chapter 2-1 : User Authentication.................................................................................................. 2-3
Passwords ..................................................................................................................................... 2-3Protecting Standard Users ............................................................................................................ 2-5Preventing Unauthorized Logons ................................................................................................. 2-7Security Measures When Using the Session Manager ................................................................. 2-8Security Measures When Using SAP Shortcuts ........................................................................... 2-8Useful Procedures in User Authentication ................................................................................... 2-9Additional Information on User Authentication......................................................................... 2-10
Chapter 2-2 : R/3 Authorization Concept .................................................................................... 2-11
Maintaining Authorizations and Profiles with the Profile Generator (PFCG) ........................... 2-12Manually Maintaining Authorizations and Profiles ................................................................... 2-14The Authorization Infosystem .................................................................................................... 2-15Organizing Maintenance Tasks .................................................................................................. 2-16Authority Checks........................................................................................................................ 2-20Reducing the Scope of Authority Checks in R/3........................................................................ 2-21Additional Information on the R/3 Authorization Concept ........................................................ 2-22
Chapter 2-3 : Network Infrastructure.......................................................................................... 2-23
Network topology ....................................................................................................................... 2-23Network Services........................................................................................................................ 2-25Routers and packet filters ........................................................................................................... 2-27The Firewall and SAProuter ....................................................................................................... 2-28Security Concept for an R/3 Network ........................................................................................ 2-31Secure Network Communications (SNC)................................................................................... 2-32Additional Information on Network Security............................................................................. 2-36
Chapter 2-4 : Operating System Protection................................................................................. 2-37
R/3 Security under UNIX ........................................................................................................... 2-37R/3 Security under Windows NT ............................................................................................... 2-43Logical Operating System Commands in R/3 ............................................................................ 2-53
R/3 Security Guide : VOLUME II
Table of Contents
iv Version 2.0a : July 31, 1998 SAP AG
Chapter 2-5 : Database Access Protection ................................................................................... 2-55
Access Using Database Tools..................................................................................................... 2-56ORACLE under UNIX ............................................................................................................... 2-57ORACLE under Windows NT ................................................................................................... 2-64INFORMIX under UNIX ........................................................................................................... 2-70ADABAS.................................................................................................................................... 2-73DB2 Common Server under UNIX ............................................................................................ 2-81DB2 Common Server under Windows NT................................................................................. 2-87DB2/400 ..................................................................................................................................... 2-94
Chapter 2-6 : Protecting Your Productive System (Change & Transport System) ................ 2-99
The R/3 System Landscape ........................................................................................................ 2-99Configuring the System Landscape for Changes...................................................................... 2-101Defining the Transport Process ................................................................................................ 2-103Responsibilities and their Corresponding Authorizations in R/3 ............................................. 2-104Emergency Changes in the Productive System ........................................................................ 2-105Additional Information for Change & Transport System......................................................... 2-106
Chapter 2-7 : Remote Communications (RFC & CPI-C)......................................................... 2-107
General Security Measures....................................................................................................... 2-107RFC Authorizations.................................................................................................................. 2-109Trusted System Networks (RFC) ............................................................................................. 2-109Authorizations for External Server Programs (RFC and CPI-C).............................................. 2-110Secure Network Communications for Remote Communications............................................. 2-111Additional Information on Remote Communications .............................................................. 2-111
Chapter 2-8 : Secure Store & Forward Mechanisms (SSF) and Digital Signatures .............. 2-112
Protecting Private Keys ............................................................................................................ 2-113Protecting Public Keys ............................................................................................................. 2-113SAP Security Library (SAPSECULIB) .................................................................................... 2-114Additional Information on SSF and Digital Signatures............................................................ 2-115
Chapter 2-9 : Logging and Auditing........................................................................................... 2-116
The Audit Info System (AIS) ................................................................................................... 2-116The Security Audit Log ............................................................................................................ 2-117System Log ............................................................................................................................... 2-118Statistic Records in CCMS....................................................................................................... 2-120Logging of Specific Activities.................................................................................................. 2-120Additional Information for Logging and Auditing ................................................................... 2-123
Chapter 2-10 : Special Topics........................................................................................................ 2-124
R/3 Internet Application Components (IAC)............................................................................ 2-124Protecting Application Link Enabling (ALE) Applications ..................................................... 2-137R/3 Online Services .................................................................................................................. 2-140Virus Protection and Integrity Checks...................................................................................... 2-142Protecting Specific Tables, Authorizations Objects, etc........................................................... 2-142

R/3 Security Services in Detail
Table of Figures
SAP AG Version 2.0a : July 31, 1998 v
CHAPTER 3 : SUMMARY ......................................................................................... 3-1Chapter 3-1 : Tools, Transactions, and Reports............................................................................ 3-1
Chapter 3-2 : Profile Parameters.................................................................................................... 3-3
Chapter 3-3 : Authorization Objects .............................................................................................. 3-9
Table of Figures
Figure 2-2-1 : Authorization Maintenance in R/3 / Profile Generator ...................................................................... 2-12
Figure 2-2-2 : Organization of User Maintenance Tasks ........................................................................................ 2-16
Figure 2-3-1 : Separating Frontend LANs from the Server LAN............................................................................. 2-24
Figure 2-3-2 : Firewall............................................................................................................................................. 2-28
Figure 2-3-3 : Recommended R/3 Network Topology ............................................................................................ 2-31
Figure 2-3-4 : Two-way Connection Using the SAProuter and a Router/Packet Filter ........................................... 2-32
Figure 2-3-5 : Application Level Protection Provided by SNC ................................................................................ 2-33
Figure 2-3-6 : Network Area Protected with SNC ................................................................................................... 2-34
Figure 2-3-7 : SNC Protection between SAProuters .............................................................................................. 2-35
Figure 2-4-1 : R/3 Directory Structure under UNIX................................................................................................. 2-40
Figure 2-4-2 : NT Domains MASTER and SAP......................................................................................................... 2-48
Figure 2-4-3 : Windows NT and R/3 Administration Users and Groups ................................................................. 2-49
Figure 2-5-1 : DB2/400 User Security Concept ...................................................................................................... 2-95
Figure 2-6-1 : Recommended Three-Tier System Landscape.............................................................................. 2-100
Figure 2-10-1 : The Internet Transaction Server .................................................................................................... 2-124
Figure 2-10-2 : The Internet Transaction Server Architecture ................................................................................ 2-126
Figure 2-10-3 : Providing ITS Security.................................................................................................................... 2-128
Figure 2-10-4 : Example ITS Network Topology..................................................................................................... 2-132

R/3 Security Guide : VOLUME II
Table of Tables
vi Version 2.0a : July 31, 1998 SAP AG
Table of Tables
Table 1-2-1 : Typographical Information Used in this Guide ................................................................................... 1-5
Table 1-2-2 : Standard Notations used in this Guide............................................................................................... 1-5
Table 2-0-1 : The Security Toolbox ......................................................................................................................... 2-1
Table 2-0-2 : Sources for Information for Additional Areas of Interest..................................................................... 2-2
Table 2-1-1 : Profile Parameters Applying to Passwords ........................................................................................ 2-4
Table 2-1-2 : Default Passwords for Standard Users .............................................................................................. 2-5
Table 2-1-3 : Loss of Functions when Locking the User SAPCPIC......................................................................... 2-6
Table 2-1-4 : Profile Parameters Applying to Preventing Unauthorized Logons...................................................... 2-8
Table 2-2-1 : Organization of the User Administrators when using the Profile Generator ..................................... 2-17
Table 2-2-2 : Organization of the User Administrators When Maintaining Profiles Manually................................. 2-19
Table 2-3-1 : Ports used by R/3 ............................................................................................................................ 2-27
Table 2-3-2 : SNC-Protected Communication Paths............................................................................................. 2-34
Table 2-4-1 : Setting Access Privileges for R/3 Directories and Files under Unix ................................................. 2-41
Table 2-4-2 : Users and their Functions under Windows NT................................................................................. 2-45
Table 2-4-3 : Database Users ............................................................................................................................... 2-47
Table 2-5-1 : Changing the Passwords for ORACLE Standard Users (ORACLE / UNIX) ..................................... 2-57
Table 2-5-2 : Setting Access Privileges for ORACLE Directories and Files (ORACLE / UNIX)............................. 2-60
Table 2-5-3 : Changing the Passwords for ORACLE Standard Users (ORACLE / Windows NT) ......................... 2-64
Table 2-5-4 : Setting Access Privileges for DB2/CS Directories and Files (ORACLE / Windows NT) ................... 2-65
Table 2-5-5 : Changing the Passwords for INFORMIX Standard Users (INFORMIX / UNIX) ............................... 2-70
Table 2-5-6 : Setting Access Privileges for INFORMIX Directories and Files (INFORMIX / UNIX) ....................... 2-71
Table 2-5-7 : Changing the Passwords for ADABAS Standard Users (ADABAS / All) .......................................... 2-73
Table 2-5-8 : Changing the Passwords for ADABAS Standard Users (ADABAS / UNIX) ..................................... 2-75
Table 2-5-9 : Setting Access Privileges for ADABAS Directories and Files (ADABAS / UNIX) ............................. 2-75
Table 2-5-10 : Changing the Passwords for DB2/CS Standard Users (DB2/CS / UNIX)......................................... 2-82
Table 2-5-11 : Setting Access Privileges for DB2/CS Directories and Files (DB2/CS / UNIX) ................................ 2-84
Table 2-5-12 : DB2/CS Standard Users under Windows NT (DB2/CS / Windows NT) ........................................... 2-88
Table 2-5-13 : DB2/CS Standard Groups under Windows NT (DB2/CS / Windows NT) ......................................... 2-88
Table 2-5-14 : Managing the Passwords for DB2/CS Standard Users (DB2/CS / Windows NT) ............................ 2-90
Table 2-5-15 : Environment Variables for DB2/CS under Windows NT (DB2/CS / Windows NT) ........................... 2-90
Table 2-5-16 : Setting Access Privileges for DB2/CS Directories and Files (DB2/CS / Windows NT)..................... 2-91
Table 2-5-17 : Changing the Passwords for DB2/400 Standard Users (DB2/400) .................................................. 2-97
Table 2-6-1 : Authorization Profiles for Change and Transport Roles ................................................................. 2-105
Table 2-6-2 : Authorizations for Development and Transport.............................................................................. 2-105
Table 2-9-1 : Profile Parameters for the Security Audit Log ................................................................................ 2-117
Table 2-9-2 : Profile Parameters and File Locations for the System Log ............................................................ 2-119
Table 2-9-3 : Profile Parameters for Statistic Records in CCMS ......................................................................... 2-120
Table 3-1-1 : Tools, Transactions, and Reports in R/3 ............................................................................................ 3-1
Table 3-2-1 : Profile Parameters ............................................................................................................................. 3-3
Table 3-3-1 : Authorization Objects......................................................................................................................... 3-9
R/3 Security Services in Detail
Table of Useful Procedures
SAP AG Version 2.0a : July 31, 1998 vii
Table of Useful Procedures
UP 2-1-1 : Specifying Impermissible Passwords.................................................................................................... 2-9
UP 2-1-2 : Defining a new Super User and Deactivating SAP*.............................................................................. 2-9
UP 2-1-3 : Changing the Passwords for Standard Users....................................................................................... 2-9
UP 2-5-1 : Changing the Passwords for <sid>adm and ora<sid> (ORACLE / UNIX) ...................................... 2-61
UP 2-5-2 : Changing the Passwords for SYS, SYSTEM, and SAPR3 using chdbpass (ORACLE / UNIX) ............ 2-62
UP 2-5-3 : Setting Access Privileges for Files and Directories (ORACLE / UNIX) ............................................... 2-63
UP 2-5-4 : Specifying the Name of the User that Starts R/3 - SAPService<SID> (ORACLE / Windows NT)... 2-67
UP 2-5-5 : Creating an OPS$ User for <SID>ADM (ORACLE / Windows NT)...................................................... 2-67
UP 2-5-6 : Creating an OPS$ User for SAPService<SID> (ORACLE / Windows NT)....................................... 2-68
UP 2-5-7 : Changing the Password of SAPR3 (ORACLE / Windows NT)............................................................. 2-68
UP 2-5-8 : Changing the passwords for <sid>adm, sapr3, and informix (INFORMIX / UNIX) ...................... 2-71
UP 2-5-9 : Setting Access Privileges for Files and Directories (INFORMIX / UNIX)............................................. 2-72
UP 2-5-10 : Changing the Passwords for the Users CONTROL, SUPERDBA, and OPERATOR (ADABAS / All) ........ 2-77
UP 2-5-11 : Updating the XUSER File for the Users CONTROL and SUPERDBA. (ADABAS / All)............................. 2-77
UP 2-5-12 : Changing the Password of SAPR3 As User SAPR3 (ADABAS / All).................................................... 2-78
UP 2-5-13 : Changing the Password of SAPR3 As User SUPERDBA (ADABAS / All) ............................................. 2-78
UP 2-5-14 : Updating the XUSER File for the User SAPR3 (ADABAS / All)............................................................. 2-79
UP 2-5-15 : Changing the Passwords for <sid>adm and sqd<sid> (ADABAS / UNIX) ..................................... 2-79
UP 2-5-16 : Setting Access Privileges for Files and Directories (ADABAS / UNIX) ............................................... 2-80
UP 2-5-17 : Changing the password for db2<sid> (DB2/CS / UNIX) ................................................................... 2-85
UP 2-5-18 : Setting Access Privileges for Files and Directories (ADABAS / UNIX) ............................................... 2-85
UP 2-5-19 : Recreating the File dscdb6.conf (DB2/CS / Windows NT).............................................................. 2-92
UP 2-5-20 : Changing the Environment Variable DB2DB6EKEY (DB2/CS / Windows NT) ..................................... 2-93
UP 2-5-21 : Changing the passwords for <SID>OFR and <SID>OPR Using CHGPWD (DB2/400) ......................... 2-98
UP 2-10-1 : Verifying Required Authorizations using Trace................................................................................. 2-139

R/3 Security Guide : VOLUME II
Table of Useful Procedures
viii Version 2.0a : July 31, 1998 SAP AG

R/3 Security Services in Detail
Chapter 1-1 : Security with R/3
1-1 Version 2.0a : July 31, 1998 SAP AG
Chapter 1 : Introduction
Chapter 1-1 : Security with R/3
The most important aspect involved when establishing and implementing a security policy for R/3security is your own demands and priorities on security for your system. Before beginning, you need toask yourself "What is it that you want to achieve", and "What does security mean to you?" The followinglist provides a sample of questions to ask yourself:
• Does security mean that unauthorized persons do not have access to certain data?
• Does it mean that no-one can retrieve information over unauthorized means (for example,eavesdropping)?
• Does it mean that activities are recorded so that they can be reconstructed?
• Does it mean that individuals can be held responsible for actions that they perform using the R/3System?
Do all of these questions mean "security" for your system, or only some of them? Which apply to yourneeds, and which do not? What else does "security" mean to you and where else is protection importantfor your system?
Once you have determined what security means to you and your system, you can proceed with the taskof deciding where and from what you need protection (protecting your system from threats).
Threats to your system
Security strives to protect your system from known or unknown threats. Therefore, to determine whereyou want to take security measures, you need to determine which threats are potential hazards for yoursystem. Threats may include:
• Annoyed or frustrated employees
• Eavesdroppers or "hackers" who want to gain sensitive information (for example, a competitorlooking for useful statistics)
• User errors or carelessness
• Software errors
You need to decide which threats are relevant and how much it is worth to provide protection.

R/3 Security Guide : VOLUME II
Chapter 1 : Introduction
1-2 Version 2.0a : July 31, 1998 SAP AG
R/3 Security
In addition, you need to consider the R/3 System itself. R/3 is a sophisticated system with many areasthat are relevant to security. Within R/3, you need to consider some or all of the following areas:
• User Authentication Methods
• The R/3 Authorization Concept
• Your Network Infrastructure
• The Operating System that you use
• Database Access
• The R/3 Change and Transport System
• Logging and Auditing
• Remote Communications (RFC & CPI-C)
• Secure Store & Forward Mechanisms and Digital Signatures
• Internet Application Components (IAC)
• Application Link Enabling Applications (ALE)
• R/3 Online Services
In this volume of the R/3 Security Guide, we include details on how these areas in R/3 deal withsecurity. Depending on your policy and your priorities, you may need to handle some or all of theseareas. When implementing your security policy, you can refer to this guide for a collection of themeasures, tools, and guidelines available in R/3.
R/3 Security Services in Detail
Chapter 1-2 : How to Use the R/3 Security Guide
1-3 Version 2.0a : July 31, 1998 SAP AG
Chapter 1-2 : How to Use the R/3 Security Guide
The R/3 Security Guide consists of three separate volumes, with different levels of detail:
R/3 Security Guide VOLUME I : An Overview of R/3 Security Services
R/3 Security Guide VOLUME II : R/3 Security Services in Detail
R/3 Security Guide VOLUME III : Checklists
R/3 Security Guide VOLUME I : An Overview of R/3 Security Services
The R/3 Security Guide VOLUME I provides a general overview of the security services that we offer inR/3. With VOLUME I, you can familiarize yourself with these services, for example, before establishinga security policy or before installing an R/3 System.
R/3 Security Guide VOLUME II : R/3 Security Services in Detail
This part of the R/3 Security Guide concentrates on the technical measures involved with R/3 Systemsecurity. It contains descriptions of the tasks involved, as well as our recommendations for the variouscomponents of the R/3 System. Use VOLUME II once you have established a security policy and areready to implement it for your R/3 System.
R/3 Security Guide VOLUME III : Checklists
The third part of the R/3 Security Guide complements VOLUME II with checklists. You can use thesechecklists to record those measures that you have taken and for assistance when reviewing andmonitoring them.
Updates
We will also publish updates to the guide as necessary. These updates will also be available overSAPNet in regular intervals.

R/3 Security Guide : VOLUME II
Chapter 1 : Introduction
1-4 Version 2.0a : July 31, 1998 SAP AG
The R/3 Security Guide VOLUME II : R/3 Security Services in Detail
You are currently working with the R/3 Security Guide VOLUME II : R/3 Security Services in Detail. Theprerequisites for using this volume are:
• An existing security policy
• Technical knowledge of R/3, as well as the database, operating, and networking systems.
• Time and resources
Security is an aspect of quality; it is an investment - of both time and resources. We recommendyou dedicate sufficient time and allocate ample resources to implement your security policy andto maintain the level of security that you desire.
Finding Your Way in Volume II
To find information in VOLUME II of the R/3 Security Guide, refer to the following contents:
• Chapter 1 : Introduction
This chapter provides:
- Introductory Material on R/3 security and how to use the R/3 Security Guide
- The R/3 Releases for which the guide is valid
- Typographical Information and Standard Notations
- What is new in this version of the guide
- Where to obtain support and how to provide us with feedback
• Chapter 2 : The R/3 Security Toolbox
This chapter provides the R/3 security toolbox. This is a collection of the various tools,mechanisms, and guidelines for providing security for your R/3 System. You can find the exactcontents of the R/3 security toolbox on Page 2-1.
• Chapter 3 : Summary
This chapter summarizes the guidelines and measures from Chapter 2, to include the following :
- R/3 Security-Relevant Tools and Transactions
- R/3 Security-Relevant Profile Parameters
- R/3 Security-Relevant Authorization Objects and Profiles
• Appendix A : List of References
This appendix includes a list of the sources of additional information.
• Feedback Reply Form
We are interested in knowing how well the R/3 Security Guide meets your needs. Give us yourfeedback using the Feedback Reply Form provided at the end of the guide.

R/3 Security Services in Detail
Chapter 1-2 : How to Use the R/3 Security Guide
1-5 Version 2.0a : July 31, 1998 SAP AG
Valid Releases
This version of the R/3 Security Guide applies to R/3 Releases 3.0, 3.1, and 4.0. Where applicable,references to other releases are explicitly indicated.
Typographical Information and Standard Notations
The following tables explain the meanings of the various formats, symbols, and standard notations usedin the guide.
Table 1-2-1 : Typographical Information Used in this Guide
This text format helps you identify
Screen Text words or characters you see on the screen (this includes systemmessages, field names, screen titles, menu names, and menu items).
User Entry exact user input. These are words and characters you type on thekeyboard exactly as they are in the documentation.
<Variable User Entry> variable user input. Pointed brackets indicate that you replace thesevariables with appropriate keyboard entries.
ALL CAPITALS report names, program names, transaction codes, table names, ABAPlanguage elements, file names, and directories.
Book Title cross-references to other books or references.
KEY name keys on your keyboard. Most often, function keys (for example, F2 and theENTER key) are represented this way.
Technical Object Name names of technical objects outside of the R/3 System (for example, UNIX orWindows NT filenames or environment variables).
This icon helps you identify
Examplean Example. Examples help clarify complicated concepts or activities.
Note a Note. Notes can contain important information like special considerationsor exceptions.
Cautiona Caution. Cautions help you avoid errors such as those that could lead todata loss.
Table 1-2-2 : Standard Notations used in this Guide
This Notation helps you identify
<sid>, <SID> the three character System ID; lower and upper case respectively.
<SYS> the R/3 system number
<sid>adm, <SID>ADM the R/3 system administrator at the operating system level; lower and uppercase respectively.Exception: Under AS/400, the system administrator is the user <SID>OFR.
R/3 Security Guide : VOLUME II
Chapter 1 : Introduction
1-6 Version 2.0a : July 31, 1998 SAP AG
Chapter 1-3 : What is new in this guide?
If you are familiar with the older version of the R/3 Security Guide, you may want to take note of thefollowing new topics contained in the guide.
New Topics
New topics include:
• The Profile Generator(see Chapter 2-2 : R/3 Authorization Concept)
• Protecting Database Access - DB2 Common Server and DB2/400(see Chapter 2-5 : Database Access Protection)
• Secure Store and Forward Mechanisms and Digital Signatures(see Chapter 2-8 : Secure Store & Forward Mechanisms (SSF) and Digital Signatures)
• The Security Audit Log and the Audit Info System(see Chapter 2-9 : Logging and Auditing)
• Protecting R/3 Internet Application Components(see Chapter 2-10 : Special Topics)
• Protecting ALE Applications(see Chapter 2-10 : Special Topics)
Additionally, sections that were already included in the former version have been updated to include anychanges that may apply.

R/3 Security Services in Detail
Chapter 1-4 : Support and Feedback
1-7 Version 2.0a : July 31, 1998 SAP AG
Chapter 1-4 : Support and Feedback
Technical Consulting Services
If the R/3 Security Guide does not satisfactorily answer all of your questions, or if additional questionsarise, contact our Technical Consulting Services.
We currently offer the following services:
• Support and consulting services when establishing a company-wide security policy
• Security analysis services
• Individual consulting services on security in the R/3 environment
• Support services when establishing a Windows NT domain concept
• Consulting services when using the Internet Transaction Server
• CA900 Course: Technical Revision - System Security
• Workshop on the R/3 Authorization Concept
For further information, contact us in the Technical Consulting Department at: +49 6227 / 7-41537.
Feedback
We are also interested in knowing how well the R/3 Security Guide meets your needs. If you havecomments pertaining to the contents or quality of this guide, use the Feedback Reply Form provided atthe end of the guide and return it to us at the following address or fax number:
SAP AGCCMS & Security DepartmentPostfach 1461D-69190 WalldorfGermany
Fax: +49-6227 / 7-41198

R/3 Security Guide : VOLUME II
Chapter 1 : Introduction
1-8 Version 2.0a : July 31, 1998 SAP AG

R/3 Security Services in Detail
Chapter 2 : The R/3 Security Toolbox
SAP AG Version 2.0a : July 31, 1998 2-1
Chapter 2 : The R/3 Security Toolbox
The security of your R/3 System depends on a large number of factors. For example, it depends on thesecurity of your operating system, your network topology, your authorization plan, and the communi-cation methods that you use, just to name a few. Depending on your policy, you may or may not decideto take measures in all of these areas of your R/3 System.
For those areas where you decide to take measures, you need the appropriate tools, mechanisms, andguidelines. In this chapter, you will find the R/3 Security Toolbox. It contains descriptions of thevarious tools and mechanisms that apply to R/3 security. Table 2-0-1 lists the various areas in R/3 andwhere you can find the appropriate tools measures in this guide that apply to each.
Table 2-0-1 : The Security Toolbox
Topic in Section: on Page:
User Authentication Chapter 2-1 2-3
R/3 Authorization Concept Chapter 2-2 2-11
Network Infrastructure Chapter 2-3 2-23
Operating System Protection Chapter 2-4 2-37
R/3 Security under UNIX 2-37
R/3 Security under Windows NT 2-43
Logical Operating System Commands in R/3 2-53
Database Access Protection Chapter 2-5 2-55
Access Using Database Tools 2-56
ORACLE under UNIX 2-57
ORACLE under Windows NT 2-64
INFORMIX under UNIX 2-70
ADABAS 2-73
DB2 Common Server under UNIX 2-81
DB2 Common Server under Windows NT 2-87
DB2/400 2-94
Protecting Your Productive System(Change & Transport System)
Chapter 2-6 2-99
Remote Communications (RFC & CPI-C) Chapter 2-7 2-107
Secure Store & Forward Mechanisms (SSF) and DigitalSignatures
Chapter 2-8 2-112
Logging and Auditing Chapter 2-9 2-116
Special Topics Chapter 2-10 2-124
R/3 Internet Application Components (IAC) 2-124
Protecting Application Link Enabling (ALE) Applications 2-137
R/3 Online Services 2-140
Virus Protection and Integrity Checks 2-142
Protecting Specific Tables, Authorizations Objects, etc. 2-142

R/3 Security Guide : VOLUME II
Chapter 2 : The R/3 Security Toolbox
2-2 Version 2.0a : July 31, 1998 SAP AG
Note
The topics of system management, high availability, database management, and dataprotection are also important topics related to security. Although we do not cover thesetopics directly in this guide, they do belong in your 'big picture'. Refer to the followingsources for more information on these topics.
Table 2-0-2 : Sources for Information for Additional Areas of Interest
Topic Documentation
System Management: CCMS • R/3 Online Documentation: BC Computer Center Management System [A.4]
High Availability • SAP Documentation: BC SAP High Availability Guide [E.3]• R/3 Online Documentation: BC SAP High Availability [A.19]
Backup, Restore, andRecovery
• R/3 Online Documentation: BC SAP Database Administration [A.11]
Protection of Personal Data • SAP Documentation: Leitfaden Datenschutz für SAP R/3, Material Number50024598 (Germany only) [E.4]

R/3 Security Services in Detail
Chapter 2-1 : User Authentication
SAP AG Version 2.0a : July 31, 1998 2-3
Chapter 2-1 : User Authentication
An unauthorized user, who manages to access a system under a known user in the system, can proceed todo whatever is possible under this known user. If the known user happens to have access to criticalinformation, then the impersonator also has access to the same information. Therefore, providing secureauthentication protects the availability, integrity, and privacy of your system at every level.
We describe how R/3 facilitates secure authentication in the following sections:
• Passwords
• Protecting Standard Users
• Preventing Unauthorized Logons
• Security Measures when Using the Session Manager
• Security Measures when Using SAP Shortcuts
• Useful Procedures in User Authentication
• Additional Information on User Authentication
You can provide additional security by using an external security product, which may include using smartcards for strong authentication. See Chapter 2-3 : Network Infrastructure, in the section titled SecureNetwork Communications (SNC).
Passwords
R/3 provides standard measures for password protection. There are a number of password "rules" thatapply to defining passwords; there are also measures for protecting the transport and storage ofpasswords. We explain these measures in the following sections.
Password Rules
The following rules apply to passwords in a standard R/3 System:
• First time dialog users are assigned an initial password that has to be changed immediately when usedfor the first time.
• The default minimum length for passwords in R/3 is 3. You can change this value (see Table 2-1-1).
• The maximum length is 8.
• The first character cannot be '?' or '!'.
• The first three characters of the password cannot appear in the same order as part of the user name.
• The first three characters cannot all be the same.
• The first three characters cannot include space characters.
• The password cannot be PASS or SAP*.

R/3 Security Guide : VOLUME II
Chapter 2 : The R/3 Security Toolbox
2-4 Version 2.0a : July 31, 1998 SAP AG
• The password is case-insensitive for dialog entries. (R/3 converts lower case characters in thepassword to upper case.)
• A user can only change his or her password in the course of logging on.
• A user can change his or her password at most once a day. (The user administrator is excepted fromthis rule.)
• You cannot reuse the last five passwords.
• You can force users to have to change their passwords after a set period of time (see Table 2-1-1).
• You can also prohibit certain character combinations in the Table USR40 (see UP 2-1-1).
• As of Release 3.0C, you can also define your own checks in the customer exit SUSR0001 (see OSSNote 37724 [C.12]).
Note
Avoid using names, dates, or words that can be found in a standard dictionary for passwords.There are many programs available that can automatically determine users' passwords thatfit in these categories.
You can make a password relatively safe by including a mixture of alphabetic and numericcharacters with at least one special character in the middle of the password.
We especially advise the system administrator to use a complex password with the maximumlength (8 characters) that contains at least one digit and special character.
Password Storage and Transport
Passwords are stored in the database in a one-way hash. For the transport between the front end and theapplication server, the data is compressed. For increased security, you can use Secure NetworkCommunications (SNC) and an external security product. With SNC, you eliminate the need to send thepassword over the network altogether. For more information, see Chapter 2-3 : Network Infrastructure, inthe section titled Secure Network Communications (SNC).
Profile Parameters
Table 4-1-1 shows the profile parameters in R/3 that apply to passwords.
Table 2-1-1 : Profile Parameters Applying to Passwords
Parameter Description Default Permitted value
login/min_password_lng Minimum length 3 3 - 8
login/password_expiration_time Number of days after which apassword must be changed.
0 (no limit) any numericalvalue

R/3 Security Services in Detail
Chapter 2-1 : User Authentication
SAP AG Version 2.0a : July 31, 1998 2-5
Protecting Standard Users
R/3 creates the standard users SAP*, DDIC, SAPCPIC and EARLYWATCH during the installation processin the clients as shown in Table 2-1-2. To protect them from unauthorized access, you need to change theirdefault passwords (see UP 2-1-3). We also describe additional measures for each of the users below.
Table 2-1-2 : Default Passwords for Standard Users
User Description Clients DefaultPassword
SAP* R/3 System super user 000, 001, 066 (as of Release 3.0D) 06071992
all new clients PASS
DDIC ABAP Dictionary and softwarelogistics super user
000, 001 19920706
SAPCPIC CPI-C user for the R/3 System 000, 001 admin
EARLYWATCH Interactive user for the EarlyWatch™ service in client 066
066 support
Note
To find out which clients you have in your system, display the Table T000 using TransactionSM31.
To ensure that the SAP* user has been created in all clients and that the standard passwordshave been changed for SAP*, DDIC and SAPCPIC, use the report RSUSR003. (See OSSNote 40689 [C.13] for more information.)
Protecting SAP*
To protect SAP*, you need to take the following precautions:
• Do not delete the user SAP*! SAP* is hard-coded in the R/3 System code and does not require auser master record! If a user master record for SAP* does not exist in a client, then SAP* exists at codelevel, has the password PASS, is not susceptible to authorization checks, and has all authorizations.Therefore, do not delete SAP* from any client.
You should define a new super user and deactivate SAP* without deleting it (see UP 2-1-2).
• As an alternative, you can deactivate the automatic user SAP* by activating the profile parameterlogin/no_automatic_user_sap* or login/no_automatic_user_sapstar (depending onrelease). For more information, see OSS Note 68048 [C.27].
Note
If a user master record was created for SAP*, then the authorizations there will apply; theyare not affected by this parameter's setting.
• Change the default password (see UP 2-1-3).

R/3 Security Guide : VOLUME II
Chapter 2 : The R/3 Security Toolbox
2-6 Version 2.0a : July 31, 1998 SAP AG
Protecting DDIC
To protect the user DDIC, note the following:
• Do not delete the user DDIC from the system. Do not delete its profiles. This user has specialprivileges tasks in the installation process, for software logistics, and for the ABAP Dictionary.
• Change DDIC's default password (see UP 2-1-3).
Protecting SAPCPIC
The SAPCPIC user is a non-dialog user that can be used for calling certain programs and function modulesin the R/3 System. To prevent misuse, you should either change its password or lock the user. Both optionshave disadvantages that you need to take into account.
• Changing SAPCPIC's Password
After changing SAPCPIC's password (see UP 2-1-3), you need to adjust the following programs.This only protects from external unauthorized access because the password appears in plain text inthe affected programs. Refer to OSS Note 29276 [C.8] for more information.
- RSM51000 (Transaction SM51)
- RSCOLL00
- RSCOLL30
- LSXPGU01
• Locking SAPCPIC
Locking the user SAPCPIC results in the following loss of functions:
Table 2-1-3 : Loss of Functions when Locking the User SAPCPIC
Report Loss of Function Release
RSM51000(Transaction SM51)
No display of process information Release 2.1/2.2
RSCOLL00 No compilation of data prior to Release 3.0F
Batch jobs The last return code remains in active status if the laststep calls an external program or command.
To receive the proper return code, you can include adummy program as the last step in the batch job.
prior to Release 4.0
You need to decide which method is best for you.

R/3 Security Services in Detail
Chapter 2-1 : User Authentication
SAP AG Version 2.0a : July 31, 1998 2-7
EARLYWATCH
The user EARLYWATCH is the interactive user for the Early Watch™ service in client 066. To protect thisuser, take the following precautions:
• Change its default password (see UP 2-1-3).
• Lock the user and unlock it only when necessary. Re-lock it after using it.
Summary
To summarize, we recommend that you regularly review the following criteria for protecting the standardusers:
• Maintain an overview of the clients that you have and ensure that no unknown clients exist.
• Ensure that SAP* exists and has been deactivated in all clients.
• Ensure that SAP* belongs to the group SUPER in all clients.
• Ensure that the default passwords for SAP*, DDIC, and EARLYWATCH have been changed.
• Ensure that the default password for SAPCPIC has been changed or that the user has been locked.
• Lock the users SAP* and EARLYWATCH. Unlock EARLYWATCH only when necessary.
Preventing Unauthorized Logons
The following measures exist in R/3 to protect against unauthorized logons:
• You can use the report RSUSR006 (available as of Release 3.0E) to find out whether any known userhas unsuccessfully attempted to logon. This report records the number of incorrect logon attempts by auser and user locks. We recommend that you schedule this report to run on a regular basis (daily).
• As of Release 4.0, you can use the Security Audit Log (Transactions SM18, SM19 and SM20) torecord all successful and unsuccessful log-on attempts. Unknown user names and terminal numberfrom where the logon or logon attempt occurred are also included in this log. See Chapter 2-9 :Logging and Auditing for more details.
• The system terminates a session if a set number of consecutive unsuccessful attempts to log on undera single user-id is exceeded (as specified in the profile parameter login/fails_to_session_end).
• You can hinder unauthorized access over an already logged-on user by configuring your R/3 System toautomatically log users off if they have been inactive for a set period. Specify this value in the profileparameter rdisp/gui_auto_logout.
• The system locks a user-id if a set number of consecutive unsuccessful attempts to logon is exceededunder a single user ID. Set the number of invalid logon attempts that are allowed in the profileparameter login/fails_to_user_lock.
The system removes such locks at midnight on the same day; however, you can also manuallyremove locks at any time. You can also explicitly set locks for specific users. As of Release 3.1G,you can also specify that R/3 should not remove user locks automatically. (Set this flag in the profileparameter login/failed_user_auto_unlock).
R/3 Security Guide : VOLUME II
Chapter 2 : The R/3 Security Toolbox
2-8 Version 2.0a : July 31, 1998 SAP AG
• The System Log records all locks. See Chapter 2-9 : Logging and Auditing for more details.
• Prior to Release 3.1H, when a user logs on to R/3, the system displays the date and time of the lastlog-on. The user can then see whether the date and time are correct. As of Release 3.1H, you canaccess the information over the System à Status menu path.
• Increase the access protection to your system by having your end users activate screen savers withpasswords.
• You can use the SAP Logon Pad to ensure that users cannot change the SAP Logon configuration.
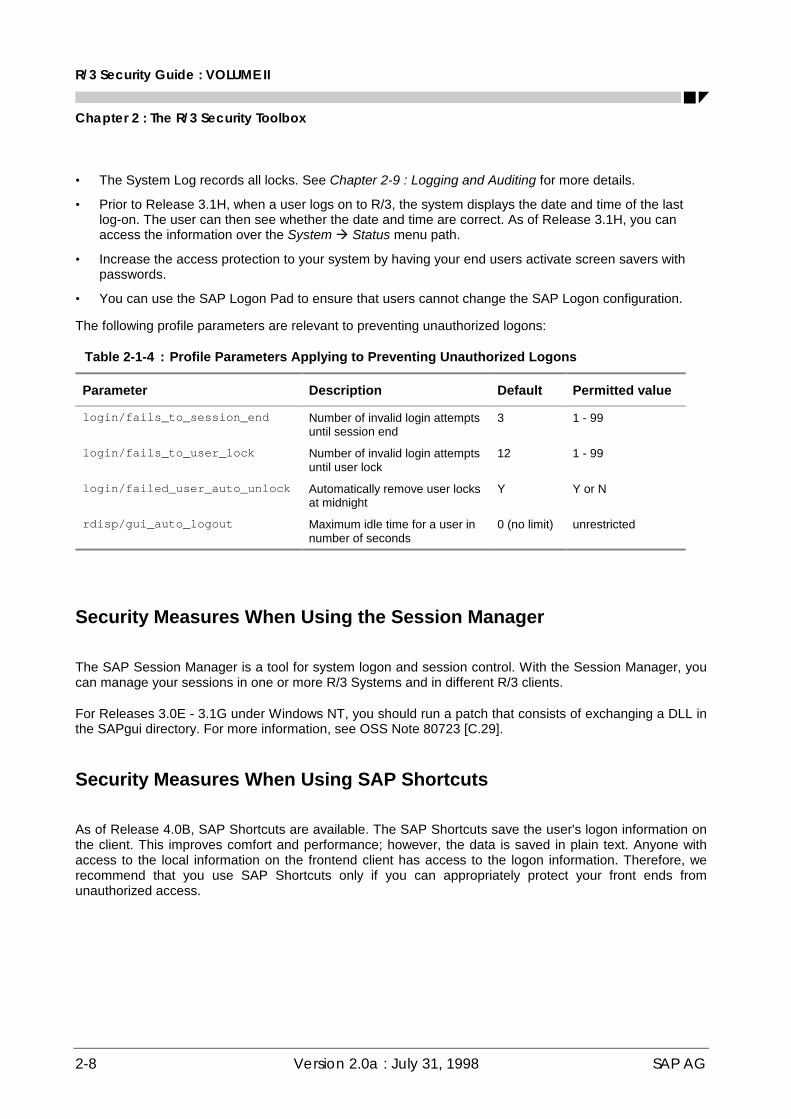
The following profile parameters are relevant to preventing unauthorized logons:
Table 2-1-4 : Profile Parameters Applying to Preventing Unauthorized Logons
Parameter Description Default Permitted value
login/fails_to_session_end Number of invalid login attemptsuntil session end
3 1 - 99
login/fails_to_user_lock Number of invalid login attemptsuntil user lock
12 1 - 99
login/failed_user_auto_unlock Automatically remove user locksat midnight
Y Y or N
rdisp/gui_auto_logout Maximum idle time for a user innumber of seconds
0 (no limit) unrestricted
Security Measures When Using the Session Manager
The SAP Session Manager is a tool for system logon and session control. With the Session Manager, youcan manage your sessions in one or more R/3 Systems and in different R/3 clients.
For Releases 3.0E - 3.1G under Windows NT, you should run a patch that consists of exchanging a DLL inthe SAPgui directory. For more information, see OSS Note 80723 [C.29].
Security Measures When Using SAP Shortcuts
As of Release 4.0B, SAP Shortcuts are available. The SAP Shortcuts save the user's logon information onthe client. This improves comfort and performance; however, the data is saved in plain text. Anyone withaccess to the local information on the frontend client has access to the logon information. Therefore, werecommend that you use SAP Shortcuts only if you can appropriately protect your front ends fromunauthorized access.

R/3 Security Services in Detail
Chapter 2-1 : User Authentication
SAP AG Version 2.0a : July 31, 1998 2-9
Useful Procedures in User Authentication
UP 2-1-1 : Specifying Impermissible Passwords
To specify impermissible passwords:
Enter the passwords that you want to prohibit in the Table USR40. (Use the Transaction SM30).
You can use '?' and '*' as wildcard characters. The '?' stands for a single character and the * stands for anycombination of characters of any length.
Example
The entry 123* in table USR40 prohibits any password that begins with the sequence "123."
The entry *123* prohibits any password that contains the sequence "123."
The entry AB? prohibits all passwords that begin with "AB" and have one additional character:"ABA", "ABB", "ABC", etc.
UP 2-1-2 : Defining a new Super User and Deactivating SAP*
You should define and deactivate SAP* in all clients that exist in Table T000. Proceed as follows:
1. Create a user master record for a new super user.2. Assign the profile SAP_ALL to this super user.3. If no user master record exists in the client, then create a user master record for SAP*.4. Assign the SUPER user group to SAP* (in all clients). This ensures that no one can change the user
master record accidentally.5. Deactivate all authorizations for SAP* (in all clients) by deleting all of the profiles in the profile list.
UP 2-1-3 : Changing the Passwords for Standard Users
Change the passwords for all of the standard users in those clients where they exist as displayed in theTable T000. (SAP* should exist in all clients.)
To change the passwords, proceed as follows:
1. Logon as the current super user.2. Select Tools à Administration à Maintain users à Users.3. Enter the <user-id> (SAP*, DDIC, SAPCPIC, or EARLYWATCH) in the User field.4. Select Goto à Change password.
A dialog appears.5. Enter the new password.
R/3 Security Guide : VOLUME II
Chapter 2 : The R/3 Security Toolbox
2-10 Version 2.0a : July 31, 1998 SAP AG
Additional Information on User Authentication
For more information, refer to the following documentation:
• R/3 Online Documentation: BC Users and Authorizations à Access Security: Logon Customizing andProtecting Standard Users [A.28]
• OSS Note 2467: Answers on the topic of "Security" [C.2]
• OSS Note 4326: No user exists with superuser privileges [C.3]
• OSS Note 29276: SAPCPIC: At which points are passwords visible [C.8]
• OSS Note 37724: Customer exits in SAP logon [C.12]
• OSS Note 40689: New reports for the User Information System [C.13]
• OSS Note 68048: Deactivating the automatic user SAP* [C.27]
• OSS Note 80723: AUTOlogin Shared Library correction [C.29]
R/3 Security Services in Detail
Chapter 2-2 : R/3 Authorization Concept
SAP AG Version 2.0a : July 31, 1998 2-11
Chapter 2-2 : R/3 Authorization Concept
The R/3 authorization concept allows you to protect transactions and programs from unauthorized use. R/3does not allow a user to execute transactions or programs, unless he or she has explicitly definedauthorizations for the activity. To accomplish this, R/3 programs and transactions include authority checks,which ensure that users have the correct authorizations for an action.
Note
If you develop your own transactions or programs, you must include the authority checks inyour developments yourself; see the section titled Authority Checks on page 2-20.
To successfully enforce this approach, you need to establish a reliable authorization plan. You need to takethe time and define which users you allow to perform which tasks in your R/3 System. Then, in R/3, youneed to assign to each user the authorizations that he or she needs to perform those tasks.
The development of a stable and reliable authorization plan is on ongoing process. We advise you toregularly review your authorization plan to ensure that it continually applies to your needs.
In the rest of this chapter, we describe what you need to take into account when working with the R/3authorization concept. We include an overview of the profile generator and the Authorization Infosystem,two tools that can help you with maintaining your authorizations. However, this is only a brief overview. Fora complete description, we advise you to refer to the Authorizations Made Easy Guide [E.2], the R/3 onlinedocumentation, or the documentation provided in the Additional Information on the R/3 AuthorizationConcept section.
This chapter is divided into the following sections:
• Maintaining Authorizations and Profiles with the Profile Generator
• Manually Maintaining Authorizations and Profiles
• The Authorization Infosystem
• Organizing Maintenance Tasks
• Authority Checks
• Deactivating Authority Checks
• Additional Information on the R/3 Authorization Concept
R/3 Security Guide : VOLUME II
Chapter 2 : The R/3 Security Toolbox
2-12 Version 2.0a : July 31, 1998 SAP AG
Maintaining Authorizations and Profiles with the Profile Generator(PFCG)
We recommend you use the profile generator (available as of Release 3.1G) to maintain yourauthorizations and profiles.
The profile generator makes your job easier by automating certain processes and providing more flexibilityin your authorization plan. For example, you can assign profiles to job positions instead of only toindividuals. If a person changes positions within the company, the profile generator automatically changesthe authorization profile with the new assignment.
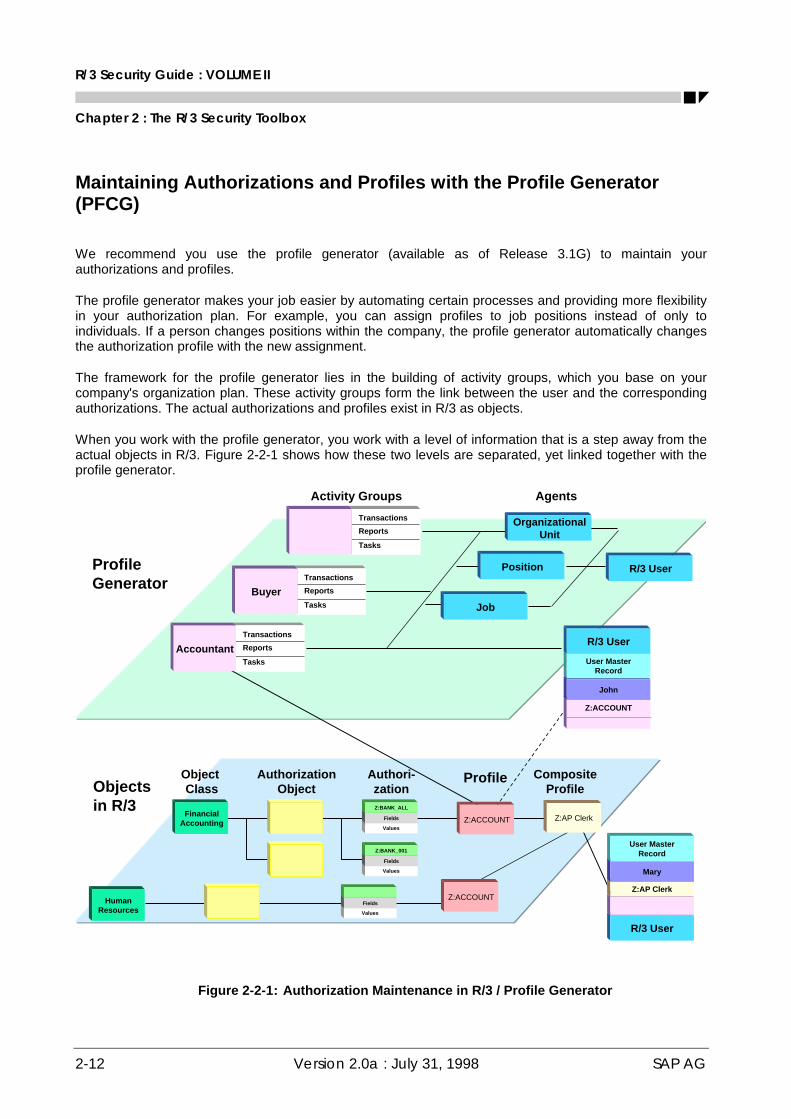
The framework for the profile generator lies in the building of activity groups, which you base on yourcompany's organization plan. These activity groups form the link between the user and the correspondingauthorizations. The actual authorizations and profiles exist in R/3 as objects.
When you work with the profile generator, you work with a level of information that is a step away from theactual objects in R/3. Figure 2-2-1 shows how these two levels are separated, yet linked together with theprofile generator.
Object Class
AuthorizationObject
Authori-zation
CompositeProfile
FinancialAccounting
Values
Fields
Z:BANK_ALLBanks: Authorizations
for company codeF_BNKA_BUK
Z:ACCOUNT
John
User MasterRecord
ProfileGenerator
Objectsin R/3
Profile
AgentsActivity Groups
R/3 User
Transactions
Reports
TasksAccountant
Transactions
Reports
TasksBuyer
Transactions
Reports
Tasks
R/3 User
Job
Position
OrganizationalUnit
HumanResources
Z:ACCOUNT
Z:ACCOUNT
Z:AP Clerk
R/3 User
Z:AP Clerk
Mary
User MasterRecord
Values
Fields
Z:BANK_001
Values
Fields
Figure 2-2-1: Authorization Maintenance in R/3 / Profile Generator
R/3 Security Services in Detail
Chapter 2-2 : R/3 Authorization Concept
SAP AG Version 2.0a : July 31, 1998 2-13
With the profile generator, you work in the upper level from Figure 2-2-1. You define the activity groups foryour various job roles with the allowed activities. Based on this information, the profile generatordetermines the appropriate authorizations for a user belonging to the activity group.
The basic process is as follows:
1. Define Job Roles
For each application area in your company, define all of the job roles (for example, in a job rolematrix). For each job role, determine the menu paths and transactions the users in this job role needto access. Determine the necessary access rights (display, change), as well as any restrictions thatmay apply.
2. Maintain Activity Groups in the Profile Generator (Transaction PFCG)
In the profile generator, create activity groups that correspond to the job roles. For each activitygroup, select those tasks (reports and transactions) that belong to the corresponding job role.
3. Generate and Maintain Authorization Profiles
In this step, the profile generator automatically builds the authorization profile that applies to theactivity group. To accept or change the suggested profile, you must work your way through theprofile tree structure and confirm the individual authorizations that you want to assign to the activitygroup.
4. Assign Activity Groups to Agents
You then assign the activity groups to any of the following:
• R/3 users
• Jobs
• Positions
• Organizational Units
By assigning activity groups to entities other than users, you increase the flexibility of yourauthorization concept. It is easier to maintain authorizations when a user changes jobs, for example.
5. Update User Master Records
In this step, you schedule a batch job that updates the user master records.
For more details, refer to the documentation provided in the Additional Information on the R/3 AuthorizationConcept section.
R/3 Security Guide : VOLUME II
Chapter 2 : The R/3 Security Toolbox
2-14 Version 2.0a : July 31, 1998 SAP AG
Manually Maintaining Authorizations and Profiles
You do not have to use the profile generator to maintain your profiles and authorizations. As an alternative,you can maintain them manually. In this case, you work directly with the lower level in Figure 2-2-1.
As with the profile generator, you need to first define all of the job roles in your company job role matrix.Then, for each job role, you define a set of authorizations. These authorizations consist of fields thatcontain values. The authority checks in R/3 use these values to determine if a user is allowed to performspecific actions. You can consolidate several authorizations into a single profile. You can also createcomposite profiles. You then assign each user those profiles that he or she needs to perform his or her job.
We describe the individual objects below:
• Object Class
The object class, for example Financial Accounting, groups together those authorization objects thatapply to the class.
• Authorization Objects
An authorization object works as a template that you can use to define your authorizations. Itcontains a maximum of 10 fields per object.
• Authorizations
An authorization allows a user to perform a particular R/3 activity, based on a set of values that youdefine in the fields of the authorization object. (This particular activity may consist of sub-activitiesthat also require authorizations. Note that these sub-authorizations are not necessarily included inthe main authorization.)
Each authorization refers to exactly one authorization object and defines the permitted value rangefor each authorization field of this authorization object. In the above diagram, the authorizationZ:BANK_ALL could be the authorization for all activities, and Z:BANK_0001 could be for a specificarea (for example, authorizations for accounts receivable only).
• Authorization Object Fields
The fields in an authorization object are linked with data elements stored in the SAP ABAPDictionary. The permissible values constitute an authorization. When an authorization check takesplace, the system verifies the values provided by the user against those required to perform theaction. The user may only perform the action if he or she satisfies the conditions for every field inthe object. In our example, the authorization Z:BANK_0001 defines the values for the fields Activityand Company code. The field Activity could have the value '*', meaning that all activities areallowed, and the field Company code could have the value 03, meaning 'display' company codes.
• Authorization Profiles
You normally assign user authorizations in the user master records, not as authorizations, but asauthorization profiles. You can create either single or composite profiles. In our example,Z:ACCOUNT is an authorization profile containing those authorizations applying to company codes.
R/3 Security Services in Detail
Chapter 2-2 : R/3 Authorization Concept
SAP AG Version 2.0a : July 31, 1998 2-15
• User Master Records
Each user that logs on to the SAP R/3 System must have a user master record. The user masterrecord contains all the information pertaining to the user, including the authorizations.
In our example, a user with the Z:ACCOUNT profile defined in his or her user master record canthen perform those activities defined in the authorizations contained in the profile.
Note
You assign the objects (authorizations, profiles, user master records, activity groups, etc.) perclient. See the online documentation BC Users and Authorizations à Transporting UserMaster Records, Authorizations and Profiles 0 and BC Change and Transport Organizer [A.3]or [A.25] on transporting these objects between clients or systems.
The Authorization Infosystem
The Authorization Infosystem (Transaction SUIM) offers you a range of selection criteria for users, profiles,authorization objects, authorizations, transactions, comparisons, where-used lists and change documents.With the Infosystem, you can quickly and easily retrieve authorization information from your R/3 System.The following are a few examples of lists that you can generate.
• Users with certain authorizations
• Authorizations that a particular user has
• All authorizations
• Profile comparisons
• Transactions that a specific user can execute
• Changes in the authorization profile for a user
We recommend that you regularly check the various lists that are important for you. Define a monitoringprocedure and corresponding checklists to ensure that you continually review your authorization plan.
We especially recommend you determine which authorizations you consider critical and continually reviewwhich users have these authorizations in their profiles. Examples of authorization objects that you mayconsider critical include:
• S_ADMI_FCD
• S_USER_AUT
• S_TABU_DIS
• S_TABU_CLI
• S_DEVELOP
• S_TRANSPRT
R/3 Security Guide : VOLUME II
Chapter 2 : The R/3 Security Toolbox
2-16 Version 2.0a : July 31, 1998 SAP AG
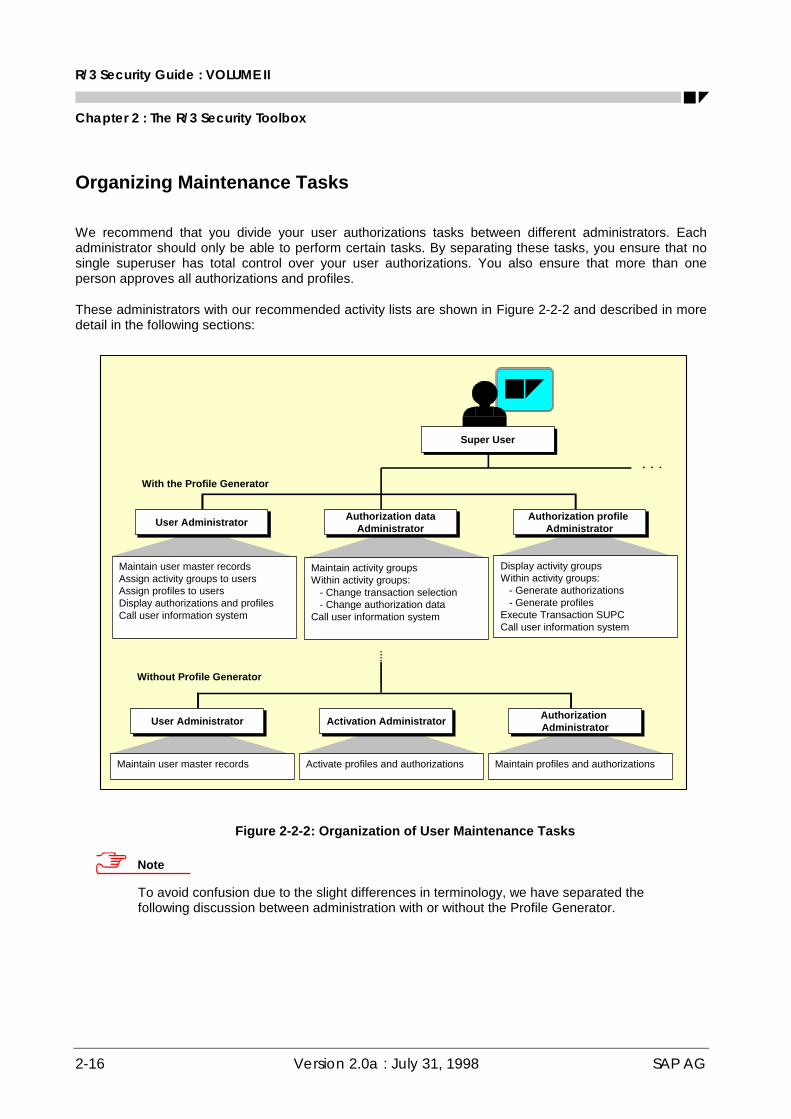
Organizing Maintenance Tasks
We recommend that you divide your user authorizations tasks between different administrators. Eachadministrator should only be able to perform certain tasks. By separating these tasks, you ensure that nosingle superuser has total control over your user authorizations. You also ensure that more than oneperson approves all authorizations and profiles.
These administrators with our recommended activity lists are shown in Figure 2-2-2 and described in moredetail in the following sections:
Authorization profile Administrator
Authorization profile Administrator
Super UserSuper User
Maintain activity groupsWithin activity groups: - Change transaction selection - Change authorization dataCall user information system
Maintain user master recordsAssign activity groups to usersAssign profiles to usersDisplay authorizations and profilesCall user information system
Display activity groupsWithin activity groups: - Generate authorizations - Generate profilesExecute Transaction SUPCCall user information system
With the Profile Generator
User AdministratorUser Administrator Activation AdministratorActivation Administrator Authorization Administrator
Authorization Administrator
Maintain user master records Activate profiles and authorizations Maintain profiles and authorizations
Without Profile Generator
Authorization dataAdministrator
Authorization dataAdministratorUser AdministratorUser Administrator
Figure 2-2-2: Organization of User Maintenance Tasks
Note
To avoid confusion due to the slight differences in terminology, we have separated thefollowing discussion between administration with or without the Profile Generator.
R/3 Security Services in Detail
Chapter 2-2 : R/3 Authorization Concept
SAP AG Version 2.0a : July 31, 1998 2-17
Organization Using the Profile Generator
If you use the profile generator, then we recommend that you divide the tasks between the followingadministrators:
• User administrator
• Authorization data administrator
• Authorization profile administrator
Assign your user and authorization administrators to the group SUPER. If you use the predefined usermaintenance authorizations, this group assignment ensures that user administrators cannot modify theirown user master records or those of other administrators. Only administrators with the predefined profileS_A.SYSTEM can maintain users in the group SUPER.
How the Three Administrators Work Together
The authorization data administrator creates an activity group, chooses transactions and maintains theauthorization data. Not having the appropriate authorization to generate the profile, he or she merely savesthe profile.
The authorization profile administrator approves the data and generates the authorization profile(s).
The user administrator assigns the activity group to the users and adds the authorization profiles to theuser master records.
Table 2-2-1 shows the tasks that you should assign to each administrator, those tasks that you should notassign, and the pre-defined templates that we provide for these tasks.
Table 2-2-1 : Organization of the User Administrators when using the Profile Generator
Permitted Tasks Non-Permitted Tasks Pre-defined Template
User administrator SAP_ADM_US
• Maintain user master records • Display or change activity group data
• Assign activity groups to users • Change or generate profiles
• Assign profiles to users
• Display authorizations and profiles
• Use the user information system(Transaction SUIM)
Authorization data administrator SAP_ADM_AU
• Maintain activity group data • Change users
• Change authorization data in activitygroups
• Generate profiles
• Use the user information system(Transaction SUIM)

R/3 Security Guide : VOLUME II
Chapter 2 : The R/3 Security Toolbox
2-18 Version 2.0a : July 31, 1998 SAP AG
Table 2-2-1 : Continued
Permitted Tasks Non-Permitted Tasks Pre-defined Template
Authorization profile administrator SAP_ADM_PR
• Display activity groups and their data • Change users
• Generate authorizations andauthorization profiles based on existingactivity groups
• Change activity group data
• Examine Activity Groups for Existence ofAuthorization Profiles (TransactionSUPC)
• Generate authorization profiles containing authorization objectsbeginning with S_USER (S_USER_AUT, S_USER_GRP,S_USER_PRO)
• Use the user information system(Transaction SUIM)
Organization without the Profile Generator
If you maintain your profiles manually, then we recommend that you divide the tasks between the followingadministrators:
• User administrator
• Authorization administrator
• Activation administrator
Assign your user and authorization administrators to the group SUPER. If you use the predefined usermaintenance authorizations, this group assignment ensures that user administrators cannot modify theirown user master records or those of other administrators. Only administrators with the predefined profileS_A.SYSTEM can maintain users in the group SUPER.
How the Three Administrators Work Together
The user administrator creates and maintains the user master records.
The authorization administrator creates and maintains profiles and authorizations.
The activation administrator activates the profiles and authorizations.
We indicate in the following those authorization objects that you should assign to each administrator, aswell as those authorizations that you should reserve for the super user.

R/3 Security Services in Detail
Chapter 2-2 : R/3 Authorization Concept
SAP AG Version 2.0a : July 31, 1998 2-19
Table 2-2-2 : Organization of the User Administrators When Maintaining Profiles Manually
Object Fields Values
User administrator
User Groups (S_USER_GRP) User group Name(s) of permissible user groups
Administrator actions 01 : Create user master records02 : Change user master records03 : Display user records06 : Delete user master records
Authorization Profile (S_USER_PRO) Profile name Name(s) of permissible profiles
Administrator actions 22 : Display profiles and enter them in usermaster records
Activation administrator
Authorization Profile (S_USER_PRO) Profile name Name(s) of permissible profiles
Administrator actions 06 : Delete profiles07 : Activate profiles
Authorizations (S_USER_AUT) Object name Name(s) of permissible objects
Authorization name Name(s) of permissible authorizationsAdministrator actions 06 : Delete authorizations
07 : Activate authorizations
Authorization administrator
Authorization Profile (S_USER_PRO) Profile name Name(s) of permissible profilesAdministrator actions 01 : Create profiles
02 : Change profiles03 : Display profiles06 : Delete profiles08 : Display change documents for profiles
Authorizations (S_USER_AUT) Object name Name(s) of permissible objectsAuthorization name Name(s) of permissible authorizations
Administrator actions 01 : Create authorizations02 : Change authorizations03 : Display authorizations06 : Delete authorizations08 : Display change documents for
authorizations
Super User
Reserve the following User Groups authorizations for the super user:
• Authorization for users in group SUPER
• 05 : Lock and unlock users (prevent or allow logons); change passwords
• 08 : Display change documents
R/3 Security Guide : VOLUME II
Chapter 2 : The R/3 Security Toolbox
2-20 Version 2.0a : July 31, 1998 SAP AG
Authority Checks
When a user wants to execute an action, he or she must have the corresponding authorizations needed toperform the action. To enforce this principle, users are susceptible to authority checks when they attemptto execute a transaction. The following methods of enforcing authority checks are available in R/3:
• R/3 Start Transaction Authorization
This method is available as of R/3 Release 3.0E. Every time a user calls a transaction, the systemperforms an authority check against the object S_TCODE. The user must have an authorization ofthis object type with the value <transaction> in his or her authorization profile to be able to startthe designated transaction.
This applies not only to SAP transactions, but also to transactions that you define yourself (inTransaction SE93).
R/3 performs authority checks at the start of every transaction called over the menu or commandline. Any transactions that are indirectly called are not included in this authority check. For moredetailed transactions, which call other transactions, there are additional authority checks. (For moreinformation on S_TCODE, see OSS Note 67766 [C.26]).
• Additional Authorization for a Transaction
When you create a transaction in SE93, you also have the option to assign an additionalauthorization to the transaction. This is useful if you can protect a transaction with a singleauthorization. If this is not the case, then consider other methods to protect the transaction (forexample, the AUTHORITY-CHECK at program level).
• AUTHORITY-CHECK at Program Level
Use this measure for any transactions that you want to protect at program source level. In this way,you can also protect transactions that are indirectly called by other programs. Here, the programmermust include an ABAP AUTHORITY-CHECK statement in the program's source code. Thestatement includes the authorization object and required values for each authorization field. A usercan only execute the program if he or she satisfies the authority check for this program.
• Report Classes
Another method of enforcing authority checks is by assigning reports to authorization classes (usethe report RSCSAUTH). For example, you may want to assign all PA* reports to an authorizationclass belonging to PA (such as PAxxx). A user who wants to run this report must then have theappropriate authorization to run reports in this class. We do not deliver any pre-defined reportclasses; you need to determine which reports you want to protect in this way.
As of Release 3.0, you can also enter the authorization classes for reports over the maintenancefunctions for reporting trees. With this method, you have a hierarchical approach when assigningauthorizations to the reports. For example, you can assign an authorization class to a reportingnode and thereby, all reports attached to this node automatically belong to this class. You also havea more transparent overview of which authorization classes you have assigned to various reports.
Note
These report authorization assignments are overwritten during an upgrade. Therefore, afteran upgrade, you need to restore your customer-specific report authorizations. For moreinformation, see OSS Note 7642 [C.4] and the documentation for RSCSAUTH [E.1].

R/3 Security Services in Detail
Chapter 2-2 : R/3 Authorization Concept
SAP AG Version 2.0a : July 31, 1998 2-21
• Table Classes
R/3 also protects tables using table classes. This prevents users from accessing tables fromgeneral access tools (such as SE16). A user must not only have the authorization to run the tool,but he or she must also have the appropriate authorization to access tables that belong to thecorresponding table class. Here, we do deliver pre-defined tables classes. These classes aredefined in the Table TDDAT, and the authorization object that is checked is S_TABU_DIS.
Reducing the Scope of Authority Checks in R/3
When you use the profile generator, you have the option of reducing the scope of authority checks(Transaction SU24). As the profile generator generates a profile, it selects all of the authorizations thatbelong to an activity. These generated profiles are not always complete (especially in older releases of theprofile generator) and you must manually add those authorizations that may not have been included. (Thisoccurs mainly due to programs that call other programs, where the sub-program requires additionalauthorizations.) In such cases, to make the administration tasks with the profile generator somewhateasier, you may want to consider reducing the scope of authority checks.
Example
For example, if a user in PA calls a program that then proceeds to call a HR routine, the usermust also have the corresponding HR authorizations. If you have not installed the HRcomponent, then you may not want to have to assign to all of your PA users the additionalHR authorizations that they need in order to run their PA reports. In this case, you may wantto deactivate the authority checks for HR authorizations in these PA transactions.
Why reduce the scope of authority checks in the R/3 System?
As we mentioned, by reducing the scope of authority checks, you simplify the administration tasks involvedwith using the profile generator. However, you should be careful when deciding which authority checks tosuppress. When you suppress authority checks, you also allow users to perform tasks for which you havenot explicitly assigned to the user. You may want to consider reducing the scope of authority checks in thefollowing cases:
• You do not use the authorization object associated with the authority check (as in our example above).
• The authority check against the object S_TCODE nevertheless protects the core transaction. (Notehowever, that the S_TCODE authority check is still only a very general protection measure. This aloneis not a reason to suppress an authority check.)
• You want to avoid having to allow all values for an authorization fields for the authorization object.
Instead of assigning the wildcard value '*', you can suppress authority checks for specific objects inspecific transactions. For other transactions, you can apply a standard authority check for the sameauthorization object.
Caution
When you reduce the scope authority checks, you allow users to perform activities withoutensuring that the user has the proper authorizations. This may lead to undesirable effects.Consider the necessity of using this option carefully before suppressing any authority checks.

R/3 Security Guide : VOLUME II
Chapter 2 : The R/3 Security Toolbox
2-22 Version 2.0a : July 31, 1998 SAP AG
How can you reduce the scope of authority checks?
You use the Transaction SU24 to set check indicators to exclude certain authorization objects fromauthority checks. However, before running SU24 you need to have set and activated the systemparameter, auth/no_check_in_some_cases = Y. You also need to run SU25 which copies the SAPcheck indicator defaults and field values from table USOBT and USOBX into the customer tables. You canthen use SU24 to proof these defaults and then set the check indicators accordingly.
Consider the following when using the Transaction SU24:
• Carefully review the SAP defaults before accepting or changing them.
• Use this option for individual transactions only. Do not use it for bulk changes.
• Regularly monitor the contents of SU24 as part of your administration tasks. Take care of the followingpoints:
1. Ensure that auth/no_check_in_some_cases contains the desired value(Y or N).
2. If this parameter contains a 'Y' value, then monitor the contents of SU24 carefully to ensure thatthese entries are set to their proper values.
Additional Information on the R/3 Authorization Concept
For more information, refer to the following documentation:
• R/3 Online Documentation: BC Users and Authorizations [A.27]
• R/3 Online Documentation: BC Users and Authorizations à Transporting User Master Records,Authorizations and Profiles 0
• R/3 Online Documentation: BC Change and Transport Organizer [A.3] or [A.25]
• SAP Documentation: Authorizations Made Easy Guide [E.2]
• SAP ASAP Implementation Roadmap: Work-package 3.11 Establish Authorization Concept; Phase 3:Realization [E.8]
• IMG: Basis Components à System Administration à Users and Authorizations à Maintainauthorizations and profiles using Profile Generator [B.1]
• OSS Note 67766: S_TCODE: Authorization check on start transaction [C.26]
• OSS Note 7642: Authorization protection of ABAP programs [C.4]
• R/3 Report Documentation: RCSCAUTH [E.1]
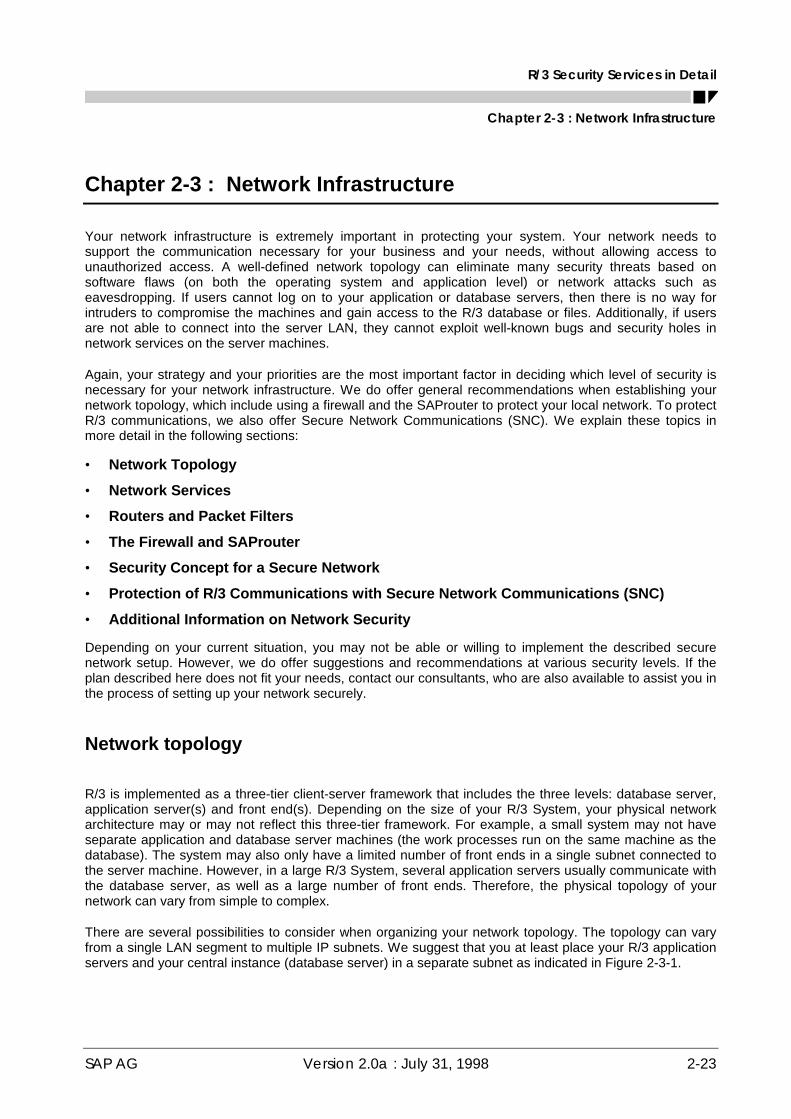
R/3 Security Services in Detail
Chapter 2-3 : Network Infrastructure
SAP AG Version 2.0a : July 31, 1998 2-23
Chapter 2-3 : Network Infrastructure
Your network infrastructure is extremely important in protecting your system. Your network needs tosupport the communication necessary for your business and your needs, without allowing access tounauthorized access. A well-defined network topology can eliminate many security threats based onsoftware flaws (on both the operating system and application level) or network attacks such aseavesdropping. If users cannot log on to your application or database servers, then there is no way forintruders to compromise the machines and gain access to the R/3 database or files. Additionally, if usersare not able to connect into the server LAN, they cannot exploit well-known bugs and security holes innetwork services on the server machines.
Again, your strategy and your priorities are the most important factor in deciding which level of security isnecessary for your network infrastructure. We do offer general recommendations when establishing yournetwork topology, which include using a firewall and the SAProuter to protect your local network. To protectR/3 communications, we also offer Secure Network Communications (SNC). We explain these topics inmore detail in the following sections:
• Network Topology
• Network Services
• Routers and Packet Filters
• The Firewall and SAProuter
• Security Concept for a Secure Network
• Protection of R/3 Communications with Secure Network Communications (SNC)
• Additional Information on Network Security
Depending on your current situation, you may not be able or willing to implement the described securenetwork setup. However, we do offer suggestions and recommendations at various security levels. If theplan described here does not fit your needs, contact our consultants, who are also available to assist you inthe process of setting up your network securely.
Network topology
R/3 is implemented as a three-tier client-server framework that includes the three levels: database server,application server(s) and front end(s). Depending on the size of your R/3 System, your physical networkarchitecture may or may not reflect this three-tier framework. For example, a small system may not haveseparate application and database server machines (the work processes run on the same machine as thedatabase). The system may also only have a limited number of front ends in a single subnet connected tothe server machine. However, in a large R/3 System, several application servers usually communicate withthe database server, as well as a large number of front ends. Therefore, the physical topology of yournetwork can vary from simple to complex.
There are several possibilities to consider when organizing your network topology. The topology can varyfrom a single LAN segment to multiple IP subnets. We suggest that you at least place your R/3 applicationservers and your central instance (database server) in a separate subnet as indicated in Figure 2-3-1.

R/3 Security Guide : VOLUME II
Chapter 2 : The R/3 Security Toolbox
2-24 Version 2.0a : July 31, 1998 SAP AG
Server LANFrontend LANs
Frontends
Frontends
Corporate Intranet
AccessControl
Managementstation(physicallysecure)
Databaseserver
Application
Servers
Figure 2-3-1: Separating Frontend LANs from the Server LAN
By placing your R/3 servers in a separate subnet, you increase the access control to your server LAN;thereby increasing the security level of your system.
Note
We discourage placing R/3 servers into any existing sub-net without taking into account theappropriate security considerations.
If you have several systems (or groups of systems) with varying security-levels, then we recommend youcreate separate server LANs for each 'group' of related systems. Determining these system 'groups' andthe security-levels that they require, is a very individual process. We do have consultants available forassistance.

R/3 Security Services in Detail
Chapter 2-3 : Network Infrastructure
SAP AG Version 2.0a : July 31, 1998 2-25
Network Services
The servers are the most vulnerable part of your network infrastructure and you should take special care toprotect them from unauthorized access. However, there are a number of network services that allow serveraccess, and you should take appropriate precautions when using these services. In the following sections,we concentrate on those measures that you can take regarding general network services, as well as SAP-specific services. Additional precautions that apply to the operating system itself are included inChapter 2-4 : Operating System Protection.
General Network Services
A typical Unix or NT server machine runs many network services of which only a few are actually neededfor running an R/3 System. The names of these services are contained in the file /etc/services. Thisfile maps the symbolic name of the service to a specific protocol and numeric port number. (UnderWindows NT, the file is located at: /winnt/system32/drivers/etc/services.)
You can and should disable most of these network services on the server net (for example, NIS or NFS).Sometimes these services contain known errors that unauthorized users may be able to take advantage ofto gain unauthorized access to your network (for example, sendmail and the NFS service). In addition, bydisabling unused network services, you also decrease the vulnerability of denial-of-service attacks.
For an even higher level of security, we recommend you use static password files and disable insecureaccess services on the application and database servers.
Note
You can list the "open" ports (ports on which a daemon or service is listening) of a UNIX orWindows NT server with the command netstat –a.
See also Chapter 2-4 : Operating System Protection.
SAP Network Services
The R/3 System also offers a variety of network services in its own infrastructure. Generally, R/3 programsuse the ports in the range 3200-3700. However, a single R/3 System actually only needs to use a limitednumber of these ports. The ports used are determined by the SAP instance number (denoted by <nn> inthe following description) or in some cases, by the System ID (denoted by <sid>).
You need to consider the following components of the R/3 System when devising your networkinfrastructure security plan:
• SAPgui and other frontend programs
• Load-balanced connections using the message server port
• External RFC or CPI-C client and server programs
• SAPlpd print daemon

R/3 Security Guide : VOLUME II
Chapter 2 : The R/3 Security Toolbox
2-26 Version 2.0a : July 31, 1998 SAP AG
SAPgui and other frontend programs Port: 32<nn>
The SAPgui connects to R/3 using the dispatcher process on the application server. The dispatcher usesport 32<nn>. Certain frontend programs can also open RFC connections to the gateway process. Thegateway process uses port sapgw<nn> (33<nn>).
Message Server Port Port: sapms<sid>
The message server port (used by SAPlogon and RFC clients for load-balancing) is sapms<sid>. The portnumber is determined in the services file and must be resolvable at both the server and the client sides.
External RFC Programs Port: sapgw<nn> (33<nn>)
External RFC clients connect to the gateway process listening on port sapgw<nn> (33<nn>). Note that thegateway port is hard-coded based on the SAP instance number and can not be changed over theservices file. The gateway process runs on each application server, but it is also possible to use a stand-alone gateway. External RFC server programs can be started in the following ways:
• manually (program registration on the gateway)
• by the gateway process
• by SAPgui
Although the server program is the passive part of the client-server connection, it must first open aconnection to the gateway process. It uses the gateway port sapgw<nn> for registration as well as forfurther RFC communication.
For more information, see Chapter 2-7 : Remote Communications (RFC & CPI-C).
SAPlpd Port: 515 (on the firewall)
The SAP program SAPlpd handles the R/3 print requests. SAPlpd usually runs on machines in the clientnetwork. The SAPlpd service listens at the printer port on the firewall (515). Note that print requests areinitiated by the application servers. Therefore, you must configure your routers and packet filters to allowconnections from machines in the server LAN to the printer port on client machines.

R/3 Security Services in Detail
Chapter 2-3 : Network Infrastructure
SAP AG Version 2.0a : July 31, 1998 2-27
Summary
Table 2-3-1 shows the ports used by the various R/3 connections:
Table 2-3-1 : Ports used by R/3
Connection Symbolic portname
Direction ofInformation Flow1)
Example:<nn> = 01
SAPgui – Application Server (dispatcher) sapdp<nn>2) à (outside - in) 3201
SAPgui – Message Server (load-balancing) sapms<sid> à (outside - in) 3600 3)
External RFC client – Application Server (gateway) sapgw<nn>2) à (outside - in) 3301
RFC Server – Application Server sapgw<nn>2) ← (inside - out) 3301
Application Server – SAPlpd printer à (outside - in) 515
anyone – SAProuter sapdp994) à (outside - in) 3299 4)
1) outside - in: indicates a communication path from the client network to the server network;inside - out: indicates a communication path from the server network to the client network.
2) Connections that use SNC use the ports sapdp<nn>s (47<nn>) and sapgw<nn>s (48<nn>).3) Defined in /etc/services.4) Default - can be configured to any port.
Note
You can reduce the number of required ports by using a SAProuter. When using aSAProuter, only one port (default 3299) must be accessible to clients.
Routers and packet filters
Routers are devices that implement algorithms to route different network protocols according to source anddestination addresses. All modern IP-routers also support packet filtering at the IP level.
By specifying a set of rules based on IP addresses and TCP ports, you can select which kinds of networkservices are accessible over the network. You should configure your router/packet filter to routeconnections to a defined subset of ports only, based on the services that you require.
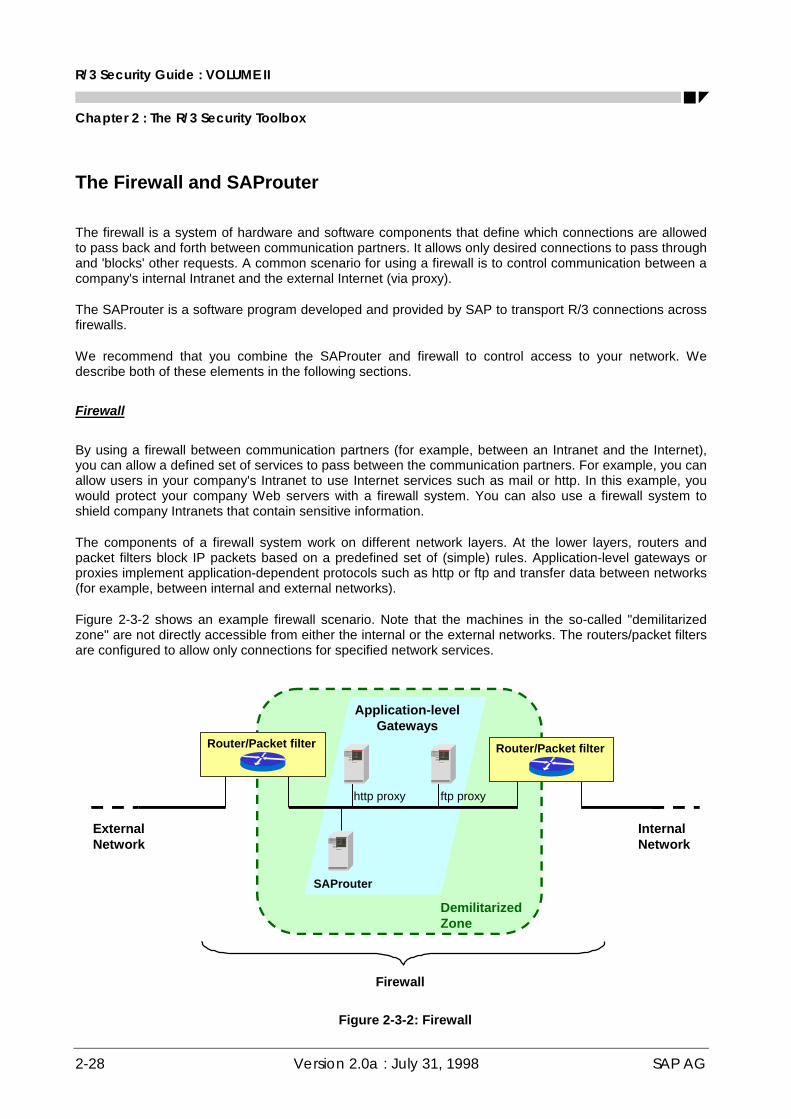
R/3 Security Guide : VOLUME II
Chapter 2 : The R/3 Security Toolbox
2-28 Version 2.0a : July 31, 1998 SAP AG
The Firewall and SAProuter
The firewall is a system of hardware and software components that define which connections are allowedto pass back and forth between communication partners. It allows only desired connections to pass throughand 'blocks' other requests. A common scenario for using a firewall is to control communication between acompany's internal Intranet and the external Internet (via proxy).
The SAProuter is a software program developed and provided by SAP to transport R/3 connections acrossfirewalls.
We recommend that you combine the SAProuter and firewall to control access to your network. Wedescribe both of these elements in the following sections.
Firewall
By using a firewall between communication partners (for example, between an Intranet and the Internet),you can allow a defined set of services to pass between the communication partners. For example, you canallow users in your company's Intranet to use Internet services such as mail or http. In this example, youwould protect your company Web servers with a firewall system. You can also use a firewall system toshield company Intranets that contain sensitive information.
The components of a firewall system work on different network layers. At the lower layers, routers andpacket filters block IP packets based on a predefined set of (simple) rules. Application-level gateways orproxies implement application-dependent protocols such as http or ftp and transfer data between networks(for example, between internal and external networks).
Figure 2-3-2 shows an example firewall scenario. Note that the machines in the so-called "demilitarizedzone" are not directly accessible from either the internal or the external networks. The routers/packet filtersare configured to allow only connections for specified network services.
Router/Packet filter
SAProuter
Router/Packet filter
Firewall
DemilitarizedZone
Application-levelGateways
ExternalNetwork
InternalNetwork
http proxy ftp proxy
Figure 2-3-2: Firewall

R/3 Security Services in Detail
Chapter 2-3 : Network Infrastructure
SAP AG Version 2.0a : July 31, 1998 2-29
SAProuter
The SAProuter is a software program developed by SAP to transport R/3 connections across firewalls. TheSAProuter is a proxy at the NI layer (Network Interface - NI is SAP's abstract network protocol based onTCP/IP). In addition, it implements the logging of connections at various levels of detail.
You can couple multiple SAProuters, making it possible to connect R/3 Systems in networks with identicalor private IP addresses.
The SAProuter complements and does not replace the firewall. We recommend that you use the SAProuterand a firewall together. A SAProuter alone does not protect your R/3 network.
Note
If you use the R/3 Online Service System (OSS), you must use a SAProuter.
You can also use the SAProuter to:
• Control and log the connections to your R/3 System, for example, from a SAP service center.
• Set up an indirect connection when programs involved in the connection cannot communicate witheach other due to the network configuration.
• Resolve address conflicts when using non-registered IP addresses.
• Improve network security by
- Protecting your SAProuter from unauthorized external access with a password.
- Allowing access from particular SAProuters only.
- Only allowing protected communication from a securely authenticated partner using SNC.
• Increase performance and stability by reducing the R/3 System load within a local area network (LAN)when communicating with a wide area network (WAN).
When using the SAProuter, you only have to open a single port on the firewall for a connection to the porton the machine running the SAProuter. All SAPgui, SAPlpd and RFC connections must pass through thisone port (3299 per default).
You specify the IP addresses and address patterns that can access your R/3 Systems in the configurationfile saprouttab. You can also have important SAProuter activities logged, such as connection setup andclosure.
Example
The following is a sample SAProuter configuration file where the main instance's hostname isappsrv1_TST_21:# sample saprouttab# permit connections from 155.152.22 subnet# to the application servers (appsrv2..appsrv4)# allow only dispatcher connectionsP 155.152.22.* appsrv2 sapdp21P 155.152.22.* appsrv3 sapdp21P 155.152.22.* appsrv4 sapdp21# only admin PC (IP address 155.152.23.3) can access appsrv1P 155.152.23.3 appsrv1 sapdp21# allow all access to message server for load-balancing# for appsrv1P 155.152.*.* appsrv1 sapmsTST
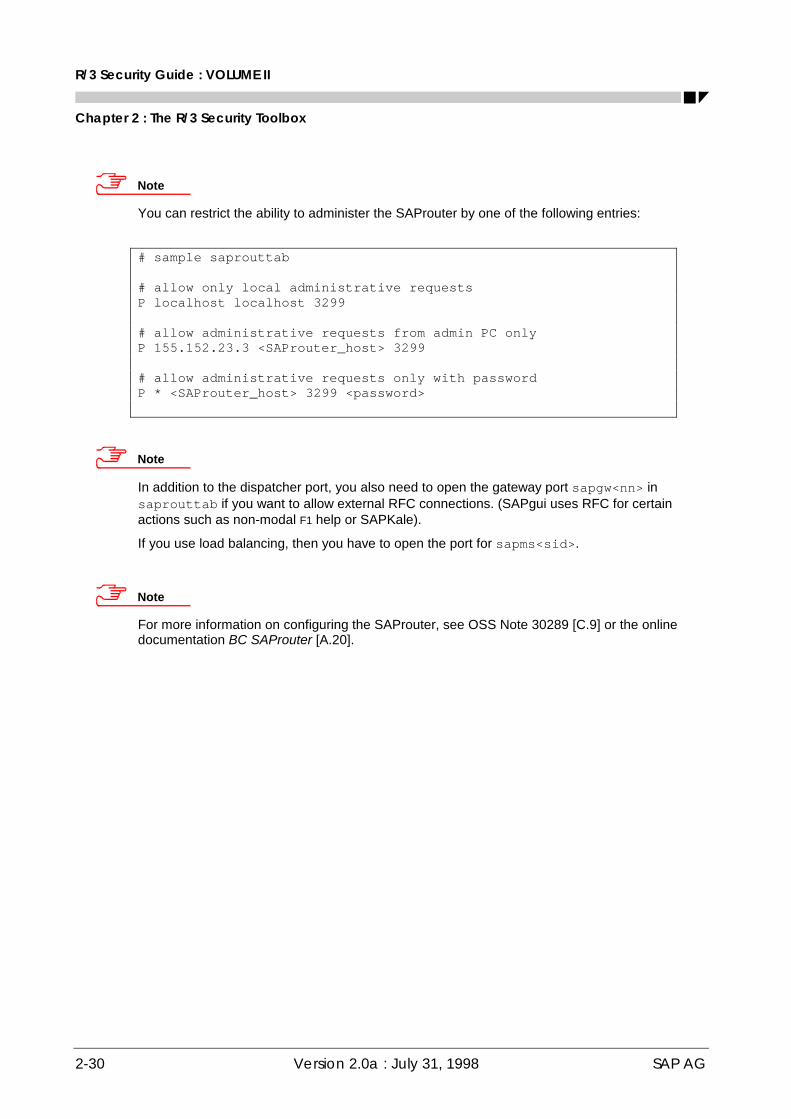
R/3 Security Guide : VOLUME II
Chapter 2 : The R/3 Security Toolbox
2-30 Version 2.0a : July 31, 1998 SAP AG
Note
You can restrict the ability to administer the SAProuter by one of the following entries:
# sample saprouttab
# allow only local administrative requestsP localhost localhost 3299
# allow administrative requests from admin PC onlyP 155.152.23.3 <SAProuter_host> 3299
# allow administrative requests only with passwordP * <SAProuter_host> 3299 <password>
Note
In addition to the dispatcher port, you also need to open the gateway port sapgw<nn> insaprouttab if you want to allow external RFC connections. (SAPgui uses RFC for certainactions such as non-modal F1 help or SAPKale).
If you use load balancing, then you have to open the port for sapms<sid>.
Note
For more information on configuring the SAProuter, see OSS Note 30289 [C.9] or the onlinedocumentation BC SAProuter [A.20].

R/3 Security Services in Detail
Chapter 2-3 : Network Infrastructure
SAP AG Version 2.0a : July 31, 1998 2-31
Security Concept for an R/3 Network
Figure 2-3-3 shows an example R/3 network topology that should be sufficient for most R/3 Systems. Thesecurity concept consists of a router/packet filter in conjunction with an accordingly configured SAProuter.
Permitconnectionsto SAP portson applicationservers only
Management Station(physically secure)
DatabaseServer
SecurityZone
Front ends
Front ends
Frontend LAN Server LAN
ApplicationServers
SAProuter
Port 3299
Permit connections toSAProuter machine on port3299 only
Router/Packet filter
Figure 2-3-3: Recommended R/3 Network Topology
We suggest using this or a similar setup for productive and other security-critical R/3 Systems.
The main security elements of this configuration are the router/packet filter and the machine running theSAProuter proxy. The router/packet filter is configured to allow only TCP connections from machines in thefrontend LAN to the port 3299 (the default SAProuter port) on the SAProuter machine. The SAProuter isconfigured to explicitly allow or deny connections from a defined subset of client machines.
Using this setup, machines in the "open" frontend LAN cannot directly access the application or databaseservers. All front ends connect to a single port on the machine running the SAProuter software. TheSAProuter machine opens a separate connection to one of the application servers. Figure 2-3-4 illustratesthis two-way connection.
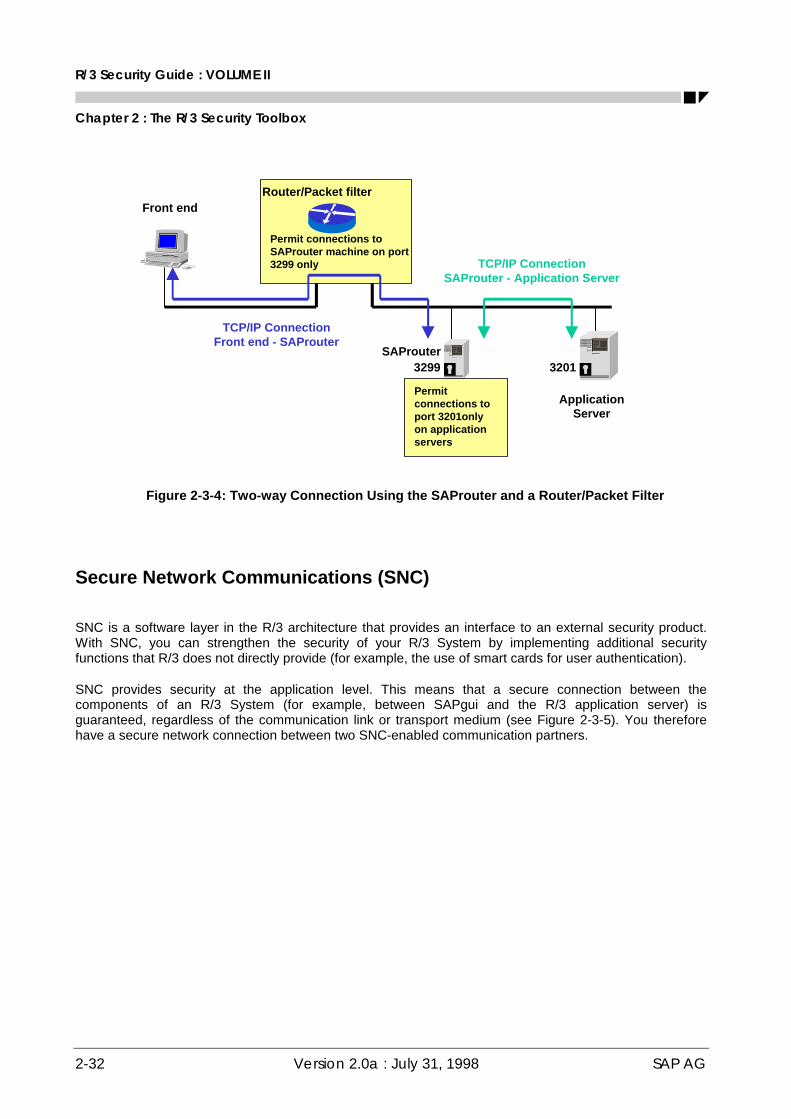
R/3 Security Guide : VOLUME II
Chapter 2 : The R/3 Security Toolbox
2-32 Version 2.0a : July 31, 1998 SAP AG
Permit connections toSAProuter machine on port3299 only
Router/Packet filterFront end
SAProuter3299
Permitconnections toport 3201onlyon applicationservers
3201
ApplicationServer
TCP/IP ConnectionFront end - SAProuter
TCP/IP ConnectionSAProuter - Application Server
Figure 2-3-4: Two-way Connection Using the SAProuter and a Router/Packet Filter
Secure Network Communications (SNC)
SNC is a software layer in the R/3 architecture that provides an interface to an external security product.With SNC, you can strengthen the security of your R/3 System by implementing additional securityfunctions that R/3 does not directly provide (for example, the use of smart cards for user authentication).
SNC provides security at the application level. This means that a secure connection between thecomponents of an R/3 System (for example, between SAPgui and the R/3 application server) isguaranteed, regardless of the communication link or transport medium (see Figure 2-3-5). You thereforehave a secure network connection between two SNC-enabled communication partners.
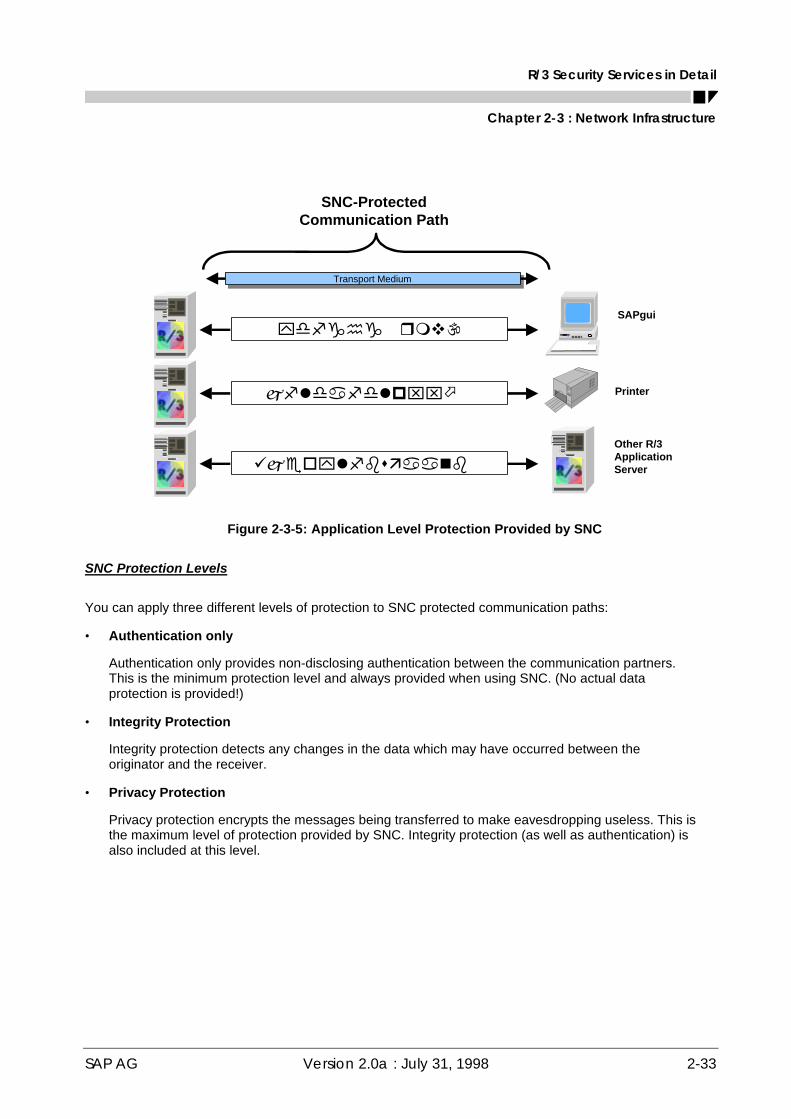
R/3 Security Services in Detail
Chapter 2-3 : Network Infrastructure
SAP AG Version 2.0a : July 31, 1998 2-33
SAPgui
Printer
Other R/3ApplicationServer
�ydfghg�r mv\
SNC-ProtectedCommunication Path
Transport MediumTransport Medium
jflda fdlp ⌧⌧ö
üjeo ylfb säa a nb
Figure 2-3-5: Application Level Protection Provided by SNC
SNC Protection Levels
You can apply three different levels of protection to SNC protected communication paths:
• Authentication only
Authentication only provides non-disclosing authentication between the communication partners.This is the minimum protection level and always provided when using SNC. (No actual dataprotection is provided!)
• Integrity Protection
Integrity protection detects any changes in the data which may have occurred between theoriginator and the receiver.
• Privacy Protection
Privacy protection encrypts the messages being transferred to make eavesdropping useless. This isthe maximum level of protection provided by SNC. Integrity protection (as well as authentication) isalso included at this level.
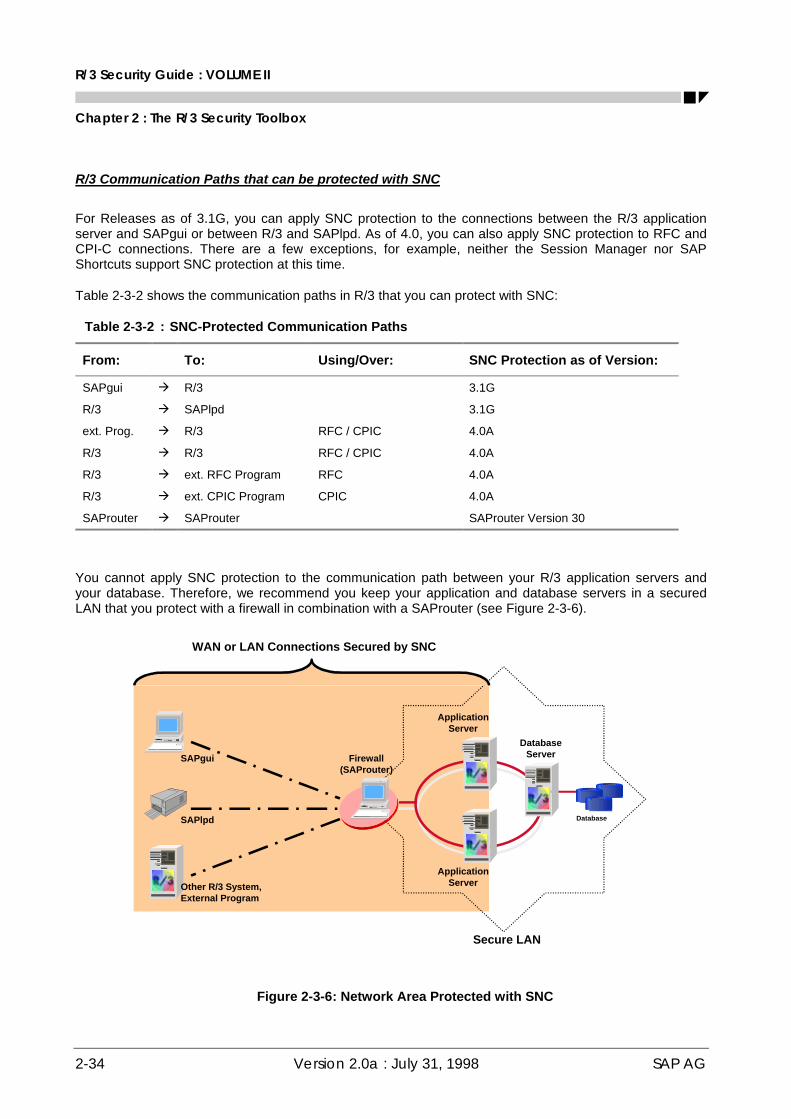
R/3 Security Guide : VOLUME II
Chapter 2 : The R/3 Security Toolbox
2-34 Version 2.0a : July 31, 1998 SAP AG
R/3 Communication Paths that can be protected with SNC
For Releases as of 3.1G, you can apply SNC protection to the connections between the R/3 applicationserver and SAPgui or between R/3 and SAPlpd. As of 4.0, you can also apply SNC protection to RFC andCPI-C connections. There are a few exceptions, for example, neither the Session Manager nor SAPShortcuts support SNC protection at this time.
Table 2-3-2 shows the communication paths in R/3 that you can protect with SNC:
Table 2-3-2 : SNC-Protected Communication Paths
From: To: Using/Over: SNC Protection as of Version:
SAPgui à R/3 3.1G
R/3 à SAPlpd 3.1G
ext. Prog. à R/3 RFC / CPIC 4.0A
R/3 à R/3 RFC / CPIC 4.0A
R/3 à ext. RFC Program RFC 4.0A
R/3 à ext. CPIC Program CPIC 4.0A
SAProuter à SAProuter SAProuter Version 30
You cannot apply SNC protection to the communication path between your R/3 application servers andyour database. Therefore, we recommend you keep your application and database servers in a securedLAN that you protect with a firewall in combination with a SAProuter (see Figure 2-3-6).
SAPgui
SAPlpd
Other R/3 System,External Program
Firewall(SAProuter)
WAN or LAN Connections Secured by SNC
Secure LAN
Database
ApplicationServer
ApplicationServer
DatabaseServer
Figure 2-3-6: Network Area Protected with SNC

R/3 Security Services in Detail
Chapter 2-3 : Network Infrastructure
SAP AG Version 2.0a : July 31, 1998 2-35
You can also use SNC between two SAProuters to build a secure tunnel between networks (seeFigure 2-3-7). You can use this infrastructure to secure connections if you have components belonging to arelease earlier than Release 3.1G.
Secure Tunnel -protected with SNC
Remote Local
Firewall +SAProuter
Equipped with SNC Interface
LAN / WAN Firewall +SAProuter
Figure 2-3-7: SNC Protection between SAProuters
External Security Products
R/3 integrates the SNC functions in the system components (for example, the R/3 Kernel, SAPgui, or RFCLibrary) as a layer between the R/3 kernel layer and the library provided by the external security product.The SNC layer communicates with the external library over the GSS-API V2 (Generic Security ServicesApplication Programming Interface Version 2). This standard was developed with SAP participation by theIETF (Internet Engineering Task Force).
The external product is not included in the SAP R/3 Software. You must purchase the product from theappropriate vendor. The product must meet the following requirements:
• The product must provide the entire functionality of the IETF-defined GSS-API V2 interface.
• The product must provide Single Sign-On.
• The functions must be dynamically loadable.
• The product must be available on platforms supported by SAP.
• The product must be certified by SAP for interoperability with SAP R/3.
Note
For more details on the availability of external security products, see OSS Note 66687 [C.25].
R/3 Security Guide : VOLUME II
Chapter 2 : The R/3 Security Toolbox
2-36 Version 2.0a : July 31, 1998 SAP AG
Additional Information on Network Security
For more information, refer to the following documentation:
• R/3 Online Documentation: BC SAProuter [A.20]
• R/3 Online Documentation: SAP Network Security [A.35]
• SAP Documentation: The SNC User's Guide [E.6]
• SAP Documentation: Secure Network Communications and Secure Store & Forward Mechanisms withR/3, Material Number 50014335 [E.7]
• OSS Note 30289: SAProuter documentation [C.9]
• OSS Note 66687: Network security products SECUDE and Kerberos [C.25]
R/3 Security Services in Detail
Chapter 2-4 : Operating System Protection
SAP AG Version 2.0a : July 31, 1998 2-37
Chapter 2-4 : Operating System Protection
Because the R/3 System manages certain information at the operating system level, the security of yourR/3 System is also dependent on the security of the operating system under which it operates. In general,we cannot guarantee the security of the operating system; however, we do offer recommendations forincreasing R/3 security under UNIX or Windows NT. These recommendations are included in the followingsections:
• R/3 Security under UNIX
• R/3 Security under Windows NT
• Logical Operating System Commands in R/3
R/3 Security under UNIX
In this section, we cover the following aspects pertaining to security under the UNIX operating system.When appropriate, we include our recommendations and any measures that you need to take.
• Protecting Specific UNIX Properties, Files and Services
• Protected R/3 Directory Structures under UNIX
• Setting Access Privileges for R/3 under UNIX
• Additional Information on UNIX Security
Protecting Specific UNIX Properties, Files and Services
You need to take precautions when using the following Unix properties, files or services:
• SUID/SGID
• passwd (password file)
• Yellow Pages (NIS)
• Network File System (NFS)
• BSD Remote Services for rlogin and remsh/rsh

R/3 Security Guide : VOLUME II
Chapter 2 : The R/3 Security Toolbox
2-38 Version 2.0a : July 31, 1998 SAP AG
SUID/SGID
The SUID/SGID property gives programs extended privileges that exceed the privileges possessed by thecaller.
Every UNIX system contains a large number of these programs for administrative purposes. Theseprograms may contain known errors that unauthorized users may be able to take advantage of in order toassign new access rights to themselves.
For example, the SENDMAIL program is such a SUID program. We suggest that you only use versions ofSENDMAIL (or similar SUID programs) in which known errors have been corrected.
passwd (Password File)
Although UNIX hashes passwords before storing them in this file, a user could use a dictionary-attackprogram to discover password information in this file.
You can improve security by using a shadow password file that allows only the user root to access thepassword information.
Yellow Pages (NIS)
You can use the NIS service (Network Information System) to manage user data and passwords centrally.It allows every UNIX machine in a local area network to read the password file using the ypcat passwdcommand, including shadow password files.
You should be aware of the fact that on some platforms an intruder could replace the password file with amanipulated password file using the NIS transmission protocol.
Before using NIS, consider the necessity of the service. There are usually alternatives available and forsecurity reasons, we recommend that you avoid using this service.
Network File System (NFS)
The NFS service is frequently used in the R/3 environment to make transport and work directoriesaccessible over the network.
The authentication procedure is based on network addresses. You should be aware that it is possible forusers to gain unauthorized access over NFS by using counterfeit network addresses (IP Spoofing).
Therefore, be cautious when assigning write authorization for NFS paths. Avoid distributing the HOMEdirectories of users across NFS. Export to certain clients only.
Note that in those areas where NFS is often used (for example, for establishing a global directory forapplication servers or in the Transport Management System), there are often alternative solutions. Again,we recommend that you consider other alternatives before deciding to use this service.
R/3 Security Services in Detail
Chapter 2-4 : Operating System Protection
SAP AG Version 2.0a : July 31, 1998 2-39
BSD Remote Services for rlogin and remsh/rsh
These services permit remote access to UNIX machines. At logon, the files /etc/host.equiv and$HOME/.rhosts are checked. If either of these files contains the hostname or the IP address of theconnection originator or a wildcard character (+), then the user can log on without having to supply apassword.
You should be aware that the UNIX services for rlogin and remsh/rsh are especially dangerous inregard to security. If possible, deactivate these services in the inetd.conf file.
Summary
To summarize the precautions that you should take, especially pertaining to NIS, NFS and the BSD remoteservices, adhere to the following guidelines:
• If you do use these services, then use them only within a secure LAN.
• Do not export directories that contain SAP data to arbitrary recipients using NFS. Export to"trustworthy" systems only.
• Protect the following users: root, <SID>adm and <DB><SID>. These should be the only users thatexist on your application servers and your main instance. After installation, you should lock<DB><SID> on your application servers.
• For critical users, empty the .rhosts files and assign access rights equal to 000.
• Either delete the file /etc/hosts.equiv or make sure that it is empty.
• Keep your operating system up to date regarding security-related patches that are released by your OSvendor.

R/3 Security Guide : VOLUME II
Chapter 2 : The R/3 Security Toolbox
2-40 Version 2.0a : July 31, 1998 SAP AG
Protected R/3 Directory Structures under UNIX
For security reasons, the R/3 System together with the user data is stored in a special directory structure inthe operating system and is protected with defined access authorizations.
Figure 2-4-1 shows how the R/3 directory structure is established in the UNIX file system:
Figure 2-4-1: R/3 Directory Structure under UNIX

R/3 Security Services in Detail
Chapter 2-4 : Operating System Protection
SAP AG Version 2.0a : July 31, 1998 2-41
Setting Access Privileges for R/3 Directories under UNIX
We recommend that you restrict the UNIX file and directory access privileges as shown in Table 2-4-1:
Note
As of Release 3.0D, the access rights shown in Table 2-4-1 are automatically set in theinstallation procedures.
Table 2-4-1 : Setting Access Privileges for R/3 Directories and Files under Unix
SAP Directory or File(s) AccessPrivilege inOctal Form
Owner Group
/sapmnt/<SID>/exe 775 <sid>adm sapsys/sapmnt/<SID>/exe/saposcol 4755 root sapsys/sapmnt/<SID>/global 700 <sid>adm sapsys/sapmnt/<SID>/profile 755 <sid>adm sapsys/usr/sap/<SID> 751 <sid>adm sapsys/usr/sap/<SID>/<Instance ID> 755 <sid>adm sapsys/usr/sap/<SID>/<Instance ID>/* 750 <sid>adm sapsys/usr/sap/<SID>/SYS 755 <sid>adm sapsys/usr/sap/<SID>/SYS/* 755 <sid>adm sapsys/usr/sap/trans 775 <sid>adm sapsys/usr/sap/trans/* 770 <sid>adm sapsys/usr/sap/trans/.sapconf 775 <sid>adm sapsys<home directory of <sid>adm> 700 <sid>adm sapsys<home directory of <sid>adm>/* 700 <sid>adm sapsys
UMASK
Newly created files have rights determined by UMASK definitions. An UMASK is a four digit octal numberthat specifies those access rights that are not to be given to newly created files. You can define UMASKSin any of several files, to include:
• .login
• .cshrc
• .profile
• /etc/profile
As with UNIX access rights, the corresponding octal positions represent user, group, and world access,and the value of the digit represents which access privileges should be removed (remove none = 0, removewrite = 2, remove all = 7).
You can use the UMASK to automatically restrict permissions for newly created files. For example, bydefining a UMASK of 0027, you specify that all newly created files have the access rights 750.

R/3 Security Guide : VOLUME II
Chapter 2 : The R/3 Security Toolbox
2-42 Version 2.0a : July 31, 1998 SAP AG
Additional Information for UNIX
For more information on UNIX security (and more), see the following Internet links:
• http://www.cert.org [D.1]
• http://www.itd.nrl.navy.mil/ITD/5540/ieee/cipher/ [D.5]

R/3 Security Services in Detail
Chapter 2-4 : Operating System Protection
SAP AG Version 2.0a : July 31, 1998 2-43
R/3 Security under Windows NT
Windows NT manages administration tasks and provides access protection over its domain concept. Adomain is a group of several computers that share a common user and security database. Within eachdomain, you define and administer your users and groups.
An R/3 System that runs under Windows NT also uses the domain concept to manage administration tasksand to protect the servers from unauthorized access. In the following sections, we explain how R/3 usesthis concept to protect its resources, as well as any measures that you yourself should take. The sectionsinclude:
• Windows NT Users and Groups in an R/3 Environment
• R/3 in the Windows NT Domain Concept
• Protecting the R/3 Resources
• Additional Information for Windows NT Security
Windows NT Users and Groups in an R/3 Environment
This section introduces the Windows NT technology for administering the users and user groups needed torun an R/3 System. In order to simplify your administrative tasks, we suggest you add all Windows NTusers to user groups that are granted the appropriate rights at the operating system level. In this section,you will find the necessary group and user information to operate your R/3 System under Windows NTsecurely.
Groups
Windows NT supports two levels of groups:
• Global Groups
You create global groups at the domain level. Global groups are known to all servers within thedomain.
• Local Groups
You create local groups on a single server. They are only known on that server.
Exception: If you define a local group of users on one domain controller (PDC or BDC), the groupis known on all domain controllers within the domain.

R/3 Security Guide : VOLUME II
Chapter 2 : The R/3 Security Toolbox
2-44 Version 2.0a : July 31, 1998 SAP AG
Global Groups
Global user groups are valid within an NT domain, not only on one server. Therefore, we recommend thatyou bundle the domain users into different activity groups, depending on their tasks. The domainadministrator may export these activity groups to other domains, so the respective user can access allresources needed to administer the R/3 System.
Example
Examples of global groups include:
• SAPadmin contains all of the R/3 System administrators
• SAPservices contains all of the R/3 System programs
• SAPusers contains all of the R/3 application users
• Domain Admins contains all NT domain administrators
Although you may choose the name of the group as you wish, the standard global group for R/3administrators is defined as SAP_<SID>_GlobalAdmin according to the SAP R/3 Installation Guide onWindows NT.
Local Groups
Local user groups (as well as local users) exist locally on one server. During installation, user rights areassigned to local users instead of groups. (For example, the user <SID>ADM receives the user right Log onas a service.) However, to simplify user administration, we recommend you assign server resources tolocal groups instead of single users. You can then assign the appropriate global users and groups to thelocal group. Thereby, you have better control over who belongs to which group, and what their tasks are.
Example
Create the local group NT Administrators. Add the local users who should belong to thegroup (for example, any local NT administrators <Local_NT_Admin>), and the global userswho should belong (for example, <Domain>\Domain Admins) to the group.
Note
Local user groups increase the security and validity scope of user rights. However, be carefulwhen using domain controllers. A single local user right defined on a domain controller isvalid on all domain controllers. We therefore do not recommend installing R/3 on a domaincontroller!
Although you may choose the name of the group as you wish, the standard local group for R/3administrators is defined as SAP_<SID>_LocalAdmin according to the SAP R/3 Installation Guide onWindows NT.
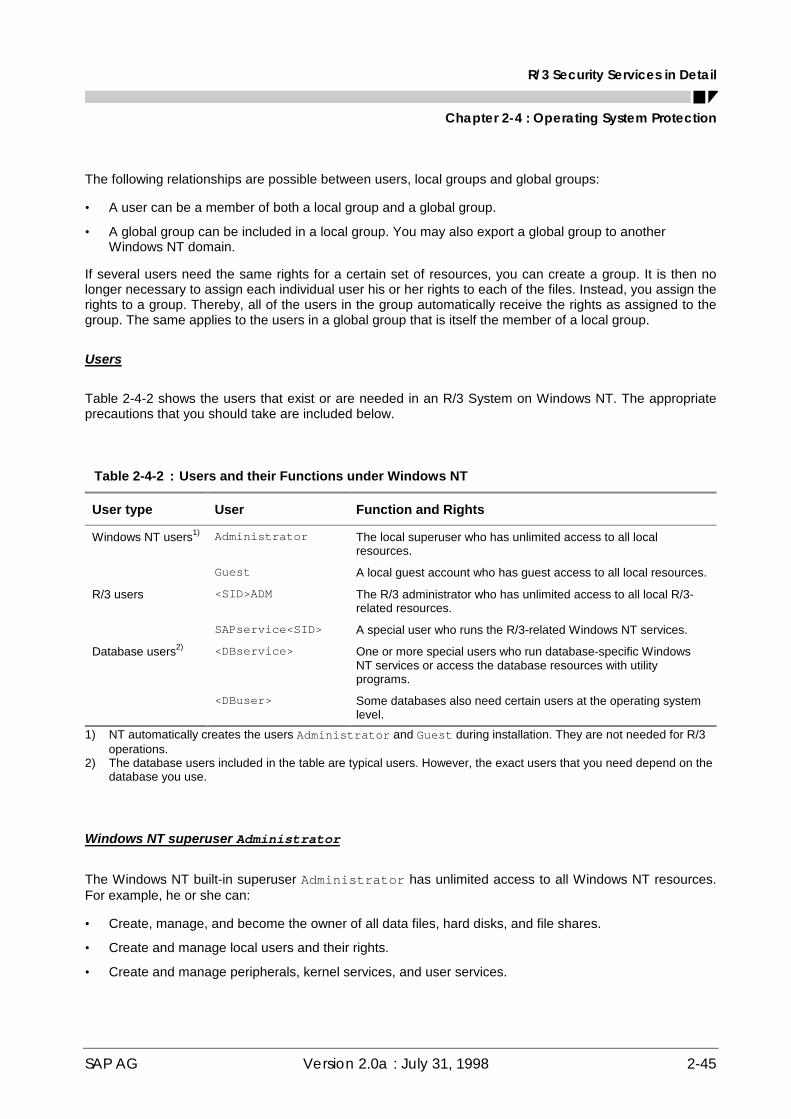
R/3 Security Services in Detail
Chapter 2-4 : Operating System Protection
SAP AG Version 2.0a : July 31, 1998 2-45
The following relationships are possible between users, local groups and global groups:
• A user can be a member of both a local group and a global group.
• A global group can be included in a local group. You may also export a global group to anotherWindows NT domain.
If several users need the same rights for a certain set of resources, you can create a group. It is then nolonger necessary to assign each individual user his or her rights to each of the files. Instead, you assign therights to a group. Thereby, all of the users in the group automatically receive the rights as assigned to thegroup. The same applies to the users in a global group that is itself the member of a local group.
Users
Table 2-4-2 shows the users that exist or are needed in an R/3 System on Windows NT. The appropriateprecautions that you should take are included below.
Table 2-4-2 : Users and their Functions under Windows NT
User type User Function and Rights
Windows NT users1) Administrator The local superuser who has unlimited access to all localresources.
Guest A local guest account who has guest access to all local resources.
R/3 users <SID>ADM The R/3 administrator who has unlimited access to all local R/3-related resources.
SAPservice<SID> A special user who runs the R/3-related Windows NT services.
Database users2) <DBservice> One or more special users who run database-specific WindowsNT services or access the database resources with utilityprograms.
<DBuser> Some databases also need certain users at the operating systemlevel.
1) NT automatically creates the users Administrator and Guest during installation. They are not needed for R/3operations.
2) The database users included in the table are typical users. However, the exact users that you need depend on thedatabase you use.
Windows NT superuser Administrator
The Windows NT built-in superuser Administrator has unlimited access to all Windows NT resources.For example, he or she can:
• Create, manage, and become the owner of all data files, hard disks, and file shares.
• Create and manage local users and their rights.
• Create and manage peripherals, kernel services, and user services.

R/3 Security Guide : VOLUME II
Chapter 2 : The R/3 Security Toolbox
2-46 Version 2.0a : July 31, 1998 SAP AG
To protect this user from unauthorized access, you should disable it. Change the user name and hide itspassword. Create other users for administrative tasks and limit their rights to those tasks for which they areused (for example, user administrators, backup operators or server operators).
<SID>ADM
<SID>ADM is the Windows NT superuser for R/3 administration. This user is created during the installationprocess, normally as a domain user for the R/3 System. This user can therefore logon to all Windows NTmachines in the domain. <SID>ADM also needs full access to all R/3 instance-specific resources such asfiles, shares, peripheral devices (for example, tape drives or printers), and network resources (for example,the SAProuter service).
Note
During installation or upgrade, you need to assign <SID>ADM to the DomainAdministrators group. In this status, <SID>ADM has the same rights as theAdministrator in a normal Windows NT environment.
To protect this user from unauthorized access, take the following precautions:
• Cancel group membership in the groups Administrators or Domain Administrators.
• Change its password regularly.
• Restrict its access rights to R/3 instance-specific resources only.
Although <SID>ADM may access R/3 files, a different user runs the R/3 System itself, namelySAPservice<SID>.
SAPservice<SID>
SAPservice<SID> is also created during installation. It is usually created as a domain user to run the R/3System and to manage database resources. This user may logon locally on all Windows NT machines inthe domain.
Since R/3 must run even if no user is logged onto the local Windows NT machine, the R/3 System runs asa Windows NT Service. Therefore, during installation, the user SAPservice<SID> receives the right toLog on as a service on the local machine.
SAPservice<SID> also administers the R/3 System and database resources within the ComputingCenter Management System (CCMS). Therefore, it needs full access to all R/3 instance-specific anddatabase-specific resources such as files, shares, peripheral devices, and network resources.
Note
It is rather difficult to change this user's password. To change an NT service's password, youneed to stop the service, edit it, and restart it. Therefore, to change this user's password, youneed to stop the R/3 System.
To protect SAPservice<SID>, take the following precautions:
• Cancel the user right Log on locally.
• Restrict its access rights to R/3 instance-specific and database-specific resources only.
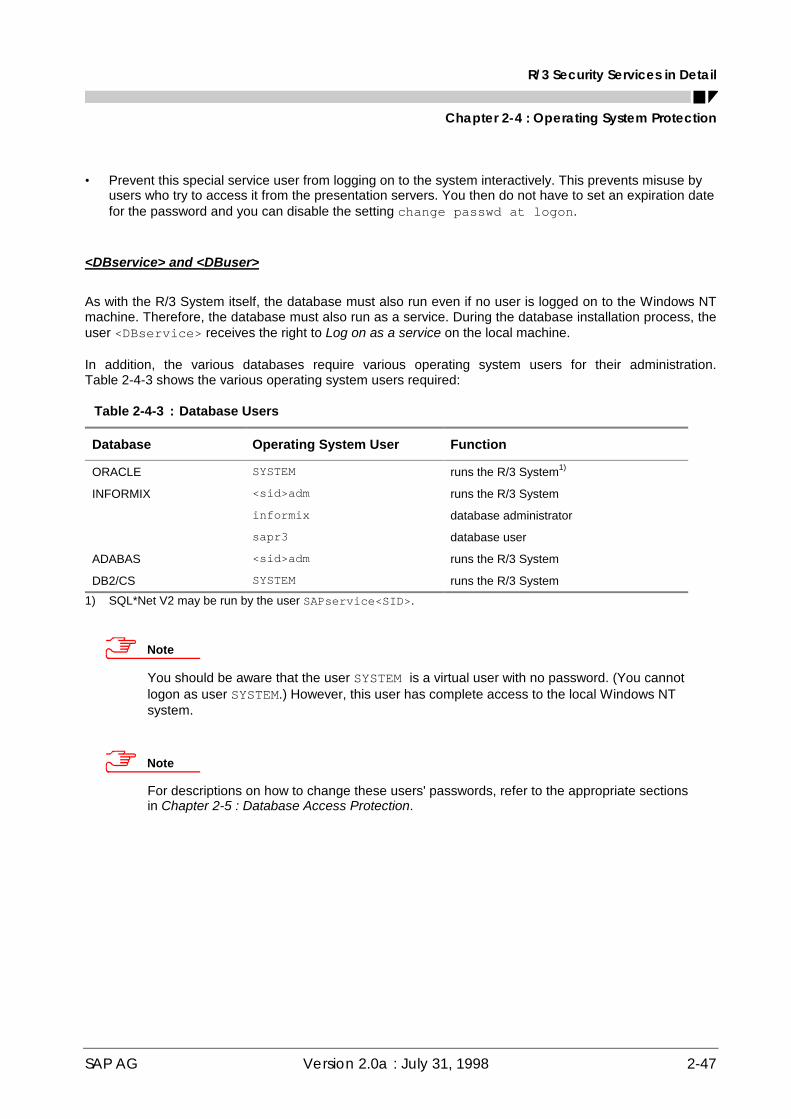
R/3 Security Services in Detail
Chapter 2-4 : Operating System Protection
SAP AG Version 2.0a : July 31, 1998 2-47
• Prevent this special service user from logging on to the system interactively. This prevents misuse byusers who try to access it from the presentation servers. You then do not have to set an expiration datefor the password and you can disable the setting change passwd at logon.
<DBservice> and <DBuser>
As with the R/3 System itself, the database must also run even if no user is logged on to the Windows NTmachine. Therefore, the database must also run as a service. During the database installation process, theuser <DBservice> receives the right to Log on as a service on the local machine.
In addition, the various databases require various operating system users for their administration.Table 2-4-3 shows the various operating system users required:
Table 2-4-3 : Database Users
Database Operating System User Function
ORACLE SYSTEM runs the R/3 System1)
INFORMIX <sid>adm runs the R/3 System
informix database administrator
sapr3 database user
ADABAS <sid>adm runs the R/3 System
DB2/CS SYSTEM runs the R/3 System
1) SQL*Net V2 may be run by the user SAPservice<SID>.
Note
You should be aware that the user SYSTEM is a virtual user with no password. (You cannotlogon as user SYSTEM.) However, this user has complete access to the local Windows NTsystem.
Note
For descriptions on how to change these users' passwords, refer to the appropriate sectionsin Chapter 2-5 : Database Access Protection.
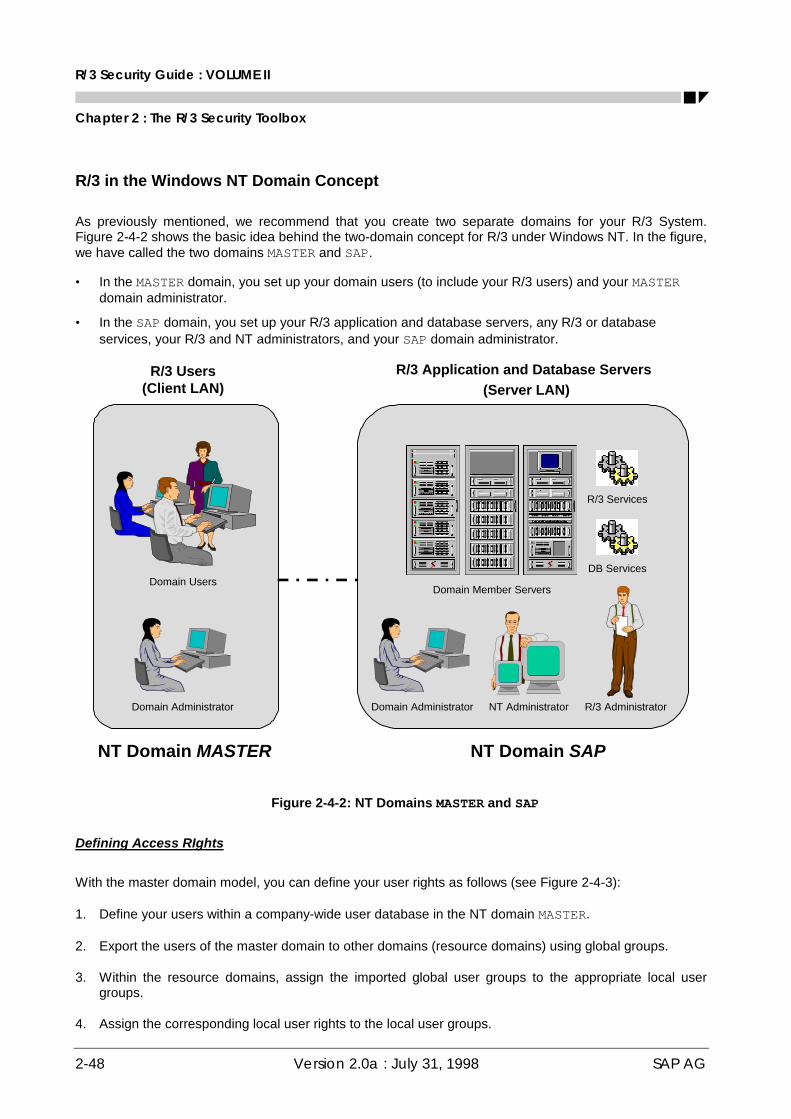
R/3 Security Guide : VOLUME II
Chapter 2 : The R/3 Security Toolbox
2-48 Version 2.0a : July 31, 1998 SAP AG
R/3 in the Windows NT Domain Concept
As previously mentioned, we recommend that you create two separate domains for your R/3 System.Figure 2-4-2 shows the basic idea behind the two-domain concept for R/3 under Windows NT. In the figure,we have called the two domains MASTER and SAP.
• In the MASTER domain, you set up your domain users (to include your R/3 users) and your MASTERdomain administrator.
• In the SAP domain, you set up your R/3 application and database servers, any R/3 or databaseservices, your R/3 and NT administrators, and your SAP domain administrator.
R/3 Application and Database Servers(Server LAN)
R/3 Users(Client LAN)
Domain Users
Domain Administrator Domain Administrator NT Administrator
R/3 Services
DB Services
Domain Member Servers
NT Domain MASTER NT Domain SAP
R/3 Administrator
Figure 2-4-2: NT Domains MASTER and SAP
Defining Access RIghts
With the master domain model, you can define your user rights as follows (see Figure 2-4-3):
1. Define your users within a company-wide user database in the NT domain MASTER.
2. Export the users of the master domain to other domains (resource domains) using global groups.
3. Within the resource domains, assign the imported global user groups to the appropriate local usergroups.
4. Assign the corresponding local user rights to the local user groups.
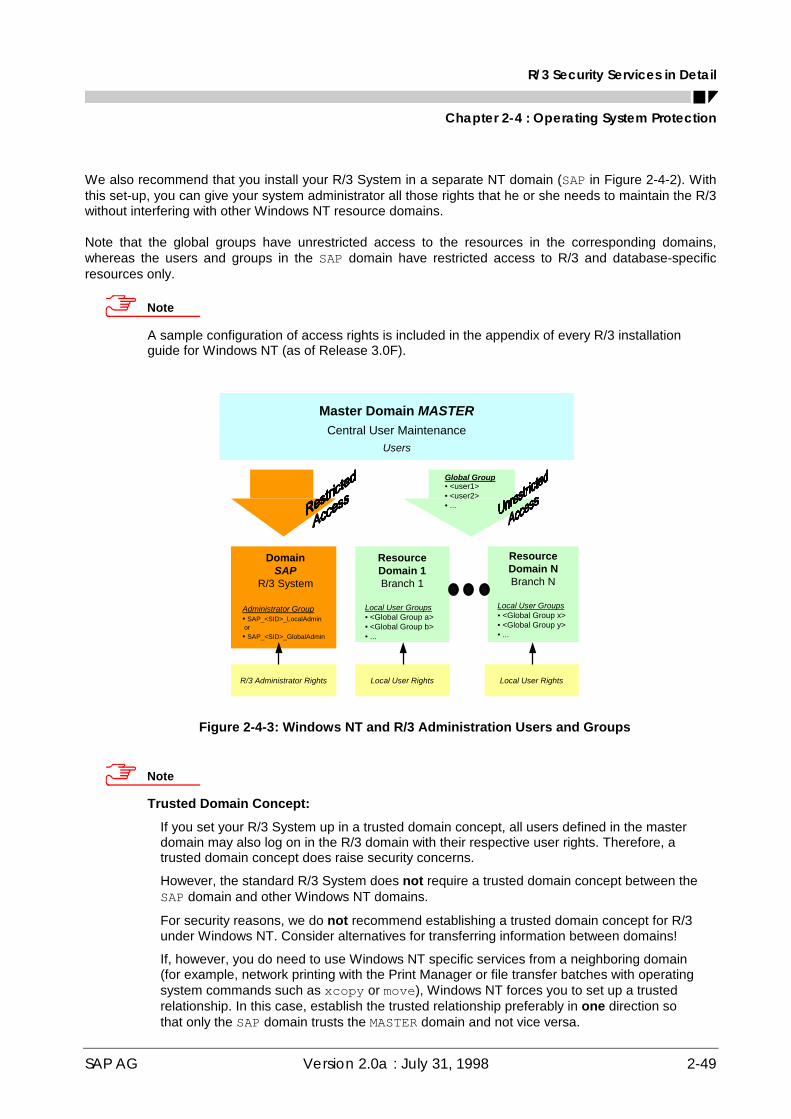
R/3 Security Services in Detail
Chapter 2-4 : Operating System Protection
SAP AG Version 2.0a : July 31, 1998 2-49
We also recommend that you install your R/3 System in a separate NT domain (SAP in Figure 2-4-2). Withthis set-up, you can give your system administrator all those rights that he or she needs to maintain the R/3without interfering with other Windows NT resource domains.
Note that the global groups have unrestricted access to the resources in the corresponding domains,whereas the users and groups in the SAP domain have restricted access to R/3 and database-specificresources only.
Note
A sample configuration of access rights is included in the appendix of every R/3 installationguide for Windows NT (as of Release 3.0F).
Master Domain MASTERCentral User Maintenance
Users
ResourceDomain 1Branch 1
Local User Groups• <Global Group a>• <Global Group b>• ...
DomainSAP
R/3 System
Administrator Group• SAP_<SID>_LocalAdmin or• SAP_<SID>_GlobalAdmin
ResourceDomain NBranch N
Local User Groups• <Global Group x>• <Global Group y>• ...
Global Group• <user1>• <user2>• ...
Local User Rights Local User RightsR/3 Administrator Rights
Figure 2-4-3: Windows NT and R/3 Administration Users and Groups
Note
Trusted Domain Concept:
If you set your R/3 System up in a trusted domain concept, all users defined in the masterdomain may also log on in the R/3 domain with their respective user rights. Therefore, atrusted domain concept does raise security concerns.
However, the standard R/3 System does not require a trusted domain concept between theSAP domain and other Windows NT domains.
For security reasons, we do not recommend establishing a trusted domain concept for R/3under Windows NT. Consider alternatives for transferring information between domains!
If, however, you do need to use Windows NT specific services from a neighboring domain(for example, network printing with the Print Manager or file transfer batches with operatingsystem commands such as xcopy or move), Windows NT forces you to set up a trustedrelationship. In this case, establish the trusted relationship preferably in one direction sothat only the SAP domain trusts the MASTER domain and not vice versa.
R/3 Security Guide : VOLUME II
Chapter 2 : The R/3 Security Toolbox
2-50 Version 2.0a : July 31, 1998 SAP AG
Protecting the R/3 Resources
In R/3, the resources you need to protect are as follows:
• All data relevant to R/3 (under \usr\sap\...)
• Named pipes, which are used for R/3 System administration
• Shared memory in the R/3 System
• Dynamically created files (Files Created by ABAP)
• All the database files that R/3 uses
We describe how to protect each of the resources below. We also include a description on how to protectresources for an installation that consists of several R/3 Systems.
All Data Relevant to R/3
The following points apply to the Windows NT domain concept and the installation of your R/3 System:
• Regardless of whether the R/3 System is installed centrally or as a distributed system, you should setup one domain that contains the R/3 application and database servers (domain SAP in the aboveexamples).
• We strongly recommend that you set up all your R/3 servers in one domain. For short-term testinstallations or demonstration purposes only, you may install a central R/3 System that is not located ina domain. However, we recommend this set-up for limited use only. It is difficult to introduce thedomain concept to a system that is already in use.
• In a central installation on a server in a domain, all R/3 administrators are members of the local groupSAP_<SID>_LocalAdmin.
• In a distributed installation with several server machines in the domain, a global group is set up for theR/3 System (SAP_<SID>_GlobalAdmin). This global group itself is a member of the server's localgroups and contains the R/3 administrators. This also simplifies the administration in the client/serverenvironment, since new users that need R/3 administration rights only need to become members of theglobal group.
• The R/3 administrator <SID>ADM, who performs the R/3 System installation, has to be a member of theNT administration group during the installation. Once the installation is complete, this is no longernecessary. You should cancel its membership in this group.
• Windows NT uses access control lists to provide access protection for files and directories. To protectR/3 files and directories, you need to make entries in the access control lists at the file level. The filesare located in the path: \usr\sap\<sid>\....
R/3 Security Services in Detail
Chapter 2-4 : Operating System Protection
SAP AG Version 2.0a : July 31, 1998 2-51
Take the following precautions when introducing the Windows NT user concept:
• Create all R/3-relevant users as domain users, and not as local users.
• Create global user groups on the domain controller. Set up the domain users as members of theseglobal groups.
• Create local user groups on every R/3 server. Set up the global groups as members of the localgroups.
• Assign access rights or resources to local groups only. This simplifies the server administration tasks.(This strategy is equally applicable to central installations and to local installations.)
• Create at least two users for the system administration:
- <SID>ADM
- SAPService<SID>
• Take the precautions for each user as previously described in the section Windows NT Users andGroups in an R/3 Environment.
Named Pipes and Shared Memory
Named pipes are required for starting and stopping the R/3 System. They inherit the access rights of theexecutable file sapntstartb.exe. The SAPgui application sservmgr.exe is used at the front end tosend the start/stop messages to the named pipe, where sapntstartb.exe is waiting for thesemessages.
As long as sapntstartb.exe has been assigned the appropriate access protection, only authorizedusers (belonging to the local group SAP_<SID>_LocalAdmin) can use sservmgr.exe to start or stopthe R/3 System.
The shared memory is used by the R/3 dispatcher and the work processes for certain activities, such asexchanging administration information. Because R/3 creates the entire shared memory, the user who startsthe R/3 System is allocated exclusive access rights for this shared memory.
In order to avoid access conflicts during operation of the R/3 System with certain internal tools(dpmon.exe, gwmon.exe), you must ensure that the same user who started the R/3 System starts thesetools.
Dynamically Created Files (Files Created by ABAP)
Because R/3 uses ANSI stream file I/O, a file created by ABAP inherits access rights from the folder inwhich it was created. Only the owner of the files or the administrator can change the access rights. WhenABAP statements create these files, they are then owned by the R/3 System, and the owner is either<SID>ADM or SAPService<SID> respectively.

R/3 Security Guide : VOLUME II
Chapter 2 : The R/3 Security Toolbox
2-52 Version 2.0a : July 31, 1998 SAP AG
Database Files
The database provider or the database administrator is responsible for protecting the data at the databaselevel. You should therefore consult the documentation supplied by the database vendor on the subject ofdata protection and security.
For R/3 specifics, see the appropriate section in Chapter 2-5 : Database Access Protection.
Installation with Several R/3 Systems
If there are several R/3 Systems on the server(s), it is possible to perform the administration tasksseparately using different local and global groups. Assign the access rights appropriately for the files in thedirectory (to include sub-directories) \usr\sap. You can distinguish between the administrators andgroups by using the names of the R/3 Systems (for example, <sid1>, and <sid2>). All administratorsshould have access to the two directories at the \usr\sap top level.
If there are several R/3 Systems installed on a single server, then an additional area of shared memoryexists. This memory is created by saposcol.exe and is used jointly by the OS Collector and all R/3Systems. Therefore, give Full Control access rights to the SAP_<SID>_LocalAdmin local groups for theexecutable file saposcol.exe. In order to avoid access conflicts here, start saposcol.exe before R/3.
Additional Information on Windows NT Security
For current updates on the development of Windows NT security, see the following Web site:
• http://www.microsoft.com/security [D.6]
• http://NTBugTraq.ntadvice.com [D.7]

R/3 Security Services in Detail
Chapter 2-4 : Operating System Protection
SAP AG Version 2.0a : July 31, 1998 2-53
Logical Operating System Commands in R/3
Users can execute logical operating system commands as external commands in R/3.
Both the maintenance and execution of external commands is protected with R/3 authorizations. Externalcommands can be maintained and executed either on-line (from the CCMS menu) or in ABAP programs,using special function modules.
In this section, we provide a short overview of this subject. For more detailed information, see the onlinedocumentation BC Computing Center Management System à External Operating System Commands[A.6].
Caution
Note that every user with either programmer authorization or debugging authorization canexecute any commands as user <sid>adm. This is another reason to be careful withassigning programming or debugging authorizations!
Executing External Commands
You can execute external commands using the Transaction SM49.
R/3 contains detailed information for each external command, including the operating system commanditself, the pre-defined parameters in their full length, and information about whether additional parametersare permitted.
Before R/3 executes an external command, the additional parameters are checked. If impermissiblecharacters are found, the command is not executed and the SECURITY_RISK exception is raised.
Users who execute external commands need to have the authorization S_LOG_COM with the followingfields definiert:
• Command (name of external command)
• Opsystem (operating system for which the command was defined)
• Host (symbolic hostname of the target system)
The fields Command and Opsystem are used to uniquely identify the external command, while Hostdefines the authorizations for executing commands on certain target computers.
The authorization S_LOGCOM_ALL (based on the authorization object: S_LOG_COM), which allows forthe execution of all commands, is included in the standard delivery in the authorization profilesS_A.SYSTEM and S_A.ADMIN.
Note
To call external commands in your own developments, you should use the function moduleCOMMAND_EXECUTE instead of CALL_SYSTEM. With COMMAND_EXECUTE, you canenforce a more extensive authorization check by including authorization profile arguments inthe parameter ADDITIONAL_PARAMETERS. In addition, unlike CALL_SYSTEM,COMMAND_EXECUTE does not use RFC for its purposes. For more information, see theonline documentation BC Basis Programming Interfaces à Programming with ExternalOperating System Commands [A.2].

R/3 Security Guide : VOLUME II
Chapter 2 : The R/3 Security Toolbox
2-54 Version 2.0a : July 31, 1998 SAP AG
Maintaining External Commands
You can modify these external commands and set up additional security mechanisms. You can also extendthe range of the pre-defined commands supplied by SAP with your own commands and parameters. (Youcannot change SAP commands in customer systems, however.)
To maintain external commands, use the Transaction SM69.
You can specify a function module to call before executing the command that checks the entry for correctparameters. We deliver the function module DUMMY_COMMAND_CHECK that you can use as a templatefor your individual command check modules. (Do not change the original. We suggest you copy it andchange the copy.)
To maintain external commands, you need to have the authorization object S_RZL_ADM with the value '01'in the field Activity in your authorization profile.
Additional Information on Logical Operating System Commands in R/3
For more information, see:
• R/3 Online Documentation: BC Computing Center Management System à R/3 System Administrationà External Operating System Commands [A.6]
• R/3 Online Documentation: BC Basis Programming Interfaces à Programming with External OperatingSystem Commands [A.2]
R/3 Security Services in Detail
Chapter 2-5 : Database Access Protection
SAP AG Version 2.0a : July 31, 1998 2-55
Chapter 2-5 : Database Access Protection
The security of the database is generally the responsibility of the database provider and your databaseadministrator. As with your network infrastructure, most of the measures that you can take depend highlyon your strategy and priorities.
There are a number of general measures, as well as database-specific measures, that you can take toincrease the protection of your database. Details are included in the appropriate sections.
General Recommendations
The following recommendations apply to database access protection in general, regardless of the specificdatabase that you use:
• We recommend that you only use R/3 tools to access the database (see the section titled AccessUsing Database Tools).
• Change the initial password for SAPR3 (<SID>OFR on AS/400).
• Do not permit any access to USR* tables.
• Do not permit write access to the T000 table.
• Decide which other R/3 tables you need to protect and set their access rights accordingly. These maybe general tables (for example, SAPUSER or RFCDES) or tables specific to an area of application(such as PA* or HCL*).
The rest of this chapter concentrates on security measures on accessing the database using databasetools as well as individual measures for the various database products with the corresponding operatingsystems:
• Access Using Database Tools
• ORACLE under UNIX
• ORACLE under Windows NT
• INFORMIX under UNIX
• ADABAS (under both UNIX and Windows NT)
• DB2 Common Server under UNIX
• DB2 Common Server under Windows NT
• DB2/400

R/3 Security Guide : VOLUME II
Chapter 2 : The R/3 Security Toolbox
2-56 Version 2.0a : July 31, 1998 SAP AG
Access Using Database Tools
As previously mentioned, we recommend you only use R/3 tools to access the database. We offer our owntools for database access, for example, SAPDBA. These tools are sufficient for operating your R/3 System.However, it is possible to use other applications and tools for connecting to the database. You should beaware of the implications of using such tools.
Access Using R/3 Tools / SAPDBA
For certain database administration tasks, for example, creating back-ups and archives, we offer the toolSAPDBA. SAPDBA runs under CCMS and supports the databases ORACLE and INFORMIX. Within R/3,we also have additional tools that assist in tasks such as reorganization. (For more information, see theonline documentation BC SAP Database Administration [A.11] under the appropriate database section.)
All R/3 tools access the database over the user SAPR3 (<SID>OFR on AS/400).
Direct Access Over External Applications (not recommended)
Certain applications use the R/3 SQL interface or the Open Database Connectivity (ODBC) interface toconnect directly to the database. In regard to security, we do not recommend that you access the databaseusing such tools. However, if you do decide to use such tools, then we advise you to take the followingprecautions:
• Do not use the user SAPR3. Create other users for such purposes.
• Restrict their access rights to the necessary tables only.
• Assign read access only to these users.
Caution
If you do allow direct access to the database, then we can no longer guarantee dataconsistency or authorization security. The data consistency mechanisms and authorizationconcept in R/3 only apply to database access using R/3 tools.
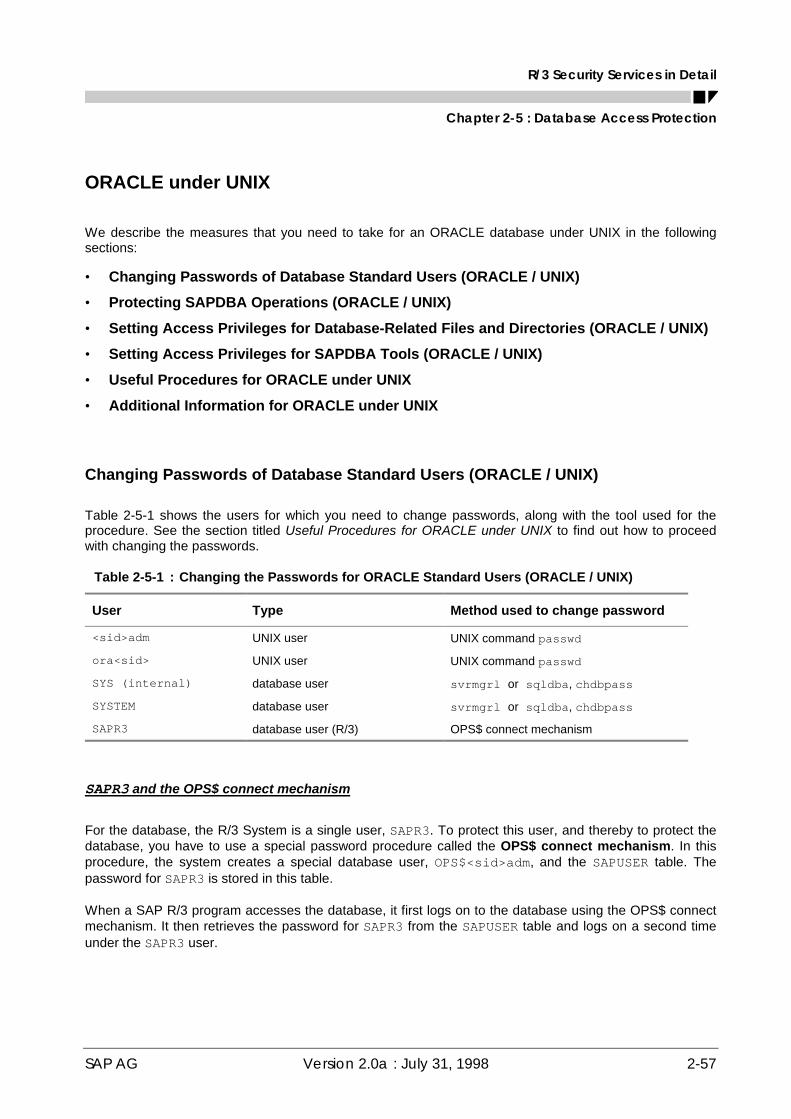
R/3 Security Services in Detail
Chapter 2-5 : Database Access Protection
SAP AG Version 2.0a : July 31, 1998 2-57
ORACLE under UNIX
We describe the measures that you need to take for an ORACLE database under UNIX in the followingsections:
• Changing Passwords of Database Standard Users (ORACLE / UNIX)
• Protecting SAPDBA Operations (ORACLE / UNIX)
• Setting Access Privileges for Database-Related Files and Directories (ORACLE / UNIX)
• Setting Access Privileges for SAPDBA Tools (ORACLE / UNIX)
• Useful Procedures for ORACLE under UNIX
• Additional Information for ORACLE under UNIX
Changing Passwords of Database Standard Users (ORACLE / UNIX)
Table 2-5-1 shows the users for which you need to change passwords, along with the tool used for theprocedure. See the section titled Useful Procedures for ORACLE under UNIX to find out how to proceedwith changing the passwords.
Table 2-5-1 : Changing the Passwords for ORACLE Standard Users (ORACLE / UNIX)
User Type Method used to change password
<sid>adm UNIX user UNIX command passwd
ora<sid> UNIX user UNIX command passwd
SYS (internal) database user svrmgrl or sqldba, chdbpass
SYSTEM database user svrmgrl or sqldba, chdbpass
SAPR3 database user (R/3) OPS$ connect mechanism
SAPR3 and the OPS$ connect mechanism
For the database, the R/3 System is a single user, SAPR3. To protect this user, and thereby to protect thedatabase, you have to use a special password procedure called the OPS$ connect mechanism. In thisprocedure, the system creates a special database user, OPS$<sid>adm, and the SAPUSER table. Thepassword for SAPR3 is stored in this table.
When a SAP R/3 program accesses the database, it first logs on to the database using the OPS$ connectmechanism. It then retrieves the password for SAPR3 from the SAPUSER table and logs on a second timeunder the SAPR3 user.
R/3 Security Guide : VOLUME II
Chapter 2 : The R/3 Security Toolbox
2-58 Version 2.0a : July 31, 1998 SAP AG
You need to consider the following points:
• Protect access to the SAPUSER table and the SAPR3 user password by changing the password for<sid>adm regularly.
• Consequently, after changing the password for SAPR3 in an R/3 System that you use as an importsystem, test imports no longer work correctly. You could override this problem by assigning OPS$users in the import system for all of the export systems. However, we recommend that you keep OPS$users to a minimum and accept the fact that test imports no longer work (see OSS Note 27928 [C.7]).
• To prevent someone from working around the OPS$ connect mechanism by using an .rhosts file,deactivate the UNIX service rlogin in the inetd.conf file.
Caution
In a distributed system, the client is responsible for the authorization checks of the operatingsystem user OPS$<sid>adm. Therefore, ensure that only authorized users can access PCclients with direct access to the database server.
Note
Do not change the value of the ORACLE parameter REMOTE_OS_AUTHENT to FALSE inorder to prevent access as OPS$<sid>adm from clients. R/3 work processes need to be ableto log on to the application servers as the OPS$<sid>adm user; therefore, this parameterneeds to be set to the value TRUE.
You can use either the tool sqldba (or svrmgrl) or chdbpass to change the passwords for the usersSYS and SYSTEM. chdbpass is described below.
Changing the passwords using chdbpass
You can use the chdbpass tool for the following tasks:
• Change the passwords of SYSTEM and SYS users.
• Set up the OPS$ connect mechanism.
• Change the password of the SAPR3 user.
• Change the password of the OPS$<sid>adm user.
• Reset all passwords to the ORACLE or SAP initial values, after which you should change thepasswords. (Use this function in certain cases, for example, if users have forgotten their passwords.)

R/3 Security Services in Detail
Chapter 2-5 : Database Access Protection
SAP AG Version 2.0a : July 31, 1998 2-59
The following ORACLE restrictions apply to passwords that this tool changes:
• The maximum length of the password is 30 characters.
• You cannot use special characters or German umlaut characters.
• The character of a password cannot be numeric.
You can find the chdbpass tool on the SAP Kernel CD in the directory /<CD-Dir>/UNIX/COMMON/INSTALL.
The tool writes a log to the following file: $ORACLE_HOME/sapreorg/chdbpass.log.
Caution
chdbpass asks for the password of the database user SYSTEM.
Check the authenticity of chdbpass very carefully before executing it. If you have reason tobelieve that the file has been tampered with, then reinstall it.
In addition, prevent unauthorized access to the chdbpass.sh file!
Protecting SAPDBA Operations (ORACLE / UNIX)
SAPDBA divides operations into two categories, standard and expert. For example, you may want torestrict who can execute operations such as RESTORE, as in comparison to BACKUP. You can protectcertain SAPDBA operations with a password, allowing only "expert" users to execute them. You set thesecategories within the SAPDBA utility.
You also need to protect the password file passwd.dba. Refer to the online documentation for informationon where the file is located, how to set the initial password and how to change the password. (See BCDatabase Administration: ORACLE à Starting and Using the SAPDBA Program à SAPDBA: Expert Modeà Defining the Password. [A.18])

R/3 Security Guide : VOLUME II
Chapter 2 : The R/3 Security Toolbox
2-60 Version 2.0a : July 31, 1998 SAP AG
Setting Access Privileges for Database-Related Files and Directories(ORACLE / UNIX)
Note
As of Release 3.0D, the access rights as shown in Table 2-5-2 are automatically set in theinstallation procedures.
We recommend that you restrict the UNIX file and directory access privileges as shown in Table 2-5-2 (seeUP 2-5-3):
Table 2-5-2 : Setting Access Privileges for ORACLE Directories and Files (ORACLE / UNIX)
ORACLE Directory or File Access Privilegein Octal Form
(3.x / 4.0)
Owner Group Comment
/oracle/<SID>/sapdata* 700 / 755 ora<sid> dba
/oracle/<SID>/sapdata*/* 700 / 755 ora<sid> dba
/oracle/<SID>/sapdata*/*/* 600 / 640 ora<sid> dba • data files
/oracle/<SID>/saparch 700 / 700 ora<sid> dba
/oracle/<SID>/saparch/* 640 / 640 ora<sid> dba • archive files
/oracle/<SID>/sapreorg 700 / 755 ora<sid> dba
/oracle/<SID>/sapbackup 755 / 755 ora<sid> dba
/oracle/<SID>/dbs 755 / 755 ora<sid> dba
/oracle/<SID>/sapcheck 700 / 755 ora<sid> dba
/oracle/<SID>/sapstat 700 / 755 ora<sid> dba
/oracle/<SID>/saptrace 700 / 755 ora<sid> dba
/oracle/<SID>/saptrace/* 700 / 755 ora<sid> dba
/oracle/<SID>/saptrace/*/* 600 / 640 ora<sid> dba
/oracle/<SID>/origlog* 700 / 755 ora<sid> dba • redo log directories
/oracle/<SID>/origlog*/* 700 / 755 ora<sid> dba • redo log files
/oracle/<SID>/mirrlog*/* 700 / 755 ora<sid> dba • redo log files
/oracle/<SID>/mirrlog*/* 700 / 755 ora<sid> dba • redo log files

R/3 Security Services in Detail
Chapter 2-5 : Database Access Protection
SAP AG Version 2.0a : July 31, 1998 2-61
Setting Access Privileges for SAPDBA Tools (ORACLE / UNIX)
If you use the CCMS backup planning tool, which uses the SAPDBA tools, then you should note thefollowing:
• For ORACLE versions < 7.3, so that BRBACKUP can start up and shut down the database, the user<sid>adm must belong to the UNIX group dba (DB role: SYSDBA).
• In ORACLE versions >= 7.3, assign <sid>adm to the group oper. BRBACKUP then logs on withconnect / as sysoper.
In ORACLE Version 7.3, the group dba has been split into the groups dba and oper. The groupoper (DB role: SYSOPER) is an administrator group that is restricted to operator operations. opercan start or shut down the database, perform backups, etc., but has no read or write authorizations.
• BRBACKUP must also have full access to the SAPR3 tables SDBAD, SDBAH and tables defined in theXDB interface.
• SAPDBA only executes from CCMS when the database is open. Appropriate database privileges arenecessary for the operations:
- -check, -next, -checkopt, -analyze
• SAPDBA must have write permissions to the following tables:
- SDBAD, SDBAH, DBSTATC, DBSTATTORA, DBSTATHORA, DBSTATIORA, DBSTAIHORA,SAPDBAPRIV, and tables defined in the XDB interface.
Useful Procedures for ORACLE under UNIX
UP 2-5-1 : Changing the Passwords for <sid>adm and ora<sid> (ORACLE / UNIX)
To change the passwords for <sid>adm and ora<sid>, proceed as follows:
Note
If you use Network Information Service (NIS) , you should also refer to the NIS guide and theoperating system documentation. (Changing the password with an activated NIS may bedifferent from changing it with passwd.)
1. Logon as user <sid>adm.2. Enter the passwd command at the UNIX prompt.3. Enter the old and new passwords.
Repeat steps 1 to 3 for the user ora<sid>.

R/3 Security Guide : VOLUME II
Chapter 2 : The R/3 Security Toolbox
2-62 Version 2.0a : July 31, 1998 SAP AG
UP 2-5-2 : Changing the Passwords for SYS, SYSTEM, and SAPR3 using chdbpass(ORACLE / UNIX)
To change the passwords for SYS, SYSTEM, and SAPR3, perform the following:
Mounting and Starting chdbpass
1. Logon as user ora<sid>.2. Ensure that the database is started and the R/3 System is stopped.3. Mount the SAP Kernel CD (see the document R/3 Installation on UNIX - OS Dependencies).4. Copy chdbpass from the upgrade or installation CD to the $ORACLE_HOME/sapreorg directory by
entering the following command:
cp <CD-DIR>/UNIX/COMMON/INSTALL/chdbpass $ORACLE_HOME/sapreorg/chdbpass(<CD-DIR> is the CD mount point).
5. Enter the following commands to select the directory and start chdbpass.
cd $ORACLE_HOME/sapreorg
./chdbpass
Changing passwords
chdbpass first makes sure that the environment variables ORACLE_HOME and ORACLE_SID are correctlyset.
6. Confirm the settings.7. Enter the current password for the SYSTEM user.
Note
chdbpass performs all database actions under this user.
8. Choose the menu option you want as indicated in the following table:
To: Choose Menu Path: What you need to know:Set up the OPS$ connectmechanism and change thepassword of SAPR3
a) Initialize OPS-Connect andchange password of SAPR3
You are first asked to specify thepassword for the new userOPS$<sid>adm and then the newpassword for SAPR3
Change the password of SYS c).......Change the password ofSYSTEM
d).......

R/3 Security Services in Detail
Chapter 2-5 : Database Access Protection
SAP AG Version 2.0a : July 31, 1998 2-63
UP 2-5-3 : Setting Access Privileges for Files and Directories (ORACLE / UNIX)
Saving Current Settings
Before changing the access privileges, we advise you to save your current settings. Enter the followingcommands:
cd /oracle/<SID>ls -lR > oracle_perm.txt
cd /usr/sapls -lR > sap_perm.txt
cd /sapmntls -lR > sap_sw.txt
Setting Access Privileges
To change the access privileges for a file or directory use the chmod command as shown below:
chmod <access privileges in octal> <file or directory>
Example
chmod 700 /oracle/<SID>/sapdata*chmod 700 /oracle/<SID>/sapdata*/*chmod 600 /oracle/<SID>/sapdata*/*/*...
Caution
Do not use chmod recursively. It is very easy to make unintended changesto authorizations when doing so.
Additional Information for ORACLE under UNIX
For more information, refer to the following documentation:
• R/3 Online Documentation: BC SAP Database Administration: Oracle [A.17]
• R/3 Online Documentation: BC Database Administration: ORACLE à Starting and Using the SAPDBAProgram à SAPDBA: Expert Mode à Defining the Password [A.18]
• OSS Note 27928: Consequences in transport during password change [C.7]
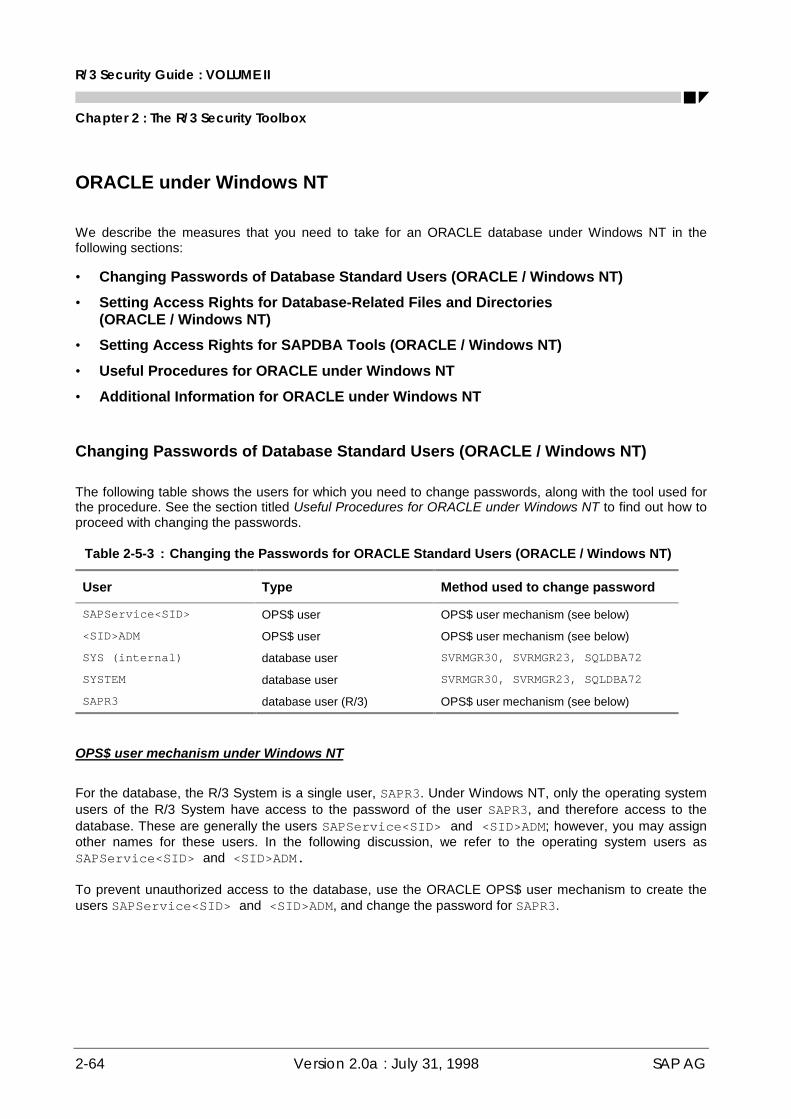
R/3 Security Guide : VOLUME II
Chapter 2 : The R/3 Security Toolbox
2-64 Version 2.0a : July 31, 1998 SAP AG
ORACLE under Windows NT
We describe the measures that you need to take for an ORACLE database under Windows NT in thefollowing sections:
• Changing Passwords of Database Standard Users (ORACLE / Windows NT)
• Setting Access Rights for Database-Related Files and Directories(ORACLE / Windows NT)
• Setting Access Rights for SAPDBA Tools (ORACLE / Windows NT)
• Useful Procedures for ORACLE under Windows NT
• Additional Information for ORACLE under Windows NT
Changing Passwords of Database Standard Users (ORACLE / Windows NT)
The following table shows the users for which you need to change passwords, along with the tool used forthe procedure. See the section titled Useful Procedures for ORACLE under Windows NT to find out how toproceed with changing the passwords.
Table 2-5-3 : Changing the Passwords for ORACLE Standard Users (ORACLE / Windows NT)
User Type Method used to change password
SAPService<SID> OPS$ user OPS$ user mechanism (see below)
<SID>ADM OPS$ user OPS$ user mechanism (see below)
SYS (internal) database user SVRMGR30, SVRMGR23, SQLDBA72
SYSTEM database user SVRMGR30, SVRMGR23, SQLDBA72
SAPR3 database user (R/3) OPS$ user mechanism (see below)
OPS$ user mechanism under Windows NT
For the database, the R/3 System is a single user, SAPR3. Under Windows NT, only the operating systemusers of the R/3 System have access to the password of the user SAPR3, and therefore access to thedatabase. These are generally the users SAPService<SID> and <SID>ADM; however, you may assignother names for these users. In the following discussion, we refer to the operating system users asSAPService<SID> and <SID>ADM.
To prevent unauthorized access to the database, use the ORACLE OPS$ user mechanism to create theusers SAPService<SID> and <SID>ADM, and change the password for SAPR3.
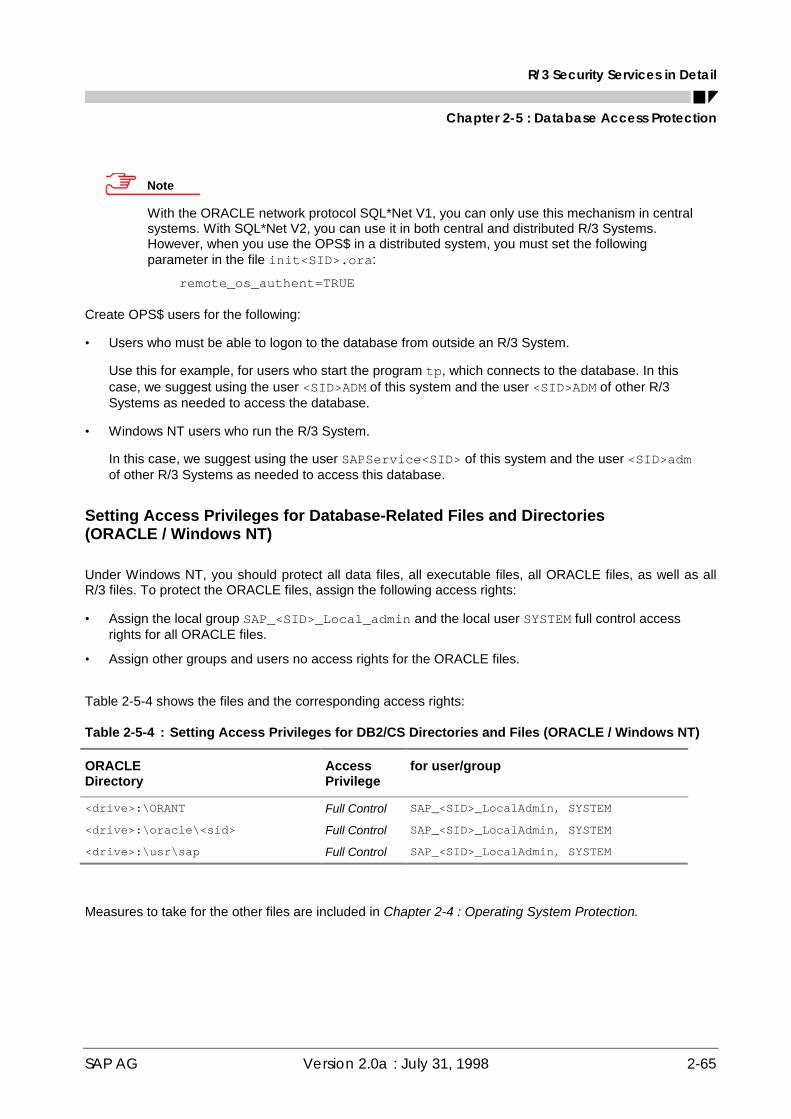
R/3 Security Services in Detail
Chapter 2-5 : Database Access Protection
SAP AG Version 2.0a : July 31, 1998 2-65
Note
With the ORACLE network protocol SQL*Net V1, you can only use this mechanism in centralsystems. With SQL*Net V2, you can use it in both central and distributed R/3 Systems.However, when you use the OPS$ in a distributed system, you must set the followingparameter in the file init<SID>.ora:
remote_os_authent=TRUE
Create OPS$ users for the following:
• Users who must be able to logon to the database from outside an R/3 System.
Use this for example, for users who start the program tp, which connects to the database. In thiscase, we suggest using the user <SID>ADM of this system and the user <SID>ADM of other R/3Systems as needed to access the database.
• Windows NT users who run the R/3 System.
In this case, we suggest using the user SAPService<SID> of this system and the user <SID>admof other R/3 Systems as needed to access this database.
Setting Access Privileges for Database-Related Files and Directories(ORACLE / Windows NT)
Under Windows NT, you should protect all data files, all executable files, all ORACLE files, as well as allR/3 files. To protect the ORACLE files, assign the following access rights:
• Assign the local group SAP_<SID>_Local_admin and the local user SYSTEM full control accessrights for all ORACLE files.
• Assign other groups and users no access rights for the ORACLE files.
Table 2-5-4 shows the files and the corresponding access rights:
Table 2-5-4 : Setting Access Privileges for DB2/CS Directories and Files (ORACLE / Windows NT)
ORACLEDirectory
AccessPrivilege
for user/group
<drive>:\ORANT Full Control SAP_<SID>_LocalAdmin, SYSTEM
<drive>:\oracle\<sid> Full Control SAP_<SID>_LocalAdmin, SYSTEM
<drive>:\usr\sap Full Control SAP_<SID>_LocalAdmin, SYSTEM
Measures to take for the other files are included in Chapter 2-4 : Operating System Protection.
R/3 Security Guide : VOLUME II
Chapter 2 : The R/3 Security Toolbox
2-66 Version 2.0a : July 31, 1998 SAP AG
Setting Access Privileges for SAPDBA Tools (ORACLE / Windows NT)
If you use the CCMS backup planning tool, which uses the SAPDBA tools, then you should note thefollowing:
• For ORACLE versions < 7.3, so that BRBACKUP can start up and shut down the database, the user<SID>ADM must belong to the Windows NT local group ORA<SID>DBA (DB role: SYSDBA).
• In ORACLE versions >= 7.3, assign <SID>ADM to the local group ORA_<SID>_OPER. BRBACKUPthen logs on with connect / as sysoper.
In ORACLE Version 7.3, the group dba has been split into the groups ORA_<SID>_DBA andORA_<SID>_OPER. The group ORA_<SID>_OPER (DB role: SYSOPER) is an administrator groupthat is restricted to operator operations. ORA_<SID>_OPER can start or shut down the database,perform backups, etc., but has no read or write authorizations.
• BRBACKUP must also have full access to the SAPR3 tables SDBAD, SDBAH and tables defined in theXDB interface.
• SAPDBA only executes from CCMS when the database is open. Appropriate database privileges arenecessary for the operations:
- -check, -next, -checkopt, -analyze
• SAPDBA must have write permissions to the following tables:
- SDBAD, SDBAH, DBSTATC, DBSTATTORA, DBSTATHORA, DBSTATIORA, DBSTAIHORA,SAPDBAPRIV, and tables defined in the XDB interface.
R/3 Security Services in Detail
Chapter 2-5 : Database Access Protection
SAP AG Version 2.0a : July 31, 1998 2-67
Useful Procedures for ORACLE under Windows NT
UP 2-5-4 : Specifying the Name of the User that Starts R/3 - SAPService<SID>(ORACLE / Windows NT)
To specify the user that starts R/3, perform the following:
1. From the WinNT task bar, choose Start à Settings à Control Panel.2. Choose Services.3. In the service list, choose the R/3 Service SAP<SID>_<Instance_ID>.4. Choose Startup.5. In the field This account in the group Log on As, specify the user who starts the R/3 System.
UP 2-5-5 : Creating an OPS$ User for <SID>ADM (ORACLE / Windows NT)
To create an OPS$ user for <SID>ADM, perform the following:
1. If the R/3 System is running, then stop it.2. Logon as user <SID>ADM to the host where the R/3 database for the R/3 System is located. You must
execute all of the following commands on this host.3. Start sqldba72 (or svrmgr23, svrmgr30)4. Logon to the database with connect internal.5. Execute the following commands in succession. Replace <password> with the new password for the
user SAPR3.
create user OPS$SAPService<SID> identified externally;
grant connect, resource to OPS$SAPService<SID>;
connect /
create table SAPUSER( USERID VARCHAR2(20), PASSWD VARCHAR2 (20));
insert into SAPUSER values ('SAPR3', '<password>'):
connect internal
alter user SAPR3 identified by <password>;

R/3 Security Guide : VOLUME II
Chapter 2 : The R/3 Security Toolbox
2-68 Version 2.0a : July 31, 1998 SAP AG
UP 2-5-6 : Creating an OPS$ User for SAPService<SID> (ORACLE / Windows NT)
To create an OPS$ user for SAPService<SID>, perform the steps below. First, note the following:
Note
If you are currently logged on as <SID>ADM, (for example you have just completed theprocedure above), then you can skip steps 1 and 2.
1. If the R/3 System is running, then stop it.2. Logon as user <SID>ADM to the host where the R/3 database for the R/3 System is located. You must
execute all of the following commands on this host.3. Start sqldba72 (or svrmgr23, svrmgr30).4. Logon to the database with connect internal.5. Execute the following commands in succession. Replace <password> with the new password for the
user SAPR3.
create user OPS$SAPService<SID> identified externally;
grant connect, resource to OPS$SAPService<SID>;
create public synonym sapuser for OPS$<SID>ADM.SAPUSER;
connect /
grant select on sapuser to OPS$SAPService<SID>;
UP 2-5-7 : Changing the Password of SAPR3 (ORACLE / Windows NT)
If you have already created the OPS$ user as described above, the password for the SAPR3 user can bechanged at any time. Perform the following steps (replace <new password> with the password for theuser SAPR3):
1. If the R/3 System is running, then stop it.2. Logon as user <SID>ADM to the host where the R/3 database for the R/3 System is located. You must
execute all of the following commands on this host.3. Start sqldba72 (or svrmgr23, svrmgr30).4. Logon to the database with connect internal.5. Execute an update on the SAPUSER table by entering the following command:
update OPS$SAPService<SID>.SAPUSER set PASSWD='<new password>' whereUSERID='SAPR3';
6. Change the password for SAPR3 in the database with the command:
alter user sapr3 identified by <new password>;

R/3 Security Services in Detail
Chapter 2-5 : Database Access Protection
SAP AG Version 2.0a : July 31, 1998 2-69
Additional Information for ORACLE under Windows NT
For more information, refer to the following documentation:
• R/3 Online Documentation: BC SAP Database Administration: Oracle [A.17]
• OSS Note 50088: Creating OPS$ users on Windows NT/Oracle [C.19]
• OSS Note 48736: Set up ORACLE SQL*Net V2 under Windows NT [C.18]

R/3 Security Guide : VOLUME II
Chapter 2 : The R/3 Security Toolbox
2-70 Version 2.0a : July 31, 1998 SAP AG
INFORMIX under UNIX
We describe the measures that you need to take for an INFORMIX database under UNIX in the followingsections:
• Changing the Passwords of the Database Standard Users (INFORMIX / UNIX)
• Setting Access Privileges for Database-Related Files and Directories (INFORMIX /UNIX)
• Useful Procedures for INFORMIX
• Additional Information for INFORMIX
Changing the Passwords of the Database Standard Users (INFORMIX / UNIX)
Table 2-5-5 shows the users for which you need to change passwords, along with the tool used for theprocedure.
When you change the password for sapr3, you also need to update the SAPUSER table in the database.Otherwise, R/3 work processes cannot connect successfully to the INFORMIX database. See UP 2-5-8 tofind out how to change the passwords, as well as how to update the SAPUSER table.
Table 2-5-5 : Changing the Passwords for INFORMIX Standard Users (INFORMIX / UNIX)
User Type Method used to change password
<sid>adm UNIX and DB user UNIX command passwd
informix UNIX and DB administrator UNIX command passwd
sapr3 UNIX and database user (R/3) UNIX command passwd
Note
Prior to Release 2.1J/2.2D, the environment variable INFORMIX_DB_PASSWD was neededwhen changing the passwords. If you have updated from an older release, you should deletethis environment variable and remove any references to it from script files.

R/3 Security Services in Detail
Chapter 2-5 : Database Access Protection
SAP AG Version 2.0a : July 31, 1998 2-71
Setting Access Privileges for Database-Related Files and Directories(INFORMIX / UNIX)
We recommend that you restrict the UNIX file and directory access privileges as shown in Table 2-5-6 (seeUP 2-5-11):
Table 2-5-6 : Setting Access Privileges for INFORMIX Directories and Files (INFORMIX / UNIX)
INFORMIX Directory or File Access Privilegein Octal Form
Owner Group Comment
/informix/<SID>/sapdata 755 informix informix
/informix/<SID>/sapdata/* 755 informix informix
/informix/<SID>/sapdata/*/* 777 --- --- • link
/informix/<SID>/sapreorg 775 informix sapsys
Raw devices for INFORMIXdatabase
660 informix informix • Refer to the rawdevices as pointed toby the links in the<physdev><i>directories.
Useful Procedures for INFORMIX
UP 2-5-8 : Changing the passwords for <sid>adm, sapr3, and informix (INFORMIX / UNIX)
To change the passwords for <sid>adm, sapr3, and informix, perform the following steps:
Note
If you use Network Information Service (NIS) , you should also refer to the NIS guide and theoperating system documentation. (Changing the password with an activated NIS may bedifferent from changing it with passwd.)
1. Logon as user <sid>adm.2. Enter the passwd command at the UNIX prompt.3. Enter the old and new passwords.4. Repeat steps 1 to 3 for the users sapr3 and informix.5. Update the SAPUSER table by entering the following commands at the UNIX command prompt:
su - <sid>adm
echo "update sapuser set passwd='<sapr3_passwd>' where userid='sapr3';" |dbaccess <sid>
R/3 Security Guide : VOLUME II
Chapter 2 : The R/3 Security Toolbox
2-72 Version 2.0a : July 31, 1998 SAP AG
UP 2-5-9 : Setting Access Privileges for Files and Directories (INFORMIX / UNIX)
Saving Current Settings
Before changing the access privileges, we advise you to save your current settings. Enter the followingcommands:
cd /informix/<SID>ls -lR > informix_perm.txt
cd /usr/sapls -lR > sap_perm.txt
cd /sapmntls -lR > sap_sw.txt
Setting Access Privileges
To change the access privileges for a file or directory use the chmod command as shown below:
chmod <access privileges in octal> <file or directory>
Example
chmod 755 /informix/<SID>/sapdatachmod 755 /informix/<SID>/sapdata/*chmod 777 /informix/<SID>/sapdata/*/*...
Caution
Do not use chmod recursively. It is very easy to make unintended changesto authorizations when doing so.
Changing Owner and Group
To change the owner and group of the INFORMIX devices, use the commands chown and chgrprespectively. See the following example to change the owner and group for a device to informix:
Example
chown informix <name of device>chgrp informix <name of device>
Additional Information for INFORMIX
For more information, refer to the following documentation:
• R/3 Online Documentation: BC SAP Database Administration: INFORMIX [A.16]

R/3 Security Services in Detail
Chapter 2-5 : Database Access Protection
SAP AG Version 2.0a : July 31, 1998 2-73
ADABAS
We describe the general measures that you need to take for an ADABAS database (under all operatingsystems) in the following sections:
• Changing the Passwords of Database Standard Users (ADABAS / All)
• Protecting CONTROL Operations (ADABAS / All)
• Measures Specific to ADABAS under UNIX (ADABAS / UNIX)
• Measures Specific to ADABAS under Windows NT (ADABAS / Windows NT)
• Useful Procedures for ADABAS
• Additional Information for ADABAS
Changing the Passwords of Database Standard Users (ADABAS / All)
Table 2-5-7 shows the database users for which you need to change passwords, along with the tool usedfor the procedure. See the section titled Useful Procedures for ADABAS to find out how to proceed withchanging the passwords.
Table 2-5-7 : Changing the Passwords for ADABAS Standard Users (ADABAS / All)
User Type Method used to change password
CONTROL database user (SYSUSER) CONTROL
SUPERDBA database user (SYSUSER) CONTROL
OPERATOR (see Note below) database user (SYSUSER) CONTROL
SAPR3 database user (R/3) XSQL or XQUERY
Note
You may or may not have to change the password for the user OPERATOR. In the followingtext (as well as in the Useful Procedures), we refer to OPERATOR. However, if you do notneed to change the password, then you can ignore OPERATOR in the corresponding actions.The following guidelines apply:
• Prior to ADABAS Release 6.2: You only need to change the password for OPERATOR ifyou use this user. If you do not use OPERATOR, then you do not need to change itspassword.
• As of ADABAS Release 6.2: Here, you do not need to change password for OPERATOR. Itis a restricted user for the xcontrol tool only.

R/3 Security Guide : VOLUME II
Chapter 2 : The R/3 Security Toolbox
2-74 Version 2.0a : July 31, 1998 SAP AG
SYSUSERS
The SYSUSERS are CONTROL, SUPERDBA and OPERATOR. You change their passwords using theCONTROL tool. See UP 2-5-10 for instructions on changing the passwords.
Note the following:
• After changing the passwords for SUPERDBA and OPERATOR, you can logon to the database withouthaving to restart the database.
• The start and stop scripts log on to the database by using the XUSER file. Therefore, when you changethe passwords of the CONTROL, SUPERDBA or OPERATOR, you must also update the XUSER file. Youmust update the file once as user <sid>adm and also as sqd<sid>. The steps required for thisprocedure are also included in UP 2-5-11.
SAPR3
For the database, the R/3 System is a single user, SAPR3. There are two ways to change the password forSAPR3.
1. As user SAPR3 (See UP 2-5-12).
2. As user SUPERDBA (See UP 2-5-13).
As with the SYSUSERS, you must also update the XUSER file. See UP 2-5-14.
Protecting CONTROL Operations (ADABAS/All)
ADABAS divides its database operations into two categories, critical and uncritical. For example, you maywant to restrict who can execute operations such as RESTORE, as in comparison to BACKUP. Therefore,there are two levels of users, the CONTROL user and the operator user. A CONTROL user can executemore operations than an operator user. For example, only an operator user can perform tasks such asstarting and stopping the database, backing up the database and logs, as well as history and log control.The CONTROL user can perform more critical operations such as restoring the database.
Measures Specific to ADABAS under UNIX (ADABAS / UNIX)
We describe the measures that you need to take for an ADABAS database under UNIX in the followingsections:
• Changing the Passwords of Operating System Users (ADABAS / UNIX)
• Setting Access Privileges for Database-Related Files and Directories (ADABAS / UNIX)

R/3 Security Services in Detail
Chapter 2-5 : Database Access Protection
SAP AG Version 2.0a : July 31, 1998 2-75
Changing the Passwords of Operating System Users (ADABAS/UNIX)
Table 2-5-8 shows the UNIX users for which you need to change passwords, along with the tool used forthe procedure. See UP 2-5-15 to find how to proceed with changing the passwords.
Table 2-5-8 : Changing the Passwords for ADABAS Standard Users (ADABAS / UNIX)
User Type Method used to change password
<sid>adm UNIX user UNIX command passwd
sqd<sid> UNIX user UNIX command passwd
Setting Access Privileges for Database-Related Files and Directories (ADABAS / UNIX)
The access rights are automatically set in the installation procedures. The script that executes thisprocedure is bin/x_install. You can find it in the directory /adabas/<SID>/db and the user ROOTcan run it at any time. The script sets the UNIX file and directory access privileges as shown inTable 2-5-9:
Table 2-5-9 : Setting Access Privileges for ADABAS Directories and Files (ADABAS / UNIX)
ADABAS Directory or File Access Privilegein Octal Form
Owner Group Comment
/adabas/<SID>/sap* 750 sqd<sid> dba
/adabas/<SID>/sapdata/* 750 sqd<sid> dba
/adabas/<SID>/saplog/* 750 sqd<sid> dba
/adabas/<SID>/sapsys/* 750 sqd<sid> dba
/adabas/<SID>/dbsys 750 sqd<sid> dba
/adabas/<SID>/dbsys/sys 660 sqd<sid> dba
Raw devices for ADABASdatabase
660 sqd<sid> • Refer to the raw devicesused as Data andLogdevspaces.
• The privileges of the nodesare also 660; not only thelinks contained in thedirectories/adabas/<SID>/sapdataand saplog.
You can also change the access privileges at any time with the chmod command (see UP 2-5-16).

R/3 Security Guide : VOLUME II
Chapter 2 : The R/3 Security Toolbox
2-76 Version 2.0a : July 31, 1998 SAP AG
Measures Specific to ADABAS under Windows NT
We describe the measures that you need to take for an ADABAS database under Windows NT in thefollowing sections:
• Changing the Passwords of Operating System Users (ADABAS / Windows NT)
• Setting Access Rights for Database-Related Files and Directories(ADABAS / Windows NT)
Changing the Passwords of Operating System Users (ADABAS / Windows NT)
Under Windows NT, you need to change the password of the user <sid>adm.
Setting Access Privileges for Database-Related Files and Directories (ADABAS / Windows NT)
If you use an ADABAS D database under Windows NT, then the Devspaces of the database areautomatically protected. Only the group of administrators has full access privileges for the devspaces andall other users have no access.
In addition, you must protect the directory %DBROOT%\config. This directory contains the configurationfiles of the databases. Set the following access privileges for the directory %DBROOT%\config and all thefiles it contains:
• Full control access privileges for the local group Administrators
• No access privileges for other groups or users
If you want to exclude all other users from access to the database with database tools, you must set thefollowing privileges for the directory %DBROOT% and all its subdirectories:
• Full control access privileges for the local group Administrators
• No access privileges for all other groups or users

R/3 Security Services in Detail
Chapter 2-5 : Database Access Protection
SAP AG Version 2.0a : July 31, 1998 2-77
Useful Procedures for ADABAS
UP 2-5-10 : Changing the Passwords for the Users CONTROL, SUPERDBA, and OPERATOR(ADABAS / All)
To change the passwords for CONTROL, SUPERDBA, and OPERATOR, proceed as follows:
Note
You can only change CONTROL's password in "cold mode"1; you can only change the passwordsfor SUPERDBA and OPERATOR in "warm mode".
In the CONTROL main menu:
1. Choose the menu path CONFIGURATION à ALTER PARAMETERS à SYSUSERS.2. In the ALTER CONTROLUSER menu, enter the name of the <user> and a new password.
You must also confirm the new password.
3. Choose OK to save the password.
Perform these steps for the users CONTROL, SUPERDBA, and OPERATOR.
UP 2-5-11 : Updating the XUSER File for the Users CONTROL and SUPERDBA. (ADABAS / All)
To update the XUSER file for the users CONTROL and SUPERDBA, proceed as follows:
1. Start the XUSER tool with the user <sid>adm.2. Logon using the user SAPR3 and the SAPR3 password.
User CONTROL
3. Use the function key F4 to page to USERKEY c.4. Enter the new password of the user CONTROL.5. Save it by pressing F5.
User SUPERDBA
6. Use the function key F4 to page to USERKEY w.7. Enter the new password of the user SUPERDBA.8. Save it by pressing F5.
Repeat steps 1-8 as user sqd<sid> instead of <sid>adm.
1 The ADABAS server has three modes of operation: offline, cold, and warm. In offline mode, the ADABAS server is
not running and the database server kernel has not been started. In cold mode, the ADABAS server has been started,however, you can only perform certain maintenance activities. Warm mode is the normal operating mode.

R/3 Security Guide : VOLUME II
Chapter 2 : The R/3 Security Toolbox
2-78 Version 2.0a : July 31, 1998 SAP AG
UP 2-5-12 : Changing the Password of SAPR3 As User SAPR3 (ADABAS / All)
To change the password of SAPR3 as user SAPR3, proceed as follows:
Note
If you use XQUERY for changing the password, you must set the SQLMODE to ADABAS in thecommand line before you execute the command.
1. Call XSQL (or XQUERY) from the operation system level without any additional options.
You will be automatically logged on (over the XUSER file) as user SAPR3.
2. To change the password, enter the following command:
ALTER PASSWORD <oldpassword> to <newpassword>
3. Update the XUSER file for user SAPR3. (See UP 2-5-14.)
UP 2-5-13 : Changing the Password of SAPR3 As User SUPERDBA (ADABAS / All)
To change the password of SAPR3 as user SUPERDBA, proceed as follows:
Note
If you use XQUERY for changing the password, you must set the SQLMODE to ADABAS in thecommand line before you execute the command.
1. Start XSQL (or XQUERY) from the operation system level by entering the following command:
xsql -u superdba,<password>
2. To change the password, enter the following command:
ALTER PASSWORD <user> <newpassword>
3. Update the XUSER file for user SAPR3 (See UP 2-5-14).
R/3 Security Services in Detail
Chapter 2-5 : Database Access Protection
SAP AG Version 2.0a : July 31, 1998 2-79
UP 2-5-14 : Updating the XUSER File for the User SAPR3 (ADABAS / All)
To update the XUSER file for user SAPR3, proceed as follows:
Note
You need to perform this procedure using both the users <sid>adm and sqd<sid> on allapplication servers.
1. Start the XUSER tool with the user <sid>adm.2. Logon using the user SAPR3 and the old SAPR3 password.3. In the first menu, USERKEY: DEFAULT, enter the new password for SAPR3.4. Save the password by pressing F5.5. Use the function key F4 to page to USERKEY <sid>.6. Enter the new password for SAPR3.7. Save it by pressing F5.
Repeat steps 1-7 with the user sqd<sid> instead of <sid>adm.
UP 2-5-15 : Changing the Passwords for <sid>adm and sqd<sid> (ADABAS / UNIX)
To change the passwords for <sid>adm and sqd<sid>, proceed as follows:
Note
If you use Network Information Service (NIS), you should also refer to the NIS guide and theoperating system documentation. (Changing the password with an activated NIS may bedifferent from changing it with passwd.)
1. Logon as user <sid>adm.2. Enter the passwd command at the UNIX prompt.3. Enter the old and new passwords.
Repeat steps 1 to 3 for the user sqd<sid>.
R/3 Security Guide : VOLUME II
Chapter 2 : The R/3 Security Toolbox
2-80 Version 2.0a : July 31, 1998 SAP AG
UP 2-5-16 : Setting Access Privileges for Files and Directories (ADABAS / UNIX)
Saving Current Settings
Before changing the access privileges, save your current settings. Enter the following commands:
cd /adabas/<SID>ls -lR > adabas_perm.txt
cd /usr/sapls -lR > sap_perm.txt
cd /sapmntls -lR > sap_sw.txt
Setting Access Privileges
To change the access privileges for a file or directory use the chmod command as shown below:
chmod <access privileges in octal> <file or directory>
Example
chmod 750 /adabas/<SID>/sap*chmod 750 /adabas/<SID>/sapdata/*chmod 750 /adabas/<SID>/saplog/*..
Caution
Do not use chmod recursively. It is very easy to make unintended changesto authorizations when doing so.
Additional Information for ADABAS
For more information, refer to the following documentation:
• R/3 Online Documentation: ADABAS (Software AG) [A.12]

R/3 Security Services in Detail
Chapter 2-5 : Database Access Protection
SAP AG Version 2.0a : July 31, 1998 2-81
DB2 Common Server under UNIX
The concept outlined here applies to Release 4.0B and later releases.
General Information
Under UNIX, DB2 common server runs with an “authentication = server”, which means that the user ID andpassword provided on connect or attach are verified by DB2 using operating system services from withinthe database server. Remote and local application servers connect to DB2 using user sapr3 or they attachfor specific purposes as user <sid>adm.
R/3 DB2 common server additionally maintains the user IDs and passwords for <sid>adm and sapr3 inthe file:
/usr/sap/<SID>/SYS/global/dscdb6.conf
This file is accessible from all application servers over NFS (AIX) or NT shares (NT). Passwords are storedencrypted. R/3 DB2 common server provides functions for the following:
• to create dscdb6.conf
• to retrieve users IDs and passwords
• to update passwords in dscdb6.conf and in the operating system simultaneously
For all the dscdb6.conf accesses described in this chapter, the environment variable DB2DB6EKEY isused to encrypt or decrypt the requested password.
Note
Prior to DB2 Version 5, the environment variable used for encrypting and decrypting thepassword was called DB6EKEY. As of Version 5, the variable is now called DB2DB6EKEY. Inthe following discussion, we refer to it as DB2DB6EKEY.
DB2DB6EKEY is set initially during installation to the value <SID><db_server_hostname>. You canchange this value at any time, but if you do, then you also need to update the sapr3 and <sid>admpasswords (see the section titled Changing the Passwords of Database Standard Users).
The SAP profiles .dbenv_<hostname>.csh and .dbenv_<hostname>.sh contain the DB2DB6EKEYvalue. This environment variable is set when <sid>adm and db2<sid> log on.

R/3 Security Guide : VOLUME II
Chapter 2 : The R/3 Security Toolbox
2-82 Version 2.0a : July 31, 1998 SAP AG
The measures that you need to take for a DB2 common server database under UNIX, as well as usefulprocedures and additional information are provided in the following sections:
• Changing the Passwords of Database Standard Users (DB2/CS / UNIX)
• Protecting SAP-DB2admin Operations (DB2/CS / UNIX)
• Setting Access Privileges for Database-Related Files and Directories(DB2/CS / UNIX)
• Useful Procedures for DB2 Common Server under UNIX
• Additional Information for DB2 Common Server under UNIX
Changing the Passwords of Database Standard Users (DB2/CS / UNIX)
Table 2-5-10 shows the UNIX users for which you need to change passwords, along with the tool used forthe procedure. See UP 2-5-17 (for db2<sid>) and the online documentation BC SAP DatabaseAdministration: DB2 common server: Users (for <sid>adm and sqd<sid>) for information on how toproceed with changing the passwords.
Table 2-5-10 : Changing the Passwords for DB2/CS Standard Users (DB2/CS / UNIX)
User Type Method used to change password
db2<sid> UNIX and database user UNIX command passwd
<sid>adm UNIX and database user DB2 Control Center
sqd<sid> UNIX and database user DB2 Control Center
db2<sid>
This user is the DB2 instance owner. It is the DB2 system administrator and the R/3 database administrator. It is authorized to execute database and Database Manager administration functions such as:
• Creating a database
• Creating or changing a tablespace
• Updating DB2 parameters
• Backing up or restoring the database
• Changing the passwords of the users sapr3 and <sid>adm
db2<sid> belongs to the operating system group SYSADM and has the DB2 authority SYSADM. SYSADMhas the highest level of DB2 authority and includes all lower-level authorities.
Use the standard operating system utilities (command passwd) to change the password of db2<sid>(seeUP 2-5-17). It is not necessary for the password to be the same on all hosts in your R/3 System.

R/3 Security Services in Detail
Chapter 2-5 : Database Access Protection
SAP AG Version 2.0a : July 31, 1998 2-83
<sid>adm
This user is the R/3 System administrator. <sid>adm is authorized to start and stop the R/3 System andthe DB2 Database Manager.
<sid>adm belongs to the operating system groups SYSCTRL and SAPSYS and has the DB2 authoritiesDBADM and SYSCTRL. DB2-specific monitoring functions invoked by R/3 application server functionsrequire SYSCTRL authority.
Use the DB2 Control Center Managing Passwords function to change the password. (For more information,see the online documentation BC SAP Database Administration: DB2 common server à ManagingPasswords of R/3 Admin Users [A.14].)
sapr3
This user is the owner of all R/3 database objects (tables, indexes and views). All R/3 application serverconnections and accesses are done on behalf of sapr3.
sapr3 belongs to the operating system group SAPSYS and is created only on R/3 Systems that have theR/3 DB2 database installed (not on remote application servers). sapr3 has the DB2 authoritiesCREATETAB, BINDADD and CONNECT.
Use the DB2 Control Center Managing Passwords function to change the password. (For more information,see the online documentation BC SAP Database Administration: DB2 common server à ManagingPasswords of R/3 Admin Users [A.14].)
Changing the Encryption Key DB2DB6EKEY
The environment variable DB2DB6EKEY contains the key used for the encryption of the <sid>adm andsapr3 passwords stored in file dscdb6.conf. You can change DB2DB6EKEY at any time, but if you do,note the following:
• You must change the DB2DB6EKEY value in all .dbenv_<hostname>.csh and.dbenv_<hostname>.sh profiles on all R/3 hosts.
• .dbenv_<hostname>.csh resp. .dbenv_<hostname>.sh is invoked when db2<sid> and<sid>adm log on.
• You must change the passwords of <sid>adm and sapr3 immediately after you have altered theDB2DB6EKEY.
Protecting SAP-DB2admin Operations (DB2/CS / UNIX)
You can perform security-critical and less critical operations with the R/3 database administration tool SAP-DB2admin.
The first category includes the RESTORE and BACKUP commands. Since these database backups shouldonly be performed in a protected and controlled environment, only the DB2 database administrator(db2<sid>) can execute these commands. Ensure that once you have made a database backup, nounauthorized persons have access to the storage medium.
Only the <sid>adm user is authorized to start and stop the R/3 System from SAP-DB2admin.

R/3 Security Guide : VOLUME II
Chapter 2 : The R/3 Security Toolbox
2-84 Version 2.0a : July 31, 1998 SAP AG
Setting Access Privileges for Database-Related Files and Directories(DB2/CS / UNIX)
Note
As of Release 3.0D, the access rights as described in the following table are automaticallyset in the installation procedures.
We recommend that you restrict the UNIX file and directory access privileges as shown in Table 2-5-11(see UP 2-5-18):
Table 2-5-11 : Setting Access Privileges for DB2/CS Directories and Files (DB2/CS / UNIX)
DB2 common serverDirectory or File
Access Privilegein Octal Form
Owner Group
/db2/<SID> 755 db2<sid> sysadm
/db2/<SID>/log_dir 750 db2<sid> sysadm
/db2/<SID>/log_retrieve (as of Release 4.0B) 750 db2<sid> sysadm
/db2/<SID>/log_archive 2755 db2<sid> sysadm
/db2/<SID>/log_archive/<SID> 755 db2<sid> sysadm
/db2/<SID>/sapdata* 700 db2<sid> sysadm
/db2/<SID>/sapdata*/* 600 db2<sid> sysadm
/db2/<SID>/saparch 777 db2<sid> sysadm
/db2/<SID>/dbs (prior to Release 4.0B) 4755 db2<sid> sysadm
/db2/<SID>/sapbackup (prior to Release 4.0B) 777 db2<sid> sysadm
R/3 Directory or File Access Privilegein Octal Form
Owner Group
<sapmnt>/exe 755 <sid>adm sapsys
<sapmnt>/global 700 <sid>adm sapsys
<sapmnt>/profile 755 <sid>adm sapsys
/usr/sap/trans 775 <sid>adm sapsys
/usr/sap/<SID> 755 <sid>adm sapsys
/usr/sap/<SID>/SYS 755 <sid>adm sapsys
/usr/sap/<SID>/<instance directory> 755 <sid>adm sapsys
/usr/sap/<SID>/SYS/exe/run/dscdb6up 4750 root sysadm
/usr/sap/<SID>/SYS/exe/run/db6util 4755 <sid>adm sapsys
/usr/sap/<SID>/SYS/exe/run/dmdb6srp 4755 <sid>adm sapsys
/usr/sap/<SID>/SYS/exe/run/brarchive 4755 db2<sid> sapsys
/usr/sap/<SID>/SYS/exe/run/brrestore 4755 db2<sid> sapsys
/usr/sap/<SID>/SYS/global/dscdb6.conf 600 <sid>adm sapsys
/usr/sap/<SID>/SYS/exe/run/sddb6utl 4755 db2<sid>(adm<sid> prior toRelease 4.0B)
sapsys
/usr/sap/<SID>/SYS/exe/run/backint(prior to Release 4.0B)
755 <sid>adm sapsys

R/3 Security Services in Detail
Chapter 2-5 : Database Access Protection
SAP AG Version 2.0a : July 31, 1998 2-85
Useful Procedures for DB2 Common Server under UNIX
UP 2-5-17 : Changing the password for db2<sid> (DB2/CS / UNIX)
To change the password for db2<sid>, proceed as follows:
Note
If you use Network Information Service (NIS), you should also refer to the NIS guide and theoperating system documentation. (Changing the password with an activated NIS may bedifferent from changing it with passwd.)
1. Logon as user db2<sid>.2. Enter the passwd command at the UNIX prompt.3. Enter the old and new passwords.
UP 2-5-18 : Setting Access Privileges for Files and Directories (ADABAS / UNIX)
Saving Current Settings
Before changing the access privileges, we advise you to save your current settings. Enter the followingcommands:
cd /db2/<SID>ls -lR > db2_perm.txt
cd /usr/sapls -lR > sap_perm.txt
cd /sapmntls -lR > sap_sw.txt
Setting Access Privileges
To change the access privileges for a file or directory use the chmod command as shown below:
chmod <access privileges in octal> <file or directory>
Example
chmod 755 /db2/<SID>chmod 750 /db2/<SID>/log_dirchmod 2755 /db2/<SID>/log_archive...

R/3 Security Guide : VOLUME II
Chapter 2 : The R/3 Security Toolbox
2-86 Version 2.0a : July 31, 1998 SAP AG
UP 2-5-18 : Continued
Caution
Do not use chmod recursively. It is very easy to make unintended changesto authorizations when doing so.
Additional Information for DB2 Common Server under UNIX
• R/3 Online Documentation: BC SAP Database Administration: DB2 common server [A.13]
• R/3 Online Documentation: BC SAP Database Administration: DB2 common server à ManagingPasswords of R/3 Admin Users [A.14]
• IBM Documentation: IBM DB2 Universal Database Administration Guide, IBM DB2 Universal DatabaseTroubleshooting Guide [E.9]

R/3 Security Services in Detail
Chapter 2-5 : Database Access Protection
SAP AG Version 2.0a : July 31, 1998 2-87
DB2 Common Server under Windows NT
The concept outlined here applies to Release 4.0B and later releases, and to Release 3.1I systems that arerunning with DB2/CS Version 5.0 and the SAP-DB2admin based on the DB2 Control Center.
General Information
R/3 work processes connect to the database server first as the user <sid>adm and then as user sapr3.
To authenticate the user, DB2 common server checks the local security database first. If the user is notfound, it then checks in the security database of the Primary Domain Controller in the current domain. If theuser is still not found, it continues to check in all trusted domains until either the user is located or all thesecurity databases have been checked. If the user is located in a security database, the password andmembership of a particular group, for example SYSADM, are checked using only the information in thissecurity database. If the user is not found, access is refused.
Note
The search for a user in a security database always starts at the database server.
A user ID and password are required to establish a connection to the database.
The connection information (for example, the password) is provided as an encrypted string by a passwordservice. Use the DB2 Control Center Managing Passwords function to manage the passwords of<sid>adm and sapr3.
The encrypted passwords for the users <sid>adm and sapr3 are stored in the file dscdb6.conf duringinstallation of the R/3 System. The stored passwords must match the passwords that are stored in thesecurity database for the respective user.
You can find the file dscdb6.conf over the following path:
\\<%DSCDB6HOME%>\sapmnt\<SID>\SYS\global\dscdb6.conf
In an exclusively NT environment, the environment variable DSCDB6HOME contains the name of thedatabase server.
In a system environment where the database server operates under an operating system other than NT,DSCDB6HOME should contain the name of a server where you can access the file dscdb6.conf via theabove-mentioned path.
The environment variable DB2DB6EKEY holds the key for decoding the passwords. The value of thisenvironment variable must be identical on all application servers, the central instance, and on the R/3database server (all systems have the same <SID>). You can change this variable to another value asdescribed in Assigning Environment Variables.
Note
Prior to DB2 Version 5, the environment variable used for encrypting and decrypting thepassword was called DB6EKEY. As of Version 5, the variable is now called DB2DB6EKEY. Inthe following discussion, we refer to it as DB2DB6EKEY.

R/3 Security Guide : VOLUME II
Chapter 2 : The R/3 Security Toolbox
2-88 Version 2.0a : July 31, 1998 SAP AG
After authentication of the user by the database security process, a check is made to see in whichdatabase authorization groups the user belong. The Windows NT system groups SYSADM and SYSCTRLare used in combination with SAP R/3. Membership of these groups is only checked with the securitydatabase in which the user was located.
The assignment of the Windows NT system groups to the corresponding database groups is executedusing parameters in the database instance. The parameter SYSADM_GROUP defines the databaseadministration group, and SYSCTRL_GROUP is the database control group. In an R/3 environment, theparameter SYSADM_GROUP is set to SYSADM and the parameter SYSCTRL_GROUP to SYSCTRL duringinstallation.
The measures that you need to take for a DB2 common server database under Windows NT, as well asadditional information are provided in the following sections:
• Assigning Users and Groups (DB2/CS / Windows NT)
• Managing the Passwords of the Database Standard Users (DB2/CS / Windows NT)
• Assigning Environment Variables (DB2/CS / Windows NT)
• Setting Access Privileges for Database-Related Files and Directories(DB2/CS / Windows NT)
• Useful Procedures for DB2 Common Server under Windows NT
• Additional Information on DB2 Common Server under Windows NT
Assigning Users and Groups (DB2/CS / Windows NT)
Table 2-5-12 and Table 2-5-13 show the users and groups that are required when running an R/3 Systemwith the DB2 common server database under Windows NT:
Table 2-5-12 : DB2/CS Standard Users under Windows NT (DB2/CS / Windows NT)
User Function
<sid>adm SAP system administrator
sapse<sid> SAP service account
db2<sid> database administrator
sapr3 user for R/3 database objects
Table 2-5-13 : DB2/CS Standard Groups under Windows NT (DB2/CS / Windows NT)
Group Function
SAP_<SID>_GlobalAdmin domain-level R/3 administration group
SAP_<SID>_LocalAdmin local groups on an application server
SYSADM Database system administrator group
SYSCTRL Database system control group

R/3 Security Services in Detail
Chapter 2-5 : Database Access Protection
SAP AG Version 2.0a : July 31, 1998 2-89
User: SAP System Administrator (<sid>adm)
The SAP system administrator is the user who administers the R/3 System. This user also performs theinstallation procedure.
User: SAP Service Account (sapse<sid>)
The SAP service account user is a virtual user. You generally start the R/3 System with this user account.You do not log on to the R/3 System with this account. This user account must have the local user rights toLog on as a service and has to be a member of the local administrator group. The name of this user mustbe sapse<sid>.
Group: SAP_<SID>_GlobalAdmin
This global group is a domain-level R/3 administration group for organizing SAP system administrators.The sole function of a global group is to gather users together at domain level so that they can be placed inthe appropriate local groups. The members of this group are the domain users <sid>adm andsapse<sid>.
Note
The group SAP_<SID>_GlobalAdmin is used only when the R/3 System belongs to an NTdomain. You do not need the group SAP_<SID>_Global_Admin if you are installing locally.
Group: SAP_<SID>_LocalAdmin
Irrespective of the type of installation, you have to create the local group SAP_<SID>_LocalAdmin.
Only local groups are created and maintained on an application server. A local group can only be givenpermissions and rights to the system where it is located. If the system is part of the domain, the local groupcan contain users and global groups from the domain.
Working with or without a Domain Controller
If you are working with a domain controller, then note the following:
• The members of the group SAP_<SID>_LocalAdmin are the global groupSAP_<SID>_GlobalAdmin, and on the database server, the domain user db2<sid>.
• The groups SYSADM and SYSCTRL are created on the domain controller.
If you are working without a domain controller, then note the following:
• The members of the group SAP_<SID>_LocalAdmin are the users <sid>adm, sapse<sid> anddb2<sid>.
• The groups SYSADM and SYSCTRL are created locally.

R/3 Security Guide : VOLUME II
Chapter 2 : The R/3 Security Toolbox
2-90 Version 2.0a : July 31, 1998 SAP AG
Note
If all R/3 servers are domain controllers, then the local group exists at domain level and onlyhas to be defined once for all domain controllers.
Managing the Passwords of the Database Standard Users(DB2/CS / Windows NT)
Table 2-5-14 shows the users for which you have to use the DB2 control center Managing Passwordsfunction to change passwords This is the only way to ensure user and password consistency within the R/3environment. For more information see BC SAP Database Administration: DB2 common server.
Table 2-5-14 : Managing the Passwords for DB2/CS Standard Users (DB2/CS / Windows NT)
User Type
<sid>adm database user (SAP system administrator)
Sapr3 database user (R/3)
Note
If you inadvertently delete or destroy the file dscdb6.conf, you can recreate it.See UP 2-5-21.
Assigning Environment Variables (DB2/CS / Windows NT)
Table 2-5-15 shows the values of the environment variables as they are assigned in the installationprocedures. We recommend that you keep these values with the exception of DB2DB6EKEY. You canchange the value of DB2DB6EKEY at any time. However, changing the value of the environment variableDB2DB6EKEY is difficult and must be executed on every server in the R/3 System where a dialog process isrunning (all systems have the same <SID>). Also, because the NT system can be destroyed by incorrectentries in the Registry, only allow an experienced NT administrator to change it. For details, on how tochange it, see UP 2-5-20.
Table 2-5-15 : Environment Variables for DB2/CS under Windows NT (DB2/CS / Windows NT)
Environment Variable Value
DB2INSTANCE DB2<SID>
DB2DBDFT <SID>
DSCDB6HOME <database server name>
DB2DB6EKEY <SID><database server name> (default)

R/3 Security Services in Detail
Chapter 2-5 : Database Access Protection
SAP AG Version 2.0a : July 31, 1998 2-91
Setting Access Privileges for Database-Related Files and Directories(DB2/CS / Windows NT)
We recommend that you restrict the file and directory access privileges as shown in Table 2-5-16:
Table 2-5-16 : Setting Access Privileges for DB2/CS Directories and Files(DB2/CS / Windows NT)
DB2 common serverDirectory
AccessPrivilege
for user/group
<drive>:\sqllib Full Control Administrators, SYSTEM,SAP_<SID>_LocalAdmin
<drive>:\sqllib\db2<sid> Full Control Administrators, SYSTEM,SAP_<SID>_LocalAdmin
<drive>:\db2<sid> Full Control SAP_<SID>_LocalAdmin, SYSTEM
<drive>:\db2 Full Control Everyone
<drive>:\db2\<sid> Full Control SAP_<SID>_LocalAdmin,SYSTEM
<drive>:\db2\<sid>\sapdata* Full Control db2<sid>, SYSTEM
<drive>:\db2\<sid>\log_dir Full Control db2<sid>, SYSTEM
<drive>:\db2\<sid>\log_archive Full Control SAP_<SID>_LocalAdmin, SYSTEM
<drive>:\db2\<sid>\sapreorg Full Control SAP_<SID>_LocalAdmin, SYSTEM
R/3 Security Guide : VOLUME II
Chapter 2 : The R/3 Security Toolbox
2-92 Version 2.0a : July 31, 1998 SAP AG
Useful Procedures for DB2 Common Server under Windows NT
UP 2-5-19 : Recreating the File dscdb6.conf (DB2/CS / Windows NT)
To recreate dscdb6.conf, proceed as follows:
1. Log on to the database server as user db2<sid>.2. Open a command line window.3. Check whether the environment variables DSCDB6HOME, DB2DB6EKEY, DB2INSTANCE and DB2DBDFT
are set correctly. You can display the current values with:
echo %<variable_name>%
4. Call the program db6util.exe:
db6util -c sapr3 <password1> <sid>adm <password2> <SID> <file>
where:
<password1>: Password of the user sapr3<password2>: Password of the user <sid>adm<file>: Name of a file in which the actions are logged.
5. Look in the log file to see whether or not the action was executed successfully.6. Execute a connection test by executing the following command:
R3trans.exe -d
7. Look in the file trans.log in the local directory to see if errors occurred during this connection test.
Note
You can find db6util.exe in the following path:
\\<hostname>\sapmnt\<SID>\SYS\exe\run
where:
<hostname> is the name of the NT Server where the central instance was installed.

R/3 Security Services in Detail
Chapter 2-5 : Database Access Protection
SAP AG Version 2.0a : July 31, 1998 2-93
UP 2-5-20 : Changing the Environment Variable DB2DB6EKEY (DB2/CS / Windows NT)
To change DB2DB6EKEY, proceed as follows:
Note
If the users <sid>adm and db2<sid> are domain users, you only have to execute steps 6, 7, 8,and 9 once; otherwise, you have to repeat the steps on every host in the R/3 System.
1. Stop the R/3 System and all application servers.2. Make a database back up.3. Log on as the administrator.4. Stop the SAP Service SAP<SID>_Instancenumber.5. Change the value of DB2DB6EKEY in the NT system database with the program regedit.
a) Start regedit.exe.b) Choose the key: HKEY_LOCAL_MACHINE\SOFTWARE\SAP\<SID>\Environment.c) Select DB2DB6EKEY à Edit à Modify.d) Set the new value.e) Select OK.
6. Start the SAP Service SAP<SID>_Instancenumber.7. Log off and log on again as user <sid>adm.8. Call the program ntreg2env. This program is used to update the environment variables for the current
user (now <sid>adm). If there are several R/3 Systems, select the correct <SID>.9. Log off and log on again as user db2<sid>.10. Call the program ntreg2env. This program is used to update the environment variables for the current
user (now db2<sid>). If there are several R/3 Systems, select the correct <SID>.11. Log off from the R/3 System.12. On the server %DSCDB6HOME% only: Execute the above steps to update/create the file dscdb6.conf.13. Start the R/3 System.
Additional Information on DB2 Common Server under Windows NT
For more information, refer to the following documentation:
• R/3 Online Documentation: BC SAP Database Administration: DB2 common server [A.13]
• IBM Documentation: IBM DB2 Universal Database Administration Guide, IBM DB2 Universal DatabaseTroubleshooting Guide [E.9]
R/3 Security Guide : VOLUME II
Chapter 2 : The R/3 Security Toolbox
2-94 Version 2.0a : July 31, 1998 SAP AG
DB2/400
The OS/400 operating system provides a broad range of facilities for managing security objects. Access toobjects (such as libraries and files) can be regulated by:
• Object Authorities
• User Profiles
• Group Profiles
• Authorization Lists
For detailed information on setting up system security, refer to the IBM books:
• OS/400 Security - Basic [E.10]
• OS/400 Security - Reference [E.11]
We describe the measures that you need to take for a DB2 database under AS400 in the followingsections:
• General Description of the DB2/400 Security Concept (DB/400)
• Changing the Passwords of Standard R/3 Users (DB2/400)
• Useful Procedures for Database Access Protection (DB2/400)
• Useful Procedures for DB2/400
• Additional Information for DB2/400
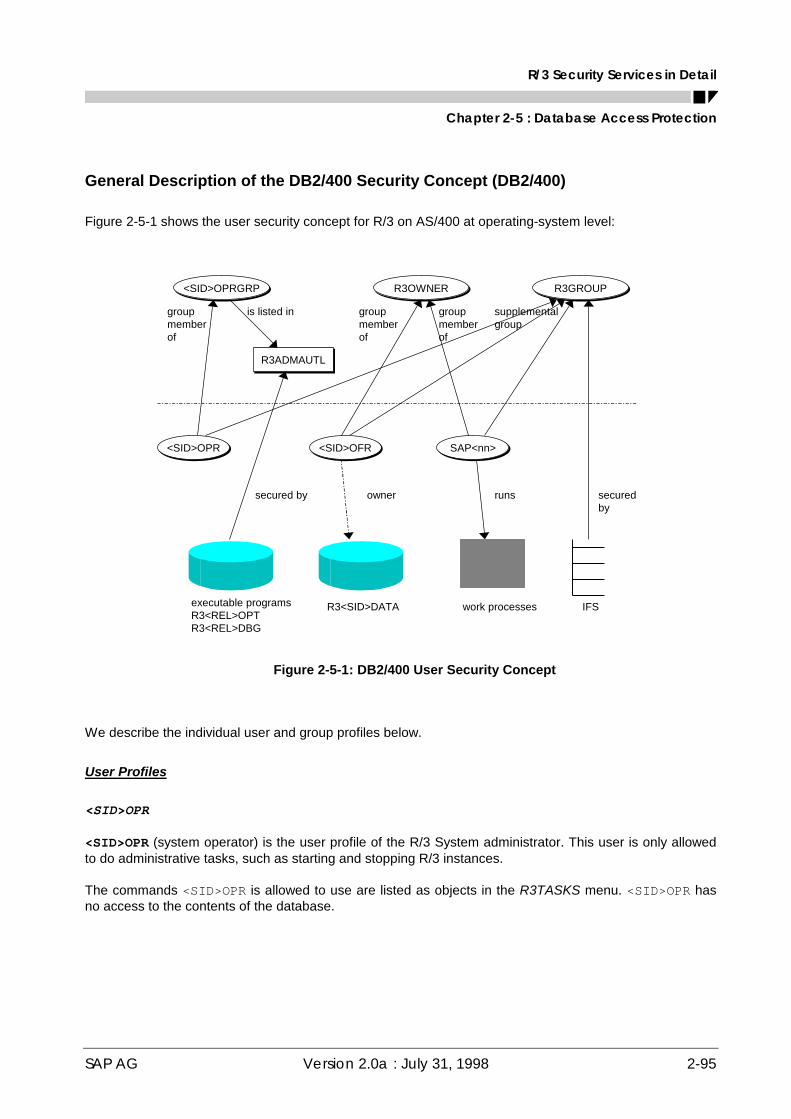
R/3 Security Services in Detail
Chapter 2-5 : Database Access Protection
SAP AG Version 2.0a : July 31, 1998 2-95
General Description of the DB2/400 Security Concept (DB2/400)
Figure 2-5-1 shows the user security concept for R/3 on AS/400 at operating-system level:
<SID>OPRGRP<SID>OPRGRP R3OWNERR3OWNER R3GROUPR3GROUP
is listed in groupmemberof
groupmemberof
supplementalgroup
groupmemberof
R3ADMAUTLR3ADMAUTL
<SID>OPR<SID>OPR <SID>OFR<SID>OFR SAP<nn>SAP<nn>
secured by owner runs securedby
IFSwork processesR3<SID>DATAexecutable programsR3<REL>OPTR3<REL>DBG
Figure 2-5-1: DB2/400 User Security Concept
We describe the individual user and group profiles below.
User Profiles
<SID>OPR
<SID>OPR (system operator) is the user profile of the R/3 System administrator. This user is only allowedto do administrative tasks, such as starting and stopping R/3 instances.
The commands <SID>OPR is allowed to use are listed as objects in the R3TASKS menu. <SID>OPR hasno access to the contents of the database.

R/3 Security Guide : VOLUME II
Chapter 2 : The R/3 Security Toolbox
2-96 Version 2.0a : July 31, 1998 SAP AG
<SID>OFR
<SID>OFR (system officer) is the user profile of the R/3 System superuser. This user has all authorizationsfor the R/3 System and the R/3 database R3<SID>DATA. <SID>OFR can perform all the tasks that it isauthorized to perform and it has certain additional rights. However, <SID>OFR has no special rights outsidethe R/3 environment. It also has no special rights to other R/3 Systems (with different SAP System IDs) thatmay run on the same AS/400. Note that <SID>OFR is not the same as QSECOFR, which is the superuser ofthe AS/400 system.
SAP<nn>
SAP<nn> runs the work processes. ("nn" represents the instance number.) The objects created by thisuser belong to the group R3OWNER.
Group Profiles
<SID>OPRGRP
<SID>OPRGRP is the group profile for <SID>OPR and thus allows the definition of multiple <SID>OPRusers.
R3OWNER
R3OWNER is the default owner for the R/3 libraries and all R/3 System objects. It is not possible to sign onas R3OWNER. It is the group profile for <SID>OFR and SAP<nn>.
R3GROUP
R3GROUP is the primary group of the R/3 Integrated File System (IFS) objects. It is the supplemental groupof all other R/3 generated user profiles. Its only purpose is to authorize R/3 users to IFS objects.
Superuser for AS/400
QSECOFR
QSECOFR is the superuser for AS/400. This user is not necessary to run and maintain the R/3 System.During installation of R/3, adopted authorities of QSECOFR are used (for creating the user profiles, forexample).
Properties of Objects Created during R/3 Installation
The following applies to the objects created during the installation of R/3:
• They are owned by R3OWNER with the exception of the database library R3<SID>DATA, which is ownedby <SID>OFR.
• IFS objects (directories and stream files) belong to the primary group R3GROUP.
• Public is always excluded. (No authorization is given to other users.)
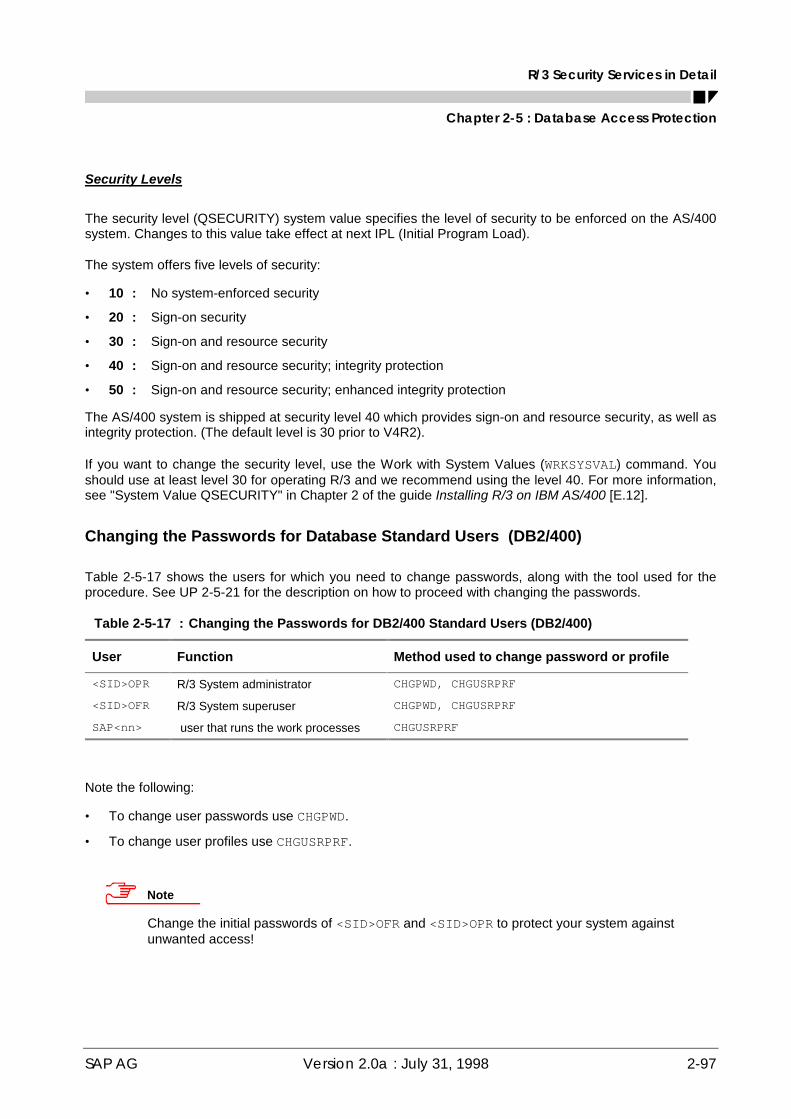
R/3 Security Services in Detail
Chapter 2-5 : Database Access Protection
SAP AG Version 2.0a : July 31, 1998 2-97
Security Levels
The security level (QSECURITY) system value specifies the level of security to be enforced on the AS/400system. Changes to this value take effect at next IPL (Initial Program Load).
The system offers five levels of security:
• 10 : No system-enforced security
• 20 : Sign-on security
• 30 : Sign-on and resource security
• 40 : Sign-on and resource security; integrity protection
• 50 : Sign-on and resource security; enhanced integrity protection
The AS/400 system is shipped at security level 40 which provides sign-on and resource security, as well asintegrity protection. (The default level is 30 prior to V4R2).
If you want to change the security level, use the Work with System Values (WRKSYSVAL) command. Youshould use at least level 30 for operating R/3 and we recommend using the level 40. For more information,see "System Value QSECURITY" in Chapter 2 of the guide Installing R/3 on IBM AS/400 [E.12].
Changing the Passwords for Database Standard Users (DB2/400)
Table 2-5-17 shows the users for which you need to change passwords, along with the tool used for theprocedure. See UP 2-5-21 for the description on how to proceed with changing the passwords.
Table 2-5-17 : Changing the Passwords for DB2/400 Standard Users (DB2/400)
User Function Method used to change password or profile
<SID>OPR R/3 System administrator CHGPWD, CHGUSRPRF
<SID>OFR R/3 System superuser CHGPWD, CHGUSRPRF
SAP<nn> user that runs the work processes CHGUSRPRF
Note the following:
• To change user passwords use CHGPWD.
• To change user profiles use CHGUSRPRF.
Note
Change the initial passwords of <SID>OFR and <SID>OPR to protect your system againstunwanted access!

R/3 Security Guide : VOLUME II
Chapter 2 : The R/3 Security Toolbox
2-98 Version 2.0a : July 31, 1998 SAP AG
Note
If you are using distributed directories on multiple AS/400s via /QfileSvr.400, you mustuse the same passwords on all the AS/400s for each of the users (<SID>OPR, <SID>OFR,and SAP<nn>).
On AS/400, the only user profiles apart from <SID>OFR that are allowed to access the database libraryR3<SID>DATA are the profiles R3SERVER and SAP<nn>. You cannot sign on with these user profiles.
Useful Procedures for DB2/400
UP 2-5-21 : Changing the passwords for <SID>OFR and <SID>OPR Using CHGPWD (DB2/400)
1. Sign on to the database server as user <SID>OFR.2. Enter the CHGPWD command in the command line.3. Enter the old and new passwords.
Repeat steps 1-3 for the user <SID>OPR.
Additional Information for DB2/400
For more information, refer to the following documentation:
• R/3 Online Documentation: BC SAP Database Administration: DB2/400 [A.15]
• IBM Documentation: OS/400 Security - Basic [E.10]
• IBM Documentation: OS/400 Security - Reference [E.11]
• IBM Documentation: Installing R/3 on IBM AS/400 [E.12]
• IBM Documentation: SAP R/3 Implementation for AS/400, Material Number SG24-4672 [E.13]
R/3 Security Services in Detail
Chapter 2-6 : Protecting Your Productive System(Change & Transport System)
SAP AG Version 2.0a : July 31, 1998 2-99
Chapter 2-6 : Protecting Your Productive System(Change & Transport System)
To protect the integrity and availability of your productive system, we recommend that you separate yourproductive system from your development system. We recommend at least two R/3 Systems, and from asecurity point of view, we recommend three separate systems. With this landscape, you can thoroughly testyour developments before making changes in your productive system.
The following topics pertain to protecting your productive system by separating your systems:
• The R/3 System Landscape
• Configuring the System Landscape for Changes
• Defining the Transport Process
• Responsibilities and their Corresponding Authorizations in R/3
• Emergency Corrections in the Productive System
• Additional Information for the Change and Transport System
The R/3 System Landscape
It is possible to develop, test, and run production within one R/3 System. However, to prevent developmentactivities from interfering with your production system, we recommend that you separate your developmentsystem from your productive system. We suggest a three-tier system that consists of separatedevelopment, quality assurance, and productive systems. The three systems share a common transportdirectory. With this set-up, you can thoroughly make and test changes without interfering with yourproductive operations. Figure 2-6-1 shows the basic set-up for our recommended three-tier systemlandscape.
Note
As of Release 3.1H, the Transport Management System (TMS) is available (TransactionSTMS) . With this tool, you no longer need to manually set-up the common transport directoryand you can also start imports from within R/3. See the online documentation BC TransportManagement System [A.24] for more information.

R/3 Security Guide : VOLUME II
Chapter 2 : The R/3 Security Toolbox
2-100 Version 2.0a : July 31, 1998 SAP AG
CommonTransport Directory
Manual imports only -to be performed by the system administrator
Production
Export
Quality Assurance
xAuto. Import
DevelopmentandCustomizing
DBDB
DB
Figure 2-6-1: Recommended Three-Tier System Landscape
The Three-Tier System Landscape
With the three-tier system landscape, you make all of the changes to your system (to include Customizing)in a separate development system. You export these changes to a common transport directory. You thenimport these changes into a quality assurance system where you can thoroughly test them. Once you aresatisfied that the changes are safe, you can then import them from the common transport directory intoyour productive system.
By following this recommendation, you provide for the following security measures:
• You ensure that changes take place in only one location, namely the development system.
• Your developers do not have access to productive data.
If you want to test with productive data, copy the subset of data that you want to use in the tests intothe quality assurance system, and perform your tests there.
• You can thoroughly test changes in a separate quality assurance system before they take effect in yourproductive system.
• You control the point in time when changes take effect in the productive system.
• You can reduce accidental or unauthorized changes to productive data by controlling when, fromwhom, and from which systems transfers take place.
• You can keep a record of changes for tracing or auditing purposes.
Note
If you discover errors in the quality assurance system that result in the need to make furtherchanges, we recommend that you make the changes in the development system and re-import them into the quality assurance system.
R/3 Security Services in Detail
Chapter 2-6 : Protecting Your Productive System(Change & Transport System)
SAP AG Version 2.0a : July 31, 1998 2-101
The Common Transport Directory
To store the data files between transports, we recommend you use the common transport directory asshown in Figure 2-6-1. The three systems use this directory for all exports and imports. All transportsshould run over this directory.
To protect the integrity, validity, and consistency of the data being transported, consider the followingpoints:
• The common transport directory is generally mounted using NFS mount. To prevent misuse, placethose systems that share the transport directory in a separate secure LAN (see Chapter 2-3 : NetworkInfrastructure.)
• Only the system administrator should be able to execute imports (using tp or R3trans).
• Archive the data in the transport directories so that you can review the transport activities if necessary.This is especially important for the transport logs and the TPPARAM configuration file (see OSS Note41731 [C.14] or 41732 [C.15]).
• If you have several R/3 Systems, separate them into logically differentiated system landscapes.
• If you use TMS, you may want to consider using a separate transport directory for the productivesystem.
If you consider this option, then take the following points into account:
- You increase security by making it harder for unauthorized persons to import data into theproductive system.
- However, you cannot start the import into the productive system within R/3. The systemadministrator (and we recommend only the system administrator) has to use ftp to initiate theimport.
- You no longer receive the return values or logs in the export system.
- In addition, you also have to copy any transport files from Hot Packages into both directories.
Configuring the System Landscape for Changes
You need to define the changes that are allowed in each of the individual systems that you have in yourcomplete system set-up (use Transaction SE06). Use the Transaction SE03 to view the settings. There aredifferences in the configuration possibilities between the Releases 3.0/3.1 and Release 4.0. Therefore, wediscuss them separately in the following sections.
Releases 3.0/3.1
In the Releases 3.0 and 3.1, you can set the following change options:
• Objects cannot be changed
We recommend this setting for the productive system.
• Only original objects (with correction system)
You can only change the objects if the original is in the system.

R/3 Security Guide : VOLUME II
Chapter 2 : The R/3 Security Toolbox
2-102 Version 2.0a : July 31, 1998 SAP AG
• All customer objects (with correction system)
With this setting, you can make repairs to customer objects, even if the original exists in anothersystem.
• All objects (with correction system)
You need this setting if you need to modify or repair objects from the SAP standard. This settingalso includes the full scope of changes to customer objects.
For more information, see the online documentation BC Transport System à Setting up the WorkbenchOrganizer and the Transport System à Setting the System Change Option [A.26].
Release 4.0
In Release 4.0, you can set the following change options in Transaction SE06:
• Repository and Client-Independent Customizing not modifiable
You cannot change any objects. We recommend this setting for productive systems.
• Repository and Client-Independent Customizing modifiable
You can change objects according to the specific settings for each namespace.
For modifiable systems, you have to define to what extent you can make changes for each namespace.You can:
• Allow changes to all objects (Choose: Edit à Select all)
With this setting, you can modify or repair objects from the SAP standard. This also includes the fullscope of changes to customer objects.
• Allow changes to your own objects only (Choose: Edit à Select all own)
With this setting, you can modify all of your own objects. (Own objects are objects belonging tonamespaces with a producer role. If you use this setting, then these namespaces are marked aschangeable.)
• Assign changes for each namespace individually.
With this setting, you can change all objects belonging to namespaces that are set to changeable.
For more information, see the online documentation BC Change and Transport Organizer à Setting up theSystem Group à Setting the System Change Option [A.26].
R/3 Security Services in Detail
Chapter 2-6 : Protecting Your Productive System(Change & Transport System)
SAP AG Version 2.0a : July 31, 1998 2-103
Defining the Transport Process
In addition to setting the change options, you also need to define the transport process. You need todetermine how you bring changes from your development successfully into your productive system. Thisinvolves defining the transport path (the series of systems) and defining the process itself (the series ofexports and imports).
The Transport Path
As with the change options, you define the transport path in the Transaction SE06. You enter the systemsthat exist in your landscape and, in addition to their change options, you define which systems transport toand from other systems. You must also enter this transport path in the TPPARAM file. (Change this file atthe operating system level.)
The Transport Process
Not only do you need to define the transport path, you also need to define the process used for transports.This is more an organizational measure than a technical measure that consists of determining whoperforms which tasks. In this section, we briefly describe the technical transport process in R/3 and the nextsection, Responsibilities and their Corresponding Authorizations, explains more about the roles andresponsibilities that apply.
In general, the following steps list the individual activities involved in the transport process in R/3. (Note thatwe do not define the corresponding roles here. You need to define your roles yourself.)
The Transport Process in R/3:
1. Release the change request to transport in Transaction SE09 or SE10.
Based on the change request, the Workbench Organizer generates files that reside in a commontransport directory at the operating system level. It also generates a control file, data file, and log filefor each released and exported change request.
2. Review the log files to ensure that the export was successful. If there were errors, you need to correctthem before continuing.
3. Import the R/3 objects into the database of the target system. Here, you must use the operating systemcommand tp.
You can use automatic import for imports into the quality assurance system; however, not forimports into the productive system.
Again, the Workbench Organizer displays log files that you should review.
4. Test your imports thoroughly. If errors occur, repair the objects in the source system and re-exportthem into the quality assurance system.
R/3 Security Guide : VOLUME II
Chapter 2 : The R/3 Security Toolbox
2-104 Version 2.0a : July 31, 1998 SAP AG
5. If additional systems exist in the complete system landscape, then you need to import the objects intothe other systems as well. This is normally not done automatically and you need to use the tpcommand at the operating system level. You should review all of the generated log reports to ensurethat no errors occurred.
Note
You can access the log files with the Workbench Organizer (Request Hierarchy).
Responsibilities and their Corresponding Authorizations in R/3
For your changes and transports to successfully take effect in your productive system, you need to have awell-organized administration team with defined roles and responsibilities. Changes to the productivesystem should not be the responsibility of one single person. You should define and document the variousroles and corresponding activities. The communication flow between the individuals in these roles shouldalso be well defined and practiced.
In this section, we discuss the responsibilities that apply to the transport process and their correspondingauthorizations in R/3. The roles we discuss here are suggestions based on the architecture of the processas defined in R/3. You may have to adjust them accordingly to apply them to your needs.
For example, we suggest that you distribute the roles between the following individuals:
• Team Members / Developers
Team members are responsible for releasing their own tasks in the Workbench Organizer.
• The Project Leader
The project leader is responsible for tasks such as:
- Defining and organizing a project using change request management
- Verifying the contents of a change request prior to release
(For example, ensuring that syntax checks have been performed for all objects with TransactionSE09.)
- Confirming the success of the release/export
- Verifying that the change request was successfully imported
- Confirming that the imported change request contained necessary objects and proper functionality
• The Administrator
The administrator is responsible for the operating system task of transporting. He or she issues theappropriate tp commands to activate the import of change requests and verify the success of animport. The administrator is not responsible for testing the contents of a change request.
• The Quality Assurance (QA) Team
The QA Team tests the entire functionality and integration of the individual components from thechange request in the quality assurance system.
R/3 Security Services in Detail
Chapter 2-6 : Protecting Your Productive System(Change & Transport System)
SAP AG Version 2.0a : July 31, 1998 2-105
Table 2-6-1 shows the corresponding pre-defined authorizations in R/3 that apply to the various roles (thecorresponding objects include S_CTS_ADMI and S_TRANSPRT.
Table 2-6-1 : Authorization Profiles for Change and Transport Roles
Role Authorization Profile
Quality Assurance (QA) Team not pre-defined in R/3
Administrator (Transport superuser) S_CTS_ALL
Project Leader S_CTS_PROJEC
Team Members / Developers S_CTS_DEVELO
End Users S_CTS_SHOW
Emergency Changes in the Productive System
Generally, users should not have programming, debugging with replace, or transport authorizations in yourproductive system. As previously mentioned, changes should occur in a single system, namely thedevelopment system. Table 2-6-2 shows those authorizations that apply to development and transport,which you should not give to users in your productive system.
Table 2-6-2 : Authorizations for Development and Transport
Authorization Object Purpose Comment
S_ADMI_FCD Executing Operating System Commandsfrom within R/3 (Transaction SM52)
• with REPL value
S_DEVELOP ABAP Workbench authorizations(programming and debugging -Transactions SExx)
• with activity 02 (change)• development object type PROG
and DEBUG
S_TRANSPRT Change and Transport authorizations
For more information on debugging authorizations, see the OSS Notes 52937 [C.20] and 65968 [C.24].
Caution
If you do have to make emergency changes in the productive system, define a procedure tomake the changes where you have supervised control over what happens. Give a single usertemporary authorizations for the Transaction SE38 and make sure that someone approvesthese changes. Once the user has made the changes, remove the authorization!
R/3 Security Guide : VOLUME II
Chapter 2 : The R/3 Security Toolbox
2-106 Version 2.0a : July 31, 1998 SAP AG
Additional Information for Change & Transport System
For more information, refer to the following documentation:
• R/3 Online Documentation: BC Transport System (3.0/3.1) [A.25]
• R/3 Online Documentation: BC Change and Transport Organizer (4.0) [A.3]
• R/3 Online Documentation: BC Transport Control [A.23]
• R/3 Online Documentation: BC Transport Management System [A.24]
• R/3 Online Documentation: BC Transport System à Setting up the Workbench Organizer and theTransport System à Setting the System Change Option [A.26]
• OSS Note 13202: Security Aspects in ABAP Programming [C.6]
• OSS Note 41731: Deletion of data in transport directory (2.1/2.2) [C.14]
• OSS Note 41732: Deletion of data in transport directory (3.0) [C.15]
• OSS Note 27928: Consequences in transport during password change [C.7]
• OSS Note 52937: Debugging authorizations (Releases 3.0A to 3.0F!) [C.20]
• OSS Note 65968: ABAP debugging authorizations as of Release 3.1G [C.24]
R/3 Security Services in Detail
Chapter 2-7 : Remote Communications (RFC & CPI-C)
SAP AG Version 2.0a : July 31, 1998 2-107
Chapter 2-7 : Remote Communications (RFC & CPI-C)
The Remote Function Call (RFC) and CPI-C interface are techniques that you can use for communicatingbetween SAP R/3 Systems and external systems or modules.
RFC enables applications to call SAP function modules that are located on other systems, and the CPI-Cinterface allows for program-to-program communication between SAP Systems and external programs orsystems.
There are several security measures that you should take when using RFC or CPI-C communications inyour R/3 System. We describe these measures in the following sections:
• General Security Measures
• RFC Authorizations
• Trusted System Networks (RFC)
• Authorizations for External Server Programs (RFC & CPI-C)
• Secure Network Communications for Remote Communications (RFC & CPI-C)
• Additional Information for Remote Communications
General Security Measures
As already stated, RFC is a technique for enabling both SAP and external applications to call SAP functionmodules that are located on other systems. RFC is an important means of communication in the R/3System landscape. We offer a number of interfaces that rely on RFC for their communications (forexample, ALE, BAPIs, and the RFC function modules themselves). We recommend that you use these pre-defined interfaces to access the database for business processing actions that involve dependenciesinstead of accessing the database directly. For more information, see the Interface Advisor in SAPNet.(See Service à index à Interface Advisor.)
The RFC interface exists for either R/3 and R/2 Systems, or for non-SAP systems:
• ABAP interface (R/3 and R/2 Systems)
An ABAP program can call a remote function with the CALL FUNCTION... DESTINATIONstatement. The DESTINATION parameter indicates the system where the function called is located.If the destination system is an R/3 System, then the function module called must be an ABAPfunction module that has been marked as "remote" in the function library.
- Remote functions can be called either synchronously or asynchronously.
- Remote debugging is also possible for communications with an R/3 System as destination (as ofRelease 3.0C).
• RFC-API: The calling interface for external programs (non SAP systems)
If either the calling partner or the called partner is not an ABAP program, then it must beprogrammed as a RFC communication partner. The R/3 System is shipped with the RFC-API(Application Programming Interface). You can install the SAP library in external systems to supportthe development of RFC partner programs.
R/3 Security Guide : VOLUME II
Chapter 2 : The R/3 Security Toolbox
2-108 Version 2.0a : July 31, 1998 SAP AG
Security Aspects
To ensure that your RFC or CPI-C connections operate securely, consider the following points and take theappropriate measures:
• Allow RFC access from known and designated systems only.
Systems that you allow to communicate with one another using RFC should be protected by theappropriate network measures (see Chapter 2-3 : Network Infrastructure). Either keep systems in aself-contained secure LAN, or control access using SAProuters and packet-filters.
• RFC connection requests are authenticated in R/3 using the standard password mechanism. (The usermaking the RFC request must remotely log on to the target system with a user-id and password.)
• Include authority checks in your own function modules that can be called using RFC.
• Restrict authorizations for maintaining RFC destinations (Transaction SM59). With the TransactionSM59, a user can remotely logon to an RFC destination (if the user in the target system is a DIALOGuser).
The necessary authorization objects are S_ADMI_FCD with the value NADM and S_TCODE withthe value SM59.
• Restrict access to the table RFCDES.
The RFC users and passwords are stored in this table, encrypted with a static key. However, notethat R/3 itself can decrypt the passwords. Therefore, restrict access to this table.
You should not store DIALOG users' information in this table. R/3 requests the DIALOG user's logininformation at the time of connection. Give only minimal rights to CPIC users in target systems.
• See OSS Note 43417 [C.16] to find out how to prevent misuse of the RFC Software Development Kit.
• Do not install the RFC Software Development Kit in your productive system, neither on your applicationservers nor on your front ends.
• Restrict possible external CPI-C or RFC server programs by making entries in the secinfo file (seethe section titled Authorizations for External Server Programs (RFC and CPI-C)).
• Disable remote monitoring of your SAP Gateways by setting the profile parameter gw/monitor to 1(see OSS Note 64016 [C.23]).
• As of Release 4.0, you can apply Secure Network Communications (SNC) protection to RFC calls andCPI-C connections.
R/3 Security Services in Detail
Chapter 2-7 : Remote Communications (RFC & CPI-C)
SAP AG Version 2.0a : July 31, 1998 2-109
RFC Authorizations
When assigning RFC authorizations to users in R/3, you need to consider the following points:
• The necessary authorization object for using RFC is S_RFC.
• The user in the target system needs to have this object in his or her authorization profile to be able toconnect to the target system using RFC.
• The RFC function modules are divided into specific groups. When assigning the authorization profile,you specify which function groups the user is allowed to call.
• Use trace functions to determine which function groups are necessary for a specific connection.
• Be restrictive when assigning these groups to users.
Trusted System Networks (RFC)
In a trusted system scenario, servers in one system 'trust' servers from another system. Users from the firstsystem (System A) that access the second system (System B) are not authenticated over passwords withevery access request. System B trusts System A, and because of this trusting relationship, System Baccepts the user from System A without further authentication. The user must have accounts in bothsystems, and he or she receives the authorizations from the target system, in this case, System B.
The advantage to this system is that users do not have to continually authenticate themselves whencommunicating with trusted systems. You save on the transmission of logon information over the network.
However, in order for trusted systems to securely operate, you need to maintain the following requirements,which involve higher administration costs:
• The systems need to have the same security-level requirements. (They consequently form a 'virtual'single R/3 System.)
• The systems need to have the same user administration. (All users need to exist in both systems andwith the same rights in both systems.)
If you can meet these requirements, then you might consider establishing a trusted system scenario.

R/3 Security Guide : VOLUME II
Chapter 2 : The R/3 Security Toolbox
2-110 Version 2.0a : July 31, 1998 SAP AG
Authorizations for External Server Programs (RFC and CPI-C)
The authorizations for external server programs are controlled by the SAP gateway. Either you can allowexternal server programs to be started over the gateway, or you can allow them to register themselves onthe gateway. The security information that the gateway needs to allow the starting or registration of theexternal server programs is stored in a file called secinfo. You can find this file in the path designated inthe profile parameter gw/sec_info; the standard value is /usr/sap/<SID>/<instance>/data/secinfo.
Note
If this file does not exist, then there are no restrictions applied to the starting or registration ofexternal server programs. We recommend that you use and maintain this file!
To define the authorizations for starting or registering external programs, modify the secinfo file byentering the information indicated in the following:
• Authorizations for Starting External Server Programs:
Enter the following line to allow a particular R/3 user <R/3_user> to start a particular externalserver program <ext_program> on a particular computer <server_host>.
USER=<R/3_user>, [PWD=<CPIC_pwd>,] [USER-HOST=<client_host>,] HOST=<server_host>,TP=<ext_program>;
The parameter <client_host> is an optional parameter where you can specify from which clientthe user must log on to the gateway to start the external server program.
The parameter <CPIC_pwd> is an optional parameter for CPI-C calls only, where you can specify apassword for the connection. (To set passwords in your own CPI-C developments, use the functionmodule CMSCSP.)
• Authorizations for Registering External Programs on the SAP Gateway:
Enter the following line to allow a particular server program on the server host <server_host> toregister itself on the SAP gateway under the program ID <program_ID>:
USER=*, HOST=<server_host>, TP=<program_ID>;
You must always specify USER=*, although this parameter is not further used.
With this method, you specify which server programs can register themselves on a SAP gateway.
• If you want to allow external operating system commands or the execution of external programs withinbatch jobsteps over the gateway, then include an entry for the program sapxpg in the secinfo file.
You can find more information on configuring the gateway in the following online documentation: BC SAPCommunication: Configuration Guide à SAP Gateway [A.9].
As previously mentaioned, as of Release 4.0, you can apply Secure Network Communications (SNC)protection to RFC calls and CPI-C connections. This also applies to the starting or registration of externalserver programs.
R/3 Security Services in Detail
Chapter 2-7 : Remote Communications (RFC & CPI-C)
SAP AG Version 2.0a : July 31, 1998 2-111
Secure Network Communications for Remote Communications
Secure Network Communication (SNC) uses an external security product to apply additional protection tothe communication paths between distributed R/3 components. As of Release 4.0, you can apply SNCprotection, which can include encryption, to both RFC and CPI-C connections. For more information, seeChapter 2-3 : Network Infrastructure in the section titled Secure Network Communications (SNC).
Additional Information on Remote Communications
For more information, refer to the following documentation:
• R/3 Online Documentation: Remote Communications [A.33]
• R/3 Online Documentation: BC SAP Communication: Configuration Guide à SAP Gateway [A.9]
• R/3 Online Documentation: BC SAP Communication: CPI-C Programmer's Guide [A.10]
• OSS Note 43417: RFC security loophole in 3.0C and 3.0D [C.16]
• OSS Note 63930: Gateway registration of RFC server program [C.22]
• OSS Note 64016: Use of the SAP gateway monitor GWMON [C.23]
• SAP Documentation: SNC User's Guide [E.6]

R/3 Security Guide : VOLUME II
Chapter 2 : The R/3 Security Toolbox
2-112 Version 2.0a : July 31, 1998 SAP AG
Chapter 2-8 : Secure Store & Forward Mechanisms (SSF) andDigital Signatures
As of Release 4.0, R/3 offers the Secure Store & Forward Mechanisms (SSF) as internal means to protectarbitrary data in the R/3 System. R/3 applications can use the SSF mechanisms to secure data integrity,authenticity and confidentiality. The data is protected even if it leaves the R/3 System. The first applicationsthat use SSF include:
• Production Planing - Process Industry
• Product Data Management
• ArchiveLink II
With time, more and more applications will use SSF for their security purposes.
In the following, we will discuss the global aspect of SSF. This background will help you understand the useof SSF in the application context. For further details, refer to the documentation pertaining to theapplication.
SSF uses digital signatures and digital envelopes to secure the data. The digital signature uniquelyidentifies the signer, is not forgeable, and protects the integrity of the data. (Any changes in the data afterbeing signed result in an invalid digital signature for the altered data.) The digital envelope ensures that thecontents of the data are only visible to the intended recipient.
SSF requires the use of a security product to perform its functions. As of Release 4.5, R/3 is shipped withSAPSECULIB (SAP Security Library) as the default SSF service provider. SAPSECULIB is a softwaresolution with functionality that is limitied to digital signatures. For support of crypto hardware (for example,smart cards, crypto boxes, etc.) or digital envelopes, you need a SAP-certified external security product.
In the following discussion, we refer to SSF in the general context, followed by the description of the specialaspects of the SAPSECULIB.
Digital signatures are based on public-key technology. To successfully use digital signatures, a public-keyinfrastructure (PKI) must be established. Because there is not yet a worldwide PKI available, you have toeither establish your own or rely on a Trust Center as a PKI service provider. Establishing your own localPKI for a very limited number of users only may or may not be easy, depending on the external securityproduct that you use. Even if establishing a local PKI is relatively easy, the process of linking the PKI toyour customers and business partners may involve a much greater effort. For you and your partners toagree on a common Trust Center, you can solve many of the PKI problems.
Regardless of your infrastructure, you need to take precautions in protecting the private keys. Eachparticipant that uses the digital signatures and envelopes needs to own a key pair (public and private key).This includes system components such as the R/3 application servers, if they act as signers. There arecertain measures that you need to take to protect these keys pairs. We describe these measures in thefollowing sections:
• Protecting Private Keys
• Protecting Public Keys
• SAP Security Library (SAPSECULIB)
• Additional Information for SSF and Digital Signatures

R/3 Security Services in Detail
Chapter 2-8 : Secure Store & Forward Mechanisms (SSF) and Digital Signatures
SAP AG Version 2.0a : July 31, 1998 2-113
Note
There are also laws in various countries that regulate the use of cryptography and digitalsignatures. These laws are currently controversial and may change. You need keep yourselfinformed on the impact these laws may have on your applications, and make sure that youare aware of any further developments.
Protecting Private Keys
There are two methods of storing the private keys. They are:
• Hardware solutions (for example, smart cards or crypto boxes)
• Software solutions (for example, PSE or PKCS#12)
Hardware Solutions
The best protection of the R/3 users' private keys is a smart card that you issue to each individual user.There is no way to reveal the private key from the smart card. The user has to authenticate him or herselfto his or her smart card, either using biometrics (for example, a fingerprint) or knowledge (for example, aPIN, password or passphrase entry). Nevertheless, each user needs to protect his or her smart card fromtheft or loss.
Caution
Do not allow your users to share smart cards or give them to others to use!
On the server side, you can use a crypto box instead of a smart card for higher performance.
Software Solutions
As an alternative, you can also use a software solution to store the users' private keys. You should beaware that the software solution is not as safe as the use of crypto hardware, however, less expensive toimplement. If you use a file to store the user's information and private key, then you need to take extra carein ensuring that the file is protected from any access by an attacker.
Protecting Public Keys
If the security product uses an address book to store the public keys instead of certificates, then you needto protect the address book from unauthorized modifications.
As an alternative, you can use certificates that are signed by a trusted Certification Authority (CA) to ensurethe authenticity of the public keys.
R/3 Security Guide : VOLUME II
Chapter 2 : The R/3 Security Toolbox
2-114 Version 2.0a : July 31, 1998 SAP AG
SAP Security Library (SAPSECULIB)
As of Release 4.5, R/3 offers the SAPSECULIB as the default security service provider for the SSF API.The functionality of the SAPSECULIB is limited to digital signatures and certificate management.Confidentiality (encryption / decryption) and the use of crypto hardware are not supported. For thosepurposes, you need to use an external security product.
The SAPSECULIB is a part of each R/3 application server. At startup, the application server looks for itsown (personal) security environment (PSE) . If no PSE is found (for example, at the first startup), theapplication server generates its own PSE.
This automated generation process is responsible for protecting the application server's PSE. The followingsections provide you with details to verify the correctness of that process.
Protection of the R/3 Application Servers' Private Keys
Each R/3 application server owns a public/private key pair. The private key is contained in the fileSAPSECU.pse in the subdirectory sec of the directory specified by the profile parameter DIR-INSTANCE.Only the user running the application server process (for example, <sid>adm) is allowed to access thefiles in the sec directory.
Caution
It is very important to protect this file from being read or copied by unauthorized persons! Anattacker who manages to copy this file has access to the R/3 application server's private keycan proceed to use it to produce digital signatures that belong to the application server.
If you have reasons to believe that the application server's private key has been compromised, you shoulddelete the files in the sec directory (do not forget to backup). During the next startup, the application serverwill generate a new PSE with a new key pair.
Caution
If any other application (for example, the archive using the ArchiveLink II interface) is usingthe R/3 application server's public key, and you replace it with a new one, then you have topublish the new application server's public key to that application. For details, refer to theapplication's documentation.
If you want to disable SAPSECULIB support for a R/3 application server, you can place an arbitrary file withthe name SAPSECU.pse in the sec directory. This will prevent the automatic PSE generation duringstartup of the application server. To re-enable SAPSECULIB support, delete the file and the applicationserver will generate a new PSE during next startup.
Caution
If you disable SAPSECULIB support for a R/3 application server and an application (forexample, the ArchiveLink II interface) tries to use it, it will fail.

R/3 Security Services in Detail
Chapter 2-8 : Secure Store & Forward Mechanisms (SSF) and Digital Signatures
SAP AG Version 2.0a : July 31, 1998 2-115
Protecting the R/3 Application Servers' Public Keys
The R/3 application servers are featured with an automatic PSE generation. A public-key certificate isgenerated, but it is self-signed (signed with the application server's private key) instead of being signed bya Certification Authority (CA).
Self-Signed Certificates
If you use self-signed certificates (for example, the application server signs its own certificate, as witharchive requests with ArchiveLink II), then the receiver of the certificate should explicitly validate it beforeaccepting it for the first time.
CA Signed Certificates
As an alternative, you can use certificates that have been signed by a CA. If the receiver trusts the CA,then the system can automatically verify the certificate. This automated verification process depends on theexternal security product that you use and can also require many preconditions. For more information, seethe documentation provided by the product vendor.
Additional Information on SSF and Digital Signatures
• SAP Documentation: Secure Network Communications and Secure Store & Forward Mechanisms withthe SAP R/3 System; Material Number: 50014335 [E.7]
• OSS Note 86927: Use of the digital signature in the R/3 System [C.30]
• OSS Note 66687: Use of network security products [C.25]
• OSS Note 110600: SAP Security Library (SAPSECULIB) [C.32]
R/3 Security Guide : VOLUME II
Chapter 2 : The R/3 Security Toolbox
2-116 Version 2.0a : July 31, 1998 SAP AG
Chapter 2-9 : Logging and Auditing
R/3 keeps a variety of logs for system administration, monitoring, problem solving, and auditing purposes.Logs and audits are important for monitoring the security of your system and to track events in case ofproblems.
In this guide, we discuss the importance and uses of the following auditing tools and logs. Sources ofadditional information are also included.
• The Audit Info System (AIS)
• The Security Audit Log
• The System Log
• Statistic Records in CCMS
• Logging of Specific Activities
- Application Logging
- Workflow Execution Logging
- Logging Changes to Business Objects
- Logging Changes to Tables
- Logging Changes to User Master Records, Profiles, and Authorizations
• Additional Information for Logging and Auditing
The Audit Info System (AIS)
The Audit Info System (AIS) is an auditing tool that you can use to analyze security aspects of your R/3System in detail. AIS presents its information in the Audit Info Structure (similar to IMG) so that you caneasily determine which activities you need to perform and which you have accomplished. The followingfunctions are available:
• Auditing procedures and documentation
• Auditing evaluations
• Audit data downloads
An auditor (or system administrator) can use AIS to check the security of your R/3 System. AIS is useful forthe following types of audits:
• Ongoing controlling
• Interim audits
• Preparation of year-end closing statements

R/3 Security Services in Detail
Chapter 2-9 : Logging and Auditing
SAP AG Version 2.0a : July 31, 1998 2-117
AIS is designed for business audits and systems audits. The Audit Info Structure is designed with thesetypes of audits in mind and we deliver pre-defined views based on these auditing types. You can modifythese views or develop your own, as you wish.
You access AIS with the Transaction SECR.
AIS is available as a standard component as of Releases 3.1I. We do support the import of AIS into otherreleases (as of 3.0D). For more information on AIS and its availability, see the OSS Notes 77503 [C.28]and 100609 [C.33].
The Security Audit Log
As of Release 4.0, you can use the Security Audit Log to record security-related system information suchas changes to user master records or unsuccessful log-on attempts. This log is a tool designed for auditorswho need to take a detailed look at what occurs in the SAP R/3 System. By activating the audit log, youkeep a record of those activities that you specify for your audit. You can then access this information forevaluation in the form of an audit analysis report.
The security audit log provides for long-term data access. The audit files are retained until you explicitlydelete them. Currently, the security audit log does not support the automatic archiving of the log files;however, you can manually archive them at any time.
You can record the following information in the Security Audit Log:
• successful and unsuccessful dialog log-on attempts
• successful and unsuccessful RFC log-on attempts
• RFC calls to function modules
• changes to User Master Records
• successful and unsuccessful transaction starts
• changes to the audit configuration
The audit files are located on the individual application servers. You specify the location of the files andtheir maximum size in the following profile parameters:
Table 2-9-1 : Profile Parameters for the Security Audit Log
Profile Parameter Definition Standard or Default Value
rsau/enable Activates the audit log on anapplication server.
Default Value:0 (audit log is not activated)
rsau/local/file Specifies the location of theaudit log on the applicationserver.
Standard Value:/usr/sap/<SID>/<instno>/log/audit_<SAP_instance_number>
rsau/max_diskspace_local Specifies the maximum lengthof the audit log.
Default Value:1,000,000 bytes
rsau/selection_slots Specifies the number ofselection slots for the audit.
Default Value:2
R/3 Security Guide : VOLUME II
Chapter 2 : The R/3 Security Toolbox
2-118 Version 2.0a : July 31, 1998 SAP AG
You specify the activities that you want to log in the Transaction SM19. You can read the log withTransaction SM20. You can delete old logs with the Transaction SM18.
For more information on the Security Audit Log, see the online documentation BC System Services à TheSecurity Audit Log [A.21].
System Log
The R/3 System logs all system errors, warnings, user locks due to failed log-on attempts from knownusers, and process messages in the system log (SysLog). The SysLog writes to two different types of logs:
• Local Logs
• Central Logs
Use the Transaction SM21 to access the system log output screen. With this transaction, you can read anyof the messages that are contained in the system logs. You can modify the view to meet your needs.
Local Logs
Each R/3 Application Server has a local log that receives all the messages output by this server. SysLogrecords these messages in a circular file on the server. When this log file reaches the maximumpermissible length, SysLog overwrites it, starting over from the beginning. (The location of the local log isspecified in the rslg/local/file profile parameter.)
Central Logs
We recommend that you also maintain a central log file on a selected application server. Each individualapplication server then sends its local log messages to this server. The server that you designate tomaintain the central log collects the messages from the other application servers and writes thesemessages to the central log.
The central log consists of two files: the active file and the old file. (The location of the active file is specifiedin the rslg/central/file profile parameter; the location of the old file is specified in therslg/central/old_file.)
The active file contains the current log. When it reaches the maximum size, the system performs a "log fileswitch". It deletes the old log file, makes the previously active file the 'old' file, and creates a new active file.The switch occurs when the size of the active log file is half the value as specified in therslg/max_diskspace/central parameter. (Note: R/3 does not support the saving of old system logfiles. If you want to save old logs, then you must archive them yourself.)
R/3 Security Services in Detail
Chapter 2-9 : Logging and Auditing
SAP AG Version 2.0a : July 31, 1998 2-119
Note
If you use Windows NT or AS/400, then note the following:
• Central logging is not available on the Windows NT and AS/400 platforms.
• Per default, the profile parameter rslg/collect_daemon/host should be setcorrectly. However, if you receive warnings, then make sure that this parameter is set toNONE.
• For these platforms, you can use the All remote syslogs function from Transaction SM21to read the data of all the instances in your R/3 System. In the alert monitor, if youreceive an alert, you can use the Remote syslog function to analyze the affectedinstance.
Profile Parameters and File Locations
Table 2-9-2 shows some of the profile parameters for the system log along with their standard values:
Table 2-9-2 : Profile Parameters and File Locations for the System Log
Profile Parameter Definition Standard or Default Value
rslg/local/file Specifies the location of thelocal log on the applicationserver.
Standard Value:/usr/sap/<SID>/D20/log/SLOG<SAP-instance_number>
rslg/collect_daemon/host Specifies the applicationserver that maintains thecentral log.
Default Value:<hostname of maininstance>
rslg/central/file Specifies the location of theactive file for the central logon the application server.
Standard Value:/usr/sap/<SID>/SYS/global/SLOGJ
rslg/central/old_file Specifies the location of theold file for the central log onthe application server.
Standard Value:/usr/sap/<SID>/SYS/global/SLOGJO
rslg/max_diskspace_local Specifies the maximum lengthof the local log.
Default Value:500,000 bytes
rslg/max_diskspace_central Specifies the maximum lengthof the central log.
Default Value:2,000,000 bytes
Note
This is not a complete list. There are additional profile parameters that refer to the systemlogs; they all begin with rslg*. However, we do not discuss them all here. You can use theTransaction RZ11 to access the rest of the parameters.
For more information, see the online documentation BC System Services à The System Log [A.22].

R/3 Security Guide : VOLUME II
Chapter 2 : The R/3 Security Toolbox
2-120 Version 2.0a : July 31, 1998 SAP AG
Statistic Records in CCMS
The R/3 System logs R/3 activities, categorized by transaction and user, in statistical records. You canaccess these records with the Transaction STAT.
Statistic records logging is controlled by the following profile parameters described in Table 2-9-3:
Table 2-9-3 : Profile Parameters for Statistic Records in CCMS
Parameter Description Default Permitted value
stat/level Sets statistic record on or off 1 0 : off
1 : on
stat/version Version of statistic record 2 1 : as in Release 2.2
2 : additional RFC statistics andmemory usage statistics
stat/file Location of the statisticrecords file
\usr\sap\<SID>\<instance>\data\stat.DAT
path name
Users who access global statistic records need an authorization based on the object S_TOOLS_EX in theirprofiles. Without this authorization, a user can only access his or her statistic records.
For more information, see the online documentation: BC Computing Center Management System à R/3Accounting Interface à Available Statistics Data [A.5].
Logging of Specific Activities
R/3 logs other specific activities in various logs. We discuss the following specific logs below:
• Application Logging
• Logging Workflow Execution
• Logging Using Change Documents (Changes to Business Data Objects)
• Logging Changes to Table Data
• Logging Changes to User Master Records, Profiles, and Authorizations
Caution
A user with programming or debugging authorizations can evade these logs. Do not assignthese authorizations in your productive system!
R/3 Security Services in Detail
Chapter 2-9 : Logging and Auditing
SAP AG Version 2.0a : July 31, 1998 2-121
Application Logging
Application logging records the progress of the execution of an application so that you can reconstruct itlater if necessary. Whereas the system log logs system events, you can use the application log to recordapplication-specific events. Use the Transaction SLG0 to define entries for your own applications in theapplication log. Use the Transaction SLG1 to analyze the application log.
The application log is a table structure consisting of several tables. Applications write their entries to thesetables over R/3 function modules. (These modules conform to the R/3 authorization concept.)
You can also find out who accessed these function modules over a where-used list by using the ReportRSFKT100 (function group: SLG0).
For more information, see the online documentation ABAP Development Workbench à ExtendedApplications Function Library à Create application log [A.8].
Logging Workflow Execution
SAP Business Workflow is a cross-application tool that integrates transactions that span variousapplications.
The technology and tools needed to automate the control and processing of cross-application processesare included in the SAP Business Workflow functions, to include logging and analysis functions. Theseactivities are not included in application logging.
The SAP Business Workflow analysis functions (such as the transactions SWI2 or SWI5) are alsoprotected by the R/3 authorization concept.
For more information, see the online documentation BC Business Engineering Workbench à SAPBusiness Workflow [A.34].
Logging Using Change Documents
Business data objects are changed frequently. We recommend that you log these changes for objects thatare critical or susceptible to audits. You may find it helpful, and sometimes necessary, to be able to trace orreconstruct such changes later, for example for investigating or auditing purposes. R/3 logs changes tobusiness data objects in change documents.
R/3 does not automatically use change documents for business objects. You must activate the processyourself.
To activate a change document for an object, you have to perform the following steps:
1. Create the change document. (Use the Transaction SCD0.)
2. Activate the change document for the object. (Use data element maintenance: Transaction SE11.)
3. Generate an update for the object. (Again, use the Transaction SCD0.)
4. Insert the appropriate calls in the corresponding programs.
To view change documents for an object, also use the Transaction SCD0.
For more information, see BC Extended Applications Function Library à Change documents [A.7] and BCABAP Dictionary (Maintaining ABAP Dictionary Objects) [A.1].

R/3 Security Guide : VOLUME II
Chapter 2 : The R/3 Security Toolbox
2-122 Version 2.0a : July 31, 1998 SAP AG
Logging Changes to Table Data
As with business objects, we recommend that you activate the logging of table data for those tables thatare critical or susceptible to audits. Again, you must explicitly activate this logging. Note the following:
• You must start the R/3 System with the rec/client profile parameter set. This parameter specifieswhether R/3 logs for all clients or only specific clients. We recommend setting this parameter to log allclients in your productive system.
• Set the Log data changes flag for those tables that you want to have logged.
If both of these conditions are met, the database logs table changes in the table DBTABPRT. (Setting theLog data changes flag only does not suffice in recording table changes; you must also set therec/client parameter.)
You can view these logs with the Transaction SCU3.
For more information, see the OSS Note 1916 [C.1].
Logging Changes to User Master Records, Profiles and Authorizations
R/3 logs changes made by a user administrator in non-transparent tables in the database. Access to thesetables is protected by the R/3 authorization concept. Once these logs have been archived, they aredeleted. (Use R/3 archiving tools to archive these logs.)
Depending on your release, use either the Authorization Infosystem or Transaction SU01 to access theselogs. You can view the following changes:
• Changes made directly to a user's authorization.
These are changes made to the profile list in the user's master record. This does not include indirectchanges that occur when authorizations or profiles are changed. View the change documents forthe profiles and authorizations to check those changes.
• Changes to:
- the user password (hashed representation only)
- the user type
- the user group
- the validity period
- the account number
• Changes made directly to profiles or authorizations.
For more information, see BC Users and Authorizations à Creating and Maintaining User Master Recordsà Displaying Change Documents [A.30].

R/3 Security Services in Detail
Chapter 2-9 : Logging and Auditing
SAP AG Version 2.0a : July 31, 1998 2-123
Additional Information for Logging and Auditing
For more information, refer to the following documentation:
Audit Info System
• OSS Note 77503: Audit Information System (AIS) Version 1.5 [C.28]
• OSS Note 100609: Audit Information System (AIS) - installation [C.33]
Security Audit Log
• R/3 Online Documentation: BC System Services à The Security Audit Log (as of 4.0B) [A.21]
System Log
• R/3 Online Documentation: BC System Services à The System Log [A.22]
Statistical Records
• R/3 Online Documentation: BC Computing Center Management System à R/3 System Administrationà R/3 Accounting Interface à Available Statistics Data [A.5]
Application Logging
• R/3 Online Documentation: BC Extended Applications Function Library à Create application log [A.8]
Logging Workflow Execution
• R/3 Online Documentation: SAP Business Workflow [A.34]
Logging Using Change Documents
• R/3 Online Documentation: BC Extended Applications Function Library à Change documents [A.7]
• R/3 Online Documentation: BC ABAP Dictionary (Maintaining the ABAP Dictionary Objects) [A.1]
Logging Changes to Table Data
• OSS Note 1916: Logging table changes in R/3 [C.1]
Logging Changes to User Master Records, Profiles and Authorizations
• R/3 Online Documentation: BC Users and Authorizations à Creating and Maintaining User MasterRecords à Displaying Change Documents [A.30]

R/3 Security Guide : VOLUME II
Chapter 2 : The R/3 Security Toolbox
2-124 Version 2.0a : July 31, 1998 SAP AG
Chapter 2-10 : Special Topics
In this chapter, we describe security measures that you can or need to take for the following special topics:
• Protecting R/3 Internet Application Components (IAC)
• Protecting Application Link Enabling (ALE) Applications
• Security when Using R/3 Online Services
• Virus Protection and SAPgui Integrity Checks
• Synchronized Data Access With Locking
• Protecting Specific Tables, Authorization Objects, and other Specific Objects
R/3 Internet Application Components (IAC)
R/3 Internet Application Components (IAC) enable users to perform business functions in R/3 using aWorld Wide Web browser as the user interface instead of SAPgui.
We supply a number of IACs that you can use as they are, or you can modify them to meet your ownneeds. (For example, you can configure the Web user interface to suit your corporate identity.) In addition,you can also develop your own Internet Application Components.
The Internet Transaction Server (ITS) serves as the link between the R/3 System and the Web. It allows foreffective communication between the two systems, in spite of their technical differences.
The Internet Transaction Server is an intermediate server between the Web server and the R/3 ApplicationServer. It controls the data flow between the R/3 System and the Internet and provides access to theInternet Application Components. This basic set-up is shown in Figure 2-10-1:
R/3Application
ServerWeb Server
InternetTransaction
Server
Web Browser
Figure 2-10-1 : The Internet Transaction Server

R/3 Security Services in Detail
Chapter 2-10 : Special Topics
SAP AG Version 2.0a : July 31, 1998 2-125
When connecting to the Internet, it is essential to protect your system from undesired access and attacksagainst your computers. We describe how the ITS is designed as well as the measures and conceptsnecessary for providing security with Internet applications in the following sections:
• The Overall Architecture of the ITS
• A Secure Network Infrastructure for the ITS
• Configuring the Server and Network Components
• An Example Network Setup
• Using Security Services / Providing Privacy
• Authenticating Users
• Protecting Session Integrity
• Setting Security Levels
• Declaring Allowed Applications
• Additional Information for Internet Applications
Although we refer to the Internet throughout the discussion, Intranet applications may also require acertain degree of protection, depending on your security policy. The following descriptions apply toIntranets as well.
The OSS Note 60058 [C.21] also contains information pertaining to security for R/3 on the Internet.
Note
In the following discussion, we describe the ITS Release 2.0, except for those points where anotable difference to earlier releases exists. In these cases, we explicitly mention thenecessary information pertaining to the earlier releases.
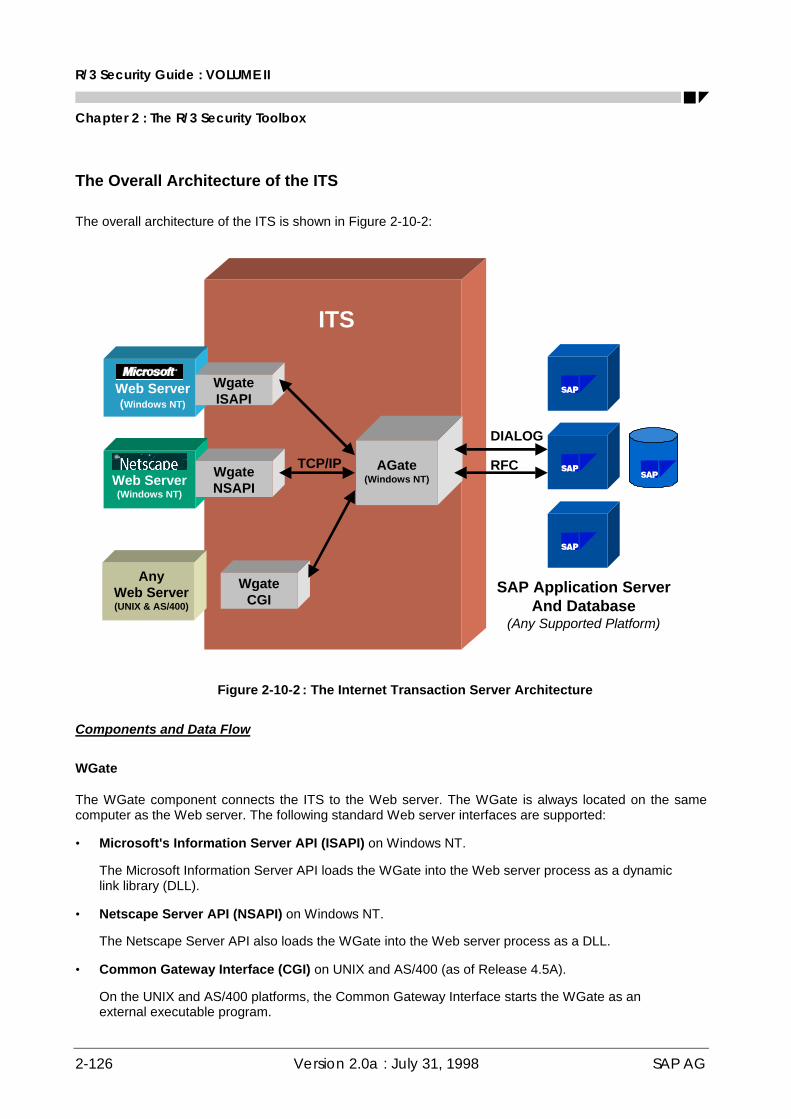
R/3 Security Guide : VOLUME II
Chapter 2 : The R/3 Security Toolbox
2-126 Version 2.0a : July 31, 1998 SAP AG
The Overall Architecture of the ITS
The overall architecture of the ITS is shown in Figure 2-10-2:
ITS
Web Server(Windows NT)
WgateISAPI
Web Server(Windows NT)
WgateNSAPI
WgateCGI
AnyWeb Server(UNIX & AS/400)
SAP Application ServerAnd Database
(Any Supported Platform)
AGate(Windows NT)
TCP/IP
DIALOG
RFC
Figure 2-10-2 : The Internet Transaction Server Architecture
Components and Data Flow
WGate
The WGate component connects the ITS to the Web server. The WGate is always located on the samecomputer as the Web server. The following standard Web server interfaces are supported:
• Microsoft's Information Server API (ISAPI) on Windows NT.
The Microsoft Information Server API loads the WGate into the Web server process as a dynamiclink library (DLL).
• Netscape Server API (NSAPI) on Windows NT.
The Netscape Server API also loads the WGate into the Web server process as a DLL.
• Common Gateway Interface (CGI) on UNIX and AS/400 (as of Release 4.5A).
On the UNIX and AS/400 platforms, the Common Gateway Interface starts the WGate as anexternal executable program.

R/3 Security Services in Detail
Chapter 2-10 : Special Topics
SAP AG Version 2.0a : July 31, 1998 2-127
AGate
The AGate program is implemented as a Windows NT service. Although the AGate can be located on thesame machine as the WGate, we recommend that you keep the two components on two separatemachines.
The AGate is responsible for managing the communication to and from R/3, including:
• Establishing the R/3 connection using DIAG (SAPgui) or RFC protocols
• Generating the HTML documents for the R/3 applications
• Managing user login data
• Managing session context and time-outs
• Code page conversions and national language support
Data Flow
The WGate establishes the connection and forwards requests to the AGate. The components communicateusing the SAP Network Interface (NI), which in turn uses a TCP connection.
The AGate receives Web requests from the WGate and communicates with the R/3 application server(using DIAG or RFC). It processes the HTTP request, sends the appropriate data (including logininformation) to the R/3 System, retrieves information from R/3, processes it, and sends the response backto the WGate.
A Secure Network Infrastructure for the ITS
The R/3 Internet architecture has many built-in security features, such as the possibility to run the WGateand AGate on separate hosts. We strongly recommend that you set up a network infrastructure that makesuse of these features to control access from the Internet to internal networks. We also recommend you useother security components, such as firewalls, packet filters and SAProuters to separate the individual partsof the network from another. Thereby, you can ensure that unauthorized access, if it does occur, isrestricted to a small part of the system and can not harm your internal network and the R/3 System.Figure 2-10-3 shows some of the components that you can use to build a secure network architecturewhen using ITS:

R/3 Security Guide : VOLUME II
Chapter 2 : The R/3 Security Toolbox
2-128 Version 2.0a : July 31, 1998 SAP AG
Firewall + SAProuterFirewallSSL
Web Server
Protection:
Data Replication with ALE
Productive R/3 System
Web Browser
https
ITS Server R/3 System
Figure 2-10-3 : Providing ITS Security
You may decide to implement some or all of these components depending on your security policy. You canfind details about the components and a concrete example network setup in the sections below.
Note
To improve performance and reduce the amount of data available to your Internetapplications, we recommend that you use a separate system (replicated using ApplicationLink Enabling) for your "Internet" system, instead of your productive system.
Configuring the Server and Network Components
Our recommended network topology consists of three separate network segments that are connected bytwo firewall systems. Note that we use the term "firewall" in a very broad sense here. Some of thedescribed firewall systems may only consist of a usual network router with packet filtering capabilities.Refer to Chapter 2-3 : Network Infrastructure for details on our networking topology and an introduction onTCP ports. Here we cover only the specific aspects pertaining to Internet applications with R/3.

R/3 Security Services in Detail
Chapter 2-10 : Special Topics
SAP AG Version 2.0a : July 31, 1998 2-129
Protecting the Web Server
You should protect your Web server against any kind of network packets that are not needed for the HTTPcommunication. To accomplish this, configure the router to pass packets to the corresponding TCP portonly.
Usually a Web server requires one TCP service. Port number 80 is reserved for HTTP and used by defaultby all servers and browsers. Web servers that support HTTPS (HTTP plus the Secure Sockets Layerprotocol), use port number 443 by default.
You should configure the Web server operating system as closed and restrictive as possible. You shoulddisable all unnecessary network services. Refer to Chapter 2-4 : Operating System Protection for moredetails.
Protecting the AGate Server
We strongly recommend that you take additional measures to isolate the Web server from your internalcorporate network. This prevents additional damage if, for example, an intruder would manage to gaincontrol of the Web server. We also recommend that you impose very strict control over any connectionbetween the external network, where the Web server and the WGate are located, and your internalcorporate network, which contains the AGate.
We recommend that you keep the AGate in your internal network, which should be protected with a firewalland SAProuter. We explain how to protect your internal network with these components in Chapter 2-3 :Network Infrastructure. The following description provides specific information that applies to the ITS. It isvalid for ITS Release 1.1 or higher. We no longer advise using Release 1.0 productively.
Note
It is possible to install multiple "virtual" AGates on a single computer. Each virtual AGate thenhas a unique name and a separate NT service. The executable files are shared with all of theAGates on a single computer. Each WGate is then configured to connect to exactly onevirtual AGate on one computer.
TCP Ports
The WGate and AGate communicate using one TCP socket connection. The WGate initiates theconnection to the TCP port of the AGate service. The connection is opened for each new incoming requestand closed once the connection is finished.
The AGate service's port is sapavw00_<INST>, where <INST> is the name of the virtual ITS instance.The file \WINNT\System32\Drivers\etc\Services (/etc/services on UNIX) defines which portnumber corresponds to this port name; normally 3900 for the first virtual AGate installed. Multiple virtualAGates use separate ports.

R/3 Security Guide : VOLUME II
Chapter 2 : The R/3 Security Toolbox
2-130 Version 2.0a : July 31, 1998 SAP AG
When installing the ITS, ten TCP ports are automatically added to the file etc\services, for example:
sapavw00_<INST> tcp/3900sapavw01_<INST> tcp/3901 sapavw08_<INST> tcp/3908sapavwmm_<INST> tcp/3909
ITS versions prior to 2.0 allocate 100 ports in a similar fashion. However, because these versions do notsupport virtual ITS instances, the <INST> string is empty.
Note
For normal ITS installations only the port sapavw00_<INST> is required for the firewall. Theother ITS ports are not used and may be deleted from etc\services.
During installation, the ITS setup program tries to find a sequence of 10 unused ports on the installationmachine starting with port number 3900. As a result, the port number associated with port namesapavw00_<INST> may vary for different installations. You need to check your installation to find outwhich port number is actually used. Each virtual ITS instance uses separate ports.
Note
Make sure that the port numbers associated with port name sapavw00_<INST> are identicalon the WGate and the AGate host. This is not automatically ensured.
Using SAProuter
For a detailed description of the SAProuter functionality and administration, see the online documentation,BC SAProuter. Configure the SAProuter to relay only one specific WGate–AGate connection and deny allother connection attempts.
Configure the WGate to connect to the AGate via a SAProuter. Enter the route string in the NT registry onthe WGate host in the following location where <INST> is the name of the virtual ITS installation:
HKEY_LOCAL_MACHINE\Software\SAP\ITS\2.0\<INST>\Connects\Host
The key may contain a route string of the type:
/H/<SAProuterhost>/S/<routerservice>/H/<host>
Do not specify the AGate port in the route string.
The SAProuter host must be able to map the port that is entered in the following key to a port number:
HKEY_LOCAL_MACHINE\Software\SAP\ITS\2.0\<INST>\Connects\PortAGate
The default entry is sapavw00_<INST>. If this port is not mapped in the SAProuter's etc\services file,enter the port number directly in this key.
R/3 Security Services in Detail
Chapter 2-10 : Special Topics
SAP AG Version 2.0a : July 31, 1998 2-131
Using other Firewall Products
You can use other firewall products (such as plug gateways) to relay the TCP connection from the WGateto the AGate.
For example, you can use a plug gateway to transparently forward an incoming TCP connection to theAGate port on the AGate host. In this case, enter the name of IP address of the plug gateway host in thefollowing WGate registry key:
HKEY_LOCAL_MACHINE\Software\SAP\ITS\2.0\<INST>\Connects\Host
Enter the import port of the plug gateway in the following key:
HKEY_LOCAL_MACHINE\Software\SAP\ITS\2.0\<INST>\Connects\PortAGate
Refer to the documentation for your firewall for further information.
Protecting the R/3 Servers
You should always protect your server LAN with a firewall and SAProuter as described in Chapter 2-3 :Network Infrastructure. These measures also apply to networks that include the ITS.
To protect the AGate from unauthorized access, we recommend that you place the AGate in the serverLAN with the R/3 application server. In this way, the AGate is protected with the same mechanisms thatprotect your server LAN.
Because the AGate communicates with the R/3 application server in the same way as the typical SAPgui(using DIAG or RFC), you may also want to protect this connection. For this purpose, you can include anadditional packet filter (either with or without a SAProuter) between the AGate and the R/3 applicationserver. See the OSS Note 104576 [C.34] for more information on this set-up.
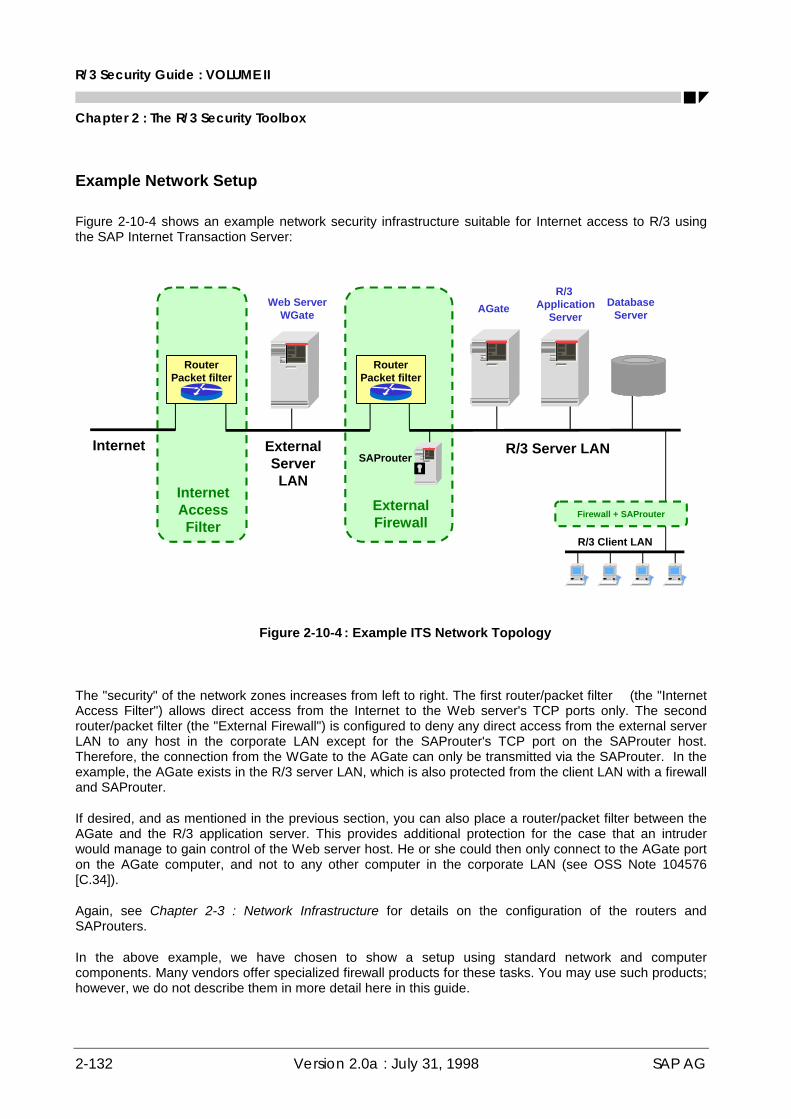
R/3 Security Guide : VOLUME II
Chapter 2 : The R/3 Security Toolbox
2-132 Version 2.0a : July 31, 1998 SAP AG
Example Network Setup
Figure 2-10-4 shows an example network security infrastructure suitable for Internet access to R/3 usingthe SAP Internet Transaction Server:
Internet
ExternalFirewall
RouterPacket filter
R/3 Application
ServerWeb Server
WGate AGate
SAProuter
RouterPacket filter
InternetAccessFilter
DatabaseServer
R/3 Server LANExternalServerLAN
Firewall + SAProuter
R/3 Client LAN
Figure 2-10-4 : Example ITS Network Topology
The "security" of the network zones increases from left to right. The first router/packet filter (the "InternetAccess Filter") allows direct access from the Internet to the Web server's TCP ports only. The secondrouter/packet filter (the "External Firewall") is configured to deny any direct access from the external serverLAN to any host in the corporate LAN except for the SAProuter's TCP port on the SAProuter host.Therefore, the connection from the WGate to the AGate can only be transmitted via the SAProuter. In theexample, the AGate exists in the R/3 server LAN, which is also protected from the client LAN with a firewalland SAProuter.
If desired, and as mentioned in the previous section, you can also place a router/packet filter between theAGate and the R/3 application server. This provides additional protection for the case that an intruderwould manage to gain control of the Web server host. He or she could then only connect to the AGate porton the AGate computer, and not to any other computer in the corporate LAN (see OSS Note 104576[C.34]).
Again, see Chapter 2-3 : Network Infrastructure for details on the configuration of the routers andSAProuters.
In the above example, we have chosen to show a setup using standard network and computercomponents. Many vendors offer specialized firewall products for these tasks. You may use such products;however, we do not describe them in more detail here in this guide.

R/3 Security Services in Detail
Chapter 2-10 : Special Topics
SAP AG Version 2.0a : July 31, 1998 2-133
Using Security Services / Providing Privacy
You can use our additional security services to increase the security of the following connections.
• Between Web Browser and Web Server
• Between WGate and AGate
• Between AGate and R/3
Between Web Browser and Web Server
All data (including passwords) is usually transmitted through the Internet in plain text. To maintainconfidentiality for this data, you can apply encryption to the connection between the Web server andbrowser. The SAP-supported Web servers and all modern browsers support the encryption of the HTTPdata stream by means of the Secure Sockets Layer protocol (SSL), also known as HTTPS. HTTPS datastreams are completely transparent to the ITS. For more details regarding encryption techniques, see thedocumentation supplied by the Web server manufacturer.
In order to use SSL encryption, the Web server must obtain an X.509 certificate. We refer to this certificatein this section as the server certificate. The server certificate is used to authenticate the server. It isissued by a Certification Authority (CA). If the browser receives a server certificate issued by a trusted CA,then the browser can verify that it is connected to the intended server.
If you want to offer a service for all Internet users, this server certificate should have been issued by anofficial CA that is trusted by most browsers used in the Internet. For internal users, you can set up acorporate CA and configure the browsers to trust this CA.
The Web server uses browser certificates to authenticate the user. To restrict access to R/3, configurethe Web server to accept only connection requests that present valid browser certificates. The browsercertificates are again issued by a CA.
Between WGate and AGate
• ITS 1.0 and ITS 1.1
Data sent between the WGate and the AGate is encrypted using a static key. This key is easilyaccessible; therefore, the protection that this encryption provides is minimal.
• ITS 2.0
For better protection, as of ITS Release 2.0, you can use SNC (Secure Network Communications)to protect the link between the WGate and AGate. SNC uses an external security product to applyencryption to communication links between components of an R/3 System. See Chapter 2-3 :Network Infrastructure in the section titled Secure Network Communications (SNC) for details. Referto the documentation provided with the security product itself for instructions on the necessaryconfiguration.
Between AGate and R/3
For current releases, we do not offer any security services for the connection between the AGate and theR/3 application server. However, as of ITS 2.2 (available with R/3 Release 4.5), you will also be able to useSNC for this communication link.

R/3 Security Guide : VOLUME II
Chapter 2 : The R/3 Security Toolbox
2-134 Version 2.0a : July 31, 1998 SAP AG
Authenticating Users
In the Internet scenario, you do not necessarily know which users want to access the application datawithin R/3. In addition, for the large number of Internet users, you normally cannot set up a separateaccount for each user. Therefore, if you want to make certain Internet Application Components available toanonymous Internet users, you normally set up service users with pre-defined passwords in R/3. Theseusers should have only the permissions necessary to access the application (for example, a productcatalog). The corresponding ITS service is configured with this logon information, to include the password.If you need to further authenticate the Internet user (for example, when he or she places an order), theapplication itself must perform the additional authentication. (For example, the application verifies thecustomer number and password using corresponding function calls.)
For each application that is accessible over the Internet, you must create a service file, which is located onthe AGate. This file contains information that is specific to the application (for example, the R/3 transactionto start, the R/3 client, the service user name and password to use). The ITS needs this information to runthe application. The password does not appear as clear text in the service file, but is encrypted using astatic key. Therefore, if you have service users with authorizations that are worth protecting, then takespecial care to protect the AGate from unauthorized access.
ITS does not store any security-relevant information on the WGate.
In an Intranet scenario, users can log on to R/3 over the ITS using their R/3 user name and password.User names and passwords are not stored permanently in the ITS in this case. User authentication takesplace entirely within the R/3 System. Internet Application Components are subject to the usual R/3authorization concept, just like any other R/3 transactions.
Protecting Session Integrity
To maintain the integrity of the multi-step transactions when using IACs, the ITS issues a unique sessionidentification number when the user makes his or her first request. This session ID is sent to the browserwith the first HTML page. It must be passed back to the ITS with every successive request. The session IDensures that another user cannot easily take over a current session. (With HTTPS, a session cannot betaken over by another user.)
ITS 1.0 and 1.1 use HTTP-Cookies to store the session ID. As of ITS version 1.11, you can disablecookies. In these versions the session ID is stored directly inside the HTML pages.
As an additional security feature, the ITS stores the client IP address along with the session ID. A possibleeavesdropper, who listens on the network connection and thus acquires the current session ID, cannoteasily issue a fake reply. (His or her IP address does not match that of the original user.)
It is possible to configure the number of significant bytes used for the network address comparison. On theAGate, the following registry key specifies a mask of the significant network address bits:
HKEY_LOCAL_MACHINE\SOFTWARE\SAP\ITS\2.0\<INST>\Connects\IPChecking
The default value is 255.255.255.255, which specifies that the entire address should be compared. For anIntranet solution, this value should be enabled. For Internet applications, it is advisable to enter a value of255.255.0.0. In this case, only the leading figures of a network address are compared. This allows clientswho use Web Proxy servers with load balancing to access the ITS.
R/3 Security Services in Detail
Chapter 2-10 : Special Topics
SAP AG Version 2.0a : July 31, 1998 2-135
Setting Security Levels
The access permissions for ITS specific files on the WGate and AGate servers should be set according toyour security needs. For example, you will probably want to set a high level of security (Level 3) for yourproductive system, and level 2 for your development system (see below).
ITS supports three levels of security (by default):
1. Full Access for everyone
At this level, everyone can access all files.
2. ITS Administrator and ITS Users
At this level, a single administrator account has access to all ITS related files and members of agiven ITS users group have restricted access to certain files. You can use this level, for example, fora development scenario. Thereby, you can allow a group of users to make changes in certain files(for example, HTML templates and service files). Only the ITS Administrator can access the rest ofthe files. Other users cannot access any files.
3. ITS Administrator
At this level, only the ITS Administrator has access to ITS related files. Apply this level to yourproductive site.
You set the security level during the installation process; however, you can change the level at any timewith the command-line utility itsvprotect.
Declaring Allowed R/3 Internet Applications
Only those R/3 applications that are explicitly written for Internet use are accessible from theInternet. This applies to both transactions, as well as for function modules and reports. You must configurethe ITS so that it knows applications, reports, and function modules are to be accessible over the Internet.We describe how you declare these applications below.
Transactions (IACs)
When you call IAC transactions, the ITS acts as a regular SAPgui accessing R/3 over transaction screens.The ITS finds the information it needs to run the desired transaction in the service file that is defined for thetransaction. You define the transaction to start in the ~transaction parameter in the service file.
Example
The Transaction VW01 needs to have a service file; we suggest naming it vw01.srvc. Inthis example, the parameter ~transaction in the file vw01.srvc has the value VW01.
If a service file does not exist for a transaction, then an Internet user cannot call the transaction over theITS.

R/3 Security Guide : VOLUME II
Chapter 2 : The R/3 Security Toolbox
2-136 Version 2.0a : July 31, 1998 SAP AG
WebRFC
ITS also supports RFC-based access to R/3 with WebRFC or WebReporting. (WebReporting is based onWebRFC.)
In the same way as with dialog transactions, you can only call those function modules that have beenspecifically written for ITS.
Additionally, as of Release 4.5, you must explicitly release all Reports and Function Modules that areaccessible over the Internet (use Transaction SMW0).
To disable the use of WebRFC altogether, delete the file SAPXGWFC.dll.
Note
For Release 3.1H, there is a patch that you should run to prevent the starting of reports thatcontain an empty authorization group (see OSS Note 92725 [C.31]).
Additional Information for Internet Applications
For more information, refer to the following documentation:
• R/3 Online Documentation: R/3 Internet Application Components [A.32]
• R/3 Online Documentation: BC SAProuter [A.20]
• OSS Note 92725: WebReporting and Authorisation group [C.31]
• OSS Note 60058: Security for R/3 Release 3.1 on the Internet [C.21]
• OSS Note 104576: Package filter (firewall) between ITS and R/3 [C.34]

R/3 Security Services in Detail
Chapter 2-10 : Special Topics
SAP AG Version 2.0a : July 31, 1998 2-137
Protecting Application Link Enabling (ALE) Applications
Application Link Enabling (ALE) business processes are integrated processes across distributed systems.
In Releases 3.0 and 3.1, ALE uses IDocs (intermediate documents) as the data transfer format betweenthe systems. IDocs act as data containers for transferring messages asynchronously to the receivingsystem.
As of Release 3.1G, ALE can also use BAPIs (Business Application Programming Interface) for theinterface between systems. BAPIs are interfaces based on object-oriented technology. BAPIs can be calledsynchronously or asynchronously. Asynchronous BAPIs also use IDocs as data containers.
Newer ALE business processes use BAPIs; however, ALE will continue to support existing IDocs. Withtime, BAPIs will be created with functionality similar to existing IDoc interfaces.
Security Measures
Because ALE relies heavily on transactional RFC, all security issues that apply to RFC also applyautomatically to ALE (see Chapter 2-7 : Remote Communications (RFC & CPI-C)). You also need a well-established network infrastructure (see Chapter 2-3 : Network Infrastructure). Additional measures thatapply to ALE are described in the following sections:
• ALE Users and Authorizations
• Useful Procedures for ALE
• Additional Information on ALE
ALE Users and Authorizations
You need to take the following measures when assigning the users and authorizations for ALE use:
General
• The authorization profile B_ALE_ALL contains the following authorization objects that are needed forALE:
- B_ALE_LSYS ALE/EDI: Maintaining logical systems
- B_ALE_MAST ALE/EDI: Distributing master data
- B_ALE_MODL ALE/EDI: Maintaining customer distribution model
- B_ALE_RECV ALE/EDI: Receiving IDocs via RFC
- B_ALE_REDU ALE/EDI: Generating messages (ex. reduction)
- S_TABU_DIS Table Maintenance (via standard tools such as SM31)
• Use the Transaction SALE to maintain the ALE configuration, to include setting up the distributionmodel and setting up ALE user authorizations and profiles.
R/3 Security Guide : VOLUME II
Chapter 2 : The R/3 Security Toolbox
2-138 Version 2.0a : July 31, 1998 SAP AG
• Protect external users and passwords.
For example, for a non-SAP system to send IDocs to an R/3 System using transactional RFC, itmust also send an R/3 user and password. In most cases, the user and password are storedoutside of the R/3 System. Ensure that this information is not accessible to external systems orprograms. (How you can do this is dependent on the system that you have; therefore, you need torefer to the documentation for the system where the information is stored.)
Distribution Model
• Protect the ALE distribution model from unauthorized access. The corresponding authorization objectis B_ALE_MODL.
Source System
• To make sure that users communicating over RFC in ALE are known to the sending system, you needto enter them and their logon information in the RFC destination. (Use Transaction SM59). Therefore,set up these ALE users in the target system so that improper use is held to a minimum. (Keep allauthorizations to a minimum.)
Target System
• Set up special users for using ALE. Give only these users the authorizations for using ALE. Do not givethe standard users authorizations for using ALE.
• The RFC users in the target system authorized to communicate in ALE with transactional RFC, mustbe made known to the sender system. To prevent remote logons, assign the ALE users in the targetsystem the type CPIC. (Use Transaction SU01). Do not assign them type DIALOG. There are tworeasons for this:
- CPIC users cannot execute dialog transactions.
- DIALOG users can remotely logon to an RFC destination from the maintenance transaction forRFC destinations (SM59).
• Restrict application authorization in the target system. You only need application authorizations in thetarget system if IDocs have to be processed immediately. IDocs should be processed as backgroundjobs and not immediately, unless absolutely necessary.
Background Processing
• ALE users only require authorization for creating IDocs; they do not need authorization for the receivingapplication.
• The authorization object for receiving an IDoc is B_ALE_RECV. It contains the field EDI_MES, whichenables you to specify the message type that the user is authorized to receive.
Immediate Processing
• If inbound IDocs have to be transferred immediately to the application, the ALE user should only beassigned those application authorizations required to post the application document from the IDoc.
• To determine which authorizations are needed, perform a trace (see UP 2-10-1).
Give the ALE user the highest level of authorization in the trace. Restrict authorizations to thosespecific function groups (authorization object S_RFC) that are accessed during the trace.

R/3 Security Services in Detail
Chapter 2-10 : Special Topics
SAP AG Version 2.0a : July 31, 1998 2-139
Useful Procedures for ALE
UP 2-10-1 : Verifying Required Authorizations using Trace
To verify required authorizations using the Trace function, perform the following procedure.
Prerequisites
The following objects in the test system are required:
• ALE user with the required authorizations (for example, full authorizations).• IDoc with the status 64 (ready for transfer to the application), which corresponds to the IDocs expected
in the production operation.
Note
The authorization trace is a component of the trace function in the R/3 System (Transaction ST01).
Procedure
Execute Trace
Proceed as follows:
1. Start Transaction BD87.2. Call Transaction ST01.3. Choose Standard options.4. Choose None to switch off all the trace options.5. Choose Trace for authorization checks.6. In the group box Restrictions, enter the ALE user in the Users field.7. Choose Accept.8. Choose Switch, edit.9. In the group box General management, set the write options to Trace: write to disk.10. In the group box Status of active system choose the symbol, Activate trace.11. Process the IDoc in Transaction BD87.
Stop Trace
Stop the trace by choosing No trace.
Display Trace
To display the trace perform the following:
1. Choose Trace files à Standard.2. Double click on file.
Additional Information on ALE
For more information, refer to the following documentation:
• R/3 Online Documentation: CA ALE [A.31]
R/3 Security Guide : VOLUME II
Chapter 2 : The R/3 Security Toolbox
2-140 Version 2.0a : July 31, 1998 SAP AG
R/3 Online Services
When using the R/3 Online Services for assistance and advice, you want to be sure that the informationbeing transferred and processed is securely handled. We discuss the necessary security measures in thefollowing sections:
• Measures That We Take at SAP
• Measures That You Should Take
• Additional Information for R/3 Online Services
Measures That We Take at SAP
To ensure the security of the remote connection, at SAP we take the following measures:
• We use only designated communication connections (VPNs) or direct connections (ISPN).
• We restrict the access authorizations of the hardware router.
• We use the SAProuter program.
• We log all usage and maintenance activities of the remote connection.
• We divide the available services into different categories, each with its own access authorizations.
• We restrict the access authorizations accordingly.
• Our employees and our partner's employees must oblige to regulations pertaining to secrecy whenaccessing personal data or company secrets. This applies to data belonging to SAP itself as well as toour customers (see OSS Note: 35493 [C.11]).
• Following our policy, you must open the remote connection. We do not initiate remote connections.
Measures That You Should Take
We recommend that you take the following measures:
• Restrict the access authorizations for the hardware router. (We recommend you use a hardwarerouter.)
• Use the SAProuter program.
- The SAProuter logs connection activities.
• Increase protection by enforcing password protected connections.
• Tailor your R/3 user profiles to the type of service required. Set these users up in test clients, unlessotherwise necessary.
• After a session, you can analyze the activities that occurred using the Transaction STAT.
• Monitor consultants with the echo mode.
R/3 Security Services in Detail
Chapter 2-10 : Special Topics
SAP AG Version 2.0a : July 31, 1998 2-141
• Do not disclose any of your users' passwords over the remote connection.
If you have a problem that can only be solved by an SAP service person accessing your system as<SID>adm, you should log the session on at the operating system level (for example, using theUNIX script command). As soon as the problem has been fixed, change the password.
• We suggest you disclose the remote user's logon information over a separate channel. Either write theinformation in a separate document, or request a return telephone call. Do not send the information inthe remote request.
• Deactivate the R/3 remote user's name and password as soon as the service session is terminated.
• Deactivate the remote connection as soon as the task is completed.
• Close the OSS connections upon completion.
• Set time limits for OSS connections.
For more information on service connections, see the OSS Note 35010 [C.10].
Additional Information on R/3 Online Services
For more information, refer to the following documentation:
• R/3 Online Documentation: SAP Network Security [A.35]
• SAP Documentation: Remote Connections to the R/3 Online Services; Material Number 50017380 [E.5]
• OSS Note 46902: Security Aspects in Remote Access [C.17]
• OSS Note 35010: Service connections: Composite note (overview) [C.10]
• OSS Note 35493: Secrecy and Data Security Obligations [C.11]
R/3 Security Guide : VOLUME II
Chapter 2 : The R/3 Security Toolbox
2-142 Version 2.0a : July 31, 1998 SAP AG
Virus Protection and Integrity Checks
General Recommendations
The spreading of software viruses is not a new topic of discussion. Viruses have infected thousands ofsystems over the past several years and they should not be taken lightly. A successful virus infectioncan destroy data or block systems within moments. The spreading of viruses has been harmful enoughon isolated machines where a single hard drive has been the storage medium. With the use ofnetworks, the damage incurred by a virus infection increases enormously. An infected network can berendered useless, costing a company money, time, and assets to re-establish itself. There arenumerous virus-checking software packages on the market that you should use to check your softwareand you should update these regularly. Additionally, you need to educate your employees on theimportance of being wary of unchecked software.
R/3 Software
We check the R/3 software and data media for viruses before delivery. Additionally, as of Release 3.0(on Windows NT platforms only), the SAPgui presentation software performs an integrity check on itself,which detects and reports any changes that may indicate a virus infection.
Protecting Specific Tables, Authorizations Objects, etc.
We recommend that you decide which individual tables, authorizations, etc. you consider sensitive andtake the appropriate measures to protect them.
There may be many objects that you consider sensitive. We are not going to discuss them all in detail here.However, we do want to draw your attention to the following objects in R/3 that we consider especiallysensitive:
• SAP_ALL Authorization
• SAP_NEW Authorization
• Table T000
• HR Tables
• HR Authorization Profile P_BAS_ALL
• System Parameter Profile File
We describe the measures that you can take to protect these objects in detail below:
R/3 Security Services in Detail
Chapter 2-10 : Special Topics
SAP AG Version 2.0a : July 31, 1998 2-143
SAP_ALL Authorization
This composite profile contains all of the SAP authorizations. A user with this authorization can perform allR/3 tasks. You should not assign any of your users this authorization profile. We recommend that youmaintain one single user with this profile; you should keep this password secret (lock it in a safe) and use itonly in emergencies.
We recommend that you distribute the authorizations from SAP_ALL on the appropriate positions. Forexample, instead of assigning your system administrator (or superuser) the authorization SAP_ALL, assignhim or her only those that apply to system administration, namely the S_* authorizations. Theseauthorizations give him or her enough rights to administer the entire R/3 System, without allowing him orher to perform tasks in other areas such as Personnel.
SAP_NEW
This composite profile contains those profiles that are new to each release. After an upgrade, you need thisprofile so that certain tasks can run smoothly. However, we do not recommend that you keep this profileactive for a longer period.
We recommend the following steps:
1. After the upgrade, delete the SAP_NEW_* profiles for releases prior to the establishment (or re-establishment) of your authorization concept.
2. Delete those SAP_NEW_* profiles for releases in which you have already distributed the profiles.
3. Distribute the rest of the profiles contained in the SAP_NEW_* profiles to their appropriate places andmaintain their values.
4. Then, delete the profile SAP_NEW.
A long list of SAP_NEW profiles (for example, after several upgrades) is an indicator that it is time to reviewyour authorization concept and re-establish it.
Table T000
Table T000 is a fundamental table in your R/3 System. You create and maintain your R/3 clients in thistable. Therefore, you should protect this table in your productive system from unauthorized access.
To protect T000, take the following precautions:
• Give maintenance access to system administrators only. The corresponding authorization object isS_ADMI_FCD.
• Define a process for creating and maintaining clients.
• Ensure that the S_TCODE authorization object contains the table maintenance and client maintenancetransactions SCC4, SM30 and SM31.
• Set the following fields to the following values for the authorization object S_TABU_DIS.
- Field: Activity; Values: 02, 03
- Field: Authorization group; Value: SS
• Set the indicator for client-independent maintenance field for the authorization object S_TABU_CLI tothe value X.

R/3 Security Guide : VOLUME II
Chapter 2 : The R/3 Security Toolbox
2-144 Version 2.0a : July 31, 1998 SAP AG
HR Tables
In Releases 3.0A-C, the PA<nnnn> (employee data) and PB<nnnn> (applicant data) tables for theinfotypes nnnn were delivered without having the authorization group PA assigned to them. Consequently,they could be read using SE16. (This problem has been solved in 3.0D.)
Therefore, to protect your HR tables in the Releases 3.0A-C, you must explicitly assign them to theauthorization group PA. In addition, exclude the group PA from the authorization object S_TABU_DIS.
HR Authorization Profile P_BAS_ALL
The P_BAS_ALL authorization profile allows users to display the contents of tables from other applicationsusing general table display transactions. This authorization is intended for HR end users only.
The P_BAS_ALL authorization profile contains the P_TABU_DIS authorization (based on the S_TABU_DISobject). As default, the P_TABU_DIS contains the authorization groups A - O* and PB - XXXX. This allowsPA users to display table contents that do not belong to the PA group (using general table viewing tools).
To restrict this function to HR tables only (PA users can then thereby view HR tables):
1. Make sure that you assign all HR tables one of the classes PC or PS.
2. Restrict the Authorization group field in P_BAS_ALL to PC and PS.
For more information, see OSS Note 11796 [C.5].
System Profile Parameter Files
Certain security-relevant configurations are contained in the following system profile files (for example, theprofile parameters login/no_automatic_user_sap* or login/fails_to_user_lock):
• <SID>_<Instance> system profile for the application server
• START_<Instance> start script
• DEFAULT.PFL global profile file
You should protect these files from unauthorized access. If an intruder manages to access and changethese files, he or she can change the configuration for the next time that the system is started.
Ensure that as few people as possible are given access to these files. Regularly make sure that these filesare authentic.
Maintain these files with the Transaction RZ11.
Additional Information for Specific Objects
For more information, refer to the following documentation:
• OSS Note 11796: Authorization profile P_BAS_ALL and table display [C.5]
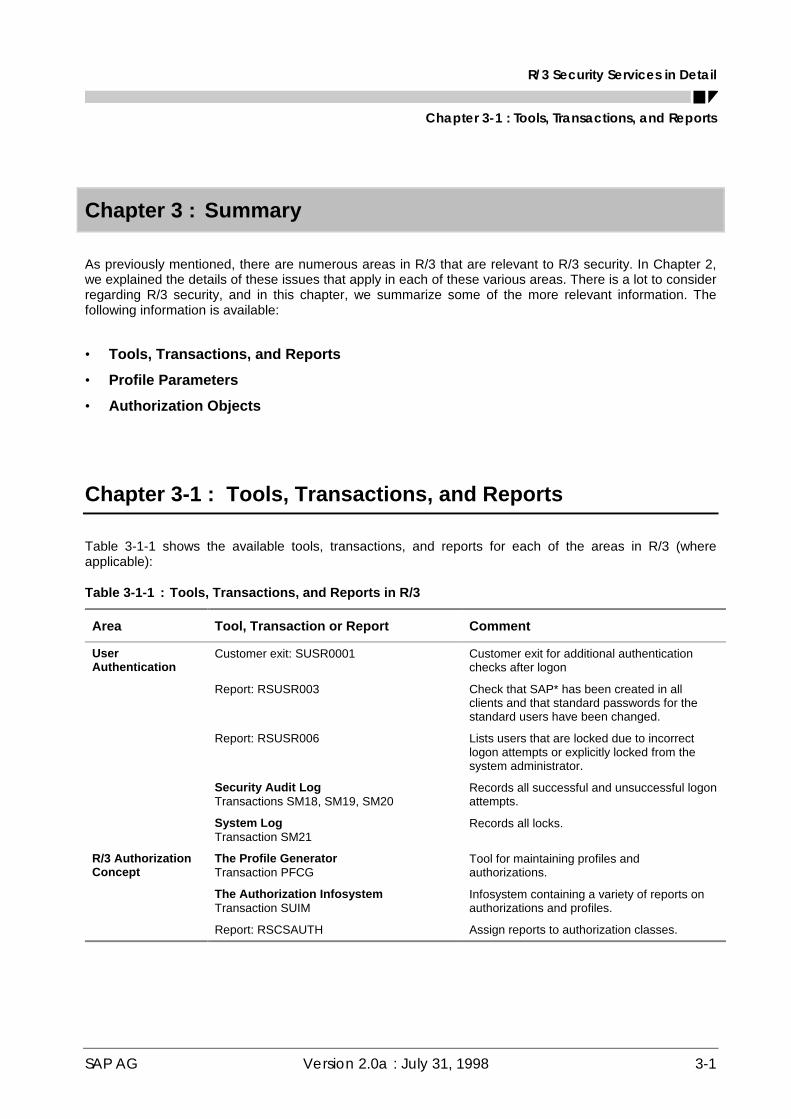
R/3 Security Services in Detail
Chapter 3-1 : Tools, Transactions, and Reports
SAP AG Version 2.0a : July 31, 1998 3-1
Chapter 3 : Summary
As previously mentioned, there are numerous areas in R/3 that are relevant to R/3 security. In Chapter 2,we explained the details of these issues that apply in each of these various areas. There is a lot to considerregarding R/3 security, and in this chapter, we summarize some of the more relevant information. Thefollowing information is available:
• Tools, Transactions, and Reports
• Profile Parameters
• Authorization Objects
Chapter 3-1 : Tools, Transactions, and Reports
Table 3-1-1 shows the available tools, transactions, and reports for each of the areas in R/3 (whereapplicable):
Table 3-1-1 : Tools, Transactions, and Reports in R/3
Area Tool, Transaction or Report Comment
UserAuthentication
Customer exit: SUSR0001 Customer exit for additional authenticationchecks after logon
Report: RSUSR003 Check that SAP* has been created in allclients and that standard passwords for thestandard users have been changed.
Report: RSUSR006 Lists users that are locked due to incorrectlogon attempts or explicitly locked from thesystem administrator.
Security Audit LogTransactions SM18, SM19, SM20
Records all successful and unsuccessful logonattempts.
System LogTransaction SM21
Records all locks.
R/3 AuthorizationConcept
The Profile GeneratorTransaction PFCG
Tool for maintaining profiles andauthorizations.
The Authorization InfosystemTransaction SUIM
Infosystem containing a variety of reports onauthorizations and profiles.
Report: RSCSAUTH Assign reports to authorization classes.

R/3 Security Guide : VOLUME II
Chapter 3 : Summary
3-2 Version 2.0a : July 31, 1998 SAP AG
Table 3-1-1 : Tools, Transactions, and Reports in R/3 (continued)
Area Tool, Transaction or Report Comment
Database Access SAPDBA Tool for database maintenance tasks.Available for ORACLE and INFORMIX.
Note: There are also tools available from thevarious database vendors. See thedocumentation on your database for moredetails.
Change andTransport System
Workbench and Customizing OrganizerTransactions SE09 and SE10
Tool for managing imports and exports
Transport Management SystemTransaction STMS
Tool for managing the change and transportsystem. (Available as of Release 3.1H.)
Programs: tp, R3trans Programs at the operating system level forexecuting transports.
Logging andAuditing
Audit Info SystemTransaction SECR
Tool for running business or security audits.
The Security Audit LogTransactions SM18, SM19, SM20
Tool for auditing security-relevant informationin R/3 such as unsuccessful transactionstarts or changes to user master records.
The System LogTransaction SM21
Tool for logging system-relevant informationsuch as user locks.
Statistic RecordsTransaction STAT
Tool for obtaining statistical records,categorized by transaction and user.
Application LoggingTransactions SLG1 and SLG0
Tool for logging application-level activities.
SAP Business Workflow analysis tools. (Transactions SWI2, SWI5, ...)
Tools for logging and analyzing workflowactivities.
Change Documents for business objectsTransaction: SCD0
Set up change documents for dictionaryobjects.
Changes to Table DataTransaction: SCU3
View changes to table data.
Change Documents for User MasterRecordsTransaction: SU01
View change documents for user masterrecords.
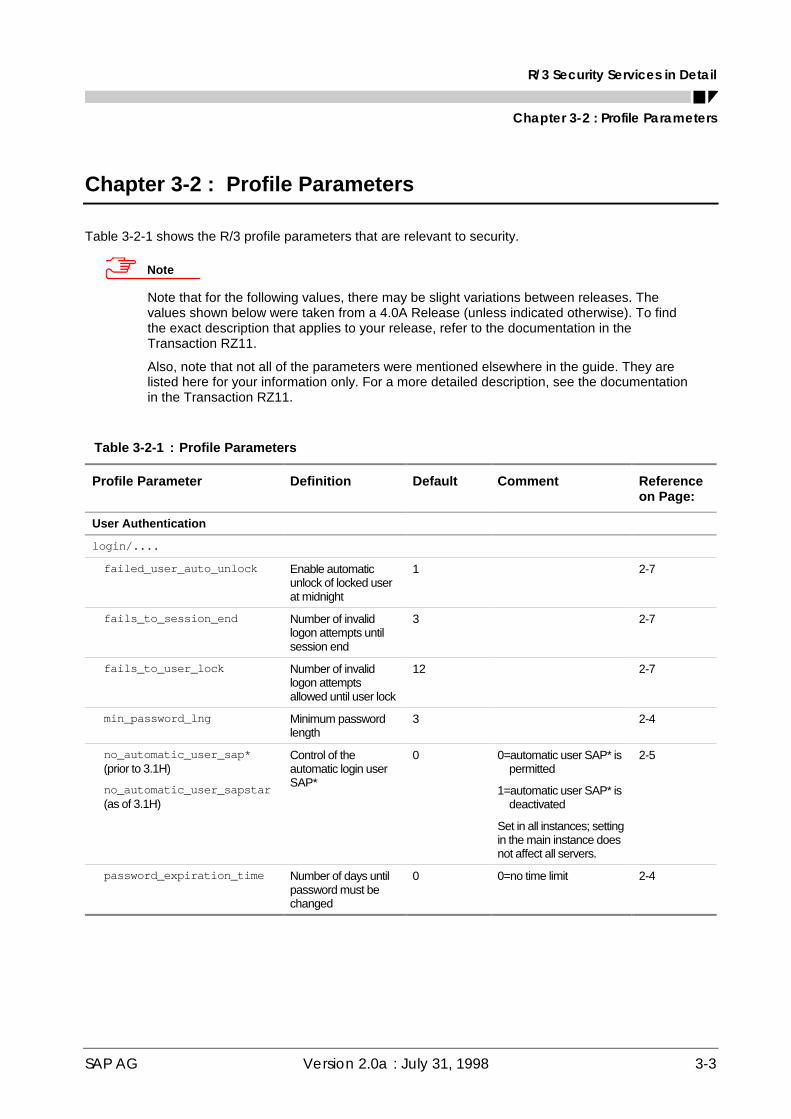
R/3 Security Services in Detail
Chapter 3-2 : Profile Parameters
SAP AG Version 2.0a : July 31, 1998 3-3
Chapter 3-2 : Profile Parameters
Table 3-2-1 shows the R/3 profile parameters that are relevant to security.
Note
Note that for the following values, there may be slight variations between releases. Thevalues shown below were taken from a 4.0A Release (unless indicated otherwise). To findthe exact description that applies to your release, refer to the documentation in theTransaction RZ11.
Also, note that not all of the parameters were mentioned elsewhere in the guide. They arelisted here for your information only. For a more detailed description, see the documentationin the Transaction RZ11.
Table 3-2-1 : Profile Parameters
Profile Parameter Definition Default Comment Referenceon Page:
User Authentication
login/....
failed_user_auto_unlock Enable automaticunlock of locked userat midnight
1 2-7
fails_to_session_end Number of invalidlogon attempts untilsession end
3 2-7
fails_to_user_lock Number of invalidlogon attemptsallowed until user lock
12 2-7
min_password_lng Minimum passwordlength
3 2-4
no_automatic_user_sap*(prior to 3.1H)
no_automatic_user_sapstar(as of 3.1H)
Control of theautomatic login userSAP*
0 0=automatic user SAP* ispermitted
1=automatic user SAP* isdeactivated
Set in all instances; settingin the main instance doesnot affect all servers.
2-5
password_expiration_time Number of days untilpassword must bechanged
0 0=no time limit 2-4

R/3 Security Guide : VOLUME II
Chapter 3 : Summary
3-4 Version 2.0a : July 31, 1998 SAP AG
Table 3-2-1 : Profile Parameters (continued)
Profile Parameter Definition Default Comment Referenceon Page:
User Authentication (continued)
rdisp/....
gui_auto_logout Number of secondsthat a user can be idlebefore being loggedoff
0 0=no time limit 2-7
rfc_max_login Maximum number ofusers that can belogged on to the R/3System.
90 % value. The totalnumber of usersallowed is specified inthe parameterrdisp/tm_max_no.
not referenced
rfc_max_own_login Maximum number ofown logons in the R/3System.
25 see above not referenced
tm_max_no Maximum number ofentries in the arraytm_adm. (Limitsmaximum number ofusers per instance.)
200 not referenced
R/3 Authorization Concept
auth/....
auth_number_in_userbuffer Maximum number ofauthorizations allowedin user buffer
1000 not referenced
authorization_trace The combination oftransaction andauthorization object iswritten to tableUSOBX uponauthorization check, ifit does not exist.
N Affects performance! not referenced
no_check_in_some_cases Special authorizationchecks switched off bycustomer.
N May be relevant if youuse the profilegenerator.
Adhere to the cautionswhen setting thisparameter!
2-22
no_check_on_tcode Disable authoritycheck againstauthorization objectS_TCODE
N Do not change unlessabsolute necessary!
not referenced

R/3 Security Services in Detail
Chapter 3-2 : Profile Parameters
SAP AG Version 2.0a : July 31, 1998 3-5
Table 3-2-1 : Profile Parameters (continued)
Profile Parameter Definition Default Comment Referenceon Page:
R/3 Authorization Concept (continued)
auth/....
rfc_authority_check Execute RFCauthority checkagainst the objectS_RFC
1 0=No authorization check
1 or 2=Authorizationcheck active(see documentation inRZ11)
Set to at least 1
not referenced
system_access_check_off Deactivateauthorization checksfor certain ABAPlanguage elements(file operations, CPICcalls)
0 not referenced
test_mode Run ReportRSUSR400 whenauthorization checksare performed.
N (off) Used for tracing purposes.
Reduced performance!
not referenced
Network Infrastructure (SNC)
snc/....
accept_insecure_cpic Accept unprotectedincoming CPIC-connections whenusing SNC.
0 0=only accept SNC-protected connections
As of 4.0
not referenced
accept_insecure_gui (4.0) orpermit_insecure_gui (3.1)
Allow non-protectedSAPgui connectionswhen using SNC.
0 0=accept secure logonsonly
not referenced
accept_insecure_r3int_rfc Accept unprotectedinternal RFC-connections whenusing SNC.
1 1=accept unprotectedRFC connections
As of 4.0
not referenced
accept_insecure_rfc Accept unprotectedincoming RFCconnections whenusing SNC.
0 0=only accept SNC-protected connections
As of 4.0
not referenced
data_protection/max Use this level ofsecurity whensnc/data_protection_use =9
3 1=authentication2=integrity3=privacy
not referenced
data_protection/min Minimum level ofsecurity for incomingconnections
2 1=authentication2=integrity3=privacy
not referenced
data_protection/use User-defined level ofsecurity for datatransfers
9 same as above plus9=use value fromsnc/data_protection/max
not referenced

R/3 Security Guide : VOLUME II
Chapter 3 : Summary
3-6 Version 2.0a : July 31, 1998 SAP AG
Table 3-2-1 : Profile Parameters (continued)
Profile Parameter Definition Default Comment Referenceon Page:
Network Infrastructure (continued)
snc/....
enable Activate SNC 0 0=off
1=on
not referenced
gssapi_lib Location of the gssapilibrary
none not referenced
identity/as Security name of theapplication server
none not referenced
permit_insecure_start Permit the starting ofunprotected externalprograms when usingSNC.
0 0=do not startunprotectedprograms
As of 4.0
not referenced
r3int_rfc_qop Quality of protectionfor internal RFCs withSNC protection
8 8=use value fromsnc/data_protection/use
As of 4.0
not referenced
r3int_rfc_secure Use SNC for initiatinginternal RFCcommunications
0 0=do not use SNC
As of 4.0
not referenced
Change and Transport System
transport/....
systemtype System class oftransport (SAP orCUSTOMER)
CUSTOMER not referenced
tp_logging Log use of transportprogram
ON not referenced
Remote Communications
gw/....
max_conn Maximum number ofactive connectionsallowed
100 not referenced
monitor Allow monitorcommands
2 0: not allowed
1: only from GWmonitors allowed
2: from local and remotegateways allowed
2-108
sec_info Directory path for theconfiguration filesecinfo
/usr/<SID>/<instance>/data/secinfo
2-110
stat Activate gatewaystatistics
0 0=off
1=on
not referenced
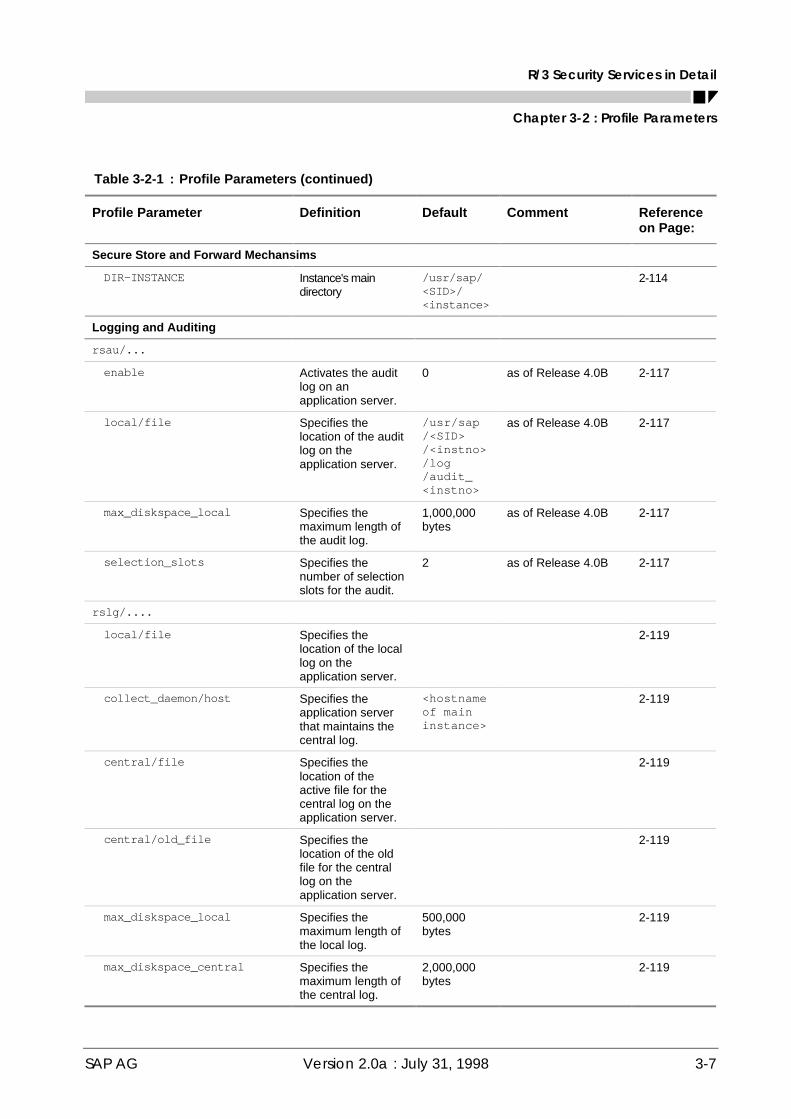
R/3 Security Services in Detail
Chapter 3-2 : Profile Parameters
SAP AG Version 2.0a : July 31, 1998 3-7
Table 3-2-1 : Profile Parameters (continued)
Profile Parameter Definition Default Comment Referenceon Page:
Secure Store and Forward Mechansims
DIR-INSTANCE Instance's maindirectory
/usr/sap/<SID>/<instance>
2-114
Logging and Auditing
rsau/...
enable Activates the auditlog on anapplication server.
0 as of Release 4.0B 2-117
local/file Specifies thelocation of the auditlog on theapplication server.
/usr/sap/<SID>/<instno>/log/audit_<instno>
as of Release 4.0B 2-117
max_diskspace_local Specifies themaximum length ofthe audit log.
1,000,000bytes
as of Release 4.0B 2-117
selection_slots Specifies thenumber of selectionslots for the audit.
2 as of Release 4.0B 2-117
rslg/....
local/file Specifies thelocation of the locallog on theapplication server.
2-119
collect_daemon/host Specifies theapplication serverthat maintains thecentral log.
<hostnameof maininstance>
2-119
central/file Specifies thelocation of theactive file for thecentral log on theapplication server.
2-119
central/old_file Specifies thelocation of the oldfile for the centrallog on theapplication server.
2-119
max_diskspace_local Specifies themaximum length ofthe local log.
500,000bytes
2-119
max_diskspace_central Specifies themaximum length ofthe central log.
2,000,000bytes
2-119

R/3 Security Guide : VOLUME II
Chapter 3 : Summary
3-8 Version 2.0a : July 31, 1998 SAP AG
Table 3-2-1 : Profile Parameters (continued)
Profile Parameter Definition Default Comment Referenceon Page:
Logging and Auditing (continued)
rec/....
client Record SM30 tablechanges
OFF Tables must also bespecified for recordingchanges
2-122
stat/....
file Location of thestatistic records file
/usr/sap/<SID>/<instance>/data/stat.DAT
2-120
level Set logging of systemactivities, changes inprofile parameters,changes in UNIXkernel parameters,and changes in DBparameters for CCMS
1 2-120
version Set logging version 2 (Vers. 2) Version 1: as in Rel. 2.0
Version 2: as with 1, butadditionally recordsRFC and memorystatistics
2-120
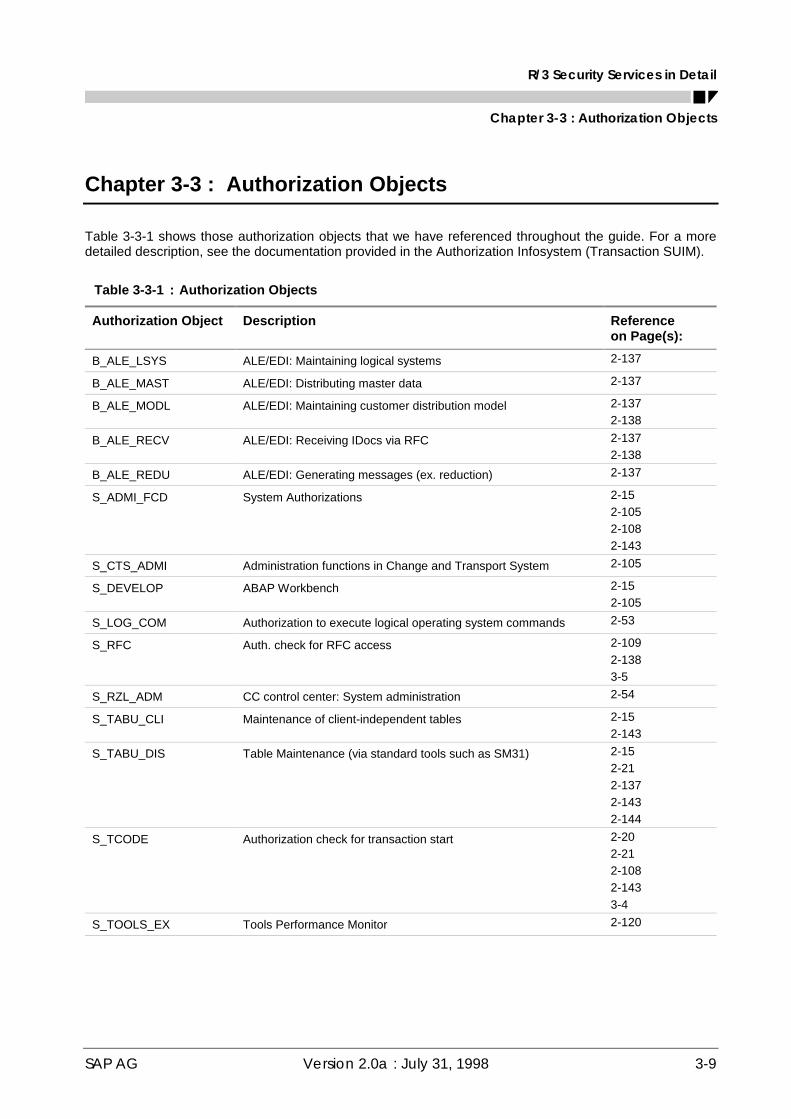
R/3 Security Services in Detail
Chapter 3-3 : Authorization Objects
SAP AG Version 2.0a : July 31, 1998 3-9
Chapter 3-3 : Authorization Objects
Table 3-3-1 shows those authorization objects that we have referenced throughout the guide. For a moredetailed description, see the documentation provided in the Authorization Infosystem (Transaction SUIM).
Table 3-3-1 : Authorization Objects
Authorization Object Description Referenceon Page(s):
B_ALE_LSYS ALE/EDI: Maintaining logical systems 2-137
B_ALE_MAST ALE/EDI: Distributing master data 2-137
B_ALE_MODL ALE/EDI: Maintaining customer distribution model 2-1372-138
B_ALE_RECV ALE/EDI: Receiving IDocs via RFC 2-1372-138
B_ALE_REDU ALE/EDI: Generating messages (ex. reduction) 2-137
S_ADMI_FCD System Authorizations 2-152-1052-1082-143
S_CTS_ADMI Administration functions in Change and Transport System 2-105
S_DEVELOP ABAP Workbench 2-152-105
S_LOG_COM Authorization to execute logical operating system commands 2-53
S_RFC Auth. check for RFC access 2-1092-1383-5
S_RZL_ADM CC control center: System administration 2-54
S_TABU_CLI Maintenance of client-independent tables 2-152-143
S_TABU_DIS Table Maintenance (via standard tools such as SM31) 2-152-212-1372-1432-144
S_TCODE Authorization check for transaction start 2-202-212-1082-1433-4
S_TOOLS_EX Tools Performance Monitor 2-120

R/3 Security Guide : VOLUME II
Chapter 3 : Summary
3-10 Version 2.0a : July 31, 1998 SAP AG
Table 3-3-1 : Authorization Objects (continued)
Authorization Object Description Referenceon Page(s):
S_TRANSPRT Change and Transport Organizer 2-152-1052-105
S_USER_AUT User Master Maintenance: Authorizations 2-152-182-19
S_USER_GRP User Master Maintenance: User Groups 2-182-19
S_USER_PRO User master maintenance: Authorization profile 2-182-19
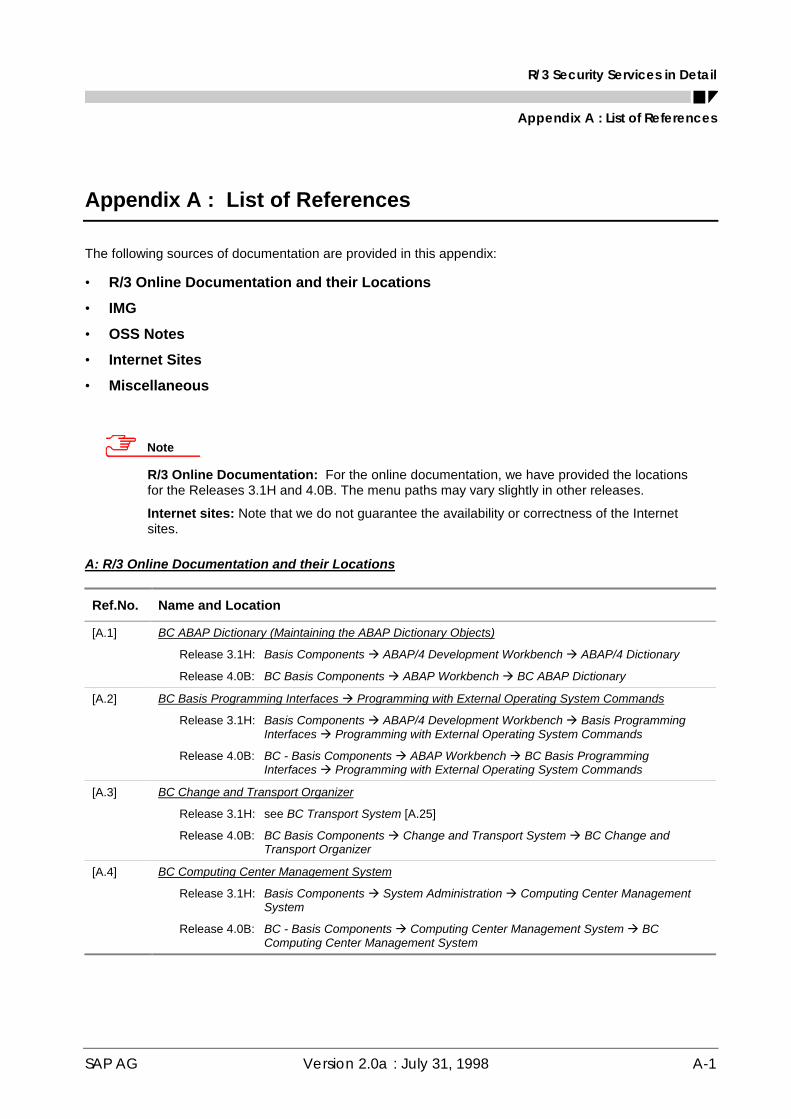
R/3 Security Services in Detail
Appendix A : List of References
SAP AG Version 2.0a : July 31, 1998 A-1
Appendix A : List of References
The following sources of documentation are provided in this appendix:
• R/3 Online Documentation and their Locations
• IMG
• OSS Notes
• Internet Sites
• Miscellaneous
Note
R/3 Online Documentation: For the online documentation, we have provided the locationsfor the Releases 3.1H and 4.0B. The menu paths may vary slightly in other releases.
Internet sites: Note that we do not guarantee the availability or correctness of the Internetsites.
A: R/3 Online Documentation and their Locations
Ref.No. Name and Location
[A.1] BC ABAP Dictionary (Maintaining the ABAP Dictionary Objects)
Release 3.1H: Basis Components à ABAP/4 Development Workbench à ABAP/4 Dictionary
Release 4.0B: BC Basis Components à ABAP Workbench à BC ABAP Dictionary
[A.2] BC Basis Programming Interfaces à Programming with External Operating System Commands
Release 3.1H: Basis Components à ABAP/4 Development Workbench à Basis ProgrammingInterfaces à Programming with External Operating System Commands
Release 4.0B: BC - Basis Components à ABAP Workbench à BC Basis ProgrammingInterfaces à Programming with External Operating System Commands
[A.3] BC Change and Transport Organizer
Release 3.1H: see BC Transport System [A.25]
Release 4.0B: BC Basis Components à Change and Transport System à BC Change andTransport Organizer
[A.4] BC Computing Center Management System
Release 3.1H: Basis Components à System Administration à Computing Center ManagementSystem
Release 4.0B: BC - Basis Components à Computing Center Management System à BCComputing Center Management System

R/3 Security Guide : VOLUME II
List of References
A-2 Version 2.0a : July 31, 1998 SAP AG
A: R/3 Online Documentation and their Locations (continued)
Ref.No. Name and Location
[A.5] BC Computing Center Management System à R/3 Accounting Interface à Available Statistics Data
Release 3.1H: Basis Components à System Administration à Computing Center ManagementSystem à R/3 System Administration à R/3 Accounting Interface à AvailableStatistics Data
Release 4.0B: BC - Basis Components à Computing Center Management System à BCComputing Center Management System à R/3 System Administration à R/3Accounting Interface à Available Statistics Data
[A.6] BC Computing Center Management System à R/3 System Administration à External OperatingSystem Commands
Release 3.1H: Basis Components à System Administration à Computing Center ManagementSystem à R/3 System Administration à External Operating System Commands
Release 4.0B: BC - Basis Components à Computing Center Management System à BCComputing Center Management System à R/3 System Administration à ExternalOperating System Commands
[A.7] BC Extended Applications Function Library à Change documents
Release 3.1H: Basis Components à ABAP/4 Development Workbench à Extended ApplicationsFunction Library à Change documents
Release 4.0B: BC - Basis Components à ABAP Workbench à BC Extended applicationsfunctions library à Change documents
[A.8] BC Extended Applications Function Library à Create application log
Release 3.1H: Basis Components à ABAP/4 Development Workbench à Extended ApplicationsFunction Library à Create application log
Release 4.0B: BC - Basis Components à ABAP Workbench à BC Extended applicationsfunctions library à Create application log
[A.9] BC SAP Communication: Configuration Guide à SAP Gateway
Release 3.1H: Basis Components à System Administration à R/3 Network Configuration à SAPCommunication: Configuration à SAP Gateway
Release 4.0B: BC - Basis Components à Basis Services / Communication Interfaces à BC - SAPCommunication: Configuration à BC - SAP Communication: Configuration à SAPGateway
[A.10] BC SAP Communication: CPI-C Programmer's Guide
Release 3.1H: Basis Components à ABAP/4 Development Workbench à CPI-C Programming
Release 4.0B: BC - Basis Components à Basis Services / Communication Interfaces à BC SAPCommunication: CPI-C Programmer's Guide
[A.11] BC SAP Database Administration
Release 3.1H: Basis Components à Database Administration
Release 4.0B: BC - Basis Components à Database Interface, Database Platforms
[A.12] BC SAP Database Administration: ADABAS (Software AG)
Release 3.1H: Basis Components à Database Administration à ADABAS
Release 4.0B: see ADABAS Documentation

R/3 Security Services in Detail
Appendix A : List of References
SAP AG Version 2.0a : July 31, 1998 A-3
A: R/3 Online Documentation and their Locations (continued)
Ref.No. Name and Location
[A.13] BC SAP Database Administration: DB2 common server
Release 3.1H: Basis Components à Database Administration à SAP Database Administration:DB2 Common Server
Release 4.0B: BC - Basis Components à Database Interface, Database Platforms à BC SAPDatabase Administration: DB2
[A.14] BC SAP Database Administration: DB2 common server à Managing Passwords of R/3 Admin Users
Release 3.1H: Basis Components à Database Administration à SAP Database Administration:DB2 Common Server à Managing Passwords of R/3 Admin Users
Release 4.0B: BC - Basis Components à Database Interface, Database Platforms à BC SAPDatabase Administration: DB2 à Users à Managing Passwords
[A.15] BC SAP Database Administration: DB2/400
Release 3.1H: Basis Components à Database Administration à SAP Database Administration:DB2/400
Release 4.0B: BC - Basis Components à Database Interface, Database Platforms à BC SAPDatabase Administration: DB2/400
[A.16] BC SAP Database Administration: INFORMIX
Release 3.1H: Basis Components à Database Administration à SAP Database Administration:INFORMIX
Release 4.0B: BC - Basis Components à Database Interface, Database Platforms à BC SAPDatabase Administration: INFORMIX
[A.17] BC SAP Database Administration: Oracle
Release 3.1H: Basis Components à Database Administration à SAP Database Administration:ORACLE
Release 4.0B: BC - Basis Components à Database Interface, Database Platforms à BC SAPDatabase Administration: Oracle
[A.18] BC Database Administration: ORACLE à Starting and Using the SAPDBA Program à SAPDBA:Expert Mode à Defining the Password
Release 3.1H: Basis Components à Database Administration à SAP Database Administration:ORACLE
Release 4.0B: BC - Basis Components à Database Interface, Database Platforms à BC SAPDatabase Administration: Oracle à Starting and Using the SAPDBA Program àConfiguring SAPDBA à SAPDBA: Expert Mode à Defining the Password
[A.19] BC SAP High Availability
Release 3.1H: Basis Components à System Administration à SAP High Availability
Release 4.0B: BC - Basis Components à Computing Center Management System à BC SAPHigh Availability
[A.20] BC SAProuter
Release 3.1H: R/3 Service and Support à SAProuter
Release 4.0B: BC Kernel Components à BC SAProuter

R/3 Security Guide : VOLUME II
List of References
A-4 Version 2.0a : July 31, 1998 SAP AG
A: R/3 Online Documentation and their Locations (continued)
Ref.No. Name and Location
[A.21] BC System Services à The Security Audit Log
Release 3.1H: not available
Release 4.0B: BC - Basis Components à Kernel Components à BC System Service à TheSecurity Audit Log
[A.22] BC System Services à The System Log
Release 3.1H: Basis Components à System Administration à System Services à The SystemLog
Release 4.0B: BC - Basis Components à Kernel Components à BC System Service à TheSystem Log
[A.23] BC Transport Control
Release 3.1H: Basis Components à System Administration à Transport Control
Release 4.0B: BC - Basis Components à Change and Transport System à BC Transport Control
[A.24] BC Transport Management System
Release 4.0B: Basis Components à System Administration à BC - Transport ManagementSystem
[A.25] BC Transport System
Release 3.1H: Basis Components à System Administration à Transport System
Release 4.0B: see à BC Change and Transport Organizer [A.3]
[A.26] BC Transport System à Setting up the Workbench Organizer and the Transport System à Setting theSystem Change Option
Release 3.1H: Basis Components à System Administration à Transport System à Setting up theWorkbench Organizer and the Transport System à Setting the System ChangeOption
Release 4.0B: BC - Basis Components à Change and Transport System à BC Change andTransport Organizer à Requirements for Working with the Change and TransportSystem (CTS) à Setting Up the System Group à Setting the System ChangeOption
[A.27] BC Users and Authorizations
Release 3.1H: Basis Components à System Administration à Users and Authorizations
Release 4.0B: BC - Basis Components à Computing Center Management System à BC Usersand Authorizations
[A.28] BC Users and Authorizations à Access Security: Logon Customizing and Protecting Standard Users
Release 3.1H: Basis Components à System Administration à Users and Authorizations àAccess Security: Logon Customizing and Protecting Standard Users
Release 4.0B: BC - Basis Components à Computing Center Management System à BC Usersand Authorizations à Access Security Logon Customizing and Protecting StandardUsers

R/3 Security Services in Detail
Appendix A : List of References
SAP AG Version 2.0a : July 31, 1998 A-5
A: R/3 Online Documentation and their Locations (continued)
Ref.No. Name and Location
[A.29] BC Users and Authorizations à Transporting User Master Records, Authorizations and Profiles
Release 3.1H: Basis Components à System Administration à Users and Authorizations àTransporting User Master Records, Authorizations and Profiles
Release 4.0B: BC - Basis Components à Computing Center Management System à BC Usersand Authorizations à Transporting User Master Records, Authorizations andProfiles
[A.30] BC Users and Authorizations à Creating and Maintaining User Master Records à Displaying ChangeDocuments
Release 3.1H: Basis Components à System Administration à Users and Authorizations àCreating and Maintaining User Master Records à Displaying Change Documents
Release 4.0B: BC - Basis Components à Computing Center Management System à BC Usersand Authorizations à Overview: Creating and Maintaining User Master Records àDisplaying Change Documents
[A.31] CA ALE
Release 3.1H: Cross Application à ALE - Application Link Enabling
Release 4.0B: CA - Cross-Application Components à Business Framework Architecture à ALEIntegration Technology
[A.32] R/3 Internet Application Components
Release 3.1H: Cross Application à SAP@WEB à R/3 Internet Application Components
Release 4.0B: CA - Cross-Application Components à Business Framework Architecture à WebBasis à R/3 Internet Application Components
[A.33] Remote Communications
Release 3.1H: Basis Components à ABAP/4 Development Workbench à RemoteCommunications
Release 4.0B: BC - Basis Components à Remote Communications à Remote Communications
[A.34] SAP Business Workflow
Release 3.1H: Basis Components à Business Engineering Workbench à SAP Business Workflow
Release 4.0B: BC - Basis Components à Business Management à SAP Business Workflow
[A.35] SAP Network Security
Release 3.1H: R/3 Service and Support à SAP Network Security
Release 4.0B: not available
B: IMG Path
Ref.No. Path
[B.1] Implementation Guide
Basis Components à System Administration à Users and Authorizations à Maintainauthorizations and profiles using profile generator
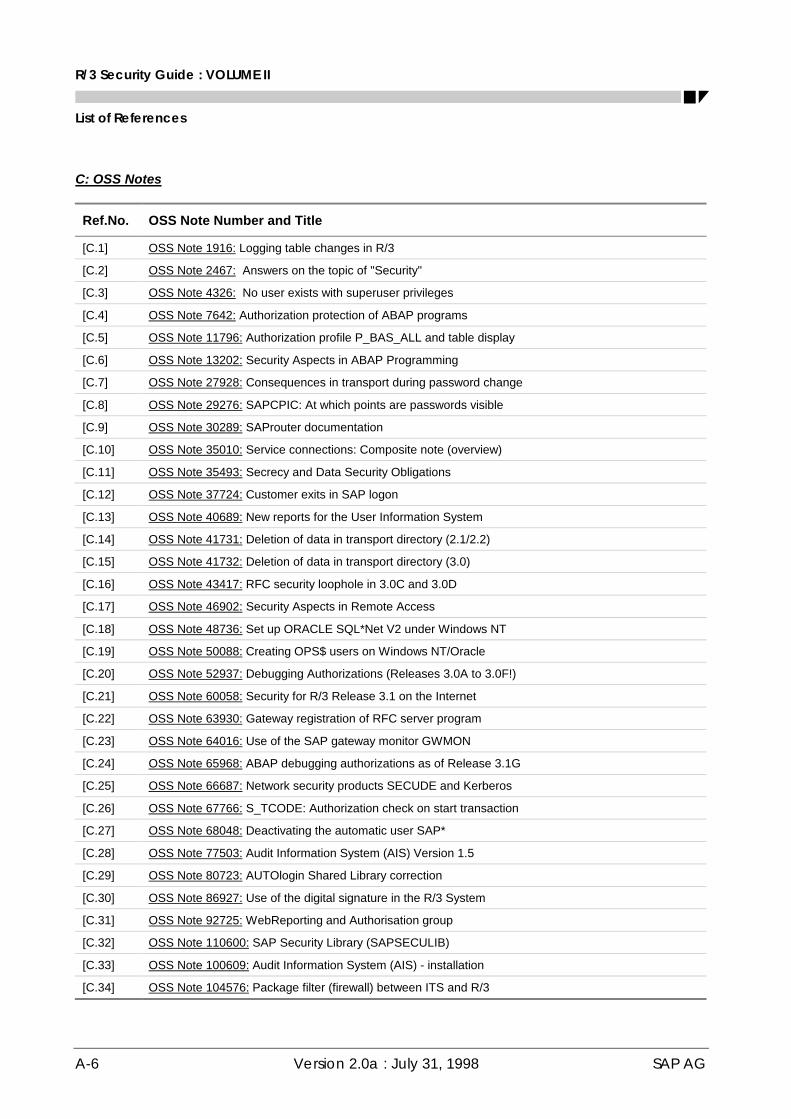
R/3 Security Guide : VOLUME II
List of References
A-6 Version 2.0a : July 31, 1998 SAP AG
C: OSS Notes
Ref.No. OSS Note Number and Title
[C.1] OSS Note 1916: Logging table changes in R/3
[C.2] OSS Note 2467: Answers on the topic of "Security"
[C.3] OSS Note 4326: No user exists with superuser privileges
[C.4] OSS Note 7642: Authorization protection of ABAP programs
[C.5] OSS Note 11796: Authorization profile P_BAS_ALL and table display
[C.6] OSS Note 13202: Security Aspects in ABAP Programming
[C.7] OSS Note 27928: Consequences in transport during password change
[C.8] OSS Note 29276: SAPCPIC: At which points are passwords visible
[C.9] OSS Note 30289: SAProuter documentation
[C.10] OSS Note 35010: Service connections: Composite note (overview)
[C.11] OSS Note 35493: Secrecy and Data Security Obligations
[C.12] OSS Note 37724: Customer exits in SAP logon
[C.13] OSS Note 40689: New reports for the User Information System
[C.14] OSS Note 41731: Deletion of data in transport directory (2.1/2.2)
[C.15] OSS Note 41732: Deletion of data in transport directory (3.0)
[C.16] OSS Note 43417: RFC security loophole in 3.0C and 3.0D
[C.17] OSS Note 46902: Security Aspects in Remote Access
[C.18] OSS Note 48736: Set up ORACLE SQL*Net V2 under Windows NT
[C.19] OSS Note 50088: Creating OPS$ users on Windows NT/Oracle
[C.20] OSS Note 52937: Debugging Authorizations (Releases 3.0A to 3.0F!)
[C.21] OSS Note 60058: Security for R/3 Release 3.1 on the Internet
[C.22] OSS Note 63930: Gateway registration of RFC server program
[C.23] OSS Note 64016: Use of the SAP gateway monitor GWMON
[C.24] OSS Note 65968: ABAP debugging authorizations as of Release 3.1G
[C.25] OSS Note 66687: Network security products SECUDE and Kerberos
[C.26] OSS Note 67766: S_TCODE: Authorization check on start transaction
[C.27] OSS Note 68048: Deactivating the automatic user SAP*
[C.28] OSS Note 77503: Audit Information System (AIS) Version 1.5
[C.29] OSS Note 80723: AUTOlogin Shared Library correction
[C.30] OSS Note 86927: Use of the digital signature in the R/3 System
[C.31] OSS Note 92725: WebReporting and Authorisation group
[C.32] OSS Note 110600: SAP Security Library (SAPSECULIB)
[C.33] OSS Note 100609: Audit Information System (AIS) - installation
[C.34] OSS Note 104576: Package filter (firewall) between ITS and R/3
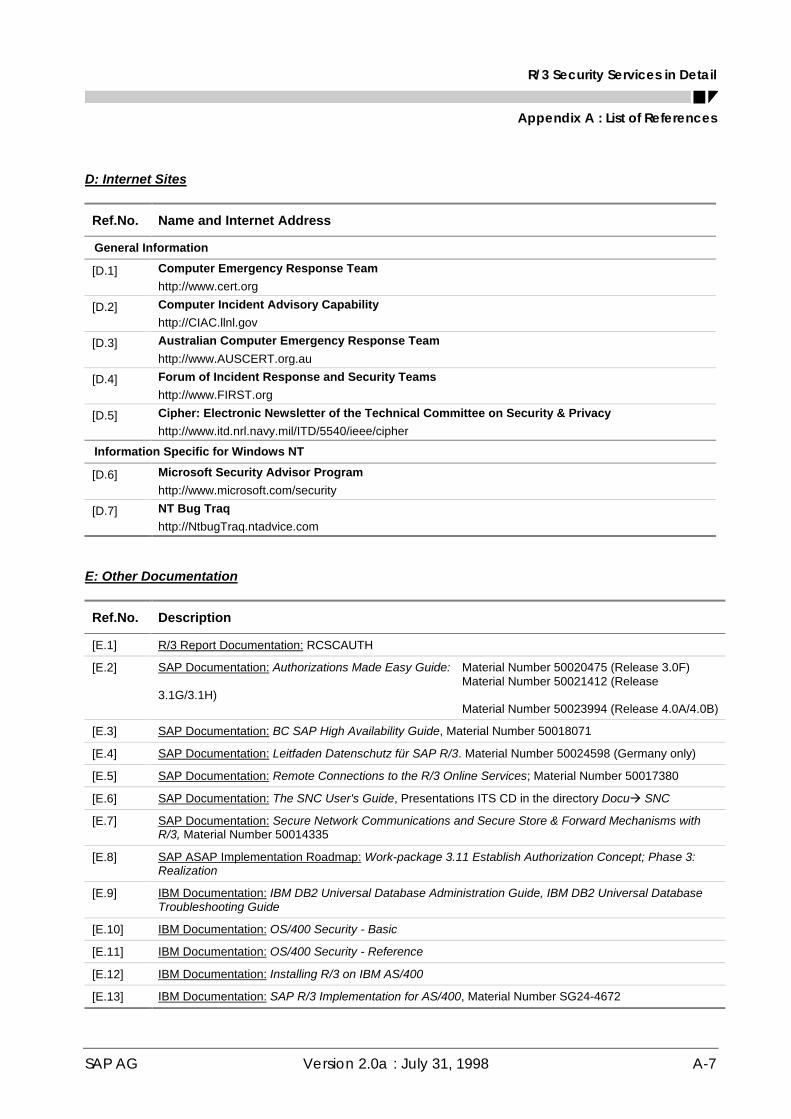
R/3 Security Services in Detail
Appendix A : List of References
SAP AG Version 2.0a : July 31, 1998 A-7
D: Internet Sites
Ref.No. Name and Internet Address
General Information
[D.1] Computer Emergency Response Teamhttp://www.cert.org
[D.2] Computer Incident Advisory Capabilityhttp://CIAC.llnl.gov
[D.3] Australian Computer Emergency Response Teamhttp://www.AUSCERT.org.au
[D.4] Forum of Incident Response and Security Teamshttp://www.FIRST.org
[D.5] Cipher: Electronic Newsletter of the Technical Committee on Security & Privacyhttp://www.itd.nrl.navy.mil/ITD/5540/ieee/cipher
Information Specific for Windows NT
[D.6] Microsoft Security Advisor Programhttp://www.microsoft.com/security
[D.7] NT Bug Traqhttp://NtbugTraq.ntadvice.com
E: Other Documentation
Ref.No. Description
[E.1] R/3 Report Documentation: RCSCAUTH
[E.2] SAP Documentation: Authorizations Made Easy Guide: Material Number 50020475 (Release 3.0F)Material Number 50021412 (Release
3.1G/3.1H)Material Number 50023994 (Release 4.0A/4.0B)
[E.3] SAP Documentation: BC SAP High Availability Guide, Material Number 50018071
[E.4] SAP Documentation: Leitfaden Datenschutz für SAP R/3. Material Number 50024598 (Germany only)
[E.5] SAP Documentation: Remote Connections to the R/3 Online Services; Material Number 50017380
[E.6] SAP Documentation: The SNC User's Guide, Presentations ITS CD in the directory Docuà SNC
[E.7] SAP Documentation: Secure Network Communications and Secure Store & Forward Mechanisms withR/3, Material Number 50014335
[E.8] SAP ASAP Implementation Roadmap: Work-package 3.11 Establish Authorization Concept; Phase 3:Realization
[E.9] IBM Documentation: IBM DB2 Universal Database Administration Guide, IBM DB2 Universal DatabaseTroubleshooting Guide
[E.10] IBM Documentation: OS/400 Security - Basic
[E.11] IBM Documentation: OS/400 Security - Reference
[E.12] IBM Documentation: Installing R/3 on IBM AS/400
[E.13] IBM Documentation: SAP R/3 Implementation for AS/400, Material Number SG24-4672

R/3 Security Guide : VOLUME II
List of References
A-8 Version 2.0a : July 31, 1998 SAP AG
R/3 Security Services in Detail
Index
SAP AG Version 2.0a : July 31, 1998 I-1
Index
A
activation administrator 2-18ADABAS 2-73
CONTROL operations 2-74passwords 2-73, 2-77, 2-78
ADABAS / UNIX 2-74files and directories 2-75, 2-80passwords 2-75, 2-79
ADABAS / Windows NT 2-76files and directories 2-76passwords 2-76
additional information 2-2, A-1ADABAS 2-80Application Link Enabling (ALE) 2-139authorization concept 2-22Change & Transport System 2-106DB2/400 2-98DB2/CS / UNIX 2-86DB2/CS / Windows NT 2-93INFORMIX/UNIX 2-72logging and auditing 2-123network security 2-36operating system commands in R/3 2-54ORACLE/UNIX 2-63ORACLE/Windows NT 2-69R/3 Online Services 2-141remote communications (RFC & CPI-C) 2-111specific objects 2-144SSF and digital signatures 2-115UNIX 2-42user authentication 2-10Windows NT 2-52
AGate 2-127, 2-129, 2-133Application Link Enabling (ALE) 2-128, 2-137
authorization trace 2-138, 2-139background processing 2-138distribution model 2-138IDocs 2-137, 2-138, 2-139passwords 2-138users and authorizations 2-137
application logging 3-2Audit Info System (AIS) 2-116, 3-2auditing 2-116
Audit Info System (AIS) 2-116Security Audit Log 2-117See also logging
authority checks 2-11, 2-20, 2-108reducing the scope of 2-21
authorization administrator 2-18authorization data administrator 2-17Authorization Infosystem 2-11, 2-15, 2-122, 3-9authorization objects
B_ALE_LSYS 2-137, 3-9B_ALE_MAST 2-137, 3-9B_ALE_MODL 2-137, 2-138, 3-9B_ALE_RECV 2-137, 2-138, 3-9B_ALE_REDU 2-137, 3-9S_ADMI_FCD 2-105, 2-108, 2-143, 3-9S_CTS_ADMI 2-105, 3-9S_DEVELOP 2-105, 3-9S_LOG_COM 2-53, 3-9S_RFC 2-109, 2-138, 3-5, 3-9S_RZL_ADM 2-54, 3-9S_TABU_CLI 2-143, 3-9S_TABU_DIS 2-21, 2-137, 2-143, 2-144, 3-9S_TCODE 2-20, 2-21, 2-108, 2-143, 3-4, 3-9S_TOOLS_EX 2-120, 3-9S_TRANSPRT 2-105, 3-10S_USER_AUT 2-19, 3-10S_USER_GRP 2-19, 3-10S_USER_PRO 2-19, 3-10summary 3-9
authorization profile administrator 2-17authorization trace 2-138, 2-139authorizations
administration tasks 2-16manually 2-18with profile generator 2-17
authorizations 2-14changes to 2-122fields 2-14object classes 2-14objects 2-14, 2-15profiles 2-14R/3 authorization concept 2-11S_LOGCOM_ALL 2-53SAP_ALL 2-143SAP_NEW 2-143user master records 2-15
B
BRBACKUP 2-61, 2-66browser certificates 2-133Business Application Programming Interface
(BAPI) 2-137
C
CCMSstatistic records 2-120
certificatesSee also public-key certificates
Certification Authority (CA) 2-113, 2-115, 2-133Change & Transport System 2-99change documents for business objects 3-2change documents for user profiles 3-2
R/3 Security Guide : VOLUME II
Index
I-2 Version 2.0a : July 31, 1998 SAP AG
change options 2-101, 2-102chdbpass 2-58, 2-62checklists 1-3Common Gateway Interface (CGI) 2-126common transport directory 2-101consulting services 1-7CPI-C 2-34, 2-107, 2-108, 2-138
external server programs 2-110crypto boxes 2-112, 2-113cryptography 2-112
D
database access 2-55SAPDBA 2-56see also the specific databaseusing external tools 2-56
DB2/400 2-94passwords 2-97, 2-98security concept 2-95security levels 2-97
DB2/CS / UNIX 2-81DB2DB6EKEY 2-81, 2-83files and directories 2-84, 2-85passwords 2-81, 2-82, 2-85SAP-DB2admin operations 2-83
DB2/CS / Windows NT 2-87DB2DB6EKEY 2-87, 2-90, 2-92, 2-93environment variables 2-90, 2-92, 2-93files and directories 2-91passwords 2-87, 2-90, 2-92users and groups 2-88
DB2DB6EKEY 2-81, 2-83, 2-87, 2-90, 2-93digital envelopes 2-112digital signatures 2-112, 2-114
E
emergency changes in productive system 2-105encryption 2-33, 2-112
F
feedback 1-7firewall 2-28, 2-34firewalls 2-127, 2-128, 2-131
G
gateway 2-108, 2-110GSS-API V2 2-35
H
HR Tables 2-144HTTP/HTTPS 2-129, 2-133, 2-134
I
IDocs 2-137, 2-138, 2-139INFORMIX / UNIX 2-70
files and directories 2-71, 2-72
passwords 2-70, 2-71SAPDBA 2-56
integrity checks on SAPgui 2-142Internet 2-124Internet Application Components (IAC) 2-124
WebReporting 2-136WebRFC 2-136
Internet Transaction Server (ITS) 2-124, 2-126, 2-131AGate 2-127, 2-129, 2-133declaring applications 2-135encryption 2-133firewalls 2-132HTTP 2-133HTTPS 2-133network infrastructure 2-127, 2-132privacy 2-133SAProuter 2-130security levels 2-135session integrity 2-134TCP ports 2-129, 2-130user authentication 2-134WGate 2-126, 2-129, 2-133
L
logging 2-116application logging 2-121Audit Info System (AIS) 2-116change documents for business objects 2-121changes to table data 2-122changes to user master records 2-122Security Audit Log 2-117See also auditingstatistic records 2-120System Log 2-118workflow execution 2-121
logons 2-7, 2-8, 2-117
M
message server 2-26Microsoft Information Server API (ISAPI) 2-126
N
Netscape Server API (NSAPI) 2-126network
routers and packet filters 2-27TCP ports 2-26, 2-27
Network File System (NFS) 2-38network infrastructure 2-23, 2-127, 2-132network services 2-25new topics 1-6NFS 2-38NIS 2-38notations 1-5
O
Online Service System 2-29

R/3 Security Services in Detail
Index
SAP AG Version 2.0a : July 31, 1998 I-3
Open Database Connectivity (ODBC) 2-56operating system 2-37Operating System Commands in R/3 2-53OPS$ connect mechanism 2-57ORACLE / UNIX 2-57
chdbpass 2-58, 2-62files and directories 2-60, 2-63OPS$ connect mechanism 2-57passwords 2-57, 2-61, 2-62SAPDBA 2-56, 2-61SAPDBA expert mode 2-59
ORACLE / Windows NT 2-64files and directories 2-65OPS$ connect mechanism 2-64, 2-67, 2-68passwords 2-64, 2-68SAPDBA 2-56, 2-66
P
packet filters 2-27, 2-31, 2-127, 2-128, 2-131, 2-132passwords
ADABAS 2-73, 2-77, 2-78ADABAS / UNIX 2-75, 2-79ADABAS / Windows NT 2-76ALE users 2-138CPI-C external server programs 2-110database user SAPR3 2-55DB2/ CS / UNIX 2-85DB2/400 2-97, 2-98DB2/CS / UNIX 2-81, 2-82DB2/CS / Windows NT 2-87, 2-90, 2-92INFORMIX / UNIX 2-70, 2-71ORACLE / UNIX 2-57, 2-61, 2-62ORACLE / Windows NT 2-64, 2-68R/3 Online Services 2-140, 2-141R/3 standard user SAPCPIC 2-6R/3 users 2-3, 2-8, 2-9
profile parameters 2-4rules 2-3storage and transport 2-4
UNIX users 2-38personal security environment (PSE) 2-114private keys 2-112, 2-113, 2-114Profile Generator 2-11, 2-12, 2-17profile parameters
auth/auth_number_in_userbuffer 3-4auth/authorization_trace 3-4auth/no_check_in_some_cases 2-22, 3-4auth/no_check_on_tcode 3-4auth/rfc_authority_check 3-5auth/system_access_check_off 3-5auth/test_mode 3-5DIR-INSTANCE 2-114, 3-7gw/max_conn 3-6gw/monitor 3-6gw/sec_info 2-110, 3-6gw/stat 3-6
login/failed_user_auto_unlock 2-7, 2-8, 3-3login/fails_to_session_end 2-7, 2-8, 3-3login/fails_to_user_lock 2-7, 2-8, 2-144, 3-3login/min_password_lng 2-4, 3-3login/no_automatic_user_sap* 2-5, 2-144, 3-3login/no_automatic_user_sapstar 3-3login/password_expiration_time 3-3login/passwords_expiration_time 2-4rdisp/gui_auto_logout 2-7, 2-8, 3-4rdisp/rfc_max_login 3-4rdisp/rfc_max_own_login 3-4rdisp/tm_max_no 3-4rec/client 2-122, 3-8rsau/enable 2-117rsau/local/file 2-117rsau/max_diskspace_local 2-117rsau/selection_slots 2-117rslg/central/file 2-118, 2-119rslg/central/old_file 2-118, 2-119rslg/collect_daemon/host 2-119rslg/local/file 2-118, 2-119rslg/max_diskspace/central 2-118rslg/max_diskspace_central 2-119rslg/max_diskspace_local 2-119snc/accept_insecure_gui 3-5snc/accept_insecure_r3int_rfc 3-5snc/accept_insecure_rfc 3-5snc/accept_insecure_spic 3-5snc/data_protection/min 3-5snc/data_protection/use 3-5snc/data_protection_max 3-5snc/enable 3-6snc/gssapi_lib 3-6snc/identity/as 3-6snc/permit_insecure_gui 3-5snc/permit_insecure_start 3-6snc/r3int_rfc_qop 3-6snc/r3int_rfc_secure 3-6stat/file 2-120, 3-8stat/level 2-120, 3-8stat/version 2-120, 3-8summary 3-3transport/systemtype 3-6transport/tp_logging 3-6
profiles 2-14B_ALE_ALL 2-137changes to 2-122P_BAS_ALL 2-144S_A.ADMIN 2-53S_A.SYSTEM 2-17, 2-18, 2-53S_CTS_ALL 2-105S_CTS_DEVELO 2-105S_CTS_PROJEC 2-105S_CTS_SHOW 2-105S_USER* 2-18SAP_ALL 2-9
public keys 2-112, 2-113, 2-115

R/3 Security Guide : VOLUME II
Index
I-4 Version 2.0a : July 31, 1998 SAP AG
public-key certificates 2-113, 2-115public-key infrastructure (PKI) 2-112
R
R/3 Online Services 2-140passwords 2-140, 2-141SAProuter 2-140
R/3 resourcesUNIX 2-40Windows NT 2-50
releases, valid 1-5remote communications 2-107remsh/rsh 2-39report classes 2-20reports
RSCSAUTH 2-20, 3-1RSFKT100 2-121RSUSR003 3-1RSUSR006 2-7, 3-1RSUSR400 3-5summary 3-1
RFC 2-34, 2-107, 2-108, 2-117, 2-137external server programs 2-26, 2-110
RFC authorizations 2-109RFC Software Development Kit 2-108RFC trusted systems 2-109RFC-API 2-107rlogin 2-39, 2-58routers 2-27, 2-31, 2-128, 2-132
S
SAP Business Workflow 3-2SAP Logon Pad 2-8SAP Network Interface (NI) 2-127SAP Security Library (SAPSECULIB) 2-112, 2-114SAP Shortcuts 2-8SAP_ALL 2-143SAP_NEW 2-143SAPDBA 2-56, 3-2
expert mode 2-59ORACLE 2-61
SAPgui 2-26, 2-34integrity checks 2-142
SAPlpd 2-26, 2-34SAProuter 2-27, 2-29, 2-34, 2-127, 2-130, 2-140secinfo 2-110Secure Network Communications
(SNC) 2-32, 2-108, 2-111, 2-133Secure Sockets Layer protocol (SSL) 2-133Secure Store & Forward (SSF) 2-112Security Audit Log 2-7, 2-117, 2-118security policy 1-1, 1-3security toolbox 2-1server certificates 2-133Session Manager 2-8smart cards 2-112, 2-113
standard users 2-5DDIC 2-6, 2-9EARLYWATCH 2-7, 2-9SAP* 2-5, 2-9SAPCPIC 2-6, 2-9
statistic records 2-120, 3-2support 1-7System Log 2-8, 2-118, 3-2system profiles 2-144
T
table classes 2-21table recording 2-122, 3-2tables
DBTABPRT 2-122RFCDES 2-55, 2-108SAPUSER 2-55, 2-57, 2-70, 2-71T000 2-9, 2-55, 2-143TDDAT 2-21USOBT 2-22USOBX 2-22USR* 2-55USR40 2-9
TCP ports 2-128, 2-129, 2-130third-party products 2-35, 2-112threats 1-1tools
summary 3-1transactions
BD87 2-139PFCG 2-12, 3-1RZ11 2-119, 2-144, 3-3SALE 2-137SCC4 2-143SCD0 2-121, 3-2SCU3 2-122, 3-2SE03 2-101SE06 2-101, 2-102SE09 2-103, 3-2SE10 2-103, 3-2SE11 2-121SE16 2-144SE38 2-105SE93 2-20SECR 2-117, 3-2SLG0 2-121, 3-2SLG1 2-121, 3-2SM18 2-7, 2-118, 3-1, 3-2SM19 2-7, 2-118, 3-1, 3-2SM20 2-7, 2-118, 3-1, 3-2SM21 2-118, 2-119, 3-1, 3-2SM30 2-9, 2-143SM31 2-143SM49 2-53SM52 2-105SM59 2-108, 2-138
R/3 Security Services in Detail
Index
SAP AG Version 2.0a : July 31, 1998 I-5
SM69 2-54SMW0 2-136ST01 2-139STAT 2-120, 2-140, 3-2STMS 2-99, 3-2SU01 2-122, 2-138, 3-2SU24 2-21, 2-22SU25 2-22SUIM 2-15, 2-17, 2-18, 3-1, 3-9summary 3-1SUPC 2-18SWI1 3-2SWI2 2-121SWI5 2-121, 3-2
Transport Management System 2-99, 3-2transport path 2-103transporting
responsibilities and authorizations 2-104
U
UMASK 2-41UNIX 2-37
Network File System (NFS) 2-38passwords 2-38R/3 resources 2-40, 2-41remsh/rsh 2-39rlogin 2-39, 2-58SUID/SGID 2-38UMASK 2-41Yellow Pages (NIS) 2-38, 2-61, 2-71
useful proceduresADABAS 2-77Application Link Enabling (ALE) 2-139
DB2/400 2-98DB2/CS / UNIX 2-85DB2/CS / Windows NT 2-92INFORMIX/UNIX 2-71ORACLE/UNIX 2-61ORACLE/Windows NT 2-67user authentication 2-9
user administrator 2-17, 2-18user authentication 2-3, 2-134user master records 2-15, 2-117
changes to 2-122
V
virus protection 2-142
W
WebReporting 2-136WebRFC 2-136WGate 2-126, 2-129, 2-133Windows NT 2-43
domain concept 2-48groups 2-43R/3 resources 2-50trusted domain 2-49users 2-45
Workbench Organizer 2-103, 3-2
X
X.509 certificates 2-133
Y
Yellow Pages (NIS) 2-38, 2-61, 2-71

R/3 Security Guide : VOLUME II
Index
I-6 Version 2.0a : July 31, 1998 SAP AG

R/3 Security Services in Detail
R/3 Security Guide / Feedback Reply Form
SAP AG Version 2.0a : July 31, 1998 Feedback
R/3 Security Guide / Feedback Reply Form
To:
SAP AGCCMS & Security DepartmentPostfach 1461D-69190 WalldorfGermany
Fax: +49-6227 / 7-41198
From:
Name: .........................................................................................
Position: .........................................................................................
Dept.: .........................................................................................
Company: .........................................................................................
Address: .........................................................................................
.........................................................................................
Telephone: .................................................Fax: ................................
email: .........................................................................................
Subject: Feedback to the R/3 Security GuideFeedback applies to: R/3 Security Guide, Volume ................ Version .................... Chapter ...............................
R/3 Release .................... Database: ...................... Operating System ...............................
Were you able to find theinformation you needed inthe guide?
¡ Yes
¡ No
How well does the R/3 Security Guidemeet your needs?
¡ Very well
¡ Well
¡ Not very well
¡ Not at all
Why or why not?(Use space below.)
Are you?
¡ Requesting further information
¡ Reporting additional information
¡ Reporting missing information
¡ Reporting an error
¡ Other........................................................
Feedback (use additional pages if necessary):
...........................................................................................................................................................................................
...........................................................................................................................................................................................
...........................................................................................................................................................................................
...........................................................................................................................................................................................
...........................................................................................................................................................................................
...........................................................................................................................................................................................
...........................................................................................................................................................................................
...........................................................................................................................................................................................
...........................................................................................................................................................................................
...........................................................................................................................................................................................
...........................................................................................................................................................................................
Thank you for your information.