quick start guide to movie maker -...
TRANSCRIPT

Quick Start Guide to Windows Movie Maker

Getting Movie Maker
(Windows Essentials contains other free
programs such as Photo Gallery and
Messenger. If you want to install Movie
Maker only, simply uncheck the options for
the other Essentials programs when
prompted by the installer.)
You can download Movie Maker at the following address:
http://windows.microsoft.com/en-US/windows-live/movie-maker-get-
started
Windows Movie Maker is a free video editing tool for Windows
provided by Microsoft via its Windows Essentials Program Suite.
While Microsoft hasn’t officially sanctioned Movie Maker for use on Windows 10, it will run.

Gathering MaterialsGather all of the video, audio, and image files that you are planning to use in your project and put them in one folder. Movie Maker links to files. Moving images or sound files outside of this folder while working on the project may break these links.

Creating a Project• Open Movie Maker.• Click the File icon next to the Home tab and choose Save Project As.• Navigate to the folder you created in the previous slide.• Name your project file in the File name field.• Click Save.
A project file contains information about the sequence of images, video, and audio used as well as transition and title details. You will use the project file to create the final movie that you will distribute to others upon finishing your project.
Example of Project File

Setting Up a Widescreen or Standard Project
With the switch to digital TV and high definition broadcasting, video cameras now shoot in a widescreen format. If you have video footage shot in the older standard format, you may need to change the project settings from the 16:9 (widescreen) to the old 4:3 (standard) aspect ratio. If your video image appears squished or stretched, making people appear taller or shorter than they should be, you need to change your project setting to a different aspect ratio. To do this:
• Click on the Project tab.• Select either 16:9 (widescreen) or 4:3 (standard) options.(Most footage will be widescreen. Older archived footage may be 4:3
standard.)

Adding Video and Images1. Under the Home tab, click the Add videos and photos button.
2. Navigate to the files that you wish to import. You can Ctrl click to select more that one file to import. Click Open.
3. In order to improve playback of some video file types, Movie Maker may generate preview files. If the “Preparing your files” message appears when you import files, wait until the program has finished generating the previews before trying to edit.

Adding Audio
1. Under the Home tab, click the Add music button.
3. Navigate to the files that you wish to import. Click Open.
2. To add audio to the entire project select the Add music option. To place the audio at a particular point in the project, navigate to that place in the project and stop. Then choose the Add music at the current point.

Problems Adding Files to a Project
1. If you receive an error when trying to add a video or audio file to a project, you may need to convert the file to a different format. Handbrake is a free transcoder. You can download Handbrake from the following address: https://handbrake.fr/

Moving Files in a ProjectDrag the files to rearrange them in a different order within a project.

Trimming Files1. Navigate to the point where you wish a clip to begin.
2. Click the Video Tools Edit tab and click Set start point.
3. Navigate to the point where you wish a clip to end. Click Set end point.
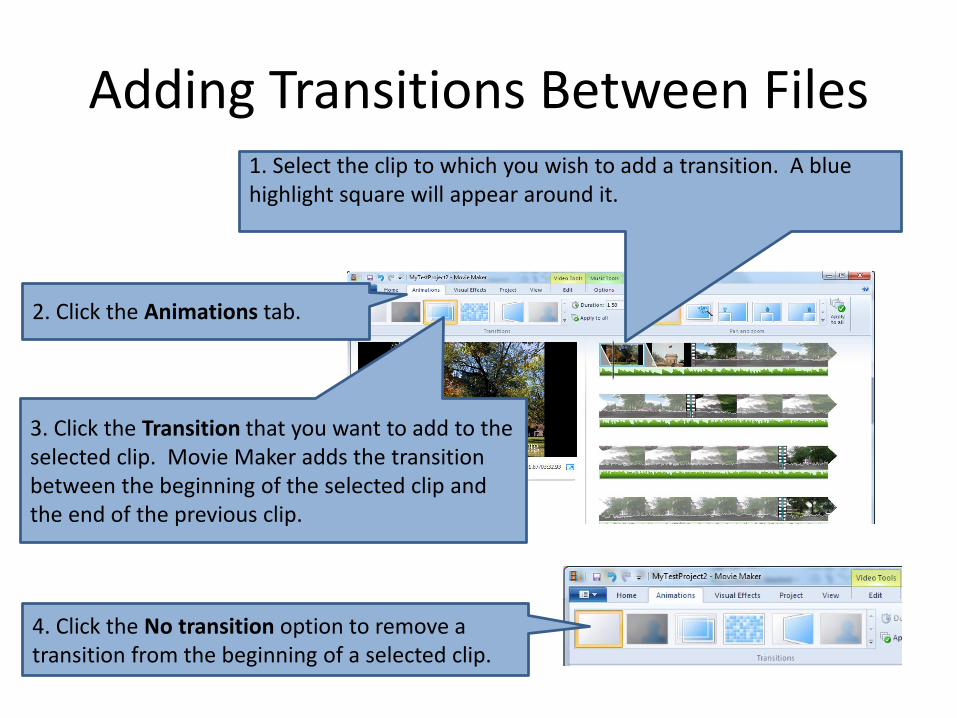
Adding Transitions Between Files1. Select the clip to which you wish to add a transition. A blue highlight square will appear around it.
2. Click the Animations tab.
3. Click the Transition that you want to add to the selected clip. Movie Maker adds the transition between the beginning of the selected clip and the end of the previous clip.
4. Click the No transition option to remove a transition from the beginning of a selected clip.
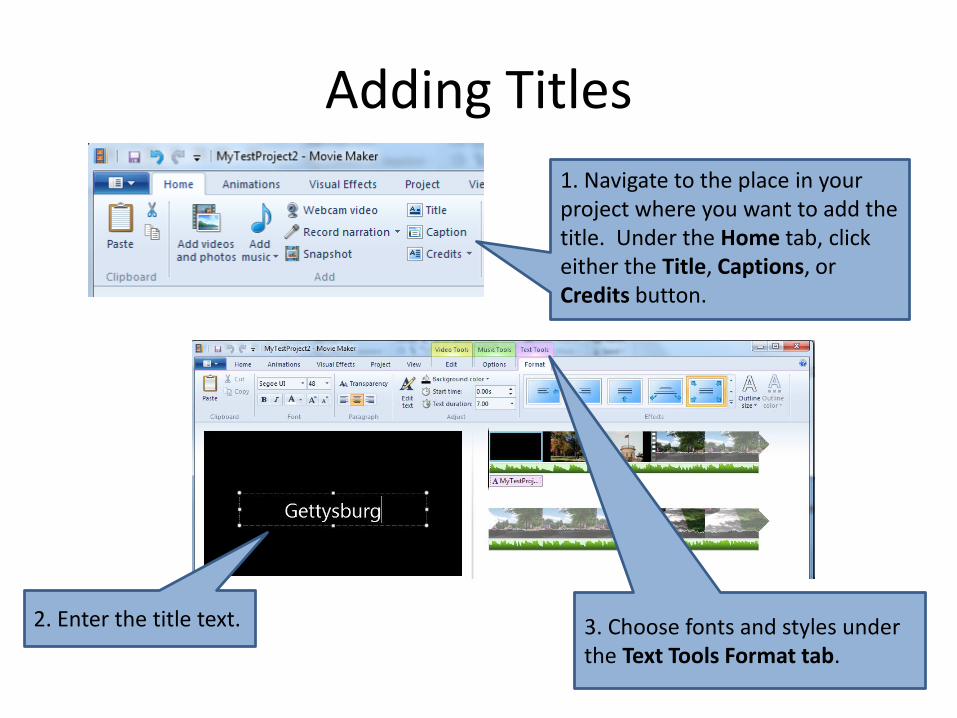
Adding Titles
1. Navigate to the place in your project where you want to add the title. Under the Home tab, click either the Title, Captions, or Credits button.
3. Choose fonts and styles under the Text Tools Format tab.
2. Enter the title text.

Sharing Your Movie with Others
1. Under the Home tab, click Save Movie button.
2. Note: The Save Project button does NOT create a self-contained file that you can play on another computer. It updates the project file and still requires all of your linked audio, video, and images.
In order to create a single .mp4 file from all of the linked images, movies, and audio files in your Movie Maker project, you must export your project using the Save movie button.

Finding Movie Maker on Campus
Movie Maker is installed on a PC in IT’s Digital Studio(located in room 101D of the ground floor of the West Building). This space is open 24/7 with college ID.
Movie Maker is also available on the PCs in the Language Resource Center
on the ground floor of Breidenbaugh. See their website for hours
(http://www.gettysburg.edu/about/offices/provost/lrc/index.dot ) Hour many
vary in the summer time and over breaks.

Movie Maker ResourcesMovie Maker Tutorials:
Vimeo Video School: Windows Movie Maker https://vimeo.com/videoschool/lesson/574/ep-1-introducing-windows-movie-maker
Microsoft’s Windows Movie Maker Helphttp://windows.microsoft.com/en-us/windows-live/windows-essentials-help#v1h=tab1