quick start guide 3g router from vodafone€¦ · quick start guide 3g router from vodafone....
TRANSCRIPT
Quick Start Guide3G Router from Vodafone
Welcometo the world of mobile communications
Router Function Overview and System Requirements 1
Basic router set-up 2Insert the SIM Card 2Connect to the Power Adapter 3Connect the router to a PC 3Connect to a Telephone 4Locating the router 4Connect the External Antenna 5Power on the router 5Make a Call 5Dial-up Access 6Protect yourself 6Advanced con� guration of the router 6
Router status indicators 7
Using the router as a USB modem (optional) 8
1
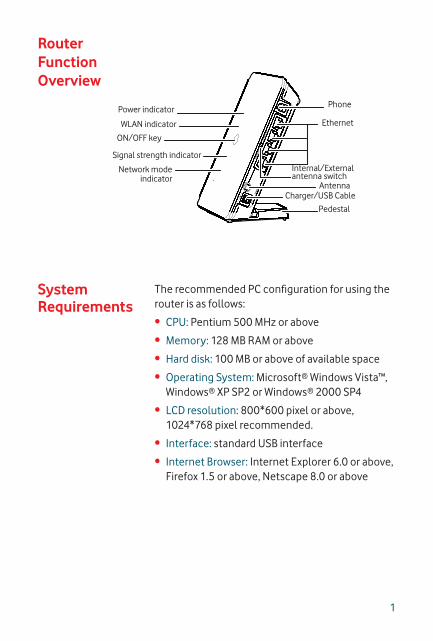
The recommended PC con� guration for using the router is as follows:
CPU: Pentium 500 MHz or above
Memory: 128 MB RAM or above
Hard disk: 100 MB or above of available space
Operating System: Microsoft® Windows Vista™, Windows® XP SP2 or Windows® 2000 SP4
LCD resolution: 800*600 pixel or above, 1024*768 pixel recommended.
Interface: standard USB interface
Internet Browser: Internet Explorer 6.0 or above, Firefox 1.5 or above, Netscape 8.0 or above
•
•
•
•
•
•
•
Router Function Overview
Power indicator
WLAN indicator
ON/OFF key
Signal strength indicator
Network mode indicator
Phone
Ethernet
AntennaCharger/USB Cable
Internal/External antenna switch
System Requirements
Pedestal

2
Step 1: Insert the SIM Card
Remove the SIM card holder from the router. Slide the SIM card into the card slot of the holder with the golden contact facing upward. Insert the card holder into the router.
Caution: Before inserting or removing the SIM card, you must disconnect the router from the power adapter.
•Basic router set-up
step 1

3
Step 2: Connect to the Power Adapter
Use a power adapter that is compatible with the router; otherwise, the router may be damaged.
Step 3: Connect the router to a PC
Use either WiFi or an Ethernet cable to connect the router to the PC. The Ethernet cable cannot be longer than 100 meters (328 feet), and to achieve the best results use a shielded cable.
•
•
step 2
step 3

4
Step 4: Connect to a Telephone
The wireless signal can interfere with the telephone, so please place the telephone at least one metre from the router.
Step 5: Locating the router
To improve wireless reception, place the router near a window and as high as possible. The router can be placed horizontally on a table, hanging against the wall, or leaning against the pedestal.
Press the clips on the pedestal, and insert the pedestal into the router as shown in the diagram. The pedestal will support the router.
Caution: To avoid interference from the wireless signal, place electrical devices at least one metre from the router.
•
•
step 4
step 5

5
Step 6: Connect the External Antenna (Optional)
In areas with weak network signal strength you can attach an external antenna to improve your connection quality. To do this, connect the external antenna cable to the antenna jack on the main unit making sure it is � rmly screwed in. Set the antenna switch to “external”.
Step 7: Power on the router
Press and hold the ON/OFF button on the front of the router to power it on or off.
Step 8: Make a Call
When you hear the dial tone after picking up the handset, you can make a call.
•
•
•
Antenna switch
Internal/External
step 6

6
Step 9: Dial-up Access
By default, the router dials up to access the Internet as required.
Step 10: Protect Yourself
We recommend you change the following settings immediately to secure your wireless router and prevent unauthorised access. Use your internet browser to navigate to the router management page (http://192.168.1.1), then select “Advanced Settings”.
1. Select “System”, modify the admin password.
2. Select “WLAN”, then select “Advanced Settings”, and choose an appropriate encryption method.
Step 11: Advanced con� guration of the router
If you need to con� gure the WLAN or other router-related parameters, please access the router management page (http://192.168.1.1) for detailed con� guration options.
Admin: Has the right to view and modify con� gurations. The default password is admin.
User: Has the right to view only basic information. The default password is user.
Note: To avoid con� icting con� gurations, only one user is allowed to log in to the router management page at a time.
•
•
•
7
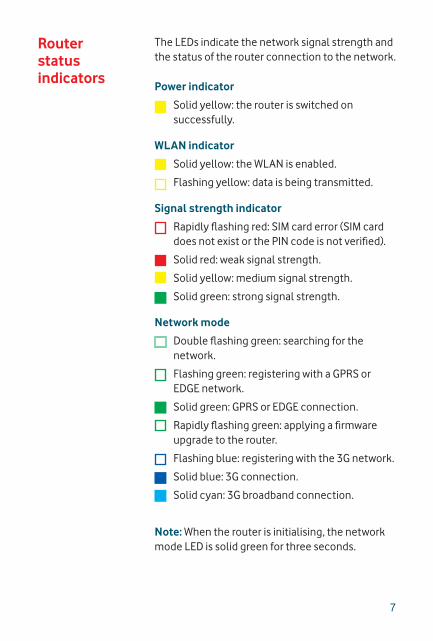
Router status indicators
The LEDs indicate the network signal strength and the status of the router connection to the network.
Power indicator
Solid yellow: the router is switched on successfully.
WLAN indicator
Solid yellow: the WLAN is enabled.
Flashing yellow: data is being transmitted.
Signal strength indicator
Rapidly � ashing red: SIM card error (SIM card does not exist or the PIN code is not veri� ed).
Solid red: weak signal strength.
Solid yellow: medium signal strength.
Solid green: strong signal strength.
Network mode
Double � ashing green: searching for the network.
Flashing green: registering with a GPRS or EDGE network.
Solid green: GPRS or EDGE connection.
Rapidly � ashing green: applying a � rmware upgrade to the router.
Flashing blue: registering with the 3G network.
Solid blue: 3G connection.
Solid cyan: 3G broadband connection.
Note: When the router is initialising, the network mode LED is solid green for three seconds.

8
Using the router as a USB modem (optional)
In USB modem mode, the router is connected to the PC with the USB cable, and the router acts as a modem. This is a single user mode, and you cannot use the LAN or the Ethernet connections. For more information, go towww.support.vodafone.com and review the Vodafone Mobile Connect software section.
Note: The double-ended USB data cable is required because it acts as an additional power supply. Make sure that all three USB cable connectors are plugged securely into their sockets.
1. Insert the SIM card.2. Connect the router to the PC with the supplied
USB data cable.3. The system automatically recognises the new
hardware as a USB device, and displays in the desktop system tray. The router and PC are connected successfully.
4. If the router is connected to a telephone set, you can make calls when you hear the dial tone.
2
1
3
1. USB data cable 2. USB connector 3. Auxiliary USB
data cable

9
For further help, please visit www.support.vodafone.com, or call Vodafone Support on XXX or XXXXXXX.
5. The Vodafone Mobile Connect installation program resident on the router starts automatically. After a successful installation, Vodafone Mobile Connect starts automatically, and will prompt you to connect to the mobile network.
Note: The � rst time you plug your router into a PC the software setup should start automatically, and proceed to set up your router. If for some reason the setup does not start, right click on the VMC Lite 9.3.x.x drive in ‘My Computer’ (Start Menu, Computer for Vista machines), select Explore and double-click the � le called setup_vmc_lite.exe. Follow the on-screen instructions.
Setting up your router may take a few minutes, but once the setup is � nished, the Vodafone Mobile Connect Lite software should start automatically. If for some reason the program does not start, select Vodafone Mobile Connect from the Windows Start menu. Do not plug or unplug the router during the installation process.

© Vodafone 2008. Vodafone and the Vodafone logos are trade marks of the Vodafone Group. Any product or company names mentioned herein may be the trade marks of their respective owners. The 3G Router from Vodafone is manufactured by Huawei Technologies Co., Ltd.
Product Code: B970 VMCLite 9.3 08/08_en_GB