quick setup fixture for wolverine or tormek grinding systems setup for wolverine or tormek...
TRANSCRIPT

© Copyright Dave Mueller 2011 www.aggieturner.com Page 1
Quick Setup Fixture for Wolverine or Tormek Grinding Systems
Dave Mueller - Brazos Valley Turners, College Station, Texas
I get pretty tired of setting up the grinding jig on my Wolverine or Tormek every time I change them to sharpen different tools. Also, I never seem to set them the same each time, resulting in a process of marking the tool edge with a Marks-A-Lot marker, touching the tool to the grinding wheel, readjusting and repeating until it is close enough. Often it is difficult to prevent multiple bevels. There are other setup fixtures commercially available, however, they are not adjustable to the settings I use to grind my tools and the cost is prohibitive to have one for each tool. After thinking about options, I came up with the following simple and inexpensive fixture to make the setup for each tool very quick and repeatable. I made one for each tool so there is no problem with sharpening each tool with a different grind or angle setting, since the fixture takes each different setup into account. This will NOT work with the Wolverine Vari-Grind 2.
The Wolverine Vari-Grind gouge jig sits in an adjustable support with a V-groove and the Tormek gouge jig has a hole that slides over a support rod. Both of these jig supports are adjustable in and out to set the distance from the grinding wheel to the point of attachment of the jig, thus setting the nose angle of the gouge. Both of the jigs also have an angle setting that modifies the gouge's wing length or sweep. With this fixture you can continue to use a specific jig angle setting, which may be different for each of your tools, however, be sure to mark the angle setting on the fixture as shown below.
I have noticed that the jig angle setting is more difficult to repeat as accurately as the wheel-to-support distance using the fixture described below. In order to eliminate as much variability as possible (and save unnecessary grinding of my gouges), I decided to use Doug Thompson's method of setting the angle on my Wolverine and Tormek gouge grinding jigs to one number and never change it. Download his description on how he grinds his tools here - http://www.thompsonlathetools.com/sharpening.asp . His jig angle setting is approximately 39°. As the angle between the gouge and the arm gets smaller, the wing or sweep of the gouge gets longer. However, it does not significantly change the nose angle, as that is primarily set by the wheel-to-support distance using this fixture.
To make the fixture,
1. Cut several 1.5" X 1.5" X 10" pieces of pine (half of a 2X4), one for each tool. They can be cut to length after the screws are set.
2. Set up your Wolverine or Tormek for a specific tool and then sharpen it as you normally would. DO NOT CHANGE ANY OF THE SETTINGS after sharpening until you complete the fixture for that tool.

© Copyright Dave Mueller 2011 www.aggieturner.com Page 2
For a Wolverine,
1. Round one end on a sander like a pencil so it does not interfere with the support, and drive a round headed screw into the end, as shown in Figure 1.
Figure 1.
2. Place the screw end into the Wolverine support, hold the fixture against the side of the grinding wheel and trace the outline of the wheel approximately on the middle of the fixture (Figure 2).
Figure 2.
© Copyright Dave Mueller 2011 www.aggieturner.com Page 3
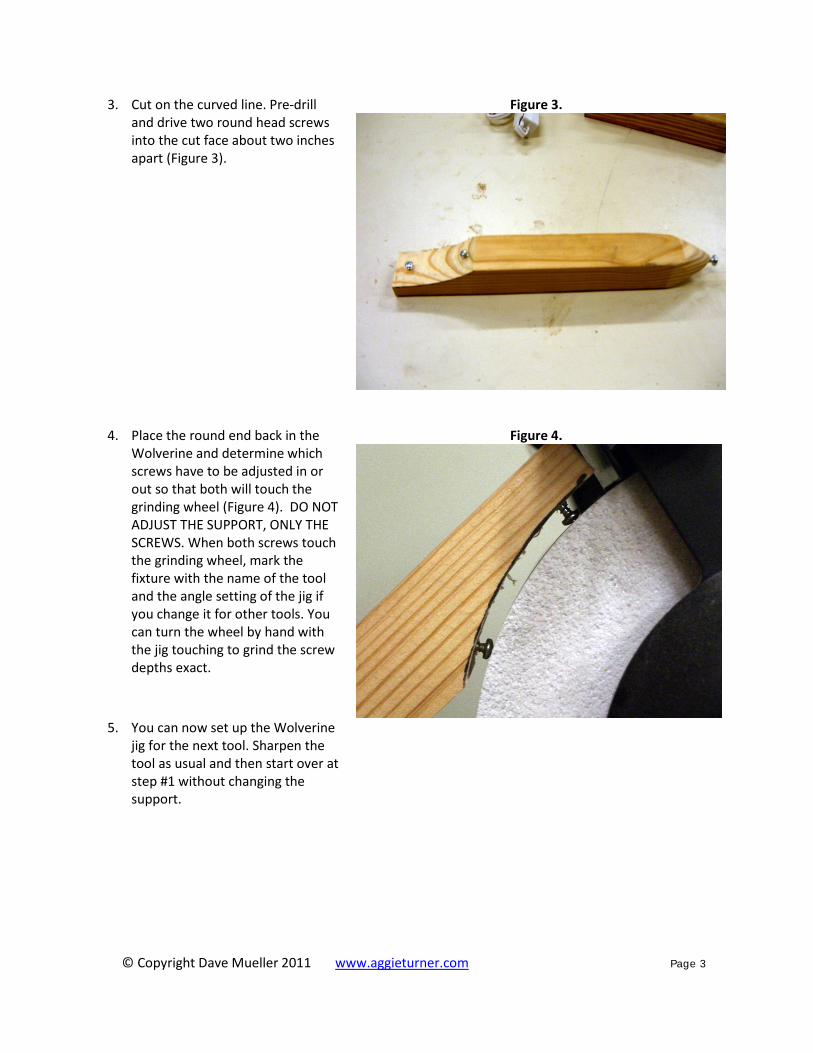
3. Cut on the curved line. Pre-drill and drive two round head screws into the cut face about two inches apart (Figure 3).
Figure 3.
4. Place the round end back in the Wolverine and determine which screws have to be adjusted in or out so that both will touch the grinding wheel (Figure 4). DO NOT ADJUST THE SUPPORT, ONLY THE SCREWS. When both screws touch the grinding wheel, mark the fixture with the name of the tool and the angle setting of the jig if you change it for other tools. You can turn the wheel by hand with the jig touching to grind the screw depths exact.
Figure 4.
5. You can now set up the Wolverine
jig for the next tool. Sharpen the tool as usual and then start over at step #1 without changing the support.
© Copyright Dave Mueller 2011 www.aggieturner.com Page 4
For a Tormek,
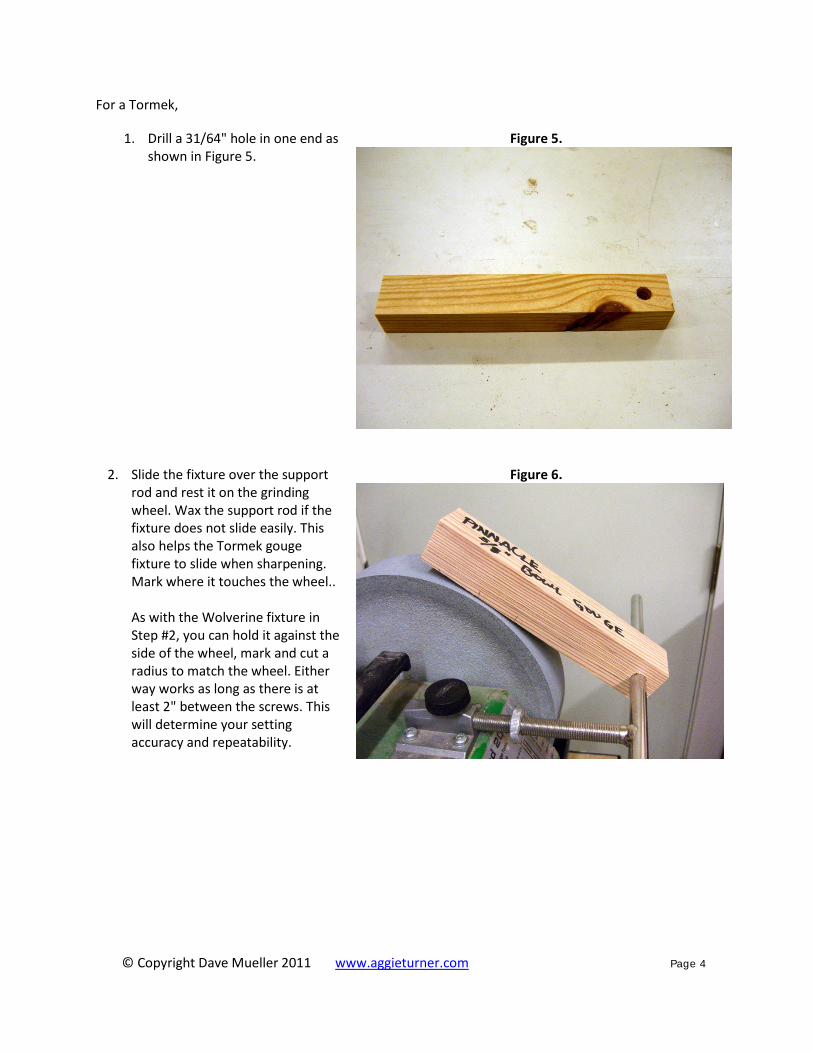
1. Drill a 31/64" hole in one end as shown in Figure 5.
Figure 5.
2. Slide the fixture over the support rod and rest it on the grinding wheel. Wax the support rod if the fixture does not slide easily. This also helps the Tormek gouge fixture to slide when sharpening. Mark where it touches the wheel.. As with the Wolverine fixture in Step #2, you can hold it against the side of the wheel, mark and cut a radius to match the wheel. Either way works as long as there is at least 2" between the screws. This will determine your setting accuracy and repeatability.
Figure 6.

© Copyright Dave Mueller 2011 www.aggieturner.com Page 5
3. From the mark where it touched the wheel, drive screws 1" on either side of the mark as shown in Figure 7.
Figure 7.
4. Slide the fixture back on the support rod and adjust the screws until both touch the grinding wheel. DO NOT ADJUST THE SUPPORT, ONLY THE SCREWS. Mark the fixture with the name of the tool and the angle setting of the jig if you do not keep it fixed. You can turn the wheel by hand with the jig touching to grind the screw depths exact.
Figure 8.
5. You can now set up the Tormek jig
for the next tool. Sharpen it and then start over at step #6 without changing the support distance.
© Copyright Dave Mueller 2011
Note - You may make copies, distribute or publish these instructions if credit is given to the author. You may not sell these instructions or sell fixtures made using these instructions.