quick guide: failover clustering - milestone xprotect ... · xprotect quick guide: failover...
TRANSCRIPT

Milestone Systems
Quick guide: Failover clustering
XProtect® Advanced VMS products

XProtect Quick guide: Failover clustering - Advanced VMS products
About Windows Server Failover
Clustering (WSFC)
If your VMS environment requires continuous access that cannot tolerate hardware and software failures without any system interruption, then a viable system solution is Windows Server Failover Clustering (WSFC).
In some cases, for example a small retail shop, the operation of the VMS is not critical enough to warrant the cost of additional hardware. Instead, the shop accepts that failures can be addressed within a day or two by fixing or replacing the server. But, if your VMS environment requires high-availability, then WSFC can be a cost-effective way of achieving that.
WSFC provides an infrastructure that supports high-availability and disaster recovery of hosted server applications. A WSFC cluster is a group of independent servers that work together to increase the availability of applications and services. If a cluster node or service fails, the services that are hosted on that node can be automatically or manually transferred to another available
node. This is known as failover.
This document provides an outline on creating a high availability environment with Microsoft Failover Clustering on two server nodes by:
Preparing the operating system for failover clustering (see "Prerequisites for clustering" on page 6)
Installing an SQL Server for failover clustering (see "Install SQL cluster failover" on page 9)
Configuring redundant XProtect management servers (see "Configure redundant XProtect management servers" on page 11)
Setting up service redundancies (see "Set service dependencies" on page 13) and
Verifying that the failover clustering works (see "Verify that failover clustering is working" on page 14)
This document provides a general outline of WSFC. Refer to the Microsoft documentation (https://msdn.microsoft.com/en-us/library/hh270278) for more detailed information.
Note: There are many ways to set up failover clustering. This document shows a simple example of one way: a Failover Cluster Instance (FCI) with shared storage.
We recommend you refer to the Microsoft documentation (https://msdn.microsoft.com/en-
us/library/hh270278) for more information about failover clustering.
This document is primarily intended for:
Surveillance system architects, designers and integrators
Large-scale surveillance project consultants
Installers
XProtect Quick guide: Failover clustering - Advanced VMS products
System setup
In XProtect Corporate and XProtect Expert, you can achieve high availability for the management server and SQL Server by using Windows Server Failover Clustering (WSFC).
Hardware failures on a standalone server running the management server and SQL Server do not affect recordings or the recording server. However, hardware failures can result in downtime for operators that are not already logged into the clients. A WSFC environment will mitigate this downtime. There are a number of reasons why you would want to use a cluster:
Server failure – If a server starts to have problems, you can run the management server
and SQL Server from another node while you resolve the issue.
System updates and security patches – Applying security patches on a standalone server can be time consuming, resulting in extended periods of downtime. By using failover clustering, you can apply system updates and security patches with minimal downtime.
Seamless connection – Because clients and applications connect to a failover cluster by using the cluster IP address and cluster name, the connection to the management server and SQL Server is transparent and failover is seamless.
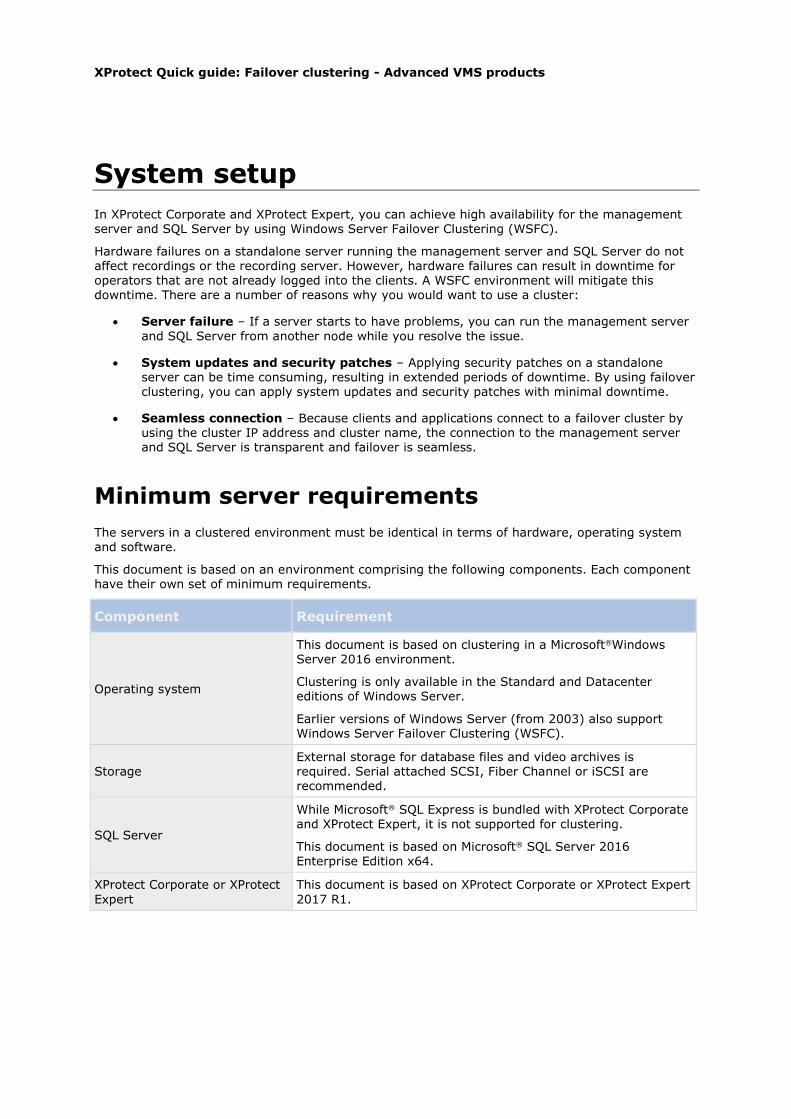
Minimum server requirements
The servers in a clustered environment must be identical in terms of hardware, operating system and software.
This document is based on an environment comprising the following components. Each component have their own set of minimum requirements.
Component Requirement
Operating system
This document is based on clustering in a Microsoft®Windows Server 2016 environment.
Clustering is only available in the Standard and Datacenter editions of Windows Server.
Earlier versions of Windows Server (from 2003) also support Windows Server Failover Clustering (WSFC).
Storage External storage for database files and video archives is required. Serial attached SCSI, Fiber Channel or iSCSI are recommended.
SQL Server
While Microsoft® SQL Express is bundled with XProtect Corporate and XProtect Expert, it is not supported for clustering.
This document is based on Microsoft® SQL Server 2016
Enterprise Edition x64.
XProtect Corporate or XProtect
Expert
This document is based on XProtect Corporate or XProtect Expert
2017 R1.

XProtect Quick guide: Failover clustering - Advanced VMS products
Planning checklist
Before you create a failover cluster environment, you should have the following information for your environment.
The following tables provide examples of the information you require.
Servers
Host
name
Windows Version
/ Edition
Physical
/Virtual CPU RAM Domain Role
Cluster1 Windows Server 2016 Datacenter Edition x64
Virtual 2 CPU 2.54 GHz
8 GB TESTDOMAIN.local Cluster node 1
Cluster2 Windows Server 2016 Datacenter Edition x64
Virtual 2 CPU 2.54 GHz
8 GB TESTDOMAIN.local Cluster node 2
Shared Storage
N/A N/A N/A N/A N/A
Shared storage for SQL Server data
Network
Host
name Network IP Subnet Gateway
Primary
DNS
Secondary
DNS
Cluster1
Public 177.16.0.213 255.255.0.0 177.16.0.1 177.16.0.200 193.168.0.200
Heartbeat 199.160.0.213 255.255.255.0
iSCSI 10.0.0.213 255.0.0.0
Cluster2
Public 177.16.0.214 255.255.0.0 177.16.0.1 177.16.0.200 193.168.0.200
Heartbeat 199.160.0.214 255.255.255.0
iSCSI 10.0.0.213 255.0.0.0
Shared Storage
Public 177.16.0.211 255.255.0.0
SQL
2016 Cluster
Public 177.16.0.217 255.255.0.0
XProtect Quick guide: Failover clustering - Advanced VMS products
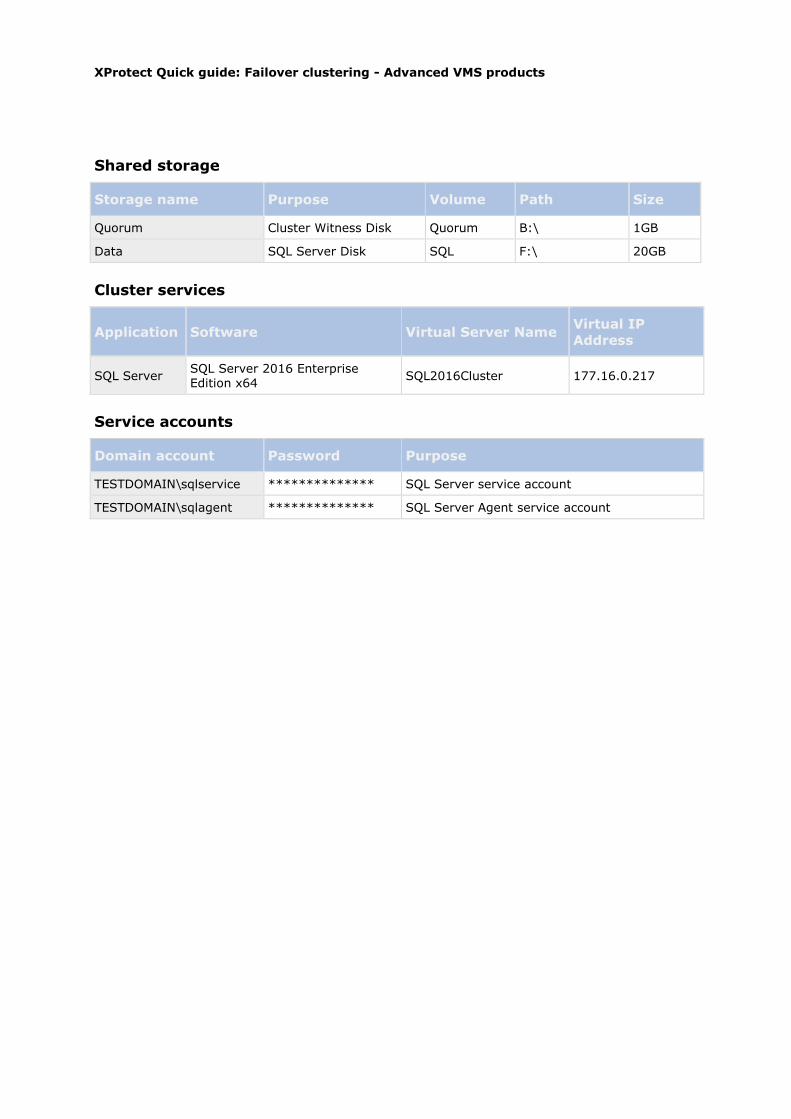
Shared storage
Storage name Purpose Volume Path Size
Quorum Cluster Witness Disk Quorum B:\ 1GB
Data SQL Server Disk SQL F:\ 20GB
Cluster services
Application Software Virtual Server Name Virtual IP
Address
SQL Server SQL Server 2016 Enterprise Edition x64
SQL2016Cluster 177.16.0.217
Service accounts
Domain account Password Purpose
TESTDOMAIN\sqlservice ************** SQL Server service account
TESTDOMAIN\sqlagent ************** SQL Server Agent service account

XProtect Quick guide: Failover clustering - Advanced VMS products
SQL Server Always On Failover Cluster
Instances (FCI)
A Failover Cluster Instance (FCI) is a single instance of SQL Server that is installed across Windows Server Failover Clustering (WSFC) nodes. On the network, an FCI appears to be an instance of SQL Server running on a single computer, but the FCI provides failover from one WSFC node to
another, if the current node becomes unavailable.
Windows Failover Cluster relies on shared storage. FCI supports storage solutions such as WSFC cluster disks (iSCSI, Fiber Channel, and so on) and server message block (SMB) file shares. When a SQL Server instance is installed on the cluster, Milestone and system databases are required to be on the shared storage. Note that this means that your storage is a single point of failure, so the
databases should be backed up elsewhere.
Shared storage allows the cluster to move the SQL instance to any node in the cluster. This can be done either manually, or automatically if one of the nodes is having a problem. There is only one
copy of the data, but the network name and SQL Server service for the instance can be made active from any cluster node.
A failover cluster gives you the ability to have all the data for a SQL Server instance installed in a shared storage that can be accessed from different servers. It will always have the same instance name, IP address and port and logins, therefore XProtect Corporate and XProtect Expert will always know where to access the data.
This document provides a general outline of FCI. Refer to the Microsoft documentation (https://msdn.microsoft.com/en-us/library/ms189134) for more detailed information.

XProtect Quick guide: Failover clustering - Advanced VMS products
Prerequisites for clustering
Windows Failover Cluster relies on shared storage. Make sure you have shared storage with at least two disks: a designated disk for quorum and another designated disk for SQL Server data.
Failover clustering also requires that you use an Active Directory domain.
Before setting up your failover cluster environment, make sure you have the component information as described in Planning checklist (on page 3).
Refer to the Microsoft documentation (https://msdn.microsoft.com/en-us/library/ms189910.aspx)
for more detailed information on installation requirements for failover clustering.
Enable failover clustering on each node
On each node, do the following:
1. Log in to the Windows Server as Administrator.
2. Open the Server Manager.
3. Click Add roles and features.
The Add Roles and Features Wizard appears.
1. In the Before You Begin window, click Next.
2. In the Installation Type window, select Role-based or feature-based installation and click Next.
3. In the Server Selection window, select Select a server from the server pool and
select the current server and then click Next.
4. In the Server Roles window, click Next.
5. In the Features window, select Failover Clustering.
The Add features that are required for Failover Clustering window appears.
Select Include management tools (if applicable) and click Add Features.
Click Next.
6. In the Confirmation window, click Install.
7. When the installation is complete, click Close.
After you have prepared the operating system on all of the nodes, create the cluster (on page 7) on Node 1.
Create the cluster
On Node 1, run a validation test to ensure the server configuration can support clustering.
1. In the Server Manager, select Tools > Failover Cluster Manager.
The Failover Cluster Manager appears.
2. In the Actions pane, click Validate Configuration.

XProtect Quick guide: Failover clustering - Advanced VMS products
The Validate a Configuration Wizard appears.
3. In the Before You Begin window, click Next.
4. In the Select Servers or a Cluster window, click Browse and add the names of the nodes in the cluster. Click Next.
5. In the Testing Options window, select Run all tests (recommended) and click Next.
6. In the Confirmation window, click Next.
The wizard validates the configuration. When it is done, the Summary window appears.
7. In the Summary window, verify that both nodes are validated. Select Create the cluster now using the validated nodes and click Finish.
The Create Cluster Wizard appears.
8. In the Create Cluster Wizard, do the following:
1. In the Before You Begin window, click Next.
2. In the Access Point for Administering the Cluster window, enter the cluster name and click Next.
3. In the Confirmation window, ensure that Add all eligible storage to the cluster is
selected, and click Next.
A new cluster is created.
4. In the Summary window, verify that the cluster is created and then click Finish.

XProtect Quick guide: Failover clustering - Advanced VMS products
Install SQL cluster failover
To create a new SQL Server installation for the failover cluster, sign in to Node 1 using the domain Administrator credentials, and start the SQL Server Installer executable. This starts the SQL Server Installation Center.
The following steps provide an outline of this installation. Refer to the Microsoft documentation (https://msdn.microsoft.com/en-us/library/ms179530.aspx) for more detailed information.
1. On the Installation page, click New SQL Server failover cluster installation.
The Install a SQL Server Failover Cluster window appears.
2. On the Product Key page, indicate whether you are installing a free edition of SQL Server,
or whether you have a PID key for a production version of the product. Click Next.
3. On the License Terms page, read the license agreement, and then select the check box to accept the license terms and conditions. Click Next.
4. The Global Rules checker runs a discovery operation on your computer.
The Global Rules checker verifies the system state of your computer before setup continues.
If the checker identifies any missing product updates, on the Product Updates page, select the Include SQL Server product updates check box and click Next to continue.
5. The setup checker identifies potential problems that might occur while running setup. You must correct failures before setup. Click Next to continue.
6. On the Feature Selection page, select Database Engine Services.
Sub-features are automatically selected.
Click Next.
The setup runs another set of rules that are based on the features you selected to validate
your configuration.
7. On the Instance Configuration page, do the following:
1. Specify a network name for the new SQL Server failover cluster. This is the name that is used to identify your failover cluster on the network.
2. Specify a named instance, name it for example SQLCLUSTER.
3. Click Next.
8. On the Cluster Resource Group page, you can specify the cluster resource group name where SQL Server virtual server resources will be located. Leave as default and click Next.
9. On the Cluster Disk Selection page, select the shared cluster disk resource for your SQL Server failover cluster.
The cluster disk is where the SQL Server data will be put. You can select more than one disk.
Click Next.
10. On the Cluster Network Configuration page, specify the network resources for your failover cluster instance.

XProtect Quick guide: Failover clustering - Advanced VMS products
Specify a static IP type and IP address for your failover cluster. This is recorded under Network in Planning checklist (on page 3).
Click Next to continue.
11. On the Server Configuration page under the Service Accounts tab, specify login accounts for SQL Server services. These are recorded under Service Accounts in Planning checklist (on page 3). Click Next to continue.
12. On the Database Engine Configuration page, define the following:
1. Under the Server Configuration tab, define the SQL server administrator account and the server authentication mode.
2. Under the Data Directories tab, define the paths for the following. The path to where SQL data will be stored is recorded under Shared Storage in Planning checklist (on page
3).
Data Root Directory
User Database Directory
User Database Log Directory
Backup Directory Distribution can be, for example:
Disk Volume Usage Path
1 Cluster Quorum Drive N/A
2 1
Data Root Directory
User Database Directory
Backup Directory
F:\
F:\MSSQL13.SQLCLUSTER\MSSQL\Data
F:\MSSQL13.SQLCLUSTER\MSSQL\Backup
3 2
User Database Log Directory
TempDB data directory
TempDB log directory
E:\MSSQL13.SQLCLUSTER\MSSQL\Data
Click Next.
The System Configuration Checker runs another set of rules that are based on the settings you selected to validate your configuration.
13. On the Ready to Install page, click Install.
14. After installation, the Complete page provides a link to the summary log file for the installation. Click Close to complete the SQL Server installation.

XProtect Quick guide: Failover clustering - Advanced VMS products
Configure redundant XProtect management servers
Now that you have created a failover cluster using both Node 1 and Node 2 servers as cluster nodes, you must install the XProtect Management Server on both Node 1 and Node 2 and configure both XProtect Management Servers so that their services run in the cluster instead of on each individual server.
Note: As a prerequisite, each Management Server in the cluster must be installed under the
domain Administrator service account.
You must do the following:
Install and configure XProtect management server on Node 1 (on page 11)
Install and configure XProtect management server on Node 2 (on page 12)
Install and configure XProtect management server on
Node 1
1. On Node 1, run the Milestone XProtect Advanced VMS Products 2017 R1 System Installer.exe file.
The installation files unpack. Depending on your security settings, one or more Windows® security warnings appear. Accept these and the unpacking continues.
2. After specifying the location of the license file and accepting the license terms, select Custom.
A list of components to be installed appears. Apart from the management server, all elements in the list are optional.
3. Select all components EXCEPT the Recording Server and Smart Client. Click Continue.
4. In the Select Microsoft SQL Server window, select Use an existing SQL Server on the network and select the location of the Central SQL Server that you installed in Install new SQL Server failover cluster installation (see "Install SQL cluster failover" on page 9). Click
Continue.
5. Select Create new database and click Continue.
6. In the Select Service Account window, select This account and enter the domain Administrator credentials. Click Continue and then click Install.
7. After the installation is complete, open the XProtect Management Client using the domain Administrator credentials.
8. From the Tools menu, select Registered Services.
9. In the Add/Remove Registered Services window, select each service in the list and click
Edit.
In the Edit Registered Service window, modify the URL address to use the Cluster Name.
Update all of the services listed in the Add/Remove Registered Services window including the Service Channel http and https fields. The new URLs should look something like this:

XProtect Quick guide: Failover clustering - Advanced VMS products
o Event Server: http://ClusterName.host:22331/
o Log Server: http://ClusterName.host:80/LogServer/soapext.dll?logserver
o Report Server: http://ClusterName.host/Reporting/
o Service Channel: http://ClusterName.host:80/ and https://ClusterName.host:443/
10. In the Add/Remove Registered Services window, click Network and in the Service address (LAN) field, modify the URL address to use the cluster service address and then
click OK.
11. In the Add/Remove Registered Services window, click Close and exit the XProtect Management Client.
12. On Node 1, stop the management server service and the IIS service.
To stop IIS, launch the Internet Information Services (IIS) Manager and navigate to the Web server node in the tree.
In the Actions pane, click Stop.
Install and configure XProtect management server on Node 2
1. On Node 2, run the Milestone XProtect Advanced VMS Products 2017 R1 System
Installer.exe file.
The installation files unpack. Depending on your security settings, one or more Windows® security warnings appear. Accept these and the unpacking continues.
2. After specifying the location of the license file and accepting the license terms, select
Custom.
A list of components to be installed appears. Apart from the management server, all elements in the list are optional.
3. Select all components EXCEPT the Recording Server, Management Client and Smart Client.
Click Continue.
4. In the Select Microsoft SQL Server window, select Use an existing SQL Server on the network and select the location of the Central SQL Server that you installed in Install new SQL Server failover cluster installation (see "Install SQL cluster failover" on page 9). Click Continue.
5. Select Create new database and click Continue.
6. In the Select Service Account window, select This account and enter the domain Administrator credentials. Click Continue and then click Install.
7. After the installation is complete, open the XProtect Management Client using the domain Administrator credentials.
8. From the Tools menu, select Registered Services.
9. In the Add/Remove Registered Services window, select each service in the list and click Edit.
In the Edit Registered Service window, modify the URL address to use the Cluster Name.

XProtect Quick guide: Failover clustering - Advanced VMS products
Update all of the services listed in the Add/Remove Registered Services window including the Service Channel http and https fields. The new URLs should look something like this:
o Event Server: http://ClusterName.host:22331/
o Log Server: http://ClusterName.host:80/LogServer/soapext.dll?logserver
o Report Server: http://ClusterName.host/Reporting/
o Service Channel: http://ClusterName.host:80/ and https://ClusterName.host:443/
10. In the Add/Remove Registered Services window, click Network and in the Service address (LAN) field, modify the URL address to use the cluster service address and then click OK.
11. In the Add/Remove Registered Services window, click Close and exit the XProtect Management Client.
Postrequisite
When this is done, modify all of the recording servers and failover servers to connect to the cluster service address for the management server by doing the following:
1. On the server where the Recording Server is installed, right-click the Recording Server icon in the tool bar and select Stop Recording Server Service from the menu.
2. After the Recording Server is stopped, again right-click the Recording Server icon in the tool bar and select Change Settings.
The Recording Server Settings window appears.
3. Modify the address for the management server to connect to the cluster service, and click
OK.
4. Right-click the Recording Server icon and select Start Recording Server service to start the Recording Server service again.
Set service dependencies
On Node 2, open the Server Manager, select Tools > Failover Cluster Manager.
1. In the Failover Cluster Management window, expand your cluster, right-click Roles and select Configure Role.
2. In the High Availability Wizard, click Next.
3. In the Select Role window, select Generic Service and click Next.
4. Select Milestone XProtect Management Server and click Next.
5. On the Client Access Point window, specify the server name for the management server generic service, and click Next.
6. On the Select Storage window, no storage is required for the service, click Next.
7. On the Replicate Registry Settings window, no registry settings should be replicated so click Next.

XProtect Quick guide: Failover clustering - Advanced VMS products
8. On the Confirmation window, verify that the cluster service is configured according to your needs and click Next.
The management server is now configured as a generic service in the failover cluster. Click Finish.
Set dependencies
In the cluster setup, both the Milestone Event Server and the Milestone Data Collector should be set as a dependent services of the Milestone Management Server, so the Event Server and Data Collector stop when the Management Server is stopped.
Add the Milestone XProtect Event Server service as a resource to the Milestone XProtect Management Server Cluster service by doing the following:
1. Right-click the XProtect Server role and select Add Resource > Generic Service.
2. Select Milestone XProtect Event Server and then click Next.
3. Click Next to confirm and click Finish.
Verify that failover clustering is working
On both Node 1 and Node 2, open the Server Manager.
If Node 2 is currently running the XProtect Server:
1. On Node 2, select Tools > Failover Cluster Manager.
2. In the tree, expand the cluster node and select Nodes.
3. In the Nodes pane, select the server for Node 2.
4. At the bottom of the window, open the Roles tab.
5. Note that the Node 2 server is running the XProtect Server.
6. Restart the Node 2 server.
7. Note that the Management Server on Node 1 comes online.
If Node 1 is currently running the XProtect Server:
1. On Node 1, select Tools > Failover Cluster Manager.
2. In the tree, expand the cluster node and select Nodes.
3. In the Nodes pane, select the server for Node 1.
4. At the bottom of the window, open the Roles tab.
5. Note that the Node 1 server is running the XProtect Server.
6. Restart the Node 1 server.
7. Note that the Management Server on Node 2 comes online.

About Milestone Systems
Milestone Systems is a global industry leader in open platform IP video management software, founded in 1998 and now operating as a stand-alone company in the Canon Group. Milestone technology is easy to manage, reliable and proven in thousands of customer installations, providing flexible choices in network hardware and integrations with other systems. Sold through partners in more than 100 countries, Milestone solutions help organizations to manage risks, protect people and assets, optimize processes and reduce costs. For more information, visit: http://www.milestonesys.com.