qliq secure texting administrator guide · pdf fileqliq secure texting administrator guide ......
TRANSCRIPT

Qliq Secure Texting Administrator Guide
ACCESS ADMIN DASHBOARD Qliq Admins can login to the Admin Dashboard from the QliqSOFT website, www.qliqsoft.com. Click the Login button in the top right corner and enter your Qliq ID and password.
USER MANAGEMENT Qliq users can be added one at a time, imported from a CSV file or synchronized with Active Directory. Add a new user to the group: 1. Users can be added From the “Users” screen, click the Add button to add/invite a new member. Enter the email address and hit the plus sign. Enter the user’s first name, last name, title or profession and optionally the subgroups the user should be assigned to.
Qliq Administrator Guide 1 © QliqSOFT, Inc. December 2016

2. If the Full Group Access box is checked, the user will be able to see all other members in the entire contact list. If unchecked, the user can only see members in the same subgroup(s). This is typically checked. 3. Check to allow Broadcast Messaging and Group Messaging. 4. If the Generate a Password box is checked, a password is generated and sent to the user in the invitation email. If unchecked, the user is allowed to set his/her own password. 5. As indicated, check to have an auto-email invitation sent to the user. You have the option to personalize the invitation email subject sent to each new user.
Qliq Administrator Guide 2 © QliqSOFT, Inc. December 2016

5. Click the Invite button to complete the process. NOTE: A user can be added to the group as a “Member” or “Non-Member”. You can view these user types by selecting from the left tool bar on the Users screen.
Definitions: “Members” are individuals in your organization and they that can see and contact users in the organization’s contact list or subgroups. A “Non-Member” is a special user type that restricts the contact list access for external users such as consulting physicians or patients. Non-members can see members, but they cannot see other non-members. For example, if external consulting physicians are non-members, then they can see your internal staff (members) but not other consulting physicians (non-members).
Admins can combine “subgroup only” or no Full Group access access along with non-member status to provide control over access of Contact List. Activity Status Located on the right side of each user row, the User Activity Status describes the current status of a user account. Common status terms are pending (invitation sent), accepted (password set) and active (user has logged in for first time).
The Gear Icon Menu allows actions to be performed on an individual user: reset password, edit account information, change email, upload an avatar and more.
Qliq Administrator Guide 3 © QliqSOFT, Inc. December 2016

Message Activity On the Gear Icon Menu, you can review message activity for each user for the past 7 days. Although no messages are available, the log of sent, delivered and read status can be viewed. Also, clicking on the UUID for a message will display the notification log. Add-On Functions Qliq offers add-on functionality including “Pager Messaging” and “Notification Escalation by Call”. If these functions are active for your group, the menu items “Add Pager” and “Add Call Escalation” will be shown in the menu. Contact qliqSOFT to learn more about the Add-On Functions. Force Logout, Wipe Data There may be circumstances when the Admin needs to remotely control the app. From the user menu, the admin can Force Logout user from all devices as well as wipe Qliq data from all devices. Admin can also Revert Wipe data for past 7 days if needed. A device-specific remote lock and remote wipe are available from the Devices screen. Remove If user is no longer active in the organization, Admin can Remove user from group. It is common practice to Wipe Data before removing user. When editing, the admin can enable or disable (1) Full group access, (2) group messaging and add users to (3) subgroups.
Qliq Administrator Guide 4 © QliqSOFT, Inc. December 2016

Note: At the qliqSOFT web site, users can also login to their individual console and edit information, reset their password and add an avatar.
5. By clicking on the menu above the Gear Icon, you can filter the user list by the Activity
Qliq Administrator Guide 5 © QliqSOFT, Inc. December 2016
Status in order to take appropriate action. For example, you can re-invite all Pending/Inactive users that have not confirmed their acceptance of the application within 72 hours.
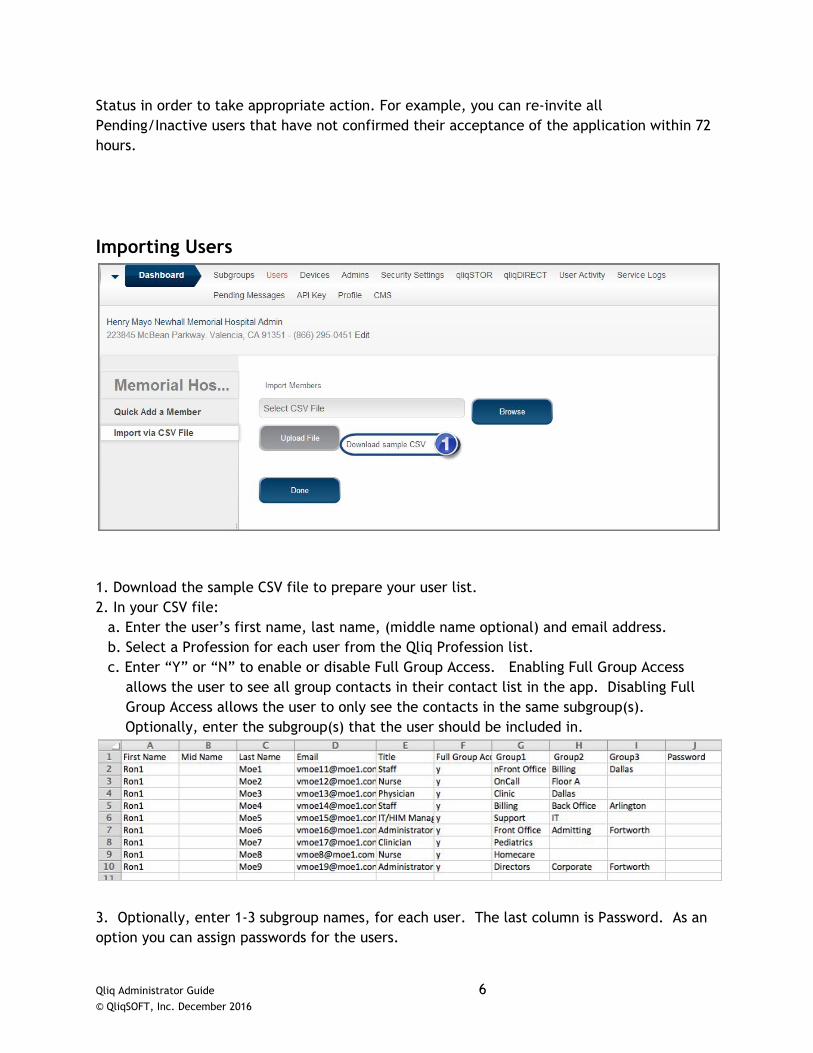
Importing Users
1. Download the sample CSV file to prepare your user list. 2. In your CSV file:
a. Enter the user’s first name, last name, (middle name optional) and email address. b. Select a Profession for each user from the Qliq Profession list. c. Enter “Y” or “N” to enable or disable Full Group Access. Enabling Full Group Access
allows the user to see all group contacts in their contact list in the app. Disabling Full Group Access allows the user to only see the contacts in the same subgroup(s).
Optionally, enter the subgroup(s) that the user should be included in.
3. Optionally, enter 1-3 subgroup names, for each user. The last column is Password. As an option you can assign passwords for the users.
Qliq Administrator Guide 6 © QliqSOFT, Inc. December 2016

4. Once the CSV list is complete, select the correct file and upload. When prompted, it is critical to review the column mapping to ensure the data will be imported correctly. Click the Import button to import user data. NOTE: The users are added to the user list, but they have not been sent an invitation.
Qliq Administrator Guide 7 © QliqSOFT, Inc. December 2016

4. The import process occurs in the background and you will receive an on-screen notification when it is complete. 5. Once the import is complete, view the imported users by clicking the “Recently Imported” tab on the left menu of the Users screen. You will see the user status is “inactive” for the recently imported users. Check the users you want to activate. (Click top checkbox to check all.) Then click the “Send Invitation” button.
Qliq Administrator Guide 8 © QliqSOFT, Inc. December 2016

1) Invited users will have the status of “pending”. The user’s status will change to “accepted” once the user sets the password and “active” once the user logs in for the first time.
Qliq Administrator Guide 9 © QliqSOFT, Inc. December 2016

Qliq Administrator Guide 10 © QliqSOFT, Inc. December 2016

SUBGROUPS Administrators can organize users in Subgroup to organize and/or control access to users in the Contact List in the Qliq apps. The Subgroups help organize users by specialty, location or other grouping characteristic.
Tip - To limit person’s access to certain contacts in Qliq, use a combination of Subgroups and Full Group/No Full Group access. In the person’s users settings, uncheck Full Group Access and then the person can only see and message people in the same subgroup(s).
To add a new subgroup, enter a group name in the field at the upper right and click “+”.
There are three types of subgroups: Standard, Dynamic Group and Private Group (2). The Standard Subgroup is created by the admin who enters all the subgroup participants. These users will appear in the group on the Contact List. These subgroups are completely managed by the admin. The Dynamic Group is a special type of subgroup in that users can add/remove themselves to/from the subgroup at any time from the Contact List in the Qliq app. The admin creates and names the subgroup but does not manage the participants. The Private Group is created by the admin who enters all the participants. The Private Group name will only appear in the Contact List of the participants of the group. Broadcasting and Group Messaging Admin can turn off Broadcasting and Group Messaging for these groups by unchecking the check boxes. It is common practice to keep both turned on.
Qliq Administrator Guide 11 © QliqSOFT, Inc. December 2016

Limited User Access The admin can limit a user’s access to only the other users in the same subgroup(s). In the users profile the admin can limit the access by unchecking Full Group Access. By configuring subgroups, member/non-member status, and full/limited group access, the admin has flexible methods for limiting a user’s access to other contacts.
EXTERNAL GROUPS In the Qliq network, it is easy to link your organization’s Qliq group to another organization’s group. This allows cross-organization secure texting. Approval by Admins of both groups is required. To initiate a link, click the + button and complete the form. This will email a link request to the Admin of the other group. You can link your entire Qliq group or just a sub-group to other external groups. Contact QliqSOFT to help facilitate external group linking with your partner organizations.
Qliq Administrator Guide 12 © QliqSOFT, Inc. December 2016

DEVICES Devices Screen and Remote Lock/Wipe The Devices Screen displays information about users and devices connected to Qliq. The information for each device includes Description, OS version, Qliq App Version, BSave (Battery Savings Mode on mobile), App Status, and the Last Login date and time.
Remote Lock & Wipe You can click the Gear Icon in the far right column to display a menu of functions. 1) Battery Save turns on or off Battery Saving Mode on the Qliq mobile app. It is recommended to keep OFF, unless battery use is an issue for a specific mobile device. Current iPhones and Android phones do a very good job at battery management already. 2) Lock App will remotely lock the Qliq application so no one can login to Qliq on that device until the app is unlocked by the admin. 3) The admin can remotely wipe the data from the Qliq app. The function will remove all data from the Qliq message database including files, media and message status. This only wipes Qliq, not the entire device. 4) Selecting Remove, will remove the device from the Qliq service. Qliq will no longer monitor the status of this device or update it with all of the current messages. The users can
Qliq Administrator Guide 13 © QliqSOFT, Inc. December 2016

reconnect the device to Qliq by logging in. ADMINS On the Admins page, multiple administrators can be set up. Click the + button to add an admin. There are two types of Admins: Group Owner and Standard Admin (Owner unchecked). The Group Owner has full admin access and can see and control all the functions on the Admin menu bar. The Standard Admin has limited admin access and can see and control Users, Subgroups, External groups, Devices and logs, but does not see or access Security Settings, QliqDIRECT and QliqSTOR. The Standard Admin is ideal for your helpdesk staff.
Choose one Point of Contact. Any emails, such as activation emails, sent to your users by Qliq will be addressed with this Admin’s name. The From: address will look like this: John Smith via QliqSOFT, <[email protected]>. We use the Admins name and our support email address so the message is recognized by the recipient but also avoids SPAM filters. Set IT/Server Admin to one or more Admins. This role receives any system alerts from QliqSOFT including new app updates or connection errors from Active Directory or your message archive.
Qliq Administrator Guide 14 © QliqSOFT, Inc. December 2016
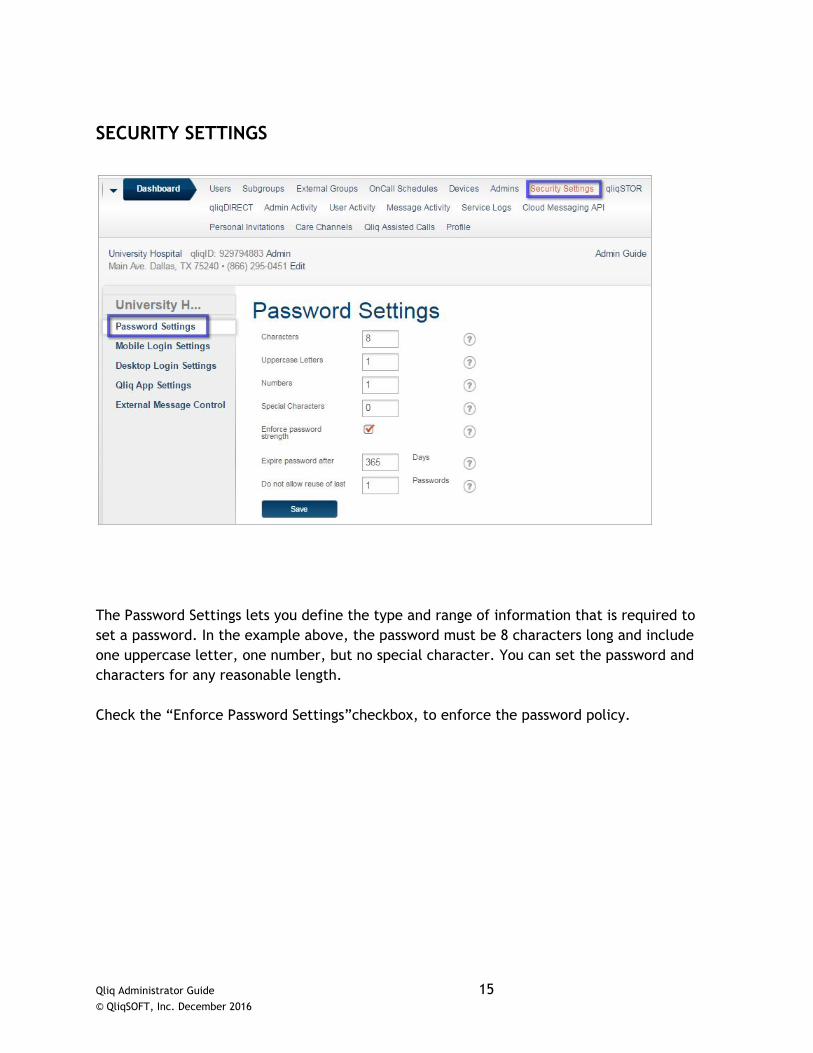
SECURITY SETTINGS
The Password Settings lets you define the type and range of information that is required to set a password. In the example above, the password must be 8 characters long and include one uppercase letter, one number, but no special character. You can set the password and characters for any reasonable length. Check the “Enforce Password Settings”checkbox, to enforce the password policy.
Qliq Administrator Guide 15 © QliqSOFT, Inc. December 2016

Login Settings
The Login Settings allows the admin to control aspects of the login process and can be configured differently for the mobile and desktop apps. Mobile Login Settings Inactivity Time is to set the number of minutes that the application can be inactive before it automatically locks the app screen. The user will continue to receive message notifications normally, but re-authentication by PIN or password is required to access the app and messages. Maximum Login Failure Attempts and Lock-Out Time work together to prevent unauthorized user access. A user will be locked out for this specified time if he incorrectly enters the password the designated number of attempts. Remember Password on the device should only be checked if another method of authentication is enforced such as through Mobile Device Management (MDM) system. In most cases, this should be unchecked. Enforce PIN for Qliq App Qliq always requires a PIN, password or fingerprint scan to access the app. The Qliq mobile apps have awareness of the iPhone and Android PIN security currently in place. To avoid the dreaded “double PIN” to access the Qliq app, uncheck this setting. If a device PIN has been
Qliq Administrator Guide 16 © QliqSOFT, Inc. December 2016

entered by the user, the Qliq app will allow direct access. If no device PIN is set up on phone, then Qliq will always ask for a PIN. Authentication will always occur one way or another. If you check this setting, Qliq will always ask for its own PIN even if the device PIN is set up and entered. Note: The Qliq apps also support Touch ID authentication on iPhones and similar fingerprint authentications on supported Android devices. Expire PIN and Do Not Allow Reuse allow the admin to set a PIN renewal policy. The maximum expiration period is 365 days. Desktop Login Settings
Inactivity Time is to set the number of minutes that the application can be inactive before it automatically locks the app screen. The user will continue to receive message notifications normally, but re-authentication by PIN or password is required to access the app and messages. Maximum Login Failure Attempts and Lock-Out Time work together to prevent unauthorized user access. A user will be locked out for this specified time if he incorrectly enters the password the designated number of attempts. Allow Remembering User Name on the Device should be checked to allow the desktop app to store the User Name in the login screen. This is a recommended convenience for users. Remember Password on the device should only be checked if another method of authentication is enforced such as through Mobile Device Management (MDM) system. In most cases, this should be unchecked.
Qliq Administrator Guide 17 © QliqSOFT, Inc. December 2016

Minimize after Login allows the Admin to instruct the desktop app to minimize the Qliq screen to the computer task bar upon login. Some organizations prefer this if the Qliq app appears on top of other apps upon login. Most Admins keep this unchecked. Qliq Application Settings
Message Retention The Message Settings allows the Admin to set the message retention policy on the devices. Messages and associated attachments will be deleted off devices when the defined retention period ends. Long Term Message Archive Messages can be archived for a longer period of time using the qliqSTOR application. Administrators can retain all messages and attachments in the qliqSTOR archive as long as needed and can also perform searches on archive for e-discovery purposes. Block Screen Shots Turn on to block screen shots in the Qliq Android app and to warn user when taking screen shot on iOS Qliq app. Currently, iOS system does not allow apps to block screen shot function.
Qliq Administrator Guide 18 © QliqSOFT, Inc. December 2016

QliqSTOR Message Archive With Qliq Secure Texting, you can archive message for a long term period for auditing and e-discovery purposes. The archive application, called QliqSTOR, resides on a Windows PC or Server behind your firewall and under your control. This is beneficial because you maintain control and access to the Protected Health Information (PHI) and it is not stored in the Cloud or accessible by qliqSOFT.
The QliqSTOR application can be downloaded from the web Admin Dashboard as shown above. Also, download the “Installation & Administration Guide” for QliqSTOR qliqSTOR Server Requirements
Processor: Intel/AMD less than 5 year old Memory: at least 2 GB Hard Drive: at least 500 GB Operating System: Windows 7/10 or Windows Server 2012 SP2 or later
Qliq Administrator Guide 19 © QliqSOFT, Inc. December 2016

Activity Logs and Other Dashboard Menu Items
Activity Logs Qliq makes all the activity logs easily available to the administrator to review. The Message Activity log is useful if a user reports an issue with Qliq. As shown below, the administrator can see all the message activity for the entire group or a single user. Here you can verify the time stamps for message delivery, message read and acknowledgement (Acked Time). By clicking on the UUID for a message, you can see the notification log for that message. If qliqSTOR archive is used, you will see messages sent to receiver as “q.groupname”.
Other system log files are also available including User Activity, Admin Activity and Service logs. These log details are helpful when receiving support from QliqSOFT. Cloud Messaging API is one method QliqSOFT provides to integrate external messaging, telecom and clinical systems with the Qliq Secure Texting Service. Please contact QliqSOFT for more detail. Personal Invitations This screen allows the Admin to monitor the external, individual invitations sent by the users from the Qliq app. From the gear icon, the Admin can add the external user as an internal member or non-member.
Qliq Administrator Guide 20 © QliqSOFT, Inc. December 2016

Advanced User Management Tips
1. Use Escalated Call Notification for clinical roles that may be “on-call” or off-site. The Escalated Call Notification adds reliability to the Qliq notification system. It will ring the user’s phone if a notification cannot be delivered and play a text-to-voice notification over the phone. This redundancy only comes into use if the user’s smart phone is off the wifi or mobile network which can happen on occasion.
2. Create a customized list of Quick Messages
In the Qliq apps, a QuickMessage menu includes a list of commonly used messages for users to select instead of typing. You can customize your default QuickMessage list from the Admin dashboard User screen. See QuickMessages on left menu bar. Users can then tailor the QuickMessage list in the Qliq app to their preferences.
3. Use Non-member accounts for external contact such as referring physicians or even patients. Non-members can see members of group or sub-group in the contact list but not other non-members. This an important way to create a secure texting network in your healthcare community. The non-member licenses are free to groups and free to the external user as well.
4. Subscribe to Qliq-assisted Call which enables users to initiate call without revealing
their personal mobile number. The call is connected through a telecom bridge. The Qliq-assisted Call allows doctors to call patients or other healthcare providers without revealing their personal mobile phone number, which often provides great relief.
Administrator Support Available The best and fastest way to receive support is to email our support team at [email protected]. Telephone support is available for Qliq Business Accounts.
Qliq Administrator Guide 21 © QliqSOFT, Inc. December 2016