qiaamp 96 virus qiacube ht handbook - qiagen
TRANSCRIPT

Sample to Insight__
August 2016
QIAamp® 96 Virus QIAcube® HT Handbook
For automated purification of viral RNA and DNA from human samples using QIAcube HT and QIAcube HT Prep Manager Software

QIAamp 96 Virus QIAcube HT Handbook 08/2016 2
Contents
Kit Contents ............................................................................................................... 4
Storage ..................................................................................................................... 5
Intended Use .............................................................................................................. 5
Safety Information ....................................................................................................... 6
Quality Control ........................................................................................................... 6
Introduction ................................................................................................................ 7
Principle and procedure .................................................................................... 7
Description of protocols ..................................................................................... 7
Nucleic acid purification protocol ....................................................................... 8
Pretreatments ................................................................................................... 8
Equipment and Reagents to Be Supplied by User .......................................................... 10
Important Notes ........................................................................................................ 12
Starting materials ........................................................................................... 12
Yields of nucleic acids ..................................................................................... 15
Using carrier RNA and internal controls ............................................................ 16
Storing nucleic acids ....................................................................................... 16
Handling RNA ............................................................................................... 16
Preparing RNA .............................................................................................. 17
Preparing reagents and instrument .................................................................... 17
Assembling the vacuum chamber...................................................................... 19
Optional features ...................................................................................................... 21
Processing fewer than 96 samples per run ......................................................... 21

3 QIAamp 96 Virus QIAcube HT Handbook 08/2016
Off-board lysis ............................................................................................... 21
QIAamp Virus Protocol .............................................................................................. 22
Things to do before starting ............................................................................. 22
Manual lysis procedure ................................................................................... 23
QIAamp virus protocol on the QIAcube HT ........................................................ 23
Cleaning the instrument after completing a run ................................................... 27
Optional steps................................................................................................ 28
Advanced options .......................................................................................... 30
Sample Pretreatment Protocols .................................................................................... 34
Pretreatment B1 for Respiratory Samples ........................................................... 34
Pretreatment B2 for Liquid Transport Media ....................................................... 35
Pretreatment B3 for Urine ................................................................................ 35
Pretreatment B4 for Dried Blood Spots .............................................................. 36
Pretreatment B5 for Swabs and Buccal Cells ...................................................... 36
Pretreatment F1 for Stool Suspensions ............................................................... 37
Pretreatment T1 Mechanical Disruption of Tissue ................................................ 37
Pretreatment T2 for Enzymatic Digestion of Tissue ............................................... 38
Troubleshooting Guide .............................................................................................. 40
Appendix A: General Remarks on Handling RNA......................................................... 43
Ordering Information ................................................................................................ 46
Quick-Start Protocol .................................................................................................. 48
QIAamp 96 Virus QIAcube HT Handbook 08/2016 4
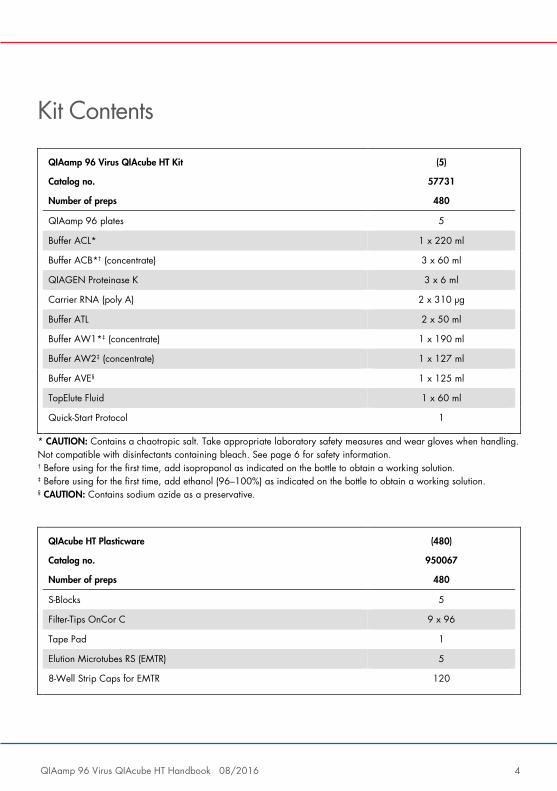
Kit Contents
QIAamp 96 Virus QIAcube HT Kit
Catalog no.
Number of preps
(5)
57731
480
QIAamp 96 plates 5
Buffer ACL* 1 x 220 ml
Buffer ACB*† (concentrate) 3 x 60 ml
QIAGEN Proteinase K 3 x 6 ml
Carrier RNA (poly A) 2 x 310 µg
Buffer ATL 2 x 50 ml
Buffer AW1*‡ (concentrate) 1 x 190 ml
Buffer AW2‡ (concentrate) 1 x 127 ml
Buffer AVE§ 1 x 125 ml
TopElute Fluid 1 x 60 ml
Quick-Start Protocol 1
* CAUTION: Contains a chaotropic salt. Take appropriate laboratory safety measures and wear gloves when handling. Not compatible with disinfectants containing bleach. See page 6 for safety information. † Before using for the first time, add isopropanol as indicated on the bottle to obtain a working solution. ‡ Before using for the first time, add ethanol (96–100%) as indicated on the bottle to obtain a working solution. § CAUTION: Contains sodium azide as a preservative.
QIAcube HT Plasticware
Catalog no.
Number of preps
(480)
950067
480
S-Blocks 5
Filter-Tips OnCor C 9 x 96
Tape Pad 1
Elution Microtubes RS (EMTR) 5
8-Well Strip Caps for EMTR 120

5 QIAamp 96 Virus QIAcube HT Handbook 08/2016
Storage
QIAamp 96 plates, buffers and lyophilized carrier RNA are stable until the expiration date
on the kit box at room temperature (15–25°C) and dry conditions without affecting
performance.
Freeze Carrier RNA dissolved in Buffer AVE immediately in aliquots at –30 to –15°C. Do not
subject aliquots of carrier RNA to more than 3 freeze–thaw cycles. Carrier RNA dissolved in
Buffer AVE is stable at room temperature (15–25°C) for up to 48 hours (see “Preparing
reagents and instrument” on page 17 for further information).
QIAGEN Proteinase K can be stored at room temperature (15–25°C). To store for extended
periods of time, or if the ambient temperature often exceeds 25°C, we recommend storing at
2–8°C.
Intended Use
The QIAamp 96 Virus QIAcube HT Kit is intended for the automated extraction of viral RNA
and DNA from human whole blood, serum, plasma, body fluids, swabs, washes, tissue and
stool using the QIAcube HT instrument. The QIAamp 96 Virus QIAcube HT Kit is intended for
molecular biology applications. This product is not intended for the diagnosis, prevention, or
treatment of a disease.
All due care and attention should be exercised in the handling of the products. We
recommend all users of QIAGEN products to adhere to the NIH guidelines that have been
developed for recombinant DNA experiments, or to other applicable guidelines.
QIAamp 96 Virus QIAcube HT Handbook 08/2016 6
Safety Information
When working with chemicals, always wear a suitable lab coat, disposable gloves and
protective goggles. For more information, please consult the appropriate safety data sheets
(SDSs). These are available online in convenient and compact PDF format at
www.qiagen.com/safety where you can find, view and print the SDS for each QIAGEN kit
and kit component.
CAUTION: DO NOT add bleach or acidic solutions directly to the sample
preparation waste.
Buffer ACL and Buffer ACB contain guanidine thiocyanate and Buffer AW1 contains
guanidine hydrochloride, which can form highly reactive compounds if combined with
bleach.
If liquid containing these buffers is spilled, clean with suitable laboratory detergent and
water. If the spilled liquid contains potentially infectious agents, clean the affected area first
with laboratory detergent and water, and then with 1% (v/v) sodium hypochlorite.
Quality Control
In accordance with QIAGEN’s ISO-certified Quality Management System, each lot of
QIAamp 96 Virus QIAcube HT Kit is tested against predetermined specifications to ensure
consistent product quality.
7 QIAamp 96 Virus QIAcube HT Handbook 08/2016
Introduction
The QIAamp 96 Virus QIAcube HT Kit uses well-established technology to enable efficient
purification of viral RNA and DNA from a broad range of sample types (see Table 1 on
page 9).
The kit combines the selective binding properties of a silica-based membrane with a high-
throughput 96-well format, and is designed for fully-automated, simultaneous processing of
96 samples on the QIAcube HT. Purified nucleic acids are eluted in Buffer AVE, and are free
of proteins, nucleases and other impurities, ready for use in downstream applications. The kit
is not intended for host RNA or host DNA preparation.
Principle and procedure
Samples are lysed under highly denaturing conditions at room temperature in the presence
of QIAGEN proteinase K and Buffer ACL, which together ensure the inactivation of
nucleases. Adding Buffer ACB adjusts the binding conditions for the co-purification of DNA
and RNA. The lysate is then transferred to a QIAamp 96 plate. During vacuum, nucleic
acids are adsorbed onto the silica membranes while contaminants pass through. Three
efficient wash steps remove the remaining contaminants and enzyme inhibitors, and nucleic
acids are eluted in Buffer AVE.
Performance is not guaranteed for every combination of starting material and virus species
and must be validated by the user. Some samples may require a pretreatment (see Table 1
on page 9).
Description of protocols
Samples will either directly undergo nucleic acid purification, or undergo pretreatment
followed by nucleic acid purification.
QIAamp 96 Virus QIAcube HT Handbook 08/2016 8
Many sample types can be directly processed without pretreatment. However, depending on
the starting material, a sample pretreatment may be needed. Table 1 provides an overview
of pretreatment protocols suited to different starting materials. This handbook includes the
following protocols:
QIAamp Virus Protocol (page 21)
Sample Pretreatment Protocols (pages 34–39)
Nucleic acid purification protocol
The protocol “QIAamp Virus Protocol”, page 21, is optimized for purification of viral RNA
and DNA from up to 200 µl of fluid material. Suitable starting materials for direct processing
using this method include:
Cell-free body fluids such as plasma, serum and CSF
Whole blood
Pretreatments
The various pretreatments included in this handbook are optimized for specific combinations
of starting material. The choice of pretreatment depends on the workflow focus, and is to be
followed by nucleic acid purification. Table 1 on page 9 summarizes the pretreatments and
their applications.
Some of the pretreatments may require additional components (see pages 10–11).

9 QIAamp 96 Virus QIAcube HT Handbook 08/2016
Table 1. Pretreatment protocols for various sample types
Sample Name Page
Fluids (e.g., plasma and serum*, cell-free body fluids*†, whole blood†‡)
No pretreatment necessary; proceed directly with “QIAamp Virus Protocol”
21
Respiratory samples and sputum§ Pretreatment B1 for Respiratory Samples 34
Liquid transport media Pretreatment B2 for Liquid Transport Media 35
Urine Pretreatment B3 for Urine 35
Dried blood spots Pretreatment B4 for Dried Blood Spots 36
Swabs and buccal cells Pretreatment B5 for Swabs and Buccal Cells 36
Stool suspensions Pretreatment F1 for Stool Suspensions 37
Tissues (e.g., liver, spleen, kidney, lymph node)
Pretreatment T1 Mechanical Disruption of Tissue Pretreatment T2 for Enzymatic Digestion of Tissue¶
37 38
*Samples can be fresh or frozen, provided they have not been frozen and thawed more than once. † Includes amniotic fluid, cerebrospinal fluid, ocular fluid, synovial fluid and pleural fluid. ‡ Includes samples containing EDTA or citrate. § Includes nasopharyngeal aspirates (NPA), bronchoalveolar lavage (BAL) fluid, sputum and nasal and throat swabs. ¶ Not suitable for viral RNA as the lysis conditions do not sufficiently conserve RNA integrity.

QIAamp 96 Virus QIAcube HT Handbook 08/2016 10
Equipment and Reagents to Be Supplied by User
When working with chemicals, always wear a suitable lab coat, disposable gloves and
protective goggles. For more information, consult the appropriate safety data sheets (SDSs),
available from the product supplier.
For all protocols:
Pipets and disposable pipet tips with aerosol barriers (20–1000 µl)
Isopropanol
Ethanol (96–100%)*
Phosphate-buffered saline (PBS) may be required for sample dilution
QIAcube HT Instrument
QIAcube HT Prep Manager Software
QIAcube HT Reagent troughs
Vortexer
Pretreatment B1 – for respiratory samples
Sputasol (Oxoid Limited) and 37°C water bath, or
NAC buffer (10 g N-acetylcysteine per liter of 0.9% NaCl solution), or
PBS or Buffer AE (cat. no. 19077), DTT and 37°C water bath
Pretreatment B2, B3, B4 and B5 – for liquid transport media, urine and dried blood spots
Buffer ATL (cat. no. 19076)
QIAGEN Proteinase K (cat. nos. 19131 or 19133)
* Do not use denatured alcohol, which contains other substances such as methanol or methylethylketone.

11 QIAamp 96 Virus QIAcube HT Handbook 08/2016
Pretreatment F1 — stool samples
0.9% NaCl solution
Pretreatment T1 – mechanical disruption of tissue
TissueLyser II (QIAGEN, cat. no. 85300) with a TissueLyser II Adapter Set 2 x 24
(QIAGEN, cat. no. 69982), or TissueLyser LT (QIAGEN, cat. no. 85600) with the
TissueLyser LT Adapter for 12 tubes (QIAGEN, cat. no. 69980), or other bead-mill
homogenizer*
5 mm stainless steel beads (cat. no. 69989)
Buffer ATL (cat. no. 19076)
QIAGEN Proteinase K (cat. nos. 19131 or 19133)
Pretreatment T2 – enzymatic digestion of tissue
Thermoshaker suitable for 2 ml collection tubes
Buffer ATL (cat. no. 19076)
QIAGEN Proteinase K (cat. nos. 19131 or 19133)
* This is not a complete list of suppliers and does not include many important vendors of biological supplies.

QIAamp 96 Virus QIAcube HT Handbook 08/2016 12
Important Notes
Starting materials
Do not overload the QIAamp membrane, as this can lead to impaired nucleic acid extraction
and/or performance in downstream assays. For samples with very high host nucleic acid
contents (e.g., for certain tissues, such as spleen or blood samples with highly increased cell
counts), use less than the maximum amount of sample recommended in the protocol or
pretreatments. In some downstream applications such as PCR and RT-PCR, very high
background concentrations of nucleic acids may impair the reaction. Use appropriate
controls (e.g., an internal control) to verify successful PCR amplification.
Avoid transferring solid material to the S-Block that could reduce flow through the membrane
(e.g., blood clots, solid tissue, swab fibers, etc.). When working with difficult samples, use a
vacuum performance step to check if all liquid has passed the membrane. See
“Troubleshooting Guide” on page 40 and the QIAcube HT User Manual for guidance.
Highly viscous fluids may require a treatment to reduce their viscosity to allow for efficient
extraction of viral nucleic acids.
Avoid repeated thawing and freezing of samples since this may reduce nucleic acid yield
and quality.
Serum, plasma, other body fluids and swab media
Up to 200 µl serum, plasma, other body fluid or swab media supernatant can be processed.
Carrier RNA should be used in the nucleic acid purification protocol to prevent the loss of
nucleic acids during the procedure (see page 16 for information about the use of carrier
RNA).

13 QIAamp 96 Virus QIAcube HT Handbook 08/2016
The processing of samples with very high inhibitor contents, such as urine or stool, may require
a reduction in sample input volume and/or an extra pretreatment to remove inhibitors. To
reduce the input volume, use 25–50 µl of the sample and adjust the volume to 200 µl with PBS
or 0.9% NaCl.
Plasma and serum samples
After collection, centrifugation and phase separation, plasma or serum can be stored at
2–8°C for up to 6 hours. For long-term storage, freezing at –30 to –15°C or –70°C in
aliquots is recommended. Frozen plasma or serum samples must not be thawed more than
once. Repeated freeze–thawing leads to reduced viral titers and therefore reduced yields of
viral nucleic acids.
Freezing of samples can lead to denaturation and precipitation of proteins that may
aggregate on the QIAamp membrane. If cryo-precipitates are visible, they can be pelleted
by centrifugation at 6800 x g for 3 minutes. The cleared supernatant should be transferred
to a new sample tube without disturbing the pellet and processed immediately. This step will
not reduce viral titers.
Swabs
Swabs may be processed on the same day as collection or stored for future processing.
While storage at –30 to –15°C is recommended, DNA of suitable quality for single-copy
gene amplification has been documented from swabs stored at room temperature for 24
months.
Alternatively, samples can be collected using plastic swabs with cotton or Dacron® tips.
Puritan® applicators with plastic shafts and cotton or Dacron tips are available from
Hardwood Products Company (www.hwppuritan.com, cat. nos. 25-806 1PC and 25-806

QIAamp 96 Virus QIAcube HT Handbook 08/2016 14
1PD) and from Daigger (www.daigger.com, cat. nos. EF22008D and EF22008DA).* Nylon
cytology brushes and other swab types may also be used.
Note: Solid pieces remaining in the sample fluid may aggregate on the QIAamp membrane,
which may decrease nucleic acid yield.
Whole blood
Blood samples treated with EDTA or citrate as anticoagulant can be used for nucleic acid
purification. Samples can be either fresh or frozen, provided that they have not been frozen
and thawed more than once. After collection, whole blood samples can be stored at 2–8°C
for up to 6 hours. For longer storage, we recommend freezing aliquots at
–30 to –15°C or –70°C.
We recommend using 50–200 µl blood per sample. Typically, 200 µl of blood can be used
with most blood samples. However, highly elevated cell counts due to inflammatory or
neoplastic diseases may strongly increase the host nucleic acid content of a sample. In this
case, reduction of sample input to 50 µl may improve results in downstream assays,
particularly in RT-PCR. If using less than 200 µl blood, adjust the sample volume to 200 µl
with PBS or 0.9% NaCl.
Dried blood spots
Drying blood on filter paper (e.g., Whatman FTA Cards) is an effective form of storage, and
samples prepared in this manner are less expensive and safer to transport. A disc (3 mm
diameter) punched out from filter paper stained with dried blood contains white blood cells
from approximately 5 µl whole blood.
* This is not a complete list of suppliers and does not include many important vendors of biological supplies.

15 QIAamp 96 Virus QIAcube HT Handbook 08/2016
Tissues
When working with tissue samples, mechanical or enzymatic disruption of the tissue structure
is the prerequisite for liberation of cells, subsequent release of nucleic acids, and membrane
permeability of the material.
Different tissue types can vary widely with regard to texture and rigidity, cell types and
content of host nucleic acids and inhibitory substances. In addition, the localization of viral
nucleic acids in the tissue may vary depending on tissue type, virus and stage of infection.
Up to 5 mg of fresh or frozen tissue can be used as a starting amount. For higher amounts of
tissue it might be necessary to check whether this amount of tissue can still be processed.
Furthermore we recommend enabling the vacuum performance check during the vacuum step
to ensure that the liquids have completely passed through the membrane before the protocol
proceeds.
Yields of nucleic acids
For samples containing a low amount of cells (e.g., serum and plasma), the yield of nucleic
acids obtained can be below 1 µg and is therefore difficult to quantify using a
spectrophotometer. In addition, eluates prepared with carrier RNA may contain much more
carrier RNA than target nucleic acids. The QIAamp 96 Virus QIAcube HT Kit recovers total
nucleic acids. Therefore, cellular DNA and RNA and circulating cell-free nucleic acids will
be co-purified along with viral RNA and DNA (and bacterial nucleic acid if present) and
cannot be distinguished using spectrophotometric measurements. We recommend using
quantitative amplification methods such as quantitative real-time PCR or real-time RT-PCR to
determine viral nucleic acid yields.

QIAamp 96 Virus QIAcube HT Handbook 08/2016 16
Using carrier RNA and internal controls
Carrier RNA
We recommend adding carrier RNA to fluids containing low amounts of cells such as serum,
plasma, swab media and wash fluid. This enhances adsorption of viral RNA and DNA to the
silica membranes, which is especially important when the target molecules are not abundant.
In addition, an excess of carrier RNA reduces the chances of viral RNA degradation in the
rare event that RNases are not denatured by the chaotropic salts and detergents in the lysis
buffer. Not using carrier RNA may decrease the recovery of viral nucleic acids.
Internal control
Using the QIAamp 96 Virus QIAcube HT Kit in combination with commercially available
amplification systems may require the introduction of an internal control into the purification
procedure. Internal control RNA or DNA should be added together with the carrier RNA to
the lysis buffer (see Table 2 on page 26). Refer to the assay manufacturer’s instructions in
order to determine the optimal concentration.
For the standard protocol, it is recommended to add 5 µl internal control solution. Using a
concentration other than that recommended may reduce amplification efficiency.
Storing nucleic acids
For short-term storage of up to 24 hours, we recommend storing the purified viral RNA and
DNA at 2–8°C. For storage longer than 24 hours, we recommend storing purified nucleic
acids at –30 to –15°C, or even –70°C in the case of RNA.
Handling RNA
RNases are very stable and active enzymes that generally do not require cofactors to
function. Since RNases are difficult to inactivate and only minute amounts are sufficient to
17 QIAamp 96 Virus QIAcube HT Handbook 08/2016
destroy RNA, do not use any plasticware or glassware without first eliminating possible
RNase contamination. Care should be taken to avoid inadvertently introducing RNases into
the RNA sample during or after the purification procedure.
Preparing RNA
When preparing viral RNA, work quickly during the manual steps of the procedure. If you
have not previously worked with RNA, read Appendix A on page 43 before starting. Buffer
AVE is RNase-free upon delivery. It contains sodium azide, an antimicrobial agent that
prevents growth of RNase–producing organisms. However, as this buffer does not contain
any RNase inhibitors, it will not actively inhibit RNases introduced by inappropriate
handling. Extreme care should be taken to avoid contamination with RNases when handling
Buffer AVE.
Preparing reagents and instrument
Carrier RNA stock solution
For use, lyophilized carrier RNA should first be dissolved in Buffer AVE. Add 1550 µl Buffer
AVE to the tube containing 310 µg lyophilized carrier RNA to obtain a stock solution of
0.2 µg/µl. Add this solution to Buffer ACL as described in Table 2 on page 26. Unused
carrier RNA dissolved in Buffer AVE should be frozen in aliquots at –30 to –15°C. Aliquots
of carrier RNA should not be subjected to more than 3 freeze–thaw cycles.
QIAGEN Proteinase K
The QIAamp 96 Virus QIAcube HT Kit contains ready-to-use QIAGEN Proteinase K supplied
in a specially formulated storage buffer. The activity of the QIAGEN Proteinase K solution is
600 mAU/ml.

QIAamp 96 Virus QIAcube HT Handbook 08/2016 18
QIAGEN Proteinase K is stable for at least 1 year after delivery when stored at room
temperature (15–25°C). To store for more than 1 year or if ambient temperature often
exceeds 25°C, we recommend storing QIAGEN Proteinase K at 2–8°C.
Buffer ACB
Buffer ACB is supplied as a concentrate. Before using for the first time, add isopropanol
(100%) as indicated on the bottle to obtain a working solution. Tick the check box on the
bottle label to indicate that isopropanol has been added. Mix well after adding isopropanol.
Buffer AW1
Buffer AW1 is supplied as a concentrate. Before using for the first time, add ethanol (96–
100%) as indicated on the bottle to obtain a working solution. Tick the check box on the
bottle label to indicate that ethanol has been added. Mix well after adding ethanol.
Buffer AW2
Buffer AW2 is supplied as a concentrate. Before using for the first time add ethanol (96–
100%) as indicated on the bottle to obtain a working solution. Tick the check box on the
bottle label to indicate that ethanol has been added. Mix well after adding ethanol.
Handling Buffer AVE
Buffer AVE is RNase-free upon delivery. It contains sodium azide, an antimicrobial agent that
prevents growth of RNase-producing organisms. However, as this buffer does not contain
any RNase-degrading chemicals, it will not actively inhibit RNases introduced by
inappropriate handling. For RNA applications, when handling Buffer AVE, avoid
contamination with RNases. Follow general precautions for working with RNA, such as
frequent change of gloves and keeping tubes closed whenever possible.
19 QIAamp 96 Virus QIAcube HT Handbook 08/2016
TopElute Fluid
TopElute Fluid is used during elution of nucleic acids from the QIAamp membrane. It enables
application of a stable and high vacuum and results in equal eluate volumes. In addition,
TopElute Fluid eliminates the formation of drops of elution buffer at the outlet nozzles of the
QIAamp 96 plates.
TopElute Fluid might be found as a top layer over the elution buffer. It is inert and has no
effects on downstream applications.
Important: Please ensure that you only take the eluate from below the top layer.
Assembling the vacuum chamber
Figure 1 illustrates the assembly of the vacuum chamber. For further information, please refer
to the QIAcube HT User Manual.
1. Insert the channeling block holder into the left (waste) chamber of the vacuum chamber.
2. Press firmly on the sides of the channeling block holder to seat it in the chamber, sealing
the O-ring on the spigot into the drain.
3. Then, place the channeling block into the channeling block holder.
4. Place the QIAamp 96 plate in the transfer carriage. Load the carriage with the QIAamp
96 plate into the left (waste) chamber of the vacuum chamber.
5. Ensure that the carriage is positioned to the left inside the vacuum chamber. Place the
riser block EMTR in the right (elution) chamber of the vacuum chamber with the pin of the
riser block EMTR in the top right position.
6. Load an elution microtubes rack (EMTR) into the elution chamber.

QIAamp 96 Virus QIAcube HT Handbook 08/2016 20
Figure 1. Assembling the vacuum chamber.
96-well plate (e.g., QIAamp 96 plate)
Transfer carriage (cat. no. 9022654)
Channeling adapter (cat. no. 9022656)
Contains: Channeling block
(cat. no. 9022665)
Channeling block holder (cat. no. 9022664)
Elution microtubes (EMTR)
Riser block EMTR (cat. no. 9022655
Vacuum chamber

21 QIAamp 96 Virus QIAcube HT Handbook 08/2016
Optional features
Processing fewer than 96 samples per run
If processing fewer than 96 samples reuse of QIAamp 96 plates, S-Block and EMTR is
possible up to three times.
Note: We recommend using fresh plasticware for every run. If reusing, take extreme care to
prevent cross-contamination.
Store plates in a way that separates the outlet nozzles under the plate, for example, in
the S-Block used in the same run or in a fresh 96-well microtiter plate.
Cover unused wells of the S-Block and QIAamp 96 plate with a tape sheet at all times.
Off-board lysis
For some applications, it may be necessary to lyse samples in a safety cabinet. For some
sample types, lysis outside the instrument might be necessary. Please refer to Sample
Pretreatment Protocols on pages 34–39.
When using an off-board lysis protocol, choose the QIAamp virus off-board lysis protocol in
the software setup step under the selected protocol.

QIAamp 96 Virus QIAcube HT Handbook 08/2016 22
QIAamp Virus Protocol
This protocol is for the purification of viral nucleic acids from diverse samples. See Table 1
on page 9 for sample pretreatments. There are two types of protocols:
QIAamp virus protocol: this protocol starts with the lysis of the samples after a necessary
pretreatment.
QIAamp virus off-board lysis protocol: this protocol starts with adding the binding buffer
to manually lysed samples.
Things to do before starting
Ensure all reagents and samples are equilibrated to room temperature (15–25°C).
Check for precipitates in reagents. If a reagent contains precipitates, incubate at 37°C
with gentle shaking to dissolve precipitates. Avoid vigorous shaking, which causes
foaming.
Check that Buffer ACB, Buffer AW1, Buffer AW2 and carrier RNA have been prepared
according to the instructions in ”Preparing reagents and instrument” (page 17).
When working with difficult samples, use a vacuum performance check to check if all
liquid has passed the membrane. See “Troubleshooting Guide” on page 40 and the
QIAcube HT User Manual for guidance.
Ensure that the relevant version of the QIAamp 96 Virus protocol is available on the
computer.
QIAcube HT Prep Manager protocol files (file extension *.qpmx), which contain all the
information required to perform a run on the QIAcube HT instrument, are available from
www.qiagen.com/p/QIAcubeHT, under the Resources tab.
Ensure that QIAcube HT Prep Manager Software is installed.
Ensure that you are familiar with operating the instrument. Refer to the QIAcube HT User
Manual for operating instructions.

23 QIAamp 96 Virus QIAcube HT Handbook 08/2016
If the volume of the samples is less than 200 µl, add PBS or 0.9% NaCl to a final volume
of 200 µl.
Prepare a mixture of Buffer ACL, carrier RNA and internal control (if applicable)
according to Table 2 on page 26.
Manual lysis procedure
Follow this procedure for manual sample lysis if using the QIAamp virus off-board lysis
protocol.
1. Add 200 µl of each fluid sample to the bottom of an S-Block well.
2. Add 20 µl of QIAGEN Proteinase K to each sample.
3. Prepare a mixture of Buffer ACL, carrier RNA and internal control (if applicable),
according to Table 2 on page 26. Add 160 µl of the Buffer ACL mixture to each sample
and mix well.
4. Cover the S-Block with adhesive tape.
5. Incubate for at least 30 min at 56°C.
6. Proceed with “QIAamp virus protocol on the QIAcube HT” on page 23 and select the
QIAamp virus off-board lysis protocol.
QIAamp virus protocol on the QIAcube HT
1. Switch on the QIAcube HT instrument and the connected laptop computer. We
recommend leaving the vacuum station switched on at all times.
2. Launch the QIAcube HT Prep Manager Software.
3. On the Home screen, select QIAamp 96 Virus experiment.
4. Enter the kit information.
5. Select the type of sample to be processed. Sample types are combined in categories.
Select the category that best fits your sample type.

QIAamp 96 Virus QIAcube HT Handbook 08/2016 24
6. Select the pre-treatment from the drop-down menu.
Note: The selected sample type will determine which pre-treatment options appear.
Note: The sample type and pre-treatment information are only for documentation and do
not influence the purification protocol.
7. Select the protocol: QIAamp Virus protocol or QIAamp Virus off-board lysis protocol (see
section “Off-board lysis” on page 21).
8. Optional: Set optional steps for checking vacuum performance.
Note: The run script provided by QIAGEN includes all necessary steps to guarantee best
performance. Nevertheless, there is the possibility to check the vacuum performance
during the run. If this option is selected, the instrument will pause after the binding step,
so you can check if any wells may be clogged. For more information, see section
“Vacuum performance check” on page 28.
9. Click Next.
10. Optionally, click Save. With QIAcube HT Prep Manager software it is possible to save
an experiment at any step in the run setup procedure.
11. In the Labware Selection screen, select Use sample ID or existing sample input file and
define the samples.
To enter sample IDs manually or to automatically generate sample IDs, select Enter
sample IDs. Then, start naming the samples by clicking Define Samples. For information
about how to automatically create sample IDs, refer to the QIAcube HT User Manual.
Alternatively, to load an existing sample file select Load existing sample files and then
either click Load sample file or use the Scan button to import the data.
Note: Changing the input labware is not recommended by QIAGEN.
12. In the Plate Assignment screen, select the samples from the input and assign them to the
output plate. Then, click Next.
The input plate is set according to your definition in the Labware selection screen. Select
the sample columns on the input labware and then click Assign to assign them to the
output plate.
It is possible to change the assignment, if required. Select the columns on the output

25 QIAamp 96 Virus QIAcube HT Handbook 08/2016
labware and click Remove assignment. Click and hold the left mouse button to mark the
columns and rearrange them as needed.
13. In the Worktable setup screen, click on any worktable positions marked with yellow color
and follow the instructions to set up the worktable.
Important: All positions to be used on the worktable must be calibrated. If the Calibrate
Labware button appears yellow, calibration is required. For further information, see the
QIAcube HT User Manual.
14. Confirm that the liquid waste level in the waste bottle matches the level indicated in the
software. The waste bottle status has three states: green indicates that the bottle has
enough space for another run; yellow indicates that the bottle is nearly full, but the run
can be started; red indicates that the bottle needs to be emptied before starting the run.
15. Place the tip chute on the worktable so that the chute is over the tip disposal box.
Ensure that the tip chute is open and unblocked. Remove the UV protective cap from the
tip chute. Ensure that the tip disposal box is empty and that the opening is aligned with
the tip chute.
16. Prepare the vacuum chamber as shown in Figure 1 on page 20. This assembly is also
described in the QIAcube HT User Manual.
Important: If fewer than 12 columns (96 wells) are to be processed, seal the unused
columns of the QIAamp 96 plate with adhesive tape (supplied). Unused wells must be
sealed to ensure proper vacuum operation.
Note: Trim any excess tape.
Note: When reusing a QIAamp 96 plate, S-Block or elution plate, take care to avoid
cross-contamination.
Note: Make sure the QIAamp 96 plate is aligned to the left in the carriage and that the
carriage is positioned to the left inside the vacuum chamber.
17. Load the tips in the indicated positions and remove the lids from the tip boxes. Ensure
that there are sufficient numbers of tips for all steps, at least up to and including lysate
transfer.
Check that the number and position of available and unused tips is the same on the

QIAamp 96 Virus QIAcube HT Handbook 08/2016 26
instrument worktable and in the software workspace.
If more tips are required, you will be prompted to replace empty tip racks with new tip
racks during the run. Information about the approximate time for refill will be given in the
run screen. For more information, see the QIAcube HT User Manual.
18. Transfer the indicated volumes of all reagents into the corresponding reagent troughs.
Close the lids and place the troughs in the indicated positions on the worktable
19. Prepare a mixture of Buffer ACL, carrier RNA and internal control (if applicable),
according to Table 2.
Important: Prepare ACL mixture immediately before starting the run.
For the QIAamp Virus protocol place the ACL mixture in the indicated positions on the
worktable.
For the QIAamp Virus off-board lysis protocol, you will need the ACL mixture during the
manual lysis procedure.
Table 2. Preparation of Buffer ACL, carrier RNA, and internal control (if applicable)
Number of samples
24 32 40 48 56 64 72 80 88 96
Buffer ACL (ml) 4.16 5.44 6.72 8.00 9.28 10.56 11.84 13.12 14.40 15.68
Carrier RNA* (µl) 130 170 210 250 290 330 370 410 450 490
Internal Control* (µl) 130 170 210 250 290 330 370 410 450 490
*If you are not using the Internal Control or Carrier RNA, then use RNase-free water instead.
20. Add the samples to the selected S-Block wells. Place the S-Block in the indicated position
of the QIAcube HT worktable.
For the QIAamp Virus protocol, add 200 µl of each sample.
For the QIAamp Virus off-board lysis protocol, add 380 µl of each lysed sample.
Note: Samples are processed in columns of 8 wells. We recommend covering unused
wells during pipetting so that unused S-Block wells can be used in subsequent runs.

27 QIAamp 96 Virus QIAcube HT Handbook 08/2016
Note: If fewer than 8 samples in a column are to be processed, add water or buffer to
the unused wells in the column. To avoid foaming, the volume of water or buffer added
to the unused wells should be the same as the sample volume.
21. Close the instrument hood and start the run by clicking Start run.
22. The protocol run begins.
Important: At the beginning of each run, an open circuit test and a plate detection test
are performed automatically. If the QIAamp 96 plate in the transfer carriage is
improperly aligned to the left compartment of the vacuum chamber, you will be prompted
to position it correctly. After adjusting the position, click Retry to initiate the tests again.
For more information about the system tests, see the QIAcube HT User Manual.
23. Optional: If you selected to use a vacuum performance check, the protocol stops for a
manual interaction after the binding step.
24. After the protocol is finished, create a report if necessary.
25. Cover the elution plate (EMTR) with the lid and remove from the elution chamber.
26. Two liquid phases might be found in the Elution Microtubes. If this is the case, TopElute
Fluid will be found as a top layer over the elution buffer. It is inert and has no effect on
downstream applications.
Important: Please ensure that you only take the eluate from below the top layer.
Cleaning the instrument after completing a run
1. Follow the instructions in the QIAcube HT Prep Manager Software for cleaning the
instrument after a run.
2. Cover tip racks that contain only unused tips with the lid and remove them from the
worktable.
3. Cover fractions of partly used tip racks with an adhesive tape. Then cover the tip racks
with the lid and remove from the worktable. Discard empty tip racks.

QIAamp 96 Virus QIAcube HT Handbook 08/2016 28
4. If the run has been stopped and the instrument did not remove all used tips, remove them
now and discard them.
5. Remove all reagent troughs and discard them.
Note: We recommend not reusing reagents for multiple runs.
6. Remove the input plate.
7. Discard the QIAamp 96 plate or keep partially used QIAamp 96 plates for subsequent
reuse. In this case cover used fractions with an adhesive tape.
8. Remove the tip chute and all adapters from the worktable. Remove the carriage,
channeling adapter and riser block from the vacuum chamber. Clean all parts as
described in the QIAcube HT User Manual.
9. Discard the tip disposal box.
10. Clean any reagents that may have spilled on the instrument worktable or vacuum
chamber with a damp cloth.
11. Discard all waste according to local safety regulations.
Note: For all further cleaning and maintenance operations, see the QIAcube HT User
Manual for detailed instructions.
Optional steps
Vacuum performance check
Using the vacuum performance check option results in one manual interaction pause after the
binding step. This optional setting allows the user to check whether all the liquid has passed
through the membranes. By default, this step is unchecked.

29 QIAamp 96 Virus QIAcube HT Handbook 08/2016
If the vacuum performance check step is checked, the instrument will pause after the binding
step. The user can then look to see whether all liquid has passed through the membranes
and decide whether to switch on the vacuum again (Re-do vacuum) or to continue (Proceed).
1. Open the instrument lid.
Note: The lid sensor is disabled during the vacuum performance check, allowing to the
user to observe the wells.
2. Check the wells on the QIAamp 96 plate for any remaining liquid.
If no liquid is visible in the wells after the vacuum step, click Proceed to continue the run.
If liquid remains in the wells, click the Re-do vacuum button to apply the same vacuum
pressure again. The vacuum will be activated for a certain time or until you press the
Stop vacuum button.
3. Mark any well that is clogged or not empty in the dialog that appears. This information
will be included in the run report. To mark a well, select the position in the dialog.
To select multiple positions, either press the Shift key and left-click with the mouse to
select adjacent positions, press the CTRL key and left-click with the mouse to select
multiple, nonadjacent positions, or drag the mouse to select adjacent positions in a
rectangle.

QIAamp 96 Virus QIAcube HT Handbook 08/2016 30
In the position table at the right, check the box next to Marked. The selected position on
the QIAamp 96 plate will be displayed as marked
Note: To unmark a position, select the position and uncheck the box next to Marked.
4. If liquid still remains in any well, manually remove the liquid using a pipet.
5. After the instrument has added additional reagents, open the hood to pause the run.
Check to see whether the affected well is still blocked. If so, manually remove the liquid
from the affected well using a pipet.
6. Either click Proceed to continue the run, or click Stop run to stop the run.
Advanced options
Important: QIAGEN does not recommend modifying any of the parameters found in the
Advanced options section.
These parameters have been optimized for each QIAcube HT Kit to guarantee accurate and
valid experiment results. QIAGEN is not responsible for the outcome and does not support
experiments performed using modified advanced options. Please note that any changes to
these options are carried out at your own risk.

31 QIAamp 96 Virus QIAcube HT Handbook 08/2016
Note: A warning icon and a corresponding warning message will be displayed if you
change any parameter. The warning text contains the recommended value. If you return to
the recommended value, the warning message will disappear.
Vacuum parameter
In the Vacuum parameter section, it is possible to change two parameters: vacuum intensity
and vacuum time.
The default settings are 35 kPa for the vacuum intensity and 180 sec for the vacuum time.
If you want to adapt your protocol you could change the vacuum intensity from 35 kPa to 70
kPa. Please note that these changes are not recommended by QIAGEN.
If you change the vacuum intensity parameter, this only affects the vacuum intensity following
the binding step. All other vacuum steps will be unaffected.
If you want to adapt your protocol you could change the vacuum time from 60 sec to 360
sec. Please note that these changes are not recommended by QIAGEN.

QIAamp 96 Virus QIAcube HT Handbook 08/2016 32
If you change the vacuum time parameter, this will only affect the vacuum time following the
binding step. All other vacuum steps will be unaffected.
Elution parameter
In the Elution parameter section, it is possible to change the total elution volume and the
elution step.
The recommended values for these parameters are shown in the QIAcube HT Prep Manager
Software.
If you want to adapt your protocol you could change the total elution volume to another
value within the defined range. Please note that these changes are not recommended by
QIAGEN.
In some cases it might be helpful to elute multiple times with a lower volume than one time
using the complete elution volume. Increasing the number of elution steps will result in a
multiplication of elution buffer distribution, incubation pause and vacuum step(s) without
influencing the total amount of elution volume.
If you want to adapt your protocol you could change the elution step from 1 to 2. Please
note that these changes are not recommended by QIAGEN.
TopElute
TopElute Fluid is used during elution of nucleic acids from the QIAamp membrane. It enables
application of a stable and high vacuum and results in equal eluate volumes. In addition,
TopElute Fluid eliminates the formation of drops of elution buffer at the outlet nozzles of the
QIAamp 96 plates.
By default, the Top Elute option is checked.
33 QIAamp 96 Virus QIAcube HT Handbook 08/2016
In case TopElute Fluid should not be used during the run, uncheck the TopElute option under
Advanced options.
Important: Changing the usage of TopElute Fluid is not recommended or tested by QIAGEN.
Note: TopElute Fluid might be found as a top layer over the elution buffer. It is inert and has
no effects on downstream applications.
Important: Please ensure that you only take the eluate from below the top layer.

QIAamp 96 Virus QIAcube HT Handbook 08/2016 34
Sample Pretreatment Protocols
Pretreatment B1 for Respiratory Samples
This protocol is intended for viscous respiratory samples. Non-viscous respiratory samples do
not require pretreatment and can be used directly as starting material in “with “QIAamp
Virus Protocol”, page 21.
Procedure
1. Liquefy the sample according to either step 1a. or 1b.
1a. Add 1 volume of Sputasol solution to 1 volume of sample, and shake well.
Place in a 37°C water bath, and incubate with periodic shaking until the sample is
completely liquefied.
1b. Mix 1 volume of sample with 1 volume of NAC buffer (10 g N-acetylcysteine per
liter of 0.9% NaCl solution). If the sample is very viscous or solid (e.g., when
working with lower respiratory samples), try to disrupt it mechanically by pipetting
up and down. Incubate at room temperature (15–25°C) for 30 min with constant
shaking.
For easier pipetting, it may be necessary to cut off the end of the pipette tip.
If the sample is solid, the incubation time needs to be increased to completely
liquefy the sample.
2. Centrifuge the liquefied sample to pellet debris, and transfer the clear supernatant to a
clean tube.
3. Use 200 µl lysate as starting material and proceed directly with “QIAamp Virus
Protocol”, page 21.

35 QIAamp 96 Virus QIAcube HT Handbook 08/2016
Pretreatment B2 for Liquid Transport Media
Most transport media, such as PreservCyt® solution, require no pretreatment and can be
used directly as starting material in “QIAamp Virus Protocol”, page 21. For some media
such as SurePath® solution, a pretreatment prior to nucleic acid purification can improve
extraction efficiency.
Procedure
1. Add 400 µl media to 120 µl Buffer ATL and 30 µl proteinase K solution.
The Buffer ATL and proteinase K solution supplied with the kit might not be sufficient for
all users. If necessary, please order separately.
2. Mix the solution carefully.
3. Use 200 µl lysate as starting material and proceed directly with “QIAamp Virus
Protocol”, page 21.
Note: Proteinase K can be replaced by Buffer ACL on the QIAcube HT worktable.
Pretreatment B3 for Urine
Procedure
1. Add 400 µl urine to 120 µl Buffer ATL and 30 µl proteinase K solution.
The Buffer ATL and proteinase K solution supplied with the kit might not be sufficient for
all users. If necessary, please order separately. See “Ordering Information” on page 46.
2. Mix the solution carefully.
3. Use 200 µl lysate as starting material and proceed directly with “QIAamp Virus
Protocol”, page 21.
Note: Proteinase K can be replaced by Buffer ACL on the QIAcube HT worktable.

QIAamp 96 Virus QIAcube HT Handbook 08/2016 36
Pretreatment B4 for Dried Blood Spots
Things to do before starting
Read “Dried blood spots” on page 14.
Procedure
1. Add dried blot spots (e.g., from Whatman FTA Cards) to 500 µl Buffer ATL and 30 µl
proteinase K solution.
The Buffer ATL and proteinase K solution supplied with the kit might not be sufficient for
all users. If necessary, please order separately. See “Ordering Information” on page 46.
2. Incubate at 56°C for 1 h with constant agitation.
3. Centrifuge briefly, and transfer 500 µl supernatant to a clean tube.
4. Use 200 µl lysate as starting material and proceed directly with “QIAamp Virus
Protocol”, page 21.
Note: Proteinase K can be replaced by Buffer ACL on the QIAcube HT worktable.
Pretreatment B5 for Swabs and Buccal Cells
Things to do before starting
Read “Swabs” on page 13.
Procedure
1. Add the swab to 800 µl Buffer ATL and 30 µl proteinase K solution.
The Buffer ATL and proteinase K solution supplied with the kit might not be sufficient for
all users. If necessary, please order separately. See “Ordering Information” on page 46.
2. Incubate at 56°C for 1 h with constant agitation.
3. Remove the swab from the tube, and centrifuge the tube to collect condensation.

37 QIAamp 96 Virus QIAcube HT Handbook 08/2016
4. Use 200 µl lysate as starting material and proceed directly with “QIAamp Virus
Protocol”, page 21.
5. Note: Proteinase K can be replaced by Buffer ACL on the QIAcube HT worktable.
Pretreatment F1 for Stool Suspensions
Procedure
1. Mix 1 volume of stool with 9 volumes of 0.9 % NaCl.
2. Vortex vigorously to prepare a homogeneous suspension.
3. Centrifuge the suspension to pellet debris, and transfer the clear supernatant to a clean
tube.
Note: Depending on the bacteria species and the speed of centrifugation, bacteria will
be present in the pellet.
4. Use 200 µl lysate as starting material and proceed directly with “QIAamp Virus
Protocol”, page 21.
Pretreatment T1 Mechanical Disruption of Tissue
This pretreatment is for the extraction of viral RNA and viral DNA from most types of tissue.
Important point before starting
Stainless steel beads must be ordered separately (see “Ordering Information” on page
46).
Procedure
1. Place up to 5 mg tissue in 2 ml microcentrifuge tubes each containing 1 stainless steel
bead (5 mm mean diameter).
Note: Up to 20 mg tissue can be processed. We recommend starting with 5 mg and
increasing the amount if needed. For tissues with a very high number of cells for a given
QIAamp 96 Virus QIAcube HT Handbook 08/2016 38
mass of tissue (e.g., spleen), a reduced amount of starting material (5–10 mg) should be
used.
If working with fibrous tissue, cutting the tissue into smaller pieces before starting
disruption will improve disruption efficiency.
2. Add 300 µl PBS or 0.9% NaCl solution to each tube.
3. Place the tubes in the TissueLyser II Adapter Set.
4. Operate the TissueLyser II for 2 min at 25 Hz.
Optional: If working with fiber-rich tissue, disassemble the adapter set, rotate the rack of
tubes so that the tubes nearest to the TissueLyser II are now outermost, and reassemble
the adapter set. Operate the TissueLyser II for a further 2 min at 25 Hz.
5. Disassemble the adapter set. Centrifuge the samples at 14,000 x g for 2 min at room
temperature (15–25°C).
6. Use 200 µl of the supernatant from step 5 as the starting material for “with “QIAamp
Virus Protocol”, page 21.
7. For fiber-rich tissues, complete disruption may not always be possible. Ensure that no
solid particles are transferred to the purification protocol.
Pretreatment T2 for Enzymatic Digestion of Tissue
This pretreatment is for the extraction of viral DNA from most types of tissue. It is not suitable
for viral RNA because the lysis conditions do not sufficiently conserve RNA integrity.
Things to do before starting
Check Buffer ATL for precipitate upon storage. If it contains precipitates, warm to 56°C
to dissolve precipitates.
Heat a thermomixer block, shaking water bath or rocking platform to 56°C for use in
step 3 of the pretreatment protocol.

39 QIAamp 96 Virus QIAcube HT Handbook 08/2016
Procedure
1. Cut up to 5 mg tissue into small pieces and place in a 2 ml microcentrifuge tube. Add
180 µl Buffer ATL.
Note: Up to 20 mg tissue can be processed. We recommend starting with 5 mg and
increasing the amount if needed. For tissues with a very high number of cells for a given
mass of tissue (e.g., spleen), a reduced amount of starting material (5–10 mg) should be
used.
We recommend cutting the tissue into small pieces for efficient lysis.
2. Add 20 µl QIAGEN Proteinase K. Close the cap and mix thoroughly by vortexing. Briefly
centrifuge the tube to collect any solution from the cap.
3. Incubate at 56°C with constant agitation until the tissue is completely lysed.
Lysis time varies depending on the type of tissue processed. Lysis is usually complete in
1–3 h. If more convenient, overnight lysis is possible but should be evaluated for specific
sample types.
After incubation, the lysate may appear viscous, but should not be gelatinous. If a
substantial gelatinous pellet remains after incubation and vortexing, extend incubation
time at 56°C for the QIAGEN Proteinase K digest and/or increase the amount of
QIAGEN Proteinase K to 40 µl. Reduce the amount of starting material in future
preparations of this tissue type.
If no thermomixer, shaking water bath or rocking platform is available, incubate in a
heating block or water bath and vortex occasionally during incubation to disperse the
sample.
4. Optional: If solid tissue or debris remains in the tubes after lysis, add 50 µl Buffer ATL.
Mix by vortexing and centrifuge at 6,000 x g (8,000 rpm) for 1 min. Use 200 µl of the
supernatant in the next step.
5. Use 200 µl lysate as starting material and proceed directly with “QIAamp Virus
Protocol”, page 21.
Note: Proteinase K can be replaced by Buffer ACL on the QIAcube HT worktable.
QIAamp 96 Virus QIAcube HT Handbook 08/2016 40
Troubleshooting Guide
This troubleshooting guide may be helpful in solving any problems that may arise. For more
information, see also the Frequently Asked Questions page at our Technical Support Center:
www.qiagen.com/FAQ/FAQList.aspx. The scientists in QIAGEN Technical Services are
always happy to answer any questions you may have about either the information and/or
protocols in this handbook or sample and assay technologies (for contact information, visit
www.qiagen.com).
Comments and suggestions
Instrument issues
a) Recovery in case of instrument failure or user interruption
The QIAcube HT interrupts a run upon opening of the hood. The run will proceed normally once the hood is closed. To ensure process safety, this incident is reported in the post-run report.
b) Instrument failure/cancelled run
It is not possible to recover the run. Please continue manually.
c) Blocked membranes When processing samples that might potentially block the membrane, we recommend using a vacuum performance check.
If liquid is still visible, remove 500 µl using a pipet. Then scrape the surface of the membrane with a fresh pipet tip in order to relocate any solid particles that may block the membrane. Take care not to damage the membrane. If there is still no liquid flow, pipet all liquid from the well and proceed with the run.
After the instrument has added wash buffer, open the hood to pause the run. Check if the well is still blocked. If so, remove all liquid using a pipet.
Do not perforate the membrane. Uncovered perforated wells will disturb vacuum integrity during elution across the whole plate.
Proceed the run. No buffer will float over from the blocked well into other wells from this step on.
Next time, use less sample (tissue).

41 QIAamp 96 Virus QIAcube HT Handbook 08/2016
Comments and suggestions
Little or no viral DNA or RNA in the eluate
a) Buffer ACB prepared incorrectly
Check that Buffer ACB concentrate was diluted with the correct volume of isopropanol, as indicated on the bottle. Use 100% isopropanol. Repeat the purification protocol with new samples.
b) Buffer AW1 or Buffer AW2 prepared incorrectly
Check that Buffer AW1 or Buffer AW2 concentrate was diluted with the correct volume of ethanol, as indicated on the bottle. Use 96–100% ethanol. Do not use denatured alcohol, which contains other substances such as methanol or methylethylketone. Repeat the purification protocol with new samples.
c) Insufficient sample lysis QIAGEN Proteinase K was stored at elevated temperatures for too long. Repeat the purification procedure using new samples and fresh QIAGEN Proteinase K (see storage recommendations on page 5).
For some DNA viruses and bacteria, heated lysis may improve lysis efficiency. In this case, choose the off-board lysis protocol.
d) Carrier RNA not added to Buffer ACL mix or degraded carrier RNA
Please refer to the recommendations for preparation, storage and addition of carrier RNA.
e) RNase contamination in Buffer AVE
Take care not to introduce RNases, which can degrade viral RNA. This may occur if tubes containing Buffer AVE are opened repeatedly. In case of RNase contamination, replace the open vial of Buffer AVE with a new vial. Repeat the purification procedure with new samples.
f) Nucleic acids in samples already degraded prior to purification
Samples were frozen and thawed more than once or stored at room temperature (15–25°C) for too long. Always use fresh samples or samples thawed only once. Repeat the purification protocol with new samples.
DNA or RNA does not perform well in downstream applications
a) Little or no DNA or RNA in the eluate
See “Little or no viral DNA or RNA in the eluate”, above.
b) Too much eluate in the amplification reaction
Some sample types may contain high amounts of background nucleic acids (e.g. whole blood, tissue) or PCR inhibiting substances (stool). High amounts of background nucleic acids may inhibit amplification reactions, and removal of inhibitors may not be complete without additional treatment. Reduce the amount of sample input and/or the amount of eluate added to the amplification reaction.
c) Too much background nucleic acids in the eluate
Determine the maximum amount of carrier RNA suitable for the amplification reaction.
In RT-PCR, a low DNA background is preferable. Use less eluate.

QIAamp 96 Virus QIAcube HT Handbook 08/2016 42
Comments and suggestions
d) Performance of purified nucleic acids in assays varies with aging of reconstituted wash buffers
Salt and ethanol components of Buffer AW1 or Buffer AW2 may have separated out after being left for a long period between preparations. Always mix buffers thoroughly before each preparation.
Precipitate in buffers
a) Precipitate in Buffer ACL or Buffer ACB
Precipitate may form after storage at low temperature or prolonged storage. To dissolve precipitate, incubate Buffer ACL or ACB for 30 min at 37°C with occasional shaking.

43 QIAamp 96 Virus QIAcube HT Handbook 08/2016
Appendix A: General Remarks on Handling RNA
Handling RNA
Ribonucleases (RNases) are very stable and active enzymes that generally do not require
cofactors to function. Since RNases are difficult to inactivate and even minute amounts are
sufficient to destroy RNA, do not use any plasticware or glassware without first eliminating
possible RNase contamination. Great care should be taken to avoid inadvertently
introducing RNases into the RNA sample during or after the purification procedure. To
create and maintain an RNase-free environment, the following precautions must be taken
during pretreatment and use of disposable and nondisposable vessels and solutions while
working with RNA.
General handling
Proper microbiological, aseptic technique should always be used when working with RNA.
Hands and dust particles may carry bacteria and molds and are the most common sources
of RNase contamination. Always wear latex or vinyl gloves while handling reagents and
RNA samples to prevent RNase contamination from the surface of the skin or from dusty
laboratory equipment. Change gloves frequently and keep tubes closed whenever possible.
Keep purified RNA on ice when aliquots are pipetted for downstream applications.
Remove RNase contamination from bench surfaces, nondisposable plasticware and
laboratory equipment (e.g., pipets and electrophoresis tanks) using general laboratory
reagents. To decontaminate plasticware, rinse with 0.1 M NaOH, 1 mM EDTA* followed
by RNase-free water (see ”Solutions”, page 44), or rinse with chloroform* if the plasticware
is chloroform-resistant. To decontaminate electrophoresis tanks, clean with detergent (e.g., * When working with chemicals, always wear a suitable lab coat, disposable gloves, and protective goggles. For more information, consult the appropriate safety data sheets (SDSs), available from the product supplier.

QIAamp 96 Virus QIAcube HT Handbook 08/2016 44
0.5% SDS),* rinse with RNase-free water, rinse with ethanol (if the tanks are ethanol-
resistant), and allow to dry.
Disposable plasticware
The use of sterile, disposable polypropylene tubes is recommended throughout the
procedure. These tubes are generally RNase-free and do not require pretreatment to
inactivate RNases.
Glassware
Glassware should be treated before use to ensure that it is RNase-free. Glassware used for
RNA work should be cleaned with a detergent*, thoroughly rinsed and oven baked at
240°C for at least 4 hours (overnight, if more convenient) before use. Autoclaving alone will
not fully inactivate many RNases. Alternatively, glassware can be treated with DEPC*
(diethyl pyrocarbonate), as described in “Solutions” below.
Solutions
Solutions should be purchased RNase-free or treated with 0.1% DEPC. We recommend
purchasing RNase-free water. This is because, if trace amounts of DEPC remain after
autoclaving buffer, purine residues in RNA might be modified by carbethoxylation and
performance of enzymatic reactions such as PCR may be negatively affected. Therefore,
residual DEPC must always be eliminated from solutions or vessels by autoclaving or heating
to 100°C for at least 15 minutes.
DEPC is a strong, but not absolute, inhibitor of RNases. It is commonly used at a
concentration of 0.1% to inactivate RNases on glass or plasticware or to create RNase-free
solutions. DEPC inactivates RNases by covalent modification. Add 0.1 ml DEPC to 100 ml of
the solution to be treated and shake vigorously to bring the DEPC into solution. Let the * When working with chemicals, always wear a suitable lab coat, disposable gloves, and protective goggles. For more information, consult the appropriate safety data sheets (SDSs), available from the product supplier.

45 QIAamp 96 Virus QIAcube HT Handbook 08/2016
solution incubate for 12 hours at 37°C. Autoclave for 15 minutes to remove any trace of
DEPC. DEPC will react with primary amines and cannot be used directly to treat Tris*,
buffers. DEPC is highly unstable in the presence of Tris buffers and decomposes rapidly into
ethanol and CO2. When preparing Tris buffers, use RNase-free water to dissolve Tris to
make the appropriate buffer.
* When working with chemicals, always wear a suitable lab coat, disposable gloves, and protective goggles. For more information, consult the appropriate safety data sheets (SDSs), available from the product supplier.

QIAamp 96 Virus QIAcube HT Handbook 08/2016 46
Ordering Information
Product Contents Cat. no.
QIAamp 96 Virus QIAcube HT Kit
For 480 preps: QIAamp plates, QIAGEN Proteinase K, Carrier RNA, Buffers
57731
QIAcube HT Plasticware For 480 preps: 5 S-Blocks, 5 EMTR RS, 2 x 50 Caps for EMTR, 9 x 96 Filter-Tips OnCor C, TapePad
950067
Elution Microtubes RS 24 x 96 Elution Microtubes, racks of 96; includes cap strips
120008
S-Blocks 24 x 96-well blocks with 2.2 ml wells 19585
Buffer ATL (200 ml) 200 ml Tissue Lysis Buffer for 1000 preps 19076
Buffer ASL 4 x 140 ml Stool Lysis Buffer 19082
TissueLyser
TissueLyser II Bead mill, 100-120/220-240 V, 50/60 Hz; requires the TissueLyser Adapter Set 2 x 24 or TissueLyser Adapter Set 2 x 96*
85300
TissueLyser Adapter Set 2 x 24
2 sets of adapter plates and 2 racks for use with 2 ml microcentrifuge tubes on the TissueLyser II
69982
TissueLyser Adapter Set 2 x 96
2 sets of adapter plates for use with Collection Microtubes (racked) on the TissueLyser II
69984
TissueLyser LT Compact bead mill, 100-240 V AC, 50–60 Hz; requires the TissueLyser LT Adapter, 12-Tube†
85600
* The TissueLyser II must be used in combination with the TissueLyser Adapter Set 2 x 24 or TissueLyser Adapter Set 2 x 96. † The TissueLyser LT must be used in combination with the TissueLyser LT Adapter, 12-Tube.

47 QIAamp 96 Virus QIAcube HT Handbook 08/2016
Product Contents Cat. no.
TissueLyser LT Adapter, 12-Tube
Adapter for disruption of up to 12 samples in 2 ml microcentrifuge tubes on the TissueLyser LT
69980
Pathogen Lysis Tubes L 50 Pathogen Lysis Tubes and 1 vial of Reagent DX
19092
Pathogen Lysis Tubes S 50 Pathogen Lysis Tubes and 1 vial of Reagent DX
19091
Stainless Steel Beads, 5 mm (200)
200 stainless steel beads (5 mm diameter), suitable for use with TissueLyser systems
69989
QIAcube HT instrument
QIAcube HT System Robotic workstation with UV lamp, HEPA filter, laptop, QIAcube HT operating software, start-up pack, installation and training, 1-year warranty on parts and labor
9001793
Accessories
Collection Microtubes (racked)
(10 x 96) nonsterile polypropylene tubes; 960 in racks of 96
19560
Collection Microtube Caps
For capping collection microtubes and round-well blocks; 960 in strips of 8
19566
For a complete list of accessories, visit www.qiagen.com/p/QIAcubeHT.
For up-to-date licensing information and product-specific disclaimers, see the respective QIAGEN kit handbook or user manual. QIAGEN kit handbooks and user manuals are available at www.qiagen.com or can be requested from QIAGEN Technical Services or your local distributor.

QIAamp 96 Virus QIAcube HT Handbook 08/2016 48
Quick-Start Protocol
This protocol is for use with QIAcube HT Prep Manager software. If you are using QIAcube
HT 4.17 software, download the corresponding protocol at www.qiagen.com/HB-1569.
Further information
QIAamp 96 Virus QIAcube HT Handbook: www.qiagen.com/HB-2160
Safety Data Sheets: www.qiagen.com/safety
Technical assistance: support.qiagen.com
Notes before starting
This protocol is for the purification of viral nucleic acids from fluid samples using the
QIAamp 96 Virus QIAcube HT Kit and QIAcube HT Prep Manager software.
See the kit handbook for information on handling various sample types.
Prepare Buffers ACB, AW1, AW2 and carrier RNA according to the instructions in the
QIAamp 96 Virus QIAcube HT Handbook.
Prepare a mixture of Buffer ACL, carrier RNA and internal control (if applicable)
immediately before starting the run according to Table 1.
1. Start the QIAcube HT Prep Manager software. Click on the Home icon in the main toolbar to access the Home screen.
2. Select QIAamp 96 Virus from the Create Experiment list. Follow the instructions in the wizard and fill in all required fields.
3. In the Setup step, select Sample type and Pre-treatment for documentation.
4. Select the protocol: QIAamp virus protocol (including lysis) or QIAamp virus off-board lysis protocol (without lysis). For information about optional steps and advanced options see the kit handbook.
5. Define samples in the Labware selection step.
49 QIAamp 96 Virus QIAcube HT Handbook 08/2016
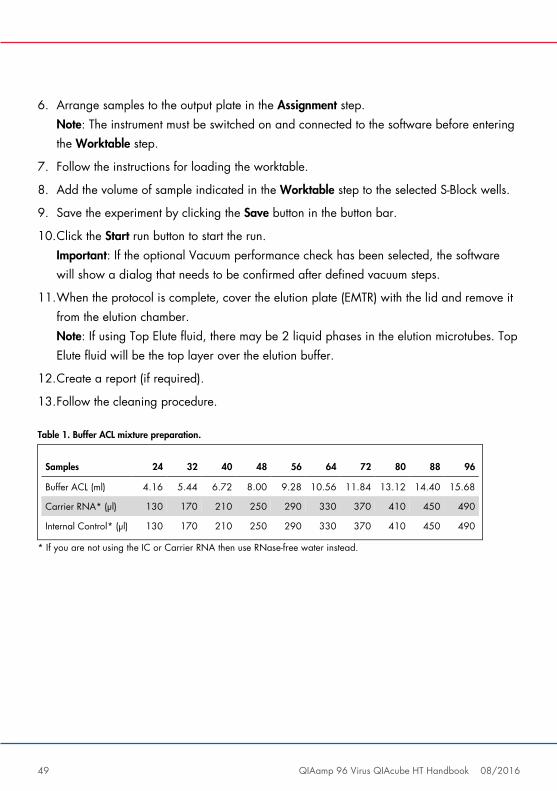
6. Arrange samples to the output plate in the Assignment step. Note: The instrument must be switched on and connected to the software before entering the Worktable step.
7. Follow the instructions for loading the worktable.
8. Add the volume of sample indicated in the Worktable step to the selected S-Block wells.
9. Save the experiment by clicking the Save button in the button bar.
10. Click the Start run button to start the run. Important: If the optional Vacuum performance check has been selected, the software will show a dialog that needs to be confirmed after defined vacuum steps.
11. When the protocol is complete, cover the elution plate (EMTR) with the lid and remove it from the elution chamber. Note: If using Top Elute fluid, there may be 2 liquid phases in the elution microtubes. Top Elute fluid will be the top layer over the elution buffer.
12. Create a report (if required).
13. Follow the cleaning procedure.
Table 1. Buffer ACL mixture preparation.
Samples 24 32 40 48 56 64 72 80 88 96
Buffer ACL (ml) 4.16 5.44 6.72 8.00 9.28 10.56 11.84 13.12 14.40 15.68
Carrier RNA* (µl) 130 170 210 250 290 330 370 410 450 490
Internal Control* (µl) 130 170 210 250 290 330 370 410 450 490
* If you are not using the IC or Carrier RNA then use RNase-free water instead.

QIAamp 96 Virus QIAcube HT Handbook 08/2016 50
Limited License Agreement for QIAamp 96 Virus QIAcube HT Kit
Use of this product signifies the agreement of any purchaser or user of the product to the following terms:
1. The product may be used solely in accordance with the protocols provided with the product and this handbook and for use with components contained in the kit only. QIAGEN grants no license under any of its intellectual property to use or incorporate the enclosed components of this kit with any components not included within this kit except as described in the protocols provided with the product, this handbook, and additional protocols available at www.qiagen.com. Some of these additional protocols have been provided by QIAGEN users for QIAGEN users. These protocols have not been thoroughly tested or optimized by QIAGEN. QIAGEN neither guarantees them nor warrants that they do not infringe the rights of third-parties.
2. Other than expressly stated licenses, QIAGEN makes no warranty that this kit and/or its use(s) do not infringe the rights of third-parties.
3. This kit and its components are licensed for one-time use and may not be reused, refurbished, or resold.
4. QIAGEN specifically disclaims any other licenses, expressed or implied other than those expressly stated.
5. The purchaser and user of the kit agree not to take or permit anyone else to take any steps that could lead to or facilitate any acts prohibited above. QIAGEN may enforce the prohibitions of this Limited License Agreement in any Court, and shall recover all its investigative and Court costs, including attorney fees, in any action to enforce this Limited License Agreement or any of its intellectual property rights relating to the kit and/or its components.
For updated license terms, see www.qiagen.com.
Trademarks: QIAGEN®, QIAamp®, QIAcube®, QIAxtractor®, Sample to Insight® (QIAGEN Group); DACRON® (Invista North America S.A.R.L. Corporation); PreservCyt® (Hologic, Inc.); Puritan® (Puritan Medical Products Company); SurePath® (Becton Dickinson and Company).
51 QIAamp 96 Virus QIAcube HT Handbook 08/2016
Notes

1103021 HB-2160-001 08/2016
www.qiagen.com