q jk spacer lift 16400 0x42 layout 1 - · pdf fileq_jk_spacer_lift_16400_0x42_layout 1 1/23/15...
TRANSCRIPT
The Trusted Source
®
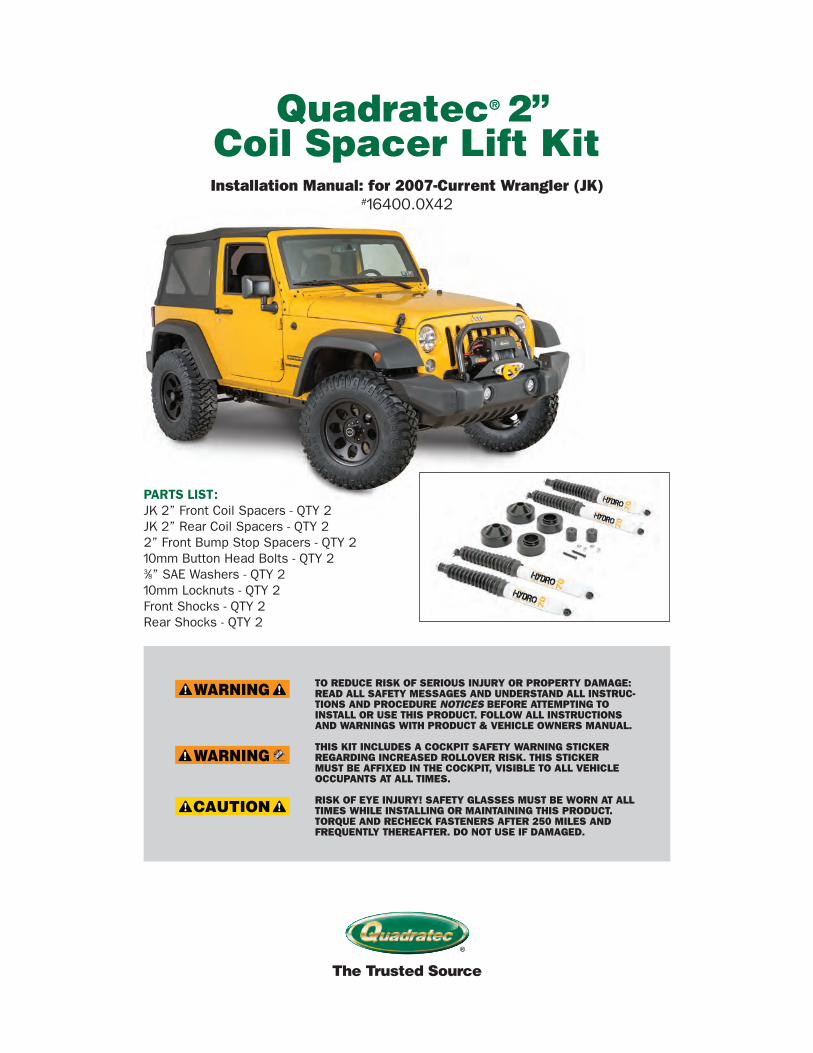
Quadratec® 2”Coil Spacer Lift Kit
TO REDUCE RISK OF SERIOUS INJURY OR PROPERTY DAMAGE:READ ALL SAFETY MESSAGES AND UNDERSTAND ALL INSTRUC-TIONS AND PROCEDURE NOTICES BEFORE ATTEMPTING TOINSTALL OR USE THIS PRODUCT. FOLLOW ALL INSTRUCTIONSAND WARNINGS WITH PRODUCT & VEHICLE OWNERS MANUAL.
THIS KIT INCLUDES A COCKPIT SAFETY WARNING STICKERREGARDING INCREASED ROLLOVER RISK. THIS STICKERMUST BE AFFIXED IN THE COCKPIT, VISIBLE TO ALL VEHICLEOCCUPANTS AT ALL TIMES.
RISK OF EYE INJURY! SAFETY GLASSES MUST BE WORN AT ALLTIMES WHILE INSTALLING OR MAINTAINING THIS PRODUCT.TORQUE AND RECHECK FASTENERS AFTER 250 MILES ANDFREQUENTLY THEREAFTER. DO NOT USE IF DAMAGED.
Installation Manual: for 2007-Current Wrangler (JK)#16400.0X42
PARTS LIST:JK 2” Front Coil Spacers - QTY 2JK 2” Rear Coil Spacers - QTY 22” Front Bump Stop Spacers - QTY 210mm Button Head Bolts - QTY 23⁄8” SAE Washers - QTY 210mm Locknuts - QTY 2Front Shocks - QTY 2Rear Shocks - QTY 2
Q_JK_SPACER_LIFT_16400_0X42_Layout 1 1/23/15 4:33 PM Page 1
01232015163444
INSTALLATION OF THIS PRODUCT ON YOUR JEEP® WILL MODIFY AND EN-HANCE ITS SUSPENSION AND OFF-ROAD PERFORMANCE. IT MAY HANDLEDIFFERENTLY THAN AS FACTORY-EQUIPPED INCLUDING; INCREASED RIDE-HEIGHT; REDUCED LATERAL STABILITY; AND HIGHER RISK OF ROLL-OVEROR OTHER ACCIDENT. ALSO, OWNER’S CHOICE OF LARGER TIRE/WHEELCOMBINATIONS MAY REQUIRE ADDITIONAL PEDAL PRESSURE OR IN-CREASED DISTANCE TO STOP; CAUSE SPEEDOMETER TO READ SLOW ANDMAY REDUCE VISIBILITY AROUND THE VEHICLE. CHOICE OF TIRE/WHEELCOMBINATIONS OTHER THAN AS TESTED OR RECOMMENDED MAYCOMPROMISE FMVSS 126 COMPATIBILITY.
FAMILIARIZE YOURSELF WITH VEHICLE HANDLING AND REVIEW ALL VEHI-CLE MANUFACTURERS AND QUADRATEC® WARNINGS, INSTRUCTIONS ANDLIMITED WARRANTIES BEFORE DRIVING A MODIFIED SUSPENSION JEEP®.FOLLOW ALL RECOMMENDED MAINTENANCE PROCEDURES AND ROUTINELYINSPECT YOUR VEHICLE COMPONENTS FOR UNUSUAL WEAR OR OFF-ROADDAMAGE.
DO NOT DRIVE UNDER ANY SPEED OR MANEUVERING CONDITIONS WHICHMAY CAUSE THE VEHICLE TO TRIP, ROLL, LOSE TRACTION OR COMPROMISEYOUR ABILITY TO SAFELY BRAKE IN AN EMERGENCY. QUADRATEC® DOESNOT RECOMMEND COMBINED USE OF SUSPENSION KITS, BODY LIFTS,OTHER LIFTING DEVICES OR COMPONENTS ALTERING THE INTENDED RIDE-HEIGHT OR FUNCTION OF ITS PRODUCTS. MANY STATES HAVE LAWS RE-STRICTING THE EXTENT OF VEHICLE MODIFICATIONS. OWNER/DRIVER ISRESPONSIBLE FOR MODIFICATIONS CONSISTENT WITH STATE LAWS ANDGOOD SENSE.
The Trusted Source
®
2
Before You Begin Installation: Congratulations on your purchase ofthe Quadratec 2” Coil Spacer Lift Kitfor 2007-Current JK Wrangler Vehicles.When unpacking, check to make sure all
parts are included and not damaged dueto shipping. If any part is missing orbroken, please call Customer Serviceat 800-745-6037 as soon as possible.
a hazardous situation which, if not avoided, could result in death orserious injury. You CAN be KILLED or SERIOUSLY HURT if you don’tfollow instructions.
a hazardous situation which, if not avoided, could result in minor ormoderate injury. You CAN be moderately HURT and also may sufferproperty damage if you don’t follow instructions.
Careful attention is required to this instruction or operation but doesgenerally not relate to personal injury. Damage to your Quadratec®
product or other property may result if you don’t follow instructions.
IMPORTANT PRODUCT SAFETY TIPS
A Few Words About Product Safety: Your Quadratec Suspension product isintended to enhance the utility andenjoyment of your off road capablevehicle. Before installation, pleasereview the following safety informationand installation recommendations.
Throughout these instructions impor-tant safety information is generallypreceded by one of three signal wordsindicating the relative risk of injury,property damage or adverse conse-quence. The signal words mean:
Q_JK_SPACER_LIFT_16400_0X42_Layout 1 1/23/15 4:33 PM Page 2
01232015163444
The Trusted Source
®
3
IMPORTANT PRODUCT SAFETY TIPS
QUADRATEC® RECOMMENDS PROFESSIONAL INSTALLATIONOF THIS PRODUCT.
PARK THE VEHICLE ON FLAT, LEVEL GROUND AND SET EMERGENCYBRAKE. ALWAYS SUPPORT FRAME RAILS USING JACK STANDS.
PARTS LIST:JK 2” Front Coil Spacers - QTY 2JK 2” Rear Coil Spacers - QTY 22” Front Bump Stop Spacers - QTY 210mm Button Head Bolts - QTY 23⁄8” SAE Washers - QTY 210mm Locknuts - QTY 2Front Shocks - QTY 2Rear Shocks - QTY 2 REQUIRED TOOLS: Safety Glasses
REQUIRED TOOLS: 25/64” Drill Bit & Hand Drill7/32” Hex Key Wrench10, 16, 18, 21 mm Sockets1/2” Socket1/2” Open End Wrench9/16” Open End Wrench5/8” Open End Wrench18mm Open End WrenchLocking Pliers (I.E. Vise Grips)Diagonal Wire Cutters
2” Coil Spacer Lift Kit Installation: Front
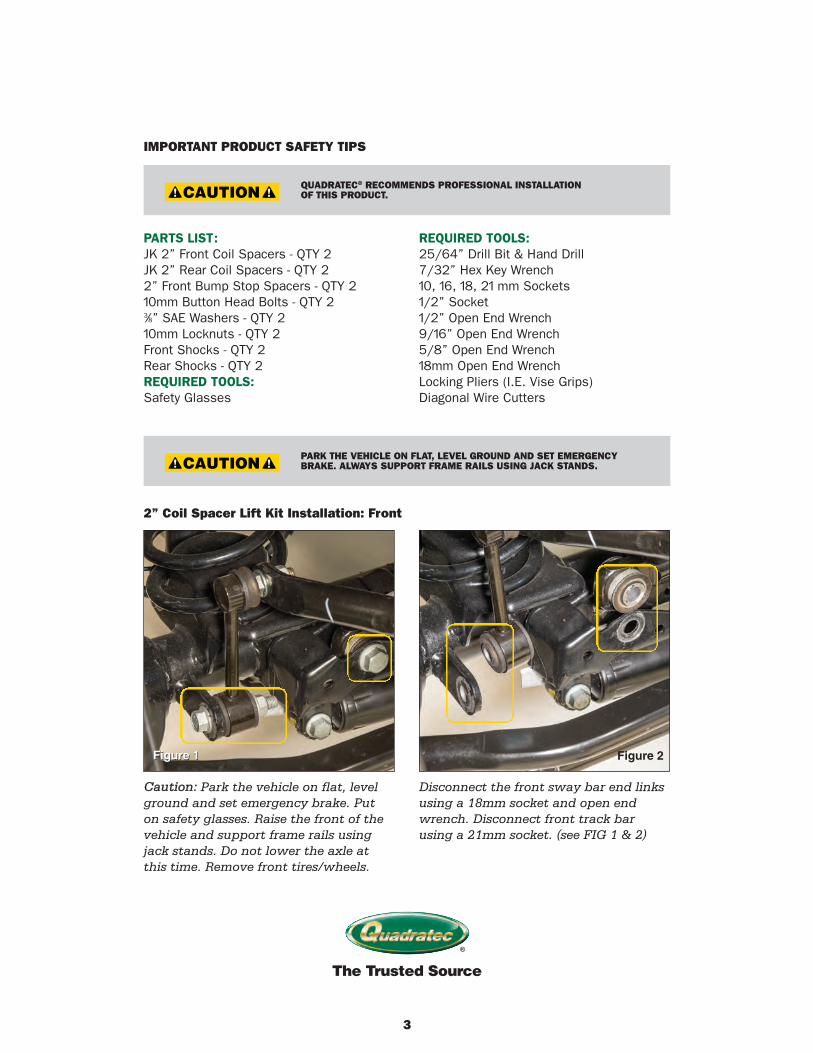
Caution: Park the vehicle on flat, levelground and set emergency brake. Puton safety glasses. Raise the front of thevehicle and support frame rails usingjack stands. Do not lower the axle atthis time. Remove front tires/wheels.
Disconnect the front sway bar end linksusing a 18mm socket and open endwrench. Disconnect front track barusing a 21mm socket. (see FIG 1 & 2)
Figure 1Figure 1 Figure 2
Q_JK_SPACER_LIFT_16400_0X42_QLIFT 2/27/15 11:21 AM Page 3
02272015112146
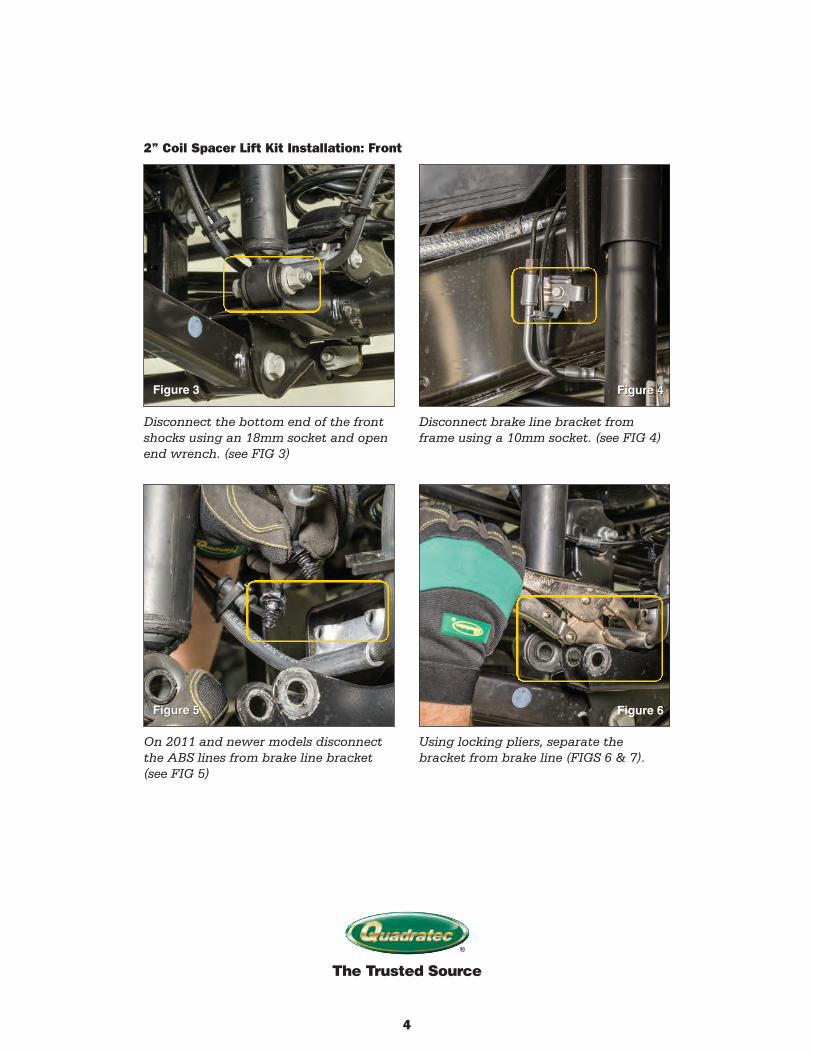
Disconnect the bottom end of the frontshocks using an 18mm socket and openend wrench. (see FIG 3)
Disconnect brake line bracket fromframe using a 10mm socket. (see FIG 4)
The Trusted Source
®
4
Figure 3 Figure 4
On 2011 and newer models disconnectthe ABS lines from brake line bracket(see FIG 5)
Using locking pliers, separate thebracket from brake line (FIGS 6 & 7).
Figure 5 Figure 6
Figure 4
Figure 5
2” Coil Spacer Lift Kit Installation: Front
Q_JK_SPACER_LIFT_16400_0X42_QLIFT 2/27/15 11:21 AM Page 4
02272015112202
The Trusted Source
®
5
2” Coil Spacer Lift Kit Installation: Front
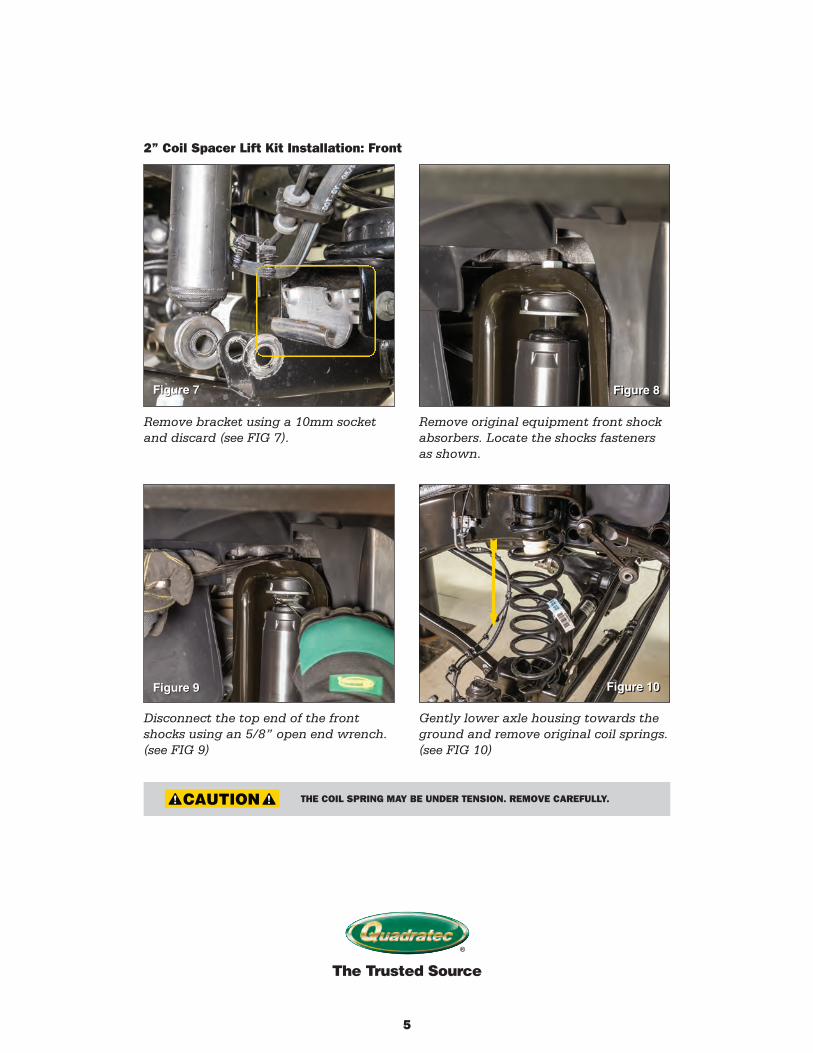
Remove bracket using a 10mm socketand discard (see FIG 7).
Remove original equipment front shockabsorbers. Locate the shocks fastenersas shown.
Figure 7Figure 7 Figure 8
Disconnect the top end of the frontshocks using an 5/8” open end wrench.(see FIG 9)
Gently lower axle housing towards theground and remove original coil springs.(see FIG 10)
THE COIL SPRING MAY BE UNDER TENSION. REMOVE CAREFULLY.
Figure 9Figure 9
Figure 8
Figure 10Figure 10
Q_JK_SPACER_LIFT_16400_0X42_QLIFT 2/27/15 11:21 AM Page 5
02272015112202
The Trusted Source
®
6
2” Coil Spacer Lift Kit Installation: Front
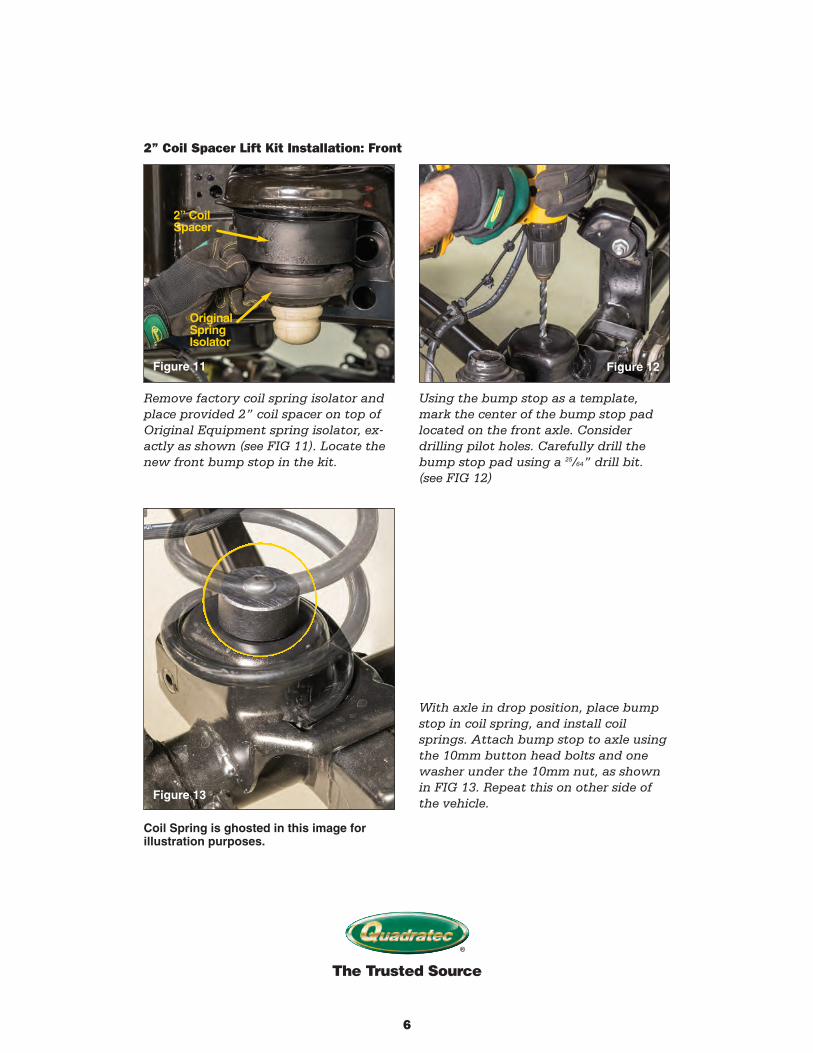
Remove factory coil spring isolator andplace provided 2” coil spacer on top ofOriginal Equipment spring isolator, ex-actly as shown (see FIG 11). Locate thenew front bump stop in the kit.
Using the bump stop as a template,mark the center of the bump stop padlocated on the front axle. Considerdrilling pilot holes. Carefully drill thebump stop pad using a 25/64” drill bit.(see FIG 12)
Figure 11
2” CoilSpacer
OriginalSpringIsolator
Figure 12
With axle in drop position, place bumpstop in coil spring, and install coilsprings. Attach bump stop to axle usingthe 10mm button head bolts and onewasher under the 10mm nut, as shownin FIG 13. Repeat this on other side ofthe vehicle.
Coil Spring is ghosted in this image forillustration purposes.
Figure 13
Q_JK_SPACER_LIFT_16400_0X42_Layout 1 1/26/15 9:55 AM Page 6
01262015095627

Press in the bottom end bushings asshown (see FIG 17).
Install the top end of the new frontshocks using a 9/16” open end wrench.
Finally, raise the axle using a floor jackso the full weight of vehicle is on thecoil springs with newly installed coilspacers.
Re-attach sway bar end links to the axlehousing using factory hardware andtorque to 60 ft lbs. Using factory hard-ware, re-attach bottom end of shockand torque to 56 ft lbs. Installwheels/tires and torque to 105 ft lbs.
Finally, remove jack stands and lowervehicle onto the ground. Re-attach trackbar using factory hardware and torqueto 111 ft lbs.
This completes the installation work onthe front end of the vehicle.
Assemble your new front shocks asshown in FIG 15, 16 &17. Install theshock boots and secure with zip-ties.Clip off zip-tie tail.
Assemble the shock top bushingsexactly as shown (see FIG 16).
7
2” Coil Spacer Lift Kit Installation: Front
The Trusted Source
®
Figure 15
Figure 17
Figure 16
Q_JK_SPACER_LIFT_16400_0X42_Layout 1 1/26/15 10:51 AM Page 7
01262015105209
The Trusted Source
®
8
ALWAYS SUPPORT FRAME RAILS USING JACK STANDS.
2” Coil Spacer Lift Kit Installation: Rear
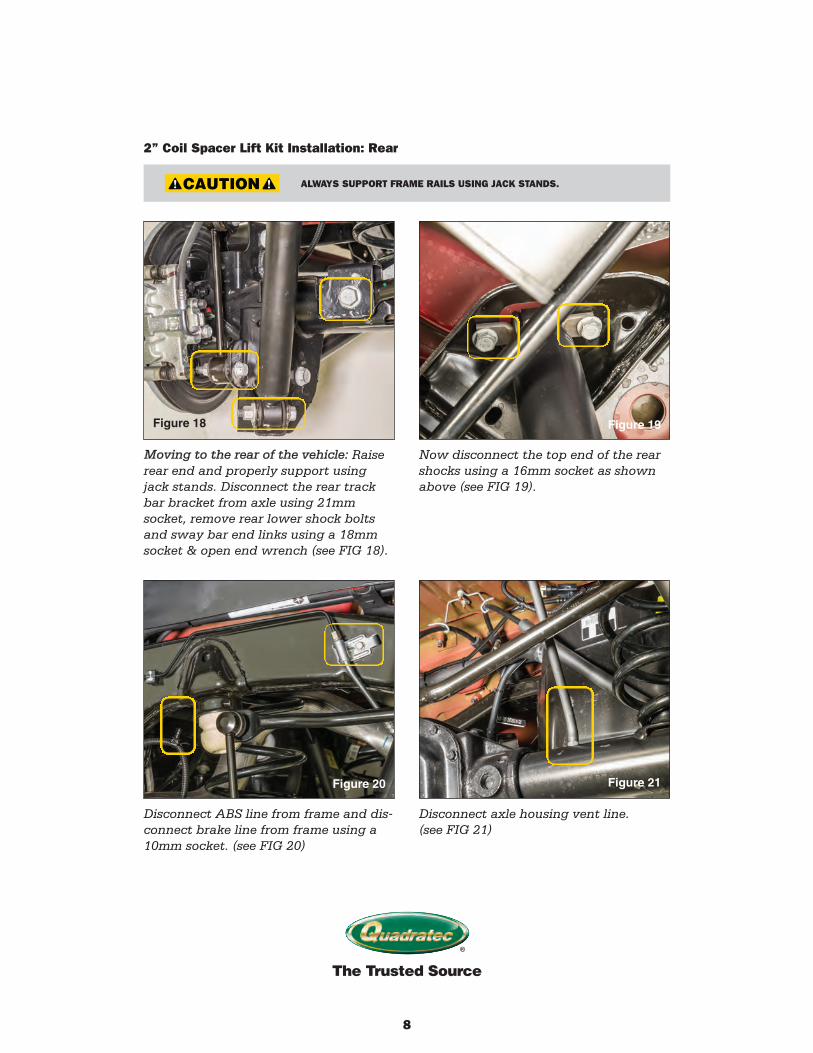
Moving to the rear of the vehicle: Raiserear end and properly support usingjack stands. Disconnect the rear trackbar bracket from axle using 21mmsocket, remove rear lower shock boltsand sway bar end links using a 18mmsocket & open end wrench (see FIG 18).
Now disconnect the top end of the rearshocks using a 16mm socket as shownabove (see FIG 19).
Disconnect ABS line from frame and dis-connect brake line from frame using a10mm socket. (see FIG 20)
Disconnect axle housing vent line. (see FIG 21)
Figure 18
Figure 20
Figure 19
Figure 21
Q_JK_SPACER_LIFT_16400_0X42_QLIFT 2/27/15 11:21 AM Page 8
02272015112203

The Trusted Source
®
9
2” Coil Spacer Lift Kit Installation: Rear
Lower axle down and remove factoryrear coil springs. Install new 2” coilspacer on top of the original equipmentspring isolator (see FIG 22).Repeat on other side of vehicle.
See next page spread for rear shockassembly and final installation steps.
Figure 22Figure 22
2” CoilSpacer
OriginalSpringIsolator
INSTALL 2” COIL SPACERSAND ORIGINAL EQUIPMENT
SPRING ISOLATORSEXACTLY AS SHOWN.
Q_JK_SPACER_LIFT_16400_0X42_Layout 1 1/23/15 4:33 PM Page 9
01232015163447

Assemble your new rear shocks asshown in FIG 23, 24 & 25. Install theshock boots and secure with zip-ties.Clip off zip-tie tail. (see FIG 23).
Assemble the shock bottom bushingsexactly as shown (see FIG 24).
The Trusted Source
®
10
2” Coil Spacer Lift Kit Installation: Rear
Push the mounting plate with bushingthrough the top eyelet of the rear shocks(see FIG 25).
Install the top end of the new rearshocks using a 16mm socket.
Finally, raise the axle using a floor jackso the full weight of vehicle is on thecoil springs with newly installed coilspacers.
Re-attach brake line bracket to frame.Re-attach rear sway bar end links to theaxle housing using factory hardwareand torque to 60 ft lbs. Using factoryhardware, re-attach bottom end ofshocks and torque to 56 ft lbs. Installwheels/tires and torque to 105 ft lbs.
Finally, remove jack stands and lowervehicle onto the ground. Re-attach trackbar using factory hardware and torqueto 111 ft lbs. This completes the installa-tion work on the rear end of the vehicle.
Figure 23
Figure 25
Figure 24
Q_JK_SPACER_LIFT_16400_0X42_Layout 1 1/26/15 10:51 AM Page 10
01262015105209

The Trusted Source
®
11
COMPLETE INSTALLATION BY CAREFULLY INSPECTING ANDCONFIRMING CLEARANCE OF CHOSEN TIRE/WHEELS THROUGHFULL STEERING SWEEP AND SUSPENSION TRAVEL. ASSUREBRAKE LINES CLEAR AND NOT RUBBING AGAINST ANY SUR-FACE, ABS FITTING AND OTHER FASTENERS SECURED. CHECKSPEEDOMETER READINGS AND IF NECESSARY RECALIBRATE.HAVE ALIGNMENT SETTINGS CHECKED AND IF INDICATED,RE-ALIGN AT SHOP WITH EQUIPMENT SUITED FOR MODIFIEDSUSPENSION JEEP VEHICLES.
INSTALL COCKPIT WARNING STICKER ON VISOR OR OTHERLOCATION VISIBLE TO ALL DRIVERS.
2” Coil Spacer Lift Kit Installation: Rear
Install cockpit warning sticker on visoror other location visible to all driversand occupants.
Q_JK_SPACER_LIFT_16400_0X42_Layout 1 1/26/15 10:50 AM Page 11
01262015105038

The Trusted Source
®
Quadratec® ExclusiveLimited Lifetime Warranty
Your Quadratec® branded accessories arecovered by the following Limited Warrantyprovided exclusively by Quadratec, Inc.,1028 Saunders Lane, West Chester PA 19380.
This Limited Warranty is the only warranty madein connection with your purchase. Quadratecneither assumes nor authorizes any vendor, re-tailer or other person or entity to assume for it anyother obligation or liability in connection with thisproduct or Limited Warranty. This Limited War-ranty does not apply and is not cumulative toany accessory or part distributed by Quadratecfor which the Manufacturer provides a separatewritten warranty.
What is Covered: Subject to the terms, exclusionsand limitations herein and with respect only toQuadratec branded accessories first sold in theUnited States, Quadratec warrants to the initialretail purchaser only that your Quadratec acces-sory shall be free of defects in material and work-manship: for as long as the original purchaserowns the vehicle. The Warranty on bushings andother serviceable wear items (including shockabsorbers) is limited to 1 year from date of retailpurchase. This Limited Warranty is not assignableand shall terminate upon sale of the vehicle uponwhich the Quadratec accessory is installed orother transfer third persons.
All other warranties are hereby disclaimed, exceptto the extent prohibited by applicable law inwhich case any implied warranty of merchantabil-ity or fitness for a particular purpose on thislimited to for as long as the original purchaserowns the vehicle. Quadratec reserves the rights to:(a.) require invoice or other proof your accessoryis within the terms of this Limited Warranty asa condition of warranty service and, (b.) makefuture revisions to this product and LimitedWarranty without prior notice or obligationto upgrade your product.
What is Not Covered:Your Quadratec Limited Warranty does not coverproducts or parts Quadratec determines to havebeen damaged by or subjected to: (a.) installationdamage, alteration, modification, combinationwith other parts, failure to maintain or improperrepair or service, (b.) defects or use whichpre-dates installation of Quadratec® accessory
or suspension kit by authorized dealer or shop,(c.) normal wear & tear or gradual reduction inexpected performance of vehicle or components,(d.) emissions control or electronic stability sys-tems or components, (e.) cosmetic damage ordamage from moisture or water immersion,(f.) fleet, rental or commercial use, (g.) Acts ofGod, accidents, misuse, negligence, inadequatemounting or impact with vehicle(s), obstaclesor other aspects of the environment, (h.) theft,vandalism or other intentional damage.(i.) use in competition or racing.
Other Exclusions: Surface finish of exposedsuspension components is not covered underthis Limited Warranty.
Remedy Limited to Repair/Replacement:The exclusive remedy provided hereunder shall,upon Quadratec inspection and at Quadratec’soption, be either repair or replacement of productor parts (new or refurbished) covered under thisLimited Warranty. Customers requesting warrantyconsideration should first contact Quadratec toobtain a RGA number (610-701-3336). All labor,removal, shipping and installation costs arecustomer’s responsibility.
Other Limitations - Exclusion of Damages- Your Rights Under State Law:In consideration of the purchase price paid,neither Quadratec nor any independent Quadratec distributor/licensee are responsible for any timeloss, rental costs, or for any incidental, consequen-tial, punitive or other damages you may have orincur in connection with any part or productpurchased. Your exclusive remedy hereunder forcovered parts is repair/replacement as describedabove.
This Limited Warranty gives you specific rights.You may also have other rights that vary fromstate to state. For example, some states do notallow limitations of how long an implied warrantylasts and /or do not allow the exclusion or limita-tion of incidental or consequential damages, sothe limitations and exclusions herein may notapply to you.
©Quadratec, Inc. 2015. All Rights Reserved.1.23.15 LTR Version Part #12999.9031
Q_JK_SPACER_LIFT_16400_0X42_Layout 1 1/23/15 4:33 PM Page 12
01232015163449