publications with publisher - · pdf filechapter five: publications with publisher 3 oma241...
TRANSCRIPT

CHAPTER FIVE: PUBLICATIONS WITH PUBLISHER 1
OMA241–INTEGRATEDOFFICEAPPLICATIONS|
TOPIC
CustomizeTemplates
TextBoxesandPicturePlaceholders
BasicTaskinPublisher
Chapter
PUBLICATIONS WITH PUBLISHER

CHAPTER FIVE: PUBLICATIONS WITH PUBLISHER 2
OMA241–INTEGRATEDOFFICEAPPLICATIONS|
Microsoft Publisher 2010 helps you create professional‐looking publications quickly and
easily. With Publisher, you can create, design, and publish professional marketing and
communication materials for print, and for mail or e‐mail merges
OpeningScreen
PublisherWorkspace
LESSON 1 CREATEPUBLICATIONS
USINGTEMPLATES
File tab
Page Navigation Pane
Publication in the work area
Popular publication types

CHAPTER FIVE: PUBLICATIONS WITH PUBLISHER 3
OMA241–INTEGRATEDOFFICEAPPLICATIONS|
Find and Apply a Template
1) OnFiletabclickNew
2) UnderAVAILABLETEMPLATES/BUILT‐IN,dooneofthefollowing:
a. Touseatemplatethatyoualreadyhaveinstalled,clickMyTemplatesclickthetemplatethatyouwantclickCreate.
b. Touseoneofthepre‐builttemplatesinstalledinPublisher,underMostPopularorMoreTemplates,clickcategorythatyouwantclickthetemplatethatyouwantclickCreate.
c. TofindandapplyatemplateonOffice.com,underMostPopularorMoreTemplatesclickthecategorythatyouwantclickthetemplatethatyouwantclickDownload.
Create a new publication Using Template
1) OnFiletabclickNew
2) UnderAvailableTemplates,clickthetemplate
youwant(Brochure,Newsletter,BusinessCard
,etc)APREVIEWofthepublicationdisplaysin
therightpane.
3) Tochangethecolorscheme
4) Tochangethefontscheme
5) Tocreatebusinessinformation
Typetheinformation,
AddLogo
TypetheBusiness
Informationsetname
ClickSave
2) ClickCreateClickSave.
CHAPTER FIVE: PUBLICATIONS WITH PUBLISHER 4
OMA241–INTEGRATEDOFFICEAPPLICATIONS|
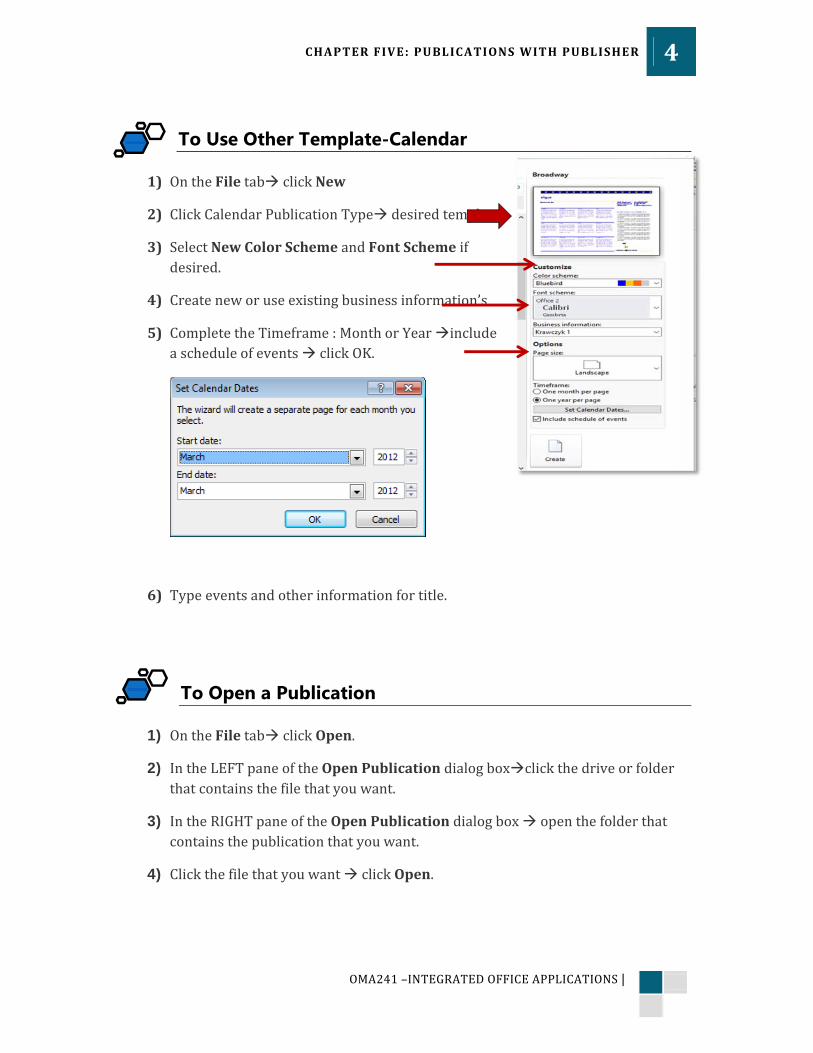
To Use Other Template-Calendar
1) OntheFiletabclickNew
2) ClickCalendarPublicationTypedesiredtemplate
3) SelectNewColorSchemeandFontSchemeifdesired.
4) Createneworuseexistingbusinessinformation’s
5) CompletetheTimeframe:MonthorYearincludeascheduleofeventsclickOK.
6) Typeeventsandotherinformationfortitle.
To Open a Publication
1) OntheFiletabclickOpen.
2) IntheLEFTpaneoftheOpenPublicationdialogboxclickthedriveorfolderthatcontainsthefilethatyouwant.
3) IntheRIGHTpaneoftheOpenPublicationdialogboxopenthefolderthatcontainsthepublicationthatyouwant.
4) ClickthefilethatyouwantclickOpen.

CHAPTER FIVE: PUBLICATIONS WITH PUBLISHER 5
OMA241–INTEGRATEDOFFICEAPPLICATIONS|
To Print your Publication
1) OntheFiletabclickPrint.
2) InthePrintsectionenterthenumberofcopiestoprintinCopiesofprintjobbox.
3) InthePrintersection,makesurethatthecorrectprinterisselected.
4) IntheSettingssection,dothefollowing:o Makesurethatthecorrectrangeofpagesorsectionsisselected.o Selecttheformatforimposingyourpagesonthesheet.o Setthepapersize.o Setwhethertoprintononesideofthesheetorpaperorboth.o Ifyourprinteriscapableofcolorprinting,chooseifyouwanttoprint
colororgrayscale.
5) ClickthePrintbuttonwhenyouarereadytoprint.

CHAPTER FIVE: PUBLICATIONS WITH PUBLISHER 6
OMA241–INTEGRATEDOFFICEAPPLICATIONS|
ActivityPb1‐1:CreateBusinessCard
a) Click the Business Cards publication type Arrows template.
b) Select the Bluebird color scheme.
c) Create new business information; key the information shown
below. Add the krawczyk logo from you resource file.
d) Name the business information Krawczyk 1; then click Create.
Name: Lynn C. Blackmon
Title: Director, Marketing
Organization: Krawczyk, Inc.
Address: 1620 Tanglewood Road | Columbia, SC 29204‐3325
Phone: 803‐555‐0159
Fax: 803‐555‐0161
E‐mail: [email protected]
e) Check the card that displays. Preview the sheet of cards
f) Use Save As (File/Save As) to save the publication as
Pb1‐Activity1 in your Chapter5 folder.
ActivityPb1‐2:CreateACalendar a) Create a Calendar Borders template and the Krawczyk 1 business information.
b) Select color scheme Bluebird and font scheme Office 2.
c) In the Options, select One year per page, use the current year to set the calendar datescheck Include schedule of events Click Create.
d) Select the event column text and type the events shown below.
• January 16, 9:30 a.m. to 11:30 a.m. Marketing Conference Room.
• March 16, 2:15 p.m. to 4:45 p.m. (tentative) Meeting will be at the Krawczyk Annual
Retreat in Bluffton. Note the time and meeting room will be
listed on the final retreat schedule.
• June 18, 9:30 a.m. to 11:30 a.m. Marketing Conference
Room.
• September 17, 9:30 a.m. to 4:30 p.m. Joint meeting with the
six Krawczyk Division Committees. Agenda will focus on
review of the current year and planning for next year.
e) Add Marketing Committee Schedule to the year as the main title.
f) Select event text and increase font size to 10 point. Do not hyphenate.
g) Preview and print. Save as Pb1‐Activity2 in your Chapter5 folder.
CLASSACTIVITY

CHAPTER FIVE: PUBLICATIONS WITH PUBLISHER 7
OMA241–INTEGRATEDOFFICEAPPLICATIONS|
Publication1–MakeaBusinessCard
1) Prepare business cards yourself using the Accent Box
template.
2) Create new business information using your school
name as the organization, your name and student as
your title.
3) Use the school address (P.O. Box 32038) , telephone (+973 17449999), and fax
number. (+973 174423232) . Save the business information with your name.
4) Click Remove on the Business Information Set dialog box to clear the previous logo.
5) Select and copy the Contrasting Triangles accent next to the school name and paste
it below your name and title. Size it about .5” x .5”. Use the e‐mail address
6) Use the Burgundy color scheme and the basic font scheme.
7) Page size landscape.
8) Save as Pb1‐Businesscard‐name and close.
Publication2–MakeaCalendar
1) Create a 1‐page calendar for the current year with
schedule of events.
2) Select the Accent Box template.
3) Use the same business information’s, color scheme, and
font scheme you used in the Publication1.
4) Paste the Contrasting Triangles object from the top of the
calendar center below the calendar. Delete the business tag line.
5) Key the items indicated below in the schedule of events section.
6) Save as Pb2‐Calendar‐name and close.
Let’sApplyIt.
BeginningdateofthenextsemesterAllHolidaysduringthesemesterBeginningandendingdatesoftheFinalExaminations
(refertotheUniversitywebsiteforthedates)
CHAPTER FIVE: PUBLICATIONS WITH PUBLISHER 8
OMA241–INTEGRATEDOFFICEAPPLICATIONS|
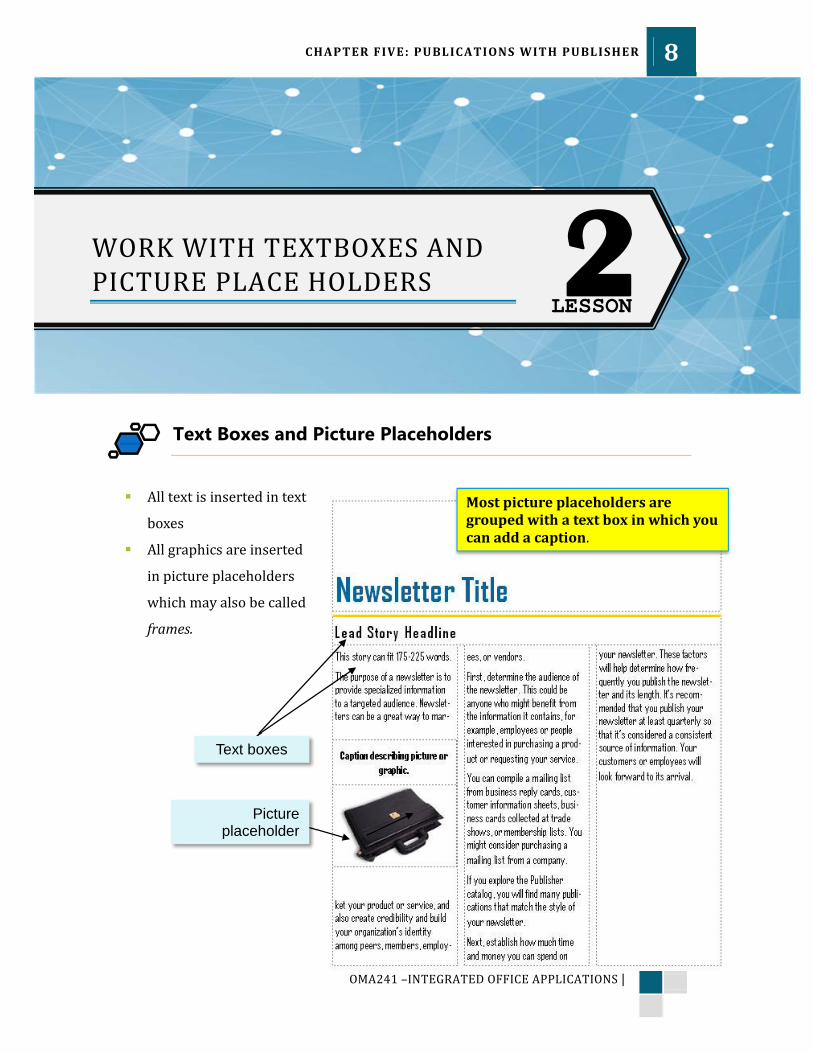
Text Boxes and Picture Placeholders
Alltextisinsertedintext
boxes
Allgraphicsareinserted
inpictureplaceholders
whichmayalsobecalled
frames.
Text boxes
Picture placeholder
Mostpictureplaceholdersaregroupedwithatextboxinwhichyoucanaddacaption.
LESSON 2 WORKWITHTEXTBOXESAND
PICTUREPLACEHOLDERS
CHAPTER FIVE: PUBLICATIONS WITH PUBLISHER 9
OMA241–INTEGRATEDOFFICEAPPLICATIONS|
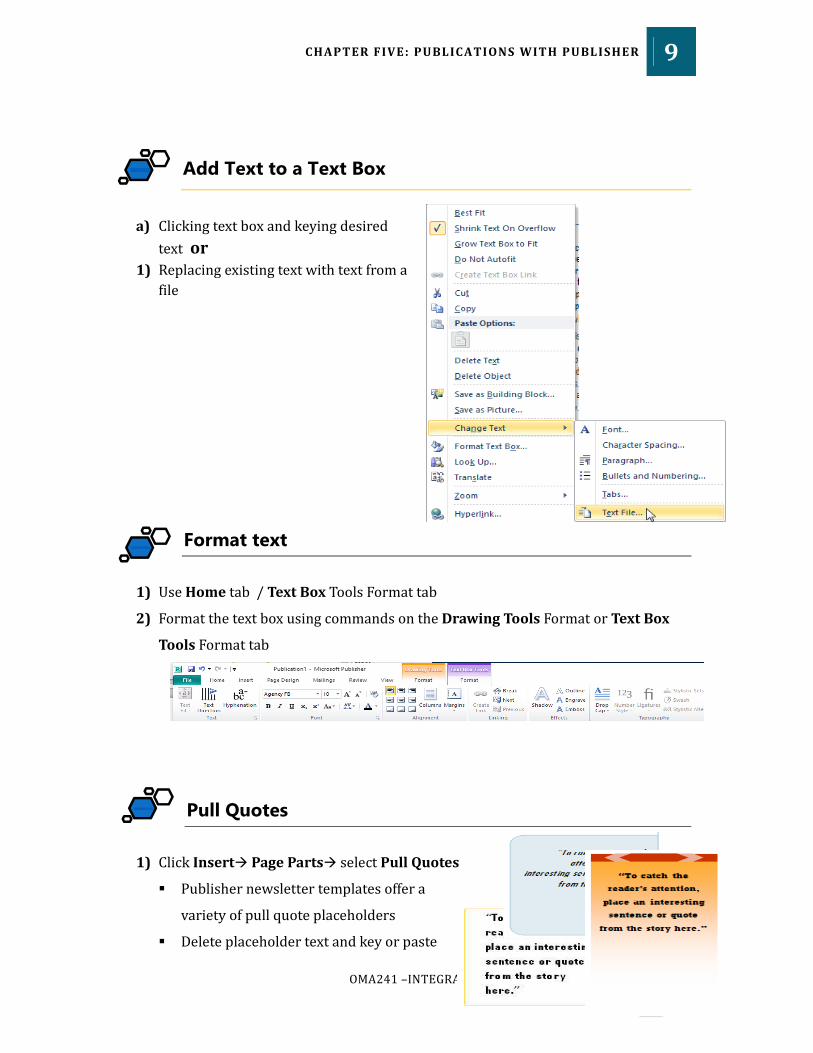
Add Text to a Text Box
a) Clickingtextboxandkeyingdesired
textor1) Replacingexistingtextwithtextfroma
file
Format text
1) UseHometab/TextBoxToolsFormattab
2) FormatthetextboxusingcommandsontheDrawingToolsFormatorTextBox
ToolsFormattab
Pull Quotes
1) ClickInsertPagePartsselectPullQuotes
Publishernewslettertemplatesoffera
varietyofpullquoteplaceholders
Deleteplaceholdertextandkeyorpaste

CHAPTER FIVE: PUBLICATIONS WITH PUBLISHER 10
OMA241–INTEGRATEDOFFICEAPPLICATIONS|
desiredtextintextbox
Connect Text Boxes
1) Linktextboxestoflowstoryfromcolumntocolumn
LinkedtextboxesdisplayGotoNextandGotoPreviousicons
TextinOverflowicondisplayswhenalltextwillnotfitintextbox
NOTE:Textboxeswithoverflowtextdisplayredsizinghandles
2) Todisplayoverflowtext,enlargethetextboxorcreatealinktoanothertextbox
a) ClickCreateLinkbutton
b) “Pour”theoverflowtextintoanemptytextbox
3) Acontinuednoticeguidesthereadertothenextorpreviouspartofastory Select the text boxright-clickFormat
Text Box
UseFormatTextBoxdialogboxtochoose“Continuedon”or“Continuedfrom”
Adjustsizeofnoticeifdesired
Go to Previous icon Text in Overflow icon
Create Link button
Theoverflowtextwillautomaticallyfillthetextboxandflowintoanyothertextboxeslinkedtoit.

CHAPTER FIVE: PUBLICATIONS WITH PUBLISHER 11
OMA241–INTEGRATEDOFFICEAPPLICATIONS|
Insert or Change Pictures
1) ClickInsertPicture,toinsertapicturefromafile
Intemplates,picturesareoftengroupedwithcaptions
UsetheUngroupcommandtoungrouppictureandcaption
o Afterungrouping,clickoutsidetodeselectbothobjects
UsetheChangePicturecommandtoreplaceapicture
Insertapictureplaceholdertoinsertaplaceholderanywhereonapage
Gray handles indicate picture is grouped with
caption
Ungroup to work with each object separately

CHAPTER FIVE: PUBLICATIONS WITH PUBLISHER 12
OMA241–INTEGRATEDOFFICEAPPLICATIONS|
ActivityPb2‐1:CreateNewsletter–EnterandFormatText
a) Create Newsletter. [FileNewMost Popular
TemplateNewsletterselect Arrows template]
b) Use the Bluebird color scheme, Office2 font scheme, and the Krawczyk 1 business
information. Select the One‐page spread page size
c) Type in the Newsletter title “Health and Fitness”; apply Title style; format the title box
using Accent 1 (blue) and change text color to
White.
d) Type in the Newsletter date “January 15, 2015” and increase font size to 12 point.
Increase the size of Krawczyk, Inc to 16 point.
e) Type in the Lead Story Headline “Krawczyk Partners with Pat’s Wellness Center”. Increase
the font size as large as it will fit on one line.
f) Right‐click on the first story text box, click
Change Text, click Text File and insert the
Partnership.docx resource file from Chapter 5
folder.
g) Save it as Pb2‐Activity1.
ActivityPb2‐2:Newsletter–ConnectTextBoxesandAddPictures
a) Open the Pb2‐Activity1 and save it as Pb2‐Activity2.
b) Select all the text in the lead story that you inserted, and increase the font size to 9 point.
c) Click the picture and caption group in the third column of the lead story and delete it.
Use the keyword fitness to search for the clip art and insert in that column. Size the
clip about 1.7”wide.
CLASSACTIVITY

CHAPTER FIVE: PUBLICATIONS WITH PUBLISHER 13
OMA241–INTEGRATEDOFFICEAPPLICATIONS|
d) Insert a picture placeholder below the newsletter date; size it about .75” wide and center it below the date. Insert the kraczyk logo from the resource file in the
placeholder.
e) Connect the text box with the clip art to the first text box of the center inside story on page 2.
f) Add a “continued on” notice below the text in the third column on page 1. Change the
font size at the continued line to 9 point.
g) Add a “continued from” notice at the beginning of the story on page 2. Change the
font size at the continued line to 9 point.
h) Type the Inside Story headline “Partnership” on page 2, increase the font size to 20 point.
i) On page 2, select the sentence “ A complete fitness and risk management will be
available to all employees at the company expense.” Copy the sentence and paste it
in the pull quote box in the left margin. Use a 10‐point font in the pull quote box.
j) Format the second and third page headers using Calibri 12‐point font.
k) Use Print Preview to check your work.
l) Resave your work as Pb2‐Activity2.

CHAPTER FIVE: PUBLICATIONS WITH PUBLISHER 14
OMA241–INTEGRATEDOFFICEAPPLICATIONS|
Publication3–MakeaNewsletter
1) Open Pb2‐Activity2 and save it as Pb3‐Newsletter‐Name.
2) Use the instructions below to complete the four‐page newsletter you worked on
Pb2‐Activity1 and Pb2‐Activity2.
3) Use 20‐point Calibri font for all story headlines and 9‐point Cambria font for the
body text and continued lines.
4) Preview, proofread, check spelling and print.
5) Resave as Pb3‐Newsletter‐Name. and close.
PAGE 1
a) Delete the Special Points of Interest placeholder.
b) Insert the file healthy lifestyle.docx in the placeholder at the bottom of page 1.
Cancel autoflow when the warning appears.
c) Key and format appropriately the headline A Healthy‐Lifestyle Approach.
d) Apply 11‐point Calibri font to the heading Inside this issue; format the stories listed
using 7‐point Cambria font. List the headline stories; delete unused text.
Let’sApplyIt.
HealthyEatingWorks‐ FadDietsDoNot! 2
Assessment–TheFirstStep 2
FitnessTraining 3
EmployeeEnhancementTaskForce 4
WhyPlaceEmphasisonHealthandFitness 4

CHAPTER FIVE: PUBLICATIONS WITH PUBLISHER 15
OMA241–INTEGRATEDOFFICEAPPLICATIONS|
PAGE 2 and STORIES CONTINUED ON PAGE 3
a) Key the following sentence to complete the last paragraph of the partnership article
on page 2:
The cost will be approximately $30 per person for the complete assessment.
b) Delete the picture and insert the file assessment. docx in the placeholder at the
bottom of page 2.
c) Key the headline Assessment‐ The first Step.
d) Connect the third column at the bottom of the page 2 to the center story on page 3.
Key and format appropriately the headline Assessment on page 3.
e) Copy the last sentence in the first column of page 3 (beginning with Exercise
increases the calories you burn ….) and paste it in then pull quote placeholder. Use
the 9‐poitn font.
f) Enlarge the picture placeholder in the top story on page 2 by dragging it to the right
border of the second column. Select the picture and ungroup it. Then delete the
caption placeholder.
g) Right‐click the picture, select Change Picture and insert the picture food pyramid in
the placeholder. Use the Picture Tools Format Crop Fit to fit the picture in the
placeholder, and then change the size of the image to 2.4” wide and 2.2” high.
Adjust the position if necessary.
h) Insert the file healthy eating.docx in the placeholder at the top of the page. This file will not fit in the placeholder; click Cancel to the query about autoflowing text.
i) Key the headline Healthy Eating Works‐ Fad Diets Do Not!
j) Delete the picture placeholder in the story on the bottom of page 3. You will need
that space for the continued text.
k) Click at the bottom of the first article on page 2 and connect it to the text box at the
bottom of the page3.
l) Add the “continued on” and “continued from” notices for the article, and key the
headline Healthy Eating on page 3.

CHAPTER FIVE: PUBLICATIONS WITH PUBLISHER 16
OMA241–INTEGRATEDOFFICEAPPLICATIONS|
PAGE 3
a) Key and format appropriately the headline Fitness Training for the first story on
page 3.
b) Delete the object in the text area of the story. You will add clip art
c) Key the following story:
d) Use the following keywords and insert a small clip illustrating each type of exercise
as shown in below, Cardiovascular – exercise bicycle, Strength – exercise; and
Flexibility – stretching.
e) Make sure the story fits on page 3 with no text overflow. If you have text overflow,
adjust the size and position of the clipart to fit on the space available.
Ourfitnesstrainingisdesignedfortheaverageindividualwhowishestobecomemorephysicallyfit–notfortheaspiringathlete.Ifact,thirtyminutesofmoderateexercisefivedaysaweekcanimproveyourfitnesssignificantly.Employeescanchoosetofollowanindividuallytailoredtrainingprogrambasedontheassessmentresultsortousethestate‐of‐the‐artequipmentandself‐directtheirworkouts.Thetrainingprogramfocusesoncardiovascularexercise,strengthtraining,andflexibility.
Cardiovascular(aerobic)exerciseincreasesyourheartrateandtheefficiencyofyourheart,lungsandblood.Walking,jogging,cycling,swimming,dancing,andusingtreadmillsandellipticalequipmentareexamplesofgoodaerobicexercise.
Strength(resistance)trainingbuildsmuscularstrength.Allmajormusclesandespeciallythecoremusclesareincluded.Weightresistanceequipment,freeweights,balls,bands,andothertoolsareused.
Flexibility(stretching)enablesjointstomovefreelyandhelpstopreventinjury.
Page1 Page2 Page3

CHAPTER FIVE: PUBLICATIONS WITH PUBLISHER 17
OMA241–INTEGRATEDOFFICEAPPLICATIONS|
Customize Color Scheme 1) ClickPageDesignColorSchemesCreateNew
ColorSchemes Customizecolorsby:
o Selectingadifferentcolorscheme‐or‐
o Creatinganewcolorscheme
Fornewcolors,choosefromstandard,custom(RGB,HSL,
CMYK),orPANTONE®colors
Customize Font Scheme
1) ClickPageDesignFontsCreateNewFontScheme
Customizefontsby: o Selectingadifferentfontscheme‐or‐
o Creatinganewfontscheme
Selectheadingandbodyfontandsaveschemewithaname
LESSON 3 CUSTOMIZETEMPLATES
Whencreatinganewfontscheme,makesurethefontsyouchoosesuitthepurposeofyourpublication.

CHAPTER FIVE: PUBLICATIONS WITH PUBLISHER 18
OMA241–INTEGRATEDOFFICEAPPLICATIONS|
Use the Building Block Library
1) ClickInsertBuildingBlockstoaccessbuildingblockcategories
TheBuildingBlockLibrarycontainspageparts,calendars,borders,accents,andadvertisementsthatcanbeaddedtoapublication
Usea“More”commandsuchasMoreBordersandAccentstoopentheBuildingBlockLibraryformoreoptions
Save as Template
1) ClickFileSaveAschangethetypetoPublisherTemplate
Saveapublicationasatemplatetocreatenewpublicationsfromthesamedesign
ClickMyTemplatesontheNewtabtoseecustomtemplates
Designsinthegallerydisplaythecurrentcolorscheme.

CHAPTER FIVE: PUBLICATIONS WITH PUBLISHER 19
OMA241–INTEGRATEDOFFICEAPPLICATIONS|
ActivityPb3‐1:CreateFlyer–CustomizeColorandFontSchemes
a) Create a Flyer using the Color Band template from the New Event
folder and apply the Reef color scheme.
b) Create a new business information and name it Children’s Center.
c) Change colors to PANTONE color indicated below, name the scheme Children’s Center
and save it.
Accent1:7458C |Accent3:602C |Accent4:643CHyperlink:3262C |FollowedHyperlink:7424C
d) Create a new font scheme using the Gill Sans MT font for headings and Comic Sans MS
font for body text; name the scheme Children’s Center and save it.
e) Apply the new color ns font scheme to the flyer.
f) Increase the company name heading to 14‐point and the text box to .3”; delete the
tagline; then type the text below; increase body font to 12 point; do not hyphenate.
g) Remove the picture placeholder and insert a clip
art picture depicting a zoo scene. Use zoo as the
keyword. Apply Picture Style 3 to the clip.
h) Save as Pb3‐Activity1.
CLASSACTIVITY
Student’sName|DirectorofActivities|WestbrookChildren’sCenter|374RenaDrive|Lafayette,L.A.70583‐4968|Telephone:337‐555‐0912|Fax:337‐555‐0816|[email protected] |nologo
ZooTripforFour–Year‐OldsTheannualzootripforfour‐year‐oldsisscheduledforFriday,May8.Theactivitiesbuswillleaveat12:45p.m.andreturntotheChildren’sCenternolaterthan4:45p.m.ThecostsofzooadmissionandasnackwereincludedintheFieldTripActivityFee.Pleasecompletetheparent’spermissionsheetanddropitintheActivitiesBoxnolaterthanThursday.

CHAPTER FIVE: PUBLICATIONS WITH PUBLISHER 20
OMA241–INTEGRATEDOFFICEAPPLICATIONS|
ActivityPb3‐2:Flyer–CreateLogoandAddIttoBusinessInformation
a) Open Pb3‐Activity1 and save it as Pb3‐Activity2.
b) Click Insert Building Blocks Borders & Accents More Borders
and Accents
c) Select 3‐D Button and click Insert.
d) Right‐click the picture and save it as Children’s center logo in your folder.
e) Delete the picture from the document so that you can
learn to add it to business information and insert it
automatically
f) Edit the business information for the children’s center
and add the logo.
g) Resave it as Pb3‐Activity2 and close
ActivityPb3‐3:Flyer–SaveandUseaTemplatea) Open Pb3‐Activity2 and save it as Pb3‐Activity3.
b) Delete the title and key the word Title in the placeholder.
c) Delete the body text and key the following: Key text about the subject of the flyer here.
d) Save as a template in the Templates folder; use the name
WBCC field trips.
e) Save the template as a Publisher file name Pb3‐Activity3
and close the file.

CHAPTER FIVE: PUBLICATIONS WITH PUBLISHER 21
OMA241–INTEGRATEDOFFICEAPPLICATIONS|
Publication4–MakeaMenu
1) Open a new publication and create a Menu using Gingham in the Regular menu
category.
2) Save as Pb4‐Menu‐Name.
SPECIFICATIONS:
a) New customized color scheme with PANTONE colors, save it as Fisatto:
Accent 1: Blue 2638C | Accent 2: Gold 116C | Accent 3: Red 1797C |
Hyperlink: Blue 293C | Followed Hyperlink : Purple 696C
b) New font scheme using FRENCH script MT as the heading font and Calibri as the
body font. Save as Fisatto.
c) New business information Name : Tyler LeBlanc
Job Position: Owner and Chef
Organization : Le Fisatto
Address: 250 Walnut Street Harrisburg, PA 17101‐1710
Phone: 717‐555‐1111
Fax : 715‐555‐1112
E‐mail : [email protected]
Tagline : Superior food cooked to the point of perfection.
Logo : fisatto, inc.logo (from your resource file)
PAGE 1, PANEL 1:
a) Replace the text in the top text box with the following: use 11‐point font. Turn hyphenation off in each box, adjust the box size and position if needed.
b) Replace the text in the bottom text box with the following text: use 9‐point
font.
Let’sApplyIt.
LeFissatoisownedbythefamilyofChefTylerLeBlancandhasserveditscustomerformorethanfortyyearsatthecurrentlocation.Priortothat,itwasownedbytheFisattofamily,LeFissatoispartofFisatto,Inc.,whichalsoownsandoperatesFisattoBistro,FisattoCateringandFisattoFreshMarket.
Call717‐555‐1111forreservations|$100perpersonincludinggratuities|Allmajorcreditcardsaccepted.
CHAPTER FIVE: PUBLICATIONS WITH PUBLISHER 22
OMA241–INTEGRATEDOFFICEAPPLICATIONS|
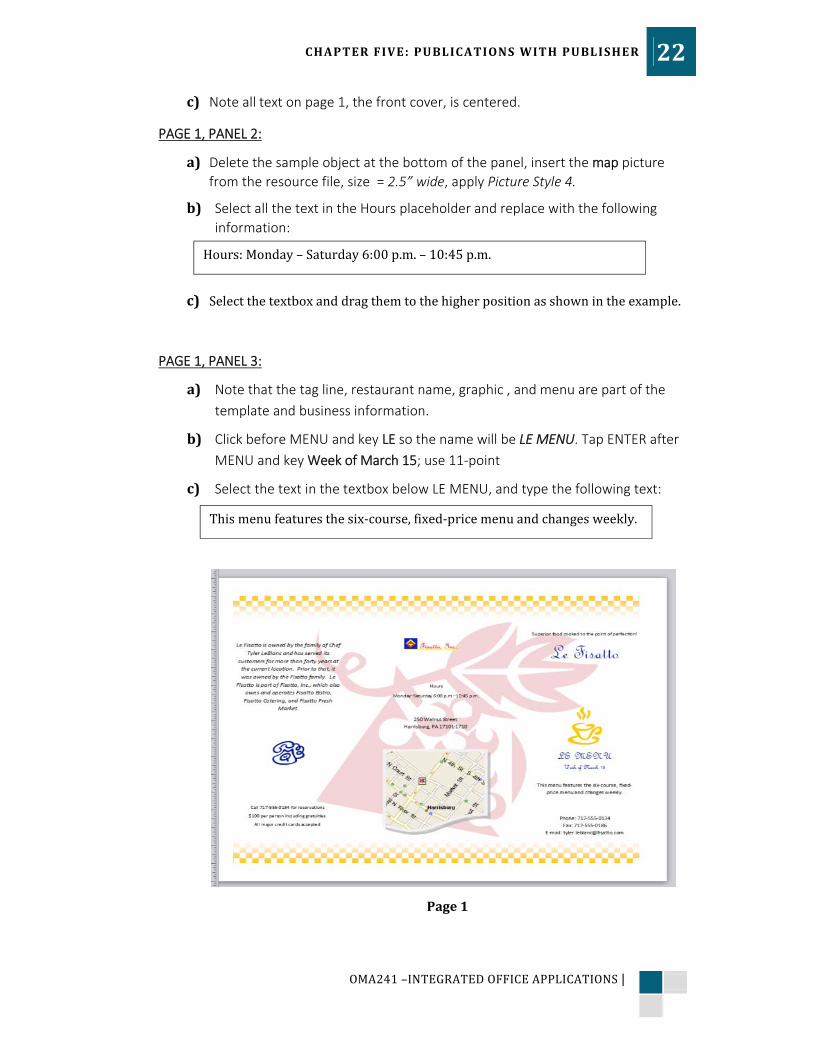
c) Note alltext on page 1, the front cover, is centered.
PAGE 1, PANEL 2:
a) Delete the sample object at the bottom of the panel, insert the map picture
from the resource file, size = 2.5” wide, apply Picture Style 4.
b) Select all the text in the Hours placeholder and replace with the following
information:
c) Selectthetextboxanddragthemtothehigherpositionasshownintheexample.
PAGE 1, PANEL 3:
a) Note that the tag line, restaurant name, graphic , and menu are part of the
template and business information.
b) Click before MENU and key LE so the name will be LE MENU. Tap ENTER after
MENU and key Week of March 15; use 11‐point
c) Select the text in the textbox below LE MENU, and type the following text:
Hours:Monday–Saturday6:00p.m.– 10:45p.m.
Thismenufeaturesthesix‐course,fixed‐pricemenuandchangesweekly.
Page1
CHAPTER FIVE: PUBLICATIONS WITH PUBLISHER 23
OMA241–INTEGRATEDOFFICEAPPLICATIONS|
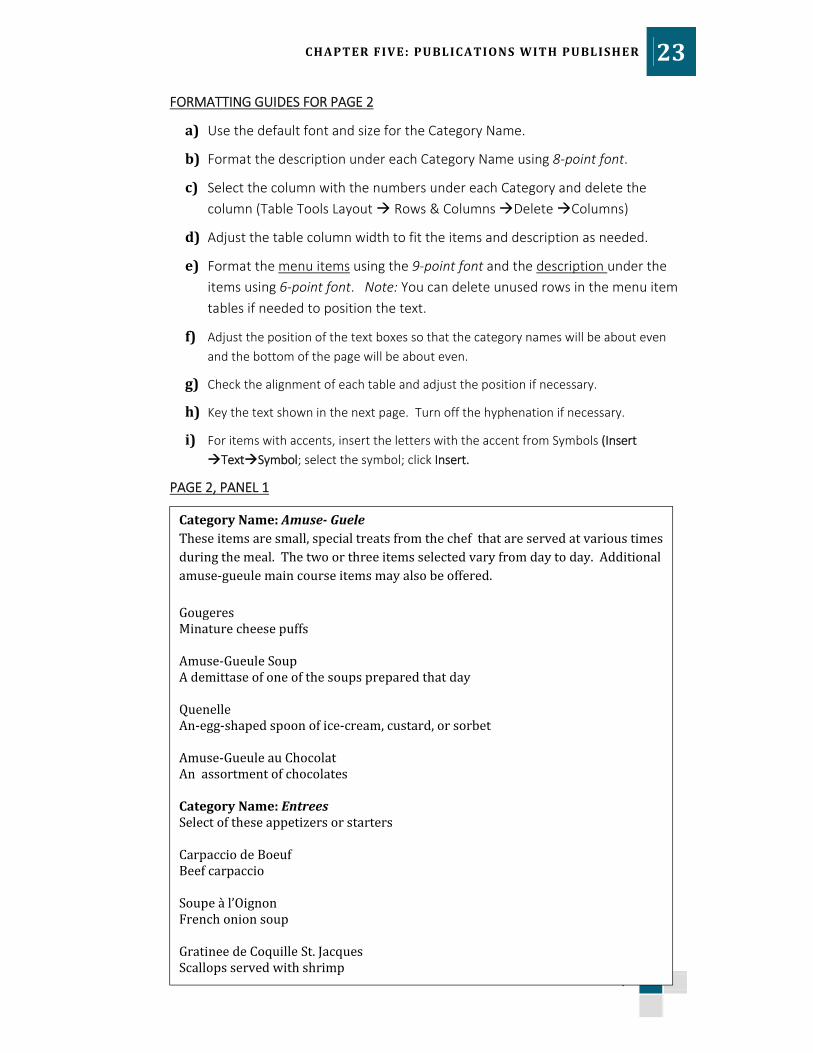
FORMATTING GUIDES FOR PAGE 2
a) Use the default font and size for the Category Name.
b) Format the description under each Category Name using 8‐point font.
c) Select the column with the numbers under each Category and delete the
column (Table Tools Layout Rows & Columns Delete Columns)
d) Adjust the table column width to fit the items and description as needed.
e) Format the menu items using the 9‐point font and the description under the
items using 6‐point font. Note: You can delete unused rows in the menu item
tables if needed to position the text.
f) Adjust the position of the text boxes so that the category names will be about even
and the bottom of the page will be about even.
g) Check the alignment of each table and adjust the position if necessary.
h) Key the text shown in the next page. Turn off the hyphenation if necessary.
i) For items with accents, insert the letters with the accent from Symbols (Insert
TextSymbol; select the symbol; click Insert.
PAGE 2, PANEL 1
CategoryName:Amuse‐GueleTheseitemsaresmall,specialtreatsfromthechefthatareservedatvarioustimesduringthemeal.Thetwoorthreeitemsselectedvaryfromdaytoday.Additionalamuse‐gueulemaincourseitemsmayalsobeoffered.GougeresMinaturecheesepuffsAmuse‐GueuleSoupAdemittaseofoneofthesoupspreparedthatdayQuenelleAn‐egg‐shapedspoonofice‐cream,custard,orsorbetAmuse‐GueuleauChocolatAnassortmentofchocolatesCategoryName:EntreesSelectoftheseappetizersorstartersCarpacciodeBoeufBeefcarpaccioSoupeàl’OignonFrenchonionsoupGratineedeCoquilleSt.JacquesScallopsservedwithshrimp

CHAPTER FIVE: PUBLICATIONS WITH PUBLISHER 24
OMA241–INTEGRATEDOFFICEAPPLICATIONS|
PAGE 2, PANEL 2
PAGE 2, PANEL 3
CategoryName:LePlatPrincipalSelectoneofthemaincourses.SautéedAtlanticHalibutColdwaterhalibutsautéedwithonions.DoverSoleGrilléeGrilledDoverSolePetitFiletMignonMedallionsBeeftenderloinMegretdeCanardDuckbreastCategoryName:LaSaladeSelectonesaladwhichwillfollowthemaincourseSaladeNiçoiseSaladwithseafoodSaladed’Endive,NoixetRoquefortSaladwithwalnutsandRoquefortcheese
CategoryName:LesFromagesThecheesefeaturesafullcheesecartwithbothsoftandhardcheeseandwithcheesemadefromboatgoatandcow’smilk.Manymorevarietiesareavailable.
Comte,BeaufortValençay,Chèvre,Sainte‐MauredeTouraneBoursin,Brie,CammbertCategoryName:LeDessertDessertisfollowedbycoffeeincludingCaféauLait,CappucincinoandEspresso.FarandoledeCrepesSweetcrepeswithassortedfillingsCrèmeCaramelAcaramelcreamcustardSouffléauChocolatChocolatesoufflé
Page2

CHAPTER FIVE: PUBLICATIONS WITH PUBLISHER 25
OMA241–INTEGRATEDOFFICEAPPLICATIONS|
Start with a Blank Page
1) Selectthedesiredblankpagesize‐or‐
CreateanewcustompagesizeusingCreateNewPageSizedialogbox
2) Selectcolorandfontschemesandbusinessinfo,andcreatethepage
3) UseInsertPagesInsertDuplicatePagetoaddasecondpagetothetemplate
Add Objects to the Page
1) InsertobjectssuchasalogoormastheadfromtheBuildingBlockLibrary
2) Inserttextboxes,pictureplaceholders,andgraphicelements
3) Formattextintextboxesasdesired
4) Addbusinessinfoifdesired
LESSON 4 CREATEATEMPLATE
FROMABLANKPAGE

CHAPTER FIVE: PUBLICATIONS WITH PUBLISHER 26
OMA241–INTEGRATEDOFFICEAPPLICATIONS|
ActivityPb4‐1:CreateaCustom‐SizedBlankPage
a) Create a custom page sized 5” x 7” b) Change the margins guides to .75” for all four sides. c) Apply the Fisatto color and font schemes. d) Apply a Border 4 frame from Borders & Accents to the publication. Drag the border
so that it frames the publication. e) Insert the Fissato logo, size it, and center it at the top of the page as shown in the
illustration. f) Draw a text box as shown by the blue dotted lines in the illustration. g) Type the text shown below, apply 16‐point font, Brush Script MT font for the text of
the invitation ; and 12‐point font for the RSVP. (Press SHIFT + ENTER for the second
line to remove the extra spaces after the paragraph.) Apply Accent 1 (PANTONE
2738C) color to all text. h) Save it as Pb4‐Activity1
ChefTylerLeBlancCordiallyinvitesyouTojoinhimforacomplimentaryCustomerAppreciationDinnerAtLeFisattoMarch15,7:30pmR.S.V.P717‐555‐1111ByMarch10
CLASSACTIVITY
CHAPTER FIVE: PUBLICATIONS WITH PUBLISHER 27
OMA241–INTEGRATEDOFFICEAPPLICATIONS|
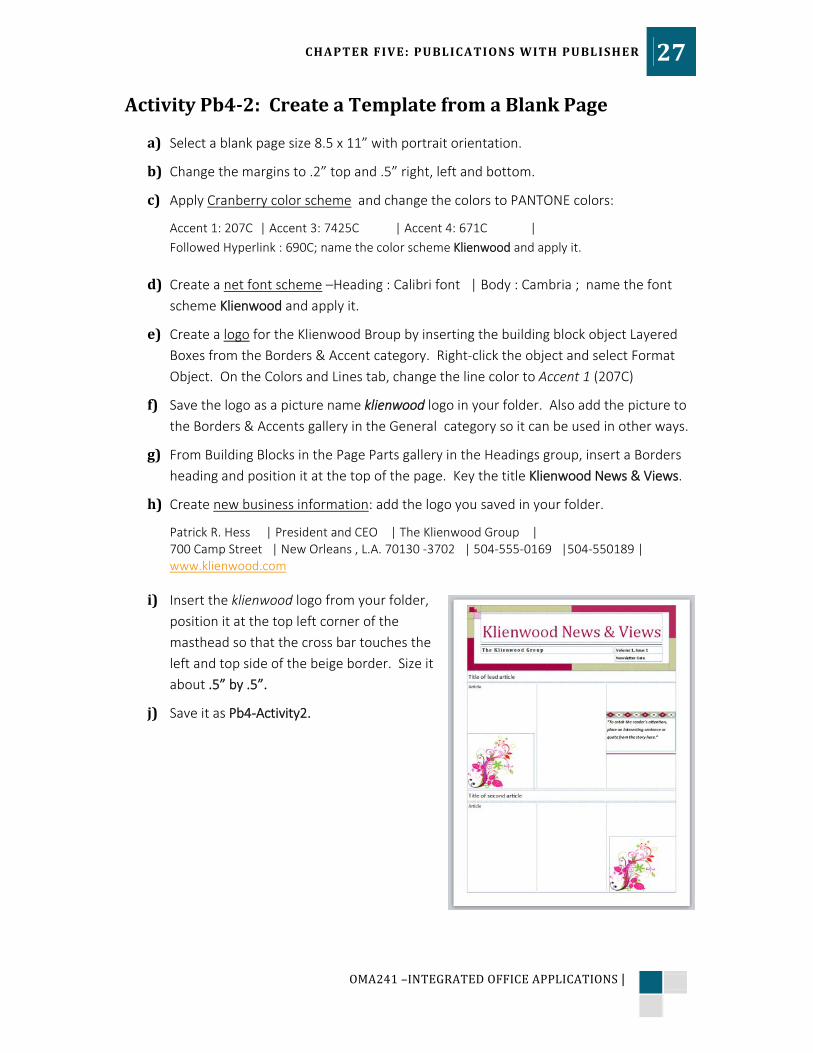
ActivityPb4‐2:CreateaTemplatefromaBlankPage
a) Select a blank page size 8.5 x 11” with portrait orientation. b) Change the margins to .2” top and .5” right, left and bottom. c) Apply Cranberry color scheme and change the colors to PANTONE colors:
Accent 1: 207C | Accent 3: 7425C | Accent 4: 671C |
Followed Hyperlink : 690C; name the color scheme Klienwood and apply it.
d) Create a net font scheme –Heading : Calibri font | Body : Cambria ; name the font
scheme Klienwood and apply it. e) Create a logo for the Klienwood Broup by inserting the building block object Layered
Boxes from the Borders & Accent category. Right‐click the object and select Format
Object. On the Colors and Lines tab, change the line color to Accent 1 (207C) f) Save the logo as a picture name klienwood logo in your folder. Also add the picture to
the Borders & Accents gallery in the General category so it can be used in other ways. g) From Building Blocks in the Page Parts gallery in the Headings group, insert a Borders
heading and position it at the top of the page. Key the title Klienwood News & Views.
h) Create new business information: add the logo you saved in your folder.
Patrick R. Hess | President and CEO | The Klienwood Group | 700 Camp Street | New Orleans , L.A. 70130 ‐3702 | 504‐555‐0169 |504‐550189 | www.klienwood.com
i) Insert the klienwood logo from your folder,
position it at the top left corner of the
masthead so that the cross bar touches the
left and top side of the beige border. Size it
about .5” by .5”.
j) Save it as Pb4‐Activity2.