ptc windchill® extension guide ptc windchill patches on page 25. for detailed information on all...
TRANSCRIPT

PTC Windchill® ExtensionGuide
PTC Windchill® Extension 1.3

Copyright © 2016 PTC Inc. and/or Its Subsidiary Companies. All Rights Reserved.
User and training guides and related documentation from PTC Inc. and its subsidiary companies (collectively"PTC") are subject to the copyright laws of the United States and other countries and are provided under alicense agreement that restricts copying, disclosure, and use of such documentation. PTC hereby grants to thelicensed software user the right to make copies in printed form of this documentation if provided on softwaremedia, but only for internal/personal use and in accordance with the license agreement under which theapplicable software is licensed. Any copy made shall include the PTC copyright notice and any otherproprietary notice provided by PTC. Training materials may not be copied without the express written consentof PTC. This documentation may not be disclosed, transferred, modified, or reduced to any form, includingelectronic media, or transmitted or made publicly available by any means without the prior written consent ofPTC and no authorization is granted to make copies for such purposes. Information described herein isfurnished for general information only, is subject to change without notice, and should not be construed as awarranty or commitment by PTC. PTC assumes no responsibility or liability for any errors or inaccuraciesthat may appear in this document.
The software described in this document is provided under written license agreement, contains valuable tradesecrets and proprietary information, and is protected by the copyright laws of the United States and othercountries. It may not be copied or distributed in any form or medium, disclosed to third parties, or used in anymanner not provided for in the software licenses agreement except with written prior approval from PTC.
UNAUTHORIZED USE OF SOFTWARE OR ITS DOCUMENTATION CAN RESULT IN CIVILDAMAGES AND CRIMINAL PROSECUTION.
PTC regards software piracy as the crime it is, and we view offenders accordingly. We do not tolerate thepiracy of PTC software products, and we pursue (both civilly and criminally) those who do so using all legalmeans available, including public and private surveillance resources. As part of these efforts, PTC uses datamonitoring and scouring technologies to obtain and transmit data on users of illegal copies of our software.This data collection is not performed on users of legally licensed software from PTC and its authorizeddistributors. If you are using an illegal copy of our software and do not consent to the collection andtransmission of such data (including to the United States), cease using the illegal version, and contact PTC toobtain a legally licensed copy.
Important Copyright, Trademark, Patent, and Licensing Information: See the About Box, or copyrightnotice, of your PTC software.
UNITED STATES GOVERNMENT RIGHTS
PTC software products and software documentation are “commercial items” as that term is defined at 48 C.F.R. 2.101. Pursuant to Federal Acquisition Regulation (FAR) 12.212 (a)-(b) (Computer Software) (MAY 2014)for civilian agencies or the Defense Federal Acquisition Regulation Supplement (DFARS) at 227.7202-1(a)(Policy) and 227.7202-3 (a) (Rights in commercial computer software or commercial computer softwaredocumentation) (FEB 2014) for the Department of Defense, PTC software products and softwaredocumentation are provided to the U.S. Government under the PTC commercial license agreement. Use,duplication or disclosure by the U.S. Government is subject solely to the terms and conditions set forth in theapplicable PTC software license agreement.
PTC Inc., 140 Kendrick Street, Needham, MA 02494 USA
Contents
About This Guide ........................................................................................................5
Overview ....................................................................................................................7PTC Windchill Extension Product Overview ............................................................8Product Requirements ..........................................................................................8Entity Overview ....................................................................................................9Architecture Overview......................................................................................... 11
Installing PTC Windchill Extension..............................................................................13Downloading the PTC Windchill Extension............................................................14PTC Windchill Extension Media ...........................................................................16Installing the PTC Windchill Extension in ThingWorx Composer .............................17Installing PTC Windchill Patches..........................................................................25
Configuring Your System ...........................................................................................27Recommended Configurations ............................................................................28Using SSL for Secure Communication..................................................................29Using Trusted Host .............................................................................................32Configuring ThingWorx Single Sign-On when Connecting to Windchill ....................33
Using the Sample Mashups .......................................................................................41Configuring Sample Mashups..............................................................................42Product Structure Sample Mashup ......................................................................43Search Sample Mashup ......................................................................................48Reusing Sample Mashup Content........................................................................51
Developing a Customized Application .........................................................................57Localizing Labels and Fields in Your Application....................................................58Adding Saved Filters to Your Mashup...................................................................58Using PTC Creo View Extension..........................................................................59Using Info*Engine Tasks when Developing Your Application ..................................60Using Windchill REST Web Services when Developing Your Application.................68
Appendix A.Example Configuration Using SSL for Secure Communications ..................71
Appendix B.Architecture of Single Sign-On..................................................................75Design of Authentication Filter .............................................................................76Design of Authenticator Extension .......................................................................77
Appendix C.Using PTC Data Query Extension when Developing YourApplication ............................................................................................................79Configuring the PTC Data Query Extension ..........................................................81Launching the Data Query Entity..........................................................................83Using the Extension to Create New Data Queries..................................................84Creating Example of a Mashup for a Part Number Search......................................88
3

About This Guide
This guide documents the installation and use of the PTC Windchill Extension. Itis intended for system administrators who are installing the PTC WindchillExtension and application developers who are using ThingWorx Composer tobuild a ThingWorx applications that connect to Windchill.To take advantage of the functionality in the PTC Windchill Extension, youshould have:• Working knowledge of your Windchill instance• Working knowledge of the ThingWorx Composer• Ability to write Java script
Technical SupportContact PTC Technical Support through the PTC website, or by phone, email, orfax if you encounter problems using this product or the product documentation.The PTC Windchill eSupport portal provides the resources and tools to supportyour implementation:https://support.ptc.com/appserver/cs/portal/For complete support details, see the PTC Customer Support Guide:http://support.ptc.com/appserver/support/csguide/csguide.jspYou must have a Service Contract Number (SCN) before you can receivetechnical support. If you do not know your SCN, see “Preparing to contact TS” onthe Processes tab of the PTC Customer Support Guide for information about howto locate it.
5

CommentsPTC welcomes your suggestions and comments on its documentation. To submityour feedback, you can send an email to [email protected]. To help usmore quickly address your concern, include the name of the PTC product and itsrelease number with your comments. If your comments are about this book,include the PTC Windchill Extension Guide book title.
6 PTC Windchill® Extension Guide

1Overview
PTC Windchill Extension Product Overview...................................................................8Product Requirements .................................................................................................8Entity Overview ...........................................................................................................9Architecture Overview................................................................................................ 11
This chapter describes the product functionality and requirements.
7

PTC Windchill Extension ProductOverviewPTC Windchill Extension enables ThingWorx application developers to quicklyand easily create connected applications that leverage the original product designinformation stored in Windchill. For example, you have the ability to do thefollowing:• Access Windchill BOM information.• Access Windchill properties.• Visualize product assemblies in 3-D.• Get published formats associated with BOM items for connected products.• Execute saved searched and queries.• Execute Info*Engine tasks to acquire and create information in Windchill.The PTC Windchill Extension includes:• An extension bundle that is imported into ThingWorx Composer. For the list
of extensions, see Installing Bundled Extensions on page 22.• Sample mashup files that show the use of some entities contained in the
extension bundle. For more information, see Using the Sample Mashups onpage 41.
• A ThingWorx entities file that contains things, thing templates, shapes, andmashups that demonstrate the use of some entities contained in the extensionbundle. These entities are intended as a sample only and should not be used tobuild your own mashup but rather serve as a template from which you cancopy what you need. For more information, see Using the Sample Mashups onpage 41.
• A set of Windchill patches that correspond to specific Windchill releases. Thecode in each patch provides the hooks that allow a ThingWorx application toconnect to the corresponding Windchill release. For more information, seeInstalling PTC Windchill Patches on page 25.
For detailed information on all included files, see PTC Windchill Extension Mediaon page 16.
Product RequirementsTo use the PTC Windchill Extension, you must be using the following products:• PTC ThingWorx 6.5• Windchill at one of the following release levels:
○ 10.2 M020 CPS 06 or later○ 10.2 M030 CPS 01 or later
8 PTC Windchill® Extension Guide
○ 11.0
To connect to systems running the Windchill releases, you must install theWindchill patch that corresponds with the release and is included with PTCWindchill Extension.
• Security fixes for PTC HTTP Server (bundled with Windchill) are requiredwhen using SSL for two-way secure communication between a ThingWorxapplication and Windchill. For more information, see RecommendedConfigurations on page 28. The required Windchill security fixes are availablefrom PTC:○ For Windchill 10.2 M020, update to CPS06 or later for required security
fixes.○ For Windchill 10.2 M030 and later releases, the PTC HTTP Server
bundled with the release has the required security fixes for using SSL.
PTC recommends that you install the CPS or Early Release Download withthe option to overwrite the PTC HTTP Server configuration and redo theconfiguration. If you choose to install the PTC HTTP Server with the option topreserve the configuration (the default option), then you need to merge theconfiguration scripts before you can configure SSL. For more information, seeExample Configuration Using SSL for Secure Communications on page 71.
• PTC Creo View 3.0 M031 is required to use the Creo View widget in amashup.
Entity OverviewThis section offers a high level overview of important entities provided with thefiles included in the PTC Windchill Extension.
ptc-windchill-extension
Entity DescriptionWindchillConnector Template representing an interface to a Windchill system.
Includes services that provide the means to accessWindchill data and the processing power of the Windchillsystem.
ptc-sample-mashup
Entity Descriptionptc-part-demo-shape Shape of the data shown in the tree and the properties
panel of the ptc-connected-demo-mashup and the searchresults of the ptc-search-demo-mashup.
ptc-windchill-demo- Shows how to wrap calls to Windchill services with
Overview 9
Entity Descriptionthing ThingWorx services that are used from a mashup. The
services defined in this Thing are used by the samplemashups.
ptc-connected-demo-mashup
A sample mashup that demonstrates the retrieval of aWindchill product structure based on the input of aWindchill part, Windchill document, or EPM documentnumber. The mashup also emulates the inclusion of datacoming from an ERP system.
ptc-search-demo-mashup
A sample mashup that demonstrates the use of Windchillsearch capabilities.
For more information, see Using the Sample Mashups on page 41.
dataquery
Entity Descriptioncom.ptc.dataquery.DataQueryTemplate
Template to create data queries for connected PTCsystems
com.ptc.dataquery.PTCConnectorTem-plate
Template to create Things for connecting to any PTCsystems
ptc-demo-navigation Generated Thing that provides the service to navigate apart structure
ptc-navigation-demo-shape
Generated DataShape that defines the shape of the resultsof part structure navigation
WindchillConnector-NavParams
Defines the set of parameters that Windchill navigationrequires
For more information, see Using PTC Data Query Extension when DevelopingYour Application on page 79.
Additional EntitiesAfter installation and configuration is complete, you can browse the ThingWorxComposer to learn more about the entities included with the PTC WindchillExtension. For example, to learn more about the WindchillConnector Template,open it in the Composer and view its list of services. As shown in the screenbelow, you can hover over a service to view additional information about theservice.
10 PTC Windchill® Extension Guide
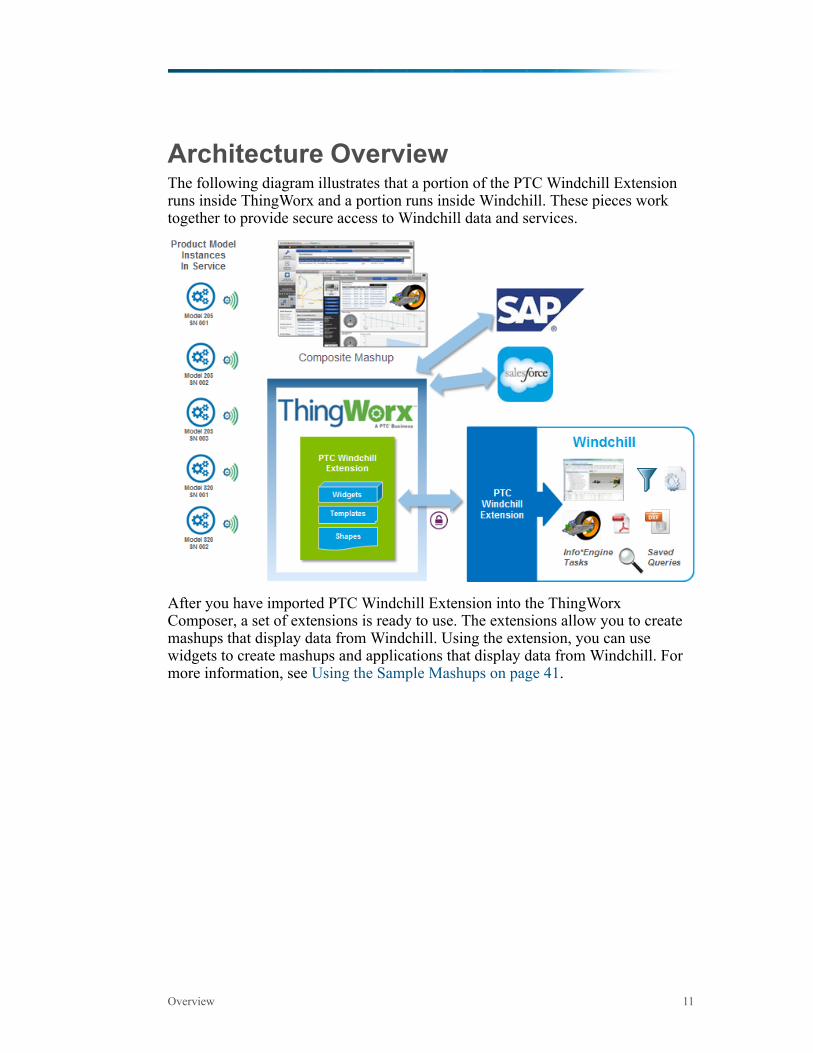
Architecture OverviewThe following diagram illustrates that a portion of the PTC Windchill Extensionruns inside ThingWorx and a portion runs inside Windchill. These pieces worktogether to provide secure access to Windchill data and services.
After you have imported PTC Windchill Extension into the ThingWorxComposer, a set of extensions is ready to use. The extensions allow you to createmashups that display data from Windchill. Using the extension, you can usewidgets to create mashups and applications that display data from Windchill. Formore information, see Using the Sample Mashups on page 41.
Overview 11
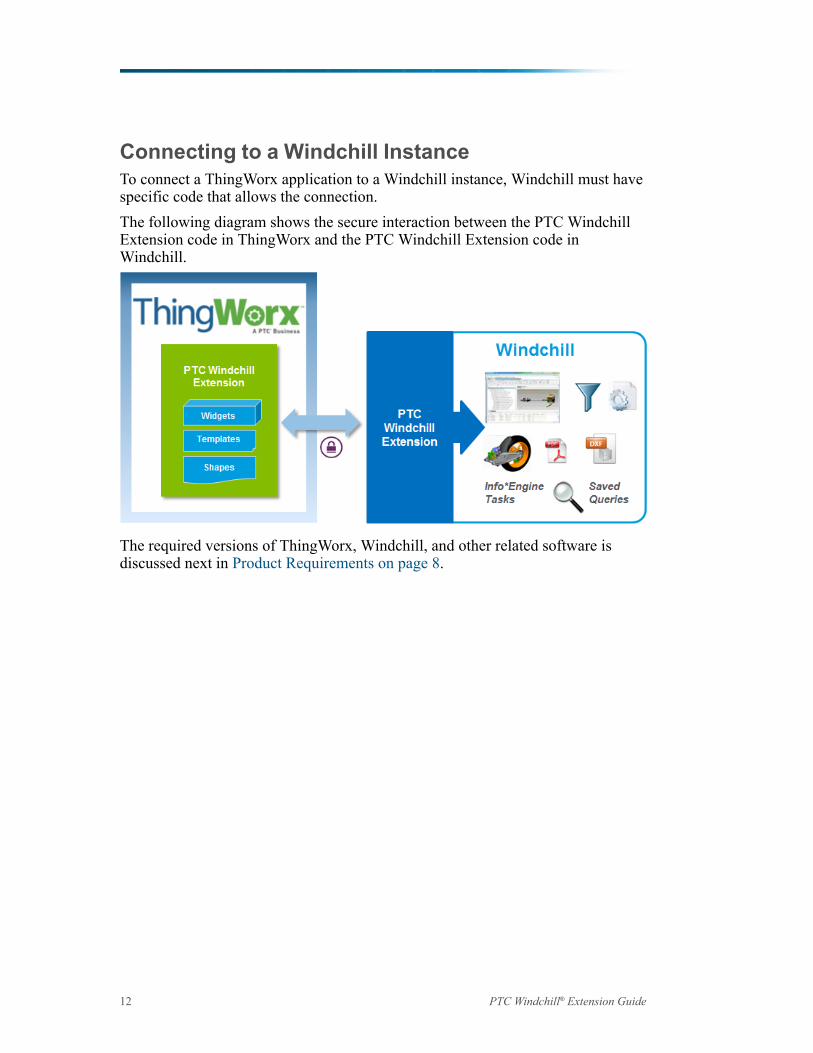
Connecting to a Windchill InstanceTo connect a ThingWorx application to a Windchill instance, Windchill must havespecific code that allows the connection.The following diagram shows the secure interaction between the PTC WindchillExtension code in ThingWorx and the PTC Windchill Extension code inWindchill.
The required versions of ThingWorx, Windchill, and other related software isdiscussed next in Product Requirements on page 8.
12 PTC Windchill® Extension Guide

2Installing PTC Windchill ExtensionDownloading the PTC Windchill Extension ..................................................................14PTC Windchill Extension Media..................................................................................16Installing the PTC Windchill Extension in ThingWorx Composer....................................17Installing PTC Windchill Patches ................................................................................25
This chapter contains download and media details as well as installationinformation.
13
Downloading the PTC WindchillExtensionThe PTC Windchill Extension is available from the ThingWorx Marketplace:http://marketplace.thingworx.comFrom the welcome page, click SIGN IN.
NoteYour company must have purchased ThingWorx and you must have a validThingWorx user name and password to download this extension. If you do nothave a valid ThingWorx user name and password, you can have your systemadministrator request one for you by sending the request [email protected].
14 PTC Windchill® Extension Guide
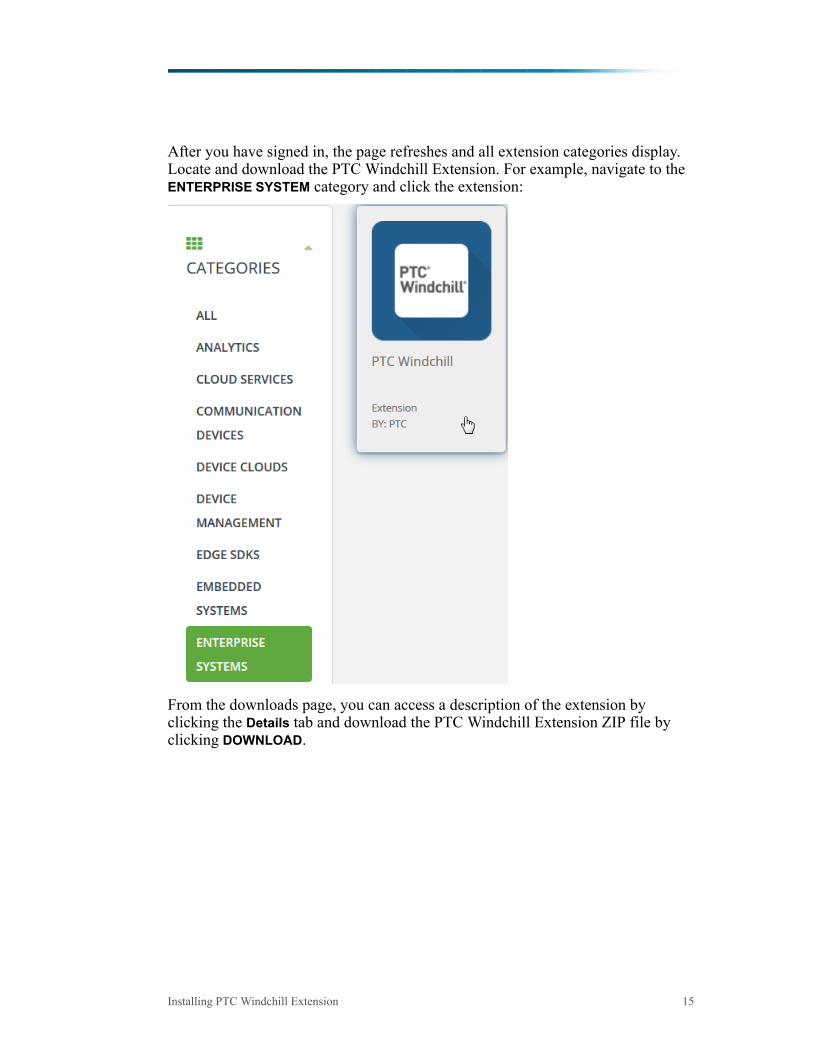
After you have signed in, the page refreshes and all extension categories display.Locate and download the PTC Windchill Extension. For example, navigate to theENTERPRISE SYSTEM category and click the extension:
From the downloads page, you can access a description of the extension byclicking the Details tab and download the PTC Windchill Extension ZIP file byclicking DOWNLOAD.
Installing PTC Windchill Extension 15
PTC Windchill Extension MediaThe PTC Windchill Extension ZIP contains the following files:• Windchill patches for each supported release that enables ThingWorx
applications to connect to Windchill. For more information, see Installing PTCWindchill Patches on page 25.
• Extensions in ptc-windchill-extension-{version}.zip. Formore information, see Installing Bundled Extensions on page 22.○ ptc-windchill-connection-extension.zip
PTC Windchill Connection Extension enables connectivity with Windchilland includes the WindchillConnector Thing Template.
○ core-ui-ext.zip
PTC Core UI Library that includes additional widgets.○ ptc-creo-view-extension.zip
PTC Creo View Extension is the Visualization widget extension. For moreinformation, see Using PTC Creo View Extension on page 59.
○ infotableselector_ExtensionPackage.zip
InfoTable Selector Extension includes the InfoTable Selector Widgetwhich is used to manage selected rows of an InfoTable.
○ ptc-identity-provider-authenticator-extension.zip
PTC Identity Provider Authenticator Extension is used for single sign-onwith Windchill. For more information, see Architecture of Single Sign-Onon page 75.
○ dataquery-ext.zip
PTC Data Query Extension provides a quick and easy way to access PTCdata through ThingWorx. The PTC Data Query Extension has somesupport limitations. For information on limitations and other informationabout the extension, see Using PTC Data Query Extension whenDeveloping Your Application on page 79.
○ UniversalConverter_Extensions.zip
Universal Converter, which is also available through the ThingWorxMarketplace.
○ twx-connector-ext.zip
PTC AngularJS ThingWorx Connector Extension• ptc-identity-provider-authentication-filter-
{version}.jar
16 PTC Windchill® Extension Guide
The PTC Identity Provider Authentication Filter is a servlet filter that is usedfor single sign-on with Windchill. For more information, see Architecture ofSingle Sign-On on page 75.
• ptc-sample-mashup-{version}.xml
AThingWorx Entities file that contains Templates, Things, Shapes, andMashups that demonstrate use of the entities contained in the extensionbundle. These entities are intended as a sample only and should not be used tobuild your own mashup but rather serve as a template from which you cancopy what you need. For information about using the sample mashups, seeUsing the Sample Mashups on page 41.
• README.txt
Contains brief information regarding the PTC Windchill Extension with apointer to this guide.
Installing the PTC Windchill Extension inThingWorx ComposerThe following sections describe the actions needed to complete the installation ofPTC Windchill in the ThingWorx Composer. All actions described in thesesections require that you are logged in as an administrator.1. Deleting Existing Entities and Extensions Before Installing PTC Windchill
Extension on page 172. Installing Bundled Extensions on page 223. Installing Sample Mashups on page 244. Installing PTC Windchill Patches on page 25
Deleting Existing Entities and Extensions BeforeInstalling PTC Windchill ExtensionIf you have previously installed the PTC Windchill Extension, continue readingthis section to learn how to find and delete existing entities and extensions.If you have not previously installed the PTC Windchill Extension, you can skipthis section.
Installing PTC Windchill Extension 17
NoteFailing to remove the entities and extensions before importing updates cancause problems with the updated files. This is because data can be stored inTomcat memory that is associated with the old entity and this data is notremoved unless you delete the entities and restart Tomcat.
Because there are dependencies among the entities and the extensions bundledwith the PTC Windchill Extension, the order in which you delete existing entitiesand extensions is important. Complete the following steps:1. Delete all the demo entities.
For more information, see Searching for Demo Entities to Delete on page 19.2. Delete the ptc-windchill-connection-extension extension.
For deletion instructions, see Deleting Extensions on page 21.3. Delete the dataquery-ext extension.4. Optionally delete the other extensions:
core-ui-extptc-creo-view-extensionptc-identity-provider-authenticator-extensiontwx-connector-ext
5. If you have an existing extension called ptc that contains the initial Creo Viewwidget, delete that extension. Leaving the old Creo View extension causesproblems with the new twx-connector-ext extension.
6. Restart Tomcat to clear the Tomcat memory
18 PTC Windchill® Extension Guide
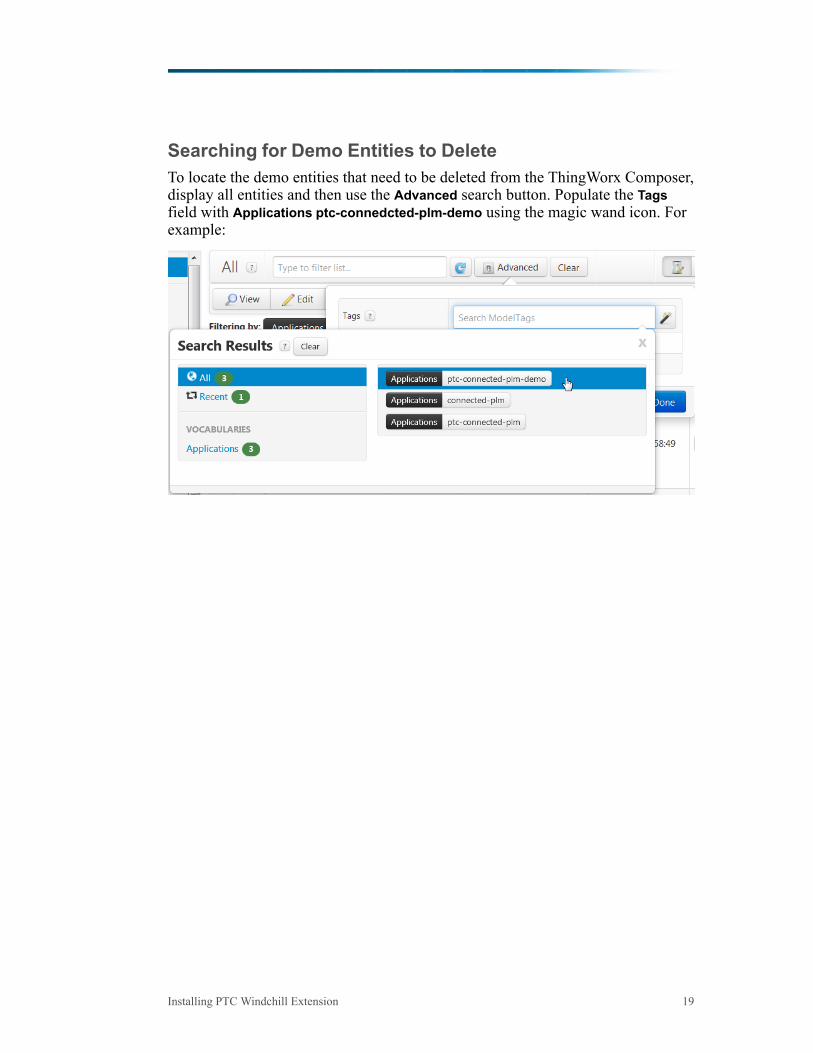
Searching for Demo Entities to DeleteTo locate the demo entities that need to be deleted from the ThingWorx Composer,display all entities and then use the Advanced search button. Populate the Tagsfield with Applications ptc-connedcted-plm-demo using the magic wand icon. Forexample:
Installing PTC Windchill Extension 19
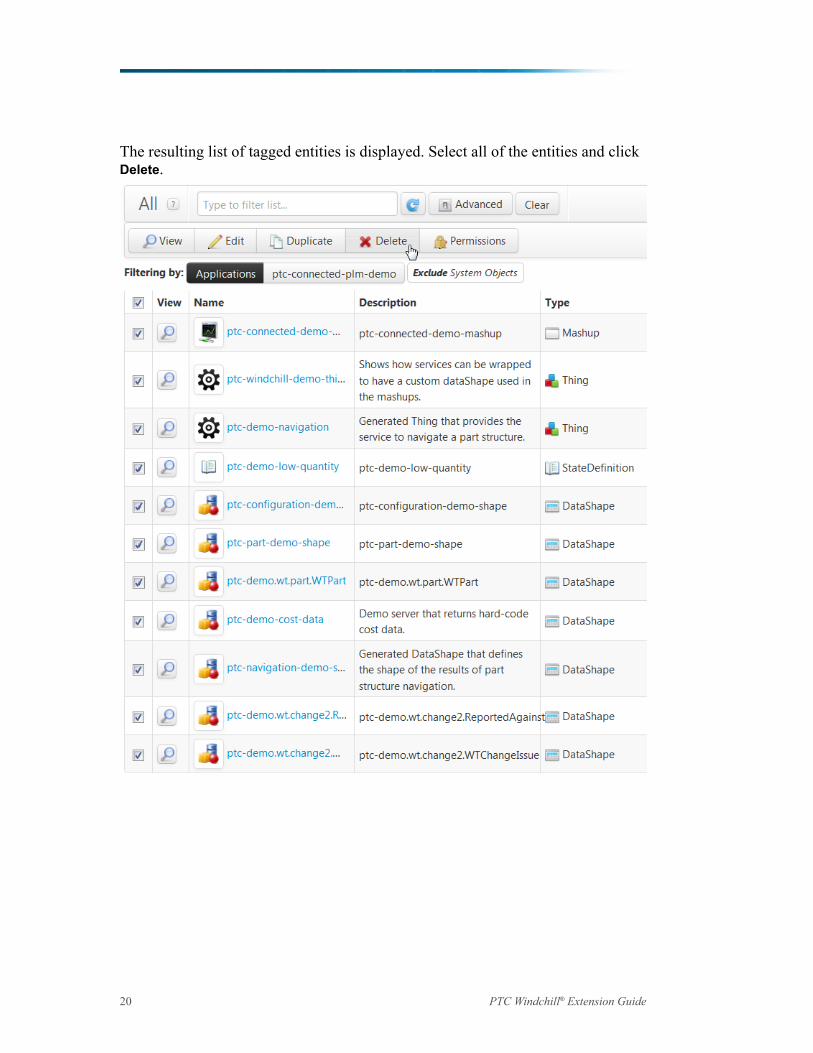
The resulting list of tagged entities is displayed. Select all of the entities and clickDelete.
20 PTC Windchill® Extension Guide
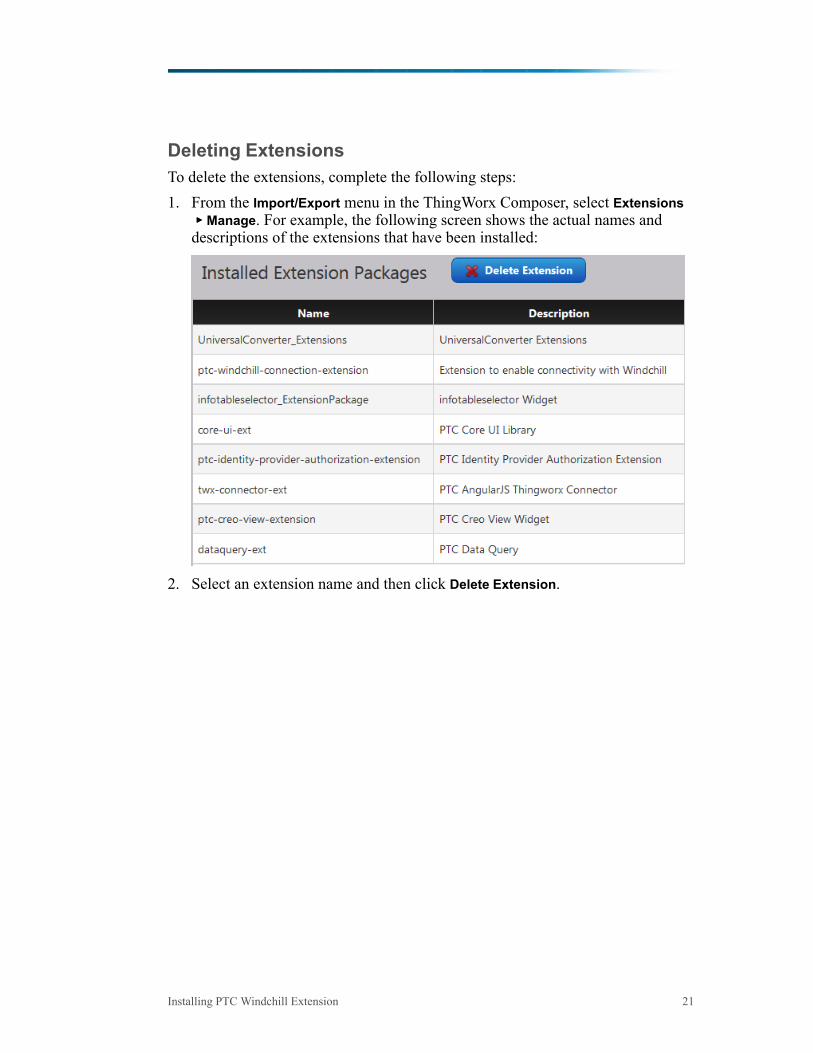
Deleting ExtensionsTo delete the extensions, complete the following steps:1. From the Import/Export menu in the ThingWorx Composer, select Extensions
▶▶ Manage. For example, the following screen shows the actual names anddescriptions of the extensions that have been installed:
2. Select an extension name and then click Delete Extension.
Installing PTC Windchill Extension 21
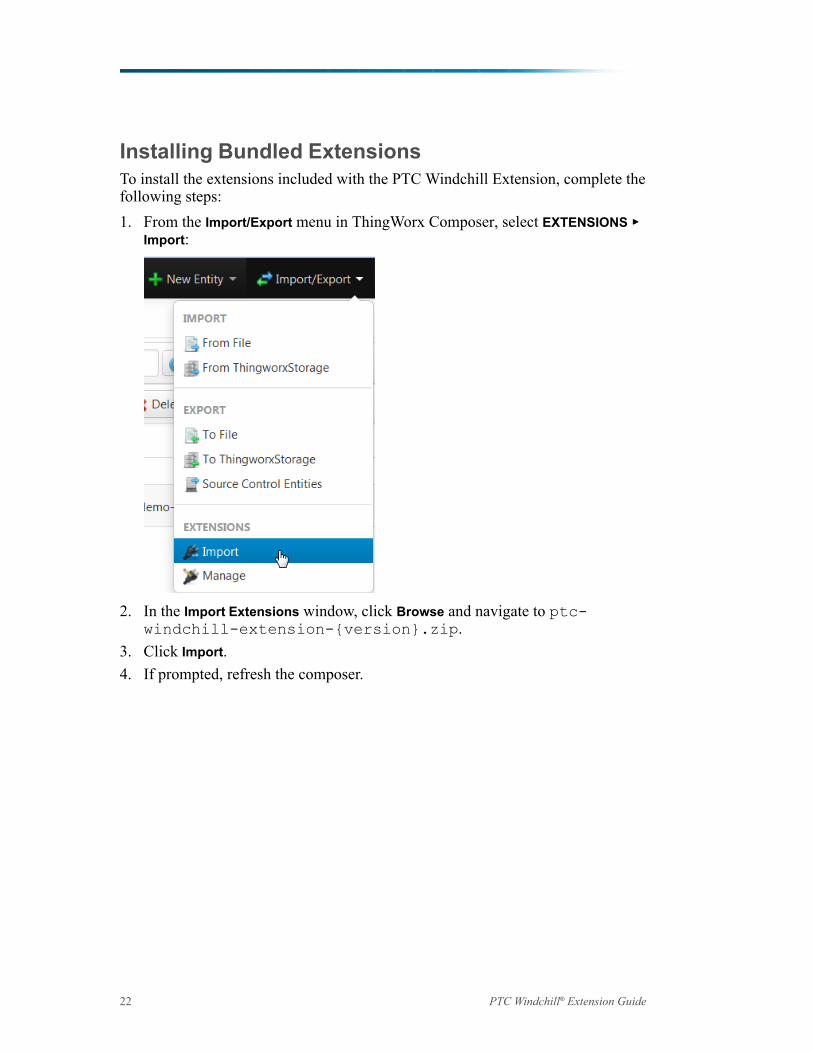
Installing Bundled ExtensionsTo install the extensions included with the PTC Windchill Extension, complete thefollowing steps:1. From the Import/Export menu in ThingWorx Composer, select EXTENSIONS ▶▶
Import:
2. In the Import Extensions window, click Browse and navigate to ptc-windchill-extension-{version}.zip.
3. Click Import.4. If prompted, refresh the composer.
22 PTC Windchill® Extension Guide
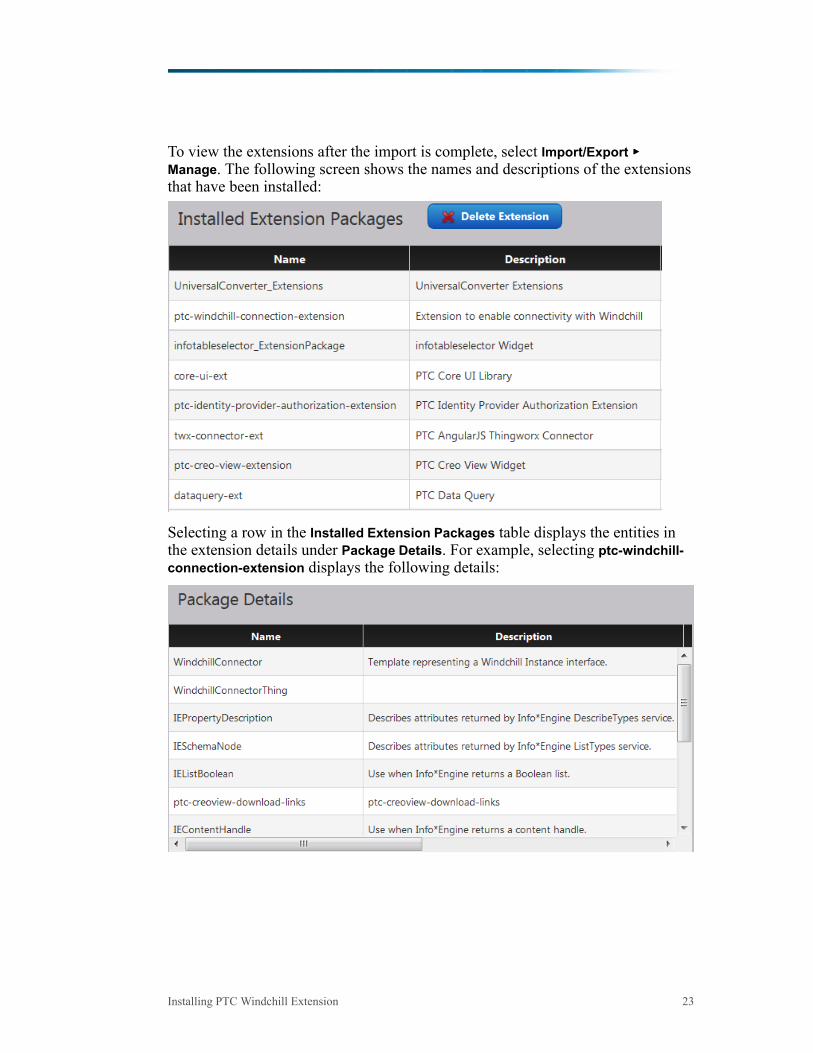
To view the extensions after the import is complete, select Import/Export ▶▶Manage. The following screen shows the names and descriptions of the extensionsthat have been installed:
Selecting a row in the Installed Extension Packages table displays the entities inthe extension details under Package Details. For example, selecting ptc-windchill-connection-extension displays the following details:
Installing PTC Windchill Extension 23
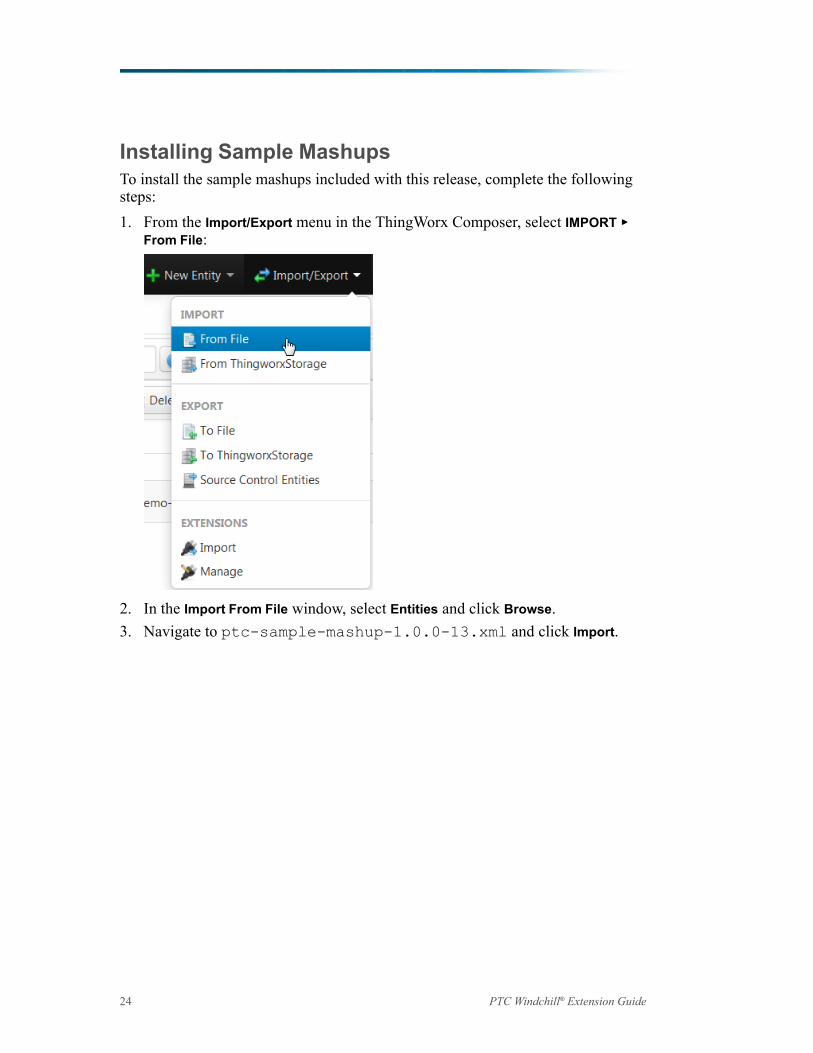
Installing Sample MashupsTo install the sample mashups included with this release, complete the followingsteps:1. From the Import/Export menu in the ThingWorx Composer, select IMPORT ▶▶
From File:
2. In the Import From File window, select Entities and click Browse.3. Navigate to ptc-sample-mashup-1.0.0-13.xml and click Import.
24 PTC Windchill® Extension Guide
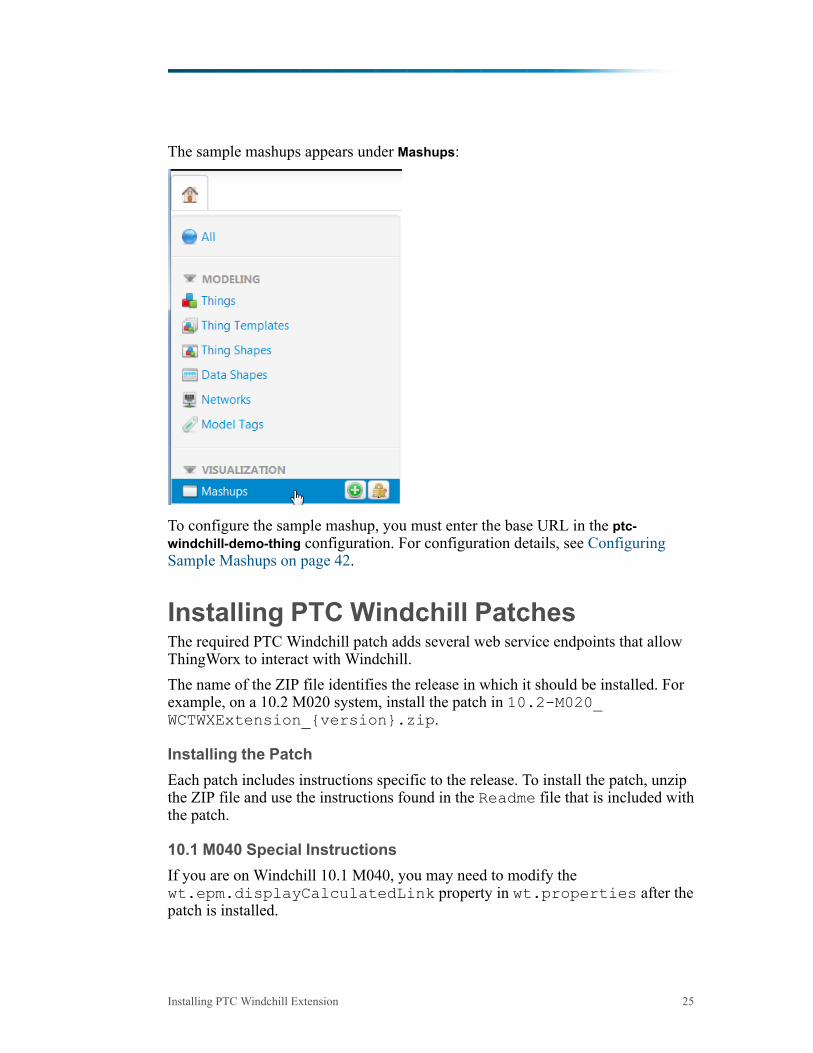
The sample mashups appears under Mashups:
To configure the sample mashup, you must enter the base URL in the ptc-windchill-demo-thing configuration. For configuration details, see ConfiguringSample Mashups on page 42.
Installing PTC Windchill PatchesThe required PTC Windchill patch adds several web service endpoints that allowThingWorx to interact with Windchill.The name of the ZIP file identifies the release in which it should be installed. Forexample, on a 10.2 M020 system, install the patch in 10.2-M020_WCTWXExtension_{version}.zip.
Installing the PatchEach patch includes instructions specific to the release. To install the patch, unzipthe ZIP file and use the instructions found in the Readme file that is included withthe patch.
10.1 M040 Special InstructionsIf you are on Windchill 10.1 M040, you may need to modify thewt.epm.displayCalculatedLink property in wt.properties after thepatch is installed.
Installing PTC Windchill Extension 25
No changes are required if the property is not set or is set to true; however, if theproperty is set to false, the View Drawing app will not function unless theproperty is changed to true. Consider whether changing this property setting hasadditional impacts at your site.If your site chooses to set the preference to true, use the following procedure toupdate site.xconf after the patch is installed.
1. Enter the following lines in site.xconf:<Property name="wt.epm.displayCalculatedLink" overridable="true"
targetFile="codebase/wt.properties" value="true"/>
NoteCode examples in this guide have been reformatted to fit the page and maycontain line numbers, hidden editing characters (such as tabs and end-of-line characters) and extraneous spaces. If you cut and paste code, check forthese characters and remove them before attempting to use the example inyour application.
2. Run xconfmanager –p to populated the properties.
26 PTC Windchill® Extension Guide
3Configuring Your System
Recommended Configurations ...................................................................................28Using SSL for Secure Communication ........................................................................29Using Trusted Host....................................................................................................32Configuring ThingWorx Single Sign-On when Connecting to Windchill...........................33
This chapter contains configuration considerations for your system.All actions described in this chapter require that you are logged in as anadministrator.
27
Recommended ConfigurationsNot all configuration steps are necessary in every installation of the PTCWindchill Extension. As a way to simplify the installation and configuration, PTCrecommends configurations for the following environments that only configurewhat is most reasonable:• Production• Development• DemoEach recommended configuration contains links to the sections that have thedetail steps to follow. Choose a recommended configuration and follow the linksto the steps and perform the configuration.
Production ConfigurationThe recommended production environment has the following characteristics:• Encrypted connection between Windchill and ThingWorx. Encrypted
communications is configured in the next step as part of using SSL to establisha trusted relationship.
• Trust between Windchill and ThingWorx that is based on SSL public/privatekeys. Follow the steps in Using SSL for Secure Communication on page 29.
• A single sign-on prompt for mashup users. The single sign-on uses Windchillcredentials. Follow the steps in Configuring ThingWorx Single Sign-On whenConnecting to Windchill on page 33.
Development ConfigurationThe recommended development environment has the following characteristics:• Non-encrypted communication between Windchill and ThingWorx.• Trust between Windchill and ThingWorx that uses the Trusted Host
mechanism. Follow the steps in Using Trusted Host on page 32.• Single sign-on is not required.
Mashup users will be prompted separately for ThingWorx credentials andWindchill credentials. Not using single sign-on will only work if theauthenticated ThingWorx user also exists as a Windchill user.
Demo ConfigurationThe recommended demo environment has the following characteristics:• Non-encrypted communication between Windchill and ThingWorx.• Trust between Windchill and ThingWorx that uses the Trusted Host
mechanism. Follow the steps in Using Trusted Host on page 32.
28 PTC Windchill® Extension Guide
• A single sign-on prompt for mashup users. The single sign-on uses Windchillcredentials. Follow the steps in Configuring ThingWorx Single Sign-On whenConnecting to Windchill on page 33.
• Sample mashups. Fore more information, see Configuring Sample Mashupson page 42.
Using SSL for Secure CommunicationYour site can use two-way SSL to secure the communication between theThingWorx server and the Windchill application. As described in RecommendedConfigurations on page , PTC recommends using SSL when working in aproduction environment. For development and demo environments, see UsingTrusted Host on page 32. The extension can use SSL to both mutually authenticatethe servers to each other and protect the communication itself.An SSL connection requires that both systems trust each other; to do this theWindchillConnector thing template must be configured to reference Java key andtrust stores held on the ThingWorx server which provide keys for the transaction.The HTTP Server on the Windchill server must be configured to trust those keys.SSL configurations vary considerably and this guide does not attempt to describeall options available in an SSL configuration. Instead, the following steps give anoverview of the process for configuring SSL, and a detailed example is availablein Example Configuration Using SSL for Secure Communications on page 71.This procedure assumes that both ThingWorx and Windchill are configured to useSSL for their standard communications. It also relies on configuration scripts thatcome with the most recent version of the PTC HTTP Server. The most recent PTCHTTP Server is included with Windchill 11.0 and the most recent CPS releases forWindchill 10.2.
NoteIt is not necessary to use the same SSL key for the primary Windchill orThingWorx communication and for the ThingWorx to Windchillcommunication discussed here. For example, a commercial trusted wildcardcertificate could be used for Windchill and a self-signed certificate usedbetween ThingWorx and Windchill.
Configuring Your System 29
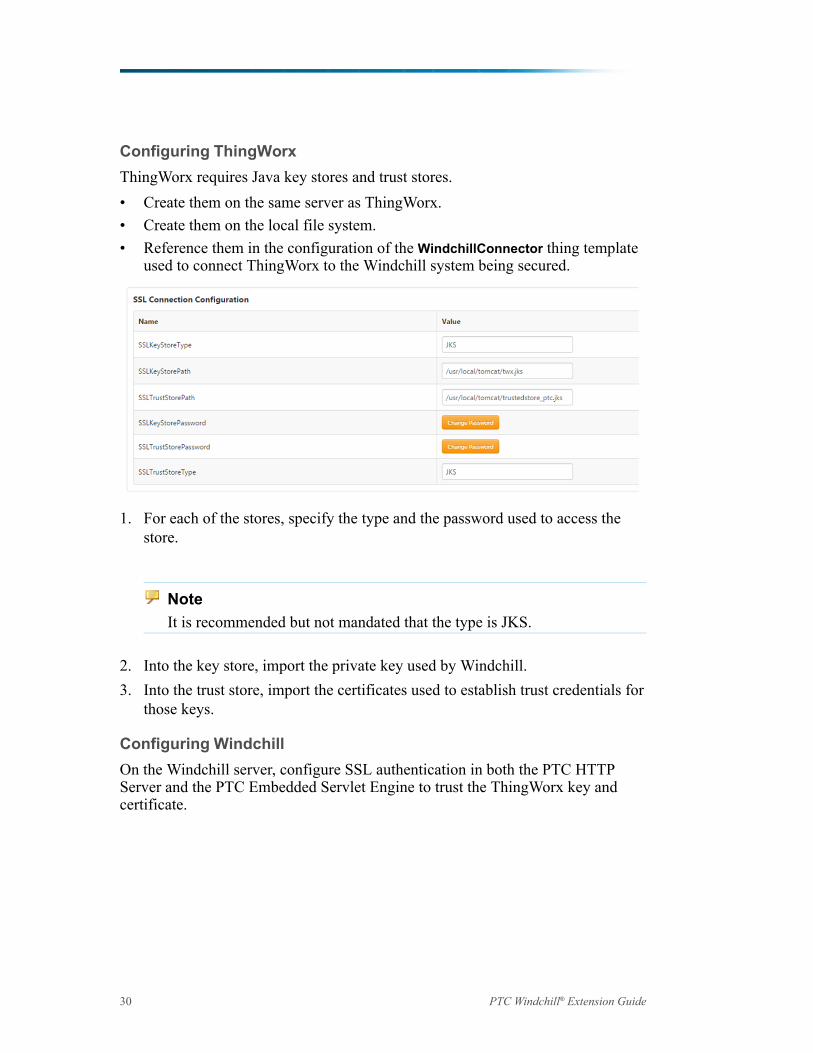
Configuring ThingWorxThingWorx requires Java key stores and trust stores.• Create them on the same server as ThingWorx.• Create them on the local file system.• Reference them in the configuration of the WindchillConnector thing template
used to connect ThingWorx to the Windchill system being secured.
1. For each of the stores, specify the type and the password used to access thestore.
NoteIt is recommended but not mandated that the type is JKS.
2. Into the key store, import the private key used by Windchill.3. Into the trust store, import the certificates used to establish trust credentials for
those keys.
Configuring WindchillOn the Windchill server, configure SSL authentication in both the PTC HTTPServer and the PTC Embedded Servlet Engine to trust the ThingWorx key andcertificate.
30 PTC Windchill® Extension Guide
NoteCode examples have been reformatted to fit the page and may contain linenumbers, hidden editing characters (such as tabs and end-of-line characters)and extraneous spaces. If you cut and paste code, check for these charactersand remove them before attempting to use the example in your application.
1. Update PTC HTTP Server configuration to reference the CA certificates file.• For Windchill 10.2 releases:
a. Navigate to and edit <HTTPSERVER_HOME>/conf/extra/httpd-ssl.conf.
b. Uncomment the SSLCACertificateFile entry so that it refers tothe ca-bundle.crt file. Make a note of the location of the ca-bundle.crt file.
c. Save changes.• For Windchill 11.0 releases:
a. Create a file in <APACHE_HOME>\conf\ca-bundle.crt. Thislocation is recommended but not required.
b. Paste the contents of Server.crt file used in HTTP Server.c. Save ca-bundle.crt.d. Create a sslclientauth.conf file at <APACHE_HOME>\conf\
sslvhostconf.d.e. Add SSLCACertificateFile <PATH_TO>\ca-bundle.crt in it so that it
refers to the ca- bundle.crt file.f. Save changes.
2. Add the ThingWorx certificate to PTC HTTP Server’s list of trusted CAcertificates.a. Edit the ca-bundle.crt file you pointed to previously in the
SSLCACertificateFile entry.
NoteIf the file does not yet exist, create the file and any required directories.
b. Append the contents of the ThingWorx certificate held in the trust store tothis file.
c. Save changes.3. Configure PTC HTTP Server for the sslClientAuth URL.
Configuring Your System 31

a. Find the Windchill web app name in <windchill-home>/codebase/wt.properties in the entry wt.webapp.name.
b. Open a shell or command prompt and enter the following:cd <HTTPSERVER_HOME>ant -f webAppConfig.xml -DappName=[windchill-web-app]
-Dresource=sslClientAuth -DresourceAuthType=sslClientAuth addAuthResource
c. Configure Windchill to trust the ThingWorx certificate.i. Edit <windchill-home>/codebase/WEB-INF/web.xml.ii. Find <filter-name>TrustedSSLAuthFilter</
filtername>.iii. Add an additional <init-param> element after the existing one where
[thingworx-cert-name] is the name of the ThingWorx certificate:<init-param><param-name>trustedSubjectPattern.1</param-name><param-value>
[thingworx-cert-name]</param-value></init-param>
d. Save changes.
Using Trusted HostWhen creating an application for internal use (such as development, testing, ordemos), you can configure communication using just a trusted host mechanism.For production environments, see Using SSL for Secure Communication on page29.Trusted hosts are established through the wt.auth.trustedHosts propertyin the wt.properties file on your Windchill system. You must ensure that thehost name of the ThingWorx server has been added to this property.If the wt.auth.trustedHosts property exists, you can use the -d parameteron the xconfmanager command to display the existing values of the property.For example, enter a command similar to the following from a Windchill shell:xconfmanager -d wt.auth.trustedHosts=twxhost1 -t codebase/wt.properties
If needed, you can enter an xconfmanager command from a Windchill shell to addthe ThingWorx host name:• If the property is not set in wt.properties and the host name is
twxhost1, enter a command similar to the following to set the property tothe host name:xconfmanager --set wt.auth.trustedHosts=twxhost1 -t codebase/wt.properties -p
• If the property has already been set in wt.properties and the host name istwxhost1, enter a command similar to the following to add the host name:xconfmanager --add wt.auth.trustedHosts=twxhost1 -p
• When multiple hosts exist, enter as a single value similar to the followingexample:
32 PTC Windchill® Extension Guide
xconfmanager -s wt.auth.trustedHosts="hostname1 hostname2 hostname3"
For more information, see the related PTC case solution. https://support.ptc.com/appserver/cs/view/solution.jsp?n=CS182327
Configuring ThingWorx Single Sign-Onwhen Connecting to WindchillThingWorx users must have corresponding user identities in Windchill to accessmashups that use the services provided by the extension. PTC recommends usingthe single sign-on option to address this.The single sign-on solution uses Windchill as the identity provider for ThingWorx.A user that opens a browser to a mashup or any ThingWorx URL is routed toWindchill for authentication. Once authenticated, the browser is routed back to themashup or another page in ThingWorx and the user is able to access ThingWorx orthe mashup as the user authenticated in Windchill. For technical details, seeArchitecture of Single Sign-On on page 75.Single sign-on requires that the same users exist in both Windchill andThingWorx. PTC Navigate provides an option to automatically create users inThingWorx once they have been authenticated in Windchill. If this option is notenabled or single sign-on is not used, then users must independently exist in bothWindchill and ThingWorx.Use the steps in the following sections to configure single sign-on using Windchillas the identity provider.
Configuring Your System 33
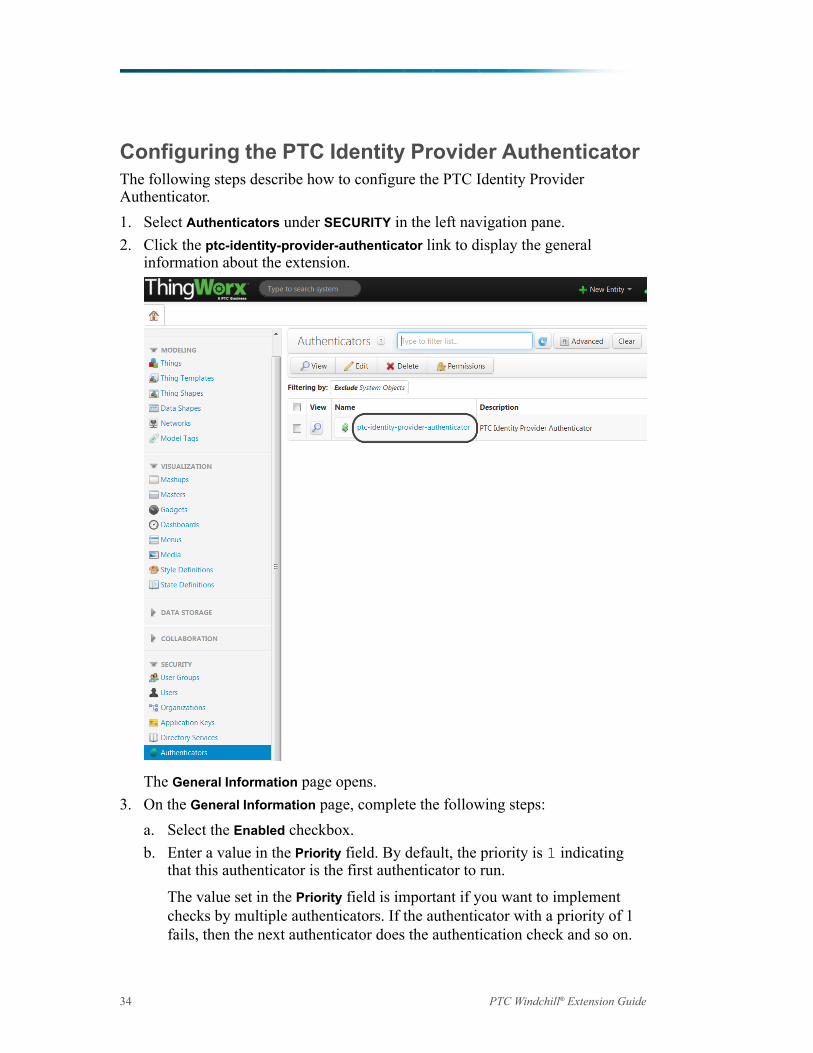
Configuring the PTC Identity Provider AuthenticatorThe following steps describe how to configure the PTC Identity ProviderAuthenticator.1. Select Authenticators under SECURITY in the left navigation pane.2. Click the ptc-identity-provider-authenticator link to display the general
information about the extension.
The General Information page opens.3. On the General Information page, complete the following steps:
a. Select the Enabled checkbox.b. Enter a value in the Priority field. By default, the priority is 1 indicating
that this authenticator is the first authenticator to run.
The value set in the Priority field is important if you want to implementchecks by multiple authenticators. If the authenticator with a priority of 1fails, then the next authenticator does the authentication check and so on.
34 PTC Windchill® Extension Guide

4. Click Configuration under ENTITY INFORMATION in the left navigation pane:
Use the two options, CreateUserDynamically and HomeMashup, with singlesign-on so that users who are authenticated in Windchill are automaticallyadded as users to ThingWorx and assigned a home mashup. When a useropens a browser to ThingWorx for the first time, they will be routed toWindchill for authentication. Once authenticated, a corresponding user iscreated in ThingWorx and the user is assigned a home mashup. Then thebrowser is routed to the specified home mashup.
• CreateUserDynamically – When selected, configures the authenticator toautomatically create a user in ThingWorx if the user does not yet exist andthe user has been authenticated by Windchill. If the authenticator is notconfigured to automatically create users, the browser is still routed toWindchill for authentication but then fails to open ThingWorx if the usersdoes not exist.
• HomeMashup – Assigns a home mashup to the newly created users. If nohome mashup is specified, ThingWorx routes the browser to theThingWorx search page.
For PTC Navigate, set to LandingPageAccessAppMashup.5. Ensure that a home mashup value is set for either all dynamically created users
using the HomeMashup field (described in the previous step) or for existingusers (other than administrative users) on the General Information pages ofusers. If a home mashup is not set for a general user, that user is redirected tothe default ThingWorx search page.
6. Click Save.
Add Servlet Filters to Tomcat ConfigurationUsing the Windchill IdP authentication filter, the ThingWorx unauthenticated useris redirected to the Windchill login form for authentication credentials. Aftersuccessful authentication, the ThingWorx application receives a key and username. For more information, see Configuring ThingWorx Single Sign-On whenConnecting to Windchill on page 33.The filter is configured on the ThingWorx side in the web.xml file that is underthe ThingWorx Tomcat installation directory. Use the following steps:
Configuring Your System 35
1. Stop Tomcat.2. Copy ptc-identity-provider-authentication-filter-
{version}.jar to the WEB-INF/lib directory that is under theThingWorx Tomcat installation directory.
NoteThe JAR file is included with the extension files in Framework.zip.
3. Navigate to the web.xml file in the following location: <Tomcat InstallLocation>\Apache Software Foundation\Tomcat 8.0\webapps\Thingworx\WEB-INF\web.xml.
4. Add code blocks to the ThingWorx web.xml file.
NoteNote the following about code examples:
• Code examples in this guide may have been reformatted to fit on thepage and, therefore, may contain line numbers, hidden editingcharacters (such as tabs and end-of-line characters) and extraneousspaces. If you cut and paste code from this manual, check for thesecharacters and remove them before attempting to use the example inyour application.
• You must include actual values. Within each code block, replace thecontent identified by [] with values for your implementation.
36 PTC Windchill® Extension Guide
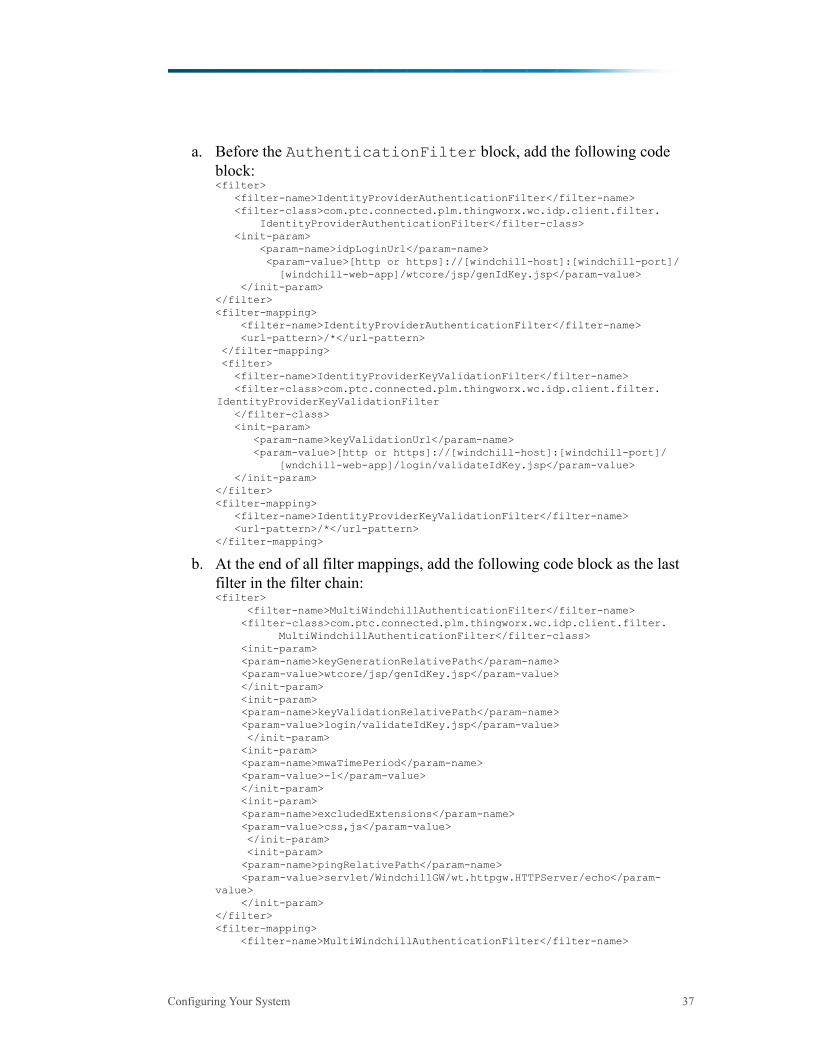
a. Before the AuthenticationFilter block, add the following codeblock:<filter>
<filter-name>IdentityProviderAuthenticationFilter</filter-name><filter-class>com.ptc.connected.plm.thingworx.wc.idp.client.filter.
IdentityProviderAuthenticationFilter</filter-class><init-param>
<param-name>idpLoginUrl</param-name><param-value>[http or https]://[windchill-host]:[windchill-port]/
[windchill-web-app]/wtcore/jsp/genIdKey.jsp</param-value></init-param>
</filter><filter-mapping>
<filter-name>IdentityProviderAuthenticationFilter</filter-name><url-pattern>/*</url-pattern>
</filter-mapping><filter>
<filter-name>IdentityProviderKeyValidationFilter</filter-name><filter-class>com.ptc.connected.plm.thingworx.wc.idp.client.filter.
IdentityProviderKeyValidationFilter</filter-class><init-param>
<param-name>keyValidationUrl</param-name><param-value>[http or https]://[windchill-host]:[windchill-port]/
[wndchill-web-app]/login/validateIdKey.jsp</param-value></init-param>
</filter><filter-mapping>
<filter-name>IdentityProviderKeyValidationFilter</filter-name><url-pattern>/*</url-pattern>
</filter-mapping>
b. At the end of all filter mappings, add the following code block as the lastfilter in the filter chain:<filter>
<filter-name>MultiWindchillAuthenticationFilter</filter-name><filter-class>com.ptc.connected.plm.thingworx.wc.idp.client.filter.
MultiWindchillAuthenticationFilter</filter-class><init-param><param-name>keyGenerationRelativePath</param-name><param-value>wtcore/jsp/genIdKey.jsp</param-value></init-param><init-param><param-name>keyValidationRelativePath</param-name><param-value>login/validateIdKey.jsp</param-value></init-param><init-param><param-name>mwaTimePeriod</param-name><param-value>-1</param-value></init-param><init-param><param-name>excludedExtensions</param-name><param-value>css,js</param-value></init-param><init-param><param-name>pingRelativePath</param-name><param-value>servlet/WindchillGW/wt.httpgw.HTTPServer/echo</param-
value></init-param>
</filter><filter-mapping>
<filter-name>MultiWindchillAuthenticationFilter</filter-name>
Configuring Your System 37

<url-pattern>/*</url-pattern></filter-mapping>
5. Restart Tomcat.
Modify ThingWorx Run Time PermissionsPermissions for AdministratorsAdministrative users need to be added to the ThingWorx Administrators group.This group is a systems object, not visible in the Groups menu by default. Toaccess the group, enter Administrators in the spotlight search at the top ofthe ThingWorx screen.
Permissions for UsersBy default, permissions for ThingWorx non-administrative users are set to readonly. Determine how you will manage your user access and modify thepermissions in the Run Time or Run Time Instance permissions for entities. Forexample, you can change the access to the ptc-windchill-demo-thing to allow read,write, and execute permissions.
38 PTC Windchill® Extension Guide
Verifying Single Sign OnBoth Windchill and ThingWorx need to agree on the name of the administratoruser. Consider the following options:• If you have not made changes in Windchill, an administrator user named
“Administrator” was created when Windchill was installed. Using aThingWorx system configured for single sign-on, you can authenticate as thatuser and have full access rights as the administrator user in ThingWorx.
• If you have modified Windchill so that there is not a user named“Administrator,” then you must decide on a username that is common to bothWindchill and ThingWorx and add that user to ThingWorx and theAdministrators user group.
To verify the single sign-on configuration, open a browser to the ThingWorxURL. The browser is routed to Windchill for authentication. Provide theWindchill credentials for Administrator (or another user configured to be theThingWorx administrator). The browser is routed back to ThingWorx, which willopen the ThingWorx Composer. Verify you are now running in ThingWorx as thatuser. This verifies that single sign-on is configured properly.If you have selected to have the authenticator automatically create users, test thatnext. To verify, open a browser to the ThingWorx URL. You are routed toWindchill for authentication. Provide Windchill credentials of a user that does notexist in ThingWorx. Your browser is routed back to ThingWorx on the pagespecified as the home mashup. Verify you are now running as the correct user inThingWorx.
Configuring Your System 39

4Using the Sample Mashups
Configuring Sample Mashups.....................................................................................42Product Structure Sample Mashup .............................................................................43Search Sample Mashup.............................................................................................48Reusing Sample Mashup Content...............................................................................51
This chapter describes the product structure and search sample mashups that areinstalled with the PTC Windchill Extension. The sections to follow describe howto configure, authenticate, and reuse the sample mashups that have been provided.
41
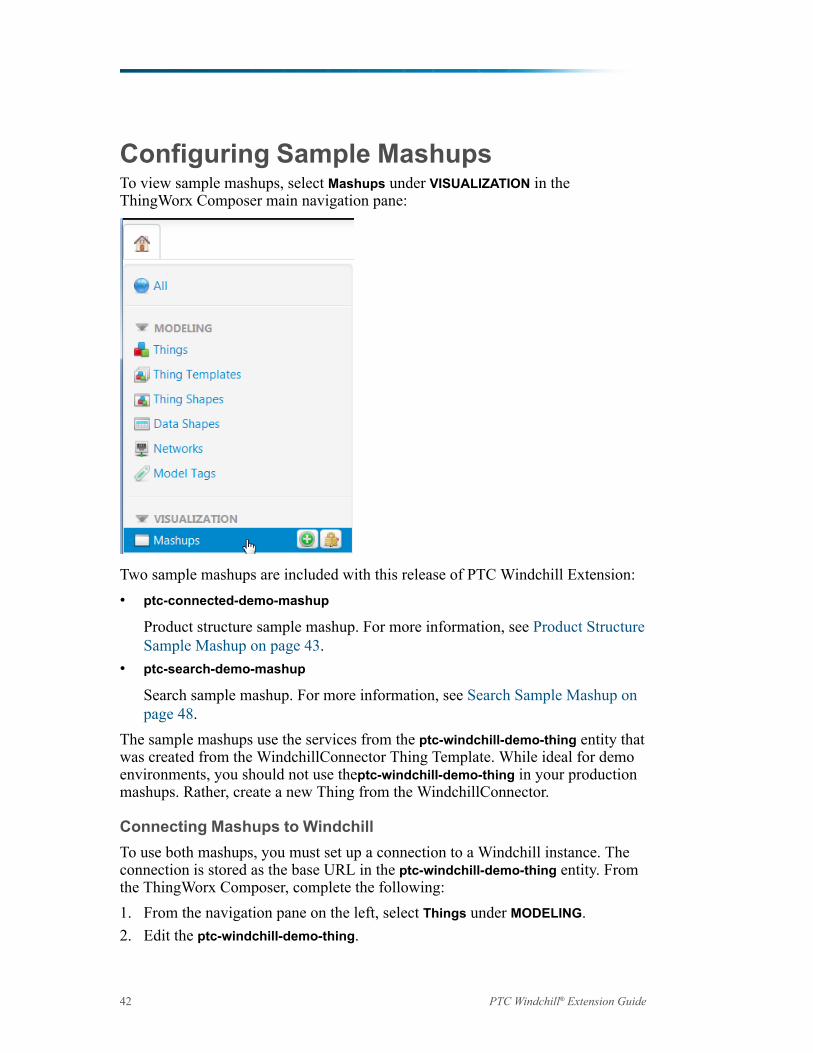
Configuring Sample MashupsTo view sample mashups, select Mashups under VISUALIZATION in theThingWorx Composer main navigation pane:
Two sample mashups are included with this release of PTC Windchill Extension:• ptc-connected-demo-mashup
Product structure sample mashup. For more information, see Product StructureSample Mashup on page 43.
• ptc-search-demo-mashup
Search sample mashup. For more information, see Search Sample Mashup onpage 48.
The sample mashups use the services from the ptc-windchill-demo-thing entity thatwas created from the WindchillConnector Thing Template. While ideal for demoenvironments, you should not use theptc-windchill-demo-thing in your productionmashups. Rather, create a new Thing from the WindchillConnector.
Connecting Mashups to WindchillTo use both mashups, you must set up a connection to a Windchill instance. Theconnection is stored as the base URL in the ptc-windchill-demo-thing entity. Fromthe ThingWorx Composer, complete the following:1. From the navigation pane on the left, select Things under MODELING.2. Edit the ptc-windchill-demo-thing.
42 PTC Windchill® Extension Guide
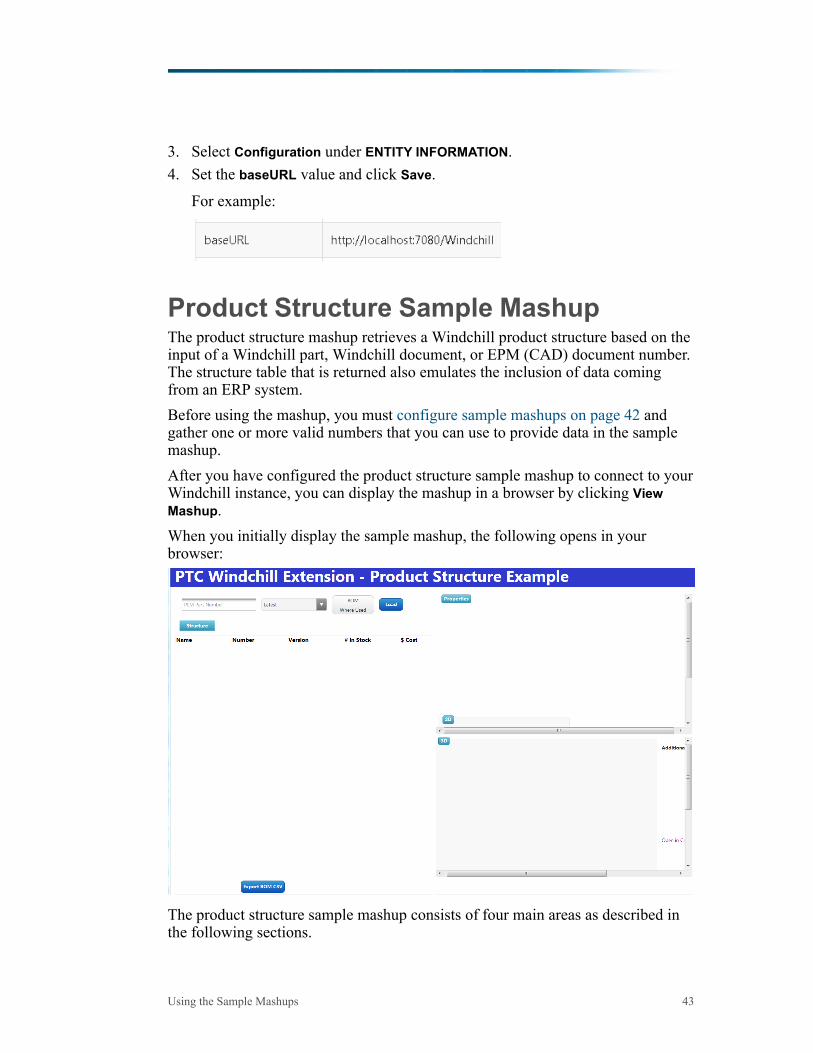
3. Select Configuration under ENTITY INFORMATION.4. Set the baseURL value and click Save.
For example:
Product Structure Sample MashupThe product structure mashup retrieves a Windchill product structure based on theinput of a Windchill part, Windchill document, or EPM (CAD) document number.The structure table that is returned also emulates the inclusion of data comingfrom an ERP system.Before using the mashup, you must configure sample mashups on page 42 andgather one or more valid numbers that you can use to provide data in the samplemashup.After you have configured the product structure sample mashup to connect to yourWindchill instance, you can display the mashup in a browser by clicking ViewMashup.When you initially display the sample mashup, the following opens in yourbrowser:
The product structure sample mashup consists of four main areas as described inthe following sections.
Using the Sample Mashups 43
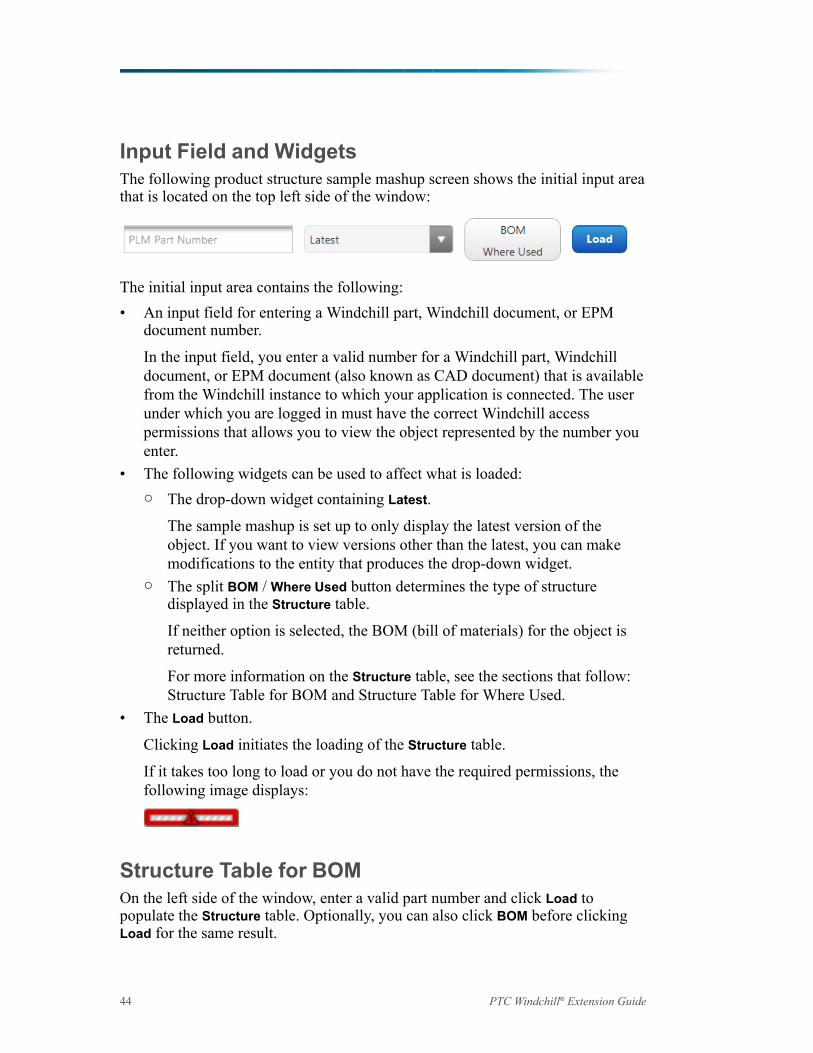
Input Field and WidgetsThe following product structure sample mashup screen shows the initial input areathat is located on the top left side of the window:
The initial input area contains the following:• An input field for entering a Windchill part, Windchill document, or EPM
document number.
In the input field, you enter a valid number for a Windchill part, Windchilldocument, or EPM document (also known as CAD document) that is availablefrom the Windchill instance to which your application is connected. The userunder which you are logged in must have the correct Windchill accesspermissions that allows you to view the object represented by the number youenter.
• The following widgets can be used to affect what is loaded:○ The drop-down widget containing Latest.
The sample mashup is set up to only display the latest version of theobject. If you want to view versions other than the latest, you can makemodifications to the entity that produces the drop-down widget.
○ The split BOM / Where Used button determines the type of structuredisplayed in the Structure table.
If neither option is selected, the BOM (bill of materials) for the object isreturned.
For more information on the Structure table, see the sections that follow:Structure Table for BOM and Structure Table for Where Used.
• The Load button.
Clicking Load initiates the loading of the Structure table.
If it takes too long to load or you do not have the required permissions, thefollowing image displays:
Structure Table for BOMOn the left side of the window, enter a valid part number and click Load topopulate the Structure table. Optionally, you can also click BOM before clickingLoad for the same result.
44 PTC Windchill® Extension Guide
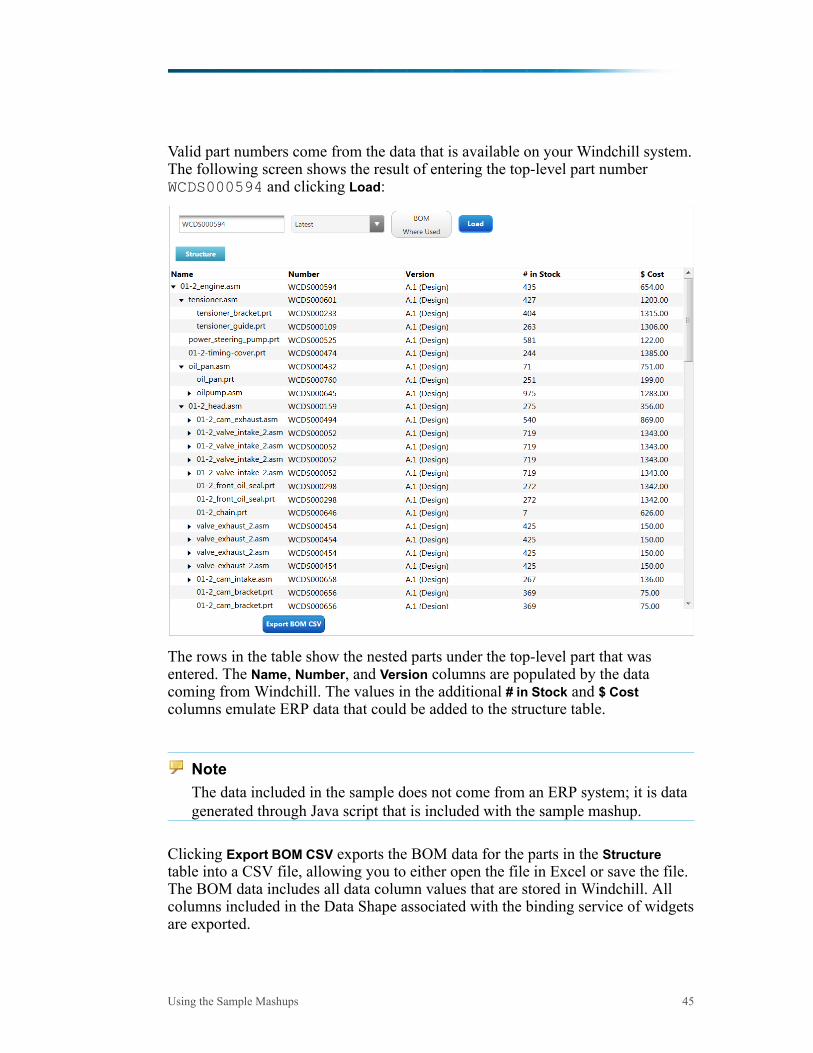
Valid part numbers come from the data that is available on your Windchill system.The following screen shows the result of entering the top-level part numberWCDS000594 and clicking Load:
The rows in the table show the nested parts under the top-level part that wasentered. The Name, Number, and Version columns are populated by the datacoming from Windchill. The values in the additional # in Stock and $ Costcolumns emulate ERP data that could be added to the structure table.
NoteThe data included in the sample does not come from an ERP system; it is datagenerated through Java script that is included with the sample mashup.
Clicking Export BOM CSV exports the BOM data for the parts in the Structuretable into a CSV file, allowing you to either open the file in Excel or save the file.The BOM data includes all data column values that are stored in Windchill. Allcolumns included in the Data Shape associated with the binding service of widgetsare exported.
Using the Sample Mashups 45
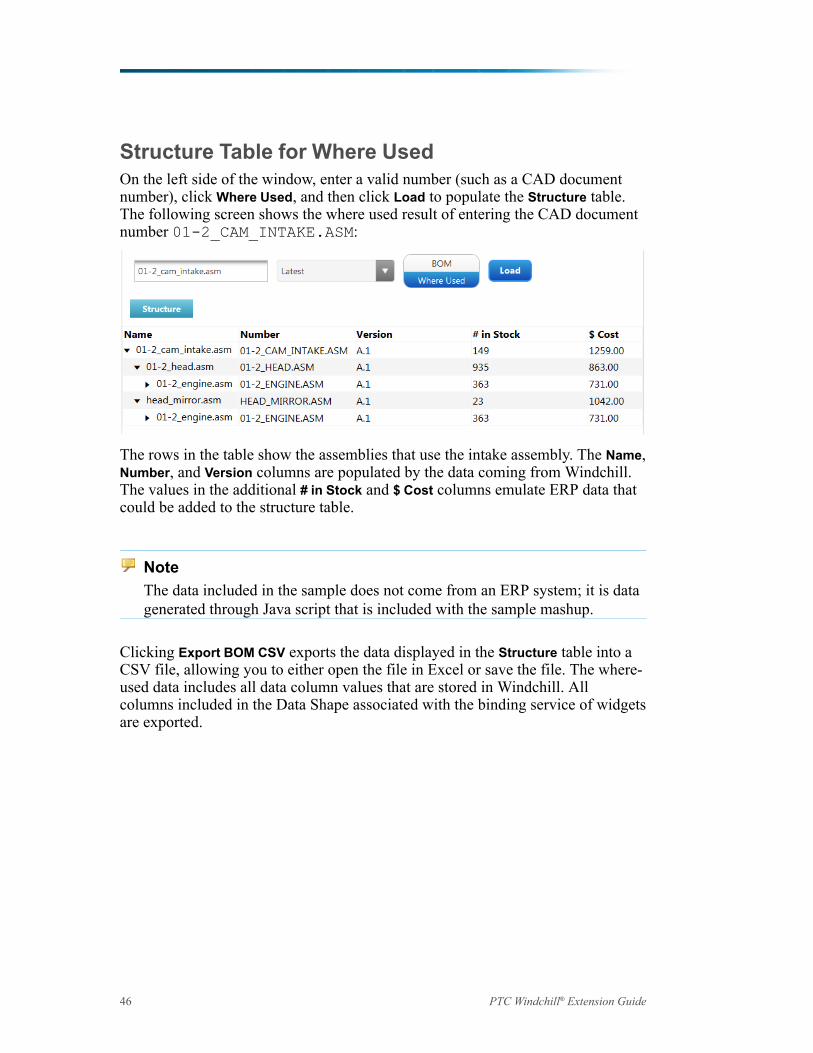
Structure Table for Where UsedOn the left side of the window, enter a valid number (such as a CAD documentnumber), click Where Used, and then click Load to populate the Structure table.The following screen shows the where used result of entering the CAD documentnumber 01-2_CAM_INTAKE.ASM:
The rows in the table show the assemblies that use the intake assembly. The Name,Number, and Version columns are populated by the data coming from Windchill.The values in the additional # in Stock and $ Cost columns emulate ERP data thatcould be added to the structure table.
NoteThe data included in the sample does not come from an ERP system; it is datagenerated through Java script that is included with the sample mashup.
Clicking Export BOM CSV exports the data displayed in the Structure table into aCSV file, allowing you to either open the file in Excel or save the file. The where-used data includes all data column values that are stored in Windchill. Allcolumns included in the Data Shape associated with the binding service of widgetsare exported.
46 PTC Windchill® Extension Guide
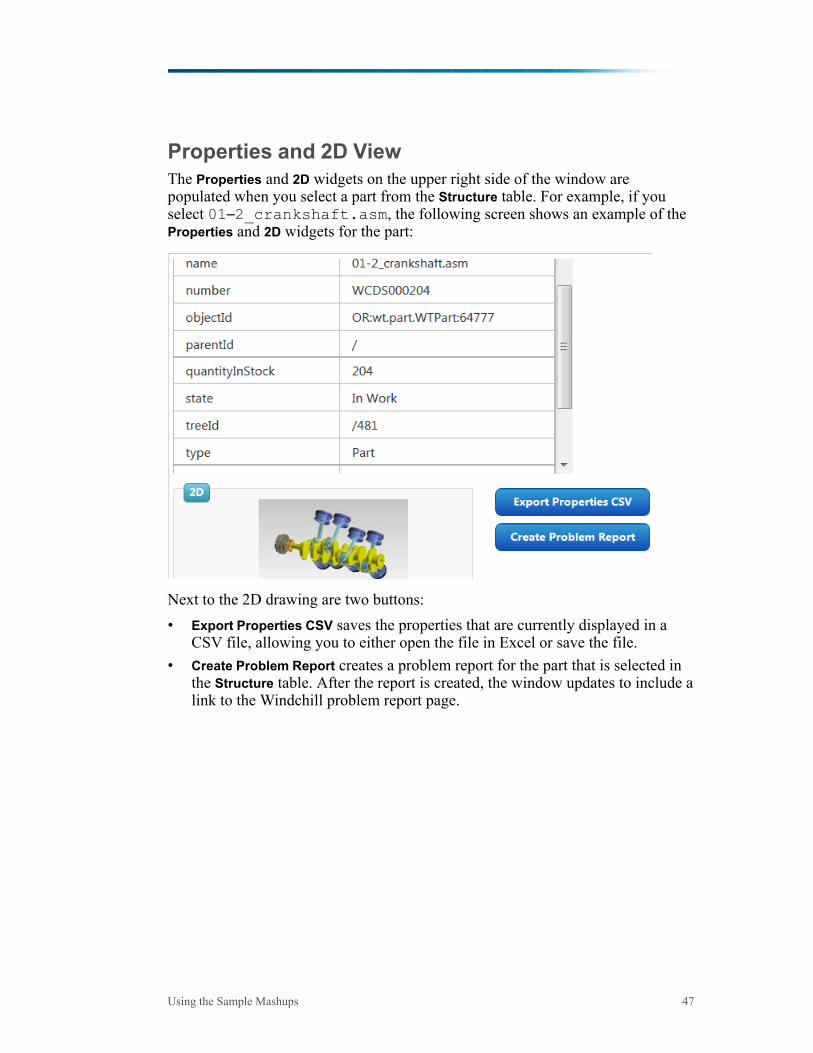
Properties and 2D ViewThe Properties and 2D widgets on the upper right side of the window arepopulated when you select a part from the Structure table. For example, if youselect 01–2_crankshaft.asm, the following screen shows an example of theProperties and 2D widgets for the part:
Next to the 2D drawing are two buttons:• Export Properties CSV saves the properties that are currently displayed in a
CSV file, allowing you to either open the file in Excel or save the file.• Create Problem Report creates a problem report for the part that is selected in
the Structure table. After the report is created, the window updates to include alink to the Windchill problem report page.
Using the Sample Mashups 47
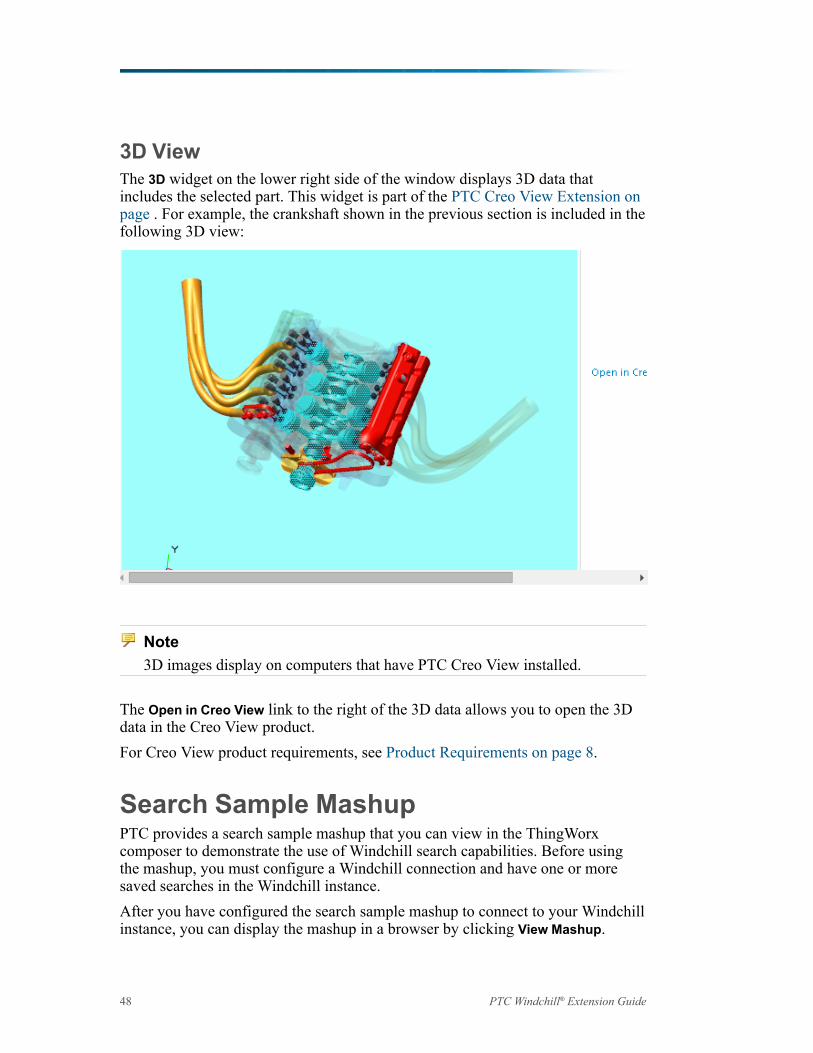
3D ViewThe 3D widget on the lower right side of the window displays 3D data thatincludes the selected part. This widget is part of the PTC Creo View Extension onpage . For example, the crankshaft shown in the previous section is included in thefollowing 3D view:
Note3D images display on computers that have PTC Creo View installed.
The Open in Creo View link to the right of the 3D data allows you to open the 3Ddata in the Creo View product.For Creo View product requirements, see Product Requirements on page 8.
Search Sample MashupPTC provides a search sample mashup that you can view in the ThingWorxcomposer to demonstrate the use of Windchill search capabilities. Before usingthe mashup, you must configure a Windchill connection and have one or moresaved searches in the Windchill instance.After you have configured the search sample mashup to connect to your Windchillinstance, you can display the mashup in a browser by clicking View Mashup.
48 PTC Windchill® Extension Guide
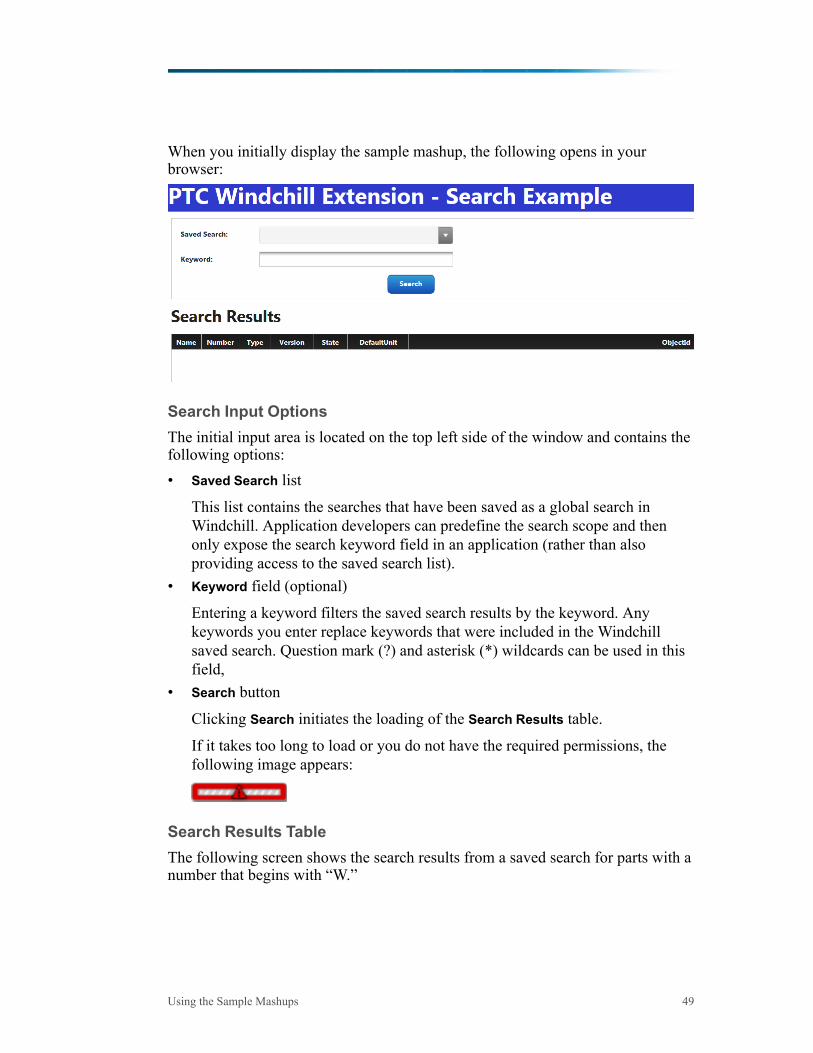
When you initially display the sample mashup, the following opens in yourbrowser:
Search Input OptionsThe initial input area is located on the top left side of the window and contains thefollowing options:• Saved Search list
This list contains the searches that have been saved as a global search inWindchill. Application developers can predefine the search scope and thenonly expose the search keyword field in an application (rather than alsoproviding access to the saved search list).
• Keyword field (optional)
Entering a keyword filters the saved search results by the keyword. Anykeywords you enter replace keywords that were included in the Windchillsaved search. Question mark (?) and asterisk (*) wildcards can be used in thisfield,
• Search button
Clicking Search initiates the loading of the Search Results table.
If it takes too long to load or you do not have the required permissions, thefollowing image appears:
Search Results TableThe following screen shows the search results from a saved search for parts with anumber that begins with “W.”
Using the Sample Mashups 49
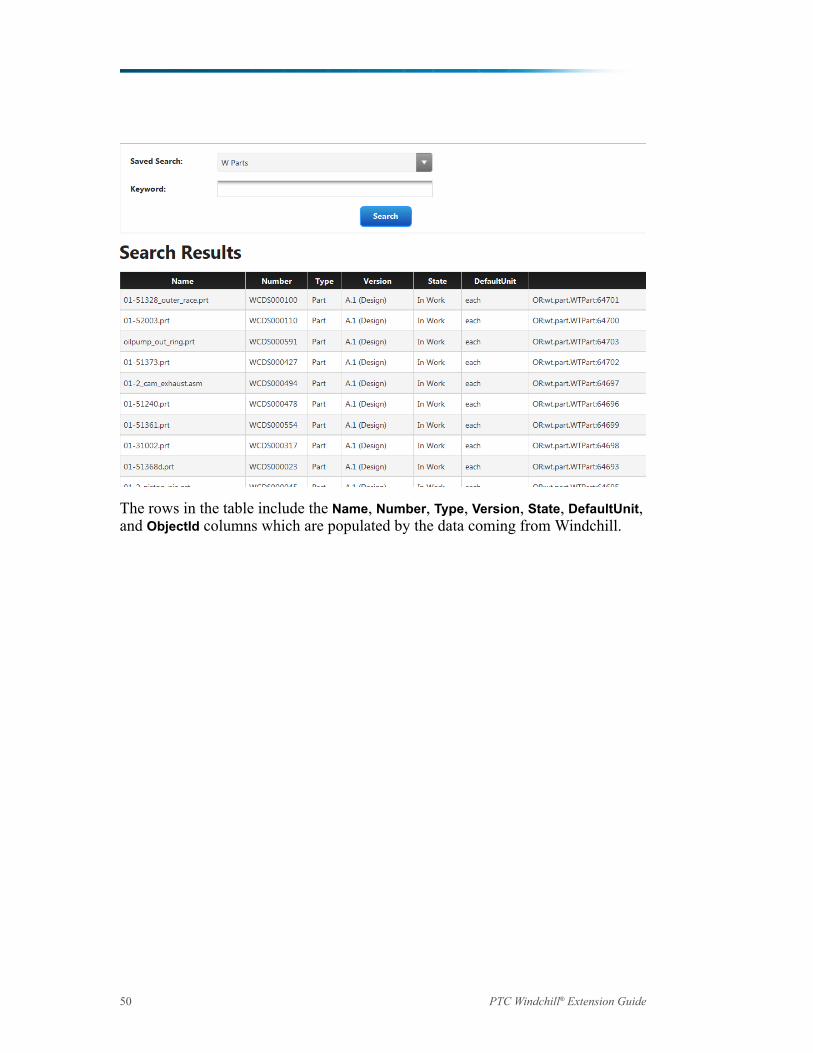
The rows in the table include the Name, Number, Type, Version, State, DefaultUnit,and ObjectId columns which are populated by the data coming from Windchill.
50 PTC Windchill® Extension Guide
Reusing Sample Mashup ContentAfter you have the Windchill connection established for the sample mashups andhave the mashups working with your data, PTC recommends that you createduplicate mashups that you can change to meet your needs.
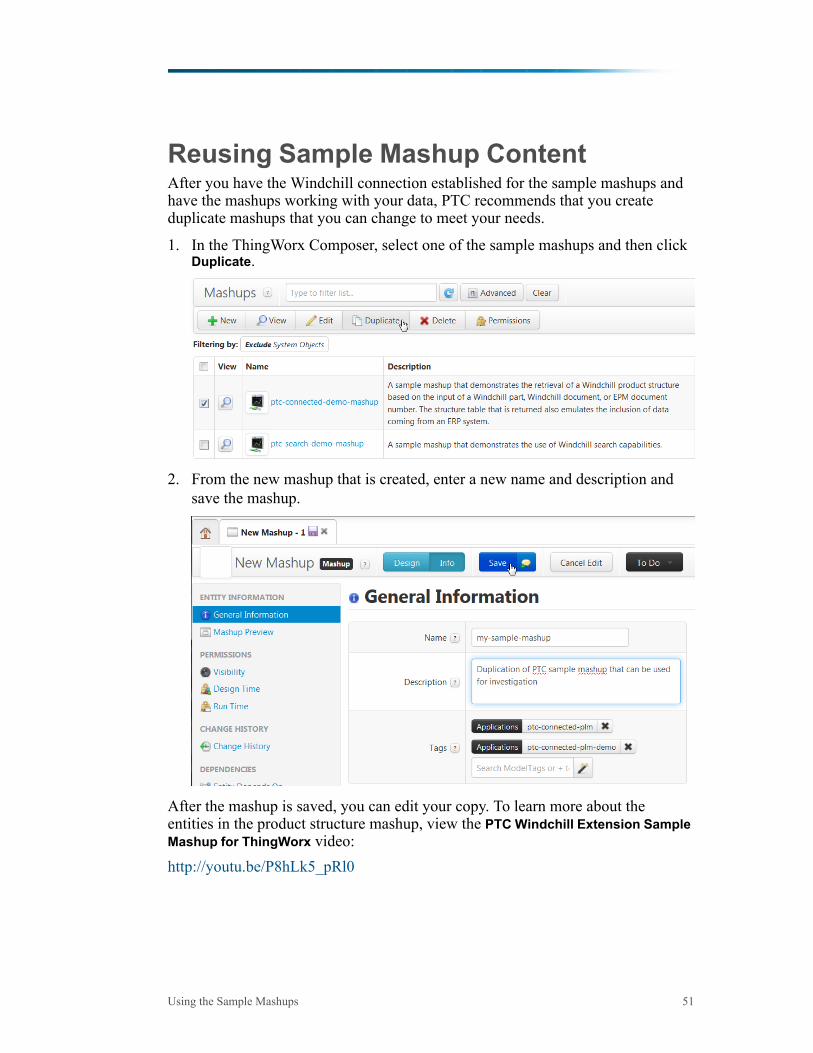
1. In the ThingWorx Composer, select one of the sample mashups and then clickDuplicate.
2. From the new mashup that is created, enter a new name and description andsave the mashup.
After the mashup is saved, you can edit your copy. To learn more about theentities in the product structure mashup, view the PTC Windchill Extension SampleMashup for ThingWorx video:http://youtu.be/P8hLk5_pRl0
Using the Sample Mashups 51
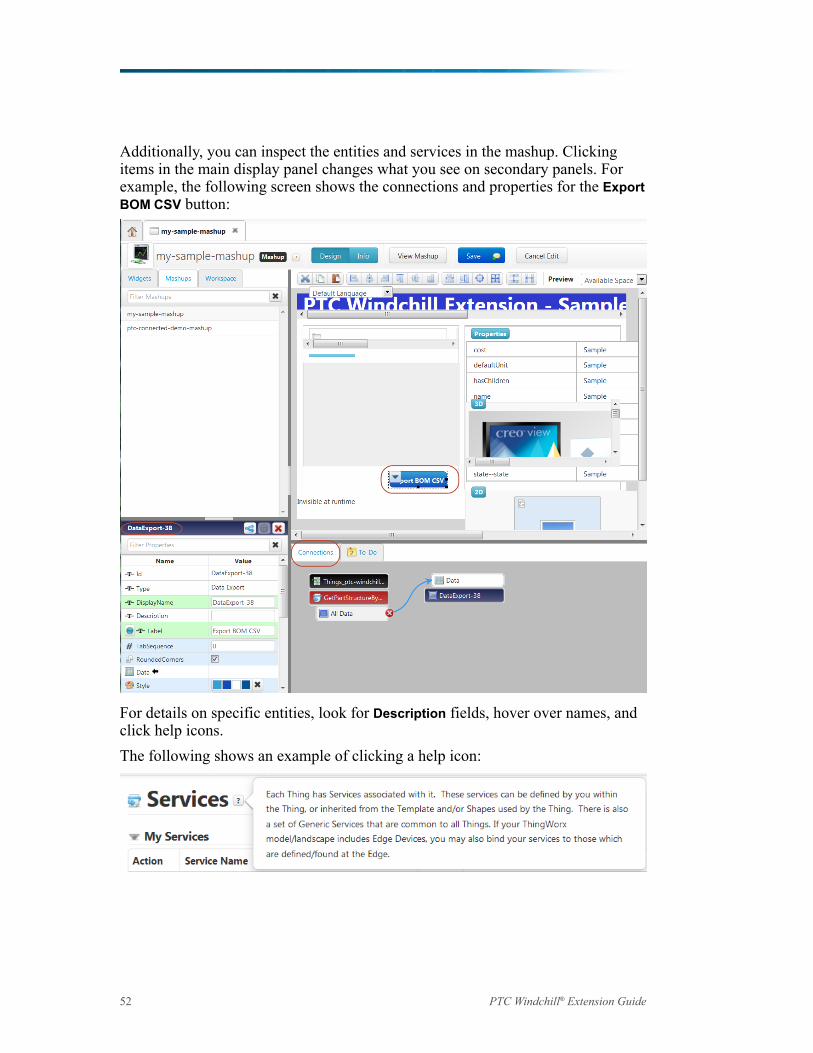
Additionally, you can inspect the entities and services in the mashup. Clickingitems in the main display panel changes what you see on secondary panels. Forexample, the following screen shows the connections and properties for the ExportBOM CSV button:
For details on specific entities, look for Description fields, hover over names, andclick help icons.The following shows an example of clicking a help icon:
52 PTC Windchill® Extension Guide
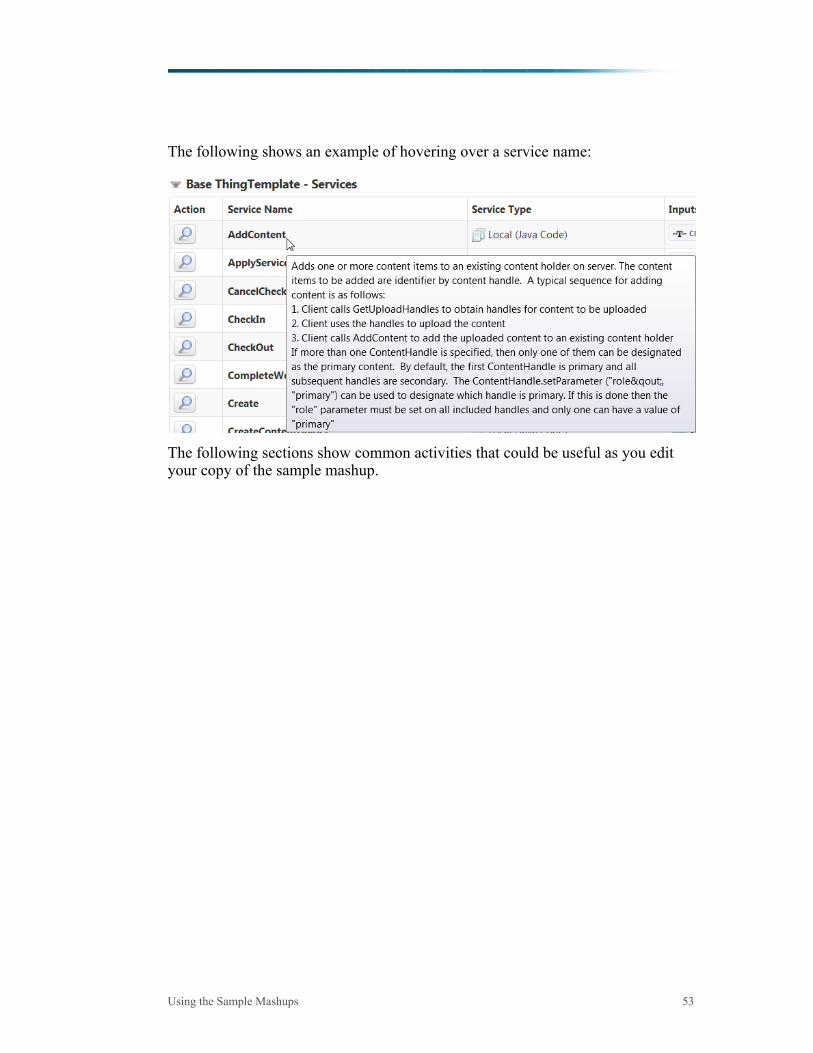
The following shows an example of hovering over a service name:
The following sections show common activities that could be useful as you edityour copy of the sample mashup.
Using the Sample Mashups 53
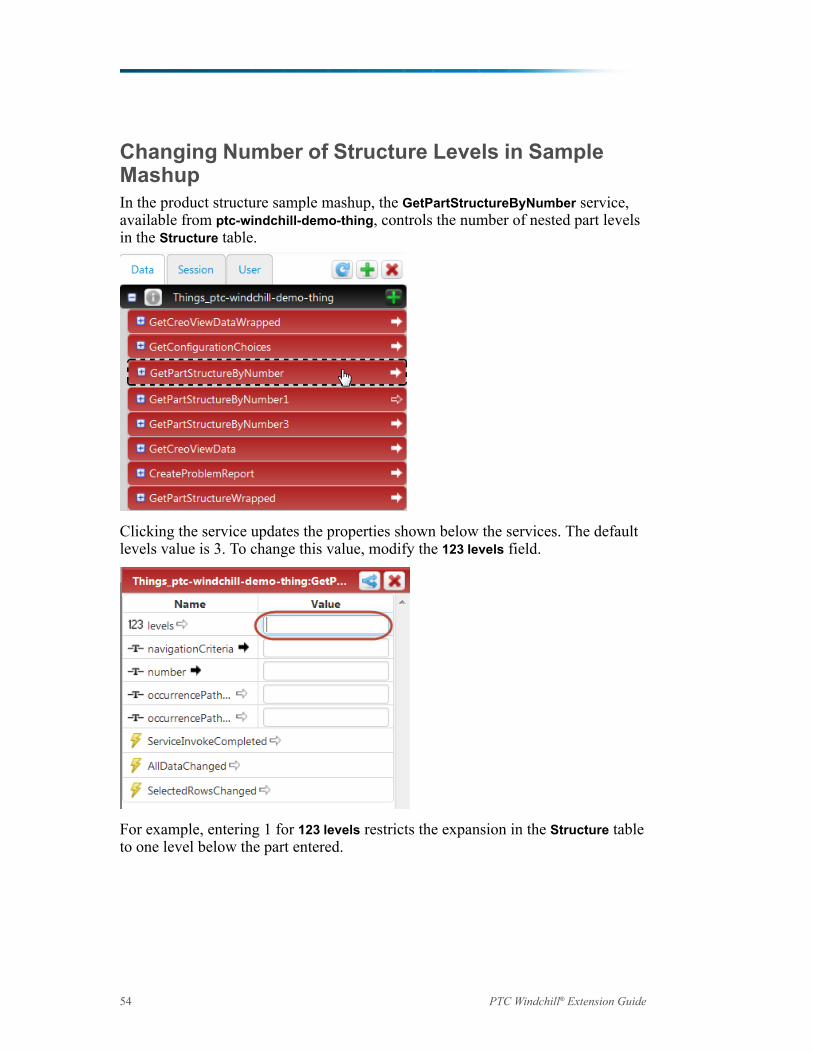
Changing Number of Structure Levels in SampleMashupIn the product structure sample mashup, the GetPartStructureByNumber service,available from ptc-windchill-demo-thing, controls the number of nested part levelsin the Structure table.
Clicking the service updates the properties shown below the services. The defaultlevels value is 3. To change this value, modify the 123 levels field.
For example, entering 1 for 123 levels restricts the expansion in the Structure tableto one level below the part entered.
54 PTC Windchill® Extension Guide
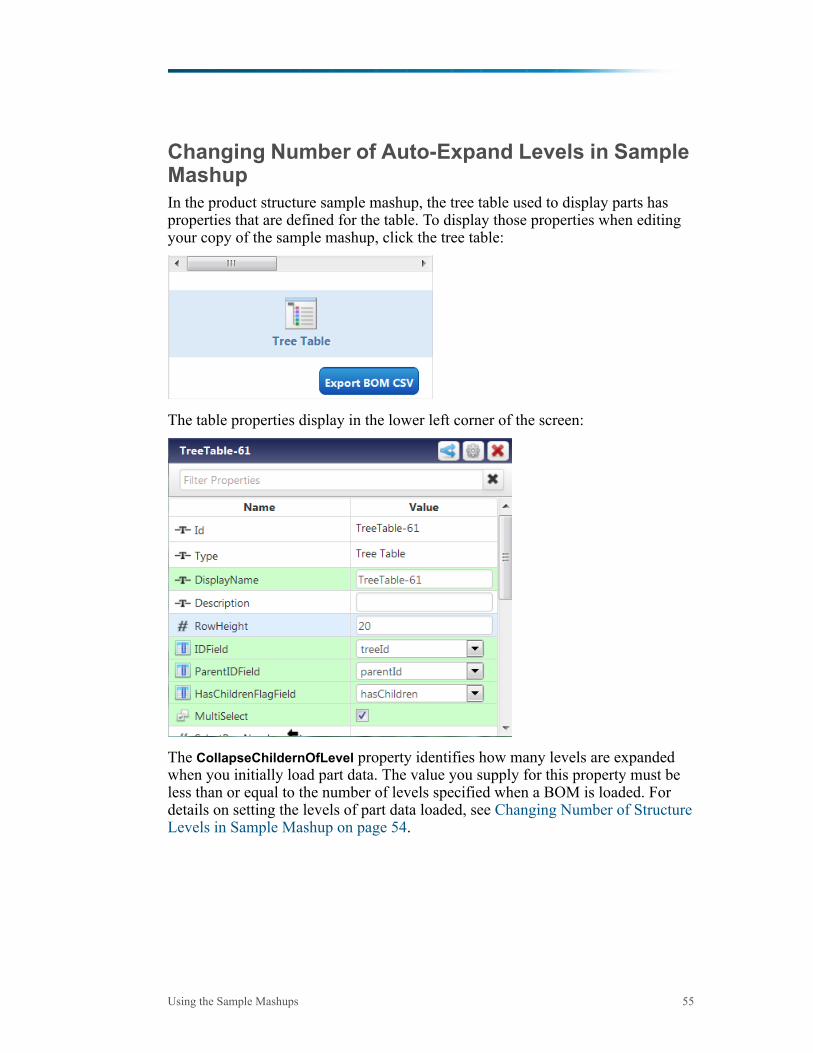
Changing Number of Auto-Expand Levels in SampleMashupIn the product structure sample mashup, the tree table used to display parts hasproperties that are defined for the table. To display those properties when editingyour copy of the sample mashup, click the tree table:
The table properties display in the lower left corner of the screen:
The CollapseChildernOfLevel property identifies how many levels are expandedwhen you initially load part data. The value you supply for this property must beless than or equal to the number of levels specified when a BOM is loaded. Fordetails on setting the levels of part data loaded, see Changing Number of StructureLevels in Sample Mashup on page 54.
Using the Sample Mashups 55
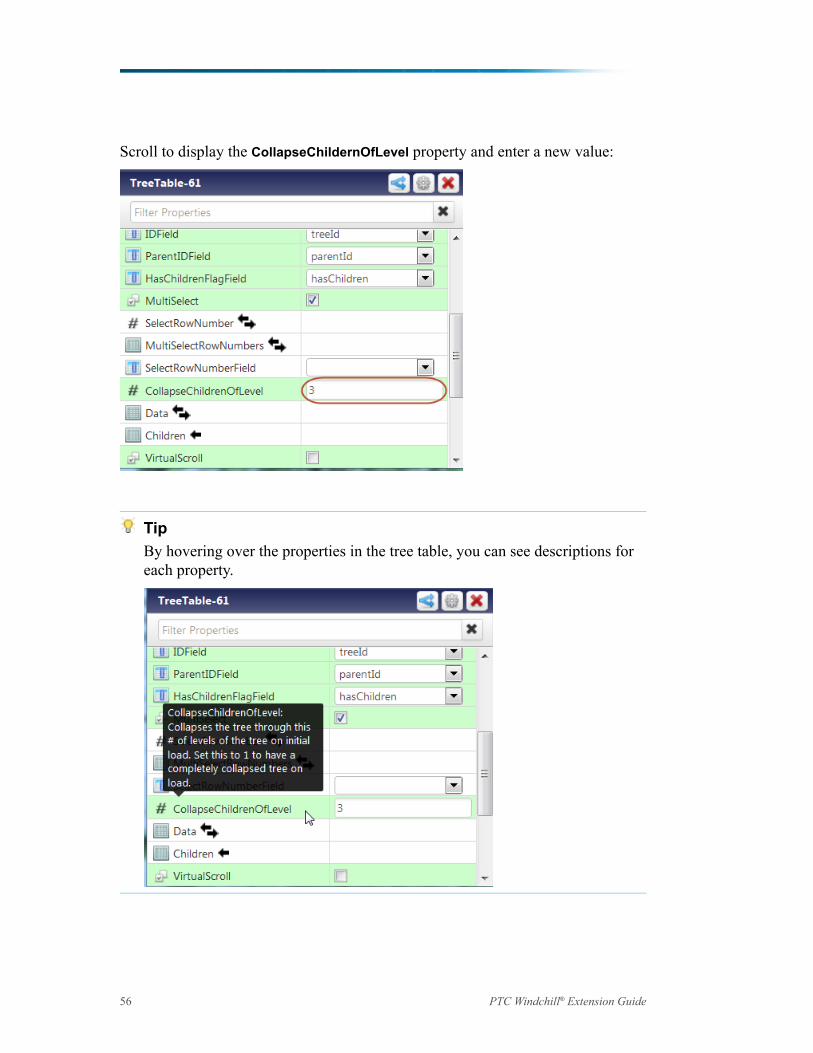
Scroll to display the CollapseChildernOfLevel property and enter a new value:
TipBy hovering over the properties in the tree table, you can see descriptions foreach property.
56 PTC Windchill® Extension Guide
5Developing a Customized
ApplicationLocalizing Labels and Fields in Your Application ..........................................................58Adding Saved Filters to Your Mashup..........................................................................58Using PTC Creo View Extension ................................................................................59Using Info*Engine Tasks when Developing Your Application .........................................60Using Windchill REST Web Services when Developing Your Application .......................68
This chapter provides additional information on ways you can develop aThingWorx application that connects to Windchill.
57
Localizing Labels and Fields in YourApplicationThingWorx supports the localization of the runtime user interface of yourThingWorx application. This includes being able to localize elements, such as thelabels and fields, that you create when using PTC Windchill Extension entities.To localize elements in entities, you must include a token for each element. Clickthe localization toggle icon to search for and select an existing token or create anew token for a field.
All tokens that you create are added to the localization tables maintained byThingWorx. By creating and populating localization tables, you can displayruntime elements in different languages. For details on how to create and populatelocalization tables, search for “localization tables” in the ThingWorx help center.The help center is available from the PTC Help Centers page.For more information on how to localize labels, see the following tutorial video:http://youtu.be/3bo6HtXSqRATo provide localized text for a large number of elements, export a localizationtable, add localized text to the exported XML file, and import the file.
Adding Saved Filters to Your MashupIn Windchill, you can create and save filters for parts, documents, or EPM (CAD)documents. You can use these saved filters to display filtered structures in aThingWorx mashup.Creating and saving filters for parts, documents, or CAD documents can be donefrom the corresponding information page of the object. To use saved filters in aThingWorx application, follow these best practices:• In a part structure mashup, a filter can only be specified by name. Ensure that
all filters that you want to use in a ThingWorx application have unique names.• In most instances, saved filters are intended to be used with the specific object
type for which they were created. Ensure the selected filters work with theobject structure you want to display in the ThingWorx application.
PTC NavigateSaved Filter options are available on the app tailoring pages. For moreinformation, see the “Basic App Tailoring” section.
58 PTC Windchill® Extension Guide
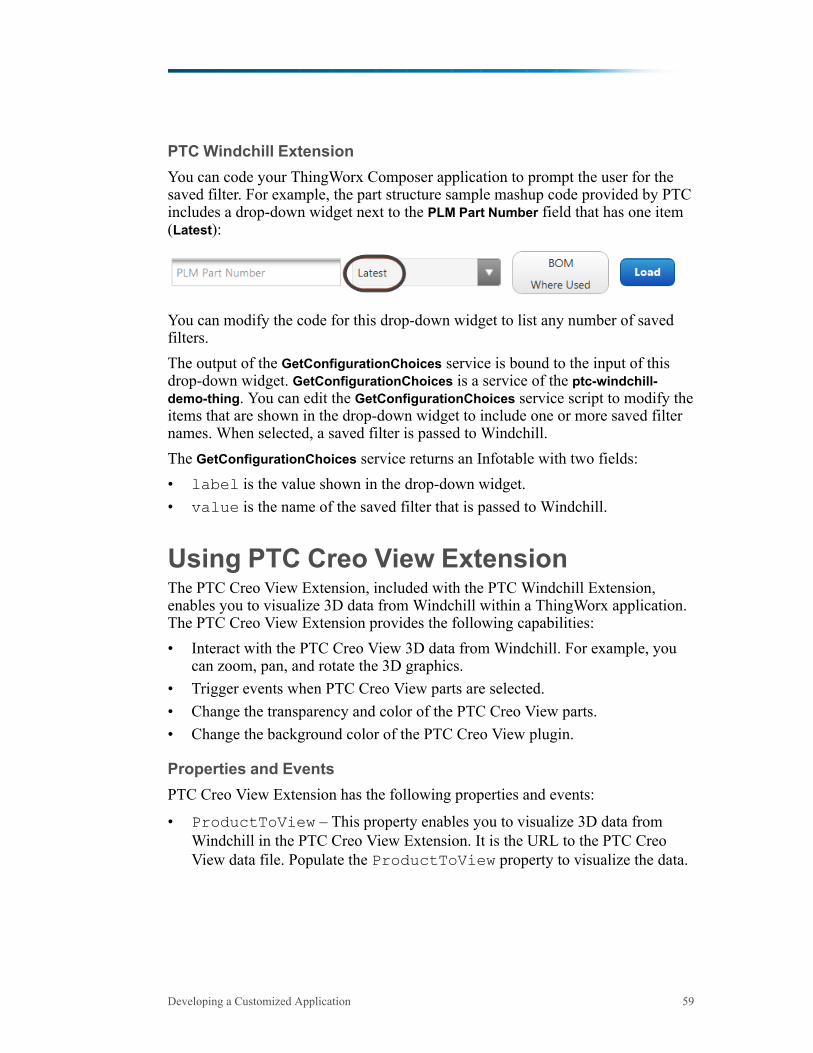
PTC Windchill ExtensionYou can code your ThingWorx Composer application to prompt the user for thesaved filter. For example, the part structure sample mashup code provided by PTCincludes a drop-down widget next to the PLM Part Number field that has one item(Latest):
You can modify the code for this drop-down widget to list any number of savedfilters.The output of the GetConfigurationChoices service is bound to the input of thisdrop-down widget. GetConfigurationChoices is a service of the ptc-windchill-demo-thing. You can edit the GetConfigurationChoices service script to modify theitems that are shown in the drop-down widget to include one or more saved filternames. When selected, a saved filter is passed to Windchill.The GetConfigurationChoices service returns an Infotable with two fields:• label is the value shown in the drop-down widget.• value is the name of the saved filter that is passed to Windchill.
Using PTC Creo View ExtensionThe PTC Creo View Extension, included with the PTC Windchill Extension,enables you to visualize 3D data from Windchill within a ThingWorx application.The PTC Creo View Extension provides the following capabilities:• Interact with the PTC Creo View 3D data from Windchill. For example, you
can zoom, pan, and rotate the 3D graphics.• Trigger events when PTC Creo View parts are selected.• Change the transparency and color of the PTC Creo View parts.• Change the background color of the PTC Creo View plugin.
Properties and EventsPTC Creo View Extension has the following properties and events:
• ProductToView – This property enables you to visualize 3D data fromWindchill in the PTC Creo View Extension. It is the URL to the PTC CreoView data file. Populate the ProductToView property to visualize the data.
Developing a Customized Application 59
Windchill sample mashups provided with the installation demonstrate how touse sample services to populate this property.
• BackgroundStyle – This property enables you to change the backgroundcolor of the PTC Creo View 3D graphics area.
• Data – This property enables you to select PTC Creo View parts, and alsochange their color and transparency. You must bind this property to a datatable. The data table must contain a column which specifies the Occurrence IDof the part. This is the unique ID of the part in the PTC Creo View 3D data.
• DataFormatter – This property enables you to specify rules that must beused to apply color and transparency to the PTC Creo View parts. Specify acolumn for these rules from the data table which is bound to the Dataproperty.
• OccurrenceField – This property enables you to select the column thatmust be used as the Occurrence ID. The column is selected from the data tablewhich is bound to the Data property.
• selectedOccurrencePath – This property specifies the Occurrence IDof the part selected in the 3D data.
• selectionChanged – This event indicates a change in the selection of 3Ddata.
Using Info*Engine Tasks whenDeveloping Your ApplicationPTC includes the general-purpose ExecuteTask service in the WindchillConnectorthing template. The ExecuteTask service allows you to invoke any task in theWindchill task codebase.• Specify the task to invoke by URI.• Define the input parameters.• Optional: Define an Infotable where row data is converted into Info*Engine
group elements and is used as the task’s input group.
60 PTC Windchill® Extension Guide
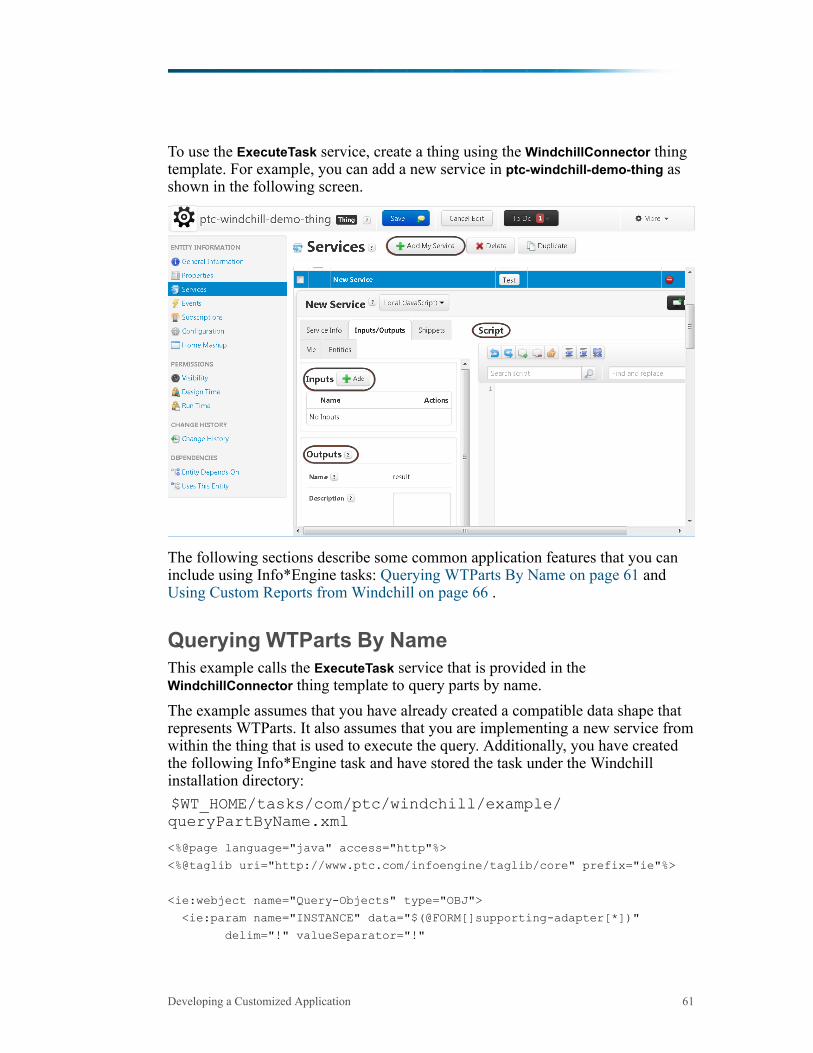
To use the ExecuteTask service, create a thing using the WindchillConnector thingtemplate. For example, you can add a new service in ptc-windchill-demo-thing asshown in the following screen.
The following sections describe some common application features that you caninclude using Info*Engine tasks: Querying WTParts By Name on page 61 andUsing Custom Reports from Windchill on page 66 .
Querying WTParts By NameThis example calls the ExecuteTask service that is provided in theWindchillConnector thing template to query parts by name.The example assumes that you have already created a compatible data shape thatrepresents WTParts. It also assumes that you are implementing a new service fromwithin the thing that is used to execute the query. Additionally, you have createdthe following Info*Engine task and have stored the task under the Windchillinstallation directory:$WT_HOME/tasks/com/ptc/windchill/example/queryPartByName.xml
<%@page language="java" access="http"%>
<%@taglib uri="http://www.ptc.com/infoengine/taglib/core" prefix="ie"%>
<ie:webject name="Query-Objects" type="OBJ">
<ie:param name="INSTANCE" data="$(@FORM[]supporting-adapter[*])"
delim="!" valueSeparator="!"
Developing a Customized Application 61

default="<%=com.infoengine.au.NamingService.getVMName()%>"/>
<ie:param name="TYPE" data="wt.part.WTPart"/>
<ie:param name="WHERE" data="name = '${@FORM[]name[]}'"/>
</ie:webject>
62 PTC Windchill® Extension Guide
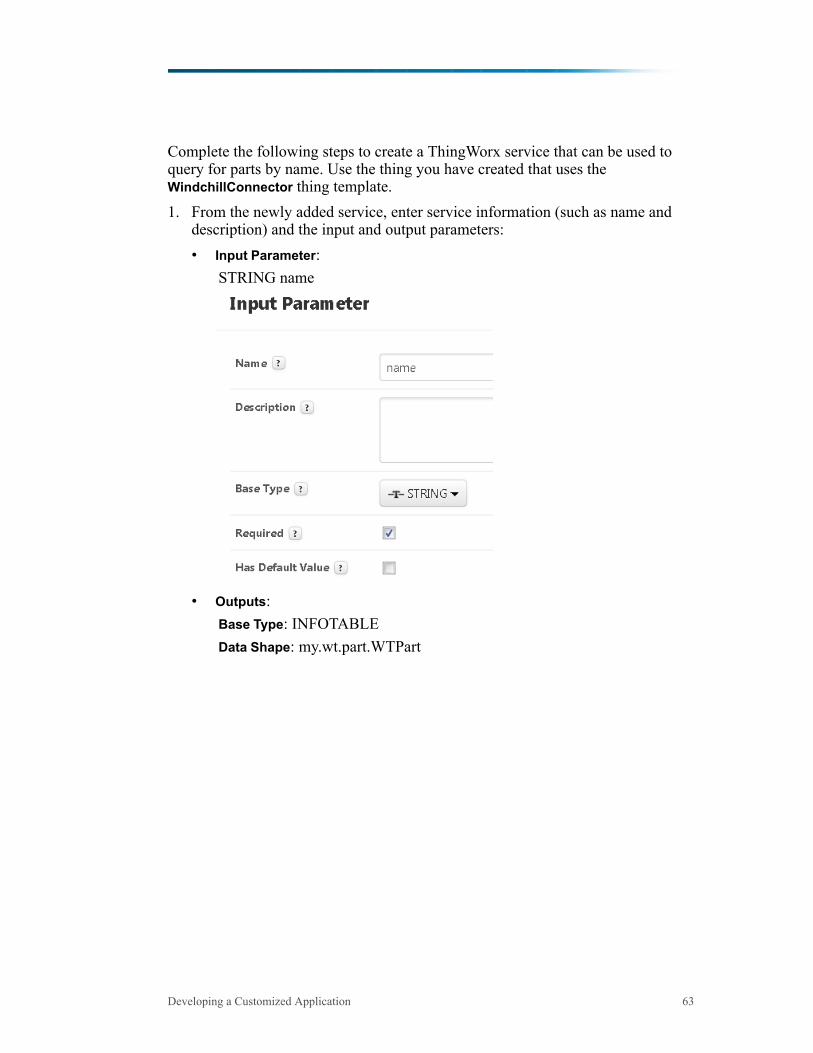
Complete the following steps to create a ThingWorx service that can be used toquery for parts by name. Use the thing you have created that uses theWindchillConnector thing template.1. From the newly added service, enter service information (such as name and
description) and the input and output parameters:• Input Parameter:
STRING name
• Outputs:Base Type: INFOTABLEData Shape: my.wt.part.WTPart
Developing a Customized Application 63
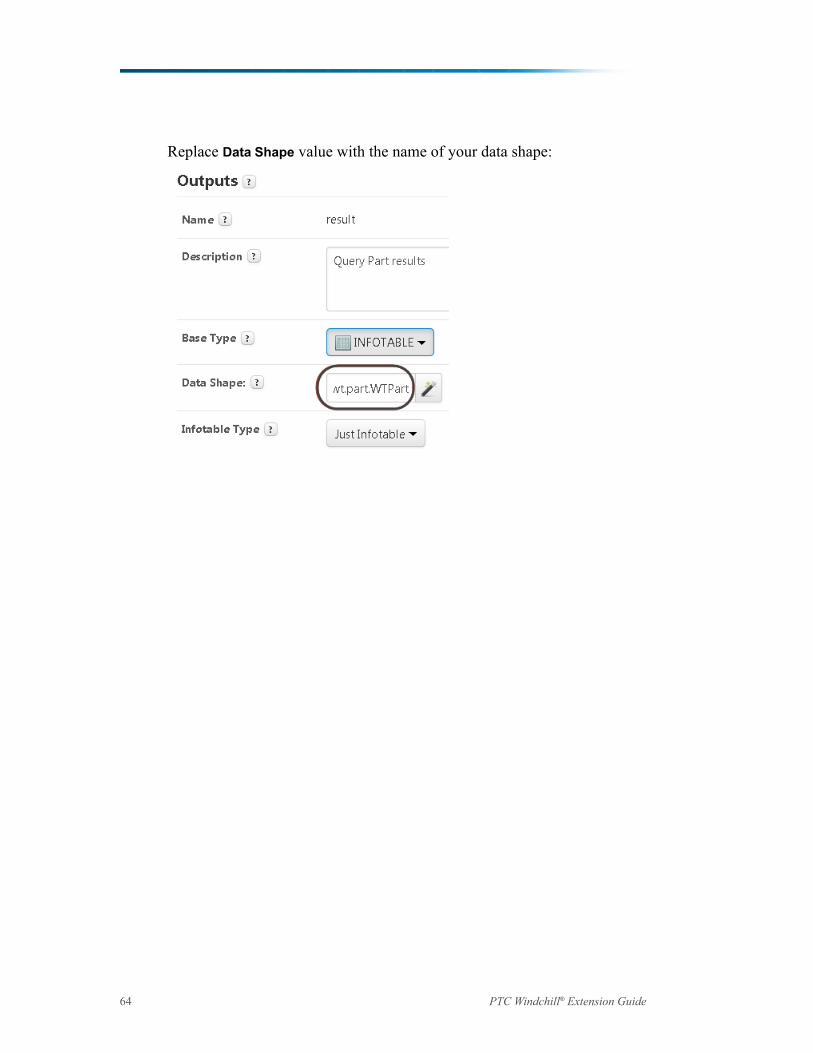
Replace Data Shape value with the name of your data shape:
64 PTC Windchill® Extension Guide
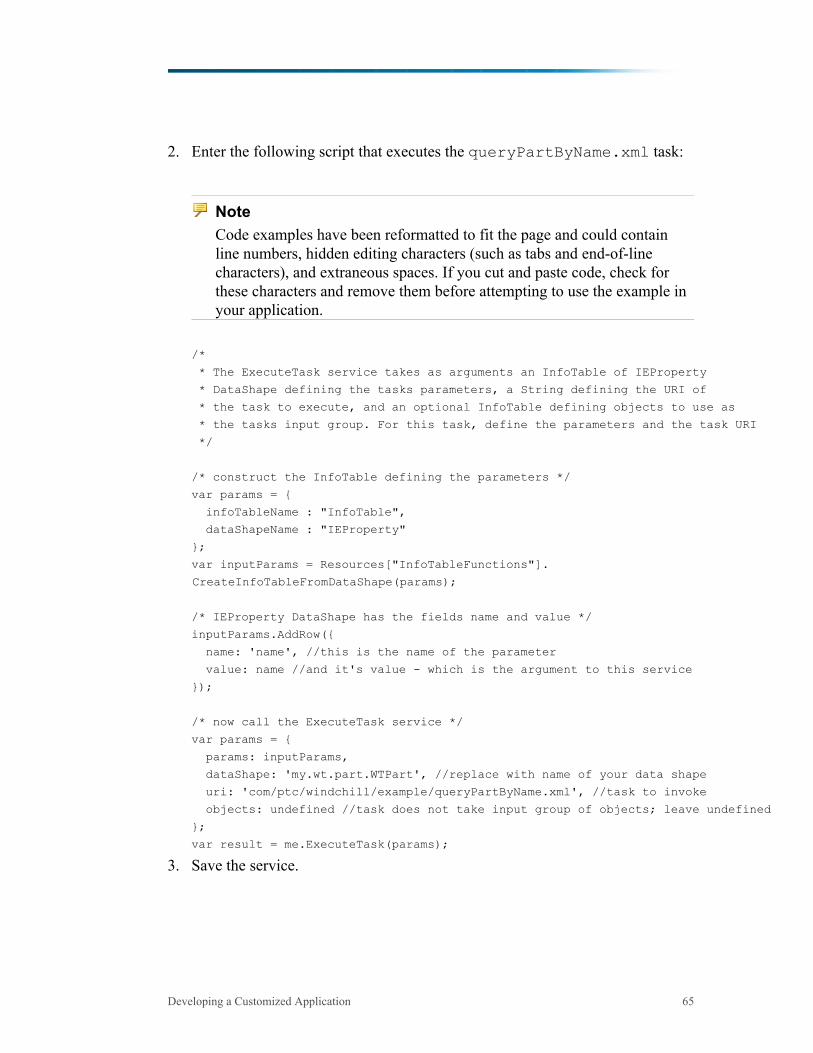
2. Enter the following script that executes the queryPartByName.xml task:
NoteCode examples have been reformatted to fit the page and could containline numbers, hidden editing characters (such as tabs and end-of-linecharacters), and extraneous spaces. If you cut and paste code, check forthese characters and remove them before attempting to use the example inyour application.
/*
* The ExecuteTask service takes as arguments an InfoTable of IEProperty
* DataShape defining the tasks parameters, a String defining the URI of
* the task to execute, and an optional InfoTable defining objects to use as
* the tasks input group. For this task, define the parameters and the task URI
*/
/* construct the InfoTable defining the parameters */
var params = {
infoTableName : "InfoTable",
dataShapeName : "IEProperty"
};
var inputParams = Resources["InfoTableFunctions"].
CreateInfoTableFromDataShape(params);
/* IEProperty DataShape has the fields name and value */
inputParams.AddRow({
name: 'name', //this is the name of the parameter
value: name //and it's value - which is the argument to this service
});
/* now call the ExecuteTask service */
var params = {
params: inputParams,
dataShape: 'my.wt.part.WTPart', //replace with name of your data shape
uri: 'com/ptc/windchill/example/queryPartByName.xml', //task to invoke
objects: undefined //task does not take input group of objects; leave undefined
};
var result = me.ExecuteTask(params);
3. Save the service.
Developing a Customized Application 65
Using Custom Reports from Windchill
NoteFor more information on custom reports, see the PTC Windchill Help Centeror PTC Windchill Customization Guide available on ptc.com.
OverviewThis example also calls the ExecuteTask service that is provided in theWindchillConnector thing template. It uses the Info*Engine taskExecuteReportTemplate to execute a custom report. In this example, youcreate a new service method that executes the report and returns the report as anInfotable. At a high level, here is what the new service method does:1. Use the WindchillConnector Query service to query for the context in which
the report template lives.2. Use the WindchillConnector Query service to query for the report template of
the report to execute.3. Use the WindchillConnector ExecuteTask service to execute the Info*Engine
task named ExecuteReportTemplate, which generates the report results.
Before You BeginBefore you can write this service, create the data shapes that this service needs.1. Use the WindchillConnector CreateDataShapes service to create the shape for
the Windchill context object whose type iswt.inf.container.WTContainer.
2. Use the WindchillConnector CreateDataShapes service to create the shape forthe Windchill report template object whose type iswt.query.template.ReportTemplate.
NoteInfo*Engine cannot retrieve the report template object because it containsBLOBed XML data. Remove any fields from your data shape that wouldcontain XML or QML data.
3. Create a data shape that matches the fields of the custom report.
66 PTC Windchill® Extension Guide
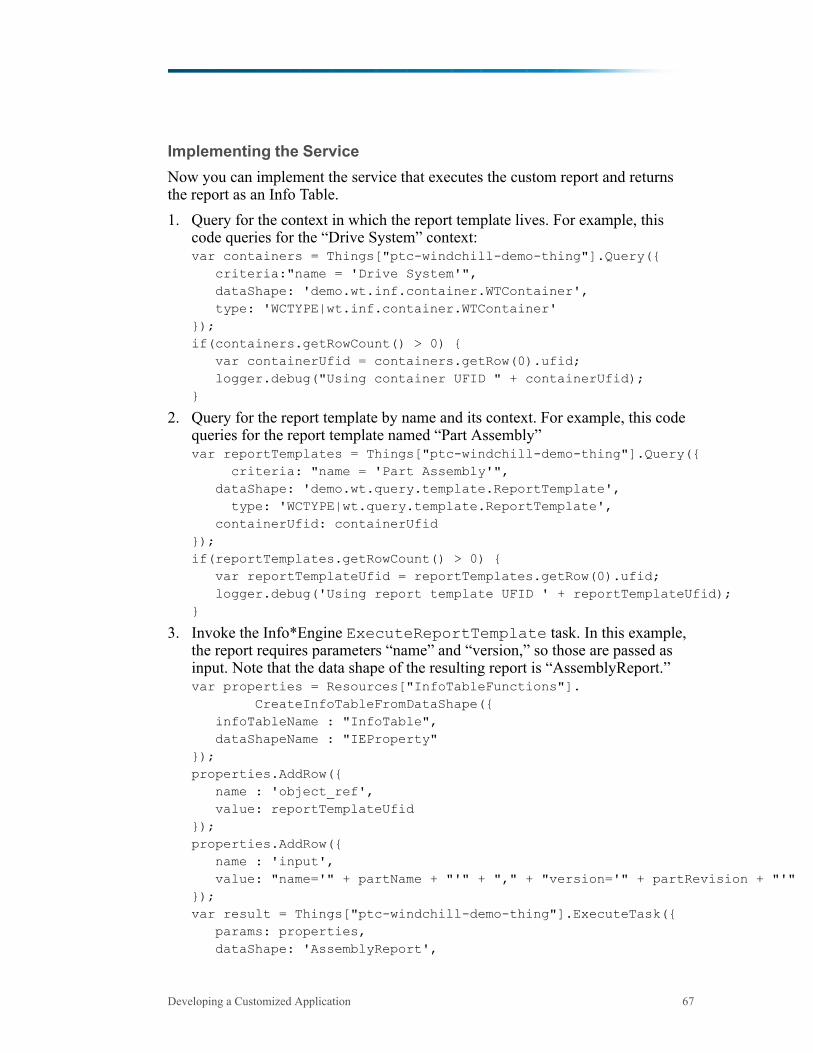
Implementing the ServiceNow you can implement the service that executes the custom report and returnsthe report as an Info Table.1. Query for the context in which the report template lives. For example, this
code queries for the “Drive System” context:var containers = Things["ptc-windchill-demo-thing"].Query({
criteria:"name = 'Drive System'",dataShape: 'demo.wt.inf.container.WTContainer',type: 'WCTYPE|wt.inf.container.WTContainer'
});if(containers.getRowCount() > 0) {
var containerUfid = containers.getRow(0).ufid;logger.debug("Using container UFID " + containerUfid);
}
2. Query for the report template by name and its context. For example, this codequeries for the report template named “Part Assembly”var reportTemplates = Things["ptc-windchill-demo-thing"].Query({
criteria: "name = 'Part Assembly'",dataShape: 'demo.wt.query.template.ReportTemplate',
type: 'WCTYPE|wt.query.template.ReportTemplate',containerUfid: containerUfid
});if(reportTemplates.getRowCount() > 0) {
var reportTemplateUfid = reportTemplates.getRow(0).ufid;logger.debug('Using report template UFID ' + reportTemplateUfid);
}
3. Invoke the Info*Engine ExecuteReportTemplate task. In this example,the report requires parameters “name” and “version,” so those are passed asinput. Note that the data shape of the resulting report is “AssemblyReport.”var properties = Resources["InfoTableFunctions"].
CreateInfoTableFromDataShape({infoTableName : "InfoTable",dataShapeName : "IEProperty"
});properties.AddRow({
name : 'object_ref',value: reportTemplateUfid
});properties.AddRow({
name : 'input',value: "name='" + partName + "'" + "," + "version='" + partRevision + "'"
});var result = Things["ptc-windchill-demo-thing"].ExecuteTask({
params: properties,dataShape: 'AssemblyReport',
Developing a Customized Application 67
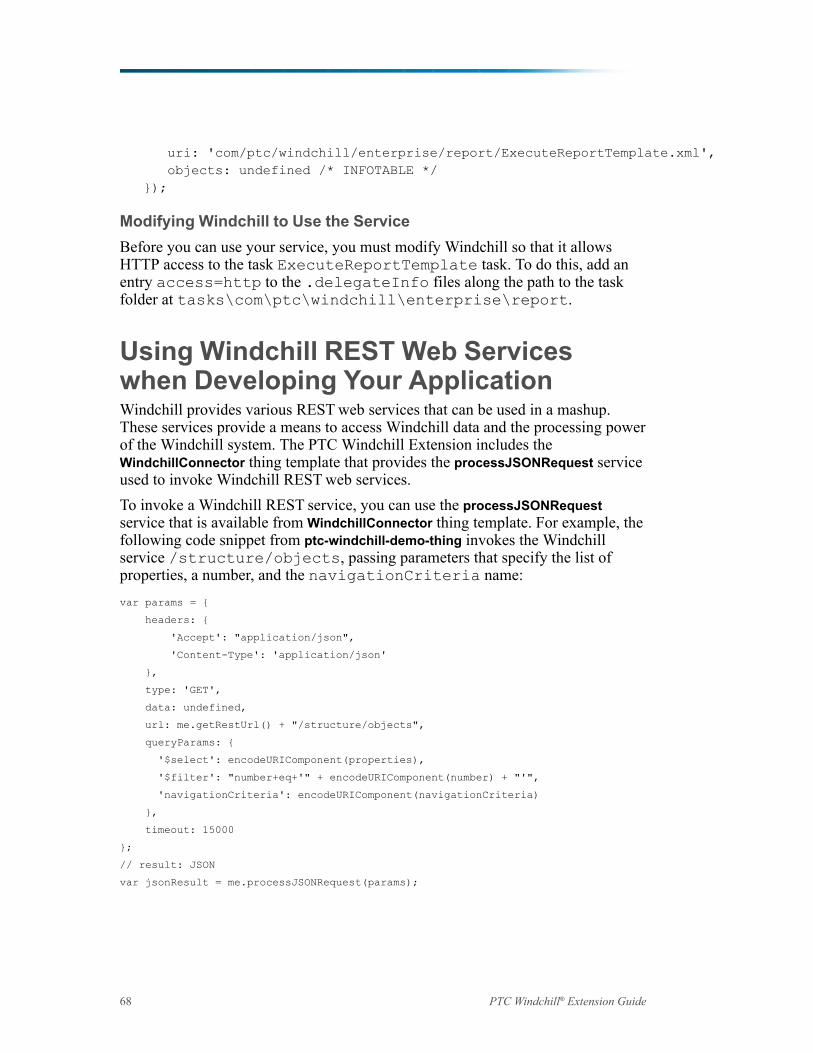
uri: 'com/ptc/windchill/enterprise/report/ExecuteReportTemplate.xml',objects: undefined /* INFOTABLE */
});
Modifying Windchill to Use the ServiceBefore you can use your service, you must modify Windchill so that it allowsHTTP access to the task ExecuteReportTemplate task. To do this, add anentry access=http to the .delegateInfo files along the path to the taskfolder at tasks\com\ptc\windchill\enterprise\report.
Using Windchill REST Web Serviceswhen Developing Your ApplicationWindchill provides various RESTweb services that can be used in a mashup.These services provide a means to access Windchill data and the processing powerof the Windchill system. The PTC Windchill Extension includes theWindchillConnector thing template that provides the processJSONRequest serviceused to invoke Windchill RESTweb services.To invoke a Windchill REST service, you can use the processJSONRequestservice that is available from WindchillConnector thing template. For example, thefollowing code snippet from ptc-windchill-demo-thing invokes the Windchillservice /structure/objects, passing parameters that specify the list ofproperties, a number, and the navigationCriteria name:var params = {
headers: {
'Accept': "application/json",
'Content-Type': 'application/json'
},
type: 'GET',
data: undefined,
url: me.getRestUrl() + "/structure/objects",
queryParams: {
'$select': encodeURIComponent(properties),
'$filter': "number+eq+'" + encodeURIComponent(number) + "'",
'navigationCriteria': encodeURIComponent(navigationCriteria)
},
timeout: 15000
};
// result: JSON
var jsonResult = me.processJSONRequest(params);
68 PTC Windchill® Extension Guide
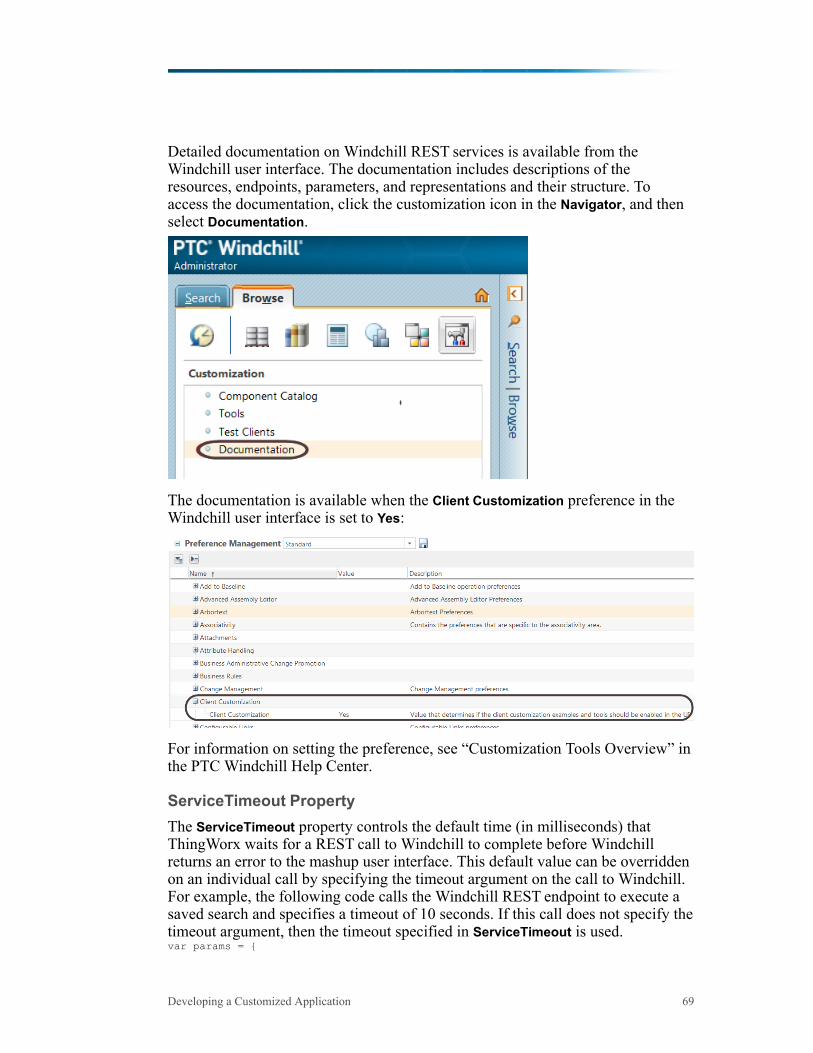
Detailed documentation on Windchill REST services is available from theWindchill user interface. The documentation includes descriptions of theresources, endpoints, parameters, and representations and their structure. Toaccess the documentation, click the customization icon in the Navigator, and thenselect Documentation.
The documentation is available when the Client Customization preference in theWindchill user interface is set to Yes:
For information on setting the preference, see “Customization Tools Overview” inthe PTC Windchill Help Center.
ServiceTimeout PropertyThe ServiceTimeout property controls the default time (in milliseconds) thatThingWorx waits for a REST call to Windchill to complete before Windchillreturns an error to the mashup user interface. This default value can be overriddenon an individual call by specifying the timeout argument on the call to Windchill.For example, the following code calls the Windchill REST endpoint to execute asaved search and specifies a timeout of 10 seconds. If this call does not specify thetimeout argument, then the timeout specified in ServiceTimeout is used.var params = {
Developing a Customized Application 69
queryParams: {'$select': 'name,number,version'
},data: {
keyword: undefined},type: 'POST',url: me.getRestUrl() + "/search/saved-searches/" + encodeURIComponent(oid) + "/results",timeout: 10000
};var jsonResult = me.processJSONRequest(params);
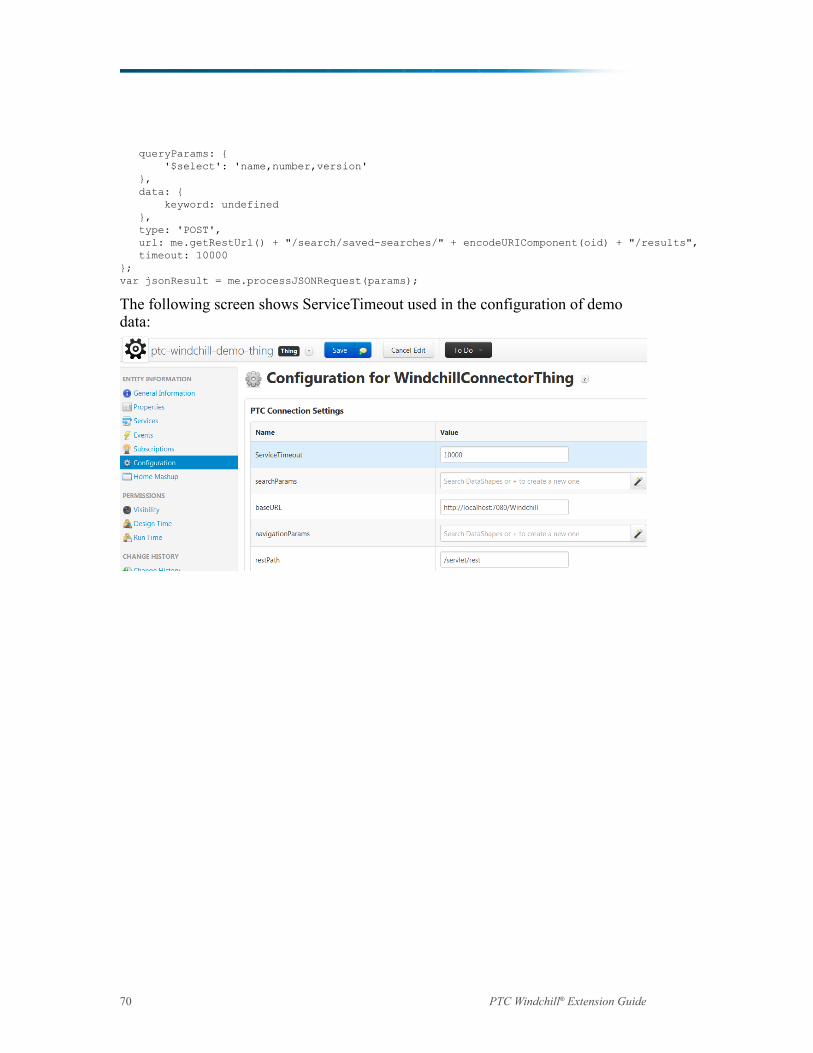
The following screen shows ServiceTimeout used in the configuration of demodata:
70 PTC Windchill® Extension Guide

AExample Configuration Using
SSL for Secure Communications
The following example illustrates one way to configure Windchill and ThingWorxfor trusted SSL communications. This example uses a self-signed certificate tosecure communications between Windchill and ThingWorx, which is appropriatefor environments where the communication occurs within the corporate firewall.Where traffic occurs on the Internet, a commercial trusted certificate is advised.
Note• These instructions rely on configuration scripts that come with the most recent
version of the PTC HTTP Server. The most recent PTC HTTP Server isincluded with Windchill 11.0 and the most recent CPS releases for Windchill10.2.
• This example assumes that Windchill is already configured to use SSL.• The key used here does not need to be the same as that used for either the
Windchill or ThingWorx web interface.• Code examples have been reformatted to fit the page and could contain line
numbers, hidden editing characters (such as tabs and end-of-line characters),and extraneous spaces. If you cut and paste code, check for these charactersand remove them before attempting to use the example in your application.
1. Create a truststore for ThingWorx and import the Windchill certificate:2. Create keystore for ThingWorx.
71
3. Configure Windchill to trust ThingWorx.
NoteIf ThingWorx and Windchill are on separate systems, step 3 a, b, c can beperformed on the Windchill server. Then copy the .jks files to theThingWorx server.
a. Update PTC HTTP Server configuration to reference the CA certificatesfile.
i. Navigate to and edit <HTTPSERVER_HOME>/conf/extra/httpd-ssl.conf.
ii. Uncomment the SSLCACertificateFile entry so that it refers tothe ca-bundle.crt file. Note the location of the ca-bundle.crt file.
iii. Save changes.b. Add the ThingWorx certificate to PTC HTTP Server’s list of trusted CA
certificates.
i. Edit the ca-bundle.crt file you pointed to previously in theSSLCACertificateFile entry.
NoteIf the file does not yet exist, create the file and any requireddirectories.
ii. Append the contents of the ThingWorx certificate (servercert.pem fromstep 2 a above) held in the trust store to this file.
iii. Save changes.c. Configure PTC HTTP Server to export the certificate information to
Windchill.
i. Edit <HTTPSERVER_HOME>/conf/extra/httpd-ssl.conf.ii. Find the line with SSLOptions.iii. Uncomment out the line with SSLOptions +ExportCertData.
For example:
SSLOptions +FakeBasicAuth +ExportCertData +StrictRequire
<FilesMatch "\.(cgi|shtml|phtml|php)$">
72 PTC Windchill® Extension Guide
SSLOptions +StdEnvVars
/FilesMatch>
<Directory "C:/ptc/Windchill_10.2/HTTPServer/cgi-bin">
SSLOptions +StdEnvVars
</Directory>
iv. Save changes.d. Configure PTC HTTP Server for the sslClientAuth URL.
i. Find the Windchill web app name in <windchill-home>/codebase/wt.properties in the entry wt.webapp.name.
ii. Open a shell or command prompt and enter the following:
cd <HTTPSERVER_HOME>ant -f webAppConfig.xml -DappName=[windchill-web-app] -Dresource=sslClientAuth -DresourceAuthType=sslClientAuth addAuthResource
iii. Configure Windchill to trust the ThingWorx certificate.
1) Edit <windchill-home>/codebase/WEB-INF/web.xml.2) Find <filter-name>TrustedSSLAuthFilter</
filtername>.3) Add another <init-param> element after the existing one where
[thingworx-cert-name] is the name of the ThingWorx certificate.For a self-signed certificate, the certificate name is the Ownervalue for the certificate when running keytool -list -v-keystore <path-to-ThingWorxKeyStore.jks>:
<init-param><param-name>trustedSubjectPattern.1</param-name><param-value>[thingworx-cert-name]</param-value></init-param>
iv. Save changes.4. Configure ThingWorx for SSL.
a. In ThingWorx Composer, edit the WindchillConnector thing template thatrepresents the connection to the Windchill system being configured.
b. Specify path to ThingWorxKeyStore.jks and also specify thepassword.
c. Specify path to ThingWorxTrustStore.jks and also specify thepassword.
d. Specify the Windchill https address and SSL port.e. Save the thing.f. View the ThingWorx Application Log to verify that no configuration
errors exist.5. Launch ptc-connected-demo-mashup to verify the ThingWorx – Windchill
trusted SSL configuration.
Example Configuration Using SSL for Secure Communications 73


BArchitecture of Single Sign-On
Design of Authentication Filter ....................................................................................76Design of Authenticator Extension ..............................................................................77
Use the authentication filter and authenticator extension provided by PTC toimplement a single sign-on for users accessing a ThingWorx application that isconnected to Windchill.In this overview, the Windchill server is the remote IdP. The authentication filterand authenticator extension are installed in ThingWorx.The architecture consists of two components:
• PTC Identity Provider Authentication Filter – Tomcat filter for authentication;the filter redirects unauthenticated users to the IdP and validates the key.
• PTC Identity Provider Authenticator Extension – ThingWorx extension forauthentication; the extension includes dynamic user creation and setting homemashup.
75

Design of Authentication FilterThe purpose of this filter is to delegate the ThingWorx authentication to theremote authentication service. The authentication filter follows the standard singlesign-on architecture.The following diagram shows the authentication flow:
The following authentication steps expand on the steps shown in the diagram.Each numbered step corresponds with the same number in the diagram:
1. User attempts to access the ThingWorx application.2. The PTC Identity Provider Authentication Filter intercepts the ThingWorx
user request and redirects it to IdP for login.
User sees Windchill login form instead of ThingWorx login form.3. User enters user name and password in the login form. Windchill authenticates
the user.4. After a successful login, Windchill server redirects request back to
ThingWorx with the generated key.
76 PTC Windchill® Extension Guide
5. The PTC Identity Provider key validation filter reads the key and validates it.6. The validation filter passes the Windchill user name to the next filter as
request attribute. In the single sign-on process, the next filter is the ThingWorxAuthentication Filter.
Authentication is complete.7. The user display is updated with a ThingWorx window. The authenticator
configuration determines the initial window for an authenticated user (asdescribed in the next section).
For details on installing and configuring the filter, see [Missing cross referencetext].
Design of Authenticator ExtensionThe purpose of the PTC Identity Provider Authenticator Extension is toauthenticate and grant ThingWorx users access to the different parts of aThingWorx application.The authentication flow is described in the following process:
1. After the remote IdP completes the authentication and has passed off theWindchill user name, the existing ThingWorx Authentication Filter invokesthe PTC Identity Provider Authenticator Extension.
2. PTC Identity Provider Authenticator Extension performs the following steps:
a. Reads the user name from the request attribute.b. If the user does not exist in the ThingWorx system, the extension creates
the user in ThingWorx.
NoteThe option to create new users is configurable. For more information,see Configuring the PTC Identity Provider Authenticator on page 34.
c. Optional: If you have configured a home mashup, sets the home mashupfor newly created users and gives the users read access to the mashup.
If the user exists in ThingWorx, it does not set the user’s home mashup.3. After a successful authentication, the ThingWorx internal controller redirects
the users to their home mashup or the default ThingWorx search page.For configuration details and additional details about configuring users, seeConfiguring the PTC Identity Provider Authenticator on page 34.
Architecture of Single Sign-On 77

CUsing PTC Data Query Extension
when Developing Your Application
Configuring the PTC Data Query Extension.................................................................81Launching the Data Query Entity ................................................................................83Using the Extension to Create New Data Queries ........................................................84Creating Example of a Mashup for a Part Number Search ............................................88Creating the PTC Data Query Things..........................................................................90Creating the Mashup Layout ......................................................................................91
The PTC Data Query Extension facilitates rapid development of providing PTCdata in ThingWorx mashups. Through a simple graphical interface, the extensionallows you to automatically generate ThingWorx Data Shapes and services thatcan then be used for searching and navigating structures. Additionally, theextension provides a mechanism for specifying the desired attributes that youwant returned from a Data Query (based on resource type).The PTC Data Query Extension is installed when you install the PTC WindchillExtension ZIP file.The PTC Data Query Extension has the following support limitations:• You can use the PTC Data Query Extension when connecting to systems
running Windchill 10.2 M020 and later; the extension is not supported whenyou are connecting to Windchill 10.1 M040 or 10.1 M050.
• Does not support the use of the extension with Internet Explorer 8 and InternetExplorer 9 browsers.
79

• Supports strictly binary link relationships; there is no support for foreign keyreferences.
• Provides limited support of object types; supports the use of only Part,Document, and EPM Document.
The following sections explain how to configure the extension, launch theextension interface, and use the extension to create a Data Query.
80 PTC Windchill® Extension Guide
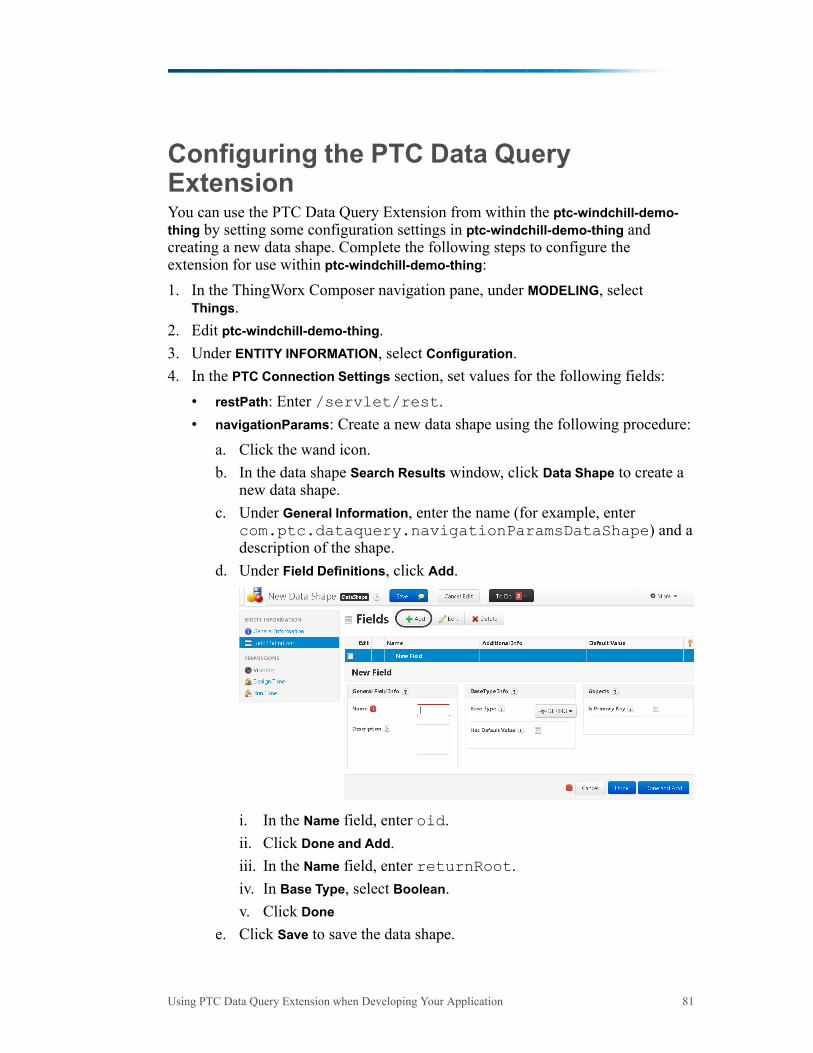
Configuring the PTC Data QueryExtensionYou can use the PTC Data Query Extension from within the ptc-windchill-demo-thing by setting some configuration settings in ptc-windchill-demo-thing andcreating a new data shape. Complete the following steps to configure theextension for use within ptc-windchill-demo-thing:1. In the ThingWorx Composer navigation pane, under MODELING, select
Things.2. Edit ptc-windchill-demo-thing.3. Under ENTITY INFORMATION, select Configuration.4. In the PTC Connection Settings section, set values for the following fields:
• restPath: Enter /servlet/rest.• navigationParams: Create a new data shape using the following procedure:
a. Click the wand icon.b. In the data shape Search Results window, click Data Shape to create a
new data shape.c. Under General Information, enter the name (for example, enter
com.ptc.dataquery.navigationParamsDataShape) and adescription of the shape.
d. Under Field Definitions, click Add.
i. In the Name field, enter oid.ii. Click Done and Add.iii. In the Name field, enter returnRoot.iv. In Base Type, select Boolean.v. Click Done
e. Click Save to save the data shape.
Using PTC Data Query Extension when Developing Your Application 81

The com.ptc.dataquery.navigationParamsDataShapeshape has been created and is the value set in the navigationParamsfield for ptc-windchill-demo-thing.
5. Switch to the ptc-windchill-demo-thing tab and click Save.
82 PTC Windchill® Extension Guide
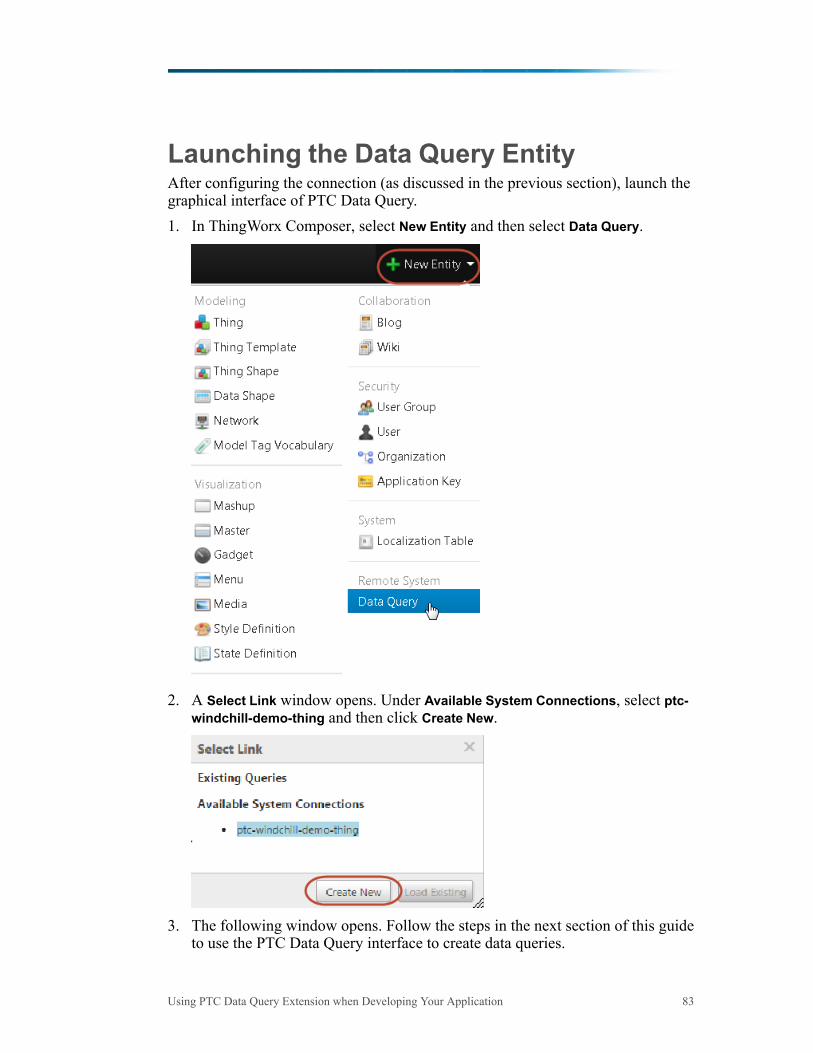
Launching the Data Query EntityAfter configuring the connection (as discussed in the previous section), launch thegraphical interface of PTC Data Query.1. In ThingWorx Composer, select New Entity and then select Data Query.
2. A Select Link window opens. Under Available System Connections, select ptc-windchill-demo-thing and then click Create New.
3. The following window opens. Follow the steps in the next section of this guideto use the PTC Data Query interface to create data queries.
Using PTC Data Query Extension when Developing Your Application 83
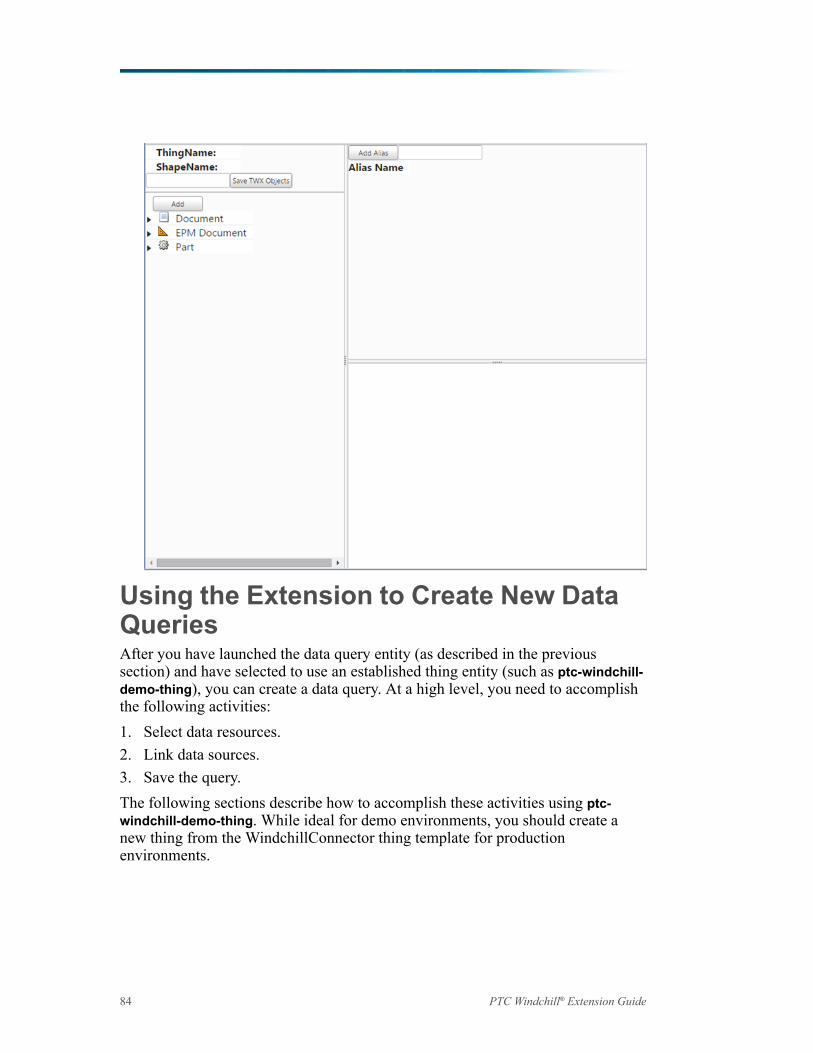
Using the Extension to Create New DataQueriesAfter you have launched the data query entity (as described in the previoussection) and have selected to use an established thing entity (such as ptc-windchill-demo-thing), you can create a data query. At a high level, you need to accomplishthe following activities:1. Select data resources.2. Link data sources.3. Save the query.The following sections describe how to accomplish these activities using ptc-windchill-demo-thing. While ideal for demo environments, you should create anew thing from the WindchillConnector thing template for productionenvironments.
84 PTC Windchill® Extension Guide
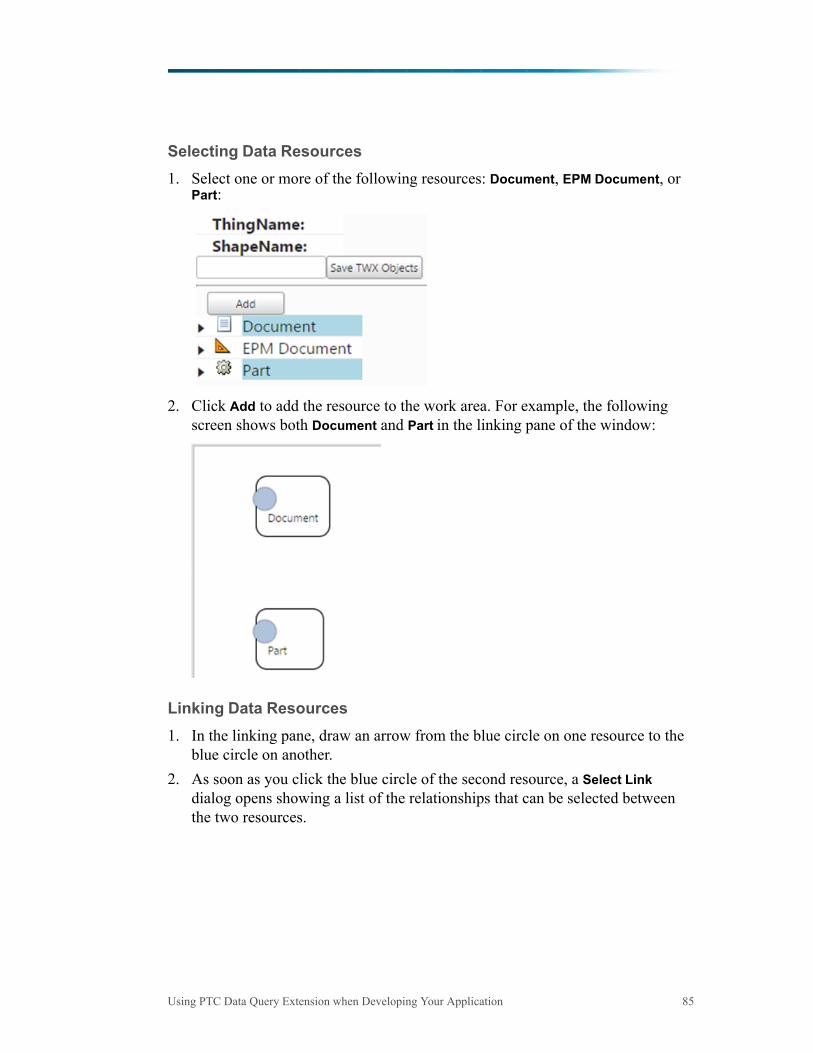
Selecting Data Resources1. Select one or more of the following resources: Document, EPM Document, or
Part:
2. Click Add to add the resource to the work area. For example, the followingscreen shows both Document and Part in the linking pane of the window:
Linking Data Resources1. In the linking pane, draw an arrow from the blue circle on one resource to the
blue circle on another.2. As soon as you click the blue circle of the second resource, a Select Link
dialog opens showing a list of the relationships that can be selected betweenthe two resources.
Using PTC Data Query Extension when Developing Your Application 85
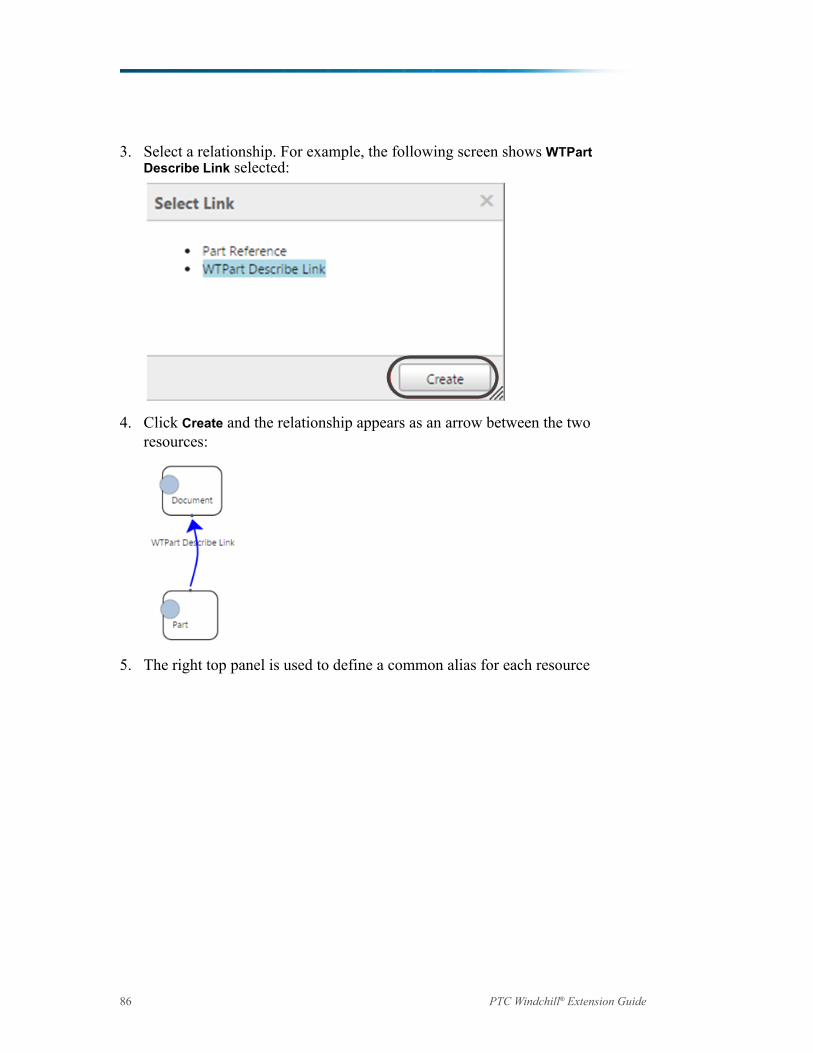
3. Select a relationship. For example, the following screen shows WTPartDescribe Link selected:
4. Click Create and the relationship appears as an arrow between the tworesources:
5. The right top panel is used to define a common alias for each resource
86 PTC Windchill® Extension Guide
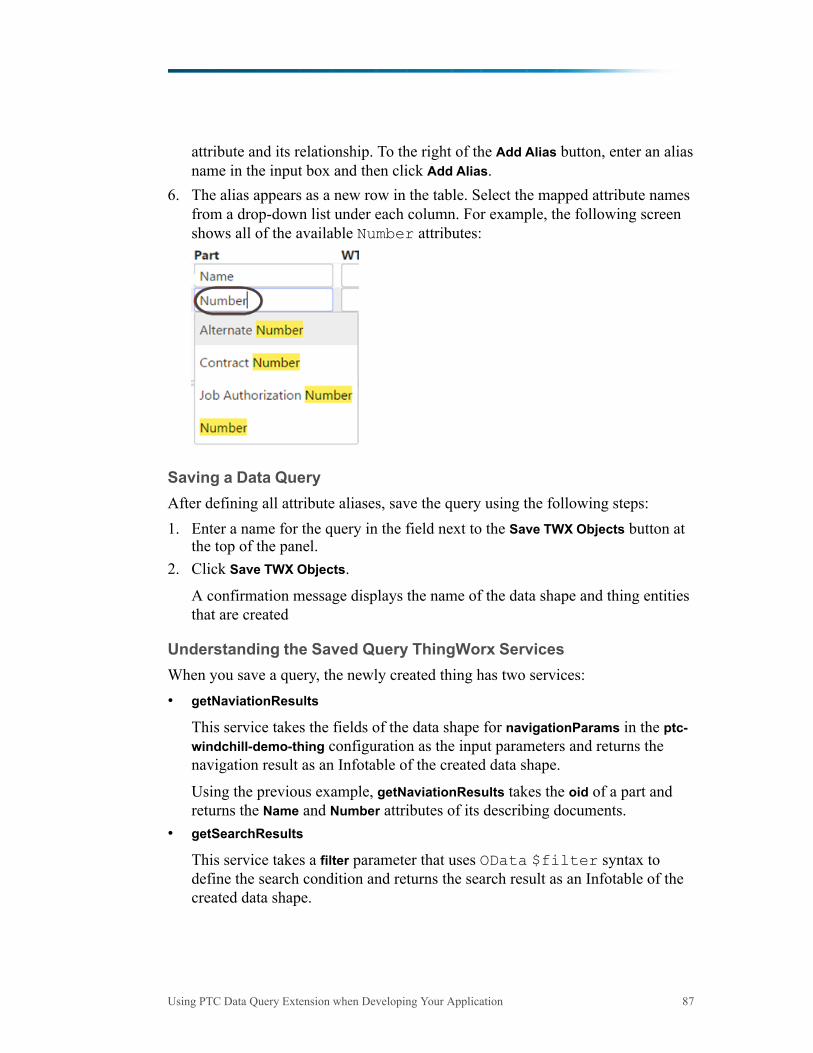
attribute and its relationship. To the right of the Add Alias button, enter an aliasname in the input box and then click Add Alias.
6. The alias appears as a new row in the table. Select the mapped attribute namesfrom a drop-down list under each column. For example, the following screenshows all of the available Number attributes:
Saving a Data QueryAfter defining all attribute aliases, save the query using the following steps:1. Enter a name for the query in the field next to the Save TWX Objects button at
the top of the panel.2. Click Save TWX Objects.
A confirmation message displays the name of the data shape and thing entitiesthat are created
Understanding the Saved Query ThingWorx ServicesWhen you save a query, the newly created thing has two services:• getNaviationResults
This service takes the fields of the data shape for navigationParams in the ptc-windchill-demo-thing configuration as the input parameters and returns thenavigation result as an Infotable of the created data shape.
Using the previous example, getNaviationResults takes the oid of a part andreturns the Name and Number attributes of its describing documents.
• getSearchResults
This service takes a filter parameter that uses OData $filter syntax todefine the search condition and returns the search result as an Infotable of thecreated data shape.
Using PTC Data Query Extension when Developing Your Application 87
Using the previous example, you could search any part or document using thesearch condition passed in the filter parameter (for example, Number eq12423) and return the Name and Number attributes of the matching parts ordocuments.
Creating Example of a Mashup for a PartNumber SearchThe PTC Data Query Extension can be used to create a mashup that would allowusers to search by a part number and then view attribute data of the returned parts.The following sections describe how to create this example mashup:1. Create two ThingWorx Things in the PTC Data Query Extension:
• The PartSearchExample Thing is used for searching.• The PartNavExample Thing is used for navigation.
2. Create a mashup that uses the Things created in step 1.The mashup that is created allows a user to enter a partial part number and thenselect a part from the search results. Selecting a part displays the structure andreference documents of the part.
88 PTC Windchill® Extension Guide
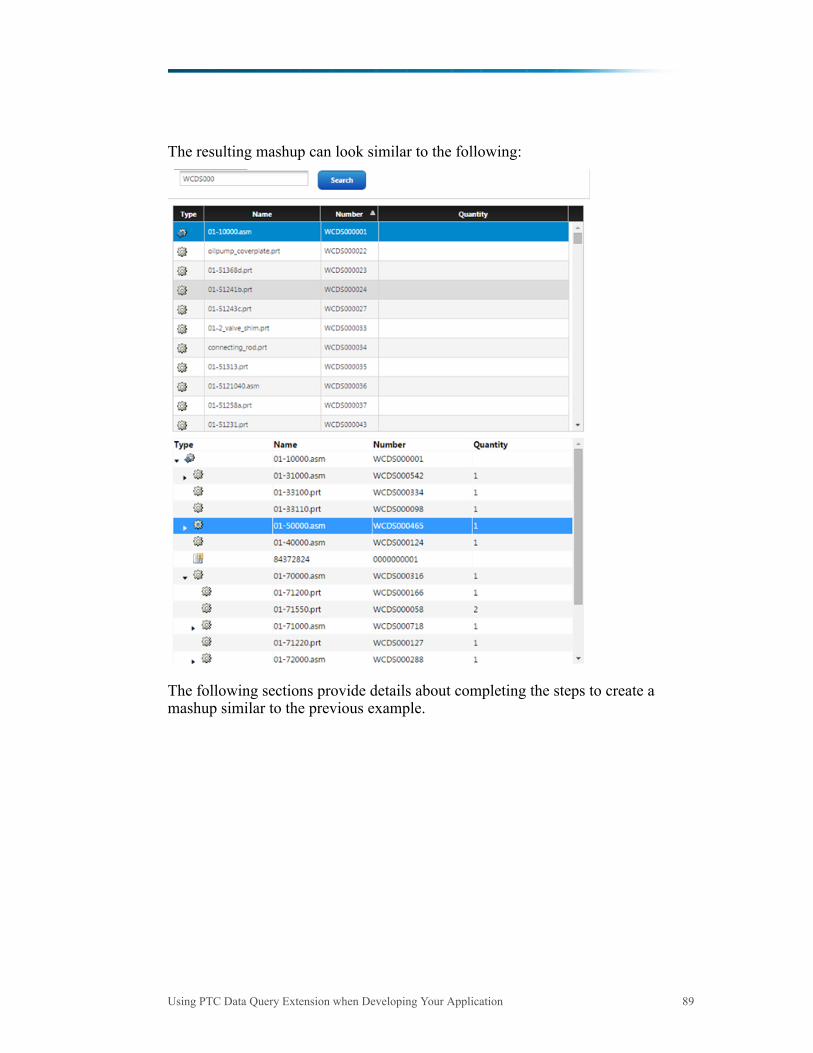
The resulting mashup can look similar to the following:
The following sections provide details about completing the steps to create amashup similar to the previous example.
Using PTC Data Query Extension when Developing Your Application 89

Creating the PTC Data Query ThingsBefore creating the mashup, create two Data Query Things using the PTC DataQuery Extension interface:• Create PartSearchExample as shown in the following:
Enter PartSearchExample as the name and click Save TWX Objects.Saving ThingWorx objects createscom.ptc.dataquery.PartSearchExampleThing andcom.ptc.dataquery.PartSearchExampleShape.
The search object just created allows searching by name or number. However,this example searches only by number.
• Create PartNavExample as shown in the following:
Enter PartNavExample as the name and click Save TWX Objects. Savingcreates a ThingWorx Thing and Data Shape.
90 PTC Windchill® Extension Guide
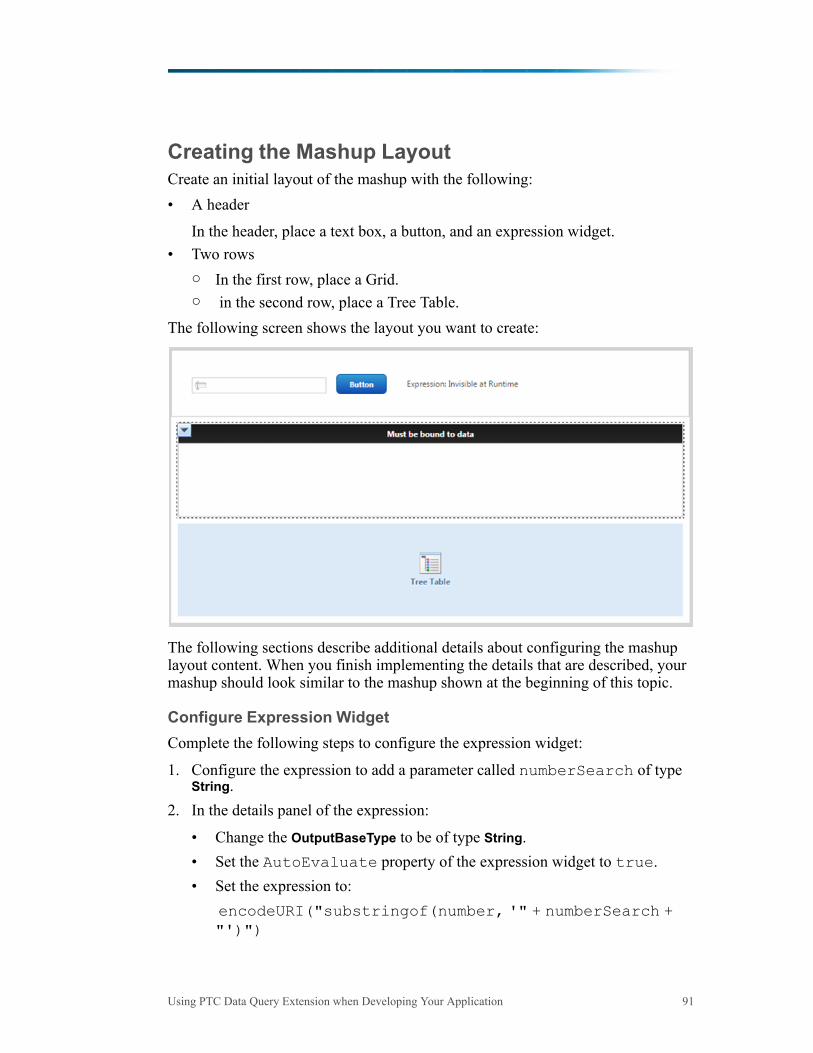
Creating the Mashup LayoutCreate an initial layout of the mashup with the following:• A header
In the header, place a text box, a button, and an expression widget.• Two rows
○ In the first row, place a Grid.○ in the second row, place a Tree Table.
The following screen shows the layout you want to create:
The following sections describe additional details about configuring the mashuplayout content. When you finish implementing the details that are described, yourmashup should look similar to the mashup shown at the beginning of this topic.
Configure Expression WidgetComplete the following steps to configure the expression widget:
1. Configure the expression to add a parameter called numberSearch of typeString.
2. In the details panel of the expression:
• Change the OutputBaseType to be of type String.• Set the AutoEvaluate property of the expression widget to true.• Set the expression to:
encodeURI("substringof(number, '" + numberSearch +"')")
Using PTC Data Query Extension when Developing Your Application 91
Add Services to MashupAdd the following services:• Locate com.ptc.dataquery.PartSearchExampleThing and add
the getSearchResults service.• Locate com.ptc.dataquery.PartNavExampleThing and add two
instances of the getNavigationResults service.
Set Bindings in MashupComplete the following steps to create the bindings required to make the dataappear correctly in the mashup:
1. Bind the Text of the text box to the numberSearch value of the expressionwidget.
2. Bind the Output of the expression widget to the filter parameter of thegetSearchResults service just added.
3. Bind the Button’s Clicked action to the getSearchResults service just added.4. Bind All Data from the getSearchResults service to the Grid.5. Bind the objectId of the Selected Rows in getSearchResults to the oid
parameter of the first getNavigationResults service.6. Bind the SelectedRowsChanged event of getSearchResults to execute the first
getNavigationResults service.7. Select the first getNavigationResults service and check the returnRoot property
in the bottom sections of the services panel.8. Bind the All Data of the first getNavigationResults service to the Data of the
Tree Table.9. Bind the objectId of the Selected Rows of the first getNavigationResults
service to the oid parameter of the second getNavigationResults service.10. Bind the All Data of the second getNavigationResults service to the Children of
the Tree Table.11. Bind the GetChildren event of the Tree Table to execute the second
getNavigationResults service.
Configure Tree TableSelect the Tree Table in the mashup. In the details panel:• Set the IDField to rowId• Set the ParentIDField to parentRowId• Set the HasChildrenFlag to hasChildren
92 PTC Windchill® Extension Guide
Configure Columns of Gird and Tree TableIn the Configure TreeTable Columns and Configure Grid Columns of the respectivewidgets, hide all but the name, number, quantity, and iconPath columns. Then,select the iconPath columns and go to the Column Renders tab and set Renderer toIMAGELINK.
Save MashupBe sure to save your mashup as well as all entities that were changed during theconfiguration.
Using PTC Data Query Extension when Developing Your Application 93