ps4100 equallogic storage installation guide
TRANSCRIPT

EqualLogic Storage Installation Guide
1 Rack Mounting the Array
Rack Requirements
• EIA-310-D compliant, four-post 19 inch rack with universal square hole or unthreaded round hole spacing.
• The rack must be rated for 540 kg (1200 pounds) static load or greater.
• The minimum rack depth is 100 cm (40 inches) from the front of the rack to the rear of the rack.
• There must be at least 4.1 cm (1.6 inches) between the rack door and the front of the array to
accommodate the array front bezel.
Protecting Hardware: Use an Electrostatic Wrist Strap
Shipping Box Contents and Required Hardware

Table 2 Additional Hardware (Not Included)
Optionally, you can also use an uninterruptible power supply system (UPS) to provide a highly available
source of power to an array. Each UPS (not included) should be on a different circuit and must provide the
correct type of voltage for an adequate amount of time.
Steps for Mounting an Array in a Rack Follow these steps to mount an array in a rack:
1. Determine where to place the mounting rails in the rack.
2. Attach the mounting rails to the rack.
3. Slide the chassis into the rack.
4. Attach the chassis to the front of the mounting rails.
5. Install the bezel.
Slide the Chassis into the Rack front view of the 3.5-inch drive array. (without Bezel)
front view of the 2.5-inch drive array.
Caution:
Be careful when lifting the chassis.
1. With assistance, lift the chassis and slide it onto the mounting rails. Keep the chassis level.
2. Make sure the chassis captive fasteners on the front of the array line up with the threaded holes on the
front of the mounting rails, and manually secure the captive fasteners to the rails. Do not use an
automatic driver to tighten the thumbscrews.
Installing the Bezel The steps for installing the bezel are the same for all the array models.
1. Hook the right end of the bezel onto the right side of the chassis.
2. Swing the left end of the bezel towards the left side of the chassis.
3. Press the bezel into place until the release latch closes.
4. Using the key provided, lock the bezel and store the key in a safe place.
2 Connecting the Array Cables
Connect the network and power cables, and optionally, the serial cable.
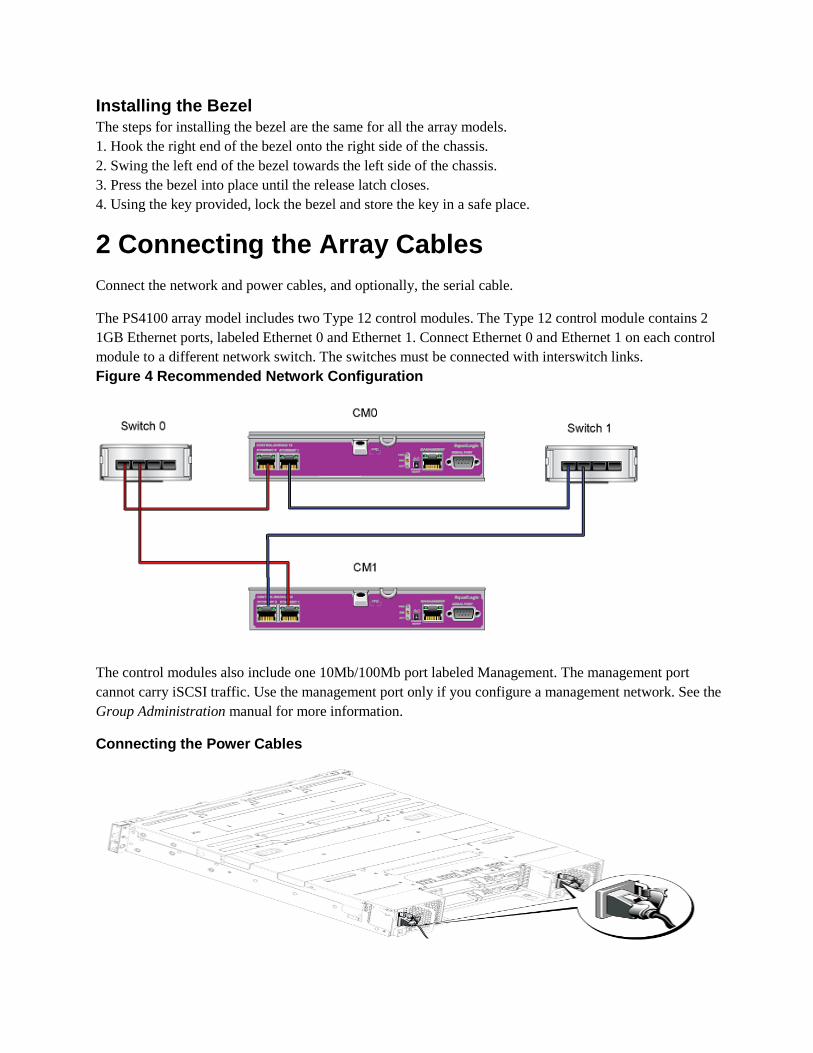
The PS4100 array model includes two Type 12 control modules. The Type 12 control module contains 2
1GB Ethernet ports, labeled Ethernet 0 and Ethernet 1. Connect Ethernet 0 and Ethernet 1 on each control
module to a different network switch. The switches must be connected with interswitch links.
Figure 4 Recommended Network Configuration
The control modules also include one 10Mb/100Mb port labeled Management. The management port
cannot carry iSCSI traffic. Use the management port only if you configure a management network. See the
Group Administration manual for more information.
Connecting the Power Cables

Turning On the Array Before turning on power, allow sufficient time for the array to adjust to ambient temperature (for example,
overnight). Power Supply LED Descriptions
1 AC Power. This LED is lit (green) as long as mains power is connected to the power supply.
2 Error. This LED is lit (amber) if the power supply has a problem.
Connecting a Serial Cable to the Array
The serial connection must have the following characteristics:
• 9600 baud, • One STOP bit, • No parity, • 8 data bits, • No flow control
3 Software Configuration
After you complete the array hardware installation, you can initialize the array and create a PS Series group
with the array as the first group member. Alternately, you can add the array to an existing group. When you
expand a group, capacity and performance scale automatically with no impact on users.
There are two methods for configuring the software. Choose one method:
• Remote Setup Wizard, either for Windows or Linux.
• Use the setup utility: Interactive, command line utility that prompts for information about the array and
group configuration. You must use a serial connection between the array and a console terminal.

Collect Configuration Information

Start the Software Configuration
‘Setup Utility’ to Configure the Software
1. On the console or terminal emulator that has the serial connection to the array, press the Enter key.
2. At the login prompt, enter grpadmin for both the account (login) name and the password.
3. When prompted, enter y to start the setup utility.
4. When prompted, enter the array and group configuration information from Collect Configuration
Information page. Press the Enter to accept a default value. Enter a question mark (?) to get help.
5. Specify to create a group with the array as the first member or add the array to an existing group.
After setup completes, you must set the member’s RAID policy in order to use the disk storage.
EXAMPLE - Using the setup Utility
Login: grpadmin
Password: xxxxxxxx
The setup utility establishes the initial network and storage configuration for a storage
array and then configures the array
as a member or a new or existing group of arrays.
For help, enter a question mark (?) at a prompt.
Welcome to Group Manager
Copyright 2011 Dell, Inc.
It appears that the storage array has not been configured.
Would you like to configure the array now? (y/n) [n] y
Group Manager Setup Utility
Do you want to proceed (yes | no) [no]? yes
Initializing. This may take several minutes to complete.
Enter the network configuration for the array:
Member name []: member1
Network interface [eth0]: eth0
IP address for network interface []: 192.17.2.41
Netmask [255.255.255.0]:
Default gateway [192.17.2.1]:
Enter the name and IP address of the group that the array will join.
Group name []: group1
Group IP address []: 192.17.2.20
Searching to see if the group exists. This may take a few minutes.
The group does not exist or currently cannot be reached. Make sure you have entered the
correct group IP address and group name.
Do you want to create a new group (yes | no) [yes]? yes
Group Configuration
Group Name: group1
Group IP address: 192.17.2.20
Do you want to use the group settings shown above (yes | no) [yes]: yes
Password for managing group membership:
Retype password for verification:
Password for the default group administration account:
Retype password for verification:
Saving the configuration ...
Waiting for configuration to become active......Done
Group member member1 now active in the group.

Group group1 has been created with one member.
Use the Group Manager GUI or CLI to set the RAID policy for the member. You can then
create a volume that a host can connect to using an iSCSI initiator.
group1>
‘Remote Setup Wizard’ to Configure the Software
1. Obtain the Host Integration Tools CD-ROM from the shipping box, or download from the support website.
3. Install the Remote Setup Wizard.
4. Start the Remote Setup Wizard by clicking: Start, Programs, EqualLogic, Remote Setup Wizard
5. In the Welcome dialog box, select ‘Initialize a PS Series array’ and click Next.
Note: You may need to use the ‘setup utility’ to configure the software.
6. Select the array that you want to initialize and click Next.
7. In the Initialize Array dialog box, enter the array configuration from ‘Collect Configuration Information
Table’ and choose to create a group or join an existing group. Then, click Next.
8. In the Create a New Group or Join an Existing Group dialog box, enter the group configuration from
‘Collect Configuration Information Table’and click Next.
9. Click Finish to exit the wizard.
If you added the array to an existing group, you must set the member’s RAID policy in order to use the disk
storage.
Set the Member RAID Policy
1- Using the CLI for a new group member:
1. Log in to the group, Use Serial connection to a member or Telnet/ ssh connection to the group IP address.
2. At the login prompt, enter the grpadmin account name and the password that you specified.
3. At the Group Manager command prompt, enter the following command, (specifying raid50, raid5,
raid10, raid6, or raid6-accelerated (only available XS array models) for the policy variable):
member select member_name raid-policy policy
For example:- The following command configures member1 with RAID50:
group1> member select member1 raid-policy raid50
2- Using the GUI to Set the RAID Policy:
1. Log in to the group by entering the group IP address in a Web browser. Then, enter the grpadmin account
name and the password that you specified when creating the group.

2. In the Group Summary window, 1- expand Members in the left panel and select the member name.
3. In the warning message dialog box that appears, click Yes to configure RAID on the member.
4. In the Configure Member – General Settings dialog box (Figure 11), click Next.

5. In the Configure Member – RAID Configuration dialog box, ‘Select the RAID policy.’ and then click Next.
(To delay using the member’s storage space until the RAID verification completes and the batteries are fully
charged, select Wait until the member storage initialization completes. By default, the space is
immediately available, although performance will not be optimal until the RAID verification completes.)
6. In the Configure Member – Summary dialog box, click Finish if the member configuration
is satisfactory. Click Back to make changes.
The array storage is ready to use.

4 Storage Allocation
Allocating group storage space to users involves the following steps:
1. Create a Volume.
2. Connect a Computer to a Volume
Create a Volume To allocate group storage space to users and applications, use the Group Manager CLI or GUI to create
volumes. A volume appears on the network as an iSCSI target. When you create a volume, specify the
information described in Table 8 Volume Configuration Information
You can set aside space for volume snapshots or configure a volume with thin provisioning. However, thin
provisioning is not appropriate for all storage environments. See the PS Series Group Administration manual
for information about advanced volume functionality.
Using the CLI to Create a Volume
1. Log in to the group. Use Serial connection to a member or Telnet/ ssh connection to the group IP address.
2. At the Group Manager command prompt, use the following command to create the volume:
volume create volume_name size [GB]
Specify the volume name and size (the default unit of measure is megabytes).
3. Use the following command to create an access control record for the volume:
volume select volume_name access create access_control
The access_control parameter can be one or more of the following:
• initiator initiator_name
• ipaddress ip_address
You can create a maximum of 16 access control records for a volume.
Example: The following example creates a 50 GB volume and one access control record. Only a computer with
the specified initiator name will be able to access the volume. group1> volume create staff1 50GB

group1> volume select staff1 access create initiator iqn.1991-
05.com.microsoft:WIN2008Server.company.com
Using the GUI to Create a Volume 1. Log in to the group.
Specify the group IP address in a Web browser. Then, in the login dialog box, enter the grpadmin
account name and the password that you specified when creating the group.
2. In the Group Summary window, click Create volume in the Activities panel.
3. Enter the volume name and an optional description, and click Next.
Create Volume – General Properties
4. Enter the volume size and click Next. The table values will reflect the size you specify.
Create Volume – Space Reserve

5. Specify the iSCSI initiator name or IP address for the access control record and click Next.
6. Review the summary information and click Finish.

2- Connect a Computer to a Volume When create a volume, the PS Series group automatically generates an iSCSI target name, volume name
appended to the end of the target name. Each volume appears on the network as an iSCSI target.
An example of an iSCSI target name for a volume named dbvol is as follows: iqn.2001-05.com.equallogic.5-4a0900-2f00000-007eca92d654f160-dbvol
To connect a computer to a volume:
1. Install and configure an iSCSI initiator on the computer. In Windows 7:
a. Click Start, type iSCSI in Start Search, and then under Programs, click iSCSI Initiator.
If this is the first time that you have launched Microsoft iSCSI Initiator, you receive a prompt that says the
Microsoft iSCSI service is not running. You must start the service for Microsoft iSCSI Initiator to run
correctly. Click Yes to start the service.
b. On the Targets tab, type the name or the IP address of the target device in the Quick Connect text
box, and then click Quick Connect. The Quick Connect dialog box is displayed.
c. If multiple targets are available at the target portal that is specified, a list is displayed. Click the
desired target, and then click Connect.
d. Click Done/OK.

2. Make sure that the computer matches one of the volume’s access control records. To display the records
for a volume:
– Using the CLI, enter the following command: volume select volume_name access show
– Using the GUI, expand Volumes in the left panel, select the volume name, and click the Access tab.
If necessary, use the CLI or the GUI to create an access control record that the computer will match.
IQN number can be collect from the target Windows Server to create a Access for Volume in PS Storage.

3. To display the iSCSI target name for the volume:
– Using the CLI, enter the following command: volume select volume_name show
– Using the GUI, expand Volumes in the left panel, select the volume name, and click Connections tab.
4. On the computer, use the iSCSI initiator utility to specify the group IP address as the iSCSI discovery
address. If the initiator supports the discovery process, it will return a list of iSCSI targets that the computer can
access. If the initiator does not support discovery, you must also specify the target name, and, in some cases,
the standard iSCSI port number (3260).
5. Use the iSCSI initiator utility to select the desired target and log in to the target.
When the computer connects to the iSCSI target, it sees the volume as a regular disk that can be formatted
using the normal operating system utilities. For example, you can partition the disk and create a file system.

6 Setting Up a Group: Common Group Customization Tasks
Advanced Group Administration Tasks

After setting up a group, you can customize the group in order to more effectively manage your storage
environment. You can also begin to use the full set of product features. The following documentation and
additional products are included in the purchase of your array and available at any time.
• The PS Series Group Administration manual provides details on storage concepts and how to use the
Group Manager GUI to manage a group.
• The PS Series CLI Reference manual describes how to use the Group Manager CLI to manage a group
and individual arrays.
• The Manual Transfer Utility supports off-network replication of volume data.
• In a VMware environment, you can use the Auto-Snapshot Manager/VMware Edition to manage
snapshots and replicas on the PS group that can restore individual virtual machines or the whole
VMware environment.
• You can use the Storage Adapter for Site Recovery Manager (SRM), which allows SRM to understand
and recognize PS Series replicas for full SRM integration.
• The Multipathing Extension Module (MEM) provides enhancements to the VMware multipathing
functionality.
• In a Microsoft environment, you can use the Auto-Snapshot Manager/Microsoft Edition to manage
snapshots and replicas on the PS group that can restore applications such as SQL Server, Exchange
Server, Hyper-V, and NTFS file shares.
• If you have several PS Series groups, you can monitor and manage them with the SAN HeadQuarters
(SANHQ) utility.