pryda timber connectors - midstate hardware€¦ · · 2012-11-23november 2010 pryda timber...
TRANSCRIPT

A complete guide to the design, specification andinstallation of Pryda Connectors & Tie-Downs
November 2010
Pryda Timber ConnectorsConnectors & Tie-Downs Guide


ESSENTIAL NOTES – PRYDA PRODUCT GUIDES
Copyright: © Pryda Australia - A Division of ITW Australia – ABN 63 004 235 063 - 2010
INTRODUCTION The information in this Product Guide is provided for use in Australia by architects, engineers, building designers, builders and others. It is based upon the following criteria:
1. No Substitution: The products covered by or recommended in
this guide must not be substituted with other products.
2. Design Capacity Basis: See Codes & Standards following
3. Supporting Constructions: Constructions using Pryda
products must be built in accordance with the BCA or an appropriate Australian standard. Note: This includes appropriate corrosion protection- See Corrosion Protection following
4. Correct Installation: Installation of Pryda products must be
strictly in accordance with the instructions in this guide
5. Current Guide Version Used: The current version of this
guide, including any amendments or additions, must be used. Users are advised to check with Pryda for updates at least every three months by telephone, the web site: www.pryda.com.au or by email to: [email protected].
CODES & STANDARDS Product design capacities in this guide have been derived from:
(a) results of laboratory tests carried out by or for Pryda Australia
(b) engineering computations in accordance with the relevant Australian standards, ie:
* AS1720.1-1997 Timber Structures. Part 1: Design Methods
* AS/NZS1170:2002 Structural Design Principles
* AS4055 -2006 Wind Loads for Housing
Reference is also made to AS1684.1-1999 Residential Timber Framed Construction - Part 1: Design Criteria.
Design capacities tabulated in this guide apply directly for joints in houses and on secondary beams in other structures. For joints on primary beams in structures other than houses, reduce the capacity as specified in page 4 (if applicable). Design capacities are related to the Joint Group of the timber as defined in AS1720 and AS1684. If the joint group of timber members joined together varies, the lower group must be assumed for design, eg: JD5 is lower than JD4. Load Duration Factor for Wind
Wind Uplift capacities are based on the AS1720.1:1997 (Amdt No.4 Nov 2002) or AS1720.1:2010 using k1=1.14, for use in conjunction with AS/NZS1170:2002 loading code
DEFINITIONS Special terms used in this guide are as defined in Australian standards, including:
Design Capacity: the maximum Limit State Design load (aka
“action”) which the product can safely support under the specified load condition, eg: 1.2G + 1.5Q (dead+roof live). See page 4 for details (if applicable)
Joint Group: classification of a timber according to its fastener-
holding capacity. See page 4 for details (if applicable)
CORROSION PROTECTION
Most Pryda products are manufactured using Z275 light-gauge steel, having zinc coating of 275 gsm (total weight). This protection is adequate only for INTERNAL applications in most corrosion environments, except areas that are classified as heavy industrial or those subject to high humidity (eg: enclosed swimming pools) etc. Under these circumstances, seek advice from experts as special protection will be required. Note: INTERNAL areas are those within the building envelope that are kept permanently dry.
AS1684.2-2010 and AS1684.3-2010- Australian Standards for Residential Timber Frame Construction stipulates a minimum Z275 steel for all sheet metal products used in an internal environment.
In areas outside the building envelope that are exposed to repeated wetting (EXTERNAL areas), Pryda’s stainless steel products or equivalent should be considered. Some alternatives include hot dip galvanised or powder coated steel, which are not supplied by Pryda. For more detailed information, read Pryda’s Technical Update on Corrosion Resistance of Pryda Products or contact a Pryda office.
LIMITED WARRANTY Pryda Australia warrants:
* Products in this guide are free from defects in the material or manufacturing
* Design capacities are in accordance with test results or current, relevant Australian standards and the Building Code of Australia.
* Pryda products are structurally adequate provided they are designed, installed and used completely in accordance with this guide.
This warranty applies only to:
* products in this guide
* products used in the specified applications and not damaged after manufacture and supply
* joints free from wood splitting, decay or other timber defects within the joint or within 150 mm of the joint.
INSTRUCTIONS FOR INSTALLATION These notes are provided to ensure proper installation.
1. All fasteners used must be manufactured by reputable companies and be of structural quality.
2. Connectors must not be installed on timber which is split before or during installation. If the timber is likely to split as fasteners are driven, fastener holes must be pre-drilled.
3. Do not overload the joints- during construction or in service.
4. Bolt hole diameter must be 0.8 mm to 1.5 mm larger than the bolt diameter and the specified washers must be installed.
5. Use proper safety equipment and due care in installing these connectors
6. Any gaps in joints between the timber members must not exceed 3 mm
7. Do not over-tighten screws.

PRYDA CONNECTORS & TIE-DOWN CONNECTORS GUIDE – NOVEMBER 2010 3
Pryda Connectors & Tie-down Connectors Guide
INDEX
ESSENTIAL NOTES- PRYDA PRODUCT GUIDES
2 PRYDA HITCH For lateral connections of trusses to non-loadbearing walls
14
SELECTION GUIDE Quick, easy guide to selection of a suitable tie-down connector for timber frames
4 STUD TIES Fix wall plates to studs at bracing units and other joints
15
BATTEN STRAPS Roof batten tie-down connector
7 TRIPLE GRIPS Multi-purpose tie-down and all-purpose connectors
16
BOTTOM PLATE ANCHOR Ties down wall frames to concrete slab floors
8 HIGH CAPACITY TIE-DOWN PLATES To resist extreme tie-down forces
18
CYCLONE STRAP Ties down rafters or trusses to supporting frame
10 HOLD DOWN BRACKET Tie-downs of trusses/rafters for a concealed application
19
JOIST STRAP Ties down timber members at right angles
11
TRUSS TIE On-site tie-down connector for roof trusses and rafters
20
MITRE PLATES Connect creeper trusses to hip trusses.
12 UNITIE Ties down timber members at right angles
21
MULTIGRIPS AND MINIGRIPS Multi-purpose tie-down and all-purpose connectors
13
Machine Driven Nail Use – General Note 32x2.3 mm Duo-Fast C SHEG (ie: screw hardened electro galvanized) machine driven nails (code D40810) or equivalent may be used instead of the specified 35x3.15 mm Pryda Timber Connector Nails to fix Pryda connectors provided that:
20% more nails are used (eg: 5 instead of 4, 4 instead of 3, 3 instead of 2) or alternatively, design capacities are to be reduced by 20% where the same number of nails are used.
machine driven nails are driven at nail spacings and edge distances similar to the hole pattern, ensuring that these nails are not driven into the holes or located not closer than 5mm from the edge of a hole.
Product Information Updates
Information contained in this product guide is subject to change. The latest updates are available from www.pryda.com.au.
PRYDA TIMBER CONNECTORS Connectors & Tie-down Connectors Guide
PRYDA CONNECTORS & TIE-DOWN CONNECTORS GUIDE – NOVEMBER 2010 4
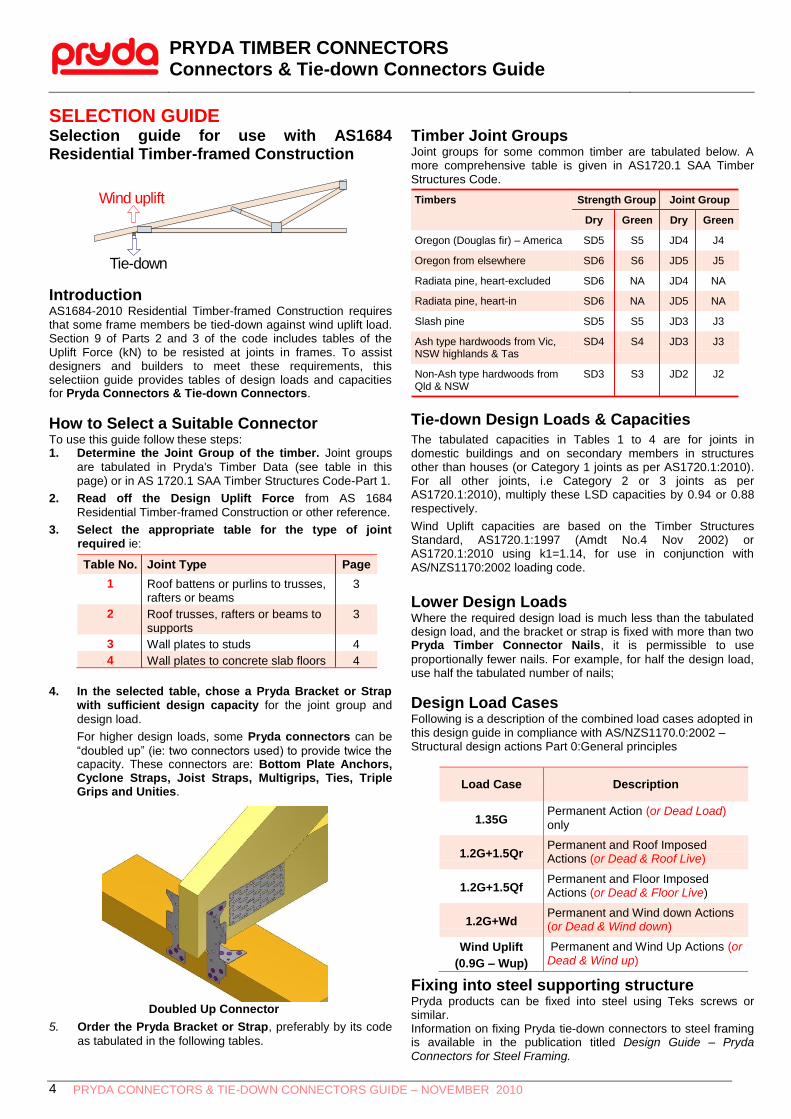
SELECTION GUIDE Selection guide for use with AS1684 Residential Timber-framed Construction
Wind uplift
Tie-down
Introduction AS1684-2010 Residential Timber-framed Construction requires that some frame members be tied-down against wind uplift load. Section 9 of Parts 2 and 3 of the code includes tables of the Uplift Force (kN) to be resisted at joints in frames. To assist designers and builders to meet these requirements, this selectiion guide provides tables of design loads and capacities for Pryda Connectors & Tie-down Connectors.
How to Select a Suitable Connector To use this guide follow these steps: 1. Determine the Joint Group of the timber. Joint groups
are tabulated in Pryda's Timber Data (see table in this page) or in AS 1720.1 SAA Timber Structures Code-Part 1.
2. Read off the Design Uplift Force from AS 1684
Residential Timber-framed Construction or other reference.
3. Select the appropriate table for the type of joint required ie:
Table No. Joint Type Page
1 Roof battens or purlins to trusses, rafters or beams
3
2 Roof trusses, rafters or beams to supports
3
3 Wall plates to studs 4
4 Wall plates to concrete slab floors 4
4. In the selected table, chose a Pryda Bracket or Strap with sufficient design capacity for the joint group and
design load.
For higher design loads, some Pryda connectors can be
“doubled up” (ie: two connectors used) to provide twice the capacity. These connectors are: Bottom Plate Anchors, Cyclone Straps, Joist Straps, Multigrips, Ties, Triple Grips and Unities.
Doubled Up Connector
5. Order the Pryda Bracket or Strap, preferably by its code
as tabulated in the following tables.
Timber Joint Groups Joint groups for some common timber are tabulated below. A more comprehensive table is given in AS1720.1 SAA Timber Structures Code.
Timbers Strength Group Joint Group
Dry Green Dry Green
Oregon (Douglas fir) – America SD5 S5 JD4 J4
Oregon from elsewhere SD6 S6 JD5 J5
Radiata pine, heart-excluded SD6 NA JD4 NA
Radiata pine, heart-in SD6 NA JD5 NA
Slash pine SD5 S5 JD3 J3
Ash type hardwoods from Vic, NSW highlands & Tas
SD4 S4 JD3 J3
Non-Ash type hardwoods from Qld & NSW
SD3 S3 JD2 J2
Tie-down Design Loads & Capacities
The tabulated capacities in Tables 1 to 4 are for joints in domestic buildings and on secondary members in structures other than houses (or Category 1 joints as per AS1720.1:2010). For all other joints, i.e Category 2 or 3 joints as per AS1720.1:2010), multiply these LSD capacities by 0.94 or 0.88 respectively.
Wind Uplift capacities are based on the Timber Structures Standard, AS1720.1:1997 (Amdt No.4 Nov 2002) or AS1720.1:2010 using k1=1.14, for use in conjunction with AS/NZS1170:2002 loading code.
Lower Design Loads Where the required design load is much less than the tabulated design load, and the bracket or strap is fixed with more than two Pryda Timber Connector Nails, it is permissible to use
proportionally fewer nails. For example, for half the design load, use half the tabulated number of nails;
Design Load Cases Following is a description of the combined load cases adopted in this design guide in compliance with AS/NZS1170.0:2002 – Structural design actions Part 0:General principles
Load Case Description
1.35G Permanent Action (or Dead Load)
only
1.2G+1.5Qr Permanent and Roof Imposed Actions (or Dead & Roof Live)
1.2G+1.5Qf Permanent and Floor Imposed Actions (or Dead & Floor Live)
1.2G+Wd Permanent and Wind down Actions (or Dead & Wind down)
Wind Uplift
(0.9G – Wup)
Permanent and Wind Up Actions (or Dead & Wind up)
Fixing into steel supporting structure Pryda products can be fixed into steel using Teks screws or similar. Information on fixing Pryda tie-down connectors to steel framing is available in the publication titled Design Guide – Pryda Connectors for Steel Framing.

PRYDA TIMBER CONNECTORS Connectors & Tie-down Connectors Guide
PRYDA CONNECTORS & TIE-DOWN CONNECTORS GUIDE – NOVEMBER 2010 5
Table 1. Battens or Purlins to Trusses, Rafters or Beams
Bracket or Strap Fixing Tie-down Load/Capacity (kN) Per Connector Name Diagram Details Green Timber Dry Timber
& Code J4 J3 J2 JD5 JD4 JD3 JD2
Batten Strap
BS70
18 Claw Nails each end + one 3.75 mm nail through batten into
truss/rafter
6.3 6.3 6.3 6.3 6.3 6.3 6.3
Joist Strap
GJS
2 Pryda Timber Connector Nails into each member
1.3 1.8 2.6 1.6 1.8 2.6 3.3
Unitie
UT90
4 Timber Connector Nails into both members
2.6 3.8 5.3 3.2 3.8 5.3 6.8
Table 2. Trusses, Rafters and Roof Beams to Supports
Bracket or Strap Fixing Tie-down Load/Capacity (kN)
Name Diagram Details Green Timber Dry Timber & Code J4 J3 J2 JD5 JD4 JD3 JD2
Cyclone Straps
35x3.15 mm Timber Connector Nails each end: 2.6 3.8 5.3 3.2 3.8 5.3 6.6
QHS6 3 3.5 5.0 6.9 4.4 5.3 7.4 9.4
QHS9 4
4.5 6.3 8.9 5.8 6.9 9.7 12.4
6 6.3 8.9 12.4 8.4 10.1 12.4 12.4
Wrapped Round QHS6, QHS9
QHS9/2
4 nails per leg driven into the underside of the top plate
12.4
15.0
12.4
15.0
12.4
15.0
12.4
15.0
12.4
15.0
12.4
15.0
12.4
15.0
Bond Beam Tie-Down
Straps
BBTD
2 nails on far face through strap folded over the chord,
1 nail on top and 3 nails on near face
15.0 15.0 15.0 15.0 15.0 15.0 15.0
Multigrip
MG
4@ 35x3.15 mm Timber Connector Nails into truss and side
of supporting wall plate or beam
2.6 3.7 4.2 3.2 3.8 4.2 4.2
Triple Grip
TGAR TGAL
4@ 35x3.15 mm Timber Connector Nails into both
members
2.6 3.8 5.3 3.2 3.8 4.6 5.8
Notes: 1. All of the connectors in Tables 1 and 2 except Batten Straps can be doubled up for twice the design capacity. 2. Wind Uplift capacities are based on the Timber Structures Standard, AS1720.1:1997 (Amdt No.4 Nov 2002) using k1=1.14, for use in conjunction with AS/NZS1170:2002 loading code.
3. Re: Machine driven nails – see General Note on page 3.
4. Detail data sheets for the newly introduced High Capacity Tie-down (HCTD) plates and the Hold Down Brackets are available in pages 19 and 20.

PRYDA TIMBER CONNECTORS Connectors & Tie-down Connectors Guide
PRYDA CONNECTORS & TIE-DOWN CONNECTORS GUIDE – NOVEMBER 2010 6
Table 3. Tie-down Design Loads for Wall Plates to Studs Bracket or Strap Fixing Details Design Capacity (kN) per Stud Tie
for Timber Joint Group
Name Diagram Green Timber Dry Timber
& Code J4 J3 J2 JD5 JD4 JD3 JD2
Stud Ties
Double-sided
In-built
Claw nails 3.7 5.6 7.0 5.3 6.3 7.0 7.0
ST3
ST4 In-built
Claw nails 4.3 6.6 7.0 6.2 6.9 7.0 7.0 (Double sided)
STS3 (Single sided)
See Installation –
Page 16 2.8 4.1 5.6 3.4 4.1 5.7 7.0
Note: See also Stud Ties - Design Loads. Re: Duration factor- see item 4 on page 3
Table 4. Tie-down Design Loads for Wall Plates to Concrete Slab Floors
Bracket or Strap Fixing Details Design Capacity (kN) Name Diagram
& Code Along Plate Across Plate Uplift
Bottom Plate Anchor
See Pryda Bottom Plate
Anchor page 9 3.9 3.9 7.5 BPA
Notes:
Examples of Tie-down Connector Selection
Ex. 1. Joint = Roof battens to sheet roof trusses Truss spacing = 1200 mm Batten spacing = 900 mm Wind Zone = N3 Truss timber = Dry pine – JD4 joint group Net uplift force = From AS1684.2 Table 9.14:
General: 1.7 kN Edges: 3.1 kN
From Table 1 in this guide, a BS70 Batten Strap has a design capacity of 6.3 kN. This is adequate for general area and at
edges.
Ex. 2 Joint = Roof trusses to wall frame Roofing = Sheet roof & ceiling Uplift Load Width = 4500 mm Truss spacing = 900 mm Wind Zone = N2 Wall frame timber = Dry hardwood – JD3 joint group Net uplift force = From AS1684.2 Table 9.13:
3.0 kN
From Table 2 in this guide, one Triple Grip or Multigrip is
sufficient (design capacity = 4.6 kN and 4.2 kN respectively).

PRYDA TIMBER CONNECTORS Connectors & Tie-down Connectors Guide
PRYDA CONNECTORS & TIE-DOWN CONNECTORS GUIDE – NOVEMBER 2010 7
BATTEN STRAPS Economical, Easy to use, Roof batten Connectors & Tie-down Connector
BS70 Batten Strap
Features Pryda Batten Straps are used for tying down roof battens to
trusses or rafters. They:
Are easy and quick to install being factory bent to suit 70 mm battens. They have in-built, sharp pointed “Claw” nails
for penetration into both softwoods and hardwoods.
Save construction time and cost by being faster and
easier to install.
Meet tie-down requirements for all wind zones including C3 - see Design Capacities following.
Description Pryda Batten Straps details are:
Product Code
Fixing each end Applicable Battens
BS70 18 built-in “Claw” nails
70 mm width by up 50 mm depth
Batten Straps are packed 70 per carton. Steel is 1.0 mm
ZincformR G300-Z275 or equivalent.
Installation Pryda Batten Straps are installed as follows:
1. Put the Batten Strap over the batten and fix both the strap and batten to the supporting truss or rafter with one galvanised, flat-head nail as follows:
– 25mm thick batten: 75 x 3.75mm nail
– 38mm thick batten: 75 x 3.75mm nail
– 50mm thick batten: 100 x 3.75mm nail
Joint Detail Hammer Fixing
2. Hammer all of the Claw nails into the truss chord or rafter.
Design Capacity Design capacity per Batten Strap is 6.3 kN for J3 or better green timber or JD5 or better dry timber. This capacity applies directly to all members in houses and secondary members in other structures. For primary members in other structures, multiply the capacity by 0.88.
Design Tables Based on the design uplift forces in AS 1684- 2010 Residential Timber-framed Construction, the numbers of Batten Straps
required for batten tie-down in various wind zones are as follows.
Tiled Roofs One Batten Strap is adequate for all joints in tiled roofs in wind zones N1 to N4 or C1 to C4 with maximum truss or rafter spacing up to 900 mm and batten spacing of 330 mm.
Sheet Roofs Non-cyclonic Areas
One Batten Strap is adequate for all joints in sheet roofs in wind zones N1 to N4 with maximum truss or rafter spacing up to 1200 mm and maximum batten spacing of 1200 mm.
Cyclonic Areas
Rafter/ Batten Wind Zone
Truss Spacing C1 C2 C3
Spacing Gen. Edges Gen. Edges Gen. Edges
mm mm Number of Batten Straps Required Per Joint
Maximum Internal Pressure
600 900 1 1 1 1 1 1
1200 1 1 1 1 1 NS
900 600 1 1 1 1 1 1
750 1 1 1 1 1 NS
900 1 1 1 NS 1 NS
1200 1 1 1 NS NS NS
1200 600 1 1 1 1 1 NS
750 1 1 1 NS NS NS
900 1 1 1 NS NS NS
1200 1 NS NS NS NS NS
Partial Internal Pressure
600 900 1 1 1 1 1 1
1200 1 1 1 1 1 NS
900 600 1 1 1 1 1 1
750 1 1 1 1 1 1
900 1 1 1 1 1 NS
1200 1 1 1 NS 1 NS
1200 600 1 1 1 1 1 NS
750 1 1 1 1 1 NS
900 1 1 1 NS 1 NS
1200 1 1 1 NS NS NS
Notes:
1. “Roof edges” are any areas of the roof within 1200 mm of an edge, hip, ridge, fascia or barge.
2. “Maximum internal pressure” applies where:
- the ceiling or eaves lining is on top of the rafters or trusses, or
- the ceiling or eaves lining does not have sufficient strength to resist the internal wind pressure, or
- roof cavities are vented to the inside of the building, eg: the manhole cover(s) is not rigidly fixed.
Otherwise, “partial internal pressure” can be assumed.
3. Wind zones are as defined in AS4055 Wind Loads for Houses.
4. The above tabulated numbers apply for: seasoned timber – JD5 or better; unseasoned timber: J3 or better.
For lower joint groups, compare the design capacity (previous page) to Table 9.14 of AS 1684 Part 2 or 3.

PRYDA TIMBER CONNECTORS Connectors & Tie-down Connectors Guide
PRYDA CONNECTORS & TIE-DOWN CONNECTORS GUIDE – NOVEMBER 2010 8
BOTTOM PLATE ANCHOR A pressed steel bracket for fixing timber bottoml plates to a concrete slab floor
Features
Pryda Bottom Plate Anchors:
Replace concrete nail fixing of bottom wall plates to a
concrete slab.
Where the anchor is used on frames with brick veneer, ABSAC have advised that metal fixings behind the brick may be regarded as “not exposed” and do not require additional corrosion protection, as specified for exposed coastal conditions. ABSAC is a national organisation which issues appraisals of building innovations; these appraisals are often used to gain state or national accreditation.
Specification Pryda Bottom Plate Anchors have the following details:
Product Code:
BPA
Diagram: Split tab for wall frameswithout sheet bracing
Tag fortemporary
fixing toformwork
Dimensions 235x50x1.2
Materials: G300- Z450 Galvanised steel
Packing: 50 per carton
Anchor Spacing Maximum spacings for Bottom Plate Anchors, determined from the design wind uplift pressures in AS1684-2010 Part 2 and Part 3, Table 9.5 are as tabulated in the following. Non-cyclonic Areas
Wind Uplift Load Width (mm)
Max. Spacing (mm) for Bottom Plate Anchors
N1 N2 N3 N3
Sheet Roof
Tile Roof
Sheet Roof
Tile Roof
Sheet Roof
Tile Roof
Sheet Roof
Tile Roof
3000 1800 NA 1800 NA 1800+ 1800+ 1500 1800
4500 1800 NA 1800 NA 1800+ 1800+ 900 1200
6000 1800 NA 1800 NA 1200 1800+ 750 900
7500 1800 NA 1800 NA 1000 1800 600 750
Cyclonic Areas
Wind Uplift Load Width (mm)
Max. Spacing (mm) - Bottom Plate Anchors
C1 C2 C3
Sheet Roof
Tile Roof
Sheet Roof
Tile Roof
Sheet Roof
Tile Roof
1500 1800 1800 1800 1800 1200 1200
3000 1500 1800 900 900 600 600
4500 900 1200 600 600 NS NS
6000 750 900 NS NS NS NS
7500 600 600 NS NS NS NS
Installation For fixing, use only 35 x 3.15 mm, galvanised Pryda Timber Connector Nails as specified in the following or alternative
nails which have guaranteed equivalent nailholding strength.
Note that these anchors are designed for use in dry use conditions.
Installation Procedure Stage 1:
Made sure the DPC is pushed hard into the corners of the trench before placing the anchors. If the top edge of the formwork is level with the FFL, tack the anchor to the formwork edge using the triangle tag.
In all cases, position the anchor with the tab (flat end) horizontal and the crimped end pointing downward at 45 degrees.
FFLTack anchor to topedge of formwork
Ensure that the DPC is pushed
hard into slab corner before
placing the anchor Stage 2:
After the initial cure of the concrete slab, position the wall frame at the slab edge.
Bend the anchor up and over the bottom wall plate. If the anchor coincides with a stud, bend only one leg of the tab over the plate. Fix the anchor with 4 Pryda Timber Connector Nails into the top face of the wall plate (or 2 into the plate and 2 into the stud) and with two Timber Connector Nails into the
edge of the plate.
Four 35x3.15 mmTimber ConnectorNails into top of wall plateTwo Timber
ConnectorNails into
edge of plate

PRYDA TIMBER CONNECTORS Connectors & Tie-down Connectors Guide
PRYDA CONNECTORS & TIE-DOWN CONNECTORS GUIDE – NOVEMBER 2010 9
Bottom Plate Anchor Continued:
Design Capacities - Wind Load
Loading Code Design Capacity Nj (kN) for Load Direction:
Along plate Across plate Uplift
AS/NZS1170:2002 3.9 3.9 7.5
Notes: 1. For capacity marked *, double the design load across the plate where the two screws or nails are driven into the wall plate.
2. Dead load capacities are about 60% of the wind load capacities.
3. Product testing by Monash University, Melbourne (NATA Registered Laboratory). Test report available on request.
RAMSETTM ANCHORSCREWSTM and WASHERS Screws for fixing timber bottom plates to a concrete slab floor
Specification Washer Specifications
Product Codes:
AS12100H and AS12150H
Diagram:
Dimensions AS12100H = M12 x 100
AS12150H = M12 x 150
Materials: Galvanised steel
Packing: 50 per carton
Design Capacities of RamsetTM AnkaScrewsTM RamsetTM AnkaScrewsTM through 35mm thick bottom plates
Part Code Anchor Size
Effective Anchor
Depth For 35mm Bottom Plate
Uplift Capacity (ΦNj) (kN) Minimum Concrete Thicknes
s (mm)
External Walls
Internal Walls 70 mm 90 mm
AS12100H M12 x 100 60 9.1 10.8 11.2 85
AS12150H M12 x 150 110 22.0 26.1 27.2 135
RamsetTM AnkaScrewsTM through 45mm thick bottom plates
Part Code Anchor Size
Effective Anchor
Depth For 45mm Bottom Plate
Uplift Capacity (ΦNj) (kN) Minimum Concrete Thickness
(mm)
External Walls Internal Walls 70 mm 90 mm
AS12100H M12 x 100 50 7.0 8.2 8.5 75
AS12150H M12 x 150 100 19.2 22.8 23.8 125
Installation of AnkaScrews is quick and easy. See the Ramset installation instructions on their web site: www.ramset.com.au or contact Ramset.
Square Washer Size
Round Washer Size
Washer Type and Pryda
Code
Capacity (ΦNj) (kN) for Joint Group:
(mm) (mm) JD5 JD4
50 x 50 x 3.0 55 dia x 3.0 Standard
OW12/56S 8.4 10.5
65 x 65 x 5.0 75 dia x 5.0 Heavy Duty
OW12/65S 20.8 26.1
Washers:
It is important to use an appropriate washer with the Anchorscrew to achieve the desired capacity. The tie-down capacity is the minimum of the design values given here for the selected washer and the Anchorscrew .

PRYDA TIMBER CONNECTORS Connectors & Tie-down Connectors Guide
PRYDA CONNECTORS & TIE-DOWN CONNECTORS GUIDE – NOVEMBER 2010 10
CYCLONE STRAPS
Pryda Cyclone Straps are used primarily in cyclonic areas for tying down purlins to trusses or roof trusses or other roof members to the wall frame.
Features Quick and easy to install
Sufficient capacity for many cyclonic area uses
Can be “doubled up” for twice tie-down capacity
Range of lengths to suit different nailing and capacity requirements
Maximum design capacity determined from Pryda tests
Specification
Size See Dimensions below
Steel G300-Z275 Galvanised steel
Packing 100 per carton
Product Code QHS4 QHS6 QHS9 QHS9/2
Thickness (mm)
1.0 1.0 1.0 1.2
Packing No. 80 80 25 25
Per Carton Carton Bundle Bundle
Length 400 mm 588 mm 880 mm 880 mm
Note: QHS4 and QHS6 are also available in Merchant Packs.
32
125
400
125
588
32
QHS4
QHS6
QHS9
125
880
32
Applications Typical applications of Pryda Cyclone Straps are shown in the
diagram below:
:
Design Capacities
Limit State Design capacities for a single Pryda Cyclone Strap resisting wind uplift are as tabulated below.
Nails
per
Leg
Design Capacity (Nj) (kN) for Timber Joint Group using any Cyclone Strap:
J3 J2 JD5 JD4 JD3 JD2
2 3.8 5.3 3.2 3.8 5.3 6.8
3 5.0 6.9 4.4 5.3 7.4 9.4
4 6.3 8.9 5.8 6.9 9.7 12.3
6 (5)
8.9 12.4(3)
8.4 10.1 12.4(3)
12.4(3)
Capacities for straps that are Wrapped Round (see Note 4)
QHS4 QHS6 QHS9
12.4 12.4 12.4 12.4 12.4 12.4
QHS9/2 15.0 15.0 15.0 15.0 15.0 15.0
Notes:
1. Wind Uplift capacities are based on the Timber Structures Standard, AS1720.1:1997 (Amdt No.4 Nov 2002) or AS1720.1:2010 using k1=1.14, for use in conjunction with AS/NZS1170:2002 loading code.
2. These design capacities apply to Pryda Cyclone Straps fixed at both ends with 35x3.15 mm galvanised Pryda Timber Connector Nails or equivalent.
3. The 12.4 kN value may be increased to 15.0 kN for QHS9/2 cyclone strap.
4. When the strap is wrapped round the wall plate or other timber member and fixed with 4 nails per leg driven into the underside of the top plate, the capacity is limited by the steel. Tests have proven that bending the legs of Cyclone Straps around the timber increases the ultimate load the
strap is capable of carrying.
5. QHS4 is not suitable for 6 nails per leg option. Use either QHS6 or QHS9 (or QHS9/2) for this application.
6. Joint groups for timbers are specified in AS1720. See also joint groups for some common timbers
7. Re: Machine driven nails – see General Note on page 3.
Cyclone Strapfixes purlin to
truss top chordor rafter
Cyclone Strapties down trussor rafter to thewall frame
Roof truss orrafter or beam
Alternate the side of the truss/rafter to which the strapis fixed
Top plate
QHS9 or QHS9/2

PRYDA TIMBER CONNECTORS Connectors & Tie-down Connectors Guide
PRYDA CONNECTORS & TIE-DOWN CONNECTORS GUIDE – NOVEMBER 2010 11
JOIST STRAP A simple joist strap with a variety of uses in building
Features Pryda Joist Strap is a simple, bent metal strap with an in-built nail and nail holes for fixing with 35x3.15 mm galvanised Pryda Timber Connector Nails. It is ideal for connecting timber
members at right angles such as floor joists to bearers, hanging beams to ceiling joists, rafters to beams, purlins to rafters or trusses.
Specification
Steel: 0.6 mm G300-Z275 galvanised steel.
Product Code: GJS
Packing: 150 per carton
Dimensions
Installation Position the Joist Strap with all nail holes at least 16 mm from the nearest timber edge. Using 35x3.15 mm galvanised Pryda Timber Connector Nails or equivalent, drive both these nails
and the in-built nail fully into both timber members. Regarding machine driven nails – see General Note on page 3.
Application The common application of Pryda Joist Strap is shown below.
Design Capacities Limit State Design capacities per Pryda Joist Strap fixed with
2@ nails each end are as tabulated below:
Load Case
Design Capacity (Nj) (kN) for Joint Group:
J4 J3 J2 JD5 JD4 JD3 JD2
1.35G 0.7 0.9 1.3 0.8 0.9 1.3 1.7
1.2G+1.5Qf 0.8 1.1 1.6 1.0 1.1 1.6 2.0
1.2G+1.5Qr 0.9 1.3 1.8 1.1 1.3 1.8 2.3
1.2G+Wd or Wind Uplift
1.3 1.8 2.6 1.6 1.8 2.6 3.3
Note:
1. These capacities apply directly for joints in houses and on secondary beams in other structures. For joints on primary beams in structures other than houses, multiply these capacities by 0.88.
2. Wind Uplift capacities are based on the Timber Structures Standard, AS1720.1:1997 (Amdt No.4 Nov 2002) or AS1720.1:2010 using k1=1.14, for use in conjunction with AS/NZS1170:2002 loading code.
3. Refer page 4 for description of load cases used in table above.
HOOP IRON & STRAPPING Pryda manufactures a range of Hoop Iron (in coils with punched nail holes) and Unpunched Strapping (coils) in two sizes. Unpunched Strapping can be used for tie-down and other joints in accordance with AS1684-2010 Residential Timber-framed Construction or other specifications. Hoop Iron is not recommended for structural bracing. See Sales Data
Hoop Iron Unpunched Strapping
22
162
22
6
Joist
Bearer
PrydaJoist
Strap

PRYDA TIMBER CONNECTORS Connectors & Tie-down Connectors Guide
PRYDA CONNECTORS & TIE-DOWN CONNECTORS GUIDE – NOVEMBER 2010 12
MITRE PLATES
Features Pryda Hip Mitre Plates are used for connecting creeper
trusses to hip trusses. They:
Are easy and quick to install being factory bent to suit
the common 45 degrees angle between most creeper and hip trusses. Can also be used with rafters. The angle of bend in the Mitre Plate stops the top corner from protruding above the line of the roof.
Meet the requirements in AS 4440-2004. See Design Loads.
Are available right handed and left handed. This is
required to pick up the creeper from both sides of the hip.
Description Pryda Hip Mitre Plates require 5/35x3.15 galvanised Pryda Timber Connector Nails into the creeper top or bottom
chord, and the same into the hip truss chords.
Note: ** The nails specified in AS 4440 – 2004 are 6 / 2.80 nails into each leg, and this capacity can also be achieved by using - 5 / 35x3.15 Pryda nails, or 5 / 38x2.87 mm (code GF18AZA) hardened, screw shank nails, or 3 / No.12 – 11x25 hex-head Type 17 screws close to the bend line.
Specification
Steel: 78 x 1.0 mm galvanised steel, grade G300, coated to Z275 or equivalent.
Packing: 20 per carton (10 left, 10 right)
Codes: MT15 are for top chord connections. MT suit bottom chord joints.
MT15
MT
Installation Pryda Hip Mitre Plates are installed as follows:
1. Refer to AS4440- 2004. Nail the creeper top chord and bottom chord to the hip truss using 65 mm long nails through the full thickness of the creeper truss members.
2. Place the long leg of the Mitre Plate against the creeper truss so that the bend is tight into the joint between the creeper and hip truss. Fix 5 / 35x3.15 Pryda Product nails to the creeper, and to the hip truss.
Hip Mitre Plate Fixing of Creepers
Design Loads When used to carry gravity loads or to resist wind uplift from creeper trusses or rafters Pryda Hip Mitre Plates have the
following design properties when fixed with five 35x3.15 Pryda Timber Connector Nails into both members. All design capacities are limited by nail capacity, and all nails are considered to be fully effective in shear and not carrying any in-plane moments.
Load Type
HMP Design Capacities, ΦNj (kN)
Seasoned timber
JD3 JD4 JD5 JD6
1.35G 3.3 2.3 2.0 1.4
1.2G+1.5Qr 4.4 3.2 2.7 2.0
1.2G+Wd or Wind uplift
6.6 4.7 3.9 2.9
Unseasoned timber
J2 J3 J4
1.35G 3.3 2.3 1.7
1.2G+1.5Qr 4.4 3.2 2.3
1.2G+Wd or Wind uplift
6.6 4.7 3.3
Note: ** Additional capacity can be achieved by considering the nailing of the creeper to the hip truss with 3 / 65 nails before applying the Mitre Plate. This detail is required in some circumstances in AS4440-2004. Wind Uplift capacities are based on the Timber Structures Standard, AS1720.1:1997 (Amdt No.4 Nov 2002) or AS1720.1:2010 using k1=1.14, for use in conjunction with AS/NZS1170:2002 loading code.
MT PrydaMitre Plate
MT15 PrydaMitre Plate
60
126
78
28 Bend line
44
126
78
Bend line
Creeper TC
Hip TC
Creeper TC
Creeper BC
Creeper BC
Hip BC
MT15 PrydaMitre Plate
MT PrydaMitre Plate

PRYDA TIMBER CONNECTORS Connectors & Tie-down Connectors Guide
PRYDA CONNECTORS & TIE-DOWN CONNECTORS GUIDE – NOVEMBER 2010 13
MULTIGRIPS AND MINIGRIPS Multi-purpose metal connectors for timber construction
Features Pryda Multigrips are ideal connectors for many uses in timber
framing. They are suitable for high load applications such as a tie-down connector for trusses or rafters to top plates and for fixing joists to the face of bearers. Pryda Minigrips provide a more economical connector for the
numerous, more lightly loaded joints in houses and other buildings.
Specification Steel: 1.0 mm G300-Z275 galvanised steel or .
Marine Grade Stainless steel.
Product Codes & Packing:
Code Product Quantity
MG* Multigrips 100 per carton no nails
MGL Long Multigrips 100 per carton no nails
MG200/SS316 Stainless Steel Marine Grade
200
MPMGS* Minigrips 100 per carton no nails
* Available in merchant pack and individually barcoded product.
Installation To install Pryda Multigrips and Minigrips, use only 35 x 3.15mm, galvanised Pryda Timber Connector Nails or
equivalent with these connectors. Stainless steel nails must be used with stainless steel Multigrips. Regarding machine driven nails – see the General Note on
page 3.
Dimensions
100
36 36
36 36
132
36 36
56
Multigrip Long Multigrip Minigrip
Applications Typical applications and load directions for Pryda Multigrips and Minigrips are shown below.
Nails into eachmember: Multigrip - 5 Minigrip - 2
Load direction 1
Load direction 2
2 Nails
2 Nails
2 Nails
4 Nails
Face Fixing Beams Stud/column Fixing
4 Nails
2 Nails
4 Nails
Load Direction 2
Truss/Rafter Tie-down- Multigrip Only (Load Direction 2)
Note: Fix Long Multigrips as for Multigrips
Design Capacities (a) Load Direction 1 (always used as pairs)
Load
Case
Design Capacity ΦNj (kN) per a PAIR of Multigrips or Long Multigrips for
Timber Joint Group:
J4 J3 J2 JD5 JD4 JD3 JD2
1.35G 2.3 3.2 4.5 2.7 3.2 4.5 5.7
1.2G+1.5Qr 3.0 4.3 6.1 3.6 4.3 6.1 7.7
1.2G+Wd or Wind Uplift
4.6 6.4 9.0 5.4 6.4 9.0 11.4
Design Capacity (kN) per
a PAIR of Minigrips
1.35G 1.1 1.6 2.2 1.3 1.6 2.2 2.8
1.2G+1.5Qr 1.5 2.1 3.0 1.8 2.1 3.0 3.8
1.2G+Wd or Wind Uplift
2.3 3.2 4.5 2.7 3.2 4.5 5.7
(b) Load Direction 2 (for a single multigrip)
Load
Case
Design Capacity ΦNj (kN) for a SINGLE Multigrip or Long Multigrip
for Timber Joint Group:
J4 J3 J2 JD5 JD4 JD3 JD2
Wind Uplift 2.6 3.7 4.2 3.2 3.8 4.2 4.2
Notes: 1. For joints on primary beams in structures other than houses,
multiply the limit state capacities by 0.88.
2.Wind Uplift capacities are based on the AS/NZS1170:2002 code using k1=1.14.
3. Refer page 4 for description of load cases.
PRYDA TIMBER CONNECTORS Connectors & Tie-down Connectors Guide
PRYDA CONNECTORS & TIE-DOWN CONNECTORS GUIDE – NOVEMBER 2010 14
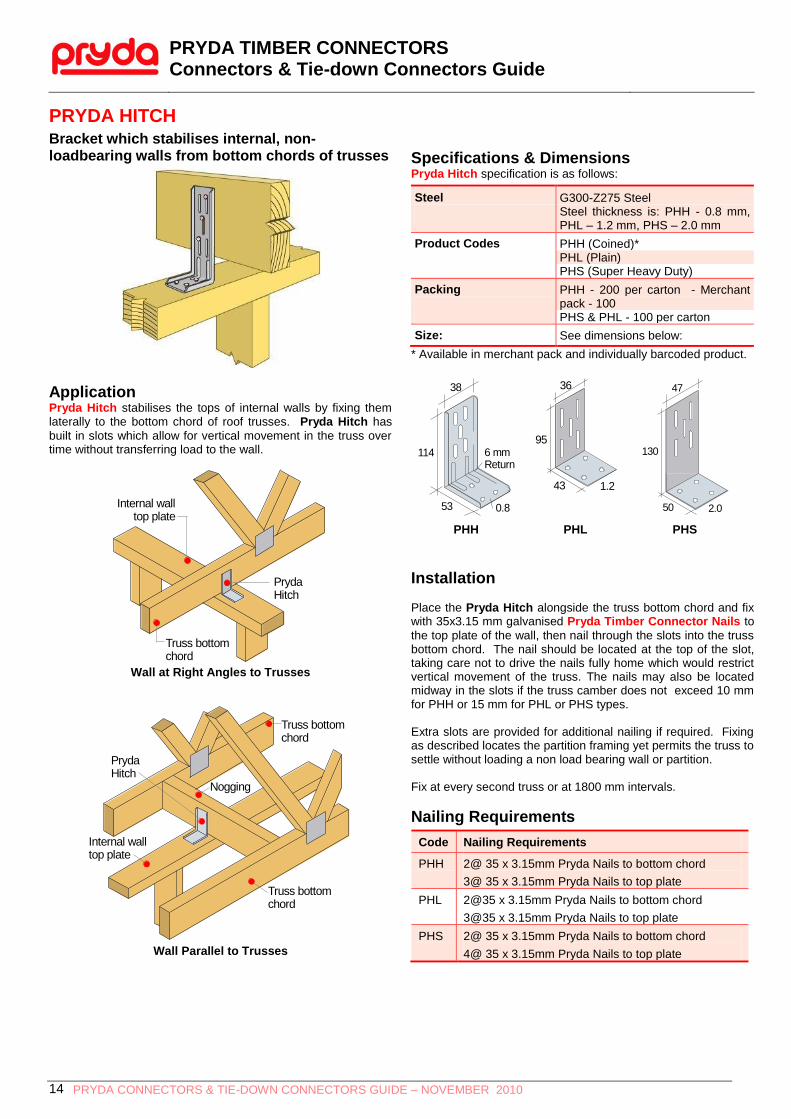
PRYDA HITCH Bracket which stabilises internal, non-loadbearing walls from bottom chords of trusses
Application Pryda Hitch stabilises the tops of internal walls by fixing them laterally to the bottom chord of roof trusses. Pryda Hitch has
built in slots which allow for vertical movement in the truss over time without transferring load to the wall.
Wall at Right Angles to Trusses
Wall Parallel to Trusses
Specifications & Dimensions Pryda Hitch specification is as follows:
Steel G300-Z275 Steel Steel thickness is: PHH - 0.8 mm,
PHL – 1.2 mm, PHS – 2.0 mm
Product Codes PHH (Coined)* PHL (Plain) PHS (Super Heavy Duty)
Packing PHH - 200 per carton - Merchant pack - 100
PHS & PHL - 100 per carton
Size: See dimensions below:
* Available in merchant pack and individually barcoded product.
PHH PHL PHS
Installation Place the Pryda Hitch alongside the truss bottom chord and fix with 35x3.15 mm galvanised Pryda Timber Connector Nails to
the top plate of the wall, then nail through the slots into the truss bottom chord. The nail should be located at the top of the slot, taking care not to drive the nails fully home which would restrict vertical movement of the truss. The nails may also be located midway in the slots if the truss camber does not exceed 10 mm for PHH or 15 mm for PHL or PHS types. Extra slots are provided for additional nailing if required. Fixing as described locates the partition framing yet permits the truss to settle without loading a non load bearing wall or partition. Fix at every second truss or at 1800 mm intervals.
Nailing Requirements
Code Nailing Requirements
PHH 2@ 35 x 3.15mm Pryda Nails to bottom chord
3@ 35 x 3.15mm Pryda Nails to top plate
PHL 2@35 x 3.15mm Pryda Nails to bottom chord
3@35 x 3.15mm Pryda Nails to top plate
PHS 2@ 35 x 3.15mm Pryda Nails to bottom chord
4@ 35 x 3.15mm Pryda Nails to top plate
Internal walltop plate
Pryda Hitch
Truss bottom chord
Truss bottom chord
Truss bottom chord
Pryda Hitch
Internal walltop plate
Nogging
38
6 mmReturn
0.853
114
36
95
1.243
47
2.050
130

PRYDA TIMBER CONNECTORS Connectors & Tie-down Connectors Guide
PRYDA CONNECTORS & TIE-DOWN CONNECTORS GUIDE – NOVEMBER 2010 15
STUD TIES A quick, neat and effective connector between studs and wall plates
Double Sided Stud Tie Single Sided Stud Tie STS3R
Features Pryda Stud Ties greatly improve the jointing of top and bottom
plates to studs compared to the common nail fixing, ie:
Greater tie-down strength: Stud Tie nails are driven into the
side grain of the stud to resist wind uplift in lateral shear. This is far stronger than relying on the withdrawal strength of common nails in end grain. For example, two 125x3.75 mm nails driven through 45 mm thick wall plates into the ends of dry pine studs (as required by AS 1684) have a capacity of 0.9 kN (WSD) while ST3 Stud Ties provide 3.9 kN.* (see
Design Capacities next page)
No splitting of the timber: With Stud Ties, the careful
location of the nails away from timber ends and edges avoids splitting which can occur in common nails only joints, especially in some timbers and particularly with skew nailing. This is not only unsightly, but it reduces the strength of the joint substantially.
Convenience: As ST3 and ST4 Stud Ties have in-built nails, there is no need for other nails. Stud Ties are quick and easy
to apply; the in-built nails are readily driven home with a conventional hammer. ST4U70 and ST4U90 Stud Ties have two bends for easy installation on 70 mm and 90 mm wall frames respectively.
Single sided Stud Ties are specially designed for factory
production. They avoid the need to reach under the frame on the framing table and have either dimples for easy fixing with power driven nails or holes for fixing with 35x3.15 mm galvanised Pryda Timber Connector Nails.
Complies with AS1684 Bracing Units rules: All types of
Stud Ties meet the tie-down requirements of the code when installed as specified in the next page.
Specification & Dimensions
Product
Codes:
Double sided, one pre-bend
ST3, ST4
Double sided, two pre-bends
ST4U70, ST4U90
Single sided,
right & left
STS3R, STS3L dimpled STS3HR, STS3HL - with holes
Size: As shown following
Steel: 1.0 mm G300 – Z275
Packing ST3 – 200 per carton, ST4 – 80 per carton STS.. - 50 per carton
Pryda Stud Tie Dimensions
70 - ST4U70 90 - ST4U90
165 - ST4U70155 - ST4U90
Dimensions- Double Sided, Two Pre-bends
ST4U70, ST4U90
Note: Pryda Straps SB103 may be used as an alternative, bent in a U-shape, and fixed with 6 nails on each leg. See Design Capacities for details.
(Continued next page…)
110
190
25
25
250
150ST3
ST4
82
32
60
66
92 STS3R
6 rowsof nails
7 rowsof nails

PRYDA TIMBER CONNECTORS Connectors & Tie-down Connectors Guide
PRYDA CONNECTORS & TIE-DOWN CONNECTORS GUIDE – NOVEMBER 2010 16
Installation The minimum permissible end distances for nails are: * ST3 and ST4 – 12 mm; STS3 - 63 mm. This relates to the distance from the under-side of top plate to the fastener.
Double Sided Stud Ties:
These Stud Ties must be installed symmetrically, ie: with the lengths down each side equal within a 20 mm tolerance.
1. Locate the Stud Tie firmly on the external corner of the wall
plate with the shorter leg on the side of the stud and centrally located in the stud thickness.
2. Hammer the nails fully into the stud with a carpenter’s hammer.
One Bend Ties:
3. Bend the longer leg around the other external edge of the plate and onto the stud.
4. Hammer the remaining nails into the stud.
Single Sided Stud Ties:
(a) With Dimples:
These Ties must be fixed on the same side as the truss fixing (for uplift) or the same side as the bracing.
1. Choose STS3R for right handed installation or STS3L for left handed.
2. Locate the Stud Tie over the stud to plate joint, with the
vertical bend on the stud arris (corner).
3. Power drive 9/32x2.3 mm galvanised, screw shank nails (code D40801) fully into the stud and wall plate, ie: 4 nails
into wall plate and 5 nails into stud, at locations indicated on the Tie.
(b) With Holes:
Install these Stud Ties as for Ties with dimples, except use 35x3.15 mm galvanised Pryda Timber Connector Nails, 3 into
wall plate and 4 nails into stud.
Applications Pryda Stud Ties are used in wall bracing units (Types A and B)
and other areas of walls for fixing of top and bottom wall plates
to studs- as shown . Suitable overall, wall plate thicknesses are: ST3 - 50 mm; ST4 - 100 mm and STS3 - 80 mm.
Design Capacities Wind uplift Limit State Design capacities for Pryda Stud Ties are tabulated below. These loads depend upon the joint group of the timber to which the Stud Ties are nailed.
Design Wind Uplift Loads per Stud Tie
Stud
Tie
Design Capacity Nj (kN) per Stud Tie for Timber Joint Group
Code Green Timber Dry Timber
J4 J3 J2 JD5 JD4 JD3
ST3 3.7 5.6 7.0 5.3 6.3 7.0
ST4 4.3 6.5 7.0 6.2 6.9 7.0
STS3
(note 1) 2.8 4.1 5.7 3.4 4.1 5.7
SB103
(note 4) 7.1 10.0 13.6 8.8 10.5 13.6
Notes:
1. STS3 Stud Ties may also be used with 5 Pryda Timber Connector nails or 6 power driven nails to the stud, and 3 or 4 nails to the top plate. In this case increase the design capacities by 25% of the values shown here.
2. The above values include the capacity of 2/skew nails.
3. Wind Uplift capacities are based on the Timber Structures Standard, AS1720.1:1997 (Amdt No.4 Nov 2002) or AS1720.1:2010 using k1=1.14, for use in conjunction with AS/NZS1170:2002 loading code.
4. SB103 capacities are based on the fixings shown below,
using SIX Pryda Timber Connector nails per leg.
Pryda StudTies at eachstud to platejoint
Stud Ties atbottom plate
ST3 ST3
ST3 ST3
Wall Bracing Units General Use of Stud Ties

PRYDA TIMBER CONNECTORS Connectors & Tie-down Connectors Guide
PRYDA CONNECTORS & TIE-DOWN CONNECTORS GUIDE – NOVEMBER 2010 17
TRIPLE GRIPS Preformed Framing Anchors
Pryda Triple Grips are used for many nail fixed timber joints
some of which are shown in the following typical applications:
Specification
Steel 1.0 mm G300- Z275
Product Codes
TGAR, TGAL MPTGAR, MPTGAL
Note: Product codes are: TG + Profile + R = Right hand or L = Left Hand, “MP” = Merchant pack – individually barcoded product
Profiles
Note: Profiles shown are Right hand
Dimensions
Packing 100 per carton, 50 per carton (merchant packs)
Installation To achieve the design capacities tabulated below, fix Triple Grips with galvanised, 35x3.15 mm Pryda Timber Connector Nails with the number of nails as shown on the relevant diagram
at top right. Do not use clouts. Regarding machine driven nails – see the General Note on
page 3.
Fixing into Steel Frames Information on fixing Pryda Triple Grips to steel framing is available in the publication titled Design Guide – Pryda Connectors for Steel Framing
Design Capacities
Limit State Design capacities for Pryda Triple Grips are as
tabulated below for the load directions shown at left.
Load Case Load
Dirn.
Design Capacity Nj (kN) per Triple Grip
for Timber Joint Group:
J3 J2 JD5 JD4 JD3 JD2
1.2G+Wdn or Wind Uplift
k1 = 1.14
A 3.8 5.3 3.2 3.8 4.6 5.8
B1 3.0 4.0 2.2 2.7 3.9 5.2
B2 1.6 1.8 0.6 1.0 1.6 2.5
C 3.3 4.5 2.2 2.9 4.3 4.5
D 3.0 3.0 3.0 3.0 3.0 3.0
E 2.4 2.4 2.4 2.4 2.4 2.4
Notes:
1. Wind Uplift capacities are based on the Timber Structures Standard, AS1720.1:1997 (Amdt No.4 Nov 2002) or AS1720.1:2010 using k1=1.14, for use in conjunction with AS/NZS1170:2002 loading code.
2. The above capacities apply directly for joints in houses and on secondary beams in other structures. For joints on primary beams in structures other than houses, multiply these capacities by 0.88
3. Load Direction – Refer illustrations on this page.
AR AL
60
73
115
40
Roof Truss to Wall Plate Rafter or Ceiling Joist to Wall Plate
Purlin to Truss,
Hanger to Ceiling Joist Wall Stud
to Bottom Plate
C
A
B1B2
E
4 nails
2 nails
4 nails
4 nails
2 nails
4 nails
PRYDA TIMBER CONNECTORS Connectors & Tie-down Connectors Guide
PRYDA CONNECTORS & TIE-DOWN CONNECTORS GUIDE – NOVEMBER 2010 18
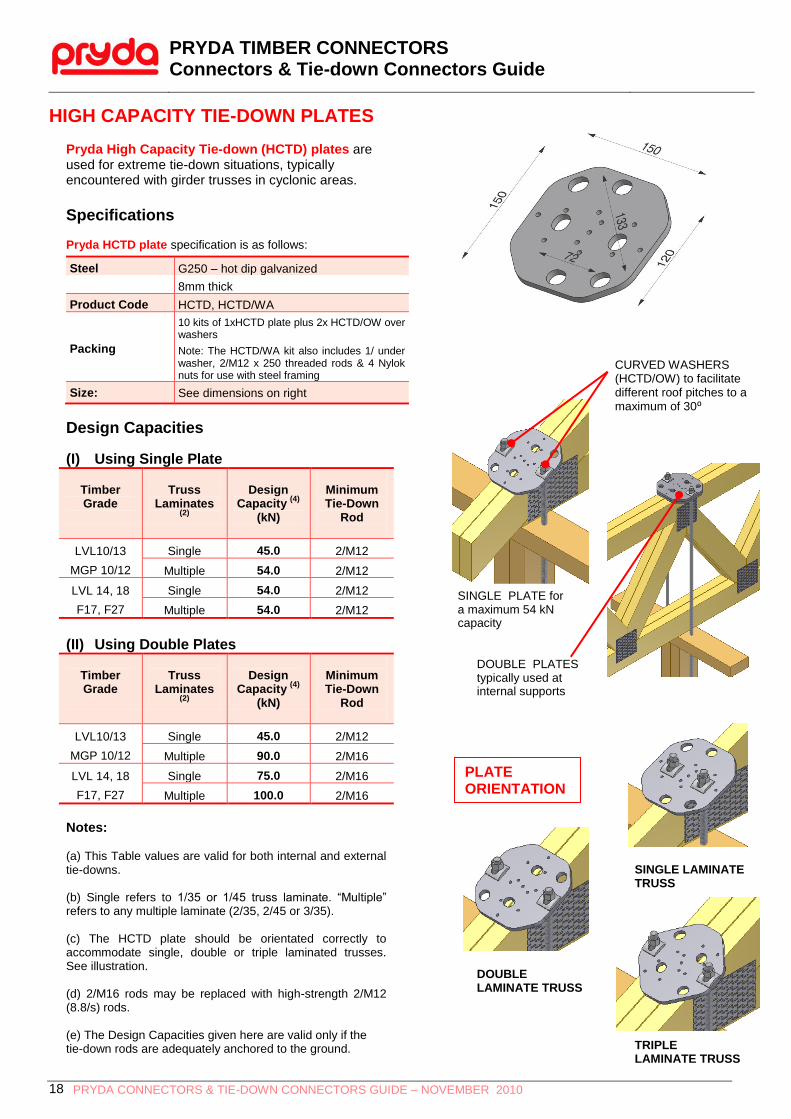
HIGH CAPACITY TIE-DOWN PLATES Pryda High Capacity Tie-down (HCTD) plates are used for extreme tie-down situations, typically encountered with girder trusses in cyclonic areas. Specifications Pryda HCTD plate specification is as follows:
Steel G250 – hot dip galvanized
8mm thick
Product Code HCTD, HCTD/WA
Packing
10 kits of 1xHCTD plate plus 2x HCTD/OW over washers
Note: The HCTD/WA kit also includes 1/ under washer, 2/M12 x 250 threaded rods & 4 Nylok nuts for use with steel framing
Size: See dimensions on right
Design Capacities
(I) Using Single Plate
Timber Grade
Truss
Laminates (2)
Design
Capacity (4)
(kN)
Minimum Tie-Down
Rod
LVL10/13
MGP 10/12
Single 45.0 2/M12
Multiple 54.0
2/M12
LVL 14, 18
F17, F27
Single 54.0
2/M12
Multiple 54.0
2/M12
(II) Using Double Plates
Timber Grade
Truss
Laminates (2)
Design
Capacity (4)
(kN)
Minimum Tie-Down
Rod
LVL10/13
MGP 10/12
Single 45.0 2/M12
Multiple 90.0
2/M16
LVL 14, 18
F17, F27
Single 75.0
2/M16
Multiple 100.0
2/M16
Notes: (a) This Table values are valid for both internal and external tie-downs.
(b) Single refers to 1/35 or 1/45 truss laminate. “Multiple” refers to any multiple laminate (2/35, 2/45 or 3/35). (c) The HCTD plate should be orientated correctly to accommodate single, double or triple laminated trusses. See illustration.
(d) 2/M16 rods may be replaced with high-strength 2/M12 (8.8/s) rods. (e) The Design Capacities given here are valid only if the tie-down rods are adequately anchored to the ground.
SINGLE LAMINATE TRUSS
DOUBLE LAMINATE TRUSS
TRIPLE LAMINATE TRUSS
PLATE ORIENTATION
DOUBLE PLATES typically used at internal supports
SINGLE PLATE for a maximum 54 kN capacity
CURVED WASHERS (HCTD/OW) to facilitate different roof pitches to a maximum of 30⁰

PRYDA TIMBER CONNECTORS Connectors & Tie-down Connectors Guide
PRYDA CONNECTORS & TIE-DOWN CONNECTORS GUIDE – NOVEMBER 2010 19
M12 TIE-DOWN ROD
WITH 40X40X5.0
WASHER
CPAH IN APPLICATION
EACH BRACKET FIXED
WITH 5 NAILS OR 4 SCREWS
TO TRUSS/RAFTER
M12 TIE-DOWN ROD
WITH 40X40X5.0
WASHER
MPCPAH IN APPLICATION
HOLD-DOWN ANGLE BRACKET
Pryda Hold-down Bracket can be used in a variety of applications in timber structures. Providing tie-down resistance for roof trusses or wall studs is the most common usage of this product. This bracket is specially useful to achieve a concealed connection.
Specification
Size 130 x 50 x 47
Steel G300-Z275
Product Code MPCPAH
Thickness (mm) 2.0
Packing 75 per carton
Design Capacities
The design capacities for a pair of MPCPAH brackets are tabulated below for use with both 35 x 3.15 Pryda Timber Connector nails and No.12 x 35 Type 17 screws. In order to achieve these capacities, a suitable tie-down connector is required. Note: These capacities are also suitable when CPAH is used as a tie-down bracket for wall studs
Uplift Capacities for a PAIR of brackets using 5/35 x 3.15 nails per bracket
Joint Group
Of Truss Chord
Uplift Capacity (kN)
(using a total of 10 nails into truss)
JD5 7.9
JD4 9.4
JD3 13.2
Uplift Capacities for a PAIR of brackets using 4/No. 12 x 35 Type 17 screws per bracket
Joint Group
Of Truss Chord
Uplift Capacity (kN)
(using a total of 8 screws into truss)
JD5 14.0
JD4 20.0
JD3 28.0
Tie-Down Anchors
Top Plate Tie-Down – Use a M12 tie-down rod with 40x40x5.0 washer anchored in to concrete using a suitable epoxy set chemical anchor. Alternatively, 4/No.14 x 50 Type 17 screws per bracket may be used in some cases (preferably with pre-drilled holes), to achieve a capacity of 10.0 kN in JD4 material (a total of 20.0 kN for a pair of brackets). In this case, additional connectors are required to transfer tie-down forces from wall plate to foundation. Wall Stud Tie-Down - When MPCPAH is used to tie-down wall studs, adopt M12 x 150 Ramset
TM
AnchorscrewTM
to anchor the bottom plates into concrete slab/footing to satisfy all of the above capacities. For a minimum edge distance of 35mm and embedment depth of 90mm in Grade 20 concrete, a tie-down capacity of approx 18.0 kN per anchor can be achieved. See more details on Anchorscrews in page 9 of this guide.
R3
1.95
13mm HOLE
6/3.6mm HOLES
53
10
9109 10
15
18
17
18
15
5547
13
0

PRYDA TIMBER CONNECTORS Connectors & Tie-down Connectors Guide
PRYDA CONNECTORS & TIE-DOWN CONNECTORS GUIDE – NOVEMBER 2010 20
TRUSS TIE
Features The Pryda Truss Tie is a fixing device that has been designed to tie down roof trusses or rafters to a timber top plate. They are easy and quick to install having preformed teeth that allow it to be hammered in without nails. Truss ties are typically used for low tie-down requirement, for concrete tile roofs. Truss ties may be used in pairs to achieve double the capacity.
Specification
Steel: 1.0mm G300, Z275
Product Code: TT
Packing: 50 (left) and 50 (right) per carton
Size:
Installation
1. The Truss Tie should be fixed on the outside face of top plate.
2. Prevent the truss/rafter from moving along the top plate by hammering a nail into the top plate against the side away from the Truss Tie, or by placing your foot against the truss/rafter.
3. Hammer the Truss Tie into the truss/rafter, then into the top plate. The Truss Tie will bend slightly during this second operation, but this is eased by the small bending hole. If two Truss Ties are required, the second Truss Tie should be located on the opposite truss/rafter face.
Design Capacities
Wind uplift Limit State Design capacities per Truss Tie are as tabulated below:
Fixing
Details
Tie-down Design Capacity Nj (kN) for Joint Group:
Green Timber
Dry Timber
J4 J3 J2 JD6 JD5 JD4 JD3
Claw Nails only 1.0 1.2 1.6 0.8 1.0 1.2 1.6
Notes:
1. Wind Uplift capacities are based on the Timber Structures Standard, AS1720.1:1997 (Amdt No.4 Nov 2002) or AS1720.1:2010 using k1=1.14, for use in conjunction with AS/NZS1170:2002 loading code..
2. Limit State Design capacities apply directly for joints in houses and on secondary beams in other structures. For joints on primary beams in structures other than houses, multiply these capacities by 0.88.
3. Double up capacities when used as pairs.
Fix top ofTruss Tie first
Locate Truss Tie hard against top plate edge.Bottom part bends as itis fixed to top plate
8
25
120
117.5
PRYDA TIMBER CONNECTORS Connectors & Tie-down Connectors Guide
PRYDA CONNECTORS & TIE-DOWN CONNECTORS GUIDE – NOVEMBER 2010 21
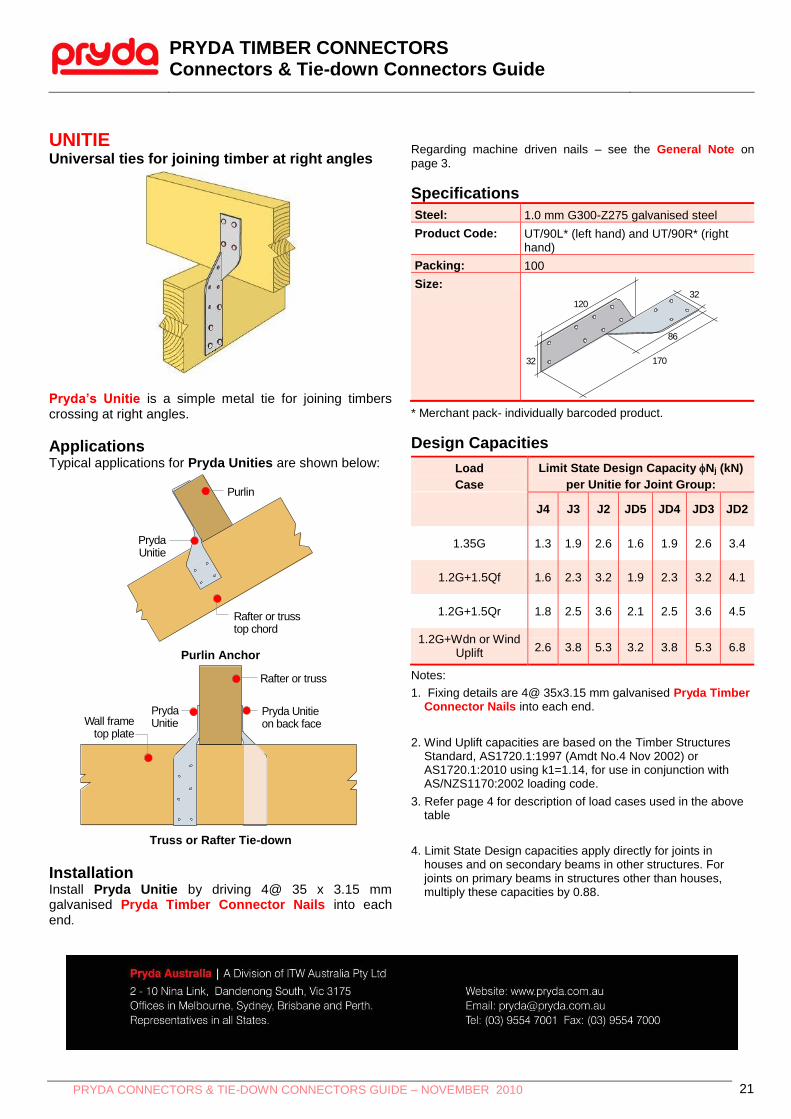
UNITIE Universal ties for joining timber at right angles
Pryda’s Unitie is a simple metal tie for joining timbers crossing at right angles.
Applications Typical applications for Pryda Unities are shown below:
Purlin Anchor
Truss or Rafter Tie-down
Installation Install Pryda Unitie by driving 4@ 35 x 3.15 mm galvanised Pryda Timber Connector Nails into each end.
Regarding machine driven nails – see the General Note on
page 3.
Specifications
Steel: 1.0 mm G300-Z275 galvanised steel
Product Code: UT/90L* (left hand) and UT/90R* (right hand)
Packing: 100
Size:
* Merchant pack- individually barcoded product.
Design Capacities
Load
Case
Limit State Design Capacity Nj (kN)
per Unitie for Joint Group:
J4 J3 J2 JD5 JD4 JD3 JD2
1.35G 1.3 1.9 2.6 1.6 1.9 2.6 3.4
1.2G+1.5Qf 1.6 2.3 3.2 1.9 2.3 3.2 4.1
1.2G+1.5Qr 1.8 2.5 3.6 2.1 2.5 3.6 4.5
1.2G+Wdn or Wind Uplift 2.6 3.8 5.3 3.2 3.8 5.3 6.8
Notes:
1. Fixing details are 4@ 35x3.15 mm galvanised Pryda Timber Connector Nails into each end.
2. Wind Uplift capacities are based on the Timber Structures Standard, AS1720.1:1997 (Amdt No.4 Nov 2002) or AS1720.1:2010 using k1=1.14, for use in conjunction with AS/NZS1170:2002 loading code.
3. Refer page 4 for description of load cases used in the above table
4. Limit State Design capacities apply directly for joints in houses and on secondary beams in other structures. For joints on primary beams in structures other than houses, multiply these capacities by 0.88.
PrydaUnitie
Purlin
Rafter or trusstop chord
Wall frametop plate
PrydaUnitie
Rafter or truss
Pryda Unitieon back face
86
170
32120
32