provider. cellular phone sch-n391 user’s manual
TRANSCRIPT

ELECTRONICS
World Wide Webhttp://www.samsungmobile.com
CELLULAR PHONESCH-N391
User’s Manual
Printed in Korea Code No.: GH68-XXXXXAEnglish. 08/2004.Rev.1.0
Please read this manual before operating your phone, and keep itfor future reference.
* Some contents of this manual may differ from your phonedepending upon the software of the phone or your serviceprovider.

3
Important Safety Precautions .................................................. 7
Unpacking ................................................................................... 9
Your Phone Phone Layout ............................................................................... 10Display ......................................................................................... 11Backlight ...................................................................................... 15Service Light ................................................................................. 15
Getting StartedUsing the Battery ......................................................................... 16Switching the Phone On or Off ...................................................... 20Your Phone’s Modes ...................................................................... 21Locking or Unlocking the Keypad .................................................. 23
Call FunctionsMaking a Call ............................................................................... 24Emergency Dialing ........................................................................ 25Redialing the Last Number ............................................................ 26Making a Call from Phonebook ..................................................... 26Prepend Dialing ............................................................................ 27Speed Dialing ............................................................................... 28Four-digit Dialing .......................................................................... 30Pause Dialing ............................................................................... 30Adjusting the Volume .................................................................... 34Answering a Call ........................................................................... 35Rejecting a Call.............................................................................. 36Options During a Call .................................................................... 36Using Caller ID ............................................................................. 37Viewing Missed Calls ..................................................................... 38Call Waiting .................................................................................. 39Three-Way Calling ......................................................................... 40
Table of Contents
4 5
Entering TextChanging the Text Input Mode ...................................................... 42Using T9(English) Mode ................................................................ 43Using Alphabet Mode .................................................................... 45Using Symbol Mode ...................................................................... 47Using Number Mode ..................................................................... 47
Using the MenusAccessing a Menu Function by Scrolling ......................................... 48Using Shortcuts .............................................................................. 49List of Menu Functions .................................................................. 50
CallsOutgoing (MENU 1-1) ............................................................. 53Incoming (MENU 1-2) ............................................................. 54Missed (MENU 1-3)................................................................... 55Erase History (MENU 1-4)......................................................... 55Air Time (MENU 1-5) ................................................................ 56
Phone BookFind (MENU 2-1) ..................................................................... 57Add New Entry (MENU 2-2) ..................................................... 59Group Setting (MENU 2-3) ..................................................... 62My Phone Number (MENU 2-4) .............................................. 63Memory (MENU 2-5)................................................................ 63
MessagesText (MENU 3-1) ...................................................................... 65MMS (MENU 3-2) ..................................................................... 71Voice (MENU 3-3) ..................................................................... 75Erase MSG (MENU 3-4)............................................................. 75MSG Setting (MENU 3-5) .......................................................... 76
PlannerToday (MENU 4-1) .................................................................. 78Scheduler (MENU 4-2) .............................................................. 80Task List (MENU 4-3) .............................................................. 82Memo Pad (MENU 4-4) ........................................................... 84Alarm (MENU 4-5) .................................................................. 85Calculator (MENU 4-6) ............................................................ 86World Time (MENU 4-7) .......................................................... 87Countdown (MENU 4-8) ........................................................... 87Set Time (MENU 4-9) .............................................................. 89
Voice ToolsVoice Memo (MENU 5-1) ......................................................... 90Voice Answer (MENU 5-2) ......................................................... 92
SoundsRinger Volume (MENU 6-1) ..................................................... 95Ringer Type (MENU 6-2) ......................................................... 96Alerts (MENU 6-3) .................................................................. 97Key tone (MENU 6-4) .............................................................. 98Roam Ringer (MENU 6-5) ..................................................... 98Power On/Off (MENU 6-6) ....................................................... 98Escalating (MENU 6-7) ............................................................. 99
DisplayMenu Style (MENU 7-1) ........................................................ 100Wallpaper (MENU 7-2) .......................................................... 100Backlight (MENU 7-3) ........................................................... 101Banner (MENU 7-4) ............................................................... 101Dual Clock (MENU 7-5) ......................................................... 102Service LED (MENU 7-6) ........................................................ 103Contrast (MENU 7-7) ............................................................. 103Power Saving (MENU 7-8) ..................................................... 104
Games ....................................................................... 105

7
Important SafetyPrecautions
Read these guidelines before using your wirelessphone. Failure to comply with them may be dangerousor illegal.
Road Safety at All TimesDo not use a hand-held phone while driving; park thevehicle first.
Switching Off When RefuelingDo not use the phone at a refueling point (servicestation) or near fuels or chemicals.
Switching Off in AircraftWireless phones can cause interference. Using themin aircraft is both illegal and dangerous.
Switching Off in HospitalsSwitch your phone off near medical equipment.Follow any regulations or rules in force.
InterferenceAll wireless phones may be subject to interference,which could affect their performance.
Special RegulationsMeet any special regulations in force in any area andalways switch off your phone whenever it is forbiddento use it, or when it may cause interference or danger(in a hospital for example).
6
SetupAuto Answer (MENU 9-1) ...................................................... 110Call Answer (MENU 9-2) ........................................................ 110Auto Key Lock (MENU 9-3) ................................................... 111Auto Retry (MENU 9-4) ......................................................... 111Set System (MENU 9-5) ......................................................... 112Data/Fax (MENU 9-6) .......................................................... 113Version (MENU 9-7) ............................................................. 114Security (MENU 9-8) ........................................................ 115
PhotosTake Picture (MENU 0-1) ....................................................... 118Photo Album (MENU 0-2) ...................................................... 122Photo Wallet (MENU 0-3) ...................................................... 124Settings (MENU 0-4) ............................................................. 125
WAPAbout the Wap Browser .............................................................. 126Launch Wap ( -1) ............................................................ 127
Health and Safety InformationExposure to Radio-Frequency Energy (SAR Information) .............. 132Precautions When Using Batteries ............................................... 133Road Safety ................................................................................ 135Operating Environment ................................................................ 135Electronic Devices ....................................................................... 136Potentially Explosive Environment ................................................ 138Emergency Calls........................................................................... 139Other Important Safety Information ............................................. 140Care and Maintenance ................................................................ 141
Glossary ..................................................................... 143
Index........................................................................... 146
Quick Reference Card .................................................. 149
8
IImmppoorrttaanntt SSaaffeettyy PPrreeccaauuttiioonnss
9
Sensible UseUse only in the normal position (held to the ear). Avoidunnecessary contact with the antenna when the phoneis switched on.
Emergency CallEnsure the phone is switched on and in service. Key in the emergency number for your presentlocation, then press the key. You must deactivateany unnecessary features before you can make anemergency call. Give all the necessary information asaccurately as possible. Do not cut off the call untilgiven permission to do so.
Water ResistanceYour phone is not water-resistance. Keep it dry.
Accessories and BatteriesUse only Samsung-approved accessories and batteries.Use of unauthorized accessories could damage yourphone and may be dangerous.
Qualified ServiceOnly qualified service personnel may install or repairyour phone.
For more detailed safety information, see “Health andSafety Information” on page 132.
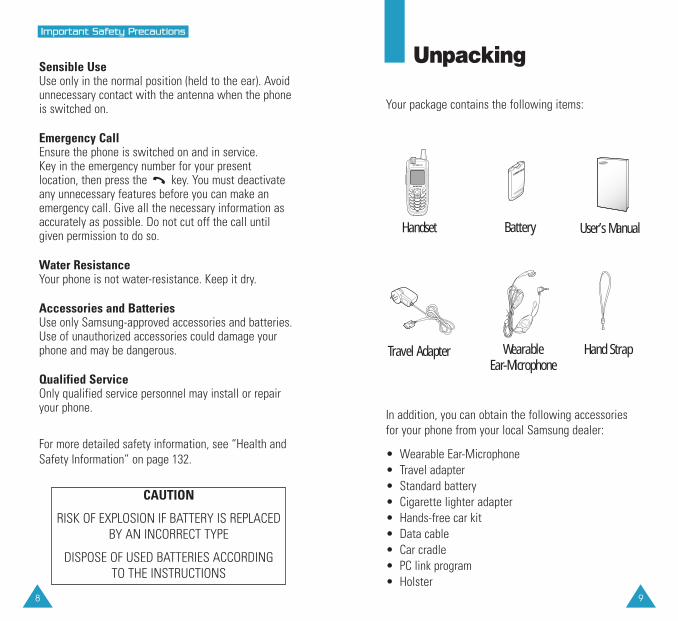
Travel Adapter
Handset Battery User’s Manual
Hand Strap
Unpacking
Your package contains the following items:
In addition, you can obtain the following accessoriesfor your phone from your local Samsung dealer:
• Wearable Ear-Microphone• Travel adapter• Standard battery • Cigarette lighter adapter • Hands-free car kit• Data cable• Car cradle• PC link program• Holster
WearableEar-Microphone
CAUTION
RISK OF EXPLOSION IF BATTERY IS REPLACEDBY AN INCORRECT TYPE
DISPOSE OF USED BATTERIES ACCORDINGTO THE INSTRUCTIONS

11
YYoouurr PPhhoonnee
10
Your Phone
Phone Layout
The following illustration shows the main elementsof your phone.
In the menu facility, scrolls through themenu options.In Standby mode, allows you to enterthe Find Name menu, allows you toenter the Scheduler menu, and allowsyou to enter the Voice Memo menu.
Key Functions
Microphone
Earpiece
DisplayVolume/Scroll keysDuring a call, adjustthe voice volume.In Standby mode,adjusts the tonevolume.In the menu facility,scrolls through themenu options.
Interface Connector
Ear Microphonejack
Antenna
Keys
Display
Layout
The display has two areas; an upper line of variousicons and a lower text and graphic area.
Icons
Text andgraphic area
Service Light
Enters Menu mode.
In Menu mode, selects the current menuor option.In Standby mode, accesses theMessages menu.
Quickly enters the Camera menu. Turns the camera on when held down.In the capture mode, works as a camerashutter.

13
YYoouurr PPhhoonnee
Roaming: Appears when you are out ofyour home area and have logged onto adifferent network, when traveling in othercountries, for example.
Ringer On: Appears when you set theringer volume for calls to one from Level 1to Level 8 or to 1-Beep.
Ringer Off: Appears when you set ringervolume for calls to Silent.
Alarm: Appears when you set an alarm toring at a specified time.
Signal Strength : Shows the receivedsignal strength. The greater the number ofbars, the better the signal.
Icons
Service: Appears when a call is inprogress.
No Service: Appears when you areoutside a service area. When it appears,you cannot make or receive calls.
New Message: Appears when a newmessage is received.
12
YYoouurr PPhhoonnee
Key Functions (continued...)
In text entry mode, changes the appearanceof input.In Standby mode, enters the Keypad Lockmode when pressed and held.
Enters numbers, letters and some specialcharacters.~
Deletes characters from the display.In the menu facility, returns to the previousmenu level.In Standby mode, quickly enters the WAPmenu. Pressing and holding down this keystarts the WAP browser.
In Standby mode, quickly enters/exits the silent mode when pressed and held.In text entry mode, inserts a space.
Ends a call. Also switches the phone on andoff when pressed and held. In the menu facility, returns to Standbymode and cancels your input.
Makes or answers a call.In Standby mode, access the recent calllogs.
Keys (continued...)
15
YYoouurr PPhhoonnee
14
YYoouurr PPhhoonnee
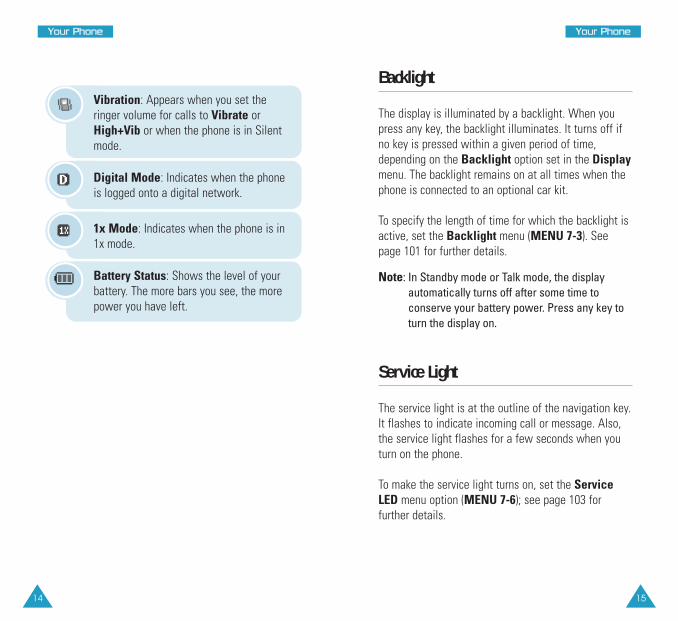
Backlight
The display is illuminated by a backlight. When youpress any key, the backlight illuminates. It turns off ifno key is pressed within a given period of time,depending on the Backlight option set in the Displaymenu. The backlight remains on at all times when thephone is connected to an optional car kit.
To specify the length of time for which the backlight isactive, set the Backlight menu (MENU 7-3). Seepage 101 for further details.
Note: In Standby mode or Talk mode, the displayautomatically turns off after some time toconserve your battery power. Press any key toturn the display on.
Service Light
The service light is at the outline of the navigation key.It flashes to indicate incoming call or message. Also,the service light flashes for a few seconds when youturn on the phone.
To make the service light turns on, set the ServiceLED menu option (MENU 7-6); see page 103 forfurther details.
Digital Mode: Indicates when the phoneis logged onto a digital network.
1x Mode: Indicates when the phone is in1x mode.
Battery Status: Shows the level of yourbattery. The more bars you see, the morepower you have left.
Vibration: Appears when you set theringer volume for calls to Vibrate orHigh+Vib or when the phone is in Silentmode.

17
GGeettttiinngg SSttaarrtteedd
16
Getting Started
Using the Battery
Your phone is powered by a rechargeable Li-ionbattery. Use only approved batteries and chargers.Ask your local Samsung dealer for further details.
Note: You must fully charge the battery before usingyour phone for the first time. A dischargedbattery is fully recharged in approximately180 minutes for a standard battery.
Removing the Battery
1. If necessary, switch off the phone by pressing andholding the key down until the power-offanimation is displayed.
2. To remove the battery, push and hold the catchabove the battery on the back of the phone andlift the battery away.
Installing the Battery
1. Insert the teeth at the bottom of the battery intothe corresponding slots.
2. Push the battery against the back of the phoneuntil it clicks into place.
Make sure that the battery is properly installedbefore switching the phone on .
19
GGeettttiinngg SSttaarrtteedd
18
GGeettttiinngg SSttaarrtteedd
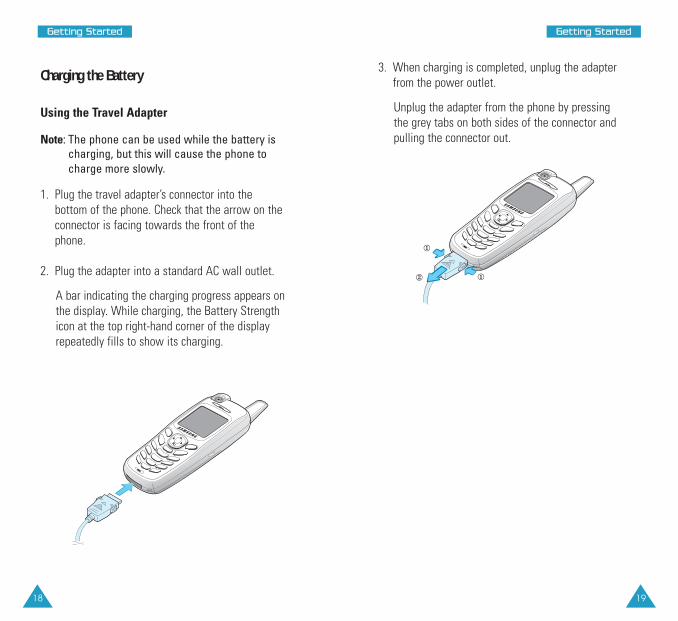
3. When charging is completed, unplug the adapterfrom the power outlet.
Unplug the adapter from the phone by pressingthe grey tabs on both sides of the connector andpulling the connector out.
Charging the Battery
Using the Travel Adapter
Note: The phone can be used while the battery ischarging, but this will cause the phone tocharge more slowly.
1. Plug the travel adapter’s connector into thebottom of the phone. Check that the arrow on theconnector is facing towards the front of thephone.
2. Plug the adapter into a standard AC wall outlet.
A bar indicating the charging progress appears onthe display. While charging, the Battery Strengthicon at the top right-hand corner of the displayrepeatedly fills to show its charging.

21
GGeettttiinngg SSttaarrtteedd
20
GGeettttiinngg SSttaarrtteedd
2. When you wish to switch the phone off, holdthe key down more than two seconds.
WARNING!Do not switch the phone on when mobile phone useis prohibited or when it may cause interference ordanger.
Note: As with any other radio-transmitting device,do not touch the antenna unnecessarily whenthe phone is switched on. Contact with theantenna affects the call quality and may causethe phone to operate at a higher power levelthan otherwise needed.
Your Phone’s Modes
Standby Mode
Standby is the most basic state of your phone. Thephone goes into Standby mode after you turn it on orwhenever you briefly press the key. When yourphone is in Standby mode, you will typically see thegreeting message and the current date and time. If youenter a phone number, you can press the key todial it or press the OK key to save it in the internalPhonebook.
Press the key at any time to return to Standbymode. Be careful; if you are on a call when you pressthe key, the call disconnects and the phonereturns to Standby mode.
Low Battery Indicator
You can easily tell if your battery needs to berecharged by checking the Battery Status icon ( ) atthe upper-right corner of your phone’s display. Thepresence of all three bars indicates a full charge, twobars indicates a smaller charge, and one bar indicatesan even smaller charge.
When the battery charge level becomes low, thebattery sensor blinks an empty Battery Status icon( ) and sounds a warning tone. If the battery levelbecomes too low, the phone automatically turns off.When this happens, you lose whatever you are doingand your phone call cuts off. Watch the Battery Statusicon and make sure that your battery is adequatelycharged.
Switching the Phone On or Off
1. Press and hold the key until the power-onimage displays to switch the phone on.
The service light on the phone flashes and an alertsounds. When the system locates services, thegreeting message displays along with the date andtime. You can now place and receive calls.
If the phone is out of service, the No Service icon( ) appears on the display. In this case, youcannot make and receive calls. You can try againlater when service is available.

23
GGeettttiinngg SSttaarrtteedd
22
GGeettttiinngg SSttaarrtteedd
In Standby mode, press and hold until “EnteringSilent Mode” and the Vibration indicator ( ) display.
To exit and reactivate the previous sound settings,press and hold again until “Exiting Silent Mode”appears. The Vibration indicator no longer displays.
Locking or Unlocking the Keypad
You can make the keypad lock manually by pressingand holding in standy mode. You can preventaccidental key pressing with this key guard mode.
To lock the keypad automatically, use the Auto KeyLock menu(Menu-9-3). See page 111.
To unlock your keypad, press and then .
Note: When the alram or schedular occurs or thecall is received, the Key Lock mode isdisabled.
Talk Mode
You can place and answer calls only when your phoneis turned on. During a call, the phone is in Talk mode.While you are in Talk mode, pressing the MENU keygives you a list of options. See page 36 for details.
Power Save Mode
Your phone comes with a Power Save feature that isautomatically activated if your phone is unable to finda signal after 15 minutes of searching. While thisfeature is active, the phone’s battery charge isconserved. The phone automatically rechecks for asignal periodically. To manually force the phone torecheck for a signal, press any key.
Lock Mode
When you lock your phone using the Lock Phonemenu (MENU 9-8-1), you cannot use the phone. InLock mode, you can receive messages and calls, butyou cannot place an outgoing call until you unlock thephone. To unlock the phone, you need to enter the lockcode.
For details about locking and unlocking your phone,see page 111.
Silent Mode
Silent mode disables all of the sounds on the phone.This feature is best used in situations where the phonemight disturb others, such as in a meeting, at a libraryor in a theater. You can switch your phone to Silentmode with one touch of a key.
25
CCaallll FFuunnccttiioonnss
Correcting the Number
To clear the Press the
last digit displayed key.
whole display key for more thanone second.
Ending a Call
When you want to finish your call, briefly press thekey.
If you end the call by pressing the key, the lengthof the call and the phone number display briefly andthe phone returns to Standby mode.
Emergency Dialing
You can place emergency calls from your emergencynumber list even if your phone is locked or all of theoutgoing calls are restricted.
For further details about emergency numbers, seepage 116.
24
Call Functions
Making a Call
In Standby mode, enter the area code and phonenumber and press the key. Or, press the last phone number and hold it down.
Note: When the Auto Retry menu (MENU 9-4) hasbeen enabled, the phone automatically retries tomake the call when the line is busy or theremote person does not answer. See page 111.
While entering a number, press the MENU key to usethe following menu options:
Talk: places a call to the number.
Save: allows you to save the number in Phonebook.
Find: allows you to find a number from Phonebook.
Hard Pause: enters a hard pause.
2sec Pause: enters a 2-second pause.
Notes: • When you enter a number corresponding to a
Phonebook location, the Speed Dial option isavailable. For details about speed dialing, see page28.
• When you enter four digits, the 4-digit Dial option isavailable. For details about four-digit dialing, seepage 30.
27
CCaallll FFuunnccttiioonnss
26
CCaallll FFuunnccttiioonnss
Prepend Dialing
The prepend option lets you add digits, such as areacodes and network feature activation codes, to aphone number that is in your call logs or Phonebook.
To prepend a phone number stored in your phone:
1. Access outgoing call logs by pressing the key orPhonebook entries by referring to page 58.
2. Scroll to the number you want to dial.
3. Press the MENU key to access the options.
4. Press the 3 key to select the Prepend option.
5. Enter the area code or feature code.
6. Press the key to dial the number.
Redialing the Last Number
To redial the last call you made, press the keytwice quickly or press and hold the key down.
Your phone stores the last 20 numbers each of thedialed, received and missed calls. To recall any ofthese numbers:
1. In Standby mode, press the key. The list of therecent calls display.
2. Press the Navigation keys until you find the name ornumber you want.
3. Press the key to dial the number displayed.
Making a Call from Phonebook
You can store the phone numbers you called regularlyin the phone’s memory, which is called Phonebook. Youthen simply recall the number to dial.
For further details about the Phonebook feature, seepage 57.

29
CCaallll FFuunnccttiioonnss
28
CCaallll FFuunnccttiioonnss
Speed Dialing
Once you have stored phone numbers in Phonebook,you can dial them easily whenever you want.
Notes: • When several numbers are saved in one name entry,
the first number you entered is automaticallyspecified as a speed dial number. To change thespeed dial number, use Speed dial of the Phonebookoptions; see page 60.
• You can also speed dial selecting Speed Dial fromthe dialing options (see page 24). Enter a numbercorresponding to a Phonebook location, press theMENU key and then press the Speed Dial option.
One-Touch Dial
Memory locations 001 through 009 are special one-touch locations. You can dial the phone numbersstored in the Phonebook memory from 001 through 009simply by pressing one key.
Press and hold the third digit of the memory locationcontaining the number to be dialled.
For example: Location no. 009Press the 9 key and hold.
The number (and name) stored displays, and thendialed.
Two-Touch Dial
Memory locations 010 through 099 are special two-touch locations.
Press the second digit briefly, then hold down the thirddigit of the memory location.
For example: Location no. 023Press the 2 key briefly and hold down the 3key.
The number (and name) stored displays, and thendialed.
Three-Touch Dial
Memory locations 100 through 900 are special three-touch locations.
Press the first two digits briefly, then hold down thethird digit of the memory location.
For example: Location no. 123Press the 1 key and the 2 key briefly, thenhold down the 3 key.
The number (and name) stored displays, and thendialed.

31
CCaallll FFuunnccttiioonnss
30
CCaallll FFuunnccttiioonnss
• 2-second pause: A two second pause stops thedialing sequence for two seconds and thenautomatically sends the remaining digits.
Note: Multiple two second pauses can be entered toextend the length of a pause. keep it mind thatpauses count as digits towards the 46 digitdialing maximum.
Storing Pauses in a Phonebook Entry
To store a number in your Phonebook that containspauses:
1. Enter the phone number you want to store, such asthe bank’s teleservice phone number.
2. Press the MENU key to access the options.
3. Select the pause type you want and press the OKkey.
• Press the 4 key for Hard Pause. The letter “P”displays, meaning that a hard pause will occur atthat point in the dialing sequence.
• Press the 5 key for 2sec Pause. The letter “T”displays, meaning that a timed pause will occurat that point in the dialing sequence.
4. Enter the digits that need to follow the pause, suchas your account number.
5. Repeat steps 2 through 4 to add more pauses andnumbers, if necessary.
6. Store the number in your Phonebook as you normallywould by pressing the OK key and following fromstep 2 on page 59.
Four-digit Dialing
You can quickly dial a phone number in Phonebook byentering its last four consecutive digits.
1. Enter the last four digits of the phone number youwant to dial.
2. Press the MENU key and select the 4-digit Dialoption. The phone displays the phone numbermatching the four digits.
If the phone found more than one number thatcontains those four digits, it displays the firstnumber. Scroll through the number using the and
keys to select a number.
3. Press the key to dial the number.
Pause Dialing
When you call an automated system, like a bankingservice, you are often required to enter a password oraccount number. Instead of manually entering thenumbers each time, you can store the numbers in yourPhonebook, separated by pauses.
There are two kinds of pauses that can be entered onyour phone:
• Hard pause: A hard pause stops the dialingsequence until you press the key.
33
CCaallll FFuunnccttiioonnss
Manual Pause Dialing
You can enter pauses manually during the dialingprocess.
1. Enter the phone number of the service you want tocall, such as a bank’s teleservice phone number.
2. Press the MENU key to access the options.
3. Select the pause you want type and press the OKkey.
• Press the 4 key for Hard Pause. The letter “P”displays, meaning that a hard pause will occur atthat point in the dialing sequence.
• Press the 5 key for 2sec Pause. The letter “T”displays, meaning that a “Timed” pause will occurat that point in the dialing sequence.
4. Enter the number to be sent after the pause andthen press the key to dial the first number.
5. For a hard pause, press the key again at theprompt to send the additional number afterconnecting.
If you enter the number using a 2-second pause(s),the phone sends the number that follows the pausetwo seconds after the connection.
32
CCaallll FFuunnccttiioonnss
Pause Dialing from a Stored Phonebook Entry
1. Dial the number of the service from Phonebook.
2. If you stored the number using a hard pause(s), waitfor the appropriate prompt from the number you arecalling. When prompted, press the key to sendthe DTMF (Dual Tone Multi-Frequency) number thatfollows your pause.
If you stored the number using a two secondpause(s), your phone transmits the number thatfollows the “T” pause two seconds after theconnection.
3. “Sending DTMF” flashes on the display and thetransmitted tone sounds.
4. Repeat from step 2, if necessary.
35
CCaallll FFuunnccttiioonnss
34
CCaallll FFuunnccttiioonnss
Answering a Call
When somebody calls you, the phone rings anddisplays the incoming call animation.
If the caller can be identified, the caller’s phonenumber, or name if available in your Phonebook,displays.
There are two ways to answer a call depending onyour setting in the Call Answer menu (MENU 9-2):
If you select To answer the call,
Any Key press any key, except the and the volume keys.
SEND Key press .
To end the call, press the key.
Notes: • You can answer a call while using Phonebook or
menu functions. The current operation stops.• If you cannot answer incoming calls, you can set the
phone to answer the call by playing a greetingmessage and record callers’ messages. For furtherdetails, see page 92.
Adjusting the Volume
During a call, if you want to adjust the voice volume,use the Volume keys on the left side of the phone.
Press the key to increase the volume level and thekey to decrease the level.
In Standby mode, you can also adjust the keypad tonevolume using these keys.
37
CCaallll FFuunnccttiioonnss
36
CCaallll FFuunnccttiioonnss
Rejecting a Call
If you press the key or one of the volume keysonce, when a call is received, the phone stops ringingor vibrating. You can still answer the call by pressingthe key. Press the key to disconnect withoutanswering the call.
Options During a Call
Your phone provides you with a number of functionsthat you can use during a call.
Press the MENU key during a call to access thefollowing options:
Phone Book: allows you to access the Phone Bookmenu. For details, see page 57.
Mute/Quit: allows you to switch your phone’s microphone off, so that the other person cannot hearyou.
Example: You wish to say something to another personin the room but do not want the other person to hearyou.
Silent/Quit: does not transmit the key tones. It allowsyou to press keys without hearing annoying key tonesduring a call.
Send tel #: sends the telephone number to the othercaller.
Calls: allows you to access the Calls menu. Fordetails, see page 53.
Messages: allows you to use the Messages menu.For details, see page 64.
Planner: allows you to access the Planner menu. Fordetails, see page 78.
Using Caller ID
This feature tells you who is calling you by displayingthe caller’s number when the phone rings. If the nameand number are stored in your Phonebook, thecorresponding name also displays. If you call someonewho has this feature, your phone number displays onher/his phone.
Note: Contact your service provider to set up theCaller Line Identification service.

39
CCaallll FFuunnccttiioonnss
38
CCaallll FFuunnccttiioonnss
Call Waiting
Call Waiting lets you receive a second call during aconversation. Your phone notifies you of a waiting callby beeping and displaying “Call Waiting.”
Your network provides you with the option of turningthe Call Waiting feature on and off, if you havesubscribed to the service. Call Waiting is on by defaultin the phone. If you choose to have a undisturbedconversation, simply turn off the feature for the currentcall.
Note: Contact your service provider to activate theCall Waiting service.
To answer a waiting call during a call:
1. When you hear a beep telling that you have awaiting call, press the key. The phone connectsthe calling person and places the current call onhold.
2. Press the key again to switch between the twocalls.
Note: If you do not respond to a Call Waitingnotification, the phone will forward the call tovoice mail server or another number that youhave set up. Contact your service provider formore information.
Viewing Missed Calls
If you fail to answer a call for any reason, the phoneindicates the missed call by displaying a textnotification on the screen. Additionally, if callerinformation is available, a Missed entry is created.
Press the key to places a call, or the key toclear the message and return to Standby mode.
To view missed calls, access the Missed menu(MENU 1-3). For details, see page 55.

41
Entering Text
At many times when using your phone, you will needto enter text, such as when storing a name inPhonebook, creating your personal greeting orscheduling events on your calendar. You can enteralphanumeric characters into your phone using yourphone’s keypad.
Your phone has the following text input modes:
• T9(English): This mode allows you to enter wordswith only one key press per letter. Each key on akeypad has more than one letter; for example, whenyou press the 5 key once J, K or L displays. T9 modeautomatically compares your key presses to aninternal linguistic database to determine the correctword. T9 mode requires far fewer keystrokes thanthe traditional multi-tap method, Alphabet mode.
• Alphabet: This mode allows you to enter letters bypressing the key labeled with the letter you want toenter once, twice, or three times until it appears onthe display.
• Symbol: This mode allows you to enter specialcharacters.
• Number: This mode allows you to enter numbers.
40
CCaallll FFuunnccttiioonnss
Three-Way Calling
This feature enables you to conduct conference callswith two separate people at the same time. The phonerecords each participant into the Outgoing Calls Log.Also, You are billed call time for each outgoing callseparately.
Note: Contact your service provider to activate Three-Way Calling.
To place a Three-Way call:
1. During a conversation, press the key. Thephone places the other person on hold.
2. Enter the phone number for the third person, andthen press the key. The phone dials the thirdperson.
3. When you are connected to the person, press thekey again to begin your three-way call.
If one of the callers (not you) hangs up, you andremaining caller stay connected. If you initiated thecall and you hang up first, all three participants aredisconnected.

43
EEnntteerriinngg TTeexxtt
42
EEnntteerriinngg TTeexxtt
Using T9(English) Mode
To type a word, press keys corresponding to the lettersyou need. Remember the following as you are typing:
1. Press alphanumeric keys on the keypad just onceper letter. For example, to enter “Hello,” press the 4,3, 5, 5 and 6 keys.
The word you are typing appears on the display. Itmay change with each key press.
2. Type to the end of the word before editing ordeleting any keystrokes.
3. Put a space between words by pressing the key.
If the word that appears on the display is not theone that you desire, press the 0 key one or moretimes to display alternative word choices for thekeys you have typed. For example, both “Of” and“Me” use the 6 and 3 keys. The phone displays themost commonly used choice first.
4. Continue entering the next word.
Smart PunctuationPeriods, hyphens, and apostrophes are available bypressing the 1 key. T9 mode applies rules of grammar toinsert the correct punctuation. Notice that the 1 key isused twice in this example to display two punctuationmarks:
L e t ‘ s e a t .
Changing the Text Input Mode
When you are in a field that allows characters entry,you should notice the text input mode indicator on thedisplay.
Example: Entering a name for a Phonebook entry
To change to another text input mode:
1. Press the MENU key.
2. Scroll to the mode by pressing the or key.
3. To select the highlighted mode, press the OK key. Ifyou want to exit the menu without changing to anew mode, press the key.
The selected text input mode indicator appears onthe display.
MENU
Text input modeindicator

45
EEnntteerriinngg TTeexxtt
44
EEnntteerriinngg TTeexxtt
Using Alphabet Mode
When typing in Alphabet mode, you need to press thekeys labeled with the letter you want:- Once for the first letter- Twice for the second letter- And so onThis method is called multi-tap typing.
For example, you press the 2 key three times to displaythe letter “C” and the 5 key two times to display theletter “K.”
The cursor moves to the right when you press adifferent key. When entering the same letter twice or adifferent letter on the same key, just wait for a fewseconds for the cursor to move to the rightautomatically, and then enter the next letter.
Refer to the table below for the list of charactersassigned on each key.
(Caps Lock mode)
. , - ? ! ’ @ : 1A B C 2D E F 3G H I 4J K L 5M N O 6P Q R S 7T U V 8W X Y Z 90
Key Characters in the Order Displayed
Including a Number
You can include a number between letters withoutexiting the T9 input mode. Press and hold thecorresponding number key.
Changing the Case
Your phone has three cases: • T9Word: the initial letter is capitalized.• T9WORD: all letters are capitalized.• T9word: all letters are lower-cased.
Press the key one or more times to display theappropriate case indicator and begin typing normally.
Other Usages
• Press the key to insert a space.
• To move the cursor to the left or right through yourtext, press the or key.
• Press the key one or more times to delete theletters one by one to the left. Press and hold the
key to clear the display.

47
EEnntteerriinngg TTeexxtt
46
EEnntteerriinngg TTeexxtt
You can display more symbols by pressing the or key.
Press the number key corresponding to the symbol youwant to enter. The phone automatically switches backto the text entry mode used just prior to selectingSymbol mode.
Using Number Mode
Number mode enables you to enter numbers.
Press the keys corresponding to the digits you want toenter and manually switch back to the text entry modeof choice. For details about changing the mode, seepage 42.
Using Symbol Mode
Symbol mode enables you to enter symbols.
MENU
Including a Number
You can quickly include a number between letters.Press and hold the corresponding number key.
Changing the Case
Your phone has three cases:• Abc: the initial letter is capitalized.• ABC: all letters are capitalized.• abc: all letters are lower-cased.
Press the key one or more times to display theappropriate case indicator, and begin typing normally.
Other Usages
• Press the key to insert a space.
• To move the cursor to the left or right through yourtext, press the or key.
• Press the key one or more times to delete theletters one by one to the left. Press and hold the
key to clear the display.

48 49
UUssiinngg tthhee MMeennuuss
Using the Menus
Your phone offers a range of functions that allow youto tailor it to your needs. These functions are arrangedin menus and submenus.
The menus and submenus can be accessed by scrollingor by using the shortcuts.
Accessing a Menu Function by Scrolling
1. In Standby mode, press the MENU key to accessMenu mode.
2. Scroll using the Navigation keys to reach the mainmenu; for example, Setup. Press the OK key toenter the menu.
3. If the menu contains any submenus; for example,Auto Answer, find the one you want by scrollingusing the or key. Press the OK key to enterthe submenu.
If the menu you have selected contains submenus,repeat this step.
4. Scroll using the or key to find the settingof your choice.
5. Press the OK key to confirm the chosen setting.
Notes:• You can return to the previous menu level by
pressing the key.• You can exit the menu without changing the menu
settings by pressing the key.
Using Shortcuts
Menu, submenus and setting options are numberedand can be quickly accessed by using their shortcutnumbers.
Note: The numbers assigned to each menu functionare indicated on the list on page 50.
1. In Standby mode, press the Menu key to accessMenu mode.
2. Enter the first digit of the shortcut number. Repeatthis for each digit of the shortcut number.
Example: Accessing the Auto Answer menu
Press the 9 and 1 keys.
9 selects Setup and 1 selects Auto Answer.
3. Find the setting of your choice by pressing the or key.
4. Press the OK key to confirm the chosen setting.

51
UUssiinngg tthhee MMeennuuss
50
UUssiinngg tthhee MMeennuuss
List of Menu Functions
Main menu Main menu 1 Main menu 2
1. Calls 1. Outgoing2. Incoming3. Missed4. Erase History 1. Outgoing
2. Incoming3. Missed4. All Calls
5. Air Time 1. Last Call2. Total3. Lifetime4. Erase Total
2. Phone Book 1. Find 2. Add New Entry3. Group Setting4. My Phone #5. Memory
3. Messages 1.Text2. MMS3. Voice7. Erase MSG8. MSG Setting 1. Scroll Timer
2. MSG Reminder3. Voice Mail #4. New MSG5. Canned MSG
Main menu Main menu 1 Main menu 2
4. Planner 1. Today2. Scheduler3. Task List4. Memo Pad5. Alarm 6. Calculator7. World Time8. Countdown9. Set Time
5. Voice Tools 1. Voice Memo 1. Record 2. Review3. Erase All
2. Voice Answer 1. Enable/Disable 2. Inbox3. Setting
6. Sounds 1. Ringer Volume 1. Calls2. Messages3. Alarms
2. Ringer Type 1. Voice Calls2. Messages3. Data/Fax In4. Schedule
3. Alerts 1. Minute Beep2. Service Alert3. Connect4. Disconnect5. Fade6. Roam
4. Key tone 1. Type2. Volume
5. Roam Ringer6. Power On/Off7. Escalating

53
Calls
You can use the Calls menu to:• view and dial the last calls you dialed, received or
missed. • erase the numbers in the call log memory.• view the length of calls.
Outgoing MENU 1-1
Note: You can also access this menu by pressing thekey in Standby mode.
The phone stores up to 20 of the last calls you dialed.When you access this menu, a list of the outgoingcalls displays.
1. Press the or key to find a number, or nameif it is saved in Phonebook.
2. Press the OK key to confirm the highlightednumber. The dialed number, or name if it is saved inPhonebook, displays along with the date and timewhen the call was made.
3. To Press the
place a call to key.the selected number
use the options MENU key. For details, see the nextpage.
exit the call log key.
52
UUssiinngg tthhee MMeennuuss
Main menu Main menu 1 Main menu 2
7. Display 1. Menu Style2. Wallpaper3. Backlight4. Banner5. Dual Clock6. Service LED7. Contrast8. Power Saving
8. Games 1. Fun Bowling2. Honey Ball3. Go Hamster
9. Setup 1. Auto Answer2. Call Answer3. Auto Key Lock4. Auto Retry5. Set System6. Data/Fax7. Version8. Security 1. Lock Phone
2. Change Lock3. Restriction4. Send PIN5. Emergency #6. Erase Pbook7. Reset Phone

55
CCaallllss
54
CCaallllss
Missed MENU 1-3
If Caller Line Identification service is available, yourphone keeps a list of the last 20 incoming calls thatyou failed to answer. Contact your service provider forfurther details about the service.
When you access this menu, a list of the missed callsdisplays.
For more information about scrolling through the listand accessing the call log, see “Outgoing” on page 53.
Erase History MENU 1-4
You can erase the entries stored in each of the threecall logs or all three logs at once.
When a confirming message displays, select Yes toerase the selected log or all of the logs. If you want tocancel the selection, select No. Press the OK key toconfirm the selection.
When you press the MENU key on the call log screen,the following options are available:
Talk: dials the number.
Save: (shown when the number is not stored in yourPhonebook) allows you to save the number inPhonebook.
Show Entry: (shown when the number is stored inyour Phonebook) displays the phone number andmemory location number.
Prepend: allows you to add an area code or featurecode to the number before dialing the number. Seepage 27 for details.
Erase: erases the selected number.
Incoming MENU 1-2
This menu lets you view up to 20 of the last calls youreceived if you are subscribed to the Caller LineIdentification service. Contact your service provider forfurther details about this service.
When you access this menu, a list of the incomingcalls displays.
For more information about scrolling through the listand accessing the call log, see “Outgoing” on page 53.

5756
CCaallllss
Phone Book
Phonebook allows you to store frequently used phonenumbers and the associated names in your personaldirectory to make it easy for you to make a callwithout having to remember or enter the phonenumber. You can store up to 900 entries including E-mail and URL addresses.Memory location 001 is reserved for the number ofyour voice mail server, Connect 1 and CustomerCarerespectively. You can change or delete the number, ifnecessary.
Find MENU 2-1
This menu allows you to find an entry in yourPhonebook.
Note: You can access this menu by pressing the key in Standby mode.
1. Press the or key to scroll to the method youwant to use.
• By Name: Enter the first few letters of the nameyou want with Alphabet mode. The Phonebookentries are listed starting with the first entrymatching your input.
• By Entry: Enter the location number of thenumber your want to find, using the numeric keys.
• By Group: Press the key and select thegroup containing the entry you want to find, usingthe or key. The phone lists all of the entriesin the selected group.
Air Time MENU 1-5
Your phone records the amount of air time, or talktime, used. Using this menu, you can view the numberof the calls to or from your phone, and the air time forcalls you made. You can easily erase the call timerecord at any time. This menu is convenient forestimating your usage.
Note: This feature is not intended to be used for billingpurposes.
The following options are available:
Last Call: shows the time of the last call.
Total: shows the number of all calls you made and thetotal duration of the calls since the time counter waslast set to zero by using the Erase Total option.
Lifetime: shows the number and total duration of allcalls you made or received your phone since the phonewas shipped from the factory.
Erase Total: erases the “Total” time measurementand resets the air time counter.

59
PPhhoonnee BBooookk
58
PPhhoonnee BBooookk
Add New Entry MENU 2-2
This menu allows you to store a number with a namein your Phonebook. You can save a person’s numbers,such as home number, workplace number, mobilenumber, pager number and fax number, into one entry.A Phonebook entry can contain up to six numbers, onein each category.
Creating a New Entry1. Enter a phone number and press the OK key.
2. Press the OK key to confirm to add a new entry.
3. Select an icon to identify the category of thenumber to be stored using the Navigation keys andpress the OK key.
4. Enter a name and press the OK key. For furtherdetails about entering characters, see page 43.
5. To select an option, scroll to it by pressing the or key. The following options are available:
• Enter Name: allows you to enter a name of up to12 characters, if you didn’t in step 4. For furtherdetails about how to enter text, see page 41.
• Entry: The first available location displays. Ifnecessary, enter the location number using thenumber keys.
2. If necessary, press the or key to scrollthrough the entries.
3. When the entry you want highlights, press the OKkey to access the entry. The phone shows thedetails about the name.
4. To Press the
place a call to key.the selected number
use the options MENU key. Fordetails about theoptions, see below.
When you press the MENU key on the details screen,the following options are available:
Talk: place a call to the number.
Edit: allows you to change the phone number, name,location number, label category and so on.
Prepend: allows you to add digits, such as areacodes, ahead of the selected number before dialling.See page 27 for further details.
Erase: erases the selected entry.
Note: The options available are different dependingon the item you selected on the screen.

61
PPhhoonnee BBooookk
60
PPhhoonnee BBooookk
8. When a confirming message appears, select Yesand press the OK key to save the entry.
After storing, the phone displays the Phonebookentry number that you just saved and the remainingslots you can further store phone numbers.
Storing Phone Numbers at Call’s End
To store a phone number at the end of your call:
1. Press the key to end the call. The call timeand the phone number display.
2. To store the phone number, press the OK key.
3. To complete storing the number, follow theprocedure from step 2 in “Creating a New Entry” onpage 59.
Adding a Number into an Existing Entry
1. Enter a number and press the OK key.
2. Scroll to the entry where you want to add a numberby pressing the or key. Press the OK key.
3. To complete storing the number, follow theprocedure from step 3 in “Creating a New Entry” onpage 59.
• Home/Work/Mobile/Pager/Fax/No label:allows you to store more numbers for eachcategory.
• Speed dial: allows you to select one of thestored numbers for speed dialing.
• E-mail: allows you to store an e-mail address.
• URL: allows you to store a URL address.
• Group: allows you to assign the entry to a callergroup. To remove the entry from a group, selectNo Group.
• Name Ringer: allows you to select the uniqueringer to be used for alerting you to an incomingcall from the person.
• Birthday: allows you to save the date of theperson’s birthday.
• Secret: allows you to prevent a number frombeing displayed when it is accessed or dialed byunauthorized users. When this option is set toON, only people with your phone’s lock code canview the secret number.
• Image: allows you to select an image to be usedfor alerting you to an incoming call from theperson.
6. Press the MENU key to enter information or use theor key to change the settings.
7. When you finish setting the options, press the OKkey.
63
PPhhoonnee BBooookk
62
PPhhoonnee BBooookk
My Phone # MENU 2-4
This menu shows you your phone number.
After viewing, press the OK key to return to theprevious screen.
Memory MENU 2-5
This menu shows you how many Phonebook locationsare used or empty.
After viewing, press the OK key to return to theprevious screen.
Group Setting MENU 2-3
This menu allows you to change the name and ringersettings for the caller groups.
1. Scroll to the group you want to edit using the orkey.
2. Press the MENU key. The following options areavailable:
• Rename: allows you to change the group name.
• Sounds: allows you to select a ringer melody toindicate when a call comes in from any memberof the group.
3. Select an option and press the OK key.
4. Enter a name or select the sound you want andpress the OK key.
For further details about how to enter text, see page41.
5. Repeat steps 2 though 4, if necessary.
MMeessssaaggeess
6564
Text MENU 3-1
New MSG (MENU 3-1-1)
You can create a SMS (Short Message Service)message and send it to other mobile phones.
Note: Message transmission is available only whenyour phone is operating in a digital network andif service is supported by your service provider.
1. Enter a destination number using the numeric keys.
Pressing the MENU key allows you to search yourPhonebook for a number.
2. To send your message to multiple destination, pressthe key and enter another number. Repeat thisstep, as needed. You can enter up to 10destinations.
3. When you are finished, press the OK key.
4. Enter the message contents. For further detailsabout how to enter text, see page 41.
When you press the MENU key, the Canned MSGoption is available to allow you to use the tencanned messages preset in the MSG Settingmenu; for details, see page 76.
5. When you finish entering the message, press theOK key.
6. To select an option, press the or key andpress the OK key.
Messages
Your phone can receive voicemail notification, textmessages, and pages. Also, your phone can send textmessages and pages if you system supplier providesthis service.
When the phone receives a message, an alert sounds,a text notification displays along with the name orphone number of the caller if available. The NewMessage icon ( ) remains on the screen until youread the new text, numeric page or web message, oryou listen to the new voicemail messages.
Messages are received even when your phone is inLock mode. To access a message, you must unlock thephone.
To enter the Messages menu, press in Standbymode.
67
MMeessssaaggeess
66
The following options are available:
• Send To: allows you to change the send-to phonenumber.
• Message: allows you to change the messagecontents you’ve already entered.
• Options: displays the following setting options.Change the setting using the or key.
- Message Save: Set whether or not the phonesaves the message in the Outbox aftertransmission. When you select Prompt Save, thephone asks if you want to save the message.
Note: Message Save options can be preset in theNew MSG option (MENU 3-5-4); for details,see page 77.
• File Msg: allows you to store the message in theFiled MSG menu for future use.
7. Repeat step 6 to set the message options.
8. After changing the setting options, press the key to send the message.
Note: Pressing the key before the message issent stops the transmission.
Inbox (MENU 3-1-2)
Your phone can store up to 98 messages total in theInbox, the Outbox and the Filed Message box. Whenthe memory is full, the phone automatically deletesthe messages from the oldest one to receive additionalmessages.
When you access the Inbox menu, the message listappears. Unread messages are italicized on the list.
To view details of a message, press the or key(or the or ke y) to scroll to the message onthe list and press the OK key. If necessary, press the
or key to scan through the contents.
You can view the next or previous page using thevolume key.
While viewing a message, press the MENU key to usethe following options:
Reply: allows you to send a reply message to thesender.
Forward: allows you to forward the message toanother person.
Delete: deletes the message from the Inbox.
Talk: places a call to the callback number.
Save #: allows you to save the callback number of themessage.
Lock/Unlock: the Lock option allows you to keep themessage from being deleted. They will not erased untilyou unlock by using the Unlock option.
MMeessssaaggeess MMeessssaaggeess
MMeessssaaggeess
69
MMeessssaaggeess
68
Outbox (MENU 3-1-3)
Your phone can store up to 98 messages total in theInbox, the Outbox and the Filed Message box.
When you access the Outbox menu, the message listappears.To view details of a message, press the or key(or the or key) to scroll to the message onthe list and press the OK key. If necessary, press the
or key to scan through the contents.
You can view the next or previous page using thevolume key.
While reviewing a message, press the MENU key touse the following options:
Resend: allows you to resend the message. Forfurther details, see page 65.
Delete: deletes the message from the Outbox.
Filed MSG (MENU 3-1-4)
Your phone can store draft messages that are yet to besent in the Filed Message box. If you save themessage contents using the File MSG menu beforesending it (see page 66), you can access them usingthis menu.
To review a stored message, press the or keyto scroll to it and press the OK key.
While reviewing a message, press the MENU key touse the following options:
Resend: allows you to resend the message. Forfurther details, see page 65.
Delete: deletes the message from the Filed Messagebox.

MMeessssaaggeess
71
MMeessssaaggeess
70
Web Alert (MENU 3-1-5)
When you receive a new wap message from the wapserver, your phone alerts you and the following optionsdisplay:
View: allows you to access the Web Inbox to displaythe wap message.
After viewing, press the key to return to theprevious screen.
When you access the Web Alerts menu (MENU 3-1-5),a list of the received web message displays. Press the
or key to scroll to the message you want toview and press the OK key. The phone starts the webbrowser and displays the message contents. Ifnecessary, press the or key to scan through thecontents.
MMS MENU 3-2
This menu allows you to use the Multimedia MessageService (MMS), which allows you to send or receivemessages containing images or sounds. To send anMMS message, you can use photos you have taken orimages or sounds downloaded from the wireless web.
New MSG (MENU 3-2-1)
You can send a message with a photo from yourPhoto Album or an image from the My Image folder.
Sending a Multimedia Message
1. Select Photo Album or My Images by pressingthe or key and press the OK key.
2. Select a photo or image and press the OK key.
The selected photo or image displays.
3. Press the OK or key.
4. Enter a title for your message.
You can change the text input mode just bypressing the MENU key.
For further details about entering characters, seepage 41.
5. Press the OK or key.
6. Write a message and press the OK or key.

7372
7. Enter the destination phone number or e-mailaddress.
8. If you want to send the message to more than oneperson, use comma “ , “ or space between thenumbers.You can access your Phonebook by pressing theMENU key and selecting the Third option of thepopup Menu “Contacts”.
9. Enter a Cc number or e-mail address and press the key.
You can choose multiple destination using comma “ , “ or space between the destination address or phone number.
10. If you want to attach a melody, select a melody bypressing the or key and press the OK key.
11. Preview the message you have created by pressing the OK key.
You can send the message by pressing SEND key with out previewing the message.
12. Press the SEND key to send the message.
Inbox (MENU 3-2-2)
When you save received messages from the web serverto your phone’s memory, your phone stores them in thismenu. When a new multimedia message comes in, atext notification displays.
Select a message using the Navigation key and:
To Press theread the message text OK key.delete single or all the message/s MENU key.
While viewing a message, press the MENU key touse the following options:
Reply: replies to the sender by sending a textmessage or multimedia message.
Delete: deletes the message.
Forward: to Forward the same message to adifferent person.
Save Image: saves the image in the My Imagesfolder.
Save Sound: allows you to save the sound in theMy Melodies folder.
Outbox (MENU 3-2-3)
In this menu, you can review sent messages.
Select a message using the Navigation key and:
To Press the
read the message text OK key.
delete single or all the message/s MENU key.
While viewing a message, press the MENU key touse the following options:
Resend: allows you to send the message again.
Delete: deletes the message..
MMeessssaaggeess MMeessssaaggeess

7574
Draft box (MENU-3-2-4)
In this menu, you can review the messages yourphone was unable to send.
On the message list, scroll to a message and:
• Press the OK key to view the message.
While viewing a message, press the MENU key touse the following options:
Edit: allows you to edit the message so that youcan send the message again and save it in thismenu.
Delete: deletes the message.
• Press the MENU key to use the following options:
Delete: deletes the message.
Delete all: allows you to delete all of themessages in this menu.
MMS Alert (MENU 3-2-5)
When you receive a new MMS message from thewap server, your phone alerts you and the followingoptions display:
View: allows you to access the Web Inbox to displaythe wap message.
After viewing, press the key to return to theprevious screen.
Voice MENU 3-3
When you receive a voice message the correspondingtext notification displays. Press the key and thephone dials the voice mail center.
If multiple new voice messages are received but notchecked, information of the last one will be displayed.The information display includes the time/date stampand the number of new voice messages.
Press the MENU key to access the following options:
Listen: allows you to listen to the voice message. Thephone automatically dials the number of yourvoicemail center.
Clear Icon: clears the New Message icon and resetsthe counter for a new voice message, if necessary. Thesystem resets the counter automatically after youlisten to all of the new messages.
Note: If you didn’t change the number in memorylocation 001, You can also access yourvoicemail box by pressing and holding instandby mode.
Erase MSG MENU 3-4
Using this menu, you can erase all of the messages ineach message box in the Text, MMS and Voicemenus. You can also erase all of the messages at onetime by selecting All Messages.
When a confirming message appears, select Yes andpress the OK key.
MMeessssaaggeess MMeessssaaggeess

MMeessssaaggeess
77
MMeessssaaggeess
76
New Message (MENU 3-5-4)
You can change the default settings of the options forcreating a new message. The following options areavailable:
Callback #: allows you to set the call back number. Itis preset to your phone number at the factory.Save Message: allows you to set whether or not youwant the transmitted message to be saved in theOutbox.
- Do Not Save: The phone does not save the message.- Prompt Save: The phone asks you whether or not you
want to save the message.- Auto Save: The phone automatically saves the
message.
Entry Method: allows you to select the text inputmode either T9 Word (T9 English) or Alphabet.
Delivery Ack: allows you to activate or deactivatethe delivery acknowledgement.Priority : allows you to select the message priority
Canned Messages (MENU 3-5-5)
This menu allows you to change the ten cannedmessages.
1. Scroll to a message on the list and press the MENUkey.
2. Change the message as needed. For further detailsabout entering characters, see page 41.
3. When you are finished, press the OK key.
MSG Setting MENU 3-5
In this menu, you can preset several options for using the messaging feature.
Scroll Timer (MENU 3-5-1)
If an incoming text message is too long for the display,the phone displays it by scrolling the screenautomatically. You can set how often the phone scrollsthe message to the next screen.
If you select Off, you need to scroll to the next screenmanually using the or keys.
Message Reminder (MENU 3-5-2)
When a message is received, the phone alerts you bysounding the selected ringer. You can set how oftenyou want to be alerted. Selecting Off means that themessage alert sounds once when the message isreceived. Selecting Once means that the messagealert sounds once when the message is received andsounds again after 2 minutes. Selecting Every 2 minmeans that the message alert sounds every 2 minutes.
Voice Mail # (MENU 3-5-3)
This menu allows you to view or change the voice mailserver number, if necessary.
Note: Voice mail is a network feature. Please contactyour service provider for further details.
78 79
Planner
The Planner feature enables you to:• keep track of important dates and events.• create a list of things to do and memos.• set an alarm to ring at a specific time.• use the phone as a calculator.• check the time in another part of the world.• count down to a specific day.• set the current date and time.
Today MENU 4-1
You can schedule up to 9 events for the current day,indicating each event’s start and end time. You can evenhave your phone's calendar alert you before an eventcommences. Events scheduled for future datesautomatically appear on your Today events schedule onthat day.
Scheduling a New Event
1. Enter your event contents and press the OK key.
For further details about entering characters, seepage 41.
2. Enter the starting time and date using the numerickeys.
You need to enter the time in 12-hour format. Pressthe 2 key for A (AM) or the 7 key for P (PM).
Note: You can move through the input fields usingthe Navigation keys.
PPllaannnneerr
3. Enter the ending time and date using the numberkeys.
4. Select when an alarm will inform you of the event,by pressing the or key. Selecting No Alarmmeans that the phone does not ring the alarm.
5. Press the OK key to store your event.
Viewing Your Today’s Schedule
The list of the events stored on the current daydisplays when you select the Today menu (MENU 4-1).
While viewing the event list, press the or keyto scroll to an event and:
• Press the OK key to view the event information. Toview the Start time and End time settings, use the
and keys. You can move to the previous ornext event by pressing the or key.
While viewing the event, press the MENU key touse the following options:
Edit: allows you to change the event.
Erase: allows you to erase the event.
• Press the MENU key to use the following options:
Add New: allows you to add a new event.
Erase: allows you to erase the selected event.
Erase All: allows you to erase all of the events.

81
PPllaannnneerr
80
PPllaannnneerr
Scheduler MENU 4-2
This menu allows you to view the current month, aswell as a past or future months, in calendar format. Onthe calendar, the current day appears in gray and dayswith scheduled events are indicated by a colored boxinside the calendar day.
Note: You can quickly access this menu by pressingthe key in Standby mode.
Scrolling Through the Calendar
• You can move by one day by pressing the or key.
• You can move by one week by pressing the orkey.
• To display the next or previous month, press the or key.
On the calendar, press the MENU key to use thefollowing options:
View: allows you to view the scheduled events of theday.
Add New: allows you to add a new event on the day.
Erase All: allows you to erase all of the events.
Creating a New ScheduleYou can store up to 70 events total in the scheduler,with up to 9 events for one day.
1. Select a day on the calendar, referring to “ScrollingThrough the Calendar” on page 80 and press the OKkey.
2. Enter your event contents and press the OK key.
For further details about entering letters, see page41.
3. Enter the starting time and date using the numerickeys.
You need to enter the time in 12-hour format. Pressthe 2 key for A (AM) or the 7 key for P (PM).
Note: You can move through the input fields usingthe Navigation keys.
4. Enter the ending time and date using the numberkeys.
5. Select when an alarm will inform you of the event,by pressing the or key.
Selecting No Alarm means that the phone does notring the alarm.
6. Press the OK key to store your event.
83
PPllaannnneerr
82
PPllaannnneerr
Viewing Your Schedule
Select a day with scheduled events on the calendar,referring to “Scrolling Through the Calendar” on page80 and press the OK key. The first event stored on theday displays.
To view the Start time and End time settings, use theor keys.
While viewing the event, press the MENU key to usethe following options:
Edit: allows you to edit the event.
Erase: allows you to erase the event.
Task List MENU 4-3
This feature allows you to enter up a list of tasks to bedone and assign both a priority and a deadline to eachtask.
Creating a New Task1. Enter the first task and press the OK key to confirm.
For further details about how to enter characters,see page 41.
2. Enter the time and date by which the task needs tobe done, by using the numeric keys.
You need to enter the time in 12-hour format. Pressthe 2 key for A (AM) or the 7 key for P (PM).
Note: You can move through the input fields usingthe Navigation keys.
3. Select high or low priority using the or key andthen press the OK key to store the task.
Viewing a TaskThe list of the tasks displays when you access theTask List menu (MENU 4-3).
While viewing the task list, press the or keyto scroll to a task and:
• Press the OK key to view details. You can move tothe previous or next task by pressing the Navigationkeys.
While viewing the task, press the MENU key to usethe following options:
Edit: allows you to edit the task.
Erase: allows you to erase the task.
• Press the MENU key to use the following options:
Add New: allows you to add a new task.
Erase: allows you to erase the selected task.
Erase All: allows you to erase all of the tasks.
85
PPllaannnneerr
84
PPllaannnneerr
Memo Pad MENU 4-4
This feature allows you to write down memos aboutanything you need to remember.
Writing a New Memo1. Enter the memo contents.
For further details about how to enter characters,see page 41.
2. Press the OK key to save the memo.
Viewing a Memo
The list of your memos displays when you access theMemo Pad menu (MENU 4-4).
While viewing the memo list, press the or keyto scroll to a memo and:
• Press the OK key to view details. You can move tothe previous or next memo by pressing theNavigation keys.
While viewing the memo, press the MENU key touse the following options:
Edit: allows you to edit the memo.
Erase: allows you to erase the memo.
• Press the MENU key to use the following options:
Add New: allows you to add a new memo.
Erase: allows you to erase the selected memo.
Erase All: allows you to erase all of the memos.
Alarm MENU 4-5
This menu allows you to set up to three alarms to ringat a specific time.
To set an alarm:
1. Select an alarm, Alarm #1 through Alarm #3, andpress the OK key.
2. Select On by pressing the or key.
3. Press the key and enter the time for the alarmto ring.
You need to enter the time in 12-hour format. Pressthe 2 key for A (AM) or the 7 key for P (PM).
4. Press the key and select an alarm melody bypressing the or key.
5. Press the key and select an alarm type, eitherDaily or Once, by pressing the or key.
6. Press the OK key to save the alarm setting.
To stop the alarm when it rings, press any key.
To deactivate an alarm setting, access it from thealarm list and select Off on the top line.
87
PPllaannnneerr
86
PPllaannnneerr
Calculator MENU 4-6
Using this feature, you can use the phone as a calculator. The calculator provides you with the basicarithmetic functions; addition, subtraction,multiplication and division.
1. Enter the first number on the first line using thenumeric keys.
Notes:• To erase mistakes or clear the display, press
the key. • Use the key to enter a decimal point and the
key to change the sign of a number to a negative (-).
2. Enter the operation for your calculation on thesecond line by pressing the Navigation keys,according to the graphic on the display.
3. Enter the second number.
4. Repeat steps 2 and 3 as many times as required.
5. To view the result, press the OK key.
World Time MENU 4-7
This menu allows you to check the current time for 24world time items of 35 major cities around the world.
Select the city corresponding to your time zone bypressing the Navigation keys one or more times. Thelocal date and time display.
To turn the DST (Daylight Saving Time) setting on:
1. After selecting the time zone you want to apply theDST, press the MENU key.
2. When DST setting highlights, press the OK key.
3. Select On and press the OK key. The DST iconappears on the left of the time.
To cancel the setting, select Off.
Countdown MENU 4-8
This menu helps you know how much time it takes foryou to do something, or how many days, hours andminutes until a specific day arrives. You can create upto 9 counters using this menu.
Creating a New Counter
1. Enter the contents for your counter and press theOK key.
For further details about entering text, see page 41.

89
PPllaannnneerr
88
PPllaannnneerr
2. Enter the time and date you want to count downfrom.
You need to enter the time in 12-hour format. Pressthe 2 key for A (AM) or the 7 key for P (PM).
Notes:• You can move through the input fields using the
Navigation keys.• You can enter a year between 1980 and 2099.
3. Press the OK key to store the counter.
Viewing a Counter
The list of the counters displays when you access theCountdown menu (MENU 4-8).
While viewing the counter list, press the or key to scroll to a counter and :
• Press the OK key to view details. You can move tothe previous or next counter, press the Navigationkeys.
While viewing a counter, press the MENU key touse the following options:
Edit: allows you to edit the counter.
Erase: allows you to erase the counter.
• Press the MENU key to use the following options:
Add New: allows you to add a new counter.
Erase: allows you to erase the selected counter.
Erase All: allows you to erase all of the counters.
Set Time MENU 4-9
To display the correct date and time on the idle screenor to use the Planner features, such as Today,Scheduler, Task List, Countdown, Alarm andWorld Time, you need to set the current time anddate using this menu.
Enter the time and date using the numeric keys.
The hour, minute, day and month each must be enteredusing 2 digits and the year requires all 4 digits. Youneed to enter the hour in 12-hour format. To select AMor PM, press the 2 key for A (AM) or the 7 key for P(PM).
91
VVooiiccee TToooollss
• Review: allows you to review the voice memo.The screen displays the length of the memo alongwith the date and time.
• Rerecord: allows you to discard the currentmemo and record another one.
• Save: allows you to save the voice memo.• Quit: allows you to quit recording the memo and
exit the Record menu.
3. When you are satisfied, select the Save option andpress the OK key.
4. Enter a title for the memo and press the OK key.
Review (MENU 5-1-2)
When a list of your voice memos displays, scroll to thememo you want to review and press the OK key. Thephone plays the memo. You can pause playing bypressing the key and resume by pressing the key.
On the memo list, press the MENU key to use thefollowing options:
Play: plays the memo.
Erase: erases the selected memo.
Info: shows detailed information about the memo,such as the title, length, memory size and date andtime when the memo was recorded.
Erase All (MENU 5-1-3)
This menu allows you to erase all of the voice memos.
When a confirming message displays, select Yes andpress the OK key.
90
Voice Tools
In this menu, you can use the phone’s voice features,allowing you to:• record a voice memo.• set the phone to answer a call and record the
caller’s message.
Voice Memo MENU 5-1
Note: You can quickly enter this menu by pressing thekey in Standby mode.
Record (MENU 5-1-1)
You can record up to voice memos of 4 minutes total.This feature shares the memory with the Voice Answerfeature and the amount of time for memos aredependent on the available memory less any callers'messages; for example, if your phone has the callers'messages of 4 minutes total, you cannot record anyvoice memo.
1. Record a memo by speaking to the microphone.
When you are recording, a timer displays to showyou the elapsed time.
You can pause recording by pressing the key andthen resume by pressing the key.
2. Press the OK key to end recording. The screenprovides you with the following choices. Scroll to anoption and press the OK key.

93
VVooiiccee TToooollss
92
VVooiiccee TToooollss
On the message list, press the MENU key to thefollowing options:
Play: plays the selected message.
Erase: erases the selected message.
Info: shows detailed information about the message,such as caller’s number if identified, length, memorysize and date and time when the message wasrecorded.
Talk: places a call to the caller’s number, if identified.
Setting (MENU 5-2-3)
You can change the settings for the voice answermode. The following options are available:
Greeting: Your phone provides you with the defaultgreeting message to be played when a call comes in.You can also record your own greeting message.
To record a greeting message:
1. Select Record and press the OK key.
2. Wait until a beeping prompt sounds and record agreeting message by speaking into the microphone.
You can pause recording by pressing the key andthen resume by pressing the key.
3. When recording is complete, press the OK key. Thephone automatically saves and activates themessage.
Voice Answer MENU 5-2
If you are not able to answer an incoming call, you canset your phone to answer a call with the preset greetingmessage and record the caller’s message. As thisfeature shares the memory with voice memos, the totallength of messages is dependent on the availablememory less any voice memos.
On/Off (MENU 5-2-1)
This menu allows you to enable or disable Voice Answermode.
Inbox (MENU 5-2-2)
You can listen to the callers’ messages recorded in yourphone. When you access this menu, a list of therecorded messages appears.
Note: If the phone has the callers’ messages waiting tobe checked, it displays the total number of themessages and caller’s number. Pressing the OKkey takes you to the Inbox.
Press the or key to scroll to a message andpress the OK key to play it.
You can pause playing by pressing the key and thenresume by pressing the key.

9594
VVooiiccee TToooollss
Sounds
You can use the Sounds menu to customize varioussound settings, such as the:• ringer volume, type, and tone.• key tone and alert sounds.• ringer for incoming calls when you are roaming.• sound which plays when the phone is switched on
or off.
Ringer Volume MENU 6-1
This menu allows you to adjust the ringer volume.
Calls: allows you to adjust the ringer volume forincoming voice calls.
Messages: allows you to adjust the ringer volume forincoming messages.
Alarms: allows you to adjust the ringer volume foralarm settings.
Press the Navigation keys to adjust the volume level.The following options are available:
- Silent: the phone does not sound a ring.
- Vibrate: the phone switches to the vibration mode.An incoming call vibrates the phone.
- 1-Beep: the phone sounds a beep.
- Level 1 ~ 8: adjust the volume level. The more bars,the louder the volume.
- High+Vib: the phone rings in the highest volume leveland then vibrates.
If you want to play back the currently selectedmessage, highlight Play and press the OK key.
To enable or disable your own greeting message:
1. Highlight Select and press the OK key.
2. Select My Message to use your message orDefault to use the default message.
3. Press the OK key to save your selection.
Note: Once you have recorded your own messageand then have changed the greeting to thedefault message, your message is deleted.
Screening: allows you to enable or disable thescreening speaker which allows you to listen to thecaller’s message while the caller is leaving it.
Wait Time: allows you to set how long the phonewaits before answering a call with the greetingmessage. Selecting OFF means that the phone playsback the message as soon as a call comes in.
97
SSoouunnddss
Alerts MENU 6-3
Your phone gives audible alerts (beeps) at a specifiedtime to inform you that certain things have happened.The alerts only occur in your earpiece so that the otherperson does not hear them.
The available alerts are:
Minute Beep: When this option is set to On, thephone sounds an alert 50 seconds before eachelapsed minute to remind you of the length of thecurrent call.
Service Alert: When this option is set to On, thephone sounds an alert when you exit service area orwhen you return to a service area.
Connect: When this option is set to On, the phonesounds the connect tone when your call is connectedto the system.
Disconnect: When this option is set to On, the phonesounds the disconnect tone when a call isdisconnected.
Fade: When this option is set to On, the phonesounds an alert when a dropped call occurs duringconversation in response to a signal fade.
Roam: When this option is set to On, the phonesounds an alert when your phone starts roaming.
96
Notes: • The options available may be different depending on
the selected ringer item.
Ringer Type MENU 6-2
This menu allows you to set the unique ringermelodies for the following items:
Voice Calls: allows you to set a unique ringer forincoming voice calls.
Messages: allows you to have a distinctive ringer forincoming voice mail, text and WAP alertsindependently.
Data/Fax In: allows you to be alerted with adistinctive ringer when you receive data or fax callsthrough the phone. This feature may not be availabledepending on your network.
Schedule: allows you to have a distinctive ring forschedule settings.
Select a unique ringer using the Navigation keys. Pressthe OK key to save the ringer.
SSoouunnddss

9998
SSoouunnddss SSoouunnddss
Key tone MENU 6-4
Using this menu, you can set up the keypad tone thatthe phone sounds when you press a key.
The following options are available:
Type: allows you to select a tone that the phonesounds when you press a key. Choose one of Beep,Rain Drop, Drum Sound, and Lady’s Voice.
Volume: allows you to adjust the volume of thekeypad tone using the Navigation keys or the Volumekeys on the left side of the phone.
Roam Ringer MENU 6-5
You can set the phone to use a distinctive ring forincoming roaming calls.
Choose Distinctive to use a distinctive ringer orNormal to use a normal ringer.
Power On/Off MENU 6-6
You can turn on or off the tone that the phone soundswhen it is switched on or off.
Choose On to use the power on/off sound or Off not touse it.
Escalating MENU 6-7
When this menu is set to On, the phone increases thevolume as it rings, from the lowest volume level to thespecified level. For example, when you set the ringvolume to Level 5, the phone rings from the level 1 to5.
If you don’t want to use this feature, select Off. Thephone rings in the specified volume level.

101
DDiissppllaayy
100
Backlight MENU 7-3
You have several options for setting how the LCDbacklight operates. Remember that backlight usedrains your battery faster.
The following options are available:
30 seconds: The backlight switches on when youpress a key and switches off 30 seconds after that.Then the display turns off after 30 seconds. If you setthe Power Saving menu (MENU 7-8) to Enable, thedisplay turns off after 30.
8 seconds: The backlight switches on when you pressa key and switches off 8 seconds after that. Then thedisplay turns off after 52 seconds. If you set thePower Saving menu (MENU 7-8) to Enable, thedisplay turns off after 52.
Banner MENU 7-4
This menu allows you to set a banner message to bedisplayed at the bottom of the display in Standbymode.
1. If necessary, press the key to delete eachletter of the old greeting. Press are hold thekey to clear the display.
2. Enter your banner message. For further details abouthow to enter characters, see page 41.
3. When you finish entering the message, press theOK key to save the new banner.
Display
The Display feature enables you to:• change the display style of the menus.• select an image to be displayed in Standby mode• set the length of time for the backlight.• set a banner message to be displayed.• select the time zones for the dual clock.• turn the service light on or off.• Adjust the screen contrast of LCD screens.
Menu Style MENU 7-1
This menu allows you to select the menu display style.
You can choose either Camera or Nature.
Wallpaper MENU 7-2
You can change the background image (wall paper) tobe displayed in Standby Mode.
When you select Dual Clock, the phone displays theanalog clocks for the two time zones selected in theDual Clock menu (MENU 7-5). See page 102.

103
DDiissppllaayy
102
DDiissppllaayy
Service LED MENU 7-6
This menu allows you to select whether or not theservice light on the phone is used.
Contrast MENU 7-7
This menu allows you to adjust the brightness of theLCD screens.
1. Press down or left navigation key to make thescreen darker, and up or right navigation key tomake the screen brighter. You can also use the volume keys to adjust thebrightness.
Each time you press the key, you will see theselected status of the LCD.
2. Press the key to save your setting.
Dual Clock MENU 7-5
You can choose two time zones to be displayed whenyou select Dual Clock for the wallpaper image; fordetails, see page 100.
To select time zones for the dual clock:
1. When Location highlights, press the key.
2. Select the time zone for the first clock by pressingthe or key and press the key.
3. Select the time zone for the second clock bypressing the or key.
4. Press the OK key to confirm the selection.
5. To set the DST (Daylight Saving Time), see below.
To exit, press the CLR or key.
To apply the daylight saving time:
1. When Location highlights, press the or key todisplay DST. Press the key.
2. Select Yes to use the daylight saving time for thefirst clock. Otherwise, select No.
3. Press the key and repeat step 2 for the secondclock.
4. Press the OK key to confirm the selection.

105
DDiissppllaayy
Games
You can enjoy three fun games on your phone:• Fun Bowling (MENU 8-1)• Honey Ball (MENU 8-2)• Go Hamster (MENU 8-3)
To start a game:
1. Select a game by pressing the or key andpress the OK key.
2. The following options are available. To select anoption, press the corresponding number key:
• New Game: allows you to start a new game.
• High Score: shows you the High Score table.
• Key Info: shows you the key helper screen.
• Continue: allows you to continue the last gameyou played.
To end the game, press the or key.
Note: If you are in Silent mode, a game sound doesnot beep.
104
Power Saving MENU 7-8
This menu allows you to set the display to turn offafter the backlight turns off so that you can conserveyour battery power.
Enable : After the backlight turns off, the displaysturns off, depending on the setting in theBacklight menu (MENU 7-3). See page101.
Disable : After the backlight turns off, the displayremains on.

107106
Fun Bowling Menu 8-1
The goal of the game is to knock down a triangulargroup of ten pins by rolling a ball.
When you start a new game, you can select therequired mode.
When the game starts, the screen shows thecharacter and ball. Move the character first, thenselect the spin and direction, and finally set thepower of the ball.
Key Commands
To... Then press...
Move left .
Move right .
Set the speed or spin . or throw the ball
Pause/Resume the game /navigation keyor numeric key (or OKkey).
GGaammeess
Honey Ball Menu 8-2
The goal of the game is to break honey blocks bybouncing a ball between a bat and the honey blocks.
When you start a new game, the ball is sitting onthe bat in the middle of the screen. Once you startthe ball moving, you must position the bat, so thatthe ball continues to bounce off it. Each time the ballhits a honey block, the block breaks, sometimesrevealing letters that enhance the efficiency of thebat or ball:
B: the bat and ball change back to their standardform.C: the ball sticks to the bat each time it hits it,giving you time to optimise your position.H: the bat increases in length.P: the ball is changed into a power ball, so that it no longer bounces off the blocks. It goes straightthrough them, destroying anything that it touches.
If you reach the final stage of the game, the rulesare slightly different. The honey blocks are muchstronger and need to be hit more than once beforethey are destroyed. At the same time, small beesattack the bat, damaging it a little each time until itis destroyed and you lose a life.
GGaammeess

108 109
Key Commands
To... Then press...
Slope up (right side) .
Slope up (left side) .
Move left ,
Move right ,
Hit the ball , or .
Pause/Resume the game /navigation key
or numeric key (or OK
key).
Go Hamster Menu 8-3
Go Hamster is an arcade board game. It requirespatience and discretion. The aim is to remove about80% of the background while avoiding the mushroombombs in order to progress to the next stage.
When the start screen appears, press any key tostart the game.
Key Commands
To... Then press...
Move up ,
Move left ,
Move right ,Move down ,Stop . Pause/Resume the game /navigation key
or numeric key (or OKkey)..
GGaammeess GGaammeess

111
SSeettuupp
110
Auto Key Lock Menu 9-3
You can set the phone to automatically lock he keys ifno key is pressed within a given of time.This featue isuseful to avoid pressing keys by mistake.
To use this feature,select the length of time for whichthe phone waits before it locks the keypad.
15 Seconds ,30 Seconds and 1 Minute areavailable.
If you don ’t want to use this feature,select Off .
Note: You can manually lock the keypad. For furtherdetails. see page 23.
Auto Retry MENU 9-4
When this menu is activated, your phone automaticallyredials when a connection fails.
To activate this feature, set how often the phone willautomatically retry the call. Select one from 60Seconds, 30 Seconds and 10 Seconds.
To deactivate the feature, select Off.
Setup
Many different features of your phone can becustomized to suit your preferences.
Auto Answer MENU 9-1
With this menu activated, the phone automaticallyanswers calls after a specified time. This featureworks only when the phone is connected to anoptional hand-free car kit or ear-microphone and isuseful while driving, for instance.
To activate this feature, set how long the phone waitsbefore answering. Select one from After 5 sec, After3 sec or After 1 sec.
To deactivate the feature, select OFF.
Call Answer MENU 9-2
This menu allows you to select how to answer anincoming call.
The following options are available:
Any Key: The phone answers when you press any keyexcept for the or / key.
SEND Key: The phone answers only when you pressthe key.

113
SSeettuupp
112
SSeettuupp
Data/Fax MENU 9-6
Your phone is capable of sending and receiving digitaldata and fax call when connected to a computingdevice (laptop, desktop, handheld, palmtop, etc.)running Windows 95, Windows 98, Windows NT orlater versions. The phone functions just like a typicalmodem on your PC, enabling you to use wireless datainvolving a wide variety of Windows softwareapplications.
To use digital data or fax services with your phone, youwill need to obtain a digital data/fax kit from yourservice provider. This kit contains the necessarycables, software, and user’s guide required for your toconnect and use your phone with your computingdevice.
Note: The phone must be on a digital network toreceive or send faxes and data.
The following options are available:
Voice Call Only: Your phone receives voice calls only.
Fax in Only: Your phone receives fax calls only.
Data in Only: Your phone receives data calls only.
Set System MENU 9-5
Roaming is a feature which is only relevant in areaswhere there are at least two cellular service providershaving valid roaming agreements. Roaming allows youto register your phone on one of the networks, but usethe facilities of the other if your own network is notavailable. This system priority feature allows you toprogram your phone for optimum operation within oroutside your home service area.
You should always check your phone’s display becauseit will let you know when you’re outside the serviceprovider network and whether your phone is operatingin another network; the Roaming icon ( ) appears.
You have the following options which allows you tocontrol the phone’s roaming ability:
Home Only: With this setting, you cannot roam. Whenyour home system is not available, your call is not beconnected and the No Service indicator ( ) displays.
Standard: Your phone automatically search for thefirst available one of all types of service according tothe Preferred Roaming List supplied by the serviceprovider.

115
SSeettuupp
114
SSeettuupp
Security MENU 9-8
Your phone provides you with many security options,including a user-programmable lock code and callrestriction features.
To access the Security menu, you need to enter a lockcode. The lock code is preset to “0000” at the factory.
Lock Phone (MENU 9-8-1)
When the phone is locked, you cannot operate thephone until you enter the lock code. However, you canreceive incomming calls or make calls to 000 oremergency numbers.
The following options are available:
Unlocked: The phone remains unlocked.
On Power-Up: The phone locks automatically the nexttime you turn it on.
Lock Now: The phone locks immediately.
To place an emergency call, enter the number and thenpress the key. The phone recognizes threeemergency numbers stored in the Emergency # menu(MENU 9-8-5).
To unlock the phone, press one of the MENU, OK, ,Volume keys, or Navigation keys and enter thelock code.
Receiving a Fax or Data FileTo receive a fax or data, ensure that your phone isconnected to your PC and is powered on. Select one ofthe Data/Fax options.
When you receive a fax call, set up the Answer modein the fax program on your PC and click on Receiveand select one of the following:
• Automatic Receive (recommended)• Manual Receive
Sending a Fax or Data FileWhen connected to a computing device, your phoneallows wireless fax and data transmissions. Yourcomputing device software initiates the call to thedestination phone number. The phone functions as awireless modem to send the fax or data file to thenumber designated by your PC software.
Version MENU 9-7
This menu allows you to view the software andhardware versions of your phone. This feature ishelpful if you need to the call customer care.
117
SSeettuupp
116
SSeettuupp
DO NOT depend on this phone as a primary method ofdialing 000 or for any other essential or emergencycommunications. Remember to always turn your phoneon and check for the adequate signal strength beforeplacing a call.
To store an emergency number:
1. Press the or key to select a location andpress the OK key.
2. If necessary, press and hold the CLR key to clear theold number.
3. Enter the number you want.
Each emergency number can be up to 32 digits long.
4. Press the OK key to store the number.
To make an emergency call in the lock mode, simplyenter a programmed number, and then press thekey.
Erase Pbook (MENU 9-8-6)
This feature allows you to clear all of the numbers inyour Phonebook.
When a confirming message displays, select Yes andpress the OK key.
Reset Phone (MENU 9-8-7)
Resetting the phone cancels all of your selection in theuser-selectable setting options and returns them to thefactory default settings.When a confirming message displays, select Yes andpress the OK key. The phone turns itself off and backon, then returns to Standby mode.
Change Lock (MENU 9-8-2)
This feature allows you to change your current lockcode to a new one. The lock code is preset to “0000”at the factory.Enter a new, four-digit lock code and then press theOK key.
Restriction (MENU 9-8-3)
This feature allows you to restrict all of the outgoingcalls.Select On to restrict the calls, or Off to deactivate therestriction.
Send PIN (MENU 9-8-4)Note: Your service provider must enable this feature
and assign you a PIN (Personal IdentificationNumber) in order for this feature to work.
This feature prevents your phone from being used byunauthorized people. The phone prompts you to enterthe your PIN code assigned by the system supplierwhen you make a call. For more details, contact yourservice provider.The following options are available:Never: the Send PIN feature is not activated.Prompt: each time you make a call, you are asked toenter the PIN code.
Emergency # (MENU 9-8-5)Your phone provides you with the option for storingfour emergency numbers. All of these numbers can bemanually dialed at any time even when your phone islocked or all of the outgoing calls are restricted.
IMPORTANT NOTICE! Emergency calling may not be available on all wirelessnetworks at all times. A connection cannot always beguaranteed, due to various transmission methods,network parameters and user settings used tocomplete a call from your wireless phone.
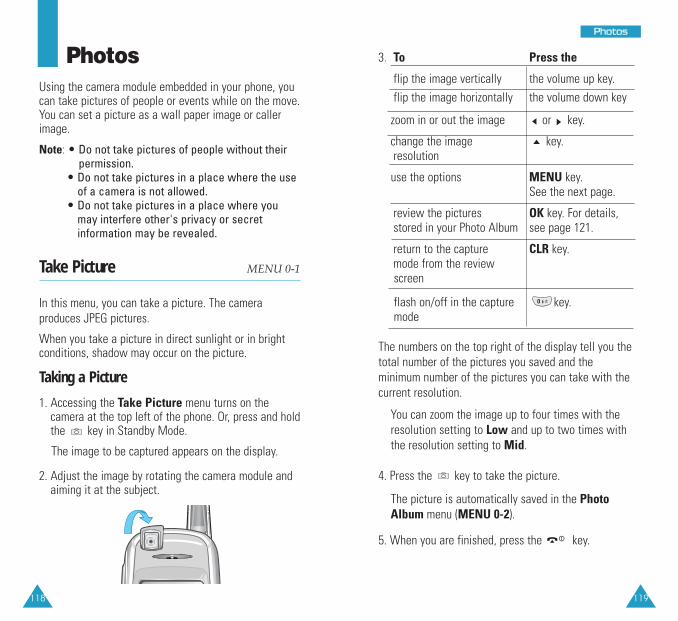
118
PhotosUsing the camera module embedded in your phone, youcan take pictures of people or events while on the move.You can set a picture as a wall paper image or callerimage.
Note: • Do not take pictures of people without theirpermission.
• Do not take pictures in a place where the useof a camera is not allowed.
• Do not take pictures in a place where youmay interfere other's privacy or secretinformation may be revealed.
Take Picture MENU 0-1
In this menu, you can take a picture. The cameraproduces JPEG pictures.
When you take a picture in direct sunlight or in brightconditions, shadow may occur on the picture.
Taking a Picture
1. Accessing the Take Picture menu turns on thecamera at the top left of the phone. Or, press and holdthe key in Standby Mode.
The image to be captured appears on the display.
2. Adjust the image by rotating the camera module andaiming it at the subject.
119
3. To Press the
flip the image vertically the volume up key.flip the image horizontally the volume down key
zoom in or out the image or key.
change the image key.resolution
use the options MENU key.See the next page.
review the pictures OK key. For details, stored in your Photo Album see page 121.
return to the capture CLR key.mode from the reviewscreen
flash on/off in the capture key.mode
The numbers on the top right of the display tell you thetotal number of the pictures you saved and theminimum number of the pictures you can take with thecurrent resolution.
You can zoom the image up to four times with theresolution setting to Low and up to two times withthe resolution setting to Mid.
4. Press the key to take the picture.
The picture is automatically saved in the PhotoAlbum menu (MENU 0-2).
5. When you are finished, press the key.
PPhhoottooss

120
Using the Camera options
When you press the MENU key in the capture mode,the following options are available for the currentshot:
Self TimerYou can set the phone to take a picture after apredefined time. Once you set the time, the timer ( )appears on the top right of the image. When you pressthe ok key, it counts down to the specified time andturns red before three seconds. The phoneautomatically takes and saves a picture when the timeexpires.
BrightnessYou can adjust the brightness of the image. Use theNavigation keys to find the status you want. When thebrightness is set to Auto, the phone automaticallydetermines the setting.
Fun FramesThis option allows you to use a frame on the picture.Press the Navigation keys to find the frame format youwant to use.
121
Color TonesThis options allows you to change the color tone of thepicture. Press the Navigation keys to find the tone youwant to use. Auto, Mono,Sepia, Negative, Emboss,Sketch, UV Positive, UV Negative are available. Toset the phone to select a color tone, select Auto.
White BalanceThis setting adjusts the color balance of the picture toremove the current lighting conditions add. With thissetting, you can make your picture appear warm orcool. To adjust the balance manually, select Manualand press the Navigation keys to find the setting youwant to use.
PPhhoottooss PPhhoottooss

122
Photo Album MENU 0-2
In this menu, you can review the pictures you havetaken. By default, your phone displays them in thethumbnail mode, which shows a picture as a smallimage.
The numbers on the top right of the display tell you theindex number of the current picture and the totalnumber of the pictures you saved.
To Press the
scroll through the Navigation keys.pictures
use the options MENU key. For details,see the next page.
switch the view mode OK key. between the expand and thumbnail modes
Using the Picture Options
When you press the MENU key while reviewing apicture, the following options are available:
CameraThis option switches the display to the capture mode.For further details about taking a picture, see page124.
123
Save to WalletThis option copies the picture to the Photo Walletmenu (MENU 0-3). See the next page.
EraseYou can erase the selected picture or all of thepictures.
Edit CaptionThis option allows you to change the picture’s titledisplayed on the right top of the picture in the expandmode. For further details about how to enter text, seepage 41.
Photo Info.This option shows you information about the picture,such as title, time and date when it was taken, imagesize and quality. Press the Navigation keys to scroll thescreen by one item.
Launch MMSThis option allows you to send a message with aphoto from your Photo Album. For further details aboutsending MMS, see page 71.
PPhhoottooss PPhhoottooss
124
Photo Wallet MENU 0-3
Photo Wallet allows you to store the picturesindependently, like your photo album. By default, yourphone displays them in the thumbnail mode, whichshows a picture as a small image.
The numbers on the top right of the display tell you theindex number of the current picture and the totalnumber of the pictures you saved.
To Press the
scroll through the Navigation keys.pictures
use the options MENU key. For details,see below.
switch the view mode OK key. between the expand and thumbnail modes
When you press the MENU key while reviewing apicture, the following options are available:
Wallpaper: copies the picture into the wall paperimage folder. You can use it in the Wallpaper menu(MENU 8-2); see page 100.
Picture ID: allows you to set the picture as a callerimage for a Contacts entry.
Erase: allows you to erase the selected picture or allof the pictures from Photo Wallet.
125
Settings MENU 0-4
This menu allows you to set up the options for usingthe camera and pictures.
Security (MENU 0-4-1)
You can lock the pictures so that a person without yourapproval cannot review them.
To access the Security menu, you need to enter thelock code. It is preset to “0000” at the factory.
Select On and press the OK key. Once you have lockedthe pictures, you need to enter the password eachtime you access the Photo Album and Photo Walletmenus.
To deactivate this feature, select Off.
Quality (MENU 0-4-2)
You can set the default image quality to one ofEconomy, Normal and Fine.
PPhhoottooss PPhhoottooss

127126
WWAAPP
Launch Wap -1
Note: The first time you use the wap browser, you willgo through a security setup process that takes 3to 5 minutes. Please follow the on-screenprompts to complete the security setup process.This initial setup process occurs only the firsttime you access the service.
1. Accessing the Launch Wap menu connects yourphone to the wireless web.
2. Once you are connected, the home page or the lastpage you visited displays.
The opening page contents may be differentaccording to your wireless web service provider.
3. To scroll through the screen, use the or key.
Exiting the Wap Browser
To exit the wap browser, simply press the key atany time.
WAP
About the Wap Browser
Your phone comes equipped with a web browserwhich makes it possible for you to access the wirelessweb.
The wap browser allows you to access up-to-theminute information through your phone. Browsing thewireless web through your phone is unlike using yourcomputer; site providers have selected only the criticalaspects of their sites to present to wireless phoneusers and they have removed most of the graphics.
Each time you start the wap browser, the phone willconnect to the wireless web and the Service icon ( )will appear on the display. Any time this icon is visibleon the display, you are connected to the wireless weband will be billed accordingly. Rates will varyaccording to your service plan.
The wap browser will end the connection after acertain period of network inactivity and willautomatically reconnect as necessary. For this reason,you may find that you are billed for several networkconnections within a single session. This is normal andis designed to minimize your bill.
You can quickly launch the wap browser by pressingand holding key in the standby mode.

129128
END key: This key ends the wap browserconnection and returns the phone to Standbymode.
Clear key: This key performs two functions:
• Sends you back in the browser. Pressing itonce sends you back one page. Pressingand holding this key sends you back to thehome page.
• Clears out the entered text or numbers.When entering characters, press this keyto clear the last number, letter or symbol.Press and hold this key to completely clearthe input field.
Numbered keys 0 - 9: If the items on apage are numbered, you can use these keysto select them.
Volume keys: These keys allows you toscroll up or down by a page or change thevolume setting.
Using the Wap Browser Menus
On the wap browser, you can access the followingoptions by pressing the MENU key:
Reload: reloads the current wap page.
Home: takes you back at any time to the homepage ofthe wireless web service provider.
Bookmarks: allows you to directly load a bookmarkedwap page.
~
WWAAPP
Using the Wap Browser Soft Keys
At the bottom of the web browser display is a solid barwhich contains browser commands. The and keysare used to execute the commands. These two keys arecalled soft keys because their functions changedepending on where you are in the wap browsersoftware.
Navigating the Wap Browser
When you use the wap browser, some keys on yourphone operate differently than when on a normal phonecall.
Here’s how the keys work in the Wap Browser:
Navigation keys: Use these keys to scroll toand select browser options. The currentlyselected option is indicated by an arrow. Youcan also use them to move the cursor whenentering text.
Left and right soft keys: These are the softkeys used to execute the commands at thebottom of the browser display. Also, usethese key to move the cursor to the left orright when entering text.
MENU key: This key is used for secondaryoptions or a menu of secondary options.
OK key: This key is used for selecting thehighlighted item.
WWAAPP

131130
WWAAPP
Mark Site: allows you to set a bookmark for mostpages; they can be accessed directly from any webpage. Bookmarks save you time by reducing thenumber of steps required to access a given page.
About Openwave: provides you with informationabout Openwave and your version of the web browser.
Advanced: gives you access the following advancedfeatures:
- Show URL: displays the URL address of the sitewhere you are currently connected. It also enablesyou to declare the current site as the startuphomepage.
- Homepage: allows you to change the startuphomepage manually.
- Set WAP Proxy: allows you to configure the proxysettings required for connecting to the wireless web.
- Offline Service: Most applications are stored on aserver that cannot be accessed outside your wirelesscoverage area. However, some applications can bestored in the cache of your phone, enabling you touse them offline. You can remove the associated sitefrom the cache at any time.
- Outbox: stores outgoing requests from the browserso that they can be processed at a later date.
- Restart Browser: restarts the browser without exitingit.
- Encryption: This option is automatically set by theservice provider. You do not need to change it.
WWAAPP
Entering Text in the Wap Browser
When prompted, you can enter letters, numbers orsymbols same way as in the phone mode. See page 41for further details about how to enter characters.

133
HHeeaalltthh aanndd SSaaffeettyy IInnffoorrmmaattiioonn
132
Precautions When Using Batteries
• Never use any charger or battery that is damaged inany way.
• Use the battery only for its intended purpose.
• If you use the phone near the network’s basestation, it uses less power; talk and standby timeare greatly affected by the signal strength on thecellular network and the parameters set by thenetwork operator.
• Battery charging time depends on the remainingbattery charge and the type of battery and chargerused. The battery can be charged and dischargedhundreds of times, but it will gradually wear out.When the operation time (talk time and standbytime) is noticeably shorter than normal, it is time tobuy a new battery.
• If left unused, a fully charged battery will dischargeitself over time.
• Use only Samsung-approved batteries and rechargeyour battery only with Samsung-approved chargers.When a charger is not in use, disconnect it from thepower source. Do not leave the battery connected toa charger for more than a week, since overchargingmay shorten its life.
• Extreme temperatures will affect the chargingcapacity of your battery: it may require cooling orwarming first.
Health and Safety Information
Exposure to Radio-Frequency Energy (SAR Information)
This phone meets Australian CommunicationsAuthority (ACA) requirements (AS/NZS 2772)concerning exposure to radio waves.Your mobile phone is a radio transmitter and receiver.It is designed and manufactured, so as not to exceedthe limits for exposure to radio-frequency (RF) energy,as recommended by ACA. These limits are part ofcomprehensive guidelines and establish permittedlevels of RF energy for the general population. Theguidelines were developed by independent scientificorganisations through periodic and thoroughevaluation of scientific studies. The limits include asubstantial safety margin designed to ensure thesafety of all persons, regardless of age and health.
The exposure standard for mobile phones employs aunit of measurement known as SAR (SpecificAbsorption Rate). The SAR limit recommended by ACAis 1.6W/kg*.
* The SAR limit for mobile phones used by the public is 1.6watts/kilogram (W/kg) averaged over one gram of body tissue. The limitincorporates a substantial margin of safety to give additional protectionfor the public and to account for any variations in measurements. TheSAR values may vary depending on the national reporting requirementsand the network band.
135
HHeeaalltthh aanndd SSaaffeettyy IInnffoorrmmaattiioonn
134
Road Safety
Your wireless phone gives you the powerful ability tocommunicate by voice, almost anywhere, anytime. Butan important responsibility accompanies the benefitsof wireless phones, one that every user must uphold.
When driving a car, driving is your first responsibility.When using your wireless phone behind the wheel ofa car, make sure that you are following the specialregulations in a given area or country.
Operating Environment
Remember to follow any special regulations in forcein any area and always switch off your phonewhenever it is forbidden to use it, or when it maycause interference or danger.
When connecting the phone or any accessory toanother device, read its user’s guide for detailedsafety instructions. Do not connect incompatibleproducts.
As with other mobile radio transmitting equipment,users are advised that for the satisfactory operation ofthe equipment and for the safety of personnel, it isrecommended that the equipment should only be usedin the normal operating position (held to your ear with the antenna pointing over your shoulder).
HHeeaalltthh aanndd SSaaffeettyy IInnffoorrmmaattiioonn
• Do not leave the battery in hot or cold places, suchas in a car in summer or winter conditions, as youwill reduce the capacity and lifetime of the battery.Always try to keep the battery at room temperature.A phone with a hot or cold battery may temporarilynot work, even when the battery is fully charged. Li-ion batteries are particularly affected bytemperatures below 0 °C (32 °F).
• Do not short-circuit the battery. Accidental short-circuiting can occur when a metallic object (coin,clip or pen) causes a direct connection between the+ and – terminals of the battery (metal strips on thebattery), for example when you carry a spare batteryin a pocket or bag. Short-circuiting the terminalsmay damage the battery or the object causing theshort-circuiting.
• Dispose of used batteries in accordance with localregulations. Always recycle. Do not dispose ofbatteries in a fire.
137
HHeeaalltthh aanndd SSaaffeettyy IInnffoorrmmaattiioonn
136
HHeeaalltthh aanndd SSaaffeettyy IInnffoorrmmaattiioonn
Other Medical DevicesIf you use any other personal medical devices, consultthe manufacturer of your device to determine if it isadequately shielded from external RF energy. Yourphysician may be able to assist you in obtaining thisinformation. Switch off your phone in health carefacilities when any regulations posted in these areasinstruct you to do so. Hospitals or health care facilitiesmay be using equipment that could be sensitive toexternal RF energy.
VehiclesRF signals may affect improperly installed orinadequately shielded electronic systems in motorvehicles. Check with the manufacturer or itsrepresentative regarding your vehicle.You should also consult the manufacturer of anyequipment that has been added to your vehicle.
Posted FacilitiesSwitch off your phone in any facility where postednotices require you to do so.
Electronic Devices
Most modern electronic equipment is shielded fromradio frequency (RF) signals. However, certainelectronic equipment may not be shielded against theRF signals from your wireless phone. Consult themanufacturer to discuss alternatives.
PacemakersPacemaker manufacturers recommend that a minimumdistance of 15 cm (6 inches) be maintained between awireless phone and a pacemaker to avoid potentialinterference with the pacemaker. Theserecommendations are consistent with the independentresearch and recommendations of Wireless TechnologyResearch.
Persons with pacemakers:• Should always keep the phone more than 15 cm (6
inches) from their pacemaker when the phone isswitched on
• Should not carry the phone in a breast pocket• Should use the ear opposite the pacemaker to
minimise potential interference
If you have any reason to suspect that interference istaking place, switch off your phone immediately.
Hearing AidsSome digital wireless phones may interfere with somehearing aids. In the event of such interference, youmay wish to consult your hearing aid manufacturer todiscuss alternatives.

139
HHeeaalltthh aanndd SSaaffeettyy IInnffoorrmmaattiioonn
138
HHeeaalltthh aanndd SSaaffeettyy IInnffoorrmmaattiioonn
Emergency Calls
This phone, like any wireless phone, operates usingradio signals, wireless and landline networks as wellas user-programmed functions, which cannotguarantee connection in all conditions. Therefore, youshould never rely solely on any wireless phone foressential communications (medical emergencies, forexample).
Remember, to make or receive any calls the phonemust be switched on and in a service area withadequate signal strength. Emergency calls may not bepossible on all wireless phone networks or whencertain network services and/or phone features are inuse. Check with local service providers.
To make an emergency call, proceed as follows.1. If the phone is not on, switch it on.2. Key in the emergency number for your present
location (for example, 000 or any other official emergency number). Emergency numbers vary by location.
3. Press the key.
If certain features are in use (call barring, for example),you may first need to deactivate those features beforeyou can make an emergency call. Consult thisdocument and your local cellular service provider.
When making an emergency call, remember to give allthe necessary information as accurately as possible.Remember that your phone may be the only means ofcommunication at the scene of an accident; do not cutoff the call until given permission to do so.
Potentially Explosive Environment
Switch off your phone when in any area with apotentially explosive atmosphere and obey all signsand instructions. Sparks in such areas could cause anexplosion or fire resulting in bodily injury or evendeath.
Users are advised to switch off the phone while at arefuelling point (service station). Users are reminded ofthe need to observe restrictions on the use of radioequipment in fuel depots (fuel storage and distributionareas), chemical plants or where blasting operationsare in progress.
Areas with a potentially explosive atmosphere areoften but not always clearly marked. They includebelow deck on boats, chemical transfer or storagefacilities, vehicles using liquefied petroleum gas (suchas propane or butane), areas where the air containschemicals or particles, such as grain, dust or metalpowders, and any other area where you wouldnormally be advised to turn off your vehicle.

141
HHeeaalltthh aanndd SSaaffeettyy IInnffoorrmmaattiioonn
140
HHeeaalltthh aanndd SSaaffeettyy IInnffoorrmmaattiioonn
Care and Maintenance
Your phone is a product of superior design andcraftsmanship and should be treated with care. Thesuggestions below will help you fulfill any warrantyobligations and allow you to enjoy this product formany years.
• Keep the phone and all its parts and accessories outof the reach of small children’s.
• Keep the phone dry. Precipitation, humidity andliquids contain minerals that will corrode electroniccircuits.
• Do not touch the phone with a wet hand while it ischarging. Doing so may cause an electric shock toyou or damage to the phone.
• Do not use or store the phone in dusty, dirty areas,as its moving parts may be damaged.
• Do not store the phone in hot areas. Hightemperatures can shorten the life of electronicdevices, damage batteries, and warp or melt certainplastics.
• Do not store the phone in cold areas. When thephone warms up to its normal operatingtemperature, moisture can form inside the phone,which may damage the phone’s electronic circuitboards.
Other Important Safety Information
• Only qualified personnel should service the phone orinstall the phone in a vehicle. Faulty installation orservice may be dangerous and may invalidate anywarranty applicable to the device.
• Check regularly that all wireless phone equipment inyour vehicle is mounted and operating properly.
• Do not store or carry flammable liquids, gases orexplosive materials in the same compartment as thephone, its parts or accessories.
• For vehicles equipped with an air bag, rememberthat an air bag inflates with great force. Do notplace objects, including both installed or portablewireless equipment in the area over the air bag or inthe air bag deployment area. If wireless equipmentis improperly installed and the air bag inflates,serious injury could result.
• Switch off your phone before boarding an aircraft.The use of wireless phones in aircraft may bedangerous to the operation of the aircraft, and isillegal.
• Failure to observe these instructions may lead to thesuspension or denial of telephone services to theoffender, or legal action, or both.

143142
HHeeaalltthh aanndd SSaaffeettyy IInnffoorrmmaattiioonn
Glossary
Airtime - Actual time spent talking on the wirelessphone. Most carriers bill customers based on howmany minutes of airtime they use each month.
Antenna - A device for transmitting or receivingsignals. The size and shape of antennas is determined,in part, by the frequency of the signal they receive.Wireless phones and the base station must haveantennas.
Base Station - The fixed radio transmitter/receiverthat maintains communications with mobile radiotelephones within a given area. (Typically called a cellor cell site)
CDMA - (Code Division Multiple Access) A spread-spectrum approach to digital transmission. WithCDMA, each conversion is digitized and then taggedwith a code. The mobile phone deciphers only aparticular code to pick the right conversation off theair. The transmitted signal is just above noise levelacross the available bandwidth.
Channel - Communications signals transmit alongpaths called channels.
Codec - Compression & Decompression.
Deactivation - The process of rendering a wirelessphone inactive.
• Do not drop, knock or shake the phone. Roughhandling can break internal circuit boards.
• Do not use harsh chemicals, cleaning solvents orstrong detergents to clean the phone. Wipe it with asoft cloth slightly dampened in a mild soap-and-water solution.
• Do not paint it. Paint can clog the device’s movingparts and prevent proper operation.
• Do not put the phone in or on heating devices, suchas a microwave oven, a stove or a radiator. Thephone may explode when overheated.
• Use only the supplied or an approved replacementantenna. Unauthorized antennas or modifiedaccessories may damage the phone and violateregulations governing radio devices.
• If the phone, battery, charger or any accessory is notworking properly, take it to your nearest qualifiedservice facility. The personnel there will assist you,and if necessary, arrange for service.

145
IInnddeexx
144
GGlloossssaarryy
Prepend - The addition of a prefix, such as an areacode, to a phone number.
RF - Radio Frequency
Roaming - The ability to use a wireless phone tomake and receive calls in places outside of the homeservice area.
Service Charge - The amount paid each month toreceive wireless service.
Standby Time - The amount of time a fully chargedwireless portable or transportable phone can be onand idle without being in use. (See Talk Time)
Talk Time - The length of time a person can talk on aportable or transportable wireless phone withoutrecharging the battery.
Vocoder - Voice Coder. A device used to convertspeech into digital signals.
Wireless - Radio-based Systems that allowtransmission of telephone or data signals through theair without a physical connection, such as a metal wire(copper) or fiber optic cable.
GGlloossssaarryy
DTMF - (Dual-tone Multi-Frequency ) You send DTMFsignals when you enter numbers by pressing the digitkeys.
EVRC - (Enhanced Variable Rate Codec) EVRC is a newglobal standard for compressing and decompressingvoice signals. EVRC uses a lower bit rate (the numberof bits sent per second) than existing CDMA vocoders,while providing significant improvements in voicequality. This technology enables your phone to providesuperb voice quality while benefiting from the abilityto process more cellular voice calls using lessbandwidth than the voice codecs in CDMA networkstoday.
Frequency - A measure based on time, as one ormore waves per second, in an electrical or light waveinformation signal. A signal’s frequency is stated incycles-per-second or Hertz (Hz).
Hands-Free - A feature that permits a driver to use awireless phone without lifting or holding the handset -an important safety feature for automobiles, tractorsand most other motorized vehicles.
LCD - (Liquid Crystal Display) Commonly used to referto the screen display on the wireless phone.
LED - (Light Emitting Diode) Commonly used to refer toa small light on the wireless phone or on the DesktopCharger. The LED lights on the phone to indicate anincoming call. The lights on the charger indicate thatbattery charging is taking place.

147
IInnddeexx
146
IIcon description • 13Inbox, messages • 67Installing battery • 16Incoming calls • 54
KKeys
description • 12Key tone
setting • 98
LLast number redialing • 26Letters, entering • 41Lock code, changing • 116Lock mode, setting • 115Low battery indicator • 20
MMaintenance • 141Memo pad • 84Menu style, changing • 100Menus
list • 50scrolling • 48shortcuts • 49
Messagesetup • 76text • 65see text message • 67voice, listening • 75
Minute beep • 97Missed calls • 55MMS
inbox • 72outbox • 73draftbox • 74alert • 74
NNames
finding • 57saving • 59
Numbercorrecting • 25finding • 57saving • 59
OOutbox, messages • 68Outgoing calls • 53
PPause dialing • 30Phone
layout • 10locking • 115modes • 21resetting • 117
Phonebookadding entries • 59finding • 57group, setting • 62memory status • 63
Phototaking a picture• 118photo album • 122photo wallet • 124
Power save mode • 22Power saving • 104Prepend dialing • 27
IndexAAccessories • 8Air time • 56Alarm • 85Alerts • 97Alphabet mode, text • 45Auto answer • 110Auto retry • 111
BBacklight • 15, 101Banner • 101Battery
charging • 18installing • 16low battery indicator • 20precautions • 133removing • 17
CCalculator • 86Calendar, schedule • 80Call Answer • 110Calls
answering • 35outgoing • 53emergency • 25, 116making • 24missed • 38, 55options • 36Incoming • 54restriction • 117three-way • 40time • 56waiting • 39
Caller ID • 37Canned messages • 77Care • 141Characters, entering • 41Connect alert • 93Countdown timer • 83
DData/fax
receiving • 113sending • 113
Daylight saving time (DST),setting • 102
Dialed calls • 53Dialing
pause • 30prepend • 27speed • 28
Disconnect alert • 97Display
icons • 13layout • 11banner • 101
Dual clocksetting • 102wallpaper • 100
EEmergency call • 25, 116English T9 mode, text • 41Erasing History • 55Erase Msg • 75Escalating • 99
FFade alert • 97Filed messages • 66Four-digit dialing • 30
GGames • 105Greeting
voice answer• 92Group, phonebook
finding • 57setting • 62

149
Save a Num
berEnter N
umber + O
K+ O
K+
/ to select Label + O
K+
Enter Nam
e + OK
+ / toselect Entry/Hom
e/Work/M
obile/Pager/Fax/N
o label/Speed dial/E-m
ail/URL/Group/Nam
eRinger/Birthday/Secret/Im
age) +/
to change the settings orM
ENU
to enter information + OK
+ OK
Speed dialing Enter M
emory Location of the
number you w
ant, holding the lastdigit to autom
atically dial.
Phonebook Press +
/ + /
Search+ O
Kor
Launch the web
Press and hold brow
ser
SCH
-N3
61
Qu
ick Re
fere
nce
Card
BA
SIC OPERATIO
NS
Make a call
Phone number +
End a call
Receive a call
Adjust the key beep volum
e(in Standby m
ode)
Adjust the speaker volum
e(during a conversation)
Redial the last calltw
ice
Switch to
Press and hold Silent m
ode
148
IInnddeexx
RReceived calls • 54Received messages • 67Recording
greeting • 93voice memo • 90
Reset, phone • 117Restriction, calls • 116Retry
auto • 111last number • 26
Ringertype • 96volume • 95
Roaming • 112Roam ringer • 98
SSafety information • 7, 132Scheduler • 80Security • 115Service alert • 97Service light • 15, 103Silent mode • 22Speed dialing • 28Standby mode • 21Symbol mode, text • 47
TTask list • 82Talk mode • 22Text, entering • 41Text input mode, changing •
42Text message
filed • 69inbox • 67outbox • 68sending • 65alert • 70
Three-way calling • 40Time, setting • 89Today, schedule • 78
VVersion, checking • 114Voice answer
caller, listening • 92greeting, recording • 93
Voice memo • 90Volume, adjusting
earpiece • 34key tone • 34, 98ringer • 96
WWaiting call • 39Wallpaper, image • 100Wap browser
launch web • 127World time • 87

150
Licensed by QUALCOMM Incorporated under one or more of the following Patents.U.S Patent No. 4,901,307 5,056,109 5,099,204
5,101,501 5,103,459 5,107,2255,109,390
MEN
U T
REE
Mai
n M
enu
(To
acc
ess,
pre
ss th
e M
ENU
key)
1 :
Calls
1
: Ou
tgoi
ng2
: In
com
ing
3 :
Mis
sed
4 :
Eras
e Hi
stor
y5
: Ai
r Tim
e
2 :
Phon
e Bo
ok
1 :
Find
2
: Ad
d N
ew E
ntry
3 :
Grou
p Se
tting
4 :
My
Phon
e #
5 :
Mem
ory
3 :
Mes
sage
s1
: Te
xt2.
: M
MS
3.:
Voic
e4.
: Er
ase
MSG
5.:
MSG
Set
ting
4 :
Plan
ner
1 :
Toda
y2
: Sc
hedu
ler
3 :
Task
Lis
t4
: M
emo
Pad
5 :
Alar
m6
: Ca
lcul
ator
7 :
Wor
ld T
ime
8 :
Coun
tdow
n9
: Se
t Tim
e
5 :
Voic
e To
ols
1 :
Voic
e M
emo
2 :
Voic
e An
swer
6 : S
ound
s1
: Ri
nger
Vol
ume
2 :
Ring
er T
ype
3 :
Aler
ts4
: Ke
y to
ne5
: Ro
am R
inge
r6
: Po
wer
On/
Off
7 :
Esca
latin
g
7 :
Disp
lay
1 :
Men
u St
yle
2 :
Wal
lpap
er
3 :
Back
light
4 :
Bann
er5
: Du
al C
lock
6 :
Serv
ice
LED
7 : C
ontra
st8
: Pow
er S
avin
g
8 :
Gam
es1
: Fu
n Bo
wlin
g2
: Ho
ney
Ball
3 :
Go H
amst
er
9 :
Setu
p1
: Au
to A
nsw
er2
: Ca
ll An
swer
3 :
Auto
Key
Loc
k4
: Au
to R
etry
5 :
Set S
yste
m6
: Da
ta/F
ax7
: Ve
rsio
n8
: Se
curit
y
0.: P
hoto
s1.
: Tak
e Pi
ctur
es2.
: Pho
to A
lbum
3.: P
hoto
Wal
let
4.: S
ettin
gs