pro‐ox iron filter 7000-sxt installation and start up guide
DESCRIPTION
Step by step installation and start up guide for the Pro‐OX Iron Filter 7000, by Clean Water Systems. View the product here:http://www.cleanwaterstore.com/filox-7000.html#item=FE008950&tab=tab1 View the complete installation guide here: http://www.cleanwaterstore.com/technical/water-treatment-guides/Iron_ProOX/Pro-OX_7000_startup.pdf For more products, how-to-guides, resources, and more, please visit: http://www.cleanwaterstore.comTRANSCRIPT

http://www.cleanwaterstore.com
PRO‐OX 7000-SXT IRON FILTER INSTALLATION & START‐UP GUIDEBrought to you by:

http://www.cleanwaterstore.com
STEP 1Unscrew by hand the entire Fleck 7000-SXT control valve from top of tank if it was shipped screwed on. The Vortech distributor tube is already installed in the tank. If not already done, make sure blue temporary plug is on top of distributor tube, or wrap the top of distributor tube with electrical or duct tape.
Note: You do not want gravel or filter media to go down the distributor tube.

http://www.cleanwaterstore.com
STEP 2Add filter gravel supplied first, using the funnel sent with the Pro-OX filter.
NOTE: Be sure not to let any parts of the bag or foreign materials enter the tank when you are adding media.
Next add Pro-OX (PRO-OX media). Tank will be approximately 60% full.
http://www.cleanwaterstore.com
STEP 3Remove cap or tape from distributor tube, being careful not to pull up on the tube.
Fill tank with water. Add 2 cups of household bleach into the tank. This bleach will activate and sanitize the Pro-OX media. It will also eliminate the need of “purging” the air out of the tank later. Next screw on control valve carefully and hand tighten.
DO NOT USE any Teflon tapes or pipe joint compound on the tank itself or on the threads where the Fleck 7000 threads into the tanks. Also do not over tighten the Fleck 7000 control valve, simply tighten by hand, there is no need for a wrench.

STEP 4See how the Fleck by-pass is connected. Note that Items 2 are the pipe connectors and the other end is what gets attached to the control valve. Items 3 are the red clips that hold the pipe connectors to the by-pass valve. To put system on or off bypass do NOT remove the red clips. Just turn knobs. Fleck 7000 is usually shipped in by-pass position.
Make sure the by-pass valve is in the bypass position when starting the installation. Follow the IN and OUT arrows on the bypass valve and control valve for proper connection of in and out water piping. Leave in the BY-PASS position for now.
http://www.cleanwaterstore.com

STEP 5Lubricate the by-pass valve o-rings only on the pipe connectors with some vegetable oil or silicone grease and connect the bypass assembly to the Fleck 7000 control by sliding the bypass valve firmly into the body of the Fleck 7000. Once bypass is in far enough, you will be able to easily insert the red connector clips. DO NOT USE PETROLEUM GREASE ON ANY PART OF THE FLECK 7000 CONTROL VALVE.
http://www.cleanwaterstore.com

STEP 6Now install your water pipes to the Fleck 7000-SXT bypass end connectors. Our preferred method is to wrap the pipe threads with 2 or 3 wraps of Teflon tape, then apply a thin coating of white non-hardening Teflon joint compound paste (available at all hardware stores) before attaching the pipe fittings. Make sure inlet is installed to the 'In" pipe connector on the bypass valve and outlet is on the “Out” connector.
http://www.cleanwaterstore.com

http://www.cleanwaterstore.com
STEP 7Connect some flexible tubing from the drain connection on the Fleck 7000-SXT control valve to a suitable drain such as a septic tank or drain to a sewer.
http://www.cleanwaterstore.com
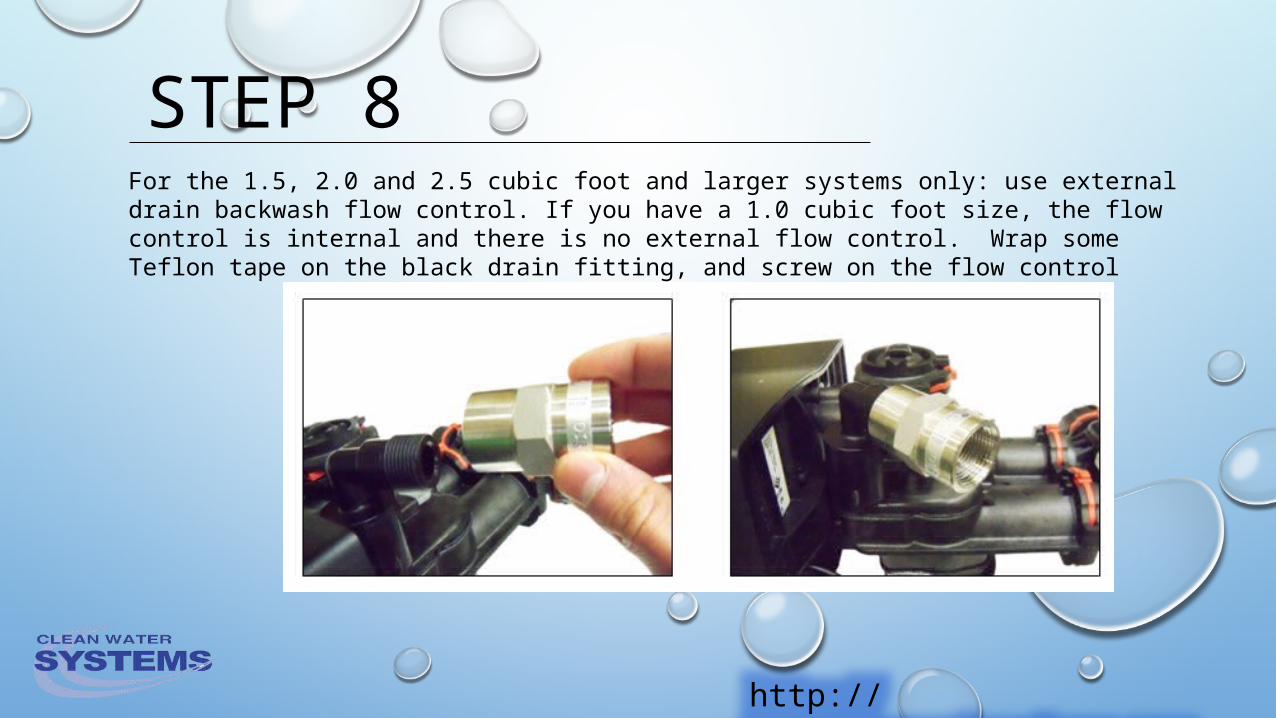
STEP 8For the 1.5, 2.0 and 2.5 cubic foot and larger systems only: use external drain backwash flow control. If you have a 1.0 cubic foot size, the flow control is internal and there is no external flow control. Wrap some Teflon tape on the black drain fitting, and screw on the flow control

http://www.cleanwaterstore.com
STEP 9Plug your Fleck 7000 control valve into an outlet to begin programming

http://www.cleanwaterstore.com
PROGRAMMING ENTER USER PROGRAMMING: Press and hold either the Up or Down buttons until the programming icon replaces the service icon and the parameter display reads TD (TIME OF DAY).
SET TIME OF DAY: Set the current time of day by pressing the up or down arrows until it is the current time of day. When the desired time is set, press the Extra Cycle button to resume normal operation, or wait 5 seconds, unit will return to normal operation if no button is pressed.

http://www.cleanwaterstore.com
PROGRAMMING SET DAYS BETWEEN BACKWASHES: Hold down the up arrow and down arrow at the same time for 5 seconds. Set the number of days between backwashes, typically for every 3 days for moderate to heavy iron. If the iron level is low and water usage is light you can try setting it for every 4 days, but a setting of every 2 days is recommended by the manufacturer. If your iron is very high (over 4.0 ppm) and you use a lot of water you can set it to every night. Frequent backwashing prolongs the life of the media by several years.
SET TIME OF NIGHT BACKWASH WILL OCCUR: Press the Extra Cycle button once. Set the time of the night that you want the Pro-OX filter to backwash. The default time is 2:00 am. Adjust the time by pushing the up or down arrow if you want.
Now press the Extra Cycle button once more. You are done programming!

http://www.cleanwaterstore.com
BACKWASH PREPNow you are ready to turn on the water. Turn on the water and leave the Pro-OX filter on bypass and check for leaks. Leave the ball valve after the Pro-OX filter closed, so water is still off to the house, but connect a garden hose and open up the hose bib after the Pro-OX filter and allow the water to run for several minutes. This important step clears out any foreign material that may be in pipes from the installation. If you do not have a valve and hose bib installed after the Pro-OX filter, you will need to turn the water on inside the house to let the water run. Use a bathtub or laundry sink or other fixture that does not have an aerator screen.
Press the Extra Cycle button for a second or two which will start a manual backwash.

http://www.cleanwaterstore.com
BACKWASHNow you can slowly turn the bypass valve to the service position. You do NOT remove the red clips on the bypass knobs in order to turn the bypass valves from the bypass to the service position. First open the Inlet Side of the bypass valve. Second slowly open the Outlet Side of the bypass until it is in the full service position. Turn the bypass valve knobs in the correct direction which is counter-clockwise as you face the bypass valve knobs.

http://www.cleanwaterstore.com
BACKWASHThere should be no Pro-OX media coming out of the drain line, but the water will be black or dirty looking. At this point the Pro-OX filter will be in a backwash cycle. The backwash takes 10 minutes. If the water slows down or stops during the first 10 minutes of backwash, press the Extra Cycle to move the Fleck 7000 control to the next cycle, the Rinse cycle. Then repeat the backwash and rinse after the rinse cycle is done, by pressing the Extra Cycle again.
If you have high water pressure you may need to turn on the water slowly to the Pro-OX filter at first to prevent some Pro-OX fines from coming out the backwash. However it is normal for some small amount of fines to come out during the backwash, although you do not want to see a large amount of media coming out, which would mean you have very high water pressure, or the drain flow control for the Fleck 7000 is missing.

http://www.cleanwaterstore.com
BACKWASHIf possible verify that the backwash flow rate. You can easily run the drain hose to a bucket and using a watch verify the flow rate in gallons per minute. For example, if the backwash fills a 5 gallon bucket in 30 seconds, you have 10 gallons per minute or 10 GPM.
An adequate backwash is critical to properly clean the Pro-OX media and prevent it from cementing together.1.0 Cubic Foot Model: 8 GPM minimum 10 GPM recommended1.5 Cubic Foot Model: 8 GPM minimum 10 GPM recommended2.0 Cubic Foot Model: 10 GPM minimum 12 GPM recommended2.5 Cubic Foot Model: 13.0 GPM minimum 15 GPM recommended

http://www.cleanwaterstore.com
BACKWASHThe next cycle is the Rinse cycle and this runs for 6 to 8 minutes. After the backwash, the Fleck 7000 will automatically advance to the rinse cycle.
After the Pro-OX filter has gone through the backwash and rinse, press the Extra Cycle button and repeat the backwash and rinse. This is the same procedure that needs to be done each time you add Pro-OX media in the future, that is, the Pro-OX media must be thoroughly backwashed and rinsed.

http://www.cleanwaterstore.com
Questions? Call us at 888-600-5426 or email us at: [email protected]
Congratulations, you’re DONE!

http://www.cleanwaterstore.com
Browse our selection of whole house water treatment systems online at http://www.cleanwaterstore.com.
There you will also find instructional guides for maintaining your treatment systems as well as manufacturer
documentation, installation guides, and more.
Thanks for watching!