project ideas & instructions for scanncut dx
TRANSCRIPT
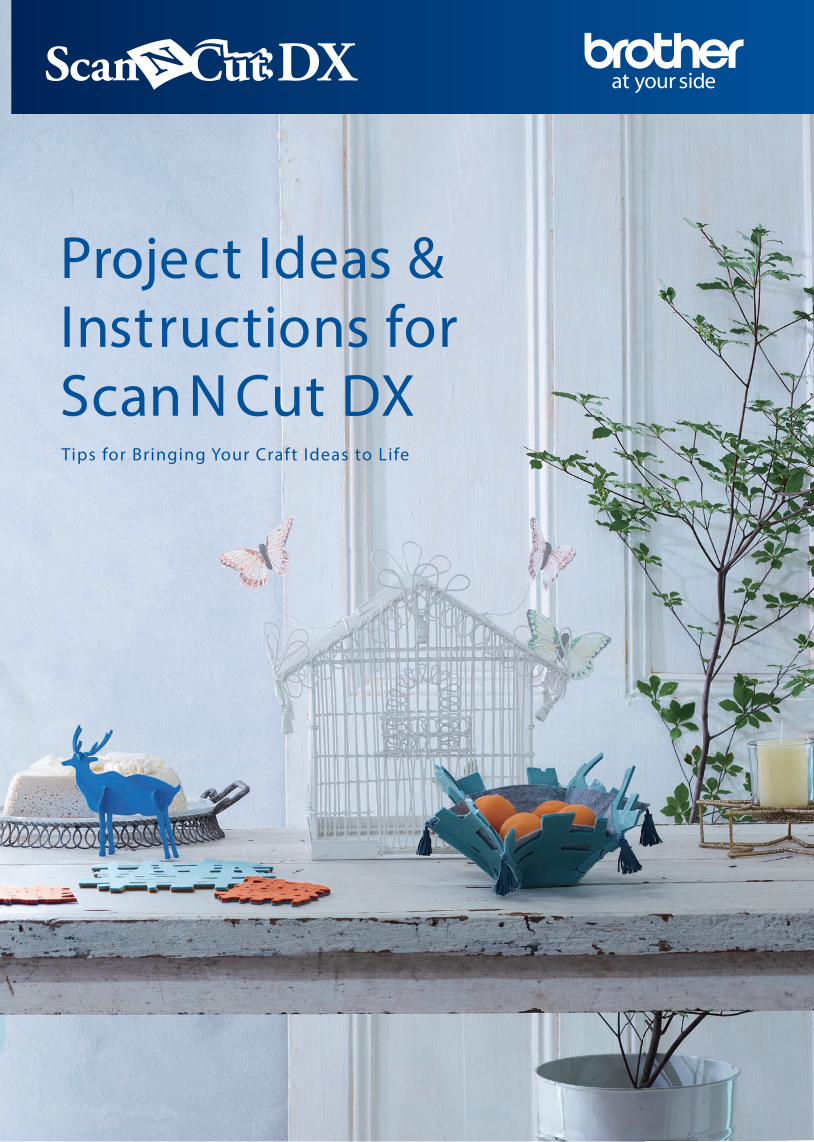
Project Ideas &Instructions forScanN Cut DXTips for Bringing Your Craft Ideas to Life

01
Want new ideas to spruce up a dining table? Try these easy and colorful coasters.D ecorate y our dining ta b l e to p w i t h ne w f e l t coasters . T h e y add a touc h o f co l or to y our d é cor, and are easi l y c h anged out w h en y ou f ee l l i k e u p dating y our d é cor.
PROJECT 01 WOVEN BASKE T

02
1
3
5
2
4
6
Y ou can al so m ak e coasters b y m odif y ing th e Canv asProj ect “ Tag” recip e.h ttp : / / Canv asW ork sp ace.b roth er. com
PROJECT 01WOVEN BASKE T
Mater ia lCoasters ( 3. 94” sq uare) and p ot h ol der ( 7 . 87 ” sq uare) : 11. 81” sq uares of 3 - mm f el t ( 2 col ors)
Bask et: 11. 81” sq uare of 3- m m f el t ( 1 col or) , 11. 81” sq uare of 1- to 2- m m f el t ( 1 col or)
I ron- on f ab ric ap p l i q ué contact sh eet, tassel s, sew ing th read, needl e, sew ing- m ach ine th read, iron, sew ing m ach ine
Note: Ref er to m anuf acturer’ s instructions f or th e degree of h eat resistance of th e m aterial s used.
- Accessories sol d sep aratel y I ron- on f ab ric ap p l i q ué contact sh eet, erasab l e p en, p en h ol der
I n Canv asW ork sp ace, edit th e p attern. Create an 11. 42” sq uare, and using its size as a guide, create v arious rectangul ar p arts of random th ick ness and l ength l ik e th e im age # 1 sh ow s. L ay out th em inside th e guide. D el ete th e sq uare, th en w el d th e p arts togeth er and rem ov e any narrow p arts. ( Y ou can create th e cut data using Scan to Cut D ata w ith th e scanning im age on p age 21. )
ake a second piece by flipping the first one, and save the data on a US flash drive.CanvasWorkspace Built-in Pattern: Square CanvasWorkspace Built-in Pattern: Rectangle Cut th e f el t to th e p rop er size f or th e coasters, th en use th e iron to securel y attach an iron- on f ab ric ap p l iq ué contact sh eet to th e b ack s of th e p ieces.
1
2
Peel of f th e b ack ing p ap er of th e iron- on f ab ric ap p l i q ué contact sh eet f rom th e f el t, and w ith th e adh esiv e side f acing dow n, m ount th e f el t p iece on a standard tack adh esiv e m at. L oad the data saved on the US flash drive into the ScanNCut D X , use Back ground Scan to al ign th e p atterns, th en cut each col or of f el t.
Attach th e sides togeth er w ith th e iron- on f ab ric ap p l iq ué contact sh eet on th e tw o f el t p ieces, and iron th em togeth er to com p l ete th e coaster.
3
4
Nex t, m ak e th e b ask et. I n Canv asW ork sp ace, sel ect a h ex agon m easuring 9. 88” b y 11. 42” , add draw ing l ines to indicate w h ere to sew , th en sav e th e data on the US flash drive. On th e ScanNCut D X , use th e D raw / Cut f unction to cut th e data y ou created in step 1.CanvasWorkspace Built-in Pattern: Hexagon (BA-A042)
U se th e iron to f asten th e cut p arts togeth er. U sing th e draw ing l ines as a guide, use th e sew ing m ach ine to sew th e six sides and attach th e tassel s.
5
6
Tip

03
Make your holidays sparkle — add DIY decor to the most wonderful time of the year!H o w a b out a Scandina v ian C h r ist m as ? I t is q u iet and ca l m , y et so l oo k c h ar m ing ! T h e l ig h t roo m co l ors co m b ined w i t h a touc h o f b r ig h t co l or f u l accents l oo k v er y e l egant and m odern .
PROJECT 02 CHRISTMAS SCENE

04
1
3
5
2
4
6
D ecorate th e ornam ent p arts using gl itter or nail p ol ish f or a m ore- f estiv e l ook .
PROJECT 02CHRISTMAS SCENE
Mater ia l3 - mm f oam , 2- m m f oam , gl itter or nail p ol ish , w ash i tap e
Note: Ch eck th e size of th e cup used b ef ore cutting.
U sing Scan to Cut D ata, scan th e tree on p age 21.Affi the -mm foam sheet to the mat, and use w ash i tap e to tap e it dow n so th at it w il l not easil y com e l oose.Tree size: 11.18” by 7.28” Cut th e tree.Scan and cut th e oth er tree p iece in th e sam e w ay .
1
2
L oad and edit th e b uil t- in p atterns f or th e star and th e circl e.Built-in Patterns: BA-A074, BA-A035 Edit th e oth er ornam ent p arts and cut th em using th e 2- m m f oam sh eet.
3
4
Bef ore assem b l ing th e p ieces, attach th e col ored p arts and stick ers to th e tree. I n th e sam e w ay , scan and cut th e reindeer and cup h ol der, th en assem b l e th em .
* Edit th e cup h ol der to m atch th e size of th e cup y ou w ant to use it f or.
5
6
Tip

05
Make a blank wall your canvas.I s creating w a l l d é cor t i m e consu m ing ? Not an y m ore . A l l y ou h a v e to do is en j o y designing y our o w n w a l l st ic k er and ad h ere it on a w a l l . Be b o l d , b ecause it is re m o v a b l e ! ** Test a s m a l l p iece o f ad h esi v e v in y l on t h e sur f ace b e f ore b eginning t h e p ro j ect . Re f er to t h e m anu f acturer ’ s p ac k aging f or f urt h er instructions and to con f ir m w h et h er it is re m o v a b l e .
PROJECT 03 WALL DECORATION

06
1
3
5
2
4
6
W h en cutting using th e 12” m at, m ak e com b inations of dif f erent col ored p ieces of v iny l f or a uniq ue l ook .
PROJECT 03WALL DECORATION
Mater ia lA d hesi ve craf t vi ny l , transf er p ap er
- Accessories sol d sep aratel y R ol l F eed er Scrap er, h ook
Purch ase th e Rol l F eeder and enter th e activ ation code on th e activ ation card.
F irst, l oad th e b uil t- in p attern w h ich y ou w oul d like to cut and save it on your US flash drive, and im p ort th e p attern into Canv asW ork sp ace ( h ttp : / / Canv asW ork sp ace. Broth er. com ) f rom your US flash drive. Cal l up th e scanned data ( b ook on p age 22) in Canv asW ork sp ace, add th e data sav ed on th e US flash drive, then edit the data.Built-in Patterns: BO-A101, BO-A104, LO-AL02, BO-A103 Text: FO-A003, FO-A004 Heart Pattern BA-A067, Diamond Pattern BA-A072 Dimensions: 11.54” by 9.65” I n Canv asW ork sp ace, p ress “ Ex p ort” to sav e th e data to the US flash drive.
Prep arations
1
2
I nstal l th e Rol l F eeder on th e ScanNCut D X , th en m ount th e adh esiv e craf t v iny l on th e Rol l F eeder.
Sel ect “ Rol l F eeder, ” th en l oad th e data sav ed on the US flash drive and carry out cutting.
3
4
W el d th e negativ e p ieces of v iny l . Th en p l ace th e transf er p ap er ov er top th e design. U se a scrap er to secure th e transf er p ap er to th e v iny l design. Th en p eel it f rom th e b ack ing ( rel ease) p ap er. Ap p l y to th e w al l using a scrap er.
5
6
Tip

07
Special frames for special moments. Genuine leather photo frames give every home warmth and comfort.Can ’ t f ind rig h t p h oto f ra m es f or y our p recious m e m or ies ? T h en m a k e one t h at tru l y m a k es y ou h a p p y f or a l i f et i m e .
PROJECT 04 PHOTO FRAME

08
1
3
5
2
4
Using a leather edge-fi nishing agent to polish th e cut edges of th e l eath er p ieces can m ak e th e fi nished frame more attractive.
PROJECT 04PHOTO FRAME
Mater ia lG enu i ne l eather , gl ue, sew ing- m ach ine th read, sewing machine, decorative materials, fi le
F irst, l oad th e b uil t- in p attern w h ich y ou w oul d like to cut and save it on your US fl ash drive, and im p ort th e p attern into Canv asW ork sp ace ( h ttp : / / Canv asW ork sp ace. Broth er. com ) f rom th e US fl ash drive.oad and edit the data saved on the US fl ash
driv e.F or th e f ront p iece, com b ine th e AR- P102 p attern ( 2 p ieces) and a rectangl e ( 3. 58” b y 1. 18” ) .At “ Al ign Ob j ect, ” sel ect “ Middl e” and arrange th e item s, th en ungroup AR- P102 and w el d th e tw o f ram es and th e rectangl e.Built-in Pattern: AR-P102CanvasWorkspace Built-in Pattern: RectangleNote: The actual size of the rectangle is 1.02” (with overlap of 0.08”
on either side for welding). F or th e b ack p iece, ( AR- P102) , edit it to l eav e onl y th e b order, and cop y to m ak e tw o p ieces.Al so m ak e a rectangl e ( 3. 58” b y 1. 34” ) .Built-in Pattern: AR-P102CanvasWorkspace Built-in Pattern: RectangleNote: The actual size of the rectangle is 1.02” (with overlap of 0.08”
on either side for attaching).
1
2
Mount th e l eath er on th e m at and cut it. G l ue togeth er th e th ree b ack p ieces, th en al l ow th em to dry com p l etel y .Finished size: 6.06” by 11.50”
3
4
F irst sew th e op enings on th e f ront and b ack p ieces, th en p ut th e tw o p ieces togeth er and sew th e l ocations oth er th an th e op enings.
5
Tip
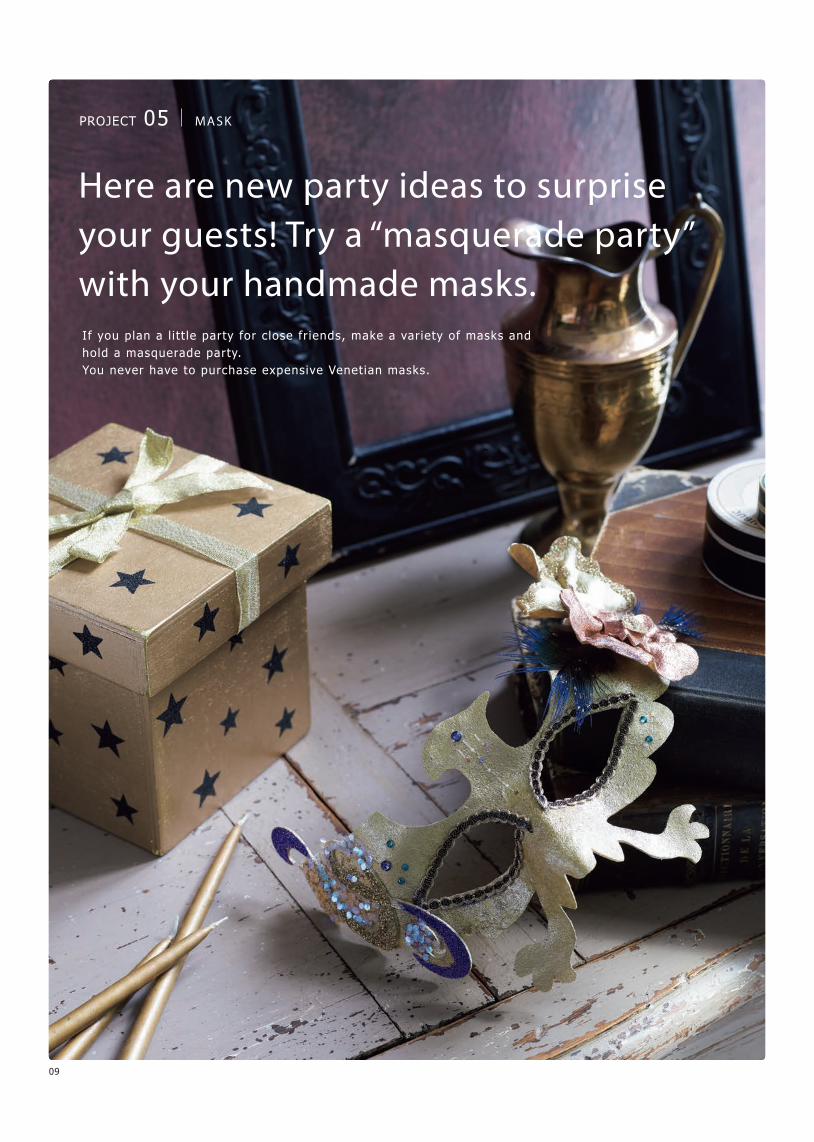
09
Here are new party ideas to surprise your guests! Try a “masquerade party” with your handmade masks.I f y ou p l an a l i tt l e p art y f or c l ose f r iends , m a k e a v ar iet y o f m as k s and h o l d a m as q uerade p art y . Y ou ne v er h a v e to p urc h ase e x p ensi v e V enetian m as k s .
PROJECT 05 MASK

10
1
3
5
2
4
Tak ing care not to b urn y oursel f , y ou can create a three-dimensional effect for the flower pieces by holding the flower with your left hand and using y our righ t h and to b end th e p etal s to f orm th em .
PROJECT 05MASK
Mater ia lT hermopl asti c ( heat- f orm pl asti c) sheet , sp ray p aint, l am é , b eads or th e l ik e, decorativ e tap e, m ask or m anneq uin h ead, al um inum f oil , cook ing p ap er, gl ue, iron, h air dry er, curl ing iron, etc.
Note: Ref er to m anuf acturer’ s instructions f or th erm op l astic sh eet.
U sing Scan to Cut D ata, scan th e ey e area on p age 21. Al so cut th e AR- J012 and AR- A019 p ieces.Built-in Patterns: AR-J007, AR-J012, AR-A019 U se th e al um inum f oil to cov er th e area of th e m ask or m anneq uin h ead th at y ou w ant to use as th e f ace m ol d. Pl ace th e p l astic sh eet th at w il l b ecom e th e m ask b etw een tw o p ieces of cook ing p ap er, th en h eat it using th e iron.
1
2
U se caution w h en using th is m aterial , as it m ay b e h ot. Pl ace th e sof tened p l astic sh eet on th e face mold and mold it to form well-defined facial f eatures. Al l ow th e p l astic sh eet to cool and h arden, th en rem ov e it f rom th e f ace m ol d. U se th e h air dry er ( or oth er h eating im p l em ent) to w arm th e AR- J012 p iece, th en b end it to th e sh ap e of th e m ask ’ s rim . W arm th e AR- A019 p ieces and sh ap e th em b y h and.
3
4
U se th e sp ray p aint to col or th e p ieces. W h en th ey h av e dried, use th e adh esiv e to attach l am é and oth er decorativ e item s.
5
Tip

11
Nothing is more elegant than delicate lace patterns.I f y ou w ant to add a su b t l e and f e m inine touc h to y our p ro j ect , tr y t h ese Tattered L ace p atterns . L oo k s too co m p l icated ? Not at a l l !
PROJECT 06 TAT TERED LACE BOX
©Craft Channel Productions LTD.

12
1
3
5
2
4
6
W el d m ul tip l e Tattered L ace p atterns togeth er f or a uniq ue, f ancy design.
PROJECT 06TAT TERED LACE BOX
Mater ia lPap er, v el l um p ap er, adh esiv e, f eath ers, b eads
- Accessories sol d sep aratel y Tattered L ace Pattern Col l ection 2 Tattered L ace Pattern Col l ection 5 Tattered L ace Pattern Col l ection 7
Purch ase th e Tattered L ace Pattern Col l ection and enter th e activ ation code on th e activ ation card.
I n Canv asW ork sp ace, edit “ Tattered L ace Pattern Col l ection 5” ( No. P05014) .Remove the lines for the body of the butterfly ( sh ow n b y th e red circl es) .Cal l up th e scanned data ( b ox on p age 24) in Canv asW ork sp ace.Arrange the edited butterfly and other parts with th e b ox and sav e th e data. Cut the bo you have laid out with the butterfly and oth er p arts.
Prep arations
1
2
Cut th e v el l um p ap er into a sq uare ( 8. 7 8” x 5. 98” ) .Attach th e cut v el l um to th e b ack of th e b ox . Assemble the bo , and bend the butterfly wings at th eir b ase to angl e th em sl igh tl y up w ard. U sing adh esiv e, decorate b y attach ing th e oth er p arts cut f rom th e oth er p ap er.
3
4
Cut “ Tattered L ace Pattern Col l ection 7 ” ( No. P07 009) , and attach it to th e surf ace of th e cut b ox using adh esiv e. I n Canv asW ork sp ace, edit “ Tattered L ace Pattern Col l ection 2” ( No. P02004) .Ov erl ay a rectangl e ( 2. 83” x 3. 94” ) b y ab out 0. 08” and w el d, th en add tw o b rok en l ines ( l eav ing a 0. 7 9” m argin f or attach m ent and a 1. 97 ” p ortion corresp onding to th e th ick ness of th e b ox ) , th en cut.Attach th is using adh esiv e so as to cov er th e b ox .
5
6
Tip
©Craft Channel Productions LTD.

13
Add a magical touch to the celebration that kids will love!T h is co l or f u l p a p er gar l and is t h e p er f ect d é cor f or a k id ’ s p art y . C h oose h is or h er f a v or ite co l ors o f p a p er and en j o y m a k ing t h e m !
PROJECT 0 7 GARLAND BANNER

14
1
3
5
2
4
6
F or greater f estiv e ap p eal , use a v ariety of dif f erent f onts f or cutting th e l etters.
PROJECT 0 7GARLAND BANNER
Mater ia lN onw oven f ab ri c , p ap er, l am é sh eet, adh esiv e, tap e, fishing line, string, sewing thread, sewing machine, rib b on
Cut th e needed num b er of circul ar p ieces ( 2. 36” ) f or th e f our- p iece round p arts. F ol d th e circul ar p ieces in h al f and attach th e h al v es to one anoth er using adh esiv e, sandw ich ing th e string in th e center of th e attach ed p ieces.
1
2
Cut th e nonw ov en f ab ric into circul ar p ieces m easuring 1. 97 ” , 1. 57 ” , and 1. 18” in diam eter. U sing straigh t stitch ing, sew on p ieces in v arious com b inations of col ors and sizes.
3
4
Cut th e b uil t- in p attern l etters using th e l am é sh eet, and al so cut th e cardb oard.Ap p l y adh esiv e to each p iece and attach th e p ieces.Tape the fishing line to the backs. Curl rib b on and attach it to decorate th e garl and.
5
6
Tip
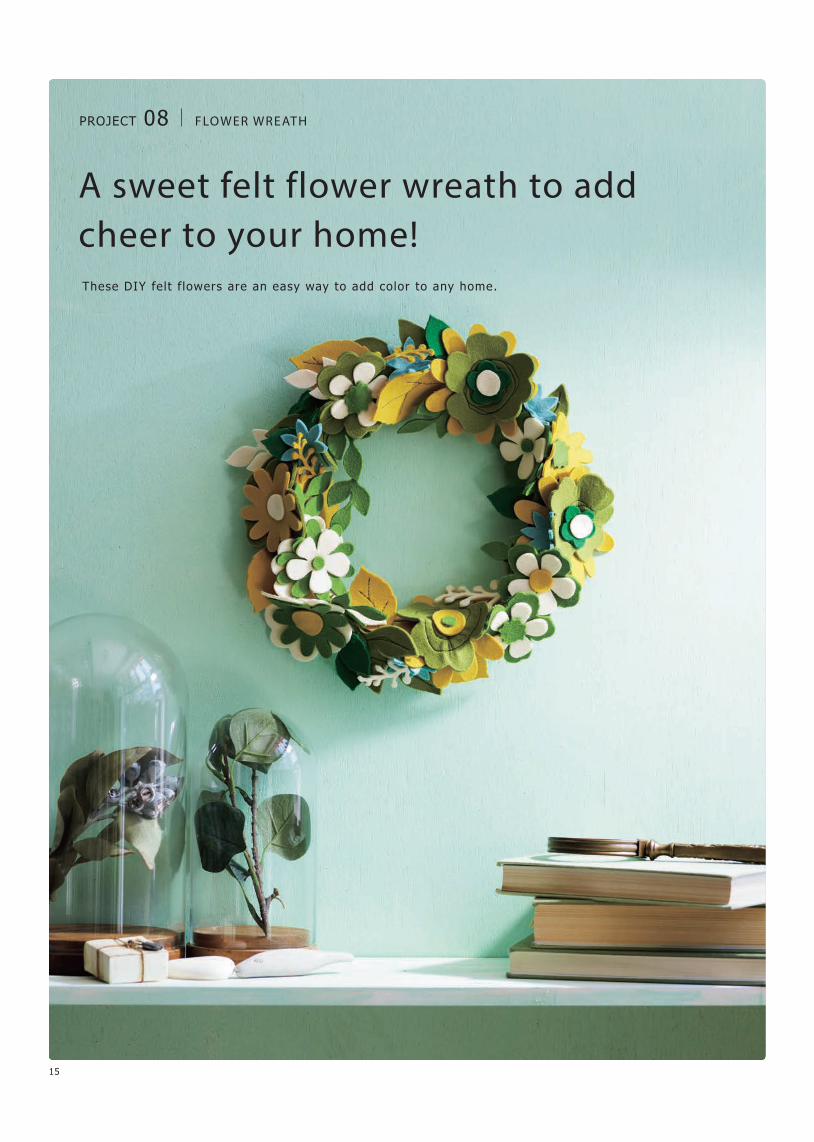
15
A sweet felt flower wreath to add cheer to your home!T h ese D I Y f e l t f l o w ers are an eas y w a y to add co l or to an y h o m e .
PROJECT 08 FLOWER WREATH

16
1
3
5
2
4
6
Attach ing corresp onding p arts b ack to b ack using adh esiv e can giv e th e w reath m ore of a th ree- dim ensional f eel .
PROJECT 08FLOWER WREATH
Mater ia l3 - mm f el t , 2 - mm f el t , 10” w reath , gl ue gun, sew ing th read, sew ing m ach ine, iron, iron- on f ab ric ap p l i q ué sh eets
- Accessories sol d sep aratel y I ron- on f ab ric ap p l i q ué contact sh eet
Select the built-in patterns for the flowers and l eav es. Pick th ree or so dif f erent sizes f or each , and cut five of each part.( Note th at som e of th e circul ar sh ap es m igh t not b e used. )Built-in Patterns: AR-A102 (1.97” x 1.97”), AR-A013 (3.94”, 2.76”),
AR-A015 (1.97” x 1.97”), AR-A017 (1.30” x 1.34”), AR-A019 (2.68” x 2.64”), AR-A020 (3.15” x 3.11”), AR-A024 (2.76” x 1.54”, 1.97” x 1.10”), AR-A027 (2.56” x 1.38”), AR-A034 (3.15” x 1.50”, 2.36” x 1.10”), AR-A102 (1.97” x 1.97”)
U se th e iron to attach th e iron- on f ab ric ap p l i q ué contact sh eet to th e f el t p ieces.
1
2
Cut th e f el t. Em b el l ish som e of th e cut f el t p ieces b y stitch ing th e p ieces using th e sew ing m ach ine to f orm p etal p ieces into ap p eal ing sh ap es and create v eins in l eaf p ieces.
3
4
Starting with the larger flower pieces, attach the flower pieces to the wreath using the glue gun, giv ing th ough t to creating a b al anced arrangem ent. W h en attach ing th e p ieces, instead of positioning the flowers so that they all face in th e sam e direction, arrange th e p etal s and l eav es to sim ul ate m ov em ent.
5
6
Tip

17
Capture the beauty of the light by creating these suncatchers. Beauti f u l stained - g l ass m o b i l es are no w eas y to m a k e . T h ese are m ade w i t h co l or f i l m s h eets and p a p er — s i m p l e and eas y .
PROJECT 09 STAINED GLASS MOBILE

18
1
3
5
2
4
6
Y ou can al so create a l ov el y m ob il e b y using th e b uil t- in p atterns.Edit a h al f - circl e l oop f or h anging onto th e top of b uil t- in p attern AR- P105.
PROJECT 09STAINED GLASS MOBILE
Mater ia lBl ack paper ( constru cti on paper) , col ored f i l m/pl asti c sheets ( colors), adhesive, fishing line, decorativ e ch arm item s, crim p b eads, cl am p - on b eads, m etal craf t rings, needl e- nose p l iers
U sing Scan to Cut D ata, scan th e cop y scanning im age A on p age 23.Cop y th e data and m ak e a m irror im age of one cop y .Cut th e p ieces to m ak e th e b l ack b ase p arts. Scan, cop y , and cut scanning im age B in th e sam e w ay . U sing Scan to Cut D ata, scan th e scanning im age A’ on p age 23.Cut th e necessary num b er of col ors f rom th e film sheets. Scan and cut scanning image in th e sam e w ay .
1
2
Ap p l y adh esiv e to th e b ack of one b l ack b ase part. Arrange the cut colored film pieces on the base part, placing them so that the film pieces do not p rotrude b ey ond th e edges of th e b ase p art. Ap p l y adh esiv e to th e b ack of th e b l ack b ase part, then carefully overlay it on the first base part to attach it, sandwiching the colored film p ieces b etw een th e b ase p arts.
3
4
ass fishing line through the assembled base p arts, th en use th e needl e- nose p l iers to crim p th e b eads to h ol d th e p arts in p l ace. Th read th e decorativ e ch arm item s onto th e fishing line, then thread on crimp beads, cl am p - on b eads, and m etal craf t rings and attach b el ow th e stained- gl ass p ieces.
5
6
Tip

19
The per fect tool to create model buildings.Precision cutting b oard is k e y to a q ua l i t y m ode l ! Cut and b ui l d m iniatures and p rotot y p es — good f or p ro f essiona l arc h i tects .
PROJECT 10 HOUSE CLOCK MODEL
20
1
3
5
2
4
6
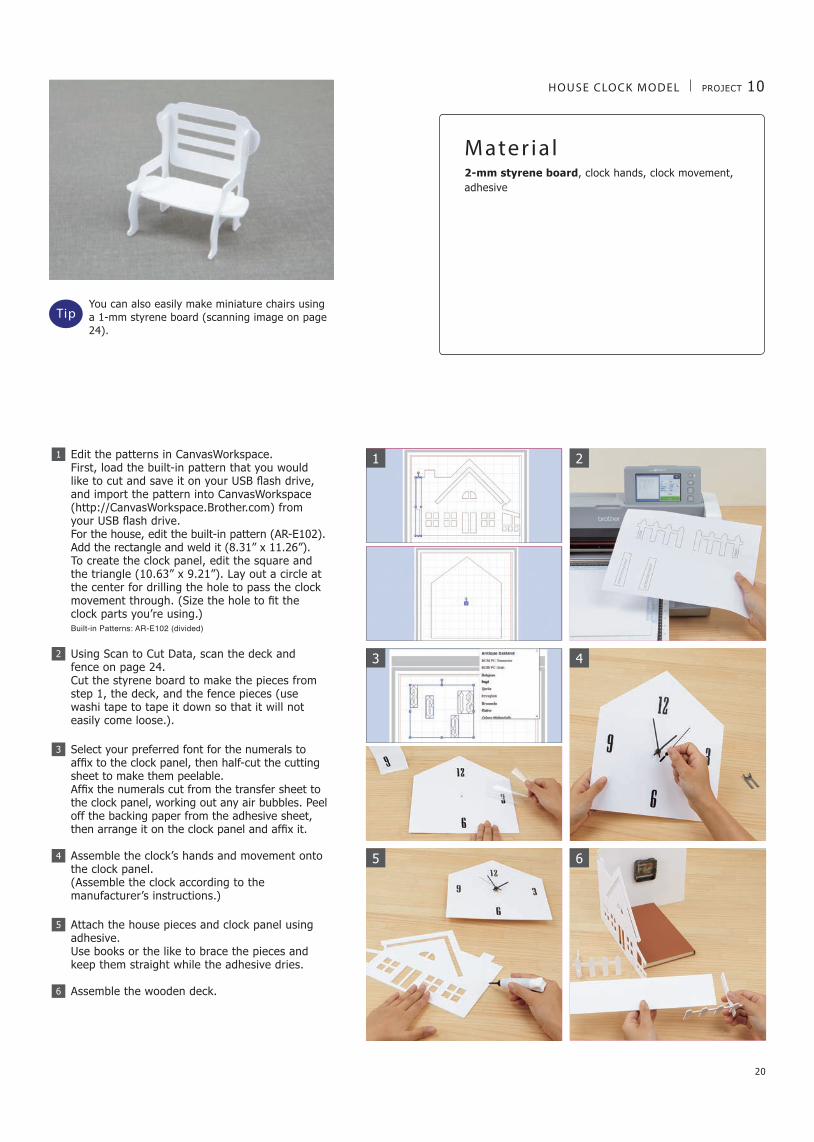
Y ou can al so easil y m ak e m iniature ch airs using a 1- m m sty rene b oard ( scanning im age on p age 24) .
PROJECT 10HOUSE CLOCK MODEL
Mater ia l2 - mm sty rene b oard , cl ock h ands, cl ock m ov em ent, adh esiv e
Edit th e p atterns in Canv asW ork sp ace.F irst, l oad th e b uil t- in p attern th at y ou w oul d like to cut and save it on your US flash drive, and im p ort th e p attern into Canv asW ork sp ace ( h ttp : / / Canv asW ork sp ace. Broth er. com ) f rom your US flash drive.F or th e h ouse, edit th e b uil t- in p attern ( AR- E102) . Add th e rectangl e and w el d it ( 8. 31” x 11. 26” ) .To create th e cl ock p anel , edit th e sq uare and th e triangl e ( 10. 63” x 9. 21” ) . L ay out a circl e at th e center f or dril l ing th e h ol e to p ass th e cl ock movement through. (Si e the hole to fit the cl ock p arts y ou’ re using. )Built-in Patterns: AR-E102 (divided) U sing Scan to Cut D ata, scan th e deck and f ence on p age 24.Cut th e sty rene b oard to m ak e th e p ieces f rom step 1, th e deck , and th e f ence p ieces ( use w ash i tap e to tap e it dow n so th at it w il l not easil y com e l oose. ) .
1
2
Sel ect y our p ref erred f ont f or th e num eral s to affi to the clock panel, then half-cut the cutting sh eet to m ak e th em p eel ab l e.Affi the numerals cut from the transfer sheet to th e cl ock p anel , w ork ing out any air b ub b l es. Peel of f th e b ack ing p ap er f rom th e adh esiv e sh eet, then arrange it on the clock panel and affi it. Assem b l e th e cl ock ’ s h ands and m ov em ent onto th e cl ock p anel .( Assem b l e th e cl ock according to th e m anuf acturer’ s instructions. )
3
4
Attach th e h ouse p ieces and cl ock p anel using adh esiv e.U se b ook s or th e l ik e to b race th e p ieces and k eep th em straigh t w h i l e th e adh esiv e dries. Assem b l e th e w ooden deck .
5
6
Tip

21
ORNAMENTS
Custom Designs for All Your Creative Needs.
PROJECT 01 WOVEN BASKE T65% reduction size
Page 02
PROJECT 05 MASK100% sizePage 10
PROJECT 02CHRISTMAS SCENE50% reduction size
Page 04

22
PROJECT 03 WALL DECORATION 50% reduction size
Page 06
Custom Designs for All Your Creative Needs.

23
ORNAMENTS
PROJECT 09STAINED GLASS MOBILE
65% reduction sizePage 18
A
B
A'
B'
PROJECT 10HOUSE CLOCK MODEL50% reduction size
Page 20

24
PROJECT 06TAT TERED LACE BOX35% reduction size
Page 12
PROJECT 10HOUSE CLOCK MODEL50% reduction size
Page 20

25
APPL I CATI ON
Why try CanvasWorkspace?
“CanvasWorkspace for PC” is a PC-based application that combines the versatility of your favorite design software and the power of your Brother cutting machines. See what you can do with it!
- Create unique cut fi les by using bul i t- in patterns and premium patterns offline l ike rhinestone, stamp, l ine or region embossing, and foi l ing.
- Use fonts already instal led on your computer.- Import .svg and convert to . fcm format.- Enjoy premium funct ions such as rhinestone, st icker, and Rol l Feeder.- Trace image files (. jpg, .gi f, .png, .bmp) to create cut data by three
image tracing methods.- Send data to the machine and import data from the machine via the
Internet.
As of August, 2018

26
Why try CanvasWorkspace?
- Free project — access to hundreds of projects that include recipes, v ideos and cut fi les (Internet connect ion is neccesary).
Download the new version from http://CanvasWorkspace.Brother.com

2018 BROTHER INDUSTORIES, LTD. NAGOYA, JAPAN2018 Broth er I ndustries, L td. Al l righ ts reserv ed. Al l inf orm ation correct at tim e of p rinting
Al l item s in th is catal og, ex cep t th e p roj ects, are p h oto p rop s.