project 18: cardboard boomerangs - no starch press · pdf file218 | project 18 boomerangs are...
TRANSCRIPT

Owing to the prevalence of untuned, Styrofoam toy-store boomerangs, genera-tions of American children wrongly grow to believe that building and throwing boomer-angs is very difficult. This flies in the face of reason: Using less-than-ideal materials, human beings have been building, throw-ing, and catching returning boomerangs for more than 11,600 years. The oldest boomer-angs found thus far were recovered from the Wyrie Swamp in Australia—but boomer-angs aren’t unique to Australia. And despite the impressions you may have gotten from Mad Max and Crocodile Dundee, returning boomerangs were never used as weapons; they are, in fact, among humanity’s longest-standing ways of showing off.
Snip, Burn, Solder, Shred© 2010 by David Erik Nelson

218 | Project 18
Boomerangs are absurdly easy to make—this is an ideal project to keep kids busy in a pinch. Learning to throw one is just a little tricky, but most of the trick is in properly tuning the boomerang. The easiest boomerangs for beginners to craft and throw are quad-bladers. This project includes two quad-blade designs. The first is a poster board Fast-Catch Boomerang. Fast-catch boomerangs usually have more than three wings and are characterized by a tight flight pattern and quick return. This design is ideal for indoor boomerang play and also good for juggling (catch-ing and tossing two boomerangs in sequence so that one is aloft at all times). The second design is a slightly heartier cardboard Cross-Stick Boomerang, suitable for outdoor use. Cross-stick boomerangs, as the name suggests, are made from two separate wings connected at the hub, rather than being cut in a single piece.
Boomerang Hunting
Although returning boomerangs are crummy weapons—they’re generally too
light to kill anything and far too hard to aim—they are used for hunting birds.
Hunters erect broad, low nets near large flocks and then approach from the
other side. They throw boomerangs over the flock, which mistake the gyring
toys for swooping birds of prey. The panicked flock flees low across the mead ow
and gets snared in the nets. Incidentally, bats can often be goaded into attack-
ing tri-blade boomerangs, as the sound of the spinning blades can be similar in
frequency to that of large moths’ wings.
Many cultures, including Australian Aborigines, do use non-returning
boomerangs for hunting. These heavier tools are more often (and less confus-
ingly) called rabbit sticks, throw sticks, or, in Australia, kylies. They are heavy
and have a biconvex airfoil—that is, both the top and bottom of the wing are
curved; our Cardboard Boomerang wings, on the other hand, are only curved
along the top, as are most conventional airplane wings. Thrown parallel to the
ground with a spin, throw sticks are stable in flight and can go a long way, with
the intent of crippling an animal’s legs so that the hunter can capture and blud-
geon it. The oldest known throw stick was discovered in Poland’s Oblazowa
Cave. Made from a split mammoth tusk, it was more than 20,300 years old.
Snip, Burn, Solder, Shred© 2010 by David Erik Nelson

Cardboard Boomerangs | 219
Tools scissors or a hobby knife
a ruler
a pencil or pen
Supplies for the Fast-Catch Boomerang: poster board or similar lightweight card-
board (Large cereal, donut, or cake boxes are ideal, as are 24-pack beer cases.)
for the Cross-Stick Boomerang: lightweight corrugated cardboard roughly 1/32" thick, e.g., a pizza box
clear packing tape
FIGURE 18 -1: The finished boomerangs: the indoor Fast-Catch Boomerang on the left, and the outdoor Cross-Stick Boomerang on the right
Snip, Burn, Solder, Shred© 2010 by David Erik Nelson

220 | Project 18
Building the Fast-Catch Boomerang
FIGURE 18 -2 : Tools and supplies
FIGURE 18 -3 : Several cardboard Fast-Catch Boomerangs
Snip, Burn, Solder, Shred© 2010 by David Erik Nelson

Cardboard Boomerangs | 221
Step 1 Using a straight edge, draw a 1' by 1' plus sign on the poster board; these two strokes will serve as guidelines. They should be perpendicular but don’t drive yourself nuts if the lines are a little skewed.
Step 2 Add 2" crossbars to the ends of each stroke, as in Figure 18-4. (In heraldry, this is called a cross potent and is the same as the central figure in a Crusaders’ cross design.)
Step 3 Connect the 2" crossbars on either end of each stroke, resulting in a 1' plus sign with 2" thick arms. Cut out this giant plus sign (Figure 18-5).
Step 4 Trim off the corners of each blade: Measure and mark 1/4" on the side and top of the blade at each corner, and cut off the corner diagonally, as indicated in Figure 18-6.
Step 5 Now we’re going to cut out the hub. Notice that the lines you added in Step 3 resulted in a 2" box at the center of the boomerang. Mark 1/4" along each of the original axes, measuring from the edge of this box towards the center of the boo-merang, as illustrated in Figure 18-7. Connect these four points, and then cut out the cocked 1" by 1" square you’ve drawn.
FIGURE 18 - 4: The cross potent boomerang skeleton
Snip, Burn, Solder, Shred© 2010 by David Erik Nelson

222 | Project 18
FIGURE 18 -5: The blank for the Fast-Catch Boomerang
FIGURE 18 -6: Marking the corners for trimming; you’ll snip the corner along the dashed line.
Snip, Burn, Solder, Shred© 2010 by David Erik Nelson

Cardboard Boomerangs | 223
Step 6 Decide which side of the Fast-Catch Boomerang you want to think of as the “face” and mark it. If you throw right-handed, then viewing the Fast-Catch Boomerang face up, the left edge of each blade is its leading edge. (Imagine the Fast-Catch Boomer-ang on the right side of Figure 18-8 spinning counterclockwise, and it all makes sense.) Left-handed throwers will be spinning the Fast-Catch Boomerang clock-wise, so their leading edges will be on the right side of each blade.
FIGURE 18 -7: Measuring for the hub cutout
FIGURE 18 -8 : The Fast-Catch Boomerang on the left shows the leading edge for left-handed throwers; the one on the right shows the leading edge for right-handed throw-ers. Leading edges are shaded, and quarter lines, described in Step 7, are dashed.
Snip, Burn, Solder, Shred© 2010 by David Erik Nelson
224 | Project 18
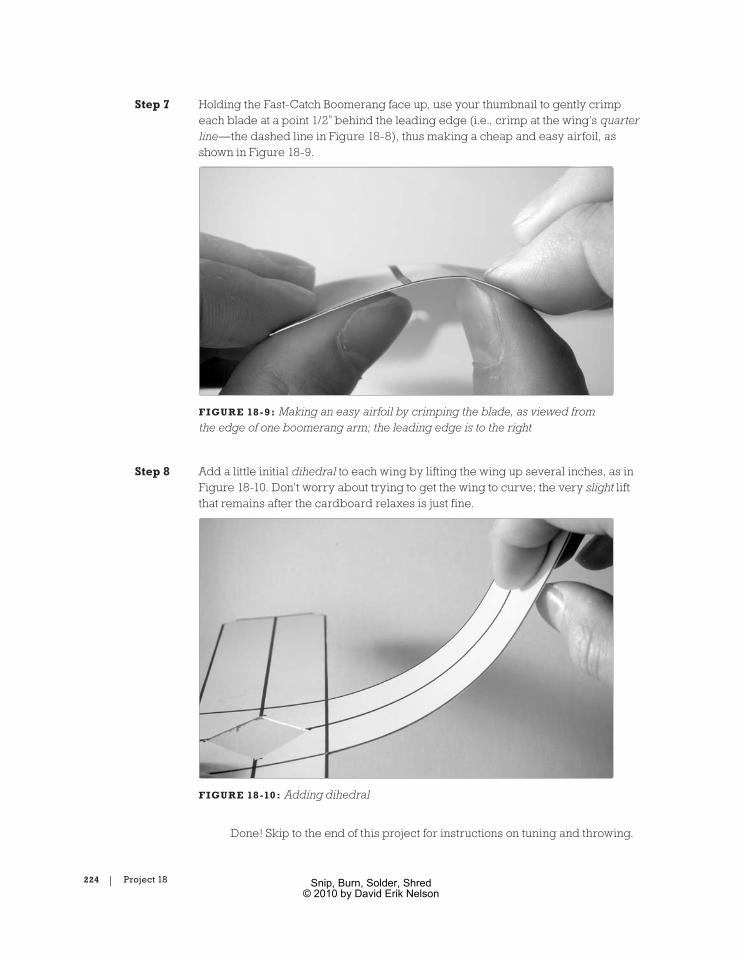
Step 7 Holding the Fast-Catch Boomerang face up, use your thumbnail to gently crimp each blade at a point 1/2" behind the leading edge (i.e., crimp at the wing’s quarter line—the dashed line in Figure 18-8), thus making a cheap and easy airfoil, as shown in Figure 18-9.
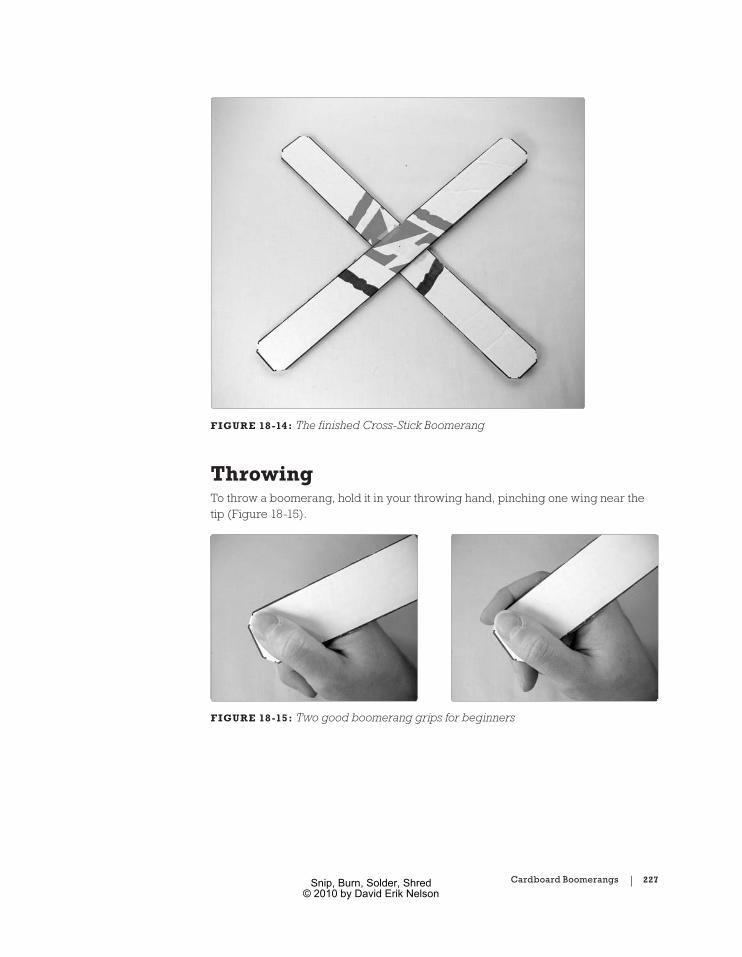
Step 8 Add a little initial dihedral to each wing by lifting the wing up several inches, as in Figure 18-10. Don’t worry about trying to get the wing to curve; the very slight lift that remains after the cardboard relaxes is just fine.
Done! Skip to the end of this project for instructions on tuning and throwing.
FIGURE 18 -9 : Making an easy airfoil by crimping the blade, as viewed from the edge of one boomerang arm; the leading edge is to the right
FIGURE 18 -10 : Adding dihedral
Snip, Burn, Solder, Shred© 2010 by David Erik Nelson

Cardboard Boomerangs | 225
Building the Cross-Stick Boomerang
Step 1 The Cross-Stick Boomerang is even easier to make than the Fast-Catch Boomerang. Cut two 14" by 1 1/2" rectangles from the corrugated cardboard (Figure 18-12).
FIGURE 18 -11: Several Cross-Stick Boomerangs
FIGURE 18 -12 : The blanks for the Cross-Stick Boomerang
Snip, Burn, Solder, Shred© 2010 by David Erik Nelson

226 | Project 18
Step 2 As with the Fast-Catch Boomerang, trim the corners of each stick at a 45-degree angle by marking 1/4" from the corner along both the side and top, and then snip-ping off that corner (see Figure 18-13).
Step 3 Use strips of tape to secure the two blades, one strip front, one strip back. Try to center the arms and tape, as in Figure 18-14, but don’t make yourself crazy: card-board boomerangs are very forgiving flyers.
Step 4 As in Steps 6 and 7 for the Fast-Catch Boomerang, decide which side of the Cross-Stick Boomerang will be the face, and then crimp each wing at its quarter line. Remember, this is going to be different for right and left handers; see Figure 18-8. It’s okay if the airfoil is hardly perceptible; aerodynamically, a little goes a long way.
Step 5 Add a touch of dihedral as explained in Step 8 of the Fast-Catch Boomerang.
Now you can move on to tuning and throwing.
FIGURE 18 -13 : Measuring and snipping a corner
Snip, Burn, Solder, Shred© 2010 by David Erik Nelson
Cardboard Boomerangs | 227
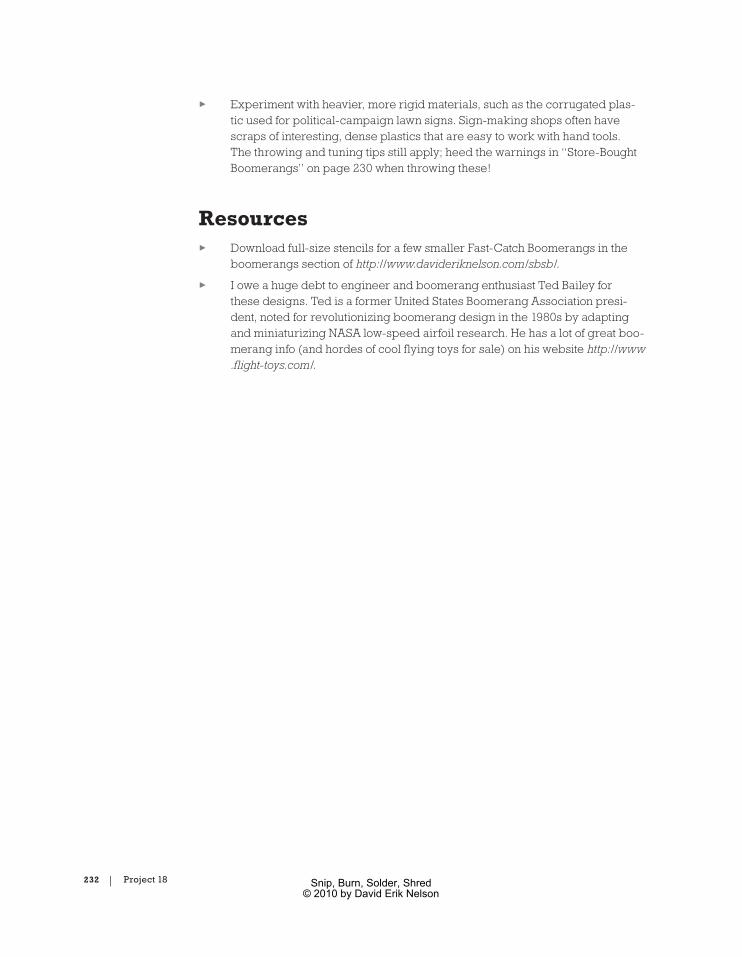
ThrowingTo throw a boomerang, hold it in your throwing hand, pinching one wing near the tip (Figure 18-15).
FIGURE 18 -14: The finished Cross-Stick Boomerang
FIGURE 18 -15: Two good boomerang grips for beginners
Snip, Burn, Solder, Shred© 2010 by David Erik Nelson

228 | Project 18
Cock your arm back so that the boomerang is vertical, with its face toward your head. Throw with a flick of the wrist, being sure to keep the boomerang verti-cal throughout your throw. Ideally, the Fast-Catch Boomerang will stay vertical and travel straight for a couple yards, then begin to curve to the left (for a right-handed thrower). It then lays over (leans into a more horizontal position) as it comes into its return curve, so that it ultimately is hovering horizontally in front of you, where you can easily catch it by sandwiching it between your horizontal hands. The Cross-Stick Boomerang tends to climb higher (10 or 12 feet from the ground, rather than the straight path of the Fast-Catch Boomerang) and go out further (perhaps 20 feet) before starting its return.
In very still air, you may find the boomerang is returning inconveniently far in front of you (following a path like a question mark). If this is the case, try throwing with some layover—angling the boomerang a few degrees away from your head, as illustrated in Figure 18-16. Since the boomerang naturally lays over as it goes into its return curve, throwing with some layover will put it into its turn sooner.
When throwing outside, throw a bit off-center of the wind. Aim about 45 degrees to the right of the wind if you’re right-handed and likewise to the left if you’re left-handed. As a rule, if there’s more wind, you need less layover to get a good return.
Throwing and tuning go hand in hand. Once you’ve finished your boomer-ang, give it a few tosses, and then start tuning to get better performance.
back of head back of head
FIGURE 18 -16: Normal throwing position (left) and throwing with a little layover (right), as viewed from behind a right-handed thrower
Snip, Burn, Solder, Shred© 2010 by David Erik Nelson

Cardboard Boomerangs | 229
TuningHere’s the key to tuning: Tiny, almost imperceptible changes have a dramatic impact on the boomerang’s behavior. Tune the wings one at a time, making a single change (e.g., adding a little dihedral or positive attack), give it a test toss, then tune some more.
There are three aspects to tuning: dihedral, positive attack, and weight:
Dihedral is a curving of the wing so that it doesn’t all lie along a single plane. Increasing dihedral makes the boomerang climb higher, follow a more circu-lar path, and lay over sooner to finish with a long hover (which makes it easier to catch). Adding lots of dihedral makes these light Cardboard Boomerangs travel fast and tight. To add dihedral to a boomerang’s wings, hold the boo-merang by the hub with its face toward you, and pull the wing toward yourself (Figure 18-17).
Positive attack is a twist along the length of the boomerang’s wing, which slows the boomerang down, resulting in a flatter, rounder, lower flight path. To add positive attack, hold the boomerang by its hub with the boomerang’s face up. Looking at the edge of the wing, twist it counterclockwise (for right-handed throwers) or clockwise (for left-handed throwers), lifting the leading edge of the blade (Figure 18-18).
FIGURE 18 -17: Adding dihedral in the field
Snip, Burn, Solder, Shred© 2010 by David Erik Nelson

230 | Project 18
Adding weight increases momentum, resulting in a longer, more elliptical flight. The easiest way to add weight to a boomerang is by taping pennies to one or more wings. The effect will be more pronounced as you put the weight further toward the tip. Add weight to one wing at a time. It’s easiest to throw a weighted Cardboard Boomerang if the heaviest arm is directly opposite the one you are holding when you throw.
And, of course, if any of these behaviors are too pronounced, you can always decrease dihedral and attack. You can even try a negative dihedral or attack, which rarely work with these multi-bladers but can be useful with some more exotic store-bought boomerangs.
Store-Bought BoomerangsAll of this tuning and throwing advice holds true for any store-bought boomerang. Bear in mind that tuning a rigid wood or hard plastic boomerang might require heating the boomerang gently over a candle or low gas flame, adjusting the attack or dihedral to your liking, and then holding the wing under cold running water to “fix the tune.”
A heavier boomerang is going to have quite a bit of momentum on its return flight, especially if it climbs high, which will result in a very fast, steep return. The rigid edge of a wood or plastic boomerang can make a mess of eyes, teeth, or soft mucous membranes. Thus, always wear pants when playing with a boomerang, and if you think you aren’t going to make a catch—especially if the boomerang climbs
FIGURE 18 -18 : Adding positive attack for a right-handed thrower
Snip, Burn, Solder, Shred© 2010 by David Erik Nelson

Cardboard Boomerangs | 231
high—then cover your eyes with your palms (which naturally results in the wrists shielding your nose and mouth) and turn away fast.
How It WorksA boomerang is basically a gyroscope made of wings and thus is subject to some quirky physics. Specifically, a boomerang benefits from gyroscopic precession, which is the tendency for a spinning mass to wobble when nudged, rather than fall-ing over. Imagine a bicyclist riding no-handed: As she cruises down the street, she stays upright because the bike’s wheels are a pair of gyroscopes, and their spin-ning gives them stability. If she wants to turn left, she leans left. Now, if this was a stationary wheel, nudging the top of it (as the rider does when she leans) would just knock it over. But since it’s a gyroscope, adding an additional force to the top causes the gyroscope to turn perpendicular to its axis of spin (imagine a top and how it wobbles around its axis instead of just falling over), and the bike magically follows a big leftward looping path.
Since the boomerang is spinning, it’s a gyroscope; this gives it stability in flight. Since the boomerang is a spinning set of wings, forces are acting on it unevenly (just as forces act unevenly on the spinning wheels of the bike when the rider leans). Although the boomerang, as a unit, has a single velocity, each wing has a different velocity relative to that, since the “top” wing is moving forward and the “bottom” moving backward as it spins. Slowly spin your boomerang on your desk while sliding it forward, and you’ll see that the topmost wing is always moving forward and thus is moving a little faster than the unit’s velocity, while the bottom wing is moving backward and thus subtracting its velocity from the velocity of the boomerang as a whole. Identical wings moving at different velocities exert dif-ferent amounts of force, with the faster wing exerting more force. (This is why an airplane can’t just tool along at 24 mph; you need some hustle to break free of grav-ity’s ardent embrace.) So, there is a greater force acting on the top of the spinning boomerang than the bottom. This has the same effect as the bike rider leaning left, pulling the boomerang around in a circular path.
Boomerang DesignNow that you’ve dispelled the magical fog from the boomerang, it’s time to design your own. A few tips:
You want the hub to be lighter than the blades (since a gyroscope functions best when the bulk of its mass is on the outermost edges). It’s best to narrow the blades as they approach the hub or cut a hole in the hub. This also pre-vents premature layover.
Parabolic wing tips are better than flat.
Different materials have different optimal lengths and widths, so experiment. In general, heavier materials mean narrower wings.
Snip, Burn, Solder, Shred© 2010 by David Erik Nelson
232 | Project 18
Experiment with heavier, more rigid materials, such as the corrugated plas-tic used for political-campaign lawn signs. Sign-making shops often have scraps of interesting, dense plastics that are easy to work with hand tools. The throwing and tuning tips still apply; heed the warnings in “Store-Bought Boomerangs” on page 230 when throwing these!
Resources Download full-size stencils for a few smaller Fast-Catch Boomerangs in the
boomerangs section of http://www.davideriknelson.com/sbsb/.
I owe a huge debt to engineer and boomerang enthusiast Ted Bailey for these designs. Ted is a former United States Boomerang Association presi-dent, noted for revolutionizing boomerang design in the 1980s by adapting and miniaturizing NASA low-speed airfoil research. He has a lot of great boo-merang info (and hordes of cool flying toys for sale) on his website http://www.flight-toys.com/.
Snip, Burn, Solder, Shred© 2010 by David Erik Nelson