programming single frame scenarios using...
TRANSCRIPT

Programming Single Frame Scenarios Using Handlers
Barbara Ratliff RN, BSN, MBA, Simulation Specialist
Baptist Health Montgomery
855 E. South Blvd Montgomery, AL 36116 [email protected]
INACSL Conference 6/14/2013
Building a basic foundation of Laerdal SimMan Event Menus, Handlers and Trends is essential to initial scenario development. Included in this handout are the steps to learning how to develop a thorough Event Menu and a basic group of Handlers and Trends to allow for increased functionality during scenario development. These tools can be transferred from one scenario to the next using the single frame scenario rather than the algorithm method that is commonly taught. Once designed, these Event Menus, Handlers and Trends offer simulation personnel unlimited potential for programming a wide variety of scenarios. This handout will guide you through the steps of planning and organizing your Event Menu, designing Handlers and inserting Trends to create automatic responses to Events as they are clicked. The addition debriefing points as Comments in your Handlers makes the scenarios easily transferrable from one instructor to the next. Finally, adapting a basic handler to suit a particular scenario will be covered.

2

3
Programming Single Frame Scenarios Using Handlers
Concepts The process of creating scenarios doesn’t have to be a lengthy ordeal. Nor does it have to involve a complex algorithm with dozens of Frames to cover every possible action by your participant. Single frame scenarios can manage your scenarios through the use of Handlers to manage the manikin’s physiological response to treatments, media, vocal sounds, as well as provide debriefing points. There are simple steps to creating a foundation for programming single frame Scenarios: creating a robust Event Menu; then creating Handlers with appropriate Trends, Media and Comments. Once your foundation has been set, creating a scenario is as simple as creating the Initial State for your scenario, choosing appropriate Handlers and adding Frames for progression of illness as desired. The key to the process is the initial foundation of Handlers. This not only works for SimMan 2G (original), SimJunior, SimBaby, and SimNewB, but can also be used to SimMan 3G and SimMan Essential by using the SimMan Classic Style.
Scenario Editors SimMan 3G/ Essential vs. SimMan, SimJunior, SimBaby, SimNewB
3G/ Essential’s Scenario Editors uses Common Learner Events rather than Event Menus, therefore all Events either have to be rebuilt in 3G/Essential or you can convert scenarios using ‘SimMan classic’ style. The choice is a personal preference based on experience with the programs and foundation of scenarios in each program.
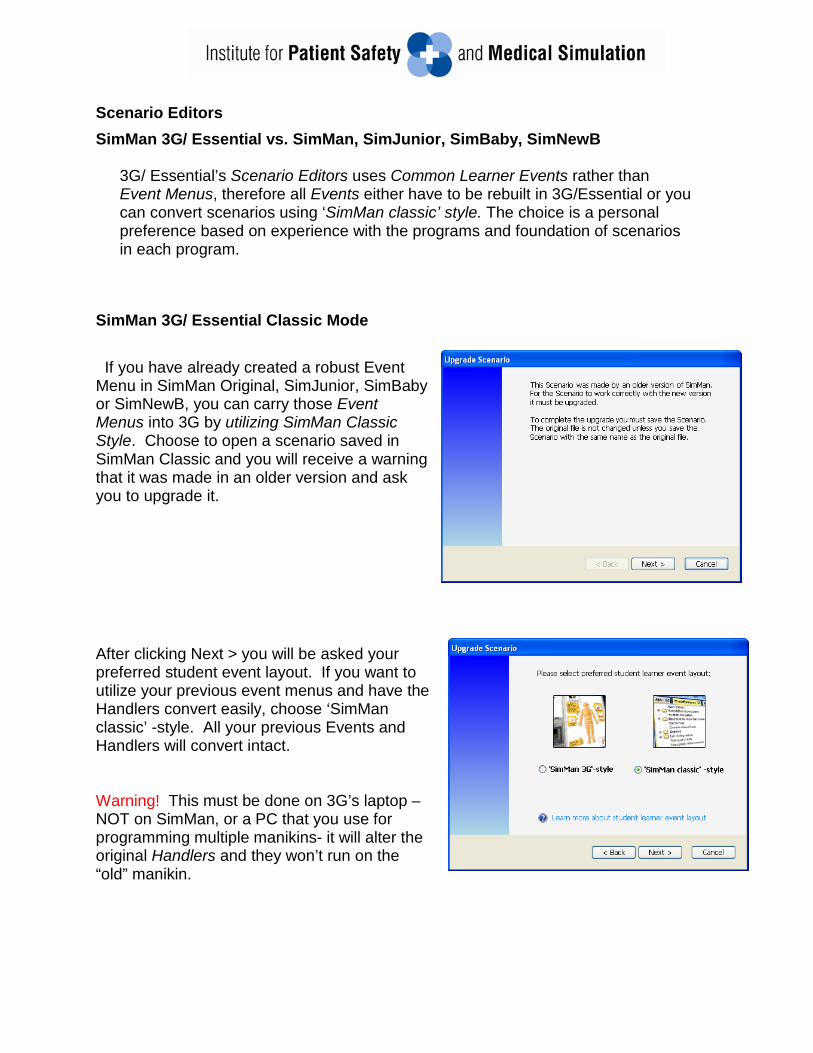
SimMan 3G/ Essential Classic Mode
If you have already created a robust Event Menu in SimMan Original, SimJunior, SimBaby or SimNewB, you can carry those Event Menus into 3G by utilizing SimMan Classic Style. Choose to open a scenario saved in SimMan Classic and you will receive a warning that it was made in an older version and ask you to upgrade it.
After clicking Next > you will be asked your preferred student event layout. If you want to utilize your previous event menus and have the Handlers convert easily, choose ‘SimMan classic’ -style. All your previous Events and Handlers will convert intact. Warning! This must be done on 3G’s laptop – NOT on SimMan, or a PC that you use for programming multiple manikins- it will alter the original Handlers and they won’t run on the “old” manikin.
5
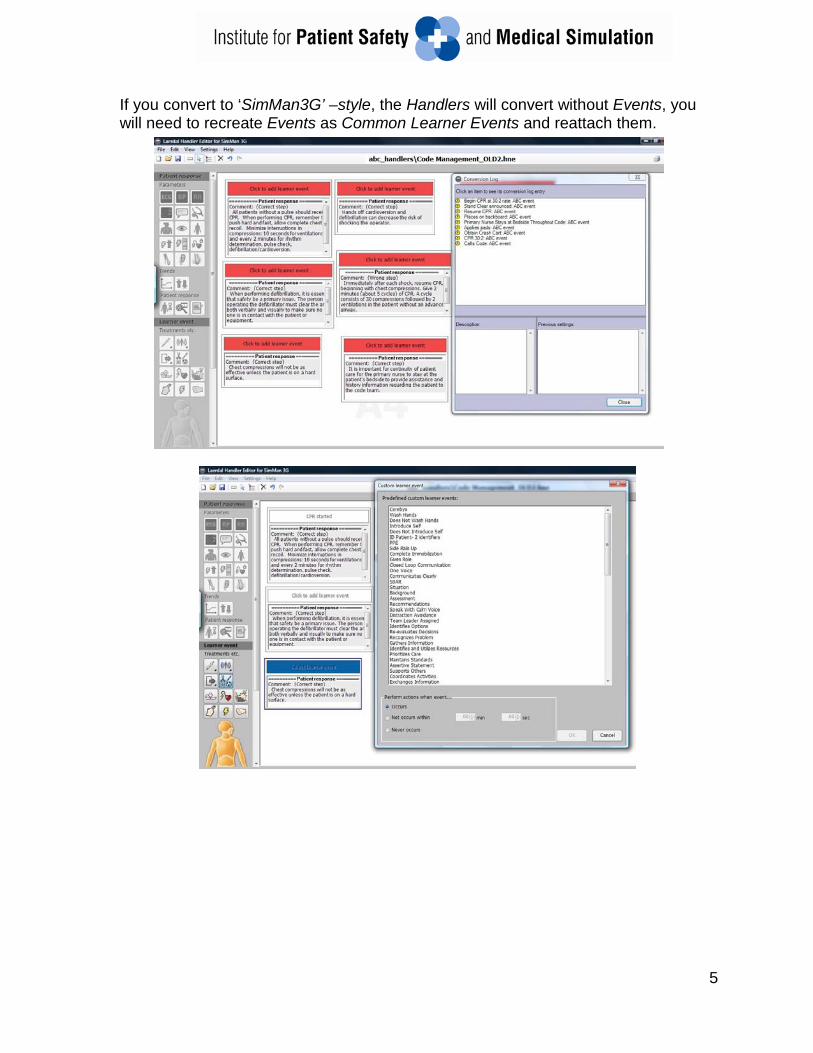
If you convert to ‘SimMan3G’ –style, the Handlers will convert without Events, you will need to recreate Events as Common Learner Events and reattach them.
6
Event Menus/ Custom Learner Events Concepts
1. Creating a robust, organized Event Menu as your Default Menu for all scenarios decreases the amount of work that must be done on each scenario.
2. If all Events are Hidden in your Default Event Menu, only the ones used by the Handlers for that scenario will be displayed.
Tips 1. Include all events used by all scenarios. 2. Choose your naming conventions in advance. Even something as simple as
always capitalizing the first letter of each word can help create a cohesive menu.
3. Organize your menu into logical categories. These categories need to be meaningful to your program and will vary from person to person.
4. When you are done making changes to your Event Menu remember to Save as Default Menu.
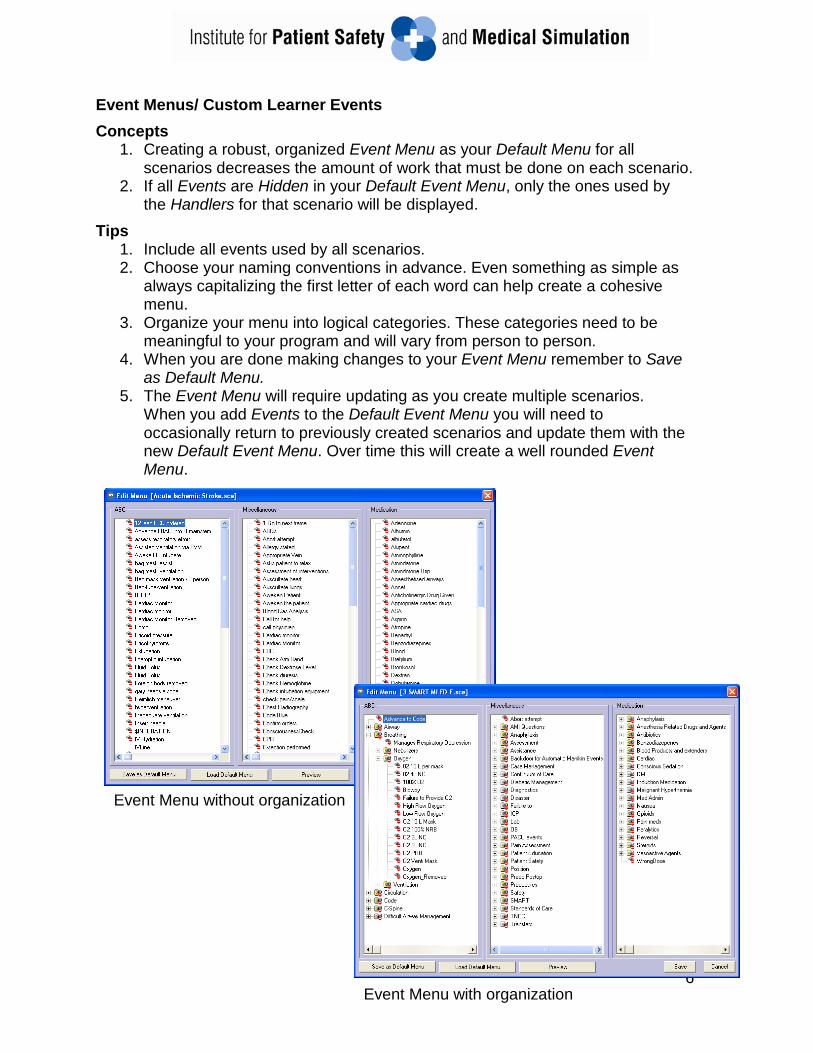
5. The Event Menu will require updating as you create multiple scenarios. When you add Events to the Default Event Menu you will need to occasionally return to previously created scenarios and update them with the new Default Event Menu. Over time this will create a well rounded Event Menu.
Event Menu without organization
Event Menu with organization

7
Practice
1. Create an Oxygen Category for your Event Menu a. Click on the Menu Item Edit b. Choose Edit Event Menu c. Create a main folder Breathing
i. Right click and Add Folder ii. Name – Breathing iii. May click and drag folders to desired location
d. Create a Category of Oxygen i. Right click and Add Folder ii. Name – Oxygen
2. Add Events to Folder a. Right Click on Folder and Add Event b. Suggested Events: Oxygen, 2L NC, 4L NC, 6L NC, 4L Mask, 6L Mask,
8L Mask, 10L Mask, Venti Mask (24%, 26%, 28%, 31%, 35% 40%, 50%, if you want), PRB, 100% NRB, 100%
3. Right click and Sort Alphabetically Sorting will help to organize your events 4. If you need events sequenced in the list- preceding them with a number will
also assist in organization. This will also assist in Debriefing. a. Example: 1-Situation, 2-Background, 3-Assessment, 4-
Recommendation. 5. Right click and Hide All. Since the Handlers will cause your Events to display,
you can use Hide All through all scenarios. This will keep the Event Menus clean in your scenarios as you run them.
Future Practice 1. Create Folders for other types of Events such as Airway, Breathing,
Circulation, Code Management, Assessment, Labs, Diagnostics, Standards of Care, Medication Administration, Antibiotics etc.
2. Add Events to create a well rounded Event Menu 3. Save as Default each time additions are made. 4. Downloaded scenarios from Laerdal SUN etc can be a good source of
Events for the newcomer: a. Download Scenario and Open with Scenario Editor b. Edit Event Menu c. Load Default Event Menu
and Save d. Open Edit Event Menu a
second time e. Events from that Scenario will
appear at the end of your Default Menu
f. Organize and rename new Events according to your naming convention
g. Save as Default Menu

8
3G Custom Learner Event
Although it is not as intuitive, 3G/Essential’s Custom Learner Events can also be utilized. You will utilize the Edit Common Learner Events List function. In this tool you can create your own Custom Learner Events.
Practice
1. Create an Oxygen Group for your Custom Learner Events a. Click on the Menu Item Edit b. Choose Open Common Learner
Events Editor c. Create a Category of Oxygen by
adding a New Group or just Choose O from the ABC List
2. Create New Learner Events a. Click New learner event b. Enter new event c. Suggested Events: Oxygen, O2 2L
NC, O2 4L NC, O2 6L NC, O2 4L Mask, O2 6L Mask, O2 8L Mask, O2 10L Mask, O2 Venti Mask (24%, 26%, 28%, 31%, 35% 40%, 50%, if you want), O2 PRB, O2 100% NRB, O2 100%
3. Highlight each Learner Event and click Add >> to move it over to your Custom List
4. You can Move up and Move down to organize them. Future Practice
1. Create Groups for other types of Learner Events such as Airway, Breathing, Circulation, Code Management, Assessment, Labs, Diagnostics, Standards of Care, Medication Administration, Antibiotics etc.
2. Add Learner Events to create a well rounded Common Learner Event Menu
3. Save each time additions are made.

9
Creating Handlers Concepts Handlers have many advantages in writing scenarios:
1. They can manage the physiologic response regardless of when or how often an Event is used.
2. Debriefing Points can be inserted as comments. 3. They manage the Event Menu for the scenario,
allowing you to have a more robust Event Menu. 4. They can be modified and renamed to suit a
specific scenario. 5. They can be created once and then used in
multiple scenarios, decreasing the time and effort required to write a new scenario.
Tips 1. Create Handlers that are based on a Folder within the Event Menu or a
specific patient problem. 2. Create most frequently used Handlers first. For Example: Oxygen, Airway,
Assessment, Lab, Rad, Medication Administration, etc. Those that will be used in nearly every scenario.
3. Modify Handlers to suit a specific scenario, but rename it before you Save. Example: Oxygen Min Response, MI Oxygen, MI Assessment etc.
4. Comments in Handlers assists Instructors with Debriefing points. Allows all instructors to use a common base for debriefing. Must be updated according to new EBP.
Practice Start with a basic Handler for your Oxygen devices
1. Create a New Handler by opening Edit Handler: Edit> Edit Handler
2. Save the Handler with a general name such as Oxygen. 3. Insert Frames for each Event desired by Clicking Create Frame and clicking
into your field.

10
4. Insert Events from Oxygen Folder into each of the boxes.
5. Note that you can choose Occurs, Not occurs within X minutes/ Seconds or Never Occurs. Use Not Occurs and Never Occurs carefully, an error on the part of simulation personnel in not clicking an Event can cause unwanted effects. Better to have an Event that is built as a negative like Failure to Provide O2.
6. Once you have the Frames and Events built you may add Actions as a response to that Event:
a. Trends to manage the physiological response b. Comments to assist with Debriefing. c. Specific Changes in response to the Event, such as Lung and Bowel
Sounds, rhythm changes, vital sign, airway response. Examples: i. 2nd defibrillation converts to Sinus Bradycardia with BP 50/20,
followed by accompanying Recovery Trend. ii. Chest Tube Event resolves pneumothorax. iii. Glucometer Initial has media of Glucometer with 570;
Glucometer Reassess has media of Glucometer with 415. d. Media such as Labwork or Radiology e. Vocal Sounds – rarely use unless moaning, vomiting etc.
7. Save the Handler frequently as you are working on it.
Future Practice
1. Create other basic Handlers that could be used in all scenarios. Suggestions: Airway, Breathing, Circulation, Assessment, Calling for Assistance, Standards of Care, Medication Administration.
2. As you gain experience and confidence, create more complex Handlers such as those used for medications or Code scenarios.

11
Trends Concepts
1. Trends manage the physiological responses to the event chosen. When the Event is clicked during the running of the scenario, the manikin will automatically respond with the pre-programmed Trend.
2. Allows simulation personnel to focus more on the participant and less on managing the manikin.
Tips 1. Remember that time is somewhat compressed in simulation and participants
expect a more rapid physiological response than normal. 2. Only choose the Parameters that are necessary for that physiological
response. 3. If you know you need multiple Trends that are similar, create and save the
first, then modify and save with a new name and repeat. For example: SpO2 increase – 1%, 2%, 3% and so on.
4. Complex Trends will require many trial runs and adjustments to perfect. Practice
1. Insert trends as appropriate for each Event. a. Click the Trend Icon and then Click in the desired Frame b. Trends selection will open. c. You may choose a current Trend if there is one that is appropriate.
d. Click Edit to create a new Trend i. Ensure only that apply to your desired trend are checked.
Example: Only Check SpO2.

12
ii. Change your trend scale to the time frame that suits your trend. Type 2 into Trend Scale and Click on the Trend below.
iii. A simple Trend may have a single point of change at the end of the Time Frame, i.e. one point at 1:59 with a Value of +2.
iv. A complex Trend may have multiple points as would be needed for an Adenosine administration Trend.
e. Insert Trends into each of your Event Frames. For Example: i. O2 2L NC Insert a trend for the SpO2 to rise 2% over 2 minutes. ii. O2 4L NC Insert a trend for the SpO2 to rise 4% over 2 minutes. iii. O2 6L NC Insert a trend for the SpO2 to rise 6% over 2 minutes. iv. O2 100% NRB Insert a trend for the SpO2 to rise 10% over 2
minutes. 2. Remember, Save the Handler frequently as you are working on it.
Future Practice
1. Create complex Trends such as: a. Adenosine Successful and Adenosine Unsuccessful similar to the one
above. b. Recovery Trends for post resuscitation- with and without return of
spontaneous respirations. c. Nitroglycerin Trends with a normal and a heightened response.

13
Comments
Concepts 1. Comments can be used as a Debriefing guide for
instructors to ensure consistency. 2. Comments can provide the participant with
information and/or reference material if the Debrief is printed.
3. Comments may include reference material such as information on a Policy and Procedure, common concepts or a current reference article.
4. Clicking Correct Step will cause the Comment to have a Green √ next to it and clicking Wrong Step will cause it to have a Red X.
5. You may also choose to assign points to certain Events under Grade. Tips
1. Have appropriate reference material at hand while creating Handlers. 2. Electronic references will lessen typing as Copy/Paste can be utilized.
Practice 1. Insert Comments to be used as Debriefing Points. 2. Click the ! for Comment and Click in the Event Box
14
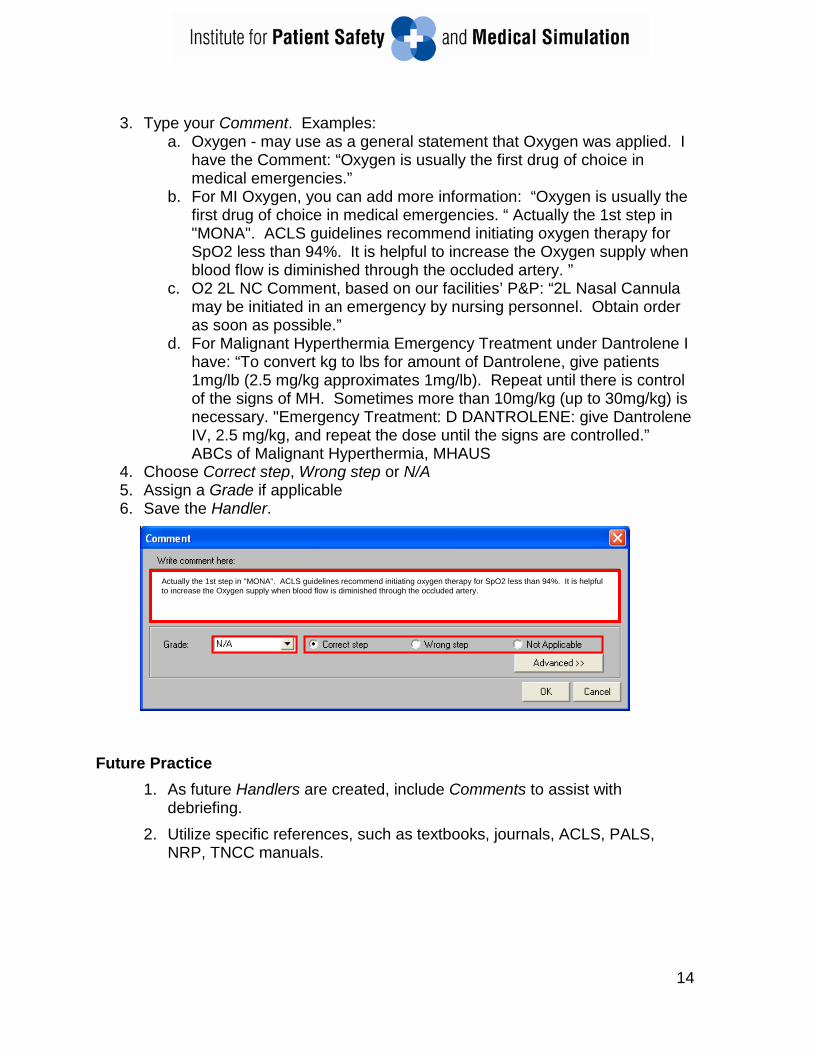
3. Type your Comment. Examples:
a. Oxygen - may use as a general statement that Oxygen was applied. I have the Comment: “Oxygen is usually the first drug of choice in medical emergencies.”
b. For MI Oxygen, you can add more information: “Oxygen is usually the first drug of choice in medical emergencies. “ Actually the 1st step in "MONA". ACLS guidelines recommend initiating oxygen therapy for SpO2 less than 94%. It is helpful to increase the Oxygen supply when blood flow is diminished through the occluded artery. ”
c. O2 2L NC Comment, based on our facilities’ P&P: “2L Nasal Cannula may be initiated in an emergency by nursing personnel. Obtain order as soon as possible.”
d. For Malignant Hyperthermia Emergency Treatment under Dantrolene I have: “To convert kg to lbs for amount of Dantrolene, give patients 1mg/lb (2.5 mg/kg approximates 1mg/lb). Repeat until there is control of the signs of MH. Sometimes more than 10mg/kg (up to 30mg/kg) is necessary. "Emergency Treatment: D DANTROLENE: give Dantrolene IV, 2.5 mg/kg, and repeat the dose until the signs are controlled.” ABCs of Malignant Hyperthermia, MHAUS
4. Choose Correct step, Wrong step or N/A 5. Assign a Grade if applicable 6. Save the Handler.
Future Practice
1. As future Handlers are created, include Comments to assist with debriefing.
2. Utilize specific references, such as textbooks, journals, ACLS, PALS, NRP, TNCC manuals.
Actually the 1st step in "MONA". ACLS guidelines recommend initiating oxygen therapy for SpO2 less than 94%. It is helpful to increase the Oxygen supply when blood flow is diminished through the occluded artery.

15
Inserting Media Concept
1. Inserting Media into your Handler can increase the fidelity of your scenario. 2. Media that is attached to an Event will automatically display when that Event
is clicked during the simulation. Tips Practice
1. If you add it to the Initial state box it will be available immediately: 2. Click on the Media button at left (look like a film reel). 3. Click in the Initial State Box and the Media Files window will pop up. 4. Choose Radiology, Media or Labs tab and then click Add Media Files on the
Right. 5. It should automatically open up to where the media files are mapped, Search
for the Media you need (Clicking on View Menu on Toolbar and choosing Thumbnail may help you to choose)
6. When you have found what you need, either double click or Highlight and Click Open.
7. Add other Media the same way. 8. When all Media is chosen, Click OK. 9. If you are programming with Handlers, when you add the Media to an Event,
it will not display during the simulation until the Event is clicked. 10. You will add the Media to the Frame that has the appropriate Event, for
example, my CHF Diagnostics Handlers has an Event "PCXR" and the Media is a CHF Xray of one of our patients (screen printing from an electronic media is pretty easy- I just copy/paste into the free program Paint, black out all identifiers and save as a jpeg.)
11. In the Handler, Add a new box and choose the appropriate Event from you Event Menu.
12. Click the Media Button at left and Click in the Actions section of the Frame. 13. Then repeat the steps as above.
Future Practice Modifying Handlers Concept
1. Once a general Handler is created, you may alter it to suit different scenarios. 2. Through modification and saving with a different name you can create a wide
variety of Handlers to suit your needs. For example, you may have a basic Lab handler with Frames with Events only. This can then be modified to Lab

16
DKA with Media inserted into the frames so that the appropriate Labs are automatically generated when the Event is clicked.
Tips 1. Save Handler with the new name before you make any changes 2. Decide on you naming conventions in advance. If you name the change
Oxygen MI it will be sorted with other Oxygen Handlers, if you name it MI Oxygen, it will be sorted near other handlers related to MI.
3. If there is no meaningful difference in the changes for a specific diagnosis, just use the generic Handler. For example, most Oxygen responses can be managed with Oxygen for patients with a normal response to Oxygen Therapy and Oxygen Minimal Response for patients with an impaired response such as COPD, pneumonia or impaired airways.
Practice In this case we will continue on with the Oxygen Handler we just created. To create a Handler for those patients whose response to Oxygen Therapy will be deceased due to diagnosis, such as COPD, Pneumothorax or Pneumonia.
1. Open your Oxygen Handler 2. Save Handler as Oxygen Minimal Response, or other wording that suits your
naming conventions. 3. Consider what response or Trend you would choose for a patient whose
response is compromised. For Example: a. O2 2L NC Insert a trend for the SpO2 to rise 1% over 2 minutes or you
may choose to have no response at all and simply delete the trend. b. O2 4L NC Insert a trend for the SpO2 to rise 2% over 2 minutes. c. O2 6L NC Insert a trend for the SpO2 to rise 4% over 2 minutes. d. O2 100% NRB Insert a trend for the SpO2 to rise 6% over 2 minutes.
4. Alter any Comments to indicate the need for an increased level of Oxygen Therapy in this situation. For Example, if you have to no change for placing the patient on 2L NC, add a Comment as to why this level of Oxygen might be insufficient in this instance or the need for greater then 1-2Liters of Oxygen for a COPD patient having an acute event.
5. Save Handler, making sure you changed the name.
Future Practice 1. What other versions of the Oxygen Handler might be desirable? Would you
need a specific one for MI vs COPD vs Anaphylaxis? 2. What other basic Handlers could be created and then modified to suit specific
scenarios? Miscellaneous Handlers such as Assessment could be modified for each scenario to include the assessment results such as heart sounds, lung sounds for each specific scenario.
Creating Scenarios Using Handlers Once your basic Handlers are developed, creating a new Scenario is made much easier by choosing the Handlers that are appropriate for the particular scenario.

17
Concept 1. Single Frame Scenarios may be as simple as:
a. Creating the Patient Information b. setting up the Initial State c. choosing Handlers may be all you need to create a scenario
2. Given sufficient Handlers, most scenarios can be Single Frame 3. You may add complexity by adding additional Frames that manage patient
condition Tips
1. Begin with basic Handlers that you would use for any scenario. 2. Edit Handlers to suit a specific scenario, but Save with a different name.
Practice 1. Complete Patient Description
a. Putting the Patient Date of Birth in the same line as the name causes the DOB to be visible to simulation personnel to ensure accurate responses to that question.
b. Compose a report in SBAR format c. Choosing Image for the patient can
either be a picture of SimMan or an image downloaded from internet sites such as Microsoft.
2. Choose Monitor. Setting up and Saving a Med Surg, I.C.U., P.A. Catheter or O.R. Monitors is quickly done and saves time in future scenarios.

18
3. Initial state will be your initial patient presentation.
a. Choose appropriate Rhythm, Rate, Auscultation Sounds, Vital Signs, etc as appropriate.
4. Choose your Handlers as appropriate to planned scenario.
5. Insert a Trend only if you plan for the patient to begin to demonstrate changes immediately.

19
Options Beyond the Single Frame Concept You can use additional frames to manage the patient’s progression through the process, rather than the algorhythmic Events and their responses as we were initially taught. Tips
1. Create the Initial State and Handlers as the basis for your scenario. 2. Use additional Frames to progress the patient’s disease process. 3. Use Frame Time as your Event in order to advance the scenario
automatically. 4. Use additional Frames to increase the complexity of the scenario, such as
advancing to a code. 5. Use specific Events, such as Advance to Code, in order to manually advance
the scenario. Examples Single Frame without progression

20
Multiple Frames with automatic progression based on Frame Time

21
Multiple Frames with manual progression based on an Event For example, the Event Advance to Code leads to your choice of lethal arrhythmia or event. This turns any scenario into ACLS scenarios with the addition of ACLS based Handlers.
These simple steps for creating a foundation for programming single frame Scenarios; creating a robust Event Menu; then creating Handlers with appropriate Trends, Media and Comments can dramatically decrease future time investment in scenario writing. Once your foundation has been set, creating a scenario is as simple as creating the Initial State for your scenario, choosing appropriate Handlers and adding Frames for progression of illness as desired. The key to the process is the initial foundation Handlers. Good Luck in all your scenario writing endeavors.