programming microsoft windows with visual basic€¦ · web viewpackage & deployment wizard...
TRANSCRIPT

1-1
Learn Visual Basic 6.0
1. Introduction to the Visual Basic Language and Environment
Preview
In this first Chapter, we will do a quick overview of how to build an application in Visual Basic. You’ll learn a new vocabulary, a new approach to programming, and ways to move around in the Visual Basic environment. You will leave having written your first Visual Basic program.
Course Objectives
Understand the benefits of using Microsoft Visual Basic 6.0 for Windows as an application tool
Understand the Visual Basic event-driven programming concepts, terminology, and available tools
Learn the fundamentals of designing, implementing, and distributing a Visual Basic application
Learn to use the Visual Basic toolbox Learn to modify object properties Learn object methods Use the menu design window Understand proper debugging and error-handling procedures Gain a basic understanding of database access and management using
databound controls Obtain an introduction to ActiveX controls and the Windows Application
Programming Interface (API)

Learn Visual Basic 6.0
What is Visual Basic?
Visual Basic is a tool that allows you to develop Windows (Graphic User Interface - GUI) applications. The applications have a familiar appearance to the user.
Visual Basic is event-driven, meaning code remains idle until called upon to respond to some event (button pressing, menu selection, ...). Visual Basic is governed by an event processor. Nothing happens until an event is detected. Once an event is detected, the code corresponding to that event (event procedure) is executed. Program control is then returned to the event processor.
EventProcedures
Some Features of Visual Basic
Full set of objects - you 'draw' the application Lots of icons and pictures for your use Response to mouse and keyboard actions Clipboard and printer access Full array of mathematical, string handling, and graphics functions Can handle fixed and dynamic variable and control arrays Sequential and random access file support Useful debugger and error-handling facilities Powerful database access tools ActiveX support Package & Deployment Wizard makes distributing your applications simple
1-2
Event? Event processor
BasicCode
BasicCode
BasicCode

Introduction to the Visual Basic Language and Environment
Visual Basic 6.0 versus Other Versions of Visual Basic
The original Visual Basic for DOS and Visual Basic For Windows were introduced in 1991.
Visual Basic 3.0 (a vast improvement over previous versions) was released in 1993.
Visual Basic 4.0 released in late 1995 (added 32 bit application support). Visual Basic 5.0 released in late 1996. New environment, supported creation
of ActiveX controls, deleted 16 bit application support.
And, now Visual Basic 6.0 - some identified new features of Visual Basic 6.0:
Faster compiler New ActiveX data control object Allows database integration with wide variety of applications New data report designer New Package & Deployment Wizard Additional internet capabilites
16 Bits versus 32 Bits
Applications built using the Visual Basic 3.0 and the 16 bit version of Visual Basic 4.0 will run under Windows 3.1, Windows for Workgroups, Windows NT, or Windows 95
Applications built using the 32 bit version of Visual Basic 4.0, Visual Basic 5.0 and Visual Basic 6.0 will only run with Windows 95 or Windows NT (Version 3.5.1 or higher).
In this Chapter, we will use Visual Basic 6.0 under Windows 95, recognizing such applications will not operate in 16 bit environments.
1-3

Control 1
Control 3
Control 2
Form 2 (.FRM)
Control 1
Control 3
Control 2
Form 3 (.FRM) Module 1 (.BAS)
Learn Visual Basic 6.0
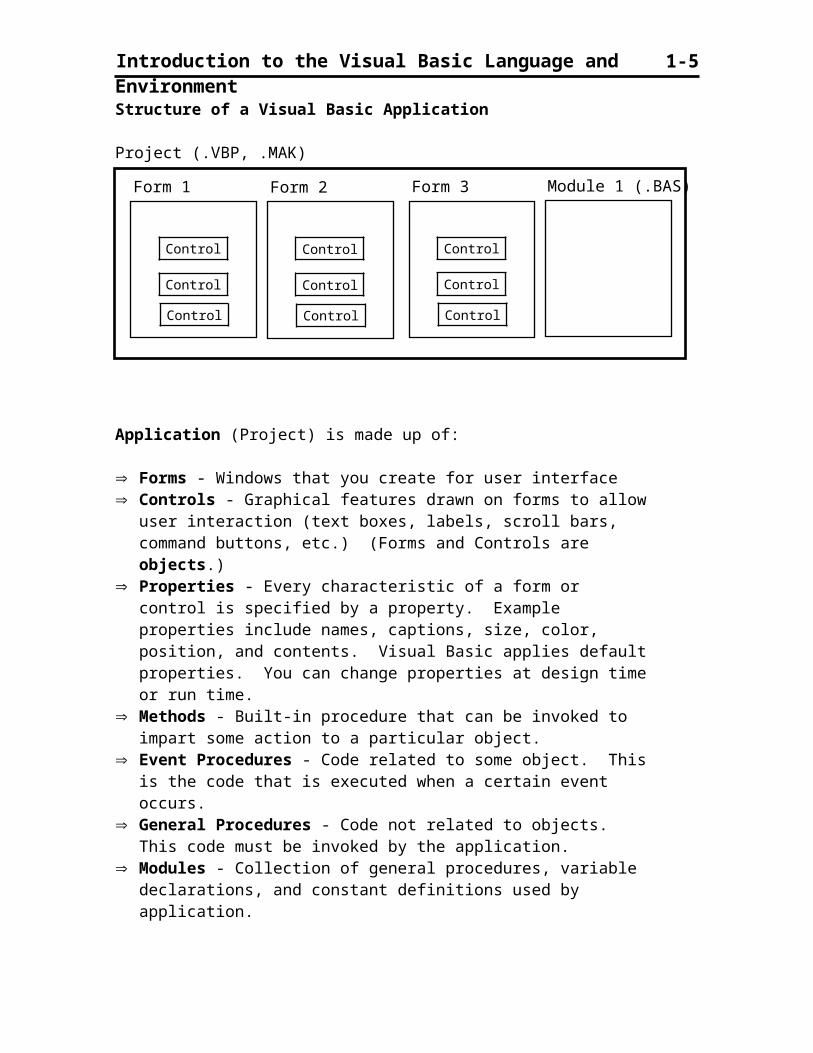
Structure of a Visual Basic Application
Project (.VBP, .MAK)
Application (Project) is made up of:
Forms - Windows that you create for user interface Controls - Graphical features drawn on forms to allow user interaction
(text boxes, labels, scroll bars, command buttons, etc.) (Forms and Controls are objects.)
Properties - Every characteristic of a form or control is specified by a property. Example properties include names, captions, size, color, position, and contents. Visual Basic applies default properties. You can change properties at design time or run time.
Methods - Built-in procedure that can be invoked to impart some action to a particular object.
Event Procedures - Code related to some object. This is the code that is executed when a certain event occurs.
General Procedures - Code not related to objects. This code must be invoked by the application.
Modules - Collection of general procedures, variable declarations, and constant definitions used by application.
Steps in Developing Application
There are three primary steps involved in building a Visual Basic application:
1. Draw the user interface2. Assign properties to controls3. Attach code to controls
We’ll look at each step.
1-4
Control 1
Control 3
Control 2
Form 1 (.FRM)
Introduction to the Visual Basic Language and Environment
Drawing the User Interface and Setting Properties
Visual Basic operates in three modes.
Design mode - used to build application Run mode - used to run the application Break mode - application halted and debugger is available
We focus here on the design mode.
Six windows appear when you start Visual Basic.
The Main Window consists of the title bar, menu bar, and toolbar. The title bar indicates the project name, the current Visual Basic operating mode, and the current form. The menu bar has drop-down menus from which you control the operation of the Visual Basic environment. The toolbar has buttons that provide shortcuts to some of the menu options. The main window also shows the location of the current form relative to the upper left corner of the screen (measured in twips) and the width and length of the current form.
1-5
New form
Add project
Open project
Save project
Menu editor
Properties window
Code Editor Tasks
Form Layout
Run
Pause
Stop
ProjectExplorer
Object Browser
Toolbox
Form positionForm dimensions

Learn Visual Basic 6.0
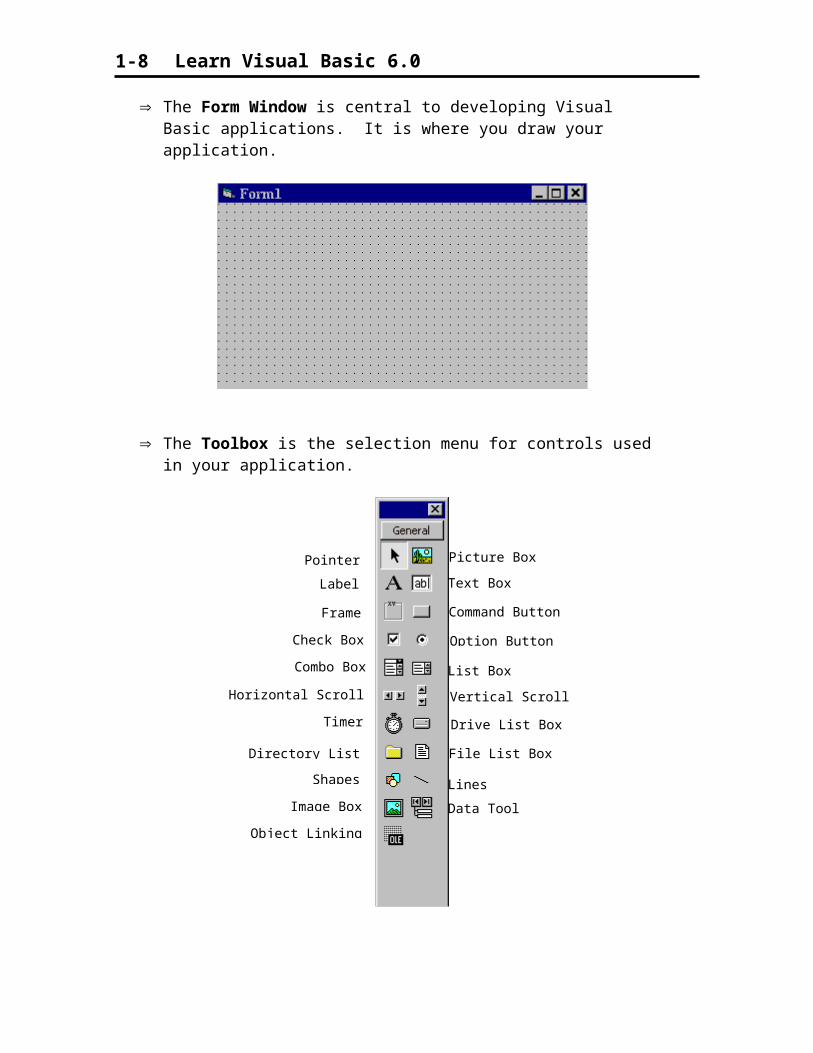
The Form Window is central to developing Visual Basic applications. It is where you draw your application.
The Toolbox is the selection menu for controls used in your application.
1-6
Pointer
Label
Frame
Check Box
Combo Box
Horizontal Scroll Bar
Timer
Directory List Box
Shapes
Image Box
Object Linking Embedding
Picture Box
Text Box
Command Button
Option Button
List Box
Vertical Scroll Bar
Drive List Box
File List Box
Lines
Data Tool

Introduction to the Visual Basic Language and Environment
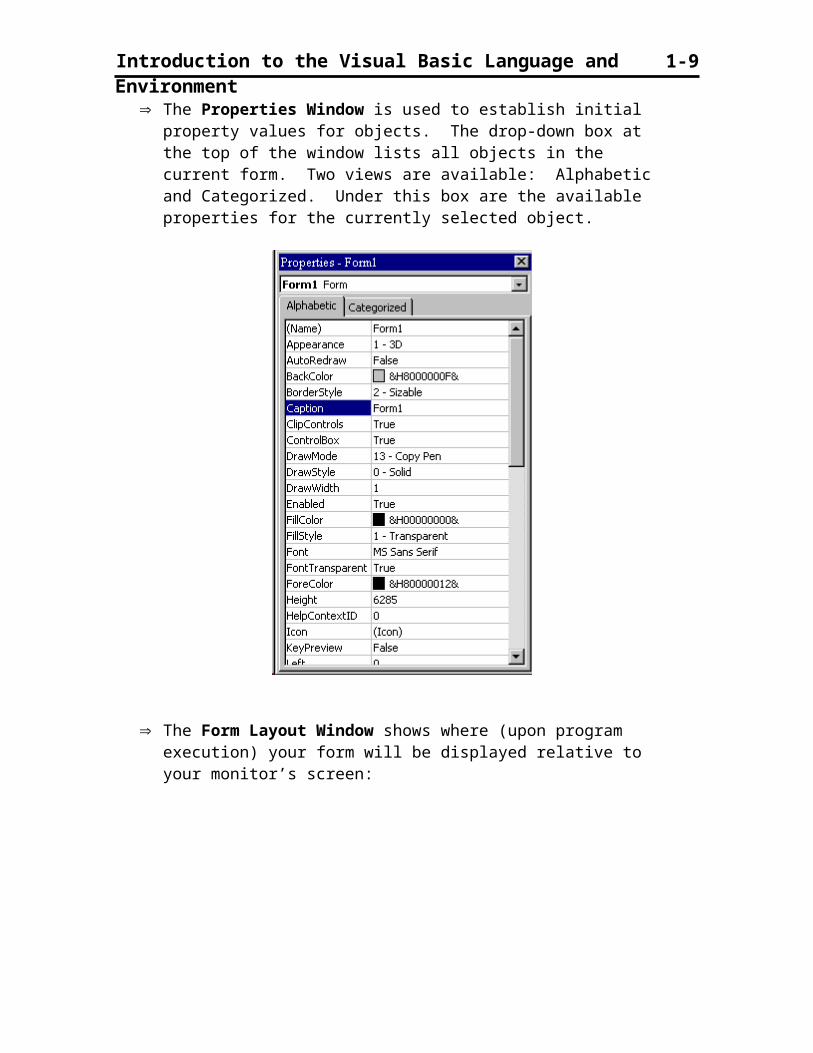
The Properties Window is used to establish initial property values for objects. The drop-down box at the top of the window lists all objects in the current form. Two views are available: Alphabetic and Categorized. Under this box are the available properties for the currently selected object.
The Form Layout Window shows where (upon program execution) your form will be displayed relative to your monitor’s screen:
1-7
Learn Visual Basic 6.0
The Project Window displays a list of all forms and modules making up your application. You can also obtain a view of the Form or Code windows (window containing the actual Basic coding) from the Project window.
As mentioned, the user interface is ‘drawn’ in the form window. There are two ways to place controls on a form:
1. Double-click the tool in the toolbox and it is created with a default size on the form. You can then move it or resize it.
2. Click the tool in the toolbox, then move the mouse pointer to the form window. The cursor changes to a crosshair. Place the crosshair at the upper left corner of where you want the control to be, press the left mouse button and hold it down while dragging the cursor toward the lower right corner. When you release the mouse button, the control is drawn.
To move a control you have drawn, click the object in the form window and drag it to the new location. Release the mouse button.
To resize a control, click the object so that it is select and sizing handles appear. Use these handles to resize the object.
1-8
Click here to move object
Use sizing handles to resize object
Introduction to the Visual Basic Language and Environment
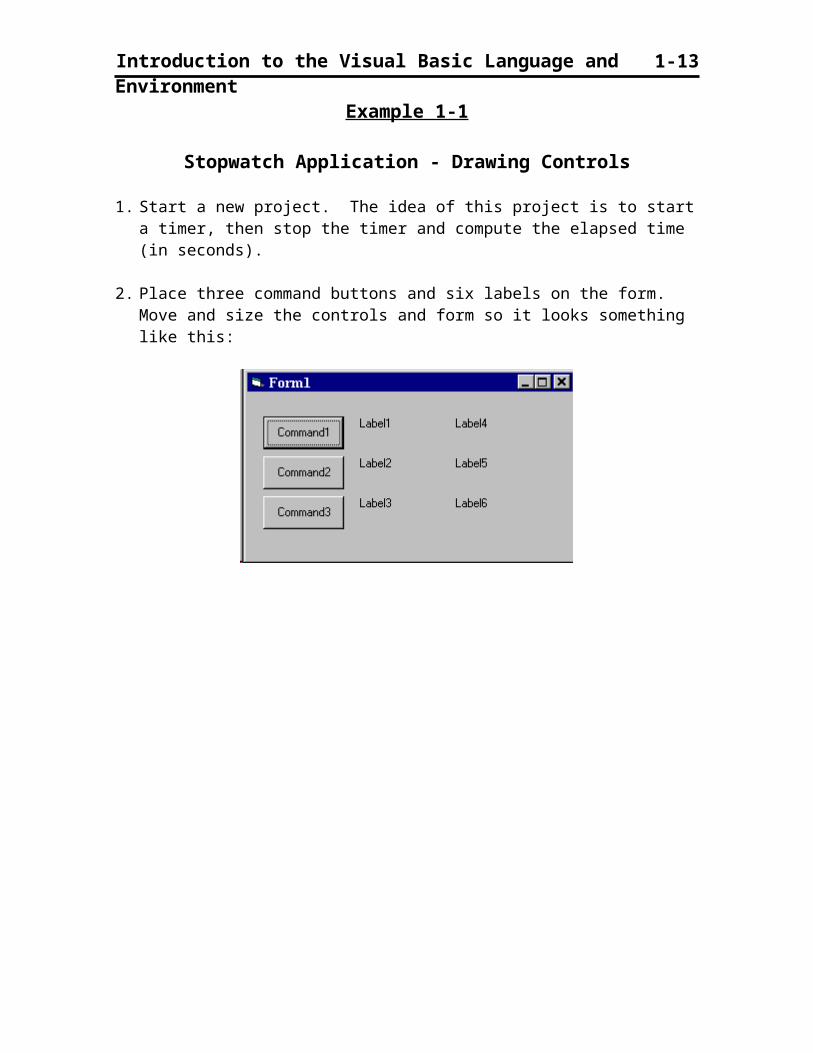
Example 1-1
Stopwatch Application - Drawing Controls
1. Start a new project. The idea of this project is to start a timer, then stop the timer and compute the elapsed time (in seconds).
2. Place three command buttons and six labels on the form. Move and size the controls and form so it looks something like this:
1-9

Learn Visual Basic 6.0
Setting Properties of Objects at Design Time
Each form and control has properties assigned to it by default when you start up a new project. There are two ways to display the properties of an object. The first way is to click on the object (form or control) in the form window. Then, click on the Properties Window or the Properties Window button in the tool bar. The second way is to first click on the Properties Window. Then, select the object from the Object box in the Properties Window. Shown is the Properties Window for the stopwatch application:
The drop-down box at the top of the Properties Window is the Object box. It displays the name of each object in the application as well as its type. This display shows the Form object. The Properties list is directly below this box. In this list, you can scroll through the list of properties for the selected object. You may select a property by clicking on it. Properties can be changed by typing a new value or choosing from a list of predefined settings (available as a drop down list). Properties can be viewed in two ways: Alphabetic and Categorized.
A very important property for each object is its name. The name is used by Visual Basic to refer to a particular object in code.
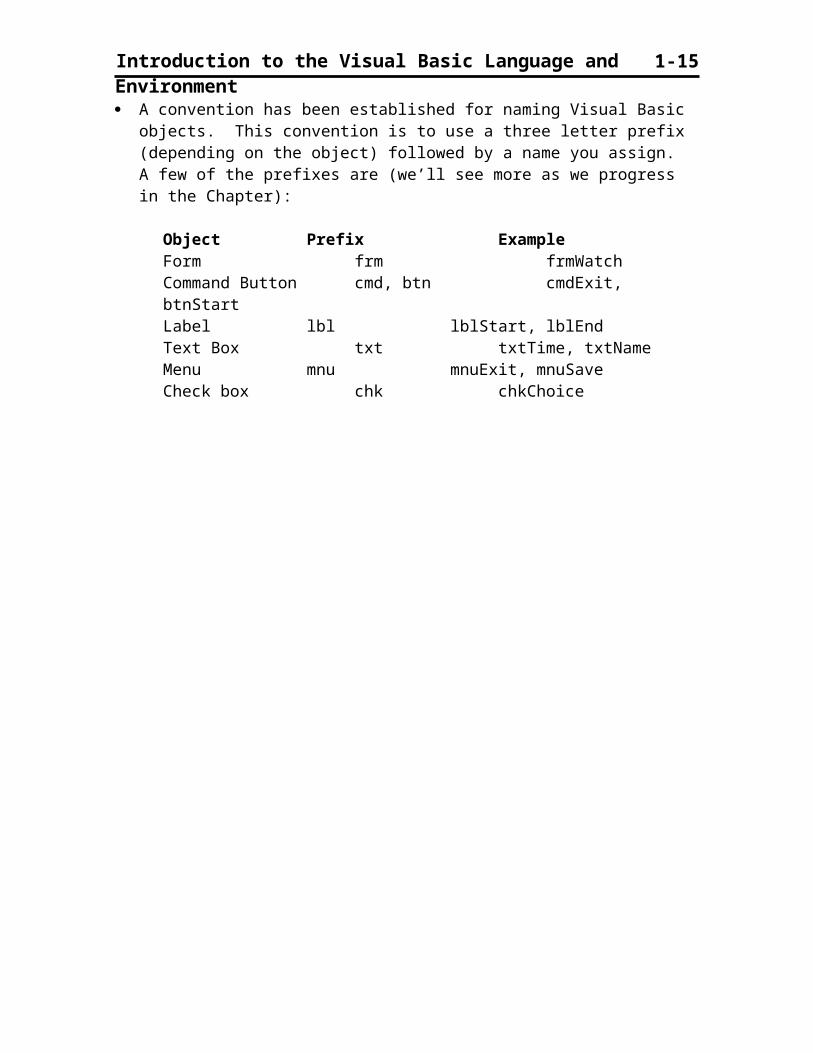
A convention has been established for naming Visual Basic objects. This convention is to use a three letter prefix (depending on the object) followed by a name you assign. A few of the prefixes are (we’ll see more as we progress in the Chapter):
Object Prefix ExampleForm frm frmWatchCommand Button cmd, btn cmdExit, btnStart
1-10

Introduction to the Visual Basic Language and Environment
Label lbl lblStart, lblEndText Box txt txtTime, txtNameMenu mnu mnuExit, mnuSaveCheck box chk chkChoice
1-11

Learn Visual Basic 6.0
Object names can be up to 40 characters long, must start with a letter, must contain only letters, numbers, and the underscore (_) character. Names are used in setting properties at run time and also in establishing procedure names for object events.
Setting Properties at Run Time
You can also set or modify properties while your application is running. To do this, you must write some code. The code format is:
ObjectName.Property = NewValue
Such a format is referred to as dot notation. For example, to change the BackColor property of a form name frmStart, we'd type:
frmStart.BackColor = BLUE
How Names are Used in Object Events
The names you assign to objects are used by Visual Basic to set up a framework of event-driven procedures for you to add code to. The format for each of these subroutines (all object procedures in Visual Basic are subroutines) is:
Sub ObjectName_Event (Optional Arguments)..
End Sub
Visual Basic provides the Sub line with its arguments (if any) and the End Sub statement. You provide any needed code.
1-12
Introduction to the Visual Basic Language and Environment
Example 1-2
Stopwatch Application - Setting Properties
1. Set properties of the form, three buttons, and six labels:
Form1:BorderStyle 1-Fixed SingleCaption Stopwatch ApplicationName frmStopWatch
Command1:Caption &Start TimingName cmdStart
Command2:Caption &End TimingName cmdEnd
Command3:Caption E&xitName cmdExit
Label1:Caption Start Time
Label2:Caption End Time
Label3:Caption Elapsed Time
Label4:BorderStyle 1-Fixed SingleCaption [Blank]Name lblStart
Label5:BorderStyle 1-Fixed SingleCaption [Blank]Name lblEnd
1-13

Learn Visual Basic 6.0
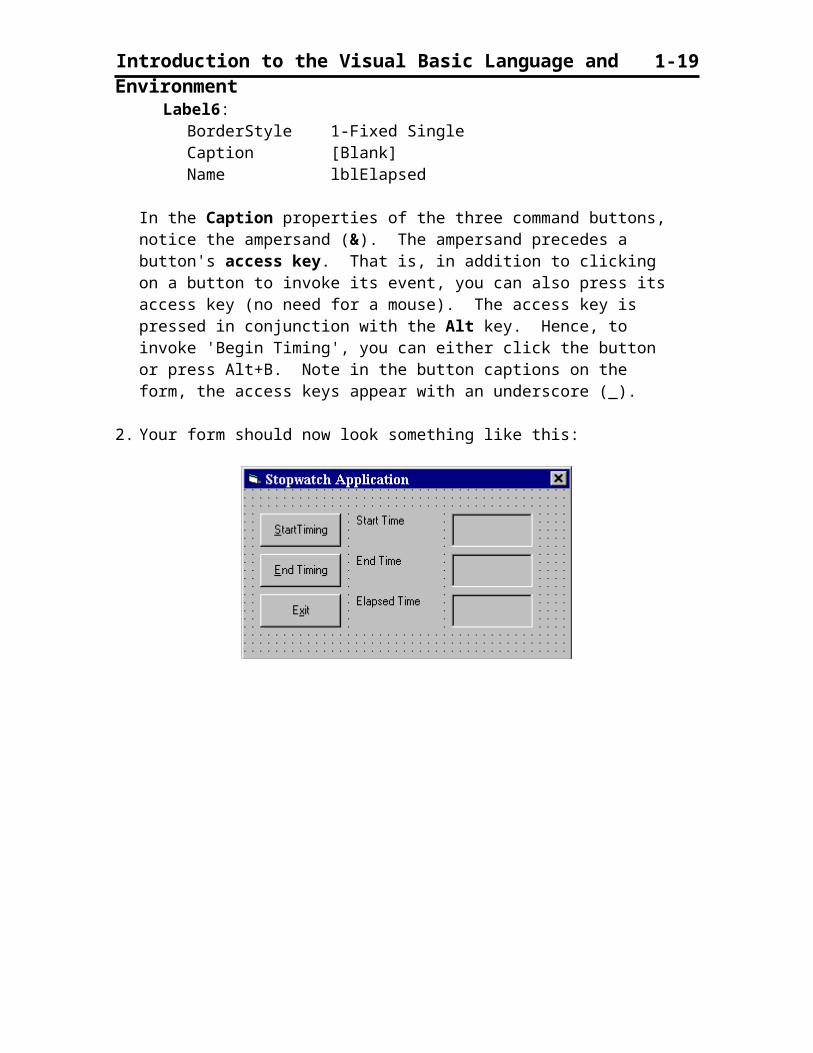
Label6: BorderStyle 1-Fixed SingleCaption [Blank]Name lblElapsed
In the Caption properties of the three command buttons, notice the ampersand (&). The ampersand precedes a button's access key. That is, in addition to clicking on a button to invoke its event, you can also press its access key (no need for a mouse). The access key is pressed in conjunction with the Alt key. Hence, to invoke 'Begin Timing', you can either click the button or press Alt+B. Note in the button captions on the form, the access keys appear with an underscore (_).
2. Your form should now look something like this:
1-14
Introduction to the Visual Basic Language and Environment
Variables
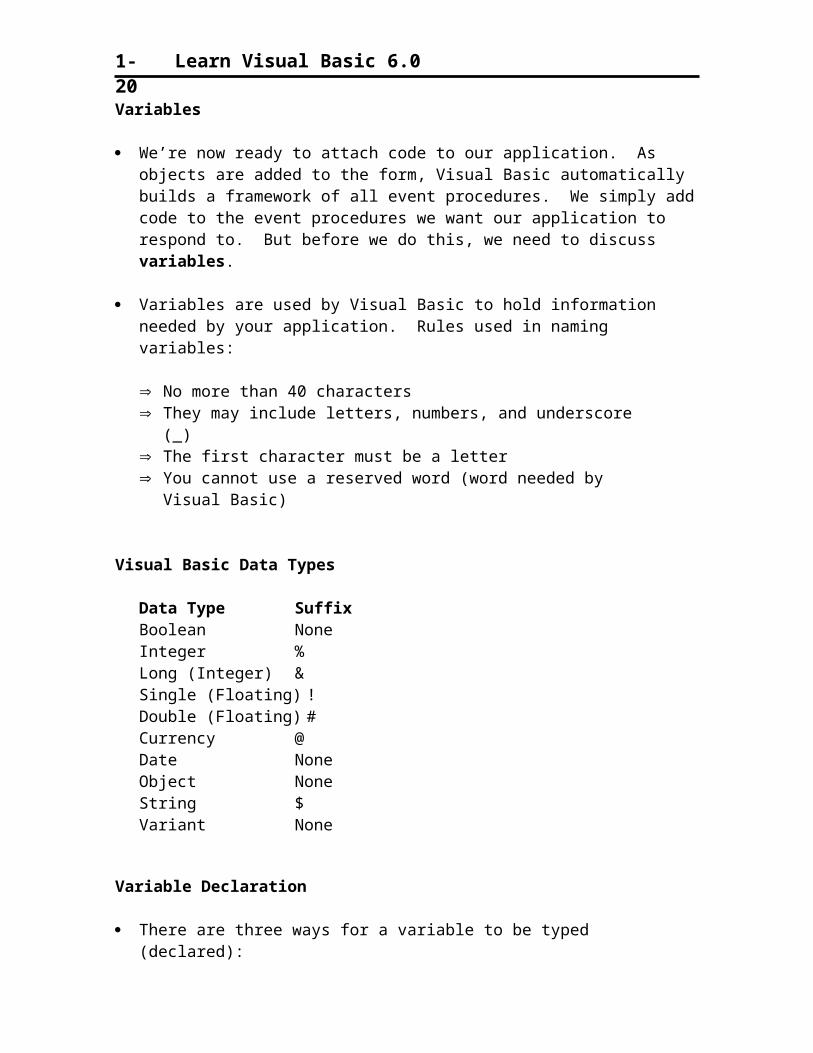
We’re now ready to attach code to our application. As objects are added to the form, Visual Basic automatically builds a framework of all event procedures. We simply add code to the event procedures we want our application to respond to. But before we do this, we need to discuss variables.
Variables are used by Visual Basic to hold information needed by your application. Rules used in naming variables:
No more than 40 characters They may include letters, numbers, and underscore (_) The first character must be a letter You cannot use a reserved word (word needed by Visual Basic)
Visual Basic Data Types
Data Type SuffixBoolean NoneInteger %Long (Integer) &Single (Floating) !Double (Floating) #Currency @Date NoneObject NoneString $Variant None
Variable Declaration
There are three ways for a variable to be typed (declared):
1. Default2. Implicit3. Explicit
If variables are not implicitly or explicitly typed, they are assigned the variant type by default. The variant data type is a special type used by Visual Basic that can contain numeric, string, or date data.
1-15

Learn Visual Basic 6.0
To implicitly type a variable, use the corresponding suffix shown above in the data type table. For example,
TextValue$ = "This is a string"
creates a string variable, while
Amount% = 300
creates an integer variable.
There are many advantages to explicitly typing variables. Primarily, we insure all computations are properly done, mistyped variable names are easily spotted, and Visual Basic will take care of insuring consistency in upper and lower case letters used in variable names. Because of these advantages, and because it is good programming practice, we will explicitly type all variables.
To explicitly type a variable, you must first determine its scope. There are four levels of scope:
Procedure level Procedure level, static Form and module level Global level
Within a procedure, variables are declared using the Dim statement:
Dim MyInt as IntegerDim MyDouble as DoubleDim MyString, YourString as String
Procedure level variables declared in this manner do not retain their value once a procedure terminates.
To make a procedure level variable retain its value upon exiting the procedure, replace the Dim keyword with Static:
Static MyInt as IntegerStatic MyDouble as Double
1-16

Introduction to the Visual Basic Language and Environment
Form (module) level variables retain their value and are available to all procedures within that form (module). Form (module) level variables are declared in the declarations part of the general object in the form's (module's) code window. The Dim keyword is used:
Dim MyInt as IntegerDim MyDate as Date
Global level variables retain their value and are available to all procedures within an application. Module level variables are declared in the declarations part of the general object of a module's code window. (It is advisable to keep all global variables in one module.) Use the Global keyword:
Global MyInt as IntegerGlobal MyDate as Date
What happens if you declare a variable with the same name in two or more places? More local variables shadow (are accessed in preference to) less local variables. For example, if a variable MyInt is defined as Global in a module and declared local in a routine MyRoutine, while in MyRoutine, the local value of MyInt is accessed. Outside MyRoutine, the global value of MyInt is accessed.
1-17

Learn Visual Basic 6.0
Example of Variable Scope:
Module1Global X as Integer
Form1 Form2Dim Y as Integer Dim Z as Single
Sub Routine1() Sub Routine3() Dim A as Double Dim C as String . . . .End Sub End Sub
Sub Routine2() Static B as Double . .End Sub
Procedure Routine1 has access to X, Y, and A (loses value upon termination)Procedure Routine2 has access to X, Y, and B (retains value)Procedure Routine3 has access to X, Z, and C (loses value)
1-18
Introduction to the Visual Basic Language and Environment
Example 1-3
Stopwatch Application - Attaching Code
All that’s left to do is attach code to the application. We write code for every event a response is needed for. In this application, there are three such events: clicking on each of the command buttons.
1. Double-click anywhere on the form to open the code window. Or, select ‘View Code’ from the project window.
2. Click the down arrow in the Object box and select the object named (general). The Procedure box will show (declarations). Here, you declare three form level variables:
Option ExplicitDim StartTime As VariantDim EndTime As VariantDim ElapsedTime As Variant
The Option Explicit statement forces us to declare all variables. The other lines establish StartTime, EndTime, and ElapsedTime as variables global within the form.
3. Select the cmdStart object in the Object box. If the procedure that appears is not the Click procedure, choose Click from the procedure box. Type the following code which begins the timing procedure. Note the Sub and End Sub statements are provided for you:
Sub cmdStart_Click ()‘Establish and print starting timeStartTime = NowlblStart.Caption = Format(StartTime, "hh:mm:ss")lblEnd.Caption = ""lblElapsed.Caption = ""End Sub
In this procedure, once the Start Timing button is clicked, we read the current time and print it in a label box. We also blank out the other label boxes. In the code above (and in all code in these notes), any line beginning with a single quote (‘) is a comment. You decide whether you want to type these lines or not. They are not needed for proper application operation.
1-19
Learn Visual Basic 6.0
4. Now, code the cmdEnd button.
Sub cmdEnd_Click ()‘Find the ending time, compute the elapsed time‘Put both values in label boxesEndTime = NowElapsedTime = EndTime - StartTimelblEnd.Caption = Format(EndTime, "hh:mm:ss")lblElapsed.Caption = Format(ElapsedTime, "hh:mm:ss")End Sub
Here, when the End Timing button is clicked, we read the current time (End Time), compute the elapsed time, and put both values in their corresponding label boxes.
5. And, finally the cmdExit button.
Sub cmdExit_Click ()EndEnd Sub
This routine simply ends the application once the Exit button is clicked.
6. Did you notice that as you typed in the code, Visual Basic does automatic syntax checking on what you type (if you made any mistakes, that is)?
7. Run your application by clicking the Run button on the toolbar, or by pressing <f5>. Pretty easy, wasn’t it?
8. Save your application - see the Primer on the next page. Use the Save Project As option under the File menu. Make sure you save both the form and the project files.
1-20
Introduction to the Visual Basic Language and Environment
9. If you have the time, some other things you may try with the Stopwatch Application:
A. Try changing the form color and the fonts used in the label boxes and command buttons.
B. Notice you can press the ‘End Timing’ button before the ‘Start Timing’ button. This shouldn’t be so. Change the application so you can’t do this. And make it such that you can’t press the ‘Start Timing’ until ‘End Timing’ has been pressed. Hint: Look at the command button Enabled property.
C. Can you think of how you can continuously display the ‘End Time’ and ‘Elapsed Time’? This is a little tricky because of the event-driven nature of Visual Basic. Look at the Timer tool. Ask me for help on this one.
Quick Primer on Saving Visual Basic Applications:
When saving Visual Basic applications, you need to be concerned with saving both the forms (.FRM) and modules (.BAS) and the project file (.VBP). In either case, make sure you are saving in the desired directory. The current directory is always displayed in the Save window. Use standard Windows techniques to change the current directory.
There are four Save commands available under the File menu in Visual Basic:
Save [Form Name] Save the currently selected form or module with the current name. The selected file is identified in the Project window.
Save [Form Name] As Like Save File, however you have the option to change the file name
Save Project Saves all forms and modules in the current project using their current names and also saves the project file.
Save Project As Like Save Project, however you have the option to change file names. When you choose this option, if you have not saved your forms or modules, you will also be prompted to save those files. I always use this for new projects.
1-21

Learn Visual Basic 6.0
Exercise 1
Calendar/Time Display
Design a window that displays the current month, day, and year. Also, display the current time, updating it every second (look into the Timer control). Make the window look something like a calendar page. Play with object properties to make it pretty.
My Solution:
Form:
Properties:
Form frmCalendar:Caption = My CalendarBorderStyle = 1 - Fixed Single
Timer timDisplay:Interval = 1000
Label lblDay:Caption = SundayFontName = Times New RomanFontBold = TrueFontSize = 24
1-22
lblDay
lblTime
timDisplay
lblMonth
lblNumber
lblYear

Introduction to the Visual Basic Language and Environment
Label lblTime:Caption = 00:00:00 PMFontName = Times New RomanFontBold = TrueFontSize = 24
Label lblYear:Alignment = 2 - CenterCaption = 1998FontName = Times New RomanFontBold = TrueFontSize = 24
Label lblNumber:Alignment = 2 - CenterCaption = 31FontName = ArialFontBold = TrueFontSize = 72
Label lblMonth:Alignment = 2 - CenterCaption = MarchFontName = Times New RomanFontBold = TrueFontSize = 24
Code:
General Declarations:
Option Explicit
timDisplay Timer Event:
Private Sub timDisplay_Timer()Dim Today As VariantToday = NowlblDay.Caption = Format(Today, "dddd")lblMonth.Caption = Format(Today, "mmmm")lblYear.Caption = Format(Today, "yyyy")lblnumber.Caption = Format(Today, "d")lblTime.Caption = Format(Today, "h:mm:ss ampm")End Sub
1-23

Learn Visual Basic 6.01-24